1
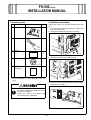
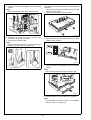
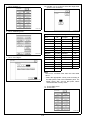
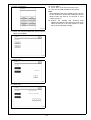
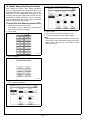
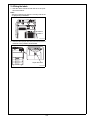
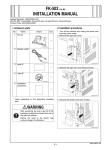
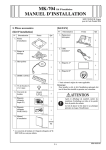
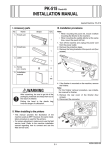
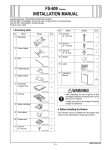
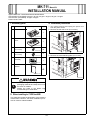
MK-711 Mount Kit
INSTALLATION MANUAL
Applied Machines: C353/C253/C203/C353P/mc8650
COLOR MFP (Color/B&W): 35 ppm / 35 ppm, 25 ppm / 25 ppm, 20 ppm / 20 ppm
COLOR PRT (Color/B&W): 35 ppm / 35 ppm
Product Code: A02E
I. Accessory parts
No.
Name
III. Installation procedures
Shape
1. Turn off the machine and unplug the power cord
from the power outlet.
2. Remove the rear left cover (four screws).
Q’ty
1. Shield box
1
A0DCIXC001DA
2. Shield box
cover
1
A0DCIXC002DA
3. Screw A
(3 × 6 mm)
10
4040IXC046DA
A0DCIXC003DA
4. Screw B
(3 × 8 mm)
4
3. Remove the metal blanking plate (six screws).
4038IXC033DA
5. Label (Super
G3 label)
1
4037IXC164DA
6. Installation
Manual
1
set
4980IXC019DA
A0DCIXC004DA
After unpacking, be sure to get rid of the
packaging materials and keep them out of
the reach of children.
Putting the head in the plastic bag
involves danger of suffocation.
II. When installing to C353P/mc8650
This manual provides the illustration of the machine
used as MFP. However, the same installation procedure is used for C353P/mc8650.
E-1
A0DC-9550-00
4. Install the shield box.
Note:
When installing the shield box, align the shield box
guide rails with the metal blanking plate (four
guide rails for right and left each).
5. Open the right rear door.
6. Fix the shield box to the machine (ten screw A’s
furnished with the kit).
A0DCIXC005DB
7. Close the right rear door.
8. Install the shield box cover (four screw B’s furnished with the kit).
A0DCIXC006DA
E-2
FK-502 Fax Kit
INSTALLATION MANUAL
I.Accessory parts
No.
Name
II. Installation procedures
Shape
<When the machine is already equipped with MK711>
1. Turn off the machine and unplug the power cord
from the power outlet.
2. Remove the shield box cover (four screws).
Q’ty
1. FAX kit
1
4037IXC118DA
2. Modular cable*
1
4442U015AA
3. Label A*
1
A0DCIXC007DA
3. Remove the shield cover (two screws).
4. Label B*
1
4037IXC226DA
5. Installation
precautions
1
* Varies depending on the applicable marketing
area
A0DCIXC008DA
4. Check to make sure that SW2 on the FAX control
board is set to “LINE-1.”
After unpacking, be sure to get rid of the
packaging materials and keep them out of
the reach of children.
Putting the head in the plastic bag
involves danger of suffocation.
4037IXC166DC
E-3
<When both the fax kit and MK-711 are installed at
one time>
1. Turn off the machine and unplug the power cord
from the power outlet.
2. Remove the shield cover (two screws).
5. Insert the FAX kit and tighten the two shoulder
screws.
Note:
When inserting the board, align it with the slits.
A0DCIXC009DB
A0DCIXC011DB
6. Reinstall the shield box cover that has been
removed in step 2 (four screws).
7. Connect the modular cable.
Note:
Plug the modular connector into the modular jack
(LINE) on the right side of the main unit.
3. Check to make sure that SW2 on the FAX control
board is set to “LINE-1.”
4037IXC166DC
4. Insert the FAX kit and tighten the two shoulder
screws.
Note:
When inserting the board, align it with the slits.
A0DCIXC010DA
A0DCIXC012DB
5. Mount the MK-711 (mount kit) to the machine.
Note:
For installation procedures, refer to the installation
manual for MK-711 (mount kit).
E-4
III. Setting the FAX
6. Connect the modular cable.
Note:
Plug the modular connector into the modular jack
(LINE) on the right side of the main unit.
1. Plug the power cord into the power outlet and
turn on the machine.
2. Display the Service Mode screen.
(For details of how to display the Service Mode
screen, see the service manual.)
3. Touch “System 2.”
A0DCIXC010DA
A00JIXE115DA
4. Touch “Option Board Status.”
A02EIXE062DA
5. Touch “Set” of Fax (circuit 1).
A00JIXE117DA
6. Touch “END.”
E-5
7. Touch “System 1.”
10. Use the
or
key to select the Target Area
(Refer to the list below).
A00JIXE118DA
A00JIXE121DA
8. Touch “Marketing Area.”
Country code setting for FAX
U.S.
US
Portugal
EU* (PT)
Canada
CA
Italy
EU* (IT)
Germany
DE
Poland
EU* (PL)
U.K.
EU* (GB) Taiwan
TW
France
EU* (FR) Australia
AU
Switzerland EU* (CH) New Zealand
NZ
Netherlands EU* (NL) Hong Kong
HK
Belgium
EU* (BE) Thailand
US
Austria
EU* (AT) Malaysia
MY
Norway
EU* (NO) Singapore
SG
Sweden
EU* (SE) South Africa
ZA
Finland
EU* (FI)
China
CN
Ireland
EU* (IE)
Korea
KR
Denmark
EU* (DK) Argentina
Spain
EU* (ES)
A02EIXE063DA
9. Touch “Fax Target.”
AR
Note:
Set OT for countries other than the ones listed
above.
* Select the appropriate country code according to
the dial system used in the installation place. For
DTMF, select “EU,” and for dial pulse, select
“each destination country code.”
A00JIXE120DA
11. Touch “END” twice.
12. Touch “FAX.”
A00JIXE118DA
E-6
17. Touch “END.”
18. Touch “Exit” on the Service Mode screen.
19. Turn OFF and ON the Main Power Switch.
Note:
When displayed the Service Mode screen, be sure
to turn off the main power after exiting the Service
Mode screen and wait for 10 seconds or more
before turning on.
13. Touch “Initialization.”
20. Perform the sending and receiving tests
between the Machine and either the store which
offers the service or the local retailer, to check
that it can be operated normally.
A00JIXE122DA
14. Touch “Fax Function Parameter” and “Communication Journal Data.”
A00JIXE123DA
15. Touch “Yes.”
A00JIXE124DA
16. Touch “Yes.”
A00JIXE125DA
E-7
IV. Caution when performing dial transfer
5. Touch “OFF” of Dial Tone Detection.
After setting the country code, dialing operations
may be selected after the switchboard dial tone is
detected depending on the destination. In this case,
depending on the switchboard connected to the
machine and the type of dial tone received from the
switchboard, dialing operations may not be available. If that happens, you may be able to avoid the
problem with the following setting.
<Turn the Dial Tone Detection function OFF>
1. Display the Service Mode screen.
(For details of how to display the Service Mode
screen, see the service manual.)
2. Touch “FAX.”
A00JIXE127DA
6. Touch “END.”
7. Touch “Exit” on the Service Mode screen.
8. Turn OFF and ON the Main Power Switch.
Note:
When displayed the Service Mode screen, be sure
to turn off the main power after exiting the Service
Mode screen and wait for 10 seconds or more
before turning on.
A00JIXE118DA
3. Touch “NetWork.”
A00JIXE122DA
4. Touch “Network Setting 2.”
A00JIXE126DA
E-8
V. Affixing the labels
1. Affix the labels furnished with the kit to the position shown below.
Note:
Affix the Label B only when the country code is set
as [DE] during installation.
Label B
Label A
A0DCIXE014DA
2. Affix the label (Super G3 label) furnished with the
machine to the position shown below.
Super G3 label
A0DCIXE015DA
E-9