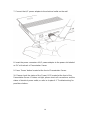
1
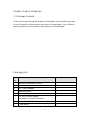
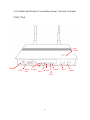
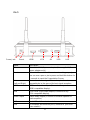
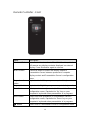
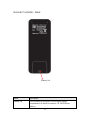
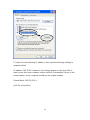
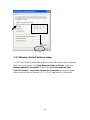
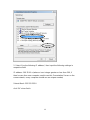
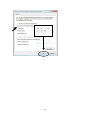
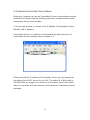
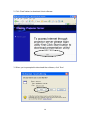
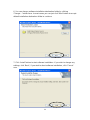
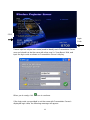
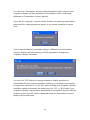
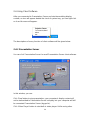
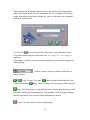
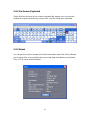
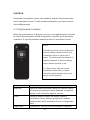
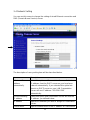
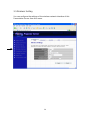
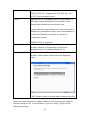
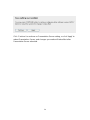
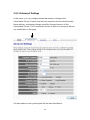
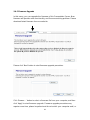
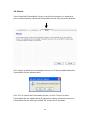
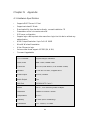
Wireless 300N Presentation Server User Manual 1 Table of Contents Chapter I Product Introduction ...................................................................................... 4 1-1 Package Contents ............................................................................................ 4 1-2 Safety Instructions ........................................................................................... 5 1-3 System Requirements ..................................................................................... 7 1-4 Highlights of this Wireless Presentation Server ........................................ 8 1-5 Familiar with Wireless Presentation Server / Remote Controller ..........9 1-6 Install Wireless Presentation Server .......................................................... 16 Chapter II Using Presentation Server ....................................................................... 19 2-1 Switch the Presentation Server On and Check IP address .................. 19 2-2 Connect to Presentation Server by Wireless Ethernet .......................... 21 2-3 Set the IP address of the Computer........................................................... 21 2-3-1 Windows 2000 IP address setup: ......................................... 21 2-3-2 Windows XP IP address setup:............................................. 22 2-3-3 Windows Vista IP address setup:......................................... 24 2-4 Download and Install Client Software ........................................................ 27 2-5 Launch Client Software ................................................................................. 33 2-6 Using Client Software .................................................................................... 39 2-6-1 Presentation Server ............................................................... 39 2-6-2 On-Screen Keyboard ............................................................. 41 2-6-3 About ........................................................................................ 41 2-6-3 Exit............................................................................................ 42 2-7 Using Remote Controller .............................................................................. 42 2-8 Select User ...................................................................................................... 43 2-8-1 ‘User Switch’ Button .............................................................. 44 2-8-2 Use Remote Controller .......................................................... 45 Chapter III Configure Presentation Server ............................................................... 46 3-1 Connect to Web Configuration Menu ........................................................ 46 3-2 Utility Download .............................................................................................. 49 3-3 Basic Setting ................................................................................................... 50 3-3-1 Change Time Zone Setting .................................................... 51 3-3-2 Password ................................................................................. 52 3-4 Network Setting .............................................................................................. 54 3-5 Wireless Setting .............................................................................................. 56 3-5-1 ‘Basic’ Settings ....................................................................... 57 3-5-2 ‘Advanced’ Settings ............................................................... 60 2 Chapter I Product Introduction 1-1 Package Contents Thank you for purchasing this Wireless Presentation Server! Before you start to use this product, please check every item in the package. If any of them is missing, please ask your dealer of purchase for a new package. Packaging List Item Name Quantity No. 1 Wireless Presentation Server 1 2 Antenna 2 2 A/C Power Adapter 1 3 Ethernet Cable 1 4 Remote Controller 1 5 CR-2302 Lithium Battery 1 (Installed in Remote Controller) 6 Rubber Foot Pad 4 7 CD(Manual) 1 4 1-2 Safety Instructions Please follow the following safety instructions when you’re using this Wireless Presentation Server, or you may damage this Presentation Server and / or yourself! 1. THIS PRESENTATION SERVER IS NOT A TOY! Keep out of reach of children! 2. Do not place this Wireless Presentation Server in humid and / or hot environment, like bathroom or kitchen. Please refer to the specification of this Wireless Presentation Server to understand the environmental requirements of this Wireless Presentation Server. 3. This Wireless Presentation Server is designed to be used indoor. Do not use this Wireless Presentation Server at places like garden or any other outdoor environment. 4. Do not put any part or any component, accessories of this Presentation Server into your body. 5. If any part or any component is dropped into water, return it to your dealer of purchase and ask for an examination; never use it again before it has been properly processed by certified technician. 6. If the Presentation Server is dropped into water when it’s powered on, DO NOT ATTEMPT TO GET IT BACK BY YOURSELF! Switch the electrical power switch off, and call a qualified electrical technician or us immediately for help. 7. If you want to hang this Wireless Presentation Server at high places, please make sure that the Wireless Presentation Server is properly secured. Falling down from high places will damage this Wireless Presentation Server, and may cause serious injury to people! 8. Do not drag any connected cord with force; the terminal and cord will be damaged. 9. Only use dry cloth with water to clean this Wireless Presentation Server; do 5 not use alcohol or other chemical solution to clean this Wireless Presentation Server. 10. There’s no user-serviceable part inside this Wireless Presentation Server; if the Wireless Presentation Server is not working properly, please contact the dealer of purchase to ask for help. 11. Do not put the Wireless Presentation Server and / or A/C adapter on paper, cloth, or other flammable materials. After hours of use, this Presentation Server will become hot, and may cause flammable materials placed under it to burn. 12. Do not cover the Wireless Presentation Server with cloth or any material; the Presentation Server will become overheat and cause malfunction, even cause fire. 13. When the Presentation Server is powered on, do not connect or disconnect any connection cable. 14. Do not display the same video content on projector, CRT / LCD display, and plasma TV for too long time. The image may remain PERMENTALY. Use screen saver to prevent to display the same video content for too long time. 15. If you smell something strange or even see smoke coming out from the Wireless Presentation Server or A/C adapter, disconnect the power cord immediately, and call your dealer of purchase for help. 6 1-3 System Requirements Video Display: A projector, CRT display, LCD display, or plasma TV that support VGA or HDMI video input. The display should support at least one resolution listed below: 800 x 600 1024 x 768 1152 x 864 1280 x 720 1280 x 768 1280 x 960 1280 x 1024 1400 x 1050 1440 x 900 1600 x 1200 1680 x 1050 1920 x 1200 1920 x 1440 Audio amplifier or speaker that accepts 3.5 audio connector. Computers support wired or wireless Ethernet connectivity. Windows 2000 / XP / Vista32/64 operating system with Internet Explorer V6.0 above browser. At least 100MB of available hard disk space. NOTE: Please check the user manual or specification of the display you’re going to use with this Presentation Server for supported resolution. Using an unsupported resolution may damage your projector, CRT / LCD display, or plasma TV. 7 1-4 Highlights of this Wireless Presentation Server Thanks again for choosing this Wireless Presentation Server. This Presentation Server eases the procedure of sharing a single projector among many presenters; they don’t have to switch VGA video cables, just use wired or wireless network connection to connect the Presentation Server, and the video on their computer display will be projected on big-screen. Other functions of this Wireless Presentation Server include: Supports both wired (10/100Mbps Ethernet connection) and wireless (802.11b / g / n 11Mbps / 54Mbps / 150Mbps connection). Wireless interface supports encryption - protects the content of presentation from theft. Presenter needs to input a random 4-digit Presentation Server access code as 2nd level security check. WPS (Wi-Fi Protected Setup) function provides fast, easy, and secure wireless encryption setup. No pre-installed software required – new users can download application from Presentation Server directly, and get it installed within 30 seconds. Works with any projector, LCD / CRT display, plasma display with VGA or HDMI video input. Supports 4/3, 16/10, and 16/9 display aspect ratio. Supports all major LCD display / projector resolutions - from 800 x 600 SVGA to 1920 x 1440 Full-HD resolution. Also supports audio output! Presenter can use supplied IR remote controller to do presentation. USB port - You can connect USB wired or wireless mouse to assist your presentation 8 1-5 Familiar with Wireless Presentation Server / Remote Controller Front / Top User Switch Remote USB Black. Ready WPS WLAN Out LAN 9 Power WPS Power Name Description Remote IR signal receiver (for remote controller), DO NOT block the receiver, or remote controller will not function. USB Front USB slot. Blackout LED Indicated that Wireless Presentation Server is in ‘Blackout’ mode (no display output). When this LED lights, nothing will be displayed on external display. Ready When this LED lights, indicates Wireless Presentation Server is ready to serve incoming requests. WPS When this LED lights, indicates WPS mode is active. WLAN When this LED flashes, indicates wireless LAN activity. LAN When this LED lights, indicates wired LAN is connected. Power When this LED lights, indicates this Wireless Presentation Server is correctly powered. WPS WPS (Wi-Fi Protected Setup) button: press this button to start WPS pairing. Power Press this button to switch this Presentation Server on / off. User Switch Press this button to switch to next presenter Heat Sink Heat generated by this Presentation Server will be removed through these holes (DO NOT BLOCK THESE HOLES WHEN THIS PRESENTATION SERVER IS POWERED ON!) 10 Back Power Jack Reset HDMI VGA AV USB LAN Name Description 5V Connect to 5V A/C power adapter (Use supplied A/C power adapter only!). Reset When this Presentation Server is not working properly, you can use a pen or pin to press and hold this button for 5 seconds to reset the Presentation Server. Antenna Transmits wireless signal. Please keep both antennas (Left and Right) perpendicular to the ground for best signal reception. HDMI HDMI audio / video output (Connects to any HDMI-compatible display). VGA VGA D-sub 15 pin video output (Connects to any VGA-compatible display). Audio Output Stereo audio output (Connects to external speaker or audio amplifier). USB Back USB slot for wired or wireless mouse. LAN 10/100Mbps fast Ethernet port (Connects to your local area network) 11 Bottom Name Description Wall Mounting If you want to hang this Presentation Server on the wall, Hole use these wall mounting holes to mount the Presentation Server. Foot Pad Sticks the 4 foot pads (supplied in product package) here so the project server can be steadily placed on the desk or other horizontal places. You don’t have to stick foot pads here if you plan to mount the Presentation Server on the wall. MAC Address Indicates the MAC address of this Presentation Server. Label Product Label Indicates the model name and serial number of this Presentation Server. This information is very useful when you need to request for assistance from the dealer of purchase. 12 Remote Controller - Front Name Description ‘Black out’ Button Press this button to activate ‘Black Out’ function, which will remove any display contents displayed on external display; Press this button again to resume. ‘Menu’ Button Press this button to switch the display output of Presentation Server between presenter’s computer display content and Presentation Server’s configuration menu. ‘Page down’ Equivalent to ‘Left’ key on your computer’s keyboard. button ‘Page up’ button Equivalent to ‘Right’ key on your computer’s keyboard. ‘Prev.’ button Select previous user (presenter) in Presentation Server’s configuration menu; Equivalent to ‘Up’ key on your computer’s keyboard when presentation is in progress. ‘Next’ button Select next user (presenter) in Presentation Server’s configuration menu; Equivalent to ‘Down’ key on your computer’s keyboard when presentation is in progress. button Select user in Presentation Server’s configuration menu. 13 Remote Controller - Top IR Transmitter Name Description IR Transmitter Infrared signal transmitter. When using the remote controller, point the IR transmitter to the front of the Presentation Server. DO NOT use your finger or other object to block the IR transmitter, or your command will not be received by Presentation Server. 14 Remote Controller - Back Battery Lid Name Description Battery Lid Press battery lid and push it out to open battery compartment (to install or remove CR-2032 lithium battery). 15 1-6 Install Wireless Presentation Server Please follow the following instructions to get the Presentation Server installed: 1. Unpack the Wireless Presentation Server’s package, and make sure no item in the package is missing. 2. Stick the foot pads on the 4 locations indicated on the picture shown below if you plan to put the Presentation Server on the desk or other horizontal places. You can skip this step if you plan to hang the Presentation Server on the wall, and use the 2 wall-mounting holes located at the bottom of the Presentation Server to do this. 3. Connect the Ethernet cable to the LAN port (this port is labeled as ‘LAN’ and located at the back of this Presentation Server) 4. Insert the audio cable which connects with external amplifier / speaker to ‘Audio Out’ port located at the back of this Presentation Server. You can skip this step if you don’t have external audio amplifier / speaker. 16 5. Insert HDMI / VGA cable which connects with external video display to HDMI / VGA port located at the back of this Presentation Server. You can only connect to HDMI or VGA port at the same time. 6. Adjust the antennas located at the back of the Presentation Server, so they’re perpendicular to the ground. 17 7. Connect the A/C power adapter to the electrical outlet on the wall 8. Insert the power connector of A/C power adapter to the power slot labeled as ‘5V’ at the back of Presentation Server. 9. Press ‘Power’ button located at the front of Presentation Server. 10. Please check the status of the ‘Power’ LED located at the front of the Presentation Server. If it does not light, please check all connections and the status of electrical power outlet, or refer to chapter 4-1 ‘Troubleshooting’ for possible solutions. 18 Chapter II Using Presentation Server 2-1 Switch the Presentation Server On and Check IP address When the connection between Presentation Server and external display is established, you can switch the display’s power on, then press the ‘Power’ button of Presentation Server, which is located at the front of Presentation Server. You should be able to see the following image displayed on external display; if not, please make sure the external display you used with Presentation Server accepts input video resolution ‘1024 x 768’, and horizontal refresh rate ‘60Hz’. If you see above image shown on display for more than two minutes, please press ‘Power’ button to switch the Presentation Server off, and then switch the Presentation Server on again. If this still happens, refer to chapter 4-2 ‘Troubleshooting’ for possible solutions. 19 When the Presentation Server is powered on and connected to a LAN with DHCP server, it will get an IP address from DHCP server automatically; when there’s no DHCP server available, it will use default IP address ‘169.254.0.200’. Please refer to chapter 2-3 ‘How to set IP address for your computer’ to set the IP address for computers wish to connect to Presentation Server when there’s no DHCP server available. The IP address of Presentation Server can be found on the connected external display, like following picture: The IP Address (Wireless / Wired Ethernet) of Presentation Server can be found here. The IP address of the WLAN (wireless Ethernet) and LAN (wired Ethernet) interface of Presentation Server can be found at the lower-left corner of video display. You can use one of these IP addresses to connect to the Presentation Server. 20 2-2 Connect to Presentation Server by Wireless Ethernet 2-3 Set the IP address of the Computer If there’s no DHCP server available on your LAN, please follow the following instructions to set the IP address of the computer, so the computers wish to use the Presentation Server can connect to project server. If the operating system of your computer is…. Windows 2000 Windows XP Windows Vista - please go to section 2-3-1 - please go to section 2-3-2 - please go to section 2-3-3 2-3-1 Windows 2000 IP address setup: 1. Click ‘Start’ button (it should be located at lower-left corner of your computer), then click control panel. Double-click Network and Dial-up Connections icon, double click Local Area Connection, and Local Area Connection Properties window will appear. Select ‘Internet Protocol (TCP/IP)’, then click ‘Properties’ 21 2. Select ‘Use the following IP address’, then input the following settings in respective field: IP address: 169.254.0.x (where x is an integer greater or less than 200, if there’s more than one computer need to use this Presentation Server on the same network, every computer should use an unique number) Subnet Mask: 255.255.255.0 click ‘OK’ when finish. 2-3-2 Windows XP IP address setup: 1. Click ‘Start’ button (it should be located at lower-left corner of your computer), then click control panel. Double-click Network and Internet Connections icon, click Network Connections, and then double-click Local Area Connection, Local Area Connection Status window will appear, and then click ‘Properties’ 22 2. Select ‘Use the following IP address’, then input the following settings in respective field: IP address: 169.254.0.x (where x is an integer greater or less than 200, if there’s more than one computer need to use this Presentation Server on the same network, every computer should use an unique number) Subnet Mask: 255.255.255.0 click ‘OK’ when finish. 23 2-3-3 Windows Vista IP address setup: 1. Click ‘Start’ button (it should be located at lower-left corner of your computer), then click control panel. Click View Network Status and Tasks, then click Manage Network Connections..Right-click Local Area Netwrok, then select ‘Properties’. Local Area Connection Properties window will appear, select ‘Internet Protocol Version 4 (TCP / IPv4), and then click ‘Properties’ 24 2. Select ‘Use the following IP address’, then input the following settings in respective field: IP address: 169.254.0.x (where x is an integer greater or less than 200, if there’s more than one computer need to use this Presentation Server on the same network, every computer should use an unique number) Subnet Mask: 255.255.255.0 click ‘OK’ when finish. 25 26 2-4 Download and Install Client Software Before any computer can use the Presentation Server, client software must be installed first. Please follow the following instructions to download and install Presentation Server client software: 1. Use the web browser to connect to the IP address of Presentation Server (WLAN / LAN IP address) Presentation Server’s IP address can be found at the lower-left corner of Presentation Server’s display (refer to chapter 2-1). Please note that the IP address of Presentation Server will vary depends on the setting of the DHCP server of your LAN. The default IP fo Wired LAN is 169.254.0.200, we suggest you connect to Presentation Server with WLAN, after you connected and open browser it will redirect to Presentation Server’s web page. 27 2. Click ‘Start’ button to download client software: 3. When you’re prompted to download the software, click ‘Run’: 28 4. Click ‘Run’ to start software installation: 5. Click ‘Next’ to continue. 29 6. You can change software installation destination folder by clicking ‘Change…’ button here. In most cases you can just click ‘Next’ button to accept default installation destination folder to continue. 7. Click ‘Install’ button to start software installation. If you wish to change any settings, click ‘Back’; if you wish to abort software installation, click ‘Cancel’ now. 30 8. Please be patient while software installation is in progress. If you want to abort due to any reason, click ‘Cancel’ button. 9. If you see this message, click ‘Continue Anyway’ to continue installation. You may see this message more than once; please click ‘Continue Anyway’ button every time when you’re prompted. 31 10. Software installation is complete when you see this message, click ‘Finish’ button to continue. 32 2-5 Launch Client Software When software installation is complete, a new icon will appear on computer’s desktop, named ‘WPS’: Double-click this icon to launch Presentation Server’s client software. If you have personal firewall software installed, or you’re using Windows XP / Vista operating system, you may see similar message windows appear: Click ‘Unblock’ (or the button with similar meaning) so firewall software will not block the network access of Presentation Server’s client software. 33 Client software will search for project server connected to local area network, and Presentation Server’s SSID will be displayed at ‘Projector SSID’ field: If there are more than one Presentation Servers found on LAN, please select the Presentation Server you wish to connect from ‘Projector SSID’ dropdown menu. If the Presentation Server you wish to connect does not appear, click icon to search again. Every Presentation Server’s SSID can be found at the lower-left corner of Presentation Server’s display, and login code can be found at lower-right corner: 34 SSID Login Code Please input an unique user name (used to identify each Presentation Server user and should not be the same with other user) in ‘User Name’ field, and input the login code as shown on Presentation Server’s display. When you’re ready, click icon to continue. If the login code you provided is not the same with Presentation Server’s displayed login code, the following message will appear: 35 If you see this message, click ‘OK’ to input correct login code. 36 If you entered correct login code, you’ll be connected to Presentation Server as one of users, and the client software will be look like this: Before any user start presentation, all connected user’s name and their IP address will be listed on Presentation Server’s display: If you want to disconnect from Presentation Server, you can click You’ll be removed from connected user list. If you want to connect to Presentation Server again, you have to repeat login procedure. 37 icon, You can click ‘Presentation’ button to start presentation (the content of your computer’s display will be transmitted to Presentation Server, and being displayed on Presentation Server’s display). If you see this message, it means there’s already a progressing presentation, please wait for existing presenter logout, or use remote controller to switch user: If your computer display’s resolution setting is different from Presentation Server’s display resolution setting, you’ll be prompted to change your computer’s display resolution: You can click ‘YES’ button to change computer’s display resolution to Presentation Server’s display resolution setting (your computer must be able to support the resolution), or click ‘NO’ button to keep your computer’s display resolution setting unchanged. No matter you click ‘YES’ or ‘NO’ button, your computer’s display content will be transmitted to Presentation Server’s display. However, if you click ‘NO’ button, displayed image on Presentation Server’s display will be malformed. 38 2-6 Using Client Software After you connected to Presentation Server and start transmitting display content, an icon will appear beside the clock of system tray, you can right-click on it and its menu will appear: The descriptions of every function of client software will be given below. 2-6-1 Presentation Server You can click ‘Presentation Server’ to recall Presentation Server client software In this window, you can: Click ‘Stop’ button to stop presentation, your computer’s display content will not be transmitted to Presentation Server’s display, but your computer will still be connected Presentation Server (logged in). Click ‘Video Player’ button to start built-in video player. Unlike using other 39 video players like Windows Media Player or QuickTime, this video player allows you to play video file on Presentation Server’s display in full-screen mode. And while you’re playing video file, you can still use your computer’s display to do other jobs: You can click icon to browse the video file on your computer to play. This video player supports video files with .asf, .mpg1,2,4, and .mpeg file extension. While video is playing, you can use these buttons to control the progress of video playing: Volume control: Drag the volume control bar to adjust volume. / Play / Pause: Click play button will become button to start video playback; the while video is playing, click it to pause video playing. Stop: Click this button to stop playing video. Please note that when video file ends, nothing will be displayed on Presentation Server’s display (display will become black). You have to click stop button to resume. Close: Click this button to close video player. 40 2-6-2 On-Screen Keyboard Select this function and an on-screen keyboard will appear, you can use this keyboard to type characters by mouse click, just like using your keyboard. 2-6-3 About You can get the version number and other information about the client software you’re using; this is very helpful when you need help from dealer of purchase. Click ‘OK’ to close ‘About’ window. 41 2-6-4 Exit Terminates Presentation Server client software, and you’ll be disconnected from Presentation Server. To start another presentation, you have to launch client software again. 2-7 Using Remote Controller When the presentation is in progress, you can use supplied remote controller to control the presentation. When using remote controller, point the remote controller’s IR signal transmitter toward the front of Presentation Server. Notice: 1) Remote controller only works when the distance between remote controller and Presentation Server is shorter than 7 meters. This distance will be shortened in some environments, or when the battery state of remote controller is low. 2) If there’s strong light source near Presentation Server and / or remote controller, remote controller may not be able to function properly. Name Description ‘Black out’ Press this button to activate ‘Black Out’ function, which will remove any display contents displayed on external display; Press this button again to resume. ‘Menu’ Press this button to switch the display output of Presentation Server between presenter’s computer display content and Presentation Server’s configuration menu. ‘Page down’ Equivalent to ‘Left’ key on your computer’s keyboard. 42 ‘Page up’ Equivalent to ‘Right’ key on your computer’s keyboard. ‘Prev.’ Select previous user (presenter) in Presentation Server’s configuration menu; Equivalent to ‘Up’ key on your computer’s keyboard when presentation is in progress. ‘Next’ Select next user (presenter) in Presentation Server’s configuration menu; Equivalent to ‘Down’ key on your computer’s keyboard when presentation is in progress. Select user in Presentation Server’s configuration menu. 2-8 Select User When there’re more than one connected client software, project server can select one of them to display its display content. In the example below, there are three connected client and none of them is in presentation mode, when ‘’>’’ goes to the user, it becomes green, others are white: You can use the ‘User Switch’ button or remote controller to select the user, and display its display content by Presentation Server’s display. 43 2-8-1 ‘User Switch’ Button A button named ‘User Switch’ is located at the top of Presentation Server: If you wish to select which user should Presentation Server display its display content, you can press this button. The configuration menu of Presentation Server will be shown on Presentation Server’s display; if there is a progressing presentation and you pressed ‘User Switch’ button, presentation will be aborted and the configuration menu of Presentation Server will be shown. In this example, total 3 users are connected. You can press ‘User Switch’ button to select which user should Presentation Server display its display content (a > mark will appear in front of selected user and the color will become green, the color of the progressing presentation one is yellow). You can press this button again and again to select other users in the list. When a user is selected, stop pressing ‘User Switch’ button and let ‘>’ mark stop at the user you wish Presentation Server to display its display content. Selected user will begin presentation after 5 seconds. 44 2-8-2 Use Remote Controller You can also use remote controller to select which user should Presentation Server display its display content: 1. If there’s a progressing presentation, press ‘Menu’ button on remote controller (Skip this step if there’s no progressing presentation). 2. Press ‘Prev.’ or ‘Next’ button to select the user you wish Presentation Server to display its display content, selected user will have a > mark in front of it and colored green. 3. When a user is selected, press button on remote controller, and the display content of the user you selected will be displayed on Presentation Server’s display. 45 Chapter III Configure Presentation Server 3-1 Connect to Web Configuration Menu This Presentation Server provides several administrative functions which can be accessed via the web configuration menu. In this chapter, you’ll be instructed to user web configuration menu to setup the Presentation Server. Please follow the following steps to connect to the web configuration menu of Presentation Server: 1. Use the web browser to connect to the IP address of Presentation Server (WLAN / LAN IP address) Presentation Server’s IP address can be found at the lower-left corner of Presentation Server’s display (refer to chapter 2-1). 46 2. Click ‘Admin Login’ link on the left. 3. You’ll be prompted to input administrator’s username and password. Default ‘User Name’ is ‘admin’ and ‘Password’ is ‘1234’. Click ‘OK’ button when you’re ready. 47 4. After you logged in, the status of Presentation Server will be shown on web browser. 48 3-2 Utility Download You can use this function to download Presentation Server’s client software. (Same as described in chapter 2-4) Click ‘Utility Download’ link on the left, and you’ll be prompted to run or save Presentation Server’s client software. 49 3-3 Basic Setting In this menu, you can configure the time zone and web configuration menu password. 50 3-3-1 Change Time Zone Setting Click ‘Time Zone’ tab, and the time zone settings will appear: The description of every setting item will be described below: Item Description Set Time Zone Select the time zone of your residence from this dropdown menu. Time Server Input the IP address or host name of time server, so the Address Presentation Server will synchronize its own time with time server. You can use default setting ‘192.43.244.18’, or other time server of your own choice. Some examples of time server: pool.ntp.org stdtime.gov.tw chronos.csr.net 51 Daylight Savings If the area of your residence uses daylight saving, please check ‘Enable Function’ box, and select the starting and ending date from dropdown menu. When you finish, please click ‘Apply’ button to save changes you made; to discard changes, click ‘Cancel’ button. 3-3-2 Password You can use this function to change the password required for logging onto web configuration menu (user name is always ‘admin’ and can not be changed). The description of every setting item will be described below: Item Description Current Password Input current password (default: 1234) here. New Password Input new password you wish to use here. Confirmed Input new password you wish to use here again, for Password confirmation. When you finish, please click ‘Apply’ button to save changes you made; to discard changes, click ‘Cancel’ button. If you click ‘Apply’, you’ll see the 52 following message: Click ‘Continue’ to continue on Presentation Server setting, or click ‘Apply’ to reboot Presentation Server, and changes you made will take effect after Presentation Server rebooted. 53 3-4 Network Setting You can use this menu to change the setting of wired Ethernet connection and DNS (Domain Name Service) server. The description of every setting item will be described below: Item Description Obtain an IP Select this option and Presentation Server will obtain an address IP address from the DHCP server on your local area automatically network automatically. If you selected this option but there’s no DHCP server on your LAN, Presentation Server will use IP address ‘169.254.0.200’ automatically. Use the following Select this option and Presentation Server will use the IP address IP address you defined below. IP address Input the IP address you wish to assign to Presentation Server. Subnet Mask Input the subnet mask of the IP address of Presentation 54 Server. Gateway address Input the IP address of the gateway of your local area network. You can leave this field blank and clients on local area network will still be able to connect to Presentation Server, but some network functionalities will not function. For example, if the time server you defined is not located within local area network, Presentation Server will not be able to access Internet and synchronize with time server. DNS address Input the IP address of DNS server here (DO NOT input the host name of DNS server here!). Secondary DNS You can input another DNS server’s IP address here, Address so if Presentation Server fails to connect to the DNS server listed above, it will use the DNS server’s IP address listed in this field instead. You can leave both fields of DNS server blank, and most functionalities of this Presentation Server will still function. However, you have to input IP address, not host name, for all servers required by this Presentation Server (like NTP server). When you finish, please click ‘Apply’ button to save changes you made; to discard changes, click ‘Cancel’ button. If you click ‘Apply’, you’ll see the following message: Click ‘Continue’ to continue on Presentation Server setting, or click ‘Apply’ to reboot Presentation Server, and changes you made will take effect after Presentation Server rebooted. 55 3-5 Wireless Setting You can configure the settings of the wireless network interface of this Presentation Server from this menu. 56 3-5-1 ‘Basic’ Settings You can configure basic wireless network settings from this menu. The description of every setting item will be described below: Item Description Wireless Function Select ‘Enable’ from dropdown menu to enable wireless network function; select ‘Disable’ to disable wireless network function (wireless radio off). Mode Select wireless mode. Only AP (Access Point) mode is supported currently. Band Select the wireless band. Available options are: 2.4GHz (B) - supports 802.11b wireless clients only. 2.4GHz (N) - supports 802.11 Draft-n wireless clients only. 2.4GHz (B+G) - supports 802.11b and 802.11 Draft-n wireless clients. 2.4GHz (G) - supports 802.11g wireless clients only. 57 2.4GHz (B+G+N) - supports 802.11b, 802.11g, and 802.11 Draft-n wireless clients. ESSID Input the ESSID (Extended Service Set IDentifier, i.e. the name used to identify this Presentation Server among other wireless access points) here. Please note that client software also uses this name to identify the Presentation Server, even client software is using wired Ethernet connection to connect to Presentation Server. Default ESSID is ‘projector’. Channel Number Select the wireless channel number used by the wireless interface of Presentation Server from dropdown menu. The default channel is 11. Associated Client Click ‘Show Active Clients’ button to show all connected wireless clients (wired clients will not be displayed here). Click ‘Refresh’ button to reload latest wireless client list. When you finish, please click ‘Apply’ button to save changes you made; to discard changes, click ‘Cancel’ button. If you click ‘Apply’, you’ll see the following message: 58 Click ‘Continue’ to continue on Presentation Server setting, or click ‘Apply’ to reboot Presentation Server, and changes you made will take effect after Presentation Server rebooted. 59 3-5-2 ‘Advanced’ Settings In this menu, you can configure advanced wireless settings of this Presentation Server. Please note that only experienced user should modify these settings, and wrong settings may affect the performance of this Presentation Server. This Presentation Server is able to run properly without any modification in this page. The description of every setting item will be described below: 60 Item Description Fragment Set the Fragment threshold of wireless radio. Threshold Do not modify default value if you don’t know what it is, default value is 2346. RTS Threshold Set the RTS threshold of wireless radio. Do not modify default value if you don’t know what it is, default value is 2347. Beacon Interval Set the beacon interval of wireless radio. Do not modify default value if you don’t know what it is, default value is 100. DTIM Period Set the DTIM period of wireless radio. Do not modify default value if you don’t know what it is, default value is 3. Data Rate Set the wireless data transfer rate to a certain value. Since most of wireless devices will negotiate with each other and pick a proper data transfer rate automatically, it’s not necessary to change this value unless you know what will happen after modification. N Data Rate Same as above, but only for 802.11n clients. Channel Width Set channel width of wireless radio. Do not modify default value if you don’t know what it is, default setting is ‘Auto 20/40 MHz’. Preamble Type Set the type of preamble of wireless radio, Do not modify default value if you don’t know what it is, default setting is ‘Short Preamble’. Broadcast ESSID Decide if the wireless router will broadcast its own ESSID or not. You can hide the ESSID of your wireless router (set the option to ‘Disable’), so only people those who know the ESSID of your wireless router can get connected. CTS Protect Enabling this setting will reduce the chance of radio signal collisions between 802.11b and 802.11g wireless access points. It’s recommended to set this option to ‘Auto’ or ‘Always’. However, if you set to ‘None’, your wireless router should be able to work fine, too. Tx Power You can set the output power of wireless radio. Unless you’re using this wireless router in a really big space, you may not have to set output power to 100%. This 61 will enhance security (malicious / unknown users in distance will not be able to reach your wireless router). Turbo Mode Enhance the data transfer rate of LAN, default value is ‘Enable’, it’s recommended to set this option to ‘Enable’. WMM The short of Wi-Fi MultiMedia, it will enhance the data transfer performance of multimedia contents when they’re being transferred over wireless network. If you don’t know what it is / not sure if you need it, it’s safe to set this option to ‘Enable’, however, default value is ‘Disable’. When you finish, please click ‘Apply’ button to save changes you made; to discard changes, click ‘Cancel’ button. If you click ‘Apply’, you’ll see the following message: Click ‘Continue’ to continue on Presentation Server setting, or click ‘Apply’ to reboot Presentation Server, and changes you made will take effect after Presentation Server rebooted. 62 3-5-3 ‘Security’ Settings In this menu, you can setup wireless security for wireless connections. By default, Presentation Server does not enable wireless security so wireless clients don’t have to know the password for wireless network before they can get connected to Presentation Server. You can improve the security level of Presentation Server by setup security settings in this menu. The description of every setting item will be described below: Item Description Encryption: Disable wireless encryption. This will allow anyone who Disable found the Presentation Server by wireless network able to connect to Presentation Server and download client software. Refer to chapter 3-5-3-1 for detailed instructions when encryption is disabled. Encryption: WEP Enables WEP (Wired Equivalent Privacy) encryption. Although some people may use certain utility software 63 to discover the password used by WEP encryption, it still be able to provide certain level of security, and almost every wireless client support WEP (especially some old IEEE 802.11b wireless clients), therefore WEP provides better compatibility. Refer to chapter 3-5-3-2 for detailed instructions of WEP encryption. Encryption: WPA Enables WPA (Wi-Fi Protected Access) encryption. pre-shared key WPA provides better protection strength against malicious attackers, and most of modern wireless clients support WPA. Refer to chapter 3-5-3-3 for detailed instructions of WPA encryption. Encryption: WPA Enables WPA encryption with RADIUS authentication RADIUS server support. Refer to chapter 3-5-3-4 for detailed settings of WPA RADIUS encryption. When you finish, please click ‘Apply’ button to save changes you made; to discard changes, click ‘Cancel’ button. If you click ‘Apply’, you’ll see the following message: Click ‘Continue’ to continue on Presentation Server setting, or click ‘Apply’ to reboot Presentation Server, and changes you made will take effect after Presentation Server rebooted. 64 3-5-3-1 Encryption: Disabled When encryption setting is disabled, Presentation Server’s wireless interface uses no protection against wireless users who attempted to connect to it. It is convenient for meeting room’s visitors; however, every one will be able to connect to Presentation Server unless you enabled 802.1x authentication. The description of every setting item will be described below: Item Description Enable 802.1x Check this box to enable 802.1x authentication. Authentication RADIUS Server IP Please input the IP address of RADIUS authentication address server here. RADIUS Server Please input the port number of radius server here. Port RADIUS Server Please input the password of radius server here. Password When you finish, please click ‘Apply’ button to save changes you made; to discard changes, click ‘Cancel’ button. If you click ‘Apply’, you’ll see the following message: 65 Click ‘Continue’ to continue on Presentation Server setting, or click ‘Apply’ to reboot Presentation Server, and changes you made will take effect after Presentation Server rebooted. 66 3-5-3-2 Encryption: WEP Enable WEP encryption. The description of every setting item will be described below: Item Description Key Length There are two types of WEP key length: 64-bit and 128-bit. Using ‘128-bit’ is safer than ’64-bit’, but will reduce some data transfer performance. Key Format There are two types of key format: ASCII and Hex. When you select a key format, the number of characters of key will be displayed. For example, if you select ’64-bit’ as key length, and ‘Hex’ as key format, you’ll see the message at the right of ‘Key Format’ is ‘Hex (10 characters), which means the length of WEP key is 10 characters. Default Tx Key You can set up to four sets of WEP key, and you can decide which key is being used by default here. If you don’t know which one you should use, select ‘Key 1’. 67 Encryption Key 1 Input WEP key characters here, the number of to 4 characters must be the same as the number displayed at ‘Key Format’ field. You can use any alphanumerical characters (0-9, a-z, and A-Z) if you select ‘ASCII’ key format, and if you select ‘Hex’ as key format, you can use characters 0-9, a-f, and A-F. You must enter at least one encryption key here, and if you entered multiple WEP keys, they should not be same with each other. Enable 802.1x Check this box to enable 802.1x authentication. Authentication RADIUS Server IP Please input the IP address of RADIUS authentication address server here. RADIUS Server Please input the port number of radius server here. Port RADIUS Server Please input the password of radius server here. Password When you finish, please click ‘Apply’ button to save changes you made; to discard changes, click ‘Cancel’ button. If you click ‘Apply’, you’ll see the following message: Click ‘Continue’ to continue on Presentation Server setting, or click ‘Apply’ to reboot Presentation Server, and changes you made will take effect after Presentation Server rebooted. 68 3-5-3-3 Encryption: WPA pre-shared key Enable WPA pre-shared key encryption. The description of every setting item will be described below: Item Description WPA Unicast Please select a type of WPA cipher suite. Cipher Suite Available options are: WPA (TKIP), WPA2 (AES), and WPA2 Mixed. You can select one of them, but you have to make sure your wireless client support the cipher you selected. Pre-shared Key Select the type of pre-shared key, you Format can select Passphrase (8 or more alphanumerical characters, up to 63), or Hex (64 characters of 0-9, and a-f). Pre-shared Key Please input the WPA passphrase here. It’s not recommended to use a word that can be found in a dictionary due to security reason. When you finish, please click ‘Apply’ button to save changes you made; to discard changes, click ‘Cancel’ button. If you click ‘Apply’, you’ll see the following message: 69 Click ‘Continue’ to continue on Presentation Server setting, or click ‘Apply’ to reboot Presentation Server, and changes you made will take effect after Presentation Server rebooted. 70 3-5-3-4 Encryption: WPA RADIUS Enable WPA RADIUS key encryption. The description of every setting item will be described below: Item Description WPA Unicast Please select a type of WPA cipher suite. Cipher Suite Available options are: WPA (TKIP), WPA2 (AES), and WPA2 Mixed. You can select one of them, but you have to make sure your wireless client support the cipher you selected. RADIUS Server IP Please input the IP address of your Radius address authentication server here. RADIUS Server Please input the port number of your Radius Port authentication server here. Default setting is 1812. RADIUS Server Please input the password of your Radius Password authentication server here. When you finish, please click ‘Apply’ button to save changes you made; to discard changes, click ‘Cancel’ button. If you click ‘Apply’, you’ll see the following message: 71 Click ‘Continue’ to continue on Presentation Server setting, or click ‘Apply’ to reboot Presentation Server, and changes you made will take effect after Presentation Server rebooted. 72 3-5-4 ‘WPS’ Settings In this menu, you can use WPS (Wi-Fi Protected Setup) to setup secure wireless connections quickly and easily with WPS-compatible wireless clients. In this menu, current WPS settings will be displayed, like above example. The descriptions of every field are: Item Description WPS Status Displays WPS configuration status: Configured (WPS ready), or Unconfigured. Self PinCode Displays WPS self pin code. This code will be used when pin-style WPS pairing mode is being used, and WPS wireless clients will need to know this code. SSID Displays the SSID of this Presentation Server. Authentication Displays current wireless authentication mode. Mode Passphrase Key Here uses asterisk mark ( * ) to show WPA passphrase key. And here’s WPS configuration menu: 73 The description of every setting item will be described below: Item Description Config Mode Select WPS configuration mode: ‘Registrar’ (This projector will accept WPS-compatible wireless client to send WPS pairing request), and ‘Enrollee’ (This Presentation Server will send WPS pairing request to other WPS registrar). Configure via Push Click ‘Start PBC’ and Presentation Server will enter Button ‘WPS Push-Button’ mode. When using this mode, another WPS-compatible wireless device must also enter WPS push-button mode with different WPS configuration mode (i.e. if Presentation Server enters WPS push button mode in ‘Registrar’ configuration mode, another WPS-compatible wireless device must use ‘Enrollee’ configuration mode; if Presentation Server enters WPS push button mode in ‘Enrollee’ configuration mode, another WPS-compatible wireless device must use ‘Registrar’ configuration mode. When you click this button, the button will be grayed-out and start 2-minute count down. If no WPS-compatible wireless device enters WPS push button mode within 2 minutes, WPS pairing will be cancelled. Hint: You can also press ‘WPS’ button located on the front of Presentation Server to enter WPS mode, too. Configure via If you got another WPS-compatible wireless device’s Client PinCode Self PinCode, you can enter it here, and press ‘Start PIN’ button to start PIN-style WPS pairing. 74 3-6 Presentation Control You can use this menu to control every connected user, and device who should be active presenter here. The description of every setting item will be described below: Item Description Administrator Check this box to enter ‘Administrator mode’ (i.e. you mode can control users). Please note that when you change the status of Administrator mode, Presentation Server needs to reboot and all connected users must reconnect to Presentation Server. You’ll be prompted before Presentation Server is rebooting, and you can cancel rebooting. Action button and selected user will become active Click presenter. IP Address Displays the IP address of this user. Status Displays the status of this user. Connection time Displays total time since connection established of this user. 75 3-7 Display Setting You can configure the characteristics of external display here. The description of every setting item will be described below: Item Description Output Mode Select which video output interface should Presentation Server use. Available options are ‘VGA’ and ‘HDMI’. Resolution Select output video resolution. Select ‘Auto’ and Presentation Server will decide output resolution by the information provided by external display (not every display supports this function), or select a resolution from this dropdown menu. When you select ‘HDMI’ as output mode, resolution can not be changed. When you finish, please click ‘Apply’ button to save changes you made; to discard changes, click ‘Cancel’ button. If you click ‘Apply’, you’ll see the following message: 76 Click ‘Continue’ to continue on Presentation Server setting, or click ‘Apply’ to reboot Presentation Server, and changes you made will take effect after Presentation Server rebooted. 77 3-8 Black Out When you don’t want audience see the content of your computer display temporarily when you’re active presenter, you can suspend video output by this function. Click ‘Screen Off’ button and video will stop displaying on external display. Click it again to resume. Please note that this function will not stop video signal, therefore external display will NOT enter power-save mode when you use this function to stop displaying video contents (if it supports). 78 3-9 Configuration Tools This menu provides several useful functions, you can save Presentation Server’s configuration (backup), upgrade firmware (to improve Presentation Server’s functionality), or reset Presentation Server from this menu. 3-9-1 Configuration Tools You can backup and restore configuration of this Presentation Server here, or restore all settings of this Presentation Server back to factory default value. The description of every setting item will be described below: 79 Item Description Backup Settings Click ‘Save…’ button to save Presentation Server’s current setting as a file and store it on your computer. You’ll be prompted when you click ‘Save…’ button, click ‘Save’ to select a folder on your computer to save Presentation Server’s configuration file. You can give each configuration file a different name, so you can remember the purpose of configuration file. Restore Settings Click ‘Browse…’ button to select a configuration file stored in your computer’s folder (you’ll be prompted to select a file), then you can click ‘Upload’ button to upload the configuration file to Presentation Server. Reset Click this button to reset all settings of Presentation Server back to factory default settings. You’ll be prompted to confirm configuration reset. 80 3-9-2 Firmware Upgrade In this menu, you can upgrade the firmware of this Presentation Server. New firmware will provide more functionality, and fix some existing problem. Please download latest firmware from our website. Please click ‘Next’ button to start firmware upgrade procedure: Click ‘Browse…’ button to select a firmware file from your computer, and then click ‘Apply’ to start firmware upgrade. Firmware upgrade procedure may require some time, please be patient and do not switch your computer and / or 81 Presentation Server off during firmware upgrade procedure. Also, please do not remove the network connection during firmware upgrade, if firmware upgrade fail, the Presentation Server may not be able to function properly, and you will need to ask your dealer of purchase for help. 82 3-9-3 Reset If you found that Presentation Server is not function properly, or respond to your command slowly, reboot the Presentation Server may solve the problem. Click ‘Apply’ to reboot the Presentation Server. You’ll be prompted before the Presentation Server reboots itself: Click ‘OK’ to reboot the Presentation Server, or click ‘Cancel’ to abort. Presentation Server needs about 60 seconds to reboot, please reconnect to Presentation Server after you clicked ‘OK’ button for 60 seconds. 83 Chapter IV Appendix 4-1 Hardware Specification Supports DHCP Server & Client Supports wireless AP Mode Download utility from the device directly, no need installation CD Presentation control via remote controller OSD menu configuration Suppots login code to protect other users from login into this device without any authentication. HDMI Output Resolution: Up to Full HD 1080P Wired & Wireless Presentation Allow 16 users to login Various video format support: MPEG1/2/4, H.264, Firmware Upgradeable CPU+ Decoder Sigma Designs SMP8635 Flash/ RAM 8MB Flash/ 128MB DDR1 Connector USB x2 (USB Mouse / 2.4G remote control) Wireless 2T2R 802.11n INIC, supports WPS Video Output VGAx1, HDMIx1 Audio Output Yes LAN Port 10/100M UTP Port x 1 Power 5V DC, 2.5A switching Power Adaptor Dimension 180mm x 120mm x 30mm Temperature 0~55 C Humidity 0~90% (Non-Condensing) Certification FCC Class B, CE Mark o 84 4-2 Troubleshooting Don’t panic if Presentation Server is not function properly! In most cases, you can solve the problem by yourself and you don’t have to send the Presentation Server back to dealer of purchase to ask of help. Please refer to this troubleshooting table to find out possible solution. Scenario Solution Can’t connect to 1. Check the LED lights located at the front of Presentation Presentation Server. If ‘Power’ LED does not light, do Server the following check: Check the connection of A/C adapter, and if the electrical outlet you used with A/C adapter is functioning properly. Press ‘Power’ button to see if ‘Power’ LED lights now. 2. If ‘Ready’ LED does not light after you switch the Presentation Server on after more than 2 minutes, ask the dealer of purchase for help. 3. Check the network connection. 4. Make sure you connected to correct IP address. 5. If you’re using wireless network, make sure you connected to correct SSID. 6. If you’re using wireless network, check the WEP / WPA password. Remote controller 1. Replace the battery of remote controller with a new does not work one (CR-2032 lithium battery). 2. Please point the IR transmitter (located at the top of remote controller) to the front panel of Presentation Server. 85 3. Make sure the IR receiver of Presentation Server (labeled as ‘Remote’) is not blocked by any object, especially when you inserted USB peripheral in front USB slot. 4. If there’s strong / fluorescent light source near IR transmitter / receiver, remote controller may not be able to function properly. 5. If the distance between IR transmitter / receiver is longer than 7 meters, remote controller may not working properly. Noting displayed 1. If you’re using ‘Black out’ function, resume it on Presentation (‘Blackout’ LED located at the front of Presentation Server’s display Server will light). 2. Check the connection between video display and Presentation Server. 3. If video display you’re using supports more than one video mode / source, make sure you selected correct video mode / source. 4. Make sure you selected correct video output type (HDMI or VGA). 5. Make sure the video display you’re using supports the video output mode you selected (in VGA mode). 6. Make sure the video display is switched on. I hear some sound 1. There’s a fan inside the Presentation Server and it when Presentation will start working when Presentation Server is switched Server is switched on. This is normal and is not malfunction. on 2. If you smell something strange or even see smoke come out from Presentation Server, unplug the A/C adapter (if possible), and return the Presentation Server back to dealer of purchase immediately. 86 87