1
Teseo2 User Manual
Turn the Eldest Seismograms into the Electronic Original Ones – 2.0.10
Stefano Pintore, Matteo Quintiliani
Istituto Nazionale di Geofisica e Vulcanologia, Roma, Italy
***
This documentation needs further updates.
Revision: 1.58 – Date: 2006-04-11 08:46:06
Please, check last revision at http://sismos.ingv.it/teseo/
Contents
1 Introduction
2 Installing
2.1 Teseo
2.2 Teseo
2.3 Teseo
2.4 Teseo
Teseo
from Source .
for Linux . . .
for Windows .
for Mac OS X
3
.
.
.
.
3
4
4
5
5
3 Getting started with Teseo
3.1 Session . . . . . . . . . . . . . . . . . . . . . . . . . . . . . . .
3.2 Teseo parasites . . . . . . . . . . . . . . . . . . . . . . . . . .
5
7
10
4 Vectorization
4.1 Manual . . . . . . . . . . . . .
4.2 Automatic . . . . . . . . . . . .
4.2.1 Colour Weighted Mean
4.3 Path manipulation . . . . . . .
4.4 Trace import/export . . . . . .
4.5 Filters . . . . . . . . . . . . . .
10
11
11
12
12
14
15
.
.
.
.
.
.
.
.
.
.
.
.
.
.
.
.
.
.
.
.
.
.
.
.
.
.
.
.
.
.
.
.
.
.
.
.
.
.
.
.
.
.
.
.
.
.
.
.
.
.
.
.
.
.
.
.
.
.
.
.
.
.
.
.
.
.
.
.
.
.
.
.
.
.
.
.
.
.
.
.
.
.
.
.
.
.
.
.
.
.
.
.
.
.
.
.
.
.
.
.
.
.
.
.
.
.
.
.
.
.
.
.
.
.
.
.
.
.
.
.
.
.
.
.
.
.
.
.
.
.
.
.
.
.
.
.
.
.
.
.
.
.
.
.
.
.
.
.
.
.
.
.
.
.
.
.
.
.
.
.
.
.
.
.
.
.
.
.
.
.
.
.
.
.
.
.
.
.
.
.
.
.
.
.
.
.
.
.
.
.
5 Analysis after trace vectorization
18
5.1 Curvature correction . . . . . . . . . . . . . . . . . . . . . . . 19
6 Before leaving Teseo
23
7 Mailing list and bug report
24
7.1 Bug report . . . . . . . . . . . . . . . . . . . . . . . . . . . . 24
1
8 Credits
25
9 Acknowledgements
25
10 Warnings
25
2
1
Introduction
c 2005
This document is the user manual of Teseo2 software – Copyright – Stefano Pintore, Matteo Quintiliani. Revision: 1.58 – Date: 2006-04-11
08:46:06 .
Teseo2 is a software tool for seismogram digitization/vectorization and it
is developed in the framework of the Sismos project [Michelini and the Sismos Team, 2005]
at Istituto Nazionale di Geofisica e Vulcanologia (Italy). This name was inspired by the myth of Theseus and it is also an acronym for Turn the Eldest
Seismograms into the Electronic Original Ones.
Teseo2 is a plug–in for GIMP – GNU Image Manipulation Program –
that extends its functionalities for seismological studies. The GIMP is a
multiplatform photo manipulation tool freely distributed. It works on many
operating systems, in many languages.
Teseo2 allows primarily for:
• additional operations on the vectorized trace (i.e. resampling and
alignment)
• supervised vectorization algorithms (colour weighted mean)
• analysis after trace vectorization, such as curvature correction and
time realignment
• trace import/export in several formats (such as SAC, SVG, DXF,
ASCII, Timemarks distances).
In order to keep track of the stages and parameters of a seismogram
vectorization, Teseo2 is able to write this information into the image saved
in xcf format.
Teseo2 is developed following the “Open–Source” philosophy and it is
freely distributed under GPL license. It is cross–platform and the sources,
the binaries for Linux, Windows and Mac OS X, are periodically updated
on the Sismos web site.
Official web site: http: // sismos. ingv. it/ teseo/
Developer e–mail: mailto: teseo@ ingv. it
User mailing–list: mailto: teseo-user@ yahoogroups. com
ML archive: http: // groups. yahoo. com/ group/ teseo-user/
2
Installing Teseo
Before installing Teseo2 you need to install GIMP 2.2. Teseo2 has never
been tested on GIMP 2.0.
Please refer to the official website at http://www.gimp.org/, user manual [Gimp, 2005] and books [Bunks, 2000], [Kylander and Kylander, 1999],
for any information about it.
3
Teseo2 is developed on Linux but binaries are also available for other
platforms such as Windows and Mac OS X. You can be able to compile
Teseo2 on every system where GIMP has been successfully installed. Sources
and some binary distributions can be downloaded at the official web site,
http://sismos.ingv.it/teseo/
In this manual we provide basic information to install Teseo2 plug-in. For
specific information, please follow instructions contained in the INSTALL
file for your distribution.
2.1
Teseo from Source
Teseo2 is mostly developed in C language, one library is written in Fortran.
In order to compile Teseo2 you need gcc, g77 and libg2c.
In general, Teseo2 works with GIMP 2.2, although version 2.2.6 or newer
is recommended. We develop Teseo2 using GTK+ and GLib. GTK+ is a library for creating graphical user interfaces. GLib is a general-purpose utility
library, which provides many useful data types, macros, type conversions,
string utilities, file utilities, a main loop abstraction, and so on. The versions
of GTK+ and GLib are the same used by GIMP.
Moreover, Teseo2 use a GTK+ widget called GtkDataBox which has been
designed to display large amounts of numerical data fast and easy. Version
greater than 0.4.0 is required. Please, refer to the section 8 for downloading
and documentation about GtkDataBox.
Teseo2 sources are subdivided into three separate modules: two libraries
(gtk–addons, newuoa) and the GIMP plug-in (teseo–2). Unpack the file
teseo–2.x.x.tar.gz and compile the source modules following this order: gtk–
addons, newuoa and teseo–2. You can use the stardard command sequence:
./configure
make
make install
For teseo–2, you should launch the configure script with the same prefix
of gimp–2.2 and, optionally, set the datadir. For example, if gimp–2.2 is
configured with −−prefix=/mydir, you have to use:
./configure −−prefix=/mydir −−datadir=/mydir/share/gimp/2.0
2.2
Teseo for Linux
First of all, install GIMP. Version 2.2.6 or newer is recommended.
Unpack the binary distribution from teseo–2.x.x–bin–linux.tar.gz and
run these commands to install Teseo2 :
cd teseo–2.x.x–bin–linux
./setup.sh linux
setup.sh needs gimptool–2.0 included in GIMP distributions.
To uninstall run:
4
cd teseo–2.x.x-bin–linux
./setup.sh linuxuninstall
2.3
Teseo for Windows
• Pre-requisite
1. Install gimp–2.2.6 or newer : files and instructions at http://
gimp-win.sourceforge.net/
2. (Optional) Install gimp–help
• Install teseo–2
1. Close GIMP
2. Extract teseo–2.x.x-setup.exe from the distributed teseo–2.x.xsetup.zip
3. Run teseo–2.x.x-setup.exe
4. Start GIMP
2.4
Teseo for Mac OS X
To install Teseo2 on Mac OS X you have 2 possibilities.
1. Download DMG image that contains Gimp.app with teseo–2 bundled
(DMG image is about 72 MB)
2. Download binary distribution pack and use shell script configuration:
(Distribution is about 1 MB)
First of all, install GIMP. Version 2.2.6 or newer is recommended.
Unpack binary distribution teseo–2.x.x–bin–macosx.tar.gz
cd teseo–2.x.x–bin–macosx
./setup.sh macosx /Applications/Gimp.App
To uninstall run:
cd teseo–2.x.x–bin–macosx
./setup.sh macosxuninstall /Applications/Gimp.App
If Gimp.app doesn’t reside in Applications folder, change it with the
correct path.
3
Getting started with Teseo
Teseo2 works only on grayscale images and it could work on any image
format manageable by GIMP. We prefer working only on xcf format, the
GIMP proprietary format, for several reasons:
5
• xcf can save layers, channels and paths.
• xcf can put up “parasites” arbitrary pieces of data which can be
attached to various GIMP objects. Teseo2 is able to import/export all
information about seismogram and vectorization within the xcf file.
• xcf natively supports gzip and bzip2 compression.
To start Teseo2 you have to:
1. Start GIMP.
2. Open seismogram image. The image must be converted in grayscale
(Image→ Mode→ Grayscale in GIMP context) and then saved in xcf
format.
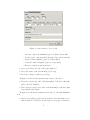
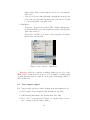
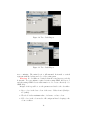
3. Select Teseo-2 from Teseo menu (figure 1). Alternatively, you can
use the context menu on the image (right-clicking) or by a customized
shortcut.
Figure 1: Teseo menu
6
Warning: When Teseo2 is launched, it is automatically “linked” to the
image by the GIMP. We suggest to vectorize one image at a time and to
respect the following order using Teseo2 : open image, open Teseo2 , close
Teseo2 , close image. The name of the image is visible in the main window
of Teseo2 . If you close the image before Teseo2 , then close Teseo2 before
reopening the image. Moreover, if you rename the image, Teseo2 work well
but the references to the correct session are lost. In this case, we strongly
recommend to open Teseo2 only after renaming the image.
Warning: If Teseo2 crashes or GIMP is closed before Teseo2 , the session
linked to the image remains locked. Next time you open Teseo2 on the
same image, a warning message will be shown asking for forcing the session
unlock. This mechanism is useful to prevent multiple instances of Teseo2 for
the same image: only one instance for each image is allowed for a correct
vectorization.
3.1
Session
Teseo2 associates to the image some information related to seismogram paper, seismic event, station data and vectorization parameters. This information is saved in a session and it is referred to a single seismic event.
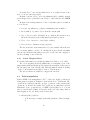
When you start Teseo2 for the first time on an image, you are required
to create a new session. Fill the fields shown in the figures 2, 3, 4, and click
OK.
Session properties can be modified at any time selecting File→ Session→
Properties (Ctrl+P in Teseo2 context). New sessions related to other events
in the same image can be created selecting File→ Session→ New (Ctrl+N in
Teseo2 context). The user can not change session file name because Teseo2
uses a fixed session naming convention.
Files related to the session are stored in gimp directory/teseo–2, where
gimp directory is the user–specific GIMP settings directory. Usually, it is the
subdirectory .gimp–2.2 in the user home directory.
When Teseo2 is started on an image associated to more sessions, the user
can choose the preferred one. All the parameters described below are saved
in the session file and, on demand, they can be imported or exported in
Teseo2 parasites (section 3.2) and saved in the xcf image.
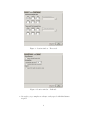
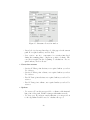
In figure 2 are shown the parameters associated to the seismic record.
• Date: date of recording.
• Event number: arbitrary ordinal number which identifies the event
contained in the image. Use it to distinguish several events on the
same image or date.
• Station data: the following parameters will be saved in SAC files.
– Name: station code.
7
Figure 2: Session window – Record tab
– Azimuth: component azimuth (degrees clockwise from north).
– Incident angle: component incident angle (degrees from vertical).
– Latitude: station latitude (degrees, north positive).
– Longitude: station longitude (degrees, east positive).
– Elevation: station elevation (meters).
• Paper speed: linear velocity of the paper [mm/sec].
• Image file: name of the current image (read-only).
• Resolution: image resolution (read-only).
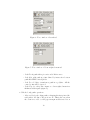
In figure 3 are shown the parameters associated to the traces.
• Event first sample time: time of the first sample of the trace, this value
will be saved in SAC files.
• Time mark first sample time: time of the first sample of the trace that
represents the time mark.
In figure 4 are shown the parameters associated to the path manipulation.
• Return directly Bézier path: if checked, when you use automatic vectorization methods, Path Fit is executed after every group of iterations.
8
Figure 3: Session window – Traces tab
Figure 4: Session window – Path tab
• Resampling step: samples are always evenly spaced with this distance
in pixel.
9
• Constant abscissa ascendent: if checked, X-values of the returned samples are strictly increasing, else X-values are evenly spaced regardless
direction.
• Export DXF path relocated in origin: if checked, DXF export will translate the path starting a the coordinate (0, 0). This option is needed
only for Sismos procedures.
3.2
Teseo parasites
In order to share and distribute results about the vectorization of a seismogram, Teseo2 includes all information related to the seismogram and his
vectorization within a single file. This can be made using GIMP proprietary image format: the xcf format. In fact, xcf format stores paths, layers,
channels and “parasites”, a mechanism provided by GIMP for attaching
arbitrary pieces of data to an image.
Teseo2 parasites contain all parameter values for the current session.
When you import or export a session as parasites you have to consider the
Event number (see figure 2). Remember that Event number is arbitrary
and it could be thinked as the ordinal number associated to the sequence of
the events occurred in the same Date. You can export only one set of the
parameters for each single event.
Parasite operations are shown in figure 5.
• Parasite Import: import the n-th event contained in the xcf image into
the current session.
• Parasite Export: export all parameters of the current session into the
xcf image as parasite.
• Parasite Remove all: remove all Teseo2 parasites contained in the xcf
file.
Warning: When parasites related to an image are modified, remember
to save the image before closing it. GIMP won’t give you any advice before
leaving the image.
4
Vectorization
Teseo2 trace vectorization completely relies on GIMP Path tool, which permits to create piecewise cubic Bézier curves and polygonals. Please, see
[Gimp, 2005] for basic usage.
Warning: Teseo2 does not support closed paths.
Warning: Unfortunately, GIMP plug-in developers do not have yet
available procedures (API) to handle paths with two or more components.
User must not create multiple components in a single path.
10
Figure 5: Teseo Parasites
Warning: Seismogram must be oriented from left to right and top to
bottom. If necessary you can use GIMP tools such as Flip or Rotate to
modify the image ;-)
4.1
Manual
You can manually vectorize the traces by GIMP Path tool creating several
piecewise cubic Bézier curves or polylines.
You should improve your manual dexterity before facing up to a complicated seismogram. Inside the distribution you find a very simple piece of
seismogram to test your skill, the file name is example.xcf.gz. Keep in mind
that the whole vectorization is based on GIMP Path tool and it is wise to
learn as much as possible about it.
example.xcf.gz contains a few paths manually made and others made by
the Teseo2 colour weighted mean algorithm, which will be described in the
next section 4.2.
4.2
Automatic
Teseo2 is designed to easily add algorithms for automatic seismogram vectorization. An iterative procedure takes place whereby at each step the
algorithm is executed providing it with:
• a rectangular portion of the image centred at the last point of the
current path;
• information regarding the closest previous points;
in order to find the next point.
11
Presently, Teseo2 uses an algorithm based on a weighted mean of the
trace colour (see subsection 4.2.1)
In future versions of Teseo2 more algorithms should be available (neural
network approach too) and will be associated to other buttons beside CWM
one.
In figure 6 the main parameters of Teseo2 automatic path vectorization
tool are shown:
• Forward: algorithm stop condition, maximum iteration number.
• Back: number of points to delete from the current path.
• Stop to the first guide: alternative stop condition, the iterations stop
when the abscissa is greater than first vertical guide position.
• Trace colour: base trace colour (black or white).
• Trace thickness: thickness average in pixels.
The arrow buttons on the main window become sensitive when the user
chooses an algorithm to execute. To calculate the next point, the algorithm
can use the additional information provided by the user who suggests a
direction clicking on arrow buttons.
4.2.1
Colour Weighted Mean
For detailed information about this algorithm read [Pintore et al., 2005].
The colour weighted mean algorithm takes a rectangular region of the
image having width and height specified in tab shown in figure 7 and centered
into the last point of the current path. This algorithm is activated clicking
on the colour weighted mean button on the toolbar in figure 6.
The arrow buttons are available to suggest the direction.
4.3
Path manipulation
Besides GIMP Path manipulation, Teseo2 adds some useful operations in
seismogram vectorization. In figure 8 is shown the Teseo2 Path menu. The
operations are subdivided in three groups: operations on the current path,
operations on all unlocked paths and operations on path that represent
Timemark. Some operations rely on GIMP vertical guides tool: you can
place a vertical guide clicking on the ruler on the left of the image window
and dragging it onto the image at the desired place.
• Current path operations
– Path Resample: resample path with parameter defined in figure
4.
12
Figure 6: Teseo window - General tab
Figure 7: Teseo window - Colour weighted mean tab
– Path Fit: fit path with a piecewise cubic Bézier curve.
– Path Split: split path at points defined by intersection beetwen
path and GIMP vertical guides.
– Path Force Polyline: transform a path in a polyline. All the
control points will be ignored.
– Path Snap: for each point compute a colour weighted mean in a
thickness width square (figure 6).
• Unlocked only paths operations
– Align unlocked paths: align paths overlapping the first point of the
next path to the last of the previous one. This is the case when
the event is recorded over the paper margin and the trace lies on
13
different lines. This operation must be used before exporting the
whole trace.
– Link unlocked paths: link paths with a straight line from the last
point of the previous path to the first point of the next one. Useful
to join several paths of the same event.
• TimeMark
– Timemark - Evaluate intermediate TMs: evaluate missing intermediate timemark of the current path and return vertical guides
where they should be.
– Timemark - Add TMs from guides: add points where the guides
intersect the current path.
Figure 8: Teseo window - Path menu
Warning: Order in operations on multiple paths respects order of the
GIMP Path tool, that is from bottom to top. For example, executing a link
on paths shown in figure 9 results in a new path concatenating paths a, b
and c in this order.
4.4
Trace import/export
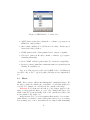
Teseo2 imports and exports several file formats as shown in figures 10–11:
• SVG: Scalable Vector Graphics [SVG Working Group, 2003].
• DXF: Drawing Interchange File Format [Autodesk, 1992].
• Trace: Teseo2 proprietary ascii format. It contains image reference
and coordinate in pixels. Only polylines.
14
Figure 9: GIMP Path Tool – Path order
• ASCII: plain text file that contains the coordinates (x,y) sequence in
millimeters. Only polylines.
• SAC: Seismic Analysis Code [Goldstein et al., 2003]. Evenly spaced
binary SAC. Only polylines.
• SISMA: plain text file “Sismogrammi Storici” software compliant.
• Timemark: plain text file that contains coordinates (x,y) sequence
identifying timemarks.
• Bézier: GIMP 1.0 Bézier path format. For downward compatibility.
• Examples: binary format that contains information for neural networks
learning. Not available yet.
Up to now, SVG export is possible only by GIMP Path tool, DXF import
is possible only on Teseo2 exported paths, SAC import is not implemented
yet.
4.5
Filters
GIMP offers a variety of filters and instruments to manipulate images. We
strongly recommend to enhance the “readability” of your seismogram before
vectorize. For example you could increase the contrast of the image.
Warning: If you want save the history of the changes applied to the
image, you may apply the filters on copies of the “Background Layer”. Remember that all operations usually work on the current layer which could
not necessarily be the visible one.
At the moment, Teseo2 provides a graphical filter useful to clean a seismogram. What do we intend to clean a seismogram? Often, before vectorizing,
it is advantageous to remove horizontal traces crossing it while mantaining
15
Figure 10: Teseo Path Import
Figure 11: Teseo Path Export
trace continuity. The main idea is to fill unwanted horizontal or vertical
segments with the background color of the seismogram.
Warning: Good results are obtained when the noisy lines are perfectly
horizontal. You can estimate required rotation using GIMP Measure tool
and then using GIMP Rotate trasformation tool to rotate effectively. See
GIMP help.
In figure 12 it is possible to see the parameters related to the clean filter.
• Base colour: is the base colour of the trace. Value from 0 (black) to
255 (white).
• Threshold: is the maximum value of tolerance on base colour.
• Fill colour: is the colour used to fill contiguous lines belonging to the
colour condition.
16
Figure 12: Teseo Filter Clean
• New layer: if checked, the current layer will be copied and the filters
will be run on the copy.
• Transparent: if checked, only the filled lines will be displayed, rest of
the image will be transparent. This works only on layer with alpha
channel.
• Horizontal/Vertical: choose one to fill horizontal or vertical line.
• Greater/Less: choose one to fill lines longer or shorter than length.
• Length: length of a single line on the image.
If you’ve never used this filter you should try it on the example image
contained in your Teseo2 distribution. Follow these steps:
1. Open example.xcf.gz
2. Select the “Background” layer inside the GIMP Layer Dialog and apply the filter using the following parameters:
• Base Colour = 0
• Threshold = 128
• Fill Colour = 255
• New layer checked
• Transparent uncheked
• Vertical checked
• Less checked
• Length = 9
17
3. A layer named “Background copy” will be created.
4. Select the “Background” layer and apply the filter using the following
parameters:
• Base Colour = 0
• Threshold = 200
• Fill Colour = 255
• New layer checked
• Transparent uncheked
• Horizontal checked
• Greater checked
• Length = 28
5. A layer named “Background copy #1” will be created.
6. Select the layer named “Background copy” and set the layer parameter
Mode to Multiply.
Nice! Isn’t it?
An animation of this operation is available on http://sismos.ingv.
it/teseo/filters/.
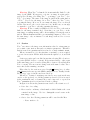
5
Analysis after trace vectorization
The seismogram curve on the image has to be corrected to become a seismic
data with right amplitude and time. There are many errors that could
be introduced during the digitization procedure that must be taken into
account.
• Rotation of the sheet during image scanning is a first error that can
be easily removed using Gimp Rotation tool with the correct angle.
• To obtain data as a sequence of samples and corresponding time a
scaling related to the paper speed is always needed.
Several different corrections have to be applied too in order to eliminate
errors due to the recording system of the seismograph.
• Instruments with photographic recording suffer from a trace distortion due to the spiral trend on the seismogram paper. This trend
is further removable with other analysis instruments like SAC2000
[Goldstein et al., 2003]. This distorsion applies to all–mechanical recording systems too, like the Wiechert seismographs.
18
• Mechanical recording systems suffer from a curvature of the seismic
trace, worst in case of great amplitude signal, due to the finite arm
lenght and finite radius of the cylinder bearing the smoked paper. To
correct this kind of distortion, Teseo2 offers an instrument able to
create a new path starting from a curved one. The algorithm used by
Teseo2 is taken from Cadek [Cadek, 1987] , while the code we use was
originally written in Fortran by A. Schlupp. The algorithm needs some
parameters, for a few of them Teseo2 offers some other instruments to
evaluate. These instruments are derived from a personal comunication
provided by [Schlupp, 2006] which is going to be published.
5.1
Curvature correction
For semplicity we suppose that speed is a constant for the path segment we
consider, otherwise we can subdivide path in segments at constant speed,
for example from a time marker to the subsequent. Then we can correct the
resulting paths one by one.
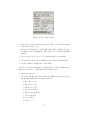
The formula for correction of the deformation due to the geometry of
the recorder, as well as coordinate conversion (x,y) in time and amplitude,
are given by Cadeck:
t(i) =
arcsin{r2 + a2 − R2 + [y(i) − b]2 } arcsin(r2 + a2 − R2 + b2 )
60
{x(i)−r
+r
}
d
2ar
2ar
where:
R = length of the writing arm, from its rotating axis to the tip of the
needle
r = radius of the drive cylinder bearing the smoked paper
a = distance from the rotating arm axis to the driving cylinder axis
b = shift of the arm axis, in millimeters, to the base line on the smoked
paper
d = minute length on the original record in millimeters
x(i) = coordinate to transform in seconds for time axis
y(i) = coordinate to transform in millimeters for amplitude axis
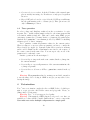
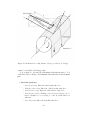
This formula applies to intruments modeled as in the schema shown in
figure 13. To use this formula, it is necessary to get information about
the seismogram. For well known machinery, r, R and a can be retrieved
from manufactory papers (figure 13). Otherwise it is possible to adjust
these parameters to reasonable values by trial and error. The d value is
proportional to speed and resolution.
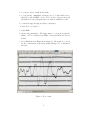
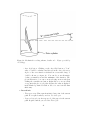
The b value is the most difficult to determine and must be deduced
directly from records, see figure 14. A detailed description of the method to
19
Figure 13: Mechanical recording schema. Figure provided by A. Schlupp.
evaluate b is available in [Schlupp, 2006].
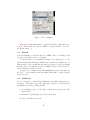
Look at figure 15, showing the Curvature Correction window. You
obtain this window clicking on Curvature Correction from Post Analysis.
• Recorder geometry
– Arm length entry: Enter the arm length value here.
– Cylinder radius entry: Enter the cylinder radius value here.
– Axial distance entry: Enter the axial distance value here.
– Axial distance button: Clicking on Axial distance button you obtain a calculation of a according to r and R, useful when a is
unknown.
– Arm shift entry: Enter the arm shift value here.
20
Figure 14: Mechanical recording schema, details on b. Figure provided by
A. Schlupp.
– Arm shift button: Clicking on the Arm Shift button a ”best”
value of b will be calculated and showed in the Arm shift entry.
A plot of the error function calculated in a reasonable range of
b will be shown: see figure 16. You can choose an alternative
b value, presumably around the minimum of the function. The
plot is interactive: you can zoom in selecting an area and then
clicking the central mouse button. Right click to zoom out. Click
on a point in the plot to select the abscissa, the value is displayed
in the Marked point field. Click on Choose to save it in the Arm
shift entry.
• Record info
– Time span entry: Time span from first to last point of the current
path. Not required unless you select Use time span.
– Paper velocity velocity: Average speed of the paper for the current
path. Required unless you select use Time span.
21
Figure 15: Curvature Correction window
– Lateral velocity: Average lateral speed of the paper for the current
path. Not required unless you select Shift
– Scan rotation: use it to compensate for a rotation introduced
during the scanning phase – angles are positive clockwise. The
correction is applied at the beginning of calculations. Not required unless you select Rotate
• Correction extrema
– Starting X: First point abscissa, not required unless you select
Use extrema.
– Starting Y: First point ordinate, not required unless you select
Use extrema.
– Final X: Last point abscissa, not required unless you select Use
extrema.
– Final Y: Last point ordinate, not required unless you select Use
extrema.
• Options
– Use extrema: To use the user provided coordinates of the first and
last point of the path. Useful for images with unknown scale.
– Use time span: If you know exactly this time you can provide it
to the algorithm. It will be used to calculate the speed.
22
– Use raster angle: To use the user provided error angle in scanning.
If not checked the possible rotation angle will be calculated from
the path.
– Rotate: Check to apply the rotation correction.
– Shift: Check to apply the lateral speed distortion correction.
• Slopes button: Click on Slopes button to plot the histogram of the
slopes for the given b. According to [Schlupp, 2006] the slope should
be 0 or at his minimum at 90 degree for the correct Arm shift.
• Correct button: Click on Correct button to obtain a new path corrected applying the Cadeck formula with the parameters selected for
the current path.
Figure 16: Plot of the function Error(b)
6
Before leaving Teseo
Before closing GIMP is a very good practice to:
1. Save session (Ctrl+S in Teseo2 context)
2. Close Teseo2 .
23
3. Save xcf file, it contains all your paths, layers and Teseo2 parasites.
xcf is your friend and gzip or bzip2 too.
4. Close GIMP.
7
Mailing list and bug report
If you would like to:
• know news about Teseo2
• suggest further improvements
• exchange experiences with others Teseo2 users
• help the developers to improve Teseo2 and make it more stable
at the moment, the best way is subscribing the mailing list devoted to the
Teseo2 users: feel free to send an e–mail to mailto:teseo-user-subscribe@
yahoogroups.com . However, the archive of the messages is open to everybody at http://groups.yahoo.com/group/teseo-user/
7.1
Bug report
Teseo2 is not a bug-free application, so if you find a bug, please report it
sending an e–mail to mailto:[email protected]
Please, remember to specify:
• Operating system
– i.e.: Windows XP, Linux Distribution, Mac OS X version, ...
• Teseo version
– Teseo version looks like 2.x.x
You find it in About window following Help→ About in Teseo menu.
• Kind of Teseo distribution
– Source code, zip or tarball binaries, dmg image, ...
• GIMP–2.2 version
– GIMP version looks like 2.2.x
• A detailed bug description
We will provide a bug tracking system if necessary.
24
8
Credits
Teseo2 source distribution contains code developed by other authors and
distributed respecting their copyright or license:
• Curvature correction – Curvature correction of Wiechert records is
based on studies and Fortran routines developed by Antoine Schlupp.
Within Teseo2 , Fortran routines have been ported in C.
Author: Antoine Schlupp (mailto:[email protected].
fr)
• NEWUOA – NEWUOA is a software developed by M.J.D. Powell
for unconstrained optimization without derivatives.
Author: M.J.D. Powell (mailto:[email protected])
• cfortran.h – cfortran.h is an easy-to-use powerful bridge between C
and FORTRAN. It provides a transparent, machine independent interface between C and FORTRAN routines and global data. http:
//www-zeus.desy.de/~burow/cfortran/
Author: Burkhard Burow (mailto:[email protected])
Main package dependencies are:
• GIMP – GNU Image Manipulation Program.
http://www.gimp.org/
• GtkDatabox – A Gtk+–Widget for Fast Data Display. http://www.
eudoxos.de/
Author: Roland Bock (mailto:[email protected])
9
Acknowledgements
We would like to thank A. Schlupp for his contribution in the Curvature Correction development. We are also grateful to A. Michelini for his continuous
encouragement and to S. Mazza for his useful and constructive suggestions.
10
Warnings
In this section are resumed all warnings contained in the manual.
• When Teseo2 is launched, it is automatically “linked” to the image by
the GIMP. We suggest to vectorize one image at a time and to respect the
following order using Teseo2 : open image, open Teseo2 , close Teseo2 , close
image. The name of the image is visible in the main window of Teseo2 . If you
close the image before Teseo2 , then close Teseo2 before reopening the image.
25
Moreover, if you rename the image, Teseo2 work well but the references to
the correct session are lost. In this case, we strongly recommend to open
Teseo2 only after renaming the image. (pag. 7)
• If Teseo2 crashes or GIMP is closed before Teseo2 , the session linked to
the image remains locked. Next time you open Teseo2 on the same image, a
warning message will be shown asking for forcing the session unlock. This
mechanism is useful to prevent multiple instances of Teseo2 for the same
image: only one instance for each image is allowed for a correct vectorization.
(pag. 7)
• When parasites related to an image are modified, remember to save the
image before closing it. GIMP won’t give you any advice before leaving the
image. (pag. 10)
• Teseo2 does not support closed paths. (pag. 10)
• Unfortunately, GIMP plug-in developers do not have yet available procedures (API) to handle paths with two or more components. User must
not create multiple components in a single path. (pag. 10)
• Seismogram must be oriented from left to right and top to bottom. If
necessary you can use GIMP tools such as Flip or Rotate to modify the
image ;-) (pag. 11)
• Order in operations on multiple paths respects order of the GIMP Path
tool, that is from bottom to top. For example, executing a link on paths
shown in figure 9 results in a new path concatenating paths a, b and c in
this order. (pag. 14)
• If you want save the history of the changes applied to the image, you may
apply the filters on copies of the “Background Layer”. Remember that all
operations usually work on the current layer which could not necessarily be
the visible one. (pag. 15)
• Good results are obtained when the noisy lines are perfectly horizontal.
You can estimate required rotation using GIMP Measure tool and then using
GIMP Rotate trasformation tool to rotate effectively. See GIMP help. (pag.
16)
List of Figures
1
2
3
4
Teseo menu . . .
Session window –
Session window –
Session window –
. . . . . . .
Record tab
Traces tab .
Path tab .
26
.
.
.
.
.
.
.
.
.
.
.
.
.
.
.
.
.
.
.
.
.
.
.
.
.
.
.
.
.
.
.
.
.
.
.
.
.
.
.
.
.
.
.
.
.
.
.
.
.
.
.
.
.
.
.
.
.
.
.
.
.
.
.
.
.
.
.
.
.
.
.
.
6
8
9
9
5
6
7
8
9
10
11
12
13
14
15
16
Teseo Parasites . . . . . . . . . . . . . . . . . . . . . . . . . .
Teseo window - General tab . . . . . . . . . . . . . . . . . . .
Teseo window - Colour weighted mean tab . . . . . . . . . . .
Teseo window - Path menu . . . . . . . . . . . . . . . . . . .
GIMP Path Tool – Path order . . . . . . . . . . . . . . . . .
Teseo Path Import . . . . . . . . . . . . . . . . . . . . . . . .
Teseo Path Export . . . . . . . . . . . . . . . . . . . . . . . .
Teseo Filter Clean . . . . . . . . . . . . . . . . . . . . . . . .
Mechanical recording schema. Figure provided by A. Schlupp.
Mechanical recording schema, details on b. Figure provided
by A. Schlupp. . . . . . . . . . . . . . . . . . . . . . . . . . .
Curvature Correction window . . . . . . . . . . . . . . . . . .
Plot of the function Error(b) . . . . . . . . . . . . . . . . . .
27
11
13
13
14
15
16
16
17
20
21
22
23
References
[Autodesk, 1992] Autodesk (1992). AutoCAD Release 12 DXF Format.
Adobe Systems Incorporated - 1585 Charleston Road - P.O. Box 7900
- Mountain View, CA 94039-7900. Drawing Interchange and File Formats
Release 12.
[Bunks, 2000] Bunks, C. (2000). Grokking the GIMP. New Riders Publishing, Thousand Oaks, CA. 352pp.
[Cadek, 1987] Cadek, O. (1987). Studying earthquake ground motion in
prague from wiechert seismograph records. Gerl. Beitr. Geoph., 96:438–
447.
[Gimp, 2005] Gimp (2005). GNU Image Manipulation Program User Manual. The GIMP Documentation Team. URL http://docs.gimp.org/.
[Goldstein et al., 2003] Goldstein, P., Dodge, D., and Firpo, M. (2003).
SAC2000: Signal processing and analysis tools for seismologists and engineers. In Lee, W., Kanamori, H., Jennings, P., and Kisslinger, C., editors,
International Handbook of Earthquake & Engineering Seismology, Part B,
pages 1613–1614, New York. Academic Press.
[Kylander and Kylander, 1999] Kylander, O. and Kylander, K. (1999).
Gimp the Official Handbook with Cdrom. Coriolis Value. 895pp.
[Michelini and the Sismos Team, 2005] Michelini, A. and the Sismos Team
(2005). Collection, digitization and distribution of historical seismological
data at ingv. EOS, 86(28).
[Pintore et al., 2005] Pintore, S., Quintiliani, M., and Franceschi, D. (2005).
Teseo: a vectoriser of historical seismograms. Computers & Geosciences,
31(10):1277–1285.
[Schlupp, 2006] Schlupp, A. (2006). Personal communication.
[SVG Working Group, 2003] SVG Working Group (2003). Scalable Vector
Graphics (SVG) 1.1 Specification. URL http://www.w3.org/TR/2003/
REC-SVG11-20030114/.
28
Index
Buttons
Arm Shift, 21
Arm shift button, 21
Axial distance, 20
Axial distance button, 20
Correct, 23
OK, 7
Slopes, 23
File formats
ASCII, 3, 15
Bézier, 15
DXF, 3, 10, 14, 15
Examples, 15
SAC, 3, 7, 8, 15
SISMA, 15
SVG, 3, 14, 15
Timemark, 15
Trace, 14
xcf, 3, 5–7, 10, 24
Filters
clean, 15, 16
GIMP, 3–7, 10–17, 23, 24
GIMP tools
Flip, 11
Measure, 16
Path, 10–12, 14, 15
Rotate, 11, 16
GLib, 4
GTK+, 4
Keywords
CWM, 12
parasites, 6, 7, 10, 24
seismic event, 7
session, 7, 10
Menu
Curvature Correction, 20
Post Analysis, 20
Teseo, 6
Teseo-2, 6
Parameters
a, 19, 20
Arm length entry, 20
Arm shift entry, 20, 21
Axial distance entry, 20
Azimuth, 8
b, 19–21, 23
Back, 12
Base Colour, 17, 18
Base colour, 16
Choose, 21
Constant abscissa ascendent, 10
Cylinder radius entry, 20
d, 19
Date, 7, 10
Elevation, 8
Event first sample time, 8
Event number, 7, 10
Export DXF path relocated in
origin, 10
Fill Colour, 17, 18
Fill colour, 16
Final X, 22
Final Y, 22
Forward, 12
Greater, 17, 18
Horizontal, 17, 18
Image file, 8
Incident angle, 8
Lateral velocity, 22
Latitude, 8
Length, 17, 18
Less, 17
Longitude, 8
Mode, 18
Name, 7
New layer, 17, 18
Paper speed, 8
Paper velocity velocity, 21
29
R, 19, 20
r, 19, 20
Resampling step, 9
Resolution, 8
Return directly Bézier path, 8
Rotate, 22, 23
Scan rotation, 22
Shift, 22, 23
Starting X, 22
Starting Y, 22
Station data, 7
Stop to the first guide, 12
Threshold, 16–18
Time mark first sample time, 8
Time span, 21
Time span entry, 21
Trace colour, 12
Trace thickness, 12
Transparent, 17, 18
Use extrema, 22
Use raster angle, 23
Use time span, 21, 22
Vertical, 17
x(i), 19
y(i), 19
Path Fit, 8, 13
Path Force Polyline, 13
Path Resample, 12
Path Snap, 13
Path Split, 13
Timemark - Add TMs from guides,
14
Timemark - Evaluate intermediate TMs, 14
Software development
g77, 4
gcc, 4
GLib, 4
GTK+, 4
GtkDataBox, 4
libg2c, 4
Teseo modules
gtk–addons, 4
newuoa, 4
teseo–2, 4
Teseo operations
Align unlocked paths, 13
Link unlocked paths, 14
Parasite Export, 10
Parasite Import, 10
Parasite Remove all, 10
30