1
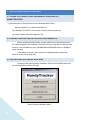
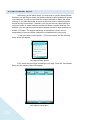
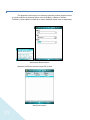
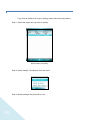
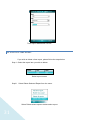
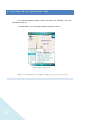
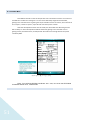
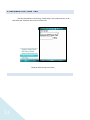
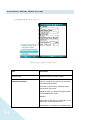
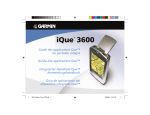
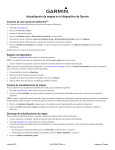
HandyTracker User’s Manual v1.0 1 CONTENT HandyTracker Overview .................................................................................................................................. 5 1. Installing HandyTracker............................................................................................................................... 6 1.1 Using software and hardware required by HandyTracker .............................................................. 6 1.2 HandyTracker installation requirements ......................................................................................... 6 1.3 Installing software and map............................................................................................................. 6 1.3.1 Map and software installation .............................................................................................. 7 1.2.2 Deleting installed maps ....................................................................................................... 11 1.2.3: Uninstall HandyTracker ...................................................................................................... 12 2. Activating software ................................................................................................................................... 13 2.1 ACTIVATING DIRECT BY PHONE..................................................................................................... 13 2.2 Activating the HandyTracker by PC ............................................................................................... 15 3. HandyTracker screen................................................................................................................................. 19 3.1 Map screen...................................................................................................................................... 19 3.2 Information screen ......................................................................................................................... 20 3.3 Tool menu ....................................................................................................................................... 20 4. Using HandyTracker................................................................................................................................... 21 4.1 System setup before use ................................................................................................................ 22 4.2 Basic setup ...................................................................................................................................... 22 4.2.1 Add trackers......................................................................................................................... 24 4.2.2 Delete trackers..................................................................................................................... 26 4.2.3 Modify trackers .................................................................................................................... 27 4.3 Auto report setup ........................................................................................................................... 28 4.3.1 Add time report ................................................................................................................... 29 4.3.2 Modify time report .............................................................................................................. 30 4.3.3 Delete a time report ............................................................................................................ 31 4.3.4 Delete all time reports......................................................................................................... 32 4.3.5 Activate auto report ............................................................................................................ 32 4.4 Position report ................................................................................................................................ 33 2 4.4.1 Position report functions.................................................................................................. 33 4.4.2 Detailed settings for Perior report ...................................................................................... 35 5. Reading report information....................................................................................................................... 37 5.1 Map screen description .................................................................................................................. 37 5.2 Status screen description ............................................................................................................... 38 6. Map functions ........................................................................................................................................... 39 6.1 Enlarge or reduce map.................................................................................................................... 39 6.2 Move map horizontally/vertically.................................................................................................. 39 6.3 Map information query .................................................................................................................. 39 6.4 Map compass .................................................................................................................................. 40 6.5 Map scale ........................................................................................................................................ 40 6.6 View track history........................................................................................................................... 40 7. Screen setup.............................................................................................................................................. 41 7.1 Split screen...................................................................................................................................... 41 7.2 Full screen ....................................................................................................................................... 42 7.3 Horizontal alignment (PDA Phone Only)........................................................................................ 42 8. Data management..................................................................................................................................... 43 8.1 Record query................................................................................................................................... 43 8.2 Delete database.............................................................................................................................. 45 8.3 Delete selected time....................................................................................................................... 46 8.4 Delete tracker record...................................................................................................................... 47 8.5 Export record .................................................................................................................................. 49 9、TR‐150/TR‐151 Setup by SMS ............................................................................................................. 50 9.1 Geofence ......................................................................................................................................... 51 9.2 SMS Default Return Phone Number .............................................................................................. 52 9.3 Maximun GPS Fixing Time .............................................................................................................. 53 9.4 Default Report Mode Setting ......................................................................................................... 54 9.5 SOS Setup........................................................................................................................................ 56 10、Coordinate Query.................................................................................................................................. 57 3 4 HANDYTRACKER OVERVIEW The HandyTracker is a personal remote positioning management and monitoring software designed for the GlobalSat TR-101/TR-102/TR-150/TR-151, a personal remote positioning tracker. It is compatible with most SmartPhones and PDA phones, such as SmartPhones and PDA phones from Dopod, Mio, ETen and HP. As long as your SmartPhone or PDA phone uses the Windows Mobile 2003 (Windows CE 4.2 or later versions) or Windows Mobile 5.0 and later versions (including Windows Mobile 6.0), and is equipped with the mobile phone function, you may use the HandyTracker on them. ¾ HandyTracker system features Displays TR-10x/TR-15x reports data on maps Monitors one or more TR-10x/TR-15x at the same time. Compatible with PDA phones and SmartPhones (using WM2003 or WM5.0/WM6.0). Scales maps up and down and moves maps horizontally Stores historical data in database for query and export. Tracks TR10x/TR15x as scheduled or at planned intervals Sends warning when receiving emergency rescue signals from TR-10x/TR-15x This manual covers only the installation and registration procedures of HandyTracker and maps and software operation instructions. Please refer to the user‟s manuals of TR-10x/TR-15x for operating the TR-10x/TR-15x. Users should refer to the user‟s manuals of their SmartPhones and PDA phones for details of operating their SmartPhones and PDA phones. Note : 1. TR-10x for TR-101 or TR-102 2. TR-15x for TR-150 or TR-151 5 1. INSTALLING HANDYTRACKER 1.1 USING SOFTWARE AND HARDWARE REQUIRED BY HANDYTRACKER (1) SmartPhones or PDA phones use the Windows Mobile 2003 , Windows Mobile 5.0 or Windows Mobile 6.0. (2) GlobalSat TR-10x/TR-15x personal remote positioning devices . (3) HandyTracker software Installation CD . 1.2 HANDYTRACKER INSTALLATION REQUIREMENTS Before installing HandyTracker, please make sure of the following items: the master programs are installed in the base memory; map data are stored in the memory card; and Memory card: (SD/MMC/MicroSD/MiniSD cards of 256MB or larger capacity Card reader: it needs a card reader for installing software and maps because of the size of map data. 1.3 INSTALLING SOFTWARE AND MAP Please put the HandyTracker Installation CD in the CD-ROM reader and run the mapinstall.exe file in the disc. HandyTracker Installation Menu 6 1.3.1 MAP AND SOFTWARE INSTALLATION Insert Memory Card into card reader then press the Map (Software) Install button on the Installation Menu and the following menu will appear on the screen. List of maps Installed memory card Machine Type Memory card capacity Installed maps Installation progress Map (Software) Install Screen 7 Step 1: Select the type of machine you wish to install. Machine Type Options PS: Select PDA Phone if you are using the HandyTracker on a PDA phone or SmartPhone if you are using it on a SmartPhone. If you want to check the model and operating system of your PDA phone, proceed as follows: StartÆ SetupÆ SystemÆ About to check the version of the Microsoft Windows Mobile installed in your system. Step 2: Select memory card location. Memory Card Location Option Note : 1. If you have only one memory card, the installation program will automatically point to this memory card. If you have more than one memory card, please select the destination of installation. In general, the HandyTracker system will be installed in the HandyTracker directory of the selected memory card. 2. If there is no memory card in the card reader or the hot-swap of memory card is in progress when you are installing the HandyTracker, the system will be unable to detect any card. In this case, please press the “Detect Card” button to detect card. 8 Step 3: Select the map(s) you wish to install. List of Map for Installing Select the maps you wish to install by checking the box in front of them. If you wish to install all the maps, press the ALL button. If you wish to de-select all selected maps, press the NONE button. Press the INVERT button to invert the selection. You can check the required space for the selected map under the map list. Step 4: Press Install button to start installing maps. Map installation button The installation progress will be display at the bottom of the screen. Map installation progress 9 Step 5: Continual installation for PDA phones and SmartPhones When you finish installing the HandyTracker in the memory card for the first time, you must run the continual installation for PDA phones and SmartPhones. Insert Memory Card into PDA Phone or SmartPhone, the autorun.exe will be run first. Press the ‘Yes” button to continue Install HandyTracker. When you finish installing the HandyTracker, PDA Phone will show HandyTracker 1.0 shortcut in Today Screen. PDA Phone Today Screen SmartPhone will create a shortcut in “Start” menu 10 1.2.2 DELETING INSTALLED MAPS If you wish to remove from the memory card maps that have been installed, select the map(s) you wish to remove and press the “Delete Map” button to delete the selected map(s) from the memory card. List of installed maps in the memory card PS: Do not directly copy or delete maps to or from the Maps directory in the memory card without running the management programs. Though this will not influence the normal operation of the programs, the installation program will not run properly. 11 1.2.3: UNINSTALL HANDYTRACKER the Uninstall: Run “\Storage Card\SmartTracjer\ remove.exe” HandyTracker. to un-install File Explorer File Explorer Run -> Storage Card -> HandyTracker -> remove.exe remove.exe to uninstall HandyTracker Uninstall Screen Note : You must run the Autorun.exe file from your PDA phone or SmartPhone to continue the installation. If you run the HandyTracker from the HandyTracker.exe in the memory card without running the continual installation, the HandyTracker will be unable to run properly. 12 2. ACTIVATING SOFTWARE Users must activate the HandyTracker after installing it in order to use it. You have two choices to Activate HandyTracker, Activate by Phone or by Input Activate code get form PC. 2.1 ACTIVATING DIRECT BY PHONE Step 1: Run HandyTracker , select menu [Tool] -> [License Manager] License Manager Screen 13 Step 2 : Select menu [License] -> [Add License by Phone] Step 3 : Input the Serial number and Email Address Then select menu [Tool] -> [Ok] to Activating HandyTracker. PS. Your PDA Phone must connecting to Internet, you can test it by click the [Test Network] menu to ensure the network is Ok. 14 2.2 ACTIVATING THE HANDYTRACKER BY PC Run the mapinstall.exe file in the Installation CD. When the Installation Menu appears, press the Active Software button as shown below Activating HandyTracker Step 1: Make sure that your desktop or laptop has been connected to the Internet. You can press the Detect Internet Connection button to check if your computer has been connected to the Internet. If you can‟t connect to the Internet, please check www.globalsat.com.tw or write mail to [email protected] report this problem. 15 Check the network status Step 2: Please check if you have the serial number for the licensed software and obtain the number for your PDA phone or SmartPhone. Check the Machine code in PDA Phone or SmartPhone 16 Step 3: find Machine code. Find the machine code in PDA Phone or SmartPhone Step 4: Input the software serial number and PDA phone or SmartPhone number to obtain the activation code. 17 Step 5: Run the HandyTracker on your PDA phone or SmartPhone. Run software License Manager menu Step 6: Input the software serial number and activation code to activate the HandyTracker. Press OK button to activate the HandyTracker 18 3. HANDYTRACKER SCREEN The screen displays the map screen, information screen and tool menus 3.1 MAP SCREEN On the map screen there are the map contents, compass, map scale, position information, position receiving time, and map enlarge and reduce buttons (PDA phones). 19 3.2 INFORMATION SCREEN On the information screen there are the status icon, receiving time, GPS positioning status, and the name of roads or landmarks of the current position. 3.3 TOOL MENU In the tool menu there are the system menu and tool function menu. System Menu and Tool Function Menu 20 4. USING HANDYTRACKER To use the HandyTracker, you must be equipped with the GlobalSat TR10x/TR15x personal remote positioning devices. GlobalSat TR-101/TR-102/TR-150/TR-151 personal remote positioning devices (1) Prepare two mobile phone SIM cards and delete the PIN on the SIM that is used on the GlobalSat personal remote positioning device. You can delete the PIN according to the instructions of your PDA phone and SmartPhone. (2) Purchase a GlobalSat TR-10x or TR-15x personal remote positioning device and a legal copy of the HandyTracker. (3) Select a compatible PDA phone or SmartPhone using Microsoft Windows Mobile 5.0™ or later versions. Supported PDA phones or SmartPhones are available from Dopod, Mio, HP, O2, Eten, Lenovo and any device using such operating systems. (4) Put one SIM in the GlobalSat TR-10x or TR-15x and another one in the PDA phone or SmartPhone. Please check the instructions of your device for installing the SIM. (5) Refer to the user’s manual of TR-10x/TR-15x for installing the SIM to TR-10x/TR-15x. You can also visit the GlobalSat site for details http://www.globalsat.com.tw/default.html . (6) Please see chapter 1 of this manual for installing the software and maps. 21 4.1 SYSTEM SETUP BEFORE USE You must set up your TR-10x/TR-15x before running the HandyTracker. You must also record the basic data for setting up the HandyTracker in order to allow TR-10x/TR-15x to successfully communicate with the HandyTracker. These data include the phone number of the SIM, the IMEI code of the TR-10x/TR-15x (a set to 15 numbers inside the battery compartment). 4.2 BASIC SETUP Select System from the menu and select Basic Setup item. Basic Setup Screen From Basic Setup, you can initialize the communication between the hardware and software. If you haven’t initialized the software and hardware, the TR-10x/TR-15x will be unable to correctly send data to the HandyTracker, and the HandyTracker will be unable to give the correct instructions to the TR-10x/TR-15x. 22 Therefore, the Basic Setup is a very important step if you are using the TR-10x/TR-15x personal remote positioning devices for the first time. Item Description Report num Input the phone number of the SIM that installed in this PDA phone or SmartPhone, for SMS message receive target. Time Zone Select the time zone according to the place where you use the device; e.g. Taiwan is +8. Personal Tracker List List the basic data of the TR-101/TR15x devices you wish to track. Note The number of Personal Tracker List varies from one version to another of the HandyTracker. The maximum Tracker number is 5. Tracker Manager: You can Add, Delete and Modify a tracker as shown below. 23 4.2.1 ADD TRACKERS Add new TR-10x/TR-15x devices to the list. Step : Select Tracker ÆAdd Tracker to go to the Add Tracker screen. Add Tracker Screen Item 24 Description Tracker Name Assign an easy-to-remember code for the tracker, e.g. Jack, John etc. Tracker Tel Input the phone number of the SIM installed in the tracker. Tracker IMEI Input the IMEI of the tracker. Each TR-10x/TR-15x has a unique IMEI. It is printed on the sticker inside the battery compartment. Icon To identity the tracker on the map. Note Change Icon: you can press ICON on the PDA phone and select an icon. You can also press the Change Icon button on the screen to select different icons. Icon Selection Screen After completing the Basic Setup, select ToolÆOK to save settings, and the following screen will appear. Setup Completed Screen 25 4.2.2 DELETE TRACKERS Step 1: Select the tracker you wish to delete. Select the tracker you wish to delete. Step 2: Select "Tracker Manager"Æ"Delete Tracker". Step 3: Delete user and the following dialogue box will pop out. Delete User Warning Message Press “YES” to delete or “NO” to abort. 26 4.2.3 MODIFY TRACKERS Step 1: Select the tracker you wish to modify. Select the tracker you wish to modify. Step 2 : Select Tracker -> Modify tracker Modify tracker menu Step 3: Modify tracker data from Tracker Manager. Modify tracker data from Tracker Manager Step 4: Press the "Tool button"Æ"OK". Tracker modification completed screen. 27 4.3 AUTO REPORT SETUP After setting up the above items, you may begin to use the HandyTracker. However, you will discover that if you wish the tracker to report positions or special circumstances, you will need to make the request manually or define the report intervals. If you wish the tracker to report at particular times or special intervals, this will be very inconvenient. Therefore, you may set the auto report feature to request a tracker to report positions at particular times or special intervals. For example, you may set the personal remote position device to report positions at 9:00am or 6:00pm. The biggest advantage of this feature is that it can run automatically to prevent human negligence or mistakes due to busy work. To set auto report, press System -> Time report setup and the following setup screen will appear. Time report Setup Screen First, select the report type according to your wish. Press the Time Report Setup and the following menu will appear. Auto Report Setup Menu 28 4.3.1 ADD TIME REPORT The purpose of time report is to allow the personal remote position device to report positions at particular times, such as 9:00am, 6:00pm or 3:00am. Therefore, report options include time, mode, disabled, report once or report daily. Auto Report Setup Screen When all the field is selected, press Ok to save. Add fix time report 29 4.3.2 MODIFY TIME REPORT If you wish to modify a time report setting, please follow the steps below. Step 1: Select the report item you wish to modify. Select report to modify Step 2: Select "Modify Time Report" from the menu. Step 3: Modify settings and press Ok to save. 30 Time Report Modification Screen 4.3.3 DELETE A TIME REPORT If you wish to delete a time report, please follow the steps below. Step 1: Select the report item you wish to delete. Select report screen Step2: Select Delete Selected Report from the menu. Select Delete select report to delete select report 31 4.3.4 DELETE ALL TIME REPORTS If you wish to delete all time reports, select Delete all reports from the menu. Delete all reports 4.3.5 ACTIVATE AUTO REPORT After setting up the report items, you must activate the auto report feature. After activating the auto report feature, a mini clock icon will appear on the map to show you that the auto report feature is on. 32 4.4 POSITION REPORT In Section 4.3, a user can request a tracker to report positions at particular times from the HandyTracker. In this section, we are going to show you how to request the tracker to report positions by communicating with the TR-10x/TR-15x. (below TR-10x/TR-15x replace with TR) 4.4.1 POSITION REPORT FUNCTIONS In a position report, the tracker is requested to report its last position and status. Select Position Report from the menu. Position Report Screen 33 Description for Position Report : Item Description Note Select Tracker Select the tracker you wish to receive reports Report [Type] Immediate Report After selecting Immediate Report, the HandyTracker will send a SMS to TR. After receiving this SMS, TR will reply the receipt of the command and to locate its current position. After completing the positioning, TR will send the position report to the HandyTracker and display it on the map. Period Report After selecting Period Report, the HandyTracker will send a SMS to TR at the planned intervals. After receiving this SMS, TR will reply the receipt of the command and to locate its current position. After completing the positioning, TR will send the position report to the HandyTracker and display it on the map. Details on the display will be described below. Stop Report After selecting Disable Report, the immediate or interval report feature will be disabled. At this moment, the HandyTracker will send a disable report command to TR. After receiving such command, TR will reply the receipt of the command and disable the immediate or interval report feature. Voice Monitor (TR-150/TR-151 Only) Send SMS with IMEI and return phone number to TR-150/TR-151 to enable voice monitor function. Then TR-150/TR-151 call back. 34 Select the report mode and press OK button, the PDA will send a SMS to the tracker. After receiving this SMS, TR will reply the receipt of the command and send the position report of disable the position report feature depending on the command content. The tracker may not report positions exactly at the planned intervals because the tracker needs to locate its positions before sending back the report. In this case, if it is in sleep mode, it needs to wake up and locate the position before sending back the report. Therefore, you may select the Immediate Report; however, this may consume more energy. So, we recommend you use the Immediate Report when it is necessary. 4.4.2 DETAILED SETTINGS FOR PERIOR REPORT Perior Report Setup Screen 35 Select report intervals ranging from 30 seconds to 12 hours. If you wish to define the interval, select User-defined and input the interval. Self-defined Interval Setup Screen 36 5. READING REPORT INFORMATION Record Map Position Record information Software screen reported by TR10x/TR15x When the information of the tracker is delivered to the software, besides the position and time information, there is additional information. The additional information sent from the tracker is described below. 5.1 MAP SCREEN DESCRIPTION Record time Red dot means historical data User ID is represented by the icon Note : Historical position data on the map are indicated by a red dot. The icon represents the corresponding icon of the selected data. 37 5.2 STATUS SCREEN DESCRIPTION Item Description Note 8438 Tracker Name or ID If the TR tracker data are not established, no corresponding name or IMEI will be located. In this case, the last four numbers of the IMEI of this tracker will be the tracker ID. 07/04/02 Date: 2 April 2007 17:39:39 Time GPS Not Fix Current GPS fix mode 0 Speed Lane 54 The name of the nearest road of the current position. 38 The movement status of the tracker. 6. MAP FUNCTIONS 6.1 ENLARGE OR REDUCE MAP If you wish to enlarge or reduce a map, press the enlarge /reduce button on the Pocket PC. Press the button to reduce the range of the map in order to view information clearer. Press the the map to view the map information clearer. button to enlarge the range of If you are using a SmartPhone, press the range of the map and the button to reduce the button to enlarge the range of the map. 6.2 MOVE MAP HORIZONTALLY/VERTICALLY If you wish to move the map horizontally/vertically, press the button to move the map up and down or left and right. 6.3 MAP INFORMATION QUERY If you are using a PDA phone, you may select the map information you wish to query with the stylus to find out the name of the road or other landmarks of the current position. Map Information Query Screen 39 6.4 MAP COMPASS The compass is located on the left upper corner of the map. The „N‟ symbol means north. Compass 6.5 MAP SCALE The map scale is located beneath the map compass. Map Scale 6.6 VIEW TRACK HISTORY If you wish to view the position of the tracker, click the Information Bar on the PDA phone. After clicking the Information Bar, the map will automatically set the position at the center and display the time of this position on the map, including tracker icon and status. Press the button to move to the previous entry of data or the button to the next entry of data. 40 7. SCREEN SETUP You can adjust the display mode from screen setup. Screen Setup Menu 7.1 SPLIT SCREEN Select Split Screen to display information and the map in separate screens. The proportion of map and data will be 3:2. Split Screen Display Mode 41 7.2 FULL SCREEN In the full screen mode, only the latest information or tracker position will be displayed on the screen, and the rest of the screen is for displaying the map. Full Screen Display Mode 7.3 HORIZONTAL ALIGNMENT (PDA PHONE ONLY) Displays map and information horizontally. Horizontal Alignment 42 8. DATA MANAGEMENT In data management, you can query, delete and export historical data. 8.1 RECORD QUERY To query records, press SystemÆRecord Query to query the current and historical data of a particular tracker. Record Query Screen 43 Select the start and end time of data, and press the OK button to start querying data. Query Results Screen Note : The query time begins from 00:00:00 of the start day and ends at 23:59:59 of the end day. 44 8.2 DELETE DATABASE If you wish to delete all data, it means to delete the data in the database. That is to say, all historical data will be deleted. To delete database, press SystemÆRecord ManagerÆDelete Database. Delete all dialogue box of users database The dialogue box “Delete all users will delete the entire database‟ will pop up. Press Yes button to delete all data or No to abort task. Note: Deleted data are irrecoverable. Please make sure you wish to do so before deleting them. 45 8.3 DELETE SELECTED TIME The difference between Delete Selected Time and Delete Database is that the former will not delete all data in the database but the data in the selected period. To delete data in the selected time, press SystemÆRecord ManagerÆDelete Selected Time. 'Delete time' dialogue box The delete select time dialogue box will pop up. Press the Yes button to delete all data or the No button to abort task. 46 8.4 DELETE TRACKER RECORD This feature allows you to delete the data of a particular tracker. Step 1: Press SystemÆRecord ManagerÆDelete Tracker Record. Step 2: Select the tracker. 47 Step 3: When the delete tracker record dialogue box pop up, press Yes to delete tracker record or No to abort task. 48 8.5 EXPORT RECORD You can export records in text files for other uses. To export records, press SystemÆRecord ManagerÆExport Record. Similarly, you will need to select the data time. Step 1: Press SystemÆRecord ManagerÆExport Record. Step 2: Select tracker and start/end time. Export Record Time Dialogue Box Note : Records will be stored in the memory card after export. 49 9、TR150/TR151 SETUP BY SMS You could use desktop computer to setup TR-150/TR-151. Similarly , you could use SMS to setup too. Use SMS setup , you could setup Geofence and basic function TR-150/TR-151 SMS setup Please read TR-150/TR-151 Hardware handbook for detail information. 50 9.1 GEOFENCE Send SMS command to make TR‐150/TR‐151 enter into Geofence mode. The content of the SMS also includes the rectangular or circular areas defined by longitutes and latitudes, getting in the restricted areas or getting out the permissible areas to send alarm, time intervals of alarm report, number of reports, report format and return phone number. After the TR‐150/TR‐151 enter into this mode, the device will start GPS fixing and the GPS is always on. Once TR‐150/TR‐151 detects the device getting in the restricted areas or getting out the permissible areas, TR‐150/TR‐151 will send alarm message back to the preset number by SMS. Geofence SMS setup screen Note : You could use WGS84 coordinate -180 ~ 180, -90 ~90 or use GPS Nmea format like W2345.1214 , N2323.3456. 51 9.2 SMS DEFAULT RETURN PHONE NUMBER TR‐150/TR‐151 will send data report or confirmed message back to this return phone number that is in the last field of all SMS tracking commands. If user leaves “Return Phone Number” empty in the tracking commands, TR‐150/TR‐151 will send report back to “SMS Default Return Phone Number”. If “Return Phone Number” and “SMS Default Return Phone Number” are both empty, TR will send report back to caller ID. SMS default return Phone number setup screen 52 9.3 MAXIMUN GPS FIXING TIME The time that allows for GPS fixing. If GPS fixing is not achieved in time, it will close GPS and send back the previous location info. Maximun GPS Fixing Time screen 53 9.4 DEFAULT REPORT MODE SETTING SetupTR-150/TR-151 basic function Default report mode setting screen Item Description Select tracker Select the tracker you want to setup Default Report Mode User can configure TR-150/TR-151 to perform the “Default Report Mode”. There are 3 report modes: immediate report, period report, stop report (standby). When you select some report mode, the unavailable item will be disabled. After power on the device, TR-150/TR-151 will perform the “Default Report Mode” automatically. For example, if the default report 54 mode is set to “Period Report” mode, every time when user power on the TR-150/TR-151, it will send out period reports by default. Report Interval Time interval of sending data report for period report mode. The unit is second. Report Format Set TR‐150/TR151 to return message by Format0 or Format1. (Please see description later in this user manual.) Number of Reports Set how many reports will be sent for period report mode? Return Phone Number After turn on the TR‐150/TR‐151, it will perform default report mode and send the data report to this number. for Default Report Mode 55 9.5 SOS SETUP When SOS button is pressed, TR-150/TR-151 will dial to these 3 numbers and send the location information to them by SMS. SOS return number Setup 56 10、COORDINATE QUERY If you have WGS84 coordinate or GPS Nmea data, you could use Coordinate Query function to locate the position. Coordinate query screen Press the Ok button to locate the position 57