1
User’s Manual
User’s Manual
Software Version 1.6.0
February 16th, 2003
Page 1
2/16/2003
User’s Manual
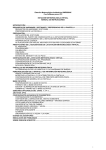
Table of Contents
ImageSalsa Editions and Capabilities ................................................................................. 3
Quick Start Guide................................................................................................................ 4
Registering: ..................................................................................................................... 4
Generating a simple Canvas:........................................................................................... 5
Setting up a video feed:................................................................................................... 8
Setting up the Canvas: .................................................................................................. 10
Using ImageSalsa and Portfolios ...................................................................................... 15
ImageSalsa Preferences..................................................................................................... 16
Canvas Properties.............................................................................................................. 17
General Tab:.................................................................................................................. 18
Text Tab:....................................................................................................................... 20
Graphics Tab:................................................................................................................ 25
Auto Save Tab:.............................................................................................................. 34
Wallpaper Tab:.............................................................................................................. 36
Internet Tab:.................................................................................................................. 37
Video Feed Setup .............................................................................................................. 40
Motion Detection Setup .................................................................................................... 42
Internal Web Server .......................................................................................................... 46
Script Setup ....................................................................................................................... 51
Writing Scripts .................................................................................................................. 53
VWS Setup ........................................................................................................................ 55
Advanced VWS Setup ...................................................................................................... 56
Schedule Setup .................................................................................................................. 58
Understanding Base Time ................................................................................................. 59
Using the Advanced Transparency Control...................................................................... 60
Canvas Assembly Specifics .............................................................................................. 64
Example: Creating a Window Effect ................................................................................ 65
Text Tags........................................................................................................................... 68
Script Language Object Tree ............................................................................................ 71
Page 2
2/16/2003
User’s Manual
ImageSalsa Editions and Capabilities
All Editions:
•
•
•
Compatible with any video capture device supporting Microsoft’s Video for
Windows (VfW) standard
Uses JPEG or Windows Bitmap picture files
Generates JPEG files
Basic Edition:
•
•
•
•
•
•
•
•
Periodic image capture to file
Periodic sequential image capture to file (for movie making)
User-adjustable motion detection – may also be used to detect nature events such
as lightning strikes
Windows background update
Automatically FTP images to a server
May be configured to use a web image for the source image
Streaming image server
Supports (1) canvas with (5) lines of text and (3) graphics
Script Edition:
•
•
•
Includes Base Edition features
Includes a scripting engine (VBScript-based) that allows users to create their own
programs to interact with many of the program’s parameters. The script engine
also allows users to interface with all standard COM objects.
Supports (3) canvases with (100) lines of text and (20) graphics per canvas
Weather Edition:
•
•
•
•
Page 3
Includes Script Edition features
Automatically retrieves weather measurements from Ambient’s Virtual Weather
Station to be used for text and graphics overlay (i.e. place the temperature and
wind speed on the image)
Keeps a 3600-entry database of VWS data for script interaction programming
Supports (3) canvases with (100) lines of text and (20) graphics per canvas
2/16/2003
User’s Manual
Quick Start Guide
This Quick Start Guide will show you the steps to creating your first canvas after
installing ImageSalsa.
First of all, install the software by running the SETUP.EXE program that you
downloaded. There is nothing special about this installation, so will skip on to actually
running the program.
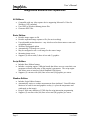
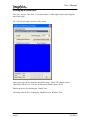
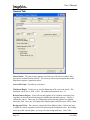
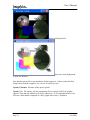
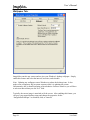
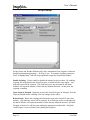
Registering:
The first time you start ImageSalsa, you will be asked to provide a registration key:
Click ‘OK’.
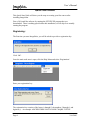
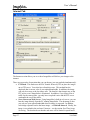
Once the main work area is open, click the Help Menu and select ‘Registration’:
Enter your registration key:
The registration key consists of the letters A through Z, the numbers 2 through 9, and
hyphens (-). An example: ABCDE-FGHIJK-LM234-56NOP-789QRS-TUVWX.
Page 4
2/16/2003
User’s Manual
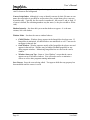
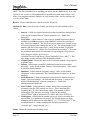
There are two types of keys:
1) Demo Keys: these unlock all of the program’s features but only supports one
canvas with a limited number of text and graphics elements (5 and 3,
respectively). In addition, it places the text “Demo Version” across the canvas.
Demo keys are typically available from the download site and expire after a few
weeks; therefore, you may need to download another key if the expiration has
passed.
2) Registered Keys: these unlock a specific edition of the software. Typically, these
keys never expire. Purchasers of ImageSalsa will receive their very own key that
they may use for their copy of the software.
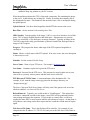
Upon successful completio n of the registration you should receive the following
message:
Close ImageSalsa and restart to make sure the program unlocks the proper features.
Check the version and registration by clicking the Help Menu and then ‘About’:
The “Registration Code” is a 5-character designation assigned to your copy. This could
be your name or serial number, but has no effect on the operation of the software. Hit
‘OK’ to close this window. You are now ready to generate a canvas.
Generating a simple Canvas:
Page 5
2/16/2003
User’s Manual
This section of the Quick Start Guide assumes that you have completed registration of the
program using a demo or registered key and have restarted the program. If you are using
a demo key, the words “Demo Version” will appear across your canvas. This is a
limitation of this version. For the following examples, a registered Basic Edition is
shown.
The work area is called a “portfolio”. Only one portfolio may be open at a time. To
create a new portfolio, select “New Portfolio” from the File Menu.
If you always want the last portfolio to open upon startup, select “Automatically load last
portfolio on program startup” from the File/Preferences menu item.
A portfolio may hold one or more canvases (limited by the edition of the softtware).
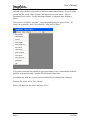
From the File menu, select “New Canvas”.
Select a file name for the canvas and press “Save”:
Page 6
2/16/2003
User’s Manual
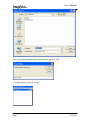
Enter your own personalized name for the canvas and press “OK”:
Your new canvas is ready for design:
Page 7
2/16/2003
User’s Manual
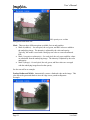
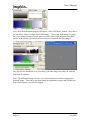
Setting up a video feed:
Now, let’s set up a video feed. If you do not have a video capture device, then skip this
part of the setup.
Set “Video Feed Setup” from the Video menu:
Select your video device from the drop down menu. Some VfW capture devices –
especially USB devices – will use the Microsoft WDM Capture device.
Enable the device by checking the “Enable” box.
Check the video feed by clicking the “Enable Preview Window” box:
Page 8
2/16/2003
User’s Manual
If you still get a blue screen, check the Frame Rate, Size, and Bits Per Pixel fields in the
bottom left. If you get 0 frames per second, the video feed isn’t operational. If there is a
number, but no picture. Check the Bits Per Pixel (BPP). The BPP should be 15 or 24.
Even a value of 24 doesn’t guarantee that it will work.
There are three Show Dialog boxes that open up the manufacturer’s driver settings. Only
certain ones may be enabled based on the manufacturer’s preferences.
Click “Show Format Dialog”:
This dialog box is specific to your video capture device so it may look different.
Page 9
2/16/2003
User’s Manual
In particular, we want the Image Format or something similar to output 15 or 24-bit RGB
data. This could also appear as RGB24, RGB15, RGB8:8:8, RGB5:5:5. In addition,
RGB16 can also be used as this is usually the same format as RGB15. At this time, there
are no plans to support other output formats as RGB15 and RGB24 are fairly standard to
most video capture devices.
When both RGB15 and RGB24 are available, experiment to see which provides the
highest Frame Rate as different drivers perform differently with each data format. Also,
while we are here, select the output to be 320 x 240 pixels.
Note: It is completely possible that the manufacturer of the video capture device may
have placed these settings in the Source Dialog or Format Dialog so you may have to
look around.
If you still can’t get a visible video feed, but you are getting a Frame Rate other than
zero, click “Show Debug Info” and provide the following data in the support forum when
requesting help:
This data provides information necessary to understand what the video capture device is
sending so we can understand the problem.
Once you have your video feed setup, close the Video Feed Selection and Setup window.
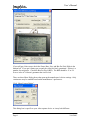
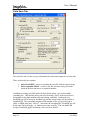
Setting up the Canvas:
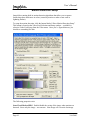
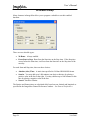
Now, let’s set some basic properties of our canvas.
Right click inside the canvas to open the “Canvas Properties” window:
Page 10
2/16/2003
User’s Manual
For the time being, let’s leave these settings.
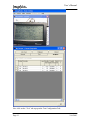
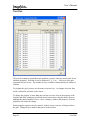
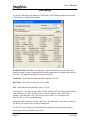
Click on the “Graphics” tab to open the Graphic Configuration Grid:
Page 11
2/16/2003
User’s Manual
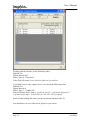
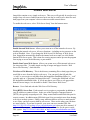
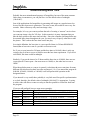
Working with the first line, set the following values:
Enabled=Yes
Update Interval=0.03
Source Type=0 - Video Feed
Video Feed=The name of your video feed that you just enabled
If you didn’t have a video capture device, you can set the following values:
Enabled=Yes
Update Interval=0
Source Type=1 – Graphic File
Source FileName=Some .bmp or .jpg file on your PC – provide the full path (i.e.
c:\pictures\mypic.bmp). It can be any size, but 320 x 240 is preferred.
Leave all other settings the same (you can experiment with them later J)
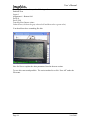
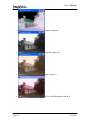
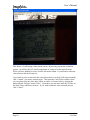
You should now see you video feed or picture in your canvas:
Page 12
2/16/2003
User’s Manual
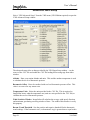
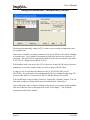
Now click on the “Text” tab top open the Text Configuration Grid:
Page 13
2/16/2003
User’s Manual
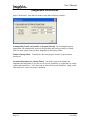
Working with the first line, set the following values:
Enabled=True
Layer=1
Alignment=6 - Bottom Left
Pos X=0
Pos Y=240
Text=My First Canvas <time>
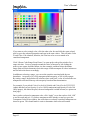
Color=Green (click on the gray-colored cell and then select a green color)
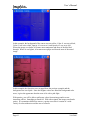
You should now have something like this:
Now feel free to explore the other parameters listed in the next section.
To save this canvas and portfolio. The easiest method is to click “Save All” under the
File menu.
Page 14
2/16/2003
User’s Manual
Using ImageSalsa and Portfolios
In this section, I’ll cover some of the small operational nuances with the program.
When you first install and start ImageSalsa it will open in a maximized window. You
can un- maximize, minimize, and resize the main window. Under the Preferences menu,
you will find an option that determines how ImageSalsa’s main window opens when you
start the program. You can have it open maximized, minimized, or at the last state it was
in when the program was closed. This information is stored in the ImageSalsa.INI file.
When you minimize ImageSalsa, it is removed from the Task Bar. At all times, the
ImageSalsa icon is available in the System Tray as a small salsa bowl:
By right-clicking the icon you can restore the window its non- minimized state (if
minimized) or exit the program. If the program is minimized, left-clicking the icon will
also restore the window.
The canvases also maintain their state (position and window state) between sessions.
This information is store in each canvas’ .can file.
Finally, most of the program’s information is stored in the portfolio’s .por file. This is
why most features require a portfolio to be open before you can set those values.
All setup files are saved as text files that you can read and edit with many text editors.
This shouldn’t normally be necessary, but if so, you will find all information in the
ImageSalsa.INI file (typically found in the ImageSalsa program directory), the .por file
for your portfolio, and a .can file for each canvas in your portfolio.
Many times when you open a setup window or make a change to a canvas or the
portfolio, it is internally marked as “dirty”. When you go to close the program, it will ask
if you want to save the changes. Sometimes the program will ask this even if the nothing
has changed (for example, you open a setup window but make no changes).
Finally, if you want ImageSalsa to start automatically when your computer starts, place a
copy in the Startup folder. Then, go to the Prefe rences (next section) and select
“Automatically Load Last Portfolio on Program Startup”.
Page 15
2/16/2003
User’s Manual
ImageSalsa Preferences
Select “Preferences” from the File menu to open the Preferences window:
Automatically Load Last Portfolio on Program Startup: By selecting this option,
ImageSalsa will automatically load your last portfolio and canvases when it is started.
This is a great option when you have ImageSalsa in the Startup folder.
Window Startup Mode : Controls how the main program window is opened when
starting up.
Location Information for Sunrise/Sunset: You need to enter your latitude and
longitude into ImageSalsa if you plan to use any text, schedules, or scripts that rely on the
sunrise and sunset times. Your time zone is retrieved from your Windows’ setting so this
also needs to be correct for proper calculation.
Page 16
2/16/2003
User’s Manual
Canvas Properties
Right click inside a canvas window or select “Properties” from the “Canvas” menu to
open the “Canvas Properties” window.
There are six tabs for the Canvas Properties window:
•
•
•
•
•
•
General – used to change some basic properties of the canvas such as background
color, dimensions, and name.
Text – used to enter the various lines of text on the canvas.
Graphics – used to place images or rectangles on the canvas.
Auto Save – used to set the file name(s) and update rates of the automatic image
saves.
Wallpaper – used to set the rate at which the Windows® background, or
wallpaper, is replaced with the canvas image.
Internet – used to set up the FTP push or web serving of the canvas image.
Page 17
2/16/2003
User’s Manual
General Tab:
Canvas Name : The canvas name appears across the top of the canvas window and is
provided as an identification aid only. The user may select any description that would
help them recognize a particular canvas.
Canvas File Name : Provided as a reference.
Width and Height: Used to set or view the dimension of the canvas (in pixels). The
maximum canvas size is 1600 x 1200. The minimum dimensions are 1 x 1.
Reload Canvas Objects : Forces all text and graphics to be reloaded, recalcula ted, etc…
regardless of interval but still obeying each enabled and schedule property. Finally, it
redraws the canvas. There may be a slight delay before internet graphics are updated
while they load. Also, any TextUpdate and GraphicUpdate enabled scrip ts will be called.
Background Color: The canvas is composed of four different layers. Before any layer
is added, the canvas is painted a solid color chosen by the background color. By clicking
on the provided colored square, you may select the background color. Note: If the
Page 18
2/16/2003
User’s Manual
background is completely obscured by other images, then it doesn’t really matter what
color is chosen as the background.
Canvas Script Index: Although it is easy to identify canvases by their file name or user
name, the script index is provided for script writers since scripts must refer to canvases
by number only. Typically, the first canvas is numbered 1, the second 2, and so forth. If
a canvas is deleted, the remaining numbers stay the same (i.e. they do not shift to fill the
void).
Shadow Intensity: Sets how dark you want the shadows to appear – 0 is the nonexistent, 100 is the darkest.
Window Mode : Sets how the canvas window behaves:
•
•
•
Child Window – Window always appears in the ImageSalsa developer area. If
ImageSalsa is minimized, all child windows are minimized as well. Canvases do
not appear in the task bar.
Own Window – Window operates outside of the ImageSalsa developer area and
appears in the task bar. Window may be hidden if behind ImageSalsa or any
other program windows. Minimizing ImageSalsa has no effect on the canvas
window.
Window Always on Top – Same as “Own Window” except that the canvas
appears on top of all other windows. You will need to move or minimize a
canvas to access other programs running underneath.
Save Canvas: Saves the canvas being edited. Text appears bold after any property has
been modified until the canvas is saved.
Page 19
2/16/2003
User’s Manual
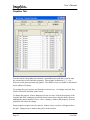
Text Tab:
The text tab contains a spreadsheet-style grid that is used to enter the various lines of text
and their properties. Each line of text is numbered 1, 2, 3, etc… Each row of the grid
represents one line of text. The number of rows available is determined by the edition of
software.
To navigate the grid, you may use the mouse or arrow keys. As changes are made, they
will be reflected in real-time on the canvas.
To change the property of more than one text line at a time, click on the property of the
first line and while continuing to hold the mouse button down, drag the mouse down to
highlight the desired number of rows. Once a change is made to the property, all of the
properties will reflect the change.
Some properties require text to be entered. In these cases, a text box will appear above
the grid. Changes may be made in the grid or in the text box.
Page 20
2/16/2003
User’s Manual
Some properties have only a fixed number of choices. In these cases, a drop down list
will appear above the grid. Changes may be made by selecting the correct value from the
drop down list. In addition, to this method, you may press the Space bar to cycle through
the options or press certain hot keys to automatically select an options (such as numbers
when the options are numbered or “Y”/”N” for Yes/No).
Some properties require opening another window to set the value. These include the
Schedule and Color properties. By pressing space while one of these cells is selected or
clicking the grid cell with the mouse, a second window will open to select the property.
You may copy and paste some cell entries using Ctrl-C (copy) and Ctrl-V (paste).
Here is an explanation of each of the properties:
Enable: Rather than delete rows, an unused line of text is made invisible by setting the
Enable property to “No”. To use a text line, set its Enable property to “Yes”.
Schedule : Used in conjunction with the Enable property, the schedule sets the time
frame during which the line of text will be visible. Click this cell to open the schedule
window. See the section Schedule Setup to learn how to set any schedule in ImageSalsa.
Layer: Each canvas is composed of four layers numbered 0 to 3 (0 being the bottommost
and 3 being the topmost layer). The user can use any of these layers to created the
desired layering affects. For example, an opaque line of text placed in layer 2 will
obscure and cast shadows on any other images or text in layers 0 and 1.
Update Interval: This property determines how often (in seconds) a particular line of
text is updated. It is beneficial to leave the update rate as high (i.e. slow) as possible. For
example, if the line of text never changes, this may be set to 0 (never update) and the line
will only be refreshed when the canvas is loaded. Any time a graphic or text item is
updated, the entire canvas is redrawn. Depending on the number of items on the canvas,
this can consume huge amounts of unnecessary system resources if the image is not
changing. Now for items of text that show the time or another dynamic value, it makes
sense to set this property to once per second or as fast as the dynamic value is expected to
change. If an image is only being saved to a file once per minute, however, those extra
59 updates may only be noticed by someone watching the canvas window.
Update Base Time : See Understanding Base Time.
Note: Independent of Update Interval and Update Base Time, all text lines are drawn
once when the program starts and/or a canvas is opened.
Alignment : The value is used with the Pos X and Pos Y properties to position lines of
text on the canvas. For example, if the Pos X and Pos Y values are set to 0,0 (the top left
corner of the canvas) and the Alignment is set to 0 (top-left alignment), the top left corner
of the text is aligned to the top- left corner of the canvas. In certain instances, it may not
appear that the far edge of the text is being used for alignment, this is a limitation based
on the font being used, its properties (bold, italic, etc…), and the letters used (a, e, w,
etc… where the text never extends more than half- way up the normal height). In these
Page 21
2/16/2003
User’s Manual
situations, the Pos X and Pos Y properties may need to be adjusted properly. Don’t
confuse the alignment property with where the text will appear on the canvas: this is
done mostly with the Pos X and Pos Y properties.
Pos X and Pos Y: The X and Y-coordinates used to position the text. The coordinate
system is such that Pos X=0, Pos Y=0 is the top-left of the canvas. Pos X sets the left to
right position and Pos Y sets the top to bottom position. Use with the Alignment
property to adjust which direction, relative to the X,Y coordinate, the text is placed.
Text: What you want to appear. Certain tags may be embedded in the text that will be
dynamically replaced with the tag’s value. For example, the tags <time> and <date> will
become the current system time and date. You may combine any static characters with
any number of tags. When using tags, set an interval for the line of text that is
appropriate to the rate of change of the tag. For example, the tag <time> only changes
once per second so it’s interval should be 1. The tag <time10>, however, changes ten
times a second so it’s interval should be 0.1 – a slower value will simply show the time,
accurate to the tent hs of a second, that the update occurred. This contains the full list of
tags that may be used.
Font: Used to set the type face, size, bold, and italic properties. By clicking this box or
pressing the space bar while this property is highlighted will open the Font dialog where
these changes may be made. The box normally shows the letters ABC using the
properties selected. Note: If the text is considerably large, the cell may appear empty.
Color: Sets the color of the text. By clicking this box or pressing the space bar while
this property is highlighted will open the Color dialog where the color may be chosen.
Shadow Enable : Used to enable (Yes) or disable (No) the shadowing of the text. The
shadow is drawn with the current layer (i.e. any shadows from layer 2 will appear on
text/graphics in layers 0 or 1).
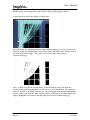
Shadow Size : Different sized shadows are available to simulate various light sources.
Examples:
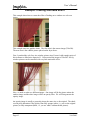
Shadow Offset X and Y: Sets the shadow location relative to the text. Values may be
positive or negative. The offsets may be changed to create the illusion of height
differences or light source locations.
Page 22
2/16/2003
User’s Manual
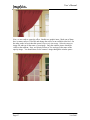
Opacity (%): The opacity sets how transparent (0%) or opaque (100%) the line of text
appears. Note that any shadows will also be affected (i.e. a very transparent line of text
will cast a faint shadow compared to a fully opaque line of text). Examples:
Mode (opacity mode): There are three different Opacity Mode options available for text
and graphics:
• Mode 0 (additive) – for each pixel, the red, green, and blue values are added to
the underlying image. The intensity is adjusted by the color and opacity.
Typically, this mode is used with a dark gray text color to create an embossed
look.
• Mode 1 (negative or subtractive) – for each pixel, the red, green, and blue values
are subtracted from the underlying image. The intensity is adjusted by the color
and opacity.
• Mode 2 (merge) – for each pixel, the red, green, and blue values are averaged
with the underlying image based on the opacity.
Example (using an R,G,B color of 64,0,64 (dark purple) on a background of 80,80,80
(gray) with 100% and 50% opacities):
Another example (Date in mode 1, subtractive, with a text color of 48,48,48 and Time in
mode 0, additive, with the same text color):
Page 23
2/16/2003
User’s Manual
Rotate Degrees: Sets an arbitrary rotation angle from 0 to 360 degrees. Rotated about
the alignment point.
Script Enable: When set to “Yes” and Scripting is enabled, a call will be attempted to
the procedure TextUpdate and will pass the canvas number and index number of the text
line. See Scripting for more details.
Page 24
2/16/2003
User’s Manual
Graphics Tab:
Like the text tab, the graphics tab contains a spreadsheet-style grid that is used to enter
the various lines of text and their properties. Each graphic is numbered 1, 2, 3, etc…
Each row of the grid represents one graphic. The number of rows available is determined
by the edition of software.
To navigate the grid, you may use the mouse or arrow keys. As changes are made, they
will be reflected in real-time on the canvas.
To change the property of more than one text line at a time, click on the property of the
first line and while continuing to hold the mouse button down, drag the mouse down to
highlight the desired number of rows. Once a change is made to the property, all of the
properties will reflect the change.
Some properties require text to be entered. In these cases, a text box will appear above
the grid. Changes may be made in the grid or in the text box.
Page 25
2/16/2003
User’s Manual
Some properties have only a fixed number of choices. In these cases, a drop down list
will appear above the grid. Changes may be made by selecting the correct value from the
drop down list. In addition, to this method, you may press the Space bar to cycle through
the options or press certain hot keys to automatically select an options (such as numbers
when the options are numbered or “Y”/”N” for Yes/No).
Some properties require opening another window to set the value. These include the
Schedule and Color properties. By pressing space while one of these cells is selected or
clicking the grid cell with the mouse, a second window will open to select the property.
You may copy and paste some cell entries using Ctrl-C (copy) and Ctrl-V (paste).
Here is an explanation of each of the properties:
Enable: Rather than delete rows, an unused graphic is made invisible by setting the
Show property to “No”. To use a graphic, set its Show property to “Yes”.
Schedule : Used in conjunction with the Enable property, the schedule sets the time
frame during which the graphic will be visible. Click this cell to open the schedule
window. See the section Schedule Setup to learn how to set any schedule in ImageSalsa.
Layer: Each canvas is composed of four layers numbered 0 to 3 (0 being the bottommost
and 3 being the topmost layer). The user can use any of these layers to created the
desired layering affects. For example, a graphic in layer 2 will obscure any other images
or text in layers 0 and 1.
Update Interval: This property determines how often (in seconds) a particular graphic is
refreshed or reloaded. It is beneficial to leave the update rate as high (i.e. slow) as
possible. For example, if the graphic never changes, this may be set to 0 (never update)
and the image will only be refreshed when the canvas is loaded. Any time a graphic or
text item is updated, the entire canvas is redrawn. Depending on the number of items on
the canvas, this can consume huge amounts of unnecessary system resources if the image
is not changing. Now for items of graphics such as video feeds, it makes sense to set this
property to the refresh rate of the video feed. If an image is only being saved to a file
once per minute, however, all of those extra updates may only be noticed by someone
watching the canvas window.
Update Base Time : See Understanding Base Time.
Note: Independent of Update Interval and Update Base Time, all graphics are drawn
once when the program starts and/or a canvas is opened.
Alignment : The value is used with the Pos X and Pos Y properties to position graphics
on the canvas. For example, if the Pos X and Pos Y values are set to 0,0 (the top left
corner of the canvas) and the Alignment is set to 0 (top-left alignment), the top left corner
of the graphic is aligned to the top- left corne r of the canvas. Don’t confuse the alignment
property with where the graphic will appear on the canvas: this is done mostly with the
Pos X and Pos Y properties.
Page 26
2/16/2003
User’s Manual
Pos X and Pos Y: The X and Y-coordinates used to position the graphic. The
coordinate system is such that Pos X=0, Pos Y=0 is the top- left of the canvas. Pos X sets
the left to right position and Pos Y sets the top to bottom position. Use with the
Alignment property to adjust which direction, relative to the X,Y coordinate, the graphic
is placed.
Source Type : There are four different types of graphics that may be used:
• Video Feeds (Type 0) – from capture cards, USB cameras, etc...
• Graphics File (Type 1) – JPEGs and BMPs.
• Internet Graphics (Type 2) – JPEGs and BMPs from the internet (i.e.
http://www.myurl.com/webcams/currentpic.jpg)
• Rectangles (Type 3) – Used for effects such as text backgrounds.
• Canvas (Type 4) – Uses another canvas’ image as a graphic
Video Feed: If Type 0 (Video Feed) is selected for the source type, select one of the
available feeds from the drop down list. The available feeds are limited by the devices
installed with Video-for-Windows (VfW) drivers, that are not in use, and have been
enabled under the Video Feeds setup. If any other source type is selected, this property is
ignored.
Source Filename : If Type 1 (Graphics File) is selected, enter the full path to a JPEG or
Bitmap image file. If any other source type is selected, this property is ignored.
Source URL: If Type 2 (Internet Graphics) is selected, enter the full URL to a JPEG or
Bitmap image on the internet. If any other source type is selected, this property is
ignored.
Source Canvas: If Type 4 (Canvas) is selected, enter the number of the source canvas
(shown as Canvas Script Index under the General Properties tab). If any other source
type is selected, this property is ignored.
Background Color: Only applicable to the rectangle graphic. Sets the color of the
rectangle.
Color Filter: Five different filters exist that you may put in place to enhance any of the
graphic images:
•
Page 27
None (Option 0)
2/16/2003
User’s Manual
•
Negative (Option 1)
•
Grayscale (Option 2)
•
Sepia (Option 3)
•
20-Year-Old Photograph (Option 4)
Page 28
2/16/2003
User’s Manual
•
Blue-Enhancement (Option 5)
Transparent Enable : Determines if the transparent color option is enabled.
Transparent Color: Selects the color or range of colors to be used as a transparent
color. When the box is clicked or the space bar is pressed while highlighted, the
Advanced Transparent Control window will open:
The Advanced Transparent Control allows you to select a range of colors that will
become transparent. For more information, consult the section Using the Advanced
Transparency Control.
Stretch: If set, forces the image to be stretched to the Width x Height dimensions. Not
used with the rectangle option.
Smooth Stretch: If set, allows pixels to be blended when stretching an image. Does not
work as well when transparent colors are used since pixels may be blended with
transparent pixel colors to produce a color that is neither transparent nor the desired
image color.
Width and Height: Used to set the rectangle dimensions or the image dimensions when
stretch is enabled with the Stretch property.
Page 29
2/16/2003
User’s Manual
Crop Left, Right, Top, Bottom: Crops the outer edge by the number of pixels given.
Not used with the rectangle option.
Shadow Enable : Used to enable (Yes) or disable (No) the shadowing of the image. The
shadow is drawn with the current layer (i.e. any shadows from layer 2 will appear on
text/graphics in layers 0 or 1).
Shadow Size : Different sized shadows are available to simulate various light sources.
See the text section for shadow examples.
Shadow Offset X and Y: Sets the shadow location relative to the image. Values may be
positive or negative. The offsets may be changed to create the illusion of height
differences or light source locations.
Opacity Picture : Enables/disables the use of an opacity picture. The opacity image
should contain black areas when the picture becomes transparent and white areas where
the picture becomes opaque (and grayscale, in between). If the picture is not the same
dimensions as the displayed image, it will be stretched to fit. Typically, this option is
useful for odd-shaped image overlays where there is no one specific transparent color or
where the overlay should have a feathered edge. Note that the feather radius and width
properties must be set to 0 as they have precedence. In addition, the general opacity
property is ignored while the opacity picture is enabled. Finally, the shadows will be
drawn with an intensity based on the opacity of the particular pixels.
Example:
Opacity Image (opacity.bmp)
Page 30
2/16/2003
User’s Manual
Image with Opacity File
Same on a white background
to show the shadows.
Note that the opacity file is not stretched to fit the image size. It does overlay the final
image before rotation is applied. See Canvas Assembly Specifics.
Opacity Filename: Filename of the opacity picture.
Opacity (%): The opacity sets how transparent (0%) or opaque (100%) the graphic
appears. Note that any shadows will also be affected (i.e. a very transparent line of text
will cast a faint shadow compared to a fully opaque line of text). Examples:
Page 31
2/16/2003
User’s Manual
90% opacity over a white
background with black text.
Mode : There are three different options available for text and graphics:
• Mode 0 (additive) – for each pixel, the red, green, and blue values are added to
the underlying image. The intensity is adjusted by the color and opacity.
Typically, this mode is used with a dark gray text color to create an embossed
look.
• Mode 1 (negative or subtractive) – for each pixel, the red, green, and blue values
are subtracted from the underlying image. The intensity is adjusted by the color
and opacity.
• Mode 2 (merge) – for each pixel, the red, green, and blue values are averaged
with the underlying image based on the opacity.
See the text tab for an example.
Feather Radius and Width: Automatically creates a feathered edge on the image. This
also affects the generated shadow since the edge is now pseudo-transparent.
Example:
Page 32
2/16/2003
User’s Manual
Rotate Degrees: Sets an arbitrary rotation angle from 0 to 360 degrees. Rotated about
the alignment point.
Script Enable: When set to “Yes” and Scripting is enabled, a call will be attempted to
the procedure GraphicUpdate and will pass the canvas number and index number of the
graphic. See Scripting for more details.
Page 33
2/16/2003
User’s Manual
Auto Save Tab:
The Auto Save tab is where you go to determine how and when images are saved to disk.
There are basically two options:
•
•
Store Fixed JPEG – keeps overwriting the same file with the current image.
Store Sequential JPEGs – creates a new file each time using a file name
based on the date and time or a sequential number.
In addition to writing one JPEG under the Store Fixed option, you can also enable
cascading files. This basically takes your base file name (“fixed” in the screen above)
and appends a four-digit number to the end starting with 0000. On the next save,
fixed0000.jpg will be moved to fixed0001.jpg and the current image will be written as
fixed0000.jpg. This cascading continues to the number of files you specified (up to
1000); at which point, they “fall off”. Note that with cascading files, fixed0000.jpg will
be the same file as fixed.jpg – or whatever you name your file. You can disable the
saving of fixed0000.jpg by deselecting “Save current as #0000”.
Page 34
2/16/2003
User’s Manual
Save Interval: Basically, how often do you want the file saved to disk. There are many
standard time intervals to choose from: from 1 second to 1 day.
Base Time : See the section Understanding Base Time.
JPEG Quality: Sets the quality of the image. 100% is very clear, but takes a lot of disk
space. 10% is nearly illegible but takes little disk space. Experiment to see good an
image you would like vs. the disk space an image consumes. Typically an image in the
70 to 90% range looks really good and takes up about a fourth of the disk space that an
image at 100% requires.
Schedule : See the section Schedule Setup.
File: The file name to use with the fixed JPEG saves. It is also used to determine the
root filename for the cascading saves. You must use a JPEG file name. You must also
specify a path. If no path is specified, the file will be written to the ImageSalsa program
directory. If cascading files is enabled, they will be written to the same directory.
Browse: Use this to select the file name for the fixed saves or to select a directory for the
sequential saves.
Save As: You can store the sequential files with a date and time stamp for a file name or
as a sequential number.
Next File #/Change: Press the “Change” button to select the next file number to write.
Storage Directory : Enter the directory where you want images to be written to. If none
is specified, they will be written to the ImageSalsa program directory.
Page 35
2/16/2003
User’s Manual
Wallpaper Tab:
ImageSalsa can take any canvas and use it as your Windows’ desktop wallpaper. Simply
enable this feature and select the interval, base time, and schedule.
Note: Updating any wallpaper causes Windows to redraw the desktop icons. It also
make create a temporary lag in system response while it is updating the picture.
Unfortunately, this is normal operating system behavior for these actions so you will have
to select an interval that you can “live” with.
Typically, the canvas image is stretched to fit the screen. After enabling this feature, you
can go to your normal desktop setup and change the properties for the
“ImageSalsaWallPaper” to stretched, tiled, or centered.
Page 36
2/16/2003
User’s Manual
Internet Tab:
The Internet section allows you to set how ImageSalsa will deliver your images to the
internet.
There are two modes of operation that you can choose (you can run both simultaneously).
• FTP Push: This mode uses the File Transfer Protocol (FTP) to place the images
on an FTP server. You select how often this occurs. This method has the
drawback that it can use a lot of your upload bandwidth. In addition, the image
will only be as new as the last image sent. The benefit is that images stay on the
FTP server even if ImageSalsa is terminated. In addition, if you expect a lot of
traffic for the same picture, you only have to upload it once and the FTP server
can handle the rest of the traffic.
• Serve Canvas on Web Server: Using ImageSalsa’s built in web server, you can
host the image directly from the PC running ImageSalsa. The advantage is that
you only use your upload bandwidth when an image is requested. In addition,
each image requested can be the latest image – see Refresh Interval. Finally, the
image is un-cached in the end-user’s browser – see the section Real-Time Image
Streaming. The drawbacks are that the end users will be limited in speed based
Page 37
2/16/2003
User’s Manual
on your upload rate. Also, unless your IP address is static, you will have to find a
method to keep any pointers to your PC accurate.
When ImageSalsa performs the FTP, it first sends a temporary file containing the image
to the server. It then deletes any existing file. Finally, it renames the temporary file to
the designated file name. This minimizes the amount of time a file is incomplete during
the upload period.
Upload Interval: Sets how often ImageSalsa should FTP the canvas to the server.
Base Time : See the section Understanding Base Time.
JPEG Quality: Sets the quality of the image. 100% is very clear, but takes a lot of disk
space. 10% is nearly illegible but takes little disk space. Experiment to see good an
image you would like vs. the disk space an image consumes. Typically an image in the
70 to 90% range looks really good and takes up about a fourth of the disk space that an
image at 100% requires.
Progress: This progress bar shows what stage of the FTP sequence ImageSalsa is
currently at.
Status : Shows a verbal status of the FTP upload. If an error occurs, the error description
is shown here as well.
Schedule : See the section Schedule Setup.
Server Name : Name of your FTP server. For example, ftp.myserver.net.
User Name : Username required to log into the FTP server.
Password: Password for the FTP server. This password is stored in plain text in your
canvas file so you may want to protect who has read access to this file.
FTP Directory/FTP File Name : Location and name of the destination file. For
example, if you want the image canvas.jpg placed in the images directory, use
“images/canvas.jpg”.
The Serve Canvas on Web Server feature will only work if the generic web server has
also been enabled – see Internal Web Server.
Refresh Interval: Typically, you would set this to “Each Request”. This means tha t
each time a connection is made for the image, a new JPEG will be generated from the
canvas image and sent to the requestor. If you set this to a timed value, it will keep
sending the same JPEG to new requests until the refresh interval expires. At that point, it
will generate a new image on the next request and use it until the refresh interval expires
again.
Web Server File Name : This is the file that will be asked for. For example, if your
computer has the IP address 111.222.033.044, and you set the Web Server File Name to
Page 38
2/16/2003
User’s Manual
canvas01.jpg, the proper URL to address this image is
http://111.222.033.044/canvas01.jpg. The built- in web server will take each request and
try to find a Web Server File Name from each canvas serving its image before looking in
the web server’s data directory.
Off-Schedule File to Serve : You can specify another file to load from the disk and send
in place of the canvas image. If you don’t specify a directory, it will use ImageSalsa’s
program directory. If no file is specified, it will try to find an index.htm file in your webserver’s data directory to send. If it doesn’t find that file, it will send a “404 - URL not
found”.
Browse: Use to select the Off-Schedule File.
Page 39
2/16/2003
User’s Manual
Video Feed Setup
To open the Video Feed Selection and Setup window, select “Video Feed Setup” from
the Video menu:
ImageSalsa supports just about any Video- for-Windows (VfW) capable input device.
These typically include USB or PCI cameras for video capture cards. Some video
(output) cards may also contain a video input and VfW drivers.
ImageSalsa enumerates all VfW input devices in the “Select Input Device” pull-down
box. Select each video device you plan to use and set the following properties:
Enable: You must enable am input device before using it. Note that VfW device drivers
typically only allow one application to open a particular device at a time. So, if you
receive an error when you try to enable a device, check to make sure no other
applications are connected to the device – if they were and they crashed, many times they
don’t release the device and you must reboot the PC.
Enable Motion Detection: Enables the motion detection capability – see the Motion
Detection Setup section.
Page 40
2/16/2003
User’s Manual
Enable Preview Window: Shows a 320x240 image as received from the input device.
Very useful to determine if the device is working correctly.
Max Frame Rate: The fastest rate at which ImageSalsa will try to poll frames from the
input device. The fastest rate is 30 frames per second (fps), however, depending on the
speed of the PC, other applications running, other work being done by ImageSalsa, and
the device drivers of the input device, your actual fps may be less. Set this value to the
slowest speed necessary for your canvases to reduce the load on your PC.
Show Motion Detection Setup: Opens the Motion Detection Setup window. Enable
motion detection first to enable the motion detection routines. See the Motion Detection
Setup section.
Show Debug Info: If the input device is sending frames to ImageSalsa (a fps other than
0) but no image is shown on the preview window, clicking this box will open an
information window about the next frame. This information can be passed along to aid in
the debug process for new input devices users may try.
Frame Rate: Current frame rate, in frames per second, received from the input device.
Size : Current frame dimensions, in pixels.
Bits Per Pixel: Current frame bit rate.
Show Format Dialog: Opens the manufacturer’s VfW Format dialog window. The
availability, contents, and look is specific to the manufacturer’s driver.
Show Source Dialog: Opens the manufacturer’s VfW Format dialog window. The
availability, contents, and look is specific to the manufacturer’s driver.
Show Display Dialog: Opens the manufacturer’s VfW Format dialog window. The
availability, contents, and look is specific to the manufacturer’s driver.
Note that ImageSalsa is designed to handle RGB15 and RGB24 frame formats. These
may also be called RGB5:5:5, RGB8:8:8, 15-bit RGB, 24-bit RGB, etc… It may also
work with RGB16 (a.k.a.16-bit RGB), which is the sane format as RGB5:5:5 since
RGB5:5:5 is 16-bits per pixel, but the last bit is ignored. You can usually set one of these
formats in the Format or Source dialog windows.
The performance of RGB15 vs. RGB24 may vary. Although RGB15 requires an extra
step in ImageSalsa to convert it to RGB24 (all processing in ImageSalsa uses RGB24),
some drivers have shown a 50% improvement in the RGB15 fo rmat. So, if both are
available, it doesn’t hurt to see which is faster. Make sure to remove all (or disable)
canvases and set the Max Frame Rate to 30fps, to allow the driver and ImageSalsa to run
at their fastest speeds.
One final note: It is possible to have a frame rate reported but no picture. This is because
the frames may not be in the RGB15 or RGB24 format necessary to display them.
Page 41
2/16/2003
User’s Manual
Motion Detection Setup
ImageSalsa contains built- in motion detection algorithms that allow you to capture
frames that show differences in colors (caused by motion or other events such as
lightning flashes).
To setup the motion detection, click the button labeled “Show Motion Detection Setup”.
This button is found on the Video Feed Selection and Setup window – available by
selection Video Feed Setup from the Video menu. Once you’ve figured that out, you
should see something like this:
The following properties exist:
Store Fixed Motion JPEG: Enable/disable the saving of the image when motion was
detected. Saves only the image – no canvases. Next image will overwrite last image.
Page 42
2/16/2003
User’s Manual
File: Path of Fixed Motion JPEG.
Store Time -Named Motion JPEG: Saves the pictures in the format
YYMMDDHHMMSSFF.JPG. The “FF” is normally 00 unless multiple pictures (up to
100) are detected in one second.
Storage Directory : Folder to store Time-Named Motion JPEG’s.
Store Diff Image With Above Saves: Stores the differential image that was used to
determine motion. Stores it with the same name as the Fixed or Time-Name Motion
JPEG’s, but instead of filename.jpg, the image is saved as filename.diff.jpg.
JPEG Quality (%): Sets the quality of the image. 100% is very clear, but takes a lot of
disk space. 10% is nearly illegible but takes little disk space. Experiment to see good an
image you would like vs. the disk space an image consumes. Typically an image in the
70 to 90% range looks really good and takes up about a fourth of the disk space that an
image at 100% requires.
Diff Image Blur Cell: Set to None, 1x1, 3x3, or 5x5. Since noisy images can give the
impression that colors are changing and will therefore cause a false motion trigger, you
can blur the image first to reduce the random noise. The more you blur, the less noisy the
final image. Note: blurring an image is a very data-intensive task and will slow the
performance of ImageSalsa on slower machines.
Intensity Range : No user-adjustable points in this window. Shows a strip chart of the
most recent images color change ranges and user settings.
Image Coverage: User may click anywhere in this window to set the percent of the
image that must change before motion is detected. The current user-selected threshold
and the actual percentage are scrolled in a strip-chart manner.
Intensity Histogram: Shows the current color changes (dark to light) composing the last
two frames. By clicking on either side of the middle of the box, you can select the dark
and light thresholds.
Trigger Rest Period: You can set the amount of time to wait between motion
detection/file saves. This period may be adjustable from none (save every image), one
frame (capture a light level change, but not the reverse as would be the case for
lightning), or number of seconds (in case the image was really noisy from wind, etc…).
Trigger: This bar shows how close (or over) the percentage coverage reached. When
the green bar exceeds the vertical line in the middle, motion is detected as long as the rest
period has elapsed since the last motion detected.
Beep When Motion is Detected: The computer will beep at you when it detects motion.
Show Coverage Size in Diff Image : When the differential image window is open, a
white square may be shown in the middle that represents the total area that must exceed
the brightness threshold for motion detection.
Page 43
2/16/2003
User’s Manual
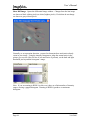
Show Diff Image: Opens the differential image window. Changes from the last image
are shown as black (darker pixels) to white (brighter pixels). Pixels that do not change
are shown as gray-colored pixels:
Generally, to set up motion detectio n, you need to determine how much noise already
exists in your image. Using the intensity histogram to judge the normal noise in the
picture (you can set a blur cell size if too much noise is present), set the dark and light
thresholds just beyond the his togram’s range:
Note: If you are running in RGB15 (as this was), there are a finite number of intensity
ranges, causing a gapped histogram. Running in RGB24, produces a continuous
histogram:
Page 44
2/16/2003
User’s Manual
Now, show the differential image by clicking the “Show Diff Image” button. Also, check
the check box “Show Coverage Size in Diff Image”. Click a spot in the Image Coverage
box to set what percentage of pixels must exceed the dark or light brightness threshold
you set in the last step (you may need a test subject to determine this percentage):
One you have the thresholds set to your liking, select the image saves that you want and
then close all windows.
Note: The differential image saves are very useful when you first start saving motion
detected images. These show you what caused the algorithm to trigger and will help you
tune a better range to prevent false triggers.
Page 45
2/16/2003
User’s Manual
Internal Web Server
ImageSalsa contains a very simple web server. This server will typically be used to serve
images from web-server-enabled canvases but it can also be used to serve other files and
html pages from your computer’s drive or other accessible network drives.
To enable the web server, select “Web Server Setup” from the Internet menu:
Enable Internal Web Server: Allows you to turn on or off the internal web server. By
disabling the internal web server, all server functions – including serving canvases on the
web are disabled. Note: If you change the Web Server File Directory or Web Server
Port, ImageSalsa automatically disables the internal web server until you click Enable
Internal Web Server again. This is done for security purposes and to prevent the program
from trying to use an invalid directory or port number.
Enable Non-Canvas Web Server: Allows you to turn on or off the internal web server
for non-canvas files. To enable simple serving of images and pages from the “Web
Server File Directory”, check this box.
Web Server File Directory : This is the directory containing files or html pages that you
would like to serve from the built- in web server. You can specify the full path like
“c:\web” or you can give a sub folder from the ImageSalsa installation folder (i.e., “web”
typically maps to “c:\program files\ImageSalsa\web”. Leaving the field blank will use
the ImageSalsa installation folder. If you do not plan to serve files or web pages other
than the canvas images, it is advisable to disable “Non-Canvas Web Server”.
Browse: Use to find and select the Web Server File Directory.
Web (HTTP) Server Port: Each network service requires a port number in addition to
your IP address to connect to/from. In the case of the Hypertext Transport Protocol
(HTTP), the typically accepted port is 80. Many routers and firewalls block this port for
security reasons. In addition many ISPs block port 80 to prevent their users from hosting
web servers on their systems. Finally, many malicious hackers will try to attack port 80
to see if they can find a security hold in web servers. These are the many cons, but there
are some benefits. If you host on port 80, your users can use a standard URL like
http://111.222.033.044/ or http://www.yourwebdomain.com/ since port 80 is assumed. If
you use a different port (like the default 18080), they will need to use the port override
URL syntax: http://111.222.033.044:18080/ or http://www.yourwebdomain.com:18080/.
Page 46
2/16/2003
User’s Manual
In addition, you can use other web server programs that would typically run on port 80.
The port numbers should typically be between 10000 and 65535 to avoid ports in used by
other programs. Even then, you may need to try a few different ones if there is an error
with the port.
If your computer is connected directly to the internet – i.e. it is directly on a standard
modem, DSL modem, or cable modem, you are already in business and you can serve
your pages using your IP address or domain name.
If you use a router or other device that allows more than one computer to connect through
a standard modem, DSL modem, or cable modem then more than likely you are using
NAT (network address translation). NAT allows many computers to use a single IP
address by assigning each computer a unique local IP address and then translating their
requests into the single internet IP address. These local IP addresses are typically start
with the numbers 192.168. Common local IP addresses are 192.168.0.X and 192.168.1.X
where X is a number from 1 to 255. In addition, most routers or NAT-enabled devices
assume the address 192.168.0.1 or 192.168.1.1 and then provide the next numbers
192.168.0.2 or 192.168.1.2 and so on to their connected computers. This is all very
important to server web pages since it will affect how you view pages vs. somebody on
the internet.
First, you need to determine your local IP address. The easiest way to find this out is to
go to a command prompt and type “ipconfig”:
If you see an address that starts with 192.168, you are most likely using NAT. Any
computer behind the router must use the local IP address to view the images being served
by ImageSalsa. For example, if your ImageSalsa machine’s address is 192.168.0.7, the
port you selected was 18080, and canvas #1 is being served as the file canvas01.jpg, then
the local URL that you would type into a browser would be
http://192.168.0.7:18080/canvas01.jpg. If the router was connected to the WAN (widearea network or internet) using the address 111.222.033.044, then internet users would
Page 47
2/16/2003
User’s Manual
have to use the URL http://111.222.033.044:18080/canvas01.jpg. To find out your WAN
address, you will need to go to your router’s setup pages to find this information. If may
have been provided to you by your ISP, but unless you have a “static IP address” the
WAN address may change (I’ve heard of this changing once a week where other users
keep theirs almost forever).
The last step is to tell your router that you have a computer on the NAT serving on port
18080. This is done in the router’s setup. Typically, this is done under a section called
“Port Forwarding”. Basically, you need to tell it to forward port 18080 to local IP
192.168.0.7. If you are given a range for the ports, enter 18080 to 18080. Since each
router is different I won’t even attempt to go into details here.
So, to troubleshoot the internal web server, first try to access from another computer on
the local area network (“behind the router”) – you can even access it from the same
computer running ImageSalsa – using the local IP address URL as shown earlier. If this
doesn’t work, then you most likely have a issue in your ImageSalsa setup – make sure
you have enabled the internal web server and the “Serve Canvas on Web Server” under
the “Internet” tab of the “Canvas Properties”. If this works but you still cannot access
ImageSalsa from the WAN, you should first check that you have the right IP address. If
this is correct, then check that you have the port forwarding enabled.
One last note about the internal web server: When forming responses for web pages and
file requests, the internal web server includes tags that ask the web browser to leave the
page or file uncached. This doesn’t change how the images or other files appear, but
instead of reloading the same image from its internal cache on each subsequent request,
the browser goes back and grabs the image from ImageSalsa’s web server. This means
nothing has to be done extra to get an up-to-date image.
Page 48
2/16/2003
User’s Manual
Real-Time Image Streaming
Using ImageSalsa’s internal web server it is possible to create a “near” real- time
streaming image on the web. I quoted “near” because very few web sites truly provide
real-time 30 frames-per-second streaming. In tested cases where a cable modem was
providing the uplink, other internal sites obtained 0.5 to 3 frames per second throughput
which is typical of other streaming sites using similar uplinks.
So, how is it done? The first thing to do is to set ImageSalsa to serve one or more
canvases using the “Serve Canvas on Web Server” feature with the Refresh Interval to
“Each Request”. As you have probably tried and seen, each time you view the image, the
image is up-to-date. So, basically, you need a script that refreshes the image on a
periodic basis. We can do this with JavaScript:
<html>
<head>
<script language="JavaScript"><!-function director() {
if (!document.images) return;
if (document.images['myPush'].readyState=='complete') {
//supports readystate properties (IE 4.0 and above)
setTimeout('RSrefresh()',100);
return;
}
//older browsers
setTimeout('Oldrefresh()',10);
return;
}
function RSrefresh() {
if (!document.images) return;
if (document.images['myPush'].readyState=='complete') {
document.images['myPush'].src=document.images['myPush'].src;
}
document.images['myPush'].onreadystatechange=RSrefreshState2;
return;
}
function RSrefreshState2() {
//used for forced delay between frames
if (document.images['myPush'].readyState=='complete') {
//set minimum delay between load to refresh
setTimeout('RSrefresh()',50);
}
return;
}
function Oldrefresh() {
if (!document.images) return;
document.images['myPush'].src=document.images['myPush'].src;
//set delay between frames (needs to allow for frame load)
setTimeout('Oldrefresh()',5000);
return;
}
--></script>
<title>Test</title>
</head>
<body onLoad="director()">
<div align="center">
<center>
<table border="1" cellpadding="0" cellspacing="0" style="border-collapse: collapse"
Page 49
2/16/2003
User’s Manual
bordercolor="#111111" width="320" id="AutoNumber1" height="269">
<tr>
<td height="18">
<p align="center"><font face="Century" size="5">WeatherVision Live</font>
</td>
</tr>
<tr>
<td height="290">
<img src="http://12.209.74.78:18181/live.jpg" name="myPush" width="520" height="290">
</td>
</tr>
<tr>
<td height="13">
<p align="center"><font size="1" color="#6699FF">Best viewed with IE4.0 or
above</font>
</td>
</tr>
</table>
</center>
</div>
</body>
</html>
This script will load the image once in your page and then continuously reload the image
with Internet Explorer. In the case of Netscape, I couldn’t find a way to automatically
start a reload upon comp letion of the image download so it will reload the image after an
interval that you can change in the example (currently set to 5 seconds so modem users
can download the image before it is reloaded).
To increase speed, reduce the JPEG quality of the served image to reduce the download
time per frame. Also, reducing the canvas dimensions help quite a bit.
There seems to be a quirk with internet browsers as they will show part of a large JPEG
before it is completely loaded. When used with this streaming procedure, it causes white
bands to appear across the bottom of the picture as it is being loaded and filled in. The
best way to eliminate this is to make your JPEGs smaller so they load faster.
It is completely feasible to create a Java applet (not JavaScript as shown here) that does a
better job of continuously retrieving the JPEGs and displaying them in a window. If
anyone is up this task and is willing to share this with other users, I’ll include it on the
ImageSalsa website and provide user information in this documentation.
Page 50
2/16/2003
User’s Manual
Script Setup
Scripts (Script and Weather Editions only) allow automation of the program’s functions
through a programming language -- Writing Scripts. To setup the scripting parameters,
select “Scripting Setup” from the Scrip ting Menu to open the Script Setup window.
Enable Scripting : Used to enable or disable the internal script execution. By enabling
scripting, the script listed in the Script File space is loaded into the script engine. Any
load-time errors will be reported. If no load-time errors are encountered, the Status
Window will report the number of lines and any Methods detected. At this point, the
scripting is running.
Open Script in Notepad: Opens the script in the Script File space in Notepad. Save the
script in Notepad before reloading it for any changes to take effect.
Reload Script: Resets the scripting and reloads the script in the Script File space into
memory. Any load-time errors will be reported. If no load-time errors are encountered,
the Status Window will report the number of lines and any Methods detected. If Enable
Scripting is checked, it will also start making the appropriate method calls. All global
variable space is reset to default values during this sequence.
Page 51
2/16/2003
User’s Manual
Script File : Path of the script file. Script files are written in VBScript using any text
editor. The file extensions may be anything you decide, but the standards use .vb or .vbs.
I prefer to use .txt since it will automatically be opened in Notepad when clicked. Also,
many virus programs (and now Outlook) are very cautious about .vbs files and may not
even let you use them.
Browse: Used to find and select a file to use as the Script File.
Methods To Run: Once the script is loaded, you must specify what methods will be
called:
•
•
•
•
•
•
•
•
Interval: Called on a regular basis based on the time and base time provided.
Looks for the method “Interval” with no parameters (i.e. “Public Sub
Interval()”)
TextUpdate: Called whenever a line of text is updated based on its interval
and base time AND the property Script Enabled is selected for each line of
text. Passes two numbers. The first is the canvas number (see General section
of Canvas Properties) that contains the line of text. The second number is the
number (grid row) of the enabled line. Looks for the method “TextUpdate”
with two parameters (i.e. “Public Sub TextUpdate(Canvas,Index)”). Note that
the parameters must usually be converted to Longs using the CLng function
before being used in the object tree (i.e.
“Portfolio.Canvas(CLng(Canvas)).Text(CLng(Index)).Text=“ABC””) This
may change in later revisions of the ImageSalsa software.
GraphicUpdate: Exactly the same as the TextUpdate method, except applied
to graphic items.
Startup: Called when a portfolio is loaded and scrip t has been enabled
previously. Looks for the method “Startup” with no parameters. Often useful
to initialize global variables.
Shutdown: Called when the program is closed. Looks for the method
“Shutdown” with no parameters. Set CancelShutdown in object tree to abort
shutdown.
MotionDetected: Called when motion is detected by the Motion Detection
routine. Passes one number – the feed that had the motion. Looks for the
method “MotionDetected” with one parameter (i.e. “Public Sub
MotionDetected(VideoFeed)”.
NewCSVData: Called when new weather station data is reported (not
necessarily what the VWS interval was set to). This is determined by
examining the CSV file’s internal time stamp. This method is called
following the CSV data post-processing. Looks for the method
“NewCSVData” with no parameters (i.e. “Public Sub NewCSVData()”)
WebRequest: Called when the internal web server receives a request for a
piece of data. Two parameters are passed. The first parameter is a string
containing the IP address of the requesting PC (i.e. “111.222.033.044”). The
second parameter is a string containing the file being requested (i.e.
“canvas01.jpg”, “images/dot.jpg”, etc…)
Status : Shows the current status including errors.
Page 52
2/16/2003
User’s Manual
Writing Scripts
ImageSalsa provides the ultimate level of user customization by providing scripting
(requires the Script or Weather Editions). Scripting uses a programming language to
perform user-defined calculations, modifications, and other automated actions without
manually having to change any settings in the program. This can be used to perform an
almost unlimited number of possible actions such as:
•
•
•
•
•
•
Change what a line of text says when a specific text tag isn’t available
Change what file a graphic item uses for its image based on some condition
Change the shadow of text based on the time of day
Read a text file to parse data to be shown
Open Microsoft Outlook and send an email and attach a recent image
Calculate the amount of time the temperature has been below freezing and
display it as a line of text – requires Weather Edition
ImageScript uses VBScript, a simplified but powerful programming language based on
Visual Basic. If you have been programming in Visual Basic or Visual Basic for
Applications (VBA), VBScript should be very simple to learn. A good reference may be
found at http://www.microsoft.com/scripting.
Here are a list of helpful points when using VBScript or ImageSalsa’s script engine:
•
•
•
•
•
•
•
•
•
Page 53
For/Next loops can not explicitly provide the variable name in the Next
statement. This is optional in VisualBasic, but it is an required omission in
VBScript.
All variables in VBScript are Variants. No variable declarations can be
declared for any type other than Variant.
All references to ImageSalsa’s properties must be done through the
ImageSalsa object tree – see Script Language Object Tree section.
Many of ImageSalsa’s internal properties and methods require explicit
variable types. When calling these types, it may be necessary to convert them
to the correct type using the CLng, CStr, functions, etc…
The object tree may change – consult this document for changes. Most
specifically, new properties and methods may become available. Also, there
is room to make the internal properties and methods more robust to variable
types (see previous statement) that would disqualify the need for type
conversions.
You can use COM objects at run-time by using the CreateObject method.
You may open, edit, and close text files using the Microsoft File System
Object. The http://www.microsoft.com/scripting site and a search for “file
system object” will provide detailed usage information.
You can launch other applications using the Windows Scripting Object.
You can open Excel, Outlook, Powerpoint, and Word documents using the
respective COM objects.
2/16/2003
User’s Manual
•
•
•
•
•
•
Page 54
You cannot use the Microsoft Script Debugger when writing VBScript
applications for ImageSalsa since the ImageSalsa Object Tree is not a
standard object recognized by the script debugger.
Scripts are best debugged by analyzing the error message under the Script
Setup window. Also, learning how to use the MsgBox method can be very
useful in tracking script execution.
Scripts have a global variable section (any variable declared outside of a
procedure) that mya be used to hold variables whose state needs to be retained
between procedure calls. Note that when a script is reloaded, the global
variable are is erased.
Code may exist outside of a procedure, but it is not recommended. Code that
needs to be executed when ImageSalsa first loads a script should be placed in
the Startup procedure call and then it will executed when the portfolio is
loaded.
When ImageSalsa is closed and Shutdown procedure is enabled and called,
setting CancelShutdown to True will abort the process.
Call ExitApp() to force a program shutdown.
2/16/2003
User’s Manual
VWS Setup
Go to the VWS Input Setup under the VWS Menu (VWS Edition required) to access the
VWS Interface Configuration window:
Load Real-Time .CSV File : Interfacing to Virtual Weather Station (VWS) all comes
down to loading a comma-separated data file that contains the last weather data retrieved
by VWS. Selecting this enabled the retrieval of this file.
Load Rate: Selects the rate that ImageSalsa reads the .CSV file.
Base Time : See Understanding Base Time section.
File: Selects the path and filename of the .CSV file.
Typically, the .CSV files are named DATA.CSV and DATA2.CSV and are placed in the
“data” directory of VWS. See the section “CSV File Export” of the VWS User’s
Manual. Note that DATA.CSV file is in the native units (°F, for example) and
DATA2.CSV is in the user-defined units.
ImageSalsa only recognizes version 1.00 of the CSV data format. Any other versions in
the future will require a new version of ImageSalsa.
See the Text Tags sections for more information about the tags listed on this window.
Any tags that are not available return “N/A”.
Page 55
2/16/2003
User’s Manual
Advanced VWS Setup
Select “VWS Advanced Setup” from the VWS menu (VWS Edition required) to open the
VWS Advanced Setup window:
The advanced setup relies on data provided by the VWS Input Setup window – set the
source of the .CSV file and enable the .CSV file loading before using tags from either
window.
Altitude : Enter your station altitude and units. This and the outdoor temperature is used
to calculate the sea- level barometric pressure.
Barometric Offset: Not to be confused with sea-level barometric pressure offset. This
value is to correct for any sensor error.
Temperature Units : Select the units provided in the .CSV file. This is required so
ImageSalsa knows what the temperature are (units are not specified in the .CSV file) to
calculate the sea- level barometric pressure.
Wind Statistics Window: ImageSalsa will calculate the average wind speed, direction,
and maximum gust during a moving window of time. The width of this window is set by
this property.
Barom. Trend Threshold: Sets the positive and negative threshold for the barometric
trend readings. If the barometric rate (<csvbaromrate> tag) is greater than or equal to this
Page 56
2/16/2003
User’s Manual
value, the <csvbaromtrend> tag returns “rising”. Similarly, the <csvbaromtrendarrow>
tag returns an upwards pointing arrow. Similarly, a value below/equal the negative of the
threshold value returns “falling” and a downwards pointing arrow. A value between the
positive and negative threshold returns “steady” and no arrow.
Temp. Trend Threshold: Same as Barom. Trend Threshold above, but with the outdoor
temperature.
The Advanced VWS window also shows tags that provide the max/min values for today
and yesterday as well as rainfall for yesterday. These values are calculated each time a
new set of data is read from the .CSV file. Therefore, ImageSalsa must be running at the
time of a minimum or maximum value to be recorded for these tags.
In addition, these calculated data values are stored to the drive and re-read when
ImageSalsa starts. This allows the machine to be rebooted without loosing the
minimum/maximums, etc… In addition, if ImageSalsa is restarted one day after being
last shutdown, it automatically loads the “today” values it had stored into the “yesterday”
values.
Any tags that are not available return “N/A”.
Page 57
2/16/2003
User’s Manual
Schedule Setup
Many elements in ImageSalsa allow you to program a schedule to set their enabled
duration:
There are two schedule types:
•
•
24-Hours : Always enabled.
From Start to Stop: Runs from the Start time to the Stop time. If the Stop time
occurs before the Start time, it will run from the Start time to the Stop time of the
next day.
For each Start and Stop time, there are three choices:
•
•
•
Absolute (Abs.) Time : A static time specified in 24-Hour HH:MM:SS format.
Sunrise: You may add up to 1440 minutes (one day) to this time by placing a
positive value in the box to the right. You may subtract up to 1440 minutes to this
time by placing a negative value in the box.
Sunset: Similar to Sunrise
The Sunrise and Sunset times are calculated daily based on your latitude and longitude as
specified in the ImageSalsa General Preferences window – see General Preferences.
Page 58
2/16/2003
User’s Manual
Understanding Base Time
Probably the most misunderstood property of ImageSalsa, but one of the most common.
Under most circumstances, you can just leave it to the default value of midnight
(“00:00:00”).
One of the applications for ImageSalsa is generating still images at a regular interval to
be used for time-lapse movie generation. For some events, this could be once every few
seconds. Other events may only need one image a day.
For example, let’s say you want to perform the task of creating a “seasons” movie where
you want one image a day for 365 days. In this scenario is it pretty important that you
take the daily picture at the same time each day. Since the computer and ImageSalsa may
be restarted many times throughout the year, you need a way to specify what time to take
the picture. This is where the base time comes into play.
In a simple definition, the base time is a user-specified time (in 24-hour HH:MM:SS
format) that at least one event of a periodic series must occur.
So, if you set your interval to 24 hours and the base time to 10:00:00, there is only one
event per day so it has to occur at 10AM to meet the base time requirement. If you left it
at 00:00:00, this time would be midnight.
Similarly, if you set the interval to 12 hours and the base time to 10:00:00, there are two
events spaced 12 hours apart. One must occur at 10AM; so, the other has to occur at
10PM.
When ImageSalsa starts or a canvas is opened, it calculates the next event times for many
different activities based on their base time and interval. So, if you started the program at
8:00AM, 8:30AM, 9:46AM, or 2:00AM, it will still perform the operation at the
designated times.
If you interval is very small, there probably is very little need for specific synchronization
to a clock; therefore, the default value of midnight (“00:00:00”) is appropriate. Leaving
it at this value still allows events to overlap as much as possible to reduce the load from
the program.
If you are still confused, here are some more examples:
Interval
Base Time
Event Times in 12 or 24-hour times
1 minute
00:00:00
Midnight, 12:01AM, 12:02AM, …, 11:58PM, 11:59PM
1 minute
00:01:00
Same as above
1 minute
12:45:10
00:00:10, 00:01:10, …, 12:45:10, 12:46:10, …, 23:59:10
10 seconds 00:00:01
00:00:01, 00:00:11, …, 23:59:51
6 hours
03:00:00
3:00AM, 9:00AM, 3:00PM, 9:00PM
6 hours
15:00:00
Same as above
Page 59
2/16/2003
User’s Manual
Using the Advanced Transparency Control
The advanced transparency control (ATC) is used to select a range of transparent colors
for a graphic item.
Each color is created by varying the amount of red, green, and blue color that are blended
to form the pixel. On a computer, the amount of each color can be from 0 (none) to 255
(the most). The color black is represented with the R,G,B code 0,0,0 and the color white
is 255,255,255. Bright green would be 0,255,0.
In its simplest mode, you can use the ATC to select one or more R,G,B colors to become
transparent. In its more complex mode, you select a range of R,G,B colors.
A range is a set of colors that exist between Color #1 (R1,G1,B1) and Color #2
(R2,G2,B2). If a pixel has the color components R,G,B, it is considered in the range if R
is between R1 and R2, G is between G1 and G2, and B is between B1 and B2.
You can add single colors or range of colors by clicking the “Add Row” button. You can
also delete a range by clicking on the grid row and then click “Delete Row”.
You set the single color or range by clicking on the grid row you want to change and then
click one of the two boxes to the right of the words “Color Range”. This opens the
Transparent Color Picker window:
Page 60
2/16/2003
User’s Manual
This shows a 2x still image of the current canvas. By moving your mouse around the
picture, you will see the R,G, and B components of each pixel in the top left corner.
When you have identified a color, click the left mouse button. If you decide to abort the
color selection, hit the Escape key.
If you want to select a color from the color picker table or set the R,G,B values manually,
click “Custom” (see picture on next page). This opens the Color Picker window where
you can select from one of the basic colors or choose a Custom Color by clicking the
button labeled “Define Custom Colors”. From there you can enter in the R,G,B value in
the Red, Green, and Blue text boxes. If you wish to abort the color selection process,
click “Cancel”.
Page 61
2/16/2003
User’s Manual
If you want to select a single color, click the other color box and click the same colored
pixel or go to the advanced properties and type in the same values. This will make Color
#1 and Color #2 be identical; therefore, the color has to be an exact match to be
considered transparent.
Click “Choose Color Range From Picture” to open up the color picker window for a
range selection. Create a rectangle around the colors of interest by left clicking the
mouse at one corner, hold the button, size the rectangle, and then release the button.
Image Salsa will then determine what color range would encompass all colors in that area
and set both color boxes accordingly.
In addition to selecting a range, you can set the opacities associated with the two
boundaries. An opacity of 0 is fully transparent and an opacity of 100 is fully opaque.
By setting a range, ImageSalsa will calculate where each pixel’s color is between the two
transparent colors and come up with an opacity based on that determination.
For example, if you picked Color #1 to be 0,0,0 (black) and Color #2 to be 255,255,255
(white) and then you set Opacity #1 to be 0 (fully transparent) and Opacity #2 to be 100
(fully opaque), the darker the pixel, the more transparent it would become (see picture on
next page).
Once you have selected a transparent color, click “Apply” to see the result or click “OK”
to see the result and exit. If you have transparent colors already set and you go to the
Transparent Color Picker window, the colors that were already considered transparent are
shown in green. This should make it easier to determine what colors still remain.
Page 62
2/16/2003
User’s Manual
In this example, the background of the canvas was set to blue, Color #1 was set to black,
Color #2 was set to white, Opacity #1 was set to 0, and Opacity #2 was set to 100.
Where the image was darker, it became more transparent and more of the blue bled
through. Where it was lighter, it became more opaque and showed more of the actual
image.
In this example, the Opacities were swapped from the previous example and the
background was set to pink. Since the brighter colors now bleed the background color
more, it gives the appearance that the room is lit with a pink light.
With practice, you will be able to pull many colors from an image and/or create
interesting effects. Something to watch for: With video signals, the image can often be
grainy. It is sometimes difficult to remove a grainy area since it consists of a wide
variety of colors without exceed the area of concern.
Page 63
2/16/2003
User’s Manual
Canvas Assembly Specifics
I find it helps to understand how things are created in a program to realize what is going
on. So here’s how a canvas and image objects are processed:
About one hundred times a second, ImageSalsa checks to see if any of the text or graphic
item’s interval has expired. If so, it clears the canvas to the background color and
assembles each layer from 0 to 3.
Each layer consists of a shadow mask and the individual objects. An object is either a
line of text or graphic item (in the program, the code that processes the images treats
them the same). First, a layer’s shadow mask is set to fully transparent. Then, each
object’s shadow is removed from the shadow mask to make that area opaque. Once all
object shadows for that layer have been processed, that shadow is applied to the current
working canvas. Then, each object is drawn on the current canvas. Graphic items are
drawn first, so any text and graphics occupying the same pixel will show the text since it
was drawn later. After all objects are drawn on the current working canvas, the next
layer is drawn.
If a layer has no objects, the above section is skipped for that layer. So, it is beneficial to
reduce the number of layers to increase performance.
As mentioned earlier, text and graphic items are treated as similar objects. Basically, text
is a rectangular graphic with text as the image and the background of the rectangle is set
to a transparent color so it doesn’t show.
These objects go through multiple processing steps depending on what has been enabled.
We will examine the picture graphic image since it is all- inclusive. The others are
variants using the same process.
First, the picture is loaded from file and placed in ImageSalsa’s memory. At this point,
any color filtering is applied.
Second, the image is cropped and then is stretched.
At this point, the final dimensions are known so the program can create an opacity mask.
This mask is either generated using the feathering parameters or it is loaded from a userspecified file. If neither option is enabled, this step is skipped.
Now, the image and opacity mask (if generated in the previous step) are rotated. At this
time, the alignment position offsets are calculated.
Next, a shadow mask is calculated using the transparent colors and opacity mask.
Finally, the shadow and image is drawn on the canvas with all of it’s buddies.
Page 64
2/16/2003
User’s Manual
Example: Creating a Window Effect
This example shows how to create the effect of looking out a window at a web cam
image:
This example uses two graphics items. The first item is the camera image (320x240).
The next item is the window picture placed on the layer above.
First, I searched the web for a nice window picture since I haven’t sold enough copies of
this software to afford nice draperies J. I then resized the image to 320x240. Nicely,
window pictures can be stretched with very little noticeable effect:
Now, we need to make two different images. One image will be the picture minus the
outdoor image and the other image will be an opacity filter. We will first generate the
opacity image.
An opacity image is usually a grayscale picture the same size as the original. The shade
at each pixel determines if the opacity from fully opaque (white, i.e. you see the original
picture) to fully transparent (black, i.e. you see what’s underneath the picture).
Page 65
2/16/2003
User’s Manual
Our goal is to make the individual panes fully transparent (black), the draperies some
shades of gray (semi- transparent), and the doors and wall fully opaque (white).
A good start was to take the negative of the picture:
Next, the image was manipulated by an image editing program to convert it to grayscale.
Then the image was manipulated to create purer whites and blacks and to remove a lot of
the darkness from the drapes. The result is our opacity image that is named
windowopacity.jpg:
Now, we need to create the original image. Since the opacity image will make the
window panes perfectly transparent, we don’t have to worry about them. The draperies,
however, need to be modified since they are only semi-transparent and their highlighting
will be visible even when the camera image is black. With some very rough editing, the
drapery highlights were removed and the image was saved as windowimage.jpg:
Page 66
2/16/2003
User’s Manual
Now, we are ready to create the effect. Enable two graphic items. Make one of them
have a camera source (320x240) and change the source to an available video feed. On
the other, make its layer than the camera’s layer so it sits on top. Select its source to
image file and type in the name of your image. Only the window picture should be
visible at the moment. Now, set Opacity Picture to Yes and type in the name of the
opacity image. You should now see the camera’s image through the window panes:
Page 67
2/16/2003
User’s Manual
Text Tags
In the case of VWS data tags (those that start with “<CSV”) you can copy the tag to the
clipboard by double-clicking the tag under the VWS and VWS Advanced Setup menus.
Tag enclosed in <>
DATE
DATEYY
DATEYYYY
DATE0M
DATEM
DATE M
DATEMONTH
DATE0D
DATED
DATE D
DATESHORTMONTH
DATEFORMALDAY
TIME
TIME10
TIME100
TIMEHH
TIME0H
TIMEH
TIME H
TIMEMM
TIMESS
TIME10S
TIME100S
TIME12H
TIME1012H
TIME10012H
TIMEHH12H
TIME0H12H
TIMEH12H
TIME H12H
TIMEAMPM
TIMEZONE
TIMEZONEABBREV
TIMEZONELOOKUP
MOTIONDETECTTIME#
Page 68
Description
Date in MM/DD/YY format
Last two digits of Year
Full Year
Month with leading zero
Month with no leading characters
Month with leading space
Full Month name
Day of Month with leading zero
Day of Month with no leading characters
Day of Month with leading space
First three letters of Month name
Day of Month with “st”, “nd”, or “rd” attached
Time in 24- hour HH:MM:SS format
Time in 24- hour HH:MM:SS.S format
Time in 24- hout HH:MM:SS.SS format
Hour with leading zero, 24-hour format
Hour with leading zero, 24-hour format
Hour with no leading characters, 24 hour-format
Hour with leading space, 24-hour format
Minute with leading zero
Second with leading zero
Tenths of a second
Hundredths of a second
Time in 12- hour HH:MM:SS AM/PM format
Time in 12- hour HH:MM:SS.S AM/PM format
Time in 12- hout HH:MM:SS.SS AM/PM format
Hour with leading zero, 12-hour format
Hour with leading zero, 12-hour format
Hour with no leading characters, 12 hour-format
Hour with leading space, 12-hour format
Time “AM” or “PM”
System Time Zone text
System Time Zone text abbreviated to uppercase letters
System Time Zone text converted to custom text from
TIMEZONE.TXT file in program directory (read at
startup). File is a list in the format “time zone text,custom
text”
Time of last motion on video feed # (0 through 9, where
the 0 is the first video feed listed under the Video Feed
Setup window) in 24-hour HH:MM:SS. Shows “N/A” if no
motion has been detected since startup.
2/16/2003
User’s Manual
MOTIONDETECTDATE#
SUNRISE
SUNSET
SUNRISE24H
SUNSET24H
The following tags
require the Weather
Edition
CSVYYYY
CSVYY
CSVM
CSVMONTH
CSVD
CSV12H
CSV24H
CSVampm
CSVAMPM
CSVMIN
CSVSEC
CSVWIND
CSVGUST
CSVDIR
CSVCOMP
CSVINHUM
CSVOUTHUM
CSVINTEMP
CSVOUTTEMP
CSVBAROM
CSVTOTALRAIN
CSVDAILYRAIN
CSVHOURLYRAIN
CSVWEATHER
CSVCH1TEMP
CSVCH1HUM
CSVCH2TEMP
CSVCH2HUM
CSVCH3TEMP
CSVCH3HUM
CSVEVAP
CSVUVINDEX
CSVSOLARRAD
CSVCHILL
Page 69
Same as above with MM/DD/YY format
Sunrise Time in 12- hour HH:MM AM/PM
Sunset Time in 12-hour HH:MM AM/PM
Sunrise Time in 24- hour HH:MM
Sunset Time in 24-hour HH:MM
Year of last CSV file data in YYYY format
Year of last CSV file data in YY format
Month of last CSV file data with leading zero
Name of Month of last CSV file data
Day of Month of last CSV file data with leading zero
Hour of last CSV file data with leading space in 12- hour
format
Hour of last CSV file data with leading zero in 24- hour
format.
Meridian designator for last CSV file data in lower case
(am or pm)
Meridian designator for last CSV file data in upper case
(AM or PM)
Minute of last CSV file data with leading zero
Second of last CSV file data with leading zero
Wind Speed, format specified by CSV file
Wind Gust, format specified by CSV file
Wind Direction (in degrees), format specified by CSV file
Wind Direction (compass direction), 16 points
Indoor Humidity, format specified by CSV file
Outdoor Humidity, format specified by CSV file
Indoor Temperature, format specified by CSV file
Outdoor Temperature, format specified by CSV file
Barometric Pressure, format specified by CSV file
Total Rain, format specified by CSV file
Daily Rain, format specified by CSV file
Hourly Rain, format specified by CSV file
Text (noun) of Weather Conditions, (i.e. “Snow”, “Rain”,
“Clear”, etc…)
Channel 1 Temperature, format specified by CSV file
Channel 1 Humidity, format specified by CSV file
Channel 2 Temperature, format specified by CSV file
Channel 2 Humidity, format specified by CSV file
Channel 3 Temperature, format specified by CSV file
Channel 3 Humidity, format specified by CSV file
Evapotranspiration, format specified by CSV file
UV Index, format specified by CSV file
Solar Radiation, format specified by CSV file
Wind Chill, format specified by CSV file
2/16/2003
User’s Manual
CSVINHEAT
CSVOUTHEAT
CSVDEW
CSVRAINRATE
CSVOUTTEMPRATE
CSVINTEMPRATE
CSVBAROMRATE
CSVCH1TEMPRATE
CSVCH2TEMPRATE
CSVCH3TEMPRATE
CSVSUNRISE
CSVSUNSET
CSVSUNRISE24H
CSVSUNSET24H
CSVSLBAROM
CSVSTATWIND
CSVSTATGUST
CSVSTATDIR
CSVSTATCOMP
CSVMAXGUSTTODAY
CSVMAXGUSTYESTER
DAY
CSVMINTEMPTODAY
CSVMAXTEMPTODAY
CSVMINTEMPYESTER
DAY
CSVMAXTEMPYESTER
DAY
CSVRAINYESTERDAY
CSVBAROMTREND
CSVBAROMTRENDAR
ROW
CSVTEMPTREND
CSVTEMPTRENDARRO
W
Page 70
Indoor Heat Index, format specified by CSV file
Outdoor Heat Index, format specified by CSV file
Dew Point, format specified by CSV file
Rain Rate, format specified by CSV file
Outdoor Temperature Rate, format specified by CSV file
Indoor Temperature Rate, format specified by CSV file
Barometric Pressure Rate, format specified by CSV file
Channel 1 Temperature Rate, format specified by CSV file
Channel 2 Temperature Rate, format specified by CSV file
Channel 3 Temperature Rate, format specified by CSV file
Sunrise Time in 12-Hour HH:MM AM/PM
Sunset Time in 12-Hour HH:MM AM/PM
Sunrise Time in 24-Hour HH:MM
Sunset Time in 24-Hour HH:MM
Sea-Level Corrected Barometer
Average Wind Speed during the statistics window
Maximum Wind Gust during the statistics window
Average Wind Direction during the statistics window
Average Wind Direction Compass during the statistics
window (N, NNW, SE, etc…), 16 points
Maximum Wind Gust since midnight
Maximum Wind Gust yesterday
Minimum Outdoor Temperature today
Maximum Outdoor Temperature today
Minimum Outdoor Temperature yesterday
Maximum Outdoor Temperature yesterday
Yesterday’s Rainfall
Barometric Trend (“Rising”, “Falling”, “Steady”)
Barometric Trend Arrow (up arrow, down arrow, nothing)
Outdoor Temperature Trend (“Rising”, “Falling”, “Steady”)
Outdoor Temperature Trend Arrow (up arrow, down arrow,
nothing)
2/16/2003
User’s Manual
Script Language Object Tree
This section lists the object tree available to user scripts written for the Script
Edition of ImageSalsa.
The root of the tree is an object called ImageSalsa. The object is different
from the rest in that it isn’t required when specifying a method or property. It is provided
for clarity.
For example, these two lines perform the same operation:
ImageSalsa.Portfolio.Canvas(1).Text(1).Enabled=True
Portfolio.Canvas(1).Text(1).Enabled=True
This demonstration also shows how the object tree is referenced using periods
(.’s) in VBScript (also in Visual Basic or VBA). Each object may contain methods
(subroutines such as Save), properties (such the Enabled property is the previous
example), or other objects (in this case, Canvas(1) is an object of Portfolio).
When dealing with multiple parts of the same object, it is easier, and more
efficient to use the With and End With :
With Portfolio.Canvas(1).Text
.Layer=2
.Text=”My Line of Text”
.Shadow=True
.Enabled=True
End With
You can also nest various levels:
With Portfolio.Canvas(1)
For i=1 to 10
With .Text(i)
.Text=””
.Enabled=False
End With
Next
End With
In the tree description, you will see variable types listed with the as keyword. For
example, in the following description:
Object CSText :
Properties:
Enabled as Boolean
Page 71
2/16/2003
User’s Manual
Boolean is the variable type of the property Enabled.
The Object Tree:
Object ImageSalsa :
Properties:
MaxCanvas as Long – Read only, based on version
MaxText as Long – Read only, based on version
MaxGraphic as Long – Read only, based on version
CurrentClock as Double – current time accurate to 1/100s.
Convert to string using CStr(CDate(CycleTime))
Sunrise as Double – sunrise accurate to 1/100s. Convert to string
using CStr(CDate(CycleTime))
Sunset as Double – sunset accurate to 1/100s. Convert to string
using CStr(CDate(CycleTime))
LoadLastOnStartup as Boolean
LoadLastFilename as String
IsSaveCapable as Boolean – Read only, based on version
IsInternetCapable as Boolean – Read only, based on
version
IsVWSCapable as Boolean – Read only, based on version
IsScriptCapable as Boolean – Read only, based on version
CancelShutown as Boolean – Set to True to cancel shutdown
Methods:
Function vbFormat(Expression as Variant,
FormatString as String) – same as VB Format function
Sub SaveAll() – same as selecting “Save All” from File Menu
Sub SavePortfolio() – same as selecting “Save Portfolio” from
File Menu
Sub ExitApp() – closes the program
Objects:
Portfolio as SCPortfolio
Object SCPortfolio :
Properties:
FileName as String
NeedSaving as Boolean – set to False to prevent save popup on
close; sets all canvas’ NeedSaving to False if value is set to False.
CycleTime as Double – Read only, time that the current cycle was
started. Convert to string using CStr(CDate(CycleTime))
Methods:
None
Objects:
Page 72
2/16/2003
User’s Manual
Canvas(1 to MaxCanvas) as SCCanvas
VideoFeed(0 to 9) as SCVideoFeed
VWS as SCVWS
WebServer as SCWebServer
Object SCCanvas :
Properties:
Width as Long
Height as Long
Name as String
FileName as String
BackgroundColor as Long -- &HBBGGRR
ShadowIntensity as Long
WindowMode as Long – 0=Child Window, 1=Own Window,
2=Always on Top
NeedSaving as Boolean – set to false to prevent popup messages
on close
Methods:
Sub SetWidthHeight(Width as Long, Height as
Long) – sets both at once.
Sub Save() – saves canvas
Sub ForceRedraw() – redraws canvas on screen
Sub ForceReload() – redraws canvas, but also forces all objects
(text and graphics) to recalculated/redrawn regardless of interval and
current time (still obeys enable and schedule properties).
Objects:
Text(1 to MaxText) as SCText
Graphic(1 to MaxGraphic) as SCGraphic
FTPPush as SCFTPPush
CanvasWebServer as SCCanvasWebServer
AutoSave as SCAutoSave
Wallpaper as SCWallpaper
Object SCText :
Properties:
Enabled as Boolean
Schedule as SCSchedule
Layer as Long
Text as String
Rate as Double
BaseTime as Long – seconds since midnight
Alignment as Long
X as Long
Y as Long
Page 73
2/16/2003
User’s Manual
FontName as String
FontSize as Single
FontBold as Boolean
FontItalics as Boolean
Color as Long -- &HBBGGRR
ProcessedString as String – string after tag conversion and
before printing (any cha nges will be lost the next time it processes Text
into ProcessedString).
Shadow as Boolean
ShadowSize as Long
ShadowOffsetX as Long
ShadowOffsetY as Long
Opacity as Long
OpacityMode as Long
RotationAngle as Single
Scripted as Boolean
Methods:
Sub ProcessText() – forces Text to be processed into
ProcessedString
Sub ForceUpdate() – forces text to be redrawn. Be careful using
this with the TextUpdate routines as it can lead to an infinite loop
condition.
Objects:
None
Object SCGraphic:
Properties:
Enabled as Boolean
Schedule as SCSchedule
Layer as Long
Rate as Double
BaseTime as Long – seconds since midnight
Alignment as Long
X as Long
Y as Long
Shadow as Boolean
ShadowSize as Long
ShadowOffsetX as Long
ShadowOffsetY as Long
Opacity as Long
OpacityMode as Long
RotationAngle as Single
Scripted as Boolean
Page 74
2/16/2003
User’s Manual
SourceType as Long
SourceVideoFeed as Long – 0 to 9
SourceFileName as String
SourceURL as String
SourceCanvas as Long – Script Index of canvas
CropLeft as Long
CropRight as Long
CropTop as Long
CropBottom as Long
Stretch as Boolean
StretchWidth as Long
StretchHeight as Long
OpacityUseFile as Boolean
OpacityFileName as String
FeatherRadius as Long
FeatherWidth as Long
ColorProcessing as Long
BackgroundColor as Long -- &HBBGGRR
TransparentEnabled as Boolean
TransparentColorCount as Long – number of table items (1
to 100)
TransparentColorTable(0 to 399) as Long – the
color table is made up of groups of four. The first two elements of the
group are the min and max colors. The second two elements are the min
and max opacities.
Methods:
Sub ForceUpdate() – forces graphic to be redrawn. Be careful
using this with the GraphicUpdate routines as it can lead to an infinite
loop condition.
Objects:
None
Object SCVWS :
Properties:
Enabled as Boolean
Rate as Double
BaseTime as Long – seconds since midnight
CSVFileName as String
Altitude as Double
AltitudeUnits as Long – 0=meters, 1=feet
TemperatureUnits as Long – 0=°C, 1=°F
BarometerOffset as Double
WindStatisticsWindow as Long – in seconds
BarometricTrendThreshold as Double
Page 75
2/16/2003
User’s Manual
TemperatureTrendThreshold as Double
LastData(0 to 59) as Double – see CSV Data below
LastDataString(0 to 39) as Double – Data unmodified
from CSV field; see CSV Data below
DatabaseBufferSize as Long – Read only, size of circular
buffer
DatabaseTailPointer as Long – Read only, 0 to
DatabaseBufferSize (oldest valid point)
DatabaseHeadPointer as Long – Read only, 0 to
DatabaseBufferSize (points to next point; DatabaseHeadPointer – 1 points
to newest valid point)
Methods:
None
Objects:
None
Object SCVideoFeed :
Properties:
Enabled as Boolean
Width as Long – read only
Height as Long – read only
Rate as Double – in frames per second
FPS as Long – read only
PreviewWindownabled as Boolean
InputDevideName as String
Methods:
None
Objects:
MotionDetect as SCMotionDetect
Object SCMotionDetect:
Properties:
Enabled as Boolean
SaveFixed as Boolean
FixedFileName as String
FixedQuality as Long
SaveTimeNamed as Boolean
TimeNamedFileName as String
TimeNamedQuality as Long
SaveDiff as Boolean
DiffQuality as Long
BlurSize as Long – 0=none, 1=3x3, 2=5x5, 3=7x7
CoverageRequirement as Double – Logarithmic;
Percent=10^(CoverageRequirement*6-4); 1=100%, 0=0.0001%
DarkTrigger as Double – -100 to 0
Page 76
2/16/2003
User’s Manual
LightTrigger as Double – 0 to 100
TriggerRestPeriod as Long – 0=none, negative=#of frames,
positive=seconds
LastMotionTime as Double – Convert to string using
CStr(CDate(CycleTime))
BeepOnTrigger as Boolean
ShowCoverageSize as Boolean – When diff window is open
Methods:
Sub ShowDiffFrame() – pops open the differential frame window
Objects:
None
Object SCWebServer :
Properties:
Enabled as Boolean
AllowNonCanvasServes as Boolean – enables/disables
serving of non-canvas files.
Port as Long – need to disable before setting and enabled afterwards
RootPath as String – need to disable before setting and enabled
afterwards; path of web files
Methods:
None
Objects:
None
Object SCFTPPush:
Properties:
Enabled as Boolean
Rate as Long – in seconds
BaseTime as Long – seconds since midnight
FilePath as String
UserName as String
Password as String
ServerName as String
Quality as Long – 0 to 100
Status as String – Status message
Stage as Long – 0 to 90, non-zero means it is busy sending a file
Methods:
Sub Upload() – forces upload if FTPPush is not currently busy.
Objects:
None
Object SCCanvasWebServer :
Properties:
Enabled as Boolean
Page 77
2/16/2003
User’s Manual
Quality as Long – 0 to 100
FileName as String
Interval as Double – number of seconds between new JPEG
generation. A zero value means always generate a new JPEG.
Methods:
None
Objects:
None
Object SCWallpaper :
Properties:
Enabled as Boolean
Schedule as SCSchedule
Rate as Long – in seconds
BaseTime as Long – seconds since midnight
Methods:
None
Objects:
None
Object SCAutoSave :
Properties:
FixedEnabled as Boolean – a.k.a. Store Fixed JPEG
FixedSchedule as SCSchedule
FixedRate as Long – in seconds
FixedBaseTime as Long – seconds since midnight
FixedFileName as String
FixedQuality as Long – 0 to 100
CascadeEnabled as Boolean
CascadeCount as Long – 1 to 1000
CascadeMode as Long – 0 = save 0000 cascade file, 1 = don’t save
SequentialEnabled as Boolean – a.k.a. Store Fixed JPEG
SequentialSchedule as SCSchedule
SequentialRate as Long – in seconds
SequentialBaseTime as Long – seconds since midnight
SequentialDirectory as String
SequentialQuality as Long – 0 to 100
SequentialType as Long – 0=YYMMDDHHMMSS.JPG,
1=########.JPG
SequentialNumber as Long
Methods:
None
Objects:
None
Page 78
2/16/2003
User’s Manual
Object SCSchedule :
Properties:
ScheduleMode as Long – 0=24-hours, 1=Start to Stop
StartMode as Long – 0=Absolute Time, 1=Sunrise, 2=Sunset
StopMode as Long – 0=Absolute Time, 1=Sunrise, 2=Sunset
StartAbsoluteTime as Double – 0<=t<1, fractional day
StopAbsoluteTime as Double – 0<=t<1, fractional day
StartSunriseOffset as Double – -1440<=t<=1440, minutes
StopSunriseOffset as Double – -1440<=t<=1440, minutes
StartSunsetOffset as Double – -1440<=t<=1440, minutes
StopSunsetOffset as Double – -1440<=t<=1440, minutes
Methods:
EnableNow(Time as Double) as Boolean – True if Time
falls in range
Objects:
None
CSV File Values Index:
TIME = 0 (time is represented as a double, use CStr(CDate(value)) to convert to a string)
VERSION = 1
YEAR = 2
MONTH = 3
DAY = 4
HOUR = 5
MINUTE = 6
SECOND = 7
WIND = 8
GUST = 9
DIRECTION = 10
IN_HUM = 11
OUT_HUM = 12
IN_TEMP = 13
OUT_TEMP = 14
BAROMETER = 15
TOTAL_RAIN = 16
DAILY_RAIN = 17
HOURLY_RAIN = 18
WEATHER = 19
0 = "Clear"
1 = "Few Clouds"
2 = "Scattered Clouds"
3 = "Broken Clouds"
4 = "Overcast"
5 = "Drizzle"
6 = "Rain"
7 = "Frozen Rain"
Page 79
2/16/2003
User’s Manual
8 = "Showers"
9 = "Mist"
10 = "Tornado"
11 = "Fog"
12 = "Smoke"
13 = "Hail"
14 = "Haze"
15 = "Ice Crystals"
16 = "Sand"
17 = "Snow Grains"
18 = "Snow"
19 = "Snow Showers"
20 = "Lightning"
21 = "Thundershowers"
CH1_TEMP = 20
CH1_HUM = 21
CH2_TEMP = 22
CH2_HUM = 23
CH3_TEMP = 24
CH3_HUM = 25
EVAP = 26
UV_INDEX = 27
SOLAR_RAD = 28
WIND_CHILL = 29
IN_HEAT_INDEX = 30
OUT_HEAT_INDEX = 31
DEW_POINT = 32
RAIN_RATE = 33
OUT_TEMP_RATE = 34
IN_TEMP_RATE = 35
BAROM_RATE = 36
CH1_TEMP_RATE = 37
CH2_TEMP_RATE = 38
CH3_TEMP_RATE = 39
Derived Values:
MAX_TEMP_TODAY = 40
MIN_TEMP_TODAY = 41
MAX_TEMP_YESTERDAY = 42
MIN_TEMP_YESTERDAY = 43
BAROM_TREND = 44
-1 = “Falling”
0 = “Steady”
1 = “Rising”
TEMP_TREND = 45
-1 = “Falling”
0 = “Steady”
1 = “Rising”
AVG_WIND_SPEED = 46
AVG_WIND_DIR = 47
Page 80
2/16/2003
User’s Manual
AVG_WIND_GUST = 48
MAX_GUST_YESTERDAY = 49
MAX_GUST_TODAY = 50
RAIN_YESTERDAY = 52
SEA_LEVEL_BAROM = 55
Page 81
2/16/2003