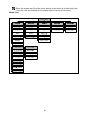
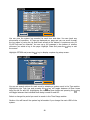
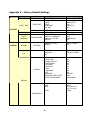
1
New 19” LCD Monitor DVR Combo
User’s Manual
English Version 1.0
Model : PCS-19/DVR-08
WARNING
RISK OF ELECTRIC SHOCK
DO NOT OPEN
WARNING: TO REDUCE THE RISK OF ELECTRIC SHOCK,
DO NOT REMOVE COVER (OR BACK).
NO USER-SERVICEABLE PARTS INSIDE.
REFER SERVICING TO QUALIFIED
SERVICE PERSONNEL.
The lightning flash with arrowhead symbol, within an equilateral triangle, is intended to
alert the user to the presence of uninsulated "dangerous voltage" within the product’s
enclosure that may be of sufficient magnitude to constitute a risk of electric shock.
The exclamation point within an equilateral triangle is intended to alert the user to the
presence of important operating and maintenance (servicing) instructions in the literature
accompanying the appliance.
COMPLIANCE NOTICE OF FCC:
THIS EQUIPMENT HAS BEEN TESTED AND FOUND TO COMPLY WITH THE LIMITS FOR A CLASS A
DIGITAL DEVICE, PURSUANT TO PART 15 OF THE FCC RULES. THESE LIMITS ARE DESIGNED TO
PROVIDE REASONABLE PROTECTION AGAINST HARMFUL INTERFERENCE WHEN THE EQUIPMENT
IS OPERATED IN A COMMERCIAL ENVIRONMENT. THIS EQUIPMENT GENERATES, USES, AND CAN
RADIATE RADIO FREQUENCY ENERGY AND IF NOT INSTALLED AND USED IN ACCORDANCE WITH
THE INSTRUCTION MANUAL, MAY CAUSE HARMFUL INTERFERENCE TO RADIO COMMUNICATIONS.
OPERATION OF THIS EQUIPMENT IN A RESIDENTIAL AREA IS LIKELY TO CAUSE HARMFUL
INTERFERENCE, IN WHICH CASE USERS WILL BE REQUIRED TO CORRECT THE INTERFERENCE AT
THEIR OWN EXPENSE.
WARNING:
CHANGES
OR
MODIFICATIONS
NOT
EXPRESSLY
APPROVED
BY
THE
PARTY
RESPONSIBLE FOR COMPLIANCE COULD VOID THE USER’S AUTHORITY TO OPERATE THE
EQUIPMENT.
THIS CLASS OF DIGITAL APPARATUS MEETS ALL
INTERFERENCE-CAUSING EQUIPMENT REGULATIONS.
REQUIREMENTS
OF
THE
CANADIAN
The information in this manual is believed to be accurate as of the date of publication. The seller is not responsible
for any problems resulting from the use thereof. The information contained herein is subject to change without
notice. Revisions or new editions to this publication may be issued to incorporate such changes.
2
Important Safeguard
1. Read Instructions
All the safety and operating instructions should be read before the
appliance is operated.
13. Damage requiring Service
Unplug this equipment from the wall outlet and refer servicing to
qualified service personnel under the following conditions:
2. Retain Instructions
The safety and operating instructions should be retained for future
reference.
A. When the power-supply cord or the plug has been damaged.
B. If liquid is spilled, or objects have fallen into the equipment.
C. If the equipment has been exposed to rain or water.
D. If the equipment does not operate normally by following the
operating instructions, adjust only those controls that are covered
by the operating instructions as an improper adjustment of other
controls may result in damage and will often require extensive
work by a qualified technician to restore the equipment to its
normal operation.
E. If the equipment has been dropped, or the cabinet damaged.
F. When the equipment exhibits a distinct change in performance —
this indicates a need for service.
3. Cleaning
Unplug this equipment from the wall outlet before cleaning it. Do
not use liquid aerosol cleaners. Use a damp soft cloth for cleaning.
4. Attachments
Never add any attachments and/or equipment without the approval of
the manufacturer as such additions may result in the risk of fire,
electric shock or other personal injury.
5. Water and/or Moisture
Do not use this equipment near water or in contact with water.
6. Accessories
Do not place this equipment on an unstable cart, stand or table. The
equipment may fall, causing serious injury to a child or adult, and
serious damage to the equipment. Wall or shelf mounting should
follow the manufacturer's instructions, and should use a mounting kit
approved by the manufacturer.
14. Replacement Parts
When replacement parts are required, be sure the service technician
has used replacement parts specified by the manufacturer or that have
the same characteristics as the original part.
Unauthorized
substitutions may result in fire, electric shock or other hazards.
15. Safety Check
Upon completion of any service or repairs to this equipment, ask the
service technician to perform safety checks to determine that the
equipment is in proper operating condition.
16. Field Installation
This installation should be made by a qualified service person and
should conform to all local codes.
17. Correct Batteries
Warning: Risk of explosion if battery is replaced by an incorrect type.
Dispose of used batteries according to the instructions.
This equipment and cart combination should be moved with care.
Quick stops, excessive force, and uneven surfaces may cause the
equipment and cart combination to overturn.
7. Power Sources
This equipment should be operated only from the type of power
source indicated on the marking label. If you are not sure of the type
of power, please consult your equipment dealer or local power
company.
8. Power Cords
Operator or installer must remove power and TNT connections before
handling the equipment.
9. Lightning
For added protection for this equipment during a lightning storm, or
when it is left unattended and unused for long periods of time, unplug
it from the wall outlet and disconnect the antenna or cable system.
This will prevent damage to the equipment due to lightning and
power-line surges.
10. Overloading
Do not overload wall outlets and extension cords as this can result in
the risk of fire or electric shock.
11. Objects and Liquids
Never push objects of any kind through openings of this equipment as
they may touch dangerous voltage points or short out parts that could
result in a fire or electric shock. Never spill liquid of any kind on
the equipment.
12. Servicing
Do not attempt to service this equipment yourself.
servicing to qualified service personnel.
Refer all
3
18. Tmra
A manufacturer’s maximum recommended ambient temperature
(Tmra) for the equipment must be specified so that the customer and
installer may determine a suitable maximum operating environment
for the equipment.
19. Elevated Operating Ambient Temperature
If installed in a closed or multi-unit rack assembly, the operating
ambient temperature of the rack environment may be greater than
room ambient.
Therefore, consideration should be given to
installing the equipment in an environment compatible with the
manufacturer’s maximum rated ambient temperature (Tmra).
20. Reduced Air Flow
Installation of the equipment in the rack should be such that the
amount of airflow required for safe operation of the equipment is not
compromised.
21. Mechanical Loading
Mounting of the equipment in the rack should be such that a
hazardous condition is not caused by uneven mechanical loading.
22. Circuit Overloading
Consideration should be given to connection of the equipment to
supply circuit and the effect that overloading of circuits might have
on over current protection and supply wiring.
Appropriate
consideration of equipment nameplate ratings should be used when
addressing this concern.
23. Reliable Earthing (Grounding)
Reliable grounding of rack mounted equipment should be maintained.
Particular attention should be given to supply connections other than
direct connections to the branch circuit (e.g., use of power strips).
Table of Contents
1. Getting Started…………………………………….………………………………………………………………6
2. Introduction………………………………………………………………………………………..…………………7
3. Major Operating Controls and Functions……………………………………………………….………….8
3.1 Front Panel……………………………………………………………………………………………………..8
3.2 Key Function………………………………………………………………………………………………...8
3.3 Rear Panel………………………………………………………………………………………….…….…10
3.4 System Configuration……………………………………………………………………………………12
3.5 Remote Controller………………………………………………………………………………………..13
3.6 Multi Function Display….……………………………………………………………………………....15
4. Combo DVR Mode........................………………………………………………………………….……16
4.1. Mouse Usage & Mouse Menu..........................………………………………………….……16
4.2. Live Monitoring Screen…………………………………………………………………………….……17
4.3. Menu Setup………………………………………………….....................………………….….....……19
4.3.1 System………………………………………………………...............………………….…………...20
4.3.1.1 System Information…………………………….....................…………………………..20
4.3.1.2 Date/Time…….…………………………………………………………………………………...21
4.3.1.3 User……………………………………………………….………………………………….……….23
4.3.1.4 Disk Management………………………………………………………………….…………...25
4.3.1.5 Setup & Update Manager……………..……………………..………………….…………...26
4.3.1.6 System Log……................................................….………………………………..27
4.3.2 Device…………………………………………......................………………………….…………...29
4.3.2.1 Camera……………………………………….......................………………………………..29
4.3.2.2 PTZ…………..….…………………………………….....................………………………...30
4.3.2.3 Display….…………………………………………………………………….…………….……….31
4.3.2.4 Remote Control…………………………………………………………………….…………...33
4.3.3. Event………………………………………………………………………………….……….…………...33
4.3.3.1 Alarm-In……..…………………………………………………………………………………….34
4.3.3.2 Motion……………………………………………………………………………………………...35
4.3.3.3 Video Loss………………………………………………………………………………………….37
4.3.3.4 Text-In………………………………………………………………………………………….…...38
4.3.3.5 System Event……………………………………………………………………………………..40
4.3.4. Record………………..……………………………………………………………………..…………...42
4.3.5. Archive……………………………………….……………………………………………….…………...45
4.3.6. Network…………..…………………………………………………………………………….………..46
4.3.6.1 Network……………………………………………………………………………………….…...47
4.3.6.2 Notification.………………………………………………………………………………………..51
4.4. Additional Key Function……………………………………………………………………………………...53
4.4.1 Key Add Function…………..………………………………………………………………………….53
4.4.2 Sequence Control……………………………………………………………………………………....54
4.4.3. Audio Control…………………………………………………………………………………….….….54
4.4.4. PTZ Control………………….………………………………….............…………………………...55
4
4.4.5. Channel Assign……....……….……………………………………………………………………….58
4.4.6. Shutdown Control....……….………………………………………………………………………….59
4.5. Playing Record Video………………………………………………………………………………………….59
4.6. Searching Record Video………………………………………………………………………………………61
5. VGA Mode ……………………….………………………………….....................…………………….……66
6. LCD Monitor Control………….………………………………………………………………………………….67
Appendix A – Factory Default Settings……..……………………………………………………………….69
Appendix B – System Log & Event Log……..………………………………………....................…….72
Appendix C – Pop-Up Messages………………….……………………………………………………………..73
Appendix D – Troubleshooting…………………………………………………………………………….…..75
Appendix E – Connector Pin Outs……..……………………………………………………………….....….76
Appendix F – Comprehension about Archive and Mirror function………………………………….77
Appendix G – Specifications……..……………………………………………………………………………….78
5
1. Getting Started
The system comes with the following components:
LCD Combo
Remote Controller
Instruction Manual
Installation CD
Client S/W Manual
Power Adaptor
Ethernet Cable
Note: Check your package to make sure that you received the complete system, including
all components shown above.
6
2. Introduction
Features
The 19” LCD monitor is an observation system with 8-channel color DVR processor.
The monitor operates as a triplex recorder offering up to 240 field/sec and four channel
audios.
The monitor has the following features:
•
19” TFT LCD Monitor with built-in H.264 DVR.
•
4 composite video input DIN connectors and 4 composite video input BNC connectors.
•
Simple operator menus and easy to use front panel controls.
•
Supports Recording, Playback, and networking at the same time.
•
Records up to 240 FPS (Frame Per Second) for NTSC with 352x240 resolution.
•
Full screen and Multi-screen camera sequencing with programmable sequence order
8 BNC model can be also supported.
and dwell times.
•
VGA Input - use your LCD Display as a PC monitor
•
Alarm handling with history log (32,000) and Pre-alarm recording.
•
Import and export the menu settings by USB.
•
Daylight savings time change function.
•
PTZ control via the RS-485 network using front panel keys.
•
Continuous Recording with the overwrite Mode.
•
Multiple Recording Mode (Schedule, Pre-Event, and Event Recording )
•
Multiple Search Engines (Date/Time, Calendar, Event, Text-In, Bookmark)
•
Four channel audio recording (Camera 1,2,3,4) and selectable one channel audio
playback.
•
Text Input for POS
•
Network Time Synchronization
•
Self-diagnostics with automatic notification including hard disk drive S.M.A.R.T.
protocol
•
On Screen Display includes Date, Time, Sequence, Alarm status, Motion, Freeze, Video
loss, Audio, Camera number and 8 -Character camera titles.
•
Alarm input polarity is user selectable.
•
Live or Recorded Video Access via Ethernet.
•
Programmable motion-detection.
•
Built-in Hard Drive with SATA interface.
•
Two USB 2.0 Ports
•
Infrared Remote Control.
7
3. Major Operating Controls and Functions
3.1 Front Panel
The configuration and function of the front panel are similar to those of VCR’s with a
multiplexer and requires similar operation. Certain keys have more than one function.
3.2 Key Function
The descriptions for each key used for the initial setting and operation of the system
are as below.
Function keys
NO
1
FUNCTION
, POWER
6
MENU
7
MARK
8
VIEW
9
SEQUENCE, SEQ
10
FUNCTION, Fn
11
AUDIO
12
13
MUTE
COPY
14
CAMERA NUMBER
VOL + (RIGHT)
15
VOL– (LEFT)
DESCRIPTION
Press the
key to turn the monitor ON. Press
key again
to turn the monitor OFF. The power LED illuminates while the
power switch is in the ON position. Press and hold the key during 3
seconds or more to shutdown the system.
Press the MENU key to enter or exit the menu setup mode. Press
and hold the key during 3 seconds or more to enter the LCD
Control Mode.
Press the MARK key to mark the point of the bookmark search in
the playback mode.
Press the VIEW key to display multi-screen. Pressing the key
again toggles the screen between Q1 (1, 2, 3, 4), Q2 (5, 6, 7, 8),
6(1+5), 8(1+7) and 3x3 multi-screen.
Press the SEQ key to enter or execute the sequence mode.
Press the Fn key to enter the function mode. Press and hold the
key during 3 seconds or more to change Display Mode. Pressing
the key again toggles DVR and VGA mode.
Press the AUDIO key to change the camera audio signal in the
multi-screen display mode. The audio channel is rotated from 1 to
4 whenever pressing this key.
Press the MUTE key to set the audio level to the minimum level.
Press the COPY key to enter the Archive setup mode
Pressing any camera key will cause that camera to
display full screen.
Press the VOL + (Volume UP) key to increase the volume level in
the live screen mode.
Press the VOL– (Volume DOWN) key to decrease the volume
level in the live screen mode.
8
16
, PAUSE
17
, STOP
18
, RECORD
19
20
PTZ
, SEARCH
21
, REWIND
22
, PLAY
23
, FAST FORWARD
24
USB
25
SPEAKER
Press the
mode.
key to freeze the video on the screen in the playback
key to return to the live screen mode while in the
Press the
playback mode
Press the
key to start schedule recording. Pressing the key
again toggles stop and start.
Press the PTZ key to enter the PTZ control mode.
key to enter Search mode.
Press the
Press the
key to play video backward at regular speed.
,
Pressing the key again toggles the playback speed between
and
. Pressing the
key plays step reverse one
frame in the Pause mode.
Pressing the
key plays video forward at regular speed.
key to play video forward at high speed. Pressing
Press the
,
and
the key again toggles the playback speed between
.
Two USB ports are provided to connect external hard disk
drives or USB memory stick for archiving video.
Sound from the camera locations or the playback audio can be
monitored from the internal speaker.
Arrow Keys
NO
FUNCTION
◄, LEFT
►, RIGHT
▲, UP
15
▼, DOWN
, ENTER
DESCRIPTION
Arrow keys are used to move the selection mark to each menu
or field. Pressing Up/Down arrow keys in a configuration
menu changes the value of a selected item. In addition, the
arrow keys can be used to pan or tilt a PTZ camera in the
PTZ mode.
The
key is used to select a submenu or menu items, or
save selections made in menus. Pressing this key while the
live monitoring mode displays the system information.
Indicators
NO
2
3
4
5
FUNCTION
POWER LED
DESCRIPTION
The POWER LED lights when the power is on.
NETWORK LED
RECORD LED
IR RECEIVER
Lights when a remote user is connected to the unit.
Lights when the unit is in the record mode.
Receives the signal of the IR transmitter.
Alternate Functions
NO
6
, SET
FUNCTION
Press the
key to store the preset while in the PTZ mode.
DESCRIPTION
10
, RUN
Press the
key to recall the preset while in the PTZ mode.
7
, IRIS CLOSE
Press the
key to control the iris close while in the PTZ mode.
11
, IRIS OPEN
press the
key to control the iris open while in the PTZ mode.
8
, FOCUS FAR
Press the
key to control the focus far while in the PTZ mode.
12
9
, FOCUS NEAR
Press the
key to control the focus near while in the PTZ mode.
Press the
mode.
Press the
mode.
key to zoom out the dome camera while in the PTZ
13
, ZOOM OUT
, ZOOM IN
key to zoom in the dome camera while in the PTZ
9
Connecting USB
Two USB ports on the front panel are provided to connect external hard disk, flash drives
for video clip copying or system upgrades. A USB mouse (not supplied) can be connected
to one of the ports. You can use the mouse to navigate through the screens and menus
much like you would on a computer.
Note: Position external drives close enough to the system so that you can make the cable
connections, usually less than 6 feet. Use the USB cable provided with the hard disk drive
to connect it to the system.
Supports USB 2.0 and up to 480Mbps (compatible with ver. 1.1)
3.3 Rear Panel
The description of each item in the rear panel follows.
NO
2
3
NAME
ALARM I/O TERMINAL
RS-485
VGA
LAN
DESCRIPTION
Connects to an alarm I/O device.
Connects to devices such as a keyboard and a PTZ camera.
Connects to devices such as a PC or Laptop.
A RJ-45 port compatible with 10/100Mbps.
4
CAMERA INPUT
6 Pin DIN Camera Inputs - Channel 1-4 (for cameras with 6
Pin DIN camera outputs), BNC Camera Inputs – Channel 58.
5
POWER
Connects to a power adaptor offered from manufacturer.
1
10
Connecting Camera Input
CAM1 ~ CAM4: DIN connectors for video source input.
CAM5 ~ CAM6: BNC connectors for video source input.
Note: You can use DIN to BNC converter supported as an optional cables in CAM1 to CAM4
input.
Connecting Alarm I/O
You can use external devices to signal the system to react to events. Mechanical or
electrical switches can be wired to INPUT (Alarm Input) and G (Ground) connectors.
The system can also activate external devices such as buzzers or lights. Connect the device
to the OUTPUT (Alarm Output) and G (Ground) connectors.
Note: To make connections on the Alarm Connector Strip, press and hold the button and
insert the wire in the hole below the button. After releasing the button, tug gently on the
wire to make certain it is connected. To disconnect a wire, press and hold the button
above the wire and pull out the wire.
Connecting VGA
Connect a PC (or other devices with a VGA Output) to the Combo System. The Combo
System will perform as a Computer Monitor (when in VGA Mode).
11
Connecting RS485
The system can control a PTZ (Pan Tilt, Zoom) camera using a RS-485 half-duplex
serial interface. Please refer to “5.8.2 SERIAL” of the Instruction Manual and the
operating manual provided by the PTZ camera manufacturer for detailed instructions
for RS485 connection. The RS485 connection is equipped with the Push 2 pin connector,
and the specification of each pin is described below.
Connecting LAN
The system can be networked using the 10/100Mb Ethernet connector. Connect a Cat5
cable with an RJ-45 jack to the rear connector. The system can be networked with a
computer for remote monitoring, searching, configuration and software upgrades.
3.4 System Configuration
12
3.5 Remote Controller
13
The meaning of each button of the Remote Controller is as below.
Function Buttons
NO
FUNCTION
1
, POWER
2
, RECORD
3
SEQ
4
VIEW
5
MENU
6
AUDIO
7
LCD(MODE)
8
MUTE
9
PTZ
10
11
12
, LOCK
MARK
, SEARCH(ACK)
DESCRIPTION
Press the
button to turn the monitor ON. Press the
button
again to turn the monitor OFF. The power LED illuminates while
the power switch is in the ON position. Press and hold the key
during 3 seconds or more to shutdown the system.
Press the
button to start schedule recording. Pressing the
button again toggles stop and start.
Press the SEQ button to enter or execute the sequence mode.
Press the VIEW button to display multi-screen. Pressing the
button again toggles the screen between Q1 (1, 2, 3, 4), Q2 (5, 6,
7, 8), 6(1+5), 8(1+7) and 3x3 multi-screen.
Press the MENU button to enter or exit the programmable setup
mode. Press and hold the button during 3 seconds or more to
enter the LCD Control Mode.
Press the AUDIO button to change the camera audio signal in the
multi-screen display mode. The audio channel is rotated from 1 to
4 whenever pressing this button.
Press the LCD(MODE) button to change current display mode.
Pressing the button again toggles DVR and VGA mode.
Press the MUTE button to set the audio level to the minimum
level.
Press the PTZ button to enter the PTZ control mode.
button to lock the keys on the front panel or the
Press the
remote controller from functioning.
Press the MARK button to mark the point of the bookmark search
in the playback mode.
Press the SEARCH (ACK) button to enter the Search mode.
Arrow Keys
NO
1
2
3
4
5
FUNCTION
▲, UP
◄, LEFT
►, RIGHT
▼, DOWN
ENTER
DESCRIPTION
Arrow buttons are used to move the selection mark to each menu
or field. Pressing Up/Down arrow buttons in a configuration menu
changes the value of a selected item. In addition, the arrow
buttons can be used to pan or tilt a PTZ camera in the PTZ mode.
The ENTER button is used to select a submenu or menu items, or
save selections made in menus. Pressing this button while the live
monitoring mode displays the system information.
PTZ Keys
NO
FUNCTION
DESCRIPTION
button to zoom out the dome camera while in the
1
, ZOOM OUT
Press the
PTZ mode.
2
, ZOOM IN
Press the
mode.
button to zoom in the dome camera while in the PTZ
3
, FOCUS FAR
Press the
mode.
button to control the focus far while in the PTZ
4
, FOCUS NEAR
Press the
mode.
button to control the focus near while in the PTZ
14
5
, IRIS CLOSE
Press the
mode.
button to control the iris close while in the PTZ
6
, IRIS OPEN
press the
mode.
button to control the iris open while in the PTZ
7
, SET
Press the
button to store the preset while in the PTZ mode.
8
, RUN
Press the
button to recall the preset while in the PTZ mode.
PLAY Keys
NO
FUNCTION
1
, REWIND
2
, PLAY
3
, FAST FORWARD
4
5
6
7
, STEP REVSERSE
DESCRIPTION
Press the
button to play video backward at regular speed.
,
Pressing the button again toggles the playback speed between
and
.
Pressing the
button plays video forward at regular speed.
button to play video forward at high speed. Pressing
Press the
,
the button again toggles the playback speed between
.
and
button to play step reverse one frame in the Pause
Press the
mode.
, PAUSE
button to freeze the video on the screen while in the
Press the
playback mode.
, STEP FORWARD
Press the
mode.
, STOP
button to return to the live screen mode while in the
Press the
playback mode
button to play step forward one frame in the Pause
3.6 Multi Function Display
This Combo System contains a multi-function display, which allows the system to function
in several modes:
• Mode 1: Combo DVR Mode - Displays the Combo DVR with live camera view.
• Mode 2: VGA Mode - Displays the device (i.e. a Computer) connected to the VGA
Port on the LCD monitor.
Press the Fn key on the front panel during 3 seconds or more, and you can switch to the
Monitor to VGA mode from DVR mode. Pressing the key again toggles DVR and VGA mode.
You can also change display mode with Remote Controller. Press the LCD(MODE) button to
change display mode in the Remote Controller. Pressing the key again toggles DVR and
VGA mode.
NOTE: The Combo System will continue to record while in other modes. This provides an
advanced level of Covert Surveillance.
15
4. Combo DVR Mode
4.1. Mouse Usage & Mouse Menu
Operate in the same way as for a PC. After locating the arrow-like mouse pointer on the
screen by moving the mouse, click the left mouse button to select an item when the mouse
pointer is on the item. Basic functions include left mouse button click, right mouse button
click, and wheel rotation.
When in one of the multi-view formats (e.g., 2x2 or 3x3), clicking the mouse button on a
camera image switches that camera to full screen. Clicking the mouse button again returns
to the previous multi-view format. In a full screen mode, you can change channel number
by rotating the mouse wheel.
Clicking the right mouse button during live monitoring displays the following menu:
Selecting Setup Menu, Key Add Function… and Search is the same as pressing the Fn , SEQ
and MENU keys as described in “3.2. Key Function”.
Clicking the right mouse button again during a live menu screen returns to the previous
menu screen. In a menu setup mode, you can change a value by rotating the mouse
wheel.
Note: You must use a three button mouse for the proper operation.
16
4.2. Live Monitoring Screen
As soon as the system completes its initialization process, it will begin showing live video
on the LCD monitor and playing live audio through the speaker on the front panel. The
default mode is to display all cameras at once. Pressing any camera button will cause that
camera to display full screen. It displays live video and plays live audio until the user enters
another mode.
Pressing the VIEW key on the front panel cycles the system through the different display
formats.
The system can be set to display full-screen video for a preset dwell time when an Event
occurs. Video from the lowest camera number associated with the event sensor will be
displayed, the system will return to the previous screen format after event monitoring dwell
time expires. While the event monitoring is activated, the monitoring for all other
subsequent events will be ignored. Pressing individual camera buttons or the VIEW key
during event monitoring releases the current event monitoring and displays the selected
camera or returns to the previous screen format.
Screen Icon
The description of each icon in a live screen and their meanings follow:
: When the system detects alarm events, the Alarm Input icon displays at the top of
the screen.
: When the system activates internal speaker, the Audio icon displays at the top of
the screen.
: When the system detects motion events, the Motion icon displays at the top of the
screen.
: When the remote clients are connected, the Network icon displays at the bottomright corner of the screen.
: When the camera is set as PTZ camera, the PTZ icon displays at the top of the
screen.
: When the system is in the sequence mode, the Sequence icon at the bottom-right
corner of the screen.
: When the system detects video-loss events, the Video-Loss icon displays at the
top of the screen.
: When the system inactivates internal speaker, the Audio icon displays at the
top of the screen.
: When the system is in the recording mode, the Record icon displays at the top-left
corner at the screen.
: When the system is in the schedule recording mode and the internal storage is
on recording, the Storage icon displays at the bottom-right corner of the screen.
: When the system can’t find internal storage or the storage is in fault during
recording, this icon displays in the bottom-right of corner at the screen.
: When the system is in the mirroring mode and the mirror device is normal, the
mirror icon displays in the bottom-right of corner at the screen.
17
: When the system can’t find the mirror device or the device is in fault during the
mirroring, this icon displays in the bottom-right of corner at the screen.
Menu Tree
18
4.3. Menu Setup
Setup mode allows you to configure major functions of the system. Your system has 8
setup menus and each menu is displayed as an icon. Click the setup menu icon and a
submenu will appear for detailed settings.
Pressing the MENU key on the front panel, the slide menu, or the remote controller will
display the Setup window.
Setup Icon
The setup screen has eight icons representing each menu on the top, and clicking an
icon after moving the cursor will display a submenu for detailed settings.
System
Device
Event
Record
19
Network
4.3.1 System
The system menu enables basic configurations for the DVR such as Time/Date, Language,
User, Disk Management, Information, Factory Default, S/W Update, System Log and Screen
Save.
Select the
icon in the main menu window.
4.3.1.1 System Information
Highlight INFORMATION in the system menu Mode and press the
screen appears.
key. The Information
In the Information screen, you can see the system name, System ID number and software
version number, the video type, and network information.
20
You can name the System Name, assign a System ID number. Highlight the System Name
key. A virtual keyboard appears that you can use to enter a System
box and press the
key.
Name. Once you have entered your title, highlight OK and press the
key. Change the number by
Highlight the box beside System ID and press the
highlighting it and using the Up and Down arrow keys to increase and decrease the number
from 0 to 99.
Note: You can also see this page when the SET button on the front panel in the Live
Monitoring mode.
4.3.1.2 Date/Time
Highlight Date/Time in the System menu and press the
screen appears.
key. The Date/Time setup
This menu enables modification of correct time and date. Highlight the first box beside
key. The individual sections of the date will highlight. Use the Up
Date and press the
and Down arrow keys to change the number. Use the Left and Right arrow keys to move
key.
between month, date and year. Once you have the correct date, press the
The display format for time and date can be changed. Highlight the Format box beside
key. Select from the three available date formats and press the
Date and press the
key to save your selected format.
Highlight the box beside Time Zone and press the
key.
list and press the
Highlight Use Daylight Saving Time and press the
between On and Off.
key. Select your time zone from the
key. Pressing the
key toggles
Note: The Factory default of time zone is “(GMT-05:00) EASTERN TIME (US & CANADA)”.
Highlight the Time Sync tab, and the Time Sync setup screen appears. You can set up time
21
synchronization between the Combo unit and standard time servers that are available in
most time zones and countries.
key. Change or enter the IP
Highlight the box beside Time Server and press the
address of a Time Server by highlighting them and using the Up and Down arrow keys to
increase or decrease the number value.
key. Set the time interval for
Highlight the box beside Interval and press the
synchronization from 30 minutes to 1 day at various time intervals.
Press the Save key to save your changes and exit the menu. Press the Cancel key to cancel
your changes and exit the menu.
Note: You can use the domain name instead of IP address if you already set up the DNS
Server when setting network.
22
4.3.1.3 User
key. The User setup screen displays the
Select User in the System menu and press the
authorized users. You can add and delete and users. When adding a user, you can assign
authority levels to the users.
This menu manages one administrator account and user accounts. User and Net User
can’t enter this page.
Admin can set ID, password and access rights for a user. When you highlight each
key, the Password setup screen will appears.
password field and press the
Maximum of 8 letters can be typed including spaces for an identity and password.
Note: Factory default password is blank.
When you highlight each access field and press the
appears.
23
key, the Access setup screen will
key will toggle between all authority levels
Highlighting the ALL box and pressing the
being turned On and Off. Highlighting the individual authority level boxes and pressing the
key will toggle between that authority level being turned On and Off.
In the Access setup screen, each type of authority is described below.
-. Playback: a right to search and play saved videos
-. Snapshot: a right to execute the snapshot in the playback mode
-. PTZ: a right to control the PTZ camera in the live screen mode
Highlighting the box beside Auto Logout allows you to select from a list of times that the
user will be automatically logged out.
The options are: Never, 1 min., 3 min., 5 min., 10 min., 15 min., 20 min., 30 min. and 1 hr.
Highlight the Remote tab, and the Remote setup screen appears.
Admin can also set ID for maximum 10 network users. When you highlight each ID field
key, a virtual keyboard will appears to allow you to enter the ID.
and press the
Set the Password and Access rights for each network user.
Press the Save button to save your changes and exit the menu.
24
4.3.1.4 Disk Management
Recorded data is saved in a storage device. The system has basically one internal
storage device and can be equipped with up to 2 USB devices. The system informs the
user of the name, and basic hardware information of each device to make the
management easier.
Highlight Disk Management in the System menu and press the
setup screen appears.
key. The Disk Manager
In case of unformatted storage, you can see Unformatted in the Format column. Press the
Format column to format storage.
Highlight the Status tab, and the Remote setup screen appears. You can see the status of
hard disk connected to the Combo System.
The current temperature of the hard disk will be displayed in the Temperature column. The
Temperature column displays Good if the temperature is below the limit and Bad if the
25
temperature is above the limit.
If an IDE hard disk installed in the system supports S.M.A.R.T. (Self-Monitoring Analysis
and Reporting Technology) monitoring program, the status of the installed IDE hard
disk is displayed.
The current status of the Disk S.M.A.R.T. will be displayed in the S.M.A.R.T column. The
S.M.A.R.T field displays Good if the Disk S.M.A.R.T. is good and Bad if it is bad.
The Disk Temperature and S.M.A.R.T. status is monitored in real-time.
4.3.1.5 Setup & Update Manager
User can update software with a USB memory stick. To update the software, connect a USB
device containing the update package file to the system.
Highlight Update Manager in the system menu and press the
screen appears.
key. The Update Manager
You can import the setup data from a USB memory stick or export current settings to
an USB memory. After saving settings by pressing the Export button, you can apply
those settings to another device by pressing the Export button.
User can import the setup data from a USB memory stick or export current settings to
an USB memory. After saving settings by pressing the Export button, you can apply
those settings to another device by pressing the Export button.
key. Select the desired setup file and press
Highlight Setup – Import and press the
the Import button to import the selected settings and change the Combo settings
accordingly.
26
key. The Setup Export screen appears. Enter
Highlight Setup – Export and press the
the file name you want to export in the File Name box. A Maximum of 16 letters can be
typed for a file name.
key. Factory Default will only be
Highlight Setup – Factory Default and press the
used on the rare occasions that you want to return all the settings to the original
key will
factory settings. Highlighting the individual item boxes and pressing the
toggle between that individual item being turned On and Off. Highlight OK button and
key to do Factory Default.
press the
User can also update system software with a USB memory stick. Insert the USB stick
containing the update file and the screen displays software version to be updated in
the box beside New. Press the ▶ button to start an update. The system restarts
automatically after the update.
4.3.1.6 System Log
Highlight System Log in the system menu and press the
appears.
27
key. The System Log screen
You can view the system log recorded for each time and date. You can check any
abnormality of operation. 10 logs are displayed per page and you can scroll through
the log pages by using the Up and Down arrows at the bottom. A maximum entry of
20,000 logs can be recorded. You can see a full message in the bottom of window
key to exit
whenever you select a log in the page. Highlight Close and press the
the screen.
Highlight OPTION and press the
key to display a system log setup screen.
You can set search options for each event by selecting a system event in the Type section.
key will toggle between all item boxes
Highlighting the Type box and pressing the
key
being turned On and Off. Highlighting the individual item boxes and pressing the
will toggle between that individual item being turned On and Off.
Select or change the period you want to search in the Time Range section.
Caution: You will lose all the system log information if you change the main HDD of the
system.
28
4.3.2. Device
This menu allows setting event options such as Camera, PTZ, and Display. Select the
icon in the main menu window.
4.3.2.1 Camera
key. The Camera setup screen
Highlight Camera in the Device menu and press the
appears. You can configure settings for the input and output of the system.
You can change the Title of each camera using the virtual keyboard and a maximum of 8
letters can be typed for a camera name. You can also determine which cameras will display
on the monitors by selecting each check box in the Covert column.
Note: If the Covert is enabled, the corresponding camera and OSD will not be displayed
on the live monitoring and playback screen.
29
Highlight the Adjust tab and the Adjust setup screen appears.
You can configure the brightness, contrast, hue, and saturation for each camera.
key to set the value of color to the factory default.
Highlight Reset and press
key to apply your settings to all channels. Highlight
Highlight Apply All and press
key to save your settings and exit the screen.
Close and press the
4.3.2.2 PTZ
key. The PTZ setup screen appears.
Highlight PTZ in the Device menu and press the
This menu enables PTZ-camera-related configurations such as controlling the direction,
zoom, and iris.
Highlight the box in the No column for the PTZ camera you wish to configure and press the
key. A list of PTZ devices appears. Select your camera from the list and press the
key. You will need to connect the camera to the RS485 connector on the back of the
Combo unit.
You can assign IDs to each camera by highlighting the box under the ID heading and
30
key. Change the number by highlighting it and using the Up and Down
pressing the
arrow keys to increase and decrease the number. The PTZ ID number can be set from 0 to
256.
Note: Refer to “4.4.3. PTZ Control” for the detailed operation.
4.3.2.3 Display
key. The Display screen appears.
Highlight Display in the Device menu and press the
The Display screen allows you to select what information will be displayed on the monitor.
key will toggle between all item boxes being
Highlighting the OSD box and pressing the
key toggles that item On and
turned On and Off. Highlighting an item and pressing the
Off. When an item is On, there is a checkmark in the box beside it.
The following items can be turned On or Off:
• Date/Time - Displays time and date.
• Audio Output - Displays an icon,
when the camera is set as an audio output.
• Event Mark - Displays an icon,
when an alarm event occurs for an event-linked
camera.
• Network - Displays an icon,
when a remote client is connected.
• Disk Size - Displays internal storage usage as an icon.
• User - Displays the ID logged in.
• Camera Name - Displays the camera title.
• PTZ - Displays an icon,
when the camera is set as a PTZ
key. A drop-down menu displays the
Highlight the box beside Language and press
key.
available languages. Highlight the desired language and press the
You can set the dwell time for the sequence. A sequence causes the system to sequence
cameras, and the system can sequence cameras. The system sequences through the
cameras and displays them full screen.
31
You can adjust the display dwell time and dwell intervals is ranging from 1 second to 99
key. A drop-down menu
seconds. Highlight the box beside Dwell Time and press
key.
displays the available items. Highlight the desired time and press the
Note: Press the SEQ key on the front panel to execute the sequence in the live monitoring
screen.
key. A drop-down
Highlight the box beside Mode in the Event Screen section and press
key.
menu displays the available modes. Highlight the desired mode and press the
When an event occurs in the live screen mode, the screen is changed to the corresponding
channel automatically and all the event screens are displayed. When the event ends after
the event hold time, the screen is returned to the live monitoring screen. Select Changed
mode to enable the event screen function.
Highlight the Screen Save tab and the Screen Save setup screen appears.
Screen Power Saving On or Screen Power Saving Off. The factory default is Screen Power
Saving Off. It controls the power of screen automatically according to the value in the Type
box. Time causes the system to turn on the power of screen once the time is same as the
value in the Screen On Time and turn off the power of screen once the time is same as the
value in the Screen Off Time.
Note: In case of Time type, you can turn on the power of screen by pressing the POWER
key on the front panel while the Screen Save mode.
Auto type causes it to turn off the power of screen once there isn’t any user operation in
the system for Timeout. The options are: 1 Min, 5 Min, 10 Min, 30 Min, and 1 Hour.
In case of Auto type, the system turns on the power of screen by detecting any user
operation while the power saving mode.
32
4.3.2.4 Remote Control
Highlight Remote Control in the Device menu and press the
setup screen appears.
key. The Remote Control
If the RS232 port and RS485 port are in use for PTZ control, networking or text input, the
remote keyboard cannot be configured.
Highlight the box beside Product Type and select the device from the list.
Note: For a proper operation, you must setup the correct Baud Rate, Parity, Data Bits and
Stop Bits for the device you are connecting to the Combo System.
4.3.3. Event
This menu allows setting event options such as Alarm-In, Motion, Video Loss, Text-in,
icon in the main menu window.
System Event, and Action. Select the
33
The system starts recording with settings configured here when an event occurs. The
types of event include External Alarm, Motion Detection, Video Loss, Text-in and
System Event. An occurred event can be notified by Alarm Output (1 Channel), Buzzer,
Calling, Email, and Callback.
4.3.3.1 Alarm-In
Highlight Alarm-In in the Event menu and press the
appears. You can configure settings for the alarm input.
key. The Alarm-In setup screen
Set the hold time an event lasts for the specified hold time from the point of detection of
key. Select an item
an alarm input. Highlight the box beside Hold Time and press the
key.
from the list and press the
key will toggle between all item boxes being
Highlighting the No box and pressing the
turned On and Off. When an item is On, there is a checkmark in the box beside it.
You can activate an alarm event by marking checkbox beside event number. The
system can make an event occur by detecting each channel’s signals coming from
alarm devices connected to the alarm input connector. Set the correct polarity in the
Type column so that an event lasts for the specified hold time from the point of the
event occurrence.
You can set the actions the system will take whenever it senses an input on one of its
key.
alarm input connectors. Highlight a box in the Action column and press the
Action screen appears.
34
Note: You can send event information to a specified e-mail address at the time of
event occurrence if you select E-Mail in the Action screen.
Note: You can send event information to a specified remote client at the time of event
occurrence if you select Network in the Action screen.
Note: For a proper operation of E-Mail and Network, the settings for E-Mail and LAN in
Notification of the Network menu should be configured.
You can select the cameras that you want the system to record whenever it detects an
input on the associated alarm input. Highlight a box in the Record column and press
key. Record screen appears.
the
Select record channel and press OK button.
4.3.3.2 Motion Detection
The Combo unit has built-in video motion detection. Video motion detection can be turned
key. The
ON or OFF for each camera. Highlight Motion in the Event menu and press the
Motion setup screen appears.
35
Set the hold time an event lasts for the specified hold time from the point of detection of a
motion change.
You can activate a motion event by marking checkbox beside event number. A rate of
motion of video signal can be processed as an event.
key. Zone setup screen appears
Highlight a box in the Zone column and press the
and it is laid over the video for the selected camera. You can set up motion detection
zones by selecting or clearing blocks. The area of camera sight is divided into 16 blocks
horizontally and 16 blocks vertically.
key allows you to adjust the Combo’s
Highlighting the Sensitivity box and pressing the
sensitivity to motion. There are five settings with 1 being the least sensitive and 8 being
the most sensitive.
key allows you to display video with a grid overlaid.
Highlighting Grid and pressing the
Highlighting Set All and pressing the
key allows you to select the entire blocks.
key allows you to unselect all the selected
Highlighting Clear All and pressing the
blocks. An unselected block is displayed in pink during the zone setup.
36
Highlighting Inverse and pressing the
and select previously unselected blocks.
key allows you to unselect selected blocks
key allows you to observe how the Combo is
Highlighting Test and pressing the
reacting to motion. When in the motion viewing mode, the detection zone of video will
be displayed. Any detected motion within the zone will be displayed in green.
Note: Pressing Grid and Test again toggles each function between on and off.
You can adjust the minimum number of detection blocks that must be activated to trigger a
key allow you to adjust the
motion alarm. Highlighting the Min. Blocks box pressing the
minimum number of detection blocks. Smaller numbers provide greater sensitivity because
fewer detection blocks must be activated.
Highlight the Action tab and the Action setup screen appears.
Set the Action and Record column and press Save button to save your changes and exit
Motion setup screen.
4.3.3.3 Video Loss
Highlight Video Loss in the Event menu and press the
screen appears.
37
key. The Video Loss setup
Set the hold time so that an event lasts for the specified hold time from the point of the
event occurrence.
You can activate a video loss event by marking checkbox beside event number. When there
is a channel with no input signal from a video input connector, it can be processed as an
event.
Set the Action and Record column and press Save button to save your changes and exit
Motion setup screen.
4.3.3.4 Text-In
Highlight Text-In in the Event menu and press the
appears.
key. The Text-In setup screen
This menu enables the system to process a text-in input of text such as a POS (Point of
Sale; i.e., cash registers) device as an event. This screen allows you to configure the LCD
Combo for each text-in device.
38
You can activate a text-in event by marking individual checkbox in the No column. Checking
the Display checkbox causes the Combo to overlay text-in data on the live monitoring
screen.
Highlight the box under the Setup heading, and press the
Highlight the box beside Text-In Product, and press the
button to select your device.
button. Select your device
from the list.
NOTE: The following description is for a Generic Text Device. The screen changes for
different types of text input devices, and there will be different parameter boxes for you to
enter information.
key. Use the
Highlight the box beside Start in the Transaction section, and press the
virtual keyboard to enter the Transaction Start string. Refer to the device manufacturer’s
documentation for the text string that the device first sends when a transaction starts.
If you want the Combo to react to any character sent from the text input device, left Start
box a blank.
key. Use the virtual keyboard
Highlight the box beside Transaction End, and press the
to enter the Transaction End string. Refer to the device manufacturer’s documentation for
the text string that the device sends when a transaction ends.
The Combo considers an input of the text type in the End box as a termination of a
transaction.
key. Use the virtual keyboard to
Highlight the box beside Line Delimiter, and press the
enter the character(s) that the device uses to indicate the end of a line.
A set of characters which will determine the end of a line can be typed in the Delimiter box.
If nothing is typed, “Carriage Return + Line Feed” replaces it.
A set of characters to be excluded from the transaction record can be typed in the Ignore
key. Use the virtual keyboard to
box. Highlight the box beside Ignore, and press the
enter any strings of text that you want the Combo to ignore. Refer to the device
manufacturer’s documentation for text strings that the device sends during transactions, so
39
you will know which ones you do not want recorded.
Highlight the Action tab and the Action setup screen appears.
Set the Action and Record column.
NOTE: You can use the POS device and expand to maximum 4 devices with the RS232,
RS485 or USB-Serial ports. In case of the 8 BNC model, you can’t use RS232 port.
NOTE: When using the USB to serial text-in device, do NOT remove the USB cable from
the port while the system is running.
4.3.3.5 System Event
key. The System Event
Highlight System Event in the Event menu and press the
setup screen appears. The Disk Almost Full, Disk Full, Disk Temperature and S.M.A.R.T.
in the System Event are supported.
This menu makes the system process any abnormality of the system as an event by
carrying out regular checkups. The types of system operation that can be used as an event
include DISK Temperature and S.M.A.R.T.
40
button. That activate the
Highlight the box under the Event heading, and press the
System Event and the Combo System will trigger an alert whenever it detects the defined
event.
Set the Hold Time and Action column and press SAVE button to save your changes and exit
Motion setup screen.
Highlight the Disk tab and the Disk setup screen appears.
Overwrite in the Combo System cause it to overwrite older recordings when the hard disk
is full. (Overwrite, Stop). The factory default is Overwrite. Setting the Combo System to
Stop causes it to stop recording once the hard disk is full.
In case of No Overwrite, You can set Disk Full Action once the hard disk is full. Set the
percentage of used disk space at which the disk full warning message is displayed when
the record mode is Stop. (OFF, 80% - 99%)
You can set the Disk Temperature, and the Combo will trigger an alert whenever it
exceeds the defined threshold temperature. Select either ºC (Celsius) or ºF
key.
(Fahrenheit), and press the
The Disk Temperature and S.M.A.R.T. status is monitored in real-time.
41
4.3.4. Record
This menu allows setting recording attribute such as Resolution, Speed, Quality, and
Schedule. As a setup for the main function of the system, each menu should be fully
understood for appropriate operation.
Select the
icon in the main menu window.
SETUP MENU
RECORD
Record
Archive
EXIT
Record
Highlight Record in the Record menu and press the
appears.
key. The Record setup screen
Set the audio and video synchronization, speed, quality and resolution of recording for each
camera. . Resolution indicates size of the recorded images and there are three levels of 704
x 576, 704 x 288, and 352 x 288. Speed indicates the recording speed and a limit is from 1
to 25 regardless of resolution. Quality indicates the recording quality and the three levels
are Best, Normal, and Low.
42
Schedule
Highlight the Disk tab in the Record menu and the Disk setup screen appears.
Set a weekly recording schedule for each channel. A combination of a schedule and an
event is possible.
Highlight the upper-most cell of the left-most column or a name of the day of the week and
key to set a schedule for the entire week or a whole day, respectively.
press the
Schedule (Green), Event (Orange), Schedule & Event (Green & Orange) will be displayed
key to set recording settings for the
alternatively. Highlight a box press the
corresponding day.
In case of using a mouse, drag or click area by a box unit at first. Then, set recording
settings for the corresponding day. You can change setting value by using a mouse wheel.
key to apply the same settings to all channels.
Highlight Apply All and press the
key to save your changes and exit the schedule setup
Highlight Save and press the
screen.
Pre-Event
Highlight the Pre-Event tab in the Record menu and the Pre-Event setup screen
appears.
When the system is in the Event Record mode it is possible to have it record images before
the event occurs. The Pre-Event screen allows you to define how to handle pre-event
recording.
43
Activate pre-event recording by marking checkbox beside Enable.
You can turn individual channels On or Off for pre-event recording and set the amount of
time to record prior to the event by adjusting the Dwell. The Dwell Time can be set from 5
to 30 seconds regardless of resolution.
Note: When the system is in the Time or Time & Event mode, it ignores the pre-event
settings and follows the time settings.
Settings
Highlight the Settings tab in the Record menu and the Settings setup screen appears.
Overwrite in the Record Mode field cause the system to overwrite older recordings when
the hard disk is full. (Overwrite, Stop). The factory default is Overwrite. Setting the system
to Stop causes it to stop recording once the hard disk is full.
You can activate Mirror by marking checkbox beside.
44
Note: A Mirror means the system record a video and copy it to the external disk at the
same time. For a proper operation, the capacity of an external disk should be bigger than
or equal to the one of the internal hard disk.
Caution: If you disconnect the USB cable connected to the USB port or the power from the
USB device while mirroring, the system display a warning message and execute an e-mail
notification.
Caution: Do NOT disconnect the USB Cable or the power from the device while Mirror. If
the USB cable is disconnected while mirroring, mirrored data might be lost.
4.3.5 Archive
key. The Archive setup screen
Highlight Archive in the Record menu and press the
appears. You can change configurations for the control of all archive devices and for the
archive of recorded data in this menu.
key. You can select Backup or Clip-Copy in the list.
Highlight the Type box and press the
Selecting Backup allow manual backup of selected range by setting the time and date. ClipCopy allows clip copy of selected clips.
The Combo unit supports the USB HDD for backup device and an USB DVD-RW, USB CDRW and an USB Memory Stick for clip-copying device.
The total capacity and available space of an archive device connected to the Combo unit is
displayed in the Storage box.
Change the Days and Time Range, the Channel you want to archive and press the Estimate
button to calculate the size of the data to be archived. The size is displayed in the File Size
key. Use the virtual keyboard to
box. Highlight the box beside File Name, and press the
enter the name of the file to be archived.
45
Highlight the Start button and press the
displayed in the Progress box.
key to start archive. The progress bar will be
key to renew the storage information of the
Highlight the Update button and press the
device. In case that there is no device for an archive in the Combo unit, the Update and
Start button will be inactivated.
Note: Please check with your installer about purchasing and installing an archive device.
Note: The maximum data size to be copied for Clip-Copy is limited to 2GB and the
copied clip data can be played by Clip Player in the windows PC.
Note: You can enter Archive setting menu directly in the Live monitoring mode by
pressing the Copy key in the front panel.
Caution: Removing a connected backup device during the backup process may result in
serious damage to the system.
4.3.6. Network
You can configure settings for TCP/IP, the serial communication, and DDNS. Select the
icon in the main menu window.
46
4.3.6.1 Network
Highlight Network in the Network menu and press the
appears.
key. The Network setup screen
Lan
Highlight the Type box and press the
key. You can select Manual or DHCP in the list.
You can set the information related to TCP/IP. Selecting the DHCP in the Type box will
deactivate TCI/IP-related information below.
Note: You’ll need to get the IP Address or Netmask, Gateway from your network
administrator.
Change the numbers by highlighting them and using the Up and Down arrow buttons to
increase or decrease the number.
The factory default LAN settings are:
IP Address:
192.168.12.172
Gateway:
192.168.12.173
Subnet Mask:
255.255.255.0
Highlight the box beside DNS Server. Press the Up and Down arrow buttons to set the IP
address of the DNS server. You can use the domain name instead of IP address when you
set up the address of Time Server or DDNS Server if you set up the DNS Server.
Highlight the Port Number box and press the
appears.
47
key. The Port Number Setup screen
This menu allow configuration of port numbers for IRMS Client Setup, IRMS Client Live,
IRMS Client Playback, IRMS Client Download and Web Browser.
The factory default Port settings are:
Setup:
3000
Live:
3001
Playback:
3002
Download:
3003
Web:
80
Note: When using a firewall, you need to change the port numbers to those allowed by the
firewall.
Serial
Highlight the Serial tab in the Network setup menu and the Serial setup screen appears.
This menu allows configuration of the serial communication to control devices such as
a PTZ, keyboard and POS device.
You can activate a serial port by marking individual checkbox in the Port column.
key to select serial device.
Highlight the box under the Use heading, and press the
You can select one device of PTZ, Remote Control, and Text-In in the list.
48
Highlight the box under the Setup heading, and press the
settings.
key to configure setup
Setup correct settings for the Baud rate, Parity, Data bit, and Stop Bit respectively.
NOTE: In case of 8 BNC model, RS-232 port do not supported.
DDNS (Dynamic Domain Name Server)
Highlight the DDNS tab in the Network setup menu and the DDNS setup screen appears.
49
You can activate the DDNS by marking checkbox beside Enable. It causes the system to
connect to DDNS server. If you don’t enable the DDNS, there is no service.
Enter the Domain Name, User Name and Password information received in email during the
DDNS setup process at http://www.dyndns.com
key. Use the virtual keyboard to
Highlight the box beside Domain Name and press the
enter the domain name string.
key. Use the virtual keyboard to
Highlight the box beside User Name and press the
enter the user name string.
key. Use the virtual keyboard to enter
Highlight the box beside Password and press the
the password string.
For example, “peter.dyndns.org” user will enter only peter in the Domain Name box.
“.dyndns.org” will be included internally. You can use up to 30 characters.
key. to test the DDNS connection. If the
Highlight the Check button and press the
connection is OK, the Status box displays Good, when the connection is failed, the Status
box displays Fail.
Note: The DDNS makes the system to support Dynamic IP addresses for remote connection.
When this feature is On, you can access your system remotely using the user name instead
of IP address. For the DDNS feature, the system should be registered on the DDNS server.
Caution: You must restart the system to apply new setup about the DDNS.
50
4.3.6.2 Notification
Highlight Notification in the Network menu and press the
screen appears.
key. The Notification setup
The Combo unit can be set up to send an email or to contact a computer running IRMS
(Intelligent Remote Monitoring System) when an event occurs.
Mail
This menu allows sending of an email to a designated address when an event occurs.
Configure correct settings of Sender and Recipients.
Highlight the box beside Sender and press the
enter the e-mail address of sender.
key. Use the virtual keyboard to
key. The Recipient setup screen
Highlight the box beside Recipient and press the
appears. You can turn individual channels On or Off for e-mail notification. You can also
register the e-mail address of recipients up to 5. Highlight the box beside Check and
key to test the e-mail setup. The system displays the status result of
press the
connection test for each e-mail address in the Status column.
Note: A correct address for both Sender and Recipient must be configured. The e-mail
address must include the “@” character to be a valid address. You can use up to 40
characters including spaces.
Highlight Exit and press the
key to exit the Recipient setup screen.
Information about the time of event occurrence is sent along with the title and event
content when an event occurs.
For example, if a motion event occurs, an e-mail as below will be sent.
51
Subject: Event Notification, 2006/11/03 00:00:00
Contents:
2006/08/22 09:32:07 PM
Motion
3
===============================================
System ID
:0
System Name : Pizza Inn
===============================================
Web Viewer: http://192.168.12.188
The Interval in the Notification setup screen represents the frequency of the e-mail
notification when an event occurs. The Limit shows the maximum number of emails sent
within each interval.
Network
Highlight the LAN tab in the Network setup menu and the LAN notification setup screen
appears.
button. Enter the
Highlight the IP Address box that you want to change and press the
IP address of the computer you want contacted during an event. You can enter up to five
IP addresses.
This menu allow configuration of port numbers for IRMS Client Setup, IRMS Client Live,
IRMS Client Playback, Web Browser, and IRMS Client Download.
key. Use the arrow buttons to
Highlight the box in the Port column and press the
enter the Notification port number obtained from your system administrator. The
default port number is 3008.
52
4.4. Additional Key Function
4.4.1 Key Add Function
Pressing the Fn key on the front panel or selecting Key Add Function from the Mouse
Menu will display the key add function screen.
Event Reset
Selecting “EVENT RESET” in the function screen causes the system to reset both the Alarm
Output signal and the internal buzzer. This function is same as the one of the ACK key on
the front panel.
Snapshot
You can capture and save a still cut in the pause mode during the playback. First, insert the
USB memory stick to the USB port in the front panel. Then, play a video and set screen
mode to full screen for the channel you want to capture. After that, press the pause button
in the capture position of video. Finally, Select Snapshot in Key Add Function menu to
capture and save a still cut.
This function is inactivated in the live monitoring mode or multi-screen playback mode.
Note: You can see a captured file in the clip player only.
Key Lock
Selecting “Key Lock” in the function screen causes the system to lock the buttons on the
front panel from functioning.
53
4.4.2. Sequence Control
Pressing the SEQ key in the live screen mode or selecting Sequence from the Mouse Menu
causes the system to display live channels sequentially.
In the full screen mode, the system sequences through the cameras and displays them full
screen. In the multi screen mode, the system displays the 2x2 live screens sequentially.
For example, if the system is in the full screen mode or the 2x2 screen, it changes pages as
follows.
For example, if the system is in the 2x2 screen mode, it changes pages as follows.
Press the SEQ key again to exit the sequence mode.
4.4.3 Audio Control
Pressing the Audio key on the front panel or selecting Audio from the Mouse Menu will
display the Audio Selection screen.
You can select an audio channel you want to connect. An audio icon,
will appear in the
corner of a multi-screen to indicate audio is available on a particular channel.
Note: Pressing the MUTE key on the front panel causes the system to set the audio level to
the minimum level. The system displays mute icon,
instead audio icon,
. Pressing
the button again toggles the mute between on and off
Increases or decreases the audio volume using the slider bar. To use the front panel
buttons, press the Left and Right arrow keys to control the audio volume.
54
4.4.4. PTZ Control
If a user who has PTZ Control authority logs into the system, the user can control PTZ
cameras. The system will control cameras with Pan, Tilt and Zoom capabilities. Press the
PTZ key on the front panel to enter the PTZ mode and press the button again to exit the
PTZ mode. You can control the camera using front panel control buttons.
Press the PTZ key on the front panel or select Key Add Function from the Mouse Menu. A
pop-up window to select a channel of the PTZ cameras will be displayed. Select the PTZ
camera you wish to control by selecting it from the menu.
change orange color on the PTZ camera screen. That means a live
The PTZ icon,
screen mode is converted to PTZ control mode.
To use the front panel buttons, press the Left and Right arrow buttons to pan left and
right. Press the Up and Down arrow buttons to tilt the camera up and down. Press the
button to zoom in, and press the
button to zoom out. You can use the
and
55
buttons to focus the image. Press the
and
buttons to control the PTZ iris.
to establish Presets and
You can establish preset positions for PTZ cameras. Press the
enter a preset number. Press the OK button to save new settings or the CANCEL button to
cancel new settings.
You can quickly move PTZ cameras to Preset positions. Press the
camera Preset position and enter a preset number.
to view an establish
You can use a mouse for convenient PTZ control. Position the mouse point at the bottom of
the screen in the PTZ mode, and the following PTZ toolbar will display.
on the right side exits the toolbar. If you want to display the toolbar again,
Clicking
position the mouse pointer at the bottom of the screen. Use the arrow buttons on the
toolbar to pan or tilt the camera to the direction you want, and other individual controls on
the toolbar perform Focus, Iris, Zoom, Set and Run.
Pressing the PTZ key on the front panel in the PTZ mode will display the PTZ function
window as below. You can control the expanded PTZ features in this mode.
56
You can set or run the preset for a PTZ camera in this window. The PRESET field enables
PTZ-camera-related configurations such as controlling the direction, zoom, and iris. A
maximum of 999 presets can be saved. Enter a preset number then, press the OK button.
After that, if you select the RUN PRESET, the PTZ camera will move to the preset position
and exit the PTZ function window.
Set the feature you wish to control by selecting it from the menu. Refer to the camera
manufacturer’s instructions for the proper settings.
Select EXIT to exit the PTZ control mode.
Note: Settings related to PTZ such as a product and brand name, ID, and serial information,
should be predefined for the proper operation.
Cause: You will not be able to use Text-In if you are using the Serial port for PTZ control.
57
4.4.5. Channel Assign
(Enter) key during 3
You can rearrange channel position in the live screen mode. Press
seconds or more on the front panel or select Channel Assign from the Mouse Menu.
Rectangle Screen appears.
Use the Up, Down, Left and Right keys to move the location of the rectangle screen. Press
the Channel number to be exchanged with a current channel. Press Menu key to see Assign
pop-up menu. Select the channel number to be exchanged with current channel. It is also
possible to exchange channel position by pressing a channel button on the front panel in
the rectangle screen mode. Press Exit button to exit Channel Assign menu.
You can also move the location of the rectangle screen by mouse. And then, click right
button of mouse to select a channel number to be exchanged.
58
4.4.6. Shutdown Control
Press and hold the Power Button on the front panel or remote control for three seconds to
turn off the System, or select Shutdown from the Mouse Menu. Enter the Admin Password
(blank by default).
Only the ADMIN can turn the unit ON/OFF. The System will NOT continue to record while
the unit is off. The LED indicators on the front of the System will be OFF.
4.5. Playing Record Video
If a user who has Search authority logs into the system, the user can view recorded image.
Once video has been recorded, you can view it by pressing the PLAY ,
key on the front
panel. When playing video for the first time, the system will display the most recent image.
When playing video the last times, the system will start playing video from the last image.
Recorded audio will be played while the system displays the camera with recorded audio.
PLAY Button
Pressing the
button plays video forward at regular speed.
RW (Rewind) Button
button plays video backward at regular speed. Pressing the button again
Pressing the
toggles the playback speed between ◄, ,
and
. The screen displays
,
and
respectively.
FF (Fast Forward) Button
button plays video forward at high speed. Pressing the button again
Pressing the
,
and
. The screen displays
,
toggles the playback speed between
respectively.
and
PAUSE Button
Pressing the
button freezes the video on the screen.
59
STOP Button
button while in the playback mode returns the system to the live screen
Pressing the
mode.
Step Forward Button
button plays step forward one frame in the pause mode.
Pressing the
Step Reverse Button
button plays step reverse one frame in the pause mode.
Pressing the
Camera Button (1 to 8)
Pressing a camera button will display that camera full screen.
VIEW Button
Pressing the VIEW key will cycle the display through the different screen layouts. The
display modes are: full, 2x2, 1+5, 1+7, 3x3.
Mouse Usage
You can use a mouse for convenient playback control. Position the mouse pointer at the
bottom of the playback screen, and the following search toolbar will display.
on the left side exits the toolbar. If you want to display the toolbar again,
Clicking
position the mouse pointer at the bottom of the playback screen.
The individual controls on the toolbar perform the following functions as described below:
Go to the first image,
Play video backward at regular speed
Pause
Play video forward at regular speed
Go to the last image
Fast backward play
Step backward one frame
Step forward one frame
Fast forward play
Clicking the right mouse button during playback displays the following menu:
60
Selecting BOOKMARK, ADD KEY FUNCTION… and AUDIO… is the same as pressing the
MARK, Fn and AUDIO keys as described in “3.2. Key Function”. Selecting SEARCH causes
the system to enter the Search mode. Select EXIT to exit the playback mode.
4.6. Searching Record Video
Pressing the SEARCH key on the front panel or the remote controller causes the system
to enter the Search mode while in the Live monitoring mode or in the Playback mode.
The Search function window will be displayed.
Select Source HDD you want to search at first in the source list.
Go to the First
Select “Go to the First” in the search screen menu.
This function displays the first recorded image.
Go to the Last
Select “Go to the Last” in the search function menu.
This function displays the last recorded image.
Go to the Date/Time
Select “Go to the Date/Time” in the search function menu.
This function searches a recorded video by date and time you want. Go to the Time/Date
window is shown below.
Select the year, month, day, hour, minute and seconds you want to search for video. Use
the arrow (up/down) key on the front panel to change the date and time.
61
Calendar Search
Select “Calendar Search” in the search screen menu. A basic search screen will be
displayed as below.
Select CHANNEL, ITEM and month you want to search.
Days with recorded video display on the calendar with red numbers. You can highlight the
days with recorded video by using the arrow buttons.
key to select it and a time bar will be
Once you have highlighted a day, press the
displayed.
Hours in which video was recorded will be highlighted in the 24 hours time bar. You can
highlight the hours with recorded video by using the arrow buttons. Once you have
key to select it and minutes in which video was recorded
highlighted an hour, press the
will be highlighted. You can see the 60 minutes bar at the bottom of the 24 hours bar.
key to select it. The playback will be started at
Once minutes are highlighted, press the
the time you selected.
Note: The 24 hours time table has 24 one-hour segments. Each segment is consist of 24numeric which is ranged from 0 to 23. If a segment is highlighted, it means that some
video was recorded during that hour. However, it does NOT mean video was recorded for
the entire hour.
Note: The 60 minutes time bar has 60 one-minute segments. If a segment is highlighted, it
means that some video was recorded during that minute. However, it does NOT mean
video was recorded for the entire hour.
Event Log Search
Select “EVENT LOG SEARCH” in the search function menu. A basic search screen will be
displayed as below.
62
The system maintains a log of each time the Alarm Input port is activated. The Event Log
Search screen displays this list. Use the arrow buttons to select the event for which you
would like to see video.
key will extract the event video and display the first image of the event.
Pressing the
key will start playing the “event” video segment. Pressing the STOP,
Pressing the PLAY,
key causes the system to return to live monitoring mode.
You can also narrow your event search by selecting the OPTION button and setting up the
new search condition.
You can search video from the first to last recorded images, or you can set the start and
stop times and dates.
Selecting the FROM and TO field will allow the user to manually change the time to be
searched.
Select the cameras you want to search in the CH field and Highlight the box beside each
event source in the TYPE field. You can select the events for which you want to search.
Once you set your desired search conditions, select the SEARCH button to display the
search results.
63
Text-In Search
Text-In Search allows the user to search a recorded video initiated by a Text-In input such
as a POS device.
Select TEXT-IN SEARCH in the search function menu to display a Text-In search window as
below. Selecting a particular event in the list will play a video of the chosen date and time.
Selecting the FROM and TO field will allow the user to manually change the time to be
searched.
If the KEYWORD fields are blank, all the Text-In events are searched. You can enter a
maximum of 5 items to be searched, and any Text-In event containing any of the typed
word will be searched.
Press the SEARCH button in Text-In Search window. The Text-in Search screen displays a
list of text-in events and extracts the video associated with the text-in event.
64
Use the arrow buttons to highlight the event for which you would like to see video.
Selecting a particular event in the list will play a video of the chosen date and time.
In this time, the playback screen is placed inside of the rectangle border line. The video will
be played during recorded time for that event.
Press the DETAIL button to overlay text-in data on the video during the Text-In playback.
Pressing the MENU key while in the On-Screen Text-In playback mode returns the system
to the Text-In search mode.
key while in the Text-In search mode returns the system to the
Pressing the PLAY,
Playback mode and exits the Text-In Search mode.
Press the MENU key to exit the Text-In search mode.
Note: The video in the Text-In playback mode is just played at regular speed.
Bookmark Search
Select “BOOKMARK SEARCH” in the search function menu to display a bookmark search
window as below.
The Bookmark Search screen displays a list of the video associated with bookmark in the
recording mode.
Use the arrow buttons to highlight the list for which you would like to see video. Selecting a
particular item in the list will play a video of the chosen date and time.
Note: You can use the MARK key on the front panel to mark the point of the bookmark
search wile in playing video. A maximum of 16 points can be saved for a bookmark.
65
5. VGA Mode
VGA Mode is used to display a device (i.e. a Computer) connected to the VGA Port on the
monitor.
Press the Fn key on the front panel during 3 seconds or more, and you can switch to the
Monitor to VGA mode from DVR mode. Pressing the key again toggles DVR and VGA mode.
You can also change display mode with Remote Controller. Press the LCD(MODE) button to
change display mode in the Remote Controller. Pressing the key again toggles DVR and
VGA mode.
NOTE: The Combo System will continue to record while in other modes. This provides an
advanced level of Covert Surveillance.
VGA Connection Errors
If the Computer is not correctly connected to the Monitor, several different error messages
may be displayed:
• Cable Not Connected:
Indicate that the VGA cable has not been securely fastened to either the Monitor or
PC.
• No Sync or Signal:
Indicate that the PC is not sending a good signal. Try changing modes on the PC.
• Going to Sleep:
Indicate that the Monitor is not receiving a signal from the PC, and is going into
hibernation. This does not affect the DVR functions.
66
6. LCD Monitor Control
Press the MENU key of the Remote Controller or the front panel of the Combo System
during 3 seconds or more to enter the Monitor Setup Menu. The Monitor Setup Menu
controls the behavior and look of the Monitor (i.e. changing the Brightness and Contrast
will affect the Brightness and Contrast in all Modes).
Note: The mouse cannot be used to change values in this menu.
6.1. Panel Adjust
You can configure the brightness and contrast of the LCD panel. Highlight the
key. The Panel setup screen appears.
the Monitor Setup Menu and press the
icon in
6.2. Display Settings
icon in the Monitor Setup Menu and press the
Highlight the
screen appears.
key. The Display setup
Use the Arrow keys on the Remote Controller or the Front Panel to select from Display
Image, Aspect Ration or PIP Control. Use the enter key to access the PIP Control
submenus. Change the values using the arrow keys and enter.
• Auto Configuration: Set the configurations of the monitor. Select YES to allow the
system to set the color, or NO to exit.
• Display Image: Sets the image display to Auto or Manual.
67
• Aspect Ratio: Set the Aspect Ratio for the monitor. In case that Display Image item
is Auto, this item is inactivated.
• PIP Control: Set the PIP On/Off, PIP Position and PIP Size.
- PIP On/Off: Turns the display of the PIP (Picture in Picture) ON or OFF. If you
turn the PIP to OFF, the default DVR screen will not be displayed when the PIP
button on the remote control is pressed.
- PIP Size: Change the display size to Small, Medium or Large.
- PIP Position: Use the Up, Down, Left and Right arrows to adjust the location of
the PIP Screen. Press the Enter button to set, and the Return button to exit the
menu.
6.3. System
icon in the Monitor Setup Menu and press the
Highlight the
screen appears.
key. The Misc. setup
Use the Arrow keys on the Remote Controller or the Front Panel to access menus. Change
the values using the arrow keys and enter.
• Mode: Set the current display mode to VGA or DVR.
• Language: Set the language to use.
68
Appendix A – Factory Default Settings
Menu
Sub Menu
INFORMATION
DATE / TIME
SYSTEM
USER
DISK
MANAGER
DEVICE
CAMERA
Item
DATE/TIME
TIME SYNC.
LOCAL
DISK MANAGER
SETTINGS
PTZ
DISPLAY
Parameter
SYSTEM ID
FORMAT :
DATE
TIME
TIME ZONE
USE DST
Default Setting
MM/DD/YYYY
24H
GMT-05:00
OFF
INTERVAL
AUTO LOG-OUT TIME
RECORD MODE
DISK FULL WARNING
DISK FULL ACTION
MIRROR
OFF
OFF
OVERWRITE
90%
BUZZER,LAN
OFF
NAME (CH1~CH8)
COVERT
CAM1 ~ CAM8
OFF
ON/OFF
PROTOCOL
ID
OFF
CDC2400 (DYNA..)
0
OSD:
DATE/TIME
AUDIO OUTPUT
EVENT MARK
NETWORK
DISK SIZE
USER
CAM NAME
PTZ
LANGUAGE
SEQUENCE DWELL TIME
EVENT SCREEN MODE
ON
ON
ON
ON
ON
ON
ON
ON
ENGLISH
3SEC
UNCHANGED
1
DISPLAY
ON/OFF
TYPE
TIME
AUTO
SCREEN SAVE
69
OFF
AUTO
O N: 09:00:00
OFF: 17:00:00
5 MIN
PRODUCT TYPE
REMOTE CONTROL
HOLD TIME
ON/OFF
TYPE
ACTION
RECORD
HOLD TIME
ON/OFF
SENSITIVITY
BLOCKS
AREA
RECORD
HOLD TIME
ON/OFF
RECORD
HOLD TIME
DISPLAY
ON/OFF
PRODUCT TYPE
RECORD
DISK ALMOST FULL:
ON/OFF
HOLD TIME
ACTION
DISK FULL:
ON/OFF
HOLD TIME
ACTION
DISK TEMPERATURE:
ON/OFF
HOLD TIME
ACTION
DISK S.M.A.R.T.:
ON/OFF
HOLD TIME
ACTION
DISK ALMOST FULL
DISK TEMPERATURE:
LIMIT
TYPE
5SEC
ON
N/O
RELAY,BUZZER
Current Channel
5SEC
ON
3
1
All Block
Current Channel
5SEC
ON
None
5SEC
ON
ON
GENERIC TEXT
ALL
REMOTE
CONTROL
ALARM-IN
MOTION
SETTINGS
ACTIONS
VIDEO LOSS
TEXT-IN
SETTINGS
ACTIONS
EVENT
SETTINGS
SYSTEM
EVENT
DISK
70
OFF
5SEC
BUZZER
OFF
5SEC
BUZZER
ON
5SEC
BUZZER
OFF
5SEC
BUZZER
90%
140
FAHRENHEIT
RECORD
RECORD
RECORD
SCHEDULE
PRE-EVENT
SETTINGS
LAN
NETWORK
NETWORK
RESOLUTION
VIDEO
AUDIO
SPEED (CONTI./EVENT)
QUALITY (CONTI./EVENT)
SERIAL
DDNS
E-MAIL
NOTIFICATION
NETWORK
ON/OFF
DWELL TIME
OVERWRITE
ENABLE MIRROR
TYPE
IP ADDRESS
SUBNET MASK
GATEWAY
DNS SERVER
PORT
RS-232:
ON/OFF
USE
STOP BIT RS-485:
ON/OFF
USE
USB-SERIAL1:
ON/OFF
USE
USB-SERIAL2:
ON/OFF
USE
PORT:
BAUD RATE (BPS)
PARITY
DATA BIT
STOP BIT
ON/OFF
RECIPIENTS:
ON/OFF
INTERVAL
LIMIT
SITES:
ON/OFF
PORT
71
352 x 240
1~8:ON
1~4:ON, 5~8:OFF
30/30
BEST/BEST
CONTINUOUS
ON
5SEC
ON
OFF
DHCP
0.0.0.0
0.0.0.0
0.0.0.0
0.0.0.0
SETUP
: 3000
LIVE
: 3001
PLAYBACK : 3002
DOWNLOAD : 3003
WEB
: 80
OFF
TEXT-IN 1
ON
PTZ
OFF
TEXT-IN 2
OFF
TEXT-IN 3
ALL PORT
9600
NONE
1
1
OFF
OFF
1 MIN
1
OFF
3009
Appendix B – System Log & Event Log
System Log
Log Message
START UP
SETUP BEGIN
SETUP END
SETUP CHANGE
RECORD ON
RECORD OFF
RMT SETUP WRITE
RMT SETUP READ
BACKUP BEGIN
BACKUP END
BACKUP FAIL
BACKUP CANCEL
TIME CHANGE(USER)
TIME CHANGE(NTP)
TIME CHANGE(RTC)
ZONE CHANGE
CLIP-COPY BEGIN
CLIP-COPY END
CLIP-COPY FAIL
CLIP-COPY CANCEL
DISK HOT
FORMAT(INTERNAL)
FORMAT(USB)
SYSTEM UPDATE
FACTORY DEFAULT
DISK FULL
E-MAIL SEND FAIL
S.M.A.R.T. FAIL
MIRROR FAIL
Description
System power on start
System setup began at the local site
System setup ended at the local site
System setup changed at the local site
Schedule recording began
Schedule recording ended
System setup saved at the remote site
System setup read at the remote site
System backup began
System backup ended
System backup failed
System backup canceled
System time changed by USER
System time changed by NTP
System time changed by RTC
System time zone changed
System Clip-Copy began
System Clip-Copy ended
System Clip-Copy failed
System Clip-Copy canceled
DISK high temperature
Internal DISK format began
External USB HDD format began
System upgraded
Factory default began
DISK is full
E-mail sending failed
S.M.A.R.T. is bad
Mirror failed
Event Log
Log Message
Motion All
Motion 1~2,4,7~8
Video Loss All
Video Loss 1~2,4,7~8
Text-In All
Text-In 1~2,4,7
Alarm-In All
Alarm-In 1~2,4,7~8
Description
Motion event detected from all channels.
Motion event detected from channel 1,2,4,7 and 8
Video Loss detected from all channels.
Video Loss detected from channel 1,2,4,7 and 8
Text-In event detected and forced all the channel to be recorded
Text-In event detected and forced channel 1,2,4,7 to be recorded
Alarm-In event detected from all channels.
Alarm-In event detected from channel 1,2,4,7 and 8
72
Appendix C – Pop-Up Messages
Classification
Displays the status of an
instantaneous operation
(disappeared automatically
after completion)
Displays the status of event,
error and operation
(disappeared in case only
user press the OK button)
Message
Description
PLEASE WAIT…
DETECTING USB DEVICE…
SNAPSHOT IS EXECUTING. PLEASE
WAIT…
TO APPLY NEW S/W, YOU SHOULD
RESTART THE SYSTEM.
NOW REBOOTING…
THE DISK IS FULL !! NO OVERWRITE
MODE.
THE DISK IS ALMOST FULL, NO
OVERWRITE MODE.
OLD FILESYSTEM FOUND IN
INTERNAL1. FORMAT NEEDED FOR
RECORDING.
OTHER SYSTEM'S DISK FOUND IN
INTERNAL1, FORMAT NEEDED FOR
RECORDING.
NEW DISK FOUND IN INTERNAL1.
FORMAT NEEDED FOR RECORD.
BACKUP/CLIP-COPY COMPLETED.
BACKUP/CLIP-COPY STOPPED.
BACKUP/CLIP-COPY FAILED.
FORMAT FAILED. CHECK DISK STATUS
AND TRY AGAIN.
UPDATE FAILED.
MIRROR HALTED! CHECK YOUR USB
DEVICE OR USB CABLE.
BOOKMARK FAILED.
THE CURRENT PLAYBACK TIME IS
BOOKMARKED.
ABC FILE SAVED.
INVALID PRESET NUMBER !
USB DEVICE ATTACHED.
USB DEVICE DETACHED.
ACCESS DENIED
THIS CAMERA IS NOT PTZ CAMERA.
Displays the status of user
handle, device detection
and instantaneous
operation.
(disappeared automatically
after 2 seconds)
CHECK YOUR PASSWORD AND TRY
AGAIN.
NO INPUT !
INVALID RANGE! ENTER CORRECT
RANGE.
NO RECORD DATA.
SITE1 ADDRESS IS AN INVALID
FORMAT.
SCREEN ON TIME AND SCREEN OFF
TIME IS SAME.
RS232 PORT IS BEING USED BY
KEYBOARD. SET UP THE RS232 PORT.
RS232 PORT IS BEING USED BY POS.
SET UP THE RS233 PORT.
PTZ MODE IS BEING USED BY CLIENT.
MAIN MENU IS BEING USED BY
CLIENT.
NO INPUT FILE NAME! ENTER THE FILE
NAME.
TOO BIG FILE SIZE. LIMITTED TO 2GB.
THE SAME FILE IS IN YOUR STORAGE.
ENTER DIFFERENT FILE NAME.
SAME ID EXISTED.
73
Waiting for internal operation.
Detecting the USB device.
Waiting for the Snap Shot operation.
The system restarts after succeeding in the System
Update.
The DISK was full
The DISK is almost full
The system found the DISK a different version of
file system was applied.
The system found the DISK a different file system
was applied.
The system found a new DISK
The Backup or Clip-Copy was completed.
The Backup or Clip-Copy was stopped.
The Backup or Clip-Copy was failed.
The DISK Format was failed.
The System Update failed.
Mirror was halted while mirroring.
Bookmark failed.
Bookmark succeeded.
Snapshot succeeded. (in case that filename is ABC)
The DVR user tried to use wrong preset number in
the PTZ Setup mode.
The system found a new USB device.
The USB device was extracted from the system.
User had no access authority.
User tried to use PTZ function for the channel not
to be defined as a PTZ.
User entered a wrong password.
User needed to enter numeric.
A selected time range is wrong
The system can't find record data in the Bookmark
Search mode.
User entered a wrong site address in the
Notification Setup mode.
The value of Screen On and Off is same in the
Screen Setup mode.
User tried to change from Remote Keyboard to PTZ
in the Serial Setup mode.
User tried to change from POS to PTZ in the Serial
Setup mode.
User tried to handle same PTZ while the remote
client controls a PTZ camera.
User tried to enter the setup mode during the
remote setup
User tried to start without filename in the Clip-Copy
mode.
The file size selected by user was bigger than 2GB
in the Clip-Copy mode
User entered the filename already existed in the
storage in the Clip-Copy mode.
User tried to select the ID already existed in the
PTZ Setup mode.
Classification
Message
Description
INVALID DOMAIN NAME. ENTER
CORRECT DOMAIN NAME.
DOMAIN NAME IS TOO LONG.
SAME PORTS EXISTED.
Displays the status of user
handle, device detection
and instantaneous
operation.
(disappeared automatically
after 2 seconds)
ADMIN IS NOT ALLOWED. ENTER
DIFFERENT ID.
USER IS NOT ALLOWED. ENTER
DIFFERENT ID.
SAME ID EXISTED. ENTER DIFFERENT
ID.
INVALID ADDRESS
SERVICE FAILED.
ADDRESS1 IS NOT AN E-MAIL FORMAT.
SENDER ADDRESS IS NOT AN E-MAIL
FORMAT.
SAME VERSION
NO AUDIO !!
74
User entered an invalid domain name in the DDNS
Setup mode.
The domain name is too long in the DDNS Setup
mode.
User tried to select the Port Number already
existed in the Port Setup mode.
User entered ADMIN as an ID in the Notification
Setup mode.
User entered USER as an ID in the Notification
Setup mode.
User tried to select the ID already existed
Notification Setup mode.
The system has an invalid NTP server address
during the NTP checking.
The system can't connect to the NTP server during
the NTP checking.
User tried to use an invalid format of e-mail
address in the Notification Setup mode.
User tried to use an invalid format of e-mail
address in the Notification Setup mode.
The firmware version for the upgrade is same as
old one.
User tried to control volume for channel 5, 6, 7 and
8
Appendix D – Troubleshooting
Problem
No Power
No Live Video
The system has stopped
recording
Live Video Very Bright or
Very Dark
The system is powered
up but do not respond
any operation
Live Video
Shrinks
Flickers
or
Possible Solution
▪ Check the power adaptor connections.
▪ Confirm that there is power at the outlet.
▪ Check camera video cable and connections.
▪ Check LCD panel power button.
▪ Confirm that the camera has power.
▪ Check camera lens settings.
▪ If hard disk drive is full, you will either need to delete video
or set the system to the Overwrite Mode.
▪ Check recording schedule settings.
▪ Check recording button on the remote controller.
▪ Adjust the Brightness and the Contrast of the system.
(Refer to the Menu Setup Section)
▪ Turn the main power off and wait for 5 seconds. The LED
indicator on the front panel should be turned off.
▪ Turn the main power on again.
▪ Check camera video cable and connections.
▪ Disconnect and reconnect camera video.
▪ Clean the camera lends.
▪ Check that the camera is not in direct sunlight.
75
Appendix E – Connector Pin Outs
I/O Connector
Input ( 1 to 8)
G
NO
COM
NC
Alarm Inputs 1 to 8
Chassis Ground
Normally Open
Common
Normally Open
RS485 Connector
Master Unit
Slave Unit
+ => TO => TX+
- => TO => TX-
76
Appendix F – Comprehension about Archive and Mirror function
ITEM
Description
BACKUP
CLIP-COPY
Clips a video segment already
stored in the storage and saves
it to the external storage.
MIRROR
Records a video to the
internal storage and
copies it to the external
storage at the same
time.
USB HDD1
USB CD-RW
USB DVD-RW2
USB STICK3
USB HDD1
300GB
2GB
-
Windows
X
○
X
DVR Combo
○
X
○
Available Media
Maximum File Size
(per 1 times)
Playback
ARCHIVE
The LCD Combo DVR supports multi-session record for CD-R/W. So you can execute a clipcopy many times under free space condition. For example, if you have 750MB CD and an
estimated file size for clip-copy is 100MB you can copy clips 7 times.
The LCD Combo DVR adopted its unique file system. So the files stored in the internal
storage or mirrored files can’t be played in the other system including Windows PC.
1. The capacity of HDD for the Mirror or Backup should be bigger than or equal to one of
internal hard disk.
2. Available CD(DVD) media: CD–R, CD–RW, DVD–R, DVD+R and DVD–RW
3. The capacity of USB stick should be bigger than or equal to 128MB
77
Appendix G - Specifications
Operating System
Language
Storage
Data Export Medium
Data Backup
Disk Management
Video Source
Video Input
Video Resolution
Display Rate
Compression Method
Recording Rate
Playback Rate
Recording Mode
Search Mode
Connection
Protocols
Remote Software
Alarm Input
Alarm Output
Audio In / Out
IR Port
User Interface
USB Port
VGA Port
RS485 Serial Port
SYSTEM
Embedded Linux (Built-In Flash Memory)
English ( Multi Languages will be available )
One HDD
USB (HDD, Flash Drive, CD-RW)
Archiving (USB HDD), Clip-Copy (CD-RW, USB Flash
Drive)
Temperature Check, SMART Diagnosis, Auto Recovery
VIDEO
NTSC or PAL (Auto Detect)
Composite: 8, 6pin 4 DIN & 4 BNC inputs, 1 Vp-p, 75
Ohms
720x480 (NTSC), 720x576 (PAL)
Real-Time Display
RECORD & PLAYBACK
H.264
240 IPS (NTSC) @ 352x240 / all cameras
120 IPS (NTSC) @ 704x240 / all cameras
60 IPS (NTSC) @ 704x480 / all cameras
Same as Recording Rate
Time-Lapse, Event, Pre-Event (up to 30 sec regardless
of IPS), Text-In
Calendar, Time/Date, Event Log, Text-In, Bookmark
NETWORK
10/100 Mbps Ethernet (RJ-45)
Static IP, DHCP, DDNS
Monitoring, Playback, Setup, Upgrade, System Status
Check, image Capture & Print, Clip Player
INPUTS/OUTPUTS
8 TTL, Terminal Block, programmable as NC or NO
1 Relay Out, Terminal Block, NC & NO,
5A @ 125VAC/30VDC, 3A @ 250VAC
4(CAM1,2,3,4 fixed & Built-in MIC)/1(Built-in Speaker)
1 Remote Control
Remote control, Mouse, IR Remote Control, Front
Buttons
2 (USB 2.0)
DSUB15
2 Connector Terminal Block
78
LCD
19" TFT LCD Panel
LCD Panel
Active Display Area
( Diagonal )
Pixel format
Pixel Pitch
Color Depths
Contrast Ratio
Brightness
Viewing Angles
(Left/Right/Up/Down)
Light Source / Lifetime
Response Time ( Tr / Tf )
4CCFT / 50,000 Hours ( Minimum )
1.5/3.5ms (Rising / Falling)
Dimensions (W x H x D)
Weight
Unit Dimension
Unit Weight
GENERAL
568 mm x 638 mm x 310 mm (Including Packing Ass’y)
19.5 Kg / 43 lbs
16.8" x 19.3" x 7.9"(WxHxD)
8.4kg / 18.5lbs (Including Stand)
Operation Environment
Temperature: 0 ∼ 40 ℃, Humidity: 0 ∼ 80 %
Power (AC input)
100VAC∼240VAC, 12VDC, 5.5A, 50/60 Hz
Approval
FCC, CSA, UL
19.0 Inches
1280(H) X 1024 (V), RGB Vertical Stripe
0.294mm X 0.294mm
16.7M Colors
1000 : 1 ( Typical )
300cd / m2
80˚ / 80˚ / 80˚ / 80˚ (Typical)
79
eneo® is a registered trademark of Videor E. Hartig GmbH
Exclusive distribution through specialised trade channels only.
Videor E. Hartig GmbH
Carl-Zeiss-Straße 8 · 63322 Rödermark, Germany
Tel. +49 (0) 6074 / 888-0 · Fax +49 (0) 6074 / 888-100
Technical changes reserved.
© Copyright by Videor E. Hartig GmbH 10/2011
www.videor.com
www.eneo-security.com
80