1
TOSHIBA.
O WNER'S M ANUAL
LCD TV
Safety Instruction
Warning
lO I'RIEVFN'I I IRF t l It SHUCK II:\7AR I) Ill) N()I I,.SI't)SI. IRIS 'VI'I'I IANC I' I() RA IN( IR ,\IOIS I1! Itl
CAUTION
RISK OF ELECTRIC SHOCK
DO NOT OPEN
NO USER - SERVICEABLE PARTS INSIDE
CAUTION : TO REDUCE THE RISK OF ELECTRIC SHOCK , DO NOT REMOVE COVER (OR
BACK ). NO USER- SERVICEABLE PARTS INSIDE . REFER SERVICING TO
QUALIFIED SERVICE PERSONNEL.
I( IIS Y)'Allll)I IS INl INI)I 1) 1<) Al F.kI II IE
1tNlIt It) 1III I'K I ISI '.NCC OF I ININSULAI'FI)
"1)ANl IIIU)l IS VOLTi;; l \Vl1I I IN 1III
PROM If IS i'4( c).St ItI II IA 1 MAYHEOF
NIL 'I I - I t 1 1 N I %I 1A . Nil UUI. 10(ONSI I I 117 I. A
RISK III. 11 Et.TRIO SH ( x As IU I'kk%C 515.
II IIS SY\IH <) I IN IN I FNNF. U I U ALI',It I' I I IL
USER li )1 III'. 1'nl SI. NCr. Or I\I I ' r )ltI)ANI
01'F I(A F IN, . ANI) ..\I AI NIFNANC I
ISLRVI4 1514,1 INS I IkU ( PIONS IN I NI
I I 11- RAIURI A ( COMPANYI NG I Ill
AI'I'LIAN('I
Important Safety Instructions
This equipmcnt Its hcrn designed and muniFacrared to liters international safety staud;uds but. like any clrtlticd
rquipflent, care must Lr taken it you arc to obtain the best rcxdts and safety is to he assured. So. please read the
points below for your own safety. They ,ire of a general nature, intended to help you with all your run Ironic
consumer produt is and stnnC points flay not apply to the goods you have just purchased.
■
Itcatt these iIs lru< lions.
■
Keep rhtsr inatuttions.
■
I Irrrl All wafflings.
■
Ioll nr A ll
■
Do nut me this I'V tea water.
■
t titan only with .l dry cloth.
■
Do not block :uhv vouilation oprningg.
Install ill :u(oul:nlte with the m:mof tcuuCI's
hurl l
■
( )sly use attachmrn,J.lrcessurics spccifi<rl by der
nh:oudacturcr.
■
Use only with tilt tan. stand , Tripod. Inatlul, or ruble
slscclfirlI hy dit nstnu8euutn t of sold wirh rhr
,l,P,r.n m \Vhen a rare I\ uwd, use caution wild,
c tMMt.
ml wtog the cardalq to .uns cornhinmilnl I,. Avoid inpuy
Ii om sip-over.
■
Unplug this appaanls dining lightning srnrmc or when
unused loo long periods of time.
■
Relcr all servicing to qualilietl service personnel.
SCl vicing is tcyuired wIldu tilt apparatus has been
daniagcd in any way , such as IX" supply trod IM plug
it d.,nugcd, luluid has hcrn spilled or objects lust s:dlm
ono the appnatus. nc^ .yq,at anus has been exposed of,
IJitt or moisture . dots not oper .or nornl : dly. or has hcrn
duopptd.
■
I he apparatus shall not lit: exposed to dripping or
sph,hing amid no nbjrcis filled with liquids. such as
e.i\c '1.11 be plated on for apparalus-
■
, a dsoclC lluonl rnl Lllttp in LCD Mlle, CUIIlJms a
small amolnn of nwrtuiy. I'kasr follow local onliinustrs
a rrl;ulaeons for disposd.
instruct it lls
■
Do not ilurall near a n y prat wmrco such as nduusrs.
hem rrgislets, stoves. or Mute apparatus (nollebug
ampliliets) tint pmdnte heat.
■
T1is1V is not conlplelcly disconoetroll h,nn a power
supply line, ,is nlinule tuucnt is consomcd even when
Ibt Power bnrnm is lolncd o17
■
Do not place hoe objeos or naked iI.unr \ources, ssttlr As
lighted candle, or oil-hl light oil or , lo,, tit tire TV.
I Iigh tentperarllre \ .JiI IIK i t pLtsric J' I kal to liras.
■
Do nor u•t on 11111 of ncc l V :Illy object or Canunirlcr (Felt
might spill liquids or small objets two the'[ V.
■
I'rometi the power cad front being walked on w
pinched, paiuerd,uly al plugs, cunveuuicllee IrteptaeirS.
and the point where it exits the uuiu.
G4d
Exemptions
■ lush Iba i. unu l i,ihIV tin .uuy J.Imagic causal by n.uuL.I diaasrer (such .1% liuurdrr, fire, earthquake). uses by third person,
err, Hlents, owners intentimcd misuse, or ose in other inrpmper rnnditiuns.
• lode ih:t is not liable lm incident:d damages (sus 11 .ter profit toss or interruption in business, nod icatiou or erasure of record
data, etc.) CA flux] by use t w if muse of pn,d uc t.
• Ib,shuha is not 11214c lot u ,y damage caused by ocylcc t of the insrttrainn, described in the owner' s manual.
■ Ioshub.t is not ltahk tot atp• cLtmagc wtnnl by misuse Ii r malfunctiuo ii neigh si nndnncous use n1 thus piodua and the
connected cttuipment.
Table of contents
I ntroduction ................................«............................. 4
Using the TV 's Features ........................................ 14
W'rknine to losluha ............................... .........__........4
Adjusting Lire Picture ........ ........._..__................... 14
Fs ploring your new 'I 'V ...................................... ..... i
S.Ict(iug the picrurc mud. ._ ................... ..14
Sneering a location hie the I'V ...................................... S
Adjusting rhr picruo quality ................................ 14
LSir'g the hluc s,.ccit Icatutn .............. _.......... ...... IS
C. awcwn;; the pnwe cord and AC atptor ....... 5
Connecting your TV ......... __
5
Sskeh,l; the vklrn input wun.e ............ _..._.............. I S
Using the into pnwn oil fcjuurr .................. _ .............. I S
('nnnccuug.w anrrnn I without other cqutptnrnt.... ..... 6
Using the RI%VI.RSAL Ivan re ................ _................ .. 16
(nuuecting n I )VI phicl .rod .t VCR ._ ........................ 7
Selling the off times .... ...... .......................................... . 16
Adjusting the Sound ...... .... ..................................... 17
4 :uuuect ing a I )VI ) ld.rorr or .irelliw receiver
Adjusting the voluntr .. ..................................... 17
and a V(R ...................._._............................... .....7
Connecting a I)VL) 14ascr ssirh cuutptrncnt vidcu ntd
bhuiug the Sound _ ........................................... 17
a VCR .............. ........................ _............... ....... x
Connecting a canrcurder .............................................. x
Conne.: riug an audio .unplifitI ....................................... R
\euiug the MIS AI N I t) mode ..................... ...._ IS
Using the remote control ....................................... 9
Adµntinng tin sound quality..... ................... 17
Receiving xemt or hdingual sound ....................... I R
I (cull; the WOW (coned rlkrq fcauuc ............... 19
Switching between two program Posirionc .................... 20
I lisplavmg on creen infnrmnioo ._ ........... ......_........ 20
L.unini; .them Ili, Rcrnote ('nnuol _._._... _._,. _.. _.... 9
In,ulling nc, rcmotc conu„I h.maics ..__. _ _. _. _. 9
Setting up yea
to
Tut uiug rite I V O n and Of} _............ _ ....................... l tl
Viewing Teletext ....... __ ........................ »«.......... . 21
Irkrcu un,dc
IclrtcxI General i ninrmarinn ....................................... 22
Mew Iintction ......... ..._.................... __................. I II
d1U butrun: ................................................. 22
Sub pages: ............................................................ 22
('han1i ng the on-cacco display I.mgual; e ..................... I I
thuguuuning (' hanncls into rile TVs memory ......... I I
Automatic Scats ll Memory (ASM) ....................... I I
Manually nmiug sour I V ...... ........_.... .............. 12
21
( 'h.vac an sat tar Idcrnr _.. 2I
I. Icing PAST mode ...................................................... 23
1king LIST mode .............................. ..................... _... 23
Ielcip.t buttons on the mmo(c control ................ _...... 24
To drip nnnnosauy Iwnirusn nuouI r _ .............. 12
Manual Fine Tuni ng (MI I ) ........................_....... 13
Automatic I ins lining ( :V f) ............................. 13
Appendix .......«...«.......»« ............................. .... .... 25
1rouhlcdtoot im;.................. ..........._ sS
11,o:ulutat ptans'uission Sys u: tux in Iach Cuunusy or
Rc gion ................................. ............................. 2S
C lo:miug and Care ................. .._.......... ........... .......... 26
Spa iliutirmc ................. «............................................ 26
Index
27
Introduction
Welcome to Toshiba
Congratulation' You have purchased one of the finest TAT I CI)'IV's
on the market!
Customer's Record
You will find the model number and
serial nuutber on the back of your*[ V
this manual will help YOU use the many excitingaud ISCILI features to
make your IV viewing more enjoyable than heforr.
set.
Record these numbers in the spaces
provided below.
Before operating your TV set, please read all these safety and
operating instructions completely and then keep them for future
reference.
Refer to them whenever you call upon
your TOSI 111 BA dealer regarding this
product.
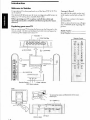
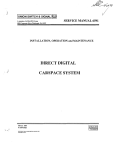
Exploring your new TV
You can operate your TV by rising the hurions oil the 161i panel or the
remote control. fhr Side and back panels provide rrrntirrd inputs for
connecting Other equipment to Your *11 *V
Model Number
Serial Number
F VOLUME +
l _. _POS II ION VA
(GOB ,
l- o
-GI+ Ira
a
'2)-i
om
III
U
r
O
<
q
O
a
U U U
<
-e (TV/VIDEO)
5
6
U U U
U - I (POWER)
$
9
U U O
G' 0 0
O O O
mop 0
U
U
rr
O
U
0
uw P&b,
ri
O O, O
n
Headphones
Jack
<O 0
Pill'.
U>r^
0 o 0
rh
'.0 O
Remote Sensor - i l ' Power indicator
OFF-Tinier indicator
To remove the cover, pull the bottom of the cover
toward you.
4
0
Selecting a location for the TV
Note: Nelnrr rrc,r, rlhnq pour I l! lsreuse real Ure n , yxurrrnr salCry ntlorrrraliua
on paqcs 2.
• Place the ' I V oil the floor or a surety . level stable surface.
You can move the LCD panel
forward and backward
• Place the . 1 V in a location where light does not diiectly hit
the +trcen.
• Place the 1V far enough from the walls to allow prnper ventilation.
Inadequate ventilation may curse overheating, which may damage the"TV.
Connecting the power cord and AC adaptor
Power curd ( supplied)
AC adaptor (supplied)
The plug typo varies according to the
couuturies.
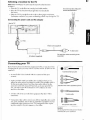
Connecting your TV
If you havens eonncctcd electronic equipuacut before , or you have been
frustrated in the past . ynu may wish to read this section . ( (:ahles are trot
supplied.)
1.1
D
Coaxial (antennd)cubie
• A coaxial cable is the standard cable that cuuhes in from your
antenna,
• Audio and video cables arc usually color Lolled according to use:
yellow ( or video and red and white for . audio, I Ire red audio cable is
for the SLCI ru right channel. and the white :mdin cable is for tlw
stereo ( or mono ) tell ehautd . If you look at the rear panel of the
-I-V, you will see char the terminals arc color coded fit the same
manner as the cables.
Standard AN cabins (red/white/y el low)
• S-Video cable is for use with video equiprracnt that his S Video
col l llccnm.1,
• Compuncut video cables conic in sets of three (typically color-coded
red, green , a nd blue), and are for use with video equipment that hj%
comprment video connectors . Your TV's component video inputs
arc color -coded in the some manner as the cables.
Caution:
Oct not idcy the T1 1 )a Unhl y;,rr hula hnrshc ri
'x nocrrmq allot yru:r rryuqunrnJ.
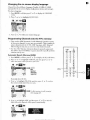
Connecting an antenna without other equipment
Kp^
UN mixer
(Not supplied)
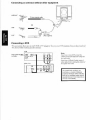
Connecting a VCR
I'll is connection allows Vol to w•arch VCR or TV progranu. You can record TV programs. You can also record one
TV channel while watchutg another cltauncl.
from antenna
or Cable
Note:
If-,Y), haw a mono V(:R, aun, ent the
LiMono to lie VCR Audio UUI using on,ti
o ec ouNNHo cahke
If w,u i.na, ;, Vf,R usfb Svideo. use oo S
mk
,o cable (0? (lie S-video lacks) ,nstcad of
,ht, rcgt,Iw widen cable
the unauthonre I rernrdmy. use.
I tnl:uuun, o; wt-!Sion of television
procyams. videotapes. DVfls and other
mate; ado; ;ue prohibited under ; eyiumd
copyright laws, and nmy subject you to
riv i ;uuI c.{wmin; l liability.
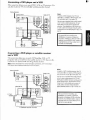
Connecting a DVD player and a VCR
This cunne(rion allows you to ware h L)VL). VCR, or 1'V programs. You
can also record one IV channel while watching another chamrel.
Note:
To uvatcb a VVL) pmgia .. Me lV must
select - t, to tmatch a VCR program. tie
1 V must select {r) 2 (see page t al
You can use 3 stand nil video cable rnstrad
uf:n? S mil(y) cab/C between the (Vaud
L)VL) p/avet, but she pienrc quad - tw/t
docxcase the rllustra(u;n t icR Junta orrc
S s'tile' cable and one parrot audio cables
ra)rrnected IIWnlbanvD ptayet to-0 I on
the IV
C
Iho un:wlhnti/eu tea ndrtgl. usc,
distribution. or revision of Iel(wixmn
piapr:u ns, videotapes. L)VDs and other
nateriskmepinlu1 edutnorregional
rsrpynght laves, and may sultjecl you In
c vii and er:nunal liah.lity
':VII:I1, •IIIIto
OF CUs'
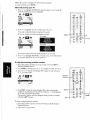
Connecting a DVD player or satellite receiver
and a VCR
This conncn iuu aliases you to search I )VF)/satellite, V( It. or l V
programs. Yon can record Iinm tltc sarellire rcceivcl or'I V. You cm alsu
record one'IV chauuc•I while ware hinK :uu.Iher ch.uuul.
Note: P your U42) player has curnprtuv't wtdcu connecDuus, see CWU? 5iUJ a
! ) v r ) /I. i v o:-NI rrrmponcnt wrdco ettd rr VCR o'; rrgr R
Nate:
10 mae ; <r t)VD Lcrrd&c prrrgrau;, the t V
mist set -ct -0 t to match a VCR pmgtanr,
Ow TV 'rust br. sot to -0 2 (see page 151.
Y;:r cart usc..? starwlant talco cable rnsrtsu/
ofart .Stdeo cable he/twen the TV anal
DVT) ptayw/satcllac rccmvet: fad 'he pxItemguak_ry uvi11 decaea se. Tiu tl/cstraaon at Intl
<l ows crm S-wrdco cable and one pan of
rturlio cuhles cnnnrrtrc/ from? the UVU
ptalmdsateflrte tecrn.er n> -F) t nn the t V.
From Satellite Dish
® uJ
S11"O A, cu
.11. I'll
* Satellete receiver use only
[he unaul nitued rrcnrdlnq_ use,
distribution. or Ievisnnl if Iclrvnuon
programs, videotapes. DVDs anll oilier
maledals atn prnhlblted under w(Ill oli al
copvnglll laws;. and unary sublect you to
civil and criminal Babilily
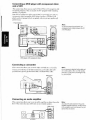
Connecting a DVD player with component video
and a VCR
Phis connection allows you to watch I )VI.), V(:R, otI'V programs, and
record'IV programs. You can record one TV program while watching
auonccr I V program.
lour lV has component video connections. Connecting your TV to a
con tponent video cumparible DVD player (meIt as a Toshiba 1 )V I)
pi lyre will) component video) can greatly enhance picture quality and
performance.
Note:
it Nw. best ptctu^r. Irrrlwmance, use
tvenpooent tmlen cables br•fween the IV
ntwl DVO pla ye,
DVD player with component video
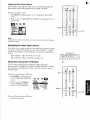
Connecting a camcorder
I his t oniwC Loll allows von to warch video recorded on a cnnr order.
If your tanvoolct bas an S. video connection, an S.video cahlr will
provide bcucr picture pc•rlormance than a standard video cable.
Note:
1)0 001 t rmnrct a statula,d wtleo cable :tnrl
an S todoo cable N, -0 1 (or -0 7)at the
some 1rnte or the plclae pr4bnrtdnce well
be trnacceprablr
Connecting an audio amplifier
This conncc iuu allows you ro lase all audio .tutplif set to adjust the audio
level. 'I bIN tt)uI(iCCliOlt kIIS() ShOWS you to use uxernal speakers
Amplifier
Note:
toamhul1lreaudio.bofbthe.IVaw/thd
amp4her must be. fumed oil. a nd the er,t ane
ofdw:urrpNrerRRAt heset aboie0. oi jinti
well tut hisu;trey sotrtrd
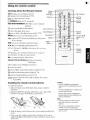
Using the remote control
Learning about the Remote Control
Picluro
Mode aura U
=i l U (POWER)
CAw0
CALL d isplays screen inhumation.(IV)
(- ij displays tckrt xr initial/iudcx.(l" IX)
TEXT/TV
J
11/(_} scle;ta tclctextl I V mode.
(J (POWER)
i1,.
IV
POSITION NUMBERS
on
.rlhnc
and
.tcccss ro
Or
-p (TVi
VIDEO)
Positron
Number
ot}
dIICU
Q
channel
positions.
CP returns to the last viewed channel.
-0 selects the Signal input source.
Stereo/Flilingual
Teletext
buttons
L, press in display a lour digit sub page number. ('Ihx)
MENU allows access to progranmung mcnnc.
Sound Mule 3
^. v.
-JF idjusra the T V picture by selecting one of the preset
Position ♦ V
Meru N'
OK
factory settings.
Volume +
EXIT.scrs menu infixnration and closes menus.
Menu'...
P (V / A) cycles through programed channels.
(/\/v) Also us.,] to highlight selections on the oil -s(:reen
T,lalexl
H - red
menus.
d d adjusts the volume level. Also used to inucase or
((1 >) reduce the value of it menu option.
OK sets programed menu information.
Teletext Colored Buttons directly access teletext
linked page.
CD I /II selects steco, hi lingual sound mode.
tK mutes the sound.
(} selects hidden tonicnr during teletext display.(11X)
holds function during teletext display.(I"I X)
[Do press no change double - size Ictrers .(l"1X)
press to cancel the Tl'X mode or display the accurate
rimc(TTX)
Installing the remote control batteries
I , install ncC hatter its:
lake rhc hartery cover off the hack olthe reunite control as
illustrated.
1. Install two R031AAA batteries. Mitch the + mid - signs on the
batteries to the signs on the battery cornparrment.
Caution:
• fh<prrsr of b.'rtta1C.a lit d rle_siynatcd
dtsprs;f r area no not throw Ixtlteo rs ink)
a Arc
• no r,pr mix battery typed tit combine used
b;dlaies with new Ones.
• Refnuvr, rlrarl bolklncs lnknedidlefy lo
prett•nt bartery.arwl lawn lcakrnp rrltc tl.w
1aua'tyCompW1?&V
Note:
• /1)13U do aM 1urrvl111 use the itu iota
contrc/ fora long little., remove the
3. Slide the battery cover hack on to the remote control until tltc lock
snaps.
• You can tote your remote control witlurt a distance of 5m and all
angle of 30 degrees from the left and right aides of the remote sensor
of your TV.
• lithe setnolr
u r.nnrrol does 1)111 olxrntc
colrecpv u+ if pre npeliturg range
becomes reduced 7e1dane both battens
writ wrw tW1c
Setting up your TV
Turning the TV On and Off
1. I'ress the POW I'. It bturn n on the TV or on the remove control. The
I'( )WFK mdNaroi will tight up in green and the picture will .gryx:ar.
2. To nun oil the TV. press the POWI'.R button again. the POWElt
indicator will light up in red (standby).
Note:
11 you ktirn• the (Vu rtNtrnded ur nursed kn km) perxxk of tats . rxtpk{q Utr. jxxteT
rYarl
Front
IF =
(5-1 (POWER)
POWEIt indicator
Green- ON
Red- starxby
Menu function
You will nerd m it( umue prelrtcnres on the] V using the menu system.
You can ar; ess the menus using i hr burtons on tout remote control.
(^) POWER
(
U
^0 0 0
I. I'mess MENU its display the n,rnu.
3
2. Puss ( of ) to select a menu[.
O
O
0
3. Press ^ er v select an itrur.
0
0
7
8
0
0
0
9
0
0
0
ID
0
r
4. Press ( et ) to select of adjust a srniuy.-
®
GN
0
Ti:7
0,.,
0
r, .1
AAIGHJN= SS
Ono
I
COLOR
mm
9
SHARPNESS I0
TINT
BLUE SCREEN a
0C
BASS
TREBLE
BAL ANCE
0 $ -0
I AUTO ^
3n
I ENGLISH ^
LANGUAGE
AUTO POWER
ION ^
REVERSAL
4OFF ^
OFFTIMER <00 40.000
TEXT 1.100E
I FAST ^
COLOR
SYSTEM
ASM
41 ^
MEIADRY
>>>
POSITION
I AUTO ^
4 BIG ^
o
t^
I P000
OK ^
caa;
17
SET UP
l
MFT
u
AFT ON
• Press OK to store the hmction wirings in ncc menus.
• The main menu display will ti sappcat aunnnatically it you do not
make a selection within 30 seconds. If yell wanr ro close ill the on
screen displays insrand y. press EXIT
a
O
I
O
0
..,n
qm
-0
0
0
°9r<O
^'^
nv
0
t
TEXTCHARA
1K
0
dim
WOW
MTSIAODE
r
0
rri
O>ty
0
O
nom()
Changing the on - screen display language
Choose from tour dilleteut languages (Engl i.sh, 'P X tel(4, UP
C e.
Russian) for the on screen display of adjustment menus and messages.
To select a language:
1. Press MENU , and then press ( or > to display the FEATURE
mcnu,
2. Press /v or \/ to highlight I.ANG(IM:t.
Q
®n
^
EAT _RE
1L1 ftiI!JCT^
AUTO POWER 4ON ^
REVERSAL 4OFF0
OFF TIMER <OK>40:00 ^
TEXT MODE 4 LIST ^
TEXT CHARA. t 2 ^
3. Press < or > to select your desired language.
Programming Channels into the TV's memory
• First, use the ASM (Automa(ic Search Memory) function to preset
all the active channels in vour aura auunuatically. Then, arrange the
preset channels with the > > >, SKI I' limuious, MP I (u\Mauual
Fineliuiing) so that you can tune into only desired channels.
• Usr the > > > f6oction ii desired channels cannot he preset with
the AS NI or if you would like w preset channels to specific position
nunthers out by one.
0
0
0 0 0
t
Automatic Search Memory (ASM)
O
Y
0
0
0
0
a
6
I. Press MENU, and then press ( or > to display the S[:*[* Up menu.
U
7
a
2. Press ^ or v to highlight CC)1 Oil, and ltcu press < or > to
select the correu color system for Your area.
0
0
C"
0
0
0
t
ASM
>>>
°
POSITION
MEMORY
4 P00 I,
OK
PAL
SECAM
443NTSC
358NTSC
Normally select AUTO.
3. Press v to highlight SYS'T'EM, and then press < or > Ilk select
the correct sound system for your area.
n
SET UUP
®,
Uff
ABC
AUT
^
0 -0-111- For the sysn: nu in each country,
>>> // ...., ,.1 t...Z^ __1.
POSITION 4 P000
MEMORY OK ^
4. Presc v to highlighr ASM. Mid then press < or > to start the
ASM All active channels will he preset autoucniadly.
®
SETUP
i;OLrH
SYSTEM
".1
J1
UK
17
4 AVtii
P.il t
F3
0
SEARCHING
lit4P1P 03
MENU:SMPVHA
POSITION IPOO ^
MEMORY OK ^
(continued on the next pag(')
0
10
O
to
--r AUTO
4 B?G ^
o
SYSTEM
43
U
0
o
gt, t;
9
W..
6
SETUP
3
0
0
s,cOl
r0
C% .,
0
0
0>,
nyrv
S7
0
0
TL3
0
(0
\Vheu the ,calth is -ompletc. the outman picture appears.
I'., .rap scarching. press MENU.
Manually tuning your TV
I'ress v to lughligiu PC )SITTON, and then press ( or > until the
position numbcr you want to program.
A n
SETUP
4 AUTO ^
48G ^
COLOR
SYSTEM
ASM
POSITION. - 4PI2 ^
MEMORY OK
2. Irtess ^ to highlight > > >, and then press ( or >.
> booth searches for higher-nnnrbcred chanucls
button searches for lower-numbcred chanucls
> bursar
t^
U PSET n
COLOR
SYSTEM
ASIA
POSITION
b1E1,fORY
MACH
4 AUTO ^
•ac ^
W111,10 I
MDAWWWR
0
4 POO
sum"
OK
44444 Q3
IIBLIS V FL
Press either bnnou until your desired program is received.
i. I'rccs v to highlight ,`llIMC )RY.:old then press > ((ir OK) burrnn
to store the clrauncl at the current IMnition.
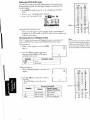
To skip unnecessary position number
t yyF
p
C `
I. \elect the ptl,iuon nunllwr you taut t o kip with life PAY of
Position Numhrl button,.
2. Press MENU. and then press < or > to display the SET UP test nu.
3. Press ^ ni v burrnn to highlight SKIT' (page 2). mid then press
Or > to whet ON
a
n
rx
SETUP
MFT
AFT
0
I ON ^
0 0
I'o ition
N umhor
1
L
1
1
a
6
®
0
a
O
o
®
0
4 I®1 0
mol
0
0
0
K
a
0
0
WA Mle
4. Press EXIT to erase the month display. Then select the position
number to lie skipped with the Number hartous. "." mark appears
to the left of the 1wsirion numhet.
T he p o% irlOn rltttrlber w dl (lien skipped when you select channels
with the PAY buttuus,
To store a skipped position nunther.
1. SelecT The position nuurbcr you watt to restore with the Position
Number hurtous.
2. Select OFF in step 3 shove.
-8 O' 0
u'
e,<Q. O . Q>r p
0
O
tf
.p
0
^
PAY
Manual Fine Tuning (MFT)
This adjusuuent is not necessary under normal receiving conditions.
However, in areas of inferior broadcast conditions where adjustment is
necessary for hewer picture. r'ollow• these steps.
1. Select the channel you want to fuetune with the PAT or Position
Number buuuus.
2. Press MENU, and then press < or > to display SET t3P menu.
3. Press n or v to highlight MET (page 2), and then press ( or
until the best possible picture and sound err Obtained.
rm
SKIP I CFF ^
While pressing the hurron, < at > will Flash.
Note:
t44;en operating the A4FT AFT,s autornattcally set OFF
Automatic Fine Tuning (AFT)
The Al I function aurornarically toners slight flucmarions when
receiving signals.
°0
1. Select the chanucl you want to fine-tune with the PA ♦ or position
Numhrr htirtons.
2. press MENU, and then press < or > to display SIFT UP menu.
3. Pres. ^ or u to highlight AFT (page 2), and then press < or > ro
select ON.
15 J1
010 o tape
0 0 0
Position
Number
0
to. 17
O
SET UP
4K
SKIP
ON ^
MET u
-0
Note:
WTnf,• • to the A! ! 01-1 - mode, " ■ ",nark
appears to thr. left of III,'! pos,uo,i,t,rmhor
Tu change progr<uu position:
• Enter the desired program position
number using the Channel position
buttons off the remote control.
For program positions below 10, use
(0 and) the regnired number i.e., for
program position 4.
• You c an also change the program position
by using the P A Or PT button.
I'he program position will be displayed on
site screen with tire StercolBilingnal
indicator.
Using the TV' s Features
Adjusting the Picture
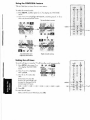
Selecting the picture mode
IItrtr are four Imnuc mode to choose from, tlesigued to suit your
h.trnrol.u Gtsrr.
fhc pit tore enlca7centenr drexcacrs front I'ictnre mode - I down to
Mode- 3. i.e. should you require high levels of eon [ rasr but a low picrurc
enhancement you ca n choose Piuurv node i a nd then increase coutr.m.
I terse settings ate stored as I'icttur uuxle-tMS,dret.iblc picture a llows you to change the contrast at the tondt of a
huu ,n
To select the altern ative picture mules:
• I're,s the -4A button repeatedly to
view the different picture modes
av.tilahlc.
Picture mode I to 3 am for preset
t5ptio n.
I
• I he Picture mode-M will contain your
own selection of Contrast, Brighutess.
Color, Sharpness and (lint) as scr out
below.
Adjusting the picture quality
You can adjusi the picture quality to your personal prcterenccs,
niluding tlLc ennit.rst, Iirighrne-s. sharpness, color. and tin t. Your
.holes will he stored automatically ut your I V's mcmoq.
To adjust the picture quality
1. Press MENU , and their press ( of > to display the Pit I'IIRk.
mcuu.
2. Press or v in highlight the I'ICTI iRE item yon want to adjust.
5. Press < or > to adjust the level.
I.
w•i
PICTI JHF
MENU
O
01,5, _., _,..
axa.
-s
1
COLCn
ONNI, C
SHaRI'Pl':SS I-•^1
TujT I---d--C
BLUE SCREEN a='
Contrast
(
Pressing
lower higher
Brightness darker
Ggh rct
Culur paler
sharpness softer
deeper
sharper
Tint' rrdthsh
greenish
tin Nl'..C SYSTP ibl only
W
0 .O>'t
0 0 0
Yi o O
The Pl(MiItl' items you have adjusted will he stored to the TVs
memory :nuontarirally.
Selection
P•7n
"v(>
Using the blue screen feature
With the blue screen function ON, the screen will automatically turn
blue and the sound will be muted when no signal is received.
swum IU
O 0
010 O Os
0
To turn on the bloc sc recur
0
0
7
3
0
0
0
0
0
0
/
N
9
0
1
1. Press MENU , and then press ( or > to display the I11CI URIi
mcuu.
2. Press ^ or u to highlight Til l_!E SCREEN, :nxl Then press ( or
to select ON.
0
0
(V
a
O
0
0
0
m"
o
0
O
F-T n ® l
0
PICTURE
CONTRAST ^^u D
BRIGHTNESS MIM 0
COLOR QONI ff
lw' 'Nn no
.0. 0
0 0>'i
p.r,.
(qT 0 0
TINT PNESS Q
11-AMM.
.. 1flillllllL"4JB3
0
u9
0 l`0
Note:
11 ti;c blue scant rends to ans.opcmte due to :msr;rhle sent sirrnrgth or bequest y.
srfex:f i)hh rn s?ep 2..
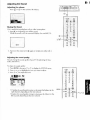
Selecting the video input source
Press -0 to view a signal coming Bout another device connected ro your
I V, such as a V(-'I& of DVD. You can select -3 I VIDEO I or -0
VIDP.O 2 depending on which input jacks au' used lot connecting the
devices.
-0 I VIDEO I: -n I tcrmin.rls III) I V lead.
TV top panel
00000c
2 VIDE(_) 2: -^ 2 terminal. ''n IIlnIIIH I si,lc
Using the auto power off feature
The 'I V will automatically turn i(sclf nhT (standby mode) after
approxinlarcly 15 minutes il it is tuned to a vacant chancel or it station
that coutpletes its broadcast for the date Ibis feature does not work in
VIDE( mode,
v10
U
0
0
Gr0
0
1
In turn on the into power of) (eature:
0
1 . 1'r ess MENU , and th e n p r e ss <
or > in i ii sp ha ( l ir FEAT UI'I .
0
mcuu.
+
Rn
press ( or > in select ON .
P i1r
REVERSAL
OFF TIMER
E'GLISH ^
tt
(OFF ^
<OK) 4 0:000
TEXT NODE
I LIST ^
TEXT CHARA
42 ^
0
2
3
0
0
0
0
s
Select OhF in step 2.
a
a
0
0
m
0
0
0
W-m
e
0
0
0
t
0
all
0
Pat-
mm
0
O.
O
er<O,
0
.0>'
0
O
WII
To turn off the auto power off teanue:
Os
0
0
,,
FEATURE
2. Press ^ or v to highlight iUA
At.) 11) POWER, and then
r
a
$3y
O
^-'-<)
Using the REVERSAL feature
Ibis is t Inn, will ro itvt-rsc the o11-xrcc11 menu.
0
' Iii select the reversal rnodc:
1. Press MENU, anti then press < or > to display the FE'Vl URF.
utenu .
2. Press n of v to highlight REVERSAL, and then pas?
or > to
select thedcsircd rvvcrsal node.
Top-and-bottom reverse
00 n ®U
FEATURE
LANGUAGE
4 ENGLISH ^
q
r ^
Run: .:
OFFTIMER <0E> 10:00
TEXT MODE
4 LIST ^
TEXTCHARA
k+::Fr t S
1FQ wC-E
4 1121 ^
C EE I4I EU <DK> 40 00 ^
,I
IN V1110 ROME
42r
^
IVI1GIIVCE 4 ENCTIZH ^
EEBLIUE
42t
t 1SI1 ^
t 00:0 ^ <RO> H3it1 Ji3
Qt?^Fb1 EBA
I N ^
t HSI19)1! ^
H3IA 01
39V119NV1
13 op
3HTliy3J
IR
Top-and-bottom and
Rigty-and -left reverse
O
0111
O
O
O
O
2
3
O
O
4
5
5
O
O
O
r
5
^
0
O
O
O
m,
O
O
O
o
O
•S/A
a
O
4310
&cO
0
0
. O>'
0
0
0
o
C)
CIO) C%
3GP11Y:31
0
■ !O
O
..,
MENU ' -^
® U
t
0
t..,to
09
3RUTA33
4 H21JOII3 ^ 3OAUU0AJ
^
&' R. J T I 14
400 0 00)
t T21J ^
t Sr
R3MfT110
303MTX3T
ARAHOTX3T
Right-and - Leh reverse
Setting the off timer
Iii set the o0 diner to turn the TV off (standby nintle) auromaut.dly:
I Press MENU , then press ( or
rn display the FEN( IRE
menu.
L Piess ^ or v to highltght
OFF LINER
.S. Press < or > to seleu the
rime.
® n ED
r
FEATURE
4 ENGLISH ^
LANGUAGE
AUTO PO'VER
4FF
REVERSAL
4 ^
TEXT MODE 4 UST ^
TEXT CHARA, 4 2 ^
Every roue you press the
button. the time display will
increase ((if decrease) by $0
ntinurrs, ulr to 3 hours.
O 0
00
,0 ° o
1
O
4
lit caned the oll tinier:
Sclett until it is set to 0:00, then press OK.
5
3
O
6
O
O
O
O
O
0
0
O
O
O
M.I.
0
O
it
0
e
MENU S
51<0
0:00 " 0:10 - 1 :00 ' 1:30 ' 2 00 ' 2:40 3:00 " 0:00
4. I'ress OK
2
0
m
rw
nrv.
O
0>1
S7
m
0
0
o
o
Adjusting the Sound
Adjusting the volume
©b
0
Press d or d to raise or lower the voluttic-
m
0
VOLUME
(0
Or a a 00
0
0
15UMNO 0
0 0
2
3
0 0
4
s e
Muting the Sound
O
O O
I his is uschd dui ing telephone calls or or her tuterruprions .
O
i
e
9
O O
0 a
0 0
0
0 '-' 0
0
0
to
a
O
-e
Press to remporatily turn ruff the unind.
While the sound is off, the screen will displ:,y the word MI. Ili.
v au
0
rNA tu7,®
0 0
°i<e) O Ng
i0
i^
0
d
0 o
).. To restore the mound, prtts t again or simply press either d or
+
Adjusting the sound quality
YOU an ehaogc ncV somid grmlin• of yout TV by adjusting the buss.
treble, and balance.
To adjust the sound quality:
I. Press MENU. then press < or > to display the SOL'NU rtteuu.
2. lives'\ of v to highlight the item you want to adjust.
O
3. Press < or ) to adjust the Icvcl.
®o®
O
t
soI Nil
IHllill
RAI ANCF
4iOw
MTSWDE
A-^
I$la
ION ^
2
0
s
0
0
r
0
a
0
a
0
0
0
r`
0
O
0
0
0
MENU
°K 0.
3
0
in
0
O
m
0
v
I
• ( makes the sound quality stronger or decreases the balance in the
Irli LIi.uuiel. depending on the item selected.
r
U
4
m„
O
4 AUTO 10
• > makes the world quality weaker or decreases the balance iii the
right channel, depending nn the item selected.
0
O O
0
0
.0>'Y
®
O
iU
110
U
iCy
Setting the MTS AUTO mode
the "AI 1'10" setting of the M IS (Moltichaitnel TV sound) nude
auromatically recognize stereo/bilingual prugr:uns depending on the
hu>adcast signal.
a
O 0
10
11110
O on
1. I'rca MENU. and theft press ( or > to display the Si 11JNO
0
menu.
4
2. Press /\ or v to highlight Ml'S MOUE.
0
3. fresh ( of )i to selm Al .l'I'D.
0
O
0
S
O
0
B
CH 12
a Fa O
Cr
0
SOUND
11----¢-4
BASS
T°F°' E 1--1
,,:)i s ^F 1- 4--V
ci 0
o
O
0
M",
S
t
0
O
O
O
O
Setting the MTS MONO mode
p
O
0 0
Il von experience noise or poor reception of any stereo/hilingual
prograut, set the Ml S mode to MONO, Noise will be reduced and
reception >lray imlrrovc.
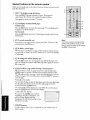
Receiving stereo or bilingual sound
0
0
0
Note:
Gher,,y:e!Mrn ^030110 wrNdpdnc^ul,
l;toqum: nn 'MOM' clurdntt/ renoptiort
usu;ki, yoxrl fly s&t'ng MIS mode, to
A1110.Ntertswitch1Me mvu htlion,
y inuudtndi). Qie/r r R> the ehd4 et tell i
i he I -V u-eeives both stereo and hilingual hioadt.asts n.msuurtcd ill
cube; the Nit AM ut licnu.tn stcreolhilingual hiomit. st systeni.
Strnro prugc,uns:
1. "R/heti a stereo program is received, OD
appca I S.
2. Press the C) 1/II co select the stcaeol
monaural mode. Q7 and 0 appear
cyclically on the screen.
r
_ Display
_ _ -Reception mode - - Stereo
CID
0 - - I Mon:nnal- - -
Bilingual programs:
1. When it bilingual program is received, 1 111
appears.
1 12
C
O
1111to
0
0
2
Sound to be heard
•
S
R
0
O
O
(Dull
German stereo/
Display
bilingual broadcast
Sub I soun d Main sound
Su b II sound
} iMam sound
1 1R
3
O O O
2. Press the CD I/II to scleu the sound to
he heard
1, II and V appear cyclically nn the
screen.
^----tom-- -
D-1111
0
d
Sub soun
_i
t_ Not dispjqed -
MM, rA?A tilt
O 0 0
ar<0, 0 0
O>IY
0 0 :U
^ v y
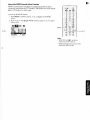
Using the WOW ( sound effect) feature
WOW sutIOU] d svidcnc and deepens audio listening field to deliver
csa PnrnriI .rmnd iI -III the'Vs speaker.. The feature uses stereo signals
from a I V broadcasr or video input.
0 0
a0 0 0
r
0
I . Precs MENU, and then press < ni > to display the SOUNL)
menu.
2. Press n or v to highlight WOW and than press < or > to select
ON or OFF.
®0 ® Im
SOUS
B A SS
v(k
T(f_BL E
BA L ANCE
I'.!
MTS MODE
o
:
I
E0
o G
4 AUTO ^
2
O 0 0
lu turn on the WOW feature:
0
0
0 0
G^ u
O 0
min
0
O
c
O
0
p
O
o
O
Y3 P©. O
hll Ntl
a,<® 0 0.
-0
Note:
WOW SHSarrd( S) symbol.ne
tr:nkrrrrrks of SRS l ab.. Inc
• WOW ler.Jurolocry is mnaporual under
lrcc+tsc ham SRS l obs, Inc.
7
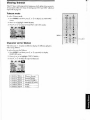
Switching between two program positions
You can switch two program positions without entering actual position
0
o
number each time.
^o O 0
1 . Select the first p ro gram p osition y ou
Position
Number _
06
want to view.
•
•
•
4
s
e
• • •
I *
2. Sclcct a second program position with
the Position Number buttons
-0 u0
^^
m.- o
O O
t
o
O
O
1 1
(0-9).
wv
PAtn w
O- d
f. Press the (2) button. The previous
channel will be displayed.
Arco.
0
.0>rf
0
0 0 0 .
; button, the I V will switch hack and forth
Each time you press the cn
between the two program positions.
Note:
The l,rrynnu lostrion selection beMrcon
difa; enr ;arnar chnnnet rakes several
snoods
Displaying on - screen information
Press CALL to disp l ay t h e fo ll owing in formation on-screen:
• Position number or External input rnudr selected
• Stereo or bilingual audio status
^„0
CALL
9
•;O
O
r
O
07
CD
0
wsu
ILIA MM
0 •0 O
® o' 0
0 0 0
Viewing Teletext
This 1'V has a multi -page teletext memory, which rakes a few moments
to load and it uflirs two ways of viewing text-FAST and LIST which are
explained on page 22.
Teletext mode
Ii,
cfcct Iclctext mode;
I fee's MENU, and then press
menu.
or > to display the FFAFTJRF.
2. Press v to highlight TEXT MODE.
3. Press < co > to select between FAS I' and LIST utodcs.
O
FEATURE
LANGUAGE IENGUSR ^
AUTO POWER 4ON ^
REVERSAL pcc ^
CfFT:AIER <O4O4C'00 ^
rr
TEXTCHARA 4 2 ^
Character set for Teletext
Cite C6aractcr 1 6 option enahlcs die display of different alphabets
when usmg'1 dctexr
to select character for ldetexr:
1. Pre" MFNU, and then press ( or > repeatedly to display
FEAI'1JRE. menu.
2. Press n or v to highlight TEXT CHARA..
3. Press < or > to select the requiled character.
1.7
LANGUAGE 4ENGUSH r
AUTOPOWER 4ON ^
EVER 9 4Ccft
4 FA,'r
(:1 IARAI :TIR- I
(:I IARAI"ITR-2
(:I IARAI TIIR-3
CI IARAI : I'h R-4
Western Europe
CI IARACI ER-5
CT IARAC, I bR-6
Greek
Eastern Europe
Russian (Cyrillic)
Ukrainian (Cyrillic)
Arabic
O
O
t
2
3
O
4
O
O
O
e
O
7
O
O
O
e
B J1 IM)
® Jn
FEATURE
0_ 0
0,0
9
0
a
0
M ,,,
0
or
0
O
O
a
O
a
0
4
•
^r<'
0
•>'t
^
•
0
a
()
0
ma
O
Teletext General information
010 button:
Pressing the 010 billion once will bring up the teletext screen. Press
again to superimpose the teletext over a normal broadcast picture. Press
again to return to normal TV node. You need to return to normal
viewing if you wish to change channels.
When you first press the 9)/0 button ro access The text service, (lie
first page you sea will be the initial page.
In FAST mode, this displays the main subjects available and their
relevant page numbers.
0
KY1
MENU
0
TAIA
0.
0 O>+Y
In LIST mode, you will see whichever page number is currently stored
oil the It button,
O
G
'fb access any teletext page, enter the 3-digit page number , using the
Number buttons (0-9) on the remote control e.g. 420 or to advance to
the next page , press the PA billion , to go back to the previous page,
press the PV button.
Once in this chosen page, if there are sub-pages they will automatically
load into memory without changing the one you are reading. Arrows
will appear alongside the page number, indicating sub-pages which have
loaded to the left or right of the one on the screen. If there are many
sub-pages, it will take a long time for them all to load and this will
depend on the speed with which the broadcaster transmits tltetn.
To access the sub - pages in memory, press the [] (-0) button, then
use the < or > buttons to view them.
Whilst in sub -pages mock an indicator will show iu the bottom left of
the screen . After a s hort time of inactivity the indicator will disappear.
(-Q) button.
To access the sub-pages again press the
-Qt^
These sub-pages will remain available to view until you choose another
page or, in normal TV mode, you change channel.
(
i
PAY
Y
O-B
R : Red
G: Green
Y : Yellow
ti : Blue
Sub-pages:
^tm
O
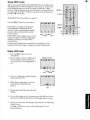
Using FAST mode
There are two Modes: FAST will display FASTF.XI; if available. LIST
will display your four favourite pages. In either mode, as an alternative
to the colored buttons you can access a page by entering a 3-digit
number, using the buttons on Lite remote control, or to advance to the
next page, press the PA (^) button, to go back to the previous page
press the PT (,/) button.
to
O
e,o 4 00
-3 0
O
IL
2
e
B
B
Q
o
C
O
®
O
®
7
To change between Fast and List, see page 21.
Press the M= In button ro access teletext.
ENU
If FASI'EXT is available , you will see 4
colored prompts at the base of the TV
screen . To access any given subject simply
press the relevant colored button on the
remote control.
If FASTEXT is not available , you can access
any page simply by entering a 3-digit page
number or pressing the corresponding
colored button.
®
O
x
O
,Q4I
3
O
O
A'^
O
P AT
P1IV.^
1822
823
824 e2$
R
C^- Y
G
p Vi B
Rod I Yellow
Green Blue
For further information on your particular text system(s), see the
broadcast teletext index page or consult your locallilshiha dealer.
Using LIST mode
1. Press Elie U/(] button to select
-ITLETEX'F.
2. You can program the set to hold your 4
favourite pages in memory. The first
memory position will be highlighted in
red.
Display example
its TEXT )e5 ■ ■ ■ ISM*
L ®)E5 MS 1855
Green Blue
Red Yellow
3. Enter the 3 digit page number using the
numher buttons (0-9).
4. When the text page appears, press the
Green button to select the next
position.
5. Repeat steps 3 and 4 for each of desired
4 pages.
6. to store the 4 pages you set in memory, press the Red hurton once
then press and hold Lite Rcd button unril 4 pages (lashes in white.
7. You can now select the desired page by pressing the corresponding
colored button.
Ilse PA or PT button can he used to select pages for each
nteutory position.
23 1
Teletext buttons on the remote control
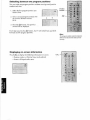
Below is an introduction to the teletext buttons on your reuwte control
and their functions. 2
.no C
0 0
1 . 9)/0 To dis play a p ag e of teletext:
2
Press the l=1/0 button to display teletext. Press again to
O
superimpose the teletext over a normal broadcast picture.
Press again to return to normal TV utode.
O
4
5
8
O
O
7
O
d
8
O
a
0 0
2. EU 'lb display an index / initial page:
In Fast-mode
3
O
MIA
O
B
O
0
0
0
3
4
O E- 5
Press the { button to access the index page. The one displayed is
dependant on the broadcaster.
In List-mode
Press the R IF button to return to your page currently stored on the
Red button,
3. Q To reveal concealed text:
Some pages cover topics such as quizzes and jokes. To discover the
solutions press the 0 button.
ff _11: To hold a wanted page:
This feature is included as it is part of the broadcast teletext system
but you will not need it as this TV allows you to control the display
of sob-pages.
5. M
=T To enlarge the teletext display size:
Press the [] button once to enlarge the top half of the page, press
again to enlarge the bottom half of the page. Press again to revert to
tilt normal size.
6. Q l
' lo select a page whilst viewing a normal picture:
When in teletext mode, if a page selection is made and then th e
E )/ED button is pressed, a normal picture will be displayed. The
TV will indicate when the page is present by displaying mite title bar
of the text page at the top of the screen. Press the [/ ❑ billion to
view t
h e page.
To display news flashes:
To view news flashes as they ate broadcast, select the news flash page
for the particular teletext service (see the index page of teletext
service). ['less the p /-Qx button.
The news flashes will be displayed as and when they are broadcast.
Press the P> /-Qx button to cancel the display.
lb select the tittle display:
if you press the Q/® button whilst
watching a normal IV broadcast, you
will ser a time display from the
broadcaster. It will remain on the screen
for about 5 seconds.
7. COLOR buttons:
to select button whose color corresponds to your desired topic in
Fastest mode.
O
t
Note:
It wdl nul be possible to change program
position Willis( III Telelext mode. yew will
have to cancel the teletext first by ptecvny
the ()/lJ button ttvrre.
Appendix
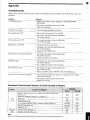
Troubleshooting
Before calling a service technician, please check the following table fora possible cause of the problem and some
solutions.
Problem
Solution
TV will not turn on
• Make sure the power cord is plugged in , then press POWER
(01orO),
• The remote control batteries may he dead.
Replace the batteries.
No picture. no sound
• Check the antenna/cable connections.
No sound , picture OK
• The sound any be muted. Press d d.
• the station may have broadcast difficulties.
Try another channel.
Poor sound , picture OK
• The station utay have broadcast dit iculdes.
Try another chanel.
Poor picture , sound OK
• Check the antenna connections.
• The station may have broadcast difficulties.
Try another channel.
• Adjust the PICTIJRE menu.
Poor reception of broadcast channels
Multiple images
• ' I lie station may have broadcast difficulties.
Try another channel.
• Check the antenna connections.
The station may have broadcast difficulties.
Try another channel.
Use a highly directional outdoor antenna.
• The station may have broadcast dilficulties.
Tryanother channel.
• Adjust the'fINf and/or COLOR in the PICTURE menu.
The remote control does not operate
• There may be an obstruction benvecn the remote control and the
remote conriol sensor.
• The remote control batteries may he dead,
Replace the haueries.
Broadcast Transmission Systems in Each Country or Region
System
Country or Region
Area
Bahrain , Kuwait, Israel , Onian, Qatar, United Arab Emirares,
Yemen, etc.
Indonesia , Malaysia, Singapore, T hailand, etc.
Asia China. etc.
M. F. China Hong Kong PAI.
Iraq, Islamic Republic of Iran , Lebanon, Saudi Arabia , crc. SECAM
Russian Federation ,
_
ctc.
SEC:AM
Myanmar,crc.
N'ISC
Oceania -Australia, New 7caland, etc. PAL
Africa Republic of South Africa, etc. PAf.
Note:
Rcrer fn thn .Sprvafcnoo.ns tob/C ov Ute next pugs ro bnd the te(a wnhle. teletasrnn systems for tl)ts IV
cleaning and care
WARNING:
Do not try ro remove the cabinet back, Refer servicing to qualified service technicians.
To clean the TV screen:
1. Unplug the TV to avoid possible shock hazard.
2. Use a clean cellulose sponge or chamois cloth dampened with a solution of mild detergent and warts water to
clean the TV screen and trim. Do not use too muds water because seater spills into the cabinet can cause
damage to the TV.
3. Wipe off any excess moisture with a clean dry cloth.
4. Polish the cabinet with a quality furniture polish to maintain the Finish and appearance of the cabinet.
Caution:
Never use strong solvents such as thinner, benzene, or other chemicals on or near the cabinet.
These chemicals can damage the finish of the cabinet.
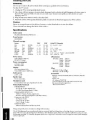
Color system
PAL/SECAMJNI.S 04.43 /NTSC:i3.58
Sound .system
BG/I/DK/M
Channel coverage
System
PAL DIG
(CCIR)
I'Al. I
(UK)
PAL D/K
SK-AM H/G
SECAM D/K
N'I'SC M
NI'SC M
(CHINA)
(GCIIt)
(OIRT)
(1:S)
(IAPAN)
VIH;
UHF
2- 12
21 -69
-
21 69
1-12
2- 12
I -12
2- 13
t 12
13 - 57
21 69
21-69
14 69
13-62
Power source
10(IV-240VAC 511/(111 11z.
DCI6V (TV input)
Power consumption
14VL413C: 45W
20VI.43C:: 6OW
Display
'I'FLActive Matrix LCD
VGA: 640(H) dots x 480(V) dots
Audio power
2.5W i 2.5W
Speaker type
45 mm round 2prs.
Headphones jack
3.5 none (Stereo-mini type). Impedance 8-32 ohm
Video / Audio Terminals
Cable TV (Charntels)
X -- Y.+2,.SI .541
Z-I Z-38
X--Zi2,Sl --S41
XI - X19
A G-A 1,A--W, AA - ZZ,AAA,BBB
X11 - MI1),S1 - S41
Dimensions
14VI.43(, \Vidrh 358mm
Height 416.Suun
Depth 177mm
20VL43 C: Width 493mm
Height 523nrni
Depth 198wnt
Mass
14VL43C: 9.21bs. (4.2kg)
20VI.43C: 14.116x. (6.4kg)
Accessories
Rnnote control (CT 90166) with two batteries. M03.67(1.
AAA")
Power cord,
AC Adaptor ('TAA-Y54)
(This AC adaptor can be only used for this LCD TV
Do not use kr ocher apparatus.)
I his (.kenos Manoal
S-VIDEO INPUT
Y. 1 V(p-p)• /1011111, negative sync.
C: 0.286 V(p-p) (burst signal), 75 ulun
VIDEO/AUDIO INPUT(L 2)
VII )FO: I V(p-p), 75 ohm, negative sync.
AUDIO: 15(1 mV(rms) (Impedance 22k ohm orabove)
Component video INI'(fI
Y: I V(p-p), 75 ohm
Cu: 0.7 V(p-p), 75 ohm
Cu: 0.7 V(p-p), 75 ohm
AUDIOOUI'Ptfl
15tlnn•( rms)(Impedanm 22k ohm or shove)
Design and specifications are subject io change wit hoot notice.
a
C
The LCD display panels arc ntanufactured using an extremely high level of preci .siou technology, however sometimes some
parts ,('the screen noq• he missing picurre elements or have luminous spots. This is not a sign of a malfunction . You can enjoy
a video game with this I V. I lowevcr, the game which uses a rav gun etc. and makes a .screen a target has some which cannot be
used on a principle.
CL
.4
26
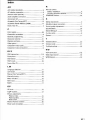
Index
AB
AN cables (standard ) ........................................................... 5
AC adaptor connection ........................................................ 5
Antenna cable (coaxial) .................. ................................. ..... 5
Audio amplifier connection ................................................ 8
R
Remote control
Battery installation ........................................................... 9
Learning about the buttons ............................................ 9
REVERSAL feature ..... ..................................................... _... 16
Auto power oft .............................................._........................15
S
Automatic Fine Tuning (AFT) ............................................ 1,3
Safety instructions ................................................................... 2
Automatic Search Memory [ASM )............. .................. 11
Satellite receiver connection ............................................... 7
Back of the TV .......................................................................... 4
Sound quality adjus t ments ................................................17
C
Specifications _ ........................................................................ 26
Stereo / Bilingual .................................................................... 18
CALL button ............................................................................20
Camcorder connection ............................................ .......... .... 8
Channel programming ............... ......................................... 11
S-video cable ............................................................................ 5
System ........................................................................................11
Character selection-.....- .............................................._..21
T
Cleaning and care .................................................................26
Teletext buttons ...................................................................... 24
Color system .... ........---- ........... ................................... ....... I 1
Teletext mode ..........................................................................21
Component video cable .................. __................... ............... 5
Troubleshooting ..... ..... ............._.......................................... 25
Component video connection ........................................ 8
VW
DEF
VCR connection ............................---..._............................ 6-8
DVO connection ................................................................... 7, 6
Video input source- ..............................................................15
Exemptions................................................................................. 3
WOW feature ...........................................................................19
EXIT button .............................................................................. 10
FAST mode ....... _......._..... ... ... .............. ...._ 23
Front of the TV .................... . ...... ........... ............... 4
LM
Language selection .............................................................. 11
LIST mode ........ .................................................. ..................... 23
Manual Fine Tuning (MFT) ................................................13
Manually tuning ..... ........... ..... ........................ .................. ..... 12
Menu function ....................................................._................. to
MTS mode ................................................................................18
MUTE ................... ......................................... ......._................... 17
OP
Off timer .................................................................................. 16
PA V buttons .........................................................................12
Picture adjustments
Picture mode ......................................................................14
Picture quality ....................................................................14
Blue screen .........................................................................15
Position Number buttons ...................................................20
Power cord connection ........................................................5
27
TOSHIBA CORPORATION
Printed in Japan


![ISQUES COLUMBIA L. Preetzmann—Àggerhalm ]](http://vs1.manualzilla.com/store/data/006392774_1-0422bcc5d356255aa7f43d6945e506b7-150x150.png)