1
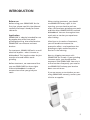
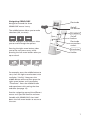
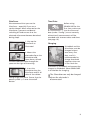
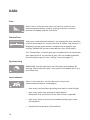
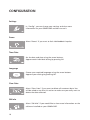
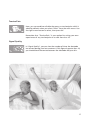
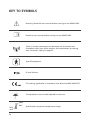
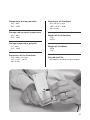
User Manual
GRINDCARE 3
UK
TABLE OF CONTENTS
INTRODUCTION . . . . . . . . . . . . . . . . . . . . . . . . . . . . . . . 5
GETTING STARTED . . . . . . . . . . . . . . . . . . . . . . . . . . . . . 6
PREPARATION FOR USE . . . . . . . . . . . . . . . . . . . . . . . . . 8
MEASURING HOW OFTEN YOU GRIND . . . . . . . . . . . . 10
REDUCING GRINDING/CLENCHING . . . . . . . . . . . . . . . 12
DATA . . . . . . . . . . . . . . . . . . . . . . . . . . . . . . . . . . . . . . . 14
CONFIGURATION . . . . . . . . . . . . . . . . . . . . . . . . . . . . . 16
TROUBLESHOOTING . . . . . . . . . . . . . . . . . . . . . . . . . . . 18
UNPACKING GRINDCARE . . . . . . . . . . . . . . . . . . . . . . . 19
GRINDCARE COMPONENTS . . . . . . . . . . . . . . . . . . . . . 20
MAINTENANCE AND DISPOSAL . . . . . . . . . . . . . . . . . 21
SAFETY . . . . . . . . . . . . . . . . . . . . . . . . . . . . . . . . . . . . 22
KEY TO SYMBOLS . . . . . . . . . . . . . . . . . . . . . . . . . . . . 24
TECHNICAL SPECIFICATIONS . . . . . . . . . . . . . . . . . . . . 26
3
4
INTRODUCTION
Before use
Before using your GRINDCARE for the
first time, please read this User Manual
carefully and keep it handy for future
reference.
Application
GRINDCARE is a device intended for use
by people who suffer from tooth
grinding/clenching, also called bruxism.
GRINDCARE can measure and treat
bruxism.
For treatment, GRINDCARE emits a small
electrical impulse – what is known as
biofeedback. This impulse makes the jaw
muscles relax and inhibits tooth
grinding.
Before treatment, we recommend that
you use GRINDCARE for three nights
without biofeedback in order to
measure how often you grind your
teeth.
When starting treatment, you should
use GRINDCARE every night. In the
morning, you can check to see how
often you have been grinding your teeth
and how often GRINDCARE has emitted
biofeedback. You can also register how
much pain or tension you experience
after waking.
After four to six weeks of treatment,
you will be able to measure the
preventive effect – and experience less
grinding at night, and/or less pain or
tension in the morning.
Now try skipping treatment with
GRINDCARE for a week. If your grinding
increases again, you should resume
treatment with GRINDCARE. Your aim is
to find out how frequently you need to
use GRINDCARE to keep your bruxism
down to a minimum.
If you are unsure as to whether you are
using GRINDCARE correctly, contact your
clinician or supplier.
5
GETTING STARTED
Get to know your GRINDCARE system
Powering the Stimulator on and off
Before using GRINDCARE for the first
time, insert the Stimulator into
Grinddock – you’ll feel how it snaps into
place. This is called ‘docking’. Now
charge them both by connecting the
charger to the socket on the back of the
Grinddock and to an AC power outlet
(see page 9).
Power on the Stimulator by pressing its
on/off button for 1 sec. A blue LED (on
the back, bottom left corner) flashes
once and stays on for a few sec. (‘On’
status is then indicated by a short blue
LED flash every 30 sec., and
by the battery symbol on the
Grinddock screen).
Using Grinddock is easy – there are only
three pushbuttons on the front and a
display. Power it on by pressing the
middle button briefly. The display lights
up showing the “Treatment” icon, which
is the first of three menus for operating
and configuring GRINDCARE. The other
two are “Data” and “Config”.
To power off, press the Stimulator on/off
button for 3 sec. until the blue LED
switches on, then release button
immediately.
Now look at the white bar across the top
of the display. On the left, the time is
displayed (if it’s incorrect, see pages 9
and 16). The middle of the bar is empty,
but this is where the quality of the
electrode contact will be displayed,
when connected (1-5 bars, just like the
signal quality displayed on a mobile
phone).
‘Off’ status can be checked on the
Grinddock display (the Stimulator
battery symbol disappears), please note
that there can be a delay. The Stimulator
will also turn off automatically if left
unused or without electrode contact for
10 minutes.
!
Note that the symbol for the
Stimulator in the Grinddock display
varies according to whether the
Stimulator is docked or not.
Powering Grinddock on and off
The right part of the bar displays symbols
indicating battery status of Grinddock
and the
Stimulator, and
whether the
Stimulator is
powered on or
docked.
6
Power Grinddock on by pressing the
middle button briefly – the display lights
up, and you can operate the
device, check battery status,
etc.
To power off, hold down the middle
button until the display switches off.
Navigating GRINDCARE
Electrode
Navigation around the three
GRINDCARE menus is easy.
The middle button allows you to make
selections (OK, or enter).
On/off,
OK button
Grinddock
On/off
button
The left and right arrow buttons allow
you to scroll through the options.
Electrode
connection
socket
Pressing the right arrow button takes
you to the next menu entry, while
pressing the left arrow button takes you
up one level.
Stimulator
Treatment
Data
Holder
Config
For example, press the middle button to
start, then the right arrow button twice
to display “Config”. Now press the
middle button once and then press the
right arrow button until you display
“Time/Date”. Press the middle button
and experiment with setting the time
and date (see page 16).
Practice navigating around the different
menus until you feel familiar and comfortable with GRINDCARE, then hold
down the left arrow button to return to
the start.
7
PREPARATION FOR USE
1. Switch on the Stimulator by pressing its
on/off button for 1 sec. A blue LED
(back, bottom left) flashes once and
stays on for a few sec. ‘On’ status is
then indicated by a short blue LED flash
every 30 sec. and by the battery symbol
on the Grinddock screen.
2. Switch on the Grinddock by pressing the
middle button. Check that both
Grinddock and Stimulator are charged.
Make sure that there is contact
between Grinddock and Stimulator.
3. Insert the electrode firmly into the
Stimulator.
4. Place the electrode on a flat surface.
Remove the short plastic liner from the
gel pad. Place the gel pad with the
recesses over the three terminals.
Remove the long plastic liner from the
gel pad. Check that there is no gel left
on the liner, so all the gel is on the
electrode.
5. Place the
electrode with
the gel pad
directly on the
skin. The skin
must be is clean
and dry. The
electrode must
be placed over
the temporalis muscle on the
temple. You can locate this by
placing a couple of fingers on the
flat part of your temple and biting
down – you will feel the muscle
bulging out.
6. Attach the Stimulator to your
nightclothes using the clip, or hang
it around your neck using the safety
cord supplied. The safety lock must
be at the back of your neck.
7. Check that there is good contact with
the skin. There should be a
minimum of three bars
visible in the electrode contact icon.
The electrode must stick to the skin
along its entire length so that all three
terminals maintain good contact with
the skin.
8. When the electrode is placed
correctly, you can proceed with
either measurement or treatment of
your grinding, depending on your
clinician’s instructions. See detailed
instructions in the next two sections.
8
StimCover
Time/Date
We recommend that you use the
StimCover - especially if you are a
restless sleeper. When mounted on the
Stimulator, it prevents accidental
switching off and ensures that the
electrode clip cannot become detached
during sleep.
Before using
GRINDCARE for the
first time, make sure
that the time and
date (under “Config”) are set correctly
otherwise all measurements will be
recorded with incorrect dates and times
(see page 16).
1. Line up the
StimCover as
illustrated.
2. Mount the
electrode clip on the
Stimulator and,
from above, thread
the electrode and cable through the
space on the right of the casing.
3. Insert the
Stimulator into the
StimCover and fit all
sides of the rubber
casing snugly into place. Ensure that the
power symbol
is over the on/off
button.
Charging
Grinddock and the
Stimulator must be
charged at least
once every five
days, and it is
recommended to
charge them both
together when not
in use. Dock the
Stimulator in Grinddock and connect the
charger to Grinddock. Place GRINDCARE
in the holder for charging.
!
The Stimulator can only be charged
when the electrode is
disconnected.
9
MEASURING HOW OFTEN YOU GRIND
Before sleeping
Treatment
Before starting treatment, it’s important to measure how often you
actually grind your teeth during sleep. These ‘zero biofeedback’
sessions provide you with a basis for comparison of your toothgrinding data before, during and after treatment with GRINDCARE.
Select “Treatment” from the main menu.
Setting biofeedback
Use the left arrow button to set the biofeedback level to zero. Press
the middle button (OK) to skip the test.
Press OK again to confirm your zero setting, and the next steps are
to calibrate GRINDCARE to suit your grinding pattern.
Relax
Start by relaxing your facial muscles.
You will see an arrow on the right of the Grinddock display – when
it disappears completely, you will proceed automatically.
Grind
Clench (do not grind) your teeth – especially the back teeth – in a
good, firm bite (around 60% of your maximum bite strength).
Repeat a couple of times until the arrow disappears.
Ready
Your treatment has now started and there is no longer wireless
communication between the Stimulator and Grinddock. You can
place Grinddock in its holder (it will switch to standby after 5 sec.).
10
Next morning
Carefully remove the electrode from your temple without pulling on the cable.
Measurement will stop automatically. Press the Stimulator on/off button to establish
wireless communication. The Stimulator battery symbol will reappear on the display
after a brief delay.
0
10
Now select “Data” and the display will show “Log Tension” – assuming
that Log Tension has been selected “on” under “Config.” Rate the
pain/tension you experienced on waking on the scale of 0 - 10.
Press the middle button to enter the value and next “Synchronizing”
is displayed to indicate upload of data. This can take up to 30 sec.
depending on the amount of data recorded.
Select “Last treatment” to view the results of your last treatment.
Remember to remove the gel pad from the electrode – now while it
is still soft and easy to detach.
!
GRINDCARE must have recorded at least one hour’s data for upload of data to
be possible.
Possible error sources
These screens are displayed only if:
The Stimulator battery needs charging.
There is no contact with the Stimulator.
There is poor contact between the skin and the electrode.
11
REDUCING GRINDING/CLENCHING
Before sleeping
Treatment
Start your treatment by selecting “Treatment” from the main menu.
Setting biofeedback
Select a biofeedback level using the arrow buttons. Press the middle
button to test it. The level is correct when you can feel a tingling
sensation. Press OK to confirm, or select a different level.
The next steps are to calibrate GRINDCARE to suit your grinding pattern.
Relax
Start by relaxing your facial muscles.
You will see an arrow on the right of the Grinddock display – when
it disappears completely, you will proceed automatically.
Grind
Clench (do not grind) your teeth – especially the back teeth – in a
good, firm bite (around 60% of your maximum bite strength).
Repeat a couple of times until the arrow disappears.
Ready
Your treatment has now started and there is no longer wireless
communication between the Stimulator and Grinddock. You can
place Grinddock in its holder (it will switch to standby after 5 sec.).
12
Next morning
Carefully remove the electrode from your temple without pulling on the cable.
Treatment will stop automatically. Press the Stimulator on/off button to establish
wireless communication. The Stimulator battery symbol will reappear on the display
after a brief delay.
0
10
Now select “Data” and the display will show “Log Tension” – assuming
that Log Tension has been selected “on” under “Config.” Rate the
pain/tension you experienced on waking on the scale of 0 - 10.
Press the middle button to enter the value and next “Synchronizing”
is displayed to indicate upload of data. This can take up to 30 sec.
depending on the amount of data recorded.
Select “Last treatment” to view the results of your last treatment.
Remember to remove the gel pad from the electrode – now while it
is still soft and easy to detach.
!
GRINDCARE must have recorded at least one hour’s data for upload of data to
be possible.
Possible error sources
These screens are displayed only if:
The Stimulator battery needs charging.
There is no contact with the Stimulator.
There is poor contact between the skin and the electrode.
13
DATA
Data
Select “Data” from the main menu to view the results of your
measurement/treatment. Start by making sure there is contact
between Grinddock and the Stimulator.
Tension/Pain
0
10
After every measurement/treatment, you should rate your sensation
of facial tension/pain on a scale from 0 to 10. When “Log Tension” is
displayed, use the arrow buttons and press OK to approve your
settings. GRINDCARE has now saved data on your tension/pain.
The “Tension/Pain” function gives you an opportunity to record your
own experiences of any tension or pain. You can enable or disable
the tension/pain query in the “Config” menu (see page 17).
Synchronizing
GRINDCARE transfers data from the Stimulator to Grinddock for
viewing. Please note that data is not stored in Grinddock but in the
Stimulator only.
Last treatment
Select “Last treatment” to view the results of your last
measurement/treatment, according to:
• How much you have been grinding your teeth in total (Grinds)
• How many hours your treatment lasted (Hours)
Remember that a minimum of one hour’s data is required!
• How many times an hour you have been grinding your teeth
(Grinds/Hour)
• Experienced tension/pain (Tension/Pain)
14
30 treatments
Select “30 treatments” to view the results of your last 30 treatments
(measurements). Each column displays data for one treatment,
according to:
• How much you have been grinding your teeth, in total
(Grinds)
• How many hours your treatments lasted (Hours)
• How many times an hour you have been grinding your teeth
(Grinds/Hour)
• Experienced tension/pain (Tension/Pain)
!
Measurement data recorded using zero biofeedback level is saved in GRINDCARE
just like all other sessions, although it is not possible to see which session used
biofeedback and which did not. This information is, however, available to your
clinician after the data has been transferred to a PC.
For this reason, it is advisable to keep a record of zero biofeedback sessions by
means of manual note-keeping, e.g. in a diary.
15
CONFIGURATION
Settings
In “Config”, you can change your settings and view more
information on your GRINDCARE and how to use it.
Demo
Select “Demo” if you want to feel a biofeedback impulse.
Time/Date
Set the date and time using the arrow buttons.
Approve each individual setting by pressing OK.
Language
Choose your required language using the arrow buttons.
Approve your settings by pressing OK.
Clear Data
Select “Clear Data” if you want to delete all treatment data. You
will be asked to confirm this action so make sure you really want to
delete the data collected.
SW Info
Select “SW Info” if you would like to view more information on the
software installed on your GRINDCARE.
16
Tension/Pain
Here, you can enable or disable the query on tension/pain which is
asked by default when you select “Data” from the main menu. Use
the right arrow button to select, then press OK.
Remember that “Tension/Pain” is your option for rating your own
experiences of any tension/pain on a scale from 0 to 10.
Signal Quality
In “Signal Quality”, you can view the number of times the electrode
lost contact during your last treatment. If this figure is greater than 10,
you should check the contact between the electrode and your skin.
17
TROUBLESHOOTING
1.The gel on the gel pad sticks to the electrode
You have positioned the gel pad the wrong way round! The gel should be against your
skin, not against the electrode.
2.I wake up at night and get biofeedback even though I am not grinding my
teeth
Make sure that the electrode is sticking to your skin along its entire length so that all
terminals maintain good contact with the skin. Review your treatment settings again
and try to bite down harder. This allows you to set a higher threshold for when
GRINDCARE is sending biofeedback.
3.I find it difficult to achieve good contact between the electrode and my skin
Make sure your skin is clean and dry. There must be no hair between the electrode and
your skin. The electrode must be attached along its entire length. If necessary, try
dampening the gel on the gel pad with a drop of water before you calibrate
GRINDCARE.
For further information, please see www.grindcare.com
18
UNPACKING GRINDCARE
All the components required for using GRINDCARE are supplied in a custom box
containing:
•
•
•
•
•
•
•
•
•
•
•
Grinddock
Stimulator
Charger
Holder
StimCover
Electrode
Safety cord
Rubber clip
Gel pads
GRINDCARE 3 User Manual
Quick Guide
When you unpack GRINDCARE for the first time, make sure that all these components
are included. If anything is missing, please contact your clinician or supplier at once.
19
GRINDCARE COMPONENTS
The Stimulator is the central unit. It registers your grinding and sends bio-feedback
through the electrode to your skin. All treatment data is saved here.
Grinddock is used to operate the Stimulator and display the results of your treatment with
GRINDCARE. Communication between the two units is wireless. This wireless
communication is terminated automatically while treatment is being given.
Grinddock is also used to charge the Stimulator and to transfer data from the Stimulator
to your clinician’s PC.
The electrode, with three contacts, is connected to the Stimulator and placed on the
temporalis muscle (located on either temple). The electrode measures electrical EMG
(electro-myographic) signals from the muscle, when it moves, and emits an electrical
impulse which makes the muscle relax.
The electrode is connected to a combined cover and clip which can conveniently be
attached to your nightclothes and ensures that the electrode cannot be inserted into any
other socket.
A safety cord, which can be attached to the clip and hung around your neck.
Rubber clip, which is used to attach the cable from the electrode to the safety cord (see
illustration on page 23).
Gel pads (x 30) are placed on the electrode to ensure contact between the electrode and
skin. These can be found at the bottom of the GRINDCARE box.
A charger, which is connected to Grinddock for charging both Grinddock and the
Stimulator.
A holder, for keeping Grinddock when not in use, when it is to be charged and when
data is transferred to a PC.
StimCover, a rubber casing designed for use with the Stimulator – it prevents the
Stimulator being detached or switched off during restless sleep.
A Quick Guide to using GRINDCARE, which you can keep handy near your bed.
This User Manual, which contains all the information you need for using GRINDCARE.
20
MAINTENANCE AND DISPOSAL
GRINDCARE unit
Wipe clean with a slightly damp cloth.
Electrode
The electrode must not be cleaned with cleaning fluids such as ethanol, propylalcohol or
similar. Wipe the electrode down with water on a damp cloth.
Gel pads
These are for single use only and must not be cleaned. They must be replaced every night
before use of GRINDCARE.
Storage of gel pads
We recommend that you store the gel pads in a cool, dry place. To keep the gels moist, it
is important to keep the gel pads in the plastic bag provided. The gel pads must not be
exposed to direct sunlight.
Disposal
The authorities require electrical and electronic devices to be collected and parts of such
devices to be recycled. Electrical and electronic devices bearing the following symbol
must be handed in to a local authority recycling facility.
WEEE directive
The WEEE directive (Directive on Waste Electrical and Electronic Equipment), 2000/96/EC,
has been adopted in order to ensure that products are recycled using the best processing,
recovery and recycling techniques in order to safeguard human health and ensure a high
degree of environmental protection. This product has been designed and produced using
high quality materials and components that can be recycled.
Disposal options
• The product can be handed in to any local authority recycling facility or other
collection point.
• The product can be returned to the supplier.
21
SAFETY
Patients with a pacemaker are
not allowed to use GRINDCARE.
The following must be observed
when using GRINDCARE
When using GRINDCARE together with a
hearing aid, the function of the hearing
aid may be impaired.
Some patients may have an allergic
reaction to electrode gel, i.e. redness,
rash or irritation at the point of contact.
In such case, remove electrode, wash off
any gel residue and contact your clinician.
The device must only be used for its
original purpose, i.e. for the measurement and treatment of bruxism.
Electric blankets and magnetic bed linen
must not be used when the device is in
use.
Mobile phones must not be placed closer
than 50 cm (19”) from GRINDCARE as
they may affect its operation.
Do not position the charger so that it is
difficult to remove from the AC power
outlet.
When using GRINDCARE, avoid
accidental contact between the gold
contacts on the stimulator and other
conductive articles, including those
connected to protective earth, such as
other electrical equipment.
22
Battery warnings
Both Grinddock and the
Stimulator contain a lithium
polymer battery, which may get hot,
explode or ignite and cause injury, if
exposed to abuse. Be sure to follow the
safety warnings listed below:
• Do not replace the battery yourself.
If the battery needs replacement,
return the device to your supplier.
• Do not place Grinddock or the
Stimulator in or near fire, on stoves
or in other high temperature
locations. Do not place them in
direct sunlight, or use or store them
inside cars in hot weather. Doing so
may cause the battery to generate
heat, ignite or explode. It may also
result in a loss of performance and
reduced battery life.
• If the device is to be used by a
young child, the caregiver should
explain the contents of this
document and provide adequate
supervision to ensure the device is
used appropriately.
• Immediately discontinue use of
GRINDCARE if, while using,
charging or storing Grinddock or
the Stimulator, they emit an
unusual smell, feel hot, change
color or shape, or appear abnormal
in any other way. Contact
Medotech if any of these problems
are observed.
• Do not place Grinddock or
Stimulator in microwave ovens,
high-pressure containers or on
induction cookers.
• In the event of battery leak,
exercise extreme precaution with
the leakage. If the fluid should gets
in your eye, do not rub the eye.
Rinse well with water and
immediately seek medical care. If
left untreated, the battery fluid
could cause damage to the eye.
The GRINDCARE limited warranty
will be void in the event of failure
to comply with the following:
1. The device must not be subject to
jolts, knocks or other mechanical
impacts.
2. The electric unit must not be
immersed in water or other fluids.
The device must be protected
against moisture.
3. The device must be cleaned in
accordance with the instructions.
See the section on maintenance
(page 21).
4. The performance of the device may
be impaired if it is exposed to
temperatures below 10°C (50°F) and
above 40°C (104°F).
5. The device must not be dismantled.
6. Only the charger supplied may be
used to charge the device.
7. Only the supplied battery may be
used for charging. If the battery
needs to be replaced, the device
must be returned to the supplier.
8. During transportation, the device
must be kept in the original
packaging supplied, otherwise the
warranty will be void.
9. If the device stops working as
intended for any reason, the supplier
must be contacted.
23
KEY TO SYMBOLS
Warning! Read the user manual before starting to use GRINDCARE.
Read the user manual before starting to use GRINDCARE.
There is wireless communication between the Stimulator and
Grinddock which may affect patients with pacemakers or hearing
aids. See under: Safety on page 22.
Type BF equipment.
IP classification.
CE marking, applicable in accordance with directive MDD 93/42/EEC.
The equipment must not be exposed to moisture.
104˚F
40˚C
50˚F
10˚C
24
Specification of general temperature range.
104˚F
40˚C
41˚F
5˚C
Specification of temperature range for gel pads.
Not for reuse.
200x-xx
Expiry date (year and month).
Serial number.
Batch number.
WEEE symbol. See the section on maintenance and disposal (page
21).
25
TECHNICAL SPECIFICATIONS
Output from the Stimulator
Max. ±40 V peak, symmetrical energy,
pulse duration 250 μs, frequency 230
hz, current regulated, max. ±7 mA
peak Classification
Type BF
Protection class
IP 30
EMG
Yes
Sample rate
2000 Hz
Input impedance
4.4 MOhm
CMRR
90 dB
RF transmitter
(Grinddock and Stimulator)
Transmission frequency: 2433 MHz
Modulation: MSK, 18 Kbit/s
Effective radiated power: 1mW
Length of electrode
Max. 50 cm (19”)
Data memory capacity
30 days activation data
Charger
100 - 240 V AC, 50 - 60 Hz
Battery
3.7 V Lithium-Polymer battery
Average battery charge time
3.5 hours
Anticipated operating time
between charges
5 days
Wireless range
3 - 6 m (10’ - 20’)
Maximum altitude for operating
and storage
3,000m above sea level
Operating and storage humidity
5 - 85% relative humidity,
non-condensing
26
Temperature during operation
10ºC - 40ºC
50ºF - 104ºF
Dimensions of Grinddock
62 x 120.8 x 21 mm
2.44” x 4.76” x 0.83”
(W x H x D)
Storage and transport temperature
10ºC - 40ºC
50ºF - 104ºF
Weight of the Stimulator
27 g
0.9 oz.
Storage temperature, gel pads
5ºC - 40ºC
41ºF - 104ºF
Weight of Grinddock
200 g
7 oz.
Dimensions of the Stimulator
53.8 x 39.9 x 13.4 mm
2.12” x 1.57” x 0.53”
(W x H x D)
Gel pad shelf life
See label on the back of gel pad pack
27
Complaints
Complaints may be submitted in accordance with applicable legislation. An invoice/
receipt showing the date of purchase must be submitted with any complaints. In the
event of a complaint, the device must be returned to the place where it was purchased.
If you have any complaints or questions, please contact Medotech Customer Service at
+45 8672 1500 or your supplier.
GRINDCARE 3 Declaration of Conformity is available upon request at
[email protected] or your local distributor.
About Medotech
Medotech A/S is a Danish biotech company offering unique expertise in the development and design of
electronic medical equipment. We aim to deliver relief to patients suffering from bruxism and to improve
their quality of life.
Medotech A/S
43A Marielundvej - DK-2730 Herlev, Denmark
Tel. +45 8672 1500 - www.medotech.dk
Copyright © 2010 Medotech A/S. 50-7019-013R3.0
EC Declaration of conformity