1
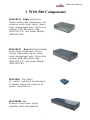
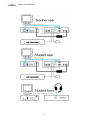
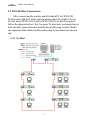
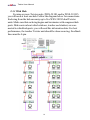
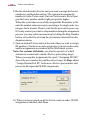
User Manual
Twister User Manual
Copyright © 2004 Beacon Technology, Inc. All rights reserved. No part of this user
guide may be reproduced or transmitted for any purpose other than the purchasers
personal use without the express written consent of Beacon Technology, Inc. WinSchool, WinSchool Multimedia Studio, and WinSchool Interactive are trademarks of
Beacon Technology, Inc. Windows, Windows 95, Windows 98, Windows XT, and
Windows NT are trademarks or registered trademarks of Microsoft Corporation. All
other trademarks or registered trademarks in this manual are supplied for reference
purposes only, and are the properties of their respective owners. Beacon Technology
makes every effort to ensure technical accuracy. Nevertheless, Beacon Technology
makes no warranty with respect to this manual or corresponding product, and specifically disclaims warranties of saleability or fitness for any particular purpose. Beacon
Technology disclaims all direct or consequential liability for damage or loss of any
kind resulting form the use or inability to use this manual or corresponding product.
Beacon Technology reserves the right to make changes to this manual and corresponding product without notice.
This product has been tested and found to comply with the limits for a Class A digital
device, pursuant to Part 15 of the Federal Communication Commission (FCC) Rules for
the United States. Operation is subject to the following two conditions: (1) This device may not cause harmful interference, and (2) this device must accept any interference received, including interference that may cause undesired operation of the device.
This product has been CE approved. In the event that this product fails to perform as
documented in this manual, please report the discrepancy to your distributor or dealer
directly. We will make our best effort to effect a swift diagnosis and resolution of the
problem.
Made in Taiwan.
Beacon Computer, Inc.
http://www.beacontech.com.tw
email: [email protected]
January, 2005
ii
Twister User Manual
Contents
1 WSS-580 Components ................................................ 1
2 Connections and Setup ................................................. 3
2.1 All Stations ............................................................................. 3
2.2 WSS-582U Install Teacher Tap Switch ................................ 5
2.3 WSS-584 Bus Connections .................................................... 8
2.3.1 No Hub .......................................................................... 8
2.3.2 Hub Basics .................................................................... 9
2.3.3 With Hub ..................................................................... 10
2.3.4 With Multiple Hubs .................................................... 11
2.4 Software Setup ..................................................................... 12
2.4.1 Teachers Setup for No-hub Systems ......................... 12
2.4.2 Teachers Setup for Systems with Hub ...................... 14
2.4.3 Student WinSchool ID Setup (with or without hubs) 18
3 Operation .....................................................................21
3.1 Teachers Tap Switch ............................................................ 21
4 Appendix .......................................................................23
4.1 Power Requirements ........................................................... 23
4.1.1 Grounding and Phase Standards ................................ 23
4.2 Pin Assignments ................................................................... 27
10-conductor Cat5 cable ...................................................... 27
8-conductor Cat5 cable ........................................................ 27
iii
Twister User Manual
iv
Twister User Manual
1 WSS-580 Components
WSS-581S1 Single WinSchool
Twister audio-video transmission unit
enhances audio-video signal, makes
cable management easy. Carton also
contains VGA/KB/mouse cable
(WSS-585-1.5), and power adapter
(WSS-581-PW).
WSS-581S2 Dual WinSchool Twister
audio-video transmission unit enhances audio-video signal, makes
cable management easy. Carton also
contains VGA/KB/mouse cable
(WSS-585-1.5), and power adapter
(WSS-581-PW).
WSS-582U Tap Switch
For instant, one-touch broadcasting
of teacher sound and screen to all
student workstations.
WSS-580R6 Hub
Enhances audio-video signal;
simplifies cable management.
1
Twister User Manual
WSS-584 CAT5e UTP Cable
10-wire CAT5e UTP twisted cable. For
audio and video signal. 8-wire UTP
will provide all functionalities but
audio.
WSS-584-2M length 2m
WSS-584-3.5M length 3.5m
WSS-584-5M length 5m
WSS-584-10M length 10m
WSS-584-15M length 15m
WSS-585-1.5 VGA/KB/mouse
cable, connects WSS-581 to teacher or
student workstation.
WSS-581-PW Power adapter with
cable. Supplies DC power to WSS581S1 or WSS-581S2 Twister unit.
WS-N WinSchool Interactive
This Windows-based software program
provides a simple drag-and-drop
interface for complete graphical
control.
2
Twister User Manual
2 Connections and Setup
2.1 All Stations
All PC stations, including the teachers station, must be connected to
WSS-581 Twister units. Each WSS-581S1 Twister single unit supports
one PC station. The WSS-581S2 (dual) can support up to two. Use
WSS-585-1.5 to connect each PC station to the back of its WSS-581
Twister unit.
WSS-585-1.5 to PC
pairing wire
mouse
WSS-581-PW
keyboard
to monitor
line in
line out
OUT WSS-584
IN WSS-584
microphone
headphones
Connect teacher and student stations per the diagram above and on
next page. For details about the WSS-584 bus cable connections, see
Section 2.3.
3
Twister User Manual
4
Twister User Manual
2.2 WSS-582U Install Teacher Tap Switch
Connect the teachers tap switch in accordance with the diagram.
When connecting the bus cable (WSS-584) to the bus in and out sockets,
either connector can serve as in, and either as out. Positions, this once, are
not important.
WSS-584 cable
bus in/out
{
WSS-572u-1.8
cable to PC USB port
Connect the Teacher Tap Switch (WSS-582U) to the USB port of
the Teacher Computer. Windows should detect it as a new device, and
pop up a Found New Hardware notice:
5
Twister User Manual
Followed by the inimitable Wiz!
Hit NEXT on the Wiz, then choose Search for a suitable driver...
Now the Wizard needs a hint. Tell him where to find the driver files
(e.g.: SERWPL.INF) for the WSS-582U, either on floppy, on CD, or
you can specify location. And whack NEXT again.
6
Twister User Manual
Navigate to the driver files and click OPEN; with luck the Wiz
should show you something like this:
Hit NEXT.
You may encounter a Microsoft message to the effect that a driver
has not been signed by Microsoft. This is particularly prone to happen
with Windows XP. Click Continue Anyway if you see this message. (It
may repeat a few times.)
Ultimately, you should see the Completing the Found New... dialog.
When you press Finish, the Wiz will do his final mop up, and exit.
7
Twister User Manual
2.3 WSS-584 Bus Connections
After connecting the teacher and all student PCs to WSS-581
Twister units, link the Twister units in a daisy chain. For eight or fewer
Twister units (WSS-581S1 and/or WSS-581S2), no hub is required;
follow the diagram below. (For 9 or more Twister units you should use at
least one hub; connections are described in a following section.) Note:
one segment of the chain must be made using 8-pin connectors on each
end.
2.3.1 No Hub
8
Twister User Manual
2.3.2 Hub Basics
Follow these guidelines for effective connection, setup, and hub
operation.
No-hub system
Max.
number of
WSS-581
Twister
Units
Max. run of
WSS-584
bus cable
8~10
100 m
(300 ft.)
5~7 per
daisy ring
6 5
OUT
4 3 2
6
IN
5 4 3
100 m per
daisy ring
2
Rules:
1. Shorter cable runs are better.
2. The fewer WSS-581 Twisters per ring, the better. Best performance is achieved with five or fewer Twister units per ring. You
can exceed this limit, but performance will degrade proportionally.
3. Pay attention to which ports are OUTs and which are INs. Feed
from OUTs to INs.
4. Make sure that each daisy ring connected to a hub begins and
terminates with congruent hub ports. That is, if the ring starts with
port 1 output, it must terminate with port 1 input. Port 2 output
must terminate with port 2 input, etc.
5. For hub systems, best performance is achieved when the teachers
Twister is alone on a daisy ring. See the diagram in Section 2.3.3.
9
Twister User Manual
2.3.3 With Hub
For nine or more Twister units (WSS-581S1 and/or WSS-581S2)
you will need at least one hub. Follow the diagram below for connections.
Each ring from the hub can carry up to five WSS-581S2 dual Twister
units. Make sure that each ring begins and terminates with congruent hub
ports. Make notes about which stations, teacher and student, are connected to which hub ports; you will need this information later. For best
performance, the teacher Twister unit should be alone on a ring. Feedback
lines must be 8-pin.
10
Twister User Manual
2.3.4 With Multiple Hubs
To operate in excess of about 35 Twister units (WSS-581S1 and/or
WSS-581S2), you will need more than one hub. All notes in Section
2.3.3 With Hub apply. Please note that for systems with more than one
hub, the last hub in line must have all its internal DIP switches set to OFF.
This acts as a terminator.
For the final hub of multi-hub systems,
set internal DIP switches to OFF.
11
Twister User Manual
2.4 Software Setup
2.4.1 Teachers Setup for No-hub Systems
A. Teacher WinSchool ID Setup
Here we assign a WinSchool ID number, usually 0, to the teachers
Twister unit.
1. Turn off power to all Twister units.
2. Turn on teachers PC and Twister.
3. Activate WinSchool Interactive on teachers PC. The very first time
that Interactive runs a message appears: “No teacher station
found. Please assign a teacher station in property page.” We will
do that now.
4. Right click on work space open classroom floor and choose
Properties.
OR
Choose Properties from the Classroom menu.
12
Twister User Manual
5. In the section labeled “This Computer,” either key in or select an
ID number for the Teacher Twister unit. This is normally set to 0.
6. At the password challenge, enter the password and hit OK.
Default password is teacher
7. When the Teacher Port ID dialog box comes up, just hit Done to
exit. Since you have no hub, you do not need to set Port ID.
Proceed to Student Setup (Section 2.4.3).
13
Twister User Manual
2.4.2 Teachers Setup for Systems with Hub
Here we assign a WinSchool ID number, usually 0, to the teachers
Twister unit.
1. Turn off power to all Twister units and all hub units.
2. Turn on teachers PC and Twister.
3. Activate WinSchool Interactive on teachers PC. The very first time
that Interactive runs a message will appear: “No teacher station
found. Please assign a teacher station in property page.” We will
do that now.
4. Right click on work space open classroom floor and choose
Properties.
OR
Choose Properties from the Classroom menu.
5. In the “This Computer” section, either key in or select an ID
number for the Teacher Twister unit. This is normally set to 0.
14
Twister User Manual
6. At the password challenge, enter the password and hit OK. The
default password is teacher
7. The Teacher Port ID dialog box will appear.
15
Twister User Manual
8. Enter the teacher port number, which you noted in Section 2.3.3,
here. (If the teacher station is connected to a hub higher than Hub
0, please see the Note: For multi-hub systems below.)
9. Hit the Done button.
Assign Hub IDs
The WinSchool system identifies each hub by a unique WS hub ID
number, ranging from 0 to 4. Please set up the HUB IDs as follows:
1. Right click on GUI classroom floor and choose Properties.
OR
Choose Properties from the Classroom menu.
2. Click the Assign Hub button located just to the right of the “This
Computer” section.
3. Fill in password when challenged. Default password is teacher
4. Select a hub ID number to start with. We suggest 0.
16
Twister User Manual
5. Click the Start button.
6. Now power on the first hub unit; the ID number showing at the
teacher station will automatically be increased by 1, indicating that
the first hub has been assigned its ID number, and the system is
waiting to assign the next number. If there are additional hubs, turn
them on in order. They will receive their WS hub IDs incrementally as they power up. Hub IDs should be assigned in numerical
sequence, e.g.: 0, 1, 2, etc.
7. When you have turned all hubs on in order, Hub ID assignment is
finished; click the Done button.
Note: For multi-hub systems, the effective port numbers on each
hub beyond Hub 0 increment automatically as shown in the
diagram below. You will use the effective port numbers when
you assign WS IDs to the individual stations.
OUT
6
5
4
3
IN
2
6 5 4 3 2 1
6
5
5
4
3
6
5
4
4
3
3
effective port numbers
HUB 1
2
9 8 7
OUT
5
HUB 0
2
IN
2
9 8 7
6
3
6 5 4 3 2 1
OUT
6
4
effective port numbers
IN
2
6
5
4
3
HUB 2
2
effective port numbers
17
Twister User Manual
2.4.3 Student WinSchool ID Setup (with or without hubs)
1. Turn off power to all Twister units.
2. Turn on teachers PC, teachers Twister, and hub(s), if any.
3. Activate WinSchool Interactive on teachers station.
4. Right click on GUI classroom floor and choose Properties.
OR
Choose Properties from the Classroom menu.
5. Click the Assign WS ID button at the bottom left corner of the
dialog box.
18
Twister User Manual
6. Enter the password when challenged. Default password is
teacher The following popup appears:
Note: For systems using hubs, this is where you will use the notes
concerning which student Twister units are connected to which
hub ports (Section 2.3.3). For systems using more than one hub,
you will use the effective port numbers for hubs beyond hub 0.
Port numbers are fixed according to hub ID number, with hub 0
comprising ports 1 through 6, hub 1 comprising ports 7 through
12, etc. (Section 2.4.2.)
Hub no.:
Effective port number
0
1
2
3
4
5
6
1
7
8
9
10
11
12
2
13
14
15
16
17
18
3
14
15
16
17
18
19
4
20
21
22
23
24
25
7. WinSchool ID numbers can start with any positive integer you
want. Set the start integer. For no-hub systems, just ignore the
“Assign Student Port ID:” area. For systems with one or more
hubs, select the port that represents the daisy ring where you want
student ID numbers to begin. Then hit the Start button to begin
assigning student IDs.
19
Twister User Manual
8. Decide which student Twister unit you want to assign the lowest
number(s), and turn that unit on. The system auto assigns the
number(s) to the Twister unit. On twin Twister units, the left port
gets the lower number and the right port gets the higher.
When the system has successfully assigned the ID number to the
unit, the number auto increments, one integer for single units, two
integers for twin units. Then it waits for the next unit to power up.
If for any reason you want to skip numbers during the assignment
process, you may either increment up by hitting the Skip Number
button, or by directly selecting the next number desired from the
dropdown menu.
9. Turn on student Twister units in the order that you want to assign
ID numbers. Numbers are auto assigned as you turn on the units,
and the assignments are retained by the WinSchool system.
Note: For systems with hubs, you must keep track of which
stations are connected to which effective ports (daisy rings).
When you complete assignments for a port (“Assigning WS ID:”
shows the next number beyond the current ring), hit Stop, adjust
“Assign Student Port ID” to the next effective port number, and
proceed with sequential WS ID assignments.
10. When you have turned on all the Twister units in order, WS ID
assignment is finished; click Done.
20
Twister User Manual
3 Operation
3.1 Teachers Tap Switch
ROCKER LED INDICATOR
RESET/ BLANK
BROADCAST
ACTIVE INDICATOR
ROCKER
TAP
SWITCH
TYPE B
TYPE A
The Teachers Tap Switch can be used as a basic Reset button to
end operations: a quick tap will end Observe, end Control, end Broadcast, or end Blank Screen*. Also you can use the Tap Switch when you
want to Broadcast the teachers screen to all students with one simple hit.
Or to make all student screens blank. On Type A, the rocker switch
toggles between Broadcast and Blank-screen functions. On Type B, the
Broadcast button initiates broadcast of the teacher screen, and the Reset/
Blank button initiates Blank screen.
Broadcast Teacher screen to all students:
Type A:
1. Make sure rocker switch LED is depressed and LED is lit.
2. Press tap switch for 3 seconds. Active Indicator lights up, and
teachers screen is broadcast.
Type B:
1. Press the Broadcast button for an instant. Teacher screen is
broadcast to all students, and green button lights up.
* Blank Screen can be ended with the Tap Switch if it was intiated with the Tap
Switch.
21
Twister User Manual
To end broadcast:
Type A:
1. Press tap switch for an instant. Broadcast ceases. Active Indicator
goes dark.
Type B:
1. Press the Broadcast button again for an instant. Broadcast ceases,
and green button goes dark.
Blank all student screens:
Type A:
1. Make sure the rocker switch LED is up, and rocker LED is off.
2. Press tap switch for 3 seconds. Active Indicator lights up, and
student screens go black.
Type B:
1. Press the Reset button for 3 seconds. Student screens go black,
and the red button lights up.
To end Blank screens:
Type A:
1. Press tap switch again for an instant. Student screens are restored.
Active Indicator goes dark.
Type B:
1. Press the Reset button for an instant. Student screens are restored, and the red button goes dark.
22
Twister User Manual
4 Appendix
4.1 Power Requirements
When installing a classroom with the WinSchool Multimedia Studio
Network, please take note of the following electrical power
requirements. Because the WinSchool Multimedia Studio Network
transmits high frequency signals, fluctuations in the quality of your
power source may cause undesired video distortion.
4.1.1 Grounding and Phase Standards
Global Grounding
WARNING: Make sure all electrical sockets in your classroom
are properly grounded. The grounding resistance should be below
1Ω. Also, please make sure that your classroom is connected to a
global ground for your building. Please make sure that you do
not associate any lightning rod with your grounding source.
These requirements must be followed exactly.
Same Phase Position
Each electrical socket has three prongs. The longest prong is the
ground prong. The other two parallel prongs are the phase and
neutral prongs. The position (right and left) of the phase and
neutral prongs should be the same for all electrical sockets in your
classroom. You may test for this using the Electrical Testing Pen
explained later in this section.
Same Phase Wire
Once you have identified the phase of each electrical socket,
please note that a standard incoming power line from the electric
company supplies three possible phase wires (R, S or T).
Generally speaking, all electrical sockets in your classroom
should be within the same phase (same wire). A qualified
electrician may quickly test each electrical socket to determine if
each supplies the same phase wire. You may also perform your
own test using the procedure explained later in this section. If it
23
Twister User Manual
is not possible set your classroom to the same phase wire, please
make sure to at least test for the same phase position as mentioned
above, and if there are inconsistencies, correct them.
Grounding Procedure
1. Turn off the main power to your classroom or building.
2. Turn on your multi-tester (voltmeter). Set the selector to Ohms
(Ω).
3. Use the two leads of the multi-tester to measure between the
ground connectors of various outlets within the same face plate
and between sockets.
4. The resistance (Ohms) should measure zero (0). If it does not
measure zero, this situation is not normal, and you should consult a
professional electrician. Do not attempt to use the WinSchool
Multimedia Studio Network under these conditions.
5. Repeat these steps for each electrical socket, testing the ground
plugs between adjacent sockets, and between the ground plugs of
adjacent face plates. Please also check the electrical fuse box of
your classroom to make sure it is grounded to a global ground.
See the diagram below for reference.
test grounds
(should be 0 ohms)
test B contacts
(should be 0 volts)
test grounds
(should be 0 ohms)
test A contacts
(should be 0 volts)
24
Twister User Manual
Same Phase Position Procedure
1. Obtain the device pictured below. This is a Electric Testing Pen.
2. Insert the left end of the Electric Testing Pen into Plugs A and B.
3. Press down on the metal strip on the side of the pen with your
fingers. When the LED inside the pen lights up, you know that the
plug you are testing is the phase plug.
4. Identify the position of the phase plugs for each electrical socket.
The phase plugs should be located on the same side (Plug A side
or Plug B side) for every electrical socket in your classroom.
Same Phase Wire Procedure
1. Turn on the main power to your classroom or building.
2. Turn on your multi-tester (voltmeter). Set the selector to AC
Voltage (VAC).
3. Use the two leads of the multi-tester to measure between the A
connectors within the same faceplate and between faceplates. You
are measuring the voltage difference between outlets. Each A
connector should be checked against at least one other A connector.
4. Likewise, use the two leads of the multi-tester to test the B
connectors of various outlets (i.e. within the same face plate and
between sockets). You are measuring the voltage difference
between the outlets. Each B connector should be tested against at
least one other B connector.
5. The voltage between all like connectors (A with A, and B with B)
should measure zero (0) volts for ideal WinSchool Multimedia
Studio Network operation. If one pair measures zero (0), and
another pair measures twice the incoming line voltage from the
power company, this situation is normal, but not ideal for WinSchool Multimedia Studio Network operation. This means that
25
Twister User Manual
your classroom is not wired with the same phase wire for each
electrical socket. Depending on whether you experience video
distortion or not, you may or may not need to correct this through
a qualified electrician.
6. Make sure you repeat these steps for all electrical sockets. If your
electrical outlets (face plates) or power strips are near each other,
try to test the A and B plugs for the same phase wire sequentially,
from socket to socket, and from adjacent face plate to face plate.
26
Twister User Manual
4.2 Pin Assignments
WinSchool Twister Cat5 cables are always straight through, pin to
pin. That is, pin 1 connects to pin 1, pin 2 to pin 2, etc. Twisted pairs and
pin assignments are handled as follows:
10-conductor Cat5 cable
Pin
1
2
3
4
5
6
7
8
9
10
Wire
color
orange
green
green/white
blue
brown
brown/white
blue/white
gray
gray/white
orange/white
Function
audio
RGB
RGB
RS485 control
RGB
RGB
RS485 control
RGB
RGB
audio
paired
with
10
3
2
7
6
5
4
9
8
1
8-conductor Cat5 cable
Eight-conductor does not have the audio function.
Pairing follows the EIA/TIA 568B RJ-45 pattern:
Wire
paired
Pin
color
Function
with
1
orange/white
RGB
2
2
orange
RGB
1
3
green/white
RS485 control
6
4
blue
RGB
5
5
blue/white
RGB
4
6
green
RS485 control
3
7
brown/white
RGB
8
8
brown
RGB
7
27