1
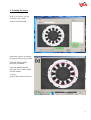
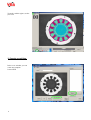
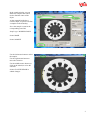
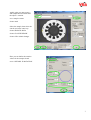
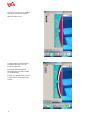
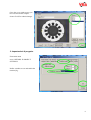
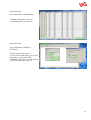
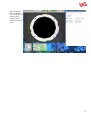
rif.: ma-sbs-rot-robot ver. 9.4.6
Step by step user manual
ROBOT
HIGH PRECISION ROTATION
WITH REFERENCE INSIDE THE
CIRCUMFERENCE
This user manual explains the necessary steps to achieve the goal above, using the HQV / VEDO software series.
Pay attention that the features here described might not exist or might be different from the ones you have
bought: this is due to the modular configuration of HQV and VEDO systems. If you do not have these modules,
please contact VEA service to obtain the correct modules.
In every picture that follows, the functions to use are highlighted in green.
1. Grabbing the image.
Once the hardware has been installed, cameras included, the first step is to take a picture that will be used to
define a scene. Please refer to the installation manual for any phase prior to this point.
From main menu:
menu: SCENE Æ SCENE 1
button CAMERA
button FULL DIMENSION
menu: OPTIONS Æ CROSS
center the object or the camera using
the red cross as reference
menu: CLOSE WINDOW
button AUTO SETTING
button OK
2
2. Creating the mask.
In the scene window you can
create the scene’s mask.
button CREATE MASK
Delimit the region to be masked
using the drawing tools provided.
USE THE LEFT MOUSE
BUTTON TO MASK.
USE THE RIGHT MOUSE
BUTTON TO CLEAR A PART
OF THE MASK.
To undo:
button UNDO (backward arrow).
3
To mask a whole region, use the
filler tool.
3. Sample acquisition.
In the scene window you can
create new samples.
button NEW
4
In the sample window you can
define the samples that will be
used to find the center of the
object.
As the example beside has a
circular shape, we prefer to define
4 samples on the boundary.
Insert the sample’s name in the
corresponding text field.
Sample type: MORPHOLOGIC
button MASK
button SAMPLE
Use the left mouse button to select
the sample.
Use the right mouse button to
move the selection.
Use the middle mouse button (or
click on the wheel) to resize the
selection.
button CLOSE WINDOW to
submit changes.
5
menu: OPTIONS Æ SAVE X /
SAVE Y
Select output variables.
In order to create a search area for
the sample, set X and Y deltas in
the text fields highlighted in the
picture and then click on ZONEAUTO.
button OK to submit changes.
In this case, you must create 4
samples: left, right, up and down
side.
6
At this point you must create a
fifth sample that will determine
the object’s rotation.
insert sample’s name
button mask
Select the sample, then select the
search area in the same way:
button SEARCH AREA
button CLOSE WINDOW
button OK to submit changes
Here you can define the rotation
values for the sample slected.
menu: OPTIONS Æ ROTATION
7
Once you close the scene window,
then the mask window appears.
Mask the whole area.
Clear the mask on the boundary,
but KEEP the mask over the
rotation sample area.
USE THE RIGHT MOUSE
BUTTON TO CLEAR A PART
OF THE MASK.
Finally you should obtain a mask
similar to the one showed in the
picture.
8
Close the scene window once you
have inserted all the samples.
button CLOSE to submit changes.
3. Impostazioni di progetto.
From main menu
menu: OPTIONS Æ PROJECT
SETTINGS
Define variables to use and enable the
rotation flag.
9
E.g. Communication protocol
configuration.
Select the device/protocol where the
communication will start.
10
From main menu
menu: OPTIONS Æ VARIABLES
Variables configuration: select the
corresponding flag and click OK.
From main menu
menu: OPTIONS Æ PROJECT
SETTINGS
TCP/IP configuration and test:
To verify the communication, you can use
the Windows’ program HYPER
TERMINAL, then open a TCP/IP channel
on the port defined in the project.
11
4. Avvio del progetto.
From main menu
menu:
OPTIONS Æ
START
In order to verify
the communication
via TCP/IP, you
should start the
connection from
the Windows’
HYPER
TERMINAL too.
Use the buttons in
the main menu in
order to select the
scene to view.
The selected
sample will be
shown on the first
line, inside the
output window.
Select SINGLE
SAMPLE and
choose a sample to
edit its thresholds
in the window
below the image.
12
You can change
the way samples
and coordinates are
shown just by
clicking on the
buttons in the main
menu.
13