1
InterBase User’s Guide
Delphi for Windows
P r e f a c e
Copyright
Agreement
This preface describes the documentation set, the printing conventions used to
display information in text and in code examples, and the conventions a user
should employ when specifying database objects and files by name in applications.
The InterBase Documentation Set
The InterBase documentation set is an integrated package designed for all levels
of users. The InterBase server documentation consists of a five-book core set and
a platform-specific installation guide. Information on the InterBase Client for
Windows is provided in a single book.
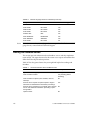
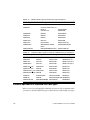
The InterBase core documentation set consists of the following books:
Table 1:
InterBase Core Documentation
Book
Description
Getting Started
Provides a basic introduction to InterBase and roadmap for using the
documentation and a tutorial for learning basic SQL through isql.
Introduces more advanced topics such as creating stored procedures
and triggers.
Data Definition Guide
Explains how to create, alter, and delete database objects through
isql.
Language Reference
Describes SQL and DSQL syntax and usage.
Programmer’s Guide
Describes how to write embedded SQL and DSQL database applications in a host language, precompiled through gpre.
API Guide
Explains how to write database applications using the InterBase API.
Installing and Running on . . .
Platform-specific information on installing and running InterBase.
Preface
1
Printing Conventions
The InterBase documentation set uses different fonts to distinguish various
kinds of text and syntax.
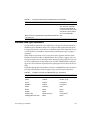
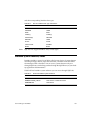
Text Conventions
The following table describes font conventions used in text, and provides examples of their use:
Table 2:
Text Conventions
Convention
Purpose
Example
UPPERCASE
SQL keywords, names of all The following SELECT statement
retrieves data from the CITY column in
database objects such as
the CITIES table.
tables, columns, indexes,
stored procedures, and SQL
functions.
italic
Introduces new terms, and The ISC4.GDB security database is not
emphasizes words. Also
accessible without a valid username and
used for file names and host- password.
language variables.
bold
Utility names, user-defined
and host-language function
names. Function names are
always followed by parentheses to distinguish them
from utility names.
To back up and restore a database, use
gbak or the server manager.
The datediff() function can be used to
calculate the number of days between two
dates.
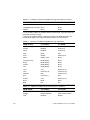
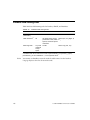
Syntax Conventions
The following table describes the conventions used in syntax statements and
sample code, and offers examples of their use:
Table 3:
2
Syntax Conventions
Convention
Purpose
Example
UPPERCASE
Keywords that must be
SET TERM !!;
typed exactly as they appear
when used.
Local InterBase Server User’s Guide
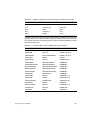
Table 3:
Syntax Conventions (Continued)
Convention
Purpose
Example
italic
Parameters that cannot be
broken into smaller units.
For example, a table name
cannot be subdivided.
CREATE TABLE name
(<col> [, <col> ...]);
<italic>
Parameters in angle brackets that can be broken into
smaller syntactic units.
For example, column definitions (<col>) can be subdivided into a name, data type
and constraint definition.
CREATE TABLE name
(<col> [, <col> ...]);
[]
Square brackets enclose
optional syntax.
<col> [, <col> ...]
...
Closely spaced ellipses indi- (<col> [, <col> ...]);
cate that a clause within
brackets can be repeated as
many times as necessary.
|
The pipe symbol indicates
SET TRANSACTION
that either of two syntax
{SNAPSHOT [TABLE STABILITY]
clauses that it separates
| READ COMMITTED};
may be used, but not both.
Inside curly braces, the pipe
symbol separates multiple
choices, one of which must
be used.
{}
Curly braces indicate that
SET TRANSACTION
one of the enclosed options {SNAPSHOT [TABLE STABILITY]
| READ COMMITTED};
must be included in actual
statement use.
<col> = name <datatype>
[CONSTRAINT name <type>]
Database Object-naming Conventions
InterBase database objects, such as tables, views, and column names, appear in
text and code in uppercase in the InterBase documentation set because this is the
way such information is stored in a database’s system tables.
When an applications programmer or end user creates a database object or refers
to it by name, case is unimportant. The following limitations on naming database objects must be observed:
• Start each name with an alphabetic character (A-Z or a-z).
Preface
3
• Restrict object names to 31 characters, including dollar signs ($), underscores (_), 0 to 9, A to Z, and a to z. Some objects, such as constraint
names, are restricted to 27 bytes in length.
• Keep object names unique. In all cases, objects of the same type, for
example, tables and views, must be unique. In most cases, object names
must also be unique within the database.
For more information about naming database objects with CREATE or
DECLARE statements, see the Language Reference.
File-naming Conventions
InterBase is available on a wide variety of platforms. In most cases users in a heterogenous networking environment can access their InterBase database files
regardless of platform differences between client and server machines if they
know the target platform’s file naming conventions.
Because file-naming conventions differ widely from platform to platform, and
because the core InterBase documentation set is the same for each of these platforms, all file names in text and in examples are restricted to a base name with a
maximum of eight characters, with a maximum extension length of three characters. For example, the example database on all servers is referred to as
employee.gdb.
Generally, InterBase fully supports each platform’s file-naming conventions,
including the use of node and path names. InterBase, however, recognizes two
categories of file specification in commands and statements that accept more
than one file name. The first file specification is called the primary file specification.
Subsequent file specifications are called secondary file specifications. Some commands and statements place restrictions on using node names with secondary
file specifications.
In syntax, file specification is denoted as follows:
"<filespec>"
Primary File Specifications
InterBase syntax always supports a full file specification, including optional
node name and full path, for primary file specifications. For example, the syntax
notation for CREATE DATABASE appears as follows:
CREATE {DATABASE | SCHEMA} "<filespec>"
[USER "username" [PASSWORD "password"]]
4
Local InterBase Server User’s Guide
[PAGE_SIZE [=] int]
[LENGTH [=] int [PAGE[S]]]
[DEFAULT CHARACTER SET charset]
. . .
In this syntax, the <filespec> that follows CREATE DATABASE supports a node
name and path specification, including a platform-specific drive or volume specification.
Secondary File Specifications
For InterBase syntax that supports multiple file specification, such as CREATE
DATABASE, all file specifications after the first are secondary. Secondary file
specifications generally cannot include a node name, but may specify a full path
name. For example, the syntax notation for CREATE DATABASE appears as follows:
CREATE {DATABASE | SCHEMA} "<filespec>"
[USER "username" [PASSWORD "password"]]
[PAGE_SIZE [=] int]
[LENGTH [=] int [PAGE[S]]]
[DEFAULT CHARACTER SET charset]
[<secondary_file>]
<secondary_file> = FILE "<filespec>" [<fileinfo>] [<secondary_file>]
<fileinfo> = LENGTH [=] int [PAGE[S]] | STARTING [AT [PAGE]] int
[<fileinfo>]
In the secondary file specification, <filespec> does not support specification of a
node name.
Preface
5
6
Local InterBase Server User’s Guide
PART 1
Overview
1
Part 1 provides an introduction to the Local InterBase Server and describes its
features.
Chapter 1: “Introduction” gives a general overview of the Local InterBase Server
and introduces each of the features.
Chapter 2: “Building InterBase Databases”describes how to build databases.
Chapter 3: “Working With Transactions” describes InterBase’s transaction processing features.
CHAPTER 1
Introduction
1
This chapter provides a high-level introduction to the Local InterBase Server.
What is the Borland Local InterBase Server?
The Borland Local InterBase Server is a single-user Windows-based version of
Borland’s InterBase Workgroup Server, an SQL-compliant relational database
management system (RDBMS). The Local InterBase Server includes Windows
ISQL and the Server Manager, a Windows tool that can be used with Local
InterBase Server or a remote InterBase server. Using the Local Interbase Server,
you can access local databases through Windows ISQL or through a SQL application program.
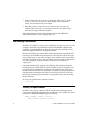
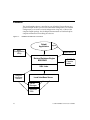
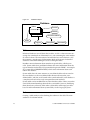
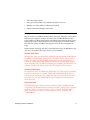
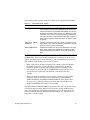
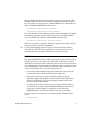
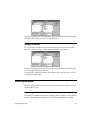
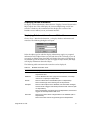
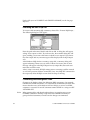
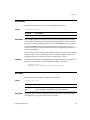
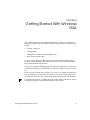
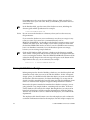
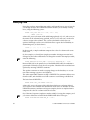
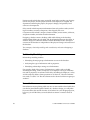
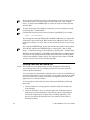
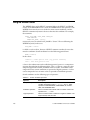
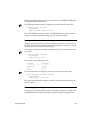
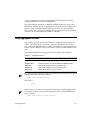
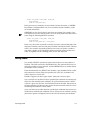
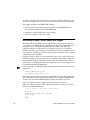
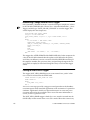
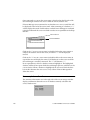
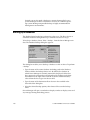
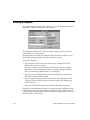
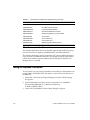
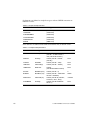
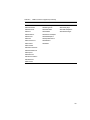
Figure 1-1 shows the relationships between the Local InterBase Server and the
associated connections for data access.
The Local InterBase Server can be used in three ways:
• As an intermediate step in upsizing, between the desktop and server,
providing a local SQL engine for development of SQL-specific features.
• As a local database engine for stand-alone desktop SQL applications.
• As a local environment for developing a client/server application.
Delphi applications can access a Local InterBase Server database through the
Borland Database Engine (BDE) and the InterBase SQL Link. For more information on creating Delphi applications for SQL servers, see the Delphi Database
Application Developer’s Guide.
Note
Introduction
To access remote databases, make sure that the InterBase Client for Windows and the proper communications protocols are installed. See the
InterBase Client for Windows User’s Guide.
9
Installation
The Local InterBase Server is installed as part of Delphi. The installation program for Delphi enables you to install a minimum configuration, a maximum
configuration, or to install a custom configuration using only a subset of the
complete Delphi package. See the Delphi documentation and online help for
complete information on installing the software.
Figure 1-1:
InterBase Client/Server Connections
Delphi
Application
report
BDE
Configuration
Utility
ReportSmith
Borland Database Engine
BDE/IDAPI
dBASE &
Paradox
tables
SQL Links
Remote
InterBase
Servers
Local InterBase Server
Server
Manager
Windows
ISQL
10
Local InterBase Server User’s Guide
InterBase Features
InterBase offers all the benefits of a fully relational DBMS. The following table
lists some of the key InterBase features:
Table 1-1:
InterBase 4.0 Features
Feature
Description
SQL-92 entry-level
conformance
ANSI standard SQL, available through an Interactive SQL tool
and Borland desktop applications.
Simultaneous access One application can access many databases at the same time.
to multiple databases
Multi-generational
architecture
Server maintains older versions of records (as needed) so that
transactions can see a consistent view of data.
Query optimization
Server optimizes queries automatically, or user may manually
specify query plan.
BLOB data type
Binary Large Objects can contain unformatted data such as
graphics and text.
Declarative referential Automatic enforcement of cross-table relationships (between
integrity
FOREIGN and PRIMARY KEYs.)
Introduction
Stored procedures
Programmatic elements in the database for advanced queries
and data manipulation actions.
Triggers
Self-contained program modules that are activated when data in
a specific table is inserted, updated, or deleted.
Updatable views
Views can reflect data changes as they occur.
Outer joins
Relational construct between two tables that enables complex
operations.
Explicit transaction
management
Full control of transaction start, commit, and rollback, including
named transactions.
Concurrent multiple
application access to
data
One application reading a table does not necessarily block others from it.
Automatic two-phase
commit
Multi-database transactions check that changes to all databases
happen before committing.
Multi-dimensional
arrays
Column data types arranged in an indexed list of elements.
Server Manager
Windows tool for database backup, restoration, maintenance,
and security.
Windows ISQL
Interactive data definition and query tool for Windows.
11
SQL Support
InterBase conforms to entry-level SQL-92 requirements. It supports declarative
referential integrity, updatable views, and outer joins.
InterBase also supports extended SQL features, some of which anticipate SQL3
extensions to the SQL standard. These include stored procedures, triggers, and
segmented BLOB support.
InterBase provides an interactive SQL data definition and data manipulation
tool, Windows ISQL.
Delphi applications can use all of Local InterBase Server SQL features with passthrough SQL. For more information see the Delphi Database Application Developer’s Guide
Transaction Management
Client applications can start multiple simultaneous transactions. InterBase provides full and explicit transaction control for starting, committing, and rolling
back transactions. The statements and functions that control starting a transaction also control transaction behavior.
InterBase transactions can be isolated from changes made by other concurrent
transactions. For the life of these transactions, the database will appear to be
unchanged except for the changes made by the transaction. Records deleted by
another transaction will exist, newly stored records will not appear to exist, and
updated records will remain in the original state.
Multi-generational Architecture
InterBase provides expedient handling of time-critical transactions through support of data concurrency and consistency in mixed use (query and update) environments. InterBase uses a multi-generational architecture, which creates and
stores multiple versions of each data record. By creating a new version of a
record, InterBase allows all users to read a version of any record at any time,
even if another user is changing that record. InterBase also uses transactions to
isolate groups of database changes from other changes.
12
Local InterBase Server User’s Guide
Database Administration
Interbase provides Windows-based tools for managing databases and servers.
Server Manager is a Windows application for performing database administration.
For more information about Server Manager, see the Windows Client User’s
Guide.
Server Manager and the command-line utilities enable the DBA to:
• Manage server security.
• Back up and restore a database.
• Perform database maintenance.
• View database and lock manager statistics.
Managing Server Security
InterBase maintains a list of user names and passwords in a security database.
The security database allows clients to connect to an InterBase database on a
server if a user name and password supplied by the client match a valid user
name and password combination in the security database on the server.
You can add and delete user names and modify a user’s parameters, such as
password and user ID.
Performing Database Backup and Recovery
Server Manager can back up a database and then restore it on any supported
operating system. A backup can run concurrently with other processes because
it does not require exclusive access to the database.
Database backup and restoration can also be used for:
• Erasing obsolete versions of database records
• Changing the database page size
• Changing the database from single-file to multi-file
• Transferring a database from one operating system to another
Server Manager and the command-line backup tool also have an option for
backing up only a database’s metadata to recreate an empty database.
Introduction
13
Maintaining a Database
Server Manager can also be used for maintaining a database and preparing it for
shutdown. If a database incurs minor problems, such as an operating system
write error, these tools enable you to sweep a database without taking the database offline.
Some of the tasks that are part of database maintenance are:
• Sweeping a database
• Shutting down the database to provide exclusive access to it
• Validating table fragments
• Preparing a corrupt database for backup
• Resolving transactions “in limbo” from a two-phase commit
• Validating and repairing the database structure
Viewing Statistics
Server Manager enables the DBA to monitor the status of a database by viewing
statistics from the database header page, and an analysis of tables and indexes.
14
Local InterBase Server User’s Guide
CHAPTER 2
Building InterBase Databases
2
This chapter introduces important database building concepts.
Building Databases
To create a database and its components, InterBase uses an implementation of
SQL which conforms to the ANSI SQL-89 entry-level standard and follows
SQL-92 and SQL3 beta specifications for advanced features.
Building a database involves defining the data. For this purpose InterBase provides a set of statements called the Data Definition Language (DDL).
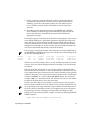
A database consists of a variety of database objects, such as tables, views,
domains, stored procedures, triggers, and so on. Database objects contain all the
information about the structure of the database and the data. Because they
encapsulate information about the data, database objects are sometimes referred
to as metadata.
An InterBase database is a single file comprising all the metadata and data in the
database. To create a new database for the Local InterBase Server, use Windows
ISQL. For more detailed information, see Chapter 4: “Using Windows ISQL.”
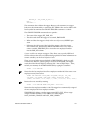
The following sections provide an overview of the InterBase database objects.
For more information on databases and database objects, see the Data Definition
Guide. For the complete syntax of data definition statements, see the Language
Reference.
Building InterBase Databases
15
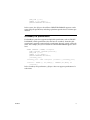
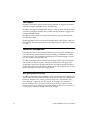
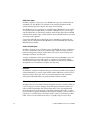
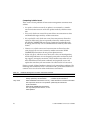
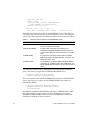
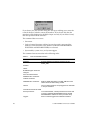
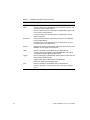
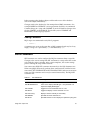
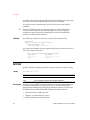
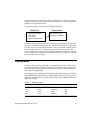
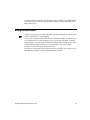
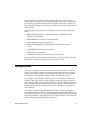
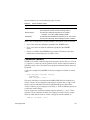
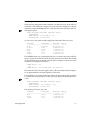
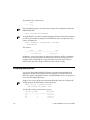
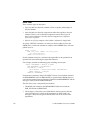
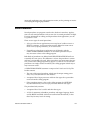
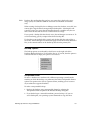
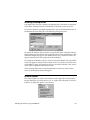
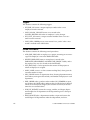
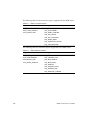
Figure 2-1:
Database Objects
Database
Tables
Domains
Columns
Indexes
Stored Procedures
Views
Triggers
Exceptions
Generators
Tables
Relational databases store all their data in tables. A table is a data structure consisting of an unordered set of horizontal rows, each containing the same number
of vertical columns. The intersection of an individual row and column is a field
that contains a specific piece of information. Much of the power of relational
databases comes from defining the relations among the tables.
InterBase stores information about metadata in special tables, called system
tables. System tables have predefined columns that store information about the
type of metadata in that table. All system tables begin with “RDB$”. An example
of a system table is RDB$RELATIONS, which stores information about each
table in the database.
System tables have the same structure as user-defined tables and are stored in
the same database as the user-defined tables. Because the metadata, userdefined tables, and data are all stored in the same database file, each database is
a complete unit and can be easily transported between machines.
System tables can be modified like any other database tables. Unless you understand all the interrelationships between the system tables, however, modifying
them directly may adversely affect other system tables and disrupt your database. For more information about system tables, see the Language Reference.
Columns
Creating a table mainly involves defining the columns in the table. The main
attributes of a column include:
16
Local InterBase Server User’s Guide
• The name of the column
• Data type of the column or the domain on which it is based
• Whether or not the column is allowed to be NULL
• Optional referential integrity constraints
Data Types
Data is stored in a predefined format called a data type. Data types can be classified into four categories: numeric, character, date, and BLOB. Numeric data
types handle everything from integers to double-precision floating point values.
Character data types hold strings of text. Date data types are used for storing
date and time values. InterBase also supports arrays of these standard data
types.
While numeric, character, and date are standard data types, the BLOB data type
and arrays of standard data types deserve special mention.
Numeric Data Types
Numeric data types are: SMALLINT, INTEGER, FLOAT, DOUBLE PRECISION,
NUMERIC, and DECIMAL. Most of these correspond in size and precision to
similar data types in C. For example, SMALLINT typically corresponds to a
short in C, and DOUBLE PRECISION corresponds to a double. When comparing or assigning values of different numeric types, InterBase handles many conversions automatically. Others can be coerced using the CAST() function.
Character Data Types
Character data types are CHAR and VARCHAR. They allow strings of multiple
characters to be stored in a column. CHAR and VARCHAR differ in the way
extra characters are treated. The CHAR data type uses all characters up to the
end of the array, but the VARCHAR data type is significant only to the first
NULL character.
Date Data Types
The DATE data type is used to store date and time values. InterBase handles
assignment and comparison between strings and dates. String values representing dates can be in a variety of formats, such as “12-1-94” and “December 1,
1994”. Certain date constants are also supported, such as “TODAY” and
“TOMORROW”.
Building InterBase Databases
17
BLOB Data Types
InterBase supports a binary large object (BLOB) data type, that can hold data of
unlimited size. The BLOB is an extension of the standard relational model,
which ordinarily provides only for data types of fixed width.
The BLOB data type is analogous to a flat file because BLOB data can be stored
in any format (for example, binary or ASCII). A BLOB, however, is not a separate file. BLOB data is stored in the database with all other data. Because BLOB
columns often contain large, variable amounts of data, BLOB columns are stored
and retrieved in segments.
Conversion of BLOB data to other data types in InterBase is not directly supported, but on some platforms, BLOB filters can translate BLOB data from one
BLOB format to another.
Arrays of Data Types
InterBase supports arrays of all data types except BLOB. An array is a collection
of values, or elements, each of the same data type. Individual array elements,
blocks of contiguous elements, or the entire array can be accessed using standard SQL statements and API calls.
An array in InterBase can be up to 16 dimensions. Because InterBase arrays are
multidimensional, you can store arrays as a whole in a single field, making
accessing and retrieval fast and simple. An element of array data is referenced
through the use of coordinates, or offsets, into the array.
Domains
In addition to explicitly stating the data type of columns, InterBase allows global
column definitions, or domains, upon which column definitions can be based. A
domain specifies a data type, and a set of column attributes and constraints.
Subsequent table definitions can use the domain to define columns.
Referential Integrity Constraints
InterBase allows you to define referential integrity rules for a column, called referential integrity constraints. Integrity constraints govern column-to-table and
table-to-table relationships and validate data entries. They are implemented
through primary keys, foreign keys, and check constraints. Basically, a primary
key is a column (or group of columns) that uniquely identifies a row in a table. A
foreign key is a column whose value must match a value of a column in another
table. A check constraint limits data entry to a specific range or set of values.
18
Local InterBase Server User’s Guide
For example, an EMPLOYEE table could be defined to have a foreign key column named DEPT_NO that is defined to match the department number column
in a DEPARTMENT table. This would ensure that each employee in the
EMPLOYEE table is assigned to an existing department in the DEPARTMENT
table.
For more information about referential integrity, see the Data Definition Guide.
Indexes
Indexes are mechanisms for improving the speed of data retrieval. An index
identifies columns that can be used to retrieve and sort rows efficiently in the
table. It provides a means to scan only a specific subset of the rows in a table,
improving the speed of data access.
InterBase automatically defines unique indexes for a table’s PRIMARY KEY and
FOREIGN KEY constraints. For more information about indexes, see the Data
Definition Guide.
Views
A view is a virtual table that is not physically stored in the database, but appears
exactly like a “real” table. A view can contain data from one or more tables or
other views and is used to store often-used queries or query sets in a database.
Views can also provide a limited means of security, because they can provide
users access to a subset of available data while hiding other related and sensitive
data. For more information about views, see the Data Definition Guide.
Stored Procedures
A stored procedure is a self-contained program written in InterBase procedure and
trigger language, an extension of SQL. Stored procedures are part of a database’s
metadata. Stored procedures can receive input parameters from and return values to applications and can be executed explicitly from applications, or substituted for a table name in a SELECT statement.
Stored procedures provide:
• Modular design: stored procedures can be shared by applications that
access the same database, eliminating duplicate code, and reducing the
size of applications.
Building InterBase Databases
19
• Streamlined maintenance: when a procedure is updated, the changes are
automatically reflected in all applications that use it without the need to
recompile and relink them. They are compiled and optimized only once
for each client.
• Improved performance: especially for remote client access. Stored procedures are executed by the server, not the client, which reduces network
traffic.
Triggers
A trigger is a self-contained routine associated with a table or view that automatically performs an action when a row in the table or view is inserted, updated, or
deleted.
Triggers can provide:
• Automatic enforcement of data restrictions to ensure that users enter
only valid values into columns.
• Reduced application maintenance, because changes to a trigger are automatically reflected in all applications that use the associated table without the need to recompile and relink them.
• Automatic logging of changes to tables. An application can keep a running log of changes with a trigger that fires whenever a table is modified.
• Event alerters in triggers can automatically notify applications of
changes to the database.
When a trigger is invoked, it has immediate access to data being stored, modified, or erased. The trigger may also access data in other tables. Using the available data, you can design the trigger to:
• Abort an operation, possibly with an error message.
• Set values in the accessed record.
• Insert, update, or delete rows in other tables.
• Signal that an event has occurred using an event alerter.
20
Local InterBase Server User’s Guide
CHAPTER 3
Working With Transactions
3
All SQL data definition and data manipulation statements take place within the
context of a transaction, a set of SQL statements that works to carry out a single
task. This chapter explains how to open, control, and close transactions using the
following SQL transaction management statements:
Table 3-1:
SQL Transaction Management Statements
Statement
Purpose
SET TRANSACTION
Starts a transaction, assigns it a name, and specifies its behavior. The following behaviors can be specified:
• Access mode describes the actions a transaction’s statements
can perform.
• Lock resolution describes how a transaction should react if a
lock conflict occurs.
• Isolation level describes the view of the database given a
transaction as it relates to actions performed by other simultaneously occurring transactions.
• Table reservation, an optional list of tables to lock for access at
the start of the transaction rather than at the time of explicit
reads or writes.
• Database specification, an optional list limiting the open databases to which a transaction may have access.
COMMIT
Saves a transaction’s changes to the database and ends the
transaction.
ROLLBACK
Undoes a transaction’s changes before they have been committed to the database, and ends the transaction.
Transaction management statements define the beginning and end of a transaction.
They also control its behavior and interaction with other simultaneously running transactions that share access to the same data within and across applications.
Working With Transactions
21
Starting a Transaction With SET TRANSACTION
SET TRANSACTION issued without parameters starts a transaction with the
following default behavior:
READ WRITE WAIT ISOLATION LEVEL SNAPSHOT
The following table summarizes these settings:
Table 3-2:
Transaction Default Behavior
Parameter
Setting
Purpose
Access Mode
READ WRITE
Access mode. This transaction can select, insert, update,
and delete data.
Lock Resolution
WAIT
Lock resolution. This transaction waits for locked tables and
rows to be released to see if it can then update them before
reporting a lock conflict.
Isolation Level
ISOLATION LEVEL
SNAPSHOT
This transaction receives a stable, unchanging view of the
database as it is at the moment the transaction starts; it
never sees changes made to the database by other active
transactions.
The following statements are equivalent. They both start a transaction with
default behavior.
SET TRANSACTION;
SET TRANSACTION READ WRITE WAIT ISOLATION LEVEL SNAPSHOT;
To start a transaction, but change its characteristics, SET TRANSACTION must
be used to specify those characteristics that differ from the default. Characteristics that do not differ from the default can be omitted. For example, the following statement starts a transaction for READ ONLY access, WAIT lock resolution,
and ISOLATION LEVEL SNAPSHOT:
SET TRANSACTION READ ONLY;
Specifying SET TRANSACTION Behavior
Use SET TRANSACTION to start a transaction, and optionally specify its behavior.
22
Local InterBase Server User’s Guide
The following table lists the optional SET TRANSACTION parameters for specifying the behavior of the default transaction:
Table 3-3:
SET TRANSACTION Parameters
Parameter
Setting
Purpose
Access Mode
READ ONLY or
READ WRITE
Describes the type of access this transaction is
permitted for a table. For more information about
access mode, see “Access Mode,” in this chapter.
Lock Resolution
WAIT or
NO WAIT
Specifies what happens when this transaction
encounters a locked row during an update or
delete. It either waits for the lock to be released
so it can attempt to complete its actions, or it
returns an immediate lock conflict error message. For more information about lock resolution,
see “Lock Resolution,” in this chapter.
Isolation Level
• SNAPSHOT provides a view of
the database at the moment this
transaction starts, but prevents
viewing changes made by other
active transactions.
• SNAPSHOT TABLE STABILITY
prevents other transactions from
making changes to tables that
this transaction is reading and
updating, but permits them to
read rows in the table.
• READ COMMITTED reads the
most recently committed version
of a row during updates and
deletions, and allows this transaction to make changes if there
is no update conflict with other
transactions.
Determines this transaction’s interaction with
other simultaneous transactions attempting to
access the same tables.
READ COMMITTED isolation level also enables
a user to specify which version of a row it can
read. There are two options:
• RECORD_VERSION specifies that the transaction immediately read the latest committed
version of a row, even if a more recent uncommitted version also resides on disk.
• NO RECORD_VERSION specifies that the
transaction can only read the latest version of
a row. If WAIT lock resolution is also specified,
then the transaction waits until the latest version of a row is committed or rolled back, and
retries its read.
Table Reservation RESERVING
RESERVING specifies a subset of available
tables to lock immediately for this transaction to
access.
The complete syntax of SET TRANSACTION is:
SET TRANSACTION
[READ WRITE| READ ONLY]
[WAIT | NO WAIT]
[[ISOLATION LEVEL] {SNAPSHOT [TABLE STABILITY]
| READ COMMITTED [[NO] RECORD_VERSION]}]
[RESERVING <reserving_clause>
Working With Transactions
23
<reserving_clause> = table [, table ...]
[FOR [SHARED | PROTECTED] {READ | WRITE}] [, <reserving_clause>]
Transaction options are fully described in the following sections.
Access Mode
The access mode parameter specifies the type of access a transaction has for the
tables it uses. There are two possible settings:
• READ ONLY specifies that a transaction can select data from a table, but
cannot insert, update, or delete table data.
• READ WRITE specifies that a transaction can select, insert, update, and
delete table data. This is the default setting if none is specified.
InterBase assumes that most transactions both read and write data. When starting a transaction for reading and writing, READ WRITE can be omitted from
SET TRANSACTION statement. For example, the following statements start a
transaction for READ WRITE access:
SET TRANSACTION;
SET TRANSACTION READ WRITE;
Tip
It is good programming practice to specify a transaction’s access mode,
even when it is READ WRITE. It makes an application’s source code easier
to read and debug because the program’s intentions are clearly spelled out.
Start a transaction for READ ONLY access when you only need to read data.
READ ONLY must be specified. For example, the following statement starts a
transaction for read-only access:
SET TRANSACTION READ ONLY;
Isolation Level
The isolation level parameter specifies the control a transaction exercises over
table access. It determines the:
• View of a database the transaction can see.
• Table access allowed to this and other simultaneous transactions.
24
Local InterBase Server User’s Guide
The following table describes the three isolation levels supported by InterBase:
Table 3-4:
ISOLATION LEVEL Options
Isolation Level
Purpose
SNAPSHOT
The default isolation level, provides a stable, committed view
of the database at the time the transaction starts. Other simultaneous transactions can UPDATE and INSERT rows, but this
transaction cannot see those changes. For updated rows, this
transaction sees versions of those rows as they existed at the
start of the transaction. If this transaction attempts to update or
delete rows changed by another transaction, an update conflict
is reported.
SNAPSHOT TABLE
STABILITY
Provides a transaction sole insert, update, and delete access
to the tables it uses. Other simultaneous transactions may still
be able to select rows from those tables.
READ COMMITTED
Enables the transaction to see all committed data in the database, and to update rows updated and committed by other
simultaneous transactions without causing lost update problems.
The isolation level for most transactions should be either SNAPSHOT or READ
COMMITTED. These levels enable simultaneous transactions to select, insert,
update, and delete data in shared databases, and they minimize the chance for
lock conflicts. Lock conflicts occur in two situations:
• When a transaction attempts to update a row already updated or deleted
by another transaction. A row updated by a transaction is effectively
locked for update to all other transactions until the controlling transaction commits or rolls back. READ COMMITTED transactions can read
and update rows updated by simultaneous transactions after they
commit.
• When a transaction attempts to insert, update, or delete a row in a table
locked by another transaction with an isolation level of SNAPSHOT
TABLE STABILITY. SNAPSHOT TABLE STABILITY locks entire tables
for write access, although concurrent reads by other SNAPSHOT and
READ COMMITTED transactions are permitted.
Using SNAPSHOT TABLE STABILITY guarantees that only a single transaction
can make changes to tables, but increases the chance of lock conflicts where
there are simultaneous transactions attempting to access the same tables. For
more information about the likelihood of lock conflicts, see “Isolation Level
Interactions,” in this chapter.
Working With Transactions
25
Comparing Isolation Levels
There are five classic problems all transaction management statements must
address:
• Lost updates, which can occur if an update is overwritten by a simultaneous transaction unaware of the last updates made by another transaction.
• Dirty reads, which can occur if the system allows one transaction to select
uncommitted changes made by another transaction.
• Non-reproducible reads, which can occur if one transaction is allowed to
update or delete rows that are repeatedly selected by another transaction. READ COMMITTED transactions permit non-reproducible reads
by design, because they can see committed deletes made by other transactions.
• Phantom rows, which can occur if one transaction is allowed to select
some, but not all, new rows written by another transaction. READ
COMMITTED transactions do not prevent phantom rows.
• Update side effects, which can occur when row values are interdependent,
and their dependencies are not adequately protected or enforced by locking, triggers, or integrity constraints. These conflicts occur when two or
more simultaneous transactions randomly and repeatedly access and
update the same data; such transactions are called interleaved transactions.
Except as noted, all three InterBase isolation levels control these problems. The
following table summarizes how a transaction with a particular isolation level
controls access to its data for other simultaneous transactions:
Table 3-5:
InterBase Management of Classic Transaction Conflicts
Problem
SNAPSHOT, READ COMMITTED
SNAPSHOT TABLE STABILITY
Lost updates
Other transactions cannot update rows
already updated by this transaction.
Other transactions cannot update tables
controlled by this transaction.
Dirty reads
Other SNAPSHOT transactions can only Other transactions cannot access tables
read a previous version of a row updated updated by this transaction.
by this transaction.
Other READ COMMITTED transactions
can only read a previous version, or committed updates.
26
Local InterBase Server User’s Guide
Table 3-5:
InterBase Management of Classic Transaction Conflicts (Continued)
Problem
SNAPSHOT, READ COMMITTED
SNAPSHOT TABLE STABILITY
Non-reproducible
reads
SNAPSHOT and SNAPSHOT TABLE
STABILITY transactions can only read
versions of rows committed when they
started.
READ COMMITTED transactions must
expect that reads cannot be reproduced.
SNAPSHOT and SNAPSHOT TABLE
STABILITY transactions can only read
versions of rows committed when they
started.
Other transactions cannot access tables
updated by this transaction.
Phantom rows
READ COMMITTED transactions may
encounter phantom rows.
Other transactions cannot access tables
controlled by this transaction.
Update side effects Other SNAPSHOT transactions can only
read a previous version of a row updated
by this transaction.
Other READ COMMITTED transactions
can only read a previous version, or committed updates.
Use triggers and integrity constraints to
try to avoid any problems with interleaved
transactions.
Other transactions cannot update tables
controlled by this transaction.
Use triggers and integrity constraints to
avoid any problems with interleaved
transactions.
Choosing Between SNAPSHOT and READ COMMITTED
The choice between SNAPSHOT and READ COMMITTED isolation levels
depends on an application’s needs. SNAPSHOT is the default InterBase isolation level. READ COMMITTED duplicates SNAPSHOT behavior, but can read
subsequent changes committed by other transactions. In many cases, using
READ COMMITTED reduces data contention.
SNAPSHOT transactions receive a stable view of a database as it exists the
moment the transactions start. READ COMMITTED transactions can see the
latest committed versions of rows. Both types of transactions can use SELECT
statements unless they encounter the following conditions:
• Table locked by SNAPSHOT TABLE STABILITY transaction for
UPDATE.
• Uncommitted inserts made by other simultaneous transactions. In this
case, a SELECT is allowed, but changes cannot be seen.
READ COMMITTED transactions can read the latest committed version of rows.
A SNAPSHOT transaction can read only a prior version of the row as it existed
before the update occurred.
SNAPSHOT and READ COMMITTED transactions with READ WRITE access
can use INSERT, UPDATE, and DELETE unless they encounter tables locked by
SNAPSHOT TABLE STABILITY transactions.
Working With Transactions
27
SNAPSHOT transactions cannot update or delete rows previously updated or
deleted and then committed by other simultaneous transactions. Attempting to
update a row previously updated or deleted by another transaction results in an
update conflict error.
A READ COMMITTED READ WRITE transaction can read changes committed
by other transactions, and subsequently update those changed rows.
Occasional update conflicts may occur when simultaneous SNAPSHOT and
READ COMMITTED transactions attempt to update the same row at the same
time. When update conflicts occur, expect the following behavior:
• For mass or searched updates, updates where a single UPDATE modifies
multiple rows in a table, all updates are undone on conflict. The
UPDATE can be retried. For READ COMMITTED transactions, the NO
RECORD_VERSION option can be used to narrow the window between
reads and updates or deletes. For more information, see “Starting a
Transaction With READ COMMITTED Isolation Level,” in this chapter.
• For cursor or positioned updates, where rows are retrieved and updated
from an active set one row at a time, only a single update is undone. To
retry the update, the cursor must be closed, then reopened, and updates
resumed at the point of previous conflict.
Starting a Transaction With SNAPSHOT Isolation Level
InterBase assumes that the default isolation level for transactions is SNAPSHOT.
Therefore, SNAPSHOT need not be specified in SET TRANSACTION to set the
isolation level. For example, the following statements are equivalent. They both
start a transaction for READ WRITE access and set isolation level to
SNAPSHOT.
SET TRANSACTION;
SET TRANSACTION READ WRITE SNAPSHOT;
When an isolation level is specified, it must follow the access and lock resolution
modes.
Tip
It is good programming practice to specify a transaction’s isolation level,
even when it is SNAPSHOT. It makes an application’s source code easier to
read and debug because the program’s intentions are clearly spelled out.
Starting a Transaction With READ COMMITTED Isolation Level
To start a READ COMMITTED transaction, the isolation level must be specified.
For example, the following statement starts a transaction for READ WRITE
access and sets isolation level to READ COMMITTED:
28
Local InterBase Server User’s Guide
SET TRANSACTION READ WRITE READ COMMITTED;
Isolation level always follows access mode. If the access mode is omitted, isolation level is the first parameter.
READ COMMITTED supports mutually exclusive optional parameters,
RECORD_VERSION and NO RECORD_VERSION. They determine READ
COMMITTED behavior when it encounters a row where the latest version of
that row is uncommitted:
• RECORD_VERSION, specifies that the transaction immediately read the
latest committed version of a row, even if a more recent uncommitted
version also resides on disk.
• NO RECORD_VERSION, the default, specifies that the transaction can
only read the latest version of a row. If the WAIT lock resolution option is
also specified, then the transaction waits until the latest version of a row
is committed or rolled back, and retries its read.
Because NO RECORD_VERSION is the default behavior, it need not be specified
with READ COMITTED. For example, the following statements are equivalent.
They start a transaction for READ WRITE access and set isolation level to READ
COMMITTED NO RECORD_VERSION.
SET TRANSACTION READ WRITE READ COMMITTED;
SET TRANSACTION READ WRITE READ COMMITTED
NO RECORD_VERSION;
RECORD_VERSION must always be specified when it is used. For example, the
following statement starts a named transaction, t1, for READ WRITE access and
sets isolation level to READ COMMITTED RECORD_VERSION:
SET TRANSACTION READ WRITE READ COMMITTED
RECORD_VERSION;
Starting a Transaction With SNAPSHOT TABLE STABILITY Isolation Level
To start a SNAPSHOT TABLE STABILITY transaction, the isolation level must be
specified. For example, the following statement starts a transaction for READ
WRITE access and sets isolation level to SNAPSHOT TABLE STABILITY:
SET TRANSACTION READ WRITE SNAPSHOT TABLE STABILITY;
Isolation level always follows the optional access mode and lock resolution
parameters, if they are present.
Important
Use SNAPSHOT TABLE STABILITY with care. In an environment where
multiple transactions share database access, SNAPSHOT TABLE
STABILITY greatly increases the likelihood of lock conflicts.
Working With Transactions
29
Isolation Level Interactions
To determine the possibility for lock conflicts between two transactions accessing the same database, each transaction’s isolation level and access mode must
be considered. The following table summarizes possible combinations:
Table 3-6:
Isolation Level Interaction with Read (SELECT) and WRITE (UPDATE)
SNAPSHOT or READ COMMITTED
SNAPSHOT or
READ
COMMITTED
SNAPSHOT
TABLE
STABILITY
SNAPSHOT TABLE STABILITY
UPDATE
SELECT
UPDATE
UPDATE
Some simultaneous updates
may conflict.
—
Always conflicts. Always conflicts.
SELECT
SELECT
—
—
—
UPDATE
Always conflicts.
—
Always conflicts. Always conflicts.
SELECT
Always conflicts.
—
Always conflicts. —
—
As this table illustrates, SNAPSHOT and READ COMMITTED transactions offer
the least chance for conflicts. For example, if t1 is a SNAPSHOT transaction with
READ WRITE access, and t2 is a READ COMMITTED transaction with READ
WRITE access, t1 and t2 only conflict when they attempt to update the same
rows. If t1 and t2 have READ ONLY access, they never conflict with any other
transaction.
A SNAPSHOT TABLE STABILITY transaction with READ WRITE access is
guaranteed that it alone can update tables, but it conflicts with all other simultaneous transactions except for SNAPSHOT and READ COMMITTED transactions running in READ ONLY mode. A SNAPSHOT TABLE STABILITY
transaction with READ ONLY access is compatible with any other read-only
transaction, but conflicts with any transaction that attempts to insert, update, or
delete data.
Lock Resolution
The lock resolution parameter determines what happens when a transaction
encounters a lock conflict. There are two options:
• WAIT, the default, causes the transaction to wait until locked resources
are released. Once the locks are released, the transaction retries its operation.
• NO WAIT immediately returns a lock conflict error without waiting for
locks to be released.
30
Local InterBase Server User’s Guide
Because WAIT is the default lock resolution, it need not be specified in a SET
TRANSACTION statement. For example, the following statements are equivalent. They both start a transaction, t1, for READ WRITE access, WAIT lock resolution, and READ COMMITTED isolation level:
SET TRANSACTION READ WRITE READ COMMITTED;
SET TRANSACTION READ WRITE WAIT READ COMMITTED;
To use NO WAIT, the lock resolution parameter must be specified. For example,
the following statement starts the named transaction, t1, for READ WRITE
access, NO WAIT lock resolution, and SNAPSHOT isolation level:
SET TRANSACTION READ WRITE NO WAIT READ SNAPSHOT;
When lock resolution is specified, it follows the optional access mode, and precedes the optional isolation level parameter.
Tip
It is good programming practice to specify a transaction’s lock resolution,
even when it is WAIT. It makes an application’s source code easier to read
and debug because the program’s intentions are clearly spelled out.
RESERVING Clause
The optional RESERVING clause enables transactions to guarantee themselves
specific levels of access to a subset of available tables at the expense of other
simultaneous transactions. Reservation takes place at the start of the transaction
instead of only when data manipulation statements require a particular level of
access. RESERVING is only useful in an environment where simultaneous transactions share database access. It has three main purposes:
• To prevent possible deadlocks and update conflicts that can occur if locks
are taken only when actually needed (the default behavior).
• To provide for dependency locking, the locking of tables that may be
affected by triggers and integrity constraints. While explicit dependency
locking is not required, it can assure that update conflicts do not occur
because of indirect table conflicts.
• To change the level of shared access for one or more individual tables in
a transaction. For example, a READ WRITE SNAPSHOT transaction may
need exclusive update rights for a single table, and could use the
RESERVING clause to guarantee itself sole write access to the table.
To reserve tables for a transaction, use the following SET TRANSACTION
syntax:
SET TRANSACTION
Working With Transactions
31
[READ WRITE| READ ONLY]
[WAIT | NO WAIT]
[[ISOLATION LEVEL] {SNAPSHOT [TABLE STABILITY]
| READ COMMITTED [[NO] RECORD_VERSION]}]
RESERVING <reserving_clause>;
<reserving_clause> = table [, table ...]
[FOR [SHARED | PROTECTED] {READ | WRITE}] [, <reserving_clause>]
Each table should only appear once in the RESERVING clause. Each table, or a
list of tables separated by commas, must be followed by a clause describing the
type of reservation requested. The following table lists these reservation options:
Table 3-7:
Table Reservation Options for the RESERVING Clause
Reservation Option
Purpose
PROTECTED READ
Prevents other transactions from updating rows. All transactions can select from the table.
PROTECTED WRITE
Prevents other transactions from updating rows.
SNAPSHOT and READ COMMITTED transactions can
select from the table, but only this transaction can update
rows.
SHARED READ
Any transaction can select from this table. Any READ
WRITE transaction can update this table. This is the most
liberal reservation mode.
SHARED WRITE
Any SNAPSHOT or READ COMMITTED READ WRITE
transaction can update this table. Other SNAPSHOT and
READ COMMITTED transactions can also select from this
table.
The following statement starts a SNAPSHOT transaction for READ WRITE
access, and reserves a single table for PROTECTED WRITE access:
SET TRANSACTION READ WRITE WAIT SNAPSHOT
RESERVING EMPLOYEE FOR PROTECTED WRITE;
The next statement starts a READ COMMITTED transaction for READ WRITE
access, and reserves two tables, one for SHARED WRITE, and another for
PROTECTED READ:
SET TRANSACTION READ WRITE WAIT READ COMMITTED
RESERVING EMPLOYEES FOR SHARED WRITE, EMP_PROJ
FOR PROTECTED READ;
SNAPSHOT and READ COMMITTED transactions use RESERVING to implement more restrictive access to tables for other simultaneous transactions.
SNAPSHOT TABLE STABILITY transactions use RESERVING to reduce the
likelihood of deadlock in critical situations.
32
Local InterBase Server User’s Guide
Ending a Transaction
When a transaction’s tasks are complete, or an error prevents a transaction from
completing, the transaction must be ended to set the database to a consistent
state. There are two statements that end transactions:
• COMMIT makes a transaction’s changes permanent in the database. It
signals that a transaction completed all its actions successfully.
• ROLLBACK undoes a transaction’s changes, returning the database to its
previous state, before the transaction started. ROLLBACK is typically
used when one or more errors occur that prevent a transaction from completing successfully.
Both COMMIT and ROLLBACK close the record streams associated with the
transaction, reinitialize the transaction name to zero, and release system
resources allocated for the transaction. Freed system resources are available for
subsequent use by any application or program.
COMMIT and ROLLBACK have additional benefits. They clearly indicate program logic and intention, make a program easier to understand, and most
importantly, assure that a transaction’s changes are handled as intended by the
programmer.
ROLLBACK is frequently used inside error-handling routines to clean up transactions when errors occur. It can also be used to roll back a partially completed
transaction prior to retrying it, and it can be used to restore a database to its
prior state if a program encounters an unrecoverable error.
Important
If the program ends before a transaction ends, a transaction is automatically rolled back, but databases are not closed. If a program ends without
closing the database, data loss or corruption is possible. Therefore, open
databases should always be closed by issuing explicit DISCONNECT,
COMMIT RELEASE, or ROLLBACK RELEASE statements.
Using COMMIT
Use COMMIT to write transaction changes permanently to a database.
COMMIT closes the record streams associated with the transaction, resets the
transaction name to zero, and frees system resources assigned to the transaction
for other uses. The complete syntax for COMMIT is:
COMMIT [RETAIN [SNAPSHOT]
Working With Transactions
33
For example, the following C code fragment contains a complete transaction. It
gives all employees who have worked since December 31, 1992, a 4.3% cost-ofliving salary increase. If all qualified employee records are successfully updated,
the transaction is committed, and the changes are actually applied to the database.
. . .
SET TRANSACTION SNAPSHOT TABLE STABILITY;
UPDATE EMPLOYEE
SET SALARY = SALARY * 1.043
WHERE HIRE_DATE < "1-JAN-1993";
COMMIT;
. . .
Tip
Even READ ONLY transactions that do not change a database should be
ended with a COMMIT rather than ROLLBACK. The database is not
changed, but the overhead required to start subsequent transactions is
greatly reduced.
Committing Updates Without Freeing a Transaction
To write transaction changes to the database without establishing a new transaction context—the system resources, and current state of cursors used in a transaction—use the RETAIN option with COMMIT. In a busy, multi-user environment,
maintaining the transaction context for each user speeds up processing and uses
fewer system resources than closing and starting a new transaction for each
action. The syntax for the RETAIN option is:
COMMIT RETAIN [SNAPSHOT];
COMMIT RETAIN writes all pending changes to the database, ends the current
transaction without closing its record stream and cursors and without freeing its
system resources, then starts a new transaction and assigns the existing record
streams and system resources to the new transaction.
A ROLLBACK executed after a COMMIT RETAIN can only roll back updates
and writes occurring after the COMMIT RETAIN.
Using ROLLBACK
Use ROLLBACK to restore the database to its condition prior to the start of the
transaction. ROLLBACK also closes the record streams associated with the
transaction, resets the transaction name to zero, and frees system resources
assigned to the transaction for other uses. The syntax for ROLLBACK is:
ROLLBACK;
34
Local InterBase Server User’s Guide
PART 2
Windows ISQL
2
Part 2 explains Windows ISQL, InterBase’s interactive SQL tool.
Chapter 4: “Using Windows ISQL” describes how to use Windows ISQL. Windows ISQL can be used to define, query, and manipulate data on InterBase servers.
Chapter 5: “Using ISQL Script Files” describes how to run an ISQL script file
from Windows ISQL, and provides details on ISQL commands that can be used
in scripts.
CHAPTER 4
Using Windows ISQL
4
This chapter describes how to use Windows ISQL, InterBase’s interactive SQL
tool. Windows ISQL is part of the Local InterBase Server package that can be
used to define, query, and manipulate data on InterBase servers.
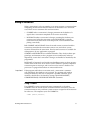
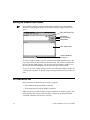
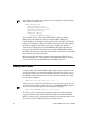
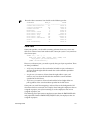
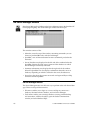
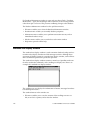
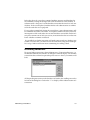
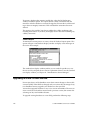
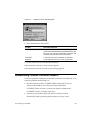
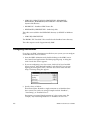
Starting and Exiting Windows ISQL
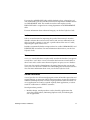
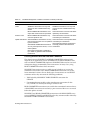
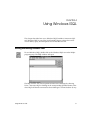
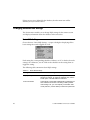
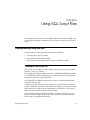
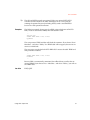
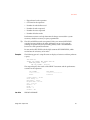
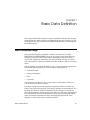
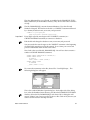
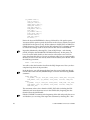
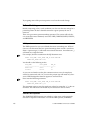
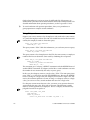
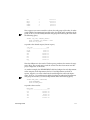
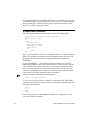
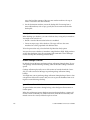
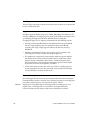
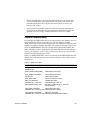
To start Windows ISQL, double-click on the Windows ISQL icon in the Delphi
program group. The ISQL window will open:
The ISQL window can also be opened from the Server Manager by choosing
Tasks | Interactive SQL or clicking on the corresponding Speedbar button. Windows ISQL will then be connected to Server Manager’s current database (if any).
Using Windows ISQL
37
The ISQL Window
The Interactive SQL window consists of a menu bar with pull-down menus, the
SQL Statement area, the ISQL Output area, control buttons, and a status bar at
the bottom of the window.
The ISQL menus are:
• File menu—contains commands to connect to, create, drop, and disconnect from a database, execute an SQL script file, save results and the session to a file, commit and roll back work, and exit ISQL.
• Session menu—contains statements to set basic and advanced ISQL settings, and display ISQL settings and version.
• View menu—contains a command to view metadata.
• Extract menu—contains commands to extract metadata for databases,
tables, and views.
• Help menu—provides on-line help.
The SQL Statement area is where you type an SQL statement to be executed. It
scrolls vertically.
The ISQL Output area is where the results of the SQL statements are displayed.
It scrolls both vertically and horizontally.
The three buttons to the right of the SQL Statement area, Run, Previous, and
Next, are used to execute SQL statements interactively and select statements in
the SQL command history. For more information about using these buttons, see
“Executing SQL Interactively,” in this chapter. The button above the ISQL Output area labeled Save Result opens a dialog box in which you can enter a file
name to which to save the results of the last SQL statement executed.
The status bar at the bottom of the ISQL window shows the name of the database to which Windows ISQL is connected or “No active database connection” if
it is not connected to a database.
To use Windows ISQL, you must either create a new database or connect to an
existing database.
Getting Help
Windows ISQL provides a full online help system. Choose one of the items on
the Help menu or click on a Help button in a dialog box to get help.
38
Local InterBase Server User’s Guide
Exiting Windows ISQL
To exit Windows ISQL, choose File | Exit. This will close the connection to the
current database (if any) and exit Windows ISQL. Any uncommitted changes to
the database will be rolled back.
Temporary Files
Windows ISQL creates temporary files used during a session to store information such as the command history, output file names, and so on. These files are
named ISQL_AA.xx, where xx is a pair of sequential generated letters. The files
are stored in the directory specified by the TMP environment variable, or if that
is not defined, the working directory, or if that is not defined, then the
WINDOWS directory.
To avoid cluttering the WINDOWS directory with temporary files, specify a
directory in which to store them by defining TMP or by defining a working
directory for Windows ISQL (by choosing File | Properties in Program
Manager).
When you exit, Windows ISQL will delete these temporary files. If Windows
ISQL abnormally terminates (for example, due to a power failure), then these
files will remain and may be freely deleted without any adverse effects. You
should not delete any of these temporary files while Windows ISQL is running,
because they may be used in the current session.
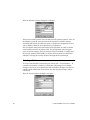
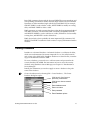
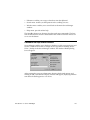
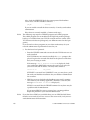
Connecting to a Database
Choose File | Connect to Database... to connect to an existing database. If
Windows ISQL is currently connected to a database, the connection will be
closed; a dialog box will prompt you to commit changes to it (if there are any). If
you choose No, then all database changes since the last commit will be rolled
back and the connection will be closed. If you choose Yes, then database changes
will be committed.
Using Windows ISQL
39
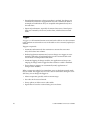
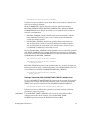
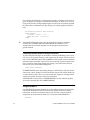
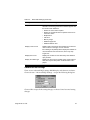
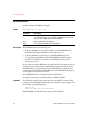
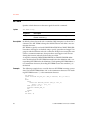
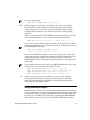
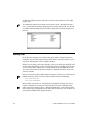
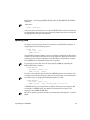
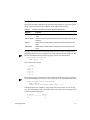
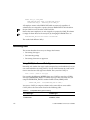
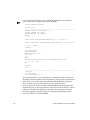
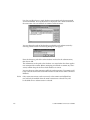
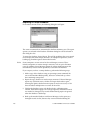
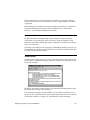
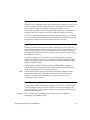
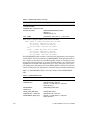
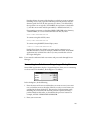
Then the Database Connect dialog box will open:
The Server text field contains ‘local’ and the network protocol contains ‘none’. In
the Database text field, enter the name of the database to which to connect
(including full volume and directory path), or click on the drop-down list and
select a database from the list of previously used databases.
The User Name and Password text fields can be left blank. A null User Name
with a null Password is considered valid. For development and testing purposes, character strings in the User Name and Password fields are compared to
the security database, ISC4.GDB. User Names and Passwords are added and
edited by accessing the security database through the Server Manager.
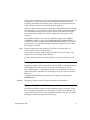
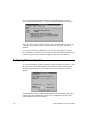
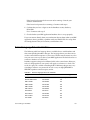
Creating a Database
To create a new database and connect to it, choose File | Create Database.... If
currently connected to a database, a dialog box will prompt you to commit
changes to it (if any). If you choose No, then all database changes since the last
commit will be rolled back. If you choose Yes, then database changes will be
committed.
Then the Create Database dialog box will open:
40
Local InterBase Server User’s Guide
The Server text field contains ‘local’ and the network protocol contains ‘none’. In
the Database text field, enter the name of the database to which to connect
(including full volume and directory path), or click on the drop-down list and
select a database from the list of previously used databases.
In the User Name and Password text fields, enter alphanumeric character strings
for the InterBase user name and password. The password will not be displayed.
Any alphanumeric strings will be accepted and no check will be made upon
future connections. The security feature is disabled, but some entry is still
required.
In the Database Options area, enter any additional options of the CREATE
DATABASE statement, such as PAGE_SIZE, DEFAULT CHARACTER SET, or
secondary files. For a complete list of CREATE DATABASE options, see the Language Reference. To create a basic database without any options, leave the Database Options area blank.
Note
Primary database files must reside on a local drive. Secondary files can
reside on either local or on remote drives.
Choose OK to create the database. ISQL will then create the database on the
specified server and connect to the database.
For more information about creating databases, see the Data Definition Guide.
Dropping a Database
Dropping a database deletes the database to which ISQL is currently connected,
removing both data and metadata. To drop the current database, choose
File | Drop Database.... A dialog box will ask you to confirm that you want to
delete the database. A database can be dropped only by its creator or the SYSDBA user.
A dropped database is removed from the list of databases maintained in
INTERBAS.INI.
Caution
Dropping a database deletes all data and metadata in the database.
Disconnecting From a Database
To disconnect from the database to which Windows ISQL is connected, choose
File | Disconnect from Database.... A dialog box will open to confirm that you
want to disconnect. If there are any uncommitted database changes, you will be
prompted to commit them before disconnecting.
Using Windows ISQL
41
Executing SQL Statements
In Windows ISQL, you can execute SQL statements:
• Interactively, one statement at a time.
• From a file containing an SQL script.
Executing SQL Interactively
To execute an SQL statement interactively, type it in the SQL Statement area and
choose Run or press Alt+U. The statement will be echoed, and up to 32K of the
results displayed in the ISQL Output area. Any output beyond 32K will be
scrolled out of the ISQL Output Area.
Tip
You can copy text from other Windows applications (such as the Notepad
text editor) and paste it into the SQL Statement area with Ctrl+V. You can
also copy statements from the ISQL Output area by highlighting them and
pressing Ctrl+C. You can then paste them into the SQL Statement area with
Ctrl+V.
When an SQL statement is executed (whether successfully or not), it becomes
part of the ISQL command history, a sequential list of SQL statements entered in
the current session. The current statement is the statement displayed in the SQL
Statement area.
The three buttons to the right of the SQL Statement area are:
• Run: executes the current statement. The resultant output is displayed in
the ISQL Output area. This button is dimmed if there is no active database connection.
• Previous: recalls the previous SQL statement in the command history,
making it the current statement. When the current statement is the first
statement in the command history, this button is dimmed and you may
not choose it.
• Next: recalls the next SQL statement in the command history, making it
the current statement. When the current statement is the last statement in
the command history, this button is dimmed and you may not choose it.
As an alternative to these buttons, use the hot keys Alt+R, Alt+P, and Alt+N,
respectively. The hot key for each button is underlined in its label.
42
Local InterBase Server User’s Guide
Legal Statements
You can execute interactively any SQL statements identified as “available in
ISQL” in the Language Reference.
Note
The SET NAMES statement cannot be entered in the SQL Statement area.
To change the active character set, choose Session | Advanced Settings...
and select the desired character set in the Advanced Set Options dialog
box.
Transaction names may not be used with SET TRANSACTION statement. Each
SQL statement optionally may be terminated by a semicolon (;).
SQL script files can include statements that are not legal to enter interactively.
For example, most of the SET statements such as SET LIST or SET TERM can be
used in scripts, but cannot be entered interactively. Use the Session menu items
to perform the corresponding functions for an interactive session.
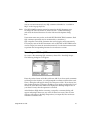
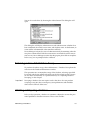
Executing an ISQL Script File
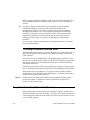
To execute a file containing SQL statements, choose File | Run ISQL Script....
The following dialog box will appear:
Enter the path and name of the file and choose OK. If you have made uncommitted changes to the database, you will prompted to commit or roll back the work.
Then, a dialog box will appear asking “Save Output to a File?” If you choose Yes,
then another dialog box will appear enabling you to specify an output file. If you
choose No, then the results will then be displayed in the ISQL Output area. If
you choose Cancel, then the operation is canceled.
After Windows ISQL finishes executing a script file, a summary dialog will
appear indicating if there were any errors. If there were errors, then an error
message will appear in the ISQL Output Area (or output file) after each statement that caused the error.
Using Windows ISQL
43
Every ISQL script file must begin with either a CREATE DATABASE statement
or a CONNECT statement (including user name and password) to specify the
database on which the script file operates. For more information, see Chapter 5:
“Using ISQL Script Files.”
Statements executed in a script file do not become part of the command history.
Committing and Rolling Back Work
Changes to the database from data definition (DDL) statements—for example,
CREATE and ALTER statements—are automatically committed by default. To
turn off automatic commit of DDL, choose Session | Basic ISQL Settings... and
click off the Auto Commit DDL check box.
Changes made to the database by data manipulation (DML) statements—for
example INSERT and UPDATE—are not permanent until they are committed.
Commit changes by choosing File | Commit Work.
To undo all database changes from DML statements since the last commit,
choose File | Rollback Work.
Saving Results to a File
Windows ISQL enables you to save to a file:
• The output of the last SQL statement executed.
• SQL statements entered in the current session.
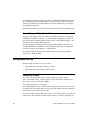
Saving ISQL Output
To save to a file the results of the last SQL statement executed, choose
File | Save Result to File... or click on the Save Result button in the ISQL window. You can also use the hot key Alt+R.
The following dialog box will appear:
Select the desired directory and file name or type the file name in the text field,
and choose OK. The output from the last successful statement and the statement
itself will be saved to the named text file.
If you run an SQL script, and then choose File | Save Result to File..., then all the
commands in the script file and their results will be saved to the output file. If
44
Local InterBase Server User’s Guide
command display has been turned off in a script with SET ECHO OFF, then SQL
statements in the script will not be saved to the file.
Saving the Session
To save the SQL statements entered in the current session to a text file, choose
File| Save Session to a File.... The following dialog box will appear:
Select the desired directory and file name or type the file name, and choose OK
to save the SQL statements to the file.
Only the SQL statements entered in the current session, not the output, will be
saved to the specified file.
Extracting Metadata
Windows ISQL enables you to extract metadata for the entire database and for a
specific table or view.
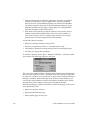
Extracting Database Metadata
To extract data definition statements (metadata) from a database to a file, choose
Extract | SQL Metadata for Database.... The following dialog box will open:
Using Windows ISQL
45
If you choose Yes, then another dialog box will open, enabling you to enter the
name of the file to which to extract the metadata. If you choose No, then the
metadata will be displayed to the ISQL Output area only. If you choose Cancel,
then the operation will be canceled.
This command does not extract:
• Generators.
• Code of external functions or filters, because that code is not part of the
database. The declarations to the database (with DECLARE EXTERNAL
FUNCTION and DECLARE FILTER) are extracted.
• System tables, system views, and system triggers.
This command extracts metadata in the following order:
Table 4-1:
Order of Metadata Extraction
Metadata
Comments
Database
Extracts database with default character set and
PAGE_SIZE.
Domains
Tables
BLOB data types and known
subtypes
NULL and default values
PRIMARY KEY constraints
CHECK constraints
FOREIGN KEY constraints
Must be added after tables by ALTER TABLE to avoid
tables referenced before being created.
Indexes
Only for tables extracted, except triggers from referential
or unique constraints.
Views WITH CHECK OPTION
46
Stored procedures
In the extracted DDL, stored procedures are shown with
no body in CREATE PROCEDURE and then ALTER
PROCEDURE to add the text of the procedure body.
Triggers
Does not extract triggers from CHECK constraints.
Local InterBase Server User’s Guide
Table 4-1:
Order of Metadata Extraction (Continued)
Metadata
Comments
GRANTs
From RDB$USER_PRIVILEGES table.
Extracting Table Metadata
To extract metadata for a single table, choose Extract | SQL Metadata for Table....
The following dialog box will open:
Click on the arrow to the right of the Table Name field to see a drop-down list of
tables in the database. Select a table, then choose OK to extract metadata from
that table.
Another dialog box will open, asking whether to save output to a file. Choose
Yes to save the metadata to a text file, No to display the metadata to the Output
area only, or Cancel to cancel the operation.
If there are no tables in the database, then the menu item will be dimmed, and
you cannot select it.
Extracting View Metadata
To extract metadata for a single view, choose Extract | SQL Metadata for View....
The following dialog box will open:
Click on the arrow to the right of the View Name field to see a drop-down list of
views in the database. Choose a view, then choose OK to extract metadata from
that view.
Another dialog box will open, asking whether to save output to a file. Choose
Yes to save the metadata to a text file, No to display the metadata to the Output
area only, or Cancel to cancel the operation.
Using Windows ISQL
47
If there are no views defined for the database, then the menu item will be
dimmed, and you cannot select it.
Changing Windows ISQL Settings
The Session menu enables you to change ISQL settings for the current session
and display information about the database and its metadata.
Basic ISQL Settings
Choose Session | Basic ISQL Settings... to open a dialog box displaying all the
basic settings that can be toggled on or off:
Each setting has a corresponding check box. If there is an “X” in the box, then the
setting is on. Otherwise, it is off. Click on the check box or the setting name to
toggle the setting.
The following table summarizes basic ISQL settings:
Table 4-2:
48
Basic ISQL Settings
Setting
Behavior when setting is ON
Display Query Plan
Display the query plan chosen by the optimizer when a
SELECT is entered. To modify the optimizer plan, use the
PLAN option of the SQL SELECT statement.
Auto Commit DDL
Automatically commits DDL (data definition) statements as
each statement is entered. This setting is ON by default.
If this setting is off, you must explicitly commit DDL statements (with File | Commit Work) to make them permanent.
Local InterBase Server User’s Guide
Table 4-2:
Basic ISQL Settings (Continued)
Setting
Behavior when setting is ON
Display Statistics
Displays performance statistics for each statement
entered. The following performance statistics appear after
the result of each statement:
• Number of read or write requests
• Number of requests for data or updates which can be
serviced in cache
• Elapsed time
• CPU time
• Memory usage
• Database page size
• Database buffers used
Display in List Format
Displays data in list format, with headings on the left and
column values on the right, one row at a time.
If this setting is off (default) data is displayed in tabular format, with data in rows and columns, which may wrap
longer rows.
Display Row Count
Displays the number of rows returned by each SELECT
query entered.
Display Time Data Type
Displays the time portion of DATE values. If this setting is
OFF, then only the date portion of DATE values is displayed.
Advanced ISQL Settings
There are two advanced ISQL settings: BLOB display and character set choice.
Choose Session | Advanced ISQL Settings... to open the following dialog box:
Choose OK to accept all the setting changes, or choose Cancel to cancel setting
changes.
Using Windows ISQL
49
BLOB Display
The upper area in the dialog box enables you to determine the display of BLOB
data types.
This setting determines the display of BLOB data. SELECT always displays the
BLOB ID for columns of BLOB data type. By default, a SELECT will also display
actual BLOB data of text subtypes beneath the associated row.
The choices are:
• Disable BLOB Display: Do not display contents of BLOB columns.
• Display ALL BLOBs: Display BLOB data of all subtypes.
• Restrict BLOB Display: Display contents of BLOB columns only for the
specified subtype. Use 0 for an unknown subtype; 1 for a text subtype
(the default), and other integers for other BLOB subtypes.
Character Set
This setting determines the active character set for strings for subsequent connections to the database. It enables you to override the default character set for a
database.
Specify the character set before connecting to the database whose character set
you want to specify. For a complete list of character sets recognized by InterBase,
see the Language Reference.
Choice of character set limits possible collation orders to a subset of all available
collation orders. Given a character set, a collation order can be specified when
data is selected, inserted, or updated in a column.
You can perform the same function in an SQL script with the SET NAMES command. Use SET NAMES before connecting to the database whose character set
you want to specify.
Displaying Settings
To display all the current ISQL settings, choose Session | Display Settings.... The
basic settings and selected advanced settings will be displayed in the ISQL
Output area.
50
Local InterBase Server User’s Guide
Displaying Version Information
To display version information, choose Session | Display Connect Version in the
ISQL Output Area. This will display the version of ISQL being used. If connected to a database, this command will also display the versions of the
InterBase access method, server, and remote interface.
Displaying Database Information and Metadata
Choose View | Metadata Information... to display database information and
metadata. The following dialog box will open:
Select the object type for which to display information, supply any required
information in the Object Name text field and choose OK. Generally, if you do
not supply an Object Name, then ISQL will display the names of all objects of
the selected type in the database. If you do supply an Object Name, then ISQL
will display information about that object.
The following table summarizes the items that can be displayed.
Table 4-3:
Metadata Information Items
Item
DIsplays
Check...
Check constraints for the specified table. Specify table name in the
Object Name field.
Database
Current database’s file name, page size and allocation, and sweep
interval. Do not specify an Object Name.
Domain
Names of all domains in the database (with no Object Name).
Name and data type of the domain given as Object Name.
Exception
Names of all exceptions in the database, their associated messages,
and the names of triggers and stored procedures which use them (with
no Object Name).
Name and message of exception given as Object Name, and names of
triggers and stored procedures that use it.
Generator
Names and current values of all generators in the database (with no
Object Name).
Name and current value of the generator given as Object Name.
Using Windows ISQL
51
Table 4-3:
52
Metadata Information Items (Continued)
Item
DIsplays
Grant
Displays permissions for the table or view given as Object Name.
Index
Names of all indexes in the database, their constituent columns, and
uniqueness (with no Object Name).
Names of all indexes for the table given as Object Name, their constituent columns, and uniqueness.
Constituent columns for the index given as Object Name, and the
index’s uniqueness.
Procedure
Names and dependencies of all stored procedures in the database
(with no Object Name).
Procedure body, for the procedure given as Object Name, its input
parameters, and output parameters.
System
Displays the names of system tables and system views for the current
database. Do not specify an Object Name.
Table
Names of all tables in the database (with no Object Name).
Columns, data types, PRIMARY KEY, FOREIGN KEY, and CHECK
constraints for the table given as Object Name.
Trigger
Names of all triggers in the database and the tables for which they are
defined (with no Object Name).
Trigger bodies when a table is given as Object Name.
Body of the trigger given as Object Name.
View
Names of all views in the database (with no Object Name).
Columns, data types, and view source for the view given as Object
Name.
Local InterBase Server User’s Guide
CHAPTER 5
Using ISQL Script Files
5
This chapter describes how to run an ISQL script file from Windows ISQL, and
provides details on ISQL commands that can be used in scripts, but not interactively.
Creating and Executing SQL Files
The basic steps for using script files with Windows ISQL are:
• Create the file using a text editor.
• Execute the file with Windows ISQL.
• View output and confirm database changes with Windows ISQL.
Creating an ISQL Script File
You can use any text editor to create an ISQL script file, as long as the final file
format is “plain text” (ASCII).
Every ISQL script file must begin with either a CREATE DATABASE statement
or a CONNECT statement (including user name and password) to specify the
database on which the script file operates.
The CONNECT or CREATE statement must contain a complete database file
name and directory path.
An ISQL script may contain any SQL statements, as described in the Language
Reference, ISQL SET commands as described in this chapter, and comments. Each
SQL statement in a script must be terminated by a semicolon (;) or the current
terminator if it has been changed with SET TERM.
Each script file should end with either EXIT to commit database changes or
QUIT to roll back changes made by the script. If neither is specified, then database changes are committed by default.
Using ISQL Script Files
53
For the full syntax of CONNECT and CREATE DATABASE, see the Language
Reference.
Executing an ISQL Script File
To execute a file containing SQL statements, choose File | Execute ISQL Script....
The following dialog box will appear:
Enter the path and name of the file and click on OK. A dialog box will appear
asking “Save output to a file?” If you choose Yes, then another dialog box will
open, enabling you to enter a file name to which to save output. If you choose
No, then output and any error messages will be displayed in the SQL Output
area.
After Windows ISQL finishes executing a script file, a summary dialog will
appear indicating if there were any errors. If there were errors, then an error
message will appear in the ISQL Output Area (or output file) after each statement that caused the error.
After a script is executed, all ISQL settings prior to executing it will be restored
as well as the previous database connection, if any. Any ISQL SET commands in
the script only affect the ISQL session while the script is running.
Committing and Rolling Back Work
Changes to the database from data definition (DDL) statements—for example,
CREATE and ALTER statements—are automatically committed by default. This
means that other users of the database will see changes as soon as each DDL
statement is executed. To turn off automatic commit of DDL in a script, use SET
AUTODDL OFF.
Note
54
When creating tables and other database objects, it is good practice to put a
COMMIT statement in the ISQL script after each CREATE statement (or
group of related statements) to make sure the changes are committed
Local InterBase Server User’s Guide
before creating other database objects and that other users of the database
will see the objects immediately.
Changes made to the database by data manipulation (DML) statements—for
example INSERT and UPDATE—are not permanent until they are committed.
Commit changes in a script with COMMIT. To undo all database changes since
the last COMMIT, use ROLLBACK. For the full syntax of COMMIT and
ROLLBACK, see the Language Reference.
Adding Comments
ISQL scripts are commented exactly like C programs:
/* comment */
A comment may occur on the same line as ISQL commands and may be of any
length, as long as it is preceded by “/*” and followed by “*/”.
ISQL SET Statements
SET Statements are used to configure the ISQL environment from a script file.
Changes to the session setting from SET statements in a script affect the session
only while the script is running. After a script completes, the session settings
prior to running the script will be restored.
You cannot enter ISQL SET statements interactively in the SQL Statement area.
When using ISQL interactively, perform these same functions with the Session
menu items. SET GENERATOR and SET TRANSACTION (without a transaction
name) are SQL statements and so may be entered interactively. The ISQL SET
statements are:
Table 5-1:
SET Statements
Statement
Description
SET AUTODDL
Toggles the commit feature for DDL statements.
SET BLOBDISPLAY n
Turns on the display of BLOB type n. The parameter n is
required to display BLOB types.
SET COUNT
Toggles the count of selected rows on or off.
SET ECHO
Toggles the display of each command on or off.
SET LIST string
Displays columns vertically or horizontally.
SET NAMES
Specifies the active character set.
SET PLAN
Specifies whether or not to display the optimizer’s query plan.
Using ISQL Script Files
55
SET AUTODDL
Table 5-1:
SET Statements (Continued)
Statement
Description
SET STATS
Toggles the display of performance statistics on or off.
SET TERM string
Allows you to change to an alternate terminator character(s).
SET TIME
Toggles display of time in DATE values.
By default all settings are initially OFF except AUTODDL and TIME, and the
terminator is a semicolon (;). Each time you start an ISQL session or execute an
ISQL script file, settings begin with their default values.
After an ISQL script completes, the settings return to their values before the
script was run. So you can modify the settings for interactive use, then change
them as needed in an ISQL script, and after running the script they automatically return to their previous configuration.
The statements SET DATABASE, SET GENERATOR, and SET TRANSACTION
are not exclusively ISQL commands, so they are not documented in this chapter.
For more information about these commands, see the Language Reference.
SET AUTODDL
Specifies whether DDL statements are committed automatically after being executed or committed only after an explicit COMMIT.
Syntax
Description
SET AUTODDL [ON | OFF];
Argument
Description
ON
Turns on automatic commitment of DDL (default).
OFF
Turns off automatic commitment of DDL.
SET AUTODDL is used to turn on or off the automatic commitment of data definition language (DDL) statements. By default, DDL statements are automatically committed immediately after they are executed, in a separate transaction.
This is the recommended behavior.
If the OFF keyword is specified, auto-commit of DDL is then turned off. In OFF
mode, DDL statements can only be committed explicitly through a user’s transaction. This mode is useful for database prototyping, because uncommitted
changes are easily undone by rolling them back.
SET AUTODDL has a shorthand equivalent, SET AUTO.
56
Local InterBase Server User’s Guide
SET AUTODDL
Tip
Examples
The ON and OFF keywords are optional. If they are omitted, SET AUTO
switches from one mode to the other. Although you can save typing by
omitting the optional keyword, including the keyword is recommended
because it avoids potential confusion.
The following example shows part of an ISQL script which turns off AUTO
DDL, creates a table named TEMP, then rolls back the work.
...
SET AUTO OFF;
CREATE TABLE TEMP (a INT, b INT);
ROLLBACK;
...
This script creates TEMP and then rolls back the statement. If you choose View |
Metadata... and select “Tables,” the TEMP table will not appear, because its creation was rolled back.
The next script uses the default AUTO DDL ON. It creates the table TEMP and
then performs a rollback:
...
CREATE TABLE TEMP (a INT, b INT);
ROLLBACK;
...
Because DDL is automatically committed, the rollback does not affect the creation of TEMP. If you choose View | Metadata... and select “Tables,” you will see
the TEMP table.
See Also
EXIT, QUIT
Using ISQL Script Files
57
SET BLOBDISPLAY
SET BLOBDISPLAY
Specifies subtype of BLOB data to display.
Syntax
Description
SET BLOBDISPLAY [n | ALL | OFF];
Argument
Description
n
Integer specifying the BLOB subtype to display. Use 0 for BLOB data
of an unknown subtype; use 1 (default) for BLOB data of a text subtype, and other integer values for other subtypes.
ALL
Display BLOB data of all subtypes.
OFF
Turn off display of BLOB data of all subtypes.
SET BLOBDISPLAY has the following uses:
• To display BLOB data of a particular subtype, use SET BLOBDISPLAY n.
By default, ISQL displays BLOB data of text subtype (n = 1).
• To display BLOB data of all subtypes, use SET BLOBDISPLAY ALL.
• To avoid displaying BLOB data, use SET BLOBDISPLAY OFF. Omitting
the OFF keyword has the same effect. Turn BLOB display off to make
output easier to read.
In any column containing BLOB data, the actual data does not appear in the column. Instead, the column displays a BLOB ID that represents the data. If SET
BLOBDISPLAY is on, data associated with a BLOB ID appears under the row
containing the BLOB ID. If SET BLOBDISPLAY is off, the BLOB ID still appears
even though its associated data does not.
SET BLOBDISPLAY has a shorthand equivalent, SET BLOB.
To determine the subtype of a BLOB column, use SHOW TABLE.
Examples
The following examples show output from the same SELECT statement. Each
example uses a different SET BLOB command to affect how output appears. The
first example turns off BLOB display.
SET BLOB OFF;
SELECT PROJ_NAME, PROJ_DESC FROM PROJECT;
With BLOBDISPLAY OFF, the output shows only the BLOB ID:
58
Local InterBase Server User’s Guide
SET COUNT
PROJ_NAME
====================
Video Database
DigiPizza
AutoMap
MapBrowser port
Translator upgrade
Marketing project 3
PROJ_DESC
=================
24:6
24:8
24:a
24:c
24:3b
24:3d
The next example restores the default by setting BLOBDISPLAY to subtype 1
(text).
SET BLOB 1;
SELECT PROJ_NAME, PROJ_DESC FROM PROJECT;
Now the contents of the BLOB appear below each BLOB ID:
PROJ_NAME
PROJ_DESC
====================
=================
Video Database
24:6
==============================================================
PROJ_DESC:
Design a video data base management system for
controlling on-demand video distribution.
PROJ_NAME
PROJ_DESC
====================
=================
DigiPizza
24:8
==============================================================
PROJ_DESC:
Develop second generation digital pizza maker
with flash-bake heating element and
digital ingredient measuring system.
. . .
See Also
BLOBDUMP
SET COUNT
Specifies whether to display number of rows retrieved by queries.
Syntax
SET COUNT [ON | OFF];
Argument
Description
ON
Turns on display of the “rows returned” message.
OFF
Turns off display of the “rows returned” message (default).
Using ISQL Script Files
59
SET ECHO
Description
By default, when a SELECT statement retrieves rows from a query, no message
appears to say how many rows were retrieved.
Use SET COUNT ON to change the default behavior and display the message.
To restore the default behavior, use SET COUNT OFF.
Tip
Example
The ON and OFF keywords are optional. If they are omitted, SET COUNT
switches from one mode to the other. Although you can save typing by
omitting the optional keyword, including the keyword is recommended
because it avoids potential confusion.
The following examples sets COUNT ON to display the number of rows
returned by all following queries:
SET COUNT ON;
SELECT * FROM COUNTRY
WHERE CURRENCY LIKE "%FRANC%";
The output displayed would then be:
COUNTRY
===============
SWITZERLAND
FRANCE
BELGIUM
CURRENCY
==========
SFRANC
FFRANC
BFRANC
3 rows returned
SET ECHO
Specifies whether commands are displayed to the ISQL Output area before
being executed.
Syntax
Description
60
SET ECHO [ON | OFF];
Argument
Description
ON
Turns on command echoing (default)
OFF
Turns off command echoing.
By default, commands in script files are displayed (echoed) in the ISQL Output
area, before being executed. Use SET ECHO OFF to change the default behavior
and suppress echoing of commands. This may be useful when sending the output of a script to a file, if you want only the results of the script and not the statements themselves in the output file.
Local InterBase Server User’s Guide
SET ECHO
Command echoing is useful if you want to see the commands as well as the
results in the ISQL Output area.
Tip
Example
The ON and OFF keywords are optional. If they are omitted, SET ECHO
switches from one mode to the other. Although you can save typing by
omitting the optional keyword, including the keyword is recommended
because it avoids potential confusion.
Suppose you execute the following script from Windows ISQL:
...
SET ECHO
SELECT *
SET ECHO
SELECT *
EXIT;
OFF;
FROM COUNTRY;
ON;
FROM COUNTRY;
The output (in a file or the ISQL Output area) will look like this:
...
SET ECHO OFF;
COUNTRY
CURRENCY
=========== ========
USA
Dollar
England
Pound
...
SELECT * FROM COUNTRY;
COUNTRY
===========
USA
England
...
CURRENCY
========
Dollar
Pound
The first SELECT statement is not displayed, because ECHO is OFF. Notice also
that the SET ECHO ON statement itself is not displayed, because when it is executed, ECHO is still OFF. After it is executed, however, the second SELECT statement is displayed.
See Also
INPUT, OUTPUT
Using ISQL Script Files
61
SET LIST
SET LIST
Specifies whether output appears in tabular format or in list format.
Syntax
SET LIST [ON | OFF];
Description
Argument
Description
ON
Turns on list format for display of output.
OFF
Turns off list format for display of output (default).
By default, when a SELECT statement retrieves rows from a query, the output
appears in a tabular format, with data organized in rows and columns.
Use SET LIST ON to change the default behavior and display output in a list
format. In list format, data appears one value per line, with column headings
appearing as labels. List format is useful when columnar output is too wide to fit
nicely on the screen.
Tip
Example
The ON and OFF keywords are optional. If they are omitted, SET LIST
switches from one mode to the other. Although you can save typing by
omitting the optional keyword, including the keyword is recommended
because it avoids potential confusion.
Suppose you execute the following statement in a script file:
SELECT JOB_CODE, JOB_GRADE, JOB_COUNTRY, JOB_TITLE FROM JOB
WHERE JOB_COUNTRY = "Italy";
The output will be:
JOB_CODE
========
SRep
JOB_GRADE
=========
4
JOB_COUNTRY
===========
Italy
JOB_TITLE
====================
Sales Representative
Now suppose, you precede the SELECT with SET LIST ON:
SET LIST ON;
SELECT JOB_CODE, JOB_GRADE, JOB_COUNTRY, JOB_TITLE FROM JOB
WHERE JOB_COUNTRY = "Italy";
The output will then be:
JOB_CODE
JOB_GRADE
JOB_COUNTRY
JOB_TITLE
62
SRep
4
Italy
Sales Representative
Local InterBase Server User’s Guide
SET NAMES
SET NAMES
Specifies the active character set to use in database transactions.
Syntax
Description
SET NAMES [charset];
Argument
Description
charset
Name of the active character set. Default: NONE.
SET NAMES specifies the character set to use for subsequent database connections in ISQL. It enables you to override the default character set for a database.
To return to using the default character set, use SET NAMES with no argument.
Use SET NAMES before connecting to the database whose character set you
want to specify. For a complete list of character sets recognized by InterBase, see
the Language Reference.
Choice of character set limits possible collation orders to a subset of all available
collation orders. Given a specific character set, a specific collation order can be
specified when data is selected, inserted, or updated in a column.
Example
The following statement at the beginning of a script file indicates to set the active
character set to ISO8859_1 for the subsequent database connection:
SET NAMES ISO8859_1;
CONNECT “EAGLE:\USR\INTERBASE\EXAMPLES\EMPLOYEE.GDB”;
...
SET PLAN
Specifies whether to display the optimizer’s query plan.
Syntax
Description
SET PLAN [ON | OFF];
Argument
Description
ON
Turns on display of the optimizer’s query plan.
OFF
Turns off display of the optimizer’s query plan (default).
By default, when a SELECT statement retrieves rows from a query, ISQL does
not display the query plan used to retrieve the data.
Using ISQL Script Files
63
SET STATS
Use SET PLAN ON to change the default behavior and display the query optimizer plan. To restore the default behavior, use SET PLAN OFF.
To change the query optimizer plan, use the PLAN clause in the SELECT
statement.
Tip
Example
The ON and OFF keywords are optional. If they are omitted, SET PLAN
switches from one mode to the other. Although you can save typing by
omitting the optional keyword, including the keyword is recommended
because it avoids potential confusion.
The following example shows part of a script which sets PLAN ON:
SET PLAN ON;
SELECT JOB_COUNTRY, MIN_SALARY FROM JOB
WHERE MIN_SALARY > 50000
AND JOB_COUNTRY = "France";
The output then includes the query optimizer plan used to retrieve the data as
well as the results of the query:
PLAN (JOB INDEX (RDB$FOREIGN3,MINSALX,MAXSALX))
JOB_COUNTRY
MIN_SALARY
===============
======================
France
118200.00
SET STATS
Specifies whether to display performance statistics after the results of a query.
Syntax
Description
SET STATS [ON | OFF];
Argument
Description
ON
Turns on display of performance statistics.
OFF
Turns off display of performance statistics (default).
By default, when a SELECT statement retrieves rows from a query, ISQL does
not display performance statistics after the results. Use SET STATS ON to
change the default behavior and display performance statistics. To restore the
default behavior, use SET STATS OFF. Performance statistics include:
• Current memory available, in bytes
• Change in available memory, in bytes
• Maximum memory available, in bytes
64
Local InterBase Server User’s Guide
SET STATS
• Elapsed time for the operation
• CPU time for the operation
• Number of cache buffers used
• Number of reads requested
• Number of writes requested
• Number of fetches made
Performance statistics can help determine if changes are needed in system
resources, database resources, or query optimization.
Tip
The ON and OFF keywords are optional. If they are omitted, SET STATS
switches from one mode to the other. Although you can save typing by
omitting the optional keyword, including the keyword is recommended
because it avoids potential confusion.
Do not confuse SET STATS with the SQL statement SET STATISTICS, which
recalculates the selectivity of an index.
Example
The following part of a script file turns on display of statistics and then performs
a query:
SET STATS ON;
SELECT JOB_COUNTRY, MIN_SALARY FROM JOB
WHERE MIN_SALARY > 50000
AND JOB_COUNTRY = "France";
The output displays the results of the SELECT statement and the performance
statistics for the operation:
JOB_COUNTRY
===============
France
MIN_SALARY
======================
118200.00
Current memory = 407552
Delta memory = 0
Max memory = 412672
Elapsed time= 0.49 sec
Cpu = 0.06 sec
Buffers = 75
Reads = 3
Writes = 2
Fetches = 441
See Also
SHOW DATABASE
Using ISQL Script Files
65
SET TERM
SET TERM
Specifies which character or characters signal the end of a command.
Syntax
Description
SET TERM string;
Argument
Description
string
Specifies a character or characters to use in terminating a statement.
Default: semicolon (;).
By default, when a line ends with a semicolon, ISQL interprets it as the end of a
command. Use SET TERM to change the default behavior and define a new termination character.
SET TERM is typically used with CREATE PROCEDURE or CREATE TRIGGER.
Procedures and triggers are defined using a special “procedure and trigger” language in which statements end with a semicolon. If ISQL were to interpret semicolons as statement terminators, then procedures and triggers would execute
during their creation, rather than when they are called.
A script file containing CREATE PROCEDURE or CREATE TRIGGER definitions should include one SET TERM command before the definitions and a corresponding SET TERM after the definitions. The beginning SET TERM defines a
new termination character; the ending SET TERM restores the semicolon (;) as
the default.
Example
The following example shows a text file that uses SET TERM in creating a procedure. The first SET TERM defines “##” as the termination characters. The matching SET TERM restores “;” as the termination character.
SET TERM ## ;
CREATE PROCEDURE ADD_EMP_PROJ (EMP_NO SMALLINT, PROJ_ID CHAR(5))
AS
BEGIN
BEGIN
INSERT INTO EMPLOYEE_PROJECT (EMP_NO, PROJ_ID)
VALUES (:emp_no, :proj_id);
WHEN SQLCODE -530 DO
EXCEPTION UNKNOWN_EMP_ID;
END
RETURN;
END ##
SET TERM ; ##
66
Local InterBase Server User’s Guide
SET TIME
SET TIME
Specifieswhether to display the time portion of a DATE value.
Syntax
Description
SET TIME [ON | OFF];
Argument
Description
ON
Turns on display of time in DATE value.
OFF
Turns off display of time in DATE value (default)
The InterBase DATE data type includes a date portion (including day, month,
and year) and a time portion (including hours, minutes, and seconds).
By default, ISQL displays only the date portion of DATE values. SET TIME ON
turns on the display of time values. SET TIME OFF turns off the display of time
values.
Note
Example
The ON and OFF keywords are optional. If they are omitted, the command
toggles time display from ON to OFF or OFF to ON.
The following example shows the default display of a DATE data type, which is
to display day, month, and year:
SELECT HIRE_DATE FROM EMPLOYEE WHERE EMP_NO = 145;
HIRE_DATE
------------------2-MAY-1994
This example shows the effects of SET TIME ON, which causes the hours, minutes and seconds to be displayed as well:
SET TIME ON;
SELECT HIRE_DATE FROM EMPLOYEE WHERE EMP_NO = 145;
HIRE_DATE
------------------2-MAY-1994 12:25:00
Using ISQL Script Files
67
SET TIME
68
Local InterBase Server User’s Guide
PART 3
Tutorial
3
Part 4 is an SQL tutorial using Windows ISQL.
Chapter 6: “Getting Started With Windows ISQL” introduces some fundamental
database concepts, SQL statements and terminology, and the Windows ISQL
tool. This chapter introduces the main categories of SQL statements.
Chapter 7: “Basic Data Definition” introduces some more SQL concepts and provides examples of performing SQL data definition. This chapter provides a thorough introduction to data definition language (DDL) statements.
Chapter 8: “Populating the Database” provides a thorough overview of data
manipulation language (DML) statements: INSERT, UPDATE, and DELETE.
Chapter 9: “Retrieving Data” explains how the SELECT statement works and
provides a thorough overview of its syntax and use.
Chapter 10: “Advanced Data Definition” discusses granting and revoking SQL
privileges, creating triggers, and creating stored procedures.
CHAPTER 6
Getting Started With Windows
ISQL
6
This chapter introduces some fundamental database concepts, and illustrates
them with simple examples in Windows ISQL. Some of the basic database tasks
include:
• Creating a database.
• Creating tables.
• Adding data to tables and modifying the data.
• Retrieving data from tables.
If you are new to SQL, read this chapter for an introduction to SQL database
concepts, and the Windows ISQL tool. Then move on to the following chapters
that provide detailed SQL tutorials.
If you are an experienced SQL programmer, skim this chapter for an overview of
how Windows ISQL works, then read any of the other chapters that are of interest.
In the tutorial presented in this chapter, you create a very simple personnel database for employee records. In the next chapter, you use the concepts learned in
this chapter to build and use a more complex database provided with InterBase.
Throughout the tutorial, a pointing finger in the left margin will identify actions
you need to perform. Pay particular attention to these items.
Getting Started With Windows ISQL
71
Starting the Windows ISQL Session
Start Windows ISQL by clicking on the Windows ISQL icon in the InterBase
Windows Client program group. The InterBase Interactive SQL window will
open:
SQL Statement area
Run Button
Previous Button
Next Button
ISQL Output area
Current database
connection
To enter an SQL statement, type the statement in the SQL Statement area at the
top of the window and then click on the Run button. The results are displayed in
the area labeled “ISQL Output”. The Previous and Next buttons enable you to
move back and forth through the list of statements previously entered.
Do not try to enter an SQL statement now, because Windows ISQL must first be
connected to a database. To do this, keep reading and follow the tutorial instructions.
An Overview of SQL
SQL statements are divided into two major categories:
• Data definition language (DDL) statements.
• Data manipulation language (DML) statements.
DDL statements are used to define, change, and delete the database, tables, and
other elements that are part of the database. Collectively, the objects defined
with DDL statements are known as metadata.
72
Local InterBase Server User’s Guide
Basic DDL statements begin with the keyword CREATE to create metadata, and
corresponding statements to modify metadata begin with the keyword ALTER.
Statements to delete metadata begin with the keyword DROP. So, for example,
CREATE TABLE is used to define a table, ALTER TABLE to modify an existing
table, and DROP TABLE to delete a table.
DML statements are used to manipulate data within the data structures defined
with DDL statements. The three basic DDL statements are INSERT, UPDATE,
and DELETE. INSERT is used to add data to a table, UPDATE is used to modify
existing data, and DELETE is used to delete data.
DML also includes what is probably the most important SQL statement of all:
SELECT. The SELECT statement is used to retrieve or query information from the
database.
Creating a Database
InterBase is a relational database. A relational database is a collection of tables,
which are two-dimensional structures composed of rows (also called records)
and columns (also called fields). InterBase databases are stored in files, customarily given the filename extension .GDB.
To create a database, you must have a valid user name and password in the
security database, ISC4.GDB. For instructions on how to access the security
database using InterBase’s Server Manager, see Chapter 11: “Introduction to
Server Manager.”
Initially, the information you need to supply to create a database is the pathname of the database.
Create a database now by choosing File | Create Database.... The Create
Database dialog box opens:
Click here for list of servers
previously connected to
Click here to choose network
protocol
Enter database name
Enter user name
Enter password
Enter Database options
Getting Started With Windows ISQL
73
Press Tab to move the cursor from one field to the next. Make sure the User
Name field shows your user name. Enter your InterBase password in the Password text field.
In the Database field, type the name of the database to create, including the
directory path and file specification. For example:
C:\IBLOCAL\EXAMPLES\MYDB.GDB
Note
Be sure to create the database in a directory where you have the necessary
file permissions.
If you create the database in your own directory area, then you can give it any
name you want. If you create it in a common directory such as
IBLOCAL\EXAMPLES, you should give the database a unique name to avoid
conflicts with other users. For example, if your name is Fred, you could name
the database FRED.GDB. You do not have to use the .GDB file name extension,
but it is an InterBase convention. Leave the Database Options area empty,
because you are creating a simple database.
Click on OK. Windows ISQL will create a database in the directory specified.
There will be a short pause and the cursor will turn into an hourglass while the
server is creating the database. Then the CREATE DATABASE statement will be
echoed in the SQL Output area and a message will appear at the bottom of the
ISQL Window that says you are connected, for example:
Connected to: C:\IBLOCAL\EXAMPLES\MYDB.GDB
Conceptual Database Design
Before getting into the details of building a database, you should step back and
determine exactly what you want to do with the database. In this “conceptual
design” phase, you should basically define the objects you want to model with
the database, their characteristics, and their relationships. Try to map out the
details as much as possible before actually doing any SQL data definition. Sometimes it is useful to create diagrams on paper to help visualize the database.
Because this chapter is intended to introduce basic database concepts, you are
going to build a very simple database, containing only two tables. In the real
world, databases will rarely be this simple. But imagine that you only need to
keep track of employees and the corporate department to which they belong.
The best way to do this is to have a table for the employees, and a table for the
departments.
The employee table should contain a row for each employee, and a column for
each item of information related to the employee. For this simple example, let’s
74
Local InterBase Server User’s Guide
assume that we only need to keep track of the employee’s name (first and last),
employee number, and department. Each department has a unique department
number and a department name.
A conceptual diagram of this database might look like this:
Employees
Employee Number *
First Name
Last Name
Department Number
Departments
Department Name
Department Number *
The box on the left represents the table for employees, and the box on the right
represents the table for departments. The columns of each table are listed inside
each box, and an asterisk indicates that the value of the column uniquely identifies a row (this is known as a primary key, and will be explained later). The
arrow indicates that each department number entered in the employee table references a department number in the department table (this is known as a foreign
key, and will be explained later).
Creating Tables
A table is a data structure consisting of an unordered set of rows, each containing a specific number of columns. Conceptually, a database table is like an ordinary table. Much of the power of relational databases comes from defining the
relationships among the tables.
For example, in this simple personnel database, the table for employees could be
called EMPLOYEE, with columns as defined previously. Each row represents an
individual employee. Here is an illustration of what such an EMPLOYEE table
might look like this:
Table 6-1:
EMPLOYEE Table
EMPNO
LAST_NAME
FIRST_NAME
DEPT_NO
10335
Smith
John
180
21347
Carter
Catherine
620
13314
Jones
Sarah
100
5441
Lewis
Stephen
180
Getting Started With Windows ISQL
75
The table containing information on departments could be called
DEPARTMENT, and look like this:
Table 6-2:
DEPARTMENT Table
DEPTNO
DEPARTMENT
180
Marketing
620
Software Products Div.
100
Sales
600
Engineering
The DEPARTMENT table is simple, so it makes a good starting point. To create a
table with Windows ISQL, use the CREATE TABLE statement. The full syntax of
this statement, as shown in the Language Reference is quite complex, but the basic
form is simple: the keywords CREATE TABLE, followed by the name of the
table, and then in parentheses a list of the columns in the table, separated by
commas. Each column in the list specifies the name of the column, the data type,
and attributes of the column such as NOT NULL and UNIQUE.
To create the DEPARTMENT table, type the following in the SQL Statement
area:
CREATE TABLE DEPARTMENT
(DEPT_NO CHAR(3) NOT NULL UNIQUE, DEPARTMENT VARCHAR(25) NOT NULL);
SQL is not case-sensitive, so you can enter statements in uppercase or lowercase.
You could enter the statement all on one line, but it is easier to read if spread
across several lines. The semicolon at the end of the statement is optional.
Type the above statement and click on Run. If you did not make any typing mistakes, then the statement will be echoed in the ISQL Output area. If you made a
mistake, an error message will be displayed.
Note
From now on in this chapter, it will be assumed that you know how to type
SQL statements in the SQL Statement area, and click on the Run button
when you are done.
This statement creates a table called “DEPARTMENT” with two columns:
DEPT_NO for the department number and DEPARTMENT for the department
name. The department number is defined as a three-character string, and
department name is defined as a string with up to 25 characters. The keywords
NOT NULL signify that each row must contain data in that column. UNIQUE
means that the data in the column must be unique. So each department must
have a name and department number and each department number must be
unique.
76
Local InterBase Server User’s Guide
To view your new table definition, choose View | Metadata Information.... This
dialog box will open:
Click here to display list of
types of metadata objects
Type here the name of the
object on which to view
information
Display a drop-down list of types of metadata objects by clicking on the arrow to
the right of the top field (as indicated above), then select “Table” and type the
name of the table, DEPARTMENT in the Object Name field. Click on OK. The
table definition will be displayed in the ISQL Output area:
At any point during this tutorial, you can view metadata by choosing View |
Metadata Information... and selecting the type of metadata. If you do not enter
anything in the Object Name field, then ISQL will display the names of all the
metadata objects of the selected type. If you enter a name, then ISQL will display
all the details about that object.
Next, you will create the EMPLOYEE table. But first, you have to understand
some new concepts.
Primary Keys and Foreign Keys
A primary key is a column or set of columns that uniquely identifies a row. In
practice, every table should have a primary key. In the employee table, EMP_NO
should be a primary key for EMPLOYEE because the employee number
uniquely identifies an employee and DEPT_NO should be the primary key for
DEPARTMENT because it uniquely identifies a department.
A foreign key is a column in one table that is the primary key column for another
table. Primary key and foreign key constraints are defined with the PRIMARY
KEY and FOREIGN KEY keywords in a CREATE TABLE statement.
Getting Started With Windows ISQL
77
Now define a new table with a primary key and a foreign key. Type the following in the SQL Statement area:
CREATE TABLE EMPLOYEE
(EMP_NO SMALLINT NOT NULL,
LAST_NAME VARCHAR(25) NOT NULL,
FIRST_NAME VARCHAR(20) NOT NULL,
DEPT_NO CHAR(3) NOT NULL,
PRIMARY KEY (EMP_NO),
FOREIGN KEY (DEPT_NO)
REFERENCES DEPARTMENT (DEPT_NO));
This statement creates a table called “EMPLOYEE” with four columns:
EMP_NO for each employee’s employee number, FIRST_NAME and
LAST_NAME, for each employee’s first and last names, and DEPT_NO for the
employee’s department number. NOT NULL after each column name signifies
that data is required in the column when a row is added to the database.
After the list of columns, the keywords PRIMARY KEY define the table’s primary key to be the EMP_NO column. The keywords FOREIGN KEY indicate
that DEPT_NO references a column in another table, and the data in this column
must match the data in the other table.
Make sure the table definition is entered in the database by choosing View |
Metadata Information..., selecting Tables, and typing EMPLOYEE as the table
name. You should see the table definition in the ISQL Output area.
Adding Data to Tables
Creating a table with CREATE TABLE simply defines the data structure. To create a useful database, you must then add data to the table. The easiest way to
add data to a table in SQL is with the INSERT statement. The simplest form of
the INSERT statement specifies values to insert into all the columns in a single
row of a table, as follows:
INSERT INTO table_name VALUES (val1, val2, ...);
where table_name is the name of the table, and val1, val2, and so on, are the values to insert. For example, to insert the values into the DEPARTMENT table for
the first row shown in the previous section, type the following:
INSERT INTO DEPARTMENT VALUES (180, "Marketing");
To use this syntax, you must know the default order of the columns. Because
you just created the table with the DEPTNO column first and then DEPARTMENT, you know to give the department number first and then the name. If you
try to insert values in a different order, you will get an error.
78
Local InterBase Server User’s Guide
Now type the following:
INSERT INTO DEPARTMENT VALUES (100, "Sales");
Note
Windows ISQL does not require a semicolon at the end of each statement.
The semicolon (or another terminator character) is required in statements
in ISQL script files. It is a good idea to get in the habit of ending your SQL
statements with semicolons, so you will not forget to do so when creating
script files.
There is a more general form of the INSERT statement that enables you to enter
values for specific columns, even if you do not know the default order:
INSERT INTO table_name (col1, col2, ...) VALUES (val1, val2, ...);
where col1 is the name of the column into which to insert value val1, col2 is the
name of the column into which to insert val2, and so on. To insert the next row of
the DEPARTMENT table, type:
INSERT INTO DEPARTMENT (DEPARTMENT, DEPT_NO)
VALUES ("Software Products Div.", 620);
This form of the INSERT statement is useful if you want to insert values into a
subset of the columns, or you do not remember the default column order. Now,
using either form of the INSERT statement, insert one more row into the
DEPARTMENT table for a department named “Engineering” with department
number 600.
Type the following to insert the values in the EMPLOYEE table. Be sure to enter
the statements one at a time and click on Run after each.
INSERT
INSERT
INSERT
INSERT
Tip
INTO
INTO
INTO
INTO
EMPLOYEE
EMPLOYEE
EMPLOYEE
EMPLOYEE
VALUES
VALUES
VALUES
VALUES
(10335, "Smith", "John", 180);
(21347, "Carter", "Catherine", 620);
(13314,"Jones", "Sarah", 100);
(5441, "Lewis", "Stephen", 180);
After you run the first of these statements, you can save some typing by
choosing the Previous button to recall it to the SQL Statement area, highlighting the data following the VALUES keyword, and typing just the new
values instead of the entire statement.
Testing Referential Integrity
InterBase databases include a feature called referential integrity. Referential integrity in its simplest form are constraints placed upon data by primary and foreign
key definitions. When you defined the EMPLOYEE table, you made EMP_NO
its primary key and DEPT_NO its foreign key, referencing the DEPARTMENT
table. What this means is that each row in the EMPLOYEE table must have a
Getting Started With Windows ISQL
79
unique value for the EMP_NO column and the value of the DEPT_NO column
must match a value in the DEPARTMENT table. These referential integrity constraints are translations of real-world rules: each employee must have a unique
employee number and each employee must be assigned to an existing department.
Test out the referential integrity rules for yourself to see how InterBase handles
them. First, try to add an employee with the same employee number as another
employee. Enter the following:
INSERT INTO EMPLOYEE VALUES (21347, "Lesh", "Phil", 620);
A small error dialog box will appear stating: “Statement failed, SQLCODE
= -803”. Choose the Detail button to get more information.
You will see the error message: “Violation of PRIMARY or UNIQUE KEY constraint INTEG_10”. The constraint name shown may be something other than
INTEG_10, because InterBase automatically gives names to integrity constraints
if you do not explicitly name them in your CREATE TABLE statement, and the
name it gives them depends on other DDL done previously.
Now try to add an employee with a non-existent department number. Enter:
INSERT INTO EMPLOYEE VALUES (5441, "West", "August", 999);
The error dialog will appear with the message: “Statement failed, SQLCODE =
-530”. Choose the Detail button, and you will see “Violation of FORIEGN KEY
constraint: INTEG_11”. The referential integrity rules will not let you enter an
employee with a department number that is not in the DEPRTMENT table.
Committing Work
By default, data definition statements are automatically committed by Windows
ISQL. DML statements, such as INSERT, UPDATE, and DELETE, are not committed unless you explicitly do so by choosing File | Commit Work. This means
that you can undo any DML statements since the last time you committed.
Commit your work now by choosing File | Commit Work to make the changes
to the database permanent.
Viewing Data
Now that you have put data into the tables, you need a way to view it. This
requires one of the most important statements in SQL: SELECT. Because
SELECT is so powerful, it has a very complex syntax, allowing a great deal of
80
Local InterBase Server User’s Guide
freedom in retrieving data from tables. The simplest form of SELECT is easy,
though:
SELECT * FROM table_name;
where table_name is the name of the table from which to retrieve data, and the
asterisk (*) means to select all columns from the table. Enter this statement for
the DEPARTMENT table:
SELECT * FROM DEPARTMENT;
The statement will be echoed to the ISQL Output area, and you should also see
the following output:
DEPTNO
DEPARTMENT
=========
======================
180
Marketing
620
Software Products Div.
100
Sales and Marketing
600
Engineering
Enter the corresponding statement for the EMPLOYEE table to see the values
you inserted.
SELECT * FROM EMPLOYEE;
Instead of selecting all columns from a table, you can specify certain columns,
using this form of SELECT:
SELECT col1, co2, ... FROM table_name;
where col1, col2, and so on, are the names of the columns to select from the table.
Experiment with this form to view subsets of the columns of the EMPLOYEE
table.
The SELECT statement has a wealth of clauses that make it such a powerful
statement. One of the most useful is the WHERE clause, that enables you to
specify conditions that rows must meet. For example, enter the following:
SELECT * FROM EMPLOYEE WHERE DEPT_NO = 180;
This query selects rows with DEPT_NO equal to 180, in other words, only
employees in department 180.
For the complete syntax of the SELECT statement, see the Language Reference.
Getting Started With Windows ISQL
81
Modifying Data
Now that you have entered data into tables, and learned how to view it, how do
you change the data? The UPDATE statement enables you to modify existing
rows, using the following syntax:
UPDATE table_name SET col1 = val1, col2 = val2,
. . . WHERE condition;
where table_name is the name of the table being updated, col1, col2, and so on, are
the names of the columns being updated, and val1, val2, and so on, are the new
values to assign to the columns. The condition determines which rows are
updated. Although condition in its full form allows a great deal of flexibility in
determining rows, its basic form is:
column [ = | > | < | >= | <= ] value
In other words, a simple condition compares the value of a column with some
fixed value.
So, for example, say Sarah Jones (employee number 13314) gets married and
changes her last name to Zabrinske. To change her record in the employee table,
enter the following:
UPDATE EMPLOYEE SET LAST_NAME = "Zabrinske" WHERE EMP_NO = 13314;
Because EMP_NO is the primary key of the EMPLOYEE table, the condition is
guaranteed to identify exactly one row to update. Check that the record has been
updated by entering a SELECT statement.
The update statement can make sweeping changes to the database, so use caution when entering it against a real database.
The other major DML statement in SQL is DELETE. This statement deletes rows
from the table, and should be used with caution to avoid losing valuable data.
The basic form of DELETE is:
DELETE FROM table_name WHERE condition;
where table_name is the name of the table from which rows are being deleted,
and condition is the condition that determines which rows are deleted. As in the
UPDATE statement, condition can be quite complex, but in its simplest form it
compares the value of a column with a fixed value.
Say Catherine Carpenter (employee number 21347) is leaving the company, and
you want to delete her record from the EMPLOYEE table. Then type:
DELETE FROM EMPLOYEE WHERE EMP_NO = 21347;
82
Local InterBase Server User’s Guide
Confirm that the record has been deleted by doing a SELECT from EMPLOYEE.
You will not get an error message, but there will be no output displayed in the
ISQL Output area.
Ending the ISQL Session
Whenever you finish your work with ISQL, you should commit it to make it permanent. Choose File | Commit Work.
If you want to continue the tutorial, do not exit Windows ISQL—continue to the
next chapter. If you’ve had enough for now, you can end your ISQL session by
choosing File | Exit to disconnect from the database and exit ISQL. If you want
to keep Windows ISQL running, you can choose File | Disconnect from
Database to disconnect from the database only.
Now that you have gained some basic experience with SQL, you can move on to
the following chapters for more detailed tutorial examples.
Getting Started With Windows ISQL
83
84
Local InterBase Server User’s Guide
CHAPTER 7
Basic Data Definition
7
This chapter will build on the basic concepts introduced in the previous chapter.
Starting with the simple database you defined in the previous chapter, you will
go through all the steps to create the full EMPLOYEE database, used throughout
the documentation.
More Conceptual Design
In the previous chapter, you defined a database consisting of two tables:
EMPLOYEE and DEPARTMENT. Now you are going to move from this basic
example to a personnel and sales database that might actually be useful in a
“real-world” application. Obviously, you will need more than just two tables.
You will also have to add more columns and other attributes to the two existing
tables.
Start by defining the goals of the database. Let’s say that upper management has
determined that your company needs a database to keep track of:
• Personnel records
• Projects and budgets
• Sales
• Customers
Your company does business all over the world, so the database will have to
account for many different countries.
Personnel records include each employee’s employee number and name (as
before), salary, job code, job grade, and country, and other associated details. The
database also needs to maintain information on the manager of each department, the department’s budget and location, and how it fits in the departmental
hierarchy. Records must be maintained on each job type, including job requirements, maximum and minimum salary, and language requirements. Each
employee’s salary history must also be maintained.
Basic Data Definition
85
Project records include the name, project ID, team leader, product type, description of each project, and the project to which each employee is assigned. The
department containing the project, the project’s budget, and quarterly head
count are also important.
Sales records include important information from each purchase order, including PO number, customer, salesperson, date shipped, and so on.
Customer records include a unique customer number, contact names, addresses,
and phone number, and other related information.
Designing a database means deciding which tables belong in the database,
which columns belong in each table, and the relationship between the tables. A
database design in a relational database affords flexibility because the logical
structure of the database is independent of the physical storage and structure of
the database.
Two concepts, relationship modeling and normalization, are basic to designing a
database.
Relationship Modeling
Relationship modeling includes:
• Identifying the major groups of information to store in the database.
• Analyzing the type of information and its properties.
• Identifying relationships among sets of information.
For example, think of the groups of information as tables, with each table
describing one thing, such as a company or an employee. The type of information and its properties are columns in the table, describing the employee’s salary
and the company address. Some questions to ask then are, “Does the information work as a table?” Or “Do the columns need to be moved from one group to
another?”
Normalization
Normalization means splitting tables into two or more smaller related tables that
can then be joined back together. Initially in a database design, you will probably create tables that contain data that are all related. As your design progresses,
however, you will find that you need tables that contain a narrower focus of
data.
86
Local InterBase Server User’s Guide
Normalization also applies to columns within tables. Each column in a row
should contain only one value that cannot be broken down into a smaller value.
For example, one column should contain an employee first name, another column contains the employee last name, instead of having a single column for first
and last name.
After studying the requirements, you determine that you need the following
tables:
• EMPLOYEE for employees’ records, and SALARY_HISTORY for each
employee’s salary history.
• DEPARTMENT for records on each department.
• JOB for information about each job type.
• PROJECT, EMP_PROJECT, and PROJ_DEPT_BUDGET for project
records.
• CUSTOMER for records on each customer.
• SALES for sales information.
• COUNTRY for maintaining the currency for each country.
For an illustration of the database, see Appendix C: Example Database. For more
information on database design, see the Data Definition Guide.
Defining Domains
A domain is a customized column definition used in creating tables. A domain
allows you to define a column with complex characteristics that you can incorporate in many tables simply by referencing the domain name. This simplifies
data definition. Conceptually, a domain is like a user-defined data type.
For example, you could define a domain to use for all employee names in the
database. Then every time you need to define a column to contain a name in a
table, you can simply refer to the domain. This is a simple example, but you can
attach CHECK constraints and other advanced features to a domain definition.
Referring to the domain is then much easier than referring to the complex column definition.
Use the SQL statement CREATE DOMAIN to define a domain, including the
name of the domain, its data type, and optional characteristics like default value
and CHECK constraints. You can use the ALTER DOMAIN statement to change
the domain definition, and it changes in every table in which it is used. This simplifies maintenance and updating of the database.
Basic Data Definition
87
Defining domains is often one of the first steps in data definition, because you
can then use the domains in creating tables. The syntax to define domains consists of the keywords CREATE DOMAIN, followed by the name of the domain,
then the keyword AS, followed by the data type of the domain, and finally any
of the optional characteristics of the domain.
Not every column needs to be defined as a domain, but if it is something that is
likely to be used many times in the database, it is a good candidate. For now,
you will define domains for employees’ first and last names, employee number,
and department number.
First, define domains for employees’ first and last names and employee numbers. Type the following statements in the SQL Statement area. Be sure to click
on the Run button after typing each statement.
CREATE DOMAIN LASTNAME AS VARCHAR(20);
CREATE DOMAIN FIRSTNAME AS VARCHAR(15);
CREATE DOMAIN EMPNO AS SMALLINT;
If you typed the statements correctly, then each one will be echoed in the ISQL
Output area after it is executed.
Next, define a domain for department number. It is defined as a three-character
string. In addition to the data type, this domain includes CHECK constraints to
ensure that the department number is either “000”, alphabetically between “0”
and “999”, or NULL. Enter the following and then click on Run.
CREATE DOMAIN DEPTNO AS CHAR(3) CHECK
(VALUE = "000" OR
(VALUE > "0" AND VALUE <= "999")
OR VALUE IS NULL);
You can enter the statement on one line or on several lines to make it easier to
read.
Using Data Definition Files
To define the rest of the domains in the database, you can use a data definition
file. A data definition file (also referred to as an ISQL script file) contains ISQL
statements, and is created with an editor (such as Windows Notepad) and run
by Windows ISQL. Data definition files can be very useful, because you can
enter multiple SQL statements with all the tools that a text editor provides,
including cut, copy, and paste. This makes repetitive tasks much easier.
In practice, most data definition is performed using data definition files, because
they enable you to maintain a record of the DDL executed and allow you to
work in a text editor instead of command by command.
88
Local InterBase Server User’s Guide
The data definition files you will need are included in the EXAMPLES\TUTORIAL subdirectory of the InterBase directory. They all have file name extensions
of .SQL.
The file, DOMAINS.SQL, contains domain definitions. View this file with
Windows Notepad. The first line in the file is a CONNECT statement followed
by a dummy database name, user name, and password:
CONNECT "C:/path/mydb.gdb"
USER "myusername" PASSWORD "mypassword"
Important
Every ISQL script file must begin with a CONNECT statement (or a
CREATE DATABASE statement) to connect to a database.
Edit the file and change the database name, user name, and password.
You must make the same changes to the CONNECT statement at the beginning
of all the ISQL script files used in this tutorial. To save time, you can cut and
paste the information from one file to the others.
Now look at the rest of the file, DOMAINS.SQL. You will see that it contains a
number of CREATE DOMAIN statements:
CREATE DOMAIN ADDRESSLINE AS VARCHAR(30);
CREATE DOMAIN PROJNO
AS CHAR(5)
CHECK (VALUE = UPPER (VALUE));
CREATE DOMAIN CUSTNO
AS INTEGER
CHECK (VALUE > 1000);
. . .
To execute the statements in this file, choose File | Run ISQL Script.... The
following dialog box will appear:
This is the standard Windows Open dialog box. In the right side of the dialog
box, select the InterBase home directory, and then the EXAMPLES\TUTORIAL
directory. Select the file, DOMAINS.SQL, and choose OK. A dialog box will
appear, asking if you want to save the results to a file. Click on No, because you
want to see the results in the ISQL window.
Basic Data Definition
89
As Windows ISQL reads the script file, it will echo the statements to the ISQL
Output area.
To confirm the domains have been created, choose View | Metadata information..., select Domain from the drop-down list, and the click on OK. You should
see all the domains defined for the database displayed in the SQL Output area,
like this:
Starting Over
In the previous chapter, you created some simple tables and populated them
with data. Now its time to delete those tables and the data they contain so you
can create and populate a more complex database.
Before you can remove the tables, though, you have to make sure that ISQL will
release them. Depending on what you have been doing with ISQL, there may be
an active transaction. Choose File | Commit Work (if it is not dimmed) to end
any active transactions. If the menu selection is dimmed, then there is no transaction to commit.
Now you can remove these tables from the database. To do this, you will use the
DROP statement, which is used to delete metadata. Enter the following:
DROP TABLE EMPLOYEE;
DROP TABLE DEPARTMENT;
Because DDL statements are automatically committed by default, you do not
need to commit these statements to make them permanent. Confirm that the
tables are gone by choosing View | Metadata Information... and selecting Tables.
Now that you have deleted these two tables and all their data, you can move on
and create the EMPLOYEE sample database.
90
Local InterBase Server User’s Guide
Creating More Tables
Refresh your memory of CREATE TABLE syntax by entering the following statement:
CREATE TABLE COUNTRY
(COUNTRY COUNTRYNAME NOT NULL PRIMARY KEY,
CURRENCY VARCHAR(10) NOT NULL);
This defines a two-column table to hold the names of countries and their currencies. Notice the declaration of the COUNTRY column uses the
COUNTRYNAME domain instead of a standard data type.
Now you will move on to more complex tables using the domains you defined
in the previous section. The file, TABLES.SQL, contains statements to create the
rest of the tables in the database. Open the file with Notepad to view it.
Note
Do not forget to edit the CONNECT statement at the beginning of
TABLES.SQL and put in your database name, user name, and password.
The first table defined in the file is a more complex version of DEPARTMENT.
The definition looks like this:
CREATE TABLE DEPARTMENT
(DEPT_NO DEPTNO NOT NULL,
DEPARTMENT VARCHAR(25) NOT NULL UNIQUE,
HEAD_DEPT DEPTNO,
MNGR_NO EMPNO,
BUDGET BUDGET,
LOCATION VARCHAR(15),
PHONE_NO PHONENUMBER DEFAULT "555-1234",
PRIMARY KEY (DEPT_NO),
FOREIGN KEY (HEAD_DEPT) REFERENCES DEPARTMENT (DEPT_NO));
The second table defined in the file is named JOB, and defines job descriptions.
The next table is the complete EMPLOYEE table. The definition of this table is
central to this database:
CREATE TABLE EMPLOYEE
(EMP_NO EMPNO NOT NULL,
FIRST_NAME FIRSTNAME NOT NULL,
LAST_NAME LASTNAME NOT NULL,
PHONE_EXT VARCHAR(4),
HIRE_DATE DATE DEFAULT "NOW" NOT NULL,
DEPT_NO DEPTNO NOT NULL,
JOB_CODE JOBCODE NOT NULL,
JOB_GRADE JOBGRADE NOT NULL,
JOB_COUNTRY COUNTRYNAME NOT NULL,
SALARY SALARY NOT NULL,
FULL_NAME COMPUTED BY (LAST_NAME || "," || FIRST_NAME)),
Basic Data Definition
91
PRIMARY KEY (EMP_NO),
FOREIGN KEY (DEPT_NO) REFERENCES
DEPARTMENT (DEPT_NO),
FOREIGN KEY (JOB_CODE, JOB_GRADE, JOB_COUNTRY) REFERENCES
JOB (JOB_CODE, JOB_GRADE, JOB_COUNTRY),
CHECK (SALARY >= (SELECT MIN_SALARY FROM JOB WHERE
JOB.JOB_CODE = EMPLOYEE.JOB_CODE AND
JOB.JOB_GRADE = EMPLOYEE.JOB_GRADE AND
JOB.JOB_COUNTRY = EMPLOYEE.JOB_COUNTRY) AND
SALARY <= (SELECT MAX_SALARY FROM JOB WHERE
JOB.JOB_CODE = EMPLOYEE.JOB_CODE AND
JOB.JOB_GRADE = EMPLOYEE.JOB_GRADE AND
JOB.JOB_COUNTRY = EMPLOYEE.JOB_COUNTRY));
Notice the complex check constraint on SALARY. It states that the salary entered
for an employee has to be greater than the minimum salary for the employee’s
job (specified by JOB_CODE, JOB_GRADE, and JOB_COUNTRY) and less than
the corresponding maximum.
Skim the file, TABLES.SQL, and look at the rest of the table definitions. Make
sure you understand them. Notice that there is a CREATE INDEX statement
after each table definition. Indexes will be explained later in this chapter.
After editing the CONNECT statement at the beginning of the file, choose File |
Run an ISQL Script... and select TABLES.SQL.
Then confirm that the tables have been created by choosing View | Metadata
Information..., select Table, and choose OK. You will see a list of all the table
names in the ISQL Output area.
Creating Indexes
Indexes are used to improve the speed of data access for a table. An index identifies columns that can be used to efficiently retrieve and sort rows in the table.
Because a primary key uniquely identifies a row, it is often also defined as the
index of the table. The CREATE INDEX statement is used to define indexes in
SQL.
An index is based on one or more columns in a table. Indexes can also enforce
uniqueness and referential integrity constraints. A unique index will prevent
duplicate values in the columns in the index.
An index is created with the CREATE INDEX statement. Here is the simplified
syntax:
CREATE INDEX name ON table (columns)
92
Local InterBase Server User’s Guide
For example, TABLES.SQL created an index called NAMEX for the EMPLOYEE
table, as follows:
CREATE INDEX NAMEX ON EMPLOYEE (LAST_NAME, FIRST_NAME);
This statement defines an index called NAMEX for the LAST_NAME and
FIRST_NAME columns in the EMPLOYEE table.
Preventing Duplicate Row Entries
To define an index that eliminates duplicate entries, include the UNIQUE
keyword in CREATE INDEX. After a unique index is defined, users cannot
insert or update values in indexed columns if the same values already exist
there.
TABLES.SQL defined a unique index named PRODTYPEX, on the PROJECT
table as follows:
CREATE UNIQUE INDEX PRODTYPEX ON PROJECT (PRODUCT, PROJ_NAME);
Note
For unique indexes defined on multiple columns, like PRODTYPEX in the
example above, the same value may be entered within individual columns,
but the combination of values entered in all columns defined for the index
must be unique.
Modifying Indexes
You can modify an index definition to change the columns that are indexed,
prevent insertion of duplicate entries, or specify a different sort order.
To change the definition of an index, follow these steps:
1. Use ALTER INDEX to make the current index inactive.
2. Drop the current index.
3. Create a new index and give it the same name as the dropped index.
Choose View | Metadata Information... and select Index from the drop-down
list of object types. Enter NAMEX in the Object Name field. The ISQL Output
area will display the definition of the index:
NAMEX INDEX ON EMPLOYEE (LAST_NAME, FIRST_NAME)
For example, suppose you need to prevent duplicate entries in the NAMEX
index you defined for the EMPLOYEE table with a UNIQUE keyword. First,
make the current index inactive, then drop it. Enter:
Basic Data Definition
93
ALTER INDEX NAMEX INACTIVE;
DROP INDEX NAMEX;
Then redefine NAMEX to include the UNIQUE keyword:
CREATE UNIQUE INDEX NAMEX ON EMPLOYEE (LAST_NAME, FIRST_NAME);
This index will now prevent entries in the EMPLOYEE table with the same first
and last names as an existing row.
For more information about altering indexes, see the Data Definition Guide.
Creating Views
A view is a virtual table. Views are not physically stored in the database, but
appear exactly like “real” tables. A view can contain data from one or more
tables or other views and can store an often-used query or set of queries in the
database. The CREATE VIEW statement is used to define views in SQL.
You are now going to create a view called PHONE_LIST that maintains a phone
list of employees from the EMPLOYEE and DEPARTMENT tables.
Enter the following statement:
CREATE VIEW PHONE_LIST AS
SELECT EMP_NO, FIRST_NAME, LAST_NAME, PHONE_EXT, LOCATION, PHONE_NO
FROM EMPLOYEE, DEPARTMENT
WHERE EMPLOYEE.DEPT_NO = DEPARTMENT.DEPT_NO;
This statement creates a view called PHONE_LIST from columns in the
EMPLOYEE and DEPARTMENT tables. After you populate these tables with
data you will be able to query this view just as you would a table.
Moving On
You have created all the tables for the full EMPLOYEE database. In the next
chapter, you will populate the database, that is, add data to it.
94
Local InterBase Server User’s Guide
CHAPTER 8
Populating the Database
8
In this chapter, you will populate (add data to) the database created in the previous chapter and manipulate the data using the SQL statements:
• INSERT, to add data to the database.
• UPDATE, to modify data in the database.
• DELETE, to eliminate data from the database.
You will also create a simple view and select data from it.
Inserting Data
You previously learned the basic form of the INSERT statement:
INSERT INTO table_name (col1, col2, ...) VALUES (val1, val2, ...);
Now, you will use this form again to insert data into the EMPLOYEE database.
Inserting Data Using Column Values
Open the file, INSERTS.SQL, with a text editor. It contains a number of INSERT
statements to add data to the database. The first group of statements inserts values into the COUNTRY table, for example:
INSERT INTO COUNTRY (COUNTRY, CURRENCY) VALUES ("USA", "DOLLAR");
The next group inserts values into the DEPARTMENT table. For example:
INSERT INTO DEPARTMENT
(DEPT_NO, DEPARTMENT, HEAD_DEPT, BUDGET, LOCATION, PHONE_NO)
VALUES
("000", "CORPORATE HEADQUARTERS", NULL, 1000000, "MONTEREY",
"(408) 555-1234");
There are groups of statements to populate the JOB and EMPLOYEE tables also.
Populating the Database
95
Make sure the CONNECT statement at the beginning of the file contains the correct database name, user name, and password. Choose File | Run an ISQL
Script... and then select INSERTS.SQL to execute the script and insert the data
into the tables.
To make the changes to the database permanent, you must commit your work
by choosing File | Commit Work.
Confirm that the data has been inserted correctly with SELECT, for example:
SELECT * FROM DEPARTMENT;
Try selecting from the COUNTRY, JOB, and EMPLOYEE tables, too. Notice that
all the data in the LANGUAGE_REQ column in the JOB table is NULL. This is
because this column is an array, and you cannot insert data into an array using
ISQL.
The script file, INSERTS2.SQL, inserts data into the other tables in the database.
View this file and then run INSERTS2.SQL by choosing File | Run an ISQL
Script.... Commit the changes to the database, by choosing File | Commit Work.
SELECT from the PROJECT, CUSTOMER, and SALES tables to confirm that the
data has been successfully inserted. Notice that all the data in the PROJ_DESC
column of the PROJECT table is NULL. This is because this column is a BLOB,
and you cannot insert data into a BLOB using ISQL.
Inserting Data From an External File
Note
This section covers an optional topic and may be skipped without losing
any continuity. However, it is an important topic not covered in detail elsewhere in the documentation.
An external table is a special kind of table that stores its data in an ASCII file separate from the database. It may occasionally want to import data from an ASCII
file into a database (for example, if the data was originally entered in another
application or at a remote location).
You can populate a table with data from a formatted ASCII file by following
these steps:
1. Create the table you want to populate. Often this table will already exist
in the database.
2. Create an ASCII file on the server containing the data, formatted strictly to
conform to the column definitions of the table in step one. Depending on
how the file originated (for example, from a desktop application), you
may have to edit the file manually with a text editor to ensure that it is
formatted correctly.
96
Local InterBase Server User’s Guide
3. Create a temporary external table that has all the columns that will get
data from the external file. It is usually easiest to create all the fields as
CHAR(n), even if they will contain numeric data. The table must also
have a CHAR(1) column (usually called EOL) to take the end-of-line
character.
4. Insert the data into the destination table using INSERT with a SELECT
clause. InterBase’s automatic type conversion feature will ensure that the
data in each column is automatically converted from CHAR to the
appropriate data type.
For example, suppose a salesman on the road has been keeping his sales records
on his laptop computer in a spreadsheet application. When he gets back to the
office, one way he could enter these records into the SALES table would be to
export the information to a text file and then import the data into the database
through an external table. So, in this example, you do not need to perform step
one, because the SALES table already exists in the database.
The next step is to create the data file. The sales data is in the file, SALES.DAT, in
the EXAMPLES\TUTORIAL directory. View this file now with the Notepad editor. It looks something like this:
V92E0340
V92J1003
V93J2004
1004
1010
1010
11
61
118
shipped
shipped
shipped
15-OCT-1992
26-JUL-1992
30-OCT-1993
16-OCT-1992
4-AUG-1992
2-DEC-1993
17-OCT-1992 y
15-SEP-1992 y
15-NOV-1993 y
The lines are too wide to display above, so only the leftmost portion of each line
is shown. You can scroll the Notepad window to the right to see the remainder
of each line.
Each line in this file corresponds to a row of data (record) in the SALES table,
and each item of text on a line is a value to be inserted into a field in the row. The
text is padded with spaces where necessary to make each field have the specified
number of characters, even at the end of each line. The first item in each line (for
example “V92E0340”) is a value for the PONUMBER column, the second (for
example “1004”) is a value for the CUST_NO column, and so on. It is crucial that
the items on each line always are in the same order.
For the server to be able to access this file, you must copy it to the server platform (to a disk to which the server has direct access). Use the standard FTP utility or operating system copy command to copy SALES.DAT to the directory on
the server where your database resides. That completes step two of the process.
The next step is to create a temporary external table in the database called
SALES_EXT. Look at the file, SALES_XT.SQL. It contains the following CREATE
TABLE statement:
CREATE TABLE SALES_EXT EXTERNAL "/PATH/SALES.DAT"
Populating the Database
97
(PO_NUMBER CHAR(10),
CUST_NO CHAR(12),
SALES_REP CHAR(10),
ORDER_STATUS CHAR(13),
ORDER_DATE CHAR(12),
SHIP_DATE CHAR(12),
DATE_NEEDED CHAR(12),
PAID CHAR(7),
QTY_ORDERED CHAR(12),
TOTAL_VALUE CHAR(12),
DISCOUNT CHAR(16),
ITEM_TYPE CHAR(8),
EOL CHAR(1));
Notice the keyword EXTERNAL at the top, followed by a file path in quotes.
You must edit this path to specify the location on the server to which you copied
SALES.DAT in the previous step. All the columns in SALES_EXT are defined as
CHAR (character) values. Notice also the EOL column. This is a dummy column
to contain the carriage return at the end of each line of data in SALES.DAT.
Input this definition by choosing File | Run an ISQL Script... and selecting
SALES_XT.SQL in the EXAMPLES\TUTORIAL directory. At this point, you
have an external table which has data stored in a file on the server. You can
query data from this table as if it were an ordinary table, but you cannot modify
the data, because it does not actually reside in the database, but in the file. Enter
the following statement:
SELECT * FROM SALES_EXT;
You will see the data from the data file in the ISQL Output area. Now you have
completed step three of the procedure.
In the final step, you will migrate the data from the external table into the real
SALES table. Look at the file, MIGRATE.SQL. It contains the following INSERT
statement:
INSERT INTO SALES
(PO_NUMBER, CUST_NO, SALES_REP, ORDER_STATUS, ORDER_DATE, SHIP_DATE,
DATE_NEEDED, PAID, QTY_ORDERED, TOTAL_VALUE, DISCOUNT, ITEM_TYPE)
SELECT
PO_NUMBER, CUST_NO, SALES_REP, ORDER_STATUS, ORDER_DATE, SHIP_DATE,
DATE_NEEDED, PAID, QTY_ORDERED, TOTAL_VALUE, DISCOUNT, ITEM_TYPE
FROM SALES_EXT;
This statement selects values from the SALES_EXT table (excluding the EOL
delimiter) and inserts them into rows in the SALES table, migrating the data
from the file to the SALES table.
Edit the CONNECT statement at the beginning of this file and specify the server
and database you are using. Then input this statement by choosing File | Run
98
Local InterBase Server User’s Guide
ISQL Script... and choosing MIGRATE.SQL from the EXAMPLES\TUTORIAL
directory.
Now enter:
SELECT * FROM SALES;
and you will see the data that was in the SALES.DAT file has been inserted into
the SALES table. Notice that the non-character columns have been converted to
the appropriate data type automatically.
Updating Data
To change values for one or more rows of data, use the UPDATE statement. A
simple update has the following syntax:
UPDATE table
SET column = value
WHERE condition
The UPDATE statement changes values for columns specified in the SET clause;
columns not listed in the SET clause are not changed. To update more than one
column, list each column assignment in the SET clause, separated by a comma.
The WHERE clause determines which rows to update.
For example, increase the salary of salespeople by $2,000, by updating the
EMPLOYEE table as follows:
UPDATE EMPLOYEE
SET SALARY = SALARY + 2000
WHERE JOB_CODE = "SALES";
To make a more specific update, make the WHERE clause more restrictive. For
example, instead of increasing the salary for all salespeople, you could increase
the salaries only of salespeople hired before January 1, 1992:
UPDATE EMPLOYEE
SET SALARY = SALARY + 2000
WHERE JOB_CODE = "SALES" AND HIRE_DATE < "01-Jan-1992";
A WHERE clause is not required for an update. If the previous statements did
not include a WHERE clause, the update would increase the salary of all
employees in the EMPLOYEE table.
Be sure to commit your work to make it permanent by choosing File | Commit
Work.
Populating the Database
99
Updating With a Script File
Open the file, UPDATES.SQL, with Notepad. As you can see, it contains a
number of UPDATE statements to update the DEPARTMENT, EMPLOYEE,
SALARY_HISTORY, and CUSTOMER tables.
Run this file by choosing File | Run ISQL Script.... Confirm that the updates
have been made.
Updating Using a Subquery
The search condition of a WHERE clause can be a subquery. Suppose you want
to change the manager of all employees in the same department as Katherine
Young. One way to do this is to first determine Katherine Young’s department
number:
SELECT DEPT_NO FROM EMPLOYEE
WHERE FULL_NAME = "Young, Katherine";
This query returns “623” as the department. Then, using 623 as the search condition in an UPDATE, you could change the manager number of all the employees
in the department with the following statement (do not enter this statement):
UPDATE EMPLOYEE
SET MNGR_NO = 107
WHERE DEPT_NO = "623";
Instead of doing this, a more efficient way is to combine the two statements
together using a subquery as follows. Enter this statement:
UPDATE EMPLOYEE
SET MNGR_NO = 107
WHERE DEPT_NO = (SELECT DEPT_NO FROM EMPLOYEE
WHERE FULL_NAME = "Young, Katherine");
Confirm the result by selecting from the department table, and then choose File
| Commit Work to make the update permanent.
Deleting Data
To remove one or more rows of data from a table, use the DELETE statement. A
simple DELETE has the following syntax:
DELETE FROM table
WHERE condition
100
Local InterBase Server User’s Guide
As with UPDATE, the WHERE clause specifies a search condition that determines the rows to delete. Search conditions can be combined or can be formed
using a subquery.
Caution
A WHERE clause is not required in a DELETE statement. If you fail to
include a WHERE clause, you will delete all rows in the table.
Enter the following statement to delete rows from the EMPLOYEE table for
which the JOB_CODE column is “MNGR.” In other words, managers are
removed from the table. Enter:
DELETE FROM EMPLOYEE
WHERE JOB_CODE = "Mngr";
You can restrict deletions further by combining search conditions. For example,
enter the following statement to delete records of all sales reps hired before
10 July 1993:
DELETE FROM EMPLOYEE
WHERE JOB_CODE = "Srep" AND HIRE_DATE < "10-Jul-1993";
Confirm that these statements deleted the appropriate records by entering the
following query
SELECT EMP_NO, JOB_CODE, HIRE_DATE FROM EMPLOYEE;
You should not see any records with a JOB_CODE of “Mngr” or any records
with a JOB_CODE of “SRep” and a hire date before 10 July 1993.
Because you really did not want to delete those records from the table, roll back
the changes to the database by choosing File | Rollback Work. Choose Previous
to recall the previous SELECT query and then Run to run it. You should now see
the deleted records displayed.
Caution
If you do not rollback these deletes, you will not get the correct results
when you do the rest of the tutorial.
Deleting Data Using a Subquery
The previous section used a subquery to update data. DELETE statements can
also use subqueries.
To remove all employees who are in the same department as Katherine Young,
including Katherine Young herself, you could first determine Katherine Young’s
department number:
SELECT DEPT_NO FROM EMPLOYEE
WHERE FULL_NAME = "Young, Katherine";
Populating the Database
101
This query returns “623” as the department number. Then, using 623 as the
search condition in a DELETE, you would enter :
DELETE FROM EMPLOYEE
WHERE DEPT_NO = "623";
The other way to remove the desired rows is to combine the two previous statements using a subquery. In this case, the DELETE statement becomes:
DELETE FROM EMPLOYEE
WHERE DEPT_NO = (SELECT DEPT_NO FROM EMPLOYEE
WHERE FULL_NAME = "Young, Katherine");
Try this and confirm that it deletes the appropriate rows. Roll back the deletions
by choosing File | Rollback Work.
102
Local InterBase Server User’s Guide
CHAPTER 9
Retrieving Data
9
The SELECT statement was introduced in Chapter 4. This chapter provides further practice with this important SQL statement.
Overview of SELECT
Chapter 6: “Getting Started With Windows ISQL”presented the simplest form of
the SELECT statement. The full syntax is much more complex; take a minute to
look at the Language Reference entry for SELECT. Much of SELECT’s power
comes from the rich syntax it allows.
In this chapter, you will learn a distilled version of SELECT syntax:
SELECT [DISTINCT] columns
FROM tables
WHERE <search_conditions>
[GROUP BY column HAVING <search_condition>]
ORDER BY <sort_order>;
This distilled version of SELECT has six main keywords. A keyword and its
associated information is called a clause.
The clauses are:
Table 9-1:
Retrieving Data
SELECT Keywords
Clause
Description
SELECT columns
Lists columns to retrieve.
DISTINCT
Optional keyword that eliminates duplicate rows.
FROM tables
Identifies the tables to search for values.
WHERE
<search_conditions>
Specifies the search conditions used to limit retrieved rows to
a subset of all available rows.
GROUP BY column
Groups rows retrieved according the value of the specified
column.
103
Table 9-1:
SELECT Keywords (Continued)
Clause
Description
HAVING
<search_conditions>
Specifies search condition to use with GROUP BY clause.
ORDER BY <sort_order> Specifies the sort order of rows returned by a SELECT.
The order of the clauses in the SELECT statement is important, but SELECT and
FROM are the only required clauses.
You have already used some basic SELECT statements to retrieve data from single tables. SELECT can also retrieve data from multiple tables, by listing the
table names in the FROM clause, separated by commas. For example, enter the
following SQL statement:
SELECT DEPARTMENT, DEPT_NO, FULL_NAME, EMP_NO
FROM DEPARTMENT, EMPLOYEE
WHERE DEPARTMENT = "Engineering" AND MNGR_NO = EMP_NO;
This statement retrieves the specified fields for the employee who is the manager of the Engineering department.
Sometimes, a column name occurs in more than one table in the same query. If
so, columns must be distinguished from one another by preceding each column
name with the table name and a dot (.).
Selecting From a View
Recall the view named PHONE_LIST you created in Chapter 7: “Basic Data Definition”. You can select from this view just like a table. Try this by entering the
statement:
SELECT * FROM PHONE_LIST;
You will see output like this:
EMP_NO
======
12
105
85
....
FIRST_NAME
==========
Terri
Oliver H.
Mary S.
LAST_NAME
=========
Lee
Bender
MacDonald
PHONE_EXT
=========
256
255
477
LOCATION
===========
Monterey
Monterey
San Francisco
PHONE_NO
===============
(408) 555-1234
(408) 555-1234
(415) 555-1234
As you can see, the output looks just as if there were a table called PHONE_LIST
containing the pertinent information.
104
Local InterBase Server User’s Guide
Removing Duplicate Rows With DISTINCT
Suppose you want to retrieve a list of all the valid job codes in the EMPLOYEE
database. Enter this query:
SELECT JOB_CODE FROM JOB;
As you can see, the results of this query are rather long, and some job codes are
repeated a number of times. What you really want is a list of job codes where
each value returned is distinct from the others. To eliminate duplicate values,
use the DISTINCT keyword.
Revise the previous query by clicking on the Previous button and editing the
command as follows:
SELECT DISTINCT JOB_CODE FROM JOB;
As you can see, each job code is listed once in the results.
What happens if you specify another column when using DISTINCT? Enter the
following SELECT statement:
SELECT DISTINCT JOB_CODE, JOB_GRADE FROM JOB;
This query produces:
JOB_CODE JOB_GRADE
======== =========
Accnt
4
Admin
4
Admin
5
CEO
1
CFO
1
Dir
2
Doc
3
Doc
5
Eng
2
Eng
3
Eng
4
Eng
5
. . .
DISTINCT applies to all columns listed in a SELECT statement. In this case,
duplicate job codes are retrieved. However, DISTINCT treats the job code and
job grade together, so the combination of values is distinct.
Retrieving Data
105
Using the WHERE Clause
The WHERE clause of the SELECT statement follows the SELECT and FROM
clauses. If an ORDER BY clause is used, the WHERE clause must precede it. The
WHERE clause tests data to see whether it meets certain conditions, and the
SELECT statement only returns the rows that meet the condition. For example,
the statement:
SELECT LAST_NAME, FIRST_NAME, PHONE_EXT
FROM EMPLOYEE
WHERE LAST_NAME = "Green";
returns only rows for which LAST_NAME is “Green”. The text following the
WHERE keyword, in this case:
LAST_NAME = "Green"
is called a search condition, because a SELECT statement searches for rows that
meet the condition. Search conditions have the following general form:
WHERE condition;
In this clause:
condition = column operator value [log_operator condition]
value = value arith_operator value
column is the column name in the table being queried, operator is a comparison
operator (described in the following table), value is a value or a range of values
compared against the column, described in the next table. A condition can be
composed of two or more conditions as operands of logical operators. A value
can be composed of two or more values as operands of arithmetic operators.
Search conditions use the following types of operators:
Table 9-2:
106
Search Condition Operators
Operator
Description
Comparison operators
Used to compare data in a column to a value in the search
condition. Examples include <, >, <=, >=, =, and <>. Other
operators include BETWEEN, CONTAINING, IN, IS NULL,
LIKE, and STARTING WITH.
Arithmetic operators
Used to calculate and evaluate search condition values. The
operators are +, -, *, and /.
Logical operators
Used to combine search conditions or negate a condition. The
keywords NOT, AND, and OR.
Local InterBase Server User’s Guide
Search conditions can use the following types of values:
Table 9-3:
Search Condition Values
Types of Values
Description
Literal values
Numbers and text strings whose value you want to test literally
(for example the number 1138 or the string “Smith”).
Derived values
Functions and arithmetic expressions, for example:
SALARY * 2 or LAST_NAME || FIRST_NAME.
Subqueries
A nested SELECT statement that returns one or more values.
The returned values are used in testing the search condition.
When a row is compared to a search condition, one of three values is returned:
• True: A row meets the conditions specified in the WHERE clause.
• False: A row does not meet the conditions specified in the WHERE
clause.
• Unknown: A field in the WHERE clause contains an unknown value that
could not be evaluated because of a NULL value.
Comparison Operators
InterBase uses all the standard comparison operators: greater than (>), less than
(<), equal to (=), and so on. These operators can be used to compare numeric or
alphabetic (text) values. Text literals must be quoted. Numeric literals must not
be quoted.
A previous example had a WHERE clause that compared a column to a literal
value:
SELECT LAST_NAME, FIRST_NAME, PHONE_EXT
FROM EMPLOYEE
WHERE LAST_NAME = "Green";
This query will retrieve records from the EMPLOYEE table for which the last
name is “Green”. If you change the equal sign to a greater than (>) sign, it will
retrieve rows for which the last name is alphabetically greater than (after)
“Green”. Likewise, if you change it to less than (<). Try these different queries to
see how the results change.
You can negate any expression with the negation operators !, ^, and ~. These
operators are all synonyms for NOT. For example, to retrieve all rows except
those for which the last name is “Green”, change the search condition to:
WHERE NOT (LAST_NAME = “Green”
Retrieving Data
107
Try negating some of the previous queries to see how the results change.
Pattern Matching
Besides comparing values, search conditions can also test character strings for a
particular pattern. If data is found that matches a given pattern, the row is
retrieved.
There are a great many pattern matching operators. This section will only discuss some of the most commonly used ones: LIKE, STARTING WITH, IS NULL,
and BETWEEN.
LIKE Operator
The LIKE operator lets you use wildcard characters in matching text. Wildcard
characters are characters that have special meanings when used in a search condition. A percent sign (%) will match zero or more characters. An underscore (_)
will match any single character.
For example, enter this statement in the SQL Statement area:
SELECT LAST_NAME, FIRST_NAME, EMP_NO FROM EMPLOYEE
WHERE LAST_NAME LIKE "%an";
You should see the following results:
LAST_NAME
====================
Ramanathan
Steadman
FIRST_NAME
===============
Ashok
Walter
EMP_NO
======
45
46
As you can see from the results, this statement retrieves rows for employees
whose last names end with “an”, because the percent sign will match any characters. LIKE distinguishes between uppercase and lowercase.
Now enter the following statement:
SELECT LAST_NAME, FIRST_NAME, EMP_NO FROM EMPLOYEE
WHERE LAST_NAME LIKE "_e%";
This statement retrieves rows for employees whose last name has “e” as the second letter. The underscore will match any one character in the last name.
STARTING WITH Operator
The STARTING WITH operator tests whether a value starts with a particular
character or sequence of characters. As with the LIKE operator, STARTING
108
Local InterBase Server User’s Guide
WITH distinguishes between uppercase and lowercase. STARTING WITH does
not support wildcard characters.
The following statement retrieves employee last names that start with “Ke”:
SELECT LAST_NAME, FIRST_NAME
FROM EMPLOYEE
WHERE FIRST_NAME STARTING WITH "Ke";
The CONTAINING operator is similar to STARTING WITH, except it matches
strings containing the specified string, anywhere, within the string.
Testing for an Unknown Value
Another type of comparison tests for the absence or presence of a value. Use the
IS NULL operator to test whether a value is unknown (that is, absent). To test for
the presence of any value, use IS NOT NULL.
For example, to retrieve the names of employees who do not have phone extensions, enter:
SELECT LAST_NAME, FIRST_NAME
FROM EMPLOYEE
WHERE PHONE_EXT IS NULL;
You should see the following results:
LAST_NAME
====================
Sutherland
Glon
Osborne
FIRST_NAME
===========
Claudia
Jacques
Pierre
To retrieve the names of employees who do have phone extensions, enter:
SELECT LAST_NAME, FIRST_NAME, PHONE_EXT
FROM EMPLOYEE
WHERE PHONE_EXT IS NOT NULL;
The results should be all the employee records except the three retrieved by the
previous query.
Comparing Against a Range or List of Values
The previous sections described operators to compare columns to a single value.
The BETWEEN and IN operators enable comparison against multiple values.
Retrieving Data
109
BETWEEN tests whether a value falls within a range. For example, to retrieve
names of employees whose salaries are between $100,000 and $250,000, inclusive, enter:
SELECT LAST_NAME, FIRST_NAME
FROM EMPLOYEE
WHERE SALARY BETWEEN 100000 AND 250000;
The IN operator searches for values matching one of the values in a list. For
example, to retrieve the names of all employees in departments 120, 600, and
623, enter:
SELECT DEPT_NO, LAST_NAME, FIRST_NAME FROM EMPLOYEE
WHERE DEPT_NO IN (120, 600, 623);
The values in the list must be separated by commas, and the list must be
enclosed in parentheses. Use NOT IN to search for values that do not occur in a
set.
Logical Operators
Up until now, the examples presented have included only one search condition.
However, you can include any number of search conditions in a WHERE clause
by combining them with the logical operators AND or OR.
When AND appears between search conditions, both conditions must be true
for a row to be retrieved. For example, enter this query:
SELECT DEPT_NO, LAST_NAME, FIRST_NAME, HIRE_DATE
FROM EMPLOYEE
WHERE DEPT_NO = 623 AND HIRE_DATE > "01-Jan-1992";
The query returns information on employees in department 623 who were hired
after 1 January 1992.
When OR appears between search conditions, either search condition can be
true for a row to be retrieved. Choose Previous to recall the previous query and
change AND to OR. As you can see, the results are quite different, because the
query retrieves rows for employees who are in department 623 or who were
hired before 1 January 1992.
As another example of using OR in a search condition, enter this query:
SELECT CUSTOMER, CUST_NO
FROM CUSTOMER
WHERE COUNTRY = "USA" OR COUNTRY = "Canada";
This query retrieves customer records for customers in the US or Canada.
110
Local InterBase Server User’s Guide
Controlling the Order of Evaluation
When entering compound search conditions, you must be aware of the order of
evaluation of the conditions. Suppose you want to retrieve employees in department 623 or department 600 who have a hire date later than 1 January 1992. Try
entering this query:
SELECT LAST_NAME, FIRST_NAME, HIRE_DATE, DEPT_NO
FROM EMPLOYEE
WHERE DEPT_NO = 623 OR DEPT_NO = 600
AND HIRE_DATE > "01-JAN-1992";
As you can see, the results include employees hired earlier than you want:
LAST_NAME
====================
Young
De Souza
Phong
Brown
Parker
Johnson
FIRST_NAME
===============
Katherine
Roger
Leslie
Kelly
Bill
Scott
HIRE_DATE
===========
14-JUN-1990
18-FEB-1991
3-JUN-1991
4-FEB-1993
1-JUN-1993
13-SEP-1993
DEPT_NO
=======
623
623
623
600
623
623
The WHERE clause was not interpreted the way you meant it because AND has
higher precedence than OR. This means that the expressions on either side of AND
are tested before those associated with OR. In the example as written, the search
conditions are interpreted as follows:
(WHERE DEPT_NO = 623)
OR
(WHERE DEPT_NO = 600 AND HIRE_DATE > "01-JAN-1992")
The restriction on the hire date applies only to the second department. Employees in department 623 are listed regardless of hire date.
Use parentheses to override normal precedence. In the example, place parentheses around the two departments so they are tested against the AND operator as
a unit:
SELECT LAST_NAME, FIRST_NAME, HIRE_DATE, DEPT_NO
FROM EMPLOYEE
WHERE (DEPT_NO = 623 OR DEPT_NO = 600)
AND HIRE_DATE > "01-JAN-1992";
This displays the results you want:
LAST_NAME
====================
Brown
Parker
Johnson
Retrieving Data
FIRST_NAME
HIRE_DATE
=============== ===========
Kelly
4-FEB-1993
Bill
1-JUN-1993
Scott
13-SEP-1993
DEPT_NO
=======
600
623
623
111
Order of precedence is not just an issue for AND and OR. All operators are
defined with a precedence level that determines their order of interpretation. For
detailed information about operator precedence, see the Programmer’s Guide.
Tip
To avoid confusion with operator precedence, always use parentheses to
group operations in complex search conditions.
Using Subqueries
Suppose you want to retrieve a list of employees who work in the same country
as a particular employee whose ID is 144. You would first need to find out what
country this employee works in. Enter this query:
SELECT JOB_COUNTRY FROM EMPLOYEE
WHERE EMP_NO = 144;
This query returns “USA.” With this information, you can form your next query:
SELECT EMP_NO, LAST_NAME FROM EMPLOYEE
WHERE JOB_COUNTRY = "USA";
This query returns a list of employees in the USA, the same country as employee
number 144. You can obtain the same result by combining the two queries:
SELECT EMP_NO, LAST_NAME FROM EMPLOYEE
WHERE JOB_COUNTRY =
(SELECT JOB_COUNTRY FROM EMPLOYEE
WHERE EMP_NO = 144);
This statement uses a subquery, a SELECT statement inside the WHERE clause of
another SELECT statement. A subquery works like a search condition to restrict
the number of rows returned by the outer, or parent, query.
In this case, the subquery retrieves a single value, “USA.” The main query interprets “USA” as a value to be tested by the WHERE clause. Because the WHERE
clause is testing for a single value, the subquery must return a single value; otherwise, the statement produces an error. As long as a subquery retrieves a single
value, you can use it in any search condition that tests for a single value.
If a subquery returns more than one value, you must use an operator that tests
against more than one value. IN is such an operator. The following example
retrieves all management-level employees. It uses a subquery that returns any
job grade lower than or equal to 2:
SELECT FIRST_NAME, LAST_NAME
FROM EMPLOYEE
WHERE JOB_GRADE IN
(SELECT JOB_GRADE FROM JOB WHERE JOB_GRADE <= 2);
112
Local InterBase Server User’s Guide
Conditions for Subqueries
The following table summarizes the operators that compare a value on the left of
the operator to the results of a subquery to the right of the operator:
Table 9-4:
InterBase Comparison Operators Requiring Subqueries
Operator
Purpose
ALL
Returns true if a comparison is true for all values returned by a subquery.
ANY or SOME
Returns true if a comparison is true for at least one value returned by a
subquery.
EXISTS
Determines if a value exists in at least one value returned by a subquery.
SINGULAR
Determines if a value exists in exactly one value returned by a subquery.
Suppose you want to see how salaries compare to the salaries of employees in
department 623. First you would need an expression that returns employee salaries for department 623. The following query returns that information:
SELECT SALARY FROM EMPLOYEE
WHERE DEPT_NO = 623;
and produces this output:
SALARY
=========
67241.25
69482.62
56034.38
35000.00
60000.00
The previous query can now be used as a subquery in the next several examples.
To see which employees have the same salary as those in department 623, enter:
SELECT LAST_NAME, DEPT_NO FROM EMPLOYEE
WHERE SALARY IN
(SELECT SALARY FROM EMPLOYEE WHERE DEPT_NO = 623);
The IN operator tests whether a value equals one of the values in a list. In this
case, the value being tested is SALARY, and the list comes from a subquery. The
statement yields this output:
LAST_NAME
DEPT_NO
==================== =======
Hall
900
Retrieving Data
113
Young
De Souza
Phong
Parker
Johnson
Montgomery
623
623
623
623
623
672
The output shows that two employees, Hall and Montgomery, earn the same as
someone in department 623.
Using ALL
The IN operator tests only against the equality of a list of values. What if you
want to test some relationship other than equality? For example, suppose you
want to find out who earns more than the people in department 623. Enter the
following query:
SELECT LAST_NAME, SALARY FROM EMPLOYEE
WHERE SALARY > ALL
(SELECT SALARY FROM EMPLOYEE WHERE DEPT_NO = 623);
to yield this output:
LAST_NAME
SALARY
==================== =======
Nelson
105900.00
Young
97500.00
Lambert
102750.00
Forest
75060.00
. . .
This example uses the ALL operator. The statement tests against all values in the
subquery. If the salary is greater, the row is retrieved. The manager of department 623 can use this output to see which company employees earn more than
his or her employees.
Using ANY, EXISTS, and SINGULAR
Instead of testing against all values returned by a subquery, you can rewrite the
example to test for at least one value. Enter this query:
SELECT LAST_NAME, SALARY FROM EMPLOYEE
WHERE SALARY > ANY
(SELECT SALARY FROM EMPLOYEE WHERE DEPT_NO = 623);
This statement retrieves rows for which SALARY is greater than any of the values from the subquery, so this statement retrieves records of employees whose
114
Local InterBase Server User’s Guide
salary is greater than any salary in department 623. The ANY keyword has a
synonym, SOME. The two are interchangeable.
Two other subquery operators are EXISTS and SINGULAR. For a given value,
EXISTS tests whether at least one qualifying row meets the search condition specified in a subquery. EXISTS returns either true or false, even when handling
NULL values. For a given value, SINGULAR tests whether exactly one qualifying
row meets the search condition specified in a subquery.
Using Aggregate Functions
SQL provides aggregate functions that calculate a single value from a group of
values. A group of values is all data in a particular column for a given set of
rows, such as the job code listed in all rows of the JOB table. Aggregate functions
may be used in a SELECT clause, or anywhere a value is used in a SELECT statement.
The following table lists the aggregate functions supported by InterBase:
Table 9-5:
Aggregate Functions
Function
What It Does
AVG(value)
Returns the average value for a group of rows.
COUNT(value)
Counts the number of rows that satisfy the WHERE clause.
MIN(value)
Returns the minimum value in a group of rows.
MAX(value)
Returns the maximum value in a group of rows.
SUM(value)
Adds numeric values in a group of rows.
For example, suppose you want to know how many different job codes are in the
JOB table. Enter the following statement:
SELECT COUNT(JOB_CODE) FROM JOB;
The result is:
COUNT
===========
31
However, this is not what you want, because the query included duplicate job
codes in the count. To count only the unique job codes, use the DISTINCT keyword as follows:
SELECT COUNT(DISTINCT JOB_CODE) FROM JOB;
Retrieving Data
115
This produces the correct result:
COUNT
===========
14
Enter the following query to retrieve the average salary of employees from the
EMPLOYEE table:
SELECT AVG(SALARY) FROM EMPLOYEE;
A single SELECT can retrieve multiple aggregate functions. Enter this statement
to retrieve the number of employees, the earliest hire date, and the total salary
paid to all employees:
SELECT COUNT(EMP_NO), MIN(HIRE_DATE), SUM(SALARY)
FROM EMPLOYEE;
The result is:
COUNT
MIN
SUM
=========== =========== ======================
42 28-DEC-1988
115530468.00
Sometimes, a value involved in an aggregate calculation is NULL or unknown.
In this case, the function ignores the entire row to prevent wrong results. For
example, when calculating an average over fifty rows, if ten rows contain a
NULL value, then the average is taken over forty values, not fifty.
Grouping Query Results
You can use the optional GROUP BY clause to organize data retrieved from
aggregate functions. Each column name that appears in a GROUP BY clause
must also appear in the SELECT clause. And each SELECT clause in a query can
have only one GROUP BY clause.
Suppose you want to display the maximum allowable salary for each job code
and job grade in the United States. Enter this query:
SELECT JOB_CODE, JOB_GRADE, MAX_SALARY
FROM JOB WHERE JOB_COUNTRY = "USA";
You should see these results (shown in part):
JOB_CODE JOB_GRADE
MAX_SALARY
======== ========= ======================
CEO
1
250000.00
CFO
1
140000.00
VP
2
130000.00
116
Local InterBase Server User’s Guide
Dir
Mngr
Mngr
Admin
Admin
. . .
2
3
4
4
5
120000.00
100000.00
60000.00
55000.00
40000.00
Now suppose you want to total the salaries for each group of job codes. In other
words, find the maximum total possible salary for all job codes, regardless of job
grade. To do so, use the SUM() function and group the results by job code. Enter
the following query:
SELECT JOB_CODE, SUM(MAX_SALARY)
FROM JOB WHERE JOB_COUNTRY = "USA"
GROUP BY JOB_CODE;
to produce the desired output (shown in part):
JOB_CODE
SUM
======== ======================
Accnt
55000.00
Admin
95000.00
CEO
250000.00
CFO
140000.00
Dir
120000.00
Doc
100000.00
Eng
300000.00
. . .
Note the difference in the results. The first query produces four entries for engineers (Eng). The second query totals the salaries for these four entries and displays a single row as the result.
As another example, the DEPARTMENT table lists budgets for each department
in the company. Each department also has a head department to which it
reports. Suppose you want to find out the total budget for each head department. To do so, you would need to add the budgets for individual departments
and group the results by each head department. Enter the following query:
SELECT HEAD_DEPT, SUM(BUDGET)
FROM DEPARTMENT
GROUP BY HEAD_DEPT;
to produce these results:
HEAD_DEPT
SUM
========= ======================
000
3500000.00
100
3800000.00
110
800000.00
120
1300000.00
600
2350000.00
Retrieving Data
117
620
670
<null>
1350000.00
1310000.00
1000000.00
Using the HAVING Clause
Just as a WHERE clause reduces the number of rows returned by a SELECT
clause, the HAVING clause can be used to reduce the number of rows returned
by a GROUP BY clause. Like the WHERE clause, a HAVING clause has a search
condition. In a HAVING clause, the search condition typically corresponds to an
aggregate function used in the SELECT clause.
For example, you can modify the previous query to display only the head
departments whose total budgets are greater than 2,000,000. Change the query
as follows:
SELECT HEAD_DEPT, SUM(BUDGET)
FROM DEPARTMENT
GROUP BY HEAD_DEPT
HAVING SUM(BUDGET) > 2000000;
This query produces the following results:
HEAD_DEPT
SUM
========= ===========
000
3500000.00
100
3850000.00
600
2350000.00
Using the ORDER BY Clause
By default, a query retrieves rows in “natural order,” the order it finds them in a
table. Because internal table storage is typically unordered, retrieval is unordered as well. The ORDER BY clause sorts results according to a column you
specify. Every column in the ORDER BY clause must also appear in the SELECT
clause of the statement.
For example, enter the statement:
SELECT LAST_NAME, FIRST_NAME, PHONE_EXT
FROM EMPLOYEE
ORDER BY LAST_NAME;
As you can see, this query sorts results by employee’s last name.
By default, ORDER BY sorts in ascending order, in this case from A to Z. To sort
in descending order instead, use the DESC keyword. Enter:
118
Local InterBase Server User’s Guide
SELECT LAST_NAME, FIRST_NAME, PHONE_EXT
FROM EMPLOYEE
ORDER BY LAST_NAME DESC;
In the previous two examples, the sort column contains characters, so ORDER
BY performs an alphanumeric sort. If a sort column contains numbers, results
are sorted numerically.
ORDER BY can also sort results by more than one column. For example, if several employees have the same last name, you can sort by both first name and last
name using the following SELECT statement:
SELECT LAST_NAME, FIRST_NAME, PHONE_EXT
FROM EMPLOYEE
ORDER BY LAST_NAME DESC, FIRST_NAME;
In this case, the results are initially sorted by last name, in descending order. For
employees with the same last name, data is further sorted by first name. The first
name is also sorted in descending order because once you specify a column’s
sort order, it applies to all subsequent columns until you specify another sort
order. To explicitly sort in ascending order, use the ASC keyword.
Joining Tables
Joins enable a SELECT statement to retrieve data from two or more tables in a
database. The tables are listed in the FROM clause. The optional ON clause can
reduce the number of rows returned, and the WHERE clause can further reduce
the number of rows returned.
From the information in a SELECT that describes a join, InterBase builds a table
that contains the results of the join operation, the result table, sometimes also
called a dynamic or virtual table.
InterBase supports two basic types of joins: inner joins and outer joins.
Inner joins link rows in tables based on specified join conditions and return only
those rows that match the join conditions. If a joined column contains a NULL
value for a given row, that row is not included in the result table. Inner joins are
the more common type because they restrict the data returned and show a clear
relationship between two or more tables.
Outer joins link rows in tables based on specified join conditions but return rows
whether they match the join conditions or not. Outer joins are useful for viewing
joined rows against a background of rows that do not meet the join conditions.
Retrieving Data
119
Inner Joins
There are three types of inner joins:
• Equi-joins link rows based on common values or equality relationships in
the join columns.
• Joins that link rows based on comparisons other than equality in the join
columns. There is not an officially recognized name for these types of
joins, but for simplicity’s sake they may be categorized as comparative
joins, or non-equi-joins.
• Reflexive or self-joins, compare values within a column of a single table.
To specify a SELECT statement as an inner join, list the tables to join in the
FROM clause, and list the columns to compare in the WHERE clause. The simplified syntax is:
SELECT <columns>
FROM <left_table> [INNER] JOIN <right_table>
[ON <searchcondition>]
[WHERE <searchcondition>];
Search conditions based on a column in the right table can be specified in an
optional ON clause following the right table reference.
For example, consider the following query including an inner join:
SELECT D.DEPARTMENT, D.MNGR_NO, E.SALARY
FROM DEPARTMENT D JOIN EMPLOYEE E
ON D.MNGR_NO = E.EMP_NO
AND E.SALARY*2 > (SELECT SUM(S.SALARY) FROM EMPLOYEE S
WHERE D.DEPT_NO = S.DEPT_NO)
ORDER BY D.DEPARTMENT;
Examine this statement in detail. The SELECT clause uses correlation names D
for DEPARTMENT and E for EMPLOYEE (as specified in the FROM clause) to
select the department name and manager number from DEPARTMENT and the
manager’s salary from the EMPLOYEE table.
The ON clause states a compound join condition:
• The MNGR_NO column in the DEPARTMENT table must match the
EMP_NO column in EMPLOYEE.
• The manager’s salary times two (E.SALARY*2) must be greater than the
sum of all employees’ salaries in the department. In other words, the
manager’s salary must be greater than half the sum of all salaries in the
department.
120
Local InterBase Server User’s Guide
Enter the above statement. You should see the following results:
DEPARTMENT
MNGR_NO
SALARY
========================= ======= ======================
Consumer Electronics Div.
107
111262.50
Corporate Headquarters
105
212850.00
Customer Services
94
56295.00
Engineering
2
105900.00
Field Office: Canada
72
100914.00
Field Office: France
134
390500.00
Field Office: Italy
121
99000000.00
Field Office: Japan
118
7480000.00
Field Office: Switzerland
141
110000.00
Finance
46
116100.00
Sales and Marketing
85
111262.50
Outer Joins
Outer joins produce a result table containing columns from every row in one
table and a subset of rows from another table. Outer join syntax is very similar to
that of inner joins:
SELECT col [, col ...] | *
FROM <left_table> {LEFT | RIGHT | FULL} [OUTER] JOIN
<right_table> [ON <searchcondition>]
[WHERE <searchcondition>];
However, with outer joins, you need to specify the type of join to perform. There
are three possibilities:
• A left outer join retrieves all rows from the left table in a join, and retrieves
any rows from the right table that match the search condition specified in
the ON clause.
• A right outer join retrieves all rows from the right table in a join, and
retrieves any rows from the left table that match the search condition
specified in the ON clause.
• A full outer join retrieves all rows from both the left and right tables in a
join regardless of the search condition specified in the ON clause.
Outer joins are useful for comparing a subset of data to the background of all
data from which it is retrieved. For example, when listing the employees that are
assigned to projects, it may be interesting to see the employees that are not
assigned to projects, too.
The following outer join retrieves employee names from the EMPLOYEE table
and project IDs from the EMPLOYEE_PROJECT table, for employees that are
assigned to projects.
Retrieving Data
121
SELECT PROJ_ID, FULL_NAME
FROM EMPLOYEE LEFT OUTER JOIN EMPLOYEE_PROJECT
ON EMPLOYEE.EMP_NO = EMPLOYEE_PROJECT.EMP_NO;
All employee names in the EMPLOYEE table are retrieved, regardless of
whether they are assigned to a project, because EMPLOYEE is the left table in
the join. Enter it to see what the results look like.
Notice that some employees are not assigned to a project; the PROJ_ID column
is empty for them. Reverse the outer join, by changing the FROM clause to:
FROM EMPLOYEE_PROJECT LEFT OUTER JOIN EMPLOYEE
The results look different. Why?
Formatting Data
This section describes three ways to change data formats:
• Converting data types
• Concatenating strings
• Converting characters to uppercase
Using CAST( ) to Convert Data Types
Normally, only similar data types can be compared in search conditions, but you
can work around this by using CAST(). Use the CAST function in search conditions to translate one data type into another. The syntax for CAST() is:
CAST (<value> | NULL AS datatype)
For example, the following WHERE clause uses CAST() to translate a CHAR
data type, INTERVIEW_DATE, to a DATE data type. This conversion lets you
compare INTERVIEW_DATE to another DATE column, HIRE_DATE:
. . . WHERE HIRE_DATE = CAST(INTERVIEW_DATE AS DATE);
You can use CAST() to compare columns in the same table or across tables.
CAST() allows the conversions listed in the following table:
Table 9-6:
122
Compatible Data Types for CAST()
From Data Type
To Data Type
NUMERIC
CHARACTER, DATE
CHARACTER
NUMERIC, DATE
Local InterBase Server User’s Guide
Table 9-6:
Compatible Data Types for CAST() (Continued)
From Data Type
To Data Type
DATE
CHARACTER, NUMERIC
Using the String Operator in Search Conditions
The string operator, also referred to as a concatenation operator, ||, joins two or
more character strings into a single string. Character strings can be constants or
values retrieved from a column. For example, enter the following:
SELECT DEPARTMENT, LAST_NAME || " is the manager"
FROM DEPARTMENT, EMPLOYEE
WHERE MNGR_NO = EMP_NO;
to produce this result:
DEPARTMENT
=========================
Corporate Headquarters
Sales and Marketing
Engineering
Finance
Quality Assurance
Customer Support
Consumer Electronics Div.
Research and Development
Customer Services
Field Office: East Coast
. . .
===================================
Bender is the manager
MacDonald is the manager
Nelson is the manager
Steadman is the manager
Forest is the manager
Young is the manager
Cook is the manager
Papadopoulos is the manager
Williams is the manager
Weston is the manager
Converting to Uppercase
The UPPER() function converts character values to uppercase. For example,
when defining a column in a table, you can use a CHECK constraint that ensures
that all column values are entered in uppercase. The following CREATE
DOMAIN statement uses the UPPER() function in defining the PROJNO
domain:
CREATE DOMAIN PROJNO
AS CHAR(5)
CHECK (VALUE = UPPER (VALUE));
Retrieving Data
123
124
Local InterBase Server User’s Guide
CHAPTER 10
Advanced Data Definition
10
This chapter provides examples of some advanced DDL features, including:
• Creating and using triggers.
• Creating and using stored procedures.
Triggers and Stored Procedures
A trigger is a self-contained routine associated with a table, that automatically
performs an action when a row in the table is inserted, updated, or deleted. A
stored procedure is a program that can be called by applications or from ISQL.
Both stored procedures and triggers are part of a database’s metadata and are
written in stored procedure and trigger language, an InterBase extension of SQL.
Procedure and trigger language includes SQL data manipulation statements and
some powerful extensions, including IF . . . THEN . . . ELSE, WHILE . . . DO,
FOR SELECT . . . DO, exceptions, and error handling.
Stored procedures can be invoked directly from applications, or can be substituted for a table or view in a SELECT statement. They can receive input parameters from and return values to the calling application.
A trigger is never called directly. Instead, when an application or user attempts
to INSERT, UPDATE, or DELETE a row in a table, any triggers associated with
that table and operation are automatically executed, or fired.
For a full explanation of stored procedures and triggers, see the Data Definition
Guide.
Triggers
Triggers have a wide variety of uses, but in general, they enable you to automate
tasks that would otherwise be done manually. They enable you to define actions
Advanced Data Definition
125
that occur automatically whenever data is inserted, updated or deleted in a particular table. Triggers are a versatile tool, and their uses are virtually unlimited.
The triggers defined in the EMPLOYEE database:
• Generate and insert unique employee numbers in the EMPLOYEE table
and customer numbers in the CUSTOMER table.
• Maintain a record of employees’ salary changes.
• Post an event when a new sale is made.
Generating Unique Column Values With Triggers
Recall the EMPLOYEE table in the example database. This table has a primary
key column named EMP_NO for each employee’s employee number. Because it
is a primary key, each employee number must be unique. And, generally,
employee numbers are sequential. So, each time you insert a new employee
record in this table, you would have to remember what the last employee number issued was, and then give the new employee the next number. This would be
cumbersome and error-prone.
Triggers provide a simple way to automate this process, by using a handy database object called a generator. A generator is a named variable that is called and
incremented through the GEN_ID() function. Each time GEN_ID() is called, it
generates the next incremental value of the generator. The value of the generator
is initialized with SET GENERATOR.
Look at the SQL file, TRIGGERS.SQL. The beginning of the file has the following
statements:
CREATE GENERATOR EMP_NO_GEN;
SET GENERATOR EMP_NO_GEN TO 145;
The first statement creates a generator named EMP_NO_GEN. The second statement initializes the generator to 145 (recall that in the script file, INSERTS.SQL,
records were inserted into EMPLOYEE for employee numbers up to 145).
The next statements define a trigger named SET_EMP_NO that uses
EMP_NO_GEN to generate unique sequential employee numbers, and inserts
them into the EMPLOYEE table.
/* Create trigger to add unique customer number */
SET TERM !! ;
CREATE TRIGGER SET_EMP_NO FOR EMPLOYEE
BEFORE INSERT
AS
BEGIN
126
Local InterBase Server User’s Guide
NEW.EMP_NO = GEN_ID(EMP_NO_GEN, 1);
END !!
SET TERM ; !!
The statements above define the trigger. Because each statement in a trigger
body must be terminated by a semicolon, SET TERM is first used to define a different symbol to terminate the CREATE TRIGGER statement as a whole.
The CREATE TRIGGER statement above specifies:
• The name of the trigger, SET_EMP_NO
• The table with which the trigger is associated, EMPLOYEE
• When and how the trigger is fired, in this case before every INSERT operation
• Following the AS keyword, the body of the trigger—what the trigger
does when it fires, bracketed by BEGIN and END. In this case, it uses a
context variable, NEW.EMP_NO to insert the next employee number
into the EMP_NO column.
Context variables are unique to triggers. They allow you to specify NEW and
OLD to reference the values of columns being updated. For more information on
context variables, see the Data Definition Guide.
There are several other triggers defined in TRIGGERS.SQL, which you will
examine later. But first, you are going to see how the SET_EMP_NO trigger
works. Read the file into ISQL by choosing File | Run an ISQL Script.... Now,
refresh your memory of the EMPLOYEE table by typing the statement:
SELECT * from EMPLOYEE;
Notice that the last employee listed has employee number 145. Now enter a new
employee record, for instance:
INSERT INTO EMPLOYEE (FIRST_NAME, LAST_NAME, DEPT_NO, JOB_CODE,
JOB_GRADE, JOB_COUNTRY, HIRE_DATE, SALARY, PHONE_EXT) VALUES
("Reed", "Richards", "671", "Eng", 5, "USA", "07/27/95", 34000, "444");
Retrieve the new record by entering
SELECT * from EMPLOYEE WHERE LAST_NAME = "Richards";
Notice that the employee number is 146. The trigger has automatically assigned
the new employee the next employee number.
TRIGGERS.SQL defines a similar trigger named SET_CUST_NO to assign
unique customer numbers. It also defines two other triggers:
SAVE_SALARY_CHANGE and POST_NEW_ORDER.
Advanced Data Definition
127
Maintaining Change Records With a Trigger
SAVE_SALARY_CHANGE maintains a record of changes to employees’ salaries
in the SALARY_HISTORY table. Choose View | Metadata Information..., select
Trigger, and then type “SAVE_SALARY_CHANGE” to view the trigger. This
will be displayed in the Output area:
SHOW TRIGGER SAVE_SALARY_CHANGE
Triggers on Table EMPLOYEE:
SAVE_SALARY_CHANGE, Sequence: 0, Type: AFTER UPDATE, Active
AS
BEGIN
IF (OLD.SALARY <> NEW.SALARY) THEN
INSERT INTO SALARY_HISTORY
(EMP_NO, CHANGE_DATE, UPDATER_ID, OLD_SALARY, PERCENT_CHANGE)
VALUES (OLD.EMP_NO,
"NOW",
USER,
OLD.SALARY,
(NEW.SALARY - OLD.SALARY) * 100 / OLD.SALARY);
END
This trigger fires AFTER UPDATE of the EMPLOYEE table. It then compares the
value of the SALARY column before the update to SALARY after the update,
and if they are different, it enters a record in SALARY_HISTORY consisting of
the employee number, date, previous salary, and percentage change in the salary. Update an employee record and change the salary to see how this trigger
works.
Posting an Event With a Trigger
The trigger, POST_NEW_ORDER, posts an event named “new_order” whenever a record is inserted into the SALES table.
CREATE TRIGGER POST_NEW_ORDER FOR SALES
AFTER INSERT AS
BEGIN
POST_EVENT "new_order";
END !!
An event is a message passed by a trigger or stored procedure to the InterBase
event manager to notify interested applications of the occurrence of a particular
condition. Applications which have registered interest in an event can pause
execution and wait for the specified event to occur. For more information on
events, see the Programmer’s Guide.
The POST_NEW_ORDER trigger is fired after a new record is inserted into the
SALES table, in other words when a new sale is made. When this event occurs,
128
Local InterBase Server User’s Guide
interested applications may take appropriate action, such as printing an invoice
or notifying the shipping department.
Stored Procedures
Stored procedures are programs stored with a database’s metadata. Applications can call stored procedures and you can also use stored procedures in ISQL.
For more information on calling stored procedures from applications, see the
Programmer’s Guide.
There are two types of stored procedures:
• Select procedures that an application can use in place of a table or view in a
SELECT statement. A select procedure must be defined to return one or
more values (output parameters), or an error results.
• Executable procedures that an application can call directly with the
EXECUTE PROCEDURE statement. An executable procedure may or
may not return values to the calling program.
Both kinds of procedures are defined with CREATE PROCEDURE and have
essentially the same syntax. The difference is in how the procedure is written
and how it is intended to be used. Select procedures can return more than one
row, so that to the calling program they appear as a table or view. Executable
procedures are simply routines invoked by the calling program which may or
may not return values.
A CREATE PROCEDURE statement is composed of a header and a body. The
header contains:
• The name of the stored procedure, which must be unique among procedure, view, and table names in the database.
• An optional list of input parameters and their data types that a procedure
receives from the calling program.
• If the procedure returns values to the calling program, the RETURNS
keyword followed by a list of output parameters and their data types.
The procedure body contains:
• An optional list of local variables and their data types.
• A block of statements in InterBase procedure and trigger language, bracketed by BEGIN and END. A block can itself include other blocks, so that
there may be many levels of nesting.
Advanced Data Definition
129
The stored procedures for the EMPLOYEE database are defined in the script file
named PROCS.SQL. Open up this file with a text editor to view them. Input this
file by choosing File | Include. You are going to experiment with these procedures one at a time to learn about them.
A Simple Select Procedure
The first procedure defined in PROCS.SQL is named GET_EMP_PROJ:
CREATE PROCEDURE GET_EMP_PROJ (EMP_NO SMALLINT)
RETURNS (PROJ_ID CHAR(5))
AS
BEGIN
FOR SELECT PROJ_ID
FROM EMPLOYEE_PROJECT
WHERE EMP_NO = :EMP_NO
INTO :PROJ_ID
DO
SUSPEND;
END ^
This is a select procedure that takes an employee number as its input parameter
(EMP_NO, specified in parentheses after the procedure name) and returns all
the projects to which the employee is assigned (PROJ_ID, specified after
RETURNS).
It uses a FOR SELECT . . . DO statement to retrieve multiple rows from the
EMPLOYEE_PROJECT table. This statement retrieves values just like a normal
select statement, but retrieves them one at a time into the variable listed after
INTO, and then performs the statements following DO. In this case, the only
statement is SUSPEND, which suspends execution of the procedure and sends
values back to the calling application (in this case, ISQL).
See how it works by entering the following query:
SELECT * FROM GET_EMP_PROJ(71);
As you can see, this query looks as if there is a table named GET_EMP_PROJ,
except that you provide the input parameter in parentheses following the procedure name. The results are:
PROJ_ID
=======
VBASE
MAPDB
These are the projects to which employee number 71 is assigned. Try it with
some other employee numbers.
130
Local InterBase Server User’s Guide
A Simple Executable Procedure
The next procedure defined in PROCS.SQL is an executable procedure named
ADD_EMP_PROJ. It is a simple example of an executable procedure and makes
use of an exception, a named error message, defined with CREATE EXCEPTION:
CREATE EXCEPTION UNKNOWN_EMP_ID
"Invalid employee number or project id.";
Once defined, this exception can be raised in a trigger or stored procedure with
the statement EXCEPTION UNKNOWN_EMP_ID. The associated error message is then returned to the calling application.
The stored procedure, ADD_EMP_PROJ, is shown below:
CREATE PROCEDURE ADD_EMP_PROJ (EMP_NO SMALLINT, PROJ_ID CHAR(5))
AS
BEGIN
BEGIN
INSERT INTO EMPLOYEE_PROJECT (EMP_NO, PROJ_ID)
VALUES (:emp_no, :proj_id);
WHEN SQLCODE -530 DO
EXCEPTION UNKNOWN_EMP_ID;
END
SUSPEND;
END ^
This procedure takes an employee number and project ID as input parameters
and adds the employee to the specified project using a simple INSERT statement. The error-handling WHEN statement checks for SQLCODE -530, violation
of FOREIGN KEY constraint, and then raises the previously-defined exception
when this occurs.
Use this procedure through the EXECUTE PROCEDURE statement, for example:
EXECUTE PROCEDURE ADD_EMP_PROJ(20, "DGPII");
Now try adding a non-existent employee to a project, for example:
EXECUTE PROCEDURE ADD_EMP_PROJ(999, "DGPII");
The statement fails and the exception message is displayed on the screen.
A Recursive Procedure
Stored procedures support recursion, that is, they can call themselves. This is a
powerful programming technique that is useful in performing repetitive tasks
Advanced Data Definition
131
across hierarchical structures such as corporate organizations or mechanical
parts. Look at the stored procedure, DEPT_BUDGET:
SHOW PROCEDURE DEPT_BUDGET;
Procedure text:
======================================================================
DECLARE VARIABLE sumb DECIMAL(12, 2);
DECLARE VARIABLE rdno CHAR(3);
DECLARE VARIABLE cnt INTEGER;
BEGIN
tot = 0;
SELECT BUDGET FROM DEPARTMENT WHERE DEPT_NO = :dno INTO :tot;
SELECT COUNT(BUDGET) FROM DEPARTMENT WHERE HEAD_DEPT = :dno INTO :cnt;
IF (cnt = 0) THEN
SUSPEND;
FOR SELECT DEPT_NO
FROM DEPARTMENT
WHERE HEAD_DEPT = :dno
INTO :rdno
DO
BEGIN
EXECUTE PROCEDURE DEPT_BUDGET :rdno RETURNING_VALUES :sumb;
tot = tot + sumb;
END
SUSPEND;
END
======================================================================
Parameters:
DNO INPUT CHAR(3)
TOT OUTPUT NUMERIC(15, 2)
This procedure takes as its input parameter a department number and returns
the budget of the department and all departments under it in the corporate hierarchy. It uses local variables declared with DECLARE VARIABLE statements.
These variables are only used within the context of the procedure.
First, the procedure retrieves from the DEPARTMENT table the budget of the
department given as the input parameter and stores it in the variable, tot. Then it
retrieves the number of departments reporting to that department using the
COUNT() aggregate function. If there are no reporting departments, then it
returns the value of tot with SUSPEND.
132
Local InterBase Server User’s Guide
Using a FOR SELECT . . . DO loop, the procedure then retrieves the department
number of each reporting department into the local variable, rdno, and then
recursively calls itself with:
EXECUTE PROCEDURE DEPT_BUDGET :rdno RETURNING_VALUES :sumb;
This statement executes DEPT_BUDGET with input parameter, rdno, and puts
the output value in sumb. Notice that when using EXECUTE PROCEDURE
within a procedure, the input parameters are not put in parentheses, and the
variable into which to put the resultant output value is specified after the
RETURNING_VALUES keyword. The value of sumb is then added to tot, to keep
a running total of the budget. The result is that the procedure returns the total of
the budgets of all the reporting departments given as the input parameter plus
the budget of the department itself. Try it:
EXECUTE PROCEDURE DEPT_BUDGET(620);
The result is:
TOT
======================
2550000.00
Notice that the procedure is defined to take a CHAR(3) as its input parameter,
but that you can get away with giving it an integer (without quotes). This is
because of automatic type conversion, a handy feature that will convert data
types, where possible to the required data type. So the integer 620 is automatically converted to the character string “620”.
The automatic type conversion will not work for department number 000
because it will convert it to the string “0”, which is not a department number.
Execute the procedure again with:
EXECUTE PROCEDURE DEPT_BUDGET("000");
This should give the same answer as the query:
SELECT TOTAL(BUDGET) FROM DEPARTMENT;
Can you figure out why?
There are a number of other procedures, some quite complex, defined in
PROCS.SQL for the EMPLOYEE database. Now that you have a basic understanding of procedures, see if you can understand and use them.
Advanced Data Definition
133
134
Local InterBase Server User’s Guide
PART 4
Server Manager
4
Part 4 describes the Local InterBase Server Manager, the graphical tool for
InterBase database administration and monitoring.
Chapter 11: “Introduction to Server Manager” provides an overview of the
Server Manager, describing what it can do, and its primary windows, menus,
and dialog boxes.
Chapter 12: “Accessing a Database” describes how to log in to an InterBase
server, connect to a database, add new users, and modify user information.
Chapter 13: “Maintaining a Database” describes how to perform database maintenance with the Server Manager, including shutting down and restarting a
database, configuring database sweeping, managing transaction recovery, and
validating a database.
Chapter 14: “Backing Up and Restoring a Database” describes how to do database backup and restoration with the Server Manager.
CHAPTER 11
Introduction to
Server Manager
11
This chapter introduces the InterBase Server Manager, a Windows application
for monitoring and administering InterBase 4.0 databases and servers. Server
Manager runs on a Windows Client, but can manage databases on any server on
the local network.
Server Manager enables you to:
• Manage server security.
• Back up and restore a database.
• Perform database maintenance, including:
• Validating the integrity of a database.
• Sweeping a database.
• Recovering transactions that are “in limbo.”
Introduction to Server Manager
137
The Server Manager Window
Start Server Manager by clicking on the Server Manager icon in the InterBase PC
Client program group. The Server Manager window will then open:
This window consists of the:
• Menu bar, across the top of the window, containing commands you can
choose to perform DBA tasks with Server Manager.
• SpeedBar, a row of shortcut buttons for menu commands, just below the
menu bar.
• Server/database tree, displayed in the left side of the window below the
SpeedBar, showing the local server’s name and the databases to which
Server Manager is currently connected.
• Summary information area, displayed in the right side of the window
below the SpeedBar. This area displays information about the server or
database, depending on which is selected in the server/database tree.
• Status line, that shows the current server and user login and flyover help
for menus and the SpeedBar.
Server Manager Menus
The Server Manager menus are the basic way to perform tasks with Server Manager. There are four pull-down menus:
• File menu: enables you to log in to a server and log out, connect to a
database, disconnect from a database, and exit Server Manager.
• Tasks menu: enables you to manage database security, perform backup
and restoration, validate a database, open the database maintenance
window, and start Windows ISQL.
138
Local InterBase Server User’s Guide
• Window menu: enables you to close or minimize Server Manager windows.
• Help menu: provides online help.
SpeedBar
The SpeedBar is a row of buttons that are shortcuts for menu commands. The
SpeedBar buttons are:
Server login: opens the login dialog box, enabling you to log in to a remote InterBase server. The local server is already connected.
Server logout: logout from the local server, and disconnect from any databases
on that server to which you are currently connected.
Database connect: opens a dialog box, enabling you to connect to a database on
the current server.
Database disconnect: disconnects Server Manager from the current database.
Configure users: opens the User Configuration dialog box for administering
server security.
Database backup: opens the Database Backup dialog box.
Database restore: opens the Database Restore dialog box.
Database maintenance: opens the Database Maintenance window, which
enables you to perform database maintenance tasks.
Start ISQL: opens the Interactive SQL Window, and automatically connects to
the current database.
Server/Database Tree
When the Server Manager window initially opens, the only menu or SpeedBar
commands available are Server Login, Windows ISQL, and Help. Once connected to a database, all other commands are enabled.
You can connect to a database by clicking on the Database Connect SpeedBar
button or choosing File | Database Connect.... A dialog box will open enabling
you to enter the file and directory path of a database.
Introduction to Server Manager
139
Once connected to a server, the server name is displayed on the left side of the
Server Manager window. This area is called the server/database tree.
If Server Manager is not connected to any database on a server, a small dot will
be displayed to the left of the server name. After connecting to a database, a “-”
will be displayed instead. Each database to which Server Manager is connected
is displayed beneath the server on which it resides in an expandable and collapsible tree.
Current Server
Current Database
Click on the “-” next to a server name (or double-click on the server name) to
collapse the database tree for the server, and then a “+” will be displayed
instead.
Click on the “+” next to a server name (or double-click on the server name) to
expand the tree and display the names of all databases on that server to which
Server Manager is currently connected. The “+” will become a “-”.
In an expanded tree, click on a database name to highlight it. The highlighted
database will be the one upon which Server Manager operates, referred to as the
current database. When a database is highlighted, the server on which the database resides becomes the current server. Any actions of Server Manager then
affect that server.
Summary Information Area
The summary information area in the right side of the server manger window
displays information about the server or database currently selected in the
server/database tree.
140
Local InterBase Server User’s Guide
Administering Security
Server Manager enables you to:
• View the list of authorized users for the server.
• Authorize new users.
• Modify user information (user name, password).
• Remove users’ authorization.
To perform any of these tasks, you must log in to the server as SYSDBA with
password masterkey and choose Tasks | Security.... The InterBase Security dialog box will then open:
The Database Maintenance Window
The other major window in the InterBase Server Manager is the Database Maintenance window. Open the Database Maintenance window by choosing Tasks |
Database Maintenance... or by clicking on the Database Maintenance SpeedBar
button.
Introduction to Server Manager
141
If a Database Maintenance window is open, and you choose Tasks | Database
Maintenance... again, Server Manager will switch focus to the existing window
rather than open a new one. This prevents conflicting changes to the database.
The Database Maintenance window has five pull-down menus:
• File menu: enables you to close the Database Maintenance window.
• Database menu: enables you to modify database properties.
• Maintenance menu: enables you to perform transaction recovery and an
immediate database sweep.
• Window menu: enables you to switch focus to the main window.
• Help menu: provides online help.
Standard Text Display Window
The standard text display window is used to monitor database backup and restoration and to display database and lock manager statistics. Although these
operations all display output in a standard text display window, each will have
menu commands specific to the particular operation.
The standard text display window contains a menu bar, a SpeedBar with icons
for often-used menu commands, and a scrolling text display area. Here is an
example of a standard text display window:
The scrolling text area displays the information of interest: messages from database backup and restore.
The standard menus in this window are:
• File menu: enables you to save the contents of the scrolling text area to a
file, or send it to a printer, and to close the window.
142
Local InterBase Server User’s Guide
• Edit menu: enables you to copy selected text into the clipboard.
• Search menu: enables you find patterns in the scrolling text area.
• Window menu: enables you to switch back to the main Server Manager
window.
• Help menu: provides online help.
The SpeedBar buttons are shortcuts for often-used menu commands. The function of each button is shown at the bottom of the window when the mouse cursor is over the button.
Database Backup and Restoration
Server Manager enables you to back up a database to a file or storage device and
restore a database from a file or storage device. To perform a backup, choose
Tasks | Backup in the Server Manager window. The Database Backup dialog
box will appear:
After entering the necessary information, choosing the desired options, and
clicking on OK, a standard text display window will appear, displaying information about the backup process as it occurs.
Introduction to Server Manager
143
To restore a database, choose Tasks | Restore... in the Server Manager window.
The Database Restore dialog box will then appear:
After entering the necessary information, choosing the desired options, and
clicking on OK, a standard text display window will appear, displaying information about the restore process as it occurs.
For more information on database backup and restoration, see Chapter 14:
“Backing Up and Restoring a Database.”
Using Online Help
Invoke the online help system by choosing a topic from the Help menu or clicking on a Help button in a dialog box. The help topic appropriate for the current
context will appear. All help topics are accessible through the Help Contents:
For instructions on using the online help system, choose Help | Using Help.
144
Local InterBase Server User’s Guide
CHAPTER 12
Accessing a Database
12
Before performing any database administration tasks, you must first connect to a
database. You may switch context from one connected database to another by
choosing the desired database in the database/server tree.
Connecting to a Database
Connect to a database by clicking on the Database Connect SpeedBar button or
choosing File | Database Connect....
The Connect to Database dialog box will then appear:
The last database connected to will be shown in the Database text field. Click on
the arrow to the right of the text field for a drop down list and select a database
from the list, or enter the full pathname for a different database name. Choose
OK to connect to that database.
If you enter a different name, Server Manager saves the last ten databases to
which it connected in the WINDOWS\INTERBAS.INI file. The database file
name and path must be appropriate; for example, C:\INTERBAS\MYDB.GDB.
After connecting to a database, the Server Manager SpeedBar and menus will be
active, and any actions you take will apply to the selected database.
Accessing a Database
145
146
Local InterBase Server User’s Guide
CHAPTER 13
Maintaining a Database
13
Database maintenance tasks include:
• Configuring database properties.
• Managing transaction recovery.
• Performing a database sweep.
• Validating and repairing a database.
Server Manager must be logged in to a server and connected to a database
before performing any of these operations. All of these tasks are performed from
the Database Maintenance Window except for validation, which is peformed
from the Server Manager window.
The Database Maintenance Window
To perform database maintenance, first choose a database by:
• Clicking the “+” to the left of a server name in the server/database tree,
if necessary, to display all databases to which Server Manager is connected on that server.
• Clicking on the name of the desired database in the server/database tree,
leaving it highlighted in reverse video.
This database is then the current database, and all Server Manager actions apply
to it.
Maintaining a Database
147
You can then click the Database Maintenance SpeedBar button or choose
Tasks | Database Maintenance... to open the Database Maintenance window:
The name of the current database and its owner are displayed at the top of the
window, along with the versions of the InterBase server, client, and access
method.
You can open a Database Maintenance window for each database to which
Server Manager is connected. You can copy text from one Database Maintenance
window and paste it into another to duplicate values between databases.
Configuring Database Properties
To view and configure database properties, choose Database | Properties... from
the menu bar in the Database Maintenance window or click on the Database
Properties SpeedBar button. The Database Properties dialog box will then
appear:
This dialog box contains a Summary Information area that displays properties
but does not allow modification of them and a Configuration area that does
allow modification of the parameters.
148
Local InterBase Server User’s Guide
The Summary Information area displays:
• Database name.
• User name of the database owner.
• Database Page Size.
• Number of allocated pages.
• Secondary file names and sizes.
The configuration area displays and allows modification of:
• Sweep interval.
• Enabling of forced writes.
Adjusting Database Sweeping
Sweeping a database is a systematic way of removing outdated records from the
database. Periodic sweeping prevents a database from growing too large. However, sweeping can also slow system performance.
Overview of Sweeping
InterBase uses a multi-generational architecture. This means that multiple versions of data records are stored directly on the data pages. When a record is
updated or deleted, InterBase keeps a copy of the old state of the record and creates a new version. This can increase the size of a database.
To limit the growth of the database, InterBase performs garbage collection, which
frees up space allocated to outdated versions of a record. Whenever a transaction accesses a record, outdated versions are garbage collected. Records that
were rolled back are ignored by typical transactions and will not be garbage collected. To guarantee that all records are garbage collected, including those that
were rolled back, InterBase periodically “sweeps” the database.
Sweeping in the Local InterBase Server is done through a dialog box which pops
up at a preconfigured interval. The dialog will ask if you want to perform a
sweep immediately. If you answer yes, the sweep will start. If you answer no,
the server will wait for the preconfigured interval again.
Note
Periodic sweeping is necessary and recommended. If sweeps are not made,
old record versions will take up space and system memory.
Maintaining a Database
149
When sweeping a database, InterBase reads every record in the database. This
forces garbage collection of outdated record versions as well as rolled back
records.
Tip
Sweeping a database is not the only way to perform systematic garbage
collection. Backing up a database achieves the same result because
InterBase must read every record, an action that forces garbage collection
throughout the database. As a result, regularly backing up and restoring a
database can reduce the need to sweep. This enables you to maintain better
application performance. For more information about the advantages of
backing up and restoring, see Chapter 14: “Backing Up and Restoring a
Database.”
You can sweep a database immediately by using the Maintenance | Database
Sweep menu command.
Controlling Performance of Forced Writes
When InterBase performs forced writes (also referred to as synchronous writes), it
physically writes data to disk whenever the database performs an (internal)
write operation.
If forced writes are not enabled, then even though InterBase performs a write,
the data may not be physically written to disk, because operating systems buffer
disk writes. If there is a system failure before the data is written to disk, then
information can be lost.
Performing forced writes ensures data integrity and safety, but will slow performance. In particular, operations which involve data modification will be slower.
When forced writes are enabled an “X” appears in the box labeled “Enable
Forced Writes” in the Database Properties dialog box. To disable forced writes,
click on the check box to remove the “X”.
Caution
If forced writes are enabled for a database, then the database will be subject
to data loss if there is a hardware or other system failure. In general, it is
best to have this feature active.
Two-phase Commit and Transaction Recovery
When committing a transaction that spans multiple databases, InterBase automatically performs a two-phase commit. A two-phase commit guarantees that the
transaction updates either all of the databases involved or none of them—data is
never partially updated.
150
Local InterBase Server User’s Guide
In the first phase of a two-phase commit, InterBase prepares each database for
the commit by writing the changes from each subtransaction to the database. A
subtransaction is the part of a multi-database transaction that involves only one
database. In the second phase, InterBase marks each subtransaction as committed in the order that it was prepared.
If a two-phase commit fails during the second phase, some subtransactions will
be committed and others will not be. A two-phase commit can fail if a network
interruption or disk crash makes one or more databases unavailable. Failure of a
two-phase commit causes limbo transactions, transactions that the server does not
know whether to commit or roll back.
It is possible that a limbo transaction will make some records in a database inaccessible. To correct this, you must recover the transaction using Server Manager.
Recovering a limbo transaction means committing it or rolling it back.
Recovering Transactions
To recover limbo transactions, choose Maintenance | Transaction Recovery... in
the Database Maintenance window. A dialog box will then display a list of limbo
transactions that can then be operated upon to recover—that is, to commit or roll
back:
All the pending transactions in the database are listed in the scrolling area on the
left side of the dialog box. Click on the “+” to display all the subtransactions of a
transaction.
Maintaining a Database
151
It is also possible to have a single database transaction that has been prepared
and not committed. These transactions are displayed with a bullet to the left of
the transaction. You can roll back or commit such transactions.
You can change the path of the database specified by each subtransaction by
choosing Connect Path. The following dialog box will appear:
Enter the directory path of the other database involved in the subtransaction,
then choose OK.
The information on the path to the database was stored when the client application attempted the commit. Before attempting to roll back or commit any transaction, confirm the path of all involved databases is correct.
You can choose to either commit or roll back each transaction. To commit or roll
back, select the desired transaction ID from the list and choose either Commit or
Rollback.
Note
152
Only entire transactions can be recovered, so the commit and rollback buttons will only be enabled when the main transaction is selected. They will
be disabled when a subtransaction is selected.
Local InterBase Server User’s Guide
You can also seek advice by choosing the Advice button. This dialog box will
open:
This dialog box will display information on each subtransaction: whether it has
been committed, the remote server name, and database name. At the bottom, an
action will be recommended: either commit or roll back.
Server Manager analyzes the state of subtransactions by determining when the
two-phase commit failed. If the first transactions are in limbo but later transactions are not, Server Manager assumes that the prepare phase did not complete.
In this case, you are prompted to do a rollback.
Performing an Immediate Database Sweep
To perform a database sweep, choose Maintenance | Database Sweep from the
menu bar in the Database Maintenance window.
This operation runs an immediate sweep of the database, releasing space held
by records which were rolled back and by out-of-date record versions. Sweeps
are also done automatically at a specified interval; see “Adjusting Database
Sweeping,” in this chapter.
Important
Sweeping a database does not require it to be shut down. You can perform
sweeping at any time, but it can impact system performance and should be
done when it will least affect users.
Validating and Repairing a Database
In day-to-day operation, a database is sometimes subjected to events that pose
minor problems to database structures. These events include:
Maintaining a Database
153
• Abnormal termination of a database application. This does not affect the
integrity of the database. When an application is canceled, committed
data is preserved, and uncommitted changes are rolled back. If InterBase
has already assigned a data page for the uncommitted changes, the page
might be considered an orphan page. Orphan pages are unassigned disk
space that should be returned to free space.
• Write errors in the operating system or hardware. These usually create a
problem with database integrity. Write errors can result in “broken” or
“lost” data structures, such as a database page or index. These corrupt
data structures can make committed data unrecoverable.
You should validate a database:
• Whenever a database backup is unsuccessful.
• Whenever an application receives a “corrupt database” error.
• Periodically, to monitor for corrupt data structures or misallocated space.
• Any time you suspect data corruption.
To validate a database, choose Tasks | Database Validation... in the Server Manager window. The following dialog box will open:
The name of the current database is displayed in the Database text field. Because
there are some conditions such as a checksum error that will make it impossible
to connect to a database, it is not necessary to connect to the database before performing a validation. If Server Manager is not connected to the database, you
can enter the desired database name in the Database text field or select it from
the drop down list by clicking on the arrow to the right of the field.
When Server Manager validates a database it verifies the integrity of data structures. Specifically, it will:
• Report corrupt data structures.
• Report misallocated data pages.
• Return orphan pages to free space.
154
Local InterBase Server User’s Guide
Validation Options
You can select three options with Database Validation:
• Validate record fragments
• Read-only validation
• Ignore checksum errors
By default, database validation reports and releases only page structures. When
you select the Validate record fragments option, validation reports and releases
record structures as well as page structures.
By default, validating a database updates it, if necessary. To prevent updating,
select the Read-only validation option.
Handling Checksum Errors
A checksum is a page-by-page analysis of data to verify its integrity. A bad
checksum means that a database page has been randomly overwritten (for
example, due to a system crash).
Checksum errors indicate data corruption. To repair a database that reports
checksum errors, select the Ignore checksum errors option. This option enables
Server Manager to ignore checksums when validating a database. Ignoring
checksums allows successful validation of a corrupt database, but the affected
data may be lost.
Caution
Even if you can restore a mended database that reported checksum errors,
the extent of data loss may be difficult to determine. If this is a concern, you
may want to locate an earlier backup copy and restore the database from it.
Maintaining a Database
155
Repairing a Corrupt Database
If a database contains errors, the following dialog box will open:
The errors encountered are summarized in the Error Summary area. The repair
options you selected in the Database Validation dialog box will be selected in
this dialog box also.
To repair the database, choose Repair. This will fix problems that cause records
to be corrupt and mark corrupt structures. In subsequent operations (such as
backing up), InterBase ignores the marked records.
Note
Some corruptions are too serious for Server Manager to correct. These
include corruptions to certain strategic structures, such as space allocation
pages. In addition, Server Manager cannot fix certain checksum errors that
are random by nature and not specifically associated with InterBase.
If you suspect you have a corrupt database, perform the following steps:
1. Make a copy of the database using an operating-system command. Do
not use the InterBase Backup utility, because it cannot back up a database containing corrupt data.
2. Repair the copy database to mark corrupt structures. If Server Manager
reports any checksum errors, validate and repair the database again,
choosing the Ignore checksum errors option. It may be necessary to validate a database multiple times to correct all the errors.
3. Validate the database again, with the Read-only validation option
selected. Note that free pages are no longer reported, and broken records
are marked as damaged. Any records marked during repair are ignored
when the database is backed up.
4. Back up the mended database with Server Manager. At this point, any
damaged records are lost, because they were not included during the
156
Local InterBase Server User’s Guide
back up. For more information about database backup, see Chapter 14:
“Backing Up and Restoring a Database.”
5. Restore the database to rebuild indexes and other database structures.
The restored database should now be free of corruption.
6. Verify that restoring the database fixed the problem by validating the
restored database with the Read-only validation option.
Maintaining a Database
157
158
Local InterBase Server User’s Guide
CHAPTER 14
Backing Up and Restoring
a Database
14
A database backup saves a database to a file on a hard disk or other storage
medium. To protect a database from power failure, disk crashes, or other potential data loss, you should regularly back up the database. For additional safety, it
is recommended to store the backup medium in a different physical location
from the database server.
A database restore re-creates a database from a backup file.
Using the Backup and Restore Utilities
Operating systems usually include facilities to archive database files. Server
Manager offers several advantages over such facilities, including:
• Database performance can be improved. Backing up and restoring a
database garbage-collects outdated records and balances indexes. The
process also frees space occupied by deleted records and packs the
remaining data, reducing database size. When you restore, you have the
option of changing the database page size or distributing the database
among multiple files or disks.
• Backups can run concurrently with other users. You need not shut down
the database to run a back up. However, any data changes that occur
after the back up begins are not recorded in the backup file. After you
create a database backup, you can include it as part of a regular system
backup.
• Multi-file databases are never partially backed up. If a database spans
multiple files, Server Manager backs up either all the files or none.
• Data can be transferred to another operating system. Different computers have their own database file formats and therefore databases cannot
simply be copied to a platform with a different operating system. If
Backing Up and Restoring a Database
159
desired, you can also make a backup in a generic format called a transportable backup that allows restoration to a server on a different operating system. Making transportable backups is highly recommended in
heterogeneous environments.
Backing Up a Database
The database being backed up is referred to as the source. The file or device to
which the database is being backed up is called the destination or target.
To back up a database, choose Tasks | Backup... from the Server Manager window. The Database Backup dialog box appears:
This dialog box enables you to back up a database to a file or device. To perform
a backup:
• Type the name of the source database (including path) in the Database
Path text field in the Backup Source area. By default, the database to
which Server Manager is currently connected is displayed. Other databases previously connected to can be displayed by clicking on the dropdown button to the right of the text field. To choose another database,
select it from the list or type it in the text field.
• Type the name of the destination file or device in the text field in the
lower left of the dialog box.
• Select the desired backup options, then choose OK to start the backup
timer.
Server Manager will open a standard text display window to display status and
any messages during the backup process.
160
Local InterBase Server User’s Guide
Note
Database files and backup files can have any name that is legal on the operating system; the .GDB and .GBK file extensions are InterBase conventions
only.
When creating a backup file, Server Manager stores the database as one file. You
cannot split a large database among multiple backup files. A backup file will
typically occupy less space than the database because it includes only the current version of data and incurs less overhead for data storage.
If you specify a backup file that already exists, Server Manager overwrites it. To
avoid overwriting, specify a unique name for the backup file.
If a database spans multiple files, specify only the first file (the primary file) as
the source. Server Manager uses the header page of each file to locate additional
files, so the entire database can be backed up based on the primary file.
Backup Options
The backup options are indicated by check boxes on the right side of the
Database Backup dialog box. If a check box has an “X” inside, then the option is
selected. If the box is empty, the option is not selected.
Transportable Format
To move a database to a machine with a different operating system from the
machine on which the backup was performed, check the Transportable Format
option. This option writes data in a generic format, enabling you to restore to
any machine that supports InterBase.
To make a transportable backup:
1. Back up the database using transportable format by selecting the
Transportable Format option in the Database Backup dialog box.
2. If you backed up to a removable medium, proceed to Step 3. If you created a backup file, use operating-system commands to copy the file to
Backing Up and Restoring a Database
161
tape, then load the contents of the tape onto another machine. Or copy it
across a network to the other machine.
3. On the destination machine, restore the backup file. If restoring from a
removable medium, such as tape, specify the device name instead of the
backup file.
Back Up Metadata Only
When backing up a database, you can exclude its data, saving only its metadata.
You might want to do this to:
• Retain a record of the metadata before it is modified.
• Create an empty copy of the database. The copy will have the same
metadata but can be populated with different data.
To back up metadata only, select the Back Up Metadata Only option.
You can also extract a database’s metadata using Windows ISQL. ISQL produces
an SQL data definition (text) file containing SQL commands. Server Manager
creates a backup file containing metadata only.
Disable Garbage Collection
By default, Server Manager performs garbage collection during backup. To prevent garbage collection during a backup, select the Disable Garbage Collection
option.
Garbage collection physically erases old versions of records from disk. Generally, you will want Server Manager to perform garbage collection during
backup.
You might not want to perform garbage collection during backup if there is data
corruption in old record versions and you want to prevent InterBase from visiting those records during a backup.
Ignore Transactions in Limbo
To ignore limbo transactions during backup, select the Ignore Transactions in
Limbo option.
When Server Manager ignores limbo transactions during backup, it ignores all
record versions created by any limbo transaction, finds the most recently committed version of a record, and backs up that version.
162
Local InterBase Server User’s Guide
Limbo transactions are usually caused by the failure of a two-phase commit.
They can also exist due to system failure or when a single-database transaction
is prepared.
Before backing up a database that contains limbo transactions, it is a good idea
to perform transaction recovery, by choosing Maintenance | Transaction
Recovery... in the Database Maintenance window.
Ignore Checksums
To ignore checksums during backup, select the Ignore Checksums option.
A checksum is a page-by-page analysis of data to verify its integrity. A bad
checksum means that a data page has been randomly overwritten; for example,
due to a system crash.
Checksum errors indicate data corruption, and InterBase normally prevents you
from backing up a database if bad checksums are detected. Examine the data the
next time you restore the database.
Verbose Output
To monitor the backup process as it runs, select the Verbose Output option. This
option opens a standard text display window to display status messages on the
screen. For example:
By default, the backup window displays the time that the backup process starts,
the time it ends, and any error messages.
The standard text display window enables you to search for specific text, save
the text to a file, and print the text. For an explanation of how to use the standard
text display window, see Chapter 11: “Introduction to Server Manager.”
Backing Up and Restoring a Database
163
Restoring a Database
To restore a database, choose Tasks | Restore... in the Server Manager window.
The Database Restore dialog box will then appear:
This dialog box enables you to restore a database from a previously created
backup file on the current server.
The backup file from which the database is being restored is called the source.
The database being restored is called the destination or target.
To restore a database:
• Type the name of the source file or device on the current server in the
Backup File or Device text field.
To restore a database to more than one database file, click on the Multifile button.... For more information about restoring to multiple database
files, see “Restoring to Multiple Files,” in this chapter.
• Type the name (including directory path) of the database to restore to in
the Primary Database File text field.
• Type the page on which to start the restore in the Start Page field, and the
page size, in bytes, in the Page Size text field. Typically, the starting page
will be zero (0).
• Select the desired restore options, and choose OK to begin the restore.
Typically, a restored database occupies less disk space than it did before being
backed up, but disk space requirements could change if the on-disk structure
version changes. For information about the ODS, see “Upgrading to a New Ondisk Structure,” in this chapter.
164
Local InterBase Server User’s Guide
Restoring to Multiple Files
You might want to restore a database to multiple files to distribute it among different disks, which provides more flexibility in allocating system resources.
To restore a database to multiple database files, click on the Multi-file button in
the Database Restore dialog box. The following dialog box opens:
To specify the database files to restore to, type the file name in the File Path text
field and then type the number of pages for that file in the text field below it. The
minimum number of pages in a file is 200. Choose Save, and the file name will
appear in the File List on the right side of the dialog box.
To modify one of the files in the list, select it and choose Modify. The selected file
name will appear in the File Path text field, where you can edit it, and the associated number of pages will appear in the Pages text field. To delete a file, select it
in the File List and choose the Delete button.
After entering all the names of the database files to restore to, choose OK to
return to the Database Restore dialog box.
Restore Options
The restore options are shown in check boxes on the right side of the Database
Restore dialog box. If a check box has an “X” inside, then the option is selected.
If the box is empty, the option is not selected.
Backing Up and Restoring a Database
165
Start Page
The Start Page is the page on which to start the restore. In most cases, this should
be left as the default, zero.
Page Size
InterBase supports database page sizes of 1024, 2048, 4096, and 8192 bytes. The
default is 1024 bytes. To change page size, back up the database and then restore
it, modifying the Page Size field in the Database Restore dialog box.
Changing the page size can improve performance for the following reasons:
• Storing and retrieving BLOB data is most efficient when the entire BLOB
fits on a single database page. If an application stores many BLOBs
exceeding 1K, using a larger page size reduces the time for accessing
BLOB data.
• InterBase performs better if rows do not span pages. If a database contains long rows of data, consider increasing the page size.
• If a database has a large index, increasing the database page size reduces
the number of levels in the index hierarchy. Indexes work faster if their
depth is kept to a minimum. Choose Tasks | Database Statistics to display index statistics, and consider increasing the page size if index depth
is greater than two on any frequently used index.
• If most transactions involve only a few rows of data, a smaller page size
may be appropriate, because less data needs to be passed back and forth
and less memory is used by the disk cache.
Replace Existing Database
Server Manager will not overwrite an existing database file unless the Replace
Existing Database option is selected. If you attempt to restore to an existing database name, and this option is not selected, the restore will fail.
Caution
166
Replacing an existing database is discouraged. When restoring to an existing file name, a safer approach is to rename the existing database file,
restore the database, then drop or archive the old database as needed.
Local InterBase Server User’s Guide
Commit After Each Table
Normally, Server Manager restores all metadata before restoring any data. If you
select the Commit After Each Table option, Server Manager restores the metadata and data for each table together, committing one table at a time.
This option is useful when you are having trouble restoring a backup file; for
example, if the data is corrupt or invalid according to integrity constraints.
If you have a problem backup file, restoring the database one table at a time lets
you recover some of the data intact. You can restore only the tables that precede
the bad data; restoration fails the moment it encounters bad data.
Deactivate Indexes
Normally, InterBase rebuilds indexes when a database is restored. If the database contained duplicate values in a unique index when it was backed up, restoration will fail. Duplicate values can be introduced into a database if indexes
were temporarily made inactive (for example, to allow insertion of many records
or to rebalance an index).
To enable restoration to succeed in this case, select the Deactivate Indexes
option. This makes indexes inactive and prevents them from rebuilding. Then
eliminate the duplicate index values, and re-activate indexes through ALTER
INDEX in Windows ISQL.
A unique index cannot be activated using the ALTER INDEX statement; a
unique index must be dropped and then created again. For more information
about activating indexes, see the Language Reference.
Note
The Deactivate Indexes option is also useful for bringing a database online
more quickly. Data access will be slower until indexes are rebuilt, but the
database is available. After the database is restored, users can access it
while indexes are reactivated.
Do Not Restore Validity Conditions
If you redefine validity constraints in a database where data is already entered,
your data might no longer satisfy the validity constraints. You might not discover this until you try to restore the database, at which time an error message
about invalid data appears.
Caution
Always make a copy of metadata before redefining it; for example, by
extracting it using Windows ISQL.
Backing Up and Restoring a Database
167
To restore a database that contains invalid data, select the Do Not Restore
Validity Conditions option. This option deletes validity constraints from the
metadata. After the database is restored, change the data to make it valid according to the new integrity constraints. Then add back the constraints that were
deleted.
This option is also useful if you plan to redefine the validity conditions after
restoring the database. If you do so, thoroughly test the data after redefining any
validity constraints.
Verbose Output
To monitor the restore process as it runs, select the Verbose Output option. This
option will open a standard text display window to display status messages on
the screen. For example:
The standard text display window enables you to search for specific text, save
the text to a file, and print the text. For an explanation of how to use the standard
text display window, see Chapter 11: “Introduction to Server Manager.”
Upgrading to a New On-disk Structure
New major releases of the InterBase server often contain changes to the on-disk
structure (ODS). If the ODS has changed, and you want to take advantage of any
new InterBase features, upgrade your databases to the new ODS.
You need not upgrade databases to use a new version of InterBase. The new versions can still access databases created with a previous version, but cannot take
advantage of any new InterBase features.
To upgrade existing databases to a new ODS, perform the following steps:
168
Local InterBase Server User’s Guide
1. Before installing the new version of InterBase, back up databases using
the old version.
2. Install the new version of the InterBase server as described in Installing
and Running InterBase for the platform.
3. Once the new version is installed, restore the databases with the new
version of InterBase.
The restored databases will be able to use any new InterBase server features.
Backing Up and Restoring a Database
169
170
Local InterBase Server User’s Guide
Appendix A
Error Messages
A
This appendix lists the error messages generated by the Server Manager during
database backup and restoration. Along with the text of each error message is a
suggested action to correct the problem.
Table A-1:
Server Manager Error Messages
Error Message
Causes and Suggested Actions to Take
Array dimension for column <string> is invalid
Fix the array definition before backing up.
Bad attribute for RDB$CHARACTER_SETS
An incompatible character set is in use.
Bad attribute for RDB$COLLATIONS
Fix the attribute in the named system table.
Bad attribute for table constraint
Check integrity constraints; if restoring, consider
using the “no validity” option to delete validity constraints.
Blocking factor parameter missing
Supply a numeric argument for “factor” option.
Cannot commit files
Database may contain corruption, or metadata may
violate integrity constraints. Try restoring tables
using “one at a time” option, or delete validity constraints using “no validity” option.
Cannot commit index <string>
Data may conflict with defined indexes. Try restoring
using “inactive” option to prevent rebuilding indexes.
Cannot find column for BLOB
Cannot find table <string>
Cannot open backup file <string>
Correct the file name you supplied and try again.
Cannot open status and error output file <string>
Messages are being redirected to invalid file name.
Check format of file or access permissions on the
directory of output file.
Column <string> used in index <string> seems to
have vanished
An index references a non-existent column. Check
either the index definition or column definition.
Commit failed on table <string>
Data corruption or violation of integrity constraint in
the specified table. Check metadata or restore “one
table at a time.”
Error Messages
171
Table A-1:
Server Manager Error Messages (Continued)
Error Message
Causes and Suggested Actions to Take
Could not drop database <string> (database might
be in use)
You used the Replace Existing Database option in
restoring a file to an existing database, but the database is in use. Either rename the target database or
wait until it is not in use.
Could not open file name <string>
Fix the file name and re-execute command.
Could not read from file <string>
Fix the file name and re-execute command.
Could not write to file <string>
Fix the file name and re-execute command.
Data type n not understood
An illegal data type is being specified.
Database format n is too old to restore to
The server version is incompatible with the version
of the database.
Database <string> already exists. To replace it, use The target database for restoration already exists.
the -R switch
Either rename the target database or use the
Replace Existing Database option.
Do not recognize record type n
Do not recognize <string> attribute n -- continuing
Do not understand BLOB INFO item n
Error accessing BLOB column <string> -- continuing
ERROR: Backup incomplete
The backup cannot be written to the target device or
file system. Either there is insufficient space, a hardware write problem, or data corruption.
Error committing metadata for table <string>
A table within the database may be corrupt. If restoring a database, try using the “Commit After Each
Table” option to isolate the table.
Exiting before completion due to errors
This message accompanies other error messages
and indicates that back up or restore could not execute. Check other error messages for the cause.
Expected array dimension m but instead found n
The problem array may need to be redefined.
Expected array version number m but found n
The problem array may need to be redefined.
Expected backup database <string>, found <string> Check the name of the backup file being restored.
Expected backup description record
Expected backup start time <string>, found <string>
Expected backup version 1, 2, or 3. Found n
Expected data attribute
Expected database description record
Expected number of bytes to be skipped, encountered <string>
172
Local InterBase Server User’s Guide
Table A-1:
Server Manager Error Messages (Continued)
Error Message
Causes and Suggested Actions to Take
Expected record length
Expected volume number m, found volume n
When backing up or restoring with multiple tapes,
be sure to specify the correct volume number.
Expected XDR record length
Failed in put_blr_gen_id
Failed in store_blr_gen_id
Failed to create database <string>
The target database specified is invalid. It may
already exist.
Index <string> omitted because m of the expected n
keys were found
Input and output have the same name. Disallowed. A backup file and database must have unique
names. Correct the names and try again.
Length given for initial file (m) is less than minimum In restoring a database into multiple files, the pri(n)
mary file was not allocated sufficient space.
InterBase automatically increases the page length
to the minimum value. No action necessary.
Missing parameter for the number of bytes to be
skipped
Multiple sources or destinations specified
Only one device name can be specified as a source
or target.
No table name for data
The database contains data that is unassigned to a
table. Use Server Manager to validate or mend the
database.
Page size specified (n bytes) rounded up to n bytes Invalid page sizes are rounded up to 1024, 2048,
4096, or 8192, whichever is closest.
Page size specified (n) greater than limit (8192
bytes)
Specify a page size of 1024, 2048, 4096, or 8192.
Protection is not there yet
Requires both input and output file names
Specify both a source and target when backing up
or restoring.
Restore failed for record in table <string>
Possible data corruption in the named table.
Skipped n bytes after reading a bad attribute n
Skipped n bytes looking for next valid attribute,
encountered attribute n
Trigger <string> is invalid
Error Messages
173
Table A-1:
Server Manager Error Messages (Continued)
Error Message
Causes and Suggested Actions to Take
Unexpected end of file on backup file
Restoration of the backup file failed. The backup
procedure that created the backup file may have terminated abnormally. If possible, create a new
backup file and use it to restore the database.
Unexpected I/O error while <string> backup file
A disk error or other hardware error may have
occurred during a backup or restore.
User name parameter missing
The backup or restore is accessing a remote
machine. Supply a user name.
Validation error on column in table <string>
The database cannot be restored because it contains data that violates integrity constraints. It may
be necessary to delete constraints from the metadata by specifying the “Do Not Restore Validity Conditions” during restore.
Warning -- record could not be restored
Possible corruption of the named data.
Wrong length record, expected m encountered n
174
Local InterBase Server User’s Guide
Appendix B
Connecting to InterBase
B
This appendix describes how to troubleshoot common InterBase SQL Link connection problems, and discusses various topics about using Borland SQL Links®
that are unique to InterBase.
InterBase Server Requirements
Table B-1 lists software that should already be installed and running at the InterBase server before you install Borland SQL Links for Windows.
Table B-1:
Server Software Requirements
Category
Description
Database server software
InterBase version 3.3 or higher.
Network protocol software
Network protocol software compatible with both the database server and the client workstation network protocol.
For information on network protocol software and network access rights, see
your system administrator.
Client Workstation Requirements
Table B-2 lists software that should already be installed and running at the client
workstation. It also lists related files and parameters.
Table B-2:
Client Workstation
Category
Description
BDE application(s)
Supported BDE application, installed as required by the
product documentation.
Connecting to InterBase
175
Table B-2:
Client Workstation (Continued)
Category
Description
Hardware and operating system requirements
1.5 MB of free disk space.
Hardware and operating system that meets the requirements of your Borland desktop product.
Access rights
If your Borland desktop product is installed on a network
(for desktop products installed file server, make sure your network user account has
on the network server only)
Read and Write access rights to the product’s BDE files
(including IDAPICFG.EXE and the BDE configuration
file). This directory is modified during SQL Link installation.
Network protocol software
Network protocol software compatible with both the
server network protocol and the client workstation client
database communication driver.
HOSTS file
A HOSTS file containing the name and IP address of
each server that you plan to attach. This file must contain
the name and IP address of at least one host. For example:
128.127.50.12 mis_server
SERVICES file
A SERVICES file containing the protocol for InterBase
server access. During SQL Links installation, this file is
updated to include the line:
gds_db 3050/tcp
Note: If you prefer, you can add the line to your
SERVICES file manually, after SQL Links installation.
Installation Changes
When you install the InterBase SQL Link driver, the following items are installed
in your workstation system:
Table B-3:
176
Installation Changes for the InterBase SQL Link Driver
Item Added
Description
SQLD_IB.DLL
Dynamic Link Library comprising the new InterBase
driver and its supporting files.
INTRBASE driver type
Added to Configuration Utility Driver Manager to enable
basic configuration of Borland InterBase SQL Link driver.
INTRBASE alias type
Added to Configuration Utility Alias Manager to enable
creation of an alias that can connect to an SQL Server
database.
SQLD_IB.HLP
Help file for configuring InterBase driver.
Local InterBase Server User’s Guide
Table B-3:
Installation Changes for the InterBase SQL Link Driver (Continued)
Item Added
Description
READLINK.TXT
Borland SQL Links for Windows README file.
INTERBAS.MSG
InterBase message files, usually installed in
C:\INTERBAS.
CONNECT.EXE
Utility to test connection between the workstation and the
InterBase server; see “TCP/IP Interface.”
REMOTE.DLL
GDS.DLL
InterBase-supplied.DLLs.
InterBase server specification, The installation updates the workstation SERVICES file
to InterBase SERVICES file
to add the correct protocol specification for InterBase
server access. The line should be similar to:
gds_db 3050/tcp
For further information, see your database administrator.
TCP/IP Interface
The following files provide InterBase client applications their interface to Winsock 1.1 compliant TCP/IP products.
Table B-4:
Winsock 1.1 Client Files
File Name
Description
MVWASYNC.EXE
Asynchronous communication module
VSL.INI
TCP/IP transport initialization file
WINSOCK.DLL
Windows Socket DLL
MSOCKLIB.DLL
Maps Windows socket calls to VSL driver
For TCP/IP products that are not Winsock 1.1 compliant, InterBase client applications will require one of the following files.
You can choose not to have the Installation program add a TCP/IP file by specifying “Use existing TCP file” during SQL Links for Windows installation.
Table B-5:
Non-Winsock Compliant TCP Support Files
File Name
TCP/IP Product
M3OPEN.EXE
3Com 3+Open TCP
Digital PATHWORKS
Microsoft LAN Manager TCP/IP
M3OPEN.DLL
3Com 3+Open TCP Version 2.0
MBW.EXE
Beame & Whiteside TCP/IP
Connecting to InterBase
177
Table B-5:
Non-Winsock Compliant TCP Support Files (Continued)
File Name
TCP/IP Product
MFTP.EXE
FTP PC/TCP
MHPARPA.DLL
HP ARPA Service for DOS
MNETONE.EXE
Ungermann-Bass Net/One
MNOVLWP.DLL
Novell LAN WorkPlace for DOS
MPATHWAY.DLL
Wollongong Pathway Access for DOS
MPCNFS.EXE
Sun PC NFS
MPCNFS2.EXE
Sun PC NFS v3.5
MPCNFS4.DLL
Sun PC NFS v4.0
MWINTCP.EXE
Wollongong WIN TCP\IP for DOS
Other Communication Protocols
The InterBase Workgroup Server for NetWare supports Novell SPX/IPX protocol. Two client files are required: NWIPXSPX.DLL, and NWCALLS.DLL.
The InterBase Workgroup Server for Windows NT supports Microsoft Named
Pipes protocol. No additional client files are required to support Named Pipes,
but the client machine must have Microsoft LAN Manager or Windows for
Workgroups 3.1.1 installed.
Testing the InterBase Connection
To test whether you can connect to InterBase successfully, use the InterBase Connection Utility (CONNECT.EXE). This utility is stored in the same directory as
the BDE files.
1. Choose File | Run from the Program Manager menu bar. The Run dialog
box appears.
2. In the Command Line text box, enter the command to run CONNECT.
(If you installed BDE files in C:\BDE, the command is
C:\BDE\CONNECT.EXE.)
3. Choose OK. The InterBase Connect Utility dialog box appears.
178
Local InterBase Server User’s Guide
Figure B-1:
InterBase Connect Utility Dialog Box
4. Enter information in each text box:
Text Box
Information Required
Database Path
The path to an InterBase database, in the format:
servername/usr/databaseDirectory/databaseName.gdb
Be sure to use Unix-style forward-slash characters, and
recall that Unix path names are case-sensitive.
User Name
A valid user name for the database you specified.
Password
A valid password for the user name you specified.
5. Choose Connect to test your network connection.
If the connection succeeds, a status message appears.
If the connection does not succeed, an error message appears.
Troubleshooting Common Connection Problems
If you have problems establishing an InterBase connection with SQL Link, try to
isolate the problem the following way:
1. Run the Connection Utility (CONNECT.EXE) to determine if you can
connect to the InterBase server from your client workstation.
If CONNECT does not work—Consult your database administrator.
If CONNECT works—Continue with step 2.
2. Verify that your InterBase SQL Link driver is correctly installed.
Reinstall SQL Link by following the procedures in Getting Started.
Connecting to InterBase
179
Also, check the SERVICES file for the correct protocol for InterBase
server access. The line should be similar to:
gds_db
3050/tcp
If you are unable to install the driver correctly—Consult your database
administrator.
If the driver is correctly installed—Continue with step 3.
Note
The following steps require a TELNET program and a PING program.
These DOS programs are not included in the SQL Link product package,
but they are available from your TCP/IP network software vendor. (Your
TCP/IP network software package may use different names for these programs.)
If you do not have these programs on your client workstation, ask your
network administrator to perform these tests for you.
3. Test the lower-level protocols.
• Enter the TELNET command to ensure that the TCP libraries are correctly installed.
If the TCP libraries are correctly installed, the login: prompt is displayed. Login to the network and check for the presence of the database you are trying to attach.
If the message can’t resolve hostname is displayed, check
your workstation HOSTS file to ensure that you have an entry for
your host name and IP address. The entry looks similar to:
128.127.50.12
mis_server
If TELNET is successful and CONNECT is not, you may have a problem with your InterBase installation. See your database administrator
for assistance.
• PING the server to check that the InterBase server itself is running
and visible to your desktop application. (If PING is successful, the
message servername is alive is displayed.)
If PING is successful but the TELNET command is not, there may be
a problem with the inet daemon.
If you cannot PING the server, you may have a routing problem.
Report the problem to your network administrator.
Note
180
If you don't have PING on your DOS client, you can PING the DOS client
from the server node (if you have access to the server node). Ask your network administrator for instructions.
Local InterBase Server User’s Guide
If the lower-level protocols do not seem to be running—Consult your
database administrator.
If the lower-level protocols are running—Continue with step 4.
4. Confirm that you have a login set in the InterBase security database,
ISC4.GDB.
If so—Continue with step 5.
5. Check whether your BDE application InterBase alias is set up properly.
If you can connect directly from your workstation but not from within your BDE
application, there is probably a problem with your IDAPI.CFG alias setup. Run
the Configuration Utility and examine your InterBase alias.
Borland Language Drivers for InterBase
The following table lists language drivers available for use with InterBase and
their corresponding InterBase subtypes. The language driver you choose must
use the same collation sequence as your server, and the same character set as the
one your server uses to pass data to your BDE application. The default can be set
at either a database or a table level.
InterBase supports subtypes for different fields in the same relation. However,
rules of a language driver you specify will apply to a relation as a whole. The
result of a query on a relation containing fields of different subtypes may vary
according to where it was processed. In such a case, set SQLQRYMODE to
SERVER to produce consistent query results.
Table B-6:
Borland Language Drivers for InterBase
Long Driver Name
Short Driver Name
InterBase Subtype
Paradox “ascii”
ascii
0 (default), 1, 100, 101
Borland DAN Latin-1
BLLT1DA0
139
DEU LATIN1
BLLT1DE0
144
ENG LATIN1
BLLT1UK0
152
ENU LATIN1
BLLT1US0
153
ESP LATIN1
BLLT1ES0
149
FIN LATIN1
BLLT1FI0
141
FRA LATIN1
BLLT1FR0
142
FRC LATIN1
BLLT1CA0
143
ISL LATIN1
BLLT1IS0
145
Connecting to InterBase
181
Table B-6:
Note
Borland Language Drivers for InterBase (Continued)
Long Driver Name
Short Driver Name
InterBase Subtype
ITA LATIN1
BLLT1IT0
146
NLD LATIN1
BLLT1NL0
140
NOR LATIN1
BLLT1NO0
105
PTG LATIN1
BLLT1PT0
154
Paradox INTL
INTL
102
Pdox NORDAN4
NORDAN40
105
Pdox SWEDFIN
SWEDFIN
106
SVE LATIN1
BLLT1SV0
151
For information on InterBase subtypes that correspond to dBASE® language drivers, contact Borland Technical Support.
Working With InterBase Servers
This section provides information about InterBase servers and their implementation of SQL. The topics discussed in this section cover aspects of InterBase that
differ from other SQL database products.
Table B-7 lists the general items that you might find helpful in working with
InterBase.
Table B-7:
182
General information About InterBase Servers
Item
Description
Dynamic Link Library (DLL) name
SQLD_IB.DLL
Case-sensitive for data?
Yes (including pattern
matching)
Case-sensitive for objects (such as tables, columns,
indexes)?
No
Does the server require an explicit request to begin a
transaction for multistatement transaction processing?
Yes
Does the server require that you explicitly start a transaction for multi-statement transaction processing in passthrough SQL?
No
Implicit row IDs
No
Local InterBase Server User’s Guide
Table B-7:
General information About InterBase Servers (Continued)
Item
Description
BLOB handles
InterBase BLOBs have handles. However, InterBase
CHAR and VARCHAR columns that are more than 255
characters long are treated
as non-handle BLOBs.
Maximum size of single BLOBs read (if BLOB handles are 32K
not supported)
InterBase Data Type Translations
Certain database operations cause SQL Link to convert data from Paradox® or
dBASE format to InterBase format. For example, a BDE application that copies
or appends data from a local table to an InterBase table causes SQL Link to convert the local data to InterBase format before performing the copy or append
operation.
Other database operations cause a conversion in the opposite direction, from
InterBase format to Paradox or dBASE format. For example, suppose you run a
local query against one or more SQL tables. During the query, SQL Link converts
any data originating in an SQL database to Paradox or dBASE format (depending on the answer format requested) before placing the data in the local answer
table.
Tables B-8 through B-13 list InterBase, Paradox, and dBASE data types and show
how SQL Link translates them in append, copy, and local query operations.
Table B-8:
InterBase to Paradox and dBASE Data Type Translations
FROM: InterBase
TO: Paradox
TO: dBASE
SHORT
Short
Number {6.0}
LONG
Number
Number {11.0}
FLOAT
Number
Float {20.4}
DOUBLE
Number
Float {20.4}
DATEa
DateTime
Date
BLOB
Binary
Memo
BLOB/1
Memo
Memo
CHAR(1-255)
Alphanumeric(n)
Character(n)2
CHAR(greater than 255)
Memo
Memo
Connecting to InterBase
183
Table B-8:
InterBase to Paradox and dBASE Data Type Translations (Continued)
FROM: InterBase
TO: Paradox
TO: dBASE
VARYING(1-255)
Alphanumeric(n)
Character(n)b
VARYING(greater than 255) Memo
b
Binary
ARRAY
Memo
Memo
a. From InterBase, QBE maps InterBase DATE to Paradox Date. Copy table maps InterBase DATE to Paradox Char(n).
b. Although an InterBase ARRAY is mapped to Paradox and dBASE data types, the
resulting fields appear to be empty when displayed within your client product.
Table B-9:
Paradox to InterBase and dBASE Data Type Translations
FROM: Paradox
TO: InterBase
TO: dBASE
Alphanumeric(n)
VARYING(n)
Character(n)
Number
DOUBLE
Float {20.4}
Money
DOUBLE
Float {20.4}
Date
DATE
Date
Short
SHORT
Number {6.0}
Memo
BLOB/1 (Text)
Memo
Formatted memo
BLOB (Binary)
Memo
Binary
BLOB (Binary)
Memo
Graphic
BLOB (Binary)
Memo
OLE
BLOB (Binary)
Memo
Long
Long
Number {11.0}
Time
Character {>8}
Character {>8}
DateTime
Date
Character {>8}
Bool
Character {1}
Bool
AutoInc
Long
Number {11.0}
Bytes
BLOB
Bytes
BCD
N/A
N/A
Table B-10:
184
dBASE to InterBase and Paradox Data Type Translations
FROM: dBASE
TO: InterBase
TO: Paradox
Character(n)
VARYING(n)
Alphanumeric(n)
Number
Floata
SHORT, DOUBLE
DOUBLE
Short number, Number
Number
Local InterBase Server User’s Guide
Table B-10:
dBASE to InterBase and Paradox Data Type Translations (Continued)
FROM: dBASE
TO: InterBase
TO: Paradox
Date
DATE
Date
Lock
Character {24}
Alpha {24}
Bytes
BLOB
Bytes
Bool
Character {1}
Bool
Memo
BLOB/1
Memo
a. dBASE data types Number and Float translate to different InterBase and Paradox data
types depending on the WIDTH and DEC specification. dBASE Number and Float values
with a WIDTH less than 5 and a DEC equal to 0 translate to InterBase SHORT or Paradox
Short Number data types.
Table B-11:
Paradox to BDE Logical to dBASE Data Type Translations
Paradox Physical
BDE Logical
dBASE
fldPDXCHAR
fldZSTRING
fldDBCHAR
fldPDXNUM
fldFLOAT
fldDBFLOAT {20.4}
fldPDXMONEY
fldFLOAT/fldstMONEY
fldDBFLOAT {20.4}
fldPDXDATE
fldDATE
fldDATE
fldPDXSHORT
fldINT16
fldDBNUM {6.0}
fldPDXMEMO
fldBLOB/fldstMEMO
fldDBMEMO
fldPDXBINARYBLOB
fldBLOB/fldstBINARY
fldDBMEMO
fldPDXFMTMEMO
fldBLOB/fldstFMTMEMO
fldDBMEMO
fldPDXOLEBLOB
fldBLOB/fldstOLEOBJ
fldDBMEMO
fldPDXGRAPHIC
fldBLOB/fldstGRAPHIC
fldDBMEMO
fldPDXBLOB
fldPDXMEMO
fldDBMEMO
fldPDXLONG
fldINT32
fldDBNUM {11.0}
fldPDXTIME
fldTIME
fldDBCHAR {>8}
fldPDXDATETIME
fldTIMESTAMP
fldDBCHAR {30}
fldPDXBOOL
fldBOOL
fldDBBOOL
fldPDXAUTOINC
fldINT32
fldDBNUM {11.0}
fldPDXBYTES
fldBYTES
fldDBBYTES
fldPDXBCD
fldBCD
fldDBCHAR
Connecting to InterBase
185
Table B-12:
dBASE to BDE Logical to Paradox Data Type Translations
dBASE Physical
BDE Logical
Paradox
fldDBCHAR
fldZSTRING
fldPDXCHAR
fldDBNUM
if( iUnits2=0 && iUnits1<5 )
fldINT16
else fldFLOAT
fldPDXSHORT
fldPDXNUM
fldDBMEMO
fldBLOB
fldPDXMEMO
fldDBBOOL
fldBOOL
fldPDXBOOL
fldDBDATE
fldDATE
fldPDXDATE
fldDBFLOAT
fldFLOAT
fldPDXNUM
fldDBLOCK
fldLOCKINFO
fldPDXCHAR {24}
fldDBBINARY
fldBLOB/fldstTYPEDBINARY
fldPDXBINARYBLOB
fldDBOLEBLOB
fldBLOB/fldstDBSOLEOBJ
fldPDXOLEBLOB
Table B-13:
InterBase to BDE Logical to Paradox and dBASE Data Type Translations
InterBase Physical BDE Logical
Paradox Physical
dBASE Physical
fldIBSHORT
fldINT16
fldPDXSHORT
fldDBNUM {6.0}
fldIBLONG
fldINT32
fldPDXLONG
fldDBNUM {11.0}
fldIBFLOAT
fldFLOAT
fldPDXNUM
fldDBFLOAT {20.4}
fldIBDOUBLE
fldFLOAT
fldPDXNUM
fldDBFLOAT {20.4}
fldIBCHAR < 255
fldZSTRING
fldPDXCHAR
fldDBCHAR
fldIBCHAR > 255
fldBLOB
fldSTMEMO
fldDBCHAR
fldPDXCHAR
fldDBCHAR
fldIBVARYING > 255 fldBLOB
fldSTMEMO
fldDBCHAR
fldIBDATE
fldTIMESTAMP
fldPDXDATETIME
fldDBDATE
fldIBBLOB
fldBLOB
fldPDXBINARYBLOB fldDBMEMO
fldIBTEXTBLOB
fldBLOB/fldstMEMO fldPDXMEMO
fldIBVARYING < 255 fldZSTRING
fldDBMEMO
InterBase Equivalents to Standard SQL Data Types
When you use pass-through SQL commands to create or alter an InterBase table,
you must use standard SQL data types. Table B-14 lists standard SQL data types
186
Local InterBase Server User’s Guide
and their corresponding InterBase data types.
Table B-14:
Note
SQL to InterBase Data Type Translations
FROM: SQL
TO: InterBase
SMALLINT
SHORT
INTEGER
LONG
DATE
DATE
CHAR(n)
CHAR(n)
VARCHAR(n)
VARYING
DECIMAL
LONG
FLOAT
FLOAT
LONG FLOAT
DOUBLE
BLOB
BLOB
SQL does not support InterBase arrays of data types.
InterBase System Relations/Tables
InterBase includes a special set of tables called system relations. System relations
describe privileges, indexes, SQL table structures, and other items that define
relationships within a database. You can access system relations with passthrough SQL from your desktop product through the SQL Editor (see your desktop application documentation).
Table B-15 lists InterBase system relations you can access through SQL Link.
Table B-15:
Selected InterBase System Relations
Name
Use
RDB$RELATIONS
Lists all tables and views
RDB$RELATION_FIELDS
Lists columns of tables and views
RDB$INDICES
Lists indexes
Connecting to InterBase
187
InterBase Field-naming Rules
Table B-16 lists field-naming rules for Paradox, dBASE, and InterBase.
Table B-16:
InterBase Field-naming Rules
Rule
Paradox
dBASE
InterBase
Max length
(characters)
25
10
31
Valid charactersa
All
All alphanumeric except Letters (A-Z, a-z), digits, $,
punctuation marks, blank or _
spaces, and other special
characters
Must begin with . . . Any valid
character
except
space
A letter
Letters only (A-Z, a-z)
a. Paradox field names should not contain square brackets [], curly braces {}, pipes |,
parentheses (), or the combination ->, or the symbol # alone.
Note
188
You cannot use InterBase reserved words for table names. See the InterBase
Language Reference for a list of reserved words.
Local InterBase Server User’s Guide
Appendix C
Example Database
C
This appendix summarizes and describes the example database provided with
InterBase. The database, source code, and executables for these examples are
contained in the EXAMPLES subdirectory of the InterBase directory
(INTERBAS, by default).
The Example Database
The database (EMPLOYEE.GDB) is created with the data definition file,
CREATEDB.SQL. It is a personnel management and sales database for a fictional
company corresponding to the database that is built in the tutorial. It is designed
to include such InterBase features as FOREIGN KEY and CHECK constraints.
Triggers are also defined for some of the tables.
The database is made up of ten tables. Those tables are:
Table C-1 Tables in the Example Database
EMPLOYEE
DEPARTMENT
JOB
SALES
PROJECT
CUSTOMER
EMPLOYEE_PROJECT
PROJ_DEPT_BUDGET
COUNTRY
SALARY_HISTORY
Each of the database tables is described in a separate table in this appendix. The
structure of the Employee database is shown in Figure C-1, “EMPLOYEE Database”. Each box in Figure C-1 represents a table. The arrows connecting boxes
represent the FOREIGN KEY references among the tables.
Domains
Fifteen domains are defined for EMPLOYEE.GDB. Domains make table definition easier, because they predefine data types, CHECK constraints, and defaults.
Example Database
189
Six domains are defined as simple data types without CHECK constraints or
DEFAULT values.
Table C-2 Simple Example Domains
Domain Name
Data Type
FIRSTNAME
(VARCHAR)
LASTNAME
(VARCHAR)
PHONENUMBER
(VARCHAR)
COUNTRYNAME
(VARCHAR)
ADDRESSLINE
(VARCHAR)
EMPNO
(SMALLINT)
Nine domains are defined with CHECK constraints and/or default values.
Table C-3 Complex Example Domains
190
Domain Name
Data Type
CHECK Constraint
Default
DEPTNO
CHAR(3)
CHECK (VALUE = ‘000’ OR
(VALUE > ‘0’ AND VALUE <=
‘999’) OR VALUE IS NULL)
None
PROJNO
CHAR(5)
CHECK (VALUE = UPPER
(VALUE))
None
CUSTNO
INTEGER
CHECK (VALUE > 1000)
None
JOBCODE
VARCHAR(5)
CHECK (VALUE > ‘99999’)
None
JOBGRADE
SMALLINT
CHECK
(VALUE BETWEEN 0 AND 6)
None
SALARY
NUMERIC(10,2)
CHECK (VALUE > 0)
0
BUDGET
DECIMAL(12,2)
CHECK (VALUE > 10000 AND
VALUE <= 2000000)
50000
PRODTYPE
VARCHAR(12)
CHECK (VALUE IN (‘software’,
‘hardware’, ‘other’, ‘N/A’))
‘software’
PONUMBER
CHAR(8)
CHECK (VALUE STARTING
WITH ‘V’)
None
Local InterBase Server User’s Guide
EMP_NO
Example Database
EMP_NO
EMP_NO
PROJ_ID
CUST_NO
DEPT_NO
UPDATER_ID
PO_NUMBER
SALES
CHANGE_DATE
PROJ_ID
DEPT_NO
CUST_NO
COUNTRY
PROJ_NAME
CUSTOMER
PROJ_ID
PROJECT
SALES_REP
YEAR
COUNTRY
COUNTRY
TEAM_LEADER
JOB_COUNTRY
MNGR_NO
JOB_GRADE
HEAD_DEPT
JOB_CODE
JOB
DEPARTMENT
JOB_COUNTRY
DEPARTMENT
JOB_GRADE
PROJ_DEPT_BUDGET
JOB_CODE
EMPLOYEE_PROJECT
DEPT_NO
SALARY_HISTORY
EMPLOYEE
Figure C-1 EMPLOYEE Database
191
Triggers
The database contains the following triggers:
• SET_EMP_NO creates a unique employee number when a new
employee record is inserted.
• SAVE_SALARY_CHANGE inserts a new record in the
SALARY_HISTORY table when an employee’s salary changes.
• SET_CUST_NO creates a unique customer number when a new customer record is inserted.
• POST_NEW_ORDER posts an event named “new_order” when a new
record is inserted in the SALES table.
Stored Procedures
The database contains the following stored procedures:
• ADD_EMP_PROJ adds an employee to a project, returning an error message if the employee is not in the EMPLOYEE table.
• DELETE_EMPLOYEE removes an employee’s records in the
EMPLOYEE, DEPARTMENT, and EMPLOYEE_PROJECT tables, unless
the employee has any sales records in the SALES table.
• GET_EMP_PROJ is a select procedure that returns all the projects to
which an employee is assigned.
• MAIL_LABEL creates a six-line customer mailing label, when given the
customer number as input.
• ORG_CHART returns an organization chart, showing department names
and numbers, manager name and title, and number of employees in each
department.
• SHIP_ORDER takes a purchase order number (PO_NUMBER) as input,
and updates the SALES table to indicate that an order has been shipped,
unless it has already been shipped, the customer is on hold, or the customer has on overdue balance.
• SUB_TOT_BUDGET returns the average, smallest, and largest department budgets for all departments in the department given as the input
parameter.
• DEPT_BUDGET takes a department number as input and returns the
total budget of all departments under that department, inclusive.
192
Local InterBase Server User’s Guide
• SHOW_LANGS returns the language requirements for a job (stored in an
array in the JOB table), when given the job code, grade, and country. This
procedure illustrates how to display the contents of an array for a specific row and column.
• ALL_LANGS uses SHOW_LANGS to return the language requirements
for all jobs in the JOB table. This procedure illustrates how to display the
contents of an array using a stored procedure for all rows in a table.
Example Database Tables
Conceptually, the EMPLOYEE table is the central table in the database. There is
one record in this table for each employee, with the employee number
(EMP_NO column) as the primary key, because each employee is uniquely identified by an employee number. The DEPT_NO column is a foreign key that references the DEPARTMENT table. The columns JOB_CODE, JOB_GRADE, and
JOB_COUNTRY reference the JOB table. The table also contains other information on each employee, such as salary and hire date. The salary is given in the
currency in which the employee works.
Table C-4, “EMPLOYEE Table” shows the contents of the EMPLOYEE table, the
definition of each column in the table and any relations to other tables (such as
foreign keys.
Table C-4 EMPLOYEE Table
Column Name
Data Type, Default Value, and CHECK Constraints
EMP_NO (EMPNO)
PRIMARY KEY
SMALLINT NOT NULL
FIRST_NAME (FIRSTNAME)
VARCHAR(15) NOT NULL
LAST_NAME (LASTNAME)
VARCHAR(20) NOT NULL
PHONE_EXT
VARCHAR(4) Nullable
HIRE_DATE DATE
NOT NULL DEFAULT ‘NOW’
DEPT_NO (DEPTNO)
FOREIGN KEY - references
DEPARTMENT (DEPT_NO)
CHAR(3) NOT NULL
CHECK (VALUE = ‘000’ OR
(VALUE > ‘0’ AND VALUE <= ‘999’) OR
VALUE IS NULL)
VARCHAR(5) NOT NULL
JOB_CODE (JOBCODE)
FOREIGN KEY - references JOB CHECK (VALUE > ‘99999’)
SMALLINT NOT NULL
JOB_GRADE (JOBGRADE)
FOREIGN KEY - references JOB CHECK (VALUE BETWEEN 0 AND 6)
Example Database
193
Table C-4 EMPLOYEE Table (Continued)
Column Name
Data Type, Default Value, and CHECK Constraints
JOB_COUNTRY
VARCHAR(15) NOT NULL
(COUNTRYNAME)
FOREIGN KEY - references JOB
SALARY (SALARY)
DOUBLE PRECISION NOT NULL
DEFAULT 0
CHECK (VALUE > 0)
FULL_NAME
Computed by: (last_name || ‘, ‘ || first_name)
There is also a complex CHECK constraint on SALARY:
CHECK (SALARY >= (SELECT MIN_SALARY FROM JOB WHERE
JOB.JOB_CODE = EMPLOYEE.JOB_CODE AND
JOB.JOB_GRADE = EMPLOYEE.JOB_GRADE AND
JOB.JOB_COUNTRY = EMPLOYEE.JOB_COUNTRY)
AND
SALARY <= (SELECT MAX_SALARY FROM JOB WHERE
JOB.JOB_CODE = EMPLOYEE.JOB_CODE AND
JOB.JOB_GRADE = EMPLOYEE.JOB_GRADE AND
JOB.JOB_COUNTRY = EMPLOYEE.JOB_COUNTRY))
The DEPARTMENT table contains a record for each department in the company,
with the DEPT_NO as the primary key. DEPARTMENT, the department name, is
also a unique (or alternate) key. The HEAD_DEPT column is a foreign key referencing the parent department. So, in effect, the table defines a tree, in which each
department can contain other departments. The “root” of the tree is the Corporate Headquarters department, for which HEAD_DEPT is NULL. The table also
contains columns for each department’s location, budget, and other information.
Table C-5, “DEPARTMENT Table” shows the contents of the DEPARTMENT
table.
Table C-5 DEPARTMENT Table
194
Column Name
Data Type, Default Value, and CHECK Constraints
DEPT_NO (DEPTNO)
PRIMARY KEY
CHAR(3) NOT NULL
CHECK (VALUE = ‘000’ OR
(VALUE > ‘0’ AND VALUE <= ‘999’) OR
VALUE IS NULL)
DEPARTMENT
UNIQUE key
VARCHAR(25) NOT NULL
HEAD_DEPT (DEPTNO)
FOREIGN KEY - references
DEPARTMENT (DEPT_NO)
CHAR(3) NOT NULL
CHECK (VALUE = ‘000’ OR
(VALUE > ‘0’ AND VALUE <= ‘999’) OR
VALUE IS NULL)
Local InterBase Server User’s Guide
Table C-5 DEPARTMENT Table (Continued)
Column Name
Data Type, Default Value, and CHECK Constraints
MNGR_NO (EMPNO)
FOREIGN KEY - references
EMPLOYEE (EMP_NO)
SMALLINT Nullable
BUDGET (BUDGET)
DOUBLE PRECISION Nullable
DEFAULT 50000
CHECK (VALUE > 10000 AND VALUE <= 2000000)
LOCATION
VARCHAR(15) Nullable
PHONE_NO (PHONENUMBER) VARCHAR(20) Nullable
DEFAULT ‘555-1234’
The JOB table contains a record for each job in the company. The three columns
JOB_CODE, JOB_GRADE, and JOB_COUNTRY are the primary key that
uniquely identifies a job. JOB_COUNTRY references the COUNTRY table, which
identifies the currency of each country.
Table C-6, “JOB Table” shows the contents of the JOB table.
Table C-6 JOB Table
Column Name
Data Type, Default Value, and CHECK Constraints
JOB_CODE (JOBCODE)
PRIMARY KEY
VARCHAR(5) NOT NULL
CHECK (VALUE > ‘99999’)
JOB_GRADE (JOBGRADE)
PRIMARY KEY
SMALLINT NOT NULL
CHECK (VALUE BETWEEN 0 AND 6)
JOB_COUNTRY
(COUNTRYNAME)
PRIMARY KEY
FOREIGN KEY - references
COUNTRY (COUNTRY)
VARCHAR(15) NOT NULL
JOB_TITLE
VARCHAR(25) NOT NULL
MIN_SALARY (SALARY)
DOUBLE PRECISION NOT NULL DEFAULT 0
CHECK (VALUE > 0)
CHECK (min_salary < max_salary)
MAX_SALARY (SALARY)
DOUBLE PRECISION NOT NULL DEFAULT 0
CHECK (VALUE > 0)
CHECK (min_salary < max_salary)
JOB_REQUIREMENT
BLOB segment 400, subtype TEXT Nullable
LANGUAGE_REQ
ARRAY OF [1:5] VARCHAR(15) Nullable
Example Database
195
The SALES table contains a record for each sale closed, with PO_NUMBER as
the primary key. Foreign keys are CUST_NO referencing the CUSTOMER table
and SALES_REP referencing the EMPLOYEE table.
Table C-7, “SALES Table” shows the contents of the SALES table.
Table C-7 SALES Table
Column Name
Data Type, Default Value, and CHECK Constraints
PO_NUMBER (PONUMBER)
PRIMARY KEY
CHAR(8) NOT NULL
CHECK (VALUE STARTING WITH ‘V’)
CUST_NO (CUSTNO)
FOREIGN KEY - references
CUSTOMER (CUST_NO)
INTEGER NOT NULL
CHECK (VALUE > 1000)
SALES_REP (EMPNO)
FOREIGN KEY - references
EMPLOYEE (EMP_NO)
SMALLINT Nullable
ORDER_STATUS
VARCHAR(7) NOT NULL
DEFAULT ‘new’
ORDER_DATE
DATE NOT NULL DEFAULT ‘now’
SHIP_DATE
DATE Nullable
DATE_NEEDED
DATE Nullable
PAID
CHAR(1) Nullable
DEFAULT ‘n’
QTY_ORDERED
INTEGER NOT NULL
DEFAULT 1
TOTAL_VALUE
INTEGER NOT NULL
DISCOUNT
FLOAT NOT NULL
DEFAULT 0
ITEM_TYPE
(PRODTYPE) VARCHAR(12) NOT NULL
DEFAULT ‘software’
CHECK (VALUE IN (‘software’, ‘hardware’, ‘other’,
‘N/A’))
AGED
Computed by: (ship_date - order_date)
Several checks are performed on the SALES table, among them:
•
A sale order must have a status: open, shipped, waiting.
•
The ship date must be entered, if order status is “shipped”.
•
New orders cannot be shipped to customers with “on_hold” status.
The CHECK constraints for this table are:
196
Local InterBase Server User’s Guide
CHECK (order_status in ("new", "open", "shipped", "waiting"))
CHECK (ship_date >= order_date OR ship_date IS NULL)
CHECK (date_needed > order_date OR date_needed IS NULL)
CHECK (paid in ("y", "n"))
CHECK (qty_ordered >= 1)
CHECK (total_value >= 0)
CHECK (discount >= 0 AND discount <= 1)
CHECK (NOT (order_status = "shipped" AND ship_date IS NULL))
CHECK (NOT (order_status = "shipped" AND
EXISTS (SELECT on_hold FROM customer
WHERE customer.cust_no = sales.cust_no
AND customer.on_hold = "*")))
The PROJECT table contains a record for each project, with PROJ_ID as the
primary key, and TEAM_LEADER referencing the EMP_NO in the EMPLOYEE
table. The PROJ_DEPT_BUDGET column shows the budget for each project and
year.
Table C-8, “PROJECT Table” shows the contents of the PROJECT table.
Table C-8 PROJECT Table
Column Name
Data Type, Default Value, and CHECK Constraints
PROJ_ID (PROJNO)
PRIMARY KEY
CHAR(5) NOT NULL CHECK (VALUE = UPPER
(VALUE))
PROJ_NAME
UNIQUE key
VARCHAR(20) NOT NULL
PROJ_DESC
BLOB segment 800, subtype TEXT Nullable
TEAM_LEADER (EMPNO)
FOREIGN KEY - references
EMPLOYEE (EMP_NO)
SMALLINT Nullable
PRODUCT (PRODTYPE)
VARCHAR(12) NOT NULL DEFAULT ‘software’
CHECK (VALUE IN (‘software’, ‘hardware’, ‘other’,
‘N/A’))
The CUSTOMER table contains a record for each customer, with CUST_NO as
the primary key, and columns for other information such as address, contact
name and phone number.
Table C-9, “CUSTOMER Table”shows the contents of the CUSTOMER table.
Table C-9 CUSTOMER Table
Column Name
Data Type, Default Value, and CHECK Constraints
CUST_NO (CUSTNO)
PRIMARY KEY
INTEGER NOT NULL
CHECK (VALUE > 1000)
CUSTOMER
VARCHAR(25) NOT NULL
Example Database
197
Table C-9 CUSTOMER Table (Continued)
Column Name
Data Type, Default Value, and CHECK Constraints
CONTACT_FIRST (FIRSTNAME)
VARCHAR(15) Nullable
CONTACT_LAST (LASTNAME)
VARCHAR(20) Nullable
PHONE_NO (PHONENUMBER) VARCHAR(20) Nullable
ADDRESS_LINE1
(ADDRESSLINE)
VARCHAR(30) Nullable
ADDRESS_LINE2
(ADDRESSLINE)
VARCHAR(30) Nullable
CITY
VARCHAR(25) Nullable
STATE_PROVINCE
VARCHAR(15) Nullable
COUNTRY (COUNTRYNAME)
FOREIGN KEY - references
COUNTRY (COUNTRY)
VARCHAR(15) Nullable
POSTAL_CODE
VARCHAR(12) Nullable
ON_HOLD
CHAR(1) Nullable DEFAULT NULL
CHECK (on_hold IS NULL OR on_hold = ‘*’)
Table C-10, “EMPLOYEE_PROJECT Table” shows the contents of the
EMPLOYEE_PROJECT table.
Table C-10 EMPLOYEE_PROJECT Table
Column Name
Data Type, Default Value, and CHECK Constraints
EMP_NO (EMPNO)
PRIMARY KEY
FOREIGN KEY - references
EMPLOYEE (EMP_NO)
SMALLINT NOT NULL
PROJ_ID (PROJNO)
PRIMARY KEY
FOREIGN KEY - references
PROJECT (PROJ_ID)
CHAR(5) NOT NULL
CHECK (VALUE = UPPER (VALUE))
Table C-11, “PROJ_DEPT_BUDGET Table” shows the contents of the
PROJ_DEPT_BUDGET table.
Table C-11 PROJ_DEPT_BUDGET Table
198
Column Name
Data Type, Default Value, and CHECK Constraints
YEAR
PRIMARY KEY
INTEGER NOT NULL
CHECK (YEAR >= 1993)
Local InterBase Server User’s Guide
Table C-11 PROJ_DEPT_BUDGET Table (Continued)
Column Name
Data Type, Default Value, and CHECK Constraints
PROJ_ID (PROJNO)
PRIMARY KEY
FOREIGN KEY - references
PROJECT (PROJ_ID)
CHAR(5) NOT NULL
CHECK (VALUE = UPPER (VALUE))
DEPT_NO (DEPTNO)
PRIMARY KEY
FOREIGN KEY - references
DEPARTMENT (DEPT_NO)
CHAR(3) NOT NULL
CHECK (VALUE = ‘000’ OR (VALUE > ‘0’ AND
VALUE <= ‘999’) OR VALUE IS NULL)
QUART_HEAD_CNT
ARRAY OF [1:4] INTEGER Nullable
PROJECTED_BUDGET
(BUDGET)
DOUBLE PRECISION Nullable
DEFAULT 50000
CHECK (VALUE > 10000 AND VALUE <= 2000000)
Table C-12, “COUNTRY Table” shows the contents of the COUNTRY table.
Table C-12 COUNTRY Table
Column Name
Data Type, Default Value, and CHECK Constraints
COUNTRY (COUNTRYNAME
PRIMARY KEY
VARCHAR(15) NOT NULL
CURRENCY
VARCHAR(10) NOT NULL
The SALARY_HISTORY table contains a record for each time an employee’s salary changes. It is automatically maintained by the SAVE_SALARY_CHANGE
trigger.
Table C-13, “SALARY_HISTORY Table” shows the contents of the
SALARY_HISTORY table.
Table C-13 SALARY_HISTORY Table
Column Name
Data Type, Default Value, and CHECK Constraints
EMP_NO (EMPNO)
PRIMARY KEY
FOREIGN KEY - references
EMPLOYEE (EMP_NO)
SMALLINT NOT NULL
CHANGE_DATE
PRIMARY KEY
DATE NOT NULL DEFAULT ‘NOW’
UPDATER_ID
PRIMARY KEY
VARCHAR(20) NOT NULL
OLD_SALARY (SALARY)
DOUBLE PRECISION NOT NULL DEFAULT 0
CHECK (VALUE > 0)
Example Database
199
Table C-13 SALARY_HISTORY Table (Continued)
200
Column Name
Data Type, Default Value, and CHECK Constraints
PERCENT_CHANGE
DOUBLE PRECISION NOT NULL DEFAULT 0
CHECK (VALUE between -50 and 50)
NEW_SALARY
Computed by:
(OLD_SALARY + OLD_SALARY *
PERCENT_CHANGE / 100)
Local InterBase Server User’s Guide
Appendix D
ODBC Driver
D
The Local InterBase Server includes an ODBC driver. The driver is implemented
through Windows DLLs.
Important
For more information on the InterBase ODBC driver, refer to the
IBODBC.TXT “readme” file in the InterBase home directory.
System Requirements
The Local InterBase Server installation program asks if you want to install the
InterBase ODBC driver. If you choose to install the InterBase ODBC driver, the
installation program copies all necessary DLLs to the WINDOWS\SYSTEM
directory, and set up Borland InterBase as the driver name and InterBase as the
database source.
If you attempt to configure a data source and you do not have the INTERBASE
directory on your path or the driver DLLs in your WINDOWS\SYSTEM directory, the following message appears:
ODBC Files
If you choose to install the InterBase ODBC driver, the following files are
installed to the WINDOWS\SYSTEM directory (or WINNT\SYSTEM on
Windows NT):
• ODBCADM.EXE - InterBase ODBC Administrator executable.
201
• ODBC.DLL, ODBCCURS.DLL, ODBCINST.DLL, BLBAS04.DLL,
BLINT04.DLL, BLMDS04.DLL, BLUTIL04.DLL - InterBase ODBC
dynamic link libraries.
• BLODBC.LIC - InterBase ODBC license file.
• BLINT04.HLP, ODBCINST.HLP - Online help files.
These files are installed in the WINDOWS directory (or WINNT on Windows
NT):
• ODBC.INI, ODBCINST.INI
The IBODBC.TXT “Read Me” file is installed to the InterBase home directory.
These files require a total of approximately 560K.
Configuring Data Sources
If you have an ODBC administrator installed on your system, you can configure
an InterBase data source as follows:
1. Start the ODBC Administrator by double-clicking on the ODBC icon in
the Control Panel application in the Main program group. A dialog box
with a list of data sources appears.
2. If you are configuring a new data source, click Add. A list of installed
drivers appears. Select Borland InterBase, and click OK. If you are configuring an existing data source, select the data source name and click
Setup. The Setup dialog box appears.
3. Specify values as follows:
Data Source Name: identifies a single connection to an InterBase database system. This can be any string. Examples include “InterBase”,
“Accounting”, or “InterBase-Serv1.”
Description: an optional long description of a data source name. For
example, “My Accounting Database” or “InterBase on Server #1.”
202
Windows Client User’s Guide
Database Name: the name of the database to which you want to connect,
including server name, separator indicating network protocol, and full
directory path. For TCP/IP, the separator is a colon (:). For Novell SPX,
the separator is an at-sign (@). For NetBEUI, the separator is a backslash
(\) and the server name must be preceded by a double backslash (\\).
For example, to connect to a database, EMPLOYEE.GDB, in the directory,
\USERS\FRED, on a server named APTOS with TCP/IP, enter:
APTOS:\USERS\FRED\EMPLOYEE.GDB
To connect using Novell SPX, enter:
APTOS@\USERS\FRED\EMPLOYEE.GDB
To connect using NetBEUI/Named Pipes, enter:
\\APTOS\C:\\USERS\FRED\EMPLOYEE.GDB
Default User Name: the default user name used to connect to your
InterBase database system, for example, SYSDBA or GUEST. Your ODBC
application may override this value or you may override this value in
the Logon dialog box.
Note
Users must be authorized with user names and passwords through Server
Manager.
Connecting to a Data Source Using a Logon Dialog Box
Some ODBC applications display a Logon dialog box when you are connecting
to a data source. For InterBase, the dialog box is as follows:
In this dialog box, do the following:
1. Enter the name of the server and database you want to access (case-sensitive) or click the arrow to the right of the box to select a server name you
specified in the Setup dialog box. This must be a full connection string
including the server name, the network protocol separator, directory
path and database file name, as described in the previous section. For
example, APTOS:\USERS\FRED\MYDB.GDB.
2. Enter your user name.
203
3. Enter your password for the system. It is case-sensitive.
4. Click OK to log on to the InterBase database system installed on the
server you specified and to update the values in ODBC.INI.
Connecting to a Data Source Using a Connection String
If your application requires a connection string to connect to a data source, you
must specify the data source name that tells the driver which section of
ODBC.INI to use for the default connection information. Optionally, you may
specify attribute=value pairs in the connection string to override the default values stored in ODBC.INI.
You can specify either long or short names in the connection string. The connection string has the form:
“DSN=data source name[;attribute=value[;attribute=value]...]”
An example of a connection string for InterBase is:
“DSN=ACCOUNTING;DB=APTOS:\USERS\FRED\PAYRLL;UID=JOHN;PWD=XYZZY”
The following table gives the long and short names for each attribute, as well as
a description.
Table D-1:
204
Connection String Attributes
Attribute
Description
DataSourceName (DSN)
A string that identifies a single Name connection to
an InterBase database system. Examples include
“Accounting” or “InterBase-Serv1.” Setup label:
Data Source Name.
Database (DB)
The name of the database system to which you
want to connect. Setup label: Database Name.
LogonID (UID)
The case-sensitive user name used to connect to
your InterBase database system. Setup label:
Default User Name.
BinarySegmentSize (BSS)
Segment size used to create a binary BLOB. The
size of the segment determines how many bytes the
segment can hold. This value does not reflect the
maximum size of the BLOB. Setup label: none.
CharSegmentSize (CSS)
Segment size used to create a text BLOB. BLOB
data are stored in segments. The size of the segment determines how many bytes the segment can
hold. This value does not reflect the maximum size
of the BLOB. Setup label: none.
Windows Client User’s Guide
Table D-1:
Connection String Attributes (Continued)
Attribute
Description
Password (PWD)
InterBase password for the specified server.
Data Types
The following table shows how the InterBase data types are mapped to the standard ODBC data types:
Table D-2:
InterBase and ODBC Data Types
InterBase Data Type
ODBC Data Type
BLOB (SEGMENTSIZE , 0)
SQL_LONGVARBINARY
BLOB (SEGMENTSIZE , 1)
SQL_LONGVARCHAR
CHAR (LENGTH)
SQL_CHAR
DATE
SQL_DATE
DOUBLE PRECISION
SQL_DOUBLE
FLOAT
SQL_FLOAT
INTEGER
SQL_INTEGER
SMALLINT
SQL_SMALLINT
VARCHAR (MAX_LENGTH)
SQL_VARCHAR
The BLOB data types cannot be used in a WHERE clause and cannot be inserted
into a column as a string. Arrays do not have an equivalent data type in ODBC
and therefore are not supported.
Isolation and Lock Levels Supported
InterBase supports the following transaction isolation levels: READ
COMMITTED, SNAPSHOT, and SNAPSHOT TABLE STABILITY. The default is
SNAPSHOT. ODBC applications can use this isolation level by calling SQLSetConnectOption(1040,1).
205
The InterBase ODBC driver supports three transaction types. The default is
SNAPSHOT isolation level. SNAPSHOT allows repeatable reads of database
records.
Table D-3:
ODBC and InterBase Transaction Levels
ODBC Model
InterBase Model
SQL_TXN_READ_UNCOMMITTED READ UNCOMMITED isolation level.
Not supported. InterBase does not provide any
way of doing dirty reads.
READ COMMITTED isolation level.
SQL_TXN_READ_COMMITTED
No dirty reads, phantom reads, non- Both types of Read Committed (NO
RECORD_VERSION and RECORD_VERSION)
repeatable reads allowed.
provide the properties required of
SQL_TXN_READ_COMMITTED.
SQL_TXN_SERIALIZABLE
Serializable transactions.
Dirty reads, non-repeatable reads,
and phantoms not possible.
SNAPSHOT TABLE STABILITY isolation level.
Transactions that reserve table-level locks at start
of transaction are serializable.
SNAPSHOT TABLE STABILITY does not have
dirty reads, non-repeatable reads, or phantoms.
SQL_TXN_VERSIONING
Transactions are serializable.
More concurrency than with
SQL_TXN_SERIALIZABLE
SNAPSHOT isolation level (default).
Transactions reserve tables (placing shared read/
write locks) on the required tables. This does not
allow serializability, but provides benefits of versioning, and no dirty reads.
ODBC Conformance Level
The InterBase driver supports the Core, Level 1, and Level 2 API functions listed
below.
Table D-4:
206
ODBC Functions Supported
Core Functions
Level One Functions
Level Two Functions
SQLAllocConnect
SQLColumns
SQLDataSources
SQLAllocEnv
SQLDriverConnect
SQLDrivers
SQLAllocStatement
SQLGetConnectOption
SQLExtendedFetch
SQLBindCol
SQLGetData
SQLMoreResults
SQLCancel
SQLGetFunctions
SQLNativeSQL
SQLColAttributes
SQLGetInfo
SQLNumParams
Windows Client User’s Guide
Table D-4:
ODBC Functions Supported (Continued)
Core Functions
Level One Functions
Level Two Functions
SQLConnect
SQLGetStmtOption
SQLProcedures
SQLDescribeCol
SQLGetTypeInfo
SQLPrimaryKeys
SQLDisconnect
SQLParamData
SQLSetScrollOptions
SQLError
SQLPutData
SQLTablePrivileges
SQLExecDirect
SQLSetConnectOption
SQLExecute
SQLSetStmtOption
SQLFetch
SQLSpecialColumns
SQLFreeConnect
SQLStatistics
SQLFreeEnv
SQLTables
SQLFreeStmt
SQLGetCursorName
SQLNumResultCols
SQLPrepare
SQLRowCount
SQLSetCursorName
SQLSetParam
SQLTransact
207
The following table lists the connection options supported by the ODBC driver.
Table D-5:
ODBC Connection Options
Supported
Not Supported
SQL_CURRENT_QUALIFIER
SQL_ACCESS_MODE
SQL_LOGIN_TIEMOUT
SQL_AUTOCOMMIT
SQL_PACKET_SIZE
SQL_ODBC_CURSORS
SQL_OPT_TRACE
SQL_OPT_TRACEFILE
SQL_QUIET_MODE
SQL_TRANSLATE_OPTION
SQL_TXN_ISOLATION
The following table lists statement options supported by the ODBC driver.
Table D-6:
ODBC Statement Options
Supported
Not Supported
SQL_ASYNC_ENABLE
SQL_BIND
SQL_CONCURRENCY
SQL_CURSOR_TYPE
SQL_KEYSET_SIZE
SQL_MAX_LENGTH
SQL_QUERY_TIMEOUT
SQL_MAX_ROWS
SQL_NOSCAN
SQL_RETRIEVE_DATA
SQL_ROWSET_SIZE
SQL_SIMULATE_CURSOR
208
Windows Client User’s Guide
Index
Symbols
% (percent), pattern matching 108
* (asterisk), wildcard 81
* operator 106
+ operator 106
/ operator 106
_ (underscore), pattern matching 108
|| operator 123
– operator 106
A
access mode parameter 21, 23, 24
default transactions 22
accessing
data 92
databases 145
adding
comments in ISQL script files 55
numbers 115
aggregate functions 115–116
ALL operator 114
ALTER DOMAIN 87
ALTER keyword 73
altering indexes 93–94
AND operator 106, 110
precedence 111
ANY keyword 115
ANY operator 114
arithmetic expressions 107
arithmetic operators 106
ASC keyword 119
ascending sort order 118
ASCII files 96
asterisk (*), wildcard 81
automating tasks 125
averages 115, 116
AVG() 115
B
backing up databases 143, 160–163
preventing sweeping 162
upgrading the on-disk structure 168–169
backup metadata only 162
backup options 161–163
BETWEEN operator 110
BinarySegmentSize (BSS) 204
BLOB data
displaying in Windows ISQL 50
improving access time 166
C
case
converting 123
nomenclature 3
pattern matching 108
CAST() 122
changing database page size 166
character sets in Windows ISQL 50
character strings 123
case, converting 123
checking for patterns 108–109
concatenating 123
joining 123
character strings, literal
testing for 107
character strings, testing for 107
characters, searching for multiple 108
CharSegmentSize (CSS) 204
CHECK constraints 123
checksums
ignoring 163
clause (defined) 103
code lines, terminating 74, 127
column names
multi-table queries 104
nomenclature 3
columns 73, 86
adding values 78
defining 76
definitions, customizing 87
selecting specific 81
updating multiple 99
comments in ISQL scripts 55
COMMIT 21, 33–34
commit after each table 167
comparing values 82, 107, 113
209
comparison operators 107
subqueries 113
comparisons, negating 106
compound search conditions 110–112
order of evaluation 111
concatenation operator (||) 123
conditions 82, 106
triggers and 128
configuring database properties 148–150
connecting to databases 145
in Windows ISQL 38
constants 123
constraints 77, 92
naming 4
CONTAINING operator 109
context variables 127
converting case 123
corrupt databases
backing up by ignoring checksums 163
repairing 156–157
COUNT() 115
counting rows 115
Create Database command (File) 73
Create Database dialog box 74
CREATE DOMAIN 87
CREATE EXCEPTION 131
CREATE INDEX 92
CREATE keyword 73
CREATE PROCEDURE 129
CREATE TABLE 76
CREATE TRIGGER 127
CREATE VIEW 94
creating
databases 73
databases in Windows ISQL 40–41
indexes 92
ISQL script files 53
multi-file databases 165
tables 75–78, 90–92
D
data
accessing 92
changing 99
dropping 82, 100–102
formatting 122–123
inserting 78, 95–99
manipulating 73
retrieving 73, 80, 118
multiple rows 130
multiple tables 104, 119
sorting 118–119
updating 82, 99–100, 127, 128
viewing 80
data definition 88
domains 88
language 125
data definition files 88
data definition statements 72
data entry, automating 125
data manipulation statements 73
deleting data 82
inserting data 78
updating data 82
data structures 78
data type translation
dBASE physical to BDE logical 186
dBASE to InterBase and Paradox 184
InterBase physical to BDE logical 186
InterBase to Paradox and dBASE 183
Paradox physical to BDE logical 185
Paradox to InterBase and dBASE 184
SQL to InterBase 187
data types
comparing 122
converting 122
domains 87
Database (DB) 204
database information displaying in Windows
ISQL 51
Database Maintenance window 141–142, 147–
148
database objects, naming 3
database specification parameter 21
database/server tree 139–140
databases
accessing 145
backing up 143, 160–163
configuring properties 148–150
connecting to 145
210
in Windows ISQL 38
creating 73
in Windows ISQL 40–41
multi-file 165
deactivating indexes 167
designing 74–75, 85–87
disabling validity checking 167
disconnecting from in Windows ISQL 41
dropping in Windows ISQL 41
extracting metadata 45–48, 162
maintaining 147–157
page size 166
recovering transactions 150–153
repairing 156–157
replacing 166
restoring 144, 164–168
rolling back limbo transactions 153, 162
splitting into multiple files 165
starting page number 166
sweeping 149–150
immediately 153
upgrading the on-disk structure 168–169
validating 153–155
verifying structures 153–157
DataSourceName (DSN) 204
dBASE data type translation
to BDE logical 186
to InterBase and Paradox 184
deactivating indexes 167
default column order 78
default transactions
access mode parameter 22
default behavior 22
isolation level parameter 22
lock resolution parameter 22
defining domains 87–90
DELETE 82, 100
derived values 107
DESC keyword 118
descending sort order 118
designing
databases ??–75
designing databases 74–??, 85–87
directories
path names 5
directories, path names 4, 5
dirty reads 26
disable garbage collection 162
disabling validity checking 167
disconnecting from databases in Windows
ISQL 41
DISTINCT keyword 105, 115
domains 18, 87–90
DROP keyword 73
dropping
data 82, 100–102
dropping databases in Windows ISQL 41
duplicate values, preventing 92, 93, 105
E
editors 88
equality operators 113
error messages
Server Manager 171–174
user-defined 131
errors 78
events 128–129
example files 89
stored procedures 130
triggers 126
viewing 89, 91
exceptions 131
executable procedures 129, 131
Execute ISQL Script command (File) 89
executing ISQL script files 43
executing statements 89
EXISTS operator 114
expressions 107
external files 96
extracting metadata 45–48, 162
F
field-naming rules for InterBase 188
file names 4–5
files 73
.gbk extension 161
.gdb extension 161
creating multi-file databases 165
example 89, 91
stored procedures 130
211
triggers 126
external 96
primary 165
secondary 165
filespec parameter 4
FOREIGN KEY constraints 77
foreign keys 77
formatted ASCII files 96
formatting data 122–123
functions 107
G
garbage collection, disabling 162
.gbk file extension 161
.gdb file extension 161
GEN_ID() 126
generators 126
IS NULL operator 109
isolation level parameter 21, 23, 24
default transactions 22
ISQL
script files 53–67
adding comments in Windows
ISQL 55
creating 53
executing 54
in Windows ISQL 43
SET statements 55–67
ISQL window
entering statements 72
opening 72
J
headers in procedures 129
joining strings 123
joins 119–122
inner 120–121
outer 121–122
I
K
ignore checksums 163
ignore limbo transactions 162
IN operator 110, 113
incremental values 126
indexes
altering 93–94
correcting duplicate values 167
creating 92
deactivating 167
improving performance 166
unique 93
inner joins 120–121
outer joins vs. 119
input parameters 129
INSERT 78
integrity constraints 77, 92
naming 4
InterBase
data type translation
to BDE logical 186
to Paradox and dBASE 183
to standard SQL 187
field-naming rules 188
keys
foreign 77
primary 77
types, defined 77
keywords 103
H
L
LIKE operator 108
limbo transactions
ignoring 162
rolling back 153, 162
literal strings, testing for 107
literal values 107
local variables 132
lock resolution parameter 21, 23, 30
default transactions 22
logical operators 106, 110–112
LogonID (UID) 204
lost updates 26
M
maintaining databases 147–157
212
manipulating data 73
matching values 110
MAX() 115
maximum values 115
metadata 72
displaying in Windows ISQL 51–52
extracting 45–48, 162
viewing 77
MIN() 115
minimum values 115
multi-file databases 165
multi-file specifications 5
multiple search conditions 106, 110–112
order of evaluation 111
multiple tables
joining 119–122
querying 104, 119
retrieving data 104, 119
multiple values, subqueries 112
N
naming conventions 3–5
naming nodes 4, 5
NO RECORD_VERSION 23
NO WAIT 23, 31
nodes
naming 5
nodes, naming 4, 5
nomenclature 3–5
non-reproducible reads 26
normalization 86
NOT NULL 76
NOT operator 106, 107
NULL values 107, 116
testing for 109
numbers 107
adding 115
averaging 115, 116
incrementing 126
sorting 119
O
ODBC administrator 202
ODBC driver 201–208
configuring data sources 202
conformance level 206
connecting to data sources 203
connection options 208
data types 205
isolation and lock levels supported 205
statement options 208
ODBC files 201
on-disk structure 168–169
online help 144
opening an ISQL window 72
operands 106
operators
ALL 114
arithmetic 106
BETWEEN 110
comparison 107
subqueries 113
concatenation 123
CONTAINING 109
IN 110, 113
IS NULL 109
LIKE 108
logical 106, 110–112
precedence 111
overriding 111
STARTING WITH 108
subqueries 114
OR operator 106, 110
precedence 111
order of evaluation (operators) 111
overriding 111
outer joins 121–122
inner joins vs. 119
output parameters 129
overriding normal precedence 111
P
page size 166
Paradox data type translation
to BDE logical 185
to InterBase and dBASE 184
parameters
access mode 21, 22, 23, 24
database specification 21
filespec 4
213
input 129
isolation level 21, 22, 23, 24
lock resolution 21, 22, 23, 30
output 129
table reservation 21, 23, 32
Password (PWD) 205
passwords 73
path names 4, 5
pattern matching (queries) 108–110
case sensitivity 108
percent sign (%), pattern matching 108
phantom rows 26
platforms 4
populating (defined) 95
precedence of operators 111
overriding 111
primary file specifications 4
primary files 165
PRIMARY KEY constraints 77
primary keys 77
printing conventions (documentation) 2–3
PROCS.SQL 130
PROTECTED READ 32
PROTECTED WRITE 32
Q
queries 67, 73, 94
dropping data 101
meeting specified conditions 106
multi-table 119
column names and 104
pattern matching 108–110
case sensitivity 108
removing duplicate rows 105
return values 107, 112, 123
search conditions 101
comparing data types 122
concatenation 123
defined 106
multiple 106, 110–112
operators in 106
testing 107
sorting data 118–119
updating data 100
R
range of values 109
READ COMMITTED 23, 25, 27, 206
READ ONLY 23
READ UNCOMMITED 206
READ WRITE 23
read-only database validation 155
record fragments, validating 155
RECORD_VERSION 23
recovering transactions 150–153
recursion 131
relationship modeling 86
repairing databases 156–157
repetitive tasks 131
replacing databases 166
RESERVING clause 23, 31
table reservation options 32
restore options 165–168
restoring databases 144, 164–168
restrictions, nomenclature 4
result tables 119
retrieving data 73, 80, 118
multiple rows 130
multiple tables 104, 119
return values (queries) 107, 112, 123
ROLLBACK 21, 33, 34
rolling back limbo transactions 153, 162
routines 129
rows 73
counting 115
ordering 118–119
retrieving 118
multiple 130
preventing duplicates 105
uniquely identifying 77
S
search conditions (queries) 101
comparing data types 122
concatenation 123
defined 106
multiple 106, 110–112
order of evaluation 111
multi-tables 119
operators in 106
214
testing 107
searching for multiple characters 108
secondary file specifications 4, 5
secondary files 165
SELECT 80, 103
DISTINCT clause 105
FROM clause 120
GROUP BY clause 116–118
HAVING clause 118
ON clause 120
ORDER BY clause 106, 118–119
WHERE clause 106–115, 120
select procedures 129, 130
SELECT statements 73
inner joins 120
multi-table 119
nesting 107, 112
outer joins 121
specific columns 81
Server Manager 137–144
backing up databases 143
configuring database properties 148–150
Database Maintenance window 141–142,
147–148
error messages 171–174
maintaining databases 147–157
menus 138–139
online help 144
restoring databases 144, 164–168
server/database tree 139–140
SpeedBar 139
standard text display window 142–??
starting 138
summary information area 140
window description 138
server/database tree 139–140
SET AUTODDL 56–57
SET BLOBDISPLAY 58–59
SET COUNT 59–60
SET ECHO 60–61
SET LIST 62
SET NAMES 63
SET PLAN 63–64
SET statements 55–67
SET STATS 64–65
SET TERM 66, 127
SET TIME 67
SET TRANSACTION 21, 22
parameters 23
syntax 23
SHARED READ 32
SHARED WRITE 32
SINGULAR operator 114
SNAPSHOT 23, 25, 27, 206
SNAPSHOT TABLE STABILITY 23, 25, 29, 206
SOME keyword 115
sort order 118
sorting data 118–119
sorting numbers 119
SpeedBar 139
splitting tables 86
SQL 71
example files 126, 130
SQL statements
adding data 78, 95
entering in ISQL window 72
entering multiple 88
executing in Windows ISQL 42–44
overview 72–73
SQL_TXN_READ_COMMITTED 206
SQL_TXN_READ_UNCOMMITTED 206
SQL_TXN_SERIALIZABLE 206
SQL_TXN_VERSIONING 206
standard text display window 142–??
starting page number 166
starting Windows ISQL 72
STARTING WITH operator 108
statements
example, printing conventions 2
executing 89
transaction management 21
stored procedures 125, 129–133
defined 125
example file 130
headers 129
naming 129
procedure body 129
recursive 131
types, described 129
string operator (||) 123
215
subqueries 107, 112–115
comparing values 113
dropping data 101
returning multiple values 112
testing against all values 114
testing against one value 114
updating data 100
SUM() 115, 117
summary information area 140
SUSPEND 130
sweeping databases 149–150
immediately 153
preventing during a backup 162
syntax
file name specifications 4
inner joins 120
outer joins 121
search conditions 106
statements, printing conventions 2
T
table names, nomenclature 3
table reservation parameter 21, 23
tables 73, 86
changing data 99
creating 75–78, 90–92
extracting metadata 47
joining 119–122
multiple, retrieving data 104
relationship modeling 86
result 119
splitting 86
temporary 97
tasks, repetitive 131
temporary tables 97
terminators (syntax) 74, 127
testing for multiple values 109
text 107
text editors 88
totals, calculating 117, 118
transaction management statements 21
transactions
ending 33
limbo 153
recovering 150–153
rolling back limbo transactions 162
transportable format 161
triggers 125–129
creating 127
defined 125
example file 126
posting events 128–129
updating data 127, 128
TRIGGERS.SQL 126, 127
two-phase commit 150, 162
U
underscore (_), pattern matching 108
unique indexes 93
UNIQUE keyword 76, 93
unique values 126
unknown values 107, 116
testing for 109
UPDATE 82, 99
update side effects 26
updating data 99–100, 127, 128
upgrading the on-disk structure 168–169
UPPER() 123
user names 73
user-defined error messages 131
V
validating
databases 153–155
record fragments 155
validity checking, disabling 167
values 106
assigning new 82
averages 115, 116
comparing 82, 107, 113
derived 107
duplicate, preventing 92, 93, 105
incremental 126
inserting in tables 78
literal 107
matching 110
maximum 115
minimum 115
ranges, testing for 109
returned in queries 107, 112, 123
216
sums 115
unique 126
unknown 107, 116
testing for 109
variables
context 127
local 132
verbose output 163, 168
viewing
data 80
example files 89, 91
metadata 77
views
creating 94
extracting metadata 47
naming 3
creating 53
executing 43, 54
settings
advanced 49–50
basic 48–49
changing 48–50
displaying 50–52
SQL statements
executing 42–44
starting 37, 72
temporary files 39
using 37–52
version information 51
window description 38
W
WAIT 23, 31
WHERE keyword 106
wildcards 81
pattern matching 108
Windows ISQL 71
BLOB display 50
character sets 50
COMMIT 44, 54–55
connecting to databases 38
creating databases 40–41
disconnecting from databases 41
displaying
database information 51
metadata 51–52
dropping databases 41
entering statements 76
executing statements 89
exiting 39
extracting metadata 45–48
getting help 38
ISQL window, opening 72
ROLLBACK 44, 54–55
saving
current sessions 45
SQL output 44
script files 53–67
adding comments 55
217
User’s Guide
Borland
Local InterBase Server
Ve r s i o n 4 . 0
Borland International, Inc., 100 Borland Way
P.O. Box 660001, Scotts Valley, CA 95067-0001
Borland may have patents and/or pending patent applications covering subject matter in this document. The
furnishing of this document does not give you any license to these patents.
Copyright © 1992, 1993, 1994, 1995 Borland International. All rights reserved. All Borland products are trademarks
or registered trademarks of Borland International, Inc. Other brand and product names are trademarks or registered
trademarks of their respective holders.
Printed in the U.S.A.
1E0R195
9495969798-9 8 7 6 5 4 3 2 1
W1
Character Data Types
Date Data Types . . .
BLOB Data Types. . .
Arrays of Data Types
Domains . . . . . . . . .
Referential Integrity
Constraints . . . . . . .
Indexes . . . . . . . . . . . .
Views. . . . . . . . . . . . .
Stored Procedures . . . . .
Triggers . . . . . . . . . . .
Table of Contents
Tables and Figures . . . . . . . . . . . . . . v
Preface. . . . . . . . . . . . . . . . . . . . . . . 1
The InterBase Documentation Set .
Printing Conventions . . . . . . . .
Text Conventions . . . . . . . .
Syntax Conventions . . . . . . .
Database Object-naming
Conventions . . . . . . . . . . . .
File-naming Conventions . . . . .
Primary File Specifications . . .
Secondary File Specifications . .
.
.
.
.
.
.
.
.
.
.
.
.
.
.
.
.
.
.
.
.
1
2
2
2
.
.
.
.
.
.
.
.
.
.
.
.
.
.
.
.
.
.
.
.
3
4
4
5
.
.
.
.
.
.
.
.
.
.
.9
10
11
12
12
. . . 12
. . . 13
. . . 13
. . . 13
. . . 14
. . . 14
Chapter 2: Building InterBase
Databases . . . . . . . . . . . . . . . . . . . 15
Building Databases . . . . . .
Tables . . . . . . . . . . . .
Columns . . . . . . . . . .
Data Types. . . . . . . .
Numeric Data Types
.
.
.
.
.
.
.
.
.
.
.
.
.
.
.
.
.
.
.
.
.
.
.
.
.
.
.
.
.
.
.
.
.
.
.
.
.
.
.
.
.
.
.
.
.
.
.
.
.
.
.
.
.
.
.
.
.
.
.
.
17
17
18
18
18
.
.
.
.
.
.
.
.
.
.
.
.
.
.
.
.
.
.
.
.
.
.
.
.
.
.
.
.
.
.
.
.
.
.
.
18
19
19
19
20
Starting a Transaction With SET
TRANSACTION . . . . . . . . . . . . . . 22
Specifying SET TRANSACTION
Behavior . . . . . . . . . . . . . . . . . 22
Access Mode . . . . . . . . . . . . . . 24
Isolation Level . . . . . . . . . . . . . 24
Comparing Isolation
Levels . . . . . . . . . . . . . . . 26
Choosing Between SNAPSHOT and
READ COMMITTED . . . . . . . 27
Starting a Transaction With
SNAPSHOT Isolation
Level . . . . . . . . . . . . . . . . 28
Starting a Transaction With
READ COMMITTED Isolation
Level . . . . . . . . . . . . . . . . 28
Starting a Transaction With
SNAPSHOT TABLE STABILITY
Isolation Level. . . . . . . . . . . 29
Isolation Level Interactions . . . . 30
Lock Resolution . . . . . . . . . . . . 30
RESERVING Clause . . . . . . . . . . 31
Ending a Transaction . . . . . . . . . . . . 33
Using COMMIT. . . . . . . . . . . . . . 33
Committing Updates Without
Freeing a Transaction . . . . . . . . 34
Using ROLLBACK . . . . . . . . . . . . 34
Chapter 1: Introduction . . . . . . . . . . . . . 9
.
.
.
.
.
.
.
.
.
.
Chapter 3: Working With
Transactions . . . . . . . . . . . . . . . . . . 21
Part 1: Overview
What is the Borland Local InterBase
Server? . . . . . . . . . . . . . . . .
Installation . . . . . . . . . . . . . . .
InterBase Features. . . . . . . . . . .
SQL Support . . . . . . . . . . . .
Transaction Management . . . . .
Multi-generational
Architecture . . . . . . . . . .
Database Administration . . . . .
Managing Server Security . . .
Performing Database Backup
and Recovery . . . . . . . . .
Maintaining a Database . . . .
Viewing Statistics . . . . . . . .
.
.
.
.
.
15
16
16
17
17
i
Adding Comments . . . . . . . . . . . . 55
ISQL SET Statements . . . . . . . . . . . . 55
Part 2: Windows ISQL
Chapter 4: Using Windows ISQL . . . . . . 37
Starting and Exiting Windows ISQL
The ISQL Window . . . . . . . . .
Getting Help . . . . . . . . . . . .
Exiting Windows ISQL . . . . . .
Temporary Files . . . . . . . . . .
Connecting to a Database . . . . . .
Creating a Database . . . . . . . .
Dropping a Database . . . . . . .
Disconnecting From a Database .
Executing SQL Statements . . . . . .
Executing SQL Interactively . . .
Legal Statements . . . . . . . .
Executing an ISQL Script File. . .
Committing and Rolling Back
Work . . . . . . . . . . . . . . . .
Saving Results to a File . . . . . . . .
Saving ISQL Output . . . . . . . .
Saving the Session . . . . . . . . .
Extracting Metadata . . . . . . . . .
Extracting Database Metadata . .
Extracting Table Metadata . . . .
Extracting View Metadata . . . .
Changing Windows ISQL Settings .
Basic ISQL Settings . . . . . . . .
Advanced ISQL Settings . . . . .
BLOB Display . . . . . . . . . .
Character Set . . . . . . . . . .
Displaying Settings . . . . . . . .
Displaying Version Information .
Displaying Database Information
and Metadata . . . . . . . . . . .
.
.
.
.
.
.
.
.
.
.
.
.
.
.
.
.
.
.
.
.
.
.
.
.
.
.
.
.
.
.
.
.
.
.
.
.
.
.
.
37
38
38
39
39
39
40
41
41
42
42
43
43
.
.
.
.
.
.
.
.
.
.
.
.
.
.
.
.
.
.
.
.
.
.
.
.
.
.
.
.
.
.
.
.
.
.
.
.
.
.
.
.
.
.
.
.
.
44
44
44
45
45
45
47
47
48
48
49
50
50
50
51
Chapter 6: Getting Started With Windows
ISQL . . . . . . . . . . . . . . . . . . . . . . 71
Starting the Windows ISQL Session .
An Overview of SQL . . . . . . . . .
Creating a Database . . . . . . . . . .
Conceptual Database Design . . . . .
Creating Tables. . . . . . . . . . . . .
Primary Keys and Foreign Keys .
Adding Data to Tables . . . . . . . .
Testing Referential Integrity . . . .
Committing Work . . . . . . . . .
Viewing Data . . . . . . . . . . . . . .
Modifying Data . . . . . . . . . . . .
Ending the ISQL Session . . . . . . .
.
.
.
.
.
.
.
.
.
.
.
.
.
.
.
.
.
.
.
.
.
.
.
.
. 72
. 72
. 73
. 74
. 75
. 77
. 78
. 79
. 80
. 80
. 82
. 83
Chapter 7: Basic Data Definition . . . . . . . 85
More Conceptual Design . . .
Relationship Modeling . . .
Normalization. . . . . . . .
Defining Domains . . . . . . .
Using Data Definition Files
Starting Over . . . . . . . . . .
Creating More Tables . . . . .
Creating Indexes . . . . . . . .
Preventing Duplicate Row
Entries . . . . . . . . . . .
Modifying Indexes . . . . .
Creating Views . . . . . . . . .
Moving On . . . . . . . . . . .
. . . 51
Chapter 5: Using ISQL Script Files . . . . . 53
Creating and Executing SQL Files.
Creating an ISQL Script File . .
Executing an ISQL Script File. .
Committing and Rolling Back
Work . . . . . . . . . . . . . . .
Part 3: Tutorial
.
.
.
.
.
.
.
.
.
.
.
.
.
.
.
.
.
.
.
.
.
.
.
.
.
.
.
.
.
.
.
.
.
.
.
.
.
.
.
.
.
.
.
.
.
.
.
.
.
.
.
.
.
.
.
.
85
86
86
87
88
90
91
92
.
.
.
.
.
.
.
.
.
.
.
.
.
.
.
.
.
.
.
.
.
.
.
.
.
.
.
.
93
93
94
94
Chapter 8: Populating the Database . . . . . 95
. . . . 53
. . . . 53
. . . . 54
Inserting Data . . . . . . . . . . . . . . . . 95
Inserting Data Using Column
Values . . . . . . . . . . . . . . . . . . 95
Inserting Data From an External
File . . . . . . . . . . . . . . . . . . . . 96
. . . . 54
ii
Updating Data . . . . . . . . . . . . .
Updating With a Script File . . . .
Updating Using a Subquery . . .
Deleting Data . . . . . . . . . . . . .
Deleting Data Using a Subquery .
.
.
.
.
.
.
.
.
.
.
. 99
. 100
. 100
. 100
. 101
Chapter 10: Advanced Data
Definition . . . . . . . . . . . . . . . . . . 125
Chapter 9: Retrieving Data . . . . . . . . . . 103
. 126
Overview of SELECT . . . . . . . . . . .
Selecting From a View. . . . . . . . .
Removing Duplicate Rows With
DISTINCT . . . . . . . . . . . . . . . .
Using the WHERE Clause . . . . . . . .
Comparison Operators . . . . . . . .
Pattern Matching. . . . . . . . . . . .
LIKE Operator . . . . . . . . . . .
STARTING WITH Operator . . . .
Testing for an Unknown
Value . . . . . . . . . . . . . . . .
Comparing Against a Range
or List of Values . . . . . . . . . .
Logical Operators . . . . . . . . . . .
Controlling the Order of
Evaluation . . . . . . . . . . . . .
Using Subqueries . . . . . . . . . . .
Conditions for Subqueries . . . . .
Using ALL . . . . . . . . . . . . . .
Using ANY, EXISTS, and
SINGULAR . . . . . . . . . . . .
Using Aggregate Functions . . . . . . .
Grouping Query Results . . . . . . . . .
Using the HAVING Clause . . . . . .
Using the ORDER BY Clause . . . . . .
Joining Tables . . . . . . . . . . . . . . .
Inner Joins . . . . . . . . . . . . . . .
Outer Joins . . . . . . . . . . . . . . .
Formatting Data . . . . . . . . . . . . . .
Using CAST( ) to Convert Data
Types . . . . . . . . . . . . . . . . .
Using the String Operator in Search
Conditions . . . . . . . . . . . . . .
Converting to Uppercase . . . . . . .
Triggers and Stored Procedures . . . .
Triggers . . . . . . . . . . . . . . . . . .
Generating Unique Column Values
With Triggers . . . . . . . . . . . .
Maintaining Change Records With
a Trigger . . . . . . . . . . . . . . .
Posting an Event With a Trigger . .
Stored Procedures . . . . . . . . . . . .
A Simple Select Procedure . . . . . .
A Simple Executable Procedure. . .
A Recursive Procedure . . . . . . . .
. 103
. 104
. 105
. 106
. 107
. 108
. 108
. 108
. 109
.
.
.
.
.
.
128
128
129
130
131
131
Part 4: Server Manager
Chapter 11: Introduction to
Server Manager . . . . . . . . . . . . . . . 137
The Server Manager Window . . . .
Server Manager Menus . . . . . .
SpeedBar . . . . . . . . . . . . . . .
Server/Database Tree . . . . . . .
Summary Information Area . . . .
Administering Security . . . . . .
The Database Maintenance
Window . . . . . . . . . . . . . . . .
Standard Text Display Window . . .
Database Backup and Restoration
Using Online Help . . . . . . . . . . .
. 109
. 110
. 111
. 112
. 113
. 114
. 114
. 115
. 116
. 118
. 118
. 119
. 120
. 121
. 122
. 125
. 125
.
.
.
.
.
.
.
.
.
.
.
.
138
138
139
139
140
141
.
.
.
.
.
.
.
.
141
142
143
144
Chapter 12: Accessing a Database . . . . . 145
Connecting to a Database . . . . . . . . . 145
Chapter 13: Maintaining a Database. . . . 147
The Database Maintenance Window .
Configuring Database Properties . . .
Adjusting Database Sweeping . . .
Overview of Sweeping . . . . . .
Controlling Performance of Forced
Writes. . . . . . . . . . . . . . . . .
. 122
. 123
. 123
iii
.
.
.
.
147
148
149
149
. 150
Two-phase Commit and Transaction
Recovery . . . . . . . . . . . . . . . .
Recovering Transactions . . . . . .
Performing an Immediate Database
Sweep . . . . . . . . . . . . . . . . . .
Validating and Repairing a
Database . . . . . . . . . . . . . . . .
Validation Options. . . . . . . . . .
Handling Checksum Errors . . .
Repairing a Corrupt Database . . .
Client Workstation Requirements . . . .
Installation Changes . . . . . . . . . . . .
TCP/IP Interface . . . . . . . . . . . . . .
Other Communication Protocols . . .
Testing the InterBase Connection . . . .
Troubleshooting Common Connection
Problems . . . . . . . . . . . . . . . . .
Borland Language Drivers for
InterBase. . . . . . . . . . . . . . . . . .
Working With InterBase Servers . . . . .
InterBase Data Type Translations . . . .
InterBase Equivalents to Standard SQL
Data Types . . . . . . . . . . . . . . . .
InterBase System Relations/Tables . . .
InterBase Field-naming Rules . . . . . .
. . 150
. . 151
. . 153
.
.
.
.
. 153
. 155
. 155
. 156
Chapter 14: Backing Up and Restoring
a Database. . . . . . . . . . . . . . . . . . . 159
Using the Backup and Restore
Utilities . . . . . . . . . . . . . . . .
Backing Up a Database . . . . . . . .
Backup Options . . . . . . . . . .
Transportable Format . . . . .
Back Up Metadata Only . . . .
Disable Garbage Collection . .
Ignore Transactions in Limbo .
Ignore Checksums . . . . . . .
Verbose Output . . . . . . . . .
Restoring a Database . . . . . . . . .
Restoring to Multiple Files . . . .
Restore Options . . . . . . . . . .
Start Page . . . . . . . . . . . .
Page Size . . . . . . . . . . . . .
Replace Existing Database . . .
Commit After Each Table . . .
Deactivate Indexes . . . . . . .
Do Not Restore Validity
Conditions . . . . . . . . . . .
Verbose Output . . . . . . . . .
Upgrading to a New On-disk
Structure . . . . . . . . . . . . . . .
.
.
.
.
.
.
.
.
.
.
.
.
.
.
.
.
.
.
.
.
.
.
.
.
.
.
.
.
.
.
.
.
.
.
. 159
. 160
. 161
. 161
. 162
. 162
. 162
. 163
. 163
. 164
. 165
. 165
. 166
. 166
. 166
. 167
. 167
179
181
182
183
186
187
188
Appendix C: Example Database . . . . . . 189
The Example Database . . .
Domains . . . . . . . . . .
Triggers . . . . . . . . . .
Stored Procedures . . . .
Example Database Tables
.
.
.
.
.
.
.
.
.
.
.
.
.
.
.
.
.
.
.
.
.
.
.
.
.
.
.
.
.
.
.
.
.
.
.
189
189
192
192
193
Appendix D: ODBC Driver . . . . . . . . . 201
System Requirements . . . . . . . . . . .
ODBC Files . . . . . . . . . . . . . . .
Configuring Data Sources. . . . . . . . .
Connecting to a Data Source Using
a Logon Dialog Box . . . . . . . . . .
Connecting to a Data Source Using a
Connection String . . . . . . . . . . .
Data Types . . . . . . . . . . . . . . . . .
Isolation and Lock Levels
Supported . . . . . . . . . . . . . . . . .
ODBC Conformance Level . . . . . . . .
. . . 167
. . . 168
. . . 168
Appendix A: Error Messages. . . . . . . . . 171
175
176
177
178
178
201
201
202
203
204
205
205
206
Index . . . . . . . . . . . . . . . . . . . . . . 209
Appendix B: Connecting to InterBase . . . 175
InterBase Server Requirements . . . . . . 175
iv
SQL Link Driver . . . . . . . . . . . . . 176
B-4: Winsock 1.1 Client Files . . . . . . . 177
B-5: Non-Winsock Compliant TCP
Support Files . . . . . . . . . . . . . . . 177
B-1: InterBase Connect Utility Dialog
Box . . . . . . . . . . . . . . . . . . . . . 179
B-6: Borland Language Drivers for
InterBase. . . . . . . . . . . . . . . . . . 181
B-7: General information About InterBase
Servers . . . . . . . . . . . . . . . . . . . 182
B-8: InterBase to Paradox and dBASE Data
Type Translations . . . . . . . . . . . . 183
B-9: Paradox to InterBase and dBASE Data
Type Translations . . . . . . . . . . . . 184
B-10: dBASE to InterBase and Paradox Data
Type Translations . . . . . . . . . . . . 184
B-11: Paradox to BDE Logical to dBASE Data
Type Translations . . . . . . . . . . . . 185
B-12: dBASE to BDE Logical to Paradox Data
Type Translations . . . . . . . . . . . . 186
B-13: InterBase to BDE Logical to Paradox
and dBASE Data Type Translations . . 186
B-14: SQL to InterBase Data Type Translations . . . . . . . . . . . . . . . . . . . . 187
B-15: Selected InterBase System
Relations. . . . . . . . . . . . . . . . . . 187
B-16: InterBase Field-naming
Rules . . . . . . . . . . . . . . . . . . . . 188
C-1 Tables in the Example
Database. . . . . . . . . . . . . . . . . . 189
C-2 Simple Example Domains . . . . . . 190
C-3 Complex Example Domains. . . . . 190
C-1 EMPLOYEE Database . . . . . . . . 191
C-4 EMPLOYEE Table . . . . . . . . . . 193
C-5 DEPARTMENT Table . . . . . . . . 194
C-6 JOB Table . . . . . . . . . . . . . . . 195
C-7 SALES Table . . . . . . . . . . . . . 196
C-8 PROJECT Table . . . . . . . . . . . . 197
C-9 CUSTOMER Table . . . . . . . . . . 197
C-10 EMPLOYEE_PROJECT Table . . . 198
C-11 PROJ_DEPT_BUDGET Table . . . 198
C-12 COUNTRY Table . . . . . . . . . . 199
Tables and Figures
1: InterBase Core Documentation. . . . . . 1
2: Text Conventions . . . . . . . . . . . . . 2
3: Syntax Conventions . . . . . . . . . . . . 2
1-1: InterBase Client/Server
Connections . . . . . . . . . . . . . . . . 10
1-1: InterBase 4.0 Features . . . . . . . . . 11
2-1: Database Objects. . . . . . . . . . . . 16
3-1: SQL Transaction Management
Statements . . . . . . . . . . . . . . . . . 21
3-2: Transaction Default Behavior . . . . 22
3-3: SET TRANSACTION
Parameters . . . . . . . . . . . . . . . . . 23
3-4: ISOLATION LEVEL Options. . . . . 25
3-5: InterBase Management of Classic
Transaction Conflicts . . . . . . . . . . . 26
3-6: Isolation Level Interaction with Read
(SELECT) and WRITE (UPDATE) . . . . 30
3-7: Table Reservation Options for the
RESERVING Clause . . . . . . . . . . . . 32
4-1: Order of Metadata Extraction . . . . 46
4-2: Basic ISQL Settings . . . . . . . . . . 48
4-3: Metadata Information Items . . . . . 51
5-1: SET Statements. . . . . . . . . . . . . 55
6-1: EMPLOYEE Table . . . . . . . . . . . 75
6-2: DEPARTMENT Table . . . . . . . . . 76
9-1: SELECT Keywords . . . . . . . . . 103
9-2: Search Condition Operators . . . . 106
9-3: Search Condition Values . . . . . . 107
9-4: InterBase Comparison Operators
Requiring Subqueries . . . . . . . . . . 113
9-5: Aggregate Functions . . . . . . . . 115
9-6: Compatible Data Types for
CAST() . . . . . . . . . . . . . . . . . . 122
A-1: Server Manager Error
Messages . . . . . . . . . . . . . . . . . 171
B-1: Server Software
Requirements . . . . . . . . . . . . . . 175
B-2: Client Workstation . . . . . . . . . 175
B-3: Installation Changes for the InterBase
v
C-13 SALARY_HISTORY Table. . . . .
D-1: Connection String Attributes . . .
D-2: InterBase and ODBC Data
Types . . . . . . . . . . . . . . . . . . .
D-3: ODBC and InterBase Transaction
Levels . . . . . . . . . . . . . . . . . . .
D-4: ODBC Functions Supported . . . .
D-5: ODBC Connection Options . . . .
D-6: ODBC Statement Options . . . . .
199
204
205
206
206
208
208
vi