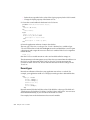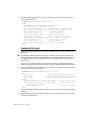
1
Delphi User’s Guide
Delphi for Windows
I n t r o d u c t i o n
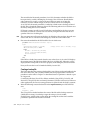
Copyright
Agreement
Delphi represents a brand new way to develop applications for Windows. It combines
the speed and ease of use of a visual development environment with the power,
flexibility, and reusability of a fully object-oriented language, the world’s fastest
compiler, and leading-edge database technology.
As a result, Delphi lets you build sophisticated client/server applications in record time.
Delphi includes support for creating stand-alone executable (.EXE) and dynamic-link
library (.DLL) files and local or networked database applications, as well as client/
server applications.
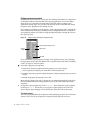
Installing Delphi
Delphi and its installation program are both Windows applications, so you must
already have Windows running to install Delphi. The installation program creates
directories as needed and copies files from the distribution disk to your hard drive.
The installation program is largely self-explanatory. The following steps tell you all you
need to know to install Delphi.
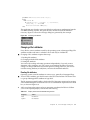
■
To install Delphi,
1 Start Windows if it is not already running on your computer.
2 Insert the Delphi CD into your CD-ROM drive.
3 Use Program Manager’s File|Run menu command or File Manager to run
\INSTALL\SETUP.EXE from the Delphi CD.
4 Follow the instructions presented by the installation program.
When the installation program finishes its work, it offers you the option of reading the
README.TXT file, which contains important last-minute information about Delphi. It’s
a good idea to read README.TXT before running Delphi for the first time.
Introduction
1
Documentation overview
Delphi includes complete documentation to help you learn to use the product quickly
and effectively.
The Delphi documentation consists of three parts:
• Printed manuals
• Online Help
• Interactive Tutors
Using this manual
• Part I, “Getting started with Delphi,” introduces you to the kinds of tasks you’ll
perform when designing and testing applications in Delphi.
• Part II, “Fundamental skills,” presents concepts and techniques you’ll use in
developing robust and sophisticated Delphi applications. These skills are discussed
in the context of creating simple but functional examples.
• Part III, “Programming topics,” discusses the language you’ll use to write your
applications, how to work with objects, and how to write robust applications by
handling exceptions.
• Part IV, “Sample applications,” presents several complete sample applications,
demonstrating most of the tasks you’ll perform when writing your own applications.
Reference material on Delphi and its component library appear in online Help.
The Delphi Component Writer’s Guide and Database Application Developer’s Guide are also
printed separately. They contain information on how to create your own components
for use in Delphi, and how to create database applications, respectively.
Using Help
Delphi’s online Help provides a superset of the information presented in the printed
manuals. Use online Help to find
• Specific procedural information regarding programming tasks in Delphi
• The language definition of Object Pascal
• Reference material for the Visual Component Library and the Run-Time Library
Using Interactive Tutors
Delphi provides seven Interactive Tutors to help you get up and running quickly:
•
•
•
•
•
2
A “quick tour” overview of the Delphi programming environment
A short lesson on how to create a simple application
A lesson on how to add components to a form
A lesson on setting component properties
A lesson on creating and modifying event handlers
Delphi User’s Guide
• A lesson on creating a simple database application
• A lesson on creating a more sophisticated database application
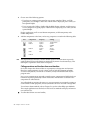
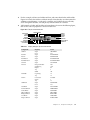
Manual conventions
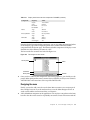
The printed manuals for Delphi use the typefaces and symbols described in Table
Intro.1 to indicate special text.
Table Intro.1
Typefaces and symbols in these manuals
Typeface or symbol Meaning
Monospace type
[]
Boldface
Italics
Keycaps
■
➤
Monospaced text represents text as it appears onscreen or in
Object Pascal code. It also represents anything you must type.
Square brackets in text or syntax listings enclose optional items.
Text of this sort should not be typed verbatim.
Boldfaced words in text or code listings represent Object Pascal
reserved words or compiler options.
Italicized words in text represent Object Pascal identifiers, such
as variable or type names. Italics are also used to emphasize
certain words, such as new terms.
This typeface indicates a key on your keyboard. For example,
“Press Esc to exit a menu.”
This symbol indicates the beginning of a procedure. The text
that follows describes a set of general steps for performing a
specified kind of task.
This symbol indicates a specific action you should take, such as
a step in an example.
Contacting Borland
The Borland Assist program offers a range of technical support plans to fit the different
needs of individuals, consultants, large corporations, and developers. To receive help
with this product send in the registration card and select the Borland Assist plan that
best suits your needs. North American customers can register by phone 24 hours a day
by calling 1-800-845-0147. For additional details on these and other Borland services, see
the Borland Assist Support and Services Guide included with this product.
Introduction
3
4
Delphi User’s Guide
Part
I
Getting started with Delphi
Part I
The single chapter making up this part, “Introducing Delphi,” introduces the Delphi
integrated development environment (IDE), and discusses basic concepts and
techniques for creating Delphi applications.
Part I, Getting started with Delphi
5
6
Delphi User’s Guide
Chapter
1
Introducing Delphi
Chapter 1
Delphi is a component-based application development environment supporting rapid
development of highly efficient Microsoft Windows-based applications with a
minimum of coding. Many of the traditional requirements of programming for
Windows are handled for you within the Delphi class library, shielding you from
complicated, or merely repetitive programming tasks.
Delphi provides design tools such as application and form templates, so you can quickly
create and test your application prototype. Then, by using Delphi’s rich component set
and intuitive code generation, you can turn your prototypes into robust applications
that fit your business needs.
Delphi’s database tools enable you to develop powerful desktop database and client/
server applications and reports. You can view “live” data at design time, so you know
immediately whether your query results are what you want.
This chapter introduces the following topics:
•
•
•
•
•
The Delphi programming environment
Elements of the Delphi interface
The Delphi development model
Overview of Delphi projects
Setting environment preferences
The Delphi programming environment
This section briefly describes the elements of the Delphi programming environment.
You can also learn about Delphi by
• Running the “A Quick Look at Delphi” Computer-based Training (choose Help|
Interactive Tutors from the Delphi menu bar)
• Viewing Help topics (choose Contents, or Topic Search from the Help menu)
Chapter 1, Introducing Delphi
7
• Choosing context-sensitive help (F1) for a particular part of the interface.
Starting Delphi
You can start Delphi the same way you start any Windows-based application:
• Double-click the Program Item for DELPHI.EXE that was created by the Install
program.
• Use File Manager to locate and double-click the DELPHI.EXE file (if you performed a
default installation, this file is located in your DELPHI\BIN directory).
• Choose Run from the Program Manager File menu, and specify the path to
DELPHI.EXE.
• Start Delphi from the command line: WIN DELPHI (assuming Windows is in your
path statement).
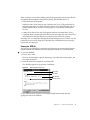
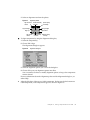
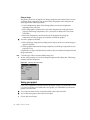
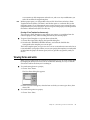
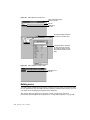
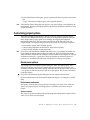
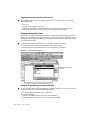
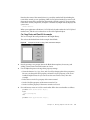
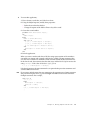
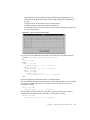
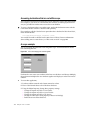
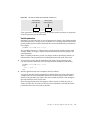
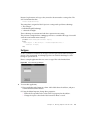
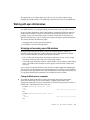
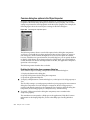
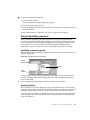
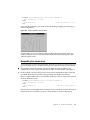
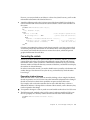
Figure 1.1
The Delphi programming environment
SpeedBar
Component palette (Standard page shown; additional
component pages available by selecting page tabs)
Object
Inspector
Code Editor
Object
selector
Properties page tab
Events page tab
Form
Elements of the Delphi interface
The elements of the Delphi programming environment were designed to provide you
with the tools you need to quickly and intuitively develop high-performance
8
Delphi User’s Guide
applications. This section briefly describes each element. For more information, choose
Programming Environment from the contents screen of online Help.
Elements visible upon starting Delphi
While many elements are visible as soon as you start Delphi, some others are not visible
until needed, or until you activate them through menu commands or other actions. This
section describes those interface elements that you can see right away when you start
Delphi.
Form
Forms are the focal point of nearly every application you develop in Delphi. You use the
form like a canvas, placing and arranging components on it to design the parts of your
user interface. Components are the building blocks of Delphi applications. They appear
on the Component palette, displayed in the top right-hand part of the screen (see
Figure 1.1).
You can think of a form as a component that can contain other components. Your
application’s main form and its components interact with other forms and their
components to create your application interface. The main form is your application’s
main interface; other forms can include dialog boxes, data entry screens, and so on.
You can resize the form and move it anywhere on your screen. A form includes
standard features such as
•
•
•
•
Control menu
Minimize and maximize buttons
Title bar
Resizeable borders
You can change these features, as well as other properties of the form by using the Object
Inspector to edit the form during design time—the time during which you are designing,
rather than running, your form. Properties define a component’s appearance and
behavior.
Form tools
Forms created in Delphi can be reused among Delphi projects, and can also be saved as
dynamic-link libraries (DLLs) so you can load them into projects built with other
applications such as C++, Paradox, dBASE, Visual Basic, and PowerBuilder.
Delphi provides several development tools that make generating productive forms and
reports easier than ever:
Chapter 1, Introducing Delphi
9
• Project Templates provide a selection of several application designs that you can use as
a starting point when building your own applications. You can save your own
projects as Project Templates.
• Form Templates enable you to choose from an array of predesigned forms when
developing your user interface. You can save your own forms as Form Templates.
• Project Experts develop projects for you based on your specified preferences,
according to general project categories.
• Form Experts develop custom forms for you based on your specified preferences. For
example, the Database Form Expert generates a form that displays data from an
external database (for more information, see the book Building Database Applications
with Delphi).
For more information about creating forms, see Chapter 3; for more information about
working with projects, see Chapter 4.
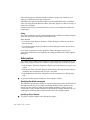
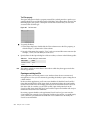
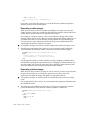
Component palette
Left scroll arrow
Components (Standard-page components shown;
additional components available by clicking the page tabs)
Placeholders for additional
components
Right scroll arrow
Pointer
Page tabs
Components are the elements you use to build your Delphi applications. They include
all the visible parts of an application, such as dialog boxes and buttons, as well as those
that aren’t visible while the application is running, such as system timers or Dynamic
Data Exchange (DDE) servers.
Delphi components are grouped functionally on the different pages of the Component
palette. For example, components that represent the Windows common dialog boxes
are grouped on the Dialogs page of the palette.
You can create your own custom components and install them onto the Component
palette, making the Delphi environment fully extensible. There is no difference in
usability between the components you create yourself and those that ship with Delphi.
You can also install Visual Basic (VBX) controls and third-party components. And the
Component palette itself is configurable and scrollable, so you can select how you want
components to be displayed in the palette.
The specific components provided with Delphi are discussed in Chapter 2 and in online
Help under the search word “Component Palette.” For information about how to
configure the palette, see Chapter 2.
10
Delphi User’s Guide
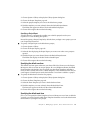
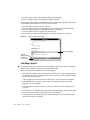
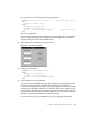
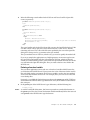
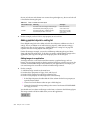
Object Inspector
Object selector (shows name and type of selected object)
Movable column separator (drag horizontally to resize columns)
Value column
Nested property (double-click to view subproperties)
Properties
page
Events page
The Delphi Object Inspector enables you to easily customize the way a component
appears and behaves in your application. The properties and events of the component
that is selected in the form are displayed in the Object Inspector.
You use the Properties page of the Object Inspector to customize components you’ve
placed on a form (or the form itself), and the Events page to generate and navigate
among certain parts of program code, called event handlers. Event handlers are
specialized procedures.
■
To keep the Object Inspector visible at all times, right-click it and choose Stay On Top
from the SpeedMenu.
Object selector
The Object selector (the drop-down list at the top of the Object Inspector) displays the
name and type of every component in the current form, including the form itself. You
can use the Object selector to easily switch among components in the form, or to switch
back to the form.
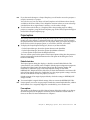
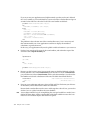
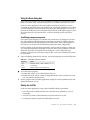
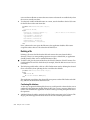
Code Editor
Title bar (displays
name of file being
viewed)
Line/column indicator
Modified indicator
Mode indicator
Page tab
The Delphi Code Editor is a full-featured editor that provides access to all the code in a
given application project. The Code Editor includes many powerful features such as
Brief-style editing, color syntax highlighting, and virtually unlimited Undo. For
information about using the editor, refer to the online Help topic Code Editor.
Chapter 1, Introducing Delphi
11
When you open a new project, Delphi generates a page in the Code Editor for the unit
source code (.PAS) file. To view the source code for a particular unit, simply click that
file’s page tab. The Code Editor title bar displays the name of the file in the active page
of the Code Editor.
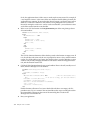
SpeedBar
Select unit
from list
Select form
Add file
from list
to project
Run
Save project
Pause
Open project
Step over
Open file
Toggle
form/unit
Save file
Remove file
from project
Trace into
New form
The Delphi SpeedBar, in its default state, provides you with shortcuts to some of the
more common commands from the File, Edit, View, and Debug menus. You can
configure the SpeedBar to include icons for most Delphi menu commands. For
information about customizing the SpeedBar, right-click it and choose the Help
command, then refer to the online Help topic SpeedBar. You can resize the SpeedBar by
dragging the separator on the right-hand side.
Elements not visible upon starting Delphi
The following elements of the Delphi interface are not visible when you first start
Delphi, but you can access them quickly from the menu bar.
Project Manager
Remove file
from project
View unit
View form
Add file to
project
Update
Project
status line
Unit name
column
Project
options
Form name column
Unit file path
The Delphi Project Manager lists the files that make up your application, and enables
you to easily navigate among them. You can use buttons on the Project Manager
SpeedBar to generate new forms and units, to view files in the current project, and to
12
Delphi User’s Guide
save modifications to all opened project files. Units are discussed in more detail on
page 24; for more detailed information about the Project Manager, see Chapter 4.
■
To display the Project Manager, choose View|Project Manager.
Menu Designer
Menu item
(Menu commands appear
below menu items)
The Delphi Menu Designer enables you to easily add menus to your forms. You open
the Menu Designer by double-clicking on a MainMenu or PopupMenu component
(found on the Standard page of the Component palette) after placing the component on
a form. Once the Menu Designer is opened, you can create your own custom menus, or
use the predefined menu templates provided with Delphi to insert ready-made menus
into your application.
The Menu Designer is discussed in more detail in Chapter 3.
Integrated debugger
Delphi provides a fully integrated debugger so you can debug your source code
without exiting the development environment. Your debugging sessions take place in
the same visual environment that Delphi provides. The debugger includes many
advanced features, including syntactic awareness, expression evaluators, watches,
conditional breakpoints, and the ability to view the call stack.
The integrated debugger is discussed in detail in Chapter 8.
ObjectBrowser
Browsing status line
Back
Show browsing history
Details
pane
Inspector pane
Scope page
Inheritance page
Reference page
The Delphi ObjectBrowser enables you to visually examine object hierarchies, units, and
global symbols your program uses. You need to compile your application with Symbol
Chapter 1, Introducing Delphi
13
Information (enabled by default) in order to enable the Browser item on the View menu.
For more information, search online Help for the topic “ObjectBrowser.”
Image editor
SpeedBar
Resource selector
window (Page tabs
provide selection
among bitmaps,
icons, and cursors)
Color palette
Tool palette
Icon editing window
Bitmap-editing window
The Delphi Image editor is a design tool that you can use to create and edit bitmaps,
icons, and cursors for display in your application. You can use any Windowscompatible bitmap, icon, or cursor—those in the Image Library shipped with Delphi,
those you create in the Image editor, or third-party images you import for use in Delphi.
Note
■
For more information about the Delphi Image Library, search online Help under Image
Library.
To view the Image editor, choose Tools|Image Editor.
The Delphi development model
This section describes the fundamental steps involved in developing your own custom
projects with Delphi. It’s also easy to quickly build prototypes by using Delphi
templates and database design tools. For more information on using Delphi templates
and other rapid form design tools, see Chapter 3 of this book. For more information on
developing forms to access your local or remote SQL databases, see Database Application
Developer’s Guide.
This section demonstrates the process of building two simple applications in Delphi.
The first application changes the color of your form when you click a button; the second
adds and clears text from a list box.
Each example illustrates the following steps, which are common to every application
you build with Delphi:
• Designing a form
• Handling events
• Starting a new project
14
Delphi User’s Guide
For the full-fledged applications you’ll write once you’re more familiar with Delphi,
you’ll perform the additional step of debugging your code. Debugging code is
discussed in Chapter 8.
Designing a form
Designing forms is as simple as arranging objects in a window. If you’re familiar with a
graphical user interface (GUI) environment such as Windows, then you already know
how to use the mouse to manipulate objects by selecting, moving, sizing, and so forth.
(If you are not familiar with these techniques, consult your Microsoft Windows
documentation.) In Delphi, the objects you manipulate are components, and the
window is the Delphi form.
This section demonstrates the following concepts:
•
•
•
•
Creating a new form
Adding components to the form
Setting component properties
Running the program
Creating a new form
There are several ways to create a new form. When you first start Delphi, if you’re
running under a default configuration, a new, blank form opens. Other ways of
generating new forms are discussed in Chapter 3. In the interest of simplicity, this
section assumes a default Delphi configuration.
➤
Start Delphi.
Adding components to the form
The first application uses only one component—a button component.
➤
Click the Button component on the Standard page of the Component palette, then click
the center of the form to place the button. (Alternatively, double-click the Button
component on the Component palette to simultaneously select it and place it in the
center of the form.)
The component appears in the center of the form.
Chapter 1, Introducing Delphi
15
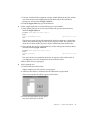
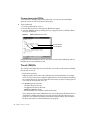
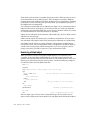
Setting component properties
Delphi makes it easy for you to set properties, the attributes that define how components
are displayed and how they function in the running application. You use the Object
Inspector to set a component’s default (initial) properties when you design your
application (during design time), and the code you enter in the Code Editor can change
properties as the application runs (during run time).
For example, you probably want the caption—that is, the descriptive label—for both the
form and the button to display something more meaningful than Form1, and Button1.
You specify the caption you’d like by using the Object Inspector to change the value of
the Caption property.
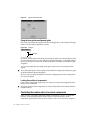
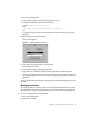
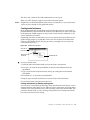
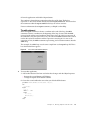
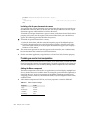
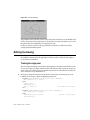
Figure 1.2
Object Inspector with Caption property selected
Caption property setting for Form 1
Property
column
Value column
Page tabs
If you wanted the Caption property to change as the application runs, you would type
the appropriate code in the Code Editor. This is explained more fully under “Handling
events” on page 18, and in Chapter 2.
■
To modify a property at design time,
1 In the form, select the component whose property you want to change.
The Component List displays the name of the selected component.
2 From the Properties page of the Object Inspector, select the property that you want to
change.
3 Modify the property by entering a new value.
Most property changes you make at design time are reflected immediately in the form.
For more information about setting properties, refer to the online Help topic Setting
Properties.
➤
Change the Caption property for Form1 to 'My Demo'. Then change the Caption property
for Button1 to 'Color'. Notice that as you type, the Caption property for Form1 and
Button1 display their changing value in the title bar of the form and on the button.
The Name property
The Name property identifies the component to the underlying program, and is the name
shown in your code. It’s good practice to change the Name property so that it is
16
Delphi User’s Guide
descriptive of the component’s function, rather than relying on default names likeForm1
or Button1.
You can change the Caption property by changing the default value of the Name
property before specifying a caption. The value of the Name property is then reflected in
the caption. By contrast, changes to the Caption property are never reflected back into
the Name property.
So long as the form Caption and Name begin with the same value, a subsequent change
to the Name property is reflected in the Caption. If the Caption differs from the Name,
changes to the Name do not affect the Caption.
Note
While the Caption property can contain any alphanumeric character of your keyboard,
including spaces, this is not the case for the Name property. The Name property must
conform to standard Object Pascal naming conventions. For more information on
naming conventions, see Chapter 5.
Running the program
Whenever you add components to a form, Delphi generates supporting code in the
background. Likewise, whenever you choose the Run command, Delphi creates a
complete standalone .EXE file that runs without any run-time interpreted DLLs. As a
result, you can actually compile and run the form just as it is.
➤
Try it now: from the Run menu, choose Run.
Notice that the components in the compiled program behave as you would expect them
to. The button appears to “push in” when you click it, and you can resize and move the
form. Such behaviors are native to each component; you don’t have to program them.
Of course, nothing useful happens when you click the button in this form. That’s where
your code comes in.
In Delphi, you write code that specifies what your program should do when it detects
user interactions such as a button click, or a drag and drop. In programming terms, such
user interactions are called events.
➤
Close the running application by double-clicking the Control-menu box.
Chapter 1, Introducing Delphi
17
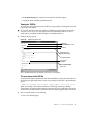
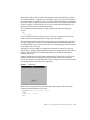
Handling events
Events represent user actions (or internal system occurrences) that your application can
recognize, such as a mouse click. The code that specifies how a component should
respond to an event is called an event handler. Every component has certain events to
which it can respond.
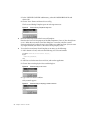
The Events page of the Object Inspector displays all events associated with the selected
component, as shown in the following figure:
Figure 1.3
Events page
Handler column
Value column
You can use the Object Inspector to generate an event handler for the form, or any
component you have on the form. When you do so, Delphi generates and maintains
parts of the code for you. For example, the following code is the initial “framework”
event handler that Delphi generates for the OnClick event of Button1 (the event that
occurs when the button is clicked) on Form1:
procedure TForm1.Button1Click(Sender: TObject);
begin
end;
The first line of the event handler names the procedure (TForm1.Button1Click) and
specifies the parameters it uses (this procedure uses only one: Sender of type TObject).
The code you insert between the begin..end block is executed whenever the OnClick
event occurs.
For this sample application, you’ll handle a button click.
■
To generate an event handler,
1 Select a component, then click the Events tab at the bottom of the Object Inspector.
2 Select an event, and double-click in the right (Value) column.
When you double-click the Value column for an event, Delphi generates an event
handler in the Code Editor, and places your cursor inside the begin..end block.
3 Inside the begin..end block, type the code that you want Delphi to execute when the
component receives the event.
18
Delphi User’s Guide
➤
Generate an event handler for the button’s OnClick event, and write the following code
inside the begin..end block:
Form1.Color := clAqua;
This specifies that when a user clicks the button, the form’s Color property changes to
the new value, Aqua.
This is how your completed event handler should look:
procedure TForm1.Button1Click(Sender: TObject);
begin
Form1.Color := clAqua;
end;
Any time you use the Object Inspector to change the name of this event handler, Delphi
maintains that name everywhere it appears in your source code.
➤
Try out the event handler you just wrote. Run the program again, and then click the
Color button. The form changes color.
➤
Close the application.
Starting a new project
You can use the New Project command from the File menu to start a new application
project, or to open any of the template applications provided with Delphi.
For the next sample application, you’ll start a blank project.
➤
To start this project, choose File|New Project.
Depending upon the configuration of the environment, one of two things can happen:
• A new instance of the project designated in the environment as the Default New
Project is generated. This is a blank project unless you or another user have
configured the Gallery differently using Options|Gallery.
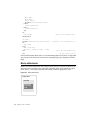
• If the Projects Gallery is enabled in the environment, the Browse Gallery dialog box
appears, with the Blank Project option selected, as illustrated in the following figure.
Figure 1.4
Browse Gallery dialog box displaying application templates
Chapter 1, Introducing Delphi
19
➤
Choose one of the following options:
• If you have an existing project open but you are not using the Gallery, you’ll be
prompted to save changes. Choose No. A blank form is displayed, just as when you
first opened Delphi.
• If you are using the Gallery, double-click the Blank Project selection, and choose not
to save changes to any open project. A blank form is displayed, just as when you first
opened Delphi.
For this application you’ll use two Button components, an Edit component, and a
ListBox component.
➤
Add the components to the form, and set any properties as noted in the following table:
Icon
Component
Property
Setting
N/A
Form1
Button1
Caption
Caption
Name
Default
&Add
AddBtn
True
Button2
Caption
Name
Text
&Clear
ClearBtn
(Blank)
Edit1
List Box Demo
ListBox1
Note
The ampersand (&) character is used in button captions and menu items to provide
quick keyboard access to the button or menu item (by means of accelerator keys). This
technique is explained in more detail in Chapter 3.
Calling procedures and functions from event handlers
So far, this chapter has discussed how to set properties at design time and run time.
However, setting properties is only a minor aspect of code development in Delphi.
Procedures and functions, also known as routines, usually constitute the bulk of your
program code.
Just as every component can respond to specific events, components in Delphi also have
routines that pertain specifically to them. Procedures and functions associated with a
component are called methods.
You call methods at run time the same way you set properties at run time by writing an
event handler. Unlike properties, however, methods are never activated at design time.
To read more about methods, refer to Chapter 5 or see the online Help topic Methods.
This sample application uses the list box’s Add and Clear methods to display and remove
text in the list box.
■
20
To call methods from an event handler,
Delphi User’s Guide
1 Generate a handler for the component event by double-clicking in the Value column
next to the selected event. Delphi generates the initial code in the Code Editor,
placing your cursor inside the begin..end block.
2 Inside the begin..end block, type the method call.
➤
For the sample application, write the following two event handlers:
1 Select AddBtn, generate an OnClick event handler and type the statement shown
inside the begin..end block:
procedure TForm1.AddBtnClick(Sender: TObject);
begin
Listbox1.Items.Add(Edit1.Text);
end;
{add this line of code}
The code you typed calls the Add method of the list box in response to a click on the
AddBtn. The parameter being passed is the Text property of Edit1. This specifies that
when the user clicks AddBtn, any text in Edit1 is added to the items in the list box.
2 Now generate the OnClick event handler for ClearBtn, and type the statement shown
inside the following begin..end block:
procedure TForm1.ClearBtnClick(Sender: TObject);
begin
ListBox1.Items.Clear;
end;
{add this line of code}
This code calls the Clear method of the list box in response to the ClearBtn click. As
you might guess, the Clear method clears the text from the list box.
All that’s left is to run your program.
➤
Try this program out:
1 From the Run menu, choose Run.
Delphi compiles your code and runs your program.
2 Add text to the edit box, and then choose the Add button (or press Alt+A).
The text you typed in the edit box appears in the list box.
3 Choose the Clear button (or press Alt+C).
Any text in the list box is cleared.
Chapter 1, Introducing Delphi
21
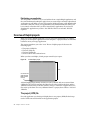
Distributing your application
This chapter has shown how easy it is to build and run a simple Delphi application, and
the same fundamental techniques apply when you create larger and more sophisticated
applications as well. When you run your program, Delphi generates a fully distributable
executable (.EXE) file. Unless your application uses dynamic-link libraries (DLLs) you
have written, or database files you have created for the application, all you need to
distribute the application is just that—the .EXE file. There is no run-time .DLL file
required.
Overview of Delphi projects
When you create a Delphi application, you can start with a blank project, an existing
project, or one of Delphi’s application or form templates. A project consists of all the files
needed to create your target application.
This section introduces you to the “core” files in a Delphi project. It discusses the
following topics:
•
•
•
•
The project (.DPR) file
The unit (.PAS) file
The form (.DFM) file
Source code for units without forms
When you first start Delphi, a blank project named Project1 opens.
Figure 1.5
A default Delphi project
Form
Unit source code
page tab (Code
Editor is behind
the form)
A blank Delphi project initially contains one unit (.PAS) file and one associated form
(.DFM) file. The .PAS file contains the Object Pascal source code for the form, and the
.DFM file contains binary code that stores the “image” of the form. Together these two
files make up the form. For every additional form in a project, there will be a .PAS and
.DFM file.
The project (.DPR) file
For each application you develop in Delphi, there is one project (.DPR) file that keeps
track of all the unit and form files in the application project.
22
Delphi User’s Guide
When you begin a new project, Delphi generates the project file, and maintains this file
throughout the development of the project. Initially, the .DPR file consists of
• The default name of the project.
Delphi provides all new projects with a default name, Project1. The project files for
template applications have more descriptive names, for example MDIApp. You can
change the name when you first save the project, or at any time by choosing File|
Save As.
• A uses clause that lists the units in the project and their associated forms (if any).
• A program block containing the code that executes the application and activates the
main application form (by default, Form1, the first form created in a project).
Normally, you view the project through the Project Manager, but you can also view the
project file as source code, using the Code Editor. For a detailed discussion of project
source code, see Chapter 4.
Viewing the .DPR file
You can view the .DPR file to see the units and forms in your current project. Because
Delphi maintains the .DPR file, manually editing the .DPR file is not recommended.
■
To view the .DPR file,
1 Choose View|Units.
The View Unit dialog box appears, displaying a list of the unit(s) in the project, and
the (single) project file.
2 Select the name of the project file, and choose OK.
The .DPR file appears in a page in the Code Editor.
Figure 1.6
Default project source code
Project name
Uses clause
Form identifiers
Compiler directive
As you add new forms or units to your project, Delphi automatically adds the
appropriate code to the .DPR file.
Chapter 1, Introducing Delphi
23
The uses clause in the .DPR file
To illustrate how Delphi maintains the project file, you can view the code Delphi
generates when you add a new form to the project.
➤
Try the following:
1 View the project file for Project1.
2 Choose File|New Form, and accept the Blank Form option.
3 View the .DPR file again by clicking the Project1 page tab in the Code Editor. Here’s
what you should see:
Figure 1.7
Modified project file source code
New form identifier
New unit file name
New unit identifier
Delphi added the identifier for the new unit, Unit2, its file name, UNIT2.PAS, and the
identifier for its associated form, Form2.
The unit (.PAS) file
The unit file is the Object Pascal source code file, saved with a .PAS extension. Initially,
the unit file consists of
• The default unit name.
Delphi provides all new units with a default name (or unit identifier), for example
Unit1, or Unit2. The units in a template application have more descriptive identifiers,
for example, MainForm. You can change the name when you first save the project, or
at any time by choosing File|Save As.
• An interface part that contains
•
•
•
•
The uses clause for the unit
The type declaration for the form
public and private sections
The declaration of an instance variable for the form
Just as the uses clause in the .DPR file lists the units in the project, the uses clause in a
.PAS file lists all other units that are accessed, in turn, by this unit. Whenever you
generate a new default unit, Delphi automatically adds the library units needed to
the unit’s uses clause. For more information, see page 25.
24
Delphi User’s Guide
• An implementation part, where the source code for the form appears.
• A program block containing initialization code.
Viewing the .PAS file
You can view any of the unit source code files in your project by selecting the associated
page in the Code Editor.
■
To view the unit file source code, click the Code Editor page tab with the name of the
unit you want to view. (You can quickly zoom the Code Editor window to view as
much code as possible by double-clicking the Code Editor title bar.)
➤
Click the Unit1 page tab.
Figure 1.8
Default unit source code
Unit identifier
Begins interface part of code
Uses clause
Delphi library units
(added automatically)
Form type declaration
Form variable
declaration
Begins implementation
part of code
For a detailed discussion of unit file source code, see Chapter 4.
The uses clause in the .PAS file
As mentioned, Delphi automatically adds the needed library units to the uses clauses of
the default unit generated when you open a new project or unit. This is the default uses
clause:
uses SysUtils, WinTypes, WinProcs, Messages, Classes, Graphics, Controls, Forms, Dialogs;
When you modify a form (discussed further, in following sections) by adding a
component to it, Delphi modifies the form unit’s uses clause by adding the name of the
unit in which the component is declared if it does not already appear in the units listed.
➤
For an example of this, try the following.
1 Start a new, blank project.
Chapter 1, Introducing Delphi
25
2 From the Standard page of the Component palette, add a GroupBox component to
Form1.
3 Run the program.
4 Select the Unit1 page tab (it is not necessary to exit the running program) and
examine the uses clause.
It appears as
uses SysUtils, WinTypes, WinProcs, Messages, Classes, Graphics, Controls, Forms,
Dialogs, StdCtrls;
Delphi added the StdCtrls library unit because that is where the GroupBox component is
declared. Similarly, whenever you add a new unit to a project, Delphi adds it to the
project’s uses clause.
When you add new forms to your project, other units in the project might need to
reference them or their components or code. In this case, you need to add the new
form’s unit to the referencing unit’s uses clause.
The form (.DFM) file
The form is the focal point for programming in Delphi. Whether you’re adding
components to the form, changing their properties using the Object Inspector, or typing
code in the Code Editor for the unit associated with the form, you’re really editing the
form.
The .DFM file is a binary file, and therefore visible only by its onscreen graphical
representation of the form, not normally by any code you directly modify. Any edits
you make to the form’s visual properties, such as changing the height, color, border, and
so forth are stored in the .DFM file and reflected in the form.
Note
You can, if you choose, view and edit the form file as text by directly opening it in the
Code Editor.
The type declaration in the .DFM file
Just as Delphi generates an instance variable for the form, it also generates an instance
variable, or field, for every component you add to the form. In this case, though, the
form contains the component, so the component declaration appears inside the form’s
type declaration. The same is true for methods (event handlers) of the form. As you add
components and event handlers to the form, the form’s type declaration expands to
include the declarations for each component and method.
For an illustration of this, try the following:
1 Arrange Form1 and Unit1 on your screen so that both are visible (resize the form if
necessary).
26
Delphi User’s Guide
2 Scroll in the Code Editor window until the type declaration for Form1 is visible.
Figure 1.9
Form type declaration
3 Add a button component to the form, while watching what happens to the type
declaration.
Figure 1.10 Modified type declaration
Instance variable code Delphi
added for Button1
If you delete Button1 from Form1, Delphi deletes the button’s instance variable, but not
any associated methods. For more information, see Chapter 2.
Note
No code is generated when you change a component’s design-time properties, because
those values are stored in the .DFM file. The only exception to this is the Name property,
as discussed previously. When you use the Object Inspector to change a component’s
Name property, Delphi changes its variable declaration for you to reflect the new name
in the underlying code. This is discussed in more detail in Chapter 5.
Source code for units without forms
Although most Delphi units are associated with forms, you may want to create or use
units that have no forms associated with them. For example, you might create a
separately compilable unit of nonvisual objects, or import a library of certain
mathematical functions.
This is the only code that Delphi generates when you add a new unit to a project
without adding a form:
Chapter 1, Introducing Delphi
27
unit Unit2;
interface
implementation
end.
Because there is no need to synchronize the code in these files with an associated form,
Delphi does not maintain the code for you. When you write your own units, or import
existing units, you need to write the uses clause that specifies which other units and
forms in your project they need to access. For example, if you want UnitA to be able to
access methods or forms declared in UnitB, you need to add UnitB to the appropriate
uses clause in UnitA.
Whenever you add a new unit to your application, however, whether or not it has an
associated form, Delphi adds the unit name to the uses clause in the .DPR file.
Setting environment preferences
Delphi provides developers with a wide array of options for configuring the integrated
development environment (IDE). References to the behavior and appearance of the IDE
in this book are based upon the default configuration created by the Delphi installation
program. If you are not working with a default installation of Delphi, bear in mind that
another user might have modified parts of the IDE configuration.
The Environment Options dialog box provides several pages of configuration options
that you can control. Some settings control behind-the-scenes elements such as the path
to library files, while others directly affect the appearance and behavior of the Delphi
interface—the Grid, Gallery, and Editor options, for example. This section discusses the
Preferences page of the Environment Options dialog box, because the settings on this
page directly affect the appearance and behavior of the IDE when you first start Delphi,
and when you open new projects and forms. (Other pages from this dialog box are
discussed elsewhere in this book, together with the topics that relate to their function.
Complete information for each page and option is available in online Help for the
Environment Options dialog box.)
Accessing environment options preferences
■
28
To display the Environment Options dialog box, choose Options|Environment from the
Delphi menu bar, then choose the Preferences page tab.
Delphi User’s Guide
Figure 1.11 Environment Options dialog box, Preferences page
Gallery options
The check boxes in the Gallery group that appear at the bottom of the Environment
Options dialog box are some of the most important options because they control what
you see when you open a new form or a new project.
Note
The exercises in this and subsequent chapters assume that the Forms Gallery option is
enabled, as it is by default when you install Delphi. However, if you share your
installation of Delphi, this option might have been disabled by another user. See
“Enabling the Gallery options” later in this section.
The Gallery is a collection of Form and Project Templates and Experts supplied with
Delphi. (Some versions of Delphi contain more Form Templates and Project Templates
than are illustrated in the following figures.) You can develop your own forms and
projects to serve as templates for your applications and add them to the Gallery, making
it easy to reuse forms, or even entire projects, in new applications. For information on
creating form and project templates see Chapter 3 and Chapter 4.
The Use On New Form and Use On New Project check boxes in the Gallery group box
control whether the Browse Gallery window is displayed when you create a new form
or project in the current or future Delphi work sessions.
Use On New Form option
When this item is checked in the Environment options dialog box, the Browse Gallery
dialog box for forms is displayed whenever you choose New Form from the File menu
or Project Manager. You can then select from the Form Templates and Experts currently
available. The new form is then built by the Expert or copied from the template and is
ready for you to customize or use as is in your project.
If this item is not checked in the Environment Options dialog box, the Gallery is not
displayed when you create a new form, and a new blank form is added to the project.
The Gallery is still accessible through the Options menu, however. The Forms Gallery is
discussed in detail in Chapter 3.
Note
This option is enabled by default in a new Delphi installation.
Chapter 1, Introducing Delphi
29
Figure 1.12 The Forms Gallery
Use On New Project
When this item is checked in the Environment options dialog box, the Browse Gallery
dialog box for projects appears whenever you choose New Project from the File menu.
You can then select from the available Project Templates and Experts. The new project,
including all forms and components, is then built by the selected project Expert or
copied from the selected template and is ready for you to customize or use as is.
If this item is not checked in the Environment Options dialog box, the Gallery does not
appear when you create a new project. A new blank project is created instead. The
Gallery is still accessible through the Options menu as you work on the new project,
however.
Note
This option is disabled by default in a new Delphi installation.
Figure 1.13 The Projects Gallery
30
Delphi User’s Guide
Enabling the Gallery options
Because the exercises in this part of the book assume that all Gallery options are enabled,
check now to make sure that they are.
■
To enable the Gallery for new projects and forms,
1 Choose Options|Environment from the Delphi menu bar.
2 In the Gallery group, check the Use On New Form and Use On New Project check
boxes if they are not already checked.
3 Choose OK to close the Environment Options dialog box.
Desktop Contents option
The setting of this option in the Environment Options dialog box controls what desktop
information is saved when you choose File|Save Project or exit Delphi. It also affects
your ability to use the ObjectBrowser, which enables you to step through the object
hierarchies, units, and global symbols in your application. (For more information on
using the ObjectBrowser, see online Help.)
Desktop Only
Choosing this option saves directory information, open files in the Code Editor, and
open windows.
Desktop And Symbols
Choosing this option saves the same information as the Desktop Only option, plus
symbol information from the last successful compilation. The ObjectBrowser uses this
symbol information to construct the object hierarchy of your application. If you plan to
use the ObjectBrowser to analyze your application, you should choose this Environment
option.
Autosave Options
These options enable you to specify what files and options are automatically saved
when you test run your program from within Delphi, and when you exit Delphi.
Editor Files
Choosing this option saves all modified files in the Code Editor. The advantage of this
option is that changes to your code are saved whenever you test run your program.
Desktop
Choosing this option saves the arrangement of your desktop. Subsequent Delphi work
sessions display the same desktop as the current session.
Form Designer options (grid)
These options control whether the form grid is displayed, whether components snap to
the nearest x,y grid position, and the spacing of the grid positions. For information on
using the grid feature, search online Help for the topic “aligning components.”
Chapter 1, Introducing Delphi
31
Debugging options
These options control debugging processes in the environment.
Integrated Debugging
Enables the Delphi integrated debugger in the environment. Check this option unless
working exclusively with programs that have already been debugged.
Step Program Block
This option causes the integrated debugger to stop at the first unit initialization
containing debug information.
Break On Exception
Choosing this option causes a running application to stop if an exception occurs and
displays the exception class, message, and location. This provides a means for you to
step through the exception handlers as if going through the code sequentially.
Minimize On Run
Choosing this option minimizes the Delphi IDE whenever you run an application from
within Delphi. The IDE returns to a normal state when the running application
terminates.
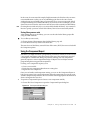
Compiling option
Delphi can display a dialog box showing the progress of the compiler as it compiles
your program. To enable this display, check the Show Compiler Progress check box in
the Environment Options dialog box. Enabling this option makes the Cancel button in
the Compiling dialog box available so you can cancel a compilation in progress.
Figure 1.14 The Compiling dialog box
Summary
This overview introduced the following concepts:
• Elements of the Delphi programming environment interface
• Overview of the Delphi development model, including
• Setting a component’s design time properties by using the Object Inspector
32
Delphi User’s Guide
• Writing event handler code to set properties and call methods during run time
• Running your application
• Structure of projects in Delphi
• The types of files in a project
• Setting environment preferences to control the behavior of Delphi when selecting
New Project or New Form
Chapter 1, Introducing Delphi
33
34
Delphi User’s Guide
Part
II
Fundamental skills
Part II
The chapters in this part present concepts and skills fundamental to creating Delphi
applications. These concepts and techniques are illustrated by simple but functional
examples that you can create.
The three chapters making up this part are
• “Using components and code”
This chapter explains the nature of Delphi components, where to find them on the
Component palette, how to place them on forms to create user interfaces, and how to
attach code to events associated with those components. Additional topics include
how to use the Component Expert to create custom components, how to add VBX
components to the Delphi Component palette, and how to customize the Delphi
Visual Class Library (VCL).
• “Building form and menus”
This chapter explains how to design and create forms for maximum reusability, both
within the same project and across multiple projects. Additional topics include how
to use the Delphi Menu designer to create and modify Form menus for both SingleDocument Interface (SDI) and Multiple-Document Interface (MDI) applications.
• “Managing projects, files, and directories”
This chapter explains how to use the Delphi Project Manager to view and administer
the files making up your Delphi project. Additional topics include how to set project
and programming environment options, and how to streamline your programming
tasks by using Delphi templates.
Part II, Fundamental skills
35
36
Delphi User’s Guide
Chapter
2
Using components and code
Chapter 2
This chapter introduces many of the fundamental tasks you’ll perform as you build user
interfaces with Delphi components. It expands on the concepts introduced in Chapter 1
by showing you how to create a dialog box that you can reuse in different applications.
While building the dialog box, you’ll find out more about manipulating components in
the form (arranging, copying, and so on), and working with code in the Code Editor.
The About box you build in this chapter is available in its completed state as a template
in the Delphi Forms Gallery. If you like, you can refer to the completed About box as
you learn how to build your own. To open the template, choose File|Open File and
select the ABOUT.PAS file in the \DELPHI\GALLERY directory.
This chapter discusses the following topics:
•
•
•
•
•
Delphi components
Manipulating components in your forms
Setting component properties
Working with code
Customizing the Delphi Visual Component Library (VCL)
Delphi components
The pages of the Component palette display the components Delphi provides to enable
you to quickly develop powerful and diverse applications. A large part of interface
design consists of using these components to customize the forms that make up your
application.
Delphi components include both visual and nonvisual types. Visual components appear
essentially the same in your form at design time as they do at run time. Nonvisual
components, on the other hand, are not visible on the form at run time. The MainMenu
and Timer components are two examples of nonvisual components. The MainMenu
component appears as an icon in your form at design time to give you access to the
Menu Designer; but at run time, only the menu you’ve designed is visible, not the
Chapter 2, Using components and code
37
component. A Timer component, on the other hand, provides a visual representation at
design time of the function that timers provide to your application—a means of
triggering events at measured intervals—while at run time, the timer measures the
intervals, but is not a visible part of your interface.
The form component
The form is a component that can contain other components. This makes it different
from most other components, and is what makes it useful to you as an area for
designing your application interface. (There are other Delphi components that can act as
containers within a form. For more information, see “Grouping components” on
page 47.)
By default, the form component doesn’t appear on the Component palette. However,
you can reuse a form by making it into a component that can be installed onto the
Component palette. For more information, see the “Delphi Component Writer’s Guide.”
Default Component palette pages
The following tables illustrate the components as they initially appear on each page of
the Component palette before any customizing you might choose to perform.
Note
The pointer icon appears on each palette page. When the pointer icon is selected, the
mouse cursor is shaped like an arrow, enabling you to select from the components in the
palette.
Table 2.1
Icon
38
Components on the Standard page
Visual
Component name
Use to
N
MainMenu
Design a menu bar and its accompanying drop-down menus
for a form.
N
PopupMenu
Y
Label
Y
Edit
Y
Memo
Design pop-up (local) menus, available to forms and controls
when the user selects the component and clicks the right
mouse button.
Create a non-windowed control that displays text such as
titles, that the user cannot access. Usually this text labels some
other control.
Display an area where the user can enter or modify a single
line of text.
Display an area where the user can enter or modify multiple
lines of text.
Y
Button
Provide a button that users can choose to carry out an
operation (for instance, stopping, starting, or cancelling a
process).
Y
CheckBox
Y
RadioButton
Y
ListBox
Present Yes/No, True/False, or On/Off options. Check boxes
operate independently of one another; the options presented
are not mutually exclusive.
Present mutually exclusive options. Radio buttons are usually
used in conjunction with group boxes to form groups where
only one of the listed options is available at any one time.
Display a list of choices from which the user can select one or
more items.
Delphi User’s Guide
Table 2.1
Icon
Table 2.2
Icon
Components on the Standard page (continued) (continued)
Visual
Component name
Use to
Y
ComboBox
Y
ScrollBar
Combine the functionality of an edit box and a list box to
display a list of choices. Users can either type text into the edit
box part or select an item from the list.
Provide a way to change which portion of a list or form is
visible, or to move through a range by increments.
Y
GroupBox
Group other related components on a form.
Y
RadioGroup
Group radio buttons on a form.
Y
Panel
Group other components, such as speed buttons on a tool bar;
also often used to create a status bar.
Components on the Additional page
Visual
Component name
Use to
Y
BitBtn
Provide a button that can receive and display a bitmap.
Y
SpeedButton
Y
TabSet
Y
Notebook
Y
TabbedNotebook
Provide a button that can be added to a Panel component to
create a tool bar. Speed buttons have some unique capabilities
that allow them to work as a set.
Create notebook tabs that give your form the appearance of
having pages. (Often used with the Notebook component.)
Provide a stack of multiple pages (often used with the TabSet
component).
Create a multi-page form with page tabs at the top.
Y
MaskEdit
Format the display of data or limit user input to valid
characters.
Y
Outline
Display information in a variety of outline formats.
Y
StringGrid
Provide a means for handling strings in columns and rows.
Y
DrawGrid
Y
Image
Provide a means for displaying non-textual information in
columns and rows.
Display a bitmap, icon, or metafile.
Y
Shape
Draw geometric shapes: an ellipse, rectangle, or rounded
rectangle.
Y
Bevel
Y
Header
Y
ScrollBox
Provide a rectangle, the single lines or entire border of which
can appear raised or sunken.
Provide a sectioned visual control that displays text and allows
each section to be resized with the mouse.
Provide a scrollable display area (smaller than the form itself).
Scroll bars automatically appear at run time if the size of the
display exceeds the size of the scroll box.
Chapter 2, Using components and code
39
Table 2.3
Icon
Visual
Table 2.4
Icon
40
Controls on the Data Access page
Component name
Use to
N
Database
N
Table
Establish and maintain a connection between a Delphi
application and a remote database server.
Link a database table with a Delphi application.
N
Query
N
StoredProc
N
DataSource
N
BatchMove
N
Report
Construct, then execute, an SQL query to a local database or
remote SQL server.
Provide a means to locally store SQL procedures applicable to
a remote SQL database.
Provide a conduit for data between a Query or Table
component, and data-aware components in your application.
Locally store a queried answer set from a remote database
server, locally modify, add, or delete records, and write the
updated batch back to the server.
Provide a means for your application to generate and print
reports using Borland ReportSmith.
Components on the Data Controls page
Visual
Component name
Use to
Y
DBGrid
Provide a grid in which your application can display data.
Y
DBNavigator
Y
DBText
Provide a means for users to navigate or edit data records
displayed by your application.
Provide a data-aware version of the Label component.
Y
DBEdit
Provide a data-aware version of the Edit component.
Y
DBMemo
Provide a data-aware version of the Memo component.
Y
DBImage
Provide a data-aware version of the Image component.
Y
DBListBox
Provide a data-aware version of the ListBox component.
Y
DBComboBox
Provide a data-aware version of the ComboBox component.
Y
DBCheckBox
Provide a data-aware version of the CheckBox component.
Y
DBRadioGroup
Provide a data-aware version of the RadioGroup component.
Y
DBLookupList
Provide a list-box type lookup list with values from a
secondary table.
Y
DBLookupCombo
Provide a combo-box type lookup of values from a secondary
table.
Delphi User’s Guide
Table 2.5
Icon
Table 2.6
Icon
Components on the Dialogs page
Visual
Component name
Use to
N
OpenDialog
N
SaveDialog
Make the Windows Open common dialog box available
to the application.
Make the Windows Save File common dialog box
available to the application.
N
FontDialog
N
ColorDialog
N
PrintDialog
N
PrinterSetupDialog
N
FindDialog
Make the Windows Find common dialog box available to
the application.
N
ReplaceDialog
Make the Windows Replace common dialog box available
to the application.
Make the Windows Font common dialog box available to
the application.
Make the Windows Color common dialog box available
to the application.
Make the Windows Print common dialog box available to
the application.
Make the Windows Printer Setup common dialog box
available to the application.
Components on the System page
Visual
Component name
Use to
N
Timer
Provide a measured time interval that can be tied to
events.
Y
PaintBox
Provide a rectangular area of the form to be painted.
Y
FileListBox
Provide a list box that displays the files in the current
directory, and enable users to scroll among them at run
time.
Y
DirectoryListBox
Y
DriveComboBox
Y
FilterComboBox
Y
MediaPlayer
Y
OLEContainer
Provide a list box that displays the directories on the
current drive, and enable the user to switch among them
at run time.
Provide a combo box that displays the current drive, and
enable the user to choose a different drive from the dropdown list at run time.
Provide a combo box that displays the current file filter
(for example, *.*), and enable the user to select from a list
of available filters at run time.
Display a VCR-style control panel for playing and
recording multimedia video and sound files.
Create an Object Linking and Embedding (OLE) client
area in the form.
N
DDEClientConv
N
DDEClientItem
N
DDEServerConv
N
DDEServerItem
Establish a client connection to a Dynamic Data Exchange
(DDE) server application.
Specify the (client) data that will be transferred during a
DDE conversation.
Establish a server connection to the DDE client
application.
Specify the server data that will be transferred during a
DDE conversation.
Chapter 2, Using components and code
41
Table 2.7
Icon
Visual
Table 2.8
Icon
Note
Components on the VBX page
Component name
Use to
Y
BiSwitch
Provide a visual toggle switch (similar to a check box).
Y
BiGauge
Provide a progress indicator for your application.
Y
BiPict
Display a bitmap, icon, or metafile.
Y
Chart
Provide charting capability.
Components on the Samples page
Visual
Component name
Use to
Y
Gauge
Display a bar, text, or pie-shaped gauge that serves as a
progress indicator.
Y
ColorGrid
Y
SpinButton
Enable the user to select colors for the elements in the
application.
Provide a means for the user to quickly increment or
decrement a value in an edit box.
Y
SpinEdit
Y
DirectoryOutline
Y
Calendar
Provide an integrated combination of a spin control and an
edit box.
Provide a hierarchical listing of the current drive’s directory
structure.
Provide a simple monthly calendar grid.
The components on the VBX and Samples page are not included in the Delphi Visual
Component Library (VCL). They are provided as examples only, and are not formally
documented as part of the core product. All components in the VCL are fully
documented in online Help. For more information, press F1 with a component selected
in the form.
Installing additional components
The components displayed in the Component palette reflect the contents of a library file
that Delphi maintains, initially called COMPLIB.DCL. You can customize this library—
and therefore what is displayed on the palette—by adding or removing components
from the file. Whenever you customize the library, Delphi rebuilds the library file.
You can also install components such as Microsoft Visual Basic (VBX) controls and other
third-party components onto the palette.
Installing components is described in the section “Customizing the Delphi Visual
Component Library (VCL)” on page 68.
42
Delphi User’s Guide
Manipulating components in your forms
This section demonstrates fundamental skills you need as you work with the
components in your forms. If you’re comfortable using controls in a graphical user
interface (GUI) environment, much of the material discussed here—such as selecting,
sizing, and deleting components and so on—might be familiar to you. You might not be
familiar, however, with how to perform some of these common operations within the
Delphi environment. This section shows you how to do so.
In the context of designing a reusable About box, this section describes such skills as
•
•
•
•
•
•
•
•
Note
Setting form properties
Adding components to the form
Selecting components in the form
Grouping components
Cutting, copying, and pasting components
Deleting and restoring components
Aligning components
Controlling the creation order of nonvisual components
Keyboard support is available for many of the tasks documented here. For more
information about keyboard techniques, the online Help topic Form Keyboard
Shortcuts.
Figure 2.1
➤
About box
To begin designing the About box, start a new project.
1 Choose File|New Project.
By default, Delphi creates a new, blank project. If you (or another user) have enabled
the Project Gallery (see Chapter 3), the Browse Gallery dialog box appears, with the
user-specified default project option selected.
2 Choose OK. (This step applies only if you are using the Project Gallery.)
Setting form properties
The first part of creating the dialog box involves setting properties for Form1. You were
introduced to the notion of properties in Chapter 1. You’ll change several form
properties, including the form name.
Chapter 2, Using components and code
43
➤
Set properties for Form1 as described in the following table:
Property
Value
Name
Caption
AboutBox
About
BorderStyle
bsDialog
Position
poScreenCenter
Changing BorderStyle to bsDialog removes the form’s Minimize and Maximize buttons
and makes its borders non-resizable. Changing Position to poScreenCenter ensures that
the dialog box appears in the center of the screen. Note that these changes become
visible at run time, not design time.
The Name property
The most important of the properties you just changed is the Name property. In fact, the
Name property is arguably the most important property for all components. Every
component in an application must have a unique name, so assigning meaningful names
at the outset not only makes your code more readable, but prevents possible name
conflicts later.
Component names must follow the standard rules for naming Object Pascal identifiers.
If you enter a value that is not consistent with Object Pascal naming requirements, the
name reverts to its previous value, and Delphi displays the following error message:
‘<name> is not a valid component name.’
For more information about Object Pascal naming conventions, see Chapter 5.
Caution
As mentioned in Chapter 1, so long as you use the Object Inspector to change a
component’s Name property, Delphi maintains your changes in the underlying code.
This is not the case, however, if you edit the component name yourself by typing the
change directly into the Code Editor. If you manually edit a component name, Delphi
will be unable to load your form.
Adding components to the form
When you add components to the form, you can either accept the default component
size, or resize the component as you add it. You can also easily add multiple copies of a
component.
■
To add a component to the center of the form, simply double-click the component in the
Component palette.
If there are already components in the form, additional components are offset (lower
and to the right) as you add them, so all the components remain at least partially visible.
■
To add a component to a specific location in the form,
1 Click the component on the Component palette.
2 Move the cursor to where you want the upper left corner of the component to appear
in the form, then click the form.
44
Delphi User’s Guide
The component appears in its default size, in the position you clicked on the form.
➤
From the Additional page of the Component palette, add a BitBtn component to the
lower center portion of AboutBox.
Figure 2.2
AboutBox with BitBtn component
As discussed in Chapter 1, when you add a component to a form, Delphi generates an
instance variable, or field, for the component and adds it to the form’s type declaration.
You’ve seen how adding a component changes the form’s type declaration:
type
TAboutBox = class(TForm)
BitBtn1: TBitBtn;
end;
{ this is the code that Delphi added )
{ some additional code omitted for brevity }
Similarly, when you delete a component, Delphi deletes the corresponding type
declaration. For more information, see “Deleting event handlers” on page 67.
Sizing a component as you add it
The next component you’ll add, an Image component, needs to be larger than its default
size. You can resize and move components after they’re on the form, or as you place
them.
■
To resize a component as you add it,
1 Select the component on the Component palette.
2 Place the cursor where you want the component to appear in the form, then drag the
mouse pointer before releasing the mouse button.
As you drag, an outline appears to indicate the size and position of the control.
3 Release the mouse button when the outline appears as you want it.
➤
Add an Image component (on the Additional page of the palette) to the lower left corner
of the form. Drag before you release the mouse button, until the outline is the size you
want the image to be.
Later, you’ll move the Image component to its final position.
Chapter 2, Using components and code
45
Selecting components in the form
There are several ways to select components in the form; most, but not all, of these
methods also apply to components contained by other components, such as the Panel or
GroupBox component.
■
To select a single component, do one of the following:
• Click the component in the form.
• Choose from the Object selector, located at the top of the Object Inspector.
• With focus in the form, tab to the component.
■
To select multiple components, do one of the following:
• First hold down the Shift key, and then click the components, one at a time.
• Click the form outside one of the components and drag over the other components
you want to select. (If the components are inside a Panel or GroupBox component,
press Ctrl, and then drag.)
As you drag, you surround the components with a dotted rectangle, or “rubber
band.” When this rectangle encloses all the components you want to select, release
the mouse button. In some cases, you might need to rearrange the components before
they can be easily enclosed within a rectangle.
Note
■
Multiple selection applies to all components in the form, including container
components and any components they contain; but when the form itself is selected, no
other components can be selected along with it.
To select all components in a form, choose Edit|Select All.
Resizing components in the form
When a component is selected on a form, small squares called sizing handles appear on
the perimeter of the component. You can use these handles to resize one or more
components.
Figure 2.3
Sizing handles
Resizes the button horizontally
Resizes the button both horizontally and vertically
Resizes the button vertically
■
To resize a single component, select the component on the form, and drag a sizing
handle until you are satisfied with the component’s size.
When you release the mouse button, the component is redrawn in the new size.
■
To resize multiple components,
1 Select the components you want to resize as a group.
2 Choose Edit|Size to display the Size dialog box.
3 Select appropriate sizing options, then choose OK.
46
Delphi User’s Guide
➤
Add a Panel component (from the Standard page of the Component palette), then resize
it so that it fills most of the form, without covering the other components, as shown in
the following figure:
Figure 2.4
Form with Panel component
Adding multiple copies of a component
You can easily add more than one copy of the same type of component to a form by
pressing the Shift key before selecting the component. The component remains selected
until you select the pointer icon on the Component palette.
■
To add multiple copies of the same component,
1 Press and hold the Shift key.
2 Click the component in the palette, then click in the form once for each copy you
want of the component. (You don’t need to hold down the Shift key after the
component is selected.)
3 Click the pointer icon to clear the selected component.
Clicking in the form continues to add the component to the form, as long as the
component remains selected in the palette.
➤
Add two Label components to the lower portion of AboutBox, to the right of the bitmap
button.
Grouping components
Besides the form itself, Delphi provides several components—the GroupBox, Panel,
Notebook, TabbedNotebook, and ScrollBox—that can contain other components. These
are often referred to as container components. You can use these container components to
group other components so that they behave as a unit at design time. For instance, you
might group components, such as speed buttons and check boxes, that provide related
options to the user. You often use container components such as the Panel component to
create customized tool bars, backdrops, status lines, and so on.
For more information about creating tool bars and status lines, see Chapter 12, or search
online Help under “tool bars” or “status lines.”
Chapter 2, Using components and code
47
When you place components within container components, you create a new parentchild relationship between the container and the components it contains. Design-time
operations you perform on these “container” (or parent) components, such as moving,
copying, or deleting, also affect any components grouped within them.
Note
The form remains the owner for all components, regardless of whether they are parented
within another component. For more information about the difference between a
component’s parent and owner, see online Help topics Owner Property and Parent
Property.
You generally want to add container components to the form before you add the
components you intend to group, as it’s easiest to add components that you want
grouped directly from the Component palette into the container component.
Once a component is in the form, you can add it to a container component by cutting
and then pasting it.
■
To group components,
1 Add a GroupBox or Panel component to the form.
2 Making sure that the container component is selected, add components as you
normally would.
As you add components, they appear inside the container component.
When you double-click a component in the palette, it appears in the middle of
whichever eligible receiving component has focus—either the form, or a container
component in the form. If you select and then place components, the container
component needn’t be selected, so long as you click within it when you place the
component.
■
To add multiple copies of a component to a container,
1 Press Shift and then select a component from the palette.
2 Click anywhere in the container component.
Each subsequent click continues to place the component in whatever eligible
receiving component (including the form) is clicked.
3 Select the pointer icon when you have finished adding components.
➤
48
Add two Label components to the Panel component, as shown in Figure 2.5.
Delphi User’s Guide
Figure 2.5
AboutBox with Panel and Label components
Cutting, copying, and pasting components
You can cut, copy, and paste components between forms, or between a form and a
container component such as a panel or group box. The container component can be on
the original form or in another form.
Note
When you copy components, you copy their property settings and event-handler
associations as well. For example, copying a button with a Caption property of Button1
and an event handler called TForm1.Button1Click creates another button with the same
Caption property and an OnClick event handler that calls the code in
TForm1.Button1Click. However, Delphi renames the copied button so that each button
maintains a unique identifier. For an example of this, see “Scope of the Name property”
on page 55.
Three general rules apply to all cut, copy, and paste operations:
• You can select multiple components to be cut or copied, but the selection can include
only those components within a single parent. That parent can be either a form or a
container component within the form, but not both.
If you individually select components that have different parents and then attempt to
cut or copy them, only the components in the parent of the component you first
selected are cut or copied. For example, if you first select a button in the form, then
select a check box in a panel on the form, and then attempt to cut or copy the two
selected components, only the button is cut or copied.
• When you paste one or more components, they appear in whichever eligible
receiving component has focus.
• When you cut, copy, or paste a component, any associated event handler code is not
duplicated, but the copied component retains associations to the original event
handlers.
■
To cut a component or components, select the component(s), then choose Edit|Cut.
■
To copy a component or components, select the component(s), then choose Edit|Copy.
■
To paste a component or components (assuming you have first placed components on
the Clipboard by cutting or copying),
Chapter 2, Using components and code
49
1 Select the form, or other container component where you want the pasted
components to appear.
2 Choose Edit|Paste.
➤
Cut the two Label components remaining in the form, and paste them into the panel.
Then cut the Image component and paste it into the top left corner of the panel.
Figure 2.6
Panel with Labels and Image components
Deleting and restoring components
Deleting components that have been added to a form is simple, and if you change your
mind after deleting a component, you can easily restore that component.
■
To delete a component, select the component in the form and press Del, or choose Edit|
Delete.
■
To restore a component that’s just been deleted, choose Edit|Undelete.
This restores the component just as it was, including any customizations you might
have made to it such as setting properties or writing code.
Caution
You must choose Undelete before performing any other operation, or the component
are not restored.
Aligning components
You can align components relative to each other, or relative to the form. Once you select
the component(s) you want to align, you can use the Alignment palette or the
Alignment dialog box to set the alignment. When aligning a group of components, the
first component you select is used as a guide to which the other components are aligned.
■
To align components by using the Alignment palette,
1 Select the component(s).
2 Choose View|Alignment Palette.
The Alignment palette appears.
50
Delphi User’s Guide
3 Select an alignment icon from the palette.
Figure 2.7
Alignment palette
Align horizontal
centers
Center horizontally
in window
Align left edges
Align right edges
Align tops
Align bottoms
Align vertical
centers
■
Space equally,
horizontally
Center vertically
in window
Space equally,
vertically
To align components by using the Alignment dialog box,
1 Select the component(s).
2 Choose Edit|Align.
The Alignment dialog box appears.
Figure 2.8
Alignment dialog box
3 Select the alignment options you want in the dialog box.
4 Choose OK to put your alignment options into effect.
You can continue to choose or modify alignment options as long as the components
remain selected.
For more information about the Alignment palette and the Alignment dialog box, see
online Help.
➤
Align the left edges of the top two Label components. Do the same for the bottom two
Label components, so the components appear as shown in Figure 2.9.
Chapter 2, Using components and code
51
Figure 2.9
Aligned Label components
Using the form grid as an alignment guide
The evenly spaced dots that appear in the form at design time are the form grid. The grid
makes it easier to align components visually.
Figure 2.10 Form grid
Form grid
By default, both the grid and its Snap To Grid option, which causes the left and top sides
of each component to always align with the nearest grid markings, are enabled at design
time. You can, however, choose to disable the Snap To Grid option, or disable the grid
altogether.
You can also modify the granularity of the grid—that is, how far apart the grid dots
appear.
■
To set form grid options, choose Options|Environment to display the Preferences page
of the Environment Options dialog box.
The next step in creating the About box involves setting properties for the components
you’ve just arranged.
Locking the position of components
Once you have aligned the components on a form, you can prevent components from
being moved accidentally.
■
To lock the position of the components on a form, choose Edit|Lock Controls from the
Delphi menu bar.
Controlling the creation order of nonvisual components
When you run your Delphi application, Delphi automatically “creates,” or loads into
memory, all the application forms. When a form is created in memory, all the
components encapsulated in the form are created as well. As you will see in Chapter 3,
52
Delphi User’s Guide
you can control the order in which forms are created at run time, and whether they are
created automatically. Similarly, you can control the creation order for nonvisual
components. (The MainMenu, PopupMenu, Database, Table, and Query are a few
examples of nonvisual components.)
For more information about controlling component creation order, search online Help
for Creation order.
Setting component properties
This section discusses different ways you can set component properties at design time,
in the context of creating the About box. Table 2.9 lists the properties you will set for the
About box.
You can also change property values while an application is running. This is discussed
in the section, “Setting properties at run time” on page 59.
For more information about the properties for each component, search online Help for
the keyword components, or see the topic Visual Component Library Components, and
select the component whose properties you want to view. You can also press F1 with the
component selected in the form.
Note
The components on the VBX and Samples page of the palette are provided as examples
only, not formally part of the Delphi VCL, and therefore are not documented as part of
Delphi.
Table 2.9
AboutBox component properties
Component
Property
Value
Panel
Name
BevelOuter
BackgroundPanel
bvLowered
Image
Label1
Caption
Name
Name
<Blank>
ProgramIcon
ProductName
Label2
Label3
Label4
Name
Name
Name
Version
Copyright
Comments
bitbtn
AutoSize
False
WordWrap
Name
Kind
True
OKButton
bkOK
➤
Change the Name property for all the components in the form, as specified in Table 2.9.
Notice that as you move from component to component, the Name property remains
selected in the Object Inspector.
➤
Set the remaining properties, as noted, for BackgroundPanel, Comments, and OKButton.
Chapter 2, Using components and code
53
How the Object Inspector displays properties
As discussed earlier, the Object Inspector dynamically changes the set of properties it
displays, based on the component selected. The Object Inspector has several other
behaviors that make it easier to set component properties at design time.
• When you use the Object Inspector to select a property, the property remains selected
in the Object Inspector while you add or switch focus to other components in the
form, provided that those components also share the same property. This enables
you to type a new value for the property without always having to reselect the
property.
If a component does not share the selected property, Delphi selects its Caption
property. If the component does not have a Caption property, Delphi selects its Name
property.
• When more than one component is selected in the form, the Object Inspector displays
all properties that are shared among the selected components. This is true even when
the value for the shared property differs among the selected components. In this case,
the property value displayed are either the default, or the value of the first
component selected. When you change any of the shared properties in the Object
Inspector, the property value changes to the new value in all the selected
components.
There is one notable exception to this: when you select multiple components in a
form, their Name property no longer appears in the Object Inspector, even though
they all have a Name property. This is because you cannot assign the same value for
the Name property to more than one component in a form.
Tab-jumping to property names in the Object Inspector
Forms and components often have lengthy lists of properties, which can make scrolling
through the list in the Object Inspector a bit unwieldy. You can jump directly to a
property by pressing the Tab key followed by any alphabetic character. This causes the
cursor to jump to the Property column of the first property beginning with the typed
letter. (The Object Inspector lists property names alphabetically.)
➤
Try using the tab jump feature now.
1
2
3
4
Select the form.
In the Object Inspector, select the form’s AutoScroll property.
Press Tab, W to jump directly to the Width property.
Press Tab again to place the cursor in the Value column, where you can begin
entering your edits.
Pressing Tab acts as a toggle between the Value column and the Property column.
Whenever you are in the Value column (as you are by default when you select a
property with the mouse), pressing Tab moves you to the Property column. Whenever
you are in the Property column, pressing an alphabetic character jumps you to the first
property starting with that character.
54
Delphi User’s Guide
Displaying and setting shared properties
You can set shared properties to the same value without having to individually set them
for each component.
■
To display and edit shared properties,
1 In the form, select the components whose shared property you want to set.
The Properties page of the Object Inspector displays only those properties that the
selected components have in common. (Notice, however, that the Name property is
no longer visible.)
2 With the components still selected, use the Object Inspector to set the property.
➤
To view this in the About box, try the following:
1 Select the bitmap button component.
Notice the properties displayed in the Object Inspector, including the Name property.
2 Press Shift, then select the Panel component. The bitmap button component remains
selected.
Notice how the properties displayed in the Object Inspector change to reflect only
properties present in all the selected components. Notice also that the Name property
is no longer visible.
For information about more ways to set properties at design time, see Setting Properties
in online Help.
Scope of the Name property
Because every component in a given form and every form in a project must have a
unique name, Delphi assigns default names to the forms and components in your
project, and numbers them sequentially as you add them. For example, if you add three
buttons to the form, Delphi names them Button1, Button2, and Button3, respectively.
The default names that Delphi generates are defined within the scope of each form. In
other words, if you have two forms in your application, each form could have a Button1.
If, however, you add a button named Button1 to a form that already contains a Button1,
Delphi renames it to the next available sequential number.
➤
For an illustration of this idea, try the following steps:
1
2
3
4
Choose File|New Form, and add a blank form.
Add a button component to Form2.
Select the button component, and choose Edit|Copy.
Choose Edit|Paste.
You’ll notice that both buttons maintain their default caption, that is, Button1.
However, when you inspect the Name property, you’ll see that Delphi recognized
Chapter 2, Using components and code
55
there was already a Button1 in Form2, and consequently changed the Name property
for the second Button1 to Button2.
Figure 2.11 Form2 with two Button1 component captions
You’ll be using Form2 later in this example to open the dialog box at run time.
➤
Change the name for Form2 to MainForm.
Using property editors
The Object Inspector provides several ways to edit properties at design time. So far, this
chapter has described two such ways: directly typing in values, or choosing from a list
of pre-existing values. For detailed information about other types of property editors,
see the online Help topic Using Property Editors.
The following section illustrates one of the Delphi dialog box editors.
Dialog box editors
With certain properties, double-clicking in the Value column opens a dialog box that
you use to set the property. Likewise, with some components, double-clicking the
component in the form opens such a dialog box. Properties you edit through a dialog
box are often indicated in the Object Inspector by an ellipsis (...) in the Value column
beside that property.
The Image component provides an example of a dialog box property editor. When you
double-click an Image component in a form, the Picture Editor dialog box appears. You
use the dialog box to specify the image you want displayed in the component.
Loading an image
You can use the Image component to load a picture into your form at design time.
■
To load a picture into a form,
1 Add an Image component to your form.
2 In the form, double-click the Image component.
56
Delphi User’s Guide
The Picture Editor dialog box appears.
Figure 2.12 Picture Editor dialog box
3 Choose the Load button.
4 In the Load Picture dialog box, select the bitmap (.BMP), icon (.ICO), or Windows
Metafile (.WMF) you want to display, and then choose OK.
The Picture Editor dialog box reappears, with your image displayed.
Figure 2.13 Image displayed in Picture Editor dialog box
5 Choose OK to accept the image you’ve selected and exit the Picture Editor dialog box.
Or, repeat steps 3 through 5 to choose another picture.
Your image appears in the form at design time.
➤
Load an image file from the Delphi Image Library into the Image component in the
About box. (For more information about the Image Library, search online Help under
Image Library.)
Figure 2.14 About box with image
Chapter 2, Using components and code
57
Sizing an image
The picture you choose to display in an Image component won’t often be the exact size
and shape of the component. You can resize either the graphic or the component by
choosing from the following methods:
• Use the Delphi Image editor (Tools|Image Editor) to resize the image before
importing it into your form.
• Resize the graphic to conform to the size of the component, by setting the Stretch
property of the Image component to True. (Stretch has no effect on the size of icon
(.ICO) files.)
• Resize the component to conform to the size of the graphic by setting the
component’s AutoSize property to True before you load the graphic.
■
To resize a graphic in the form,
1 Resize the Image component according to how large or small you want the image to
appear in the form.
2 With a graphic loaded into the Image component, set the Image component’s Stretch
property to True.
Graphics that are larger will shrink to fit, and those that are smaller will expand to fit the
Image component.
Note
➤
*.ICO file types will not stretch to fill the image area.
Set the Stretch property to True for the Image component in the About box. The bitmap
stretches to fit the component.
Figure 2.15 About box with sized image
Saving your project
Once you’ve completed your form layout and property settings, you’ll probably want to
save your work. Since you started with a new project, you could either save the entire
project, or just the form.
58
■
To save just the form (and its associated unit file), choose File|Save File.
■
To save the entire project, choose File|Save Project.
➤
Choose File|Save Project.
Delphi User’s Guide
You’re prompted for a name for each unit (form) in the project, and for the project file
itself. If you rely on the form and unit names that Delphi generates automatically, you
are likely to experience name conflicts when you reuse those forms and units. On the
other hand, if you assign descriptive names like AboutBox, you greatly reduce the
likelihood of putting two like-named forms into the same project.
You can never be sure what names the forms and units in future projects will have, but
if you consistently use descriptive names, it’s much easier for you and other developers
using your forms to find and use them without conflicts.
➤
Use the following names:
Default name
Change to
UNIT1.PAS
UNIT2.PAS
ABOUT.PAS
MAINFORM.PAS
PROJECT1.DPR
MYPROJ.DPR
Each file must have a unique prefix, even though their extensions can be different. For
example, if you specify About as the file name for both the form and project file, Delphi
displays the following error message:
The project already contains a module named About.
If you see this error message, Delphi won’t save the project file (or whichever file you
named secondly). Simply rename the file by saving it again with a different name.
Setting properties at run time
Any property you can set at design time can also be set at run time by using code. There
are also properties that can be accessed only at run time. These are known as run-timeonly properties.
As you’ve seen, when you use the Object Inspector to set a component property at
design time, you follow these steps:
1 Select the component.
2 Specify the property (by selecting it from the Properties page).
3 Enter a new value for that property.
Setting properties at run time involves the same steps: in your source code, you specify
the component, the property, and the new value, in that order. However, run-time
property settings override any settings made at design time.
Using properties to customize forms at run time
When you include a form, such as a dialog box, in several projects, you should avoid
making design-time changes to the form that might conflict with the use of the form in
another project. Instead, write code that changes the form’s properties at run time.
For example, the caption of an About box generally includes the name of the program
that uses it. If you use the same About box in several projects simultaneously, you don’t
want to accidentally use the name from another application.
Chapter 2, Using components and code
59
The following section discusses how to customize the caption of the About box at run
time. To do so, you’ll use the Object Inspector and the Code Editor to generate, locate,
and modify an event handler.
Working with code
In Delphi, almost all the code you write are executed, indirectly or directly, in response
to an event. As noted, such code is called an event handler. Event handlers are actually
specialized procedures.
In Delphi, you usually use the Object Inspector to generate event handlers. Of course,
you can write source code in the Code Editor without using the Object Inspector. For
example, you might write a general-purpose routine that’s not associated directly with a
component event, but that is called by an event handler. You can also write event
handlers manually, but any time you can use the Object Inspector, you should. The
Object Inspector not only generates the event handler name for you, but if you change
that name later by using the Object Inspector, Delphi changes it everywhere that it
occurs in your source code. This is not the case for event handlers you write without
using the Object Inspector.
This section discusses ways to use the Object Inspector and the Code Editor to generate
and navigate your source code. It describes this in the context of testing and using the
About box at run time. The following topics are explained:
•
•
•
•
Generating the default event handler
Working with the Code Editor
Locating an existing event handler
Associating an event with an existing event handler
Generating the default event handler
In Chapter 1, you saw how to use the Object Inspector to generate an event handler. You
can also generate an event handler for most components simply by double-clicking the
component in the form. This generates a handler for the default event of that component,
if one exists. The default event is the one the component most commonly needs to
handle at run time. For example, a button’s default event is the OnClick event.
■
Note
To generate a default event handler, double-click the component in the form.
Certain components, such as the Timer or the Notebook, don’t need to handle user
events. For these components, double-clicking them in the form doesn’t generate an
event handler. Double-clicking certain other components, such as the Image component
or either of the menu components, opens a dialog box where you perform design-time
property edits.
Displaying the form as a dialog box
Unlike the main form of an application, dialog boxes are temporary windows that
generally remain invisible until the user opens them. The main form of an application is
60
Delphi User’s Guide
generally the form that users first see when they run the application. (For more
information about application forms, see Chapter 3.)
So far, you’ve been designing the About box as the application’s main form, so you can
run it without writing any code and have it appear immediately. To view it as a dialog
box, as it would probably appear in a “real world” application, you first need to specify
another form as the application’s main form.
➤
Change the main form for MyProj to MainForm.
1 Choose Options|Project.
2 Select the Forms page tab.
3 Open the drop-down list next to Main form, and select MainForm.
For more information about changing the application’s main form, see Chapter 3.
In this example, you’ll write one line of code that enables you to “open” the About box
at run time. A quick way to do this is to add a button to the main form and write code to
open the dialog box when the user clicks the button. In a real application, you’d usually
open an About box in response to a click on a menu item, but for a quick test, it’s easier
to add a command button.
Since you’ve already added buttons to MainForm, all you need to do is generate the
event handler and write the code that displays the dialog box.
➤
To test the dialog box,
1 Double-click Button1 (in MainForm) to generate the default event handler.
2 Inside the begin..end block, add the following line of code to execute the dialog box
by calling its ShowModal method:
AboutBox.ShowModal;
The ShowModal method displays the About box modally, meaning the user must
explicitly close this dialog box before performing any other action. For more
information about modal versus modeless dialog boxes, see Chapter 3.
3 Add the About unit to MainForm’s uses clause. (For detailed information, see
Chapter 1.)
4 Compile and run the application.
The main form appears.
5 Click Button1.
Chapter 2, Using components and code
61
The About box appears as designed, in the center of the screen.
Figure 2.16 Run-time About box
6 Click OK.
Clicking OK closes the dialog box automatically because, at design time, you set the
button’s Kind property to bkOK and the border style to bsDialog.
Working with the Code Editor
Using the Delphi Code Editor, you can easily view and modify your source code. You
can also open related data files inside the Code Editor.
When you open a new project, Delphi automatically generates a page in the Code Editor
for the initial form unit file. When you add a new form, unit, or other file to the project,
Delphi adds a new Code Editor page to contain the associated source code or other data.
Viewing pages in the Code Editor
When a page of the Code Editor is displayed, you can scroll through all the data it
contains, not just particular sections of your code. When entering and editing your
source code, you can easily switch between viewing the form and viewing code to see
how your design changes your code, and vice versa.
■
To view a page in the Code Editor, choose from the following methods:
• Click the tab for the page you want to view.
• Press Ctrl+Tab to move forward through the Editor pages, and Shift+Ctrl+Tab to move
backward.
• Choose View|Units to open the View Unit dialog box, and choose the unit you want
to view.
• Use SpeedBar buttons to display the current unit, or to open the View Unit dialog
box.
When viewing a page in the Code Editor, you can return to the form associated with the
current Code Editor page or to a different form at any time.
■
62
To return to the form, choose from the following methods:
Delphi User’s Guide
• Click any part of the form that is visible under the Code Editor page.
• Choose View|Form to open the View Form dialog box, and choose the form you
want to view.
• Use Speedbar buttons to display the current form, or to open the View Form
dialog box.
Note
Remember that simply toggling from viewing a unit to viewing a form returns you to
the form associated with the selected page tab in the Code Editor. This might not
necessarily be the form you were previously viewing.
Locating an existing event handler
Once you’ve generated an event handler, it’s easy to locate it in the Code Editor.
■
To locate an existing event handler in the Code Editor,
1 In the form, select the component whose event handler(s) you want to locate.
2 In the Object Inspector, display the Events page.
3 In the Events column, double-click the event whose code you want to view.
Delphi displays the Code Editor, placing your cursor inside the begin..end block of
the event handler. You can now modify this event handler.
Locating default event handlers
If you generated a default event handler for a component by double-clicking it in the
form, you can locate that event handler in like fashion.
■
To locate an existing default event handler, double-click the component in the form.
➤
Double-click Button1 in MainForm.
The Code Editor opens, with your cursor at the start of the first line of code for the
Button1 OnClick event handler.
Modifying an existing event handler
Once you know how to locate an event handler in the Code Editor, it’s easy to modify it.
For the purposes of the About box, for example, you might customize the About box
caption before calling the ShowModal method to open the dialog box. To do so, you’d
add a line of code to the event handler you wrote for the Button1 OnClick event.
➤
Modify the existing Button1 OnClick (default) event handler so that it looks like the
following:
procedure TForm1.Button1Click(Sender: TObject);
begin
AboutBox.Caption := 'About '+ Application.Title;
AboutBox.ShowModal;
end
➤
{ use the application’s name }
{ then open the dialog box }
Run the program again. The About box caption displays the name of the project file.
Chapter 2, Using components and code
63
Figure 2.17 About box displaying program name in form title bar
Note
The Title property for an application, which is displayed when the application is
minimized as an icon, defaults to the name of the project (.DPJ) file. However, you can
change this property by means of the Application page of the Project Options dialog
box. For more information, see Chapter 4.
Associating an event with an existing event handler
Delphi emphasizes reuse at all levels of application development, from the project, to
the form, to components and code. You can reuse code by writing event handlers that
handle more than one component event.
You can do this in the case of generic event handlers that, for example, are called by both
a menu command and an equivalent button on a SpeedBar.
Once you write one such event handler, you can easily associate other compatible
events with the original handler.
To illustrate this concept, you’ll add an if..then..else statement to the OnClick event
handler for MainForm.Button1. Then you’ll associate the event handler with
MainForm.Button2.
Using the Sender parameter
The Sender parameter in an event handler informs Delphi which component received
the event, and therefore called the handler. You can write a single event handler that
responds to multiple component events by using the Sender parameter in an
if..then..else statement.
For another example of code that uses the Sender parameter see Chapter 10. For more
information about these and other Object Pascal language statements, see Chapter 5.
➤
Add an if..then..else statement to the existing OnClick handler for MainForm.Button1 so
that it looks like the following:
procedure TMain1.Button1Click(Sender: TObject);
begin
if Sender = Button1 then
AboutBox.Caption := 'About ' + Application.Title
else AboutBox.Caption := '';
AboutBox.ShowModal;
end;
64
Delphi User’s Guide
{this is the first line you add}
{remove the existing semicolon}
{this is the second line you add}
Now you’ll associate MainForm.Button2’s OnClick event with this handler.
■
To associate a new component event with an existing event handler,
1 In the form, select the component whose event you want to code.
2 Display the Events page of the Object Inspector, and select the event to which you
want to attach handler code.
3 Click the down arrow next to the event to open a list of existing event handlers.
The list shows only the event handlers in this form that can be assigned to the
selected event.
4 Select from the list by clicking an event handler name.
The code written for this event handler is now associated with the selected
component event.
➤
Select Button2 and associate it with Button1Click.
Note
Delphi doesn’t duplicate the event handler code for every component event associated
with a shared handler. You see the code for shared handlers in the Code Editor only
once, even though the same code is called whenever any of the associated component
events occurs.
➤
Run the program again and click Button1. The application title appears in the About box
caption. Now, close the About box and click Button2 in the main form. The About box
opens but does not display the application title.
Displaying and coding shared events
There is another way to share event handlers. When components have events in
common, you can select the components to display their shared events, select a shared
event, and then create a new event handler for it, or select an existing one. All the
selected components will now use this event handler.
To demonstrate this, you’ll add a speed button to MainForm that calls the same OnClick
event handler as Button1 and Button2. Then you’ll modify the shared event handler to
display a different icon in the About box Image component.
■
To display shared events,
1 In the form, select all the components whose common events you want to view.
2 Display the Events page of the Object Inspector.
The Object Inspector displays only those events that pertain to all the selected
components. (Note also that only events in the current form are displayed.)
■
To associate a shared component event with an existing event handler,
1 Select the components with which you want to associate a shared event handler.
2 Display the Events page of the Object Inspector, and select an event.
The Object Inspector displays only those events which the selected components have
in common.
Chapter 2, Using components and code
65
3 From the drop-down list next to the event, select an existing event handler, and press
Enter.
Whenever any of the components you selected receives the specified event, the event
handler you selected is called.
■
To create an event handler for a shared event,
1 Select the components for which you want to create a shared event handler.
2 Display the Events page of the Object Inspector, and select an event.
3 Type a name for the new event handler and press Enter, or double-click the Handler
column if you want Delphi to generate a name.
Delphi creates an event handler in the Code Editor, positioning the cursor in the
begin..end block.
If you choose not to name the event handler, Delphi names it for you based on the
order in which you selected the components. For example, if you create a shared
event handler for several buttons, Delphi names the event handler Button<n>Click,
where Button<n> is the first button you selected for sharing an event handler.
4 Type the code you want executed when the selected event occurs for any of the
components.
➤
To see an example of these concepts, perform the following steps:
1 Add a SpeedButton component to MainForm.
2 In MainForm, select Button1.
3 Display the Events page of the Object Inspector.
Note the events displayed.
4 Press and hold Shift while you select the speed button.
Note how the events displayed dynamically change to show only events shared by
the two components.
5 Select the OnClick event, and from the drop-down list, select Button1Click.
The speed button OnClick event now calls Button1Click.
➤
Run the program and click the speed button. The About box appears.
Modifying a shared event handler
Modifying an event handler that is shared by more than one component is virtually the
same as modifying any existing event handler. Just remember that whenever you
modify a shared event handler, you are modifying it for all the component events that
call it.
■
66
To modify the shared event handler,
1 Select any of the components whose event calls the handler you want to modify.
2 In the Events page of the Object Inspector, double-click the event handler name.
Delphi User’s Guide
3 In the Code Editor, modify the handler.
Now when any of the components that share this handler receive the shared event,
the modified code gets called.
The following example demonstrates this notion. It also provides an illustration of how
run-time property settings override those made at design time.
➤
Modify the Button1 OnClick event handler by adding the following line of code before
the the following ShowModal method call, where <path> equals your Delphi \BIN
directory:
AboutBox.ProgramIcon.Picture.LoadFromFile('<path>\TDW.ICO');
➤
Run the program and click any of the buttons in MainForm. The About box appears,
with the newly specified icon showing in the Image component. Because all of the
buttons in MainForm share the same event handler, and because the run-time property
setting overrides deign-time values, clicking any button produces the same results.
Figure 2.18 About box with run-time icon
It’s a matter of personal preference whether you load the picture, or other values, into
the About box at run time or design time. If you want to share the About box as a
standardized form, you’ll probably want to complete it at design time as nearly as
possible before making it available to other developers or users.
For more information about sharing forms and projects, see Chapter 3 and Chapter 4.
Deleting event handlers
When you delete a component, Delphi removes its reference in the form’s type
declaration. However, deleting a component does not delete any associated methods
from the unit file, because as noted earlier, those methods might be called by other
components in the form. You can still run your application so long as the method
declaration and the method itself both remain in the unit file. If you delete the method
without deleting its declaration, Delphi generates an “Undefined forward” error
message, indicating that you need to either replace the method itself (if you intend to
use it), or delete its declaration as well as the method code (if you do not intend to
use it).
You can still explicitly delete an event handler, if you choose, or you can have Delphi do
it for you.
Chapter 2, Using components and code
67
■
To manually delete an event handler, remove all event handler code and the handler’s
declaration.
■
To have Delphi delete an event handler, remove all the code (including comments)
inside the event handler. The handler is removed when you compile or save the project.
Customizing the Delphi Visual Component Library (VCL)
You can customize the Delphi component library, and therefore what’s displayed on the
Component palette, by adding or deleting components to parallel the functionality you
need while developing a particular application. You use the Install Components dialog
box to modify the contents of the Delphi library (.DCL) file.
You can develop as many such customized library files as you choose by saving each
library configuration with a different file name. You can then choose to use a particular
library file when building applications, so that the Component palette provides you
with exactly the components you prefer.
Note
Customizing the Component palette by using the Palette page of the Options|
Environment dialog box does not affect the .DCL library file. When you use this dialog
page to customize the palette, Delphi does not rebuild the library file, but merely
changes the visual representation of the Component palette. This topic is discussed in
online Help; see the Help topics Palette (Options|Environment) or Customizing the
Component Palette.
When modifying libraries, keep the following points in mind:
• You can work on a project in Delphi only if the current component library contains all
the components used in the project. If you try to load a project that uses components
not currently installed, Delphi displays a message indicating which component type
it tried to load but could not.
• Delphi always saves the last version of the component library, so if you remove
components that you later want to use, you can easily revert to the previous version.
The previous version of the library file is stored with the same name, and the
extension .BAK. (If you are creating multiple versions of the library, you should give
each version a distinct name.)
• Always follow the installation instructions that accompany any third-party
components to ensure they are correctly installed in your system, before adding them
to a library file.
• Avoid using the same file name for a library and a project.
This section discusses the following topics:
•
•
•
•
68
Adding and removing components from the library
Handling an unsuccessful compilation
Using the Component Expert
Using customized libraries
Delphi User’s Guide
Adding and removing components from the library
You add and remove components from the library by adding or removing the unit file
associated with the component(s). This adds the unit to the project, or removes it from
the project.
■
To add components to the component library,
1 Choose Options|Install Components.
The Install Components dialog box appears.
The directory in which the unit resides must be on the search path specified in this
dialog box.
Note
2 If necessary, specify a path to the component unit, or choose Add to open the Add
Module dialog box.
3 In the Add Module dialog box, type the name of the unit you want to add, or choose
Browse to specify a search path.
Note that you can’t specify a literal path in the Add Module dialog box. The path you
choose in the Add Module Browse dialog box adds the directory path to the search
path listed in the Install Components dialog box.
4 Choose OK to close the Add Module dialog box.
The name(s) of the component unit(s) you have specified appear at the bottom of the
Installed Units list. If you select the unit name, the class names for units already
residing in the library are displayed in the Component classes list. Class names for
newly added units are not shown.
5 Choose OK to close the Install Components dialog box and rebuild the library.
Note that even if you’ve made no changes to the unit list, Delphi rebuilds the library.
If you have unsaved forms open, you’re prompted to save them. Once the library is
rebuilt, the components you’ve installed are reflected in the Component palette.
Note
■
Newly installed components initially appear on the page of the Component palette that
was specified by the component writer in the component source code. You can move the
components to a different page after they’ve been installed on the palette. For more
information, see the online Help topics Palette (Options|Environment) or Customizing
the Component Palette.
To remove components from the component library,
1
2
3
4
Choose Options|Install Components to open the Install Components dialog box.
In the Installed Units list box, select the unit you want to remove.
Choose Remove to remove the unit from the list box.
Choose OK to close the Install Components dialog box.
Delphi rebuilds the library, and the deleted components no longer appear in the
palette.
Chapter 2, Using components and code
69
Adding VBX controls
You can add VBX controls to the Delphi component library, so long as they conform to
Microsoft Visual Basic 1.0 specifications. To do so, you specify the .VBX file that contains
the control you want to add. Delphi then automatically creates a “wrapper” unit (a .PAS
file) for the control to make it into a recognizable object type, and adds it to the list of
installed units. You can specify a name for the control and which palette page you’d like
it to appear on.
■
To add a VBX control to the component library,
1 Open the Install Components dialog box.
2 Choose VBX to open the Install VBX File dialog box.
3 Navigate until you locate the VBX file you want to add, then choose OK.
The Install VBX dialog box appears, with the name of the specified .VBX file
displayed in a read-only edit box.
4 Use the options in this dialog box to specify
• The directory path where the .VBX file is located (use the Browse button if you’re
not sure of the full directory path for the file)
• The page on the palette where you want the VBX control to be installed
• A new name for the component class, if necessary
Change the name, for example, if you’re installing a VBX control that has the same
class name as an existing component in your project.
5 Once you have specified the options you want, choose OK to return to the Install VBX
File dialog box.
6 Repeat steps 3 through 5 until you have specified all the VBX controls you want to
add.
They should appear in the Installed Units list.
7 Choose OK to close the Install VBX File dialog box and rebuild the component
library.
Note
In many cases, VBX controls are written so as to require placement in the system path, or
in the \WINDOWS\SYSTEM directory. If you see a message stating, “Can’t load VBX”
when you compile or run your application, verify that any VBX controls are in the
proper location.
Handling an unsuccessful compilation
Before rebuilding the component library, Delphi checks to make sure all the specified
units are available and compilable. If the compilation succeeds, Delphi loads the newly
built library into the Component palette.
If Delphi encounters a problem, it displays an error message, stops building the library,
and displays the Code Editor so that you can correct the error. You may be able to
correct the problem simply by adding missing directories to the search path.
70
Delphi User’s Guide
In the event of an unsuccessful compile, Delphi maintains the Unit list with your most
recent modifications so that you can try rebuilding again later in the same session,
without having to exit Delphi. Once you correct the error, you must reopen the Install
Components dialog box to rebuild the library. If you don’t want to recompile, you can
choose Revert to restore the unit list to match the state of the currently installed library.
Note
Choosing Revert works only before you successfully rebuild the library. You cannot use
Revert to specify a previous version of the library after it’s been successfully rebuilt.
Saving library source code
After making changes to the library, you can save the code for the library project file
using the .DPR extension.
■
To save library source code,
1 Choose Options|Environment, then click the Library page tab.
2 Check the Save Library Source Code check box.
The uses clause of this library source file lists all the units (.DCU) that are used to build
the Component palette.
Using the Component Expert
Sometimes you might encounter a programming situation for which you want to create
a new custom component, rather than simply using one of the components provided
with Delphi or available from third-party vendors. Writing your own components
generally requires a more in-depth knowledge of Object Pascal and object-oriented
programming than using pre-built components.
Creating a new component requires you to
• Create a new unit file
• Derive the new component object from an existing class
• Register the new component
Once you are familiar with component writing, you can use the Component Expert to
help you get started. You supply information about the component you want to create,
and the Component Expert creates the new unit file with the appropriate declarations to
derive and register the new class.
➤
To open the Component Expert and create a new component unit file,
1 Choose File|New Component to open the Component Expert dialog box.
Figure 2.19 The Component Expert dialog box
Chapter 2, Using components and code
71
2 In the Class Name edit box, enter the name of the new class you are creating.
Remember that all Object Pascal classes are generally prefaced with a letter T (for
“type”). For example, the name of a new button component type could be
TMyButton.
3 Use the drop-down list of the Ancestor Class combo box to select a base class, or enter
the name of a base class for your new component. Unless you override them in the
component declaration, your new component will inherit all the properties, methods,
and events from its ancestor class.
4 Use the drop-down list of the Palette Page combo box to select a page, or enter the
name of the palette page where you want your new component to appear when you
add it to the library.
5 Choose OK to create the unit file for the new component you are creating.
The following code shows an example of component unit file code created by the
Component Expert:
unit Unit1;
interface
uses
SysUtils, WinTypes, WinProcs, Messages, Classes, Graphics, Controls,
Forms, StdCtrls;
type
TMyButton = class(TButton)
private
{ Private declarations }
protected
{ Protected declarations }
public
{ Public declarations }
published
{ Published declarations }
end;
procedure Register;
implementation
procedure Register;
begin
RegisterComponents('Samples', [TMyButton]);
end;
end.
You are now ready to write the rest of the Object Pascal code needed to program the
new component.
Using customized libraries
During application development, you might want to work with your own custom
component library file. You can create a distinct library file by saving your
customizations to the Delphi library file under a new name.
72
Delphi User’s Guide
■
To create a new library file,
1 Choose Options|Install Components. The Install Components dialog box appears.
2 Specify the full path and new file name in the Library Filename box.
3 Choose OK to create and compile the new library file.
Now you can install this customized library whenever you want, or specify it as the
default component library.
■
To replace the current component library,
1 Choose Options|Open Library.
The Open Library dialog box appears.
2 Select the library file you want to install and choose OK.
Delphi replaces the current library with the library file you have chosen, and reflects
the contents of your library file in the Component palette.
Summary
This chapter has presented the following topics, in the context of developing a reusable
About box:
• The Delphi components and the pages of the Component palette on which they can
be found
• Adding and manipulating components in your forms
• Setting component properties, both at design time and at run time
• Working with code to generate, locate, and modify event handlers
• Customizing the Delphi Visual Component Library by using the Component Expert,
by writing your own customized components, or by adding Visual Basic (VBX)
components
Chapter 2, Using components and code
73
74
Delphi User’s Guide
Chapter
3
Building forms and menus
Chapter 3
Forms are the foundation for all your Delphi applications. The previous chapter, “Using
components and code,” described how to build the simplest of forms, a reusable About
box. This chapter discusses more about how forms work together to provide an
integrated user interface.
An application usually contains multiple forms: a main form, which is the primary user
interface, and other forms such as dialog boxes, secondary windows (for instance, those
that display OLE 2.0 data,) and so on.
You develop your application by customizing the main form and adding and
customizing forms for other parts of the interface. You customize forms by adding
components, setting their properties, and creating menus to provide user control over
the application at run time.
You can begin your form design from one of the Form Templates provided with Delphi,
and you can save any form you design as a template that you can reuse in other projects.
Likewise, you can use menu templates as starting points for menus you customize to
suit your programming needs.
This chapter discusses the following topics:
•
•
•
•
•
•
•
What is a form?
Sharing forms
Building forms
Creating form menus
Associating menu events with code
Importing resource (.RC) files
Managing run-time behaviors of forms
Chapter 3, Building forms and menus
75
What is a form?
The term form means different things to different people depending upon what type of
programming environment they have previously experienced. For the purposes of this
book, a form is any component of the TForm class, and its visual representation
onscreen. For more information about classes, see Chapter 6. For more information
about the TForm class, press F1 with the form selected.
Designing usable forms
When designing a graphical user interface, application developers must be part
programmer and part visual designer. Good planning and design of forms and their
interaction are important for a number of reasons. Well-designed, intuitively usable
forms require less documentation, and well-designed forms and interfaces are easier to
support and maintain.
Teaching you about basic visual and user interface design principles is beyond the scope
of this book, but there are many good third-party books that can help you learn how to
develop a consistent and efficient user interface design. This chapter presents
techniques and tips for building usable forms—but it is up to you to incorporate the
forms you design into an overall user interface that presents your application to its best
advantage.
Sharing forms
Before you begin designing and building the forms for your applications, think about
whether these forms will be available to other developers or users. Delphi is designed
around the principle of reusable components, and this encompasses larger elements
such as forms or even entire projects.
The easiest way to share a form is simply to add an existing form to a project. The About
box you created in Chapter 2 is an example of a form that’s broadly reusable. Delphi
provides the About box as a Form Template for just that purpose. Form Templates are
predesigned forms that you can easily reuse in your projects.
When you share forms among projects, there are several considerations to keep in mind:
• As discussed in Chapter 1, to make the forms you add visible to other forms in the
project, you need to add their unit identifier to the uses clause of those other forms.
• When forms reference each other, you need to avoid creating a circular reference.
• When you modify a shared form, the modifications will show up in every project that
uses the form, not just the project where the form was originally created.
These considerations are discussed in more detail in the sections that follow.
Making forms visible to other forms
As mentioned previously, adding a form, such as a Delphi Form Template (discussed
later in this chapter), to your project adds it to the uses clause in the project (.DPR) file,
76
Delphi User’s Guide
but not to the uses clause of any other units in the project. Before you can use the new
form interactively with other forms in the project, you need to add its unit identifier to
the uses clause of those forms’ unit files.
Enabling forms to reference each other
When two forms must reference each other, it’s possible to cause a “Circular reference”
error when you compile your program. To avoid such an error, do one of the following:
• Place both uses clauses, with the unit identifiers, in the implementation parts of the
respective unit files. (This is the usual means of allowing two forms to reference each
other.)
• Place one uses clause in an interface part and the other in an implementation part.
(You rarely need to place another form’s unit identifier in this unit’s interface part.)
Do not place both uses clauses in the interface parts of their respective unit files. This
will generate the “Circular reference” error at compile time.
Modifying a shared form
If you have several projects that all use the same form, changes to the shared form that
you make in any of the projects show up in all of them. This might be your intention. If
it’s not, however, there are several ways to prevent this. You can
• Save the form under a different name and use the renamed form in your project
instead of the original.
This is similar to using a Form Template in your project.
• Make the changes to the form at run time instead of at design time, as discussed in
Chapter 2.
• Make the shared form a component that can be installed onto the Component palette.
This has the added advantage of enabling users to customize the form at design time.
For more information, see the Delphi Component Writer’s Guide.
If you expect to be the only user of the form, and you don’t plan extensive or frequent
changes, run-time customization is probably acceptable. If you plan on using the form
in many different applications, run-time customization involves more coding for you
and other developers. In this case it’s usually more convenient, whenever possible, to
make the form a component that other users or developers can install onto their
Component palette.
Note
You can also reuse a form by making it into a DLL. For more information, see the Delphi
Component Writer’s Guide.
Using the Form Templates of the Browse Gallery
As mentioned earlier, the easiest way to share and reuse forms within and among
Delphi projects is to use the Form Templates of the Delphi Browse Gallery. The Browse
Gallery for Form Tempaltes is enabled in a default Delphi installation, but you can
choose to disable it.
Chapter 3, Building forms and menus
77
■
To enable or disable the Browse Gallery in the environment,
1 Choose Options|Environment.
The Environment Options dialog box appears.
2 On the Preferences page, check or uncheck the Use On New Form check box, as
appropriate, in the Gallery group box.
(For information on setting Environment Preferences, see Chapter 1.)
When the Browse Gallery for Form Templates is enabled, it appears whenever you
choose File|New Form from the Delphi menu bar, or the New Form button on the
SpeedBar.
Adding a template form to a project
You can easily add any Form Template from the Delphi Browse Gallery to your
application. You can also save any form you’ve designed as a template that gets
installed into the Gallery. For more information about saving forms as templates, see
“Saving a form as a template” on page 93.
■
To add a template form to your project,
1 With a project open, choose File|New Form.
The Browse Gallery dialog box appears, with the Blank Form option highlighted by
default. (If another form has been specified as the Default New Form, that option is
highlighted instead.)
Note
Depending on which templates have been installed, modified, or deleted in your Delphi
installation, your Browse Gallery window for Form Templates might differ from that
shown here.
Figure 3.1
Standard Delphi Form Templates in the Browse Gallery
2 On the Templates page, use the arrow keys or the mouse to select the template you
want to add, and choose OK.
Delphi adds a copy of the template form and its associated unit file to the project you
have open. You can now use this form the way you would any form in a project. You
78
Delphi User’s Guide
can customize it, add components and code to it, and so on. Any modifications you
make do not affect the original template.
Note
With no project open, it is still possible to choose File|New Form and select a Form
Template from the Gallery. The form’s unit file then opens as a reference file (see the
following section). If you subsequently open a project or create a new project, the open
template form is not part of that project. To save it as part of the project, save the open unit
file under a different name (File|Save File As).
Opening a Form Template for reference only
You can open a Form Template, or any form in any project, as a standalone form for
reference purposes only, without adding the form to your current project.
■
To open a Form Template as a separate form and unit file,
1 Choose File|Open File to display the Open File dialog box.
2 Switch to the \DELPHI\GALLERY directory, and select the .PAS file that
corresponds to the template you want to open.
The Form Template opens, and you can view it or its associated unit source code, but it
is not included in your project. When you run your project, the template is not compiled
or linked into the project. It remains open, however, just like any open file, until you
close it.
Viewing forms and units
When you’re working with several forms at design time, it’s easy to switch among them
by bringing the form you want to work on to the front. Similarly, it’s easy to view the
unit source code for the form you’re working in.
■
To switch among forms in a project,
1 Choose View|Forms.
The View Form dialog box appears.
2 In the View Form dialog box, select the form to which you want to give focus, then
choose OK.
■
To switch among units in a project,
1 Choose View|Units.
Chapter 3, Building forms and menus
79
The View Unit dialog box appears.
2 In the View Unit dialog box, select the unit you want to view, then choose OK.
You can also use the Delphi Project Manager to navigate among the units and forms in
your project. For more information, see Chapter 4.
Building forms
Delphi provides you with tools for building the forms that will make up your
application’s user interface. By using the Browse Gallery, simple function calls, and
Delphi components, it’s easy to create a wide variety of forms, from the simplest to the
most complex.
One of the most common ways that Windows-based applications interact with users is
through dialog boxes. Dialog boxes supply information about the application, and in
most cases accept input from the user. The About box is an example of the most simple
kind of dialog box. It doesn’t accept any input from the user (other than a button click),
but it does provide useful information. A message box that displays a warning or error
message is also a kind of dialog box.
More intricate dialog boxes require input from the user before the application can
continue. Delphi provides many such fully designed dialog boxes as components, and
you can also develop your own custom dialog boxes by using Delphi components.
Using routines to display dialog boxes
The Delphi Dialogs unit provides several simple routines that display predesigned
dialog boxes to the user, based on the parameters you specify.
This section discusses how to use those routines to perform the following tasks in
Delphi:
• Displaying message boxes
• Creating simple input forms
• Masking input characters
Displaying message boxes
Message boxes display text to the user and must be manually cleared from the screen
before the application can continue. Message boxes can be used for a variety of
purposes, including
• Displaying warning information to the user
80
Delphi User’s Guide
• Displaying error messages
• Requesting confirmation before closing a file or exiting the application
ShowMessage procedure
The ShowMessage procedure is the simplest way to display a brief message to the user.
The syntax of the procedure is
ShowMessage(const Msg: string);
This procedure displays a modal dialog box containing the text you specify in the Msg
parameter and an OK button that closes the dialog box.
➤
To display a message box with the ShowMessage procedure, try this:
1 Create a new blank project and place a Button component on Form1.
2 In the button’s OnClick event handler, write the following code:
ShowMessage('Delphi delivers!');
When you run the program and click the button, a modal dialog box appears with the
name of the executable file in the title bar, the text from the Msg parameter, and an OK
button, as shown in the following figure.
Figure 3.2
Example ShowMessage message box
MessageDlg() function
The MessageDlg function displays a message box that contains text you specify, and
optionally, various captions, symbols, and buttons.
Here is the syntax of the function:
function MessageDlg(const Msg: string; AType: TMsgDlgType; AButtons: TMsgDlgButtons;
HelpCtx: LongInt) : Word;
The following table summarizes what each parameter specifies. See online Help for
detailed information regarding each parameter.
Table 3.1
MessageDlg parameters
Parameter name
Specifies
Comments
Msg
Text displayed in the dialog box
If you omit this parameter, no text appears
in the dialog box.
AType
Caption on title bar, and
accompanying symbol in dialog box
If you omit this parameter, no caption
appears on the message box title bar.
AButtons
Type of button(s) in the dialog box
HelpCtx
Link to a Help topic
If you omit this parameter, no buttons
appear in the box.
Not required.
You need to pass an integer into the HelpCtx parameter even if you don’t have an
application Help file. In this case, pass 0 (zero). If you do have an application Help file,
Chapter 3, Building forms and menus
81
you should include a Help button in the dialog box and pass the Help context that
corresponds to the topic you want users to view for this dialog box. If the integer you
pass is not a valid Help context, users will get an error message when they choose the
Help button.
For more information on connecting your application to a Help system, see “Help file”
on page 128 of Chapter 4.
➤
To create a sample message dialog box, try the following:
1 Start a new, blank project.
2 Add a button to Form1, and generate the following event handler:
procedure TForm1.Button1Click(Sender: TObject);
begin
MessageDlg('Save changes?', mtConfirmation, mbYesNoCancel , 0);
end;
3 Run the program.
The message box illustrated here appears when you click Button1.
Figure 3.3
Note
Confirmation message dialog box
MessageDlg displays the message box in the center of the screen by default. You can use
the MessageDlgPos function to create a message box that appears at a screen location you
specify.
For more information about MessageDlg and MessageDlgPos, look up the references in
online Help and see the Help topic Displaying a Message Box.
Creating simple input forms
Where MessageDlg displays an informational form that requires only a button click from
the user, the Dialogs unit also provides two functions, InputBox and InputQuery, that
display forms requiring a single line of input from the user. For example, you might use
such a form as a password entry screen.
Here is the syntax for each function:
function InputBox(const ACaption, APrompt, ADefault: string): string;
function InputQuery(const ACaption, APrompt: string; var Value: string): Boolean;
Both InputBox and InputQuery create a dialog box with an OK and Cancel button. Use
InputBox if you simply want the string the user enters returned if the user chooses OK,
and not returned if the user chooses Cancel or presses Esc to exit the dialog box. Use
InputQuery if you want to be able to interpret the user’s action (OK, Cancel or Esc) as a
Boolean variable that the program can recognize.
➤
82
For an illustration of how InputBox works, try the following:
Delphi User’s Guide
1 Start a new, blank project.
2 Add a Button component and a Label component to Form1.
3 Generate the following OnClick event for Button1:
procedure TForm1.Button1Click(Sender: TObject);
begin
Label1.Caption := InputBox('Password Entry Form', 'Enter Password', '')
end;
Leaving the ADefault parameter string empty means no text initially appears in the
input box.
4 Run the program and choose Button1.
The input box appears.
Figure 3.4
Sample input box in running form
5 Type some text in the input box, and choose OK.
The text appears in Label1.
6 Choose Button1 again to display the input box.
7 Type some text, and this time, choose Cancel or press Esc to exit the dialog box.
The text is not displayed in Label1: instead, the ADefault string is returned. In this case,
the string is blank, so the text in Label1’s Caption property is cleared, but no other text
replaces it.
For more information about InputBox and InputQuery, see the online Help topic for each
function.
Masking input characters
In a dialog box that you create yourself, you can mask the characters that a user enters
into an edit field. Use the PasswordChar property of the Edit component to display any
characters the user enters as special characters, such as asterisks (*) or pound signs (#).
➤
To see an example of this, try the following:
1 Start a new, blank project.
2 Choose File|Add File.
Chapter 3, Building forms and menus
83
3 In the \DELPHI\GALLERY subdirectory, select the PASSWORD.PAS file and
choose OK.
4 Choose View|Forms and choose PasswordDlg.
The Password Dialog Template opens in its design-time state.
Figure 3.5
➤
Password Dialog Template at design time
Select the Edit component in the Password Template.
Note that the PasswordChar property of the Edit component, Password, has already been
set to *. When the user enters text in this dialog box at run time, only the asterisk
character is displayed, so that the user’s password is not visible onscreen. (You can enter
any single character you choose as the PasswordChar property value.)
➤
To see the Password entry Form Template at run time, try the following:
1 Add a button to Form1, and write the following OnClick event handler:
procedure TForm1.Button1Click(Sender: TObject);
begin
PasswordDlg.ShowModal;
end;
2 Add Password to the uses clause in Unit1, and run the application.
3 Choose Button1 to display the Password dialog box.
Figure 3.6
Password dialog box at run time
4 Type some text into the edit box.
Only asterisks appear.
Figure 3.7
84
Delphi User’s Guide
Password dialog box displaying masked characters
Developing custom dialog boxes
In addition to routines that display simple, predesigned dialog boxes, and Form
Template dialog boxes such as the Password Dialog Template, Delphi provides a
number of fully designed dialog boxes as components. These appear on the Dialogs
page of the Component palette, and include components that encapsulate the Windows
common dialog boxes. You can specify different options for these dialog boxes, such as
whether a Help button appears in the dialog box, but for the most part you cannot
change their overall design.
It’s useful, therefore, to know how to build a dialog box “from scratch,” since you’ll
undoubtedly want to design your own. This section discusses the most common
considerations when designing any dialog box, including
•
•
•
•
•
•
•
•
•
Making a dialog box modal or modeless
Setting form properties for a dialog box
Providing command buttons
Creating standard-command buttons
Setting the tab order
Testing the tab order
Removing a component from the tab order
Enabling and disabling components
Setting the focus in a dialog box
Making a dialog box modal or modeless
At design time, dialog boxes are simply customized forms. At run time they can be
either modal or modeless. When a form runs modally, the user must explicitly close it
before working in another running form. Most dialog boxes are modal.
When a running form is modeless, it can remain onscreen while the user works in
another form (for example, the application main form). You might create a modeless
form to display status information, such as the number of records searched during a
query, or information the user might want to refer to while working.
Note
If you want a modeless dialog box to remain on top of other open windows at run time,
set its FormStyle property to fsStayOnTop.
Forms have two methods that govern their run-time modality. To display a form in a
modeless state, you call its Show method; to display a form modally, you call its
ShowModal method.
The following two procedures use the Delphi About box Form Template to demonstrate
the Show and ShowModal methods of the form.
Displaying a dialog box modelessly
➤
To run the About box in a modeless state,
1 Create a new blank project with a blank form.
2 Add a button to Form1.
Chapter 3, Building forms and menus
85
3 Generate the following event handler for Button1:
procedure TMainForm.Button1Click(Sender: TObject);
begin
AboutBox.Show; {This is the line you need to write}
end;
4 Add Unit2 to the uses clause of the Unit1 source code.
5 Add the About box to the project by choosing File|New Form and selecting the
About Box template from the Browse Gallery.
6 Run the application, and choose Button1.
The About box appears.
7 Click on Form1.
Notice that focus shifts to Form1, and the About box shifts to the background. This is
because the About box is acting as a modeless dialog box.
8 Use the Control menu to close the About box.
Displaying a dialog box modally
➤
To run the About box as a modal dialog box,
1 Change the code in the OnClick event handler for Form1.Button1 to read as follows:
procedure TMainForm.Button1Click(Sender: TObject);
begin
AboutBox.ShowModal;
end;
2 Now run the program, choosing Button1 to display the About box.
3 Try to click Form1.
Notice that you cannot access it until you close the About box.
4 Choose the OK button in the About box; it now closes.
Note
The choice of modality doesn’t affect the appearance of a dialog box.
Setting form properties for a dialog box
By default, Delphi forms have Maximize and Minimize buttons, a resizable border, and
a Control menu that provides additional commands to resize the form. While these
features are useful at run time for modeless forms, modal dialog boxes seldom need
them.
Delphi provides a BorderStyle property for the form that includes several useful values.
Setting the form’s BorderStyle to bsDialog implements the most common settings for a
modal dialog box, such as
• Removing the Minimize and Maximize buttons
• Providing a Control menu with only the Move and Close options
• Making the form border non-resizable, and giving it a “beveled” appearance
86
Delphi User’s Guide
The following table shows other form property settings that can be used, individually or
in concert, to create different form styles.
Table 3.2
Alternate form settings
Property
Setting
Effect
False
False
False
Removes Control (System) menu
Removes Minimize button
Removes Maximize button
bsSizeable
bsSingle
bsNone
Enables the user to resize the form border
Provides a single outline, non-resizable border
No distinguishable border; not resizable
BorderIcons
biSystemMenu
biMinimize
biMazimize
BorderStyle
Note
Changing these settings doesn’t change the design-time appearance of the form; these
property settings become visible at run time.
Specifying a caption for the dialog box
In most Windows-based applications, each dialog box has a caption on its title bar that
describes the primary function of the dialog box.
By default, Delphi displays the Name property value for each form in the form's title bar.
If you change the Name property of the form prior to changing the Caption property, the
title bar caption changes to the new name. Once you change the Caption property, the
form’s title bar always reflects the current value of Caption.
Providing command buttons
Depending on whether you intend to use your dialog box in a modal or modeless state,
you’ll want to provide certain command buttons in the dialog box. For modal dialog
boxes, you need to provide the user with a way to exit the dialog box. It’s fairly standard
design to provide one or more command buttons for this purpose. For simple modal
dialog boxes, such as a message box, one button is often sufficient. Such a button might
be labeled, for instance, “OK” or “Close.” (If you have another button in the dialog box
labeled “No,” as described in the next paragraph, this button might be labeled “Yes.”)
In cases where the dialog box accepts input from the user, you want to provide users
with a choice of whether or not to process their input on exiting the dialog box. You can
do this by means of an additional button labeled, for example, “Cancel” or “No.” (If
your dialog box explicitly asks a question of the user, you might want to label this
button “No”; otherwise, “Cancel” is usually more appropriate.)
Your code controls what happens when a user chooses a command button, for example,
whether changes are processed or not.
By setting properties of the Button component, you can call a button’s event handler
code when the user presses Enter or Esc; and you can specify that the dialog box closes
when the user chooses a command button, without writing any additional code.
Chapter 3, Building forms and menus
87
Executing button code on Esc
Delphi provides a Cancel property for Button components. When your form contains a
button whose Cancel property is set to True, pressing the Esc key at run time executes
any code contained in the button’s OnClick event handler.
■
To designate a button as the Cancel button, set its Cancel property to True.
Executing button code on Enter
Buttons have a Default property that operates similarly to the Cancel property. When
your form contains a button whose Default property is set to True, pressing Enter at run
time executes any code contained in the button’s OnClick event handler—unless another
button has focus when the Enter key is pressed.
Even if your form contains a default button, another button can take focus away at run
time. Pressing the Enter key calls the OnClick event handler code of the button with
focus, overriding any other button’s Default property setting. (The button with focus is
indicated by a darker, thicker border than that of other buttons in the dialog box.)
Note
Although other components in a form can have focus, only button components respond
when the user presses Enter. The default button takes the OnClick event when another
non-button component in the form has focus. For an example of this, see “Setting focus
at run time” on page 92.
■
To specify a button as the Default button, set its Default property to True.
■
To change focus at run time, call the button’s SetFocus method.
For more information, see “Setting the focus in a dialog box” on page 92.
Closing a dialog box when the user chooses a button
You can specify that a modal dialog box close automatically when the user chooses any
button whose ModalResult property has a non-zero value. By setting ModalResult to
match a button’s caption, you can also determine which button the user chose. For
example, if you have a Cancel button, set its ModalResult property to mrCancel; if your
form contains an OK button, set its ModalResult to mrOK. Both buttons will close the
form when chosen, because ModalResult returns a non-zero value to the ShowModal
function. However, because ModalResult returns mrCancel in one case, and mrOK in the
other, your code can determine which button was pressed and branch accordingly.
➤
To automatically close the dialog box when the user chooses a Cancel button or presses
Esc, set the Cancel button’s ModalResult property to mrCancel.
■
To automatically close the dialog box when the user presses Enter when an OK button
has focus, set the button’s ModalResult property to mrOK.
The following section describes how to create in one simple step such standard
command buttons as the Cancel and OK buttons just described.
Creating standard-command buttons
You can quickly create buttons for many standard commands by adding BitBtn
components to the form and setting the Kind property for each button. The possible Kind
property settings and their effect are shown in the following table. (In addition to the
88
Delphi User’s Guide
property settings shown, the bitmap button displays graphics, such as a green check
mark for the OK button, or a red X for the Cancel button.)
Table 3.3
Delphi’s predefined bitmap button types
Kind value Effect
Appearance
Equivalent property setting(s)
Comments
bkAbort
Makes a Cancel
button with
Abort as caption
Caption := ‘Abort’
ModalResult := mrAbort
Red X appears next to
caption.
bkAll
Creates an OK
button (with All
caption)
Caption := ‘&All’
ModalResult := 8
Green double check mark
appears next to caption.
bkCancel
Makes a Cancel
button
Caption := ‘Cancel’
Cancel := True
ModalResult := mrCancel
Red X appears next to
caption.
bkClose
Creates a Close
button; closes
the window
Caption := ‘&Close’
bkCustom
None
A lavender “exit” door
appears as the glyph for
this button.
Use this setting to create a
custom command button,
including specifying a
custom Glyph bitmap.
bkHelp
Creates a button
with Help as the
caption
Caption := ‘&Help’
A blue ? appears next to the
caption. Use the event
handler of this button to
call your program Help file.
(If the dialog box has a Help
context, Delphi does this
automatically.)
bkIgnore
Creates a button
to ignore
changes and
proceed with
specified action
Caption := ‘&Ignore’
ModalResult := mrIgnore
Use to continue an
operation after an error
condition has occurred.
bkNo
Makes a Cancel
button (with No
as the caption)
Caption := ‘&No’
Cancel := True
ModalResult := mrNo
Red circle with slash
appears next to caption.
bkOK
Creates an OK
button
Caption := ‘OK’
Default := True
ModalResult := mrOK
Green check mark appears
next to caption.
bkRetry
Creates a button
to retry specified
action
Caption := ‘&Retry’
ModalResult := mrRetry
Green circular arrow
appears next to the caption.
bkYes
Creates an OK
button (with Yes
caption)
Caption := ‘&Yes’
Default := True
ModalResult := mrYes
Green check mark appears
next to caption.
N/A
N/A
Note that setting the Kind property also sets the ModalResult property, discussed
previously, in every case except bkCustom, bkHelp and bkClose. In these cases,
ModalResult remains mrNone and choosing the button doesn’t automatically close the
dialog box.
Chapter 3, Building forms and menus
89
Setting the tab order
Tab order is the order in which focus moves from component to component in a
running application when the Tab key is pressed. To enable the Tab key to shift focus to a
component on a form, the TabStop property of the component must be set to True.
The tab order is initially set by Delphi, corresponding to the order in which you add
components to the form. You can change this by changing the TabOrder property of each
component, or by using the Edit Tab Order dialog box.
■
To use the Edit Tab Order dialog box,
1 Select the form, or a container component in the form, that contains the components
whose tab order you want to set.
2 Choose Edit|Tab Order, or choose Tab Order from the form’s SpeedMenu.
The Edit Tab Order dialog box appears, displaying a list of components ordered (first
to last) in their current Tab order.
Figure 3.8
Edit Tab Order dialog box
3 In the Controls list, select a component, and press the appropriate arrow button (Up
or Down), or drag the component to its new location in the tab order list.
4 When the components are ordered to your satisfaction, choose OK.
Using the Edit Tab Order dialog box changes the value of the components’ TabOrder
property. You can also do this manually, if you want.
■
To manually change a component’s TabOrder property,
1 Select the component whose position in the tab order you want to change.
2 In the Object Inspector, select the TabOrder property.
3 Change the TabOrder property’s value to reflect the position you want the component
to have in the tab order.
Note
The first component in the tab order should have the TabOrder value of 0.
Keep in mind the following points when manually setting your tab order (you needn’t
be concerned with these points if using the Edit Tab Order dialog box):
• Each TabOrder property value must be unique. If you give a component a TabOrder
value that has already been assigned to another component on this form, Delphi
renumbers the TabOrder value for all other components accordingly.
90
Delphi User’s Guide
• If you attempt to give a component a TabOrder value equal to or greater than the
number of components on the form (because numbering starts with 0), Delphi does
not accept the new value, instead entering a value that ensures the component is last
in the tab order.
• Components that are invisible or disabled are not recognized in the tab order, even if
they have a valid TabOrder value. When the user presses Tab, the focus skips over
such components and goes to the next one in the tab order. For more information, see
“Enabling and disabling components” on page 91.
Testing the tab order
You can test the tab order you’ve set by running the application. At design time, focus
always moves from component to component in the order that the components were
placed on the form. Changes you make to the tab order at design time are reflected only
at run time.
■
To test the tab order,
1 Run the application.
2 Use the Tab key to view the order in which focus moves from component to
component.
Removing a component from the tab order
In some cases you might want to prevent users from being able to tab to a component on
a form. For example, there’s usually no need for users to access a Panel component,
because they can’t modify it. You might want, in such a case, to remove the component
from the tab order altogether. When the user presses the Tab key in the running
application, the focus will skip over this component and go to the next one in the tab
order. This is true even if the component has a valid TabOrder value.
■
To remove a component from the tab order,
1 Select the component in the form.
2 Use the Object Inspector to set the value of the TabStop property to False.
Note
Removing a component from the tab order doesn’t disable the component.
Enabling and disabling components
You often want to prevent a user from accessing certain components in a dialog box or
form, either initially when the dialog box opens, or in response to changing conditions
with the dialog box at run time. For instance, in file-handling dialog boxes you might
want to disable the OK button unless a file name is first specified.
When a component is disabled, it appears dimmed in the running application, and the
user cannot tab to it, even if its TabStop property is set to True.
By disabling a component at design time, you specify that the component is initially
unavailable to the user when the dialog box first opens. You can also dynamically
change whether a component is enabled at run time.
■
To disable a component at design time, use the Object Inspector to set the component’s
Enabled property to False.
Chapter 3, Building forms and menus
91
■
To disable a component at run time, type the following code in an event handler for the
component, where <componentn> is the name of the component (for example, Button1):
<componentn>.Enabled := False;
For example, the following event handler specifies that when Button1 receives an
OnClick event, Button2 is disabled.
procedure TForm1.Button1Click(Sender: TObject);
begin
Button2.Enabled := False;
end;
Setting the focus in a dialog box
Only one component per form can be active, or have the focus, in a running application
at any given time. The component having the focus by default corresponds to the
ActiveControl property of the form, which can be set at design time, or used during run
time to access the component that has focus. To change focus at run time, use the
SetFocus method.
Setting focus at design time
When you design a dialog box, you usually want to specify which component should
have focus when the dialog box first opens. For example, in a data entry form you might
want to give focus to the edit or memo component where users will first be entering
data. That way the user can begin typing immediately, without first having to tab to a
certain component.
■
To specify the active component at design time,
1 Select the form, then use the Object Inspector to select the form’s ActiveControl
property.
2 From the property’s drop-down list, select the component you want to have focus
when the form first opens.
If no component is specified as the form’s active component, Delphi gives initial focus to
the component that is first in the tab order, excluding
• Disabled components
• Components that are not visible at run time
• Components whose TabStop property is set to False
Setting focus at run time
Focus changes automatically at run time when the user tabs among components. You
often want to actively specify a focus change. Taking the previous example, if you are
designing a data entry form, you might want to specify that focus change from field to
field each time the user presses an arrow key. You specify that a component gets focus
by using the SetFocus method.
■
To change the active component during run time, type the following code in the
appropriate event handler, where <componentn> is the name of the component, for
example, Button1:
<componentn>.SetFocus;
92
Delphi User’s Guide
For more information, see the online Help topic SetFocus method.
Note
➤
If you set a button as the active control for the form at design time, that setting overrides
at run time any default button you might have specified. However, you’ll often find
ways to use an active control together with a default button to process user input.
For an example of this, try the following.
1 On a blank form, add an Edit component, a Button component, and a Memo
component.
2 Set the component properties as follows:
Table 3.4
Property settings for demonstrating ActiveControl
Component
Property
Setting
Form1
Edit1
ActiveControl
Text
Edit1
<blank>
Button1
Button1
Default
Caption
True
OK
3 Write the following OnClick event handler for Button1:
procedure TForm1.Button1Click(Sender: TObject);
begin
Memo1.Lines.Add(Edit1.Text);
Edit1.Clear;
end;
4 Run the program.
When the program starts, the cursor is in Edit1, the active control for the form.
5 Type some text in Edit1, and press Enter.
Because Button1 is the default button, pressing Enter activates its OnClick event.
Saving a form as a template
Once you’ve designed a custom dialog box, you might want to reuse it in other projects.
One convenient way to do this is to save it as a Form Template.
Saving a form as a template is similar to saving a copy of the form under a different
name. When you save a form as a template, however, it then appears on the list of
templates displayed in the Browse Gallery. You specify the bitmap and description of
the template that appears in this template list.
■
To save your current form as a template,
1 Right-click the form to open the Form SpeedMenu.
2 From the Form SpeedMenu, choose the Save As Template command.
Chapter 3, Building forms and menus
93
The Save Form Template dialog box appears.
Figure 3.9
Save Form Template dialog box
3 In the Title edit box, specify a name for the template.
4 In the Description edit box, type a brief description of this template.
5 To specify an icon for the template, choose the Browse button.
The Select Bitmap dialog box appears.
6 Locate and select the bitmap (if any) you want to use, and choose OK to exit the Select
Bitmap dialog box.
7 Choose OK to accept your specifications, and exit the Save Form Template dialog
box.
The next time you choose File|New Form, your template appears in the templates
list, with the bitmap you chose to represent it, and the description you entered.
Saving form files as ASCII text
Delphi enables you to save .DFM form files as ASCII text. You can then modify a form
by using any standard text editor to edit the text file. Later, you can load the ASCII file in
the Code Editor and convert it back into the binary .DFM format. This can be useful
when using Delphi projects in a team development environment, or whenever version
control is an issue, since most version control mechanisms depend on a text-based
comparison.
■
To convert a form file to ASCII format,
1 Choose File|Open File. (You need not have a project open.)
2 Select the .DFM file you want to convert to ASCII.
If the form’s unit file (.PAS) is open, you are prompted to save changes and close it
before the .DFM file opens in the Code Editor.
3 Choose File|Save File As.
4 In the Save As dialog box, rename the file using a .TXT file extension.
94
Delphi User’s Guide
Using the .TXT file extension automatically causes the .DFM file to convert to ASCII
text.
5 Repeat these steps for any other .DFM files you want to convert to ASCII.
Note
You cannot have the same form open simultaneously in both visual and text formats.
Converting text files back to .DFM format
After editing an ASCII form file, you can convert the text-based form back into its
regular binary .DFM format. Once you understand the structure and content of a form
file, it’s even possible for you to create a form by writing its structure as a text file and
converting that to binary format. However, it’s normally far more efficient to create
forms with the visual tools that Delphi provides.
■
To convert an ASCII-based form file back into binary (.DFM) format,
1 Choose File|Open File. (You need not have a project open.)
2 Select the text file you want to convert to binary .DFM format.
The file opens in the Code Editor.
3 Choose File|Save File As.
4 In the Save File As Type combo box, choose Form File (*.DFM).
5 Name the file with a .DFM extension in the File Name edit box.
6 Repeat this process for any other files you want to convert to binary .DFM format.
Sample ASCII Form file
Here is the text output of the Password Dialog Form Template. As you can see, it is
basically a summary listing of the objects that make up the form, and the main visual
properties of those objects.
object PasswordDlg: TPasswordDlg
Left = 200
Top = 99
ActiveControl = Password
AutoScroll = False
BorderStyle = bsDialog
Caption = 'Password Dialog'
Font.Color = clBlack
Font.Height = -11
Font.Name = 'MS Sans Serif'
Font.Style = [fsBold]
PixelsPerInch = 96
Position = poScreenCenter
ClientHeight = 93
ClientWidth = 236
object Label1: TLabel
Left = 8
Top = 9
Width = 92
Chapter 3, Building forms and menus
95
Height = 13
Caption = 'Enter password:'
end
object Password: TEdit
Left = 8
Top = 27
Width = 220
Height = 20
TabOrder = 0
PasswordChar = '*'
end
object OKBtn: TBitBtn
Left = 66
Top = 59
Width = 77
Height = 27
TabOrder = 1
Kind = bkOK
Margin = 2
NumGlyphs = 2
Spacing = -1
end
object CancelBtn: TBitBtn
Left = 152
Top = 59
Width = 77
Height = 27
TabOrder = 2
Kind = bkCancel
Margin = 2
NumGlyphs = 2
Spacing = -1
end
end
MDI and SDI forms
Any form you design can be implemented in your application as a Multiple Document
Interface (MDI) or Single Document Interface (SDI) form. In an MDI application, more
than one document or child window can be opened within a single parent window. This
is common in applications such as spreadsheets or word processors. An SDI application,
by contrast, normally contains a single document view.
It’s probably more common to design an MDI form as such from the beginning, but you
can change forms you create into MDI or SDI forms simply by changing their FormStyle
property.
96
Delphi User’s Guide
The following table displays the possible FormStyle property settings and their purpose.
Table 3.5
➤
FormStyle property settings
FormStyle value
Creates
Comments
fsNormal
fsMDIForm
fsMDIChild
A standalone (SDI) form
An MDI parent or frame form
An MDI child form
fsStayOnTop
A standalone form that stays on top
of other open forms at run time
This form can contain other forms at run time.
This form is contained by the MDI parent at
run time.
To demonstrate how MDI parent forms contain child forms, try the following.
1 Start a new, blank project and add a new, blank form.
2 Set the FormStyle property for Form1 to fsMDIForm, and for Form2 to fsMDIChild.
3 Add a Panel component to Form1, and change its Alignment property to AlTop.
4 Add a SpeedButton component to the panel, and generate the following OnClick
event handler for it:
procedure TForm1.SpeedButton1Click(Sender: TObject);
begin
Form2.Show;
end;
5 Add Unit2 to Unit1’s uses clause.
6 Run the program, and click SpeedButton1.
Form2 opens inside Form1.
Figure 3.10 Sample MDI child and parent forms
You can resize and move either form, but the child form always stays within the
borders of the parent.
Here are some rules about MDI parent and child forms:
• The MDI parent form must always be the application’s main form.
If the MDI parent form isn’t specified as the application’s main form, the application
won’t be correctly compiled.
Chapter 3, Building forms and menus
97
• There can be only one form of style fsMDIForm per application.
• The application’s main form can never be of type MDIChild. This would also prevent
the application from being properly compiled.
• In general, you should remove the MDI child form from the Auto-create forms list on
the Forms page of the Project Options dialog box.
This is because for true MDI applications, you create multiple instances of a single
child form at run time. If, on the other hand, your application uses only one instance
of each of several different types of child forms, as might be the case in a database
application, you probably don’t need to create each child form at run time. In this
case, you needn’t remove the forms from the Auto-create list.
For more information about the Auto-create forms list, see “Specifying forms to autocreate” on page 113, or search online Help for “instantiating forms.” For more
information about MDI applications, see Chapter 10, which documents how to write the
demo application, TEXTEDIT.DPR.
The next section describes the Delphi Menu Designer, which you use to add menus to
your forms. For information about adding tool bars and status lines to your forms, see
Chapter 12.
Creating form menus
Menus provide an easy way for your users to execute logically grouped commands. The
Delphi Menu Designer enables you to easily add a menu—either predesigned or custom
tailored—to your form. You simply add a menu component to the form, open the Menu
Designer, and type menu items directly into the Menu Designer window. You can add
or delete menu items, or drag and drop them to rearrange them during design time.
You don't even need to run your program to see the results—your design is
immediately visible in the form, appearing just as it will during run time. Your code can
also change menus at run time, to provide more information or options to the user.
This section explains how to use the Delphi Menu Designer to design menu bars and
pop-up (local) menus. It discusses the following ways to work with menus at design
time and run time:
•
•
•
•
•
•
Note
98
Opening the Menu Designer
Building menus
Editing menu items without opening the Menu Designer
Using the Menu Designer SpeedMenu
Using menu templates
Saving a menu as a template
For specific code samples that demonstrate ways to manipulate menus at run time, refer
to the example application chapter, Chapter 10.
Delphi User’s Guide
Figure 3.11 Delphi menu terminology
Menu items on the menu bar
Menu items in a menu list
Accelerator key
Separator bar
Keyboard shortcut
Opening the Menu Designer
To start using the Delphi Menu Designer, first add either a MainMenu or PopupMenu
component to your form. Both menu components are located on the Standard page of
the Component palette.
Figure 3.12 MainMenu and PopupMenu components
MainMenu component
PopupMenu component
A MainMenu component creates a menu that’s attached to the form’s title bar. A
PopupMenu component creates a menu that appears when the user right-clicks in the
form. Pop-up menus do not have a menu bar.
■
To open the Menu Designer, select a menu component on the form, and then choose
from one of the following methods:
• Double-click the menu component.
• From the Properties page of the Object Inspector, select the Items property, and then
either double-click [Menu] in the Value column, or click the ellipsis (...) button.
The Menu Designer appears, with the first (blank) menu item highlighted in the
Designer, and the Caption property highlighted in the Object Inspector.
Chapter 3, Building forms and menus
99
Figure 3.13 Menu Designer for a main menu
Title bar (shows Name property
for Menu component)
Menu bar
Placeholder for
menu item
Menu Designer displays WYSIWYG
menu items as you build the menu.
A TMenuItem object is created and
the Name property set to the menu
item Caption you specify (minus any
illegal characters and plus a numeric
suffix).
Figure 3.14 Menu Designer for a pop-up menu
Placeholder for first
menu item
Building menus
You add a menu component to your form, or forms, for every menu you want to include
in your application. You can build each menu structure entirely from scratch, or you can
start from one of the Delphi predesigned menu templates.
This section discusses the basics of creating a menu at design time. For more
information about Delphi menu templates, see “Using menu templates” on page 106.
100
Delphi User’s Guide
Naming menus
As with all components, when you add a menu component to the form, Delphi gives it a
default name; for example, MainMenu1. You can give the menu a more meaningful
name that follows Object Pascal naming conventions. (For more detail on the Object
Pascal language, see Chapter 5.)
Delphi adds the menu name to the form’s type declaration, and the menu name then
appears in the Component list.
Naming the menu items
In contrast to the menu component itself, you need to explicitly name menu items as
you add them to the form. You can do this in one of two ways:
• Directly type in the value for the Name property.
• Type in the value for the Caption property first, and let Delphi derive the Name
property from the caption.
For example, if you give a menu item a Caption property value of File, Delphi assigns
the menu item a Name property of File1. If you fill in the Name property before filling
in the Caption property, Delphi leaves the Caption property blank until you type in a
value.
Note
If you enter characters in the Caption property that are not valid for Object Pascal
identifiers, Delphi modifies the Name property accordingly. For example, if you want
the caption to start with a number, Delphi precedes the number with a character to
derive the Name property.
The following table demonstrates some examples of this, assuming all menu items
shown appear in the same menu bar.
Table 3.6
Sample captions and their derived names
Component caption
Derived name
Explanation
&File
&File (2nd occurrence)
File1
File2
Removes ampersand
Numerically orders duplicate items
1234
1234 (2nd occurrence)
$@@@#
N12341
N12342
N1
Adds a preceding letter and numerical order
- (hyphen)
N2
Removes all non-standard characters, adding preceding
letter and numerical order
Numerical ordering of second occurrence of caption with
no standard characters
As with the menu component, Delphi adds any menu item names to the form’s type
declaration, and those names then appear in the Component list.
Adding, inserting, and deleting menu items
The following procedures describe how to perform the basic tasks involved in building
your menu structure. Each procedure assumes you have the Menu Designer window
open.
■
To add menu items at design time,
Chapter 3, Building forms and menus
101
1 Select the position where you want to create the menu item.
If you’ve just opened the Menu Designer, the first position on the menu bar is already
selected.
2 Begin typing to enter the caption. Or enter the Name property first by specifically
placing your cursor in the Object Inspector and entering a value. In this case, you
then need to reselect the Caption property and enter a value.
3 Press Enter.
The next placeholder for a menu item is selected.
If you entered the Caption property first, use the arrow keys to return to the menu
item you just entered. You’ll see that Delphi has filled in the Name property based on
the value you entered for the caption. (See “Naming the menu items” on page 101.)
4 Continue entering values for the Name and Caption properties for each new item you
want to create, or press Esc to return to the menu bar.
Use the arrow keys to move from the menu bar into the menu, and to then move
between items in the list; press Enter to complete an action. To return to the menu bar,
press Esc.
■
To insert a new, blank menu item, place the cursor on a menu item, then press Ins.
Menu items are inserted to the left of the selected item on the menu bar, and above the
selected item in the menu list.
■
Note
To delete a menu item or command, place the cursor on the menu item you want to
delete, then press Del.
You cannot delete the default placeholder that appears below the item last entered in a
menu list, or next to the last item on the menu bar. This placeholder does not appear in
your menu at run time.
Adding separator bars
Separator bars insert a line between menu items. You can use separator bars to indicate
groupings within the menu list, or simply to provide a visual break in a list.
■
To make the menu item a separator bar, type a hyphen (-) for the caption.
Specifying accelerator keys and keyboard shortcuts
Accelerator keys enable the user to access a menu command from the keyboard by
pressing Alt+ the appropriate letter, indicated in your code by the preceding ampersand.
The letter after the ampersand appears underlined in the menu.
Keyboard shortcuts enable the user to perform the action without accessing the menu
directly, by typing in the shortcut key combination.
■
To specify an accelerator, add an ampersand in front of the appropriate letter.
For example, to add a Save menu command with the S as an accelerator key, type &Save.
■
102
To specify a keyboard shortcut, use the Object Inspector to enter a value for the ShortCut
property, or select a key combination from the drop-down list.
Delphi User’s Guide
This list is only a subset of the valid combinations you can type in.
When you add a shortcut, it appears next to the menu item caption.
Caution
Delphi does not check for duplicate shortcut keys or accelerators, so you need to track
values you have entered in your application menus.
Creating nested (sub)menus
Many application menus contain drop-down lists that appear next to a menu item to
provide additional, related commands. Such lists are indicated by an arrow to the right
of the menu item. Delphi supports as many levels of such nested, or submenus as you
want to build into your menu.
Organizing your menu structure this way can save vertical screen space. However, for
optimal design purposes you probably want to use no more than two or three menu
levels in your interface design. (For pop-up menus, you might want to use only one
such nested level, if any.)
Figure 3.15 Nested menu structures
Menu item on
the menu bar
Menu item in
a menu list
■
Nested menu item
To create a nested menu,
1 Select the menu item under which you want to create a nested menu.
2 Press Ctrl→ to create the first placeholder, or choose Create Submenu from the
SpeedMenu.
3 Type a name for the nested menu item, or drag an existing menu item into this
placeholder.
4 Press Enter, or ↓, to create the next placeholder.
5 Repeat steps 3 and 4 for each item you want to create in the nested menu.
6 Press Esc to return to the previous menu level.
Creating nested menus by demoting existing menus
You can create a nested menu by inserting a menu item from the menu bar (or a menu
template) between menu items in a list. When you move a menu into an existing menu
structure, all its associated items move with it, creating a fully intact nested menu. This
pertains to nested menus as well—moving a menu item into an existing nested menu
just creates one more level of nesting.
Chapter 3, Building forms and menus
103
Moving menu items
During design time, you can move menu items simply by dragging and dropping. You
can move menu items along the menu bar, or to a different place in the menu list, or into
a different menu entirely.
The only exception to this is hierarchical: you cannot demote a menu item from the
menu bar into its own menu; nor can you move a menu item into its own nested menu.
However, you can move any item into a different menu, no matter what its original
position is.
While you are dragging, the cursor changes shape to indicate whether you can release
the menu item at the new location. When you move a menu item, any items beneath it
move as well.
■
To move a menu item along the menu bar,
1 Drag the menu item along the menu bar until the arrow tip of the drag cursor points
to the new location.
2 Release the mouse button to drop the menu item at the new location.
■
To move a menu item into a menu list,
1 Drag the menu item along the menu bar until the arrow tip of the drag cursor points
to the new menu.
This causes the menu to open, enabling you to drag the item to its new location.
2 Drag the menu item into the list, releasing the mouse button to drop the menu item at
the new location.
Viewing the menu
You can view your menu in the form at design time without first running your program
code. (Pop-up menu components are visible in the form at design time, but the pop-up
menus themselves are not. Use the Menu Designer to view a pop-up menu at design
time.)
■
To view the menu,
1 If the form is visible, click the form, or from the View menu, choose the form whose
menu you want to view.
2 If the form has more than one menu, select the menu you want to view from the
form’s Menu property drop-down list.
The menu appears in the form exactly as it will when you run the program.
Editing menu items without opening the Menu Designer
This section has discussed how to set several properties for menu items—for example,
the Name and Caption properties—by using the Menu Designer.
The section has also described how to set menu item properties, such as the ShortCut
property, directly in the Object Inspector, just as you would for any component selected
in the form.
104
Delphi User’s Guide
When you edit a menu item by using the Menu Designer, its properties are still
displayed in the Object Inspector. You can switch focus to the Object Inspector and
continue editing the menu item properties there. Or you can select the menu item from
the Component list and edit its properties without ever opening the Menu Designer.
■
To edit a menu item without opening the Menu Designer, select the item from the
Component list.
■
To close the Menu Designer window and continue editing menu items,
1 Switch focus from the Menu Designer window to the Object Inspector by clicking the
properties page of the Object Inspector.
2 Close the Menu Designer as you normally would.
The focus remains in the Object Inspector, where you can continue editing properties
for the selected menu item. To edit another menu item, select it from the Component
list.
Using the Menu Designer SpeedMenu
The Menu Designer SpeedMenu provides quick access to the most common Menu
Designer commands, and to the menu template options. (For more information about
menu templates, refer to “Using menu templates” on page 106.)
■
To display the SpeedMenu, right-click the Menu Designer window, or press Alt+F10
when the cursor is in the Menu Designer window.
Commands on the SpeedMenu
The following table summarizes the commands on the Menu Designer SpeedMenu.
Table 3.7
Menu Designer SpeedMenu commands
Menu command
Action
Insert
Delete
Inserts a placeholder above or to the left of the cursor.
Deletes the selected menu item (and all its sub-items, if any).
Create Submenu
Creates a placeholder at a nested level and adds an arrow to the
right of the selected menu item.
Opens a list of menus in the current form. Double-clicking a
menu name opens the designer window for the menu.
Opens the Save Template dialog box, where you can save a
menu for future reuse.
Select Menu
Save As Template
Insert From Template
Opens the Insert Template dialog box, where you can select a
template to reuse.
Delete Templates
Opens the Delete Templates dialog box, where you can choose
to delete any existing templates.
Opens the Insert Menu from Resource file dialog box, where
you can choose an .MNU file to open in the current form.
Insert From Resource
For more information about the Menu Designer SpeedMenu, see the online Help topic
Menu Designer SpeedMenu.
Chapter 3, Building forms and menus
105
Switching among menus at design time
If you’re designing several menus for your form, you can use the Menu Designer
SpeedMenu or the Object Inspector to easily select and move among them.
■
To use the SpeedMenu to switch among menus in a form,
1 Right click in the Menu Designer to display the SpeedMenu.
2 From the SpeedMenu, choose Select Menu.
The Select Menu dialog box appears.
Figure 3.16 Select Menu dialog box
This dialog box lists all the menus associated with the form whose menu is currently
open in the Menu Designer.
3 From the list in the Select Menu dialog box, choose the menu you want to view or
edit.
■
To use the Object Inspector to switch among menus in a form,
1 Give focus to the form whose menus you want to choose from.
2 From the Component list, select the menu you want to edit.
3 On the Properties page of the Object Inspector, select the Items property for this
menu, and then either click the ellipsis button, or double-click [Menu].
Using menu templates
Delphi provides several predesigned menus, or menu templates, that contain frequently
used commands. You can use these menus in your applications without modifying
them (except to write code), or you can use them as a starting point, customizing them
as you would a menu you originally designed yourself. Menu templates do not contain
any event handler code.
The menu templates shipped with Delphi are stored in the \DELPHI\BIN directory in a
default installation. These files have a .DMT (Delphi menu template) extension.
You can also save as a template any menu that you design using the Menu Designer.
After saving a menu as a template, you can use it as you would any predesigned menu.
If you decide you no longer want a particular menu template, you can delete it from the
list.
■
106
To add a menu template to your application,
Delphi User’s Guide
1 Right-click the Menu Designer window.
The Menu Designer SpeedMenu appears.
2 From the SpeedMenu, choose Insert From Template.
(If there are no templates, the Insert From Template option appears dimmed in the
SpeedMenu.)
The Insert Template dialog box opens, displaying a list of available menu templates.
Figure 3.17 Sample Insert Template dialog box for menus
3 Select the menu template you want to insert, then press Enter or choose OK.
This inserts the menu into your form at the cursor’s location. For example, if your
cursor is on a menu item in a list, the menu template is inserted above the selected
item. If your cursor is on the menu bar, the menu template is inserted to the left of the
cursor.
■
To delete a menu template,
1 Right-click the Menu Designer window.
The Menu Designer SpeedMenu appears.
2 From the SpeedMenu, choose Delete Templates.
(If there are no templates, the Delete Templates option appears dimmed in the
SpeedMenu.)
The Delete Templates dialog box opens, displaying a list of available templates.
Figure 3.18 Delete Templates dialog box for menus
Chapter 3, Building forms and menus
107
3 Select the menu template you want to delete, and press Del.
Delphi deletes the template from the templates list and from your hard disk.
Saving a menu as a template
Any menu you design can be saved as a template so you can use it again. You can use
menu templates to provide a consistent look to your applications, or use them as a
starting point which you then further customize.
The menu templates you save are stored in your \DELPHI\BIN directory as .DMT files.
■
To save a menu as a template,
1 Design the menu you want to be able to reuse.
This menu can contain as many items, commands, and submenus as you like;
everything in the active Menu Designer window will be saved as one reusable menu.
2 Right-click in the Menu Designer window to open the SpeedMenu.
3 From the Menu Designer SpeedMenu, choose Save As Template.
The Save Template dialog box appears.
Figure 3.19 Save Template dialog box for menus
4 In the Template Description edit box, type a brief description for this menu, and then
choose OK.
The Save Template dialog box closes, saving your menu design and returning you to
the Menu Designer window.
Note
The description you enter is displayed only in the Save Template, Insert Template, and
Delete Templates dialog boxes. It is not related to the Name or Caption property for the
menu.
Naming conventions for template menu items and event handlers
When you save a menu as a template, Delphi does not save its Name property, since
every menu must have a unique name within the scope of its owner (the form).
However, when you insert the menu as a template into a new form by using the Menu
Designer, Delphi then generates new names for it and all its items.
108
Delphi User’s Guide
For example, suppose you save a File menu as a template. In the original menu, you
name it MyFile. If you insert it as a template into a new menu, Delphi names it File1. If
you insert it into a menu with an existing menu item named File1, Delphi names it File2.
Delphi also does not save any OnClick event handlers associated with a menu saved as a
template, since there is no way to test whether the code would be applicable in the new
form. When you generate a new event handler for the menu template item, Delphi still
generates the event handler name.
You can easily associate items in the menu template with existing OnClick event
handlers in the form. For more information, see “Associating a menu item with an
existing event handler” in the next section.
Associating menu events with code
While you use the Delphi Menu Designer to visually design your application menus,
the underlying code is what makes the menus ultimately useful. Each menu command
needs to be able to respond to an OnClick event, and there are many times when you
want to change menus dynamically in response to program conditions.
The following topics describe how to associate code with menu events. For specific code
examples that demonstrate ways to dynamically modify menus in a running
application, refer to Chapter 10.
Menu component events
The MainMenu component is different from most other components in that it doesn’t
have any associated events. You can verify this for yourself by adding a menu
component to the form and then selecting the Events page of the Object Inspector. You
access the events for items in a main menu by means of the Menu Designer.
By contrast, the PopupMenu component has one event: the OnPopup event. This is
necessary because pop-up menus have no menu bar, therefore no OnClick event is
available prior to users opening the menu. (The OnClick event handler for menu items
on a menu bar is often used to change the state of underlying menu items, dependent on
program conditions, before the menu is opened.)
Handling menu item events
There is only one event for menu items (as opposed to menu components): The OnClick
event. Code that you associate with a menu item’s OnClick event is executed whenever
the user chooses the menu item in the running application, either by clicking the menu
command or by using its accelerator or shortcut keys.
■
To generate an event handler for any menu item,
1 From the Menu Designer window, double-click the menu item.
2 Inside the begin..end block, type the code you want to execute when the user clicks
this menu command.
Chapter 3, Building forms and menus
109
You can also easily generate event handlers for menu items displayed in a form. This
procedure does not apply to pop-up menu items, as they are not displayed in the form
at design time.
■
To generate an event handler for a menu item displayed in the form, simply click the
menu item (not the menu component). For example, if your form contains a File menu
with an Open menu item below it, you can click the Open menu item to generate or
open the associated event handler.
This procedure applies only to menu items in a list, not those on a menu bar. Clicking a
menu item on a menu bar opens that menu, displaying the subordinate menu items.
Associating a menu item with an existing event handler
You can associate a menu item with an existing event handler, so that you don’t have to
rewrite the same code in order to reuse it.
■
To associate a menu item with an existing OnClick event handler,
1 In the Menu Designer window, select the menu item.
2 Display the Properties page of the Object Inspector, and ensure that a value is
assigned to the menu item’s Name property.
3 Display the Events page of the Object Inspector.
4 Click the down arrow next to OnClick to open a list of previously written event
handlers.
Only those event handlers written for OnClick events in this form appear in the list.
5 Select from the list by clicking an event handler name.
The code written for this event handler is now associated with the selected menu
item.
Adding menu items dynamically
Sometimes you want to add menu items to an existing menu structure while the
application is running, to provide more information or options to the user. You can
insert a menu item by using the menu item’s Add or Insert method, or you can
alternately hide and show the items in a menu by changing their Visible property. The
Visible property determines whether the menu item is displayed in the menu. To dim a
menu item without hiding it, use the Enabled property.
For specific code examples that use the menu item’s Visible and Enabled properties, see
Chapter 10 and online Help.
In Multiple Document Interface (MDI) and Object Linking and Embedding (OLE)
applications, you can also merge menu items into an existing menu bar. The following
section discusses this in more detail.
110
Delphi User’s Guide
Merging menus
For MDI applications, such as the text editor sample application, and for OLE client
applications, your application’s main menu needs to be able to receive menu items
either from another form or from the OLE server object. This is often called merging
menus.
You prepare menus for merging by specifying values for two properties:
• Menu, a property of the form
• GroupIndex, a property of menu items in the menu
Specifying the active menu: Menu property
The Menu property specifies the active menu for the form. Menu-merging operations
apply only to the active menu. If the form contains more than one menu component,
you can change the active menu at run time by setting the Menu property in code. For
example,
Form1.Menu := SecondMenu;
Determining the order of merged menu items: GroupIndex property
The GroupIndex property determines the order in which the merging menu items appear
in the shared menu bar. Merging menu items can replace those on the main menu bar,
or can be inserted.
The default value for GroupIndex is 0. Several rules apply when specifying a value for
GroupIndex:
• Lower numbers appear first (farther left) in the menu.
For instance, set the GroupIndex property to 0 (zero) for a menu that you always want
to appear leftmost, such as a File menu. Similarly, specify a high number (it needn’t
be in sequence) for a menu that you always want to appear rightmost, such as a Help
menu.
• To replace items in the main menu, give items on the child menu the same
GroupIndex value.
This can apply to groupings or to single items. For example, if your main form has an
Edit menu item with a GroupIndex value of 1, you can replace it with one or more
items from the child form's menu by giving them a GroupIndex value of 1 as well.
Giving multiple items in the child menu the same GroupIndex value keeps their order
intact when they merge into the main menu.
• To insert items without replacing items in the main menu, leave room in the numeric
range of the main menu’s items and “plug in” numbers from the child form.
For example, number the items in the main menu 0 and 5, and insert items from the
child menu by numbering them 1, 2, 3 and 4.
Additional rules apply for OLE client applications. For more information, refer to
Chapter 15.
Chapter 3, Building forms and menus
111
Importing resource (.RC) files
Delphi supports menus built with other applications, so long as they are in the standard
Windows resource (.RC) file format. You can import such menus directly into your
Delphi project, saving you the time and effort of rebuilding menus that you created
elsewhere.
■
To load existing .RC menu files,
1 In the Menu Designer, place your cursor where you want the menu to appear.
The imported menu can be part of a menu you are designing, or an entire menu in
itself.
2 From the Menu Designer SpeedMenu, choose Insert From Resource.
The Insert Menu From Resource dialog box appears.
3 In the dialog box, select the resource file you want to load, and choose OK.
The menu appears in the Menu Designer window.
Note
If your resource file contains more than one menu, you first need to save each menu as a
separate resource file before importing it.
Managing run-time behaviors of forms
The main focus of this chapter up to this point has been on the design and construction
aspects of forms. There are two run-time aspects of forms that you might find you want
to specify at design time. These are designating a form as the project main form, and
controlling the creation order of forms at run time.
Specifying a form as the project main form
The first form you create and save in a project becomes, by default, the project’s main
form, which is the first form created at run time. (For more information about form
creation order, see “Controlling the form auto-create order” later in this chapter, or see
online Help.) As you add forms to your projects, you might decide to designate a
different form as your application’s main form. Also, specifying a form as the main form
is an easy way to test it at run time, because unless you change the form creation order,
the main form is the first form displayed in the running application.
■
To change the project main form,
1 Choose Options|Project from the Delphi menu bar to display the Project Options
dialog box.
2 Select the Forms page of the dialog box.
3 In the Main Form combo box, select the form you want as the project main form and
choose the OK button.
Now if you run the application, your new main form choice is displayed.
112
Delphi User’s Guide
Specifying forms to auto-create
The form you specify as the project main form is always “created” (loaded in memory)
when the application runs. The main form is also the first form loaded unless you
specify otherwise in code. As you create additional forms for the project, these are also
auto-created at run time.
This has the advantage of having all forms in the application available to display
without writing any code to specifically create the form (you still need to show or hide
the form). However, there might be times when you decide you don’t want all the forms
in an application created in memory when the application first starts running; you
might prefer to control programmatically when the forms are created. For example, if
there are several different forms that automatically connect to databases, you might
prefer to create those forms only as necessary.
You can use the Project Options dialog box to specify which of your application’s forms
will auto-create at run time.
■
To specify whether forms are auto-created at run time,
1 Choose Options|Project, and select the Forms page of the dialog box.
The names of all forms in the project are displayed in the Auto-Create Forms list.
2 In the Auto-Create Forms list, select any form(s) that you do not want created in
memory at run time, and choose the > button. To move all form names from one list
to the other, choose the << or the >> button.
The selected files move to the Available Forms list. Forms displayed in this list do not
auto-create at run time.
3 Choose the OK button to save the information and close the dialog box.
Note
It’s usually best to have Delphi create your application forms. If you decide not to autocreate a form, you must specifically create the forms at run time by writing code. If you
try to reference a form that hasn’t first been created, for example by calling its Show
method, Delphi raises an exception.
For more information on creating forms at run time, search online Help for
“Instantiating Forms.”
Controlling the form auto-create order
After the main form, the forms you specify in the Auto-Create Forms list are created at
run time in the order they are displayed in the list. You can change the order by
changing a form name’s position in the list. For instance, if you’ve designed one form
that contains dependencies to another form, you can ensure the form is available by
creating it first.
■
To change a form’s creation order, in the Auto-Create list, select the form name and drag
it to the position you want.
Chapter 3, Building forms and menus
113
Note
The main form and auto-create specifications on the Forms page of the Project Options
dialog box are reflected in the Application.CreateForm statements in the project (.DPR)
file.
Summary
This chapter has presented the following topics:
• Sharing forms with other units, both in the same project and in other projects
• Using the Browse Gallery to add Form Templates to your project
• Viewing forms and units
• Designing forms, including setting design-time and run-time properties, specifying
the tab order, and setting focus
• Adding and saving forms as ASCII
• MDI and SDI forms
• Creating form menus, including how to use the Menu Designer to create and name
menu items, specifying accelerator keys and keyboard shortcuts, creating nested
menus, and moving menu items
• Setting menu properties through the Object Inspector
• Using the Menu Designer SpeedMenu
• Using and saving menu templates
• Dynamically adding menu items
• Merging menu items
• Importing resource (.RC) files
• Changing the project main form designation
• Controlling the auto-create order of forms
114
Delphi User’s Guide
Chapter
4
Managing projects, files, and
directories
Chapter 4
The purpose of this chapter is to help you understand what a Delphi project comprises
and how to manage the projects you create as you work with Delphi. The topics covered
in this chapter include
•
•
•
•
•
•
What is a project?
Beginning new projects
Customizing project options
Managing project content
Compiling, building, and running projects
Managing multiple project versions and team development
What is a project?
The Delphi application development process centers around the concept of projects. A
Delphi project is a collection of all the files that together make up a Delphi application (or
distributable library). Some of these files are generated as you work on a project at
design time. Others are created when you compile the project source code.
Project directories
Normally, you should store each Delphi project you create in its own directory. If you
begin a project using any Project Template other than the Blank Project template, Delphi
prompts you for a directory path and then (if necessary) creates the specified directory
for the project. If you begin with the Blank Project template, Delphi saves it by default in
the \BIN directory, unless you specify otherwise. To avoid cluttering this directory, and
potentially overwriting files, create the project directory from the Windows operating
environment before saving the new project for the first time. (See “Beginning a project
with a Project Template” on page 122 for more information about Project Templates.)
Chapter 4, Managing projects, files, and directories
115
Note
Projects can reside in any network or local drive location that your computer can access.
Delphi doesn’t require you to store projects in separate directories, but you will find it
much easier to manage them if you do.
Constituent files of a project
To manage projects effectively, you need to understand the various files and file types
that constitute a Delphi project. Simply opening a new project within Delphi does not
create project files on disk. Delphi generates the actual files at different times as you
work on the project—some at design time, when you initially save the project or
changes to it, and some when you compile the project’s source code. Still other files used
in a project might be created by other applications and integrated into your Delphi
application at save or compile time.
Files generated at design time
Some project files are generated as you develop a project. These are mainly source code,
configuration, and backup files. File- or project-saving operations within Delphi trigger
their creation on disk. Table 4.1 summarizes these files and their DOS file extensions and
explains when they are written to disk.
Table 4.1
116
Design-time project files
File extension
Definition
Purpose
.DPR
Project file
Pascal source code for the project’s main program file. Lists
all form and unit files in the project, and contains application
initialization code. Created when project is first saved.
.PAS
Unit source (Object
Pascal) code
One .PAS file is generated for each form the project contains
when the project is first saved. (Your project might also
contain one or more .PAS files not associated with any
form.) Contains all declarations and procedures, including
event handlers, for the form.
.DFM
Graphical form file
Binary file containing the design properties of a form
contained in the project. One .DFM file is generated along
with the corresponding .PAS file for each form the project
contains when the project is first saved.
.OPT
Project options file
Text file containing the current settings for project options.
Generated with first save and updated on subsequent saves
if changes were made to project options.
.RES
Compiler resource file
.~DP
Project backup file
.~PA
Unit backup file
Binary file containing the application icon and other outside
resources used by the project.
Generated on the second save of a project and updated on
subsequent saves, this file stores a copy of the .DPR file as it
existed before the most recent save.
This file stores a copy of a .PAS file as it existed before the
most recent save.
If a .PAS file changes, this parallel file is generated on the
second project save, or any save of the .PAS unit file after a
change has occurred. It is updated on subsequent saves if
the .PAS file has changed.
Delphi User’s Guide
Table 4.1
Design-time project files (continued)
File extension
Definition
Purpose
.~DF
Graphical form backup
If you open a .DFM file as text in the Code Editor and make
changes, this file is generated when you save the .DFM file.
It stores a binary-format copy of the .DFM file as it existed
before the most recent save.
.DSK
Desktop settings
This file stores information about the desktop settings you
have specified for the project in the Environment options
dialog box.
Compiler-generated project files
Some project files are created on disk at compile time. These include the application
executable file that you can deploy and distribute when the project is complete, and the
object code for the project unit files (each separately compiled, to minimize time
required for compilation).
Table 4.2 summarizes the project files created and/or written at compile time.
Table 4.2
Compiler-generated project files
File extension
Definition
Purpose
.EXE
Compiled
executable file
.DCU
Unit object code
This is the distributable executable file for your application. This
file incorporates all necessary .DCU files when your application
is compiled. There is no need to distribute .DCU files with your
application.
Compilation creates a .DCU file corresponding to each .PAS file
in the project.
.DLL
Compiled
Dynamic-link
library
For information on creating DLLs, see the Delphi Component
Writer’s Guide.
Non-Delphi resource files
Some files that you use in a Delphi project might be files created with applications other
than Delphi and need not reside in the project directory. When you correctly specify
such files in a project, Delphi integrates them when you save or compile the project.
Some of these files might be common to multiple projects. The most common examples
of non-Delphi files used in Delphi projects are
• Image files. The bitmaps (.BMP, .WMF files) that you use in TImage-type components,
or as glyphs on TBitBtn components, can reside anywhere on your system. When
specified as properties of these graphical components, Delphi takes a “snapshot” of
the disk file and stores this in the binary form (.DFM) file. They are eventually
compiled into the project executable file. Once the image has been stored in the form
file, the original image file is no longer required by Delphi.
• Icon files. The icons (.ICO files) that you specify in the Icon property of forms and in
the Project Options dialog box can also reside anywhere. They are integrated into the
project in the same way as bitmap image files. After being included in the project, the
original icon file is no longer required by Delphi. .BMP and .ICO files can also be
created with the Delphi Image Editor, or you can choose from the bitmaps and icons
Chapter 4, Managing projects, files, and directories
117
available in the Delphi Image Library. For more information on the Image editor, and
the Delphi Image Library, see online Help.
• Help files. The online Help (.HLP) file that you specify for the project in the Project
Options dialog box can also reside anywhere. The .HLP file can be compiled using
either the Microsoft Help Compiler shipped with Delphi, or another third-party Help
compiling system. Only the file name and its path (if specified) are integrated into the
project, not the Help file itself. This can affect the accessibility of Help when you
deploy or distribute your application. For more information, see “Application page”
under “Project options” on page 128.
Understanding the files in a project
As described in Tables 4.1 and 4.2, several different DOS file types work together to
create a project, specifying project and environment options, containing compiled and
uncompiled Object Pascal code, detailing the appearance and behavior of the project’s
forms, and so on.
This section discusses the file types within the project that affect the appearance and
behavior of your completed application, including
•
•
•
•
The project source code (.DPR) file
Unit source code (.PAS) files
Unit object code (.DCU) files
Graphical form (.DFM) files
The project source code (.DPR) file
The .DPR file is the main program file Delphi uses to compile all other units. Delphi
updates this file throughout the development of the project.
When you initially save the project, you are prompted to name the project source code
file (after being prompted to name any unit source code files the project contains). Since
the project file is stored by the operating system, the file name must conform to DOS file
naming rules.
As introduced in Chapter 1, Delphi generates the following source code for a default
project:
program Project1;
uses
Forms,
Unit1 in 'UNIT1.PAS' {Form1};
{$R *.RES}
begin
Application.CreateForm(TForm1, Form1);
Application.Run;
end.
118
Delphi User’s Guide
• Project1 represents the file name of the project source code file. For example, if you
save the project source code file under the name MYNEWAPP.DPR, the first line of
the source code would be
program Mynewapp;
• Unit1 represents the unit identifier, where ‘UNIT1.PAS’ represents the actual DOS
file name for the unit. If the unit identifier is longer than the standard eight character
DOS file-name convention, Delphi creates the file name as a truncated version of the
identifier. Otherwise these names are identical and must remain so in order for your
project to be correctly compiled.
• The in clause tells the compiler where to find the unit file. {Form1} represents the
variable identifier for the form associated with this unit (this would not appear in the
clause if this were not a form-associated unit.) This is the same as the Name property
of the form. Because you use the Object Inspector to name the form, Delphi maintains
the name in the .DPR file.
• The $R compiler directive specifies that the file with a .RES extension and the same base
name as the project is to be included in the project. For more information, search
online Help for the Resource File Directive topic.
• The Application.CreateForm statement loads the form specified in its argument. Delphi
adds an Application.CreateForm statement to the project file for each form you add to
the project. The statements are listed in the order the forms are added to the project.
This is the order that the forms will be created in memory at run time. If you want to
change this order, do not edit the project source code. Use Options|Project on the
Delphi menu bar. (For more information see Chapter 3.)
• The Application.Run statement starts your application.
Each time you add a new form or unit to the project, Delphi adds it to the uses clause in
the project source code file. For more information, see “Integrating forms and units into
a project” on page 133.
Important
Because Delphi maintains the .DPR file, you should not normally need to modify it
manually, and in general it is not recommended that you do so.
Unit source code (.PAS) files
Units are the main building blocks of Delphi applications. Unit files are identified by a
.PAS file extension. They contain the Object Pascal source code for the elements of the
Delphi applications you build. For example, every form has its own unit source code
file. Unit source code files may initially be created as part of a project, but this is not
required. You can create and save a unit as a stand-alone file that any project can use.
Once you add a unit to a project, Delphi registers the unit in the uses clause of the
project .DPR file.
If you open and save a default new project, the project directory initially contains one
unit source code (.PAS) file, and one associated graphical form (.DFM) file. The .PAS file
contains the source code for the form and its event handlers; the .DFM file contains
binary code that stores the visual image data for the form.
Chapter 4, Managing projects, files, and directories
119
Not all unit files need be associated with forms. For example, if you write your own
procedures, functions, DLLs, or components, their source code might reside in a
separate .PAS file that has no associated form. The rest of this section explains how to
generate a default unit (.PAS) file for each purpose.
Form-associated unit files
The type of unit source code file you will probably work with most is the formassociated unit. This is the type of unit created whenever you open a new form. As
introduced in Chapter 1, Delphi generates the following code for Unit1 of a default
blank project, and for every unit with an associated blank form that you add to the
project. Of course, the default unit identifier will be incrementally updated (Unit2,
Unit3, and so on) as you add new forms.
unit Unit1;
interface
uses
SysUtils, WinTypes, WinProcs, Messages, Classes, Graphics, Controls,
Forms, Dialogs;
type
TForm1 = class(TForm)
private
{ Private declarations }
public
{ Public declarations }
end;
var
Form1: TForm1;
implementation
{$R *.DFM}
end.
Form unit type declaration
The type declaration (or class declaration) part introduces the form as a class. A class is
simply an object, which you will recognize if you are familiar with previous versions of
Borland Pascal products, or another object-oriented programming language. Chapter 5
discusses classes and objects in more detail.
All the elements that make up a Delphi application, such as buttons, labels, fonts and so
forth, are objects. Delphi objects encapsulate Windows behaviors, enabling you to
interact with the object instead of directly with Windows.
Form unit var declaration
The form unit var declaration declares your form as an instance of TForm1. This means it
contains all the behaviors and characteristics of a TForm object.
Form unit compiler directive
The $R compiler directive links the TForm’s binary file (.DFM). This adds the .DFM file(s)
in your project to the compiled executable.
120
Delphi User’s Guide
You can change which form is specified as your application’s main form. For more
information, see “Gallery options” on page 124.
Caution
Do not remove the $R *.DFM directive from a form unit file. Doing so will result in code
that will never work correctly.
Unit files for procedures and functions
You can write custom procedures or functions within any source code unit, including
those associated with a form file. You might, however, want to reuse the routines that
you write. In this case, it’s usually better to create a unit specifically to contain those
routines. By creating “stand-alone” units that have no associated form, you can make
your specialized procedures and functions easily available to other projects.
■
To create a unit file not associated with a form, choose File|New Unit.
It is not necessary to have a project open unless you want the new unit to be part of a
project.
Unit files for components
If you elect to write a new Delphi component, you need to create a unit file for the
source code. The default structure of the unit source code for a new component differs
somewhat from other unit files. (You begin creating a new component unit file when
you choose New Component from the File menu.)
For information on creating a component unit file, see “Using the Component Expert” in
Chapter 2. You can find an example of unit file source code for a new component on
page 72. The Delphi Component Writer’s Guide provides complete information on creating
new Delphi components.
Unit object code (.DCU) files
When you compile a project, Delphi creates an object code file for each unit. The file
name is the same as the corresponding unit source file (.PAS), and Delphi adds a .DCU
extension. Thus, the object code file for UNIT1.PAS is UNIT1.DCU.
The .DCU file is a binary file maintained by the Object Pascal compiler, so you should
never need to open or modify this file by any other means.
Note
.DCU files are used to help achieve the high speed and efficiency of the Delphi
compilation process. You do not need to distribute .DCU files with your completed
application.
Graphical form (.DFM) files
As discussed in previous chapters, a file with a .DFM extension is a binary file that
contains information about the graphical properties of a form. The visual display of a
form at design time and at run time derives its information from this file. Delphi
maintains a corresponding .DFM file for each form-associated unit source code file.
If you develop forms exclusively with the visual tools provided by Delphi, you seldom,
if ever, need to deal directly with .DFM files. Delphi updates them as you save changes
Chapter 4, Managing projects, files, and directories
121
to the visual form image. You can, however, edit a .DFM file as text by opening it as a
file in the Code Editor (using File|Open File). When you close a .DFM file, the Code
Editor automatically converts it back to binary format.
For more information on .DFM files, see Chapter 3, “Saving form files as ASCII text” on
page 94.
Beginning new projects
As discussed in Chapter 1, you can choose from a number of options that control what
occurs when you begin a new project in Delphi. In a default installation of Delphi,
opening a new project displays a blank form, based on the Blank Project template. You
can change this default behavior in several ways. By changing Gallery options, (setting
Gallery options is discussed on page 124) you can
• Specify the default new project to be one of the other Delphi Project Templates,
including any project you have created and saved as a Project Template. (Saving a
project as a Project Template is discussed on page 126.)
• Specify the default new project be started from one of the Delphi Project Experts. For
more information about Project Experts, search the online Help system under
Experts.
• Specify that the default new form be one of the Delphi Form Templates, including
any form you have created and saved as a Form Template. (Saving a form as a Form
Template is discussed on page 126.)
• Specify that the default new form be one of the Delphi Form Experts.
The following section discusses how to begin a new project from one of the non-default
Delphi Project Templates. “Customizing project options” on page 123 describes how to
set your preferred project options or modify project options set by another Delphi user.
Beginning a project with a Project Template
Delphi’s Project Templates provide you with predesigned projects that you can use as a
starting point for your applications. Project Templates are part of the Gallery (located in
the \DELPHI\GALLERY directory), which also provides Form Templates and Experts.
When you begin a project from a Project Template (other than the Blank Project
Template), you are prompted to specify a project directory, a unique subdirectory in
which to store the new project files. If you specify a directory that doesn’t currently
exist, Delphi creates it for you. From that point on, Delphi treats the template as a
separate open project. You can modify it, adding new forms and units, or use it
unmodified, adding only your event handler code. In either case, your changes affect
only the open project. The original Project Template is unaffected and can be used again.
■
To start a new project from a Project Template,
1 Choose File|New Project to display the Browse Gallery dialog box.
2 Select the Project Template you want and choose OK.
122
Delphi User’s Guide
3 In the Select Directory dialog box, specify a directory for the new project’s constituent
files.
A copy of the Project Template opens in the specified directory.
Note
If the Browse Gallery dialog does not appear in step 2, the Gallery is not enabled in the
environment. The Project Template option in the Gallery is disabled by default in a new
Delphi installation..
Customizing project options
While the preceding section discusses how to create new projects using the default
values of a new Delphi installation, your ability to control project options doesn’t end
there. Delphi offers you the option of customizing the integrated development
environment (IDE) itself. The appearance and behavior of the IDE when you start
Delphi or begin a new project are governed by the settings of several types of options:
• Environment settings affect all Delphi projects.
• Gallery settings determine the default new form and new project.
• Project settings affect the current project only.
Note
If you share your installation of Delphi with other users, it’s possible that another user
has modified the default option settings; in which case, displays or behaviors might
differ from those described in the examples and illustrations in this chapter. In a sharedinstallation situation, it’s a good idea to check and modify environment options (if
necessary), as described in the following sections, before creating a new project.
Environment options
The settings in the Environment Options dialog box affect all Delphi projects. This
dialog box contains several pages of options that you can change to customize your
installation of Delphi. Some of the settings affect the behavior of Delphi when you open
a new project, or add new forms and units to an open project. This section covers those
particular settings.
■
To open the Environment Options dialog box, choose Options|Environment.
For more information on the Environment Options dialog box, see Chapter 1 or online
Help.
Environment preferences
The options on the Preferences page have the most impact on what occurs when you
open a new project, reopen an existing project, or add forms and units to an open
project.
Autosave options
The Autosave options are Editor Files and Desktop. The settings of these options affect
what you see when you start Delphi.
Chapter 4, Managing projects, files, and directories
123
If the Desktop option is checked, Delphi loads the last project you worked on, and
displays any forms that were open at that time.
If the Editor files option is checked, Delphi saves all modified files in the Code Editor
when you choose from the Run menu (Run, Trace Into, StepOver, or Run To Cursor), or
when you exit Delphi.
By default, these boxes are unchecked. Thus, when you start Delphi, the default new
project opens.
Gallery
The Gallery check boxes specify whether Delphi displays the Browse Gallery dialog box
when you choose File|New Project or File|New Form.
When checked,
• Use On New Form displays the Browse Gallery dialog box whenever you choose
File|New Form.
• Use On New Project displays the Browse Gallery dialog box whenever you choose
File|New Project.
If you check an option that causes the Browse Gallery dialog box to be used, its
appearance and defaults are controlled by the settings specified in the Gallery Options
dialog box.
Gallery options
The settings in the Gallery Options dialog box affect the behavior of Delphi when you
begin a new project or create a new form in an open project. This is where you specify
• Default Project. The Project Template or Expert to be used whenever you open a new
project.
• Default New Form. The Form Template Form Expert to be used when the Gallery is
disabled in the environment and you open a new form.
• Default Main Form. The Form Template used as the main form for a blank project
only.
■
To open the Gallery Options dialog box, choose Options|Gallery.
Specifying the default new project
The default new project opens whenever you choose New Project from the File menu on
the Delphi menu bar. In a new Delphi installation the Blank Project template is the
default. You can specify any other Project Template (including a project you have
created and saved as a Project Template) as the default new project. Alternatively, you
can designate a Project Expert to run by default when a new project is begun.
Specifying a Project Template
■
124
To specify a Project Template as the default new project,
Delphi User’s Guide
1 Choose Options|Gallery to display the Gallery Options dialog box.
2 Choose the Project Templates page tab.
3 Select the project template you want as the default new project.
4 With the template you want selected, choose the Default Project button.
The folder icon appears in the box for the selected default project.
5 Choose OK to register the new default setting.
Specifying a Project Expert
A Project Expert is a program that enables you to build a project based on your
responses to a series of dialog box options.
Instead of opening a Project Template by default when you begin a new project, you can
run a Project Expert instead.
■
To specify a Project Expert as the default new project,
1 Choose Options|Gallery.
2 Choose the Project Experts page tab.
3 Select the box displaying the Project Expert you want to run when a new project is
opened.
4 With the Expert you want selected, choose the Default Project button.
The folder icon displays in the box for the selected Expert.
5 Choose OK to register the new default setting.
Specifying the default new form
The default new form opens whenever you choose File|New Form or use the Project
Manager to add a new form to an open project. In a new Delphi installation, the Blank
Form template is the default. You can specify any other Form Template, including a
form you have created and saved as a Form Template, as the default new form. Or you
can designate a Form Expert to run by default when a new form is added to a project.
■
To specify the default new form for new projects,
1 Choose Options|Gallery to display the Gallery Options dialog box.
2 Choose the Form Templates page tab.
3 Select the Form Template you want as the default new form.
4 With the template you want selected, choose Default New Form.
The form icon appears in the box for the selected default form.
5 Choose OK to register the new default setting.
Specifying the default main form
Just as you can specify the Form Template to be used whenever a new form is added to
a project, you can also specify which Form Template should be used as the default main
form whenever you begin a new project.
Chapter 4, Managing projects, files, and directories
125
■
To specify the default main form for open projects,
1 Choose Options|Gallery to display the Gallery Options dialog box.
2 Choose the Form Templates page tab.
3 Select the Form Template you want as the default main form.
4 With the template you want selected, choose Default Main Form.
The folder-with-form icon appears in the box for the selected default form.
5 Choose OK to register the new default setting.
Adding templates to the Gallery
You can save your own projects and forms as templates and add them to those already
available in the Gallery. This is helpful in situations where you want to enforce a
standard framework for programming projects throughout an organization.
For example, suppose you develop custom billing applications. You might have a
generic billing application project that contains the forms and functionality common to
all billing systems. Your business centers around adding and modifying features in this
application to meet specific client requirements. In such a case, you might want to save
the project containing your Generic Billing application as a Project Template and
optionally specify it as the default new project on your Delphi development system.
Likewise, you’ll probably have a particular form within this project that you want to
appear as the default main or new form.
Before adding a project or form to the Gallery, you should develop it as fully as possible
and practical, to minimize the amount of additional work needed when you open the
template.
■
To add a project to the Gallery,
1 If necessary, open the project you want added to the Gallery.
2 Choose Options|Gallery.
3 On the Project Templates page, choose Add to display the Save Project Template
dialog box.
4 Specify a DOS-compatible file name (without extension) for the template file.
By default, Delphi suggests the name of the project (.DPR) file.
5 In the Title edit box, enter a project title.
The title for the template will appear in the Browse Gallery window.
6 In the Description field, enter text that describes the template.
This text will appear in the Gallery window’s status panel.
7 Choose Browse and select bitmap file to represent this template in the Gallery.
This can be any Windows-compatible bitmap (including those you create in Delphi’s
Image editor), but the Gallery displays only the upper left portion of any bitmap too
large to fully fit the available space.
8 Choose OK to put your choices into effect, and save the current project as a Project
Template.
126
Delphi User’s Guide
Note
If you later make changes to a Project Template, you will need to resave the project as a
template, not merely as a project.
You can also save your own forms as Form Templates and add them to those already
available in the Forms Gallery. This is helpful in situations where you want to develop
standard forms for an organization’s software, as in the earlier example.
■
To add a form to the Gallery as a Template, follow the preceding steps for adding
projects as templates, using the Form Templates page of the Gallery Options dialog box
instead of the Project Templates page.
Project options
The settings in the Project Options dialog box affect only the current open project. If you
modify any of the defaults, a configuration file with a file extension .OPT is created in
the project directory the next time you save the project. When you reopen the project in
future work sessions, the project options, as saved in the .OPT file, are in effect.
■
To display the Project Options dialog box, choose any of these methods:
• In the Project Manager, choose the Options button on the SpeedBar.
• In the Project Manager, choose the Options SpeedMenu command.
• Choose Options|Project from the Delphi menu bar.
The next sections point out the options in the Project Options dialog box that pertain to
project management. Detailed information for each option in the dialog box can be
found in online Help.
Default check box
The Project Options dialog box displays a check box control labeled Default. This
control enables you to modify some of Delphi’s default project configuration properties.
Checking this control writes the current settings from the Compiler, Linker, and
Directories/Conditionals pages of the Project Options dialog to a file called
DEFPROJ.OPT. Delphi creates this file when you check the Default box and choose OK
in the Project Options dialog box. Delphi then uses the project options settings stored in
this file as the default for any new projects you create.
Delphi maintains all its original project defaults, which the settings in DEFPROJ.OPT
simply override.
■
Note
To restore Delphi’s original default settings, delete or rename the DEFPROJ.OPT file.
Project options you set for an open project override the current Delphi defaults, whether
those defaults are as originally shipped or as modified by you or another user.
Form options
The options on the Forms page of the Project Options dialog box enable you to change
the form designated as the project’s main form, and to control the creation order of
forms at run time. For more information see Chapter 3.
Chapter 4, Managing projects, files, and directories
127
Application page
The Application page is where you specify a title, Help file, and icon for the project. You
can also specify these options as default project settings.
Title
The text you enter here appears below the application icon when you minimize the
running application. If no title is specified, the minimized application displays the file
name of the .EXE file.
Help file
If you have created a Windows Help (.HLP) file for the project, you “connect” it to the
application by specifying it in the Help File edit box. Either type a file name or use the
Browse button to select an existing Help file.
At run time, the Help file name (and path if it exists) is passed to the Windows
WINHELP.EXE, which attempts to load your help file and access the context topic if
appropriate. For further information, consult your Windows Help documentation, or
the online Help file, “Creating Windows Help.”
Caution
Be aware that the Help file for your distributed application might not reside in the same
location, relative to the executable file, as it does on your development system. Avoid
specifying a drive name unless you know for certain that the finished application’s Help
file will always reside on a drive with that name.
Consult your Windows Help documentation for further information on how
WINHELP.EXE attempts to locate Help files.
Icon
Delphi supplies a default icon for all projects, which appears whenever the running
application is minimized, or when the application’s .EXE is specified in creating a
program item for the Windows Program Manager. You’ll probably want to use a
different icon for your applications. The Delphi Image Library supplies some icon files
that you can use directly or modify by using the Delphi Image editor. You can specify
any standard Windows icon file (.ICO) residing in any location. The specified icon is
compiled into the project’s executable file.
Compiler page
The options on this page enable you to specify compiler options. Modified settings affect
only the current project unless the Default box is checked. Checking the Default box
preserves the settings on this page as the default compiler settings for all new projects
(see “Default check box” on page 127).
For information on the individual settings on this page, see online Help.
Linker page
This page enables you to specify how the link options are configured. The two options
that relate to project management are Include TDW Debug Info and the Default check
box.
128
Delphi User’s Guide
Checking the Include TDW Debug Info check box causes debugging information to be
compiled into the project executable file. This enlarges the size of that file. See online
Help for information about using this or other options on the Linker page.
Checking the Default check box preserves the settings on this page as the default linker
configuration for all new projects (see “Default check box” on page 127).
Directory and Conditional options
On the Directories/Conditionals page, you can control the location of the project’s
compiled output and specify the location of resources needed to compile, link, and
distribute the application.
If you want the compiled project output to be stored in a directory other than the project
directory, you can enter a path in the Output Directory edit box. The specified directory
must exist or be accessible at compile time or Delphi generates an error message.
The Search Path edit box specifies the location(s) of any non-Delphi library file(s)
needed to compile the program. The Delphi compiler always includes \DELPHI\BIN
and \DELPHI\LIB directories in its search for resources. If your program needs to
access libraries residing elsewhere, you need to specify the library path location in this
area of the dialog box. See online Help for more information.
Enter any symbols referenced in conditional compiler directives in the Conditional
Defines edit box. Again, see online Help for information.
Managing project content
Delphi’s object-oriented architecture enables projects to use resources from a wide
variety of physical locations. Some of the units in a project might reside in the project
directory, while others might reside in the directory of the project that created them, or
in some other directory.
If you never reuse in other projects anything you create in one project, you’ll have little
difficulty keeping track of what files are being used in a project and where they reside.
(You’ll also miss out on one of Delphi’s biggest benefits, however!)
As you create new projects, create new forms and units in projects, and share files from
other projects, keeping track of what files a project uses and where those files are stored
becomes more and more necessary. The Delphi Project Manager makes this task and
several others easier to do, and more centrally accessible.
Using the Project Manager
The Delphi Project Manager provides a high-level view of the form and unit files listed
in the uses clause of your .DPR file. (It looks at the in directive to get the file names.) You
can use the Project Manager to open, add, save, and remove project files, and to open the
Project Options dialog box, where you can configure project default settings.
You access the Project Manager window by means of the View menu.
Chapter 4, Managing projects, files, and directories
129
If you share files among different projects, using the Project Manager is recommended
because you can quickly and easily tell the location of each file in the project. This is
especially helpful to know when creating backups that include all files the project uses.
(See page 139 for more information on making backups.)
Displaying the Project Manager
You need to have a project open in order to view the Project Manager.
■
To view the Project Manager window, with a project currently open, choose View|
Project Manager.
The Project Manager window
The Project Manager window displays information about the status and file content of
the currently open project. It also provides quick access to project management
functions, easy navigation among the constituent files, and access to project options
through the SpeedBar and SpeedMenu.
Figure 4.1
Add file to
project
Project Manager window
Remove file
from project
View unit
View form
Update
SpeedBar
(contains six
SpeedButtons)
Project
status bar
Unit name
column
Project options
Form name column
Unit file path
As shown in the preceding figure, the main elements of the Project Manager window
are
• The SpeedBar
• The project status bar
• The project file list
The Project Manager also has a SpeedMenu which you can display by right-clicking
anywhere inside the window.
130
Delphi User’s Guide
Project Manager SpeedBar
The SpeedBar has six buttons that provide commonly needed functionality:
Table 4.3
Project Manager SpeedBar buttons
Button
PM
Delphi
SpeedMenu menu
command
command
Add
Add File
Remove
Function
Comment
File|Add File
Adds a shared or non-shared file
to the project. The Path column of
the Project Manager’s constituent
file list reflects the location of any
shared file.
Remove File
File|Remove File
Removes the selected file(s) from
the current project.
View
Unit
View Unit
View|Units
(Ctrl + F12)
View
Form
View Form
View|Forms
(Shift + F12)
Opens (if necessary) and displays
the selected file in the Code
Editor. If multiple files are
selected in the Project Manager
window, displays the most
recently selected file.
Displays the visual image of the
currently selected form unit. If the
currently selected file is not a form
unit, this button is disabled and
the SpeedMenu command is
dimmed.
Non-shared files reside in the
project directory. Shared files still
reside outside the project
directory; they are not copied to
the current project directory. Any
changes to the shared file, in any
project, are reflected in all projects
using the file.
Only the relationship of the
selected file(s) with the current
project is removed. The file still
exists in its current location. The
.DPR file is updated to reflect the
change.
Using the Delphi menu command
opens the View Unit dialog box,
where you can select which unit
to view.
Options
Options
Options|Project
Update
Update
Displays the Project Options
dialog box.
Synchronizes the Project Manager
window display with listings in
the project unit source code
(.DPR) file.
Using the Delphi menu command
opens the View Form dialog box,
where you can select which form
to view.
This button normally remains
disabled, and its parallel
SpeedMenu command dimmed,
unless you have manually
modified the project (.DPR) file
(which is not recommended).
Project Manager status bar
This area, immediately below the SpeedBar, displays information about the location of
the main project source code (.DPR) file, and a summary of the number of forms and
units registered in the .DPR file.
The .DPR file location can be a useful reference if you are bringing many forms and
units that reside in locations other than the main project directory into the current
project. It can help you track what you are doing as you either add shared files as part of
the project, or save copies of shared files in the current project directory. The form and
unit summary information can also be helpful in evaluating the scope of proposed
project modifications.
Chapter 4, Managing projects, files, and directories
131
Project Manager file list
This area of the Project Manager details the current composition of the project. It gets its
information from the project source code (.DPR) file. If you have modified this file
manually (that is, you edited the source code directly), the information in this list might
be inaccurate. When you open the Project Manager, Delphi compares the information in
the .DPR file to the last saved information for the Project Manager. If these are not
synchronized, the contents of the Project Manager file list become dimmed, and the
Update button on the SpeedBar becomes enabled so that you can synchronize the
information.
Caution
Delphi has mechanisms for automatically tracking the files that make up a project and
for keeping the project .DPR file updated. Avoid editing project files manually unless
you have a thorough understanding of this process and its ramifications. By editing a
.DPR file, you circumvent Delphi’s automated project management mechanisms and
risk maintaining inaccurate information about project composition. Compilation
failures and other problems can result.
Project Manager Path column
If you have an open project that uses files that reside in a location other than the current
project directory, or if you save a copy of a project to another location, the Path column
of the constituent file list can be the most important bit of information the Project
Manager provides. This column tells you exactly where each file resides on disk,
regardless of its project affiliation.
If the Path column is empty for a listed file, this means the file resides in the current
project directory. On the other hand, if there is an entry in the Path column, you know
immediately that the file resides elsewhere. If you often share files among different
projects, this can alert you that this file might be used by another project. This is
illustrated in the following figure.
132
Delphi User’s Guide
Figure 4.2
Example Project Manager project listing
Shared file residing in a
remote location
Files residing in a
subdirectory of the current
project directory
Non-form unit file residing
in the project directory
Notice how this project’s directories are structured. The project directory contains only
project source and configuration files, and a \BIN directory for compiled output and
a \FORMS directory for form unit and graphical form (.DFM) files were created. This
structure is purely optional—storing all these files in the project directory
(D:\AR_DIV1) would work equally well.
In the Path column, observe that
• Files residing in the project directory do not display any path information.
• Files in subdirectories beneath the project directory appear with no preceding
backslash (\) character.
• Files in other locations display full path information. In this case, the ARSplash unit
resides on a different drive. If it resided on the same drive as the project directory, the
path column would display the information as \SPLASH\.
Using the Project Manager is highly recommended because it enables you to track the
location of everything in your project.
Integrating forms and units into a project
You can use either the Project Manager or commands on the Delphi File menu to create
new forms or new unit files in a project, or to add existing files from locations outside
the project directory. In order for any form or unit to “belong” to a project, the project
Chapter 4, Managing projects, files, and directories
133
must be open so that Delphi can update the project source code (.DPR) file as new or
shared unit files are added.
As you build a project, you can
•
•
•
•
•
Create new form units
Create new source code units
Create new component units
Use files from a different project or location (shared files)
Use existing Borland Pascal source code units
This section discusses each of these topics.
Creating new form units
Opening a new form unit in a project is one of the tasks you probably do most
frequently. For information on creating new forms in a project, see Chapter 3.
Creating new source code units
If you want to write a custom Object Pascal procedure, function, or DLL as a stand-alone
program callable from any unit, you need to save it in a new source code unit. If you
want to create this type of unit and not have it be part of a project, you can open the new
unit without having a project open.
■
To open a new source code unit, choose File|New Unit from the Delphi menu bar.
If you have a project open, you can also choose New Unit from the Project Manager
SpeedMenu. When you create a unit in an open project by means of the New Unit
command, the new unit is registered in the project (.DPR) file when you save the project
or new unit file.
Creating new component units
You need to create a new component unit only if the purpose of your project is to write a
new Delphi component. For information on opening a new component unit, see “Using
the Component Expert” on page 71. Complete information on writing Delphi
components is contained in the online Help system.
Sharing files from other projects or directories
A project can use existing form and unit files that it did not create and which don’t
reside in the current project directory, or any subdirectory of that directory. When you
compile your project, it does not matter whether the files that make up the project reside
in the project directory, a subdirectory of the project directory, or any other location.
If you add a shared file to a project, bear in mind that the file is not copied to the current
project directory; it remains in its current location. Adding the shared file to the current
project simply registers the file name and path in the uses clause of the project’s .DPR
file. Delphi automatically does this as you add units to the project. The compiler treats
shared files the same as those created by the project itself.
■
To add a shared file to the current project, do one of the following:
• Choose File|Add File from the Delphi menu bar.
134
Delphi User’s Guide
• Choose the Add File button on the Delphi SpeedBar.
• Choose the Add button on the Project Manager SpeedBar.
• Choose Add File from the Project Manager SpeedMenu.
Any of these actions displays the Add To Project dialog box, in which you can select the
file you want the current project to use. The Path column of the Project Manager’s file
list displays the path to the shared file.
Using Borland Pascal source code units
If you have existing source code units for custom procedures or functions written in
Borland Pascal or Turbo Pascal, you can use these units in a Delphi project. You add
these files in the same way as files created in Delphi.
Removing constituent files from a project
You can remove forms and units from a project at any point during project
development. The removal process deletes the reference to the file in the uses clause of
the .DPR file. Note that using the following procedure to remove a unit that has an
associated form file removes the form file as well.
■
To remove a unit from a project, open the project and choose any of these methods:
• In the Project Manager window,
• Select the unit or units you want to remove, then choose the Remove button on the
SpeedBar.
• Select the unit or units you want to remove, then choose Remove File from the
SpeedMenu.
• Choose the Remove File button on the Delphi SpeedBar.
• Choose File|Remove File from the Delphi menu bar.
Removing a file from the project ends its relationship with the project; it does not delete
the file from disk. Use the Windows File Manager or another utility to delete unwanted
files from disk.
Caution
Do not use Windows file management programs or DOS commands to delete Delphi
project files from disk until you have performed the preceding removal process in every
Delphi project that uses the files. Otherwise, the project (.DPR) file of each project using
the deleted files retains references to them in the uses clause. When you open the project
again, Delphi attempts to find the deleted files and displays error messages for each file
it cannot find. When the project opens, the information about its constituent files in the
Project Manager is inaccurate.
Saving projects and individual project files
At any time during project development, you can save an open project in its current
state to the project directory. You can optionally save a copy of the project in a different
directory under the same or a different name.
Chapter 4, Managing projects, files, and directories
135
You can also save your project as a Project Template which adds it to the Gallery so that
you or others can reuse it. For more information, see “Adding templates to the Gallery”
on page 126.
You are not limited to saving a project as a whole. Delphi enables you to save individual
constituent files of a project, including saving a copy of a file to a different directory or
under a different file name.
Saving a project
This section explains how to save an open project to the directory created to store it (that
is, the project directory).
Note
If the project was begun from a Project Template, the Gallery selection process creates
the project directory. Otherwise, Delphi saves projects by default to the \BIN directory,
unless you specify otherwise.
■
To save all open project files to the project directory, use one of the following methods:
• Choose File|Save Project.
• Choose the Save Project button on the Delphi SpeedBar.
• Choose the Save Project command on the Project Manager SpeedMenu.
From here, the save process for projects varies somewhat depending upon whether or
not the project has been saved.
First project save
If you have not previously saved the project, Delphi displays the Save As dialog box.
This dialog box prompts you to supply a name for each open unit file that has been
created in the current project. (You are not prompted for any shared files you might
have added to the project. See “Sharing files from other projects or directories” earlier in
this chapter.)
After you name the unit file(s), Delphi prompts you to name the project source code
(.DPR) file before saving it to disk. This processing order ensures that the unit and form
file names you just specified are correctly registered in the project file’s source code.
Subsequent saves
If you have previously saved the project, all open files that reside in the project directory
are saved to disk if they have been modified.
If you have opened any new forms or units in the project since the last save, the Save
Unit As dialog box appears and prompts you to name those unit files before saving
them.
The .DPR project file is then updated to reflect any new units and any newly shared files
that you might have specified for the project to use.
Naming unit and project source code files
As you open new units in a project, Delphi supplies them with default names such as
UNIT1.PAS, UNIT2.PAS, UNIT3.PAS, and so on. You will soon run into confusion if
136
Delphi User’s Guide
you use these default names when saving the project. It is highly advisable to supply a
meaningful name for each unit in a project as you save it.
When naming the project source code file, you need to supply a name not previously
used by any of the unit files listed in the uses clause of the .DPR file. If you attempt to
give the project the same name as one of these units, Delphi displays an error message
similar to the following:
If this occurs, respond OK to the error message box and supply a different name for the
.DPR file in the Save As dialog box.
As with unit files, Delphi supplies a default name, PROJECT1.DPR, for the unit source
code (.DPR) file. Again, you should supply a more meaningful name when saving the
file for the first time.
All unit and project file names must conform to DOS naming conventions.
Saving a separate version of the project file
Delphi enables you to save a separate version of an open project in a directory other
than the project directory. The File|Save Project As command initiates the process.
However, because the open project might use shared files in addition to files that were
created as part of the current project, the Save Project As command saves only a copy of
the project source code (.DPR) file, project options settings (.OPT file), and the project
resource (.RES) file to the new location.
Important
■
No unit files are saved to the new location. When you open the copied version, the Project
Manager displays all units in the copied project as shared files; that is, none of them
reside in the project directory of the currently open project.
To save a separate copy of the project (.DPR) file in another location,
1 Choose File|Save Project As from the Delphi menu bar to display the Save
<projectname> As dialog box.
2 Select the directory where you want to copy the project file.
3 If you want to save the project file under a different name, enter the new name in the
File Name edit box. If a .DPR file with the same name exists in the directory you
specify, you’re prompted as to whether you want to overwrite the existing file.
4 Choose OK to complete the task.
The open project is now the project you just saved.
Delphi saves the .DPR file, the project options (.OPT) file, and the project resource (.RES)
file under the name and/or new location you specify. Delphi also saves any modified
Chapter 4, Managing projects, files, and directories
137
unit files (in their current location), so you won’t be prompted to save these changes
again when you close the project. When you open either version of the project, all
changes saved with the Save As operation are reflected in both places.
If you check the constituent file list in the Project Manager, you will see that all the files
in the currently open version of the project reside in a directory other than the current
project directory. If you want separate copies of any of those files in the new project
directory, you need to save them individually to the new location using File|Save File
As. (See “Creating a backup of an entire project” on page 139 for more information.)
If you leave the new project unchanged, it continues to use the files in their present (that
is, old) location as shared files, which might or might not be what you want. If you don’t
understand how the new project is using its constituent files, you can run into problems
later (see “Project Manager Path column” on page 132 for an example).
Caution
Do not use file management tools other than those in Delphi to save a copy of a project
to a new location.
Saving files
You can save individual files in a project, or non-project files (such as text files) that you
may have open in the Code Editor. To save a file, it must be open.
■
To save an individual file,
1 Bring the file to the topmost level of the Code Editor by selecting its tab.
2 Choose File|Save File. If this is the first time you’ve saved the file, you’re prompted
to name it.
3 If necessary, name the file and choose OK.
Delphi saves the file.
■
To save a file under a different name or location,
1 Bring the file to the topmost level of the Code Editor by selecting its tab.
2 Choose File|Save File As.
The Save File As dialog box appears.
3 Specify the new file name, or location, or both, and choose OK.
Delphi saves a copy of the file under the name and location you specify.
Note
This changes the name of the file, and if it is already part of the project, includes the
file with the new name in the project. The older unit name still exists as a file but isn’t
included in the project any longer.
File|Save versus File|Save As
Using the File|Save As command is, in many respects, the same as choosing File|
Save—you’re prompted to name any unsaved units and forms before saving the .DPR
file. Once all project files have been named, File|Save and File|Save As both prompt
you to name only new (not modified) units; and both then save any modifications to
previously named project files. The distinction between the two commands is that the
138
Delphi User’s Guide
File|Save As command expects you to save the .PAS file to a new location. If you do not
specify either a new name, or new location for the .PAS file, Delphi prompts you to
specify whether you want to overwrite the existing .PAS file.
Creating a backup of an entire project
Backing up a project can be a simple matter of copying directories or can involve some
additional steps. This depends upon how your project directories are structured and
whether the project uses files from outside its own directory tree.
The project directory isn’t encoded into the project (.DPR) file. The project file does,
however, record the location of all constituent project files. If these files reside in
subdirectories of the main project directory, than all path information is relative, which
makes backup easy, as shown in figure Figure 4.3.
Figure 4.3
Example project directory tree
Main project directory
You could back up this entire project simply by copying the directory tree to another
location. If you open the project at the backup location, all the project files that reside
within that structure are present, and the project will compile.
If this project uses files that reside outside this tree, the project might or might not
compile at the backup location. Check the Project Manager’s file list to see if these
outside files are accessible from the backup location. If they are, the project will compile.
If other backup processes already preserve these outside files, then there is probably no
need to make separate backup copies of them in the backup project directory.
Navigating among project components
As you work on a project, you will find that you frequently need to navigate back and
forth among forms, units, and the various open windows such as the Project Manager,
Alignment Palette, and so on. This section explains the basic techniques involved.
Viewing forms and units
You can easily toggle between viewing the currently displayed form and its unit source
code by using commands from the View menu, a keyboard shortcut, or the Project
Manager.
You can also view or edit any open unit or form by choosing commands from the View
menu, buttons on the Project Manager SpeedBar, or commands from the Project
Manager SpeedMenu.
Chapter 4, Managing projects, files, and directories
139
Toggling between form image and unit source code
■
To switch between viewing the current form and its unit source code, use any of the
following methods:
• Press F12.
• Choose View|Toggle Form/Unit.
• In the Project Manager, double-click in the Unit column of the unit you want to
display its source code, or the Form column to display the form image.
Bringing a window to the front
If you have a number of windows open, such as the Delphi Project Manager or Object
Browser, you can easily get to the window you want by selecting it in the Window List
dialog box. This dialog box displays a list of all open windows, and enables you to bring
any of them to the front.
■
To display the Window List dialog box and bring a window to the front,
1 Press Alt+0 (zero) or choose View|Window List from the menu.
2 Double-click the name of the window you want to bring to the front.
Figure 4.4
The Window List dialog box
Double-click to bring window
to the front
Using the Project Manager to view or edit units
■
To view or edit a unit, in the Project Manager window, select the unit you want to view
or edit, and then choose from the following methods:
•
•
•
•
140
On the SpeedBar, choose the View Unit button.
Press the Enter key.
From the SpeedMenu, choose the View Unit command.
Double-click the unit file name you want in the Unit column.
Delphi User’s Guide
If the source code file for the selected unit is not open, a Code Editor page opens to
display it. Otherwise, the appropriate Code Editor page comes to the top.
■
To view or edit a form, in the Project Manager window, select the form you want to
view or edit, and then choose from the following methods:
•
•
•
•
On the SpeedBar, choose the View Form button
Press Shift+Enter.
From the SpeedMenu, choose the View Form command.
Double-click the form name in the Form column.
If the form is already open, it comes to the front in design mode. Otherwise, the form
opens and comes to the front.
Viewing the project source code (.DPR) file
As with unit source code files, you can also open the project source code (.DPR) file in
the Code Editor. The main reason to do this is so you can see the units and forms that
make up the project, and which form is specified as the application’s main form. As you
add forms and units to the project, you can see Delphi’s updates of the project source
code.
Caution
■
Manually editing the .DPR file is not recommended.
To view the .DPR file, use either of these methods:
• Choose View Project from the Project Manager SpeedMenu.
• From the Delphi menu bar, choose View|Project Source.
The contents of the .DPR file appear in a page in the Code Editor. To hide the .DPR file
again, close the page in the Code Editor.
Note
Closing a Code Editor page by double-clicking the Control-menu box closes all open
units in the project. To close a single page, choose Close Page from the Code Editor
SpeedMenu.
Compiling, building, and running projects
All Delphi projects have as a target a single distributable executable file, either an .EXE
or a .DLL file. You can view or test your application at various stages of development by
compiling, building or running it. You can also test the validity of your source code
without attempting to compile the project.
Checking source code syntax
The Compile menu on the Delphi menu bar provides you the option of running a syntax
check on your project’s source code. The checking is identical to that for a compilation,
and errors in your code generate the same error messages. However, the process is
faster because Delphi makes no attempt to generate object code, and if the check
succeeds, no executable file is generated.
■
To run a syntax check on your project source code,
Chapter 4, Managing projects, files, and directories
141
1 Save the project source code (recommended but not required).
2 Choose Compile|Syntax Check from the Delphi menu bar.
The hourglass cursor appears, to indicate that syntax checking is in progress and returns
to normal if the check finds no errors. If an error is found,
•
•
•
•
•
The Code Editor window comes to the front.
The unit source file page containing the error comes to the top of the Code Editor.
The line containing the error is highlighted in the Code Editor.
The Code Editor status bar displays an error message.
Context-sensitive help regarding the error message is available by pressing F1.
Figure 4.5
Syntax or compile error display
Line with error highlights
Status bar
displays message
Unit with error
comes to the top
Compiling a project
■
To compile all the source-code files that have changed since the last time you compiled
them, choose Compile|Compile from the Delphi menu bar.
When you choose this command, this is what happens:
• The compiler compiles source code for each unit if the source code has changed since
the last time the unit was compiled. This creates a file with a .DCU (Delphi Compiled
Unit) extension for each unit.
If the compiler can’t locate the source-code file for a unit, the unit isn’t recompiled.
• If the interface part of a unit’s source code has changed, all the other units that
depend on it are recompiled.
To learn about the interface section of a unit, see “Unit source code (.PAS) files” on
page 119.
• If a unit links in an .OBJ file (a file containing assembly language code), and the .OBJ
file is newer than the unit’s .DCU file, the unit is recompiled.
• If a unit contains an include (.INC) file, and the include file is newer than the unit’s
.DCU file, the unit is recompiled.
142
Delphi User’s Guide
Once all the units that make up the project have been compiled, Delphi compiles the
project source (.DPR) file and creates an executable file (or dynamic link library). This
file is given an .EXE (or DLL) file extension and the same file name as the project source
code file. This file now contains all the compiled code and forms found in the individual
units, and the program is ready to run, or, in the case of a DLL, to be redistributed.
You can choose to compile only portions of your code if you use {$ifdef} conditional
directives and predefined symbols in your code. For information about conditional
compilation, see Conditional Directives in online Help.
Obtaining compile status information
You can get information about the compile status of your project by displaying the
Information dialog box (Choose Information from the Compile menu). This dialog box
displays information about the number of lines of source code compiled, the byte size of
your code and data, the stack and heap sizes, and the compile status of the project.
You can get status information from the compiler as a project compiles by checking the
Show Compiler Status box in the Environment Options dialog box. (For more
information, see Environment Options in online Help.)
Building a project
■
To compile all the source-code files in your project, regardless of when they were last
compiled, choose Compile|Build All from the Delphi menu bar.
The result of this command is similar to that of the Compile|Compile command, except
that all units in the project are compiled, regardless of whether or not they have changed
since the last compile. This technique is useful when you are unsure of exactly which
files have or have not been changed, or when you simply want to ensure that all files are
current and synchronized.
Running a project
You can test run a project from within Delphi, or you can run the compiled .EXE file
from the Windows operating environment without having to run Delphi.
■
To compile and then run your application from within Delphi,
• Choose Run|Run command from the Delphi menu bar.
• Choose the Run button on the Delphi SpeedBar.
These actions are identical to choosing the Compile|Compile command, except that
Delphi runs your application immediately if the compile operation succeeds.
Executing a project from Windows
Because the compiler always creates a fully compiled stand-alone executable file (.EXE),
you can run your application from the Windows operating environment using the same
techniques as you would for any other Windows application.
Chapter 4, Managing projects, files, and directories
143
If you have specified an icon for your project, it will appear in the Program Manager if
you create a Windows program item for your application, or if you minimize the
application while it is running. (For more information, see online Help).
Managing multiple project versions and team development
When you are developing a complex programming project in a team setting, or
managing several development projects, you might soon develop the need for a version
control system (VCS). A version control system can archive files, control access to
project files, and track multiple versions of your projects.
Delphi Client/Server has a built-in interface for Intersolv’s PVCS Version Manager
(available separately). It supports PVCS version 5.1 and later. Because Delphi uses an
Open Tools API, it can also be used with any commercially available version-control
utility.
Enabling team development support
Before using Delphi’s built-in team development support, you need to have PVCS
installed on your system, and the following files must reside in your \WINDOWS\
SYSTEM directory:
• PVCSVMW.DLL
• NWNETAPI.DLL (If running on a Novell network; otherwise, use the appropriate
network support DLL as specified in PVCS documentation.)
Consult your PVCS documentation for complete details on installing and setting up that
product.
■
To enable team development support in Delphi,
1 Exit Delphi.
2 Add the following lines to the DELPHI.INI file located in your \WINDOWS
directory:
[Version Control]
VCSManager=c:\delphi\bin\stdvcs.dll
Note
If the location of the \DELPHI\BIN directory on your system is different from that
shown, modify the VCS manager line to include the correct drive and path.
3 Restart Delphi, then choose Workgroups|Archive Manager to display the main team
development window.
For information on using the team development support features of Delphi, look up
PVCS or Version Control in Delphi’s online Help.
144
Delphi User’s Guide
Summary
This chapter has discussed these primary topic areas:
•
•
•
•
•
•
What is a project?
Beginning new projects
Customizing project options
Managing project content
Compiling, building, and running projects
Managing multiple project versions and team development
Chapter 4, Managing projects, files, and directories
145
146
Delphi User’s Guide
Part
III
Programming topics
Part III
The chapters in this part discuss how to program using the Object Pascal language.
The four chapters making up this part are
• “Writing Object Pascal code”
This chapter explains how to write code to create Delphi applications.
• “Programming with Delphi objects”
This chapter explains what you need to know about objects and how to use them to
create Delphi applications.
• “Writing robust applications”
This chapter explains how to anticipate, recognize, and handle exceptions in your
Delphi applications.
• “Using the integrated debugger”
This chapter explains how to debug Delphi applications using the Delphi integrated
debugger.
Part III, Programming topics
147
148
Delphi User’s Guide
Chapter
5
Writing Object Pascal code
Chapter 5
Previous chapters discuss how to build a user interface for your application by adding
components to forms. They describe how to create event handlers for those components,
so the components can respond to events that occur as your application runs.
This chapter explains the primary features of the Object Pascal language and shows you
how to use it to write code within event handlers and other parts of your application.
After reading this and the following chapter, “Programming with Delphi objects,” you
should be able to develop useful and more sophisticated Delphi applications.
This chapter assumes you already have some programming experience. You certainly
don’t have to be an expert, however. If you’ve programmed successfully in any of the
popular programming languages, you’ll recognize common concepts in Object Pascal.
While the chapter does show you the most common uses of Object Pascal in a Delphi
application, it doesn’t explain all there is to know about the language.
You can find in-depth information about Object Pascal in Delphi’s online Help—look up
the Language Definition topic. The information there includes syntax diagrams of all
Object Pascal language constructs. You might also want to read one or more of the
excellent books published about Pascal, especially those that discuss Delphi, Turbo
Pascal, and Borland Pascal.
If you are familiar with Borland Pascal language already, you can probably either skim
this chapter rapidly, or skip it altogether and go directly to the next chapter,
“Programming with Delphi objects.” You’ll still want to refer to the Language
Definition in Delphi’s online Help to learn about the new additions to the language,
however.
The primary topics in this chapter are
•
•
•
•
•
Writing readable code
Writing assignment statements
Declaring identifiers
Declaring constants
Calling procedures and functions
Chapter 5, Writing Object Pascal code
149
•
•
•
•
•
•
Controlling the flow of code execution
Object Pascal blocks
Understanding scope
Writing a procedure or function
Defining new data types
Understanding Object Pascal units
To use this chapter effectively, you need to understand how a Delphi project is
structured and how to create event handlers. If you are uncertain about these topics,
review Chapter 1, Chapter 3, and Chapter 4.
Writing readable code
Although you write code for the compiler to compile and turn into an executable
program, you want yourself and others to be able to read your code easily.
Coding style
As you prepare for writing your first code statements, you should realize that it doesn’t
matter to the compiler how you space, indent, or capitalize your Object Pascal code, or
how you break lines of code to continue on the next line. As long as the code is
syntactically correct, the compiler can handle it properly. For example, this code
compiles just fine:
PROCEDURE
TFORM1.
Button1CLICK(SENDER
TOBJECT);begin
Edit1.Color
:=
CLRED;END;
:
You would probably find this version of the event handler easier to read, however:
procedure TForm1.Button1Click(Sender: TObject);
begin
Edit1.Color := clRed;
end;
Choose a code indentation and capitalization style, and break lines of code where you
need to, so that your code is easy for you and others to read.
Commenting your code
You can also place comments in your code anywhere you like.
■
To put comments in your code, enclose all the text of your comments in braces ({ }).
For example, you could add the following comment to the previous event handler:
150
Delphi User’s Guide
procedure TForm1.Button1Click(Sender: TObject);
begin
Edit1.Color := clRed;
end;
{ Changes the color of the edit box }
Comments can extend over many lines. The compiler considers everything after the first
brace ({) to be a comment until it finds the closing brace (}):
{ This comment runs on a bit
and really doesn’t say anthing
useful, but it shows you that comments
can have multiple lines of text }
procedure TForm1.Button1Click(Sender: TObject);
begin
Edit1.Color := clRed;
end;
{ Changes the color of the edit box }
Don’t forget to include the closing brace, or the compiler considers the rest of your code
to be a comment.
The compiler ignores all comments in the code, treating them as if they were spaces.
Look up the Comments topic in Delphi Help for more information about adding
comments to your code.
Use comments to help the reader of your code (including yourself) understand its logic.
Even though you understand how your code works when you write it, it might not
seem so clear to you when you examine it later.
Writing assignment statements
The most common task you’ll encounter when writing code within event handlers is
assigning a new value to a property or variable. You can use the Object Inspector to
change the value of a property while designing the user interface, but also you’ll often
want to change the value of a property while the application is running. Some
properties can be changed only at run time; such properties are noted as run-time only in
the property reference topics of online Help. To change a property or variable at run
time, you need to write an assignment statement.
Assignment statements consist of two parts, separated by the Object Pascal assignment
operator (:=). The left side of an assignment statement is a property or variable name,
while the right side of the statement is the new value for the property or variable. The
assignment statement, like all Object Pascal statements, ends with a semicolon (;).
Here is a simple assignment statement within an OnClick event handler for a button
control. This statement assigns the value clRed to the Color property of an edit box
control named Edit1:
procedure TForm1.Button1Click(Sender: TObject);
begin
Edit1.Color := clRed;
end;
Chapter 5, Writing Object Pascal code
151
Assuming that an edit box control named Edit1 and a button control named Button1
exist on the form, the assignment statement runs and the edit box turns red when the
user clicks the button.
Note that the component name precedes the property name, with a period (.) separating
the component and property. If you include the component name with the property,
there is no confusion as to which Color property should be changed. In fact, if you omit
the component name, the color of the form changes when the user clicks the button. For
more information about this topic, see the section “Understanding scope” on page 177.
Assigning values to properties and variables
Whether you assign a value to a property or to a variable, you follow the same rules.
The value on the right side of the assignment statement is assigned to the property or
variable on the left side of the assignment statement. When a value is assigned, a copy of
the value is placed into the property or variable. The value being assigned can be a
constant, a literal value, a variable, or another property value. For example,
var
Name : string;
Number : Integer;
begin
Name := Edit1.Text;
Number := 15;
Edit2.Text := ‘Welcome to Delphi ‘ + Name;
{ Assigns a property value to a variable }
{ Assigns a literal value to a variable }
{ Assigns a string made up of a
string constant and a variable
string to a property }
end;
The code example on page 151 shows you how to use an assignment statement to set or
change the color of a component—in this case, an edit box—in response to a button
click. Suppose, instead, that you want the user to be able to use a color grid to change the
color of an edit box on a form. You want the edit box to change color when the user
clicks a color rectangle in the color grid.
➤
Create a form with a color grid and an edit box, so that it looks similar to this:
Figure 5.1
➤
152
A sample form for assigning a property value to another property
Create an event handler for the OnClick event of the color grid:
Delphi User’s Guide
procedure TForm1.ColorGrid1Click(Sender: TObject);
begin
Edit1.Color := ColorGrid1.ForegroundColor;
end;
➤
Run the application and click a color on the color grid.
The assignment statement assigns the value of the ColorGrid1.Foreground property to the
Edit1.Color property. In other words, the color of the edit box control becomes the color
the user clicks in the color grid.
You can assign the value of a property, variable, constant, or literal to a variable or
property if the assigned value is of the same type or is assignment-compatible with the
variable or property receiving the new value. (To read about type and assignment
compatibility, see page 157.)
The type of a property or variable defines the set of values the property or variable can
have and the operations your code can perform on it. In the previous example, both
Color (a property of the edit box) and ForegroundColor ( a property of the color grid) are
of type TColor.
You can find out the type of a property by looking up the property in online Help, or by
selecting the property in the Object Inspector and pressing F1. The type is listed at the
end of a property declaration. For example, the Color property declaration declares Color
to be of type TColor.
property Color: TColor;
Note
You can’t assign new values to all properties. Some properties are read-only, which
means you can find out what the value of the property is, but you can’t change its value
in your application. Properties that are read-only are noted as such in Delphi’s online
Help.
Declaring identifiers
Identifiers are names you give to any part of a Delphi application, including variables,
types, procedures, functions, methods, and so on. (All identifiers are italicized in the
Delphi books, except in the code examples.) Object Pascal requires that you declare
identifiers before using them in your code.
If you haven’t used a compiled language before, you might wonder why it is necessary
to declare identifiers before you use them. As with all compiled languages, the compiler
must be given explicit information about the identifiers before the compiler can create
executable code that uses them.
The compiler can then check your code to ensure that the values you assign to variables
or properties are of the correct type. If they aren’t, Delphi displays a syntax error
message, so you can correct the problem. Languages that aren’t compiled can’t protect
you from assigning a value of a wrong type, a common programming mistake. Object
Pascal is known as a strongly typed language.
Also, because Object Pascal is a compiled language, your Delphi applications will run
much faster than applications you build with an interpreted language. Declaring
Chapter 5, Writing Object Pascal code
153
identifiers before you use them reduces the number of programming errors and
increases the efficiency of your code.
Declaring variables
A variable is a name in code that stands for a memory address, the contents of which
can change as the code runs. You need to declare a variable before using it. There are
two steps in declaring a variable:
1 Naming a variable
2 Giving a variable a type
Naming a variable
When you declare a variable, you need to select a name for it. You should try to select a
name that reminds you of the variable’s purpose, so your code is easier to read. For
example, Day, Name, and Total are more memorable names than X, Y, and Z.
Beyond choosing meaningful names for your variables, you should remember a few
rules that apply to variables and all other identifiers.
• Identifiers can be up to 63 characters in length.
If your identifiers are longer than 63 characters, the compiler ignores the extra
characters.
• Identifiers must begin with either a letter or an underscore (_) character.
• Subsequent characters can be letters, underscores, or the digits 0–9.
• Identifiers can’t contain any other symbols, such as $, %, *, and so on.
For example, identifiers called Do@Noon or Gross%Return result in a syntax error.
• You cannot use an Object Pascal reserved word for naming an identifier.
Reserved words have special meaning to the compiler. If you use one of these
reserved words to name an identifier, Delphi displays an error message. You can find
a list of Object Pascal reserved words in online Help under the Reserved Words topic.
All reserved words are boldfaced in the Delphi documentation.
• Avoid using identifiers already defined in the Object Pascal language to name your
identifiers.
For example, the words Boolean and Integer are predefined data types (see the section
“Data types” on page 156 to read about predefined data types). You can use either of
these words to name a variable without generating an error message, but if you do,
you won’t be able to use the Boolean and Integer types in your code.
Giving a variable a type
When declaring a variable, you must state its type. The type of a variable defines the set
of values the variable can have.
In general, you declare a variable where you want to use it. For example, if you want to
use a variable in an event handler, you declare the variable within the event handler. For
154
Delphi User’s Guide
more details about where to declare variables, read the sections “Object Pascal blocks”
on page 174 and “Understanding scope” on page 177.
Precede all variable declarations with the reserved word var. The declaration itself is
made up of two parts: the left side is the name of the new variable, and the right side
declares what the variable’s type is. The two parts are separated by a colon (:). This
example declares three variables, Value, Sum, and Line:
var
Value: Integer;
Sum: Integer;
Line: string;
Because Value and Sum are both of type Integer, the variable declaration could look like
this, with a comma separating the two variables of the same type:
var
Value, Sum: Integer;
Line: string;
The following example assumes that there is an edit box named Edit1 and a button
named AddButton on the form. Three variables (X, Y, and Sum) are declared as type
Integer. When the user clicks the AddButton, two variables, X and Y, are assigned Integer
values and added together. The result, Sum, appears in the edit box:
procedure TForm1.AddButtonClick(Sender: TObject);
var
X, Y, Sum: Integer;
begin
X := 100;
Y := 10;
Sum := X + Y;
Edit1.Text := IntToStr(Sum);
end;
This line assigns the value of an expression to a variable:
Sum := X + Y;
An expression is usually two identifiers related to one another through an operator. (To
read about expressions, see the Expressions topic in online Help.) Because the Text
property of an edit box is of type string and the Sum variable is of type Integer, this line is
not permissible and causes a type mismatch error if you try to run or compile it:
Edit1.Text := Sum;
Instead, the last line of the event handler uses the IntToStr function from the Delphi runtime library to convert the Sum value to a text string, then assigns the value of the Sum
variable to the Edit1.Text property.
This variation avoids the assigning of a value to Sum altogether:
procedure TForm1.AddButtonClick(Sender: TObject);
var
X, Y: Integer;
Chapter 5, Writing Object Pascal code
155
begin
X := 100;
Y := 10;
Edit1.Text := IntToStr(X + Y);
end;
Using functions in your code is discussed in more detail in the section “Calling
functions” on page 161, but it’s useful to know that functions return a value of a
particular type, and that value can then be assigned to a variable or property.
Data types
Object Pascal has several data types built into the language. You can create variables of
any of these predefined types. The following table lists the predefined data types:
Table 5.1
Object Pascal predefined data types
Category
Data type
Description
Integer
Integer
Numbers without a fractional part, within the range of –32768 to 32767.
Requires two bytes of memory.
Shortint
Numbers without a fractional part, within the range of –128 to 127. Requires
only one byte of memory.
Numbers without a fractional part, within the range of –2147483647 to
2147483647. Requires four bytes of memory.
Longint
Real
Byte
Numbers without a fractional part, within the range of 0 to 255. Requires one
byte of memory.
Word
Numbers without a fractional part, within the range of 0 to 65535. Requires
two bytes of memory.
A number that can contain a fractional part with 7–8 significant digits.
Requires 4 bytes of memory. Available only when the 8087/80287 option
{N+} is on. (Refer to Real Types in online Help for the range of each real
type.)
A number that can contain a fractional part with 15–16 significant digits.
Requires 8 bytes of memory. Available only when the 8087/80287 option
{N+} is on.
A number that can contain a fractional part with 19–20 significant digits.
Requires 10 bytes of memory. Available only when the 8087/80287 option
{N+} is on.
Single
Double
Extended
Comp
Boolean
Char
String
Boolean
Char
string
A number that can contain a fractional part with 19–20 significant digits that
requires 8 bytes of memory. Available only when the 8087/80287 option
{N+} is on.
A number that can contain a fractional part with 11–12 significant digits.
Requires 6 bytes of memory. Use Real only for compatibility with earlier
Borland Pascal releases; otherwise use Double or Extended.
Can contain the values of True or False. Occupies one byte of memory.
An ASCII character.
A sequence of up to 255 ASCII characters.
Pointer
PChar
Pointer
PChar
An untyped pointer, that is, a pointer that doesn’t point to any specific type.
A pointer to a null-terminated string.
Real
Besides the predefined data types, you can define your own data types. For many
Delphi applications, the predefined data types are sufficient. This chapter, however, has
already discussed the use of a user-defined data type. The Color property is of type
156
Delphi User’s Guide
TColor, which isn’t a predefined data type in Object Pascal, but a type defined by the
creators of the Delphi run-time library. To learn more about predefined types, see the
Type Declarations topic in online Help. To read about defining your own data types, see
the section “Defining new data types” on page 195.
Type and assignment compatibility
Table 5.1, “Object Pascal predefined data types,” lists five different data types that make
up the integer category and five data types that make up the real category. Within each
category, all types are compatible with each other. You can assign a value of one type to
a variable or property of a different type but within the same category as long as the
value falls within the range of possible values for the target variable or property.
For example, you can assign a variable of type Integer with the value 7 to a variable of
type Shortint, because a Shortint type can contain any value from –127 to 128. If the value
of the Integer variable is 300, however, you can’t assign it to a Shortint variable, because
300 is outside the Shortint range. If you try, and have range-checking turned on (choose
Options|Project and select Range Checking on the Compiler Options page), you’ll
generate a range error when you try to run the code containing the assignment. If you
don’t have range-checking turned on, the code runs, but the assigned value won’t be
what you expect.
In some cases, you can assign values to a variable or property that is within a different
category. In general, this process works only when assigning values from a type of a
smaller range to a type of a larger range of possible values. For example, you can assign
a value of type Integer to a property of type Double, a type that accepts floating-point
values, making the value now 10.0. You can’t assign a Double value to a variable or
property of type Integer, however, because integer values don’t have fractional parts.
When you are unsure which types are compatible, you can refer to a complete set of
rules for type and assignment compatibility. See the topics Type Compatibility and
Assignment Compatibility in Delphi’s online Help.
Declaring constants
While variables contain values that can change as your application runs, constants
contain values that can’t change. Constants are given a value at the time they are
declared.
Just as variables are declared in a variable declaration, constants are declared in a
constant declaration. A constant declaration begins with the reserved word const. This
example declares three constants:
const
Pi = 3.14159;
Answer = 342;
ProductName = 'Delphi';
Pi, Answer, and ProductName are all constant names that describe the value of the
constant. The actual value of the constants, which can’t change while the application
runs, are 3.14159, 342, and ‘Delphi’, respectively. When naming constants, follow the
same rules for naming variables and other identifiers given on page 154.
Chapter 5, Writing Object Pascal code
157
Like variables, constants also have types. Unlike variables, however, constants assume
the type of the value declared in the constant declaration part. For example, the constant
Pi is of type Real because the value 3.14159 is real number, Answer is of type Integer
because 342 is an integer, and ProductName is of type string, because ‘Delphi’ is a text
string.
Note that the equal sign (=) in a constant declaration is different from the assignment
operator (:=) in assignment statements. The equal sign in a constant declaration states
that the left side and the right side of the declaration are equal values.
It’s a common mistake to misuse an equal sign operator in Object Pascal code. When the
compiler finds an equal sign rather than an assignment operator, it expects that the left
side of the statement is a constant or that two values are being compared. If that isn’t
how you are using the equal sign, Delphi displays a syntax error message.
If you make the reverse mistake of using an assignment operator in a constant
declaration, a syntax error occurs, and a message appears telling you that the compiler
expected an equal sign.
Calling procedures and functions
Procedures and functions are modular pieces of code that perform some specific task.
They are known as subroutines in other languages. The Delphi run-time library contains
many procedures and functions your applications can use. You don’t need to write the
code—the procedures and functions are already written. While you don’t need to
understand the logic of the code within the procedures and functions, you need to
understand what they do.
When procedures and functions are declared within objects, which include components
and controls, they are called methods. An object is a data type you can read about in the
next chapter, “Programming with Delphi objects.”
Calling procedures
Perhaps you’ve noticed that all event handlers begin with the reserved word procedure.
All event handlers are procedures, subroutines that divide the logic of your application
into manageable chunks. Each event handler contains just the code you want executed
when the event occurs.
■
To use an existing procedure, type the name of the procedure as a statement in your
code. This is called “calling a procedure.”
For example, the memo control has a CutToClipboard method that removes the text the
user has selected within the memo control and stores it in the Clipboard object. Because
this functionality is built into the method, you need to know only what the method does
and how to use it. This is how you call the CutToClipboard method of a memo control
named Memo1:
Memo1.CutToClipboard;
158
Delphi User’s Guide
Note that the name of the control, Memo1, is part of the method call. By including the
name of the control, you are specifying which CutToClipboard method you want to call.
Separate the name of the control from the method call with a period (.). If you omit the
name of the control, component, or object in a method call, Delphi usually displays this
syntax error:
Unknown identifier
When your application calls Memo1.CutToClipboard, the code within the CutToClipboard
method runs, and the user’s selected text is cut to the Clipboard object.
Cut, Copy, Paste, and Clear All: An example
This is an example that calls procedures in the Delphi library.
This is how the finished form for the example should look:
Figure 5.2
A sample form for the Cut, Copy, Paste, and Clear All example
➤
Start by opening a new project (choose the Blank form template, if necessary) and
adding a memo control and four buttons to a form.
➤
Use the Object Inspector to change these property settings:
• Name the buttons Cut, Copy, Paste, and ClearAll by changing their Name properties.
Be sure you change the Name property and not the Caption property, or the event
handlers Delphi creates for you won’t have the same names as they do in this
example.
• Delete the text in the Text property of the memo control.
• Set the WordWrap property of the memo control to True.
• Set the ScrollBars property of the memo control to scVertical.
➤
For each button, create an OnClick event handler. Fill in the event handlers as follows:
procedure TForm1.CutClick(Sender: TObject);
begin
Memo1.CutToClipboard;
end;
procedure TForm1.CopyClick(Sender: TObject);
Chapter 5, Writing Object Pascal code
159
begin
Memo1.CopyToClipboard;
end;
procedure TForm1.PasteClick(Sender: TObject);
begin
Memo1.PasteFromClipboard;
end;
procedure TForm1.ClearAllClick(Sender: TObject);
begin
Memo1.Clear;
end;
➤
Run the application.
You can type text into the memo control and cut, copy, paste, and clear text as you want.
When you click the Cut button, the memo’s CutToClipboard method runs. When you
click the Copy button, the memo’s CopyToClipboard method runs, and so on.
Calling procedures with parameters
Many procedures require you to specify parameters. The statements of the called
procedure use the values passed in the parameters when the procedure’s code runs; the
values are treated as variables declared within the procedure. Parameters are
surrounded with parentheses in a procedure call. For example, the LoadFromFile method
is declared in a TStrings object like this:
procedure LoadFromFile(const FileName: string);
FileName, the sole parameter of the method, is of type string. When you call the
LoadFromFile method, you specify which file you want loaded by specifying a string as
the FileName parameter. This code would read the MYFILE.TXT file into the lines of a
memo control:
Memo1.Lines.LoadFromFile('MYFILE.TXT');
Instead of directly specifying a string value, you could use a variable or expression of
type string:
var
Name: string;
begin
Name := 'MYFILE.TXT';
Memo1.Lines.LoadFromFile(Name);
end;
Finally, you could specify a property value of type string. In this example, the code first
calls the Execute method of the Open dialog box, displaying the dialog box in your
application. When you select a file name in the dialog box, that file name is specified as
the parameter of the LoadFromFile method:
begin
OpenDialog1.Execute;
Memo1.Lines.LoadFromFile(OpenDialog1.FileName);
end;
160
Delphi User’s Guide
{ the user specifies the parameter }
You can read more about using the open dialog box (the TOpenDialog component) and
the FileName property of an open dialog box in Delphi’s online Help.
To read more about parameters, see “Passing parameters” on page 190.
Calling functions
Like a procedure, a function executes code that performs a specific task. Also like a
procedure, a function that is declared within an object, component, or control is called a
method.
The difference between a function and procedure is that a function returns a value when
it stops running, and a procedure doesn’t. Your code then uses the value returned by the
function to do one of two things:
• Assign it to a property or variable
• Use the value to determine the flow of code execution
Assigning a function’s returned value
This code example appears on page 155:
procedure TForm1.AddButtonClick(Sender: TObject);
var
X, Y, Sum: Integer;
begin
X := 100;
Y := 10;
Sum := X + Y;
Edit1.Text := IntToStr(Sum);
end;
The example uses the IntToStr function:
Edit1.Text := IntToStr(Sum);
IntToStr converts an integer value of type Longint into a string value. This is the
declaration of the IntToStr function in Delphi’s run-time library:
function IntToStr(Value: Longint): string;
All functions begin with the reserved word function. The word after the final colon in a
function declaration is the data type of the value that is returned. The IntToStr function
therefore returns a value of type string.
Once the code in the IntToStr function runs, the assignment statement assigns the
returned string value to the Text property of an edit box named Edit1.
Value is the only parameter of the IntToStr function. It has a data type of Longint, an
integer type. To use IntToStr, you can specify as the Value parameter
• An actual integer value:
IntToStr(3)
Chapter 5, Writing Object Pascal code
161
• A variable or property that is an integer type:
IntToStr(Sum)
• An expression that is evaluated as an integer value (assume X and Y are integer
values in this example):
IntToStr(X+Y)
■
To call a function, assign the returned value to a variable or property that is compatible
with the returned value:
Edit1.Text := IntToStr(Sum);
Using functions that return a Boolean value to branch code
Some functions return a Boolean value, which is either True or False. Your code can use
such a function to branch to various tasks and routines based upon the value
returned.
Here is an example:
➤
Add a color dialog box and a button to a form.
➤
Using the Object Inspector, change the name of the button to ChangeColor.
Your form should look something like this:
Figure 5.3
➤
A form for an example that uses the Execute function
Create this event handler for the OnClick event:
procedure TForm1.ChangeColorClick(Sender: TObject);
begin
if ColorDialog1.Execute then
Form1.Color := ColorDialog1.Color
else
Form1.Color := clRed;
end;
➤
{ if user clicks OK button }
Run the application and click the button.
The event handler uses the Execute method, a function that returns a Boolean value. You
can either select a color in the dialog box and choose OK, or choose Cancel to exit the
dialog box without selecting a color. If you choose OK, the ColorDialog1.Execute method
162
Delphi User’s Guide
returns True; if you choose Cancel, the method returns False. If ColorDialog1.Execute
returns True, the form is colored with your color selection (Form1.Color is assigned the
value you selected, which is ColorDialog1.Color); if it returns False, the form is colored
red.
The compiler would interpret the code the same way if you wrote the Execute function
like this:
if ColorDialog.Execute = True then ...
Controlling the flow of code execution
Object Pascal has several statements that direct the flow of code execution. Two are
branching statements, and the other three are loop statements:
• Branching statements
• The if statement
• The case statement
• Looping statements
• The repeat statement
• The while statement
• The for statement
The if statement
Object Pascal’s if statement evaluates an expression and determines the flow of your
code based on the result of that evaluation. If a certain condition is True, the code flow
branches one way. If the condition is False, the flow branches in another direction. To see
the syntax of an if statement, see the if reserved word topic in Delphi’s online Help.
This example uses a simple if statement. This is how your finished form should look:
Figure 5.4
➤
A sample form to illustrate an if statement
To create this sample application,
1 Create a form that contains one edit box control, two label controls, and a button.
2 Place Label1 above the edit box control, and place Label2 below it.
Chapter 5, Writing Object Pascal code
163
3 Change these properties with the Object Inspector:
• Change the caption of Label1 to ‘Enter a day of the week:’.
• Delete the caption of Label2 so the label isn’t visible when the application runs.
• Rename the button OK.
4 Create this OKClick event handler:
procedure TForm1.OKClick(Sender: TObject);
begin
if Edit1.Text = 'Saturday' then
Label2.Caption := 'Why are you working today?';
end;
In this event handler, the equal sign operator (=) is used as a relational operator. It
compares the value of the constant Saturday with the value of the Edit1.Text property.
➤
Run the application and enter a day of the week in the edit box.
The if statement in this handler is of the simplest form. The if statement begins with the
reserved word if and is followed by an expression that results in a Boolean value: True or
False. If the expression is True, the code following the reserved word runs. So if you type
the word Saturday into the edit box control and click the OK button on the form, a
message appears in the second label.
Using an else part in an if statement
The logic for this simple application has a flaw. What if you type Saturday in the edit box
and click the OK button one time, but then type Monday and click the OK button again?
The Saturday message still remains in the second label. You could add an else part to
the if statement to handle strings other than Saturday typed in the edit box.
➤
For example, modify the event handler to look like this:
procedure TForm1.OKClick(Sender: TObject);
begin
if Edit1.Text = 'Saturday' then
Label2.Caption := 'Why are you working today?'
else
Label2.Caption := '';
end;
➤
Run the application, enter a day of the week in the edit box, and click OK.
This if statement also includes the else reserved word. The statement following else
runs if the following tested condition is False:
Edit1.Text = 'Saturday'
The statement in the else part clears the caption, as ‘'is an empty string.
Note
164
In the if statement just shown, there is no semicolon until the end of the else part. If you
put a semicolon before the else part, Delphi generates an error.
Delphi User’s Guide
Writing multiple statements within an if statement
If you want more than one thing to happen when the tested condition in an if statement
is True, you can write multiple statements in a begin..end block. This expanded handler
now displays a message and also turns the form yellow:
procedure TForm1.OKClick(Sender: TObject);
begin
if Edit1.Text = 'Saturday' then
begin
Label2.Caption := 'Why are you working today?';
Form1.Color := clYellow;
end
else
Label2.Caption := '';
end;
Each statement in the begin..end block ends in a semicolon. When you use multiple
statements in the if part of an if statement, you still need to remember never to precede
the else part with a semicolon. That is why no semicolon follows the first end reserved
word in the previous code example.
Note
You can use multiple statements any place that requires a statement as long as you start
the statement part with begin and end it with end. Such a statement part is known as a
compound statement. You can read more about compound statements in Delphi’s online
Help.
Nesting if statements
You can put if statements within if statements when the logic of your application
requires it. For example, the OKClick handler shown here can now test three conditions:
procedure TForm1.OKClick(Sender: TObject);
begin
if Edit1.Text = 'Saturday' then
Label2.Caption := 'Why are you working today?'
else
if Edit1.Text = 'Sunday' then
Label2.Caption := 'You should be resting'
else
if Edit1.Text = 'Monday' then
Label2.Caption := 'Welcome to a new work week!'
else
Label2.Caption := '';
end;
As soon as a condition is met, the statement part runs and no further testing of
conditions occurs. In other words, if you type Saturday in the edit box, the code displays
the Saturday message in the label, and the rest of the if statement is ignored.
Note
No semicolon appears until the end of the final else part. When you write nested if
statements, choose a consistent, clear indentation style. This will help you and anyone
else who reads your code see the logic of the if statement and how the code flows when
your application runs.
Chapter 5, Writing Object Pascal code
165
You can also nest if statements containing else parts within if statements that don’t have
else parts. Your nested if statement might have this structure:
if ConditionA = True then
if Condition B = True then
DoThis
else
DoThat;
Be aware that if you do this, the compiler considers the else part to belong to the innermost if statement. If you want to call DoThat whenever ConditionA is False regardless of
the value of ConditionB, write your code like this:
if ConditionA = True then
begin
if ConditionB = True then
DoThis
end
else
DoThat;
In this case, using the begin and end reserved words forces the else part to be linked
with the first if statement.
For more information about writing if statements, see Delphi’s online Help.
The case statement
Your application can also use a case statement to branch to the appropriate lines of code.
The case statement is often preferable to a series of if statements when the variable or
property being evaluated is an integer type (with the exception of Longint), a Char type,
an enumerated type, or a subrange type. (You can read about enumerated and subrange
types beginning on page 195.) The logic of a case statement is usually easier to see than
in complex nested if statements, and the code runs more quickly.
To see the syntax of the case statement, look up the case reserved word topic in Delphi’s
online Help.
This is the form used for the following case statement example:
Figure 5.5
166
A form for a case statement example
Delphi User’s Guide
➤
To create this application,
1 Place a button, an edit box, and a label on a form.
2 Using the Object Inspector, modify these properties:
• Delete the text from the edit box.
• Change the caption of the label to ‘Enter a day of the week’.
3 Create this event handler:
procedure TForm1.OKClick(Sender: TObject);
var
Number: Integer;
begin
Number := StrToInt(Edit1.Text);
case Number of
1, 3, 5, 7, 9: Label2.Caption := 'Odd digit';
0, 2, 4, 6, 8: Label2.Caption := 'Even digit';
10..100: Label2.Caption := 'Between 10 and 100';
else
Label2.Caption := 'Greater than 100 or negative';
end;
end;
4 Run the application.
When you enter a number and choose OK, the string representation of the number is
converted to an integer and assigned to the Number variable. The case statement then
uses the value of Number to determine which statement within the case statement runs.
In this line of code, the statement after the colon runs, and the Label2.Caption receives the
string 'Odd digit' if the value of Number is 1, 3, 5, 7, or 9:
1, 3, 5, 7, 9: Label2.Caption := 'Odd digit';
Like the if statement, the case statement has an optional else part. Case statements end
with the end reserved word.
Note
If you want to include more than one statement in the statement part of a case statement
(the part following the colon (:)), place the begin and end reserved words around the
multiple statements. For example,
case Number of
1, 3, 5, 7, 9:
begin
Label2.Caption := 'Odd digit';
Form1.Color := clBlue;
end;
2, 4, 6, 8: Label2.Caption := 'Even digit';
ƒ
Chapter 5, Writing Object Pascal code
167
Writing loops
Object Pascal has three statements that execute blocks of code repeatedly:
• The repeat statement
• The while statement
• The for statement
The repeat statement
The repeat statement repeats a statement or series of statements until some condition is
True. The statement begins with the repeat reserved word and ends with the reserved
word until, followed by the condition that is evaluated. The condition is always a
Boolean expression.
To see the syntax of the repeat statement, look up the repeat reserved word topic in
online Help.
This is the finished form for an application that uses a repeat statement.
Figure 5.6
➤
A form for a repeat statement example
To create this application,
1 Create a new form with one button on it.
2 Using the Object Inspector, change these properties:
• Change the button name to RepeatButton.
• Change the caption of the button to Repeat.
3 Create this event handler that runs when you click the button:
procedure TForm1.RepeatButtonClick(Sender: TObject);
var
I: Integer;
begin
I := 0;
repeat
I := I + 1;
Writeln(I);
until I = 10;
end;
168
Delphi User’s Guide
4 Run the application and click the Repeat button.
The numbers 1 through 10 are written down the edge of the form. The Boolean
expression I = 10 isn’t evaluated until the end of the repeat..until block. This means that
the statements within the repeat..until block always run at least one time.
For more information about repeat statements, see Delphi’s online Help.
The while statement
While the repeat statement evaluates a condition at the end of the loop, the while
statement evaluates a condition at the beginning of the loop. It starts with the while
reserved word and the tested condition, which must always be a Boolean expression. If
the condition is met (the expression is True), the code in the while statement runs until it
reaches the end of the statement and the expression is tested again. As soon as the
expression is False, the while statement stops running, and execution continues after the
while loop.
This example of a while loop uses the same sample form as the repeat loop did. This is
how the finished form appears:
Figure 5.7
➤
A form for a while statement example
To create this application,
1 Add another button to the form and make these changes with the Object Inspector:
• Rename the second button to WhileButton.
• Change the caption of the button to While.
2 Create this event handler that runs when you click the While button:
procedure TForm1.WhileButtonClick(Sender: TObject);
var
J: Integer;
begin
J := 0;
while J < 10 do
begin
J := J + 1;
Writeln(J:50);
end;
end;
Chapter 5, Writing Object Pascal code
169
3 Run the application and click the While button.
The following Boolean expression is examined first:
J < 10
If it is True, the remainder of the code within the while statement runs, and then the
expression is evaluated again. If the expression is False, the while statement stops
running.
When you click the While button, once again the numbers 1 through 10 are written. This
time they appear 50 character spaces to the left of the edge of the form.
Note!
When you try the following suggested steps, your application might appear to be in an
endless loop. Be patient a moment, and the code will stop running.
➤
Change the statement I := 0 to I := 10 in the RepeatButtonClick handler. Then, change the
statement J := 0 to J := 10 in the WhileButtonClick handler. Finally, run the application and
click one of the buttons.
If you click the Repeat button, the statements within the repeat statement run, even
though I already equals 10. This happens because the Boolean expression isn’t evaluated
until the end of the repeat statement. The loop keeps running until I = 10 once again.
If you click the While button, the statements within the while statement don’t run at all.
Because J already equals 10, the Boolean expression is True, and the while statement
stops running.
For more information about while statements, see Delphi’s online Help.
The for statement
So far this section has discussed two kinds of loops, the repeat statement and the while
statement. The repeat statement runs until a condition is True, and the while statement
runs while a condition is True. The for statement is the third type of loop in Object Pascal.
The code within a for loop runs a specific number of times.
The value of a control variable, which is really just a counter, determines how many
times a for statement runs. You need to declare a variable for each for loop you use in
your code. The variable can be any integer, Boolean, Char, enumerated, or subrange type.
The simplest way to understand a for statement is to look at an example. The code
shown here would print the numbers 1 to 5, each on a separate line. X is the control
variable:
var
X: Integer;
for X := 1 to 5 do
Writeln(X);
The for statement defines an initial value (1) and a final value (5) for variable X. When
the for statement begins running, X is assigned the initial value, and the Writeln
procedure runs, displaying the current value of X. The value of X is then incremented
by 1. Because the value of X, now 2, is not greater than the final value (5), the Writeln
procedure runs again, this time displaying the value of X as 2. This process continues
170
Delphi User’s Guide
until the value of X becomes greater than the final value, 5, and the execution of the for
statement ends.
A counting example
This is a variation of the same for loop just discussed. It uses a string grid control and a
button the user clicks to start the counting process.
➤
To create the form,
1 Place a string grid control and a button on the form.
2 Use the Object Inspector to
• Change the value of the button’s Name property to CountButton.
• Change the caption of the button to Count.
• Change the ColCount property for the string grid to 6.
• Change the RowCount property for the string grid to 6.
You might have to resize the form and the string grid so that you can see all six columns.
Your form should look like this:
Figure 5.8
A sample form to illustrate a for loop
Row 0
Column 0
➤
Create this CountButtonClick event handler:
procedure TForm1.CountButtonClick(Sender: TObject);
var
Col: Integer;
begin
for Col := 1 to 5 do
StringGrid1.Cells[Col, 1] := IntToStr(Col);
end;
➤
Run the application and click the Count button.
This event handler uses the Cells property, which is a two-dimensional array of strings
indexed by a column and row value. (If you are unfamiliar with arrays, you can read
about them starting on page 199.) Each cell in the string grid is represented in theCells
property array. To access a particular cell in the grid, you specify the cell’s column and
row value. For example, the top left cell in the grid is Cells[0,0], meaning that the cell is in
column 0 and row 0 (the first position in the Cells array is 0).
Chapter 5, Writing Object Pascal code
171
The for statement in the CountButtonClick handler displays the numbers 1 through 5,
one in each cell, in row 1 of the string grid, starting with column 1. As the for statement
runs, the column number increases, but the row number remains the same (1).
The for statement can also decrement values using the downto reserved word.
➤
Change the CountButtonClick handler to look like this:
procedure TForm1.CountButtonClick(Sender: TObject);
var
Col: Integer;
begin
for Col := 5 downto 1 do
StringGrid1.Cells[Col, 1] := IntToStr(Col);
end;
➤
Run the application and click the Count button.
Although the end result is the same as before, the handler displays the numbers
beginning with column 5 and proceeding to column 1. As the code runs, the Col variable
is assigned the initial value of 5, which is then decremented until the value of Col is less
than the final value (1).
Using nested for loops
Writing a for loop within another for loop is very useful when you want to display data
in a table or a grid. This example uses the string grid. The code displays simple column
and row titles in the nonscrolling or fixed regions of the grid, and then displays the
column and row coordinates for each cell. When you click the Show Coordinates button,
this appears in the grid:
Figure 5.9
➤
A form with string grid displaying column and row coordinates
To set up the example,
1 Place a string grid control and a button control on the form.
2 With the Object Inspector, change these property values for the grid:
• Change RowCount to 6.
• Change ColCount to 6.
• Change DefaultColWidth to 105.
172
Delphi User’s Guide
You might have to enter a different DefaultColWidth value depending on your
screen resolution. Make the columns wide enough to display the coordinates of
the cells.
• Change the name of the button to ShowCoordinatesButton.
• Change the caption of the button to Show Coordinates.
You probably also want to increase the size of the form and the grid to display all
the rows and columns.
Figure 5.10 A form for a nested for loop example
3 Create this event handler that runs when you click the Show Coordinates button:
procedure TForm1.ShowCoordinatesButtonClick(Sender: TObject);
var
Col, Row: Integer;
begin
for Col := 1 to 5 do
StringGrid1.Cells[Col, 0] := 'Col ' + IntToStr(Col);
for Row := 1 to 5 do
StringGrid1.Cells[0, Row] := 'Row ' + IntToStr(Row);
for Col := 1 to 5 do
for Row := 1 to 5 do
StringGrid1.Cells[Col, Row] :=
'Col ' + IntToStr(Col) + ', ' + 'Row ' + IntToStr(Row);
end;
4 Run the application and click the Show Coordinates button.
This event handler contains four for statements. The first for statement writes the string
‘Col ’ plus the current value of the Col variable in the row 0 once the value of Col is
converted to a string:
for Col := 1 to 5 do
StringGrid1.Cells[Col, 0] := 'Col ' + IntToStr(Col);
The second for statement writes the string ‘Row ’ plus the current value of the Row
variable in the column 0 once the value of Row is converted to a string:
for Row := 1 to 5 do
StringGrid1.Cells[0, Row] := 'Row ' + IntToStr(Row);
Chapter 5, Writing Object Pascal code
173
The fourth for statement is nested within the third for statement. Together, the two for
statements display each cell’s column and row coordinates within the cell:
for Col := 1 to 5 do
for Row := 1 to 5 do
StringGrid1.Cells[Col, Row] :=
'Col ' + IntToStr(Col) + ', ' + 'Row ' + IntToStr(Row);
Col receives the initial value of 1, indicating the first scrolling column of the grid. Before
the for statement actually does something, the second for loop begins. Row is assigned
the initial value of 1, indicating the first row of the scrolling column of the grid. The code
then writes a string in the column 1 and row 1. The string consists of the substring ‘Col ‘,
the string value of the Col variable, the substring ‘, ’, the substring ‘Row ’, and the string
value of the Row variable. The actual value in Cells[1, 1] is this string: ‘Col 1, Row 1’.
The code continues to execute the nested for loop, moving to the next row within the
same column as the value of the Col variable is still 1. The nested for loop ends when the
value of Row has increased from 1 to 5 and a value is written within each row of
column 1. Then the third for loop continues to run as the Col variable is assigned the
next highest value, at which time the nested for loop begins again with the new Col
value.
For more information about for statements, see Delphi’s online Help.
Deciding which loop to use
This section has described several kinds of Object Pascal loops. How do you decide
which kind to use? Here are some guidelines to help you decide:
• Use the for loop if you know how many times you want a loop to repeat. The for loop
is very fast and efficient.
• Use the repeat..until loop if you don’t know how many times you want the loop to
repeat, but you do know it must run at least once.
• Use the while..do loop if you don’t know how many times you want the loop to
repeat, and it’s possible you don’t want the loop to run at all.
Object Pascal blocks
Blocks are an important concept in Object Pascal. They provide the structure of your
application, and they determine the scope of variables, properties, and so on. You can
read about scope in the section “Understanding scope” on page 177.
An Object Pascal block is made up of two parts: an optional declaration part and the
statement part. If there is a declaration part, it always precedes the statement part.
A declaration informs the compiler of the item being declared. Object Pascal has
• Variable declarations
• Constant declarations
• Type declarations
174
Delphi User’s Guide
• Label declarations
• Procedure, function, and method declarations
Following the declaration part is the statement part of the block. The statements of a
block describe algorithmic actions that can be executed. If a block contains a declaration
part, the statement part uses the items declared in the declaration part of the same block.
Blocks within event handlers
One of the most common kinds of blocks you encounter in Delphi are the blocks within
event handlers. The following simple event handler doesn’t have a declaration part, but
it does have a statement part:
procedure TForm1.Button1Click(Sender: TObject);
begin
{ The block starts here with the statement part }
Edit1.Text := 'Welcome to Delphi';
end;
{ The block ends here at the end of the statement part }
The beginning of the statement part is marked with the reserved word begin. The end
of the statement part is marked with the reserved word end.
Blocks can contain optional declaration parts. This is a revised version of the event
handler that now includes a variable declaration part:
procedure TForm1.Button1Click(Sender: TObject);
var
{ The block begins here with the start of the declaration part }
Name: string;
begin
{ The statement part of the block begins }
Name := Edit1.Text;
Edit2.Text := 'Welcome to Delphi, ' + Name;
end;
{ The end of the block }
As shown in this event handler, the variable declaration part starts with the reserved
word var and continues until the beginning of the statement part.
As described earlier, event handlers are Object Pascal procedures. Procedures that aren’t
event handlers also have blocks that look exactly like the blocks in event handlers. You
can read more about procedures and also about functions, which are very similar to
procedures, in the section “Writing a procedure or function” on page 183.
Blocks within units
Units also have blocks that are made up of a declaration part and a statement part.
While units have a few unique parts of their own, the notion of a block is still present.
For example,
unit Unit1;
interface
uses WinTypes, WinProcs, Classes, Graphics, Forms, Controls, Apps;
type
TForm1 = class(TForm)
{ Beginning of the declaration part and the unit block }
Chapter 5, Writing Object Pascal code
175
Edit1: TEdit;
Edit2: TEdit;
Button1: TButton;
procedure Button1Click(Sender: TObject);
private
{ Private declarations }
public
{ Public declarations }
end;
var
Form1: TForm1;
{ The end of the declaration part }
implementation
{$R *.DFM}
procedure TForm1.Button1Click(Sender: TObject);
var
Name: string;
begin
Name := Edit1.Text;
Edit2.Text := 'Welcome to Delphi, ' + Name;
end;
end.
{ Beginning of the event handler block }
{ End of the event handler block }
{ The end of the unit block }
For more information about units, see “Understanding Object Pascal units” on page 206.
You can also read about units and study the accompanying syntax diagrams in online
Help.
Blocks within blocks
Blocks can contain other blocks. For example, in the previous example, the block of the
Button1Click event handler exists within the unit block, which exists within the project
block. Here is a visual representation of the blocks within the application so far:
Figure 5.11 Blocks within blocks
Project1 block
Unit1 block
Button1Click
event handler
block
176
Delphi User’s Guide
All Delphi applications have the same basic structure. As your application becomes
more complex, you are adding new blocks of code, such as new event handlers to a unit,
or new units to a project.
Understanding scope
The scope of a variable, constant, method, type, or other identifier defines where the
identifier is active. The identifier is local in scope to the smallest block in which it is
declared.
When your application is executing code outside the block in which an identifier is
declared, that identifier is no longer in scope. That means the identifier is no longer
available to the executing code. Only when code execution reenters the same block as
the identifier declaration can the code access the identifier again.
You were introduced to blocks in the previous section. Imagine that you have a project
that contains two units. Each of those units contains three event handlers, or procedures.
Here is your project depicted graphically:
Figure 5.12 Blocks within a simple project
Project1
Unit A
Procedure A
Procedure B
Procedure C
Unit B
Procedure D
Procedure E
Procedure F
Each rectangle in the diagram represents a block. If you declare a variable within
procedure D, only the code within procedure D can access that variable, as that variable
is local in scope to procedure D. If you declare a variable in unit B that is not in any
procedure, all procedures D, E, and F can use the variable, because all these procedures
are within the scope of unit B. The variable is now global in scope to the procedures, but
local in scope to unit B.
In general, declare identifiers that are as local in scope as possible. This gives the data in
your application increased protection from being modified when you do not intend it to
be. Only when you need to share data between different blocks should you consider
using a more global scope.
Chapter 5, Writing Object Pascal code
177
Accessing declarations that are not within scope
You can refer to declarations in blocks that are not within the scope of the current block.
For example, if you create an event handler that calculates an interest payment in one
unit, it is possible for another unit to access that event handler.
■
To access a declaration that is not within scope, preface the declaration name with the
name of the block in which it is declared and a period(.).
For example, to call the CalculateInterest procedure that is declared in Unit1 from Unit2,
make the call like this:
Unit1.ComputeInterest(Principal, InterestRate: Double);
You would also need to add Unit1 to the uses clause of Unit2. For more information
about adding units to a uses clause, see “How units are used” on page 209.
A scope example
This is an example that illustrates local and global scope. Your finished form should
look something like this:
Figure 5.13 A form for multiplying two numbers together
Each time the user enters two numbers in the first two edit boxes and chooses Multiply,
the application multiplies the two numbers together and displays it in the The Answer
edit box.
➤
To create this application,
1 Put three edit box controls and a button control on a form.
2 Place a label control above each of the three edit boxes.
3 Using the Object Inspector, change these property settings:
• Change the caption of Label1 to First Number.
• Change the caption of Label2 to Second Number.
• Change the caption of Label3 to The Answer.
• Change the value of the Name property of Button1 to Multiply.
• Delete the text in all the edit boxes.
178
Delphi User’s Guide
4 Create this OnClick event handler for the Multiply button:
procedure TForm1.MultiplyClick(Sender: TObject);
{ Multiplies two numbers together }
var
FirstNumber, SecondNumber: Integer;
begin
FirstNumber := StrToInt(Edit1.Text);
SecondNumber := StrToInt(Edit2.Text);
Edit3.Text := IntToStr(FirstNumber * SecondNumber);
{ Displays answer in Edit3 }
end;
5 Run your application.
You can put one integer in the first edit box and a second integer in the second edit box.
When you click the Multiply button, the third statement multiplies the two numbers
together and displays the result in the third edit box.
➤
Add another button to the form and rename it Divide:
Figure 5.14 A form for a scope example
➤
Create this event handler:
procedure TForm1.DivideClick(Sender: TObject);
begin
FirstNumber := StrToInt(Edit1.Text);
SecondNumber := StrToInt(Edit2.Text);
Edit3.Text := IntToStr(FirstNumber div SecondNumber);
end;
➤
Try to compile or run your application.
You get an Unknown Identifier error message. Even though you already declared the
FirstNumber and SecondNumber variables in the MultiplyClick event handler, the
DivideClick event handler can’t use them. Code in your application can’t access variables
outside the event handler in which they were declared. In fact, these variables cease to
exist in memory when code execution continues outside the event handler. This is true
for all identifiers declared within any routine, whether it is an event handler, procedure,
function, or method. Such identifiers are called local in scope.
You can choose one of these two methods to make your application run correctly:
Chapter 5, Writing Object Pascal code
179
• You can redeclare the FirstNumber and SecondNumber variables in the DivideClick
event handler. Again, the variables are local in scope:
procedure TForm1.DivideClick(Sender: TObject);
var
FirstNumber, SecondNumber: Integer;
begin
FirstNumber := StrToInt(Edit1.Text);
SecondNumber := StrToInt(Edit2.Text);
Edit3.Text := IntToStr(FirstNumber div SecondNumber);
end;
• You can move the variable declaration part out of the MultiplyClick event handler to
an area above all event handlers, but after the implementation line and the {$R
*.DFM} directive. Your code should look like this, beginning with the
implementation part:
implementation
{$R *.DFM}
var
FirstNumber, SecondNumber: Integer;
{ Variables global to the event handlers }
procedure TForm1.MultiplyClick(Sender: TObject);
{ Multiplies two numbers together }
begin
FirstNumber := StrToInt(Edit1.Text);
SecondNumber := StrToInt(Edit2.Text);
Edit3.Text := IntToStr(FirstNumber * SecondNumber);
{ Displays result in Edit3 }
end;
procedure TForm1.DivideClick(Sender: TObject); { Divides first number by the second }
begin
FirstNumber := StrToInt(Edit1.Text);
SecondNumber := StrToInt(Edit2.Text);
Edit3.Text := IntToStr(FirstNumber div SecondNumber);
{ Displays result in Edit3 }
end;
ƒ
If you choose the second method, FirstNumber and SecondNumber are no longer local in
scope to the event handlers. Because any event handler can now access these variables,
even those you might add in the future, they are called global in scope, or global variables.
The variables are local in scope to the unit, however, because the variables are declared
within the unit block.
As stated earlier, you should try to keep your variables as local as possible. This protects
you from forgetting where a variable is used and getting side effects you don’t want
when your code changes the value of the variable. Therefore, the first method discussed
earlier is probably the best choice. You should consider variables with a broader scope
only when your application needs to share data between different blocks.
Because the code now can access the necessary variables, regardless of which method
you chose, the example works correctly—almost. If the FirstNumber value isn’t
evenly divisible by the SecondNumber value, the fractional part of the result is
discarded, because the example is using only integer values.
180
Delphi User’s Guide
Redeclaring identifiers in a different scope
It’s perfectly legal to declare an identifier in more than one place in your application, as
long as the scope of the identifier differs. The compiler always accesses those variables
that are the most local in scope.
This section has already discussed how two event handlers can declare the same
variables, FirstNumber and SecondNumber. Because any identifiers declared within
MultiplyClick and DivideClick are not within the same scope, the two can have identifiers
with the same name declared within them.
If FirstNumber were declared globally within the scope of the unit and also declared
locally within the scope of an event handler within the unit, your application would
compile without problems. The compiler, however, uses the most local variable to
which it has access each time it encounters a FirstNumber variable in code.
Using a global variable
Suppose you wanted to keep track of the number of calculations performed while your
application was running. You could modify your form to look like this:
Figure 5.15 A form that uses a global variable
➤
To create this application,
1 Add a fourth edit box to the form and a label to the left of the new edit box.
2 With the Object Inspector, make these changes:
• Change the value of the edit box Name property to Counter.
• Change the caption of the new label to Number of Calculations.
3 Add these lines of code to each event handler:
Count := Count + 1;
Counter.Text := IntToStr(Count);
These lines of code add one to the Count variable each time you click one of the
buttons on the form, and display the result in the Counter edit box.
Chapter 5, Writing Object Pascal code
181
If you try to run your application now, Delphi reminds you that you haven’t declared
the Count variable yet. You could declare Count in each of the event handlers and give it
an initial value of 0. This is how the DivideClick event handler would look:
procedure TForm1.DivideClick(Sender: TObject);
var
FirstNumber, SecondNumber, Count: Integer;
begin
Count := 0;
FirstNumber := StrToInt(Edit1.Text);
SecondNumber := StrToInt(Edit2.Text);
Edit3.Text := IntToStr(FirstNumber div SecondNumber);
Count := Count + 1;
Counter.Text := IntToStr(Counter);
end;
The problem is that each time one of the event handlers runs, Count is reset to 0, and
then incremented by one. Your application would never display the number of
calculations as greater than one!
In this case, your application really needs a global variable to function as you want it to.
➤
Declare Count outside of the scope of the event handlers, and within the scope of the
unit in the unit’s implementation part.
ƒ
implementation
{$R *.DFM}
var
Count: Integer;
procedure TForm1.MultiplyClick(Sender: TObject);
ƒ
➤
Because you don’t want to reset Count to 0 each time you click the Multiply or Divide
button, initialize Count in the initialization part of the unit. To create an initialization
part, add the reserved word initialization and the code that initializes Count above the
final end reserved word at the bottom of the unit. The block should look like this:
initialization
Count := 0;
end.
➤
( Add initialization reserved word here }
{ Initializes Count to 0 }
Now run your application and enter values in Edit1 and Edit2. Each time you click one
of the buttons, one is added to the number of calculations.
Because both event handlers need to access and change the value of Count, you need to
declare Count as a global variable to the event handlers.
Note
182
A more object-oriented way of accomplishing the same goal would be to make Count a
field of the form object. All the event handlers of the form could then access the Count
field. You can read about objects and fields in Chapter 6.
Delphi User’s Guide
The next section uses the same sample application, so don’t delete the work you have
just done if you are working through the examples.
Writing a procedure or function
Much of the code you write while developing a Delphi application is contained
within event handlers Delphi creates for you. Still, there are times when you want to
write your own procedures and functions that aren’t event handlers.
For example, if you find yourself writing the same code over and over to perform some
common task within event handlers, consider moving that code from the event handlers
into a procedure or function outside the handlers. Then any event handler can call the
procedure or function as it does any other existing procedure or function. You derive
two benefits: you need to write the code only once, and the code in your event handlers
is less cluttered.
This example continues with the scope example presented in the previous section. Here
is the code of the example as it should exist currently, beginning with the
implementation part:
ƒ
implementation
{$R *.DFM}
var
Count: Integer;
procedure TForm1.MultiplyClick(Sender: TObject);
var
FirstNumber, SecondNumber: Integer;
begin
FirstNumber := StrToInt(Edit1.Text);
SecondNumber := StrToInt(Edit2.Text);
Edit3.Text := IntToStr(FirstNumber * SecondNumber);
Count := Count + 1;
Counter.Text := IntToStr(Count);
end;
procedure TForm1.DivideClick(Sender: TObject);
var
FirstNumber, SecondNumber: Integer;
begin
FirstNumber := StrToInt(Edit1.Text);
SecondNumber := StrToInt(Edit2.Text);
Edit3.Text := IntToStr(FirstNumber div SecondNumber);
Count := Count + 1;
Counter.Text := IntToStr(Count);
end;
initialization
Count := 0;
end.
Chapter 5, Writing Object Pascal code
183
So far, the application doesn’t allow users to make any data entry errors. For example, if
a user neglects to enter a value in one of the two edit boxes before clicking a button, the
application stops running. To ensure that this doesn’t happen, you’ll write some code to
check for a value in the edit boxes and, if there is none, prompt the user to enter one.
Instead of writing this code twice—once in each event handler—you could write it once
and call the routine from the event handler.
➤
Write a new NoValue function in the implementation part of the unit, placing it above
all event handlers:
function NoValue(AnEditBox: TEdit): Boolean;
begin
if AnEditBox.Text = '' then
begin
AnEditBox.Color := clRed;
AnEditBox.Text := 'Enter a value';
Result := True;
end
else
begin
AnEditBox.Color := clWindow;
Result := False;
end;
end;
The NoValue function determines if the edit box passed to the function is empty or not. If
it is, the edit box color turns red, the user is prompted to enter a value, and the function
returns True. If the edit box isn’t empty, the edit box color is set to the Windows system
window color, thereby changing the edit box color back to normal if it happened to be
red, and the function returns False.
➤
Call the NoValue function from the two event handlers. Here is the call (actually two of
them) from the MultiplyClick event handler:
procedure TForm1.MultiplyClick(Sender: TObject);
var
FirstNumber, SecondNumber: Integer;
begin
if NoValue(Edit1) or NoValue(Edit2) then
{ This line calls NoValue twice }
Exit;
{ If an edit box is empty, quit this event handler }
FirstNumber := StrToInt(Edit1.Text);
SecondNumber := StrToInt(Edit2.Text);
Edit3.Text := IntToStr(FirstNumber * SecondNumber);
Count := Count + 1;
Counter.Text := IntToStr(Count);
end;
If either function call returns True (one or both of the edit boxes are empty), the Exit
procedure runs. Exit is a routine in the run-time library that stops executing the code in
the current block. This means that none of the remaining lines of code in the
MultiplyClick event handler run.
➤
184
Run your application.
Delphi User’s Guide
Now when either edit box is left empty, the user is notified.
A procedure or function consists of
• A procedure or function heading
• A block of code
Writing a procedure or function header
Every procedure or function begins with a header that identifies the procedure or
function and lists the parameters the routine uses, if any. A procedure begins with the
procedure reserved word. A function begins with the function reserved word.
The parameters are listed within parentheses. Each parameter has an identifying name
and usually has a type. Parameters in a parameter list are separated from one another by
a semicolon. For example,
procedure ValidateDate(Day: Integer; Month: Integer; Year: Integer);
You can combine parameters of the same type, like this:
procedure ValidateDate(Day, Month, Year: Integer);
You can read more about using parameters in the section “Passing parameters” on
page 190.
Functions have one additional element in their headers: a return value type. Specify the
type of the value returned by the function, separated from the rest of the header with a
colon. For example, this function returns a value of type Double:
function CalculateInterest(Principal, InterestRate: Double): Double;
End all headers with a semicolon.
Writing a procedure or function block
As discussed in the section “Object Pascal blocks” on page 174, all blocks have two
parts: an optional declaration part and a statement part.
Declarations within a procedure or function block
Declaration parts within a procedure or function block can contain
• Type declarations
• Variable declarations
• Constant declarations
Type declarations
Delphi applications can create new types beyond the predefined data types that are part
of the Object Pascal language. You can read about creating user-defined types in the
section “Defining new data types” on page 195, but here you can see what a type
declaration part can look like. A type declaration part begins with the reserved word
type. These are some type declarations:
Chapter 5, Writing Object Pascal code
185
type
TCount = Integer;
TPrimaryColor = (Red, Yellow, Blue);
TTestIndex = 1..100;
TTestValue = –99..99;
TTestList = array[TTestIndex] of TTestValue;
TCharVal = Ord('A')..Ord('Z');
TDays = (Monday, Tuesday, Wednesday, Thursday, Friday, Saturday, Sunday);
An equal sign (=) follows the type identifier. The rest of the declaration defines the
values that make up the new type. A variable of type TNumber must be an Integer value.
A variable of type TPrimaryColor can be only red, yellow, or blue. A variable of type
TCharVal must fall within the range of values returned by the Ord function on the
capital letters A through Z, and so on.
Note that each type has a name that begins with the letter T. This isn’t necessary, but it’s
the convention the Delphi documentation uses, and you’ll find it helpful in
distinguishing type names from other identifiers if you use it, too.
Just like variable and constant declarations, type declarations can be global or local in
scope, depending on where you place the declaration. For example, if you declare the
type TDays within a procedure, the TDays type exists only when that procedure runs,
and it is therefore local in scope. If you place a type declaration at the top of the
implementation part, all event handlers and other procedures and functions can use it.
Variable and constant declarations
Declaring variable and constants within event handlers is discussed in the section
“Declaring variables” on page 154, and in the section “Declaring constants” on
page 157. Because event handlers are procedures, you should already know how to
create variable and constant declarations for procedures and functions.
Ordering the declaration parts
Traditionally, any type declarations appear in a procedure or function before variable
declaration parts, and any variable declarations appear before constant declarations.
This isn’t required, though, and you can mix declaration parts any way you choose. You
can also have more than one declaration part of the same kind. For example, you can
have two or more variable declaration parts. The only rule you must remember is that
declarations occur after the procedure or function header and before the statement or
code part of the routine.
Writing the statement part
The statement part of a procedure or function begins with the reserved word begin and
ends with the reserved word end, followed by a semicolon. All the code within the
begin and end block are the statements of a procedure or function. As discussed earlier,
statements can be assignment statements, procedure or function calls, if or case
statements, or loops.
Assigning a return value in a function
Because a function returns a value, you need to ensure that you assign that return value.
You can do this in either of two ways:
186
Delphi User’s Guide
• Assign the value to be returned to the name of the function.
• Assign the value to be returned to the Result variable.
The following example shows you the first way; the value to be returned is assigned to
the name of the function:
function CalculateInterest(Principal, InterestRate: Double): Double;
begin
CalculateInterest := Principal * InterestRate;
end;
The next example accomplishes the same thing, but the value is assigned to a Result
variable that all functions have:
function CalculateInterest(Principal, InterestRate: Double): Double;
begin
Result := Principal * InterestRate;
end;
You don’t have to declare the Result variable—it is automatically available for you to
use. Using Result is a shortcut that makes your code just a little easier to understand.
No matter which method you choose, the function call is still the same. For example, this
function call is the same regardless of whether the CalculateInterest function internally
assigns a value to CalculateInterest or Result:
InterestEarned := CalculateInterest(1000, 0.08);
Positioning a procedure or function in your code
Procedures and functions are placed in the implementation part of a unit. All identifiers
declared in the implementation part can be used only by the code contained within that
unit.
You can set up procedures and functions so that code in other units can use the
procedures and functions you write.
■
To make a procedure or function available to other units,
1 Put the header of the procedure or function in the interface part of the unit.
By placing the header in the interface part, you are declaring the routine in the
interface part, thereby making the routine available to any unit that uses this unit.
2 Place the entire procedure or function, repeating the header, in the implementation
part of the unit.
3 Add the name of the unit in which you declared the routine to the uses clause of the
unit that needs to access the routine.
You can read more about units, the uses clause, and how to use routines declared in
other units in the section “Understanding Object Pascal units” on page 206.
For example, the NoValue function described on page 184 could be declared in the
interface part of the unit. Then you could place the body of the routine, or its
Chapter 5, Writing Object Pascal code
187
implementation, in the implementation part of the unit. This is a skeleton of how the
unit would look:
unit Unit1;
interface
uses
ƒ
type
TForm1 = class(TForm)
Multiply: TButton;
Divide: TButton;
procedure MultiplyClick(Sender: TObject);
procedure DivideClick(Sender: TObject);
ƒ
end;
var
Form1: TForm1;
function NoValue(AnEditBox: TEdit): Boolean;
implementation
function NoValue(AnEditBox: TEdit): Boolean;
ƒ
end;
procedure TForm1.MultiplyClick(Sender: TObject);
ƒ
end;
procedure TForm1.DivideClick(Sender: TObject);
ƒ
end;
end.
If the NoValue function is not declared in the interface part, but in the implementation
part instead, only this unit and no other can use NoValue.
When Delphi creates an event handler, the event handler procedure is declared in the
object type declaration. Because the object type declaration is in the interface part of the
unit, any other unit can call the event handler. For more information about the interface
and implementation parts of a unit, see the section “Understanding Object Pascal units”
on page 206.You can also read more about object type declarations in Chapter 6.
The NoValue function as it appears on page 184 is an example of a routine that is not
declared separately from its implementation. Because you want only the code within the
event handlers to be able to use NoValue, you would not declare it in the interface part,
but in the implementation part, as the code in the event handlers is in the
implementation part.
188
Delphi User’s Guide
Note
NoValue appears before the event handlers that use it. If the NoValue function is declared
and implemented after the event handlers, the compiler reports the NoValue call in the
handlers to be an unknown identifier.
Wherever you first declare a procedure or function, you should place either the
declaration or the procedure or function itself above all routines that use them, whether
they are event handlers or routines you write entirely on your own. In other words, a
routine can’t use another routine unless the second routine has already been declared.
This is in keeping with the Object Pascal rule that states you can’t use an identifier until
you have declared it.
Forward declarations
There is an exception to this rule, however, that allows routine A to call routine B, and
then while routine B is running, routine B calls routine A. This type of calling is called
mutual recursion.
To make such mutual recursion possible, you need to declare a routine as a forward
declaration. When you declare a routine using the forward standard directive, you can
place the implementation of the procedure or function anywhere you choose—between
event handlers, after other procedures and functions that call the routine, and so on. If
the NoValue declaration is declared as a forward declaration, it looks like this:
function NoValue (AnEditBox: TEdit): Boolean; forward;
A forward declaration uses the forward standard directive. The declaration doesn’t
include the implementation of the procedure. Instead, the NoValue implementation has
to appear somewhere after the forward declaration.
The implementation of NoValue can appear after other procedures, functions, event
handlers, and methods that might call it, however.
This is an example of two procedures that call each other recursively. The form in this
application has one button on it. When you click the button, the two procedures begin
calling one another:
unit Unit1;
interface
uses WinTypes, WinProcs, Classes, Graphics, Forms, Controls, Apps;
type
TForm1 = class(TForm)
Button1: TButton;
procedure Button1Click(Sender: TObject);
private
{ Private declarations }
public
{ Public declarations }
end;
var
Form1: TForm1;
Chapter 5, Writing Object Pascal code
189
implementation
{$R *.DFM}
var
Alpha: Integer;
procedure Test2(var A : Integer); forward;
procedure Test1(var A: Integer);
begin
A := A - 1;
if A > 0 then
Test2(A);
Writeln(A);
end;
procedure Test2(var A: Integer);
begin
A := A div 2;
if A > 0 then
Test1(A);
Writeln(A);
end;
{ Test2 is declared as a forward procedure }
{ A call to the Test2 procedure }
{ A call to the Test1 procedure }
procedure TForm1.Button1Click(Sender: TObject);
begin
Alpha := 15;
{ The Alpha variable receives a starting value }
Test1(Alpha);
{ The first call to the Test1 procedure }
end;
end.
The code in the OnClick event handler for the button gives the Alpha variable a value
and then calls the Test1 procedure. Test1 subtracts one from the value of the Alpha
variable and then tests Alpha to determine if it is greater than 0. If it is, Test1 calls the
Test2 procedure. Test2 divides the value of the Alpha variable by 2 and then tests Alpha to
determine if it is greater than 0. If it is, Test 2 calls Test1. The two procedures continue to
call each other until Alpha is no longer greater than 0, at which time the Writeln
statements of the procedures run.
A more detailed discussion of mutual recursion and how it works is beyond the scope of
this chapter. The important point to note is that the Test2 procedure is declared as a
forward procedure before the implementations of Test1, Test2, and the Button1Click
event handler. If Test2 is not declared as a forward procedure, the project will not
compile, because the code would then be calling Test2 before it is declared.
Passing parameters
When your code calls a procedure or function, it often uses parameters to pass data to
the called procedure or function. The section “Calling procedures with parameters” on
page 160, describes how to use a parameter in calling a procedure; the section “Writing
a procedure or function header” on page 185, describes how to create a parameter list in
a procedure or function header. This section describes the most common kinds of
parameters your procedures and functions can use:
190
Delphi User’s Guide
• Value parameters
• Variable parameters
• Constant parameters
Any parameters specified by the calling procedure or function are called the actual
parameters. The corresponding parameters in the called procedure of function are
called the formal parameters. So, in this procedure call, the Edit1 parameter is the actual
parameter:
ColorIt(Edit1);
The corresponding AnEditBox parameter in the called procedure declaration is the
formal parameter
procedure ColorIt(AnEditBox: TEdit);
Value parameters
With the exception of the code example in the previous section, “Forward declarations,”
value parameters are the only type of parameters discussed in this chapter so far. A
formal value parameter is a copy of the actual value parameter. In other words, the
compiler puts the actual parameter at one memory address, and the formal parameter at
another memory address. Therefore, the called procedure or function can change the
value of the formal parameter, yet the value of the actual parameter remains unchanged.
➤
To see an example of this,
1 Put two edit box controls and a button on a form.
2 Using the Object Inspector, delete the text specified as the value of the Text property
for the two edit box controls.
Your form should look something like this:
Figure 5.16 A form for a value parameter example
3 Create this OnClick event handler for the button:
procedure TForm1.Button1Click(Sender: TObject);
var
Number: Integer;
Chapter 5, Writing Object Pascal code
191
begin
Number := StrToInt(Edit1.Text);
Calculate(Number);
Edit2.Text := IntToStr(Number);
end;
The handler retrieves the number the user enters in the first edit box and assigns it to the
Number variable. This variable is passed to the Calculate procedure as Calculate is called.
The last line displays the value of Number in the second edit box.
➤
Place this Calculate procedure above the event handler in your code, but below the
implementation reserved word:
procedure Calculate(CalcNo: Integer);
begin
CalcNo:= CalcNo * 10;
end;
In the Calculate procedure, the value in the CalcNo parameter changes. By the end of the
procedure, the value of CalcNo is ten times greater than it was when Calculate began.
➤
Run the application and enter a number in the Edit1 edit box.
The value you enter in the Edit1 edit box is the value of Number before Number is passed
to the Calculate procedure. The value that appears in the Edit2 edit box is the value of
Number after the Calculate procedure runs. The two values of Number are the same!
Because the CalcNo parameter is only a copy of the Number parameter, Number remains
unchanged, while the value of CalcNo changes considerably. The application never
displays the value of CalcNo.
A couple of simple illustrations can demonstrate what is happening. Number and CalcNo
each have a separate address in your computer’s memory. The boxes in the following
drawings represent memory locations. When Calculate is called, the value of Number is
copied into the CalcNo memory location.
Figure 5.17 The value of Number and CalcNo when Calculate begins running
Value of Number
(actual parameter)
Value of CalcNo
(formal parameter)
10
10
Because the Calculate procedure changes the value of the CalcNo parameter, the values of
Number and CalcNo are no longer the same when Calculate stops running.
192
Delphi User’s Guide
Figure 5.18 The values of Number and CalcNo after Calculate runs
Value of Number
(actual parameter)
Value of CalcNo
(formal parameter)
10
100
Value parameters can be any expression. To read about what constitutes an expression,
see the Expressions topic in online Help.
Variable parameters
Sometimes you want the value of a passed parameter to change as the called procedure
or function processes it. In these cases, you need to use a variable parameter. Precede the
formal parameter in the called routine with the reserved word var in the parameter list.
For example,
procedure Calculate(var CalcNo: Integer);
This variable parameter is a reference to the actual parameter, which is Number in the
example. It does not occupy a separate location in memory, but instead, points to the
actual parameter.
When a variable parameter is passed, any changes made to the formal parameter are
reflected in the actual parameter because both parameters refer to the same value.
➤
To see how this works, add the word var in front of the CalcNo parameter in the
Calculate procedure declaration. The Calculate procedure should now look like this:
procedure Calculate(var CalcNo: Integer);
begin
CalcNo := CalcNo * 10;
end;
➤
Run the application and enter a number in the Edit1 edit box.
You can see that the Calculate procedure does indeed change the value of the Number
variable in the OnClick event handler. Because the Number actual parameter and the
formal CalcNo parameter now refer to the same variable, the Number value changes in
the second edit box when Calculate runs.
These drawings demonstrate what happens. When Calculate is called, the value of
Number and the value of CalcNo are the same, because both the actual and the formal
parameters refer to the same memory location.
Chapter 5, Writing Object Pascal code
193
Figure 5.19 The value of Number and CalcNo when Calculate begins running
Value of Number
(actual parameter)
Value of CalcNo
(actual parameter)
10
After the Calculate procedure runs, the Number and CalcNo parameters still refer to the
same value, even though that value has changed.
Figure 5.20 The value of Number and CalcNo after Calculate runs
Value of Number
(actual parameter)
Value of CalcNo
(formal parameter)
100
Constant parameters
If a formal parameter never changes its value when a procedure or function runs, you
should consider using a constant parameter instead of a value parameter. Make a formal
parameter a constant parameter by typing the reserved word const before the name of
the parameter in the parameter list.
Like a value parameter, a constant parameter can be any expression. Using a constant
parameter instead of a value parameter, however, protects you from accidentally
assigning a new value to the parameter when you don’t want the parameter to change.
If you try to assign a value to a constant parameter, you’ll receive an Invalid Variable
Reference message because the value of a constant isn’t allowed to change.
Deciding which kind of parameter to use
Keep these points in mind when you use parameters:
• Use a value parameter when you don’t want the value of the actual parameter to
change. Because the formal parameter is only a copy of the actual parameter, the
value of the actual parameter never changes.
(Remember, the actual parameter is the parameter specified in the procedure or
function call. The formal parameter is the parameter specified in the called routine.)
• Use a variable parameter when you do want the called routine to change the value of
the passed parameter. Because both the actual and the formal parameters refer to the
same value, the value of an actual variable parameter can change when it is
processed in the called routine.
• Use a constant parameter as the formal parameter in the called routine when the
routine never changes the formal parameter. This protects you from inadvertently
194
Delphi User’s Guide
assigning a new value to the formal parameter when you really don’t want the
formal parameter to change.
Defining new data types
The Object Pascal language comes with a number of predefined data types (see Table 5.1
for a list of them). You can use these data types to create new data types that meet the
specific needs of your application. This section briefly describes the primary kinds of
data types you can create:
•
•
•
•
•
•
Enumerated types
Subrange types
Array types
Set types
Record types
Object types
Object Pascal has other user-defined data types that aren’t discussed in this chapter: file,
pointer, and procedural types. For more information about these types, see the
corresponding topics in online Help.
Enumerated types
An enumerated type declaration lists all the values the type can have. These are some
examples of enumerated type declarations:
type
TDays = (Monday, Tuesday, Wednesday, Thursday, Friday, Saturday, Sunday);
TPrimaryColor = (Red, Yellow, Blue);
TDepartment = (Finance, Personnel, Engineering, Marketing, MIS);
TDog = (Poodle, GoldenRetriever, Dachshund, NorwegianElkhound, Beagle);
These are some variables of those enumerated types:
var
DayOfWeek: TDays;
Hue: TPrimaryColor;
Department: TDepartment;
DogBreed: TDog;
Each value listed in parentheses in an enumerated type declaration has an underlying
integer value determined by the position of the value in the list. For example, Monday in
the TDays type declaration has the value 0, Tuesday has the value 1, and so on. You could
achieve the same result by declaring the DayOfWeek variable to be of type Integer and
then assign an Integer value to represent each day of the week. While this system might
work in an orderly and predictable series such as days of the week or months of the
year, it’s less useful when the order of represented values is arbitrary. Most people are
not very good at remembering what a number stands for. For example, the assignment
DogBreed := Dachshund;
Chapter 5, Writing Object Pascal code
195
means much more to people than
DogBreed := 2;
When you list a value in an enumerated type, you are declaring the value as an
identifier. If the previous enumerated type declarations and variable declarations were
in your application, you could not, therefore, declare a Finance variable, because a
Finance identifier already exists.
➤
To experiment using an enumerated type,
1 Create this form containing four radio buttons (in a group box), a label, and a button:
Figure 5.21 A form for an enumerated type example
2 Change these properties using the Object Inspector:
• Change the group box caption to Select A Course.
• Name the first radio button HistoryButton, and change the caption to History.
• Name the second radio button LiteratureButton, and change the caption to
Literature.
• Name the third radio button BiologyButton, and change the caption to Biology.
• Name the fourth radio button PsychologyButton, and change the caption to
Psychology.
• Change the caption of the button to Display Selected Course.
3 Declare a TCourse type below the implementation reserved word and the resource
directive ({$R *.DFM}), and declare a SelectedCourse variable of type TCourse:
type
TCourse = (Nothing, History, Literature, Biology, Psychology);
var
SelectedCourse: TCourse;
4 Create an OnClick event handler for each radio button. When you have finished, your
code should look like this:
ƒ
implementation
{$R *.DFM}
196
Delphi User’s Guide
type
TCourse = (Nothing, History, Literature, Biology, Psychology);
var
SelectedCourse: TCourse;
procedure TForm1.HistoryButtonClick(Sender: TObject);
begin
SelectedCourse := History;
end;
procedure TForm1.LiteratureButtonClick(Sender: TObject);
begin
SelectedCourse := Literature;
end;
procedure TForm1.BiologyButtonClick(Sender: TObject);
begin
SelectedCourse := Biology;
end;
procedure TForm1.PsychologyButtonClick(Sender: TObject);
begin
SelectedCourse := Psychology;
end;
procedure TForm1.Button1Click(Sender: TObject);
begin
case SelectedCourse of
History: Label1.Caption := 'You are taking history';
Literature: Label1.Caption := 'You are taking literature';
Biology: Label1.Caption := 'You are taking biology';
Psychology: Label1.Caption := 'You are taking psychology';
else
Label1.Caption := 'You are taking nothing';
end;
end;
ƒ
5 Run the application.
When you select a radio button to choose a course, an enumerated value is assigned to
the SelectedCourse variable. The OnClick event handler for the button uses a case
statement to display an appropriate message, based on the value of the SelectedCourse
variable.
Subrange types
A subrange type is a range of values of any of these types: integer, Boolean, Char, or
enumerated types. Subranges are useful when you want to limit the number of values a
variable can have. To create a subrange, specify the minimum and maximum values in
the range with two periods in between them. For example,
1..100
Chapter 5, Writing Object Pascal code
197
Declare the subrange as a new type in a type declaration. Here are some examples:
type
TCompassRange
TValidLetter
TMonthlyIncome
THours
TPrecipitation
TRain
➤
=
=
=
=
=
=
0..360;
'A'..'F';
10000..30000;
0..23;
(Drizzle, Showers, Rain, Downpour, Thunderstorm); {an enumerated type}
Drizzle..Downpour;
{a subrange of TPrecipitation}
Here is a simple application that uses a new subrange type.
1 Place an edit box and a button on a form. Place a label above the edit box, and put a
second label beneath the edit box.
2 Using the Object Inspector, change these properties:
• Delete the text specified as the value of the Text property for the edit box.
• Change the Caption value for the Label1 label to ‘Enter a number between 1 and
100’.
• Delete the text specified as the value of the Caption property for the Label2 label.
• Change the Default property of the button to True.
Your form should look like this:
Figure 5.22 A form for a subrange example
3 Create this event handler for the button’s OnClick event:
procedure TForm1.Button1Click(Sender: TObject);
{$R+}
type
TValidEntry = 1..100;
var
Entry: TValidEntry;
begin
Entry := StrToInt(Edit1.Text);
Label2.Caption := 'Excellent!';
end;
4 Run the application, enter a number in the edit box, and click the button.
198
Delphi User’s Guide
Try putting a number greater than 100 in the edit box. You’ll get a run-time error that
informs you a range-check error has occurred. If you enter a number within 1 to 100, the
application runs as expected.
Note the use of the $R directive. {$R+} turns on range checking while the event handler
runs. If you omit the $R directive, the compiler won’t catch out-of-range errors. To read
about compiler directives, see the Compiler Directives topic in the Help system. You can
also turn on range checking by choosing Options|Project|Compiler Options and
selecting Range Checking.
Array types
An array is an ordered collection of a data type, with each element of the collection
specified by its numeric position within the collection. When the array is created, the
elements don’t contain useful values at first, but you can fill them with data and
manipulate that data as you need to. For example, here is a variable declaration for an
array of Double types:
var
Check : array{1..10] of Double;
This declaration tells Delphi that the variable Check refers to a list of ten variables of type
Double, each with a number (called its index) from 1 to 10.
Each item of an array is referred to by the name of the array, followed by its index
enclosed in brackets ([ ]). So the array Check contains the ten variables Check[1], Check[2],
Check[3], Check[4], and so on, up to Check[10]. You can use any of these variables
wherever you would use a regular Real variable. Also, the index value doesn’t have to
be a constant. It can be any expression that yields an integer in the range 1 to 10. For
example,
J := 5;
Check[J] := 0.0;
These statements assign the value 0.0 to variable Check[5]. (Because Check is an array of
type Double, the value you assign must be Real and contain a decimal point. Also, all
Double values must begin with a digit, not a decimal point, so you can’t write 0.0 as .0)
If you want to assign a value of zero to all the Check variables in the array, you could use
a for loop to do it. Because an index can be a variable, a for loop is easier to use than
assigning a value to each item in an array with separate assignment statements. This for
loop assigns the 0.0 amount to all ten checks:
for J := 1 to 10 do
Check(J) := 0.0;
You can define arrays as types. For example,
type
TCheck = array[1..100] of Double;
You can then declare variables of the array type. For example, this code declares a
CheckingAccount to be a variable of type TCheck, which is an array of 100 real numbers.
Chapter 5, Writing Object Pascal code
199
var
CheckingAccount: TCheck;
Multidimensional arrays
The arrays discussed so far are one-dimensional lists. Arrays can have many
dimensions. Two-dimensional arrays can be used to hold all the values in a table, for
example.
This is how you would create a two-dimensional array that can hold all the values in a
table that contains 20 columns and 20 rows:
type
TTable = array[1..20, 1..20] of Double;
Then you can declare a variable of the TTable type:
var
BigTable: TTable;
To initialize all the values in the table to 0.0, you could use nested for loops:
var
Col, Row: Integer;
ƒ
for Col := 1 to 20 do
for Row:= 1 to 20 do
BigTable[Col, Row] := 0.0
String types: Arrays of characters
Strings, such as the text you enter for the caption on a control, are actually onedimensional arrays of characters (an array of type Char). When you declare a variable of
type string, you specify the size of the string, much as you specify the size of an array
when you declare an array type.
These are some string type declarations:
type
MyString: string[15];
BigString: string;
LittleString: string[1];
These declarations declare the MyString type to contain 15 characters and the LittleString
type to contain 1 character. If no size is specified, the string contains 255 characters, the
maximum size, as is the case with the BigString type.
You can then declare variables of these character arrays just as you would with any
other data type:
var
MyName: MyString;
Letter, Digit: LittleString;
You can assign a value to a string variable or property by enclosing the sequence of
characters that make up the string in single quotation marks or apostrophes (‘). For
example,
200
Delphi User’s Guide
MyName := 'Frank P. Land';
Label1.Caption := 'File name';
Because MyName is a variable of type MyString, which holds 15 characters, the MyName
variable is stored in memory as if the string were ‘Frank P. Land ‘. If you assigned the
string 'Frank P. Borland' to the MyName variable, MyName would contain the string
'Frank P. Borlan', because the MyName variable can hold only 15 characters.
Object Pascal strings are stored as arrays of characters in memory, but the arrays are
actually one byte bigger than size of the specified string. The first position of the string,
[0], is a byte that contains the size of the string.
Because strings are arrays of characters, you can access characters within a string with
an index value, just as you would in an array. For example,
MyName[1]
refers to the first letter contained in the MyName string variable.
You can use Object Pascal’s rich assortment of operators, procedures, and functions to
manipulate variables and properties of string types. Here are some examples of stringhandling routines in the run-time library:
Table 5.2
String procedures and functions
Routine
Description
Concat
Concatenates multiple strings, creating a larger string. You can also
concatenate strings together using the plus sign (+).
Copy
Delete
Insert
Returns a substring within a string.
Deletes a specified number of characters from a string beginning at
specified position within the string.
Inserts another string within a string.
Length
Pos
Returns the length of the string.
Returns the position (index) of a substring within a string.
You can find information about using these string procedures and functions in online
Help.
Finding the length of a string
This is a simple example that finds the length of a string the user enters in an edit box.
Your finished form should look something like this:
Chapter 5, Writing Object Pascal code
201
Figure 5.23 A form for a string-handling example
➤
To create this application,
1 Add an edit box, a button, and two labels to a form. Put Label1 above the edit box
control, and put Label2 below the edit box control.
2 Using the Object Inspector, change these properties:
• Change the caption of Label1 to ‘Enter a string’.
• Delete the caption of Label2 so the label becomes invisible.
• Delete the text of the edit box.
• Rename the button to FindLength.
• Change the caption of the button to Find Length.
3 Create this event handler:
procedure TForm1.FindLengthClick(Sender: TObject);
type
TEditString = string;
var
UserString: TEditString;
begin
UserString := Edit1.Text;
Label2.Caption := 'This string is ' + IntToStr(Length(UserString)) +
' characters in length';
end;
4 Run the application.
When you click the button, the length of the string you entered in the edit box is
reported in the Label2 control.
The text you entered in the edit box is assigned to the UserString variable:
UserString := Edit1.Text;
Because UserString is of type TEditString, it can contain as many as 255 characters.
The Length function returns the number of characters in UserString:
Length(UserString)
202
Delphi User’s Guide
Because Length returns an Integer value, it needs to be converted to a string value. The
IntToStr function does this:
IntToStr(Length(UserString))
The string that is assigned to Label2.Caption is a string made up of three substrings:
• ‘This string is ’
• IntToStr(Length(UserString))
• ‘ characters in length’
These substrings are concatenated with the + operator into one string.
The previous example declares a string type and uses a variable of that type. You could
write the event handler more concisely:
procedure TForm1.FindLengthClick(Sender: TObject);
begin
Label2.Caption := 'This string is ' + IntToStr(Length(Edit1.Text)) +
' characters in length';
end;
Set types
A set is a collection of elements of one type. That one type must be either an integer,
Boolean, Char, enumerated, or subrange type. Sets are useful for checking if a value
belongs to a particular set.
Here is a simple application that uses a new set type. This is the finished form:
Figure 5.24 A form for a set type example
➤
To create this application,
1 Place an edit box and a button on a form. Add a label above the edit box, and put a
second label beneath the edit box.
2 Using the Object Inspector, change these properties:
• Delete the text specified as the value of the Text property for the edit box.
• Change the Caption value for the Label1 control to ‘Enter a vowel’.
Chapter 5, Writing Object Pascal code
203
• Delete the text specified as the value of the Caption property for the Label2 control.
• Change the Default property of the button to True.
3 Create this event handler for the button’s OnClick event:
procedure TForm1.Button1Click(Sender: TObject);
type
TVowels = set of Char;
var
Vowels: TVowels;
begin
Vowels := ['A','E','I','O','U'];
if Edit1.Text[1] in Vowels then
Label2.Caption := 'You are clever'
else
Label2.Caption := 'Please try again';
end;
4 Run the application and enter a letter in the edit box.
The new type TVowels is a set of type Char. Vowels is declared as a variable of type
TVowels. The first line of code after the begin reserved word builds the vowel set (puts
values into it) and assigns this new set to the Vowels variable. If the Vowels assignment
looked like this,
Vowels := [];
then the Vowels set would contain no values and would be called an empty set.
The if statement uses the in operator to see if the value you entered into the edit box is in
the Vowels set. The expression Edit1.Text[1] in Vowels is a Boolean expression that
evaluates to either True or False. It tests if the first character in the Text string is in the
Vowels set.
Record types
Records are collections of data that your application can refer to as a whole. For
example, your application could use a TEmployee record type that is declared like this:
type
TEmployee = record
LastName : string[20];
FirstName: string[15];
YearHired: 1990..2000;
Salary: Double;
Position: string[20]
end;
Records contain fields that hold data values. Each field has a data type. The fields of a
TEmployee type are LastName, FirstName, YearHired, Salary, and Position. You can access
these fields individually, or you can refer to the record as a whole.
For example, here are the declarations of two record variables:
204
Delphi User’s Guide
var
NewEmployee, PromotedEmployee: TEmployee;
Your code can refer to the Salary field of a NewEmployee record, like this:
NewEmployee.Salary := 43500.00
Or your code can manipulate the record as a single entity:
PromotedEmployee := NewEmployee;
When you refer to a field within a record, you need to type the name of the record, a
period (.), and the name of the field:
PromotedEmployee.Position
If you are going to assign values to fields within a record, you can use the with
statement. Instead of writing this code,
PromotedEmployee.LastName := 'Jeffries';
PromotedEmployee.FirstName := 'Richard';
PromotedEmployee.YearHired := 1990;
PromotedEmployee.Salary := 100000.00;
PromotedEmployee.Position := 'Senior technical writer';
you could assign the values like this:
with PromotedEmployee do
begin
LastName := 'Jeffries';
FirstName := 'Richard';
YearHired := 1990;
Salary := 100000;
Position := 'Senior technical writer';
end;
A few words about objects
Objects are user-defined data types that are very important in programming for Delphi.
Like records, objects are structured data types that contain fields that hold values.
Objects, however, also contain methods. Methods are procedures and functions that act
on the data in the object’s fields.
Each time you time you add a new component to a form, you are adding a field to a
form object. Each component is also an object, and each time you create an event
handler so the component can respond to an event, you are automatically creating a
method within the form object. All this happens automatically when you build the user
interface for your application and create event handlers using the Object Inspector.
Nevertheless, it is helpful to understand how Delphi uses objects to build your
application. You can read more about objects in Chapter 6.
Chapter 5, Writing Object Pascal code
205
Understanding Object Pascal units
This section explains what a unit is, how you use it, and how to write your own units
that aren’t associated with forms.
What is a unit?
A unit is a collection of constants, data types, variables, and procedures and functions
that can be shared by several applications. Delphi comes with a large number of
predefined units you use to construct your Delphi applications. The Delphi Visual
Component Library is made up of several units that declare the objects, components,
and controls you use to design the interface for your application. Each time you add a
check box to a form, for example, you are using the StdCtrls unit automatically because
the TCheckBox component is declared in StdCtrls.
As you design the forms for your application, you are automatically creating new units
that are associated with the forms. Units don’t have to be associated with forms,
however. You can use a predefined unit that contains only mathematical routines, for
example. Or you can write your own unit of math functions.
All the declarations in a unit are related to one another. For example, the CDialogs unit
contains all the declarations for using common dialog boxes in your applications.
The structure of a unit
Regardless of whether a unit is associated with a form, the basic structure of a unit is the
same. The parts of a unit are
unit <identifier>;
interface
uses <list of units>;
{ optional }
{ public delcarations }
implementation
uses <list of units>;
{ optional }
{ private declarations }
{ implementation of procedures and functions }
initialization
{ optional initialization code}
end;
{ optional }
The unit header starts with the reserved word unit, followed by the unit’s name (an
identifier). The next item in a unit is the reserved word interface, which indicates the
beginning of the interface part of the unit—the part visible to other units or applications
that use this unit.
A unit can use the declarations in other units by specifying those units in a uses clause.
The uses clause can appear in two places:
206
Delphi User’s Guide
• It can appear immediately after the reserved word interface.
Any code in the current unit can use the declarations declared in the interface parts
of the units specified in the uses clause.
For example, suppose you are writing code in unit A, and you want to call a
procedure declared in the interface part of unit B. Once you add the name of unit B to
the uses clause in the interface part of unit A, any code in unit A can call the
procedure declared in unit B.
Also, any unit that uses the current unit can also use any of the units listed in the
current unit’s uses clause.
For example, if unit C is in the uses clause in the interface part of unit B, and unit B is
in the uses clause in the interface part of unit A, unit A can use any declarations in
the interface parts of both C and B, even if unit C is not in the uses clause of unit A.
If unit B is in the uses clause in the interface part of unit A, unit A cannot be in the
uses clause in the interface part of unit B. This creates a circular unit reference, and
when you attempt to compile, Delphi generates an error message.
• It can appear immediately after the reserved word implementation.
Only declarations in the current unit can use the declarations in the interface parts of
the units specified here. Any other units that use the current unit won’t be able to use
the units listed in this uses clause.
For example, if unit C is in a uses clause in the implementation part of unit B, and
unit B is in a uses clause of unit A, unit A can use only the declarations in the
interface parts of unit B. Unit A can’t access the declarations in unit C, unless unit C is
in a uses clause of unit A.
If unit B is in the uses clause in the implementation part of unit A, unit A can be in
the uses clause in the implementation part of unit B. While circular unit references
are not allowed in the interface part, they are fine in the implementation part.
Interface part
The interface part of a unit begins with the reserved word interface, which appears
after the unit header and ends at the reserved word implementation. The interface
determines what is “visible” (accessible) to any application or other unit using this unit.
In the unit interface part, you can declare constants, data types, variables, procedures,
and functions. If Delphi builds a unit for you as you design a form, the form data type,
the form variable that creates an instance of the form, and the event handlers are
declared in the interface part. You can see examples of these in Chapter 6.
The procedures and functions visible to any unit or application using the unit are
declared in the interface part. Their actual bodies—their implementations—are found
in the implementation part. You don’t need to use forward declarations, and they aren’t
allowed in the interface part. The interface part lists all the procedure and function
headers; the implementation part contains the coded logic of the procedures and
functions, including those that are event handlers.
Chapter 5, Writing Object Pascal code
207
An optional uses clause can appear in the interface and must immediately follow the
interface reserved word.
Implementation part
The implementation part of a unit begins with the reserved word implementation.
Everything declared in the interface part is accessible to the code in the implementation
part.
The implementation can have additional declarations of its own, although these
declarations aren’t accessible to any other application or unit. These declarations are
used by the procedures, functions, and event handlers declared in this unit.
An optional uses clause can appear in the implementation part and must immediately
follow the implementation reserved word.
The bodies of the routines declared in the interface part must appear in the
implementation part. The procedure or function header that appears in the
implementation part can be identical to the declaration that appears in the interface
part, or it can be in the short form.
To use the short form, type the procedure or function reserved word and follow it with
the routine’s name. You can omit any list of parameters, and, if the routine is a function,
the return type. For example, suppose you declare this function in the interface part:
function CalculateInterest(Principal, InterestRate: Double): Double;
When you write the body of the function in the implementation part, you can choose to
write the function like this:
function CalculateInterest;
begin
Result := Principal * InterestRate;
end;
Note that the parameter and the return type have been omitted.
If you declare any routines in the implementation part (not in the interface part), you
must use the long form of the procedure or function header.
Initialization part
If you want to initialize any data the unit uses or makes available through the interface
part to the application or unit using it, you can add an initialization part to the unit.
Above the final end reserved word at the bottom of the unit, add the reserved word
initialization. Between the initialization and end reserved words, you write the code
that initializes the data. For example,
initialization
{ Your initialization code goes here }
end.
When an application uses a unit, the code within the unit’s initialization part is called
before the any other application code runs. If the application uses more than one unit,
each unit’s initialization part is called before the rest of the application runs.
208
Delphi User’s Guide
How units are used
To use another unit, you need to add the name of that unit to the uses clause of your
current unit. Delphi does this automatically when you add new components to a form
you are designing. If you add a component declared in a unit that isn’t already in the
standard Delphi uses clause, Delphi adds the unit name to the uses clause for you.
For example, if you add a color grid to a form, Delphi attaches ColorGrd to the end of the
unit’s uses clause. This makes all the declarations in the ColorGrd unit available to the
unit associated with the form.
A few objects declared in units have no corresponding visual components in the Delphi
environment, however. For example, if you want to use predefined message boxes in
the code within a unit, you must add the MsgDlg unit to the uses clause yourself. The
same is true if you want to use the TPrinter object in the Printers unit.
■
To add a unit name to the uses clause, put the unit name before the semicolon (;) that
ends the uses clause, separating the unit name from the previous unit name in the
clause with a comma.
■
To use a routine declared in another unit, preface the name of the routine with the name
of the unit in which it is declared.
For example, to call a ComputePayment function declared in Unit1 from Unit2, make the
call like this:
Amount := Unit1.ComputePayment(1000, .085, 242);
You can preface any identifier—property, constant, data type, variable, or routine—
with the unit name.
The uses clause in the implementation part
Object Pascal allows you to put an optional uses clause in a unit’s implementation part.
If you put it in, it must appear immediately following the implementation reserved
word.
A uses clause in the implementation part lets you hide the inner details of a unit,
because units specified in the implementation part aren’t visible (accessible) to the users
of the unit.
Writing a unit “from scratch”
You are free to add code to any unit that Delphi creates. You must not alter the code that
Delphi generates, however.
If you want to create a new unit in your project that is not associated with a form, Delphi
gets you started.
■
To create a new unit, choose File|New Unit.
A new unit is added to your current project. The source code of the new unit looks like
this:
Chapter 5, Writing Object Pascal code
209
unit Unit2;
interface
implementation
end.
The name Delphi selects for your unit depends on how many units are already in your
project. You can then fill in this skeleton unit to include the code that you want.
Note that the end reserved word is not paired with a begin reserved word. If you like,
you can add an initialization reserved word above the find end reserved word to create
an initialization part. Many of the units you write don’t require any initialization code,
as they are often collections of related procedures, functions, and data types. If you do
want to include initialization code, add the initialization reserved word and put the
initializing code between between initialization and end.
When you choose to compile or build your project, the new units you added are
compiled into files with .DCU file extensions. When the MYUNIT.PAS file is compiled,
for example, the resulting file is MYUNIT.DCU. This newly created file is machine code
that is linked into your project executable file.
Adding an existing unit to a project
If you want to use a unit that is already complete, whether it is a unit Delphi created that
is associated with a form, or whether you or someone else wrote the unit from scratch,
you can simply add it to your project.
■
To add an existing unit to your project,
1 Open the project you want to add the unit to.
2 Choose File|Open File, select the source code (the .PAS file) of the unit you want
added, and choose OK.
Summary
This chapter presented these topics:
• Writing readable code
It doesn’t matter to the compiler how you space, indent, or capitalize your code, or
where you break lines of code. As long as the syntax of your code is correct, the
compiler can handle it. You should, however, choose a style that makes your code
easily readable by you and others.
Enclose all comments in your code within braces ({ }).
• Writing assignment statements
Assignment statements assign the value on the right side of the statement to the
property or variable on the left side of the assignment statement. The assignment
210
Delphi User’s Guide
operator is a combination of a colon and an equal sign (:=). Assignment statements
look like this:
Edit1.Color := clRed;
Object Pascal statements end with a semicolon (;).
• Declaring variables
Before you can use a variable, you need to declare it. To declare a variable, you give it
a name and a type. For example, the following code declares the variable named
MyVariable to be of type Double:
var
MyVariable: Double;
Variable declaration sections begin with the reserved word var.
Object Pascal has several data types built into the language. You can create variables
of any of these predefined types. In general, you can assign values of a particular type
to a variable or property of the same type, or within the same category of types.
• Declaring constants
Before you can use a constant, you need to declare it. To declare a constant, you give
it a name and a value. For example, the following code declares the constant MyApp
to contain the string ‘Financial Calculator’:
const
MyApp = 'Financial Calculator';
Constants assume the type of the value declared in the constant declaration. Constant
declaration sections begin with the reserved word const.
• Calling procedures and functions
To call an existing procedure, type the name of the procedure as a statement in your
code. For example, the following statement calls the CutToClipboard method of the
memo control called Memo1:
Memo1.CutToClipboard;
You can pass parameters to procedures and functions. Parameters are surrounded by
parentheses in a procedure or function call. For example, this statement calls the
LoadFromFile procedure of a memo control named Memo1 and passes it the string
‘MYFILE.TXT’.
Memo1.Lines.LoadFromFile('MYFILE.TXT');
To call a function, you assign the return value of the function to a variable or property
in your code. For example,
Edit1.Text := IntToStr(Sum);
In this example, the compiler executes the IntToStr function, passing it the value in
the Sum parameter. IntToStr converts the Sum value to a string, and this string return
value is assigned to the Text property of an edit box named Edit1.
• Controlling the flow of code execution
Chapter 5, Writing Object Pascal code
211
Object Pascal has several statements that direct the flow of code execution.
• The if statement evaluates an expression and determines the flow of your code
based upon the result of that evaluation. For example,
if Edit1.Color := clLime then
Edit1.Text := 'Lime green';
An if statement can contain an else part. For example,
if Edit1.Color := clLime then
Edit1.Text := 'Lime green'
else
Edit1.Text := 'Some shade of blue';
An if statement can be nested within other if statements.
• The case statement can be used to branch to code in place of a series of if
statements if the expression being evaluated is an integer type (but not Longint), a
Char type, or an enumerated or subrange type. The logic of a case statement is
usually easier to see, and the code runs more quickly.
• The repeat statement is a looping statement that repeats a statement, or a series of
statements, until some condition is True. This condition is evaluated at the end of
the loop. A repeat statement always runs at least once.
• The while statement is a looping statement that evaluates a condition at the
beginning of the loop. Because a while statement doesn’t loop if the condition
evaluates to True, it is possible a while statement might not loop at all.
• The for statement is a looping statement that runs a specific number of times
depending on the value of a control variable. For loops are fast and efficient.
• Object Pascal blocks
Blocks are made up of an optional declaration part and a statement part. The
statement part is made up of code statements. The declaration part declares the
identifiers that are used by the code in the statement part.
Blocks can exist within other blocks. For example, a project block contains one or
more unit blocks, which contain one or more event handler blocks.
• Understanding scope
The scope of an identifier defines where the identifier is active. The identifier is local
in scope to the block in which it is declared. Once the execution of your code is
outside that block, the identifier is no longer within the same scope of the executing
code, so the code cannot directly use the identifier. Such an identifer that is not in
scope can be accessed if you preface the identifer name with the name of the block
and a period (.).
Identifiers declared in top-level blocks are local to the blocks they are declared in, but
global in scope to the blocks contained within the block.
• Writing a procedure or function
A procedure or function is made up of a header and a block.
212
Delphi User’s Guide
A procedure or function begins with a header that identifies the procedure and
function, and lists the parameters the routine uses, if any.
The block contains optional type, variable, and constant declarations, and the
statement part, the code that implements the logic of the routine.
Functions must assign a return value in the statement part of the function. The value
can be assigned to the name of the function, or to the Result variable.
Procedures and functions appear in the implementation part of a unit. They can be
declared in either the interface or implementation part, however, depending
whether they are to be used only by the current unit or by other units also.
The parameters of procedures and functions can be value, variable, or constant
parameters. A value parameter is a copy of the actual parameter. A variable
parameter is a reference to the actual parameter. A constant parameter never changes
in value.
• Defining new data types
You can create your own user-defined data types in Object Pascal. The user-defined
data types are
• Enumerated types—a list of values a variable or property of this type can assume.
Code can refer to these values by name, rather than by position in the list.
• Subrange types—a range of values of any of these types: integer, Boolean, Char, or
enumerated types.
• Array types—an ordered collection of a specified data type, with each element of
the collection accessible by its numeric position within the collection.
• Set types—a collection of elements of one type, either an integer, Boolean, Char,
enumerated, or subrange type.
• Record types—collections of data that your application can refer to as a whole.
Records contain fields, each with its own type, that contain data.
• Object types—collections of typed fields that contain data, and methods,
procedures and functions that act on the data in the fields.
• Understanding Object Pascal units
Units are collections of constants, data types, variables, procedures, and functions
that can be shared by several applications. Delphi comes with a large number of
predefined units your code can use. Your Delphi applications are composed of a
collection of units.
You create units as you design an application and write code in Delphi. You can also
write your own units that are not associated with forms.
Units always have an interface part, which includes all the declarations that are
accessible to other units as well as the current one.
Units always have an implementation part, which contains the bodies of the
procedures, functions, and methods—the coded logic of the unit.
Chapter 5, Writing Object Pascal code
213
An optional uses clause lists the units that the code in this unit can access. A uses
clause can appear in either the interface or implementation part of a unit, or in both
places.
Units can also have an optional initialization part.
214
Delphi User’s Guide
Chapter
6
Programming with Delphi objects
Chapter 6
Object-oriented programming (OOP) is a natural extension of structured programming.
OOP requires that you use good programming practices and makes it very easy for you
to do so. The result is clean code that is easy to extend and simple to maintain.
Once you create an object for an application, you and other programmers can then use
that same object in other applications. Reusing objects can greatly cut your development
time and increase productivity for yourself and others.
Together, Delphi and the Object Pascal language make programming with objects easier
than ever before. This chapter explains what you need to know about objects to use
Delphi effectively. If you want to create new components and put them on the Delphi
Component palette, see the Delphi Component Writer’s Guide.
These are the primary topics discussed in this chapter:
•
•
•
•
•
What is an object?
Inheriting data and code from an object
Object scope
Assigning values to object variables
Creating nonvisual objects
Before reading this chapter, you should know how to design a user interface for your
application using the Delphi tools, how a Delphi project is structured, and how to
handle events. You should also know the fundamentals of the Object Pascal language.
To review topics in any of these areas, refer to the appropriate chapters in this book, or
use Delphi’s online Help.
What is an object?
An object is a data type that wraps up data and code all into one bundle. Before OOP,
code and data were treated as separate elements.
Chapter 6, Programming with Delphi objects
215
Think of the work involved to assemble a bicycle if you have all the bicycle parts and a
list of instructions for the assembly process. This is analogous to writing a Windows
program from scratch without using objects. Delphi gives you a head start on “building
your bicycle” because it already gives you many of the “preassembled bicycle parts”—
the Delphi forms and components.
You can begin to understand what an Object Pascal object is if you understand what an
Object Pascal record is. In Chapter 5, you read that records are made of up fields that
contain data, and each of these fields has its own data type. Records make it easy to refer
to a related collection of varied data elements as one entity.
Objects are also collections of data elements. Like records, they also have fields, each of
which has its own data type.
Unlike records, objects also contain code—procedures and functions—that act on the
data contained in the object’s fields. These procedures and functions are called methods.
Also unlike records, objects can contain properties. The properties of Delphi objects
have default values. You can change these values at design time to modify an object to
suit the needs of your project without writing code. If you want a property value to
change at run time, you need to write only a very small amount of code.
Examining a Delphi object
When you choose to create a new project, Delphi displays a new form for you to
customize. In the Code Editor, Delphi declares a new object type for the form and
produces the code that creates the new form object. A later section discusses why a new
object type is declared for each new form. For now, examine the following example to
see what the code in the Code Editor looks like:
unit Unit1;
interface
uses WinTypes, WinProcs, Classes, Graphics, Forms, Controls, Apps;
type
TForm1 = class(TForm)
private
{ Private declarations }
public
{ Public declarations }
end;
{ The type declaration of the form begins here }
{ The type declaration of the form ends here }
var
Form1: TForm1;
implementation
{ Beginning of implementation part }
{$R *.DFM}
end.
{ End of of implemntation part and unit}
The new object type is TForm1, and it is derived from type TForm, which is also an
object. A later section presents more about TForm and objects derived from other objects.
216
Delphi User’s Guide
Recall that an object is like a record in that they both contain data fields, but an object
also contains methods—code that acts on the object’s data. So far, type TForm1 appears
to contain no fields or methods, because you haven’t added to the form any components
(the fields of the new object), and you haven’t created any event handlers (the methods
of the new object). As discussed later, TForm1 does contain fields and methods, even
though you don’t see them in the type declaration.
This variable declaration declares a variable named Form1 of the new object type
TForm1.
var
Form1: TForm1;
Form1 is called an instance of the type TForm1. The Form1 variable refers to the form
itself to which you add components to design your user interface.
You can declare more than one instance of an object type. You might want to do this to
manage multiple child windows in a Multiple Document Interface (MDI) application,
for example. Each instance carries its own data in its own package, and all the instances
of an object use the same code.
Although you haven’t added any components to the form or written any code, you
already have a complete Delphi application that you can compile and run. All it does is
display a blank form because the form object doesn’t yet contain the data fields or
methods to do more.
Suppose, though, that you add a button component to this form and an OnClick event
handler for the button, that changes the color of the form when the user clicks the
button. You then have an application that’s about as simple as it can be and still actually
do something. Here is the form for the application:
Figure 6.1
A simple form
When the user clicks the button, the form changes color to green. This is the eventhandler code for the button OnClick event:
procedure TForm1.Button1Click(Sender: TObject);
begin
Form1.Color := clGreen;
end;
Chapter 6, Programming with Delphi objects
217
If you create this application and then look at the code in the Code Editor, this is what
you see:
unit Unit1;
interface
uses WinTypes, WinProcs, Classes, Graphics, Forms, Controls, Apps;
type
TForm1 = class(TForm)
Button1: TButton;
procedure Button1Click(Sender: TObject);
private
{ Private declarations }
public
{ Public declarations }
end;
{ New data field }
{ New method declaration }
var
Form1: TForm1;
implementation
{$R *.DFM}
procedure TForm1.Button1Click(Sender: TObject);
begin
Form1.Color := clGreen;
end;
{ The code of the new method }
end.
The new TForm1 object now has a Button1 field—that’s the button you added to the
form. TButton is an object type, so Button1 is also an object. Object types, such as TForm1,
can contain other objects, such as Button1, as data fields. Each time you put a new
component on a form, a new field with the component’s name appears in the form’s
type declaration.
All the event handlers you write in Delphi are methods of the form object. Each time
you create an event handler, a method is declared in the form object type. The TForm1
type now contains a new method, the Button1Click procedure, declared within the
TForm1 type declaration.
The actual code for the Button1Click method appears in the implementation part of the
unit. The method is the same as the empty event handler you created with Delphi and
then filled in to respond when the user clicks the button as the application runs.
Changing the name of a component
You should always use the Object Inspector to change the name of a component. For
example, when you change the default name of a form from Form1 to something else by
changing the value of the Name property using the Object Inspector, the name change is
reflected throughout the code Delphi produces. If you wrote the previous application,
but named the form ColorBox, this is how your code would appear:
218
Delphi User’s Guide
unit Unit1;
interface
uses WinTypes, WinProcs, Classes, Graphics, Forms, Controls, Apps;
type
TColorBox = class(TForm)
Button1: TButton;
procedure Button1Click(Sender: TObject);
private
{ Private declarations }
public
{ Public declarations }
end;
var
ColorBox: TColorBox;
{ Changed from TForm1 to TColorBox }
{ Changed from Form1 to ColorBox }
implementation
{$R *.DFM}
procedure TColorBox.Button1Click(Sender: TObject);
begin
Form1.Color := clGreen;
{ The reference to Form1 didn't change! }
end;
end.
Notice that the name of the form object type changed from TForm1 to TColorBox. Also
note that the form variable is now ColorBox, the name you gave to the form. References
to the ColorBox variable and the TColorBox type also appear in the final begin and end
block of code, the code that creates the form object and starts the application running. If
Delphi originally generated the code, it updates it automatically when you use the
Object Inspector to change the name of the form or any other component.
Note that the code you wrote in the OnClick event handler for the button hasn’t
changed. Because you wrote the code, you have to update it yourself and correct any
references to the form if you change the form’s name. If you don’t, your code won’t be
compiled. In this case, change the code to this:
procedure TColorBox.Button1Click(Sender: TObject);
begin
ColorBox.Color := clGreen;
end;
You should change the name of a component only with the Object Inspector. While
nothing prevents you from altering the code Delphi produced and changing the name
of component variables, you won’t be able to compile your program.
Inheriting data and code from an object
The TForm1 object described on page 217 might seem quite simple. If you create the
application, TForm1 appears to contain one field, Button1, one method, Button1Click, and
Chapter 6, Programming with Delphi objects
219
no properties. Yet you can change the size of the form, add or delete minimize and
maximize buttons, or set up the form to become part of a Multiple Document Interface
(MDI) application. How is it possible to do all these things with a form that contains
only one field and one method?
The answer lies in the notion of inheritance. Recalling the bicycle analogy, once you
have put together all the objects that make up a complete “bicycle object,” you can ride it
because it has all the essentials to make the bicycle useful—it has pedals you push to
make the wheels go around, it has a seat for you to sit on, it has handlebars so you can
steer, and so on. Similarly, when you add a new form to your project, it has all the
capabilities of any form. For example, all forms provide a space to put other components
on them, all forms have the methods to open, show, and hide themselves, and so on.
Suppose, though, that you want to customize that bicycle, just as you would customize
a form object in Delphi. You might adjust a few gear settings, add a headlight, and
provide a horn with a selection of sounds—just as you might customize a form by
adding or rearranging buttons, changing a few property values, and adding a new
method that allows the form to appear with a plaid background.
To change the bicycle to make it exactly as you want it, you start with the basic model
and then customize it. You do the same thing with Delphi forms. When you add a new
form to your project, you’ve added the “basic model” form. By adding components to
the form, changing property values, and writing event handlers, you are customizing
the new form.
To customize any object, whether it be a blank form, a form with multiple controls that
is used as a dialog box, or a new version of the Delphi bitmap button, you start by
deriving a new object from an existing object. When you add a new form to your project,
Delphi automatically derives a new form object for you from the TForm type.
At the moment a new form is added to a project, the new form object is identical to the
TForm type. Once you add components to it, change properties, and write event
handlers, the new form object and the TForm type are no longer the same.
No matter how you customize your bicycle, it can still do all the things you expect a
bicycle to do. Likewise, a customized form object still exhibits all the built-in capabilities
of a form, and it can still do all the things you expect a form to do, such as change color,
resize, close, and so on. That’s because the new form object inherits all the data fields,
properties, methods, and events from the TForm type.
When you add a new form to an Delphi project, Delphi creates a new object type,
TForm1, deriving it from the more generic object, TForm. The first line of the TForm1 type
declaration specifies that TForm1 is derived from TForm:
TForm1 = class(TForm)
Because TForm1 is derived from TForm, all the elements that belong to a TForm type
automatically become part of the TForm1 type. If you look up TForm in online Help (you
can click the form itself and press F1), you see lists of all the properties, methods, and
events in the TForm object type. You can use all the elements inherited from TForm in
your application. Only the elements you specifically add to your TForm1 type, such as
components you place on the form or event handlers (methods) you write to respond to
220
Delphi User’s Guide
events, appear in the TForm1 type declaration. These are the things that make TForm1
different from TForm.
The more broad-based or generic object from which another more customized object
inherits data and code is called the ancestor of the customized object. The customized
object itself is a descendant of its ancestor. An object can have only one immediate
ancestor, but it can have many descendants. For example, TForm is the ancestor type of
TForm1, and TForm1 is a descendant of TForm. All form objects are descendants of
TForm, and you can derive many form objects from TForm.
Figure 6.2
Inheriting from TForm
TForm
TForm1
TForm2
TForm3
MyDialogBox
Objects, components, and controls
When you look up TForm in online Help, you’ll notice that TForm is called a component.
Don’t let this confuse you. All components and controls are also objects. The
terminology used in the documentation comes from the inheritance hierarchy of the
Delphi Visual Component Library. Figure 6.3 is a greatly simplified diagram of the
hierarchy, omitting some intermediary objects. To see a more complete diagram, refer to
the Delphi Component Writer’s Guide:
Figure 6.3
A simplified hierarchy diagram
TObject
TComponent
TControl
TForm
TButton
TCheckBox
TListBox
Everything in this hierarchy is an object. Components, which inherit data and code from
a TObject type, are objects with additional properties, methods, and events that make
them suitable for specialized purposes, such as the ability to save their state to a file.
Controls, which inherit data and code from a TComponent type (which in turn inherits
elements from TObject) have additional specialized capabilities, such as the ability to
Chapter 6, Programming with Delphi objects
221
display something. So controls are components and objects, components are objects but
not necessarily controls, and objects are simply objects. This chapter refers to all
components and controls as objects.
Even though TCheckBox isn’t an immediate descendant of TObject, it still has all the
attributes of any object because TCheckBox is ultimately derived from TObject in the VCL
hierarchy. TCheckBox is a very specialized kind of object that inherits all the functionality
of TObject, TComponent, and TControl, and defines some unique capabilities of its own.
Object scope
An object’s scope determines the availability and accessibility of the data fields,
properties, and methods within that object. Using the earlier bicycle analogy, if you
were to add a headlight only to your customized “bicycle object,” the headlight would
belong to that bicycle and to no other. If, however, the “basic model bicycle object”
included a headlight, then all bicycle objects would inherit the presence of a headlight.
The headlight could lie either within the scope of the ancestor bicycle object—in which
case, a headlight would be a part of all descendant bicycle objects—or within the scope
only of the customized bicycle object, and available only to that bicycle.
Likewise, all data fields, properties, and methods declared within an object declaration
are within the scope of the object, and are available to that object and its descendants.
Even though the code that makes up the methods appears outside of the object
declaration in the implementation part of the unit, those methods are still within the
scope of the object because they were declared within the object’s declaration.
When you write code in an event handler of an object that refers to properties, methods,
or fields of the object itself, you don’t need to preface these identifiers with the name of
the object variable. For example, if you put a button and an edit box on a new form, you
could write this event handler for the OnClick event of the button:
procedure TForm1.Button1Click(Sender: TObject);
begin
Color := clFuchsia;
Edit1.Color := clLime;
end;
The first statement colors the form. You could have written the statement like this:
Form1.Color := clFuchsia
It’s not necessary, however, to put the Form1 qualifier on the Color property because the
Button1Click method is within the scope of the TForm1 object. Any time you are within
an object’s scope, you can omit the qualifier on all properties, methods, and fields that
are part of the object.
The second statement refers to the Color property of a TEdit object. Because you want to
access the Color property of the TEdit1 type, not of the TForm1 type, you need to specify
the scope of the Color property by including the name of the edit box, so the compiler
can determine which Color property you are referring to. If you omit it, the second
statement is like the first; the form ends up lime green, and the edit box control remains
unchanged when the handler runs.
222
Delphi User’s Guide
Because it’s necessary to specify the name of the edit box whose Color property you are
changing, you might wonder why it’s not necessary to specify the name of the form as
well. This is unnecessary because the control Edit1 is within the scope of the TForm1
object; it’s declared to be a data field of TForm1.
Accessing components on another form
If Edit1 were on some other form, you would need to preface the name of the edit box
with the name of the form object variable. For example, if Edit1 were on Form2, it would
be a data field in the TForm2 object declaration, and would lie with the scope of Form2.
You would write the statement to change the color of the edit box in Form2 from the
TForm1.ButtonClick method like this:
Form2.Edit1.Color := clLime;
In the same way, you can also access methods of a component on another form. For
example,
Form2.Edit1.Clear;
To give the code of Form1 access to properties, methods, and events of Form2, you need
to add Unit2 to the uses clause of Unit1 (assuming the units associated with Form1 and
Form2 are named Unit1 and Unit2, respectively). For more information about the uses
clause, see the section, “Understanding Object Pascal units” starting on page 206 in
Chapter 5.
Scope and descendants of an object
The scope of an object extends to all the object’s descendants. That means all the data
fields, properties, methods, and events that are part of TForm are within the scope of
TForm1 also, because TForm1 is a descendant of TForm. Your application won’t be able
to declare a data field using the same name as a data field in the object’s ancestor.
If Delphi displays a duplicate-identifier message, it’s possible a data field with the same
name already exists in the ancestor object, such as in TForm. If you see the duplicate
identifier message and you don’t understand why, try altering the name of the identifier
slightly. It might be that you happened to choose the name of a data field in an ancestor
object.
Overriding a method
You can, however, use the name of a method within an ancestor object to declare a
method within a descendant object. This is how you override a method. You would most
likely want to override an existing method if you want the method in the descendant
object to do the same thing as the method in the ancestor object, but the task is
accomplished in another way. In other words, the code that implements the two
methods differs.
It’s not often that you would want to override a method unless you are creating new
components. You should be aware that you can do so, though, and that you won’t
receive any warning or error message from the compiler. You can read more about
overriding methods in the Delphi Component Writer’s Guide.
Chapter 6, Programming with Delphi objects
223
Public and private declarations
When you build an application using the Delphi environment, you are adding data
fields and methods to a descendant of TForm. You can also add fields and methods to an
object without putting components on a form or filling in event handlers, but by
modifying the object type declaration directly.
You can add new data fields and methods to either the public or private part of an
object. Public and private are standard directives in the Object Pascal language. Treat
them as if they were reserved words. When you add a new form to the project, Delphi
begins constructing the new form object. Each new object contains the public and
private directives that mark locations for data fields and methods you want to add to
the code directly. For example, note the private and public parts in this new form object
declaration that so far contains no fields or methods:
type
TForm1 = class(TForm)
private
{ Private declarations }
public
{ Public declarations }
end;
Use the public part to
• Declare data fields you want methods in objects in other units to access
• Declare methods you want objects in other units to access
Declarations in the private part are restricted in their access. If you declare fields or
methods to be private, they are unknown and inaccessible outside the unit the object is
defined in. Use the private part to
• Declare data fields you want only methods in the current unit to access
• Declare methods you want only objects defined in the current unit to access
To add data fields or methods to a public or private section, put the fields or method
declarations after the appropriate comment, or erase the comments before you add the
code. Here is an example:
type
TForm1 = class(TForm)
Edit1: TEdit;
Button1: TButton;
procedure Button1Click(Sender: TObject);
private
{ Private declarations }
Number: Integer;
function Calculate(X, Y: Integer): Integer;
public
{ Public declarations }
procedure ChangeColor;
end;
224
Delphi User’s Guide
Place the code that implements the Calculate and ChangeColor methods in the
implementation part of the unit.
The Number data field and Calculate function are declared to be private. Only objects
within the unit can use Number and Calculate. Usually, this restriction means that only
the form object can use them, because each Delphi unit contains just one object type
declaration of type TForm.
Because the ChangeColor method is declared to be public, code in other units can use it.
Such a method call from another unit must include the object name in the call:
Form1.ChangeColor;
The unit making this method call must have Form1 in its uses clause.
Note
When adding fields or methods to an object, always put the fields before the method
declarations within each public or private part.
Accessing object fields and methods
When you want to change the value of a property of an object that is a field in the form
object, or you want to call a method of an object that is a field in the form object, you
must include the name of that object in the property name or method call. For example,
if your form has an edit box control on it and you want to change the value of its Text
property, you should write the assignment statement something like this, making sure
to specify the name of the edit box (in this example, Edit1):
Edit1.Text := 'Frank Borland was here';
Likewise, if you want to clear the text selected in the edit box control, you would write
the call to the ClearSelection method like this:
Edit1.ClearSelection;
If you want to change several property values or call several methods for an object that
is a field in a form object, you can use the with statement to simplify your code. The
with statement is as convenient to use with objects as it is with records. For example,
this is an event handler that makes several changes to a list box when a user clicks the
button on the form:
procedure TForm1.Button1Click(Sender: TObject);
begin
ListBox1.Clear;
ListBox1.MultiSelect := True;
ListBox1.Items.Add('One');
ListBox1.Items.Add('Two');
ListBox1.Items.Add('Three');
ListBox1.Sorted := True;
ListBox1.Font.Style := [fsBold];
ListBox1.Font.Color := clPurple;
ListBox1.Font.Name := 'Times New Roman';
ListBox1.ScaleBy(125, 100);
end;
Chapter 6, Programming with Delphi objects
225
If the code uses a with statement, it looks like this:
procedure TForm1.Button1Click(Sender: TObject);
begin
with ListBox1 do
begin
Clear;
MultiSelect := True;
Items.Add('One');
Items.Add('Two');
Items.Add('Three');
Sorted := True;
Font.Style := [fsBold];
Font.Color := clPurple;
Font.Name := 'Times New Roman';
ScaleBy(125, 100);
end;
end;
By using the with statement, you don’t have to qualify each reference to a ListBox1
property or method with the ListBox1 identifier. Within the with statement, all the
properties and methods called are local in scope to the ListBox1 object variable.
Assigning values to object variables
You can assign one object variable to another object variable if the variables are of the
same type or assignment compatible, just as you can assign variables of any type other
than objects to variables of the same type or assignment-compatible types. For example,
if objects TForm1 and TForm2 are derived from type TForm, and the variables Form1 and
Form2 have been declared, you could assign Form1 to Form2:
Form2 := Form1;
You can also assign an object variable to another object variable if the type of the
variable you are assigning a value to is an ancestor of the type of the variable being
assigned. For example, here is a TDataForm type declaration and a variable declaration
section declaring two variables, AForm and DataForm:
type
TDataForm = class(TForm)
Button1: TButton;
Edit1: TEdit;
DataGrid1: TDataGrid;
Database1: TDatabase;
TableSet1: TTableSet;
VisibleSession1: TVisibleSession;
private
{ Private declarations }
public
{ Public declarations }
end;
var
226
Delphi User’s Guide
AForm: TForm;
DataForm: TDataForm;
AForm is of type TForm, and DataForm is of type TDataForm. Because TDataForm is a
descendant of TForm, this assignment statement is legal:
AForm := DataForm;
You might wonder why this is important. Taking a look at what happens behind the
scenes when your application calls an event handler shows you why.
Suppose you fill in an event handler for the OnClick event of a button. When the button
is clicked, the event handler for the OnClick event is called.
Each event handler has a Sender parameter of type TObject. For example, note the Sender
parameter in this empty Button1Click handler:
procedure TForm1.Button1Click(Sender: TObject);
begin
end;
If you look back at Figure 6.3, “A simplified hierarchy diagram” on page 221, you’ll
recall that TObject is at the top of the Delphi Visual Component Library. That means that
all Delphi objects are descendants of TObject. Because Sender is of type TObject, any
object can be assigned to Sender. Although you don’t see the code that makes the
assignment, the component or control to which the event happened is assigned to
Sender. This means the value of Sender is always the control or component that responds
to the event that occurred.
How is this information useful? You can test Sender to find the type of component or
control that called the event handler using the reserved word is. For example,
if Sender is TEdit then
DoSomething
else
DoSomethingElse;
The drag-and-drop demonstration project shipped as part of the Delphi package has a
project file named DRAGDROP.DPR. If you load the project and look at the
DROPFONT.PAS unit code, you’ll find that the Memo1DragOver method checks the
type of an object variable. In this case, the parameter is Source rather than Sender:
procedure TForm1.Memo1DragOver(Sender, Source: TObject; X, Y: Integer;
State: TDragState; var Accept: Boolean);
begin
Accept := Source is TLabel;
end;
The Source parameter is also of type TObject. Source is assigned the object that is being
dragged. The purpose of the Memo1DragOver method is to ensure that only labels can be
dragged. Accept is a Boolean parameter, so it can have only one of two values, True or
False. If Accept is True, the control the user has selected to drag can be dragged. If Accept
is False, the user can’t drag the selected control.
Chapter 6, Programming with Delphi objects
227
This expression is assigned to the Accept variable:
Source is TLabel
The is reserved word checks the Source variable to determine if Source is of type TLabel. If
it is, the expression evaluates to True. Because the expression becomes True only when
the user tries to drag a label, Accept becomes True only under the same circumstances.
The next event handler in the drag-and-drop demonstration, Memo1DragDrop, also uses
the Source parameter. The purpose of this method is to change the font of the text in the
memo control to the font of the label dropped on the memo control. Here is the
method’s implementation:
procedure TForm1.Memo1DragDrop(Sender, Source: TObject; X, Y: Integer);
begin
Memo1.Font := (Source as TLabel).Font;
end;
When writing the assignment statement in this handler, the developer didn’t know
which label the user would drag. By referring to the name of the label as (Source as
TLabel), the font of the label the user dropped is assigned to Memo1.Font because Source
contains the name of the control the user dragged and dropped. Only if Source is a label
does the event handler allow the assignment to occur.
Creating nonvisual objects
Most of the objects you use in Delphi are components you can see at both design time
and run time, such as edit boxes and string grids. A few, such as common dialog boxes,
are components you don’t see at design time, but they appear at run time. Still others,
such as timers and data source components, never have any visual representation in
your application at run time, but they are there for your application to use.
Occasionally you might want to create your own nonvisual objects for your application.
For example, you might want to create a TEmployee object that contains Name, Title, and
HourlyPayRate fields. You could then add a CalculatePay method that uses the data in the
HourlyPayRate field to compute a paycheck amount for a given period.
The TEmployee type declaration could look like this:
type
TEmployee = class(TObject)
Name: string[25];
Title: string[25];
HourlyRate: Double;
function CalculatePayAmount: Double;
end;
In this case, TEmployee is derived from TObject. TEmployee contains three fields and one
method. Because it is derived from TObject, TEmployee also contains all methods of
TObject (TObject has no fields).
Place object type declarations you create without the help of Delphi in the type
declaration part of your unit along with the form type declaration.
228
Delphi User’s Guide
In the variable declaration part of the unit, you need to declare a variable of the new
type:
var
Employee: TEmployee;
Creating an instance of an object
TEmployee is just an object type. An actual object doesn’t exist in memory until the object
is instantiated, or created, by a constructor call. A constructor is a method that allocates
memory for the new object and points to the new object, which is called an instance of
the object type. Calling the Create method, the constructor, assigns this instance to a
variable.
If you want to declare an instance of the TEmployee type, your code must call Create
before you can access any of the fields of the object:
Employee := TEmployee.Create;
In the TEmployee type declaration, there isn’t a Create method, but because TEmployee is
derived from TObject, and TObject has a Create method, TEmployee can call Create to
create a TEmployee instance, which is assigned to the Employee variable.
Now you are ready to access the fields of an Employee object, just as you would any other
Delphi object.
Destroying your object
When you are through using your object, you should destroy it, which releases the
memory the object used. You destroy an object by calling a destructor, a method that
releases the memory allocated to the object.
Delphi has two destructors you can use, Destroy and Free. You should almost always use
Free. In its implementation, the Free method calls Destroy, but only when the instance
pointer isn’t nil; in other words, the pointer still points to the instance. For this reason, it
is safer to call Free than Destroy. Also, calling Free is slightly more efficient in the
resulting code size.
To destroy the Employee object when you have finished using it, you would make this
call:
Employee.Free;
Just as it inherits the Create method, TEmployee inherits Free from TObject.
To follow good programming practices, you should place your destructor call in the
finally part of a try..finally block, while placing the code that uses the object in the try
part. This assures that the memory allocated for your object is released even if an
exception occurs while your code is attempting to use the object. You can read about
exceptions and what a try..finally block is in Chapter 7.
You can find a more common example of creating a nonvisual object in Chapter 9. String
list objects are commonly used in Delphi applications.
Chapter 6, Programming with Delphi objects
229
Summary
This chapter presented these topics:
• What is an object?
An object is a data type that combines data and code. Like a record, an object contains
data fields. Unlike a record, an object also contains methods, procedures and
functions that act on the data, and properties.
• Inheriting data and code from an object
An object inherits all the data fields, methods, and properties of its ancestor object.
All the controls and components in the Delphi Visual Component Library are objects,
as they all descend from TObject.
• Object scope
All data fields, properties, and methods of an object are within the scope of the object.
Any time you refer to a data field, property, or method within the scope of the object,
you can omit the object qualifier.
An object’s scope extends to all descendants of the object.
You can use the public part of an object to declare data fields you want to be able to
access from methods in objects in other units and to declare methods you want other
objects in other units to be able to use.
You can use the private part of an object to restrict access to an object’s data fields and
methods.
You can access the fields and methods of an object using a with statement.
• Assigning values to object variables
You can assign one object variable to another object variable if the variables are of the
same type or are assignment compatible. Using the reserved word is, you can
determine which specific object is assigned to a variable. Also, instead of specifying a
particular object, you can use the as reserved word and specify any object of a
particular type in your code.
• Creating nonvisual objects
You can create your own nonvisual objects. Write the object type declaration in the
type declaration part of the unit. Before you can use the object, you need to instantiate
it with a call to the Create method. When you have finished using the object, you must
destroy it and release its allocated memory with a call to the Free method.
If you are interested in creating your own Delphi components, you can learn more
about objects by reading the Delphi Component Writer’s Guide.
230
Delphi User’s Guide
Chapter
7
Writing robust applications
Chapter 7
Delphi provides you with a mechanism to ensure that your applications are robust,
meaning that they handle errors in a consistent manner that allows the application to
recover from errors if possible and to shut down if need be, without losing data or
resources.
Error conditions in Delphi are indicated by exceptions. An exception is an object that
contains information about what error occurred and where it happened.
To use exceptions to create safe applications, you need to understand the following
tasks:
•
•
•
•
•
•
Protecting blocks of code
Protecting resource allocations
Handling RTL exceptions
Handling component exceptions
Silent exceptions
Defining your own exceptions
Protecting blocks of code
To make your applications robust, your code needs to recognize exceptions when they
occur and respond to them. If you don’t specify a response, the application will present
a message box describing the error. Your job, then, is to recognize places where errors
might happen, and define responses, particularly in areas where errors could cause the
loss of data or system resources.
When you create a response to an exception, you do so on blocks of code. When you
have a series of statements that all require the same kind of response to errors, you can
group them into a block and define error responses that apply to the whole block.
Blocks with specific responses to exceptions are called protected blocks because they can
guard against errors that might otherwise either terminate the application or damage
Chapter 7, Writing robust applications
231
data. A protected block starts with the reserved word try and ends with the reserved
word end. Between these reserved words, you put the statements you want to protect
and define the kind of responses you want to make for that block.
■
To protect blocks of code you need to understand
• Responding to exceptions
• Exceptions and the flow of execution
• Nesting exception responses
Responding to exceptions
When an error condition occurs, the application raises an exception, meaning it creates
an exception object. Once an exception is raised, your application can execute cleanup
code, handle the exception, or both.
Executing cleanup code
The simplest way to respond to an exception is to guarantee that some cleanup code is
executed. This kind of response doesn’t correct the condition that caused the error but
lets you ensure that your application doesn’t leave its environment in an unstable state.
You typically use this kind of response to ensure that the application frees allocated
resources, regardless of whether errors occur. For a detailed explanation, see “Protecting
resource allocations” later in this chapter.
Handling the exception
Handling an exception means making a specific response to a specific kind of exception.
This clears the error condition and destroys the exception object, which allows the
application to continue execution.
You typically define exception handlers to allow your applications to recover from
errors and continue running. Types of exceptions you might handle include attempts to
open files that don’t exist, writing to full disks, or calculations that exceed legal bounds.
Some of these, such as “File not found,” are easy to correct and retry, while others, such
as running out of memory, might be more difficult for the application or the user to
correct. For detailed explanations, see “Handling RTL exceptions,” “Handling
component exceptions,” and “Defining your own exceptions” in this chapter.
Exceptions and the flow of execution
Object Pascal makes it easy to incorporate error handling into your applications because
exceptions don’t get in the way of the normal flow of your code. In fact, by moving error
checking and error handling out of the main flow of your algorithms, exceptions can
simplify the code you write.
When you declare a protected block, you define specific responses to exceptions that
might occur within that block. When an exception occurs in that block, execution
immediately jumps to the response you defined, then leaves the block.
232
Delphi User’s Guide
Here’s some code, for example, that includes a protected block. If any exception occurs
in the protected block, execution jumps to the exception-handling part, which beeps.
Execution resumes outside the block.
ƒ
try
Font.Name := 'Courier';
Font.Size := 24;
Color := clBlue;
except
on Exception do MessageBeep(0);
end;
ƒ
{ begin the protected block }
{ if any exception occurs... }
{ ...in any of these statements... }
{ ...execution jumps to here }
{ this handles any exception by beeping }
{ execution resumes here, outside the protected block}
Nesting exception responses
Your code defines responses to exceptions that occur within blocks. Because Pascal
allows you to nest blocks inside other blocks, you can customize responses even within
blocks that already customize responses.
In the simplest case, for example, you can protect a resource allocation, and within that
protected block, define blocks that allocate and protect other resources. Conceptually,
that might look something like this:
Figure 7.1
Nested resource protections
{ allocate first resource }
try
{ allocate second resource }
try
{ code that uses both resources }
finally
{ release second resource }
end;
finally
{ release first resource }
end;
You can also use nested blocks to define local handling for specific exceptions that
overrides the handling in the surrounding block. Conceptually, that looks something
like this:
Chapter 7, Writing robust applications
233
Figure 7.2
Nested exception handlers
try
{ protected code }
try
{ specially protected code }
except
{ local exception handling }
end;
except
{ global exception handling }
end;
You can also mix different kinds of exception-response blocks, nesting resource
protections within exception handling blocks and vice versa.
Protecting resource allocations
One key to having a robust application is ensuring that if it allocates resources, it also
releases them, even if an exception occurs. For example, if your application allocates
memory, you need to make sure it eventually releases the memory, too. If it opens a file,
you need to make sure it closes the file later.
Keep in mind that exceptions don’t come just from your code. A call to an RTL routine,
for example, or another component in your application might raise an exception. Your
code needs to ensure that if these conditions occur, you release allocated resources.
To protect resources effectively, you need to understand the following:
• What kind of resources need protection?
• Creating a resource-protection block
What kind of resources need protection?
Under normal circumstances, you can ensure that an application frees allocated
resources by including code for both allocating and freeing. When exceptions occur,
however, you need to ensure that the application still executes the resource-freeing
code.
Some common resources that you should always be sure to release are
•
•
•
•
Files
Memory
Windows resources
Objects
The following event handler, for example, allocates memory, then generates an error, so
it never executes the code to free the memory:
234
Delphi User’s Guide
procedure TForm1.Button1Click(Sender: TComponent);
var
APointer: Pointer;
AnInteger, ADividend: Integer;
begin
ADividend := 0;
GetMem(APointer, 1024);
AnInteger := 10 div ADividend;
FreeMem(APointer, 1024);
end;
{ allocate 1K of memory }
{ this generates an error }
{ it never gets here }
Although most errors are not that obvious, the example illustrates an important point:
When the division-by-zero error occurs, execution jumps out of the block, so the
FreeMem statement never gets to free the memory.
In order to guarantee that the FreeMem gets to free the memory allocated by GetMem,
you need to put the code in a resource-protection block.
Creating a resource-protection block
To ensure that you free allocated resources, even in case of an exception, you embed the
resource-using code in a protected block, with the resource-freeing code in a special part
of the block. Here’s an outline of a typical protected resource allocation:
{ allocate the resource }
try
{ statements that use the resource }
finally
{ free the resource }
end;
The key to the try..finally block is that the application always executes any statements in
the finally part of the block, even if an exception occurs in the protected block. When
any code in the try part of the block (or any routine called by code in the try part) raises
an exception, execution immediately jumps to the finally part, which is called the
cleanup code. If no exception occurs, the cleanup code is executed in the normal order,
after all the statements in the try part.
Here’s an event handler, for example, that allocates memory and generates an error, but
still frees the allocated memory:
procedure TForm1.Button1Click(Sender: TComponent);
var
APointer: Pointer;
AnInteger, ADividend: Integer;
begin
ADividend := 0;
GetMem(APointer, 1024);
{ allocate 1K of memory }
try
AnInteger := 10 div ADividend;
{ this generates an error }
finally
FreeMem(APointer, 1024);
{ execution resumes here, despite the error }
end;
end;
Chapter 7, Writing robust applications
235
The statements in the termination code do not depend on an exception occurring. If no
statement in the try part raises an exception, execution continues through the
termination code.
Note
A resource-protection block doesn’t handle the exception. In fact, the termination code
doesn’t have information about whether an exception even occurred, so it can’t
determine whether it needs to handle an exception. If an exception occurs in a resourceprotection block, execution first goes to the termination code, then leaves the block with
the exception still raised. The block that contains the protected block can then respond to
the exception.
Handling RTL exceptions
When you write code that calls routines in the run-time library (RTL), such as
mathematical functions or file-handling procedures, the RTL reports errors back to your
application in the form of exceptions. By default, RTL exceptions generate a message
that the application displays to the user. You can define your own exception handlers to
handle RTL exceptions in other ways.
There are also silent exceptions that do not, by default, display a message. The
explanation of silent exceptions begins on page 243.
To handle RTL exceptions effectively, you need to understand the following:
•
•
•
•
•
What are the RTL exceptions?
Creating an exception handler
Providing default exception handlers
Handling classes of exceptions
Reraising the exception
What are the RTL exceptions?
The run-time library’s exceptions are defined in the SysUtils unit, and they all descend
from a generic exception-object type called Exception. Exception provides the string for
the message that RTL exceptions display by default.
There are seven kinds of exceptions raised by the RTL:
•
•
•
•
•
•
•
236
Input/output exceptions
Heap exceptions
Integer math exceptions
Floating-point math exceptions
Typecast exceptions
Conversion exceptions
Hardware exceptions
Delphi User’s Guide
Input/output exceptions
Input/output (I/O) exceptions can sometimes occur when the RTL tries to access files or
I/O devices. Most I/O exceptions are related to error codes returned by Windows or
DOS when accessing a file.
The SysUtils unit defines a generic input/output exception called EInOutError that
contains an object field named ErrorCode that indicates what error occurred. You can
access that field in the exception-object instance to determine how to handle the
exception, as shown in “Using the exception instance” on page 240.
Heap exceptions
Heap exceptions can sometimes occur when you try to allocate or access dynamic
memory. The SysUtils unit defines two heap exceptions called EOutOfMemory and
EInvalidPointer. Table 7.1 shows the specific heap exceptions, each of which descends
directly from Exception:
Table 7.1
Heap exceptions
Exception
Meaning
EOutOfMemory
EInvalidPointer
There was not enough space on the heap to complete the requested operation.
The application tried to dispose of a pointer that points outside the heap. Usually, this
means the pointer was already disposed of.
Integer math exceptions
Integer math exceptions can occur when you perform operations on integer-type
expressions. The SysUtils unit defines a generic integer math exception called EIntError.
The RTL never raises an EIntError, but it provides a base from which all the specific
integer math exceptions descend.
Table 7.2 shows the specific integer math exceptions, each of which descends directly
from EIntError.
Table 7.2
Integer math exceptions
Exception
Meaning
EDivByZero
ERangeError
EIntOverflow
Attempt to divide by zero.
Number or expression out of range.
Integer operation overflowed.
Floating-point math exceptions
Floating-point math exceptions can occur when you perform operations on real-type
expressions. The SysUtils unit defines a generic floating-point math exception called
EMathError. The RTL never raises an EMathError, but it provides a base from which all
the specific floating-point math exceptions descend.
Chapter 7, Writing robust applications
237
Table 7.3 shows the specific floating-point math exceptions, each of which descends
directly from EMathError:
Table 7.3
Floating-point math exceptions
Exception
Meaning
EInvalidOp
EZeroDivide
EOverflow
Processor encountered an undefined instruction.
Attempt to divide by zero.
Floating-point operation overflowed.
EUnderflow
Floating-point operation underflowed.
Typecast exceptions
Typecast exceptions can occur when you attempt to typecast an object into another type
using the as operator. The SysUtils unit defines an exception called EInvalidCast that the
RTL raises when the requested typecast is illegal.
Conversion exceptions
Conversion exceptions can occur when you convert data from one form to another
using functions such as IntToStr, StrToInt, StrToFloat, and so on. The SysUtils unit
defines an exception called EConvertError that the RTL raises when the function cannot
convert the data passed to it.
Hardware exceptions
Hardware exceptions can occur in two kinds of situations: either the processor detects a
fault it can’t handle, or the application intentionally generates an interrupt to break
execution. Hardware exception-handling is not compiled into DLLs, only into
standalone applications.
The SysUtils unit defines a generic hardware exception called EProcessorException. The
RTL never raises an EProcessorException, but it provides a base from which the specific
hardware exceptions descend.
Table 7.4 shows the specific hardware exceptions.
Table 7.4
Hardware exceptions
Exception
Meaning
EFault
EGPFault
EStackFault
Base exception object from which all fault objects descend.
General protection fault, usually caused by an uninitialized pointer or object.
Illegal access to the processor’s stack segment.
EPageFault
EInvalidOpCode
The Windows memory manager was unable to correctly use the swap file.
Processor encountered an undefined instruction. This usually means the processor
was trying to execute data or uninitialized memory.
The application generated a breakpoint interrupt.
The application generated a single-step interrupt.
EBreakpoint
ESingleStep
You should rarely encounter the fault exceptions, other than the general protection fault,
because they represent serious failures in the operating environment. The breakpoint
238
Delphi User’s Guide
and single-step exceptions are generally handled by the integrated debugger within
Delphi.
Creating an exception handler
An exception handler is code that handles a specific exception or exceptions that occur
within a protected block of code.
■
To define an exception handler, embed the code you want to protect in an exceptionhandling block and specify the exception handling statements in the except part of the
block. Here is an outline of a typical exception-handling block:
try
{ statements you want to protect }
except
{ exception-handling statements }
end;
The application executes the statements in the except part only if an exception occurs
during execution of the statements in the try part. Execution of the try part statements
includes routines called by code in the try part. That is, if code in the try part calls a
routine that doesn’t define its own exception handler, execution returns to the
exception-handling block, which handles the exception.
When a statement in the try part raises an exception, execution immediately jumps to
the except part, where it steps through the specified exception-handling statements, or
exception handlers, until it finds a handler that applies to the current exception.
Once the application locates an exception handler that handles the exception, it executes
the statement, then automatically destroys the exception object. Execution continues at
the end of the current block.
Exception-handling statements
Each statement in the except part of a try..except block defines code to execute to handle
a particular kind of exception. The form of these exception-handling statements is as
follows:
on <type of exception> do <statement>;
You can define, for example, an exception handler for division by zero to provide a
default result:
function GetAverage(Sum, NumberOfItems: Integer): Integer;
begin
try
Result := Sum div NumberOfItems;
except
on EDivByZero do Result := 0;
end;
end;
Note that this is clearer than having to test for zero every time you call the function.
Here’s an equivalent function that doesn’t take advantage of exceptions:
Chapter 7, Writing robust applications
239
function GetAverage(Sum, NumberOfItems: Integer): Integer;
begin
if NumberOfItems <> 0 then
Result := Sum div NumberOfItems
else Result := 0;
end;
The difference between these two functions really defines the difference between
programming with exceptions and programming without them. This example is quite
simple, but you can imagine a more complex calculation involving hundreds of steps,
any one of which could fail if one of dozens of inputs were invalid.
By using exceptions, you can spell out the “normal” expression of your algorithm, then
provide for those exceptional cases when it doesn’t apply. Without exceptions, you have
to test every single time to make sure you’re allowed to proceed with each step in the
calculation.
Using the exception instance
Most of the time, an exception handler doesn’t need any information about an exception
other than its type, so the statements following on..do are specific only to the type of
exception. In some cases, however, you might need some of the information contained
in the exception instance.
To read specific information about an exception instance in an exception handler, you
use a special variation of on..do that gives you access to the exception instance. The
special form requires that you provide a temporary variable to hold the instance.
If you create a new project, for example, that contains a single form, you can add a scroll
bar and a command button to the form. Double-click the button and add the following
line to its click-event handler:
ScrollBar1.Max := ScrollBar1.Min - 1;
That line raises an exception because the maximum value of a scroll bar must always
exceed the minimum value. The default exception handler for the application opens a
dialog box containing the message in the exception object. You can override the
exception handling in this handler and create your own message box containing the
exception’s message string:
try
ScrollBar1.Max := ScrollBar1.Min - 1;
except
on E: EInvalidOperation do
MessageDlg('Ignoring exception: ' + E.Message, mtInformation, [mbOK], 0);
end;
The temporary variable (E in this example) is of the type specified after the colon
(EInvalidOperation in this example). You can use the as operator to typecast the exception
into a more specific type if needed.
Note
240
Never destroy the temporary exception object. Handling an exception automatically
destroys the exception object. If you destroy the object yourself, the application attempts
to destroy the object again, generating a fatal application error.
Delphi User’s Guide
Scope of exception handlers
You don’t have to provide handlers for every kind of exception in every block. In fact,
you need to provide handlers only for those exceptions you want to handle specially
within that particular block.
If a block doesn’t handle a particular exception, execution leaves that block and returns
to the block that contains the block (or to the code that called the block), with the
exception still raised. This process repeats with increasingly broad scope until either
execution reaches the outermost scope of the application or a block at some level
handles the exception.
Providing default exception handlers
You can provide a single default exception handler to handle any exceptions you
haven’t provided specific handlers for. To do that, you add an else part to the except
part of the exception-handling block:
try
{ statements }
except
on ESomething do { specific exception-handling code };
else { default exception-handling code };
end;
Adding default exception handling to a block guarantees that the block handles every
exception in some way, thereby overriding all handling from the containing block.
Warning!
You should probably never use this all-encompassing default exception handler. The
else clause handles all exceptions, including those you know nothing about. In general,
your code should handle only exceptions you actually know how to handle. In other
cases, it’s better to execute cleanup code and leave the handling to code that has more
information about the exception and how to handle it.
Handling classes of exceptions
Because exception objects are part of a hierarchy, you can specify handlers for entire
parts of the hierarchy by providing a handler for the exception class from which that
part of the hierarchy descends.
The following block outlines an example that handles all integer math exceptions
specially:
try
{ statements that perform integer math operations }
except
on EIntError do { special handling for integer math errors };
end;
You can still specify specific handlers for more specific exceptions, but you need to place
those handlers above the generic handler, because the application searches the handlers
in the order they appear in, and executes the first applicable handler it finds.
For example, this block provides special handling for range errors, and other handling
for all other integer math errors:
Chapter 7, Writing robust applications
241
try
{ statements performing integer math }
except
on ERangeError do { out-of-range handling };
on EIntError do { handling for other integer math errors };
end;
Note that if the handler for EIntError came before the handler for ERangeError, execution
would never reach the specific handler for ERangeError.
Reraising the exception
Sometimes when you handle an exception locally, you actually want to augment the
handling in the enclosing block, rather than replacing it. Of course, when your local
handler finishes its handling, it destroys the exception instance, so the enclosing block’s
handler never gets to act. You can, however, prevent the handler from destroying the
exception, giving the enclosing handler a chance to respond.
When an exception occurs, you might want to display some sort of message to the user,
then proceed with the standard handling. To do that, you declare a local exception
handler that displays the message then calls the reserved word raise. This is called
reraising the exception, as shown in this example:
try
{ statements }
try
{ special statements }
except
on ESomething do
begin
{ handling for only the special statements }
raise;
end;
end;
except
on ESomething do ...;
end;
{ reraise the exception }
{ handling you want in all cases }
If code in the { statements } part raises an ESomething exception, only the handler in the
outer except part executes. However, if code in the { special statements } part raises
ESomething, the handling in the inner except part is executed, followed by the more
general handling in the outer except part.
By reraising exceptions, you can easily provide special handling for exceptions in
special cases without losing (or duplicating) the existing handlers.
Handling component exceptions
Delphi’s components raise exceptions to indicate error conditions. Most component
exceptions indicate programming errors that would otherwise generate a run-time
error. The mechanics of handling component exceptions are no different than handling
RTL exceptions.
242
Delphi User’s Guide
A common source of errors in components is range errors in indexed properties. For
example, if a list box has three items in its list (0..2) and your application attempts to
access item number 3, the list box raises an “Index out of range” exception.
The following event handler contains an exception handler to notify the user of invalid
index access in a list box:
procedure TForm1.Button1Click(Sender: TObject);
begin
ListBox1.Items.Add('a string');
{ add a string to list box
ListBox1.Items.Add('another string');
{ add another string...
ListBox1.Items.Add('still another string');
{ ...and a third string
try
Caption := ListBox1.Items[3];
{ set form caption to fourth string in list box
except
on EListError do
MessageDlg('List box contains fewer than four strings', mtWarning, [mbOK], 0);
end;
end;
}
}
}
}
If you click the button once, the list box has only three strings, so accessing the fourth
string (Items[3]) raises an exception. Clicking a second time adds more strings to the list,
so it no longer causes the exception.
Silent exceptions
Delphi applications handle most exceptions that your code doesn’t specifically handle
by displaying a message box that shows the message string from the exception object.
You can also define “silent” exceptions that do not, by default, cause the application to
show the error message.
Silent exceptions are useful when you don’t intend to handle an exception, but you want
to abort an operation. Aborting an operation is similar to using the Break or Exit
procedures to break out of a block, but can break out of several nested levels of blocks.
Silent exceptions all descend from the standard exception type EAbort. The default
exception handler for Delphi applications displays the error-message dialog box for all
exceptions that reach it except those descended from EAbort.
■
There is a shortcut for raising silent exceptions. Instead of manually constructing the
object, you can call the Abort procedure. Abort automatically raises an EAbort exception,
which will break out of the current operation without displaying an error message.
The following code shows a simple example of aborting an operation. On a form
containing an empty list box and a button, attach the following code to the button’s
OnClick event:
procedure TForm1.Button1Click(Sender: TObject);
var
I: Integer;
begin
for I := 1 to 10 do
begin
{ loop ten times }
Chapter 7, Writing robust applications
243
ListBox1.Items.Add(IntToStr(I));
if I = 7 then Abort;
end;
end;
{ add a numeral to the list }
{ abort after the seventh one }
Defining your own exceptions
In addition to protecting your code from exceptions generated by the run-time library
and various components, you can use the same mechanism to manage exceptional
conditions in your own code.
To use exceptions in your code, you need to understand these steps:
• Declaring an exception object type
• Raising an exception
Declaring an exception object type
Because exceptions are objects, defining a new kind of exception is as simple as
declaring a new object type. Although you can raise any object instance as an exception,
the standard exception handlers handle only exceptions descended from Exception.
It’s therefore a good idea to derive any new exception types from Exception or one of the
other standard exceptions. That way, if you raise your new exception in a block of code
that isn’t protected by a specific exception handler for that exception, one of the
standard handlers will handle it instead.
For example, consider the following declaration:
type
EMyException = class(Exception);
If you raise EMyException but don’t provide a specific handler for EMyException, a
handler for Exception (or a default exception handler) will still handle it. Because the
standard handling for Exception displays the name of the exception raised, you could at
least see that it was your new exception raised.
Raising an exception
To indicate an error condition in an application, you can raise an exception which
involves constructing an instance of that type and calling the reserved word raise.
■
To raise an exception, call the reserved word raise, followed by an instance of an
exception object.
When an exception handler actually handles the exception, it finishes by destroying the
exception instance, so you never need to do that yourself.
Setting the exception address
Raising an exception sets the ErrorAddr variable in the System unit to the address where
the application raised the exception. You can refer to ErrorAddr in your exception
244
Delphi User’s Guide
handlers, for example, to notify the user of where the error occurred. You can also
specify a value for ErrorAddr when you raise an exception.
■
To specify an error address for an exception, add the reserved word at after the
exception instance, followed by and address expression such as an identifier.
For example, given the following declaration,
type
EPasswordInvalid = class(Exception);
you can raise a “password invalid” exception at any time by calling raise with an
instance of EPasswordInvalid, like this:
if Password <> CorrectPassword then
raise EPasswordInvalid.Create('Incorrect password entered');
Summary
Exceptions provide a powerful and flexible mechanism for reporting and responding to
error conditions in your applications. The Delphi run-time library and all the standard
components raise and respond to exceptions.
By handling exceptions in your applications, you can ensure that you don’t lose system
resources when your application must unexpectedly shut down, or you can enable the
application or the user to correct the error condition and retry the operation. In either
case, exceptions provide information necessary to the application and a mechanism you
can use to respond to error conditions.
Chapter 7, Writing robust applications
245
246
Delphi User’s Guide
Chapter
8
Using the integrated debugger
Chapter 8
No matter how careful you are when you write code, a newly completed program is
likely to contain errors, or bugs, that prevent it from running as it was designed to.
Debugging is the process of locating and fixing the errors in your programs.
Delphi contains an integrated debugger, so you can debug programs without leaving
Delphi integrated development environment. The following topics are discussed in this
chapter:
•
•
•
•
•
•
•
•
•
Types of bugs
Planning a debugging strategy
Starting a debugging session
Controlling program execution
Restarting the program
Using breakpoints
Examining program data values
Viewing function calls
Handling hardware and language exceptions
You can access the integrated debugger through either of two menus: Debug or View.
Types of bugs
The integrated debugger can help find two basic types of programming errors: run-time
errors and logic errors.
Run-time errors
If your program successfully compiles, but fails when you run it, you’ve encountered a
run-time error. Your program contains valid statements, but the statements cause errors
when they’re executed. For example, your program might be trying to open a
nonexistent file, or it might be trying to divide a number by zero. The operating system
Chapter 8, Using the integrated debugger
247
detects run-time errors and stops your program execution if such an error is
encountered.
Without a debugger, run-time errors can be difficult to locate because the compiler
doesn’t tell you where the error is located in your source code. Often, the only clue you
have to work with is where your program failed and the error message generated by the
run-time error.
Although you can find run-time errors by searching through your program source code,
the integrated debugger can help you quickly track down these types of errors. Using
the integrated debugger, you can run to a specific program location. From there, you
can begin executing your program one statement at a time, watching the behavior of
your program with each step. When you execute the statement that causes your
program to fail, you have pinpointed the error. From there, you can fix the source code,
recompile the program, and resume testing your program.
Logic errors
Logic errors are errors in design and implementation of your program. Your program
statements are valid (they do something), but the actions they perform are not the actions
you had in mind when you wrote the code. For instance, logic errors can occur when
variables contain incorrect values, when graphic images don’t look right, or when the
output of your program is incorrect.
Logic errors are often the most difficult type of errors to find because they can show up
in places you might not expect. To be sure your program works as designed, you need
to thoroughly test all of its aspects. Only by scrutinizing each portion of the user
interface and output of your program can you be sure that its behavior corresponds to
its design. As with run-time errors, the integrated debugger helps you locate logic errors
by letting you monitor the values of your program variables and data objects as your
program executes.
Planning a debugging strategy
After program design, program development consists of a continuous cycle of program
coding and debugging. Only after you thoroughly test your program should you
distribute it to your end users. To ensure that you test all aspects of your program, it’s
best to have a thorough plan for your debugging cycles.
One good debugging method involves breaking your program down into different
sections that you can systematically debug. By closely monitoring the statements in each
program section, you can verify that each area is performing as designed. If you do find
a programming error, you can correct the problem in your source code, recompile the
program, and then resume testing.
248
Delphi User’s Guide
Starting a debugging session
If you find a program run-time or logic error, you can begin a debugging session by
running your program under the control of the debugger.
■
To begin a debugging session,
1 Generate debug information when you compile your program.
2 Run your program from within Delphi.
When debugging, you have complete control of your program’s execution. You can
pause the program at any point to examine the values of program variables and data
structures, to view the sequence of function calls, and to modify the values of program
variables to see how different values affect the behavior of your program.
You can also use the debugger to watch each step of your program’s execution. By
stepping through your program’s source code (as described in “Stepping through code”
on page 252), you can monitor your program code as it is executed.
Generating debugging information
Before you can begin a debugging session, you need to compile your project with
symbolic debug information. Symbolic debug information, contained in a symbol table,
enables the debugger to make connections between your program’s source code and the
machine code that’s generated by the compiler. This way you can view the actual source
code of your program while running the program through the debugger.
■
Although Delphi generates symbolic debug information by default, you can manually
turn on symbolic debug information for your project with the following steps:
1 Choose Options|Project to open the Compiler Options dialog box.
2 Click the Compiler Options tab to access the debugging options.
3 Check the Debug Information and Local Symbols check boxes.
When you generate symbolic debug information for use with the internal debugger, the
compiler stores a symbol table in each associated .DCU file.
If you want to use Turbo Debugger (the standalone debugger), you also need to include
symbolic debug information in your final .EXE file.
■
To include symbolic debug information in your project’s compiled .EXE file,
1 Choose Options|Project to open the Compiler Options dialog box.
2 Click the Linker tab to access the linker options.
3 Check the Debug Info In EXE check box.
Note
Be aware that including symbolic debug information in your executable file
significantly increases the size of the final .EXE file. Because of this, you want to include
debug information in your files only during the development stage of your project.
Once your program is fully debugged, compile your program without debug
information to reduce the final .EXE file size.
Chapter 8, Using the integrated debugger
249
Before you begin
In order to access the integrated debugger commands, you need to make sure the
integrated debugger is enabled.
■
To enable the integrated debugger,
1 Choose Options|Environment and click the Preferences page tab.
2 Check the Integrated Debugging check box, if necessary (this box is checked by
default).
3 If you want, check the Minimize On Run check box to specify that the Delphi
environment be minimized when you run your program.
Running your program
Once you’ve compiled your program with debug information, you can begin a
debugging session by running your program from Delphi. The debugger takes control
whenever you run, trace, or step through your program code.
When you run your program under the control of the debugger, it behaves as it
normally would; your program creates windows, accepts user input, calculates values,
and displays output. In the time that your program is not running, the debugger has
control, and you can use its features to examine the current state of the program. By
viewing the values of variables, the functions on the call stack, and the program output,
you can ensure that the area of code you’re examining is performing as it was designed
to.
As you run your program through the debugger, you can watch the behavior of your
application in the windows it creates. For best results during your debugging sessions,
arrange your screen so you can see both the Code Editor and your application window
as you debug. To keep windows from flickering as the focus alternates between the
debugger windows and those of your application, arrange the windows so they don’t
overlap (tile the windows). With this setup, your program’s execution will be quicker
and smoother during the debugging session.
Specifying program arguments
If the program you want to debug uses command-line arguments, you can specify those
arguments from within Delphi.
■
To specify command-line arguments for your application,
1 Choose Run|Parameters.
2 In the Run Parameters dialog box, type the arguments you want to pass to your
program when you run it under the control of the integrated debugger.
3 Choose OK.
250
Delphi User’s Guide
Controlling program execution
The most important property of a debugger is that it lets you control the execution of
your program; you can control whether your program executes a single line of code, an
entire function, or an entire program block. By dictating when the program should run
and when it should pause, you can quickly move over the sections that you know work
correctly and concentrate on the sections that are causing problems. The integrated
debugger lets you control the execution of your program in the following ways:
•
•
•
•
Running to the cursor location
Stepping and tracing
Running to a breakpoint
Pausing your program
When running code through the debugger, all program execution is based on lines of
source code. The integrated debugger lets you control the rate of debugging to the level
of a single line of code. However, the debugger considers multiple program statements
on one line of text to be a single line of code; you cannot individually debug multiple
statements contained on a single line of text. In addition, the debugger regards a single
statement that’s spread over several lines of text as a single line of code.
Running to the cursor location
When beginning a debugging session, you often run your program to a spot just before
the suspected location of the problem. At that point, you want to ensure that all data
values are as they should be. If everything appears to be correct, you can run your
program to another location, and again check to ensure things are functioning correctly.
■
To run to a specific program location,
1 In the Code Editor, position the cursor on the line of code where you want to begin
(or resume) debugging.
2 Run to the cursor location using one of the following methods:
• Choose Run To Cursor from the Code Editor SpeedMenu.
• Choose Run|Run To Cursor.
• Press F4 (default key mapping).
When you run to the cursor, your program executes at full speed until the execution
reaches the location marked by the text cursor in the Code Editor. When the execution
encounters the code marked by the cursor, the debugger regains control and places the
execution point on that line of code.
The execution point
The execution point marks the next line of source code to be executed by the debugger.
Whenever you pause the program execution within the debugger (for example,
whenever you run to the cursor or step to a program location), the debugger highlights
a line of code, marking the location of the execution point. The execution point always
shows the next line of code to be executed, whether you are going to trace, step, or run
your program at full speed.
Chapter 8, Using the integrated debugger
251
Stepping through code
The Trace Into and Step Over commands offer the simplest way of moving through
your program code. While the two commands are very similar, they each offer a
different way to step through code. When you step, you watch your program execute
statements one at a time. After stepping, the program execution is paused, and you can
use the debugger to investigate the different aspects of your program.
Trace Into
The Trace Into command executes a single program statement at a time. If the execution
point is located on a call to a function that was compiled with debugging information,
choosing Trace Into causes the debugger to step into that function by placing the
execution point on the function’s first statement. However, if the execution point is
located on a function call that doesn’t contain debugging information (a library function,
for example), then choosing Trace Into runs that function at full speed, after which the
execution point is positioned on the statement following the function call.
If the execution point is located on the last statement of a function, choosing Trace Into
causes the debugger to return from the function, placing the execution point on the line
of code that follows the call to the function you are returning from.
The term single stepping refers to using Trace Into to successively run though the
statements in your program code.
■
To issue the Trace Into command, choose one of the following methods:
• Choose Run|Trace Into.
• Press F7 (default key mapping).
• Click the Trace Into SpeedButton.
Step Over
The Step Over command, like Trace Into, enables you to execute program statements
one at a time. However, if you issue the Step Over command when the execution point
is located on a function call, the debugger runs that function at full speed (instead of
tracing into it), then positions the execution point on the statement that follows the
function call.
■
To issue the Step Over command, choose from one of the following methods:
• Choose Run|Step Over.
• Press F8 (default key mapping).
• Click the Step Over SpeedButton.
As you debug, you can choose to trace into some functions and step over others. If you
know a function performs as it was designed to, you can step over calls to that function
with confidence that the function call will not cause an error. If, on the other hand, you
aren’t sure that a function is well behaved, you can choose to Trace Into the function to
verify that it works as designed.
252
Delphi User’s Guide
Debugging your application startup code
By default, when you initiate a debugging session by choosing Trace Into or Step Over,
Delphi moves the execution point to the first line of code that contains debugging
information (this is normally a location that contains user-written code). However, you
can override this behavior and have Delphi step to the first executable statement in the
program when you begin a debugging session. This feature provides the ability to
debug the startup routines of your project.
■
To have Delphi step to the first executable statement in the program,
1 Choose Options|Environment, then click the Preferences page tab.
2 Check the Step Program Block check box.
3 Run your program by choosing Trace Into or Step Over.
Running to a breakpoint
You set breakpoints on lines of source code where you want the program execution to
pause during a run. Running to a breakpoint is similar to running to a cursor position in
that the program runs at full speed until it reaches a certain source code location.
However, unlike Run To Cursor, you can have multiple breakpoints in your code, and
you can customize each one so it pauses the program execution only when a specified
condition is met. For more information on breakpoints, see “Using breakpoints” on
page 254.
Pausing the program
In addition to stepping over or tracing into code, you can also pause your program
while it’s running. Choosing Run|Program Pause causes the debugger to pause your
program the next time the execution point enters your code. You can then use the
debugger to examine the state of your program with respect to this program location.
When you’ve finished examining the program, continue debugging by running as
usual.
If your program assumes control and won’t allow you to return to the debugger (for
example, if it runs into an infinite loop), you can press Ctrl+Alt+Sys Req to stop your
program. However, be aware that you might need to press this command several times
before your program actually stops—the command doesn’t work if Windows kernel
code is executing.
Restarting the program
Sometimes while debugging, you will find it necessary to restart the program from the
beginning. For example, you might need to restart the program if you step past the
location of a bug, or if variables or data structures become corrupted with unwanted
values.
■
To end the current program run and reset the program, choose Run|Program Reset (or
press Ctrl+F2).
Chapter 8, Using the integrated debugger
253
Resetting a program closes all open program files, releases resources allocated by calls to
the VCL, and clears all variable settings. However, resetting a program does not delete
any breakpoints or watches that you have set, which makes it easy to resume a
debugging session.
Note
Resetting a program might not release all Windows resources allocated by your
program. In most cases, all resources allocated by VCL routines are released. However,
Windows resources allocated by the code you have written might not be properly
released. If your system becomes unstable (through either multiple hardware or
language exceptions or through a loss of system resources as a result of resetting your
program), it is best to exit Delphi before restarting your debugging session.
Using breakpoints
You use breakpoints to pause the program execution at designated source code locations
during a debugging session. By setting breakpoints in potential problem areas of your
source code, you can run your program at full speed, knowing that its execution will
pause at a location you want to debug. When your program execution encounters a
breakpoint, the program pauses, and the debugger displays the line containing the
breakpoint in the Code Editor. You can then use the debugger to view the state of your
program.
Setting breakpoints
Breakpoints are flexible in that they can be set before you begin a program run or at any
time that the integrated debugger has control. For a breakpoint to be valid, it must be set
on an executable line of code. Breakpoints set on comment lines, blank lines,
declarations, or other non-executable lines of code are invalid and become disabled
when you run your program.
■
To set a breakpoint, select the line of code in the Code Editor where you want the
breakpoint set, then do one of the following:
• Click the left margin of the line in the Code Editor where you want the breakpoint
set.
• Press F5 (default key mapping).
• Choose Toggle Breakpoint from the Code Editor SpeedMenu.
• Choose Run|Add Breakpoint, then choose New (in the Edit Breakpoint dialog box)
to confirm a new breakpoint setting, or choose Modify to implement changes to an
existing breakpoint.
• Choose Add Breakpoint from the Breakpoint List SpeedMenu.
Alternately, if you know the line of code where you want the breakpoint set, choose
Run|Add Breakpoint and type the source-code line number in the Line Number box.
When the settings in the Edit Breakpoint dialog box are correct, choose New to complete
the breakpoint entry.
254
Delphi User’s Guide
When you set a breakpoint, the line on which the breakpoint is set becomes highlighted,
and a stop-sign glyph appears in the left margin of the breakpoint line.
Invalid breakpoints
If a breakpoint is not placed on an executable line of code, the debugger considers it
invalid. For example, a breakpoint set on a comment, a blank line, or declaration is
invalid. If you set an invalid breakpoint, the debugger displays the Invalid Breakpoint
error box when you attempt to run the program. To correct this situation, close the error
box and delete the invalid breakpoint from the Breakpoint List window. You can then
reset the breakpoint in the intended location. However, you can also ignore invalid
breakpoints; the IDE disables any invalid breakpoints when you run your program.
Note
During the linking phase of compilation, lines of code that do not get called in your
program are marked as dead code by the linker. In turn, the integrated debugger marks
any breakpoints set on dead code as invalid.
Setting breakpoints after starting a program
While your program is running, you can switch to the debugger (by accessing the Code
Editor) and set a breakpoint. When you return to your application, the new breakpoint
is set, and your application halts when it reaches the breakpoint.
Working with breakpoints
The Breakpoint List window lists all breakpoints by their file name and line number. In
addition, each breakpoint listing shows any condition and pass count associated with
the breakpoint. If a breakpoint is either disabled or invalid, then the breakpoint listing is
dimmed in the Breakpoint List window.
■
To open the Breakpoint List window, choose View|Breakpoint.
Figure 8.1
The Breakpoint List window
Use the Breakpoint List window to view and maintain all your breakpoints; you don’t
need to search through your source files to find the breakpoints you’ve set. Also, using
the commands on the Breakpoint List SpeedMenu, you can view or edit the code at any
breakpoint location.
Viewing and editing code at a breakpoint
If a breakpoint isn’t displayed in the Code Editor window, you can use the Breakpoint
List window to quickly find the breakpoint’s location in your source code.
Chapter 8, Using the integrated debugger
255
■
To use the Breakpoint List window to locate a breakpoint,
1 Select the breakpoint in the Breakpoint List window.
2 Choose View Source or Edit Source from the SpeedMenu.
The Code Editor is updated to show the breakpoint’s location. If you choose View
Breakpoint, the Breakpoint List window remains active so you can modify the
breakpoint or go on to view another. If you choose Edit Breakpoint, the Code Editor
gains focus on the line containing the breakpoint, enabling you to modify the source
code at that location.
Disabling and enabling breakpoints
Disabling a breakpoint hides the breakpoint from the current program run. When you
disable a breakpoint, all the breakpoint settings remain defined, but the breakpoint is
hidden from the execution of your program; your program will not stop on a disabled
breakpoint. Disabling a breakpoint is useful if you have defined a conditional
breakpoint that you don’t need to use now, but might need to use at a later time.
■
To disable a breakpoint,
1 Open the Breakpoint List window and highlight the breakpoint you want to disable.
2 Choose Disable Breakpoint from the Breakpoint List SpeedMenu.
You can also disable all current breakpoints by selecting the Disable All Breakpoints
command on the Breakpoint List SpeedMenu.
■
To reenable a breakpoint, highlight the breakpoint in the Breakpoint List window, then
choose Enable Breakpoint from the SpeedMenu. You can also choose Enable All
Breakpoints from the SpeedMenu to enable breakpoints.
Deleting breakpoints
When you no longer need to examine the code at a breakpoint location, you can delete
the breakpoint from the debugging session. You can delete breakpoints using either the
Code Editor or the Breakpoint List window:
■
Use the following methods to delete breakpoints:
• From the Code Editor, place the text cursor in the line containing the breakpoint and
press F5 (or choose Toggle Breakpoint from the Speed Menu).
• Click the stop-sign glyph in the Code Editor window to delete the associated
breakpoint.
• From the Breakpoint List window, highlight the breakpoint you want removed, then
choose Delete Breakpoint from the SpeedMenu.
• To delete all currently set breakpoints, choose Delete All Breakpoints from the
Breakpoint List SpeedMenu.
Caution
256
The breakpoint delete commands are not reversible.
Delphi User’s Guide
Modifying breakpoint properties
To view and modify the properties of a breakpoint, double-click the breakpoint in the
Breakpoint List window or select it and choose Edit Breakpoint from the SpeedMenu.
The Edit Breakpoint dialog box appears.
Figure 8.2
The Edit Breakpoint dialog box
In addition to examining a breakpoint’s properties, you can use the Edit Breakpoint
dialog box to change the location of a breakpoint, set a conditional breakpoint, and set a
pass count for the breakpoint.
Creating conditional breakpoints
When a breakpoint is first set, by default it pauses the program execution each time the
breakpoint is encountered. However, using the Edit Breakpoint dialog box, you can
customize your breakpoints so that they are activated only when a specified set of
conditions is met.
Use the integrated debugger to add two types of conditions to your breakpoints:
• Boolean expressions
• Pass counts
Setting Boolean conditions
The Condition edit box in the Edit Breakpoint dialog box lets you enter an expression
that is evaluated each time the breakpoint is encountered during the program execution.
If the expression evaluates to True (or not zero), then the breakpoint pauses the program
run. If the condition evaluates to False (or zero), then the debugger does not stop at the
breakpoint location.
Conditional breakpoints are useful when you want to see how your program behaves
when a variable falls into a certain range or what happens when a particular flag is set.
➤
For example, suppose you want a breakpoint to pause on a line of code only when the
variable mediumCount is greater than 10. To do so,
1 Set a breakpoint on the line of code you want by moving the text cursor to that line of
code in the Code Editor and pressing F5.
2 Open the Breakpoint List window by choosing View|Breakpoints.
3 Highlight the breakpoint just set and choose Edit Breakpoint from the SpeedMenu.
The Edit Breakpoint dialog box opens.
Chapter 8, Using the integrated debugger
257
4 Enter the following expression into the Condition edit box:
mediumCount > 10
5 Choose Modify to confirm your settings.
Note
You can input any valid language expression into the Condition edit box, but all
symbols in the expression must be accessible from the breakpoint’s location, and the
expression cannot contain any function calls.
Using pass counts
The Pass Count edit box enables you to specify a particular number of times that a
breakpoint must be passed for the breakpoint to be activated; pass counts tell the
debugger to pause the program execution the nth time that the breakpoint is
encountered during the program run (the number n is user-specified and is set to 1 by
default).
The pass count number is decremented each time the line containing the breakpoint is
encountered during the program execution. If the pass count equals 1 when the
breakpoint line is encountered, the breakpoint activates and pauses the program
execution on that line of code.
Pass counts are useful, for example, when you think that a loop is failing on the nth
iteration. Or, if you can’t tell on which iteration the loop fails, you can set the pass count
to the maximum loop count and run your program. When the program fails, calculate
the number of times that the program went through the loop by examining the number
in the pass count field.
When pass counts are used in conjunction with Boolean conditions, the breakpoint
pauses the program execution the nth time that the condition is true; the condition must
be true for the pass count to be decremented.
Customizing the breakpoint and execution point colors
You can customize the colors used to indicate the execution point and the enabled,
disabled, and invalid breakpoint lines.
■
To set execution point and breakpoint colors,
1 Choose Options|Environment to access the Environment Options dialog box.
2 Select the Editor Colors page tab.
3 From the Element list, select Execution Point, Active Break, Disabled Break, or
Invalid Break, then set the background and foreground colors as you want.
Examining program data values
Even though you can discover many interesting things about your program by running
and stepping through it, you usually need to examine the values of program variables to
uncover bugs. For example, it’s helpful to know the value of the index variable as you
step though a for loop, or the values of the parameters passed to a function call.
258
Delphi User’s Guide
The integrated debugger has the following tools to help you examine the data values in
your program:
• The Watch List window
• The Evaluate/Modify dialog box
• The Call Stack window
Data evaluation operates at the level of expressions. An expression consists of constants,
variables, and values contained in data structures, combined with language operators.
In fact, almost anything you can use as the right side of an assignment operator can be
used as a debugging expression, with the exception of function calls.
Watching expressions
You use watches to monitor the changing values of variables or expressions during your
program run. After you enter a watch expression, the Watch List window displays the
current value of the expression. As your program runs, the value of the watch changes
as your program updates the values of the variables contained in the watch expression.
If the execution point moves to a location where any of the variables in the watch
expression are undefined, then the entire watch expression becomes undefined. If the
execution point returns to a location where the watch expression can be evaluated, then
the Watch List window again displays the current value of the watch expression.
■
To open the Watch List window, choose View|Watches.
Figure 8.3
■
The Watch List window
The easiest way to set a watch is from the Code Editor:
1 Select the expression you want to monitor.
2 Choose Set Watch from the Code Editor SpeedMenu to add the expression to the
Watch List window.
■
You can also create a watch by doing the following:
1 Open the Watch Properties dialog box using any of the following techniques:
• From the Main menu, choose Run|Add Watch.
• Choose Add Watch At Cursor from the Code Editor SpeedMenu.
• Press Ctrl+F5 (default key mapping).
• Double-click a watch in the Watch List window.
• Select a watch in the Watch List window, then choose Edit from the SpeedMenu.
2 In the Expression edit box, enter the expression you want to watch (or choose a
previously entered expression from the drop-down list).
Chapter 8, Using the integrated debugger
259
Formatting watch expressions
You can format the display of a watch expression using the Watch Properties dialog
box. By default, the debugger displays integer values in decimal form. However, by
checking the Hex Integer button in the Watch Properties dialog box, you can specify that
an integer watch be displayed as hexadecimal.
Figure 8.4
The Watch Properties dialog box
If you’re setting up a watch on an element in a data structure (such as an array), you can
display the values of consecutive data elements. For example, suppose you have an
array of five integers named xarray. Type the number 5 in the Repeat Count box of the
Watch Properties dialog box to see all five values of the array. However, to use a repeat
count, the watch expression must represent a single data element.
To format a floating-point expression, indicate the number of significant digits you want
displayed in the Watch List window by typing this number in the Digits edit box.
Disabling a watch
If you prefer not to watch an expression that you’ve entered in the Watch List window,
but you don’t want to delete it because you might need to use it later, you can disable
the watch. Disabling watches speeds up the response of the debugger because it won’t
have to monitor the watch as you step or run through your program.
In the Watch List window, the Enable check box lies to the left of each watch listing.
When you set a watch, the debugger enables the watch by checking this box.
■
To disable a watch, do one of the following:
• Double-click a watch in the Watch List window to open the Watch Properties dialog
box, then uncheck the Enabled check box.
• Select the watch in the Watch window and choose Disable Watch from the
SpeedMenu.
You can also disable all current watches by choosing Disable All Watches from the
SpeedMenu. To reenable a watch, recheck the Enabled check box, or select it in the
Watches window, then choose Enable Watch (or Enable All Watches) from the
SpeedMenu.
Deleting a watch
To delete a watch expression, select the expression in the Watch window, then choose
Delete Watch from the SpeedMenu. You can also delete all the watches by choosing
Delete All Watches from the SpeedMenu.
260
Delphi User’s Guide
Caution
The delete watch commands cannot be reversed.
Evaluating and modifying expressions
You can evaluate expressions and change the values of data items using the Evaluate/
Modify dialog box. The Evaluate/Modify dialog box has the advantage over watches in
that it enables you to change the values of variables and items in data structures during
the course of your debugging session. This can be useful if you think you’ve found the
solution to a bug, and you want to try the correction before exiting the debugger,
changing the source code, and recompiling the program.
Evaluating expressions
Choose Run|Evaluate/Modify to open the Evaluate/Modify dialog box.
Figure 8.5
The Evaluate/Modify dialog box
By default, the word at the cursor position in the current Code Editor is placed in the
Expression edit box. You can accept this expression, enter another one, or choose an
expression from the history list of expressions you’ve previously evaluated.
■
To evaluate the expression, click the Evaluate button at the bottom of the Evaluate/
Modify dialog box. Using this dialog box, you can evaluate any valid language
expression, except those that contain
• Local or static variables that are not accessible from the current execution point
• Function and procedure calls
Note
The Evaluate/Modify dialog box lets you view and modify the values of object
properties while running the program. However, to view a property, you need to
explicitly specify the property name. For example, you can enter the following
expression to evaluate the Caption property of Button1:
Button1.Caption
When you evaluate an expression, the current value of the expression is displayed in the
Result field of the dialog box. If necessary, you can format the result by adding a comma
Chapter 8, Using the integrated debugger
261
and one or more format following specifiers to the end of the expression entered in the
Expression edit box. Table 8.1 details the legal format specifiers.
Table 8.1
Expression format specifiers
Character
Types affected
Function
H or X
Integers
Hexadecimal. Shows integer values in hexadecimal with the 0x
prefix, including those in data structures.
C
Char, strings
D
Integers
Fn
Floating point
nM
All
P
Pointers
R
Records, classes, and
objects
Char, strings
Character. Shows special display characters for ASCII 0..31. By
default, such characters shown using the appropriate C escape
sequences (/n, /t, and so on).
Decimal. Shows integer values in decimal form, including those
in data structures.
Floating point. Shows n significant digits (where n is in the range
2..18, and 7 is the default).
Memory dump. Shows n bytes starting at the address of the
indicated expression. If n is not specified, it defaults to the size in
bytes of the type of the variable.
By default, each byte shows as two hex digits. The C, D, H, S, and
X specifiers can be used with M to change the byte formatting.
Pointer. Shows pointers as seg:ofs instead of the default
Ptr(seg:ofs). It tells you the region of memory in which the
segment is located, and the name of the variable at the offset
address, if appropriate.
Records/Classes/Objects. Shows both field names and values
such as (X:1;Y:10;Z:5) instead of (1,10,5).
String. Shows any non-displayable ASCII characters as #nn,
where nn represents the ordinal value of the ASCII character. Use
only to modify memory dumps (see nM).
S
For example, to display a result in hexadecimal, type ,H after the expression. To see a
floating point number to 3 decimal places, type ,F3 after the expression.
Modifying the values of variables
Once you’ve evaluated a variable or data structure item, you can modify its value.
Modifying the value of data items during a debugging session enables you to test
different bug hypotheses and see how a section of code behaves under different
circumstances.
■
To modify the value of a data item,
1 Open the Evaluate/Modify dialog box, then enter the name of the variable or data
item you want to modify in the Expression edit box.
2 Click Evaluate to evaluate the data item.
3 Type a value into the New Value edit box (or choose a value from the drop down
box), then click Modify to update the data item.
Note
262
When you modify the value of a data item through the debugger, the modification is
effective for that specific program run only; the changes you make through the
Evaluate/Modify dialog box do not effect your program source code or the compiled
program. To make your change permanent, you must modify your program source
code in the Code Editor, then recompile your program.
Delphi User’s Guide
Keep these points in mind when you modify program data values:
• You can change individual variables or elements of arrays and data structures, but
you cannot change the contents of an entire array or data structure.
• The expression in the New Value box need to evaluate to a result that is assignmentcompatible with the variable you want to assign it to. A good rule of thumb is that if
the assignment would cause a compile-time or run-time error, it’s not a legal
modification value.
• You can’t directly modify untyped parameters passed into a function, but you can
typecast them and then assign new values.
Warning!
Modifying values (especially pointer values and array indexes), can have undesirable
effects because you can overwrite other variables and data structures. Use caution
whenever you modify program values from the debugger.
Viewing function calls
While debugging, it can be useful to know the order of function calls that brought you to
your current program location. Using the Call Stack window, you can view the current
sequence of function calls. The Call Stack window is also helpful when you want to
view the arguments passed to a function call; each function listing in the window is
followed by a listing that details the parameters with which the call was made.
■
To display the Call Stack window, choose View|Call Stack.
Figure 8.6
Call Stack window
The top of the Call Stack window lists the last function called by your program. Below
this is the listing for the previously called function. The listing continues, with the first
function called in your program located at the bottom of the list. Note that only
functions in the currently loaded symbol table are listed in this window. To view
functions located in a different module, change symbol tables, as described later in this
chapter.
The Call Stack window is particularly useful if you accidentally trace into code you
wanted to step over. Using the Call Stack window, you can return to the point from
which the current function was called, then resume debugging from there.
■
To use the Call Stack window,
1 In the Call Stack window, double-click the function that called the function you
accidently traced into (it is the second function listed in the Call Stack window). The
Code Editor becomes active with the cursor positioned at the location of the function
call.
Chapter 8, Using the integrated debugger
263
2 In the Code Editor, move the cursor to the statement following the function call.
3 Choose Run To Cursor on the Code Editor SpeedMenu (or press F4).
Navigating to function calls
Using the Call Stack window, you can view or edit the source code located at a
particular function call.
■
To view or edit the source code of a function call, choose either View Source or Edit
Source (as appropriate) from the Call Stack SpeedMenu.
The View Source and Edit Source commands each cause the Code Editor to navigate to
the selected function. However, Edit Source gives focus to the Code Editor so you can
modify the source code at that function location, while View Source does not move the
focus from the Call Stack window.
If you select the top function in the Call Stack window, View Source and Edit Source
cause the Code Editor to display the location of the execution point in the current
function. Selecting any other function call causes the debugger to display the actual
function call in the Code Editor.
Handling hardware and language exceptions
Delphi provides a mechanism to control the way exceptions are handled while you are
debugging. In addition, Delphi makes the debugging session easier by treating most
hardware exceptions as Object Pascal language exceptions. This means Delphi traps the
hardware exceptions generated by your Delphi application, and you can gracefully
recover before your program run ends with a system crash.
If a hardware or language exception occurs during a debugging session, the VCL
displays a dialog box that notes the exception (note that the VCL displays this dialog
box regardless of whether you are debugging the program). When you choose OK to
close the dialog box, your program run continues and you can continue to debug your
application.
■
To have Delphi pause the program run when an exception occurs,
1 Choose Options|Environment, then click the Preferences page tab.
2 Check the Break On Exceptions check box (checked by default).
3 Begin your debugging session.
If you check Break On Exception, the IDE displays an Error dialog box whenever an
exception occurs. When you choose OK to close this dialog box, Delphi opens the Code
Editor with the execution point positioned on the code that caused the exception. At this
point, you can examine the program code to determine why the exception occurred. If
you continue the program run from this point, the VCL displays an exception dialog
box.
Note
264
Because certain hardware exceptions can place your system in an unstable condition, it
is usually best to terminate your program run after an exception occurs. Resolve the
program error, then resume the debugging session.
Delphi User’s Guide
Summary
You can use the integrated debugger to debug your Delphi applications without leaving
the IDE. You can control the execution of your program by pausing the execution at any
code location. Once you pause the program, you can examine the program state by
reviewing the current values of program data values and the routines that are currently
on the program call stack.
Controlling program execution means that you control when the program should be
executed and when (or where) the program should pause. You can use the integrated
debugger to control the program execution by
•
•
•
•
Running to the cursor location
Stepping and tracing
Running to a breakpoint
Pausing your program
While you’re debugging a program, either the program is running or it is paused at a
program code location. When the program is paused, you are free to examine the
current values of the program data items. Program data items include program
variables, items in data structures, class fields, and object properties. The integrated
debugger enables you to examine the values of these data items with the following:
• The Watch List window
• The Call Stack window
• The Evaluate/Modify dialog box
In addition to examining program data values, you can also change the values of single
data items using the Evaluate/Modify dialog box. Modifying program data values
during a debugging session provides a way to test hypothetical bug fixes during a
program run. If you find that a modification fixes a program error, you can exit the
debugging session, fix your program code accordingly, and recompile the program to
make the fix permanent.
Chapter 8, Using the integrated debugger
265
266
Delphi User’s Guide
Part
IV
Sample applications
Part IV
The chapters in this part show several complete examples of building applications with
Delphi. Although each of the sample applications is a complete and useful application,
the primary purpose of these chapters is to explain how to perform typical applicationbuilding tasks in Delphi within a realistic context.
For example, the text editor example describes how to manipulate menu items, and the
graphics example shows how to create and use tool bars. You will most likely use these
techniques in other kinds of applications, but by seeing these items in the context of
complete applications, you can better see how to integrate them into your own.
You can use the chapters in this part in several ways: to learn to build complete
applications, to see how to use particular components, or to see how to perform a
specific task with a component.
The sample applications in this part describe the following skills:
• “Using string lists”
This chapter presents various skills for using string-list objects, which appear in the
text editor example and the file manager example.
• “Text editor example”
This chapter demonstrates the creation and seamless integration of MultipleDocument Interface (MDI) applications, fundamental concepts and techniques for
displaying and manipulating text.
• “Using graphics at run time”
This chapter discusses concepts and techniques for creating graphics applications in
Delphi. Encapsulation of Windows GDI functions in the Delphi Canvas.
Part IV, Sample applications
267
• “Graphics example”
This chapter features an extension and practical application of the techniques
presented in Chapter 11, including dynamic creation of tool bars and use of the pen
and brush.
• “File manager example”
This chapter demonstrates such concepts as building a drive list, creating ownerdraw controls, manipulating files, using drag-and-drop techniques, using file
controls, and using the tab-set control.
• “Exchanging data with DDE or OLE”
This chapter offers background and conceptual material for understanding Dynamic
Data Exchange (DDE), Object Linking and Embedding (OLE) versions 1.0 and 2.0,
and their implementation within the Delphi programming environment.
• “OLE example”
This chapter expands on the concepts introduced in Chapter 14 by showing you how
to create an MDI application that can use either OLE 1.0 or OLE 2.0.
268
Delphi User’s Guide
Chapter
9
Working with string lists
Chapter 9
There are numerous occasions when Delphi applications need to deal with lists of
character strings. Among these lists are the items in a list box or combo box, the lines of
text in a memo field, the list of fonts supported by the screen, the names of the tabs on a
notepad, the items in an outline, and a row or column of entries in a string grid.
Although applications use these lists in various ways, Delphi provides a common
interface to all of them through an object called a string list, and goes even farther by
making them interchangeable—meaning you can, for example, edit a string list in a
memo field and then use it as the list of items in a list box.
You have probably already used string lists through the Object Inspector. A string-list
property appears in the Object Inspector with (TStrings) in the Value column. When
you double-click (TStrings), the String List editor appears, where you can edit, add, or
delete lines.
You can also work with string lists at run time. These are the most common types of
string-list tasks:
•
•
•
•
Manipulating the strings in a list
Loading and saving string lists
Creating a new string list
Adding objects to a string list
Manipulating the strings in a list
Quite often in an Delphi application, you need to write code to work with strings in an
existing string list. The most common case is that some component in the application
has a string-list property, and you need to change it or get strings from it.
These are the common operations you might need to perform:
• Counting the strings in a list
• Accessing a particular string
Chapter 9, Working with string lists
269
•
•
•
•
•
•
Finding the position of a string
Adding a string to a list
Moving a string within a list
Deleting a string from a list
Copying a complete string list
Iterating the strings in a list
Counting the strings in a list
■
To find out how many strings are in a string list, use the Count property. Count is a readonly property that indicates the number of strings in the list. Since the indexes used in
string lists are zero-based, Count is one more than the index of the last string in the list.
For example, an application can find out how many different fonts the current screen
supports by reading the Count property on the screen object’s font list, which is a string
list containing the names of all the supported fonts:
FontCount := Screen.Fonts.Count;
Accessing a particular string
The string list has an indexed property called Strings, which you can treat like an array
of strings for most purposes. For example, the first string in the list is Strings[0].
However, since the Strings property is the most common part of a string list to access,
Strings is the default property of the list, meaning that you can omit the Strings identifier
and just treat the string list itself as an indexed array of strings.
■
To access a particular string in a string list, you refer to it by its ordinal position, or
index, in the list. The string numbers are zero-based, so if a list has three strings in it, the
indexes cover the range 0..2.
■
To determine the maximum index, check the Count property. If you try to access a string
outside the range of valid indexes, the string list raises an exception.
For example, the following two lines do exactly the same thing, setting the first line of
text in a memo field:
Memo1.Lines.Strings[0] := 'This is the first line.';
Memo1.Lines[0] := 'This is the first line.';
Finding the position of a string
Given a string, you often want to find out its position in a string list (or whether it’s in
the list at all).
■
To locate a string in a string list, you use the string list’s IndexOf method. IndexOf takes a
string as its parameter, and returns the index of the matching string in the list, or –1 if
the string is not in the list.
Note that IndexOf works only with complete strings. That is, it must find an exact match
for the whole string passed to it, and it must match a complete string in the list. If you
270
Delphi User’s Guide
want to match partial strings (for instance, to see if any of the strings in the list contains a
given series of characters), you must iterate the list yourself and compare the strings.
Here’s an example of using IndexOf to determine whether a given file name is in the list
of files in a file list box:
if FileListBox1.Items.IndexOf('AUTOEXEC.BAT') > -1 then { you're in the root directory };
Adding a string to a list
There are two ways to add a string to a string list. You can either add it to the end of the
list or insert it in the middle of the list.
■
To add a string to the end of the list, call the Add method, passing the new string as the
parameter. The added string becomes the last string in the list.
■
To insert a string into the list, call the Insert method, passing two parameters: the index
where you want the inserted string to appear and the string.
To make the string ‘Three’ become the third string in a list, you would call Insert(2,
'Three'). If the list doesn’t already have at least two strings, Delphi raises an index-outof-range exception.
Moving a string within a list
You can move a string to a different position in a string list, such as when you want to
sort the list. If the string has an associated object, the object moves with the string.
■
To move a string in the list, call the Move method, passing two parameters: the current
index of the item and the index where you want to move the item to. For example, to
move the third string in a list to the fifth position, you would call Move(2, 4).
Deleting a string from a list
■
To delete a string from a string list, you call the string list’s Delete method, passing the
index of the string you want to delete. If you don’t know the index of the string you
want to delete, use the IndexOf method to locate it.
■
To delete all the strings in a string list, use the Clear method.
This example uses IndexOf to determine the location of a string in a list, and deletes that
string if present:
with ListBox1.Items do
begin
if IndexOf('bureaucracy') > -1 then
Delete(IndexOf('bureaucracy'));
end;
Chapter 9, Working with string lists
271
Copying a complete string list
■
To copy a list of strings from one string list to another, just assign the source list to the
destination list. Even if the lists are associated with different kinds of components (or no
components at all), Delphi handles the copying of the list for you.
Copying the strings from one list to another overwrites the strings that were originally
in the destination list. If you want to add a list of strings to the end of another list, you
call the AddStrings method, passing as a parameter the list of strings you want to add.
This example copies the items from a combo box into an outline:
Outline1.Lines := ComboBox1.Items;
This example adds all the items from the combo box to the end of the outline:
Outline1.AddStrings(ComboBox1.Items);
Iterating the strings in a list
Many times you need to perform an operation on each string in a list, such as searching
for a particular substring or changing the case of each string.
■
To iterate through each string in a list, you use a for loop with an Integer-type index.
The loop should run from zero up to one less than the number of strings in the list
(Count – 1). Inside the loop you can access each string and perform the operation you
want.
For example, here’s a loop that iterates the strings in a list box and converts each one to
all uppercase characters in response to a button click:
procedure TForm1.Button1Click(Sender: TObject);
var
Index: Integer;
begin
for Index := 0 to ListBox1.Items.Count - 1 do
ListBox1.Items[Index] := UpperCase(ListBox1.Items[Index]);
end;
Loading and saving string lists
You can easily store any Delphi string list in a text file and load it back again (or load it
into a different list). String list objects have methods to handle both operations. Using
these methods, you can quickly create a simple text editor by loading a file into a memo
component (as shown in Chapter 10). But you can also use the same mechanism to save
lists of items for list boxes or complete outlines.
■
272
To load a string list from a file, call the LoadFromFile method and pass the name of the
text file to load from. LoadFromFile reads each line from the text file into a string in the
list.
Delphi User’s Guide
■
To store a string list in a text file, call the SaveToFile method and pass it the name of the
text file to save to. If the file doesn’t already exist, SaveToFile creates it. Otherwise, it
overwrites the current contents of the file with the strings from the string list.
This example loads a copy of the AUTOEXEC.BAT file from the root directory of the C
drive into a memo field and makes a backup copy called AUTOEXEC.BAK:
procedure TForm1.FormCreate(Sender: TObject);
var
FileName: string;
begin
FileName := 'C:\AUTOEXEC.BAT';
with Memo1 do
begin
LoadFromFile(FileName);
SaveToFile(ChangeFileExt(FileName, 'BAK'));
end;
end;
{ storage for file name }
{ set the file name }
{ load from file }
{ save into backup file }
Creating a new string list
Most of the time when you use a string list, you use one that is part of a component, so
you don’t have to construct the list yourself. However, you can also create standalone
string lists that have no associated component. For instance, your application might
need to keep a list of strings for a lookup table.
The most important thing to remember when you create your own string list is to free
the list when you finish with it. There are two distinct cases you might need to handle: a
list that the application creates, uses, and destroys all in a single routine, and a list that
the application creates, uses throughout run time, and destroys before it shuts down.
The way you create and manage a string list depends on whether it’s going to be a longterm list or a short-term list.
Short-term string lists
If you need to use a string list only for the duration of a single routine, you can create it,
use it, and destroy it all in one place. This is the safest way to use string list objects.
Because the string list object allocates memory for itself and its strings, it is important
that you protect the allocation by using a try..finally block to ensure that the object frees
its memory even if an exception occurs.
■
The basic outline of the use of a short-term string list, then, is to
1 Construct the string-list object.
2 In the try part of a try..finally block, use the string list.
3 In the finally part, free the string-list object.
The following event handler responds to a button click by constructing a string list,
using it, and then destroying it again.
Chapter 9, Working with string lists
273
procedure TForm1.Button1Click(Sender: TObject);
var
TempList: TStrings;
begin
TempList := TStringList.Create;
try
{ use the string list }
finally
TempList.Free;
end;
end;
{ declare the list }
{ construct the list object }
{ destroy the list object }
Long-term string lists
If you need a string list that’s available at any time while your application runs, you
need to construct the list when the application is first executed, then destroy it before the
application is terminated.
■
To create a string list that’s available throughout run time,
1 Add a field of type TStrings to the application’s main form object, giving it the name
you want to use.
2 Create a handler for the main form’s OnCreate event. The create-event handler
executes before the form appears onscreen at run time.
3 In the create-event handler, construct the string-list object.
4 Create a handler for the main form’s OnDestroy event. The destroy-event handler
executes just after the main form disappears from the screen before the application
stops running.
Any other event handlers can then access the string list by the name you declared in the
first step.
This example features an added string list named ClickList. The click-event handler for
the main form adds a string to the list every time the user clicks a mouse button, and the
application writes the list out to a file before destroying the list.
unit Unit1;
interface
uses SysUtils, WinTypes, WinProcs, Messages, Classes, Graphics, Controls, Forms, Dialogs;
type
TForm1 = class(TForm)
procedure FormCreate(Sender: TObject);
procedure FormDestroy(Sender: TObject);
procedure FormMouseDown(Sender: TObject; Button: TMouseButton;
Shift: TShiftState; X, Y: Integer);
private
{ Private declarations }
public
{ Public declarations }
ClickList: TStrings;
274
Delphi User’s Guide
{ declare the field }
end;
var
Form1: TForm1;
implementation
{$R *.DFM}
procedure TForm1.FormCreate(Sender: TObject);
begin
ClickList := TStringList.Create;
end;
{ construct the list }
procedure TForm1.FormDestroy(Sender: TObject);
begin
ClickList.SaveToFile(ChangeFileExt(Application.ExeName, '.LOG'));
{ save the list }
ClickList.Free;
{ destroy the list object }
end;
procedure TForm1.FormMouseDown(Sender: TObject; Button: TMouseButton;
Shift: TShiftState; X, Y: Integer);
begin
ClickList.Add(Format('Click at (%d, %d)', [X, Y]));
{ add a string to the list }
end;
end.
Adding objects to a string list
In addition to its list of strings, stored in the Strings property, a string list can also have a
list of objects, which it stores in its Objects property. Like Strings, Objects is an indexed
property, but instead of an indexed list of strings, it is an indexed list of objects.
If you’re just using the strings in the list, it doesn’t matter whether you have objects; the
list does nothing with the objects unless you specifically access them. Also, it doesn’t
matter what kind of object you assign to the Objects property. Delphi just holds the
information; you manipulate it as you need to.
Note
Some string lists ignore added objects, because it doesn’t make sense to have them. For
example, the string lists representing the lines in a memo do not store objects added to
them. Other string lists, such as the pages in a notebook, already use their associated
objects as part of their standard operation. The Notebook component uses its Pages
string list to store both the names of the pages and the objects that represent those pages.
Although you can assign any type of objects you want to Objects, the most common use
is to associate bitmaps with strings for owner-draw controls. The important thing to
remember is that strings and objects in a string list work in pairs. For every string, there
is an associated object, although by default, that object is nil. Chapter 13 includes an
example of how to associate objects with strings and use them in an owner-draw
control.
Chapter 9, Working with string lists
275
It’s important to understand that the string list doesn’t own the objects associated with
it. That is, destroying the string-list object does not destroy the objects associated with
the strings.
Operating on objects in a string list
For each of the operations you can perform on a string list with a string, you can
perform the corresponding operation with a string and its associated object. For
example, you can access a particular object by indexing into the Objects property, just as
you would the Strings property. The biggest difference is that you cannot omit the name
Objects, since Strings is the default property of the string list.
The following table summarizes the properties and methods you use to perform
corresponding operations on strings and objects in a string list.
Table 9.1
Corresponding string and object methods in string lists
Operation
For strings
For objects
Access an item
Add an item
Strings property
Add method
Objects property
AddObject method
Insert an item
Locate an item
Insert method
IndexOf method
InsertObject method
IndexOfObject method
Methods such as Delete, Clear, and Move operate on items as a whole. That is, deleting an
item deletes both the string and the corresponding object. Also note that the
LoadFromFile and SaveToFile methods operate on only the strings, since they work with
text files.
Accessing associated objects
You access objects associated with a string list just as you access the strings. For
example, to get the first string in a string list, you access the string list’s Strings property
at index 0: Strings[0]. The object corresponding to that string is Objects[0].
Adding associated objects
To associate an object with an existing string, you assign the object to the Objects
property at the same index. For example, if a string list named Fruits contains the string
‘apple’ and you want to associate a bitmap called AppleBitmap to it, you would use the
following assignment:
with Fruits do Objects[IndexOf('apple')] := AppleBitmap;
You can also add objects at the same time you add the strings by calling the string list’s
AddObject method instead of Add, which just adds a string. AddObject takes two
parameters, the string and the object. For example,
Fruits.AddObject('apple', AppleBitmap);
276
Delphi User’s Guide
Summary
Delphi components use string-list objects for a number of purposes. Because all string
lists share some common properties and methods, your applications can easily move
entire lists of strings from one component to another.
In addition, you can create your own string lists to store data outside of components,
either on a short-term, temporary basis, or for the duration of the application’s
execution.
Chapter 9, Working with string lists
277
278
Delphi User’s Guide
Chapter
10
Text editor example
Chapter 10
This chapter presents the steps involved in building a simple Multiple Document
Interface (MDI) text editor that uses the Windows common dialog boxes to open, save,
and print manipulable text files.
It assumes you are familiar with the material covered in Part II, “Fundamental skills.”
For instance, you need to know how to set component properties and build a menu. You
should also be familiar with Object Pascal language constructs, as discussed in Part III,
“Programming topics.” Finally, Chapter 9 discusses concepts that you’ll encounter as
you build the text editor.
The topics discussed in the context of creating this application are
•
•
•
•
•
•
Multiple Document Interface (MDI) applications
Working with open child windows
Manipulating text in a Memo component
Using common dialog boxes
Printing the text file
Exiting the application
Each section of this chapter builds upon preceding sections, but the steps themselves are
modular and can be used in a different context to achieve the same result. If you want to
learn how to load a text file, for example, you don’t need to read the section on creating
an MDI editor window first.
To see the completed application, open the project file TEXTEDIT.DPR, found in the
DELPHI\DEMOS\DOCS\TEXTEDIT directory if you installed Delphi using default
directories. Figure 10.1 shows the application as it appears the first time a new window
is opened.
Chapter 10, Text editor example
279
Figure 10.1 The finished text editor program, TEXTEDIT.EXE
Multiple Document Interface (MDI) applications
Multiple Document Interface is a means for applications to simultaneously open and
display two or more files, within the same application. For example, you might use MDI
to allow a word-processing application to open and display several documents
simultaneously and provide the user with a way to quickly switch among those open
documents. Likewise, you might use MDI to create a spreadsheet application that
enables users to have several spreadsheets open at once, for example to compare sales
figures or interest charges.
MDI applications provide a convenient way to view and exchange data among multiple
documents that share a common workspace. The common workspace is often referred
to as the “parent” or “frame.” In a Delphi MDI application, the frame is always the
application’s main form.
Within the frame window other windows, often called “child” windows, can be opened.
Each child window appears and behaves the same way. The application documents, or
other data, are opened inside the child windows. These documents can all be of the
same format, or they can be a mix of file formats supported by the MDI application.
At design time, you create the MDI frame form as the main application form, and you
create the child form as a template for the application’s child windows. You can create
more than one type of child form, but MDI applications support only one frame form.
This section describes the following steps involved in creating a basic MDI application
for text manipulation:
•
•
•
•
•
Creating the MDI frame form
Creating the MDI child form
Creating the application menus
Merging the application menus
Creating child windows at run time
You’ll want to save your work periodically as you follow the steps this chapter outlines.
280
Delphi User’s Guide
Creating the MDI frame form
In an MDI application, the frame window provides a workspace for the application
documents, which open inside one or more child windows. Creating a frame form is the
first step in building the text editor application.
➤
If necessary, start Delphi. Then, choose File|New Project, and select the Blank project.
The FormStyle property
The FormStyle property determines whether the form is a frame or child form (or a nonMDI application form). You set the FormStyle property only at design time.
■
To create an MDI frame form, select the main form and use the Object Inspector to set its
FormStyle property to fsMDIForm.
There can be only one MDI frame form per application.
Caution
➤
You can set any form’s FormStyle property to fsMDIForm, but your application will not
be compiled correctly if you do so for a form that is not specified as the application’s
main form. To verify or change the application’s main form, choose Options|Project
and select the Forms page.
For the purposes of the text editor application, set the values of the FormStyle, Caption,
and Name properties as indicated in Table 10.1.
Table 10.1
Text editor property values
Property
Value
Name
Caption
FrameForm
Text Editor
FormStyle
fsMDIForm
Creating the MDI child form
You create child forms at design time as templates for the appearance of each instance of
the child window that the user opens at run time. Since child windows are visible by
default, your code needs to explicitly create them at run time, rather than allowing
Delphi to automatically create them when the application first runs. The section
“Creating child windows at run time” on page 285 discusses how to do so.
The text editor application, for example, creates an instance of the text editor (child)
form every time the user chooses File|New. This instance reads its initial state from the
image in the form’s .DFM file. (For more information about the .DFM file, refer to
Chapter 1.)
The following procedure sets the form property for an MDI child window, and removes
the MDI child form from the form Auto-Create list.
Caution
You can set any form’s FormStyle property to fsMDIChild, however your program won’t
be compiled correctly if you do so for the application’s main form. To verify or change
the application’s main form, choose Options|Project and select the Forms page.
Chapter 10, Text editor example
281
■
To create an MDI child form,
1
2
3
4
5
Choose File|New Form, and choose the Blank form option.
Use the Object Inspector to set the new form’s FormStyle property to fsMDIChild.
Choose Options|Project to access the Forms Auto-Create list.
In the Auto-Create forms list, select the MDI child form.
Click the > key to move the MDI child form into the Available forms list, and choose
OK to exit the dialog box.
Note
The text editor application uses just one type of child form, but you can have any
number of different types of child windows in an MDI application. If your application
uses multiple types of child windows, you’ll generally want to remove them from the
Auto-create forms list, as just described, and write code that specifically creates them at
runtime. If, however, your application will use only one instance of each type of child
form, it’s probably better to let Delphi create them for you.
➤
For the purposes of the text editor application, create a new form and set the values of its
FormStyle, Caption, and Name properties as indicated in Table 10.2. Then remove
EditForm from the project’s Auto-Create forms list, as described in the previous
procedure.
Table 10.2
Child form property settings for the text editor example
Property
Setting
Name
Caption
EditForm
< blank>
FormStyle
fsMDIChild
Creating the application menus
The frame form menu bar serves as the main application menu. If the child form
contains a menu bar, any menu items on it merge into the frame form’s menu when a
child window has focus at run time.
For example, Figure 10.2 shows the text editor menu as it appears when the application
first runs, with no child windows open:
Figure 10.2 Text editor application menu with no child windows open
The File and Window menu items exist in the frame form, because they control
functions of the frame, rather than functions specific to a particular child window. When
the user opens a child window by choosing File|New or File|Open, the application
menu changes to include two new menu options, as shown in Figure 10.3:
282
Delphi User’s Guide
Figure 10.3 Text editor application menu with child window open
The Edit and Character menu items exist in the child form, because they control
functions specific to the child window and its contents. These menu items merge with
the frame form’s menu items to present one application menu, with options appropriate
to the current condition of the application.
Note
While most MDI applications merge frame and child menus, you can also choose to
replace menus, rather than merging them.
You’ll use the Delphi Menu Designer to create the text editor application menus. If you
do not know how to use the Menu Designer, see Chapter 3.
Creating the frame form menu
The menu items in the text editor frame form provide users with various ways to
manipulate child windows in the running application.
➤
Create the File and Window menus for the text editor frame form, as shown in Table
10.3. For each menu item, specify a value for the Caption property, and accept the values
Delphi then creates for the Name property.
Table 10.3
Frame form menu items
&File
&Window
&New
&Open ...
&Tile
&Cascade
– <hyphen>
E&xit
&Arrange Icons
Note that specifying a hyphen for the caption (below the Open1 menu item on the file
menu) creates a separator bar. In later sections you’ll set additional properties for the
frame form menu.
Creating the child form menu
The menu items in the text editor child form provide users with ways to manipulate text
in the running application. At run time, the File menu in EditForm completely replaces
the File menu in FrameForm. Instead of creating a new File menu, however, you’ll use
the File menu template provided with Delphi.
➤
To create the EditForm menu, add the Delphi File menu template, and then create the
remaining menu items shown in Table 10.4. For each menu item, specify values for the
Chapter 10, Text editor example
283
Caption property, and accept the default value that Delphi then generates for the Name
property. For the Edit menu, specify values for the ShortCut property.
Table 10.4
Child form menu items
&Edit
(Edit menu
Shortcut keys)
&Character
Cu&t
&Copy
&Paste
De&lete
Ctrl+X
Ctrl+C
Ctrl+V
Ctrl+D
&Left
&Right
&Center
– <hyphen>
– <hyphen>
Select &All
&Word Wrap
– <hyphen>
&Font ...
In later sections you’ll set additional properties for this menu.
You should now have a frame form and a child form for the MDI application, each with
its respective menu bar. The following section discusses how these two menus interact
at run time.
➤
Save the project now. Use the following names:
Table 10.5
Naming the project files
Default name
Save as
UNIT1.PAS
UNIT2.PAS
MDIFRAME.PAS
MDIEDIT.PAS
PROJECT1.DPR
TEXTEDIT.DPR
Merging the application menus
MDI child windows do not always have their own menus, but when they do (as in this
example) these menus often interact during run time with the application’s main menu
bar. This is known as merging menus. Merging menus is discussed in detail in
Chapter 3.
When the text editor first opens, and no child window is open, only the FrameForm
menu items are available. Once the user opens a child window by choosing File|New,
the EditForm menu items merge into the frame form’s menu bar. This happens
automatically in a Delphi MDI application.
The way that menu items merge is determined by the GroupIndex property.
284
Delphi User’s Guide
➤
Set the GroupIndex property for each form’s menu titles as noted in Table 10.6. To do so,
either open the Menu Designer or select each menu item from the Object selector in the
Object Inspector.
Table 10.6
GroupIndex property settings
Form
Menu title
GroupIndex setting
FrameForm
FrameForm
EditForm
File
Window
File
0
9
0
EditForm
EditForm
Edit
Character
1
1
Assigning both File menu titles a GroupIndex value of 0 causes the EditForm File menu to
replace the FrameForm File menu at merge time and ensures that the File menu always
appears first, whether or not the menus are merged. Assigning the Window menu title a
GroupIndex a value of 9 ensures that the Window menu always appears last (because
the number 9 exceeds the total number of merged menu items).
Assigning the Edit and Character menu items identical GroupIndex values maintains
their order in the merge, and the value of 1 in this case inserts them after the File menu.
If the frame form had a menu item with a value of 1, the Edit and Character menu items
would, as a unit, replace it.
The following section describes how to create your application’s child windows at run
time.
Creating child windows at run time
Now that you have created the child form and its menus, you’re ready to write the code
that generates an instance of EditForm at run time. You do this by calling the Create
method of EditForm.
In the text editor application, when the new child window is created to contain a new
document or to display an existing one, the EditForm File menu replaces the FrameForm
File menu. This is part of the menu merging mentioned previously. Because of this, you
need to handle the File|New and File|Open events separately for each menu.
➤
Write the following event handler for the OnClick event of the File|New item on the
FrameForm menu bar (be sure to name the handler NewChild, rather than accepting the
default name Delphi generates):
procedure TFrameForm.NewChild(Sender: TObject);
var
EditForm: TEditForm;
begin
EditForm := TEditForm.Create(Self);
end;
{declare the child form as a variable}
{create the new child window}
Opening a new document won’t vary much—you can simply point back to the original
event handler in FrameForm. Opening an existing file involves a bit more, and is
discussed under “Using the OpenDialog component” on page 297.
Chapter 10, Text editor example
285
➤
Write the following event handler for the EditForm File|New click:
procedure TEditForm.New1Click(Sender: TObject);
begin
FrameForm.NewChild(Sender);
end;
Referencing other units
If you try to compile the application now, Delphi generates an “Unknown identifier”
error message. If you want to reference anything declared in another form’s unit, you
need to add the form to the referencing form’s uses clause. In this case it’s actually
EditForm itself that FrameForm doesn’t recognize.
➤
Add MDIEdit to the uses clause in the interface section of the MDIFrame unit:
uses Sysutils, ... Menus, MDIEdit;
By the same token, if you run the application now, you get the same error message for
the FrameForm reference in EditForm’s New1Click method.
➤
Create the following uses clause in the implementation part of the MDIEdit unit:
uses MDIFrame;
Note
➤
When two units reference each other, placing both unit references in the uses clause of
the interface part causes a circular reference. That is why you wrote a uses clause in the
implementation part of MDIEdit, instead of editing the existing uses clause in the
interface part. For more information, refer to Chapter 5.
Try the following:
1 Run the application.
Even though you’ve created the child form, it doesn’t appear initially because you
removed it from the Auto-create forms list.
2 Choose File|New Form.
You’ve just called the event handler that instantiates the child form at run time, and
the child window appears.
Figure 10.4 Open child window
3 Close the running application.
286
Delphi User’s Guide
The application as it’s written doesn’t provide any way to easily navigate among
multiple open child windows. The following section discusses how to accomplish this.
Working with open child windows
Now that your application can respond to the File|New menu command by creating a
new child window, you can begin writing code that works with open child windows.
In the text editor application, when a child window is opened, the EditForm menu bar
merges into the FrameForm menu. Commands from the EditForm File menu, such as
printing, saving, and closing files, become available. Commands on the FrameForm
Window menu provide a way to arrange and navigate among the open child windows.
This section describes the following topics:
• Arranging and accessing open child windows
• Providing an area for text manipulation
Arranging and accessing open child windows
MDI applications provide the ability to open several child windows within one
common workspace (the frame window). Because of this, MDI applications should
always include a Window (or other) menu item that contains
• Tile, Cascade, and Arrange Icons commands to offer users an easy way to arrange
their open documents in the client area of the frame window.
• A list of the open document windows, which enables users to quickly switch among
them. (The window that currently has focus appears in the list with a check mark
next to it.)
You’ve already created the Window menu for the text editor application. Enabling the
Tile, Cascade, and Arrange Icons commands requires just a few lines of code. Similarly,
providing a list of open documents as part of the Window menu requires only that you
set a property. Both of these procedures are described in the next section.
Coding the Window menu commands
➤
To handle the clicks for the Tile, Cascade, and Arrange Icons menus commands,
generate the following OnClick event handlers, assigning each handler to the
appropriate command. For each event handler, you need write only one line of code—a
method call—and Delphi does the rest for you.
procedure TFrameForm.Tile1Click(Sender: TObject);
begin
Tile;
end;
{this is the only code you write}
procedure TFrameForm.Cascade1Click(Sender: TObject);
begin
Cascade;
end;
{this is the only code you write}
Chapter 10, Text editor example
287
procedure TFrameForm.ArrangeIcons1Click(Sender: TObject);
begin
ArrangeIcons;
{this is the only code you write}
end;
Including a list of open documents in a menu
You can add a list of open documents to any menu item that appears on a menu bar in
the MDI form. However, there can be only one such list per menu bar. The list of open
documents appears underneath the last item in the menu.
To include a list of open documents as part of a menu, set the frame form’s WindowMenu
property to the name (not the caption) of the menu under which you want the list to
appear. The following procedure describes this process.
■
To include an open document list in a menu,
1 Select the frame form, and then select the Properties page of the Object Inspector.
2 From the drop-down list next to the WindowMenu property, select the name of the
menu item under which you want the open document list to appear (for example, a
Window or View menu).
Note
This name must represent an item that appears on the menu bar, not a submenu item,
because document lists cannot be used in nested menus.
➤
For the text editor application, assign Window1 to FrameForm’s WindowMenu property.
Providing an area for text manipulation
Once you’ve created a child form for text editors, and a frame form to contain the child
forms and provide a means of navigating them, you need to provide an area where the
user can manipulate text. You do this by adding a Memo component to the child form.
Adding the Memo component
The Memo component can be used in an application to read and display multiple lines
of text, whether that text is loaded in from an existing file, pasted from the Clipboard, or
entered by the user. You can set properties of the Memo component to enable word
wrapping, provide scroll bars, and control the border style and alignment of the memo
within the form.
➤
288
Add a Memo component to EditForm, and set its properties as noted in Table 10.7.
Table 10.7
Memo component settings
Property
Value
Align
BorderStyle
ScrollBars
alClient
bsNone
ssBoth
WordWrap
False
Delphi User’s Guide
You now have a form with an area that can receive text. By setting several properties,
you’ve ensured that the Memo component remains indistinguishable from the form at
run time.
Setting the memo’s Align property to a value of alClient ensures that the memo always
fills the client area, or working space, of the form. The bsNone value of the BorderStyle
property removes any border from within the Memo component.
Note
Because the Memo component has been aligned to fill the client area, when you edit the
form itself later in this chapter, you will access it by using the Object selector in the
Object Inspector.
Manipulating text in a Memo component
Once the user can open a new text file, you want to provide some basic text
manipulation operations, such as alignment, word wrapping, and cutting, copying, and
pasting. This application uses event handlers for the EditForm menu items to provide
these options. Depending on the current condition of the text, these menu items might
change during run time—for example, a check mark might appear next to a menu item
to indicate whether an option is selected, or a menu item might appear dimmed when
it’s not available. The text editor application also provides a local, or pop-up, menu that
contains text manipulation commands such as Cut, Copy, and Paste.
This section discusses the following topics:
•
•
•
•
Setting text alignment and word wrapping
Selecting text
Using the Clipboard with text
Providing a pop-up menu
Setting text alignment and word wrapping
In the text editor application, users set text alignment and word wrapping options by
means of commands on the Character menu. A check mark appears next to the menu
command to indicate which options are in effect.
Alignment and WordWrap are properties of the Memo component. As with all properties,
you can set their values during run time with a simple assignment statement. Checked is
a Boolean property for menu items: If Checked is True, then a check mark appears next to
that menu item.
Setting text alignment
An example of using the Sender parameter is discussed in Chapter 3. The text alignment
commands on the EditForm Character menu have a single event handler that uses the
Sender parameter to check which alignment option was selected. Depending on the
value of Sender, the event handler sets the appropriate alignment, and either checks or
unchecks the menu items as called for.
Chapter 10, Text editor example
289
Here is the event handler:
procedure TEditForm.AlignClick(Sender: TObject);
begin
Left1.Checked := False;
Right1.Checked := False;
Center1.Checked := False;
with Sender as TMenuItem do Checked := True;
with Memo1 do
if Left1.Checked then
Alignment := taLeftJustify
else if Right1.Checked then
Alignment := taRightJustify
else if Center1.Checked then
Alignment := taCenter;
end;
➤
Write the OnClick event handler for the Character|Left menu item, as shown. Then
associate the same event handler with both the Right and Center menu items on the
Character menu. (For more information see Chapter 3.)
➤
You can test the application at this point if you like. Run the application and experiment
with opening and arranging new child windows, and entering and aligning text.
Adding scroll bars dynamically
Recall that you set the initial value of the ScrollBars property for the Memo component at
design time. When the application first runs, the memo contains both vertical and
horizontal scroll bars, and word wrap is not selected. If the user selects word wrap, then
only the vertical scroll bar remains, as there is no need to scroll to the right because text
wraps within the current size of the Memo component.
The OnClick event handler for the Character|WordWrap command sets the value of the
Memo component’s WordWrap property as a toggle. In other words, whenever the user
selects the WordWrap command, the value of the WordWrap property changes to its
inverse. If WordWrap was True, it becomes False; if False, it becomes True. The event
handler adds either vertical scroll bars, or both vertical and horizontal scroll bars to the
Memo component based on the value of the WordWrap property. Finally, it sets the
Checked property to the value of the WordWrap property: if WordWrap is True, then the
Checked property is also set to True.
➤
Write the following OnClick event handler for the Character|WordWrap menu item:
procedure TEditForm.SetWordWrap(Sender: TObject);
begin
with Memo1 do
begin
WordWrap := not WordWrap;
if WordWrap then
ScrollBars := ssVertical else
ScrollBars := ssBoth;
WordWrap1.Checked := WordWrap;
end;
end;
290
Delphi User’s Guide
Using the Clipboard with text
Most text-handling applications provide users with a way to move selected text
between documents, including documents in different applications. The Clipboard object
in Delphi encapsulates the Windows Clipboard and includes methods that provide the
basis for operations such as cutting, copying, and pasting text (and other formats).
The Clipboard object is declared in the CLIPBRD.PAS unit file. Before you can access
methods declared in the Clipboard object, you need to add CLIPBRD.PAS to any units
that will use those methods. In the text editor application, only the MDIEdit unit calls
methods of the Clipboard object.
➤
Add Clipbrd to the uses clause in the MDIEdit unit’s interface part.
Selecting text
Before you can send any text to the Clipboard, the text must be selected. The function of
reading and displaying selected text is native to the Memo and Edit components. In
other words, you don’t need to write code so that the Memo component can display
selected text; it comes with this behavior.
The Stdctrls unit in Delphi provides several methods to work with selected text. (Recall
that Delphi automatically adds the Stdctrls unit to the uses clause of any unit whose
form contains a component declared within Stdctrls.) SelText, a run-time only property,
contains a string based on any text selected in the component. The SelectAll method
selects all the text in the memo or other component. The SelLength and SelStart methods
return values for a selected string’s length and starting position, respectively.
The text editor application uses SelLength to determine whether the Memo component
contains any selected text, and then sets the condition of the Edit menu items
accordingly. This is discussed in the section “Dimming menu items” on page 292.
SelStart is discussed in the section “Loading the file” on page 300.
➤
Write the following handler for the Edit|Select All OnClick event:
procedure TEditForm.SelectAll(Sender: TObject);
begin
Memo1.SelectAll;
end;
Cutting, copying, and pasting text
In Delphi, the CopyToClipboard method copies all selected text in a memo or edit
component to the Clipboard; the CutToClipboard method cuts selected text from the
memo or edit component and also places it on the Clipboard; and the
PasteFromClipboard method copies all text currently on the Clipboard back to the
location of the insertion point.
In the text editor application, these methods are called with OnClick event handlers for
the Edit menu commands.
➤
Write the following OnClick event handlers for the Edit|Cut, Edit|Copy, and Edit|
Paste commands, respectively:
Chapter 10, Text editor example
291
procedure TEditForm.CutToClipboard(Sender: TObject);
begin
Memo1.CutToClipboard;
end;
procedure TEditForm.CopyToClipboard(Sender: TObject);
begin
Memo1.CopyToClipboard;
end;
procedure TEditForm.PasteFromClipboard(Sender: TObject);
begin
Memo1.PasteFromClipboard;
end;
Deleting text without changing the contents of the Clipboard
The Edit menu also includes a Delete command that simply clears any selected text from
the memo, without copying the text to the Clipboard. The event handler for the Edit|
Delete command calls the ClearSelection method for Memo1.
➤
Write the following event handler for the Edit|Delete OnClick event:
procedure TEditForm.Delete(Sender: TObject);
begin
Memo1.ClearSelection;
end;
➤
Save and run the application, then try cutting, copying, and pasting selected text. To
demonstrate that the text you delete doesn’t get copied to the Clipboard, delete some
text and choose Edit|Paste again. The text that gets pasted into the memo corresponds
to the last text copied or cut to the Clipboard, not the text you deleted.
Dimming menu items
Often in an application you want to prevent users from accessing certain menu
commands based on current program conditions, but you don’t want to remove the
command from the menu altogether. In the text editor application, for example, if there
is no text currently selected in the document, the Cut, Copy, and Delete items on the
Edit menu appear dimmed.
You specify whether a particular menu command is available to the user by setting the
Boolean value for its Enabled property. (In contrast to the Visible property, the Enabled
property leaves the item visible: a value of False simply dims the menu item.)
As with most properties, you can specify the Enabled property’s initial value by using
the Object Inspector. The default value for this property is True.
In the text editor application, the UpdateMenus method sets the Enabled property for the
Cut, Copy, and Delete menu items based on whether any text is selected in the memo.
By contrast, it sets the Enabled property for the Paste command based on whether any
text exists on the Clipboard.
UpdateMenus uses a Boolean variable, HasSelection, to reflect the value of the memo’s
SelLength property. If SelLength is not equal to zero (in other words, if the memo contains
292
Delphi User’s Guide
selected text), HasSelection stores True; otherwise, it stores False. The rest of the
procedure assigns a value to the menu items’ Enabled property based on the value of
HasSelection.
➤
Open the Code Editor, and write the following method in the MDIEdit unit. This
method will be called by another event handler (which you will write shortly), so you
won’t use the Object Inspector to generate it.
procedure TEditForm.UpdateMenus;
var
HasSelection: Boolean;
{declare a variable that stores the results of the Boolean}
begin
Paste1.Enabled := Clipboard.HasFormat(CF_TEXT); {enable or disable the Paste menu item}
HasSelection := Memo1.SelLength <> 0; {assign the value of the Boolean variable based on
whether any text is selected in the Memo}
Cut1.Enabled := HasSelection; {enable the menu items if HasSelection evaluates to True}
Copy1.Enabled := HasSelection;
Delete1.Enabled := HasSelection;
end;
The HasFormat method of the Clipboard returns a Boolean value based on whether the
Clipboard contains objects, text, or images of a particular format. By checking the value
of the Boolean expression for HasFormat of type text (CF_TEXT), the UpdateMenus
procedure enables the Paste menu item if the Clipboard contains any text, and disables
the Paste item if the Clipboard does not contain text.
For more information about the HasFormat method, refer to online Help. For
information about using the Clipboard object with graphics, refer to Chapter 12.
Declaring a method
If you compile the program now, Delphi generates a “Method identifier expected” error
message. Because UpdateMenus wasn’t generated by using the Object Inspector, Delphi
didn’t create the method declaration. In order for the program to recognize
UpdateMenus as a valid method of the TEditForm class, you need to declare it yourself.
➤
Add the following line to the private part of the TEditForm type declaration in the
interface part of the MDIEdit unit:
procedure UpdateMenus;
Declaring the method in the private part keeps other units from accessing this method.
Because the MDIFrame unit has no reason to use this method (since it contains no such
menus) it’s good programming practice to keep it separate from the MDIEdit unit’s
sharable methods.
Calling a procedure from an event handler
The handler for the Edit menu item OnClick event consists of one line of code—a call to
the UpdateMenus method you’ve just written. The OnClick event handler for the pop-up
menu component, which you’ll add later, calls this same method.
➤
Write the following handler for the Edit menu item’s OnClick event:
procedure TEditForm.SetEditItems(Sender: TObject);
begin
Chapter 10, Text editor example
293
UpdateMenus;
end;
Providing a pop-up menu
Pop-up, or local, menus are a common “ease of use” feature for any application. They
enable users to minimize mouse movement by simply right-clicking anywhere in the
application workspace to access a list of frequently used commands.
In the text editor application, for example, a pop-up menu repeats the Cut, Copy, and
Paste commands. These pop-up menu items use the same event handlers as the items on
the application’s main Edit menu.
➤
Add a PopupMenu component to EditForm, and use the Menu Designer to create the
Cut, Copy, and Paste menu items. You don’t need to create any accelerator or shortcut
keys for pop-up menus. Then attach the pop-up menu items to the event handlers for
the corresponding menu items from the Edit menu.
Adding a pop-up menu and associating a menu item’s OnClick event with an existing
handler are explained in Chapter 3.
Handling the OnPopup event
To complete the pop-up menu, you need to handle the menu component’s OnPopup
event. This event handler calls the UpdateMenus procedure, as does the handler for the
Edit menu title’s OnClick event, SetEditItems. In both cases, you need to call the event
handler code when the user activates the menu. With a pop-up menu, however, there is
no top-level menu bar, so to prepare the pop-up menu commands, you code the menu
component itself.
First you need to add a few lines of code to UpdateMenus, one for each menu item in the
pop-up menu. You simply duplicate the code you wrote for the equivalent items on the
main menu—Cut, Copy, and Paste.
➤
Locate the UpdateMenus procedure in the Code Editor, and add the three lines of code as
shown:
procedure TEditForm.UpdateMenus;
var
HasSelection: Boolean;
begin
Paste1.Enabled := Clipboard.HasFormat(CF_TEXT);
Paste2.Enabled := Clipboard.HasFormat(CF_TEXT);
HasSelection := Memo1.SelLength <> 0;
Cut1.Enabled := HasSelection;
Cut2.Enabled := HasSelection;
Copy1.Enabled := HasSelection;
Copy2.Enabled := HasSelection;
Delete1.Enabled := HasSelection;
end;
{Add this line}
{Add this line}
{Add this line}
Now you could simply associate the pop-up menu component’s OnPopup event with
the SetEditItems event handler. The text editor, however, keeps each event handler
294
Delphi User’s Guide
separate, for the purpose of clarity. When the code is simple enough that duplicating it
isn’t a serious obstacle, sometimes it makes more sense to give distinct procedures their
own names. This is one such example.
➤
Generate a new event handler called SetPopupItems for the PopUpMenu component’s
OnPopup event, that calls the UpdateMenus procedure.
procedure TEditForm.SetPopUpItems(Sender: TObject);
begin
UpdateMenus;
end;
Specifying the pop-up menu for the form
If you ran the application now and tried to access the pop-up menu by right-clicking in
the memo, nothing would happen. That’s because you haven’t told the form which popup menu to call in response to the right-click. The form has a PopupMenu property
which you can use to specify which pop-up menu the form should call.
➤
From the Object selector, select EditForm and set its PopupMenu property to
PopupMenu1. Try running the application again—choose File|New and right-click in
the new child window.
The pop-up menu appears, and is fully functional. Note that because no text is selected,
the Cut and Copy items appear dimmed. The condition of the Paste item indicates
whether any text exists on the Windows Clipboard.
Using common dialog boxes
The dialog box components on the Dialogs page of the Component palette make the
Windows “common” dialog boxes available to your Delphi applications. These dialog
boxes provide all Windows-based applications with a familiar, consistent interface that
enables the user to perform common file operations such as opening, saving, and
printing files.
Each dialog box opens when its Execute method is called. Execute returns a Boolean
value: if the user chooses OK to accept any changes made in the dialog box, Execute
returns True; if the user chooses Cancel to escape from the dialog box without making or
saving any changes, Execute returns False.
This section discusses the following topics:
•
•
•
•
•
•
Common dialog box options in the Object Inspector
Using the OpenDialog component
Using the Save dialog box
Saving the text file
Using the Font dialog box
Changing the font in the Memo component
Chapter 10, Text editor example
295
Common dialog box options in the Object Inspector
In Delphi’s implementation of the common dialog boxes, each dialog box (with the
exception of the Printer Setup dialog box) includes an Options property. The available
settings are presented as nested properties under the Options property. For example, the
following figure shows the nested Options settings for the Font dialog box:
Figure 10.5 Font dialog box component options
The following sections discuss several of the options for the dialog box components
you’ll use as you build the text editor application. Most of these options are unique to
each dialog box. All the common dialog boxes share at least one option in common,
however, which deserves special mention. For each dialog box, you can specify whether
to display a Help button. If you choose to display a Help button, you need to enable it,
so that when the user chooses the Help button at run time, the application’s Help file is
opened to a relevant topic.
The following section describes how to do this.
Enabling the Help button from a common dialog box
There are three steps to enabling a Help button from a common dialog box:
1 Display the button in the dialog box.
2 Specify a Help context for the dialog box component.
3 Specify the application Help file.
■
To display a Help button in a common dialog box, set the Options|ShowHelp property to
True.
The ShowHelp setting is a nested property under the Options property for most common
dialog box components. For each dialog box component, the ShowHelp property is
prefaced with initials particular to the component. For example, in the Font dialog box
component, the ShowHelp property is called fdShowHelp—for Font Dialog.
■
To specify a Help context for the dialog box component, enter a number in the
HelpContext property.
This number must correspond to a Help topic in the application’s Help file. For more
information on developing Help files, see the online Help topic Creating Windows
Help.
296
Delphi User’s Guide
■
To specify the application Help file,
1 Choose Options|Project.
The Project Options multi-page dialog box appears.
2 Choose the Applications page tab.
3 In the Auxiliary files section, specify a Help file. Use the Browse button if necessary to
locate the Help file.
For more information, see “Help file” and “Icon” on page 128 of Chapter 4.
Using the OpenDialog component
In the text editor application, the handler for the FrameForm File|Open menu item
OnClick event interacts with the Open dialog box to load a file. By setting initial values
for several properties of the OpenDialog component, and writing a few lines of code,
you can provide users with an interface consistent with other Windows-based
applications, so they can easily view a list of available files and select a file to open.
OpenDialog component properties
The properties for the OpenDialog component correspond to areas of the dialog box, as
shown in Figure 10.6.
Figure 10.6 OpenDialog component properties
FileName,
DefaultExt
InitialDir
Filters,
FilterIndex
For the purposes of the text editor application, you’ll specify values only for the Filter
property. For information about the other properties of the OpenDialog component,
refer to online Help.
➤
Add an OpenDialog component to FrameForm. Name it OpenFileDialog.
Specifying file filters
The List Files Of Type list box displays file types from which the user can select when
specifying a file to open. Only those files with the specified extension and in the current
directory are displayed in the list box. These file extensions are also known as filters.
To create such a list of filters, or valid file extensions, you set the Filters property for the
Open dialog box. (For more information about creating file filters, see the online Help
topic “Filter Editor.”)
Chapter 10, Text editor example
297
The Filter property
The Open dialog box includes a property named Filters, which provides a quick way to
specify both the types and the listed order of file filters. In the Filter editor, shown in the
following figure, you specify a description and the file extension that you want to be
associated with each file type.
Figure 10.7 The Filter editor
■
To specify file filters,
1 In the Object Inspector, double-click the Value column next to the Filter property, or
click the ellipsis (...) button in the Value column.
2 Specify a filter name (for example, “Text”) and an associated file-name extension (for
example, “*.TXT”) for each filter you want to use.
➤
Specify filters for the Open dialog box of the text editor, as shown in the following table:
Table 10.8
Note
File filter settings for the text editor
Filter name
Filter
Text files (*.TXT)
All files
*.TXT
*.*
The order in which you enter filters is the order in which they then appear in the List
File Of Type list box.
Opening an existing text file
Your application can already present a new window where the user can enter and
manipulate text. Now you can continue by providing the ability to open existing files in
a child window.
In the text editor application, you’ll write event handlers for both the FrameForm File|
Open click and the EditForm File|Open click. As mentioned earlier, the event handler
for the EditForm File|New click simply pointed to the event handler for the FrameForm
File|New click. In a similar way, the EditForm File|Open click points back to the
FrameForm File|Open click. Then, the FrameForm File|Open event handler calls an Open
method that exists in the new child form.
By writing a generic handler at the application (FrameForm) level, you can reuse the
event handler. For example, if you wanted to load other types of files, you could simply
write a different Open method in the child form. You wouldn’t have to modify the
FrameForm event handler.
298
Delphi User’s Guide
➤
Write the following event handlers for the EditForm and FrameForm File|Open click
events, respectively:
procedure TEditForm.Open1Click(Sender: TObject);
begin
FrameForm.OpenChild(Sender);
end;
procedure TFrameForm.OpenChild(Sender: TObject);
var
EditForm: TEditForm;
begin
if OpenFileDialog.Execute then
begin
EditForm := TEditForm.Create(Self);
EditForm.Open(OpenFileDialog.Filename);
EditForm.Visible := True;
end;
end;
{Calls the Open method of EditForm}
The event handler code for the File|Open click executes the Open File dialog box. If the
user then selects a file to open, the Execute function returns a value of True, and the
remaining code runs. The value of the file name specified by the user in the Open File
dialog box is then passed as a parameter to the Open method.
The Open method exists in EditForm, which is why you need to qualify the method call.
If you try to compile the application now, Delphi generates an error message because
the OpenChild event handler calls the Open method of EditForm, which you haven’t
written yet. In the following section, you’ll write the Open method that loads the file the
user selected in the Open File dialog box. First you need to declare a new field in the
MDIEdit unit.
Declaring a form-level variable
The text editor application source code uses a form-level variable called Filename that
you’ll declare in the MDIEdit unit. Filename stores the value of the name for the text file
that each child window can contain. The Filename variable is used in the Open method,
and several other methods of EditForm—for example, those you write to save files and
create backup files.
Previously, you added the UpdateMenus procedure to the private part of the TEditForm
declaration in the MDIEdit unit’s type declaration. Now you’ll add the Filename field to
that same part.
➤
In the private part of the MDIEdit unit’s type declaration, add the following line:
Filename: string;
Caution
As with all such field declarations, this line must precede any method declarations in
the private part. Thus, the Filename declaration should immediately follow the reserved
word private in the MDIEdit unit’s type declaration.
Chapter 10, Text editor example
299
When EditForm is instantiated (for example, through the FrameForm.NewChild
procedure), Filename acts as a form-level variable of EditForm. Therefore, to access it
from FrameForm, you’d need to qualify it (EditForm.Filename).
Compiling the application at this point still generates an error message because theOpen
method of EditForm does not yet exist. The following section discusses the writing and
declaration of this method.
Loading the file
The EditForm.Open method uses the LoadFromFile method discussed in Chapter 9. In this
case, the file being loaded corresponds to the value passed from the
FrameForm.OpenChild method, which was the file the user selected from the Open File
dialog box.
The Open method also uses a function, ExtractFileName, which takes a full file name,
including the file-name extension and a path if specified, and returns only the file name
and extension. For example, if the user used the Open File dialog box to specify a file
such as: C:\WINDOWS\DELPHI\MYFILE.TXT, ExtractFileName, when passed that file
as a parameter, returns only MYFILE.TXT.
Once the file is loaded into the memo, the Open method resets the value of the memo’s
SelStart property to zero. The SelStart property returns the starting position of the
selected text, or the current cursor position if there is no text selected. By default, when
lines are loaded into either an edit or a Memo component, SelStart gets the value of the
last position of the lines, rather than the first. By setting SelStart to zero, the cursor
appears where the user expects it— that is, at the beginning rather than the end of the
file.
➤
First declare the Open method. Add the following line to the TEditForm type declaration
section in the interface part of the MDIEdit unit:
procedure Open(const AFilename: string);
You declare the file name as a constant because its value won’t be modified inside the
method.
➤
Now write the Open method in the implementation part:
procedure TEditForm.Open(const AFilename: string);
begin
Filename := AFilename;
{assigns the parameter passed from FrameForm.OpenChild to the
form variable}
Memo1.Lines.LoadFromFile(FileName);
{loads the file specified in the form variable}
Memo1.SelStart := 0;
Caption := ExtractFileName(FileName);
{displays the filename in the form caption}
Memo1.Modified := False;
end;
Setting the memo’s Modified property to False enables you to track any changes the user
makes to the text file. This in turn gives you the opportunity to provide messages that
prompt the user to save the file before closing.
300
Delphi User’s Guide
Using the Save dialog box
Once users have created a new file, or modified an existing one, your code must enable
them to save their work. You’ll do this by means of a handler for the File|Save event.
In the text editor application, the event handler for the FrameForm File|Save menu
command interacts with the Save As dialog box to save the file. If the file has never been
saved, choosing File|Save opens the Save As dialog box, prompting the user to enter a
file name. If the file has been saved (and therefore named), no dialog box appears when
the user chooses File|Save, but the file is saved and a backup version of the file is
created.
SaveDialog component properties
You use the Open dialog box to read from files, and the Save As dialog box to write to
files. The properties for both dialog box components are identical. It follows that the
properties for the SaveDialog component correspond to the areas of the dialog box in
the same way as do those for the OpenDialog component. Refer to Figure 10.6.
For the purposes of the text editor application, you’ll set the Filter property, which you
also set for the OpenDialog component. You’ll also set the Options property so that the
Read Only check box isn’t displayed in the dialog box—since setting read-only
attributes would prevent users from saving the file—and so that read-only files cannot
be overwritten.
➤
Add a SaveDialog component to EditForm, and set the properties as noted in Table 10.9.
Table 10.9
■
SaveDialog component properties
Property
Value
Filter
Name
Text Files (*.TXT) | *.TXT | All Files (*.*) | *.*
SaveFileDialog
Options
[ofHideReadOnly,ofNoReadOnlyReturn]
To set the Options property,
1 Double-click Options to view the members of the set.
2 Double-click in the Values column to change the Boolean value, or choose the value
you want from the drop-down list.
➤
For the purpose of the text editor application, change the value for ofHideReadOnly and
ofNoReadOnlyReturn to True.
Saving the text file
In the text editor application, saving a file is handled with three procedures:
• Save1Click, which is called when the user selects File|Save, whether for a new or
existing file,
• SaveAs1Click, which is called when the user selects File|Save As, and
• CreateBackup, which is nested and called within Save1Click.
Chapter 10, Text editor example
301
The outer block of the nested procedure, Save1Click, determines whether the file has
been previously saved by checking for an existing value of Filename. (Recall that the
code written so far assigns a value to Filename if the user opens an existing file.
Otherwise, Filename remains empty.) If the user selects Save for an existing file,
Save1Click calls the nested procedure, CreateBackup, which creates a backup version of
the file. This is described in the next section. The remaining code in Save1Click then saves
the file by calling the SaveToFile method.
If Filename is empty (or null), Save1Click calls the event handler for the Save As menu
item click, SaveAs1Click. SaveAs1Click saves the file, using the file name that the user
specifies in the Save As dialog box.
Note
➤
The user must enter a file name or the Save As dialog box does not close when the user
chooses OK. This is a function of the dialog box, not of the event handler code.
First write the method for the EditForm File|Save As click event:
procedure TEditForm.SaveAs1Click(Sender: TObject);
begin
SaveFileDialog.Filename := Filename;
{display current value of Filename, if any}
if SaveFileDialog.Execute then
begin
Filename := SaveFileDialog.Filename;
Caption := ExtractFileName(Filename);
Save1Click(Sender);
end;
end;
If the file has already been named when the user selects Save As, SaveAs1Click displays
the existing name in the File Name field of the Save As dialog box. Otherwise, what’s
displayed there corresponds to the Filters property of the dialog box, discussed earlier.
Next you’ll write the Save1Click method called by SaveAs1Click.
Creating a backup file
The EditForm method for creating a backup file is part of the nested event handler for the
File|Save click event, and is actually called by the outer program block. This kind of
procedure is often called a “helper” or subroutine because it performs a subtask as part
of a larger task.
CreateBackup calls three Visual Class Library methods: ChangeFileExt, DeleteFile, and
RenameFile. ChangeFileExt has two formal parameters, FileName and Extension. In the text
editor application, the Extension string parameter is replaced with a BackupExt constant.
➤
Write the following constant declaration in the implementation part of the MDIEdit
unit:
const
BackupExt = '.BAK';
The ChangeFileExt method combines the name of the file and the backup extension
(.BAK) into one string. CreateBackup assigns this string to a local variable,
BackupFilename, which is then used to delete the existing file and rename it with the
parameters specified in the RenameFile method.
302
Delphi User’s Guide
➤
Write the following handler for the EditForm File|Save OnClick event:
procedure TEditForm.Save1Click(Sender: TObject);
procedure CreateBackup(const Filename: string);
var
BackupFilename: string;
begin
BackupFilename := ChangeFileExt(Filename, BackupExt);
DeleteFile(BackupFilename);
RenameFile(Filename, BackupFilename);
end;
begin
if Filename = '' then
SaveAs1Click(Sender)
else
begin
CreateBackup(Filename);
Memo1.Lines.SaveToFile(Filename);
Memo1.Modified := False;
end;
end;
The SaveToFile file-name parameter takes the value of the Filename variable whenever
the user saves the file.
➤
Run the application and choose File|Open.
The Open File dialog box appears, displaying the file filters you specified at design time.
➤
Select a text file and choose OK.
The text file you specified opens inside the child window.
Using the Font dialog box
At design time, you can use the Font property of the Memo component or of the Font
dialog box component, to set an initial font for text in the memo. Primarily, however,
you need to provide a way for the user to select a font at run time. You might, for
example, provide a menu list that interacts with the Font dialog box to provide a list of
available fonts.
In the text editor application, the Character|Font command opens the Font dialog box,
where the user can then select a font.
➤
Add a Font dialog box component to EditForm.
Font dialog box component properties
The properties available in the Object Inspector for the Font dialog box consist mainly of
the settings in the Options drop-down list. These settings correspond to several areas of
the Font dialog box in the running application, as shown in the following illustration.
Chapter 10, Text editor example
303
Figure 10.8 Font dialog box component properties
fdTrueTypeOnly
fdFixedPitchOnly
fdNoSizeSelect
fdEffects
fdNoStyleSelect
You can also edit the initial settings for the dialog box by selecting the Font property in
the Object Inspector and clicking the ellipsis (...) button next to (TFont). This opens the
dialog box in a design-time state.
For the purposes of the text editor application, you won’t set any properties for the Font
dialog box component at design time. For more information about the properties of the
Font dialog box component not discussed here, refer to online Help.
Changing the font in the Memo component
The event handler for the Character|Font click creates a reflexive relationship between
the Memo component and the Font dialog box: it ensures that the value of the memo’s
Font property is reflected in the dialog box, and that settings made from within the
dialog box are reflected back into the memo.
The first time the user opens the Font dialog box in the text editor application, the
default settings are displayed. To change this, change the Font property for the Memo
component—not for the Font dialog box.
Note
➤
Any settings you make at design time to the Font dialog box are overridden by the
Character|Font event handler. This is by design, because you generally don’t want the
dialog box to display anything other than default settings unless the user makes
modifications from within the dialog box at run time.
Write the following handler for the Character|Font OnClick event:
procedure TEditForm.SetFont(Sender: TObject);
begin
FontDialog1.Font := Memo1.Font;
if FontDialog1.Execute then
Memo1.Font := FontDialog1.Font;
end;
➤
304
Test the event handler by running the application, opening a new file, and then
choosing Character|Font to change the font.
Delphi User’s Guide
Printing the text file
The Delphi Printers unit contains routines that provide your application with all the
printing capabilities users expect. The printing functionality written into the text editor
represents only a subset of what you can provide in your Delphi applications. In the text
editor application, you’ll enable users to print the contents of the text file, or to print
selected text. When printing a selection, the first line of selected text will be printed leftaligned, even if, for example, the selected text starts mid-line. Subsequent lines will be
printed left-aligned, as expected.
The following printing features are beyond the scope of the text editor application:
•
•
•
•
•
•
WYSIWYG printing
Printing multiple copies
Collating multiple copies
Printing page ranges
Printing multiple fonts
Printing word-wrapped text
The Printers unit declares an object, TPrinter, that acts as an interface between a print job
and the output printer. The AssignPrn procedure, also declared in the Printers unit,
directs your text file to the printer currently selected in the Print Setup dialog box.
Using the printer object
You call methods and set properties declared in the Printer object to control the way
your application prints documents. These methods and properties interact with the
Print and Printer Setup common dialog boxes.
The code for the File|Print OnClick event handler in the text editor application refers to
only some of the printer object properties, as noted here. For information about the other
methods refer to online Help.
Canvas
Canvas represents the surface of the currently printing document. You assign the
contents of your text file to the Canvas property of the printer object. The printer object
then directs the contents of the Canvas property (your text file) to the printer.
Fonts
Fonts represents the list of fonts supported by the current printer. These fonts appear in
the Font list of the Font dialog box.
As described previously, any font selected from the Font dialog box is reflected back
into the Font property for Memo1. However, the printer object has no such relationship
to the Font dialog box or to the Font property for Memo1. Unless your program specifies
otherwise, the printer uses the default (System) font that is returned by the Windows
device driver to print your text file.
Chapter 10, Text editor example
305
To change the printer’s font, simply assign the Font property for Memo1 to the Font
property for the printer object’s Canvas. This effectively downloads the selected font to
the printer.
For example,
Printer.Canvas.Font := Memo1.Font;
Using the printer dialog box(es)
In the text editor application, the File|Print command opens the Print dialog box, where
the user can then select printing options, or open the Printer Setup dialog box to change
printers. The File Print Setup command also opens the Printer Setup dialog box.
➤
Add a Print dialog box component and a Printer Setup dialog box component to
EditForm.
Print dialog box component properties
The properties available in the Object Inspector for the Print dialog box component
correspond to several areas of the Print dialog box in the running application, as shown
in the following illustration.
Figure 10.9 Print dialog box component properties
PrintRange, FromPage,
MaxPage, MinPage,
Options, ToPage
properties
Options | PrintToFile
property
Options|Help property
Copies property
Collate property
Although Delphi makes it easy to do so, you don’t usually need to reset the default
options for this dialog box at design time. There are, however, a few print options worth
mentioning here.
MinPage / MaxPage
Use these settings to place an upper or lower limit on the number of pages the user can
specify in the Pages From: and To: edit boxes. Note that any setting you make does not
change what’s displayed in the dialog box. If the user enters a number outside the range
you specify and then presses Enter, the application displays an error message that says
“From (or To) value is below (or above) the minimum (or maximum) range.”
Options | poPageNums
A value of True enables the Pages From: and To: radio buttons, so the user can specify a
page range. For example, you might set this to True at run time once you’ve determined
that more than one page exists in the current document.
306
Delphi User’s Guide
Options | poPrintToFile
A value of True adds the Print To File check box to the dialog box. (Your application
code must provide the actual capability of printing to a file.)
Options | poSelection
A value of True enables the Selection radio button, so the user can print selected text. For
example, you might set this to True at run time once you’ve determined that selected
text exists in the current document.
PrintRange
The Print Range settings specify what appears as the Print Range default when the
dialog box first opens. For example, a setting of PrintRange = prPageNums specifies that
the Pages radio button is selected, instead of the All radio button. AllPages is the default
setting.
Note that in order for either of the two non-default settings to take effect in the dialog
box, the corresponding Options setting must be True. For example, if you set PrintRange
to prSelection without also setting Options|Selection to True, the dialog box still opens
with the default Print Range setting of AllPages.
Using the Printer Setup dialog box component
ChangeDefault is the only property displayed in the Object Inspector for the Printer
Setup dialog box component that interacts with the dialog box in the running
application. The run-time value of this property changes to True when the user selects a
different printer setup.
The remaining settings in this dialog box and in the Options and Advanced Options
dialog boxes write to and read from settings in the user’s WIN.INI file. Therefore you
won’t write much code that interacts directly with this component, other than launching
it. All the functions it provides after that are handled by Windows.
Handling the File | Print Setup OnClick event
The File|Print Setup OnClick event handler simply calls the Print Setup dialog box.
➤
Write the following handler for the EditForm File|Print Setup OnClick event:
procedure TEditForm.PrintSetUp1Click(Sender: TObject);
begin
PrinterSetupDialog1.Execute;
end;
Directing your text file to the printer
The next few sections describe the parts of code that make up the File|Print OnClick
event handler. You’ll see how to write the complete event handler in “Printing the
contents of the memo” on page 308.
Before you begin printing, you need to assign a text-file variable to the printer by calling
the AssignPrn procedure. The File|Print OnClick event handler, Print1Click, declares a
local variable, PrintText, for a file of type Text, as defined by the System unit. Print1Click
then passes this variable as a parameter to the AssignPrn method.
Chapter 10, Text editor example
307
Once you use AssignPrn to assign PrintText to the printer, any Write or Writeln
statements sent to the file variable are then written on the printer object’s canvas, using
the Canvas property’s font and pen position.
Here is the AssignPrn procedure call from the text editor application:
begin
AssignPrn(PrintText);
Rewrite(PrintText);
The call to Rewrite (a procedure in the System unit) actually creates and opens the output
file.
The AssignPrn method is declared in the Delphi Printers unit, so you need to add Printers
to MDIEdit’s uses clause.
➤
Add Printers to the uses clause in MDIEdit’s interface part. Here’s what the uses clause
should include at this point:
uses SysUtils, WinTypes, WinProcs, Classes, Messages, Graphics, Forms, Controls,
Printers, Dialogs, Menus, StdCtrls, Clipbrd;
You’ll add two additional Delphi units before you complete the text editor application.
Downloading the text
When the printer is ready for input, you use a for loop to write the text from the memo
to the printer. First, you declare a counter variable:
var
Line: Integer;
Then you need to write a for loop to write the contents (Lines property) of Memo1 to the
printer. Here is the code that follows the call to Rewrite in the text editor application:
for Line := 0 to Memo1.Lines.Count-1 do
Writeln(Printer1, Memo1.Lines[Line]);
The last line to be printed equals the number of lines in the memo, minus one, because
the counting begins with zero as the first line.
The following section shows how all of these methods fit together into a single event
handler for the EditForm File|Print OnClick event.
Printing the contents of the memo
All the code discussed in the preceding sections is used in the text editor application to
handle the File|Print click event. This section shows the event handler in its entirety.
➤
Write the following handler for the EditForm File|Print OnClick event:
procedure TEditForm.Print1Click(Sender: TObject);
var
Line: Integer;{declare an integer variable for the number of lines of text}
PrintText: System.Text; {declare PrintText as text file defined in System unit}
begin
if PrintDialog1.Execute then
308
Delphi User’s Guide
begin
AssignPrn(PrintText);
{assign the global variable PrintText to the printer}
Rewrite(PrintText);
{create and open the output file}
Printer.Canvas.Font := Memo1.Font;{assign the current Font setting for Memo1 to the
Printer object's canvas}
for Line := 0 to Memo1.Lines.Count - 1 do
Writeln(PrintText, Memo1.Lines[Line]);
{write the contents of the Memo to the
printer object}
CloseFile(PrintText);
end;
end;
Your application now has the ability to print a text file.
➤
Save and run the application, and test its printing capability.
Exiting gracefully
Applications that enable users to modify and save data into files should include
safeguards so that users do not lose their work. The text editor application, for example,
creates a backup file every time the user saves an existing file. Other important safety
measures involve responding to a file or application close event—making sure that
modified files are not closed without giving the user the option to save changes.
So far you’ve given users the ability to open, save, and print their text files—but not the
ability to close them. In Delphi, closing a child window involves the same process as
closing the main MDI application window. In both cases you use the Close method of
TForm.
The Close method executes your form’s OnCloseQuery event handler code, which returns
a Boolean value for the CanClose parameter. If CanClose returns True, then the Close
method executes your form’s OnClose event handler code. You should ensure that the
code you write for the OnCloseQuery event handles any changes made to the text file
before the window closes.
This section discusses
• Closing a window
• Determining whether the file has been modified
• Exiting the application
Closing a window
In the text editor application, there are two menu items that call the Close method: File|
Close, and File|Exit. File|Close closes the child window, and File|Exit closes
FrameForm, which terminates the application (and indirectly closes all child windows).
Note that users can also close an application window in any of the following ways:
• Pressing Alt+F4 from an MDI frame window (terminates the application)
• Pressing Ctrl+F4 from an MDI child window (closes the child window)
Chapter 10, Text editor example
309
• Double-clicking the Control-menu box (also known as the System menu)
• Choosing Close from the Control menu
All of these occurrences invoke Form.Close as well. In the text editor application, to
handle any of these user actions, you’ll write a handler for the edit form’s OnClose event.
Closing the child window
The handler for the File|Close OnClick event exists in EditForm, so there is no need to
specify which form should close.
➤
Write the following handler for the EditForm File|Close OnClick event:
procedure TEditForm.Close1Click(Sender: TObject);
begin
Close;
end;
Now you’ll write the handler that gets called when the user closes the form without
using the File|Close command.
➤
Write the following handler for the EditForm OnClose event:
procedure TEditForm.FormClose(Sender: TObject; var Action: TCloseAction);
begin
Action := caFree;
end;
This method closes the form and frees all memory allocated to it.
Determining whether the file has been modified
The Close method of TForm calls the CloseQuery method of TForm, as mentioned
previously. CloseQuery returns a Boolean value for the variable CanClose, which
determines whether to close the form.
The text editor application uses CloseQuery in conjunction with the Modified property of
the memo to provide users with a message that asks them whether they want to save
their changes. If the user cancels the message box, CanClose returns False and the form
doesn’t close.
The MessageDlg function, which is declared in the Dialogs unit, produces the message
dialog box. (For more information about MessageDlg, refer to online Help.) MessageDlg
calls the Format function, which exists in the SysUtils unit (automatically declared in the
uses clause of EditForm’s interface part).
The text editor application uses a global constant to present the user’s file name in the
message dialog box, or “Untitled” if the file name has not already been saved.
➤
Declare the following global constant in the implementation part of the MDIEdit unit:
const
SWarningText = 'Save Changes to "%s"?';
310
Delphi User’s Guide
The EditForm CloseQuery method substitutes the ”%s” wildcard with the value of the
Caption property for the text file. Thus, if the user has previously saved the file, the file
name is displayed.
➤
Write the following handler for the EditForm OnCloseQuery event:
procedure TEditForm.FormCloseQuery(Sender: TObject; var CanClose: Boolean);
var
DialogValue: Integer;
{declare an integer variable to store the user's response
to the message dialog}
FName: string;
{declare a string variable to store the value of
the file name when saving}
begin
if Memo1.Modified then
begin
FName := Caption;
{save the value of the Caption property to the FName variable}
if Length(FName) = 0 then
FName := 'Untitled';
{if there is no filename, use 'Untitled'}
DialogValue := MessageDlg(Format(SWarningText, [FName]), mtConfirmation,
[mbYes, mbNo, mbCancel], 0);
{produce the message dialog box}
case DialogValue of
id_Yes: Save1Click(Self);
{Self parameter saves the instance of EditForm open at
the time the user chooses Yes in the dialog}}
id_Cancel: CanClose := False;
{if the user chooses Cancel, exit the dialog and
don’t close the form}
end;
end;
end;
Note that there is no need to provide a response if the user chooses No from the message
dialog box, because the default value for CanClose is True— which means that the dialog
box will close without saving the user’s changes.
Exiting the application
The File|Exit event handler calls the Close method of TForm, as does the File|Close
event handler. In an MDI application, the Close method closes the window that has
focus; if the focused window is the application’s main form, then the CloseQuery method
of that form first iterates through all open MDI child windows to determine whether
they can close. If any MDI child form’s CanClose value is False, then the MDI frame form
won’t close. If every child form closes successfully (CanClose returns True), then the MDI
frame form closes, and therefore the application terminates.
Since both the EditForm and FrameForm File menus have an Exit item, you need to write
an event handler for each menu’s File|Exit OnClick event. Similar to the handlers for the
File|New and File|Open clicks, the handler for EditForm’s File|Exit click simply calls
FrameForm’s File|Exit click event handler.
➤
Write the following handler for the EditForm File|Exit OnClick event:
procedure TEditForm.Exit1Click(Sender: TObject);
begin
Chapter 10, Text editor example
311
FrameForm.Exit1Click(Sender);
end;
➤
Writ e the following handler for the FrameForm File|Exit OnClick event:
procedure TFrameForm.Exit1Click(Sender: TObject);
begin
Close;
end;
Summary
Delphi provides tools to help you quickly and easily create Multiple Document Interface
applications, as well as several text-manipulation tools. This chapter discussed such text
manipulation techniques as cutting, copying, and pasting text, using the Clipboard with
text, and specifying a text font. In addition, the chapter presented such applicationdevelopment techniques as creation of MDI frame and child windows and merging
frame and child menus.
312
Delphi User’s Guide
Chapter
11
Drawing graphics at run time
Chapter 11
There are three ways to get graphic images into your Delphi applications: you can insert
pre-drawn pictures at design time, create them using graphical controls at design time,
or draw them dynamically at run time. This chapter describes how to draw graphics at
run time, either on a window or on a custom control or owner-draw control. Designtime graphics, using image controls, are explained in Chapter 13.
When you draw graphics in a Delphi application, you draw on an object’s canvas, rather
than directly on the object. The canvas is a property of the object, and is itself an object
with its own properties. The canvas object has four important properties: a pen for
drawing lines, a brush for filling shapes, a font for writing text, and an array of pixels to
represent the image.
The Font property is described in detail in Chapter 10. This chapter discusses how to use
the pixel array, the pen, and the brush.
Canvases are available only at run time, so you do all your work with canvases by
writing code.
To use graphics effectively at run time, you need to understand
•
•
•
•
•
Drawing versus painting
Using the pixel array
Drawing lines and polylines
Drawing shapes
Drawing special parts
If you’re already familiar with the graphics capabilities of Windows, you can probably
go straight to the sample application in Chapter 12. You’ll find that the canvas is easier
to use than direct calls to the Windows Graphics Device Interface (GDI), while
maintaining a high degree of compatibility.
While working through the sample application in Chapter 12, you might find it
convenient to refer back to this chapter for specific techniques.
Chapter 11, Drawing graphics at run time
313
Drawing versus painting
When working with graphics, you often encounter the terms drawing and painting. It’s
important that you understand the difference between the two.
• Drawing is the creation of a single, specific graphic element, such as a line or a shape,
with code. In your code, you tell an object to draw a specific graphic in a specific
place on its canvas by calling a drawing method of the canvas.
• Painting is the creation of the entire appearance of an object. At certain times,
Windows determines that objects onscreen need to refresh their appearance, so it
generates OnPaint events. OnPaint events happen when, for example, a window that
was hidden is brought to the front.
The thing to remember is this: painting usually involves drawing. That is, in response to
OnPaint events, an object generally draws some graphics. An edit box, for instance,
paints itself by drawing a rectangle and then drawing some text inside. A shape control,
on the other hand, paints itself by drawing a single graphic.
The examples in this chapter demonstrate how to draw various graphics, but they do so
in response to OnPaint events. The sample application in Chapter 12 shows how to do
the same kind of drawing in response to other events.
Using the pixel array
Every canvas has an indexed property called Pixels that represents the individual
colored points that make up the image on the canvas. You rarely need to access Pixels
directly, unless you need to find out what color a particular pixel is or to set that pixel’s
color. It’s more important to understand that Pixels is the drawing surface of the canvas,
and that the pen and brush are just convenient ways to manipulate groups of pixels.
This section describes
• Manipulating pixels
• Using pens
• Using brushes
Manipulating pixels
You can treat the pixels of a canvas like a two-dimensional array, with each element in
the array having a particular color. You can either read or set individual pixels.
Reading a pixel’s color
■
314
To retrieve the color of a particular pixel, you access the Pixels property of the canvas,
using as indexes the x- and y-coordinates of the pixel you want to read. The upper left
corner of the canvas is the origin of the coordinate system.
Delphi User’s Guide
For example, the following event handler responds to a click on a check box by
changing the color of the text in the check box to the color of the pixel at the point (10, 10)
in the form:
procedure TForm1.CheckBox1Click(Sender: TObject);
begin
CheckBox1.Font.Color := Canvas.Pixels[10, 10];
end;
Setting a pixel’s color
■
To set a pixel’s color, you assign a color value to the Pixels property, using as indexes the
x- and y-coordinates of the pixel.
For example, the following event handler responds to a click on a button by changing a
random pixel on the form to red. (For detailed information on the Random function, see
online Help.)
procedure TForm1.Button1Click(Sender: TObject);
begin
Canvas.Pixels[Random(ClientWidth), Random(ClientHeight)] := clRed;
end;
Using pens
The Pen property of a canvas controls the way lines appear, including lines drawn as the
outlines of shapes. Drawing a straight line is really just changing a group of pixels that
lie between two points.
The pen itself has four properties you can change: Color, Width, Style, and Mode.
The values of these properties determine how the pen changes the pixels in the line. By
default, every pen starts out black, with a width of 1 pixel, a solid style, and a mode
called copy that overwrites anything already on the canvas.
You can set the color of a pen as you would any other Color property at run time. Width
is an integer number of pixels. Style gives you solid lines, dashed lines, dotted lines, and
so on. Mode lets you specify various ways to combine the pen’s color with the colors
already in the pixel array.
The sample program in Chapter 12 demonstrates the effects of each pen property.
Moving the pen
The current drawing position—the position from which the pen will draw its next line—
is called the pen position. The canvas stores its pen position in a property called PenPos.
Pen position affects the drawing of lines only; for shapes and text, you specify all the
coordinates you need.
■
To set the pen position, call the MoveTo method of the canvas. For example, to move the
pen position to the upper left corner of the canvas, you use the following code:
Canvas.MoveTo(0, 0);
Chapter 11, Drawing graphics at run time
315
Note
Drawing a line with the LineTo method also moves the current position to the endpoint
of the line.
Using brushes
The Brush property of a canvas controls the way you fill areas, including the interior of
shapes. Filling an area with a brush is a way of changing a large number of adjacent
pixels in a specified way.
The brush has three properties you can manipulate: Color, Style, and Bitmap.
The values of these properties determine the way the canvas fills shapes or other areas.
By default, every brush starts out white, with a solid style and no pattern bitmap.
You can set the color of a brush as you would any other Color property at run time. Style
lets you specify various ways to combine the brush’s color with any colors already on
the canvas. Bitmap lets you specify a bitmap image for the brush to use as a pattern for
filling shapes and other areas.
The sample program in Chapter 12 demonstrates the effects of each brush property.
Drawing lines and polylines
A canvas can draw two kinds of lines: straight lines and polylines. A straight line is just
a line of pixels connecting two points. A polyline is a string of straight lines, connected
end-to-end. The canvas draws all lines using its pen.
Drawing straight lines
■
To draw a straight line on a canvas, use the LineTo method of the canvas. LineTo draws a
line from the current pen position to the point you specify and makes the endpoint of
the line the current position. The canvas draws the line using its pen.
For example, the following method draws crossed diagonal lines across a form
whenever the form is painted:
procedure TForm1.FormPaint(Sender: TObject);
begin
with Canvas do
begin
MoveTo(0, 0);
LineTo(ClientWidth, ClientHeight);
MoveTo(0, ClientHeight);
LineTo(ClientWidth, 0);
end;
end;
An OnPaint event occurs whenever Windows determines that a form needs to be
redrawn, such as when another window covers it and then goes away again. FormPaint
is the default name Delphi generates for a handler for a form’s OnPaint event. Handle
316
Delphi User’s Guide
OnPaint events when you want to paint a background on a form or when you want to
regenerate an image.
The rest of the examples in this chapter also do their drawing in OnPaint event handlers.
As you construct the sample application in Chapter 12, you’ll see how to draw on a
canvas interactively.
Drawing polylines
In addition to individual lines, the canvas can also draw polylines, which are groups of
any number of connected line segments.
■
To draw a polyline on a canvas, call the PolyLine method of the canvas. The parameter
passed to the PolyLine method is an array of points. You can think of a polyline as
performing a MoveTo on the first point and LineTo on each successive point.
The following method, for example, draws a rhombus in a form:
procedure TForm1.FormPaint(Sender: TObject);
begin
with Canvas do
PolyLine([Point(0, 0), Point(50, 0), Point(75, 50), Point(25, 50), Point(0, 0)]);
end;
This example takes advantage of Delphi’s ability to create an open-array parameter “on
the fly.” You can pass any array of points, but an easy way to construct an array quickly
is to put its elements in brackets and pass the whole thing as a parameter. For more
information, see online Help.
Drawing shapes
Canvases have methods for drawing four kinds of shapes. The canvas draws the outline
of a shape with its pen, then fills the interior with its brush.
There are three distinct kinds of shape drawing:
• Drawing rectangles and ellipses
• Drawing rounded rectangles
• Drawing polygons
Drawing rectangles, ellipses, and rounded rectangles are quite similar, but polygons are
a little different.
Drawing rectangles and ellipses
■
To draw a rectangle or ellipse on a canvas, you call the canvas’s Rectangle or Ellipse
method, passing the coordinates of a bounding rectangle. The Rectangle method draws
the bounding rectangle; Ellipse draws an ellipse that touches all sides of the rectangle.
The following method, for example, draws a rectangle filling a form’s upper left
quadrant, then draws an ellipse in the same area:
Chapter 11, Drawing graphics at run time
317
procedure TForm1.FormPaint(Sender: TObject);
begin
Canvas.Rectangle(0, 0, ClientWidth div 2, ClientHeight div 2);
Canvas.Ellipse(0, 0, ClientWidth div 2, ClientHeight div 2);
end;
Drawing rounded rectangles
To draw a rounded rectangle on a canvas, you call the canvas’s RoundRect method. The
first four parameters passed to RoundRect are a bounding rectangle, just as for Rectangle
or Ellipse. RoundRect also takes two more parameters that indicate how to draw the
rounded corners.
The following method, for example, draws a rounded rectangle in a form’s upper left
quadrant, rounding the corners as sections of a circle with a diameter of 10 pixels:
procedure TForm1.FormPaint(Sender: TObject);
begin
Canvas.RoundRect(0, 0, ClientWidth div 2, ClientHeight div 2, 10, 10);
end;
Drawing polygons
■
To draw a polygon with any number of sides on a canvas, call the Polygon method of the
canvas. Polygon takes an array of points as its only parameter and connects the points
with the pen, then connects the last point to the first to close the polygon. After drawing
the lines, Polygon uses the brush to fill the area inside the polygon.
To draw a right triangle in the lower left half of a form, for example, do the following:
procedure TForm1.FormPaint(Sender: TObject);
begin
Canvas.Polygon([Point(0, 0), Point(0, ClientHeight),
Point(ClientWidth, ClientHeight)]);
end;
Drawing special parts
In addition to all the lines and shapes described in this chapter, a canvas also provides
some more specialized graphics capabilities, such as pie slices, arcs, and chords. You can
also flood-fill regions and rectangles and copy images from other canvases. To see
details on all the graphics you can draw on a canvas, see TCanvas component in online
Help.
318
Delphi User’s Guide
Summary
Delphi’s canvas objects enable you to draw quickly and easily on a form at run time.
You can use the same techniques to create images in owner-draw controls and other
custom controls. Normally, you use the pen and brush properties of the canvas to create
lines and shapes, but you can also manipulate individual pixels.
Chapter 11, Drawing graphics at run time
319
320
Delphi User’s Guide
Chapter
12
Graphics example
Chapter 12
This chapter presents all the steps to create a simple graphics application that draws
lines and shapes on a window’s canvas in response to mouse clicks and drags. Each
section in the chapter builds on the previous sections, but the individual sections also
explain discrete tasks.
To see the finished application, open the project GRAPHEX.DPR in the DEMOS\
GRAPHEX directory. Figure 12.1 shows the completed application.
Figure 12.1 The finished graphics program, GRAPHEX.EXE
The main steps involved in creating the program are
•
•
•
•
•
•
Responding to the mouse
Adding a field to a form object
Refining line drawing
Adding a tool bar to a form
Adding speed buttons to a tool bar
Responding to clicks
Chapter 12, Graphics example
321
•
•
•
•
•
•
•
•
Drawing with different tools
Customizing pens and brushes
Adding a status bar
Drawing on a bitmap
Adding a menu
Printing graphics
Working with graphics files
Using the Clipboard with graphics
The basic graphics skills used in this chapter are explained in Chapter 11.
Responding to the mouse
There are four kinds of mouse actions you can respond to in your applications. Three of
these are uniquely mouse actions: mouse-button down, mouse moved, and mousebutton up. The fourth kind of action, a click (a complete press-and-release, all in one
place) is a bit different, as it can also be generated by some kinds of keystrokes (such as
pressing Enter in a modal dialog box).
In this example, you’ll respond to the unique mouse actions. You’ll also see how clicks
work when responding to tool-bar commands.
In this example, your application will draw shapes in response to clicks and drags:
pressing a mouse button starts drawing and releasing the button ends the drawing.
You’ll also have the application draw a temporary “rubber-band” image of the drawing
while the user moves the mouse with the button pressed.
Initially, you’ll just draw lines. Later you’ll use other drawing tools to draw shapes.
There are four important topics to understand about mouse events:
•
•
•
•
What’s in a mouse event?
Responding to a mouse-down action
Responding to a mouse-up action
Responding to a mouse move
What’s in a mouse event?
There are three mouse events defined in Delphi: OnMouseDown, OnMouseMove, and
OnMouseUp.
When a Delphi application detects a mouse action, it calls whatever event handler
you’ve defined for the corresponding event, passing five parameters. You use the
322
Delphi User’s Guide
information in those parameters to customize your responses to the events. The five
parameters are as follows:
Table 12.1
Mouse-event parameters
Parameter
Meaning
Sender
Button
Shift
X, Y
The object that detected the mouse action
Indicates which mouse button was involved: mbLeft, mbMiddle, or mbRight
Indicates the state of the Alt, Ctrl, and Shift keys at the time of the mouse action
The coordinates where the event occurred
Most of the time, the most important information in a mouse-event handler is the
coordinates, but sometimes you also need to check Button to determine which mouse
button caused the event.
Note
Delphi uses the same criteria as Microsoft Windows in determining which mouse
button has been pressed. Thus, if you have switched the default “primary” and
“secondary” mouse buttons (so that the right mouse button is now the primary button),
clicking the primary (right) button will record mbLeft as the value of the Button
parameter.
Responding to a mouse-down action
Whenever the user presses a button on the mouse, an OnMouseDown event goes to the
object the pointer is over. The object can then respond to the event.
In this example, the user will press the mouse button with the pointer over the form
itself, at which time the application starts drawing. So you need to define the form’s
response to OnMouseDown events.
■
To respond to a mouse-down action, you attach an event handler to the OnMouseDown
event. If you’re not sure how to create an event handler, see Chapter 2.
Delphi generates an empty handler for a mouse-down event on the form:
procedure TForm1.FormMouseDown(Sender: TObject; Button: TMouseButton;
Shift: TShiftState; X, Y: Integer);
begin
end;
➤
Just to get a feel for writing a mouse-event handler, try displaying some text at the point
where you press the mouse button. To do that, you use the X and Y parameters sent to
the method, and call the TextOut method of the canvas to display text there:
procedure TForm1.FormMouseDown(Sender: TObject; Button: TMouseButton;
Shift: TShiftState; X, Y: Integer);
begin
Canvas.TextOut(X, Y, 'Here!');
{ write text at (X, Y) }
end;
Chapter 12, Graphics example
323
If you run the application, you can press the mouse button down on with the mouse
cursor on the form and have the string appear at the point clicked, as shown in Figure
12.2.
Figure 12.2 Drawing text at the point clicked
The application wouldn’t be able to draw a line yet, because the user would only have
pressed the mouse button. Pressing the button only tells the application where the
drawing will start, and for a line you need both a starting point and an ending point.
➤
For now, you can change the mouse-down event handler to set the current drawing
position to the coordinates where the user presses the button:
procedure TForm1.FormMouseDown(Sender: TObject; Button: TMouseButton;
Shift: TShiftState; X, Y: Integer);
begin
Canvas.MoveTo(X, Y);
{ set pen position }
end;
Pressing the mouse button now sets the pen position, setting the line’s starting point.
You just need to draw a line to the point where the user releases the button. To do that,
you’ll need to respond to a mouse-up event.
Responding to a mouse-up action
An OnMouseUp event occurs whenever the user releases a mouse button. The event
usually goes to the object the mouse cursor is over when the user presses the button,
which is not necessarily the same object the cursor is over when the button is released.
This enables you, for example, to draw a line as if it extended beyond the border of the
form.
■
To respond to mouse-up actions, you define a handler for the OnMouseUp event. If
you’re not sure how to create an event handler, see Chapter 2.
➤
In this example, you can draw a line to the point on the form where the user releases the
mouse button.
Here’s a simple OnMouseUp event handler that draws a line to the point of the mousebutton release:
324
Delphi User’s Guide
procedure TForm1.FormMouseUp(Sender: TObject; Button: TMouseButton;
Shift: TShiftState; X, Y: Integer);
begin
Canvas.LineTo(X, Y);
{ draw line from PenPos to (X, Y) }
end;
If you run the application, you can draw lines by clicking, dragging, and releasing, as
shown in Figure 12.3.
Figure 12.3 Graphics application with lines drawn
Unfortunately, you can’t see the line until you release the mouse button. In the next
section you’ll give the user some intermediate feedback by drawing temporary lines
while the mouse moves.
Responding to a mouse move
An OnMouseMove event occurs periodically when the user moves the mouse. The event
goes to the object that was under the mouse pointer when the user pressed the button.
■
To respond to mouse movements, you need to define the form’s handler for the
OnMouseMove event. If you’re not sure how to define an event handler, see Chapter 2.
➤
In this example, you’ll use mouse-move events to draw intermediate shapes while the
user holds down the mouse button, thus providing some feedback to the user.
Here’s a simple OnMouseMove event handler that draws a line on a form to the location
of the OnMouseMove event:
procedure TForm1.FormMouseMove(Sender: TObject;Button: TMouseButton;
Shift: TShiftState; X, Y: Integer);
begin
Canvas.LineTo(X, Y);
{ draw line to current position }
end;
Note that if you run the application, moving the mouse over the form causes drawing to
follow the mouse, even before you press a mouse button, as shown in Figure 12.4.
Chapter 12, Graphics example
325
Figure 12.4 Graphics application following the mouse
Mouse-move events occur even when you haven’t pressed the mouse button. You need
to add code so the application acts on mouse-move events only when the mouse button
is down.
To track whether there is a mouse button pressed, you need to add an object field to the
form object.
Adding a field to a form object
When you add a component to a form, Delphi also adds a field that represents that
component to the form object, and you can refer to the component by the name of its
field. Component fields are explained in Chapter 6. You can also add your own fields to
forms by editing the type declaration at the top of the form’s unit.
In this example, the form needs to track whether the user has pressed a mouse button.
To do that, you can add a Boolean field and set its value when the user presses the
mouse button.
■
To add a field to an object, edit the object’s type definition, specifying the field identifier
and type after the public directive at the bottom of the declaration. Delphi “owns” any
declarations before the public directive: that’s where it puts the fields that represent
controls and the methods that respond to events.
To give a form a field called Drawing of type Boolean, you edit the form object’s
declaration as follows:
type
TForm1 = class(TForm)
procedure FormMouseDown(Sender: TObject; Button: TMouseButton;
Shift: TShiftState; X, Y: Integer);
procedure FormMouseUp(Sender: TObject; Button: TMouseButton;
Shift: TShiftState; X, Y: Integer);
procedure FormMouseMove(Sender: TObject; Button: TMouseButton;
Shift: TShiftState; X, Y: Integer);
public
Drawing: Boolean;
{ field to track whether button was pressed }
end;
326
Delphi User’s Guide
➤
You’ll add several more fields to the graphics form as you work on this example. In fact,
you’re going to need two fields of type TPoint, so go ahead and add one called Origin
and one called MovePt in addition to Drawing:
type
TForm1 = class(TForm)
procedure FormMouseDown(Sender: TObject; Button: TMouseButton;
Shift: TShiftState; X, Y: Integer);
procedure FormMouseUp(Sender: TObject; Button: TMouseButton;
Shift: TShiftState; X, Y: Integer);
procedure FormMouseMove(Sender: TObject; Button: TMouseButton;
Shift: TShiftState; X, Y: Integer);
public
Drawing: Boolean;
Origin, MovePt: TPoint;
{ fields to store points }
end;
➤
Now that you have the Drawing field to track whether to draw, you should set it to True
when the user presses the mouse button, and False when the user releases it:
procedure TForm1.FormMouseDown(Sender: TObject; Button: TMouseButton;
Shift: TShiftState; X, Y: Integer);
begin
Drawing := True;
{ set the Drawing flag }
Canvas.MoveTo(X, Y);
end;
procedure TForm1.FormMouseUp(Sender: TObject; Button: TMouseButton;
Shift: TShiftState; X, Y: Integer);
begin
Canvas.LineTo(X, Y);
Drawing := False;
{ clear the Drawing flag }
end;
➤
Then you can modify the OnMouseMove event handler to draw only when Drawing is
True:
procedure TForm1.FormMouseMove(Sender: TObject;Button: TMouseButton;
Shift: TShiftState; X, Y: Integer);
begin
if Drawing then
{ only draw if Drawing flag is set }
Canvas.LineTo(X, Y);
end;
Now you get drawing only between the mouse-down and mouse-up events, but it’s still
not very useful. You still get a scribbled line that tracks the mouse movements instead of
a nice, straight line, and no final line from the original point when you release the mouse
button, as shown in Figure 12.5.
Chapter 12, Graphics example
327
Figure 12.5 Line with lost origin
The problem is that each time you move the mouse, the mouse-move event handler calls
LineTo, which moves the pen position, so by the time you release the button, you’ve lost
the point where the straight line was supposed to start.
In the next section, you’ll use the Origin and MovePt fields you added to track the
starting and intermediate points.
Refining line drawing
Now that you have fields in place that can track various points, you can correct some of
the problems introduced in the application. The first step is to track the line origin so
you can draw the final line.
Tracking the origin point
The most important thing to track when drawing lines is the point where the line starts.
As you saw earlier, you know where the line ends, because that’s where the mouse-up
event occurs. The OnMouseUp event handler needs to know where the line started, too.
That’s where the Origin field comes in.
➤
Set Origin to the point where the mouse-down event occurs, so the mouse-up event
handler can use Origin to place the beginning of the line:
procedure TForm1.FormMouseDown(Sender: TObject; Button: TMouseButton;
Shift: TShiftState; X, Y: Integer);
begin
Drawing := True;
Canvas.MoveTo(X, Y);
Origin := Point(X, Y);
{ record where the line starts }
end;
procedure TForm1.FormMouseUp(Sender: TObject; Button: TMouseButton;
Shift: TShiftState; X, Y: Integer);
begin
Canvas.MoveTo(Origin.X, Origin.Y);
{ move pen to starting point }
Canvas.LineTo(X, Y);
328
Delphi User’s Guide
Drawing := False;
end;
Those changes get the application to draw the final line again, but what about the
intermediate drawing?
Figure 12.6 Straight line with intermediate drawing
Tracking movement
The problem with the OnMouseMove event handler as currently written is that while it
draws a line to the current position of the mouse, it draws that line from the last mouse
position, not from the original position.
➤
Now that the application tracks the origin, however, that’s easy to correct. Move the
drawing position to the origin point, then draw to the current point:
procedure TForm1.FormMouseMove(Sender: TObject;Button: TMouseButton;
Shift: TShiftState; X, Y: Integer);
begin
if Drawing then
begin
Canvas.MoveTo(Origin.X, Origin.Y);
{ move pen to starting point }
Canvas.LineTo(X, Y);
end;
end;
That’s better, in that you now get lines to the current mouse position. Unfortunately, the
lines don’t go away, so you can hardly find the final line.
Chapter 12, Graphics example
329
Figure 12.7 Persistent intermediate lines
The trick is to erase each line before you draw the next one, and that means you need to
keep track of where the previous one was. That’s the purpose of the MovePt field you
added earlier.
➤
Set MovePt to the endpoint of each intermediate line, so you can use MovePt and Origin
to erase that line the next time a line is drawn:
procedure TForm1.FormMouseDown(Sender: TObject; Button: TMouseButton;
Shift: TShiftState; X, Y: Integer);
begin
Drawing := True;
Canvas.MoveTo(X, Y);
Origin := Point(X, Y);
MovePt := Point(X, Y);
{ keep track of where this move was }
end;
procedure TForm1.FormMouseMove(Sender: TObject;Button: TMouseButton;
Shift: TShiftState; X, Y: Integer);
begin
if Drawing then
begin
Canvas.Pen.Mode := pmNotXor;
{ use XOR mode to draw/erase
Canvas.MoveTo(Origin.X, Origin.Y);
{ move pen back to origin
Canvas.LineTo(MovePt.X, MovePt.Y);
{ erase the old line
Canvas.MoveTo(Origin.X, Origin.Y);
{ start at origin again
Canvas.LineTo(X, Y);
{ draw the new line
end;
MovePt := Point(X, Y);
{ record point for next move
Canvas.Pen.Mode := pmCopy;
end;
}
}
}
}
}
}
Now you get a nice “rubber-band” effect when you draw the line. By changing the pen’s
mode to pmNotXor, you have it combine your line with the background pixels. When
you go to erase the line, you’re actually setting the pixels back to the way they were. By
changing the pen mode back to pmCopy (its default value) after drawing the lines, you
ensure that the pen is ready to do its final drawing when you release the mouse button.
330
Delphi User’s Guide
Figure 12.8 Line after rubber banding
You’ve come a long way with your line drawing, and as you’ll see shortly, it will all pay
off when you want to draw different shapes, such as rectangles and ellipses. Before you
can draw those shapes, however, you need to add a way for the user to choose which
shape to draw. In the next section, you’ll define a tool bar that provides those choices,
then see how to respond to the tool bar’s controls.
Adding a tool bar to a form
A tool bar is a panel, usually across the top of a form, below the menu bar, that holds a
number of controls, especially buttons. Tool bars provide an easy, visible way to present
options to users of your applications, and Delphi makes it easy to add tool bars to your
forms.
■
To add a tool bar to a form,
1 Add a Panel component to the form.
2 Set the panel’s Align property to alTop. When aligned to the top of the form, the panel
maintains its height, but matches its width to the full width of the form’s client area,
even if the window changes size.
3 Add speed buttons or other controls to the bar.
You can add as many tool bars to a form as you want. If you have multiple panels
aligned to the top of the form, they “stack” vertically in the order added.
➤
Add a tool bar to the graphics-example form and delete its caption. In the next section,
you’ll add buttons to the tool bar. Later in this example, you’ll add more tool bars to the
form, and see how to show and hide them at run time.
Adding speed buttons to a tool bar
Delphi provides buttons, called speed buttons, specially designed to work on tool bars.
A speed button usually has no caption, only a small graphic called a glyph, which
represents the button’s function.
Chapter 12, Graphics example
331
Speed buttons have three possible modes of operation. They can
• Act like regular pushbuttons
• Toggle on and off when clicked
• Act like a set of radio buttons
The graphics example uses some of each kind of speed button.
There are four tasks related to speed buttons on tool bars:
•
•
•
•
Adding a speed button to a tool bar
Assigning a speed button’s glyph
Setting the initial condition of a speed button
Creating a group of speed buttons
Adding a speed button to a tool bar
■
To add a speed button to a tool bar, just place the speed button component on the panel
that represents the tool bar. The panel, rather than the form, “owns” the speed button,
so moving or hiding the panel also moves or hides the speed button.
➤
For the graphics program, add six speed buttons to the tool bar, arranged as shown in
Figure 12.9, and change the Name property of each to the indicated text.
Figure 12.9 The tool bar with 6 buttons:
LineButton
RectangleButton
EllipseButton
RoundRectButton
BrushButton
PenButton
The default height of the tool bar is 41, and the default height of speed buttons is 25. If
you set the Top property of each button to 8, they’ll be vertically centered. The default
grid setting snaps the speed button to that vertical position for you.
Assigning a speed button’s glyph
Each speed button needs a graphic image called a glyph to indicate to the user what the
button does. If you supply the speed button only one image, the button manipulates
that image to indicate whether the button is pressed, unpressed, selected, or disabled.
You can also supply separate, specific images for each state if you prefer.
You normally assign glyphs to speed buttons at design time, although you can assign
different glyphs at run time.
■
To assign a glyph to a speed button at design time,
1 Select the speed button.
2 In the Object Inspector, select the Glyph property.
3 Double-click the Value column beside Glyph.
Delphi opens the Picture editor.
332
Delphi User’s Guide
4 Choose Load in the Picture editor.
Delphi opens a file-open dialog box.
5 Select the .BMP file that contains the image you want on the button and choose OK.
The file-open dialog box closes, and the Picture editor displays the selected bitmap
image.
6 Choose OK to close the Picture editor.
➤
Assign the appropriate glyphs to each speed button. Figure 12.10 shows the graphics
example’s tool bar with the file names for the glyphs for all the speed buttons. These
files are all located in the same directory as the project files.
Figure 12.10 The tool bar buttons with glyphs assigned
LINE.BMP
RECT.BMP
ELLIPSE.BMP
BRUSH.BMP
PEN.BMP
ROUNDREC.BMP
Setting the initial condition of a speed button
Speed buttons use their appearance to give the user clues as to their state and purpose.
Because they have no caption, it’s important that you use the right visual cues to assist
users.
■
• To make a speed button appear pressed, set its Down property to True.
■
• To make a speed button appear disabled, set its Enabled property to False.
Since the default drawing tool for this application is the line, you need to ensure that the
line button on the tool bar is pressed when the application starts.
➤
Set LineButton’s Down property to True.
Creating a group of speed buttons
A series of speed buttons often represents a set of mutually exclusive choices. In that
case, you need to associate the buttons into a group, so that clicking any button in the
group causes the others in the group to pop up.
■
To associate any number of speed buttons into a group, assign the same number to each
speed button’s GroupIndex property. The easiest way to do that is to select all the buttons
you want in the group, and with the whole group selected, set GroupIndex to a unique
value.
Since the shape-drawing-tool buttons are mutually exclusive, you assign them to a
group.
➤
Select the four shape-drawing tools (the four leftmost buttons), and set their GroupIndex
to 1. Now when you run the application, you can click any tool’s button, and all others
pop up.
Chapter 12, Graphics example
333
Allowing toggle buttons
Sometimes you want to be able to click a button in a group that’s already pressed and
have it pop up, leaving no button in the group pressed. Such a button is called a toggle.
Use AllowAllUp to create a grouped button that acts as a toggle: click it once, it’s down;
click it again, it pops up.
■
To make a grouped speed button a toggle, set its AllowAllUp property to True. Setting
AllowAllUp to True for any speed button in a group automatically sets the same property
value for all buttons in the group. This enables the group to act as a normal group, with
only one button pressed at a time, but also allows the case with no button pressed.
➤
Both the pen and brush buttons in this example are single-button groups that act as
toggles. Make sure each has its AllowAllUp property set to True, then set the GroupIndex
properties of PenButton and BrushButton to 2 and 3, respectively.
Responding to clicks
When the user clicks a control, such as a button on a tool bar, the application generates
an OnClick event. You handle those OnClick events by writing OnClick event handlers
for your forms. In this section, you’ll see how to respond to one such click event, and do
something useful in response.
Responding to a button click
Speed-button components have only two events built into them: OnClick and
OnDblClick.
■
To respond to the user’s click on a speed button, you define a handler for the button’s
OnClick event. If you’re not sure how to generate an event handler, see Chapter 2.
By default, Delphi generates an OnClick event handler named after the control clicked.
For example, the default OnClick event handler for a speed button named LineButton
would be
procedure TForm1.LineButtonClick(Sender: TObject);
begin
end;
You then fill in the action you want to occur when the user clicks that button.
In this example, you’ll write several kinds of responses to speed-button clicks. For the
drawing-tool buttons, you’ll select the appropriate drawing tool. For the pen and brush
buttons, you’ll display other tool bars.
Drawing with different tools
Now it’s time to put some of the skills explained earlier to good use. Earlier sections
have described adding fields to keep track of a state and how to respond to speed-
334
Delphi User’s Guide
button clicks. In this section, you’ll respond to clicks on speed buttons by setting the
drawing tool for the form.
The next few sections demonstrate
• Declaring an enumerated type
• Changing the tool with speed buttons
• Using the drawing tools
Declaring an enumerated type
The graphics program needs a way to keep track of what kind of drawing tool you want
it to use at any given time. You could assign numbers to each kind of tool, but then you
would have to remember what each number stands for. You can do that more easily by
assigning mnemonic constant names to each number, but your code won’t be able to
distinguish which numbers are in the proper range and of the right type. Fortunately,
Object Pascal provides a means to handle both of these shortcomings. You can declare
an enumerated type.
An enumerated type is really just a shorthand way of assigning sequential values to
constants. Since it’s also a type declaration, you can use Object Pascal’s type-checking to
ensure that you assign only those specific values.
■
To declare an enumerated type, you use the reserved work type, followed by an
identifier for the type, then an equal sign, and the identifiers for the values in the type in
parentheses, separated by commas.
For example, the following code declares an enumerated type for each of the drawing
tools in a graphics application:
type
TDrawingTool = (dtLine, dtRectangle, dtEllipse, dtRoundRect);
➤
Add the declaration of the TDrawingTool type above the declaration of the form class:
type
TDrawingTool = (dtLine, dtRectangle, dtEllipse, dtRoundRect);
TForm1 = class(TForm)
ƒ
{ this is already there }
{ you type this }
{ this is already there }
By convention, type identifiers begin with the letter T, and groups of similar constants
(such as those making up an enumerated type) begin with a 2-letter prefix (such as dt for
“drawing tool”).
The declaration of the TDrawingTool type is equivalent to declaring a group of constants:
const
dtLine = 0;
dtRectangle = 1;
dtEllipse = 2;
dtRoundRect = 3;
The main difference is that by declaring the enumerated type, you give the constants not
just a value, but also a type, which enables you to use Object Pascal’s type-checking to
prevent many errors. A variable of type TDrawingTool can be assigned only one of the
Chapter 12, Graphics example
335
constants dtLine..dtRoundRect. Attempting to assign some other number (even one in the
range 0..3) generates a compile-time error.
➤
You can now add a field to the form to keep track of its drawing tool:
type
TDrawingTool = (dtLine, dtRectangle, dtEllipse, dtRoundRect);
TForm1 = class(TForm)
ƒ
{ method declarations }
public
Drawing: Boolean;
Origin, MovePt: TPoint;
DrawingTool: TDrawingTool;
{ field to hold current tool }
end;
Since objects (including forms) initialize all their fields to zero, the drawing tool when
you start the application is dtLine.
Changing the tool with speed buttons
Since you have already seen how to respond to speed-button click events, you can set
up OnClick event handlers for all the drawing-tool buttons on the tool bar.
➤
Attach the following event handlers to the OnClick events of the four drawing-tool
buttons on the tool bar, setting DrawingTool to the appropriate value for each:
procedure TForm1.LineButtonClick(Sender: TObject);
begin
DrawingTool := dtLine;
end;
procedure TForm1.RectangleButtonClick(Sender: TObject);
begin
DrawingTool := dtRectangle;
end;
procedure TForm1.EllipseButtonClick(Sender: TObject);
begin
DrawingTool := dtEllipse;
end;
procedure TForm1.RoundedRectButtonClick(Sender: TObject);
begin
DrawingTool := dtRoundRect;
end;
{ LineButton }
{ RectangleButton }
{ EllipseButton }
{ RoundRectButton }
Now that you can tell the form what kind of tool to use, the only step left is to teach it
how to draw the different shapes. The only methods that do any drawing are the
mouse-move and mouse-up handlers, and the only drawing code draws lines, no
matter what tool is selected.
336
Delphi User’s Guide
Using the drawing tools
Now that the application has the ability to specify different drawing tools, you need to
make the event handlers apply the tool the user selects, which you’ve stored in
DrawingTool. Your code now needs to choose how to draw, based on the selected tool.
This section describes
• Making efficient choices
• Drawing the appropriate shapes
• Adding a method to a form
Making efficient choices
If you had only a few choices, you’d probably just rewrite the drawing methods to look
something like this:
procedure TForm1.FormMouseUp(Sender: TObject);
begin
if DrawingTool = dtLine then { draw a line }
else if DrawingTool = dtRectangle then { draw a rectangle }
{ ... and so on ... }
end;
The comments like { draw a line }, of course, represent blocks of statements such as
those you wrote earlier to draw a line.
Once you get more than a few choices, though, this becomes tedious and inefficient.
Fortunately, Object Pascal and Delphi offer an easier way to switch among alternatives,
the case statement. Among other things, case statements make it easier to add new
choices later.
The method shown above could be rewritten using a case statement instead of the
if..then..else statements:
procedure TForm1.FormMouseUp(Sender: TObject);
begin
case DrawingTool of
dtLine: { draw a line }
dtRectangle: { draw a rectangle }
{ ... and so on ... }
end;
end;
Drawing the appropriate shapes
Drawing shapes is just as easy as drawing lines: Each one takes a single statement, and
you’ve already got all the coordinates you need.
➤
Rewrite the OnMouseUp event handler to draw shapes for all the tools you’ve defined:
procedure TForm1.FormMouseUp(Sender: TObject);
begin
case DrawingTool of
dtLine:
Chapter 12, Graphics example
337
begin
Canvas.MoveTo(Origin.X, Origin.Y);
Canvas.LineTo(X, Y)
end;
dtRectangle: Canvas.Rectangle(Origin.X, Origin.Y, X, Y);
dtEllipse: Canvas.Ellipse(Origin.X, Origin.Y, X, Y);
dtRoundRect: Canvas.RoundRect(Origin.X, Origin.Y, X, Y,
(Origin.X - X) div 2, (Origin.Y - Y) div 2);
end;
Drawing := False;
end;
Of course, you also need to update the OnMouseMove handler to draw shapes:
procedure TForm1.FormMouseMove(Sender: TObject; Shift: TShiftState; X, Y: Integer);
begin
if Drawing then
begin
Canvas.Pen.Mode := pmNotXor;
case DrawingTool of
dtLine: begin
Canvas.MoveTo(Origin.X, Origin.Y);
Canvas.LineTo(MovePt.X, MovePt.Y);
Canvas.MoveTo(Origin.X, Origin.Y);
Canvas.LineTo(X, Y);
end;
dtRectangle: begin
Canvas.Rectangle(Origin.X, Origin.Y, MovePt.X, MovePt.Y);
Canvas.Rectangle(Origin.X, Origin.Y, X, Y);
end;
dtEllipse: begin
Canvas.Ellipse(Origin.X, Origin.Y, X, Y);
Canvas.Ellipse(Origin.X, Origin.Y, X, Y);
end;
dtRoundRect: begin
Canvas.RoundRect(Origin.X, Origin.Y, X, Y,
(Origin.X - X) div 2, (Origin.Y - Y) div 2);
Canvas.RoundRect(Origin.X, Origin.Y, X, Y,
(Origin.X - X) div 2, (Origin.Y - Y) div 2);
end;
end;
MovePt := Point(X, Y);
end;
Canvas.Pen.Mode := pmCopy;
end;
You probably notice that there is a lot of repeated code in those methods. In fact, the
code to draw each shape appears three different times. This is a good example of a time
when you should move repeated code into a separate routine. In the next section, you’ll
move all the shape-drawing code into a single method that both mouse-event handlers
can call.
338
Delphi User’s Guide
Adding a method to a form
Any time you find that a number of your event handlers use the same code, you can
make your application more efficient by moving the repeated code into a method that
all the event handlers can share.
■
To add a method to a form,
1 Add the method declaration to the form object.
You can add the declaration in either the public or private parts at the end of the
form object’s declaration. If the code is just sharing the details of handling some
events, it’s probably safest to make the shared method private.
2 Write the method implementation in the implementation part of the form unit.
The header for the method implementation must match the declaration exactly, with
the same parameters in the same order.
➤
To get rid of repetitive shape-drawing code from mouse-event handlers, you can add a
method to the form called DrawShape and call it from each of the handlers:
1 Add the declaration of DrawShape to the form object’s declaration.
type
TForm1 = class(TForm)
ƒ
{ many fields and methods omitted for brevity }
public
{ Public declarations }
procedure DrawShape(TopLeft, BottomRight: TPoint; AMode: TPenMode);
end;
2 Write the implementation of DrawShape in the implementation part of the unit.
implementation
{$R *.FRM}
ƒ
{ many other method implementations omitted for brevity }
procedure TForm1.DrawShape(TopLeft, BottomRight: TPoint; AMode: TPenMode);
begin
with Canvas do
begin
Pen.Mode := AMode;
case DrawingTool of
dtLine:
begin
MoveTo(TopLeft.X, TopLeft.Y);
LineTo(BottomRight.X, BottomRight.Y);
end;
dtRectangle: Rectangle(TopLeft.X, TopLeft.Y, BottomRight.X, BottomRight.Y);
dtEllipse: Ellipse(TopLeft.X, TopLeft.Y, BottomRight.X, BottomRight.Y);
dtRoundRect: RoundRect(TopLeft.X, TopLeft.Y, BottomRight.X, BottomRight.Y,
(TopLeft.X - BottomRight.X) div 2, (TopLeft.Y - BottomRight.Y) div 2);
end;
end;
end;
Chapter 12, Graphics example
339
3 Modify the other event handlers to call DrawShape.
procedure TForm1.FormMouseUp(Sender: TObject; Button: TMouseButton;
Shift: TShiftState; X, Y: Integer);
begin
DrawShape(Origin, Point(X, Y), pmCopy);
{ draw the final shape }
Drawing := False;
end;
procedure TForm1.FormMouseMove(Sender: TObject; Button: TMouseButton;
Shift: TShiftState; X, Y: Integer);
begin
if Drawing then
begin
DrawShape(Origin, MovePt, pmNotXor);
{ erase the previous shape }
MovePt := Point(X, Y);
{ record the current point }
DrawShape(Origin, MovePt, pmNotXor);
{ draw the current shape }
end;
end;
Customizing pens and brushes
A graphics program that lets you only draw black-and-white images isn’t very
interesting. In order to use more colors, you need to modify the pen and brush the
canvas uses to do its drawing and painting. In this section, you’ll add more tool bars to
the application, one each for the pen and brush.
Specifically, you’ll see how to perform the following tasks:
•
•
•
•
•
•
•
Adding hidden tool bars
Hiding and showing tool bars
Changing the pen style
Changing the pen color
Changing the pen width
Changing the brush style
Changing the brush color
Adding hidden tool bars
Tool bars don’t have to be visible all the time. In fact, it’s often convenient to be able to
have a number of tool bars available, but show them only when the user wants to use
them. Often you create a form that has several tool bars, but hide some or all of them.
■
To create a hidden tool bar,
1 Add a tool bar to the form. (Be sure to set Align to alTop.)
2 Set the panel’s Visible property to False.
Although the tool bar remains visible at design time so you can modify it, it remains
hidden at run time until the application specifically makes it visible.
340
Delphi User’s Guide
➤
For this example, add two new hidden tool bars, and name them PenBar and BrushBar.
Figure 12.11 shows the tool bars and their controls. Note that they use other controls in
addition to speed buttons—a color grid, a scroll bar, and a label in the case of PenBar,
and a color grid in BrushBar. You can put any kind of controls on a tool bar.
➤
Add controls to PenBar and BrushBar and name them as shown in the following figure,
then set the values of properties as shown in Table 12.2.
Figure 12.11 The pen and brush tool bars
DashDotDotPen
DashDotPen
DotPen
DashPen
SolidPen
SolidBrush
ClearBrush
HorizontalBrush
VerticalBrush
Table 12.2
ClearPen
PenColor
PenWidth
PenSize
BrushColor
DiagCrossBrush
CrossBrush
BDiagonalBrush
FDiagonalBrush
Property settings for pen and brush tool bars
Component
Property
Value
SolidPen
Glyph
Down
SOLID.BMP
True
DashPen
DotPen
Glyph
Glyph
DASHED.BMP
DOTTED.BMP
DashDotPen
DashDotDotPen
ClearPen
PenColor
Glyph
Glyph
Glyph
BackgroundEnabled
DASHDOT.BMP
DASHDOT2.BMP
CLEAR.BMP
False
GridOrdering
Height
go8x2
30
Top
Width
LargeChange
Top
5
144
10
12
ClearBrush
HorizontalBrush
FocusControl
Caption
Top
Glyph
Down
Glyph
Glyph
PenWidth
1
13
FSOLID.BMP
True
FCLEAR.BMP
FHORIZ.BMP
VerticalBrush
FDiagonalBrush
Glyph
Glyph
FVERT.BMP
FDIAG.BMP
BDiagonalBrush
Glyph
BDIAG.BMP
CrossBrush
DiagCrossBrush
Glyph
Glyph
CROSS.BMP
DCROSS.BMP
PenWidth
PenSize
SolidBrush
Chapter 12, Graphics example
341
Table 12.2
Property settings for pen and brush tool bars (continued)
Component
Property
Value
BrushColor
BackgroundEnabled
GridOrdering
Height
Top
False
go8x2
30
5
Width
144
Hiding and showing tool bars
Often, you want an application to have multiple tool bars, but you don’t want to clutter
the form with all of them at once. Or some users might not want tool bars at all. As with
all components, tool bars can be shown or hidden at run time as needed.
■
To hide or show a tool bar at run time, you set its Visible property to False or True,
respectively. Usually you do this in response to particular user events or changes in the
operating mode of the application.
A common practice is to put some kind of close button on each tool bar. When the user
clicks that button, the application hides the corresponding tool bar.
➤
For this example, however, you’ve already provided a means to toggle these tool bars:
the pen and brush buttons on the main tool bar. Since each click on one of those buttons
presses or releases the button, you can add a click-event handler to each one and show
or hide the corresponding tool bar depending on whether the button is up or down:
procedure TForm1.PenButtonClick(Sender: TObject);
begin
PenBar.Visible := PenButton.Down;
end;
procedure TForm1.BrushButtonClick(Sender: TObject);
begin
BrushBar.Visible := BrushButton.Down;
end;
If you run the application now, you’ll see that the pen and brush tool bars appear and
disappear on demand, and that their alignment takes care of assuring that they stack
properly at the top of the frame.
Now that you’ve got tool bars for the pen and brush, the next sections describe using
them to customize your drawing tools.
Changing the pen style
A pen’s style determines what kind of lines the pen draws, such as solid, dashed, or
dotted. Note that some video drivers do not support different styles for pens with a
pixel width greater than one. Those drivers generally make all larger pens solid, no
matter what style you specify.
342
Delphi User’s Guide
■
To change the style of a pen, set the pen’s Style property to the value corresponding to
the effect you want: psSolid, psDash, psDot, psDashDot, psDashDotDot, or psClear.
For this example, you could add click-event handlers for each of the pen-style buttons
on the pen’s tool bar, but instead, let’s see how you can share one event handler for all
the pen-style buttons.
Sharing an event handler
Different controls can all use the same event handler to handle events, as long as the
events are compatible, meaning their handlers take the same parameters in the same
order. The most common use of this is to provide different entry points to do the same
action, such as attaching the click events for a menu item and a button to the same
handler, which gives a user multiple ways to perform the same action. But you can also
have several different controls share a handler that does different things depending on
which control called it.
■
To share an event handler, you assign the same event handler to the events of multiple
controls. If you need to determine which control actually got the event, check theSender
parameter.
➤
In this example, you’ll create a click-event handler for all the pen-style buttons on the
pen’s tool bar, attach the handler to each of the controls, then use Sender to determine
which button to respond to.
1 Select all six pen-style buttons.
2 On the Events page in the Object Inspector, select OnClick.
3 In the Handler column, type SetPenStyle and press Enter. Delphi generates an empty
click-event handler called SetPenStyle and attaches it to the OnClick events of all six
buttons.
4 Fill in the click-event handler by setting the pen’s style depending on the value of
Sender, which is the control that sent the click event:
procedure TForm1.SetPenStyle(Sender: TObject);
begin
with Canvas.Pen do
begin
if Sender = SolidPen then Style := psSolid
else if Sender = DashPen then Style := psDash
else if Sender = DotPen then Style := psDot
else if Sender = DashDotPen then Style := psDashDot
else if Sender = DashDotDotPen then Style := psDashDotDot
else if Sender = ClearPen then Style := psClear;
end;
end;
Changing the pen color
A pen’s color determines the color of the lines the pen draws, including lines drawn as
the boundaries of shapes, as well as other lines and polylines.
■
To change the pen color, assign a value to the Color property of the pen.
Chapter 12, Graphics example
343
In this example, you’ll use the color grid on the pen’s tool bar to let the user choose a
new color for the pen.
A color grid can set both foreground and background colors (for example, it’s the same
control used to pick the syntax-highlight colors in Delphi). In this case, you want only
one color, so you’ll use the foreground color.
➤
The user chooses a new color by clicking the grid, so change the pen’s color in response
to the OnClick event:
procedure TForm1.PenColorClick(Sender: TObject);
begin
Canvas.Pen.Color := PenColor.ForegroundColor;
end;
Changing the pen width
A pen’s width determines the thickness, in pixels, of the lines it draws. Remember that
when the thickness is greater than 1, some video drivers always draw solid lines, no
matter what the value of the pen’s Style property.
■
To change the pen width, assign a numeric value to the pen’s Width property.
In this example, you’ll use the scroll bar on the pen’s tool bar to set width values for the
pen. You’ll also update the label next to the scroll bar to provide feedback to the user.
Using the scroll bar’s position to determine the pen width, you need to update the pen
width every time the position changes.
➤
Handle the scroll bar’s OnChange event as follows:
procedure TForm1.PenWidthChange(Sender: TObject);
begin
Canvas.Pen.Width := PenWidth.Position;
PenSize.Caption := IntToStr(PenWidth.Position);
end;
{ set the pen width directly }
{ convert to string for caption }
Changing the brush style
A brush style determines what pattern the canvas uses to fill shapes. The predefined
styles include solid color, no color, and various line and hatch patterns.
■
To change the style of a brush, set its Style property to one of the predefined values:
bsSolid, bsClear, bsHorizontal, bsVertical, bsFDiagonal, bsBDiagonal, bsCross, or bsDiagCross.
➤
For this example, you can set brush styles just as you did pen styles, sharing a clickevent handler for all the brush-style buttons. Select all eight brush-style buttons and
type in SetBrushStyle for the OnClick handler name.
procedure TForm1.SetBrushStyle(Sender: TObject);
begin
with Canvas.Brush do
begin
if Sender = SolidBrush then Style := bsSolid
else if Sender = ClearBrush then Style := bsClear
344
Delphi User’s Guide
else
else
else
else
else
else
end;
end;
if
if
if
if
if
if
Sender
Sender
Sender
Sender
Sender
Sender
=
=
=
=
=
=
HorizontalBrush then Style := bsHorizontal
VerticalBrush then Style := bsVertical
FDiagonalBrush then Style := bsFDiagonal
BDiagonalBrush then Style := bsBDiagonal
CrossBrush then Style := bsCross
DiagCrossBrush then Style := bsDiagCross;
Changing the brush color
A brush’s color determines what color the canvas uses to fill shapes.
■
To change the fill color, assign a value to the brush’s Color property.
➤
Again, you can set the brush color just as you did the pen color, in response to a click on
the color grid on the brush’s tool bar:
procedure TForm1.BrushColorClick(Sender: TObject);
begin
Canvas.Brush.Color := BrushColor.ForegroundColor;
end;
Adding a status bar
A status bar is much like a tool bar, except it usually occupies the bottom of a window
instead of the top, and instead of having controls on it, the status bar usually displays
text. Delphi’s panel component makes an excellent status bar.
Often you want to subdivide the status bar into multiple status areas and provide each
with a three-dimensional bevel effect. To do this, you can use panel components nested
within the status-bar panel.
Adding a status bar to an application involves the following tasks:
•
•
•
•
Placing a status-bar panel
Subdividing a panel
Creating 3-D panels
Updating the status bar
Placing a status-bar panel
In general, status bars appear at the bottom of a form. Aligning the status-bar panel to
the bottom of the form takes care of both placement and resizing for you.
■
To add a status bar panel to a form,
1 Place a panel component on the form.
2 Set the panel’s Align property to alBottom.
3 Clear the panel’s caption.
Chapter 12, Graphics example
345
Once you’ve added the status-bar panel, you can subdivide it into separate status
panels. If you’re not going to subdivide, you probably want to set the BevelInner and
BorderWidth properties to create a 3-D effect, as explained later. Panels that just serve as
containers for smaller panels generally don’t change those properties.
You also want to decide how to align the text within a panel. By default, panels center
their captions, but often in a status bar, you want to set Align to alLeft.
➤
For this example, add a status-bar panel to the form and name it StatusBar.
Subdividing a panel
Often you want to divide a panel, particularly one used for a status bar, into multiple,
independent areas. Although you can achieve a similar effect by carefully formatting the
text in a single panel, it’s more efficient to use individual panels instead.
■
To create panels within another panel,
1
2
3
4
5
6
Place a new panel within the panel.
Set any 3-D effects you want for the new panel.
Set the Align property of the new panel to alLeft.
Move the right side of the new panel to adjust its width.
Clear the new panel’s caption.
Repeat steps 1 to 5 as needed for additional panels.
As you add new left-aligned panels to the original panel, they align to each others’ right
sides. For the last panel, you probably want to set Align to alClient, rather than alLeft, so
that the last panel takes up all remaining space in the original panel.
➤
For this example, add two panels to the status bar, named OriginPanel and CurrentPanel.
Align OriginPanel to the left and CurrentPanel to the client area.
Creating 3-D panels
Panel components used for status-bar information usually have a 3-D effect. By default,
all panels have an outer bevel to give them a slightly raised appearance. Interior text,
however, usually looks better if you set it off by lowering, making the panel look like a
frame around the text.
■
To create the lowered-text effect, you change two properties: BevelInner and
BorderWidth.
• To create the “engraved” look for the panel, set BevelInner to bvLowered.
• To change the space between the inner and outer bevels, change the BorderWidth
property. A BorderWidth of 2 gives a good appearance.
The combination of inner and outer bevels creates a frame around the text.
➤
346
Set the BevelInner and BorderWidth properties for both OriginPanel and CurrentPanel to
bvLowered and 2, respectively.
Delphi User’s Guide
Updating the status bar
Once you have a status bar in a form, you need to update the status bar information.
You can set the caption text of a panel at any time to reflect the status of the application.
■
To update a status bar panel, set the panel’s Caption property to reflect the current status.
Add this caption-changing code to any event handlers that affect the status a particular
panel reflects.
➤
Since the graphics program has two panels, you can update the drawing’s origin point
in OriginPanel when the user presses the mouse button and track the current position in
CurrentPanel:
procedure TForm1.FormMouseDown(Sender: TObject; Button: TMouseButton;
Shift: TShiftState; X, Y: Integer);
begin
Drawing := True;
Canvas.MoveTo(X, Y);
Origin := Point(X, Y);
MovePt := Origin;
OriginPanel.Caption := Format('Origin: (%d, %d)', [X, Y]);
{ update status bar }
end;
procedure TForm1.FormMouseMove(Sender: TObject; Shift: TShiftState; X, Y: Integer);
begin
if Drawing then
begin
DrawShape(Origin, MovePt, pmNotXor);
MovePt := Point(X, Y);
DrawShape(Origin, Point(X, Y), pmNotXor);
end;
CurrentPanel.Caption := Format('Current: (%d, %d)', [X, Y]);
{ update status bar }
end;
Drawing on a bitmap
The times when you want to draw directly on a form are relatively rare. More often, an
application should draw on a bitmap, since bitmaps are very flexible for operations such
as copying, printing, and saving. Delphi’s image control is a component that can contain
a bitmap, making it easy to put one or more bitmaps into a form.
In addition, the bitmap need not be the same size as the form: it can be either smaller or
larger. By adding a scroll box control to the form and placing the image inside it, you
can draw on bitmaps that are much larger than the form or even larger than the screen.
Adding a scrollable bitmap for drawing takes two steps:
• Adding a scrollable region
• Adding an image control
Once you move the application’s drawing to the bitmap in the image control, it is easy to
add printing, Clipboard, and loading and saving operations for bitmap files.
Chapter 12, Graphics example
347
Adding a scrollable region
The are many times when an application needs to display more information than will fit
in a particular area. Some controls, such as list boxes and memos can automatically
scroll their contents. But other controls, and sometimes even forms full of controls, need
to be able to scroll. Delphi handles these scrolling regions with a control called a scroll
box.
A scroll box is much like a panel or a group box, in that it can contain other controls, but
a scroll box is normally invisible. However, if the controls contained in the scroll box
cannot all fit in the visible area of the scroll box, it automatically displays one or two
scroll bars, enabling users to move controls outside the visible region into position
where they can be seen and used.
■
To create a scrolling region, place a scroll-box control on a form and set its boundaries to
the region you want to scroll.
You often use the Align property of a scroll box to allow the scroll box to adjust its area
to a form or a part of a form.
➤
For this example, you’ll create a scrollable region covering the entire area between the
tool bar and the status bar, which can then be used for drawing large images. Place a
scroll box component on the form, and set its Align property to alClient, assuring that it
fills the entire portion of the form between the top- and bottom-aligned panels.
Adding an image control
An image control is a kind of placeholder component. It allows you to specify an area on
a form that will contain a picture object, such as a bitmap or a metafile. You can either
set the size of the image manually or allow the image control to adjust to the size of its
picture at run time.
You can use an image control to hold a bitmap that isn’t necessarily displayed all the
time, or which an application needs to use to generate other pictures. The example in
Chapter 13 uses image controls to hold bitmaps used to generate the items in an ownerdraw control.
Placing the control
You can place an image control anywhere on a form. If you take advantage of the image
control’s ability to size itself to its picture, your only concern is setting the top left corner.
If the image control is a nonvisible holder for a bitmap, you can place it anywhere, just
as you would a nonvisual component.
➤
348
Add an image control to the graphics example’s form, making sure to drop it on the
scroll box already aligned to the form’s client area. This assures that the scroll box will
Delphi User’s Guide
add any scroll bars necessary to access offscreen portions of the image’s picture. Set the
image control’s properties as shown in Table 12.3:
Table 12.3
Image control properties for GRAPHEX
Property
Value
Name
AutoSize
Left
Image
True
0
Top
0
Setting the initial bitmap size
When you place an image control, it has no picture. You’ve created the placeholder, but
haven’t given it anything to display. If the control will always hold a particular picture,
you can set the image control’s Picture property at design time. The control can also load
its picture from a file at run time, as described later in this chapter. If you just need a
blank bitmap for drawing, however, you should create it at run time.
■
To create a blank bitmap when the application starts, attach a handler to the OnCreate
event for the form that contains the image, create a bitmap object, and assign it to the
image control’s Picture.Graphic property.
➤
For the graphics example, the image is in the application’s main form, Form1, so attach a
handler to Form1’s OnCreate event:
procedure TForm1.FormCreate(Sender: TObject);
var
Bitmap: TBitmap;
begin
Bitmap := TBitmap.Create;
Bitmap.Width := 200;
Bitmap.Height := 200;
Image.Picture.Graphic := Bitmap;
end;
{ temporary variable to hold the bitmap }
{ construct the bitmap object
{ assign the initial width...
{ ...and the initial height
{ assign the bitmap to the image control
}
}
}
}
Assigning the bitmap to the picture’s Graphic property gives ownership of the bitmap to
the picture object. It will therefore destroy the bitmap when it finishes with it, so you
should not destroy the bitmap object. You can assign a different bitmap to the picture, as
you’ll see later in this chapter on page 353, at which point the picture disposes of the old
bitmap and assumes control of the new one.
If you run the application now, you see that client area of the form has a white region,
representing the bitmap. If you size the window so that the client area cannot display
the entire image, you’ll see that the scroll box automatically shows scroll bars to allow
display of the rest of the image. But if you try to draw on the image, you don’t get any
graphics, because the application is still drawing on the form, which is now behind the
image and the scroll box.
Drawing on the bitmap
➤
There are two things you need to do to make the drawing code you already wrote apply
to the bitmap instead of the form:
Chapter 12, Graphics example
349
1 Use the image control’s canvas instead of the form’s canvas.
The easiest way to make that change is to use the editor’s search-and-replace dialog
box to change every instance of “Canvas” to “Image.Canvas”.
2 Attach the mouse-event handlers to the appropriate events in the image control.
In the Object Inspector, drop down the handler list next to OnMouseDown for the
image control, and choose FormMouseDown, then do the same for OnMouseMove and
OnMouseUp. If you want, you can also detach the methods from the form’s events,
but it’s not necessary. Since there are now controls on all parts of the form, the form
will never receive any mouse clicks or drags.
Now when you run the application, you can draw as before, but only on the image
control. Note also that if you hide and show the pen and brush tool bars, the scroll box
moves the bitmap so that you can still draw on the upper part of the image.
Adding a menu
Up to this point, all the features you added to the graphics application use either direct
interaction with the mouse or manipulation of tool-bar controls to activate them. The
next few steps, however, deal with printing, loading, saving, and Clipboard operations.
Although you can invoke these operations from tool bar buttons, the standard, expected
interface for them uses menu commands.
Menu creation is not a major topic of this example, however. If you do not know how to
use the Menu Designer or how to attach event handlers to menu-item clicks, see
Chapter 3.
➤
Add a MainMenu component to the application. You can place it anywhere on the form,
but off to the side on the main tool bar is probably convenient. Create File and Edit
menu titles and the items shown in Table 12.4:
Table 12.4
Graphics example File and Edit menus
&File
&Edit
&New
&Open...
Cu&t
&Copy
&Save
Save &as...
&Print
- <hyphen>
&Paste
E&xit
The remaining steps in this chapter assume that you created these menus with the
specified captions and accepted the Name property values created by Delphi. If you
choose other names, or if you choose to activate these features with tool bar buttons, you
need to make the necessary adjustments.
Now that you have a menu, it’s a good idea to attach a handler to the File|Exit item, to
provide the standard method to terminate the application.
350
Delphi User’s Guide
➤
Attach the following event handler to the OnClick event of the File|Exit menu item:
procedure TForm1.Exit1Click(Sender: TObject);
begin
Close;
end;
You will attach event handlers to the other menu items in the remaining sections of this
chapter.
As you work with the menus, you might sometimes notice that the application draws an
extra line or shape after the user clicks a menu item. Windows sometimes sends a
mouse-up message to a form that didn’t see the mouse-down message. Because the
application always draws in its OnMouseUp event handler, these extra mouse-up
messages can disrupt your drawing.
The solution is the same one used to filter out unwanted mouse movements on
page 326: execute the drawing code only if the Drawing flag is set.
➤
Modify the event handler for OnMouseUp events to check the Drawing field before
drawing the shape:
procedure TForm1.FormMouseUp(Sender: TObject; Button: TMouseButton;
Shift: TShiftState; X, Y: Integer);
begin
if Drawing then
begin
DrawShape(Origin, Point(X, Y), pmCopy);
Drawing := False;
end;
end;
Now the application should draw only when the user initiates the drawing by pressing
the mouse button.
Printing graphics
Printing graphic images from a Delphi application is a simple task. The only
requirement for printing is that you add the Printers unit to the uses clause of the form
that will call the printer. The Printers unit declares a printer object called Printer that has
a canvas that represents the printed page.
■
To print a graphic image, copy the image to the printer’s canvas.
You can use the printer’s canvas just as you would any other canvas. In particular, that
means you can copy the contents of a graphic object, such as a bitmap, to the printer
directly.
➤
In this example, you’ll print the contents of the image control in response to a click on
Print item on the File menu:
procedure TForm1.Print1Click(Sender: TObject);
begin
with Printer do
Chapter 12, Graphics example
351
begin
BeginDoc;
Canvas.Draw(0, 0, Image.Picture.Graphic);
EndDoc;
end;
end;
{ start printing }
{ draw Image at upper left of page }
{ finish printing }
Working with graphics files
Graphic images that exist only for the duration of one running of an application are of
very limited value. Often, you either want to use the same picture every time, or you
want to save a created picture for later use. Delphi’s image control makes it easy to load
pictures from a file and save them again. Once you add the ability to load and save files,
this sample application becomes a much more powerful tool.
The logic for loading and saving graphics files is the same as for any other files, so this
chapter doesn’t cover the mechanics in great detail. The purpose of this section is to
introduce the file-loading and file-saving capabilities of the graphics objects, including
• Loading a picture from a file
• Saving a picture to a file
• Replacing the picture
➤
Before you start to load or store files, add three things to the application:
• An open-file dialog box
• A save-file dialog box
• An object field named CurrentFile of type string, to the form object
Adding common dialog boxes is part of the sample application in Chapter 10. Adding
object fields is covered in this chapter, on page 326.
Loading a picture from a file
The ability to load a picture from a file is important if your application needs to modify
the picture or if you want to store the picture outside the application so a person or
another application can change the picture without changing code.
■
To load a graphics file into an image control, call the LoadFromFile method of the image
control’s Picture object.
➤
Attach the following handler to the OnClick event of the File|Open menu item:
procedure TForm1.Open1Click(Sender: TObject);
begin
if OpenDialog1.Execute then
begin
CurrentFile := OpenDialog1.FileName;
Image.Picture.LoadFromFile(CurrentFile);
end;
end;
352
Delphi User’s Guide
Saving a picture to a file
When you have created or modified a picture, you often want to save the picture in a file
for later use. The Delphi picture object can save graphics in several formats, and
application developers can create and register their own graphic-file formats so that
picture objects can store them as well.
■
To save the contents of an image control in a file, call the SaveToFile method of the image
control’s Picture object.
The SaveToFile method requires the name of a file to save into. If the picture is newly
created, it might not have a file name, or a user might want to save an existing picture in
a different file. In either case, the application needs to get a file name from the user
before saving, as shown in the next section.
➤
The following pair of event handlers, attached to the File|Save and File|Save As menu
items, respectively, handle the resaving of named files, saving of unnamed files, and
saving existing files under new names.
procedure TForm1.Save1Click(Sender: TObject);
begin
if CurrentFile <> '' then
Image.Picture.SaveToFile(CurrentFile)
else SaveAs1Click(Sender);
end;
procedure TForm1.Saveas1Click(Sender: TObject);
begin
if SaveDialog1.Execute then
begin
CurrentFile := SaveDialog1.FileName;
Save1Click(Sender);
end;
end;
{ save if already named }
{ otherwise get a name }
{ get a file name }
{ save the user-specified name }
{ then save normally }
Replacing the picture
You can replace the picture in an image control at any time. If you assign a new graphic
to a picture that already has a graphic, the new graphic replaces the existing one.
■
To replace the picture in an image control, assign a new graphic to the image control’s
Picture object.
Creating the new graphic is the same process you used to create the initial graphic (see
page 349), but you should also provide a way for the user to choose a size other than the
default size used for the initial graphic. An easy way to provide that option is to present
a dialog box, such as the one in Figure 12.12.
Chapter 12, Graphics example
353
Figure 12.12 Bitmap-dimension dialog box from the BMPDlg unit.
WidthEdit
HeightEdit
Creating a dialog-box form is not the focus of this chapter, so it doesn’t present all the
details of creating the bitmap-dimensions dialog box here. You can create your own, or
you can use the one in the BMPDlg unit included with the GraphEx project. The rest of
this section assumes you use the dialog box in the BMPDlg unit.
➤
Add the BMPDlg unit to your project. You also need to add BMPDlg to the uses clause
in the unit for the main form. You can then attach the following event handler to the
File|New menu item’s OnClick event:
procedure TForm1.New1Click(Sender: TObject);
var
Bitmap: TBitmap;
{ temporary variable for the new bitmap
begin
with NewBMPForm do
begin
ActiveControl := WidthEdit;
{ make sure focus is on width field
WidthEdit.Text := IntToStr(Image.Picture.Graphic.Width); { use current dimensions...
HeightEdit.Text := IntToStr(Image.Picture.Graphic.Height);
{ ...as default
if ShowModal <> idCancel then
{ continue if user doesn't cancel dialog box
begin
Bitmap := TBitmap.Create;
{ create fresh bitmap object
Bitmap.Width := StrToInt(WidthEdit.Text);
{ use specified width
Bitmap.Height := StrToInt(HeightEdit.Text);
{ use specified height
Image.Picture.Graphic := Bitmap;
{ replace graphic with new bitmap
CurrentFile := '';
{ indicate unnamed file
end;
end;
end;
}
}
}
}
}
}
}
}
}
}
The important aspect to understand is that assigning a new bitmap to the picture
object’s Graphic property causes the picture object to destroy the existing bitmap and
take ownership of the new one. Delphi handles the details of freeing the resources
associated with the previous bitmap automatically.
Using the Clipboard with graphics
You can use the Windows Clipboard to copy and paste graphics within your
applications or to exchange graphics with other applications. Delphi’s Clipboard object
makes it easy to handle different kinds of information, including graphics.
Before you can use the Clipboard object in your application, you need to add theClipBrd
unit to the uses clause of any unit that needs to access Clipboard data.
354
Delphi User’s Guide
Copying graphics to the Clipboard
You can copy any picture, including the contents of image controls, to the Clipboard.
Once on the Clipboard, the picture is available to all Windows applications.
■
To copy a picture to the Clipboard, assign the picture to the Clipboard object using the
Assign method.
➤
For this example, you can assign the image control’s Picture property to the Clipboard in
response to a click on the Edit|Copy menu item:
procedure TForm1.Copy1Click(Sender: TObject);
begin
Clipboard.Assign(Image.Picture);
end;
Cutting graphics to the Clipboard
Cutting a graphic to the Clipboard is exactly like copying it, but you also erase the
graphic from the source.
■
To cut a graphic from a picture to the Clipboard, first copy it to the Clipboard, then erase
the original.
In most cases, the only issue with cutting is how to effect the erasure of the original
image. Setting the area to white is a common solution.
➤
For this example, you can attach the following event handler to the OnClick event of the
Edit|Cut menu item.
procedure TForm1.Cut1Click(Sender: TObject);
var
ARect: TRect;
begin
Copy1Click(Sender);
with Image.Canvas do
begin
CopyMode := cmWhiteness;
ARect := Rect(0, 0, Image.Width, Image.Height);
CopyRect(ARect, Image.Canvas, ARect);
CopyMode := cmSrcCopy;
end;
end;
{ copy picture to Clipboard }
{ copy everything as white
{ get bitmap rectangle
{ copy bitmap over itself
{ restore normal mode
}
}
}
}
Pasting graphics from the Clipboard
If the Windows Clipboard contains a bitmapped graphic, you can paste it into any
image object, including image controls and the surface of a form.
■
To paste a graphic from the Clipboard,
1 Call the Clipboard’s HasFormat method to see whether the Clipboard contains a
graphic.
Chapter 12, Graphics example
355
HasFormat is a Boolean function. It returns True if the Clipboard contains an item of
the type specified in the parameter. To test for graphics, you pass CF_BITMAP.
2 Assign the Clipboard to the destination.
➤
In this example, you can paste a bitmap from the Clipboard into the image control’s
picture in response to a click on the Edit|Paste menu item:
procedure TForm1.PasteButtonClick(Sender: TObject);
var
Bitmap: TBitmap;
begin
if Clipboard.HasFormat(CF_BITMAP) then
{ check to see if there’s a bitmap on the clipboard )
begin
{create a bitmap to hold the contents on the clipboard }
Bitmap := TBitmap.Create;
try
{ Get the bitmap off the clipboard using Assign }
Bitmap.Assign(Clipboard);
{ Copy the bitmap to the Image }
Image.Canvas.Draw(0, 0, Bitmap);
finally
Bitmap.Free;
end;
end;
end;
The graphic on the Clipboard could come from this application, or you could have copied
it from another application, such as Windows Paintbrush.
Summary
The sample application described in this chapter covers quite a number of issues, but
leaves several others unresolved. In particular, a polished version of the application
would likely display the name of the current bitmap file in the main form’s caption, and
would track whether the user makes changes to a picture, prompting the user whether
to save the changes before loading or creating another picture.
The skills presented, however, apply to a number of different kinds of applications. In
particular, tool bars and status bars appear in nearly all commercial applications. Using
different combinations of panels in your applications, you can make many functions
easily accessible to users.
In addition, the application uses the standard printer and Clipboard objects with
graphics, much as the sample application in Chapter 10 does with text.
Topics presented in this chapter included:
•
•
•
•
356
Responding to the mouse
Adding a field to a form object
Refining line drawing
Adding a tool bar to a form
Delphi User’s Guide
•
•
•
•
•
•
•
•
•
•
Adding speed buttons to a tool bar
Responding to clicks
Drawing with different tools
Customizing pens and brushes
Adding a status bar
Drawing on a bitmap
Adding a menu
Printing graphics
Working with graphics files
Using the Clipboard with graphics
Chapter 12, Graphics example
357
358
Delphi User’s Guide
Chapter
13
File manager example
Chapter 13
This chapter presents all the steps necessary to create a small file manager application.
Each section in the chapter builds on the previous sections, but the individual sections
also explain discrete tasks. The material assumes you already know how to perform
most of the basic Delphi tasks, such as placing components on a form and creating a
menu. Those tasks are described in Chapter 2 and Chapter 3.
The complete application appears under the DEMOS\DOC directory and is called
FILMANEX.DPR. Figure 13.1 shows the completed application.
Figure 13.1 The complete file manager example
The topics presented in this example include
• Creating the file-manager form
• Building the drive list
• Creating an owner-draw control
Chapter 13, File manager example
359
• Manipulating files
• Dragging and dropping
The file manager example makes use of a number of routines in a unit called FMXUtils,
located in the same directory with the project file. The implementation of those routines
is outside the scope of this chapter, but you can look at the source code to see examples
of routines that, for example, copy and move files or return the size of a specified file.
Creating the file-manager form
The first step in creating the file manager application is designing the form. The
following sections describe briefly how to lay out the form, place the controls, and
design the menu.
Laying out the form
➤
Start by creating a new project. Then use the Object Inspector to set the following
properties on the project’s main form:
Table 13.1
Property values for the file manager example’s main form
Property
Value
Caption
Name
File Manager Example
FMForm
Position
poDefault
Placing the controls
➤
Next you need to add controls to the form. Because you’ll align all the controls to each
other, it’s important that you place them and set their properties in the order indicated
in Table 13.2. Note that DirectoryPanel and FilePanel go inside StatusBar to form a
subdivided status bar. For more information on creating status bars and their panels, see
“Subdividing a panel” in Chapter 12.
Table 13.2
360
Property values for the main-form components in FILMANEX
Component
Property
Value
Panel
Align
Caption
alBottom
<leave blank>
Name
BevelOuter
StatusBar
bvNone
Panel
Align
Caption
Name
BevelInner
BevelWidth
alLeft
<leave blank>
DirectoryPanel
bvLowered
2
Panel
Align
alClient
Delphi User’s Guide
Table 13.2
Property values for the main-form components in FILMANEX (continued)
Component
TabSet
DirectoryOutline
FileListBox
Property
Value
Caption
Name
BevelInner
BevelWidth
<leave blank>
FilePanel
bvLowered
2
Align
alBottom
Name
Name
Align
Align
DriveTabSet
DirectoryOutline
alLeft
alClient
Name
ShowGlyphs
FileList
True
Note that for the DirectoryOutline component, you can use either the DirectoryOutline
on the Samples page of the Component palette or the standard DirectoryListBox
component from the System page. The DirectoryOutline component can display a more
detailed view of the directory structure of a disk.
The form with all its controls now looks like Figure 13.2.
Figure 13.2 File-manager form with controls
DirectoryOutline
FileList
DriveTabSet
DirectoryPanel
➤
FilePanel
Once you have added all the components and set their properties, you should save the
project. When prompted for names, rename Unit1 to FMXWin, and Project1 to FilManEx.
Add FMXUtils to the uses clause at the top of the FMXWin unit.
Designing the menu
Finally, you need to add a menu bar to the form. Menu creation is not a major topic of
this example, however. If you do not know how to use the Menu Designer or how to
attach event handlers to menu-item clicks, see Chapter 3.
➤
Add a MainMenu component to the application. You can place it anywhere on the form,
but off to the side on the status bar is probably convenient. Create a File menu with the
Chapter 13, File manager example
361
menu items listed in Table 13.3. Note that this File menu differs from the standard Filemenu template.
Table 13.3
File-menu items for the file manager example
Caption
Shortcut
&Open
&Move...
&Copy...
&Delete...
Enter
F7
F8
Del
&Rename...
&Properties...
-<hyphen>
Alt+Enter
E&xit
➤
Before proceeding, create an OnClick event handler for the File|Exit menu item that
closes the application’s main form:
procedure TFMForm.Exit1Click(Sender: TObject);
begin
Close;
end;
Although you can generally terminate the application by double-clicking the Controlmenu box on the caption bar, it’s a good idea to provide the File|Exit option and
respond to it by closing down the application.
Now that you have the application set up, the following sections lead you through
connecting the controls and updating the status bar.
Building the drive list
When you added the tab set to the form, you probably noticed that it didn’t have any
tabs on it. The tab set creates tabs for each item in its list of tabs, represented by the Tabs
property. Initially, that list is empty. You can edit the list at design time through the
Object Inspector, but you can also build or change the list at run time.
In this example, you need to build a list of disk drives at run time, since you can’t be sure
at design time what drives will be present at run time.
Determining valid drives
The Windows API provides a function, GetDriveType, that returns information about the
type of a specified drive.
■
362
To determine whether a drive is valid, pass the number of the drive to GetDriveType. The
return value indicates the type of drive present: a return value greater than zero
indicates a valid drive. Zero or a negative value indicates that the drive is not valid.
Delphi User’s Guide
For now, you can just check to see if there is a drive of any kind. Later on, you’ll use the
information to determine what kind of drive it is.
➤
Attach the following code to the OnCreate event of the form to build a list of tabs for a
tab set when the form is first created. The tab list contains a tab for each valid drive on
the system.
procedure TFMForm.FormCreate(Sender: TObject);
var
Drive, AddedIndex: Integer;
begin
for Drive := 0 to 25 do
{ iterate through all possible drives
if GetDriveType(Drive) > 0 then
{ positive values mean valid drives
begin
AddedIndex := DriveTabSet.Tabs.Add(Chr(Drive + ord('a')));
{ add a tab
if Chr(Drive + ord('A')) = FileList.Drive then
{ if it's current drive...
DriveTabSet.TabIndex := AddedIndex;
{ ...make that current tab
end;
end;
}
}
}
}
}
Of course, just putting drive letters on tabs doesn’t provide a very large target to click,
and doesn’t provide any information on what kind of drive each tab represents. In the
next section you’ll make the tab set into an owner-draw tab set, which will provide
graphical information for each drive.
Connecting the controls
Now that you have controls to represent disk drives, directories, and files, you need to
connect them so that they all represent their different aspects of the file and directory
information. That is, when you choose a different drive with the tab set, you want the
directory outline to reflect the directory structure of that drive, and the file list to display
the contents of selected directory.
In order to connect the controls, you need to handle events caused by tab selections and
outline changes. Note that in one case, the tab set, you handle clicks, while the others
have changes.
Responding to tab-set changes
When the user selects a tab in a tab-set control by clicking a tab or using the keyboard,
the tab set generates an OnClick event. Any other controls that depend on the setting of
the tab set need to have their values updated in response to those click events.
For example, with a tab set that contains tabs for each valid disk drive, a click on a
different tab indicates a change of drive selection. Other controls, such as directory lists,
need to respond to the change.
■
To respond to changes in a tab set, attach an event handler to the tab set’s OnClick event.
➤
The following code, attached to the OnClick event of a tab set named DriveTabSet, sets
the Drive property in a directory-outline control to the first letter of the clicked tab:
procedure TFMForm.DriveTabSetClick(Sender: TObject);
begin
Chapter 13, File manager example
363
with DriveTabSet do
DirectoryOutline.Drive := Tabs[TabIndex][1];
end;
If you select a tab on the drive list now, it causes the directory outline to display the
directory structure of the specified drive.
Responding to outline changes
When the user selects an item in an outline by clicking it or using an arrow key, the
outline generates a click. Any controls that depend on the currently selected item in the
outline need to update themselves in response to those clicks.
For example, in a directory outline, a click usually indicates a change in the current
directory. Other controls, such as file lists, need to respond to this change. However, it is
possible that the click was on the directory already selected. Instead of handling the
OnClick event, it is more useful to handle the OnChange event, which indicates that
something in the directory outline has changed.
■
To respond to changes in an outline, attach a handler to the outline’s OnChange event.
➤
The following code updates both a file list box and a status-bar panel to reflect the
current directory in a directory outline every time the directory outline changes:
procedure TFMForm.DirectoryOutlineChange(Sender: TObject);
begin
FileList.Directory := DirectoryOutline.Directory;
DirectoryPanel.Caption := DirectoryOutline.Directory;
end;
Any change in the directory outline, whether caused by changing to a different drive
(and therefore replacing the entire directory list) or changing to a different directory in
the same outline, now causes the status-bar panel to reflect the current directory path
and causes the file list box to display the contents of that directory.
Responding to list box changes
When the user clicks an item in a list box or uses an arrow key to move to one, that item
becomes the selected item, and the list box generates an OnChange event. The
application can handle the change and update any dependent controls.
■
To respond to changes in a list box, attach an event handler to the list box’sOnChange
event.
For example, a file list box can have an associated panel that displays information about
the selected file or files.
➤
The following event handler for a file list box’s OnChange event updates a status-bar
panel with the name and size of the file currently selected in a file list box:
procedure TFMForm.FileListChange(Sender: TObject);
var
TheFileName: string;
begin
with FileList do
begin
364
Delphi User’s Guide
if ItemIndex >= 0 then
{ is there a selected item?
begin
TheFileName := Items[ItemIndex];
{ get the file name
FilePanel.Caption := Format('%s, %d bytes', [TheFileName,
GetFileSize(TheFileName)]);
{ set caption to file name/size
end
else FilePanel.Caption := '';
{ blank panel if none selected
end;
end;
}
}
}
}
GetFileSize is a function in the FMXUtils unit.
Changing the selected file in the list box now causes the status-bar panel to display the
name of the current file and its size. If there is no selected file, the panel is blank.
The next section of this chapter deals with turning the drive tab set into an owner-draw
control that shows bitmaps next to the drive letters. The application works fully without
the owner-draw feature, however, so if you want to skip it for now, you can jump right
to the section “Manipulating files” on page 369.
Creating an owner-draw control
Windows list-box and combo-box controls have a style available called “owner draw,”
which means that instead of using Windows’ standard method of drawing text for each
item in the control, the control’s owner (generally, the form) draws each item at run
time. The most common application for owner-draw controls is to provide graphics
instead of, or in addition to, text for items. The Delphi tab-set control also has a similar
owner-draw style.
Owner-draw controls have one thing in common: they all contain lists of items. By
default, those lists are lists of strings, which Windows displays as text. Delphi enables
you to associate an object with each item in a list and gives you the chance to use that
object when drawing items. String lists are explained in more detail in Chapter 9.
In general, creating an owner-draw control in Delphi takes three steps:
1 Setting the owner-draw style
2 Adding graphical objects to a string list
3 Drawing owner-draw items
Setting the owner-draw style
Each control that has an owner-draw variant has a property called Style. Style
determines whether the control uses the default drawing (called the “standard” style) or
owner drawing.
For list boxes and combo boxes, there is also a choice of owner-draw styles, called fixed
and variable, as Table 13.4 describes. Owner-draw tab sets are always variable. Although
Chapter 13, File manager example
365
the size of each row and column in an owner-draw grid might vary, the size of each cell
is fixed before drawing the grid.
Table 13.4
Fixed vs. variable owner-draw styles
Owner-draw style Meaning
Examples
Fixed
lbOwnerDrawFixed,
csOwnerDrawFixed
lbOwnerDrawVariable,
csOwnerDrawVariable,
tsOwnerDraw
Variable
➤
Each item is the same height, with that height
determined by the ItemHeight property.
Each item might have a different height,
determined by the data at run time.
For this example, set DriveTabSet’s Style property to tsOwnerDraw.
Adding graphical objects to a string list
Every Delphi string list has the ability to hold a list of objects in addition to its list of
strings. That is, in addition to its indexed Strings property, which contains strings, a
string list also has an Objects property. “Adding objects to a string list” on page 275
explains more about using objects with string lists.
For the file manager example, you need to add bitmaps indicating the type of drive
along with the letter of the drive. To do that, you need to add the bitmap images to the
application, then copy those images into the proper places in the string list.
Adding images to an application
An image control is a nonvisual control that contains a graphical image, such as a
bitmap. You use image controls to display graphical images on a form, but you can also
use them to hold hidden images that you’ll use in your application. For example, you
can store bitmaps for owner-draw controls in hidden image controls.
➤
For this example,
1
2
3
4
Add three image controls to the main form.
Set their Name properties to Floppy, Fixed, and Network.
Set the Visible property for each image control to False.
Set the Picture property of each image to the correct bitmap:
1 In the Object Inspector, double-click the Value column for the Picture property to
open the Picture editor.
2 Choose Load in the Picture editor to open a file dialog box.
3 Choose the bitmap file corresponding to the name of each control: FLOPPY.BMP
for Floppy, and so on.
You should now have three small images on the form, as shown in the following figure.
The image controls will be invisible when you run the application.
366
Delphi User’s Guide
Adding images to a string list
Once you have graphical images in an application, you can associate them with the
strings in a string list. You can either add the objects at the same time as the strings, or
associate objects with already-added strings. If you have all the needed data available,
you should generally add strings and objects together.
For the file manager example, that means along with a letter for each valid drive, you
need to add a bitmap indicating each drive’s type, so update the OnCreate event handler
as follows:
procedure TFMForm.FormCreate(Sender: TObject);
var
Drive, AddedIndex: Integer;
DriveLetter: Char;
begin
for Drive := 0 to 25 do
{ iterate through all possible drives
begin
DriveLetter := Chr(Drive + ord('a'));
case GetDriveType(Drive) of
{ positive values mean valid drives
DRIVE_REMOVABLE:
{ add a tab
AddedIndex := DriveTabSet.Tabs.AddObject(DriveLetter, Floppy.Picture.Graphic);
DRIVE_FIXED:
{ add a tab
AddedIndex := DriveTabSet.Tabs.AddObject(DriveLetter, Fixed.Picture.Graphic);
DRIVE_REMOTE:
{ add a tab
AddedIndex := DriveTabSet.Tabs.AddObject(DriveLetter, Network.Picture.Graphic);
end;
if UpCase(DriveLetter) = UpCase(DirectoryOutline.Drive) then
{ current drive?
DriveTabSet.TabIndex := AddedIndex;
{ then make that current tab
end;
end;
}
}
}
}
}
}
}
Drawing owner-draw items
When you set a control’s style to owner draw, Windows no longer draws the control on
the screen. Instead, it generates events for each visible item in the control. Your
application handles the events to draw the items.
■
To draw the items in an owner-draw control, follow these steps. The steps are repeated
for each visible item in the control, but you use a single event handler for all items.
1 Size the item.
If the owner-draw items are all the same size (for example, with a list box style of
lsOwnerDrawFixed), you don’t need to do this step.
2 Draw the item.
Sizing owner-draw items
Before giving your application the chance to draw each item in a variable owner-draw
control, Windows generates a measure-item event. The measure-item event tells the
application where the item will appear on the control.
Chapter 13, File manager example
367
Windows determines what size the item will probably be (generally just large enough to
display the item’s text in the current font). Your application can handle the event and
change the rectangle Windows chose. For example, if you plan to substitute a bitmap for
the item’s text, you’d change the rectangle to be the size of the bitmap. If you want the
bitmap and text, you adjust the rectangle to be big enough for both.
■
To change the size of an owner-draw item, attach an event handler to the measure-item
event in the owner-draw control. Depending on the control, the name of the event will
vary. List boxes and combo boxes use OnMeasureItem. Tab sets use OnMeasureTab. Grids
have no measure-item event.
The sizing event has two important parameters: the index number of the item and the
size of that item. That size is variable: the application can make it either smaller or
larger. The positions of subsequent items depend on the size of preceding items.
For example, in a variable owner-draw list box, if the application sets the height of the
first item to five pixels, the second item starts at the sixth pixel down from the top, and
so on. In list boxes and combo boxes, the only aspect of the item the application can alter
is height of the item. The width of the item is always the width of the control. In tab sets,
only the width of the tabs varies, since the size of the control fixes the height of the tabs.
Note
Owner-draw grids cannot change the sizes of their cells as they draw. The size of each
row and column is set before drawing by the ColWidths and RowHeights properties.
For a tab set, the default width of each tab is the width of the text it contains. To
accommodate bitmaps next to the text, you need to handle the measure-item event,
increasing the tab width value to include enough space for both the graphic and the text.
➤
The following code, attached to the OnMeasureItem event of an owner-draw tab set,
increases the width of each tab to accommodate its associated bitmap:
procedure TFMForm.DriveTabSetMeasureTab(Sender: TObject; Index: Integer;
var TabWidth: Integer);
{ note that TabWidth is a var parameter}
var
BitmapWidth: Integer;
begin
BitmapWidth := TBitmap(DriveTabSet.Tabs.Objects[Index]).Width;
{ increase tab width by the width of the associated bitmap plus two }
Inc(TabWidth, 2 + BitmapWidth);
end;
Note
You must typecast the items from the Objects property in the string list. Objects is a
property of type TObject so that it can hold any kind of object. When you retrieve objects
from the array, you need to typecast them back to the actual type of the items.
Drawing each owner-draw item
When an application needs to draw or redraw an owner-draw control, Windows
generates draw-item events for each visible item in the control.
■
368
To draw each item in an owner-draw control, attach an event handler to the draw-item
event for that control. The names of events for owner drawing always start with
OnDraw, such as OnDrawItem, OnDrawTab, or OnDrawCell.
Delphi User’s Guide
The draw-item event contains parameters indicating the index of the item to draw, the
rectangle in which to draw, and usually some information about the state of the item
(such as whether the item has focus). The application handles each event by rendering
the appropriate item in the given rectangle.
➤
For example, to draw tabs in a tab set that has bitmaps associated with each string,
attach the following handler to the OnDrawItem event for the tab set:
procedure TFMForm.DriveTabSetDrawTab(Sender: TObject; TabCanvas: TCanvas;
R: TRect; Index: Integer; Selected: Boolean);
var
Bitmap: TBitmap;
begin
Bitmap := TBitmap(DriveTabSet.Tabs.Objects[Index]);
with TabCanvas do
begin
Draw(R.Left, R.Top + 4, Bitmap);
{ draw bitmap }
TextOut(R.Left + 2 + Bitmap.Width,
{ position text }
R.Top + 2, DriveTabSet.Tabs[Index]);
{ and draw it to the right of the bitmap }
end;
end;
Note
Most draw-item events don’t pass a canvas object as a parameter; you normally use the
canvas of the control being drawn. Because the tab set also has to render its tab
separators between items, it passes a special canvas for item drawing as a parameter.
Manipulating files
There are several common file operations built into Object Pascal’s run-time library. The
procedures and functions for working with files operate at a high level: you specify the
name of the file you want to work on, and the routine makes the necessary calls to the
operating system for you. In addition, the FMXUtils unit in the directory with the filemanager sample application provides some supplementary routines useful for this
example.
Previous versions of the Pascal language perform similar operations on files themselves,
rather than on file names. That is, you have to locate a file and assign it to a file variable
before you can, for example, rename the file. By operating at the higher level, Object
Pascal reduces your coding burden and streamlines your applications. The lower-level
functions are still available, but you shouldn’t need them as often.
These are the file manipulations that Object Pascal handles for your applications:
•
•
•
•
Deleting a file
Changing a file’s attributes
Moving, copying, and renaming files
Executing an application
The file manager example attaches all these operations to items on the File menu. Before
attaching functions to the menu items, though, it’s a good idea to make sure those items
are available only when you have a file selected. Otherwise, you would have to check
whether a file was selected each time you performed one of those functions. It’s much
Chapter 13, File manager example
369
easier and more efficient to ensure that menu items and controls are enabled only when
the user can actually use them.
➤
To selectively enable and disable items on a menu, attach a handler to the OnClick event
for the File item on the main menu bar:
procedure TFMForm.File1Click(Sender: TObject);
var
FileSelected: Boolean;
begin
FileSelected := FileList.ItemIndex >= 0;
Open1.Enabled := FileSelected;
Delete1.Enabled := FileSelected;
Copy1.Enabled := FileSelected;
Move1.Enabled := FileSelected;
Rename1.Enabled := FileSelected;
Properties1.Enabled := FileSelected;
end;
{ True if there is a file selected }
Now, whenever the user opens the File menu, the application disables all the items
except Exit unless there is a file selected in the file list box.
Deleting a file
Deleting a file erases the file from the disk and removes the entry from the disk’s
directory. There is no corresponding operation to restore a deleted file, so applications
should generally allow users to confirm deletions of files.
■
To delete a file, pass the name of the file to the DeleteFile function. DeleteFile returns True
if it deleted the file and False if it did not (for example, if the file did not exist or if it was
read-only).
➤
The following code handles a click on a File|Delete menu item by deleting the selected
file in a file list box, then updating the list so it reflects the deletion.
procedure TFMForm.Delete1Click(Sender: TObject);
begin
with FileList do
if DeleteFile(FileName) then Update;
end;
The application now deletes the selected file in response to either File|Delete or the Del
key, which is the shortcut for that menu item.
Confirming file deletions
A safer way to approach deleting files, however, would provide a chance for the user to
confirm that the application should delete the file. You can use a message dialog box to
tell the user which file the application is about to delete, providing the option to cancel
the operation.
➤
370
Add the following handler, attached to the File|Delete menu item’s OnClick event. The
MsgDlg unit must appear in the uses clause for the unit containing this handler.
Delphi User’s Guide
procedure TFMForm.Delete1Click(Sender: TObject);
begin
with FileList do
if MessageDlg('Delete ' + FileName + '?', mtConfirmation,
[mbYes, mbNo], 0) = mrYes then
if DeleteFile(FileName) then Update;
end;
The application now displays a message dialog box and requests confirmation from the
user before deleting any files. This gives the user a chance to cancel the deletion if
necessary. Figure 13.3 shows the message dialog box generated by this example.
Figure 13.3 Confirming a file deletion
Changing a file’s attributes
Every file has various attributes stored by the operating system as bitmapped flags. File
attributes include such items as whether a file is read-only or a hidden file.
■
Changing a file’s attributes requires three steps:
1 Reading file attributes
2 Changing individual file attributes
3 Setting file attributes
You can use the reading and setting operations independently, if you only want to
determine a file’s attributes, or if you want to set an attribute regardless of previous
settings. To change attributes based on their previous settings, however, you need to
read the existing attributes, modify them, and write the modified attributes.
Reading file attributes
Operating systems store file attributes in various ways, generally as bitmapped flags.
■
To read a file’s attributes, pass the file name to the FileGetAttr function. The return value
is a group of bitmapped file attributes of type Word.
The file manager example handles a click on the File|Properties menu item by opening
a file-attribute dialog box in which the user can see each attribute represented as a check
box, as shown in Figure 13.4.
➤
Add a new form to the project and set its properties as indicated in Table 13.5. When
you save the updated project, name the new unit FAttrDlg.
Table 13.5
Property
Property values for the file-attribute dialog box form
Value
Name
FileAttrForm
Caption
File Attributes
Chapter 13, File manager example
371
Table 13.5
Property values for the file-attribute dialog box form (continued)
Property
Value
Position
BorderIcons
BorderStyle
poScreenCenter
[biSystemMenu]
bsDialog
Next, add controls as indicated in Table 13.6 and Figure 13.4.
Table 13.6
Property values for the file-attribute dialog box components
Component
Property
Value
Label
Label
Label
Name
Name
Name
FileName
FilePath
ChangeDate
Group Box
CheckBox
Caption
Name
Attributes
ReadOnly
Caption
Name
Caption
Name
&Read Only
Archive
&Archive
System
Check Box
Check Box
Check Box
Bitmap Button
Bitmap Button
Caption
&System
Name
Caption
Kind
Kind
Hidden
&Hidden
bkOK
bkCancel
Figure 13.4 The file-attribute dialog box
Changing individual file attributes
Because Delphi represents file attributes in a set, you can use normal bitwise operators
to manipulate the individual attributes. Each attribute has a mnemonic name defined in
the SysUtils unit.
For example, to set a file’s read-only attribute, you would do the following:
Attributes := Attributes or faReadOnly;
You can also set or clear several attributes at once. For example, to clear both the systemfile and hidden attributes, do the following:
Attributes := Attributes and not (faSysFile or faHidden);
372
Delphi User’s Guide
Setting file attributes
Delphi enables you to set the attributes for any file at any time.
■
To set a file’s attributes, pass the name of the file and the attributes you want to the
FileSetAttr procedure.
➤
The following code reads a file’s attributes into a set variable, sets the check boxes in the
file-attribute dialog box to represent the current attributes, then executes the dialog box.
If the user changes and accepts any dialog box settings, the code sets the file attributes to
match the changed settings:
procedure TFMForm.Properties1Click(Sender: TObject);
var
Attributes, NewAttributes: Word;
begin
with FileAttrForm do
begin
FileDirName.Caption := FileList.Items[FileList.ItemIndex];
{ set box caption
PathName.Caption := FileList.Directory;
{ show directory name
ChangeDate.Caption := DateTimeToStr(FileDateTime(FileList.FileName));
Attributes := FileGetAttr(FileDirName.Caption);
{ read file attributes
ReadOnly.Checked := (Attributes and faReadOnly) = faReadOnly;
Archive.Checked := (Attributes and faArchive) = faArchive;
System.Checked := (Attributes and faSysFile) = faSysFile;
Hidden.Checked := (Attributes and faHidden) = faHidden;
if ShowModal <> mrCancel then
{ execute dialog box
begin
NewAttributes := Attributes;
{ start with original attributes
if ReadOnly.Checked then NewAttributes := NewAttributes or faReadOnly
else NewAttributes := NewAttributes and not faReadOnly;
if Archive.Checked then NewAttributes := NewAttributes or faArchive
else NewAttributes := NewAttributes and not faArchive;
if System.Checked then NewAttributes := NewAttributes or faSysFile
else NewAttributes := NewAttributes and not faSysFile;
if Hidden.Checked then NewAttributes := NewAttributes or faHidden
else NewAttributes := NewAttributes and not faHidden;
if NewAttributes <> Attributes then
{ if anything changed...
FileSetAttr(FileDirName.Caption, NewAttributes);
{ ...write the new values
end;
end;
end;
}
}
}
}
}
}
}
The file manager application now lets you change the attributes on any selected file.
Moving, copying, and renaming files
Moving, copying, and renaming files are all similar operations, in that they all produce a
file from another file. The difference is in how they treat the original file. Copying leaves
the original file alone. Renaming changes the name of the original file. Moving deletes
the original file after copying it to its new location.
The run-time library provides a function called RenameFile that handles renaming. The
FMXUtils unit provides similar procedures called MoveFile and CopyFile for those
Chapter 13, File manager example
373
operations. Each routine takes two string parameters: the name of the original file and
the name of the destination file. In fact, you can easily provide a single method in your
application that handles any of the three operations.
The following code shows a method called ConfirmChange that displays a confirmation
dialog box, then performs the specified operation if confirmed:
procedure TFMForm.ConfirmChange(const ACaption, FromFile, ToFile: string);
begin
if MessageDlg(Format('%s %s to %s?', [ACaption, FromFile, ToFile]),
mtConfirmation, [mbYes, mbNo], 0) = mrYes then
begin
if ACaption = 'Move' then
MoveFile(FromFile, ToFile)
else if ACaption = 'Copy' then
CopyFile(FromFile, ToFile)
else if ACaption = 'Rename' then
RenameFile(FromFile, ToFile);
FileList.Update;
end;
end;
Because all three operations are so similar, the file manager application can share much
of the code involved. In particular, you can create a dialog box that prompts the user for
an original name and a destination name, and use the same dialog box no matter which
operation the user requests. Figure 13.5 shows the dialog box and the names of its
components.
Figure 13.5 The change-file dialog box
CurrentDir
FromFileName
ToFileName
Once you’ve designed the dialog box, you can open it from an event handler shared by
the Move, Copy, and Rename items on the File menu by doing the following:
1 Double-click the main-menu component (not the File menu itself) on the main form
to open the Menu Designer.
2 In the Menu Designer window, choose File|Move.
3 Choose the Events page in the Object Inspector.
4 Click in the Handler column next to the OnClick event.
5 Type in FileChange and press Enter.
Delphi generates an event handler called FileChange.
6 In the Menu Designer window, choose File|Copy and set its OnClick handler to
FileChange.
7 Repeat step 6 for File|Rename.
374
Delphi User’s Guide
➤
You can then fill in the empty FileChange handler as follows:
procedure TFMForm.FileChange(Sender: TObject);
begin
with ChangeDlg do
begin
if Sender = Move1 then Caption := 'Move'
else if Sender = Copy1 then Caption := 'Copy'
else if Sender = Rename1 then Caption := 'Rename'
else Exit;
CurrentDir.Caption := DirectoryOutline.Directory;
FromFileName.Text := FileList.FileName;
ToFileName.Text := '';
if (ShowModal <> mrCancel) and (ToFileName.Text <> '') then
ConfirmChange(Caption, FromFileName.Text, ToFileName.Text);
end;
end;
The application now displays the file-change dialog box with the correct caption, and
performs the correct operation.
Executing an application
Many times an application needs to execute another application, either to perform a
specific task or just to have that application run concurrently. The Windows API
provides a function, ShellExecute, that executes an application, but it requires a number
of parameters superfluous to Delphi applications. The FMXUtils unit provides a more
useful alternative, called ExecuteFile.
ExecuteFile operates in two different ways. If passed the name of an executable file,
ExecuteFile runs that application. If passed the name of a document with an associated
application, ExecuteFile runs the application, automatically opening that document at
startup.
Executing a file from a file list box
ExecuteFile takes three string parameters and a fourth parameter that indicates how it
should display the window containing the executed application. The three strings
represent the name of the file, any command-line parameters to pass to the application,
and the directory to use as the startup directory.
The last parameter should be one of Windows’ constants used for the ShowWindow API
function. For example, SW_SHOW shows the window normally,
SW_SHOWMINIMIZED shows the window initially as an icon, and so on.
A file list box contains all the information you need to execute a file in the list. The
following code shows a simple use of ExecuteFile to execute the currently selected file in
the file list box:
procedure TFMForm.Open1Click(Sender: TObject);
begin
with FileList do
ExecuteFile(FileName, '', Directory, SW_SHOW);
end;
Chapter 13, File manager example
375
➤
If you add the Open1Click method to handle the File|Open menu item’s click event, you
can execute the selected file. You can attach the same handler to the file list box’s doubleclick event, so that double-clicking an item executes it.
Of course, it doesn’t always make sense to execute a file. If the selected item is a
directory; for example, instead of executing it, you probably want to open it, or change
to that directory.
The following code shows another version of Open1Click that handles directories
differently from files:
procedure TFMForm.Open1Click(Sender: TObject);
begin
with FileList do
begin
if HasAttr(FileName, faDirectory) then
DirectoryOutline.Directory := FileName
else ExecuteFile(FileName, '', Directory, SW_SHOW);
end;
end;
HasAttr is a Boolean function in the FMXUtils unit that returns True if the file named in
its first parameter has the specified attribute set and False otherwise.
Setting the directory outline’s Directory property to the new directory changes to that
directory. Because you handle the directory outline’s change event by updating the file
list box, double-clicking a directory in the file list box now has the effect of changing
directories.
Dragging and dropping
Dragging and dropping of items on a form can be a handy way to enable users to
manipulate objects in a form. You can let users drag entire components, or let them drag
items out of components such as list boxes into other components.
There are four essential elements to drag-and-drop operations:
1
2
3
4
Starting a drag operation
Accepting dragged items
Dropping items
Ending a drag operation
Starting a drag operation
Every control has a property called DragMode that controls how the component
responds when a user begins dragging the component at run time. If DragMode is
dmAutomatic, dragging begins automatically when the user presses a mouse button with
the cursor on the control. A more common usage is to set DragMode to dmManual (which
is the default) and start the dragging by handling mouse-down events.
■
376
To start dragging a control manually, call the control’s BeginDrag method.
Delphi User’s Guide
BeginDrag takes a Boolean parameter called Immediate. If you pass True, dragging begins
immediately, much as if DragMode were dmAutomatic. If you pass False, dragging
doesn’t begin until the user actually moves the mouse a short distance. Calling
BeginDrag(False) allows the control to accept mouse clicks without beginning a drag
operation.
You can also place conditions on whether to begin dragging, such as checking which
button the user pressed, by testing the parameters of the mouse-down event before
calling BeginDrag.
➤
The following code, for example, handles a mouse-down event on a file list box by
beginning dragging only if the left mouse button was pressed:
procedure TFMForm.FileListBox1MouseDown(Sender: TObject;
Button: TMouseButton; Shift: TShiftState; X, Y: Integer);
begin
if Button = mbLeft then
{ drag only if left button pressed
with Sender as TFileListBox do
{ treat Sender as TFileListBox
begin
if ItemAtPos(Point(X, Y), True) >= 0 then
{ is there an item here?
BeginDrag(False);
{ if so, drag it
end;
end;
}
}
}
}
Once you run the program, you’ll see that you can drag items from the file list box, but
that the cursor always indicates that you can’t drop the item anywhere. The cursor
never changes from the slashed circle. Before you can drop items, you have to have
controls that accept drops. You’ll add those in the next section.
Accepting dragged items
When a user drags something over a control, that control receives an OnDragOver event,
at which time it must indicate whether it can accept the item if the user drops it there.
Delphi changes the drag cursor to indicate whether the control can accept the dragged
item.
■
To accept items dragged over a control, attach an event handler to the control’s
OnDragOver event. The drag-over event has a variable parameter called Accept that the
event handler can set to True if it will accept the item.
Setting Accept to True specifies that if the user releases the mouse button at that point,
dropping the dragged item, the application can then send a drag-drop event to the same
control. If Accept is False, the application won’t drop the item on that control. This means
that a control should never have to handle a drag-drop event for an item it doesn’t know
how to handle.
The drag-over event includes several parameters, including the source of the dragging
and the current location of the mouse cursor. The event handler can use those
parameters to determine whether to accept the drop. Most often, a control accepts or
rejects a dragged item based on the type of the sender, but it can also accept items only
from specific instances.
Chapter 13, File manager example
377
➤
In the following example, a directory outline accepts dragged items only if they come
from a file list box:
procedure TFMForm.DirectoryOutline1DragOver(Sender, Source: TObject; X,
Y: Integer; State: TDragState; var Accept: Boolean);
begin
if Source is TFileListBox then
Accept := True;
end;
Dropping items
Once a control indicates that it can accept a dragged item, it should then also define
some way to handle the item should it be dropped. If a user sees the mouse cursor
change to indicate that a control will accept the item being dragged, it is reasonable for
the user to then expect that dropping the item there will accomplish some task.
■
To handle dropped items, attach an event handler to the OnDragDrop event of the
control accepting the dropped item.
Like the drag-over event, the drag-drop event indicates the source of the dragged item
and the coordinates of the mouse cursor over the accepting control. These parameters
enable the drag-drop handler to get any needed information from the source of the drag
and determine how to handle it.
➤
For example, a directory outline accepting items dragged from a file list box can move
the file from its current location to the directory dropped on:
procedure TFMForm.DirectoryOutline1DragDrop(Sender, Source: TObject; X,
Y: Integer);
begin
if Source is TFileListBox then
with DirectoryOutline do
ConfirmChange('Move', FileList.FileName, Items[GetItem(X, Y)].FullPath);
end;
Dragging and dropping now has the same effect as using File|Move, but the user
doesn’t need to type in the file name.
Ending a drag operation
When a dragging operation ends, either by dropping the dragged item or by the user
releasing the mouse button over a control that doesn’t accept the dragged item, Delphi
sends an end-drag event back to the control the user dragged.
■
To enable a control to respond when items have been dragged from it, attach an event
handler to the OnEndDrag event of the control.
The most important parameter in an OnEndDrag event is called Target, which indicates
which control, if any, accepts the drop. If Target is nil, it means no control accepts the
dragged item. Otherwise, Target is the control that accepts the item. The OnEndDrag
event also includes the x- and y-coordinates on the receiving control where the drop
occurs.
378
Delphi User’s Guide
➤
In this example, a file list box handles an end-drag event by refreshing its file list,
assuming that dragging a file from the list changes the contents of the current directory:
procedure TFMForm.FileListBox1EndDrag(Sender, Target: TObject; X, Y: Integer);
begin
if Target <> nil then FileList.Update;
end;
Summary
The sample application in this chapter demonstrates a number of widely useful tasks,
including specific applications of some outline, list-box, and tab-set controls, using
image controls to store hidden bitmaps, dragging and dropping within an application,
and manipulating files.
There are a number of other features you would probably want to add to the application
for real use, such as dragging and dropping to the drive tab set, handling of multiple file
selections, and display of file information other than the size. All of these are
straightforward extensions to the existing application.
Chapter 13, File manager example
379
380
Delphi User’s Guide
Chapter
14
Exchanging data with DDE or OLE
Chapter 14
Exchanging data among applications is an important feature of multitasking
environments such as Microsoft Windows. You’re probably already familiar with one
way to share data: the Windows Clipboard. With Clipboard objects and methods such
as CopyToClipboard, Delphi enables you to take advantage of the Clipboard. See Chapter
10 for an example that uses the Clipboard, or search online Help for TClipboard for more
information about using Clipboard objects.
Data sharing methods such as Dynamic Data Exchange (DDE) and Object Linking and
Embedding (OLE) are even more powerful. With them, you can automatically reflect
changes in one data file to many users using many instances of your application. You
can create a front end that integrates the data and functionality of a word processor,
spreadsheet, and database all in one application. You can even run and control other
applications from within your application.
This chapter discusses
• Using DDE
• Using OLE
• Comparing DDE and OLE
Using DDE
Dynamic Data Exchange (DDE) sends data to and receives data from other applications.
With Delphi, you can use this data to exchange text with other applications. You can
also send commands and macros to other applications, so your application can control
other applications.
Here’s a typical way to use DDE: a link between two applications is established, either
by your application or the other application. Once this link (called a conversation) is
established, the two applications can continuously and automatically send data back
and forth. A typical use for DDE is to exchange text data. When the text changes in one
application, DDE automatically updates the text in the other. For example, in the
Chapter 14, Exchanging data with DDE or OLE
381
following figure, text changes in the Delphi application are automatically reflected
in Word.
Figure 14.1 A DDE conversation between a Delphi application and Microsoft Word 6.0.
Linked text
Note
Not all applications support DDE. To determine whether an application supports DDE,
refer to its documentation.
To understand DDE applications, you need to become familiar with the concept of DDE
conversations.
DDE conversations
In order to have a DDE conversation, there must be a DDE client application and a DDE
server application. The application that requests data is the client. The application that
provides the requested data, and updates the DDE client, is the DDE server. With
Delphi, you can create both DDE clients and DDE servers. In fact, a single Delphi
application can be both a DDE client and a DDE server at the same time. A DDE
conversation is defined by its service, topic, and item.
Note
Sometimes DDE clients are called destinations, and DDE servers are called sources. The
terminology is interchangeable.
This section explains
• DDE services
• DDE topics
• DDE items
DDE services
The service of a conversation is the name of the DDE server. Typically, this is the server
application’s main executable file without the .EXE extension. For example, if you want
your application to establish a conversation with Novell Quattro Pro 6.0 (QPW.EXE),
the conversation service is QPW.
Sometimes, however, the service differs from the main executable file name. For
example, if you want your application to establish a conversation with Borland
ReportSmith 2.0 (RPTSMITH.EXE), the DDE service would be ReportSmith.
382
Delphi User’s Guide
If the server is a Delphi application, the service is the project name without the .DPR or
.EXE extension. For example, to establish a conversation with PROJ1.DPR the service is
PROJ1.
Note
The DDE service depends on the DDE server application. Refer to the documentation of
the DDE server for specific information about specifying the DDE service.
Note
Sometimes DDE services are called application names. The terminology is
interchangeable.
DDE topics
The topic of a DDE conversation is a unit of data, identifiable to the server, containing
the linked information. Typically, the topic is a file. For example, if the data you want to
share is in the Quattro Pro notebook file NOTEBK1.WB2, the topic would be
NOTEBK1.WB2; the full file name is used, including the extension.
If the server is a Delphi application, the topic is (by default) the caption of the form
containing the data you want to link. For example, if you want to link to text in a form
with a Caption of MyApp, the topic would be MyApp. (Optionally, you could use the
name of a DDEServerConv component as explained in “Creating DDE server
applications” on page 388.)
DDE items
The item of a DDE conversation identifies the actual piece of data to link. The syntax
used for specifying the DDE item depends on the DDE server application. Examples of
possible DDE items are spreadsheet cells or database fields. For example, to link to cell
A1 on page A in a Quattro Pro notebook, the item would be $A:$A$1..$A$1.
If the server is a Delphi application, the item is the name of the linked DDEServerItem
component. For example, to establish a conversation with the DDE server component
named DDEServer1, the item would be DDEServer1. DDEServerItems are discussed in
“Creating DDE server applications” on page 388.
Note
See the documentation for the DDE server for specific information about specifying the
application, topic, and item of a conversation.
Creating DDE client applications
DDE client applications initiate conversations and typically request to receive data from
DDE servers. Client applications can also send data to servers, which is called poking
data. They can also execute macros of servers with macro capabilities.
■
To create a DDE client to be automatically updated by a DDE server,
1 Add a DDEClientConv and a DDEClientItem component to a form.
2 Assign the name of the DDEClientConv component to the DDEConv property of the
DDEClientItem component. To establish a link at design time, choose this value from
a list of possible conversations for DDEConv in the Object Inspector. To establish a
link at run time, your application should execute code that assigns the value to the
DDEConv property.
Chapter 14, Exchanging data with DDE or OLE
383
➤
For example, the following code links an DDEClientItem component named
DDEClientItem1 to a DDEClientConv component named DDEClientConv1:
DDEClientItem1.DDEConv := 'DDEClientConv1';
■
To create a DDE client to be manually updated by a DDE server, add only a
DDEClientConv component to a form. To be updated, your client application must
execute code that calls the RequestData method of the DDEClientConv component. See
“Requesting data” on page 386 for more information.
Of course, no DDE conversation is yet taking place, because the DDEClientConv
component has not yet been connected to a DDE server. Nonetheless, you have “set the
stage” for this conversation to take place from your Delphi application. The next
sections explain
•
•
•
•
Establishing a link with a DDE server
Requesting data
Poking data
Controlling other applications
Establishing a link with a DDE server
If you have access to the DDE server application and data, you can establish a DDE link
by pasting it from the Clipboard at design time.
■
To paste a DDE link from the Clipboard at design time,
1 Activate the server application and select the data to link to your client application.
➤
For example, to link to a cell in a Quattro Pro notebook called C:\NOTEBK1.WB2,
run Quattro Pro, load the notebook, and select the cell.
2 Copy the data and DDE link information to the Clipboard from the server
application. Typically, you do this by choosing Copy from the Edit menu of the
server.
➤
For example, in Quattro Pro choose Edit|Copy.
3 Activate Delphi and select the DDEClientConv component.
4 Click either the DDEService or the DDETopic property in the Object Inspector, then
click the ellipsis (...) button.
The DDE Info dialog box appears.
Figure 14.2 The DDE Info dialog box
5 Choose Paste Link.
384
Delphi User’s Guide
The App and Topic boxes are filled in with the correct values automatically. If the
Paste Link button is disabled, then the application you intended to be the server does
not support DDE, or the DDE information was not successfully copied to the
Clipboard.
➤
For example, if you copy from the Quattro Pro notebook C:\NOTEBK1.WB2, App is
QPW and Topic is C:\NOTEBK1.WB2.
6 Choose OK.
The DDEService and DDETopic properties now contain the appropriate values to
establish a DDE link.
7 Select the DDEClientItem component and choose the name of the linked
DDEClientConv component for the DDEConv property from the list in the Object
Inspector.
8 If the contents of the Clipboard haven’t changed since you completed step 2, then the
Clipboard contains a value for the DDE item of the conversation. Choose this value
for the DDEItem property from the drop-down list in the Object Inspector. If the
contents of the Clipboard do not contain a value for the DDE item, type the
appropriate value for DDEItem in the Object Inspector.
➤
■
For example, if you copy cell A1 from page A in the Quattro Pro notebook, select or
type $A:$A$1..$A$1 for DDEItem. Remember that you also need to provide your
application with an area and a means to display the data being exchanged. The
DDEItem component is nonvisual, so it serves only as a means of access, not a means
of display.
To establish a DDE link at run time, specify the service and topic of the conversation,
using the SetLink method of the DDEClientConv component.
The first parameter of SetLink is a string specifying the service, and the second
parameter is a string specifying the topic. SetLink assigns these strings to the DDEService
and DDETopic properties of the DDEClientConv component, respectively. For more
information about this method, search online Help for SetLink.
Note
➤
Simply assigning values to the DDEService and DDETopic properties of a
DDEClientConv component does not establish a link at run time. You need to use the
SetLink method to property initiate a DDE conversation.
For example, execute the following line of code to link to a Quattro Pro notebook named
C:\NOTEBK1.WB2:
DDEClientConv1.SetLink('QPW', 'C:\NOTEBK1.WB2');
■
After using the SetLink method, you need to assign the DDE item of the conversation to
the DDEItem property of the DDEClientItem component.
➤
For example, execute the following line of code to link to cell A1 on page A of the
Quattro Pro notebook:
DDEClientItem1.DDEItem := '$A:$A$1..$A$1';
When a DDE link has been established, the linked data appears in the Text and Lines
properties of the DDEClientItem component. Text specifies a string, and Lines specifies a
Chapter 14, Exchanging data with DDE or OLE
385
TStrings object. Text can contain up to 255 characters of linked text data. If the text data
from the DDE server is longer than 255 characters, use Lines to access the data. The data
is continuously updated by the DDE server, and an OnChange event of the
DDEClientItem component occurs whenever the data changes.
■
One way to process linked text data is to display it in an edit box (Edit component). To
do this, you assign the value of the Text property of the DDEClientItem to the Text
property of the edit box (or, for larger bodies of text, you could assign the Lines property
of the DDEClientItem to the Lines property of a memo). Attach the assignment
statement to the OnChange event handler of the DDEClientItem.
➤
For example, if the DDEClientItem component is named DDEClientItem1 and the edit
box is named Edit1, execute the following code:
Edit1.Text := DDEClientItem1.Text;
Requesting data
Some DDE items aren’t passed automatically in a DDE conversation. Instead, the client
must explicitly request a specific item to be updated by the DDE server. Also you might
want your client application to obtain data from a DDE server once, and not be
continually updated by the DDE server. In these cases, your DDE client should request
to be updated with the RequestData method.
Note
■
To determine if your DDE client must explicitly request to be updated, see the
documentation of the DDE server application.
To request data, use the RequestData method of a DDEClientConv component. Specify
the item to request as a parameter of RequestData. The item is the simply a DDE item.
RequestData returns a PChar null-terminated string containing the requested text.
The requested data is given to the DDE client only in the return value of RequestData.
Even if the DDEClientConv component is connected to a DDEClientItem component,
RequestData won’t update the values of the Text or Lines properties of the
DDEClientItem. Search online Help for RequestData for more information about this
method.
➤
For example, to request the data from cell A1 on page A in a Quattro Pro notebook, and
store the data in a PChar variable named TheData, execute the following code:
TheData := DDEClientConv1.RequestData('$A:$A$1..$A$1');
Note
➤
The memory for the PChar string returned by RequestData must be freed after your
application is finished with it. Use the StrDispose function to do this.
For example, after your application has processed TheData, you should deallocate it
with the following code:
StrDispose(TheData);
Poking data
Poking data means sending data from your DDE client application to the DDE server
application, directly opposite the usual data flow direction for DDE.
386
Delphi User’s Guide
■
To poke data, use the PokeData or PokeDataLines methods of a DDEClientConv
component. PokeData pokes a PChar string, while PokeDataLines pokes a TStrings object.
The first parameter of PokeData specifies the item of the DDE conversation (usually
specified in the DDEItem property of the associated DDEClientItem component). The
second parameter of PokeData is a PChar containing the text to send. PokeDataLines
functions similarly, except its second parameter is of type TStrings. Search online Help
for PokeData or PokeDataLines for more information about these methods.
➤
For example, to send the text ‘Hello’ from a DDEClientConv component named
DDEClientConv1 to a linked DDE server, execute the following code, assuming that
TheText is of type PChar:
StrPCopy(TheText, 'Hello');
DDEClientConv1.PokeData(DDEClientItem1.DDEItem, TheText);
The text string “Hello” is inserted into the DDE item specified in the DDEItem property
of DDEClientItem1.
Note
StrPCopy simply copies a Pascal-style string into a null-terminated PChar string.
Just as you need to provide an area and a means to display DDE data in your
application, so you also need to provide a source for the data you want your application
to poke. In the previous example, the text string itself was passed as a parameter, but in
most of your “real world” applications, the DDEClientConv control probably obtains
this data from another control.
Controlling other applications
All DDE client applications can control server applications in one particular way: clients
attempt to run servers, when necessary. When your DDE client tries to establish a link
with a DDE server that isn’t running, the client attempts to activate the server and load
the conversation topic (specified in the DDETopic property of the DDEClientConv
component).
■
To activate a DDE server when the client form is created, set the value of the
ConnectMode property of a DDEClientConv component to dmAutomatic.
If the value of ConnectMode is dmManual, your application must execute the OpenLink
method of the DDEClientConv component.
Another way to control other applications is to execute macro commands.
■
To execute a macro in the DDE server from within the DDE client, use the ExecuteMacro
or ExecuteMacroLines methods of the DDEClientConv component to send text
containing one or more macro commands to the server. The server then processes the
macro. ExecuteMacro sends a PChar string, while ExecuteMacroLines sends a TStrings
object.
➤
For example, you could tell Microsoft Word 6.0 to close its active worksheet by
executing the following code in your client application, assuming that TheMacro is of
type PChar:
StrPCopy(TheMacro, '[FileClose(2)]');
DDEClientConv1.ExecuteMacro(TheMacro, False);
Chapter 14, Exchanging data with DDE or OLE
387
In this example, the second parameter is a “wait flag.” It specifies whether your client
application should wait for the server application to indicate that it has finished
processing the macro before sending any more DDE data to the server. If False, your
application sends more data to the server if you execute another ExecuteMacro,
ExecuteMacroLines, PokeData, or PokeDataLines method. If True, subsequent calls to these
methods before the server has indicated the completion of the first macro do not send
data. Search online Help for ExecuteMacro or ExecuteMacroLines for more information
about these methods.
Note
Not all DDE servers can process macros. See the documentation for the server
application to determine whether it supports macros and for its macro syntax.
Creating DDE server applications
DDE server applications respond to DDE clients. Typically, they contain data to which
the client application needs access. Servers simply update clients.
■
To create a DDE server, add a DDEServerItem component to a form.
The Text or Lines properties of the DDEServerItem component contain the data to link.
Your server application continuously updates all clients with the value of the Text or
Lines properties.
As with the DDEClientItem component, Text specifies a string, while Lines specifies a
TStrings object. If the text to exchange is longer than 255 characters, use the Lines
property to specify the data. When either Text or Lines is modified, the other is
automatically updated to reflect the change. The value of Text always equals the value of
the first line of Lines.
Optionally, you can add a DDEServerConv component and link the DDEServerItem
and DDEServerConv together. When you add a DDEServerConv component, the DDE
topic becomes the name of the DDEServerConv component (instead of the Caption of the
form containing the DDEServerItem component). You should use a DDEServerConv
component in the following situations:
• The value of the Caption property of the form containing the DDEClientItem
component might change, or might not be unique at run time. If this value is not
unique or constant, the link might not be able to be established.
• The DDE client might send a macro to your server application for processing. If this
happens, an OnMacroExecute event of the DDEServerConv component occurs. The
OnMacroExecute event contains a string parameter that specifies the macro sent from
the DDE client. Search online Help for OnMacroExecute for more information about
this event.
■
To create a DDE server using a DDEServerConv component,
1 Add DDEServerItem component and a DDEServerConv component to a form.
2 Assign the name of the DDEServerConv component to the ServerConv property of the
DDEServerItem component.
388
Delphi User’s Guide
At design time, choose this value from a list of possible conversations for ServerConv
in the Object Inspector. To establish this link at run time, your application should
execute code that assigns the value to the ServerConv property.
➤
For example, the following code links a DDEServerItem component named
DDEServerItem1 to a DDEServerConv component named DDEServerConv1:
DDEServerItem1.ServerConv := 'DDEServerConv1';
Establishing a link with a DDE client application
Typically, it is up to the DDE client to establish the link with a DDE server application. If
you want to test a link from your DDE server, you can use the Clipboard to paste a link.
■
To establish a DDE link,
1 Use the CopyToClipboard method of the DDEServerItem component to copy the value
of the Text (or Lines) property, along with DDE link information, to the Clipboard.
2 Insert the linked data into the DDE client application. Typically, do this by choosing
the appropriate command (such as Edit|Paste Special or Edit|Paste Link) of the
client application.
Search online Help for CopyToClipboard for more information about this event.
➤
For example, to create a link from a DDEServerItem component named DDEServerItem1
to a WordPerfect 6.0 document, perform the following steps. (If you don’t have
WordPerfect installed, this example is worth examining because the steps required are
similar for any other DDE client application that can paste links.)
1 At run time, your DDE server application should execute the following code:
DDEServerItem1.CopyToClipboard;
2 Activate WordPerfect and choose Edit|Paste Special.
The WordPerfect Paste Special dialog box appears.
Figure 14.3 The WordPerfect Paste Special dialog box
3 Choose Paste Link.
The Paste Special dialog box closes and the linked text from the Text (or Lines)
property of DDEServerItem1 appears at the insertion point in the WordPerfect
document. When the value of Text (or Lines) changes, the text in the WordPerfect
document is updated automatically.
Chapter 14, Exchanging data with DDE or OLE
389
Note
The method for establishing a DDE link depends on the DDE client application. See the
documentation for the client for specific information about establishing DDE links. If the
DDE client is another Delphi application, refer to “Establishing a link with a DDE
server” on page 384.
■
One way to process linked text data is to keep the client updated to changes in an edit
box (Edit component) in your DDE server application. Assign the value of the Text
property of an edit box to the Text property of the DDEServerItem (or, for larger bodies
of text, you could assign the Lines property of a memo to the Lines property of the
DDEClientItem). Attach the assignment statement to the OnChange event of the edit box
or memo.
➤
For example, if the edit box is named Edit1 and the DDEServerItem component is
named DDEServerItem1, execute the following code:
DDEServerItem1.Text := Edit1.Text;
Using OLE
This section explains
• What is OLE?
• Creating OLE container applications
• OLE data in files
What is OLE?
Object Linking and Embedding (OLE) is a method for sharing data among applications.
To use OLE, one application must be an OLE server, and another application must be an
OLE container. With Delphi, you can create OLE container applications.
An OLE server is an application that can create and edit an OLE object. An OLE
container is an application that can contain an OLE object. An OLE object is simply the
data shared by the two applications. Examples of OLE objects are documents,
spreadsheets, pictures, and sounds.
Here’s a typical way to use OLE: the OLE container application displays a picture
representing the OLE object. The user activates the OLE object, typically by doubleclicking the picture. When the OLE object is activated, the OLE server application opens,
and the user can edit the OLE object using the OLE server. Then the user updates the
OLE object within the OLE container and closes the OLE server.
Note
Not all applications support OLE. To determine whether an application supports OLE,
refer to its documentation.
This section explains
•
•
•
•
390
OLE 1.0 and OLE 2.0
Design-time and run-time object creation
Linking and embedding
OLE classes
Delphi User’s Guide
• OLE documents
• OLE items
OLE 1.0 and OLE 2.0
There are two versions of OLE at the time of this writing: OLE 1.0 and OLE 2.0. When
the user activates an OLE object that was created with an OLE 1.0 server application, the
server application opens in its own window in the foreground and receives focus. The
OLE container application exists in a separate window in the background.
When the user activates an OLE object that was created with an OLE 2.0 server
application, the object might try to activate in place. In-place activation means the OLE
server’s menu is merged with the OLE container’s menu. The server’s tool bar replaces
the container’s tool bar, and the server might try to use the container’s status bar. The
object is edited from within the OLE container application window, but all the
processing is handled by the OLE server.
Note
The mode of activation depends upon the server with which the OLE object was
created, not the container application in which it is linked or embedded. If an OLE 1.0
object is opened within an OLE 2.0-compliant application, it still opens in the OLE 1.0
style (not in place).
Design-time and run-time object creation
This chapter discusses creating OLE objects at design time. Chapter 15 discusses
creating objects at run time. The following table discusses the differences between
creating OLE objects at design time and at run time:
Note
Design-time OLE object creation
Run-time OLE object creation
The object is stored in the executable file, increasing
the size of the compiled application.
The object is stored in a file or exists only at run
time, reducing the size of the compiled application.
The developer needs access to the OLE server
application at design time.
The developer does not need access to the OLE
server application at design time.
The OLE object is already created at run time,
reducing application execution time.
The OLE object must be created at run time,
increasing application execution time.
The OLE object can be edited at design time or run
time.
The application can contain only as many OLE
objects as the number of OLEContainer components
added at design time.
The OLE object can be edited only at run time.
The application can create new OLEContainer
components at run time to contain more OLE
objects than were created at design time.
At design time, an object can’t be activated in place. The OLE server activates in its own
window, not in place, even if the object supports in-place activation. At run time,
however, objects that support in-place activation are activated in place.
Chapter 14, Exchanging data with DDE or OLE
391
Linking and embedding
Data in a linked OLE object is stored in a file by the OLE server that created it. Data in an
embedded OLE object is stored in the OLE container application. Here are guidelines for
when to link or to embed OLE objects:
When to link
When to embed
You want to be able to make changes to the original
object and have those changes reflected in all
applications or documents linked to that original.
You want to be able to make changes to the object
and have those changes reflected only in one
particular application or document.
The original object is likely to be frequently
modified, or modified from multiple OLE container
applications.
The original object is unlikely to be frequently
modified, or modified from only one instance of an
OLE container application.
The original object file is likely to be frequently
moved, or possibly deleted.
The object is small, or when the object is large but
you won’t be distributing it via a network or
electronic mail.
The original object file is unlikely to be frequently
moved, and won’t be deleted.
The object is large, and you will be distributing it
via a network or electronic mail.
You need to conserve disk space by having only one
copy of the object.
You don’t need to conserve disk space by having
only one copy of the object.
Linked objects
Linked objects are stored in files. You can’t create a new OLE link unless the OLE object
has previously been saved to a file from within the OLE server application.
The data in an linked OLE object file can be modified by your OLE container application
and by other applications. The OLE server application and other OLE container
applications can all access and modify the OLE object. Data can exist in one location but
be accessible from multiple applications.
You can program your OLE container application in Delphi to continually obtain the
latest data from the OLE object file. When the OLE object data is modified, even by other
applications, the changes will appear in all OLE container applications that contain a
link to the file, including your own.
Embedded objects
Embedded objects are stored in your OLE container application. Other OLE container
applications can’t access the OLE object. The only time the embedded OLE object can be
edited is when the user activates the object from your OLE container application. Only
then can the OLE server edit the OLE object data.
Embedded OLE objects don’t need to exist in files. All the data can be stored in your
container application. This ensures that the OLE data cannot be accidentally deleted,
modified, or corrupted by being stored in an external file. The drawback is that the size
of your OLE container application increases by the size of the included OLE data.
If you want to make the changes you make to the embedded OLE object appear the next
time you run your application, save the OLE data to a file. See “OLE data in files” on
page 395 for more information.
392
Delphi User’s Guide
OLE classes
The class of an OLE object determines the OLE server application that created the OLE
object. Sometimes, you can link or embed more than one type of object from an OLE
server application. For example, you could link or embed an entire spreadsheet, a range
of cells, or a graph from a spreadsheet application. The OLE class also determines which
type of data the OLE object contains.
For example, if the OLE object is a Quattro Pro notebook, the class would be Quattro Pro
Notebook.
Note
The OLE class must be specified for both linked and embedded objects.
OLE documents
The document of an OLE object determines the source file that contains the data for the
OLE object. The object document must be used for a linked object, because linked
objects exist in files. The object document is used for an embedded object only if you
create the object from an existing source file. If you create a new embedded object that
doesn’t yet exist in a file, you would not specify an OLE document.
For example, if the OLE object is linked to the Quattro Pro notebook TUTOR.WB2
stored in the D:\OFFICE\QPW directory, the OLE document would be D:\OFFICE\
QPW\TUTOR.WB2.
Note
The OLE document must be specified only for linked objects. For embedded objects,
only the OLE class should be specified.
OLE items
The item of an OLE object determines what portion of an OLE document contains the
data to link or embed. Items are used when you want the OLE object to contain a smaller
piece of data than an entire document file.
For example, if the OLE object is linked to the cell range B4 to B5 of the page titled
GasCosts in a Quattro Pro notebook, the OLE document would be
$GasCosts:$B$4..$B$5.
Note
The OLE item must be specified only for linked objects. For embedded objects, only the
OLE class should be specified.
Note
You don’t need to use the OLE item if the OLE object will not contain a piece of data
more specific than the file specified in the OLE document.
Creating OLE container applications
OLE container applications simply hold OLE objects.
■
To create an OLE container application, add an OLEContainer component to a form for
every OLE object you want the form to contain.
■
To insert the OLE object at design time, if you have access to the OLE server and data,
you specify the OLE class, and optionally, the document and item:
Chapter 14, Exchanging data with DDE or OLE
393
1 Select the OLEContainer component on your form.
2 Click the ellipsis button for either the ObjClass or ObjDoc property in the Object
Inspector. The Insert Object dialog box appears.
Figure 14.4 The Insert Object dialog box
3 If you want to insert an object that has already been created and saved in a file by the
OLE server, choose Create From File. Specify the file name and path to the OLE object
file. To link the object, select the Link check box.
If you want to embed a new object, choose Create New and select an OLE object from
the Object Type list. You cannot link a new object, since it has not yet been saved as a
file.
4 Choose OK.
If you are creating a new object, the OLE server becomes active. From the OLE server,
you can edit the OLE object. When you have finished creating the OLE object, update
the OLE server and close the OLE object in your OLE container application.
Typically, do this by choosing File|Close or File|Update within the OLE server
application.
5 The ObjClass property now contains the appropriate value for the OLE class, and the
OLEContainer component contains a picture representing the OLE object. If the OLE
object was created from an existing file and you inserted a linked object, the ObjDoc
property contains the appropriate value for the OLE document.
■
If you have access to the OLE server application and data, you can paste an OLE object
containing an OLE item at design time:
1 Activate the server application and select the item to be contained (in the OLE object)
by your OLEContainer component.
2 Copy the data and OLE object information to the Clipboard from the server
application. Typically, do this by choosing Edit|Copy.
3 Activate Delphi and select the OLEContainer component.
394
Delphi User’s Guide
4 Click the ellipsis (...) button for the ObjItem property in the Object Inspector.
The Paste Special dialog box appears with the currently available OLE object in the
As list.
Figure 14.5 The Paste Special dialog box
5 Select the OLE object from the As list.
6 Select Paste to create an embedded object or Paste Link to create a linked object.
7 Choose OK.
The OLEContainer component is now initialized. If you pasted an embedded object,
the ObjClass property now contains the appropriate value for the OLE object. If you
pasted a link to an OLE object in a file, the ObjClass, ObjDoc, and ObjItem properties
are all specified. The OLEContainer component contains a picture representing the
OLE object.
■
If you have access to an OLE server application that supports drag-and-drop of OLE
objects, you can create an OLE container component and embed an OLE object in a form
by dragging the object from the server and dropping it on the form at design time:
1 Activate the server application and select the object to be embedded in the Delphi
form.
2 Drag the OLE object by clicking the mouse button while the mouse pointer is over the
selected object in the server and move the mouse pointer over the design-time form.
3 Drop the OLE object by releasing the mouse button.
An OLE container is created in the form and it is initialized to contain the dropped
OLE object.
Note
For information about initializing OLEContainer components at run time, see
Chapter 15.
OLE data in files
If you want to save changes made to an OLE object from within your OLE container
application, the object data should be saved in a file. If the object is linked, the data is
automatically stored in the original source file, and the object is automatically updated
every time the data changes.
Chapter 14, Exchanging data with DDE or OLE
395
If the object is embedded, however, the original data is stored in the form. To save any
edits to the embedded object, your application must save the data in a special OLE file.
To update an embedded object that has been saved to a file, your application must load
the OLE object from the file. Otherwise, the OLEContainer will contain only the
originally embedded OLE object. The OLE data file is not in the same format used by the
application that created the original OLE object, though.
For example, if your container application saves an embedded spreadsheet to a file, the
OLE server spreadsheet application wouldn’t be able to open your file as a spreadsheet.
Only your OLE container application can use the data saved in this file.
■
To save an OLE object, call the SaveToFile method of the OLEContainer component.
➤
For example, to store the OLE data in a file called SALES.OLE in the C:\TIPPER
directory, execute the following code. The OLEContainer component is named
OleContainer1.
OleContainer1.SaveToFile('C:\TIPPER\SALES.OLE');
■
To obtain OLE data from a file saved with the SaveToFile method, use the LoadFromFile
method.
➤
To load the OLE data from the file saved by the previous code, execute the following
code:
OleContainer1.LoadFromFile('C:\TIPPER\SALES.OLE');
If you attached the code above to the OnCreate event of the form containing the
OLEContainer component, your application would restore the latest version of the OLE
object every time you run your OLE container application.
For an example that uses SaveToFile and LoadFromFile, refer to Chapter 15. Search online
Help for more information about SaveToFile and LoadFromFile.
Comparing DDE and OLE
DDE and OLE are both for sharing data between applications. When should you use
DDE and when should you use OLE?
DDE is good for exchanging distinct text strings. If all you want to know is the
bottom line of a profits spreadsheet, it makes sense to link the cell that contains the
bottom line to a Delphi DDE client application. Then you could output the data in an
edit box or label. DDE protects the data in the spreadsheet by not allowing the user to
activate and edit the spreadsheet from your client application.
OLE is able to exchange more complex information than DDE, such as sounds and
documents. Control transfers to the OLE server application when you activate an
object in your OLE container, so the user can access all the functionality of the server
application from within your container application. The server does all the
processing and you don’t have to program your container to edit the OLE object. This
would be good if you wanted to allow your users to modify the profits spreadsheet
from within your application.
396
Delphi User’s Guide
The final factor in determining when to use DDE and when to use OLE is the
capabilities of the applications involved. Some Windows applications don’t support
DDE. Some don’t support OLE. Other applications can be OLE containers, but can’t
be OLE servers. For more information, see the documentation for the application
with which you want to exchange data.
Summary
This chapter presented these topics:
• DDE conversations
A DDE client application and DDE server application exchange text data in a DDE
conversation. A conversation is defined by its service (name of the server), topic (file
containing the linked data), and item (the actual text to link).
• Creating DDE client applications
To create a DDE client, add a DDEClientConv component and a DDEClientItem
component to a form. Client applications can request to be updated by the server
with the RequestData method. Client applications can poke data (send data to the
server) with the PokeData method. Clients can control the server by running it or
sending macros with the ExecuteMacro method.
• Creating DDE server applications
To create a DDE server, add a DDEServerItem component (and optionally, a
DDEServerConv component) to a form. You can then copy DDE data to the
Clipboard with the CopyToClipboard method and paste the link in the client
application.
• What is OLE?
With OLE you can link or embed OLE objects in a container application. An OLE link
is defined by its class (name of the application that created the object), document
(name of the file containing the object), and item (the portion of the document
containing the OLE object to link).
• Creating OLE container applications
To create an OLE container application, add an OLEContainer component to a form.
Then, you can use the Insert Object dialog box to specify the ObjClass or ObjDoc
properties, and the Paste Special dialog box to specify the ObjItem property. You can
also drag-and-drop from an OLE server to embed an OLE object at design time.
• OLE data in files
You can use the SaveToFile method to save OLE data in a file, and the ReadFromFile
method to read OLE data from a file.
Chapter 14, Exchanging data with DDE or OLE
397
• Comparing DDE and OLE
DDE exchanges text strings between applications and does not give the user access to
the functionality of the source application. OLE can exchange more complex forms of
information, such as documents, and allows the user to activate the source
application to make changes to the data.
More advanced features of OLE such as run-time creation and drag-and-drop of OLE
objects are covered in Chapter 15.
398
Delphi User’s Guide
Chapter
15
OLE example
Chapter 15
Now that you have read the material in Chapter 14, you’re ready to practice exchanging
data with Object Linking and Embedding (OLE) by building a simple application.
This chapter assumes you are familiar with basic OLE terms such as objects, linking,
embedding, and OLE servers. It presents the steps involved in building a simple OLE
container application that allows the user to insert, paste, and drop OLE objects into
Multiple Document Interface (MDI) child windows. The application uses Windows
common dialog boxes to save and open OLE objects.
Note
The material presented in this chapter assumes you are familiar with the MDI
application and common dialog material discussed in Chapter 10. The OLE example is
also an MDI application that uses Windows common dialog boxes, but this example
focuses on creating an OLE container application. If you are unfamiliar with creating
MDI applications or using common dialog boxes, read Chapter 10 first.
The complete application appears under the DEMOS\DOC directory, and is called
OLE.DPR. Figure 15.1 shows the application as it appears the first time a new window is
opened.
Figure 15.1 The completed OLE container application
Chapter 15, OLE example
399
The topics discussed in the context of creating this application are
•
•
•
•
•
Creating the MDI framework
Inserting objects
Pasting objects
Dropping objects
Working with objects in files
Creating the MDI framework
This application will allow the user to create multiple OLE objects, each within its own
MDI child window. This gives the user an easy way to manipulate each object.
When an OLE object is activated, control switches to the OLE server that created the
object. If the server uses OLE 1.0, the server is activated in a separate window. If the
server uses OLE 2.0, the server might activate the object within your container
application window (this is called in-place activation).
Two conditions must be met for an OLE object to activate in place within your OLE
container application:
• The OLE server must support in-place activation.
• The main form of the OLE container application must contain a MainMenu
component.
Note
If you don’t program your container application for in-place activation, an OLE object
that supports in-place activation will be activated in its own window (not in place). See
the documentation for the OLE server for information about whether it supports inplace activation.
This section describes the following steps involved in creating an MDI application
framework for in-place activation of OLE objects:
•
•
•
•
Creating the frame and child forms
Adding the OLE container component
OLE application menus
OLE tool bars and status bars
Creating the frame and child forms
The first step in creating the OLE container application is to create an MDI frame form.
The frame form displays “OLE Example” in the title bar and will contain multiple MDI
child windows.
➤
400
Start by creating a new project. Then use the Object Inspector to set the following
properties of the project’s main form:
Property
Value
Caption
OLE Example
Delphi User’s Guide
Property
Value
FormStyle
fsMDIForm
Name
OLEFrameForm
Next, you need to add an MDI child form. The MDI child will be displayed within
OLEFrameForm at run time.
➤
Add a new form to the project and use the Object Inspector to set the following
properties of the new form:
Property
Value
Caption
FormStyle
Name
OLE Object
fsMDIChild
OLEObjectForm
Since this application will create instances of OLEObjectForm dynamically at run time, it
should not create an instance of OLEObjectForm automatically.
➤
Remove OLEObjectForm from the Auto-create list for the project.
1 Choose Options|Project to display the Project Options dialog box.
2 On the Forms page of the Project Options dialog box, move OLEObjectForm from the
Auto-create forms list box to the Available forms list box.
3 Choose OK.
➤
Save the project now, using the following names:
Default name
Save as
UNIT1.PAS
UNIT2.PAS
OLEFRAME.PAS
OLEOBJ.PAS
PROJECT1.DPR
OLE.DPR
Adding the OLE container component
In this example, a child window can contain an OLE object. You’ll add an OLEContainer
component to OLEObjectForm to contain the OLE object. An OLEContainer component
can contain only one object at a time. To contain more than one OLE object in a form,
you need to add a new OLEContainer for each OLE object. However, this sample
application will contain only one OLE object per OLEObjectForm.
You’ll program the OLEContainer component to contain an actual OLE object at run
time in the section “Inserting objects.”
■
To create an OLE container application, add an OLEContainer component to a form.
Chapter 15, OLE example
401
➤
Add an OLE container component (from the System page of the Component palette) to
OLEObjectForm, and use the Object Inspector to set the following properties of the OLE
container component:
Property
Value
Name
OLEContainer
Top
Left
8
8
Height
Width
96
192
OLE application menus
The menus of an OLE container application behave like the menus of any other nonOLE application until an OLE 2.0 object that supports in-place activation is activated. If
you aren’t familiar with designing menus, see Chapter 3.
When you activate an object created by an OLE 2.0 server application, the server might
try to merge its menus with the menus of your container application, depending on the
OLE server application.
Note
See the documentation for the OLE server for information about whether it attempts
menu merge during in-place activation.
The GroupIndex property of each of the container application’s menus determines where
merging menu items appear in the container’s menu bar. Merged menu items from the
OLE server might replace those on the main menu bar, or they might be inserted beside
existing container application menu items.
The OLE server will merge up to three groups of menu items: the Edit, View, and Help
groups. Each group is distinguished by a unique group index and can contain any
number of menu items. The following table summarizes which menu item groups the
OLE server application will merge:
Source (when OLE
active)
Group
Index
Description
File
0
OLE container application
Edit
Object
1
2
Menu item(s) for using files and exiting the
application
Menu item(s) for editing the active OLE object
Menu item(s) for manipulating the deactivated
OLE object
View
3
OLE server application
Window
Help
4
5
Menu item(s) for modifying the view of the OLE
object
Menu item(s) for manipulating windows
Menu item(s) for accessing the server’s online Help
OLE server application
OLE container application
OLE container application
OLE server application
Any menu items in your container application that have a GroupIndex property value of
1, 3, or 5 will be replaced by the menu items with corresponding index values from the
OLE server application when an OLE object is activated in place. In this example, you’ll
402
Delphi User’s Guide
create an Edit menu item with a GroupIndex value of 1; it will be replaced by an OLE
server’s Edit menu item group when the OLE object is activated.
The menu items from your OLE container that won’t be replaced by the server are any
that have a GroupIndex value other than 1, 3, or 5.
■
To prevent a menu item from an OLE container application from being replaced with
menu items from an OLE server application when an OLE object is activated in place,
assign a value of 0, 2, or 4 (or greater than 5) to the GroupIndex property of the menu
item.
This section describes the following steps involved in creating the menus for the OLE
example:
• Creating the frame form menu
• Creating the child form menu
Creating the frame form menu
■
To allow OLE objects to be activated in place, the main form of an application must
contain a MainMenu component.
➤
To create the OLEFrameForm menu,
1 Add a MainMenu component (from the Standard page of the Component palette) to
OLEFrameForm, and open the Menu Designer.
2 Create the File menu title and underlying menu items as shown in the following
table. For each menu item, specify the values for the Caption property, and accept the
values Delphi creates for the Name property.
&File
&New
&Open...
- <hyphen>
E&xit
By default the value of the GroupIndex property for the File menu title is 0, which is what
you want. Later in the example, when you activate an OLE object, the menus merged
from the OLE server application will be inserted to the right of the File menu because
their index values are greater than 0.
Next, you will program the sample application to create and show a new
OLEObjectForm window.
➤
To be able to create OLE object forms, the unit where OLEObjectForm is declared must
be referenced by the OLEFrame unit. Add the OLEObj unit name to the uses clause of the
interface section of the OLEFrame unit.
interface
uses ... , OLEObj;
{Refer to unit OLEOBj.PAS}
Chapter 15, OLE example
403
type
ƒ
➤
Write the following CreateChild method in the implementation part of the OLEFrame
unit. This method will be called by the File|New OnClick event handler, so you won’t
use the Object Inspector to generate it.
function TOLEFrameForm.CreateChild: TOLEObjectForm;
begin
CreateChild := TOLEObjectForm.Create(Self);
end;
{Create the OLEObjectForm window}
You need to declare CreateChild in order to call it at run time:
➤
Add the following line to the private part of the TOLEFrameForm type declaration in the
interface part of the OLEFrame unit:
interface
ƒ
type
TOLEFrameForm = class(TForm)
ƒ
private
function CreateChild: TOLEObjectForm;
public
{ Public declarations }
end;
ƒ
{Add this line to declare CreateChild function}
Next, you will attach the CreateChild method to the OnClick event of the File|New menu
item.
➤
Write the following event handler for the OnClick event of the File|New item on the
OLEFrameForm menu bar.
procedure TOLEFrameForm.New1Click(Sender: TObject);
begin
CreateChild
end;
{Call the CreateChild method}
The code to create an OLEObjectForm child window was put in a separate method
because it will also be called from the OnDragDrop event handler of OLEFrameForm
(discussed in “Dropping objects”), as well as from the OnClick event handler for the
File|Open menu item (discussed in “Working with objects in files”). This way, the child
window creation code can be shared.
Next, you’ll write the code to exit the application.
➤
Write the following event handler for the OnClick event of the File|Exit item on the
OLEFrameForm menu bar.
procedure TOLEFrameForm.Exit1Click(Sender: TObject);
begin
Close
{close the main form, which terminates the application}
end;
404
Delphi User’s Guide
You’ll write the event handler for the File|Open item later in the example, in the section
“Loading objects from files.”
➤
Save the project now, then run it:
1 Choose File|New to create a new OLE Object window.
The application should resemble 2.
2 Choose File|Exit to close the application.
Figure 15.2 The OLEFrameForm and OLEObjectForm windows
Creating the child form menu
The menu items in OLEObjectForm provide users with ways to manipulate the object
and object window in the running application. At run time, the File menu from
OLEObjectForm replaces the File menu from OLEFrameForm. The other menu items from
OLEObjectForm will be merged with the menu bar of OLEFrameForm.
➤
To create the OLEObjectForm menu,
1 Add a MainMenu component to OLEObjectForm and open the Menu Designer.
2 Create the File, Edit, Object, and Window menu titles and underlying menu items as
shown in the following table. For each menu item, specify the value for the Caption
property, and accept the values Delphi creates for the Name property.
&File
&Edit
&Object
&New
&Open...
&Save As...
&Insert Object...
&Paste Special...
- <hyphen>
&Deactivate
- <hyphen>
E&xit
&Object
&Window
&Cascade
&Tile
&Arrange Icons
3 Specify the GroupIndex property values for the File, Edit, Object, and Window menu
titles as shown in the following table:
Menu
GroupIndex
File
Edit
0 (default)
1
Chapter 15, OLE example
405
Menu
Note
GroupIndex
Object
2
Window
4
The GroupIndex property of the Edit menu has the same value (1) as the index of the Edit
menu group from the OLE server. When an OLE object is activated in place, the Edit
menu item group from the OLE server replaces the Edit menu from OLEObjectForm. The
other menu item groups from the OLE server are merged with the menu of
OLEObjectForm.
The OnClick event handlers for the New and Exit menu items on the File menu of the
OLEObjectForm menu bar simply call the corresponding event handlers of the
OLEFrameForm menu bar.
➤
To be able to call methods of OLEFrameForm, the unit where OLEFrameForm is declared
must be referenced by the OLEObj unit. Add a uses clause to the implementation part
of the OLEObj unit, and refer to the OLEFrame unit.
implementation
uses OLEFrame;
ƒ
Note
➤
{Refer to unit OLEFRAME.PAS}
Do not add OLEFrame to the uses clause in the interface section of OLEObj. This would
cause a circular unit reference error at compile time.
Write the following event handler for the OnClick event of the File|New item on the
OLEObjectForm menu bar:
procedure TOLEObjectForm.New1Click(Sender: TObject);
begin
OLEFrameForm.New1Click(Sender)
{Call OLEFrameForm's File|New handler}
end;
➤
Write the following event handler for the OnClick event of the File|Exit item on the
OLEObjectForm menu bar:
procedure TOLEObjectForm.Exit1Click(Sender: TObject);
begin
OLEFrameForm.Exit1Click(Sender)
{Call OLEFrameForm's File|Exit handler}
end;
The OnClick event handlers for the Tile, Cascade, and Arrange Icons menu items on the
Window menu of the OLEObjectForm menu bar call the corresponding method of
OLEFrameForm. These methods simply control the appearance of the OLEObjectForm
MDI child window(s).
➤
Write the following event handler for the OnClick event of the Window|Cascade item
on the OLEObjectForm menu bar:
procedure TOLEObjectForm.Cascade1Click(Sender: TObject);
begin
OLEFrameForm.Cascade
{Cascade the MDI children of OLEFrameForm}
end;
406
Delphi User’s Guide
➤
Write the following event handler for the OnClick event of the Window|Tile item on the
OLEObjectForm menu bar:
procedure TOLEObjectForm.Tile1Click(Sender: TObject);
begin
OLEFrameForm.Tile
{Tile the MDI children of OLEFrameForm}
end;
➤
Write the following event handler for the OnClick event of the Window|Arrange Icons
item on the OLEObjectForm menu bar:
procedure TOLEObjectForm.ArrangeIcons1Click(Sender: TObject);
begin
OLEFrameForm.ArrangeIcons
{Arrange the icons of the MDI chilren of OLEFrameForm}
end;
You’ll write the OnClick event handlers for the Edit and Object menu items, as well as
for File|Open and File|Save As later in the example.
The OLE object menu item
The Edit|Object menu command of the OLEObjectForm menu bar is a special menu
item. It will be the OLE object menu item. This item enables the user to open, edit, or
convert an OLE object when an OLE container containing an object is selected at run
time. You don’t program your OLE container application for this functionality; it comes
from OLE itself.
■
To designate a menu item as the OLE Object menu item, assign the name of the menu
item to the ObjectMenuItem property of the form that owns the menu item.
➤
To make the Edit|Object menu command the OLE object menu item,
1 Open the Menu Designer for the menu of OLEObjectForm.
2 Change the value of the Name property of the Edit|Object menu item from Object1 to
OLEObjectMenuItem.
This is simply to make this menu command easier to identify. The OLE object menu
item can have any valid value for its Name property, including Object1.
3 In the Object Inspector, change the value of the OLE object form’s ObjectMenuItem
property to OLEObjectMenuItem.
➤
Save the project now, then run it:
1 Choose File|New to create a new OLE Object window.
The application should look like Figure 15.3. Note that the OLEObjectForm menu has
merged with the OLEFrameForm menu.
2 Choose the various menu commands of the application.
The Window menu commands should control the appearance of any OLEObjectForm
MDI child windows. Note that the Edit|Object menu item is disabled automatically,
because OLEContainer does not contain an OLE object yet.
Chapter 15, OLE example
407
3 Choose File|Exit to close the application.
Figure 15.3 The OLE container application menu
OLE tool bars and status bars
When an OLE object is activated in place, the OLE server might try to replace the
container application’s tool bar and status bar messages with its own, depending on the
OLE server application. If you intend the container application to contain OLE objects
that can be activated in place, you should program your application to allow the OLE
server to use your container’s tool bar and status bar.
This section describes the following steps involved in allowing an OLE server to use the
tool bar and status bar of your container application:
• Setting up tool bars and status bars
• Adding the tool bar to the container application
• Adding the status bar to the container application
Setting up tool bars and status bars
Usually, you create tool bars and status bars by modifying Panel components. When an
OLE object is activated in place, Panels (and any other aligned controls) are candidates
for client-space negotiation with the OLE server. This means that the OLE server can
replace controls (except those that have been locked) aligned to any edge of the client
area of a form of the OLE container application. For example, if a Panel is aligned alTop,
alLeft, alBottom, or alRight and is not locked, the OLE server can replace it. If the Panel is
aligned alClient or alNone, the OLE server will not replace it.
■
To prevent an OLE server application from replacing the tool bar or status bar of an OLE
container application, lock the tool bar or status bar Panel by assigning True to its Locked
property.
Adding the tool bar
You create a tool bar for OLE in-place activation the same way you create a tool bar for a
non-OLE application. If you are unfamiliar with creating tool bars, see Chapter 12 for
information about this process.
■
408
To allow an OLE server to replace the tool bar of an OLE container application with its
own when an OLE object is activated in place, assign alTop, alBottom, alLeft, or alRight to
the Align property of a Panel component which is not locked.
Delphi User’s Guide
➤
Add a Panel component (from the Standard page of the Component palette) to
OLEFrameForm and use the Object Inspector to set the following properties of the panel
component:
Property
Note
Value
Name
ToolBarPanel
Align
Caption
alTop
<Blank>
Locked
False (default)
The OLE server will replace ToolBarPanel when an OLE object is activated in place
because the control is not locked.
Adding the status bar
You create a status bar for OLE in-place activation the same way you create a status bar
for a non-OLE application. If you are unfamiliar with creating status bars, see Chapter
12 for information about this process.
➤
Note
Add another Panel component to the OLEFrameForm and use the Object Inspector to set
the following properties of the panel component:
Property
Value
Name
Align
StatusBarPanel
alBottom
Caption
Locked
<Empty string>
True
The OLE server cannot replace StatusBarPanel when an OLE object is activated in place
because the control is locked.
When an OLE object is active and the OLE server has a message to display in the status
bar, an OnStatusLineEvent event of the OLE container component occurs. A text string is
passed from the OLE server to this event handler. The Msg parameter of the
OnStatusLineEvent event handler contains the text from the OLE server.
■
To display status bar messages from OLE server applications, assign the value of the
Msg parameter of the OnStatusLineEvent handler to the Caption property of the status
bar panel.
➤
Write the following event handler for the OnStatusLineEvent event of OLEContainer in
OLEObjectForm:
procedure TOLEObjectForm.OleContainerStatusLineEvent(Sender: TObject; Msg: String);
begin
OLEFrameForm.StatusBarPanel.Caption := Msg
{Display Msg in status bar}
end;
➤
Save the project now, then run it.
Chapter 15, OLE example
409
The application should look like Figure 15.4.
➤
Choose File|Exit to close the application.
Figure 15.4 The OLE container application tool bar and status bar
Inserting objects
At this point, the OLE example application is ready to contain OLE objects. This section
describes the following steps involved in inserting OLE objects at run time:
• Using the Insert Object dialog box
• Initializing the OLE container
• Deactivating objects
Using the Insert Object dialog box
To insert an OLE object into an OLEContainer component, use the Insert Object dialog
box. Recall from Chapter 14 that specifying the ObjClass or ObjDoc property of an
OLEContainer component at design time displays the Insert Object dialog box. At run
time, the InsertOLEObjectDlg function displays the Insert Object dialog box. Figure 15.5
shows this dialog box.
Figure 15.5 The Insert Object dialog box
Note
410
InsertOLEObjectDlg is an independent function, not a method of the OLEContainer
component.
Delphi User’s Guide
To see the parameters used with InsertOLEObjectDlg, examine its declaration:
function InsertOleObjectDlg(Form: TForm; HelpContext: THelpContext;
var PInitInfo: Pointer): Boolean;
The parameters of InsertOLEObjectDlg are as follows:
• Form is the form that owns the Insert Object dialog box. In the Form parameter, pass
the name of the form that contains the OLEContainer component.
• HelpContext is used to identify the Insert Object dialog box for online Help. If your
application is not programmed for online Help, pass 0 (zero) for HelpContext. Then a
Help button won’t appear in the Insert Object dialog box. Pass an integer other than 0
to use HelpContext as the context-sensitive online Help identification number for the
dialog box.
• PInitInfo is a pointer to an internal data structure of OLE initialization information
necessary to initialize the OLE container. (The internal details of the data structure
are not documented here, as this information is meaningful only to the OLE container
component.) InsertOLEObjectDlg modifies this pointer so that it points to a valid
structure containing initialization information for the OLE object selected in the
Insert Object dialog box. After the pointer has been used, you should deallocate the
memory set aside for the OLE initialization information by calling the
ReleaseOLEInitInfo procedure.
■
To enable the user to select an OLE object from the Insert Object dialog box, use the
InsertOLEObjectDlg function to call the Insert Object dialog box.
You’ll write the code to do this in the next section, but you should first have an
understanding of the options available in this dialog box.
• To embed an object that has already been created and saved in a file by the OLE
server, the user chooses Create From File, specifying the file name and path to the
OLE object file.
• To link an object that has already been created and saved in a file by the OLE server,
the user follows the previous step, also selecting the Link check box.
• To embed a new object, the user chooses Create New and selects an OLE object type
from the Object Type list. The user cannot link a new object, as it has not yet been
saved as a file.
• To display the linked or embedded object as an icon, the user checks the Display As
Icon check box.
The Change Icon button appears when Display As Icon is checked.
• To change the default icon or the label of the OLE object, the user chooses Change
Icon.
When the user chooses OK to close the Insert Object dialog box, InsertOLEObjectDlg
returns True. It then stores the information necessary to initialize the OLE container in
the data structure pointed to by the PInitInfo parameter.
Chapter 15, OLE example
411
Initializing the OLE container
In order to contain an OLE object in an OLEContainer component, you need to initialize
the component. Initializing the component means the OLE class is specified, as well as
the OLE document (if the object is linked) and the OLE item (if the object is a more
specific unit of data than is specified by the OLE document). After initialization, the
OLEContainer component contains the OLE object.
■
To initialize an OLEContainer component, notify the OLEContainer where the OLE
initialization information exists.
Assigning the pointer passed in the PInitInfo parameter of InsertOLEObjectDlg to the
PInitInfo property of the OLEContainer component initializes the component. The
ObjClass, ObjDoc, and ObjItem properties of the component is specified automatically.
When you initialize the OLE container component, the OLE object is activated. The OLE
server will take control, and the user can edit the object through the OLE server. After
you deactivate the OLE object, an initialized OLE container component contains a
picture representing the OLE object or an icon. The object can be reactivated in the
manner specified by the AutoActivate property of the OLEContainer component. By
default, activate the OLE object by double-clicking the OLEContainer component.
Next, you will write code to initialize the OLEContainer. You will write code to specify
the Info parameter later, with a call to InsertOLEObjectDlg in the OnClick event handler
for Edit|Insert Object.
➤
Open the Code Editor, and write the following InitializeOLEObject method in the
implementation part of the OLEObj unit. This method is called by an event handler, so
you won’t use the Object Inspector to generate it. Note that after initialization, the
allocated memory is freed with ReleaseOLEInitInfo.
procedure TOLEObjectForm.InitializeOLEObject(Info: Pointer);
begin
OLEContainer.PInitInfo := Info;
{Initialize the container by pointing to Info}
ReleaseOLEInitInfo(Info)
end;
You need to declare InitializeOLEObject in order to call it at run time.
➤
Add the following line to the private part of the TOLEObjectForm type declaration in the
interface part of the OLEObj unit.
interface
ƒ
type
TOLEObjectForm = class(TForm);
ƒ
private
procedure InitializeOLEObject(Info: Pointer);
public
ƒ
end;
ƒ
412
Delphi User’s Guide
{Add this line to declare procedure}
Next, you will attach InitializeOLEObject to the OnClick event for the Edit|Insert Object
menu item.
➤
Write the following event handler for the OnClick event of the Edit|Insert Object menu
item on the OLEObjectForm menu bar.
procedure TOLEObjectForm.InsertObject1Click(Sender: TObject);
var
Info: Pointer;
{Declare the pointer to the OLE initialization info}
begin
if InsertOLEObjectDlg(OLEFrameForm, 0, Info) then
{Insert Object dialog box}
InitializeOLEObject(Info);
{Initialize the OLE object}
end;
The code to initialize the OLE container was put in a separate method because it will
also be called from the OnClick event handler for Edit|Paste Special (discussed in
“Pasting objects”). This way, the OLE container initialization code can be shared.
Deactivating objects
If the OLE object was created by an OLE 1.0 server, it is activated in the OLE server’s
window. Focus and control transfer to the OLE server when an OLE object is activated
within its own window.
■
To deactivate an OLE object created by an OLE 1.0 server, choose the OLE server’s File|
Exit command (or its equivalent in the command structure of the OLE server).
If the OLE object was created by an OLE 2.0 server, it might activate in the OLE
container application’s window (if the OLE server application supports in-place
activation and you’ve added a MainMenu component to the main form of your
container application). The File|Exit command from the OLE server isn’t available
because the available File menu (or any menu with a GroupIndex of 0) is from the OLE
container application.
■
To deactivate an OLE object created by an OLE 2.0 server, focus must shift to a control in
the OLE container application other than the OLEContainer component containing the
active OLE object. You can also deactivate the object by clicking in the client area of the
form that contains the OLEContainer.
Note
Shifting focus to another control does not deactivate an OLE object activated in its own
window (rather than in place). Also, shifting focus to a menu item does not deactivate
an OLE object.
■
Another way to deactivate an in-place active OLE object is to set the value of the Active
property of the OLEContainer component to False.
In the sample application, use the Object|Deactivate menu command from the menu
bar of OLEObjectForm to do this. Recall that the Object menu was given a GroupIndex
property value of 2, so it is still available when an OLE server merges menus with the
OLE container application.
➤
Write the following event handler for the OnClick event of the Object|Deactivate item
on the OLEObjectForm menu bar.
Chapter 15, OLE example
413
procedure TOLEObjectForm.Deactivate1Click(Sender: TObject);
begin
OLEContainer.Active := False
end;
➤
{Deactivate the OLE object}
Save the project now, then run it.
1 Choose File|New to display an OLE Object window.
2 Choose Edit|Insert Object to display the Insert Object dialog box.
3 Choose an object to link or embed, then choose OK.
4 If the object is activated in place, choose Object|Deactivate to deactivate an OLE
object.
If the object is activated in its own window (rather than in place), choose File|Exit (or
its equivalent in the command structure of the OLE server application) to deactivate
the object.
The OLEContainer is initialized and contains a picture representing the OLE object.
For example, if you chose to insert a Windows Paintbrush picture object, the OLE
Object window contains the object as in Figure 15.6.
Note
If the Insert As Icon check box of the Insert OLE Object dialog box is checked, the
OLE object is inserted as an icon representing the server application associated with
the object. An object inserted as an icon is always activated in its own window, rather
than in place.
Figure 15.6 A Paintbrush picture OLE object
5 Double-click the OLEContainer component.
Because the AutoActivate property of the OLEContainer component has not been
changed from its default value (aaDoubleClick), this reactivates the OLE object.
6 Experiment with creating new OLE Object windows and embedding and linking
OLE objects with the Edit|Insert Object command.
7 Choose File|Exit to close the application.
414
Delphi User’s Guide
Pasting objects
Some OLE server applications allow the user to copy or cut OLE objects to the
Clipboard. If an OLE object is stored on the Clipboard, you can initialize an
OLEContainer by allowing the user to use the Paste Special dialog box to paste the
object into the OLE container application.
This section describes the following steps involved in pasting OLE objects at run time:
• Using the Paste Special dialog box
• Using OLE objects with the Clipboard
• Pasting the OLE object
Using the Paste Special dialog box
To paste an OLE object into an OLEContainer component, use the Paste Special dialog
box. Recall from Chapter 14 that specifying the ObjItem property of an OLEContainer
component at design time displays the Paste Special dialog box. At run time, the
PasteSpecialDlg function displays the Paste Special dialog box. Figure 15.7 shows this
dialog box.
Figure 15.7 The Paste Special dialog box
Note
PasteSpecialDlg is an independent function, not a method of the OLEContainer
component.
To see the parameters used with PasteSpecialDlg, examine its declaration:
function PasteSpecialDlg(Form: TForm; const Fmts: array of BOleFormat;
HelpContext: THelpContext; var Format: Word; var Handle: THandle;
var PInitInfo: Pointer): Boolean;
The parameters of PasteSpecialDlg are as follows:
• Form is the form that owns the Paste Special dialog box. You should pass the name of
the form that contains the OLEContainer component in the Form parameter.
• Fmts is the array of object formats to register. Each format is specified by an array
element of type BOLEFormat. For this example, you will register two object formats:
FEmbedClipFmt for embedded OLE objects and FLinkClipFmt for linked OLE objects.
Chapter 15, OLE example
415
To understand more about object formats, examine the declaration of the
BOLEFormat record:
BOleFormat = Record
fmtId: Word; { Clipboard format id }
fmtName: array [0..31] of char; { for paste special listbox - %s if ole fmt }
fmtResultName: array [0..31] of char; { for paste special results box - %s if ole fmt}
fmtMedium: BOleMedium; { based upon clip format id }
fmtIsLinkable: Bool;
end;
The fields of BOLEFormat are as follows:
• fmtId is the Clipboard format ID of the object format. fmtId can be the standard
Clipboard formats such as CF_TEXT and CF_BITMAP. (See the HasFormat or
Formats property in online Help for more information about standard Clipboard
formats.) For OLE objects, however, you should register new Clipboard formats to
handle OLE objects. You do this with the RegisterClipboardFormat Windows API
function.
• fmtName is the name of the object. This field specifies the name of the object to
appear in the list box of the Paste Special dialog box. For this example, you should
assign ‘%s’ to fmtName. The format name from the OLE server application is
automatically substituted for ‘%s’ for each object. For example, if the OLE server is
Paintbrush, ‘Paintbrush Picture Object’ will be substituted for ‘%s’ at run time.
• fmtResultName specifies the name to appear in the Results box of the Paste Special
dialog box. For this example, you should assign ‘%s’ to fmtResultName. The format
result name from the OLE server application is automatically substituted for ‘%s’
for each OLE object. For example, if the OLE server is Paintbrush, ‘Paintbrush
Picture’ is substituted for ‘%s’ at run time.
• fmtMedium is of type BOLEMedium. This is simply a numeric constant used by
Windows to determine the type of data of an object format. You should use
BOLE_MED_STREAM for linked OLE objects and BOLE_MED_STORAGE for
embedded OLE objects. You use the BOLEMediumCalc function to calculate the
BOLEMedium type required for this field. Search online Help for BOLEMedium for
more information about the BOLEMedium type.
• fmtIsLinkable determines if the object format is linkable. Set fmtIsLinkable to True for
linked OLE objects, or False for embedded OLE objects.
• HelpContext is used to identify the Paste Special dialog box for online Help. If your
application is not programmed for online Help, pass 0 (zero) for HelpContext. Then a
Help button won’t appear in the Paste Special dialog box. Pass an integer other than 0
to use HelpContext as the context-sensitive online Help identification number for the
dialog box.
• Format is modified by PasteSpecialDlg to specify the Clipboard format of the data on
the Clipboard. Since you can’t be sure what type of data is on the Clipboard when the
Paste Special dialog box is used, use Format to determine how to process the data on
the Clipboard. Pass a variable of type Word in this parameter. For this example,
PasteSpecialDlg will modify this variable to specify either the FEmbedClipFmt or
FLinkClipFmt formats registered in the OnCreate event of OLEFrameForm (this is
discussed in the section “Registering Clipboard formats”). If the data on the
416
Delphi User’s Guide
Clipboard is not an OLE object, Format will be modified to specify some other format
of data (such as CF_TEXT for text data).
• Handle is modified by PasteSpecialDlg to specify the handle of the data on the
Clipboard. Use Handle to access the Clipboard data if it is of some type other than an
OLE object, such as text. Pass a handle variable in the Handle parameter. For this
example, you will only process the pasting of OLE objects, so the value of the Handle
parameter is not important.
• PInitInfo is a pointer to an internal OLE object initialization information structure,
which is required to initialize the OLE container in the same way as described in
“Initializing the OLE container.” You should pass a pointer in the Info parameter.
PasteSpecialDlg modifies this pointer so that it points to a valid data structure
containing initialization information for the OLE object selected in the Paste Special
dialog box.
■
To enable the user to paste an OLE object from the Paste Special dialog box, use the
PasteSpecialDlg function to call the Paste Special dialog box.
You’ll write the code to do this in the following section, but you should first have an
understanding of the options available in this dialog box.
• To insert the contents of the Clipboard into the OLE container application, so that the
data is embedded, the user chooses Paste.
• To create a link between the OLE server source file and the OLE container
application, so that the data is linked, the user chooses Paste Link. Recall that linked
data must exist in an external file.
• To display the linked or embedded object as an icon, the user chooses Display As
Icon.
When this check box is checked, the Change Icon button appears.
To change the default icon or the label of the OLE object, the user chooses Change
Icon.
• If the data is not one of the registered formats, the Paste and Paste Link options are
disabled in the Paste Special dialog box. The user won’t be allowed to paste data from
the Clipboard. For this example, the data on the Clipboard must be of type
FEmbedClipFmt (embedded OLE object) or FLinkClipFmt (linked OLE object).
• The user chooses the type of data from the As list. Sometimes, data might be
interpreted in a variety of ways. For example, if you copy text from some word
processor OLE servers, you could choose to paste the data as text or as an OLE object.
The values of the As list are determined by the OLE server application.
When the user chooses OK to close the Paste Special dialog box, PasteSpecialDlg returns
True. It then stores the information necessary to initialize the OLE container in the data
structure pointed to by the PInitInfo parameter.
Using OLE objects with the Clipboard
This section discusses the following steps involved in registering and specifying the
object formats for pasting:
Chapter 15, OLE example
417
• Registering Clipboard formats
• Specifying OLE formats
Registering Clipboard formats
OLE objects should be registered with Windows as Clipboard formats. Before you can
paste an OLE object into the OLEContainer component, you need to register two new
Clipboard formats for linked and embedded OLE objects with the Windows API
function RegisterClipboardFormat. These formats can then be used in the fmtId field of the
BOLEFormat record.
■
To register a Clipboard format for OLE objects, call RegisterClipboardFormat. Pass a
description of the format as a parameter. RegisterClipboardFormat returns a Word value
that uniquely identifies the newly registered format.
Next, you’ll write code to register two new Clipboard formats for linked and embedded
OLE objects, using RegisterClipboardFormat.
➤
RegisterClipboardFormat returns a Word value identifying the registered Clipboard
format. Declare FEmbedClipFmt and FLinkClipFmt in the private part of the
OLEFrameForm type declaration, before the declaration of the CreateChild method:
type
TOLEFrameForm = class(TForm)
ƒ
private
FEmbedClipFmt: Word;
{Declare the embedded OLE object Clipboard format}
FLinkClipFmt: Word;
{Declare the linked OLE object Clipboard format}
function CreateChild: TOLEObjectForm;
public
{ Public declarations }
end;
➤
For this example, the OLE object Clipboard formats should be registered as soon as the
user runs the application. Therefore, attach the following code to the OnCreate method
of OLEFrameForm:
procedure TOLEFrameForm.FormCreate(Sender: TObject);
begin
FEmbedClipFmt := RegisterClipboardFormat('Embedded Object');
FLinkClipFmt := RegisterClipboardFormat('Link Source');
end;
Note
You can pass any valid string as a parameter to RegisterClipboardFormat. ‘Embedded
Object’ and ‘Link Source’ are appropriate choices used for this example, since that’s the
purpose of the formats being registered. Search for RegisterClipboardFormat in online
Help for more information.
Specifying OLE formats
To specify which objects to allow the user to paste, you pass an array of object formats in
the Fmts parameter of the PasteSpecialDlg method. Each format is specified in a
BOLEFormat record.
418
Delphi User’s Guide
It is possible to register standard Clipboard formats as well as OLE formats for pasting.
For example, to register text as a paste format, specify CF_TEXT for the value of the
fmtId field and BOLE_MED_HGLOBAL for the value of the fmtMedium field of a
BOLEFormat record. (You can use the BOLEMediumCalc function to let Delphi calculate
the fmtMedium value depending on which Clipboard format you’re specifying.) Then, if
the user copies text from another application and pastes it on your application, your
application can process the pasted text. For this example, however, you will register
only two formats: one for linked OLE objects and one for embedded OLE objects.
■
To specify OLE object formats, specify the fields of a BOLEFormat record for each object
format:
• fmtId should be the Clipboard format (previously registered with
RegisterClipboardFormat).
• fmtMedium should be BOLE_MED_STORAGE for embedded OLE objects or
BOLE_MED_STREAM for linked OLE objects. Pass the Clipboard format for which
you need a BOLEFormat as a parameter of BOLEMediumCalc. That function will
return the correct value for any valid Clipboard format, including the ones you
registered for embedded and linked OLE objects.
• fmtIsLinkable should be False for embedded objects and True for linked objects.
• fmtName should be ‘%s’, copied into a null-terminated string by the StrPCopy
function. This will be replaced by the object name from the source at run time
automatically.
• fmtResultName should be ‘%s’, also copied into a null-terminated string by StrPCopy.
This will be replaced by the results name from the source at run time automatically.
Next, you will specify an array of BOLEFormat records which you will use with
PasteSpecialDlg later.
➤
The BOLEFormat type is declared in the BOLEDefs unit, and the BOLEMediumCalc
function is declared in the TOCtrl unit. Add these units to the uses clause of the
interface part of the OLEFrame unit:
interface
uses ... , BOLEDefs, TOCtrl;
{Refer to unit BOLEDefs}
type
ƒ
➤
Declare the Fmts array in the public part of the OLEFrameForm type declaration. Fmts is
public instead of private for this example because it is referenced from the OLEObj unit.
type
TOLEFrameForm = class(TForm)
ƒ
private
ƒ
public
Fmts: array[0..1] of BOleFormat;
end;
{Declare the array of OLE formats}
Chapter 15, OLE example
419
➤
Attach the following code to the OnCreate method of OLEFrameForm, after the calls to
RegisterClipboardFormat:
procedure TOLEFrameForm.FormCreate(Sender: TObject);
begin
FEmbedClipFmt := RegisterClipboardFormat('Embedded Object');
FLinkClipFmt := RegisterClipboardFormat('Link Source');
Fmts[0].fmtId := FEmbedClipFmt;
{Embedded OLE object Clipboard format}
Fmts[0].fmtMedium := BOLEMediumCalc(FEmbedClipFmt); {Medium for embedded objects}
Fmts[0].fmtIsLinkable := False;
{No linking to OLE server}
StrPCopy (Fmts[0].fmtName, '%s');
{Name from OLE server}
StrPCopy (Fmts[0].fmtResultName, '%s');
{Result name from OLE server}
Fmts[1].fmtId := FLinkClipFmt;
{Linked OLE object Clipboard format}
Fmts[1].fmtMedium := BOLEMediumCalc(FLinkClipFmt); {Medium for linked objects}
Fmts[1].fmtIsLinkable := True;
{Allows linking to OLE server}
StrPCopy (Fmts[1].fmtName, '%s');
{Name from OLE server}
StrPCopy (Fmts[1].fmtResultName, '%s');
{Result name from OLE server}
end;
Pasting the OLE object
Before pasting the OLE object, you should determine if there is an OLE object on the
Clipboard.
■
To determine if the Paste Special dialog box is enabled, call PasteSpecialEnabled. This
function determines if any of the Clipboard formats specified in the Fmts array are on
the Clipboard. If so, the Paste Special dialog box is enabled and PasteSpecialEnabled
returns True.
To paste an OLE object into the OLE example application, you need to initialize the
OLEContainer component in the same way you did in “Initializing the OLE container.”
➤
Write the following event handler for the OnClick event of the Edit|Paste Special menu
item on the OLEObjectForm menu bar.
procedure TOLEObjectForm.PasteSpecial1Click(Sender: TObject);
var
ClipFmt: Word;
{Declare the Windows Clipboard format variable}
DataHand: THandle;
{Declare the Windows Clipboard data handle variable}
Info: Pointer;
{Declare the pointer to the OLE initialization info}
begin
if PasteSpecialEnabled(Self, OLEFrameForm.Fmts) then
{If there is something to paste}
if PasteSpecialDlg(OLEObjectForm, OLEFrameForm.Fmts, 0,
{Paste Special dialog box}
ClipFmt, DataHand, Info) then
InitializeOLEObject(Info)
{Initialize the OLE object}
end;
You should enable the Edit|Paste menu item only when the Paste Special dialog box is
enabled.
➤
420
Write the following event handler for the OnClick event of the Edit menu item on the
OLEObjectForm menu bar.
Delphi User’s Guide
procedure TOLEObjectForm.Edit1Click(Sender: TObject);
begin
PasteSpecial1.Enabled := PasteSpecialEnabled(Self, OLEFrameForm.Fmts)
end;
➤
Save the project now, then run it.
1 Choose File|New to display an OLE Object window.
2 Activate an OLE server application and copy an OLE object to the Clipboard.
3 From the OLE example application, choose Edit|Paste Special to display the Paste
Special dialog box.
4 Choose an object to link or embed by pasting, then choose OK.
The OLE container in the OLE Object window is initialized. You can activate the OLE
object by double-clicking the OLE container component.
5 Choose File|Exit to close the application.
Dropping objects
Dragging OLE objects from an OLE server application and dropping them on the OLE
container application is an easy way to link or embed an OLE object into the OLE
example application. By dragging and dropping, the user isn’t required to use the Insert
Object or Paste Special dialog box to specify an OLE object. The user simply “grabs” the
OLE object from the OLE server with the mouse, drags it over the OLE example
application, and drops it by releasing the mouse button.
Note
The material presented in this section assumes you are familiar with the general
concepts of drag-and-drop covered in Chapter 13. The OLE example also uses dragand-drop, but this example focuses on the registration of OLE object formats. If you are
unfamiliar with drag-and-drop in general, you should read Chapter 13 first.
This section describes the following steps involved in dragging-and-dropping OLE
objects onto the OLE example application:
• Registering a form as an OLE drop target
• Dropping an OLE object onto the OLE example application
Registering a form as an OLE drop target
To accept dropped OLE objects, a form should be registered with Windows as an OLE
drop target. Use the RegisterFormAsOLEDropTarget function to do this. To see the
parameters used with RegisterFormAsOLEDropTarget, examine its declaration:
procedure RegisterFormAsOleDropTarget(Form: TForm; const Fmts: array of BOleFormat);
The parameters of RegisterFormAsOLEDropTarget are as follows:
• Form is the form to be registered as a possible drop target for OLE objects. For this
example, you should pass OLEObjectForm in the Form parameter.
Chapter 15, OLE example
421
• Fmts is the array of object formats to register. This is an array of type BOLEFormat,
identical in purpose to the Fmts array used with PasteSpecialDlg in the section
“Pasting objects.” Each type of data to be dropped must be registered by having a
corresponding BOLEFormat element of the Fmts array. For this example, you will use
the same Fmts array that has been declared in the OnCreate event of OLEFrameForm,
which registers two formats, one for linked objects and one for embedded OLE
objects. However, if you wanted to be able to drop types of data other than OLE
objects (such as text), then Fmts would require an additional element for each other
type of data. For example, if you also wanted to allow the dropping of text, Fmts
should have a third element with a fmtId field value of CF_TEXT and a
corresponding BOLEMedium field value of BOLE_MED_HGLOBAL.
Note
The fmtName and fmtResultName fields of BOLEFormat are not used when dragging and
dropping OLE objects. They are required fields only for pasting objects. For this
example, both pasting and dropping should be enabled, so they should be specified as
they are in the OnCreate event of OLEFrameForm. However, if you wanted to allow dragand-drop but not pasting in another application, you could leave them uninitialized.
■
To register a form as an OLE drop target, call RegisterFormAsOLEDropTarget. Specify the
object types you want to allow to be dropped on the form in the Fmts parameter.
Note
To use RegisterFormAsOLEDropTarget, the TOCtrl unit must be referenced in the uses
clause of the unit. Since you already added this reference for OLEFrame in order to call
BOLEMediumCalc, nothing needs to be done to the OLE example application. For other
applications, remember to refer to TOCtrl.
➤
Attach the following code to the OnCreate method of OLEFrameForm, after the
specification of the Fmts array elements:
procedure TOLEFrameForm.FormCreate(Sender: TObject);
begin
ƒ
RegisterFormAsOleDropTarget(Self, Fmts)
end;
{Register form as drop target}
Dropping an OLE object onto the OLE example application
When an object is dropped onto a form, an OnDragDrop event occurs. The object is
specified as the Source parameter of the TDragDropEvent method, which is the event
handler of OnDragDrop events. If the Source is an OLE object, it is a descendant of type
TOLEDropNotify. TOLEDropNotify objects have a PInitInfo property that corresponds to
the PInitInfo property of TOLEContainer components. To use the Source OLE object, you
should typecast it as a TOLEDropNotify object.
■
Note
422
To initialize an OLEContainer component when an OLE object is dropped, assign the
value of the PInitInfo property of the Source object (typecast as a TOLEDropNotify object)
to the PInitInfo property of the OLEContainer component in the OnDragDrop event
handler.
You don’t need to use ReleaseOLEInitInfo to release memory allocated for the PInitInfo
property of the Source object. Delphi does this for you automatically.
Delphi User’s Guide
➤
Attach the following code to the OnDragDrop event handler of OLEFrameForm. This
code creates a new OLEObjectForm and initializes its OLEContainer.
procedure TOLEFrameForm.FormDragDrop(Sender, Source: TObject; X, Y: Integer);
var
NewChild: TOLEObjectForm;
begin
if Source is TOLEDropNotify then
begin
NewChild := CreateChild;
with Source as TOLEDropNotify do
NewChild.OLEContainer.PInitInfo := PInitInfo;
end
end;
Note
➤
To use the TOLEDropNotify object, the TOCtrl unit must be referenced in the uses clause
of the unit. Since you already added this reference for OLEFrame in order to call
BOLEMediumCalc, nothing needs to be done to the OLE example application. For other
applications, remember to refer to TOCtrl.
Save the project now, then run it.
1 If you have access to an OLE server application that supports drag-and-drop of OLE
objects, open a file within that server application.
2 Grab an OLE object from the OLE server and drag it over the OLE Example
application window.
Notice that the mouse pointer changes to the default “no-drop” pointer when over a
surface (such as the Windows desktop) that doesn’t accept dragged OLE objects.
When the mouse pointer is over the OLE example application window, it should
change back to the “drag-and-drop” mouse pointer to indicate that the object can be
dropped. To change the appearance of the mouse pointer during drag-and-drop
operations, modify the DragCursor property. For this example, however, don’t
modify the default settings of DragCursor.
3 Release the mouse button to drop the OLE object.
An OLE object window is created and its OLE container component is initialized to
contain the dropped OLE object.
4 Choose File|Exit to close the application.
Working with objects in files
Saving OLE objects in files and restoring OLE objects from files was discussed in the
section “OLE data in files” in Chapter 14. This application will use the SaveDialog and
OpenDialog components to work with OLE data in files.
This section describes the following steps involved in working with OLE objects in files:
• Saving objects to files
• Loading objects from files
Chapter 15, OLE example
423
Saving objects to files
■
To save an OLE object in a file, use the SaveToFile method of the OLEContainer
component.
For this example, use a SaveDialog component to enable the user to specify a file name
and location.
➤
➤
Add a SaveDialog component (from the Dialogs page of the Component palette) to
OLEObjectForm and use the Object Inspector to set the following properties of the
SaveDialog component:
Property
Value
Name
DefaultExt
SaveAsDialog
ole
FileName
Filter
*.OLE
OLE files (*.OLE)|*.OLE
Write the following event handler for the OnClick event of the File|Save As item on the
OLEObjectForm menu bar.
procedure TOLEObjectForm.Saveas1Click(Sender: TObject);
begin
if SaveAsDialog.Execute then
OLEContainer.SaveToFile(SaveAsDialog.FileName)
end;
{Save the object to FileName}
Loading objects from files
■
To load an OLE object in a file, use the LoadFromFile method of the OLEContainer
component.
For this example, use an OpenDialog component to enable the user to specify a file
name and location.
➤
Add an OpenDialog component (from the Dialogs page of the Component palette) to
OLEFrameForm (not OLEObjectForm) and use the Object Inspector to set the following
properties of the Open common dialog box component:
Property
➤
Value
Name
OpenDialog
DefaultExt
FileName
Filter
ole
*.OLE
OLE files (*.OLE)|*.OLE
Write the following event handler for the OnClick event of the File|Open item on the
OLEFrameForm menu bar.
procedure TOLEFrameForm.Open1Click(Sender: TObject);
var
424
Delphi User’s Guide
NewChild: TOLEObjectForm;
begin
if OpenDialog.Execute then
begin
NewChild := CreateChild;
NewChild.OLEContainer.LoadFromFile(OpenDialog.FileName)
end
end;
➤
Write the following event handler for the OnClick event of the File|Open item on the
OLEObjectForm menu bar.
procedure TOLEObjectForm.Open1Click(Sender: TObject);
begin
OLEFrameForm.Open1Click(Sender)
end;
➤
Save the project now, then run it:
1 Drop an OLE object, or display a new OLE Object window and insert or paste an
object onto the child window.
2 Edit the object, then deactivate it.
An OLE Object window now contains an inactive OLE object.
3 Choose File|Save As to display the SaveAs dialog box as in 3.
Figure 15.8 The Save As dialog box
4 Choose a file name, then choose OK.
The OLE object in the OLE Object window that had focus when you chose File|Save
As is saved to a file.
5 Close the OLE Object window.
The main OLE Example frame form now contains no OLE Object windows.
6 Choose File|Open to display the Open dialog box as in . Select the previously saved
file, and choose OK.
Chapter 15, OLE example
425
A new OLE Object window appears, displaying the object.
Figure 15.9 The Open dialog box
7 Choose File|Exit to close the application.
Note
You can also save OLE objects to memory streams. Use SaveToStream and
LoadFromStream to work with objects in streams..
Summary
This chapter presented these topics:
• Creating the MDI framework
For this example, each OLE object that is linked or embedded is contained in an OLE
container component in its own MDI child window. To contain an OLE object, add
an OLEContainer component to the OLE Object window. When an OLE object is
activated in place, menu items from the OLE server can be merged with the OLE
container application’s menus. To control where menu items merge and which menu
items are replaced, specify appropriate values for the GroupIndex property of menu
items. OLE servers can also access the OLE container application’s tool bar and menu
bar. Use the Locked property to prevent the OLE server from replacing the tool bar or
status bar of the OLE container application.
• Inserting objects
To enable the user to use the Insert Object dialog box to insert an OLE object into the
OLEContainer component, call InsertOLEObjectDlg. To initialize the OLEContainer
component, assign a pointer modified by InsertOLEObjectDlg to the PInitInfo
property. To deactivate the OLE object, shift focus to another control, click the client
area of the form that owns the OLEContainer, or set the Active property to False.
• Pasting objects
To register new Clipboard formats for OLE objects, call the Windows API function
RegisterClipboardFormat. To register the Clipboard formats for OLE objects (or any
other data type you want to be able to drop) in the same way as when pasting objects,
call RegisterClipboardFormat and specify an array of BOLEFormat elements. To enable
the user to use the Paste Special dialog box to paste an OLE object into the
426
Delphi User’s Guide
OLEContainer component, call PasteSpecialDlg. To specify what types of objects to
allow to be pasted, specify an array of BOLEFormat elements; one element for each
type of object. This array should be passed in the Fmts parameter of PasteSpecialDlg.
To initialize the OLEContainer component in the same way as when inserting objects,
assign a pointer modified by PasteSpecialDlg to the PInitInfo property.
• Dropping objects
To register a form for object drag-and-drop, call RegisterFormAsOLEDropTarget. To
use the dropped object as an OLE object, typecast the Source object as a
TOLEDropNotify object in the OnDragDrop event handler of the form. To initialize the
container when an OLE object is dropped, assign the value of the PInitInfo property
of the Source object to the PInitInfo property of an OLEContainer component.
• Working with objects in files
To save objects to files, call the SaveToFile method. To load objects from files, call the
LoadFromFile method.
Chapter 15, OLE example
427
428
Delphi User’s Guide
Appendix
A
Selected Bibliography
Appendix A
The following third-party titles are available to help you learn more about Delphi and
the Object Pascal programming language. For details concerning availability of any of
these books, please consult your local bookseller.
• The Delphi Programmer Explorer by J. Duntemann/J. Mischel/D. Taylor
Coriolis Group, ISBN: 1-883577-25-X$39.99
A new type of tutorial: Theory and practice alternate in short chapters, with the
emphasis on creating useful software starting on the very first page.
• Delphi for Dummies by Neil Rubenking
IDG Press, ISBN: 1-56884-200-7$19.99
Readers will learn about Borland's new language in the easy to understand style of
the Dummies series.
• Teach Yourself Delphi by Devra Hall
MIS Press, ISBN: 1-55828-390-0$27.95
Here is a complete, self-guided tour to the new development environment from
Borland, encompassing all the features of the language and all the tools, tricks, and
advantages of Delphi.
• Delphi Nuts and Bolts by Gary Cornell and Troy Strain
Osborne-McGraw-Hill
• Software Engineering with Delphi by Edward C. Webber, J. Neal Ford, and
Christopher R. Webber
Prentice Hall Professional, Trade & Reference
A guide to developing client/server applications with an emphasis on Delphi’s
object-oriented tools.
• Delphi by Example by Blake Watson
Que, ISBN: 1-56529-757-1$29.99
Appendix A, Selected Bibliography
429
Aimed at the beginning programmer who has no prior experience with other
languages or development products, this book presents basic concepts of
programming along with a clear explanation of the key development tools that are
part of Delphi.
• Using Delphi, Special Edition by Namir Shammas and John Matcho
Que, ISBN: 1-56529-823-3$29.99
This 3-part tutorial on the most important Delphi features covers how to install the
product and develop applications using Delphi's visual tools, explores the Windows
application development process, and deals with some advanced programming
topics.
• Developing Client/Server Applications with Delphi by Vince Killen and Bill Todd
Sams Publishing
• Delphi Developer's Guide by Xavier Pacheco/Steve Teixeira
Sams Publishing, ISBN: 0-672-30704-9$45.00
Intermediate to advanced guide to developing applications using Delphi.
• Mastering Delphi by Charlie Calvert
Sams Publishing, 9-6$45.00
Comprehensive tutorial/reference for intermediate programming with Delphi.
• Teach Yourself Delphi in 21 Days by Andrew Wozniewicz
Sams Publishing
• Mastering Delphi by Marco Cantu
Sybex
• Delphi How-To by Gary Frerking
Waite Group Press
Presents large collection of programming problems and their solutions in standard,
easy-to-use reference format, including unique solutions that use VBX controls and
easy ways to build multimedia projects with Delphi.
• Developing Windows Applications Using Delphi by Paul Penrod
John Wiley, ISBN: 0-471-11017-5$29.95
This introduction for traditional C programmers who want to make the transition to
rapid application development also provides detailed instructions for building
sophisticated Windows applications and for creating graphical interfaces.
• Instant Delphi by Dave Jewell
Wrox Press, ISBN: 1-874416-57-5$19.95
Instant Delphi is the fast-paced tutorial guide for the programmer who wants to get
up to speed on the Delphi product as quickly as possible.
Look for announcements of other books based on Borland Delphi.
430
Delphi User’s Guide
Index
Symbols
& (ampersand) character 20, 102
+ (plus sign) concatenating
strings 201
. (period)
declarations not within
scope 178
identifiers and 152
method calls 159
subrange types 197
... (ellipsis) in Value column 56
: (colon)
function declarations 161
variable declarations 155
:= (assignment operator) 151
= (equal) operator vs. 158
; (semicolon)
end of statements 151, 165
if statements 165
= (equal sign)
as relational operator 164
constant declarations 158
type declarations 186
{ } (braces) enclosing
comments 150
‘ (apostrophe) in strings 200
Numerics
3-D panels 346
A
Abort procedure 243
About dialog box 37, 43, 76, 86
as modeless form 61, 85
ABOUT.PAS 37
accelerators 102–103
See also menu items
access keys See accelerators
accessing
array elements 199
characters in strings 201
components 223
data
DDE applications 41, 385,
386
OLE applications 41, 392
declarations not within
scope 178
fields 224, 225
files 117, 237
menu commands 102, 292
methods 224, 225
property values 54
activating OLE objects 391, 400,
412
Active property 413
ActiveControl property 92
actual parameters 191, 193
formal parameters vs. 191
Add Breakpoint command
(Run) 254
Add button (Project
Manager) 131
Add File command (Project
Manager) 131
Add method
menus 110
strings 271
Add Module Browse dialog
box 69
Add Module dialog box 69
Add To Project dialog box 135
Add Watch At Cursor command
(Code Editor window) 259
Add Watch command (Run) 259
adding
See also creating
buttons 38, 39
to dialog boxes 87–89
child windows 281, 401, 404
at run time 285
common dialog boxes 41
components 44–45, 209
container 48
multiple 44, 47
new 121
overview 15
third-party 42, 68, 69, 70
fields to forms 326–328
forms 26, 59, 76, 220, 224
gauges 42
glyphs 332–333
graphics 39, 313, 321
menus 38, 100–104, 350–351
drop-down 103
file-manager
example 361–362, 369
from other
applications 112
MDI applications 282–284,
288, 294
OLE example 402–408
pop-up 38, 294
methods 339–340
non-textual information 39
objects to string lists 275–276,
366–367
OLE objects 393, 395, 401,
410–413, 421
pages to notebooks 39
panels 331, 345, 346
scroll bars 39, 290
scroll boxes 39
status bars 39, 345–347
OLE example 409–410
strings to string lists 271, 276
strings to strings 201
text 38, 83, 269
MDI applications 288–295
OLE applications 419, 422
tool bars 39, 331
OLE example 408–409
units to projects 25, 27, 119,
209, 210
Additional page (Component
palette) 39
AddObject method 276
addresses
exceptions 244
memory 154
AddStrings method 272
alBottom constant 345
alClient constant 289
Align command (Edit) 51
Align property
memos 289
panels 331, 345, 346
scroll boxes 348
alignment
components 50–52
with grids 52
text 289
in status bars 346
Alignment dialog box 51
Alignment palette 50
Alignment Palette command
(View) 50
Alignment property
status bars 346
allocated resources
freeing 234, 235
protecting 233, 234–236
allocating memory 113, 229,
234, 235
character strings 201
string lists 273
Index
431
AllowAllUp property 334
ampersand (&) character 20, 102
ancestor objects 221, 223, 226
See also inheriting from objects
Answer tables (databases) 40
apostrophes (‘) in strings 200
application files See project files
application icon 116, 128
Application page (Project
Options) 128
applications 75, 96, 126, 224
See also projects
client See DDE applications
closing 350
file-manager example 362
OLE example 404
text editor example
309–312
container See OLE
applications
developing 7–33, 37, 80
fundamentals 14–22
tools 9–10, 121
distributing 22
executing 17, 143, 250, 251,
375–376
pausing execution 253,
254, 264
to breakpoints 253, 254,
258
to specific locations 251,
254
file-manager 359–379
initializing 116
Multiple Document Interface
See MDI applications
naming 128
predesigned 10
robust 231
sample 267
scrollable regions 348
server See DDE applications;
OLE applications
specifying icons 94
starting 119
testing 141, 143, 248
version control 94, 144
word-processing 280
Archive Manager command
(Workgroups) 144
arcs 318
arguments See parameters
arranging icons
child windows 287
array types 199–203
432
Delphi User’s Guide
arrays 199–203
See also indexes
accessing elements 199
character 200–203
debugging 260, 263
declaring 200
as types 199
defined 199
initializing 200
multidimensional 200
pixel 314–315
string 171, 270
zeroing 199
as modal form 86
as operator 238
as reserved word 228
ASCII characters 156
debugging 262
ASCII text files
reading from 95
saving forms as 94
assigning icons to forms 94
assigning types 157
constants 158
variables 154
assigning values 151–153
See also setting property
values
fields in records 205
functions 161, 186
placing limits 197
to strings 200
type compatibility and 157
zeros, to arrays 199
assignment operator (:=) 151
equal (=) operator vs. 158
assignment statements 151–153,
199
enumerated types and 195
function calls 161
object variables 226
type compatibility 157
AssignPrn procedure 305, 307
associating bitmaps with
strings 275–276, 366
at reserved word 245
attributes
See also properties
file 371–373, 376
reading 371
setting 373
AutoActivate property 412, 414
auto-creating forms at run
time 113–114
automatically opening files 375
automatically saving files 31
Autosave options 31, 123
AutoSize property 58
B
backdrops 47
backgrounds, repainting 317
backing up files 139, 302–303
backup files 116, 117
bar gauges 42
BatchMove component 40
begin reserved word 165, 167,
175
begin..end blocks 174–177
case statements 167
if statements 165
nesting 176
BeginDrag method 376
Bevel component 39
beveled panels 346
BevelInner property 346
bibliography 429
BiGauge component 42
biMazimize constant 87
biMinimize constant 87
binary files 116
saving as text 94
BiPict component 42
BiSwitch component 42
biSystemMenu constant 87
BitBtn component 39, 88
bitmap buttons 39
adding to dialog boxes 88–89
custom 89
Bitmap property
brushes 316
bitmapped flags 371
bitmaps 117, 347–350
See also graphics
as form icon 94
associating with strings
275–276, 366
blank 349
destroying 354
displaying 39, 42
editing 14
file-manager example
366–367
draw-item events 369
measure-item events 368
scrolling 348
temporary 348, 349
bitwise operators
file attributes and 372
bkAbort constant 89
bkAll constant 89
bkCancel constant 89
bkClose constant 89
bkCustom constant 89
bkHelp constant 89
bkIgnore constant 89
bkNo constant 89
bkOK constant 89
bkRetry constant 89
bkYes constant 89
Blank Form template 125
Blank Project template 115, 124
blocks 174–177, 185
event handlers 175
multiple statements 165, 167
protected 231–232, 233
syntax 235
protecting 231–234
within blocks 176
.BMP files 117
BMPDlg unit 354
BOLEFormat type 416, 418, 422
BOLEMedium type 416
BOLEMediumCalc function 419
Boolean conditions
(breakpoints) 257, 258
Boolean data type 156, 162
BorderIcons property 87
borders
3-D panels 346
forms 44, 86
hiding 289
BorderStyle property
forms 86, 87
memos 289
BorderWidth property 346
Borland Assist program 3
braces ({ }) enclosing
comments 150
branching statements 162,
163–167
Breakpoint command
(View) 255
Breakpoint List window
255–258
opening 255
breakpoints 254–258
changing 257–258
coloring 258
conditional 256, 257–258
defined 253
deleting 256
displaying 255, 258
invalid 255, 258
setting 254–255, 256
after execution begins 255
Browse Gallery dialog box 19,
29, 78
enabling 124
browsing through code 13
Brush property 316
BRUSH.BMP 333
brushes 316, 344, 345
bsDialog constant 44, 86
bsNone constant 87, 289
bsSingle constant 87
bsSizeable constant 87
Build All command
(Compile) 143
building forms 80–98
building projects 14–22, 133–135,
143
Button component 15, 38
buttons 331
See also specific type
adding 38, 39
to dialog boxes 87–89
as active component 93
customizing 89
default 88
Minimize/Maximize 44, 86
mouse See mouse buttons
bvLowered constant 346
Byte data type 156
C
Calendar component 42
Call Stack command (View) 263
Call Stack window 263–264
opening 263
calling procedures and
functions 20–21, 158–163
order of calls 263–264
recursively 189–190
Cancel buttons 88, 89
Cancel property 88
Canvas property
printers 305
canvases 313–319, 369
manipulating pixels 314–315
capitalization in code 150
Caption property 16, 388
invalid entries 101
Name property vs. 17
panels 347
captions 16, 17, 87, 200
See also labels
cascading child windows 287
case conversions 272
case reserved word 166
case sensitivity of code 150
case statements 166–167, 337
else reserved word and 167
CDialogs unit 206
CD-ROM drives See media
players
Cells property 171
centering speed buttons 332
ChangeDefault property 307
ChangeFileExt method 302
changes, tracking 300
changing
See also editing
breakpoints 257–258
component names 218–219
directories 41, 376
file attributes 371, 372
file names 353, 373–375
fonts 304
forms 26
in text files 94
shared 77
Gallery options 122
main forms 60, 112
property values 54, 55, 56,
225
design-time 16, 27
run-time 151
tab order 90
tab sets 363–364
text 300
values while debugging 261,
262–263
Char data type 156
character arrays 200–203
character strings See string lists;
strings
Chart component 42
charts 42, 318
check boxes 38
data-aware 40
check marks (menu items) 289
CheckBox component 38
child forms See child windows
child windows 97, 280, 287, 404
See also MDI applications
accessing 287–288
adding 281, 401, 404
at run time 285
closing 309, 310
OLE objects in 401
chords 318
circular references 77, 286
classes 72, 120, 241
debugging 262
Clear method
strings 271, 276
clearing error conditions 232
Index
433
ClearSelection method
memos 292
clicking mouse buttons 323, 324,
326, 334
See also mouse events
client/server applications See
DDE applications; OLE
applications
Clipboard 291–292
DDE links and 384, 389
formats 416, 418–420
registering 417, 418
returning 419
graphics and 354–356
testing for images 356
OLE objects and 394, 415–421
testing for 420
Clipboard object 291
ClipBrd unit 354
Clipbrd unit 291
CLIPBRD.PAS 291
clock 38
Close buttons 89
Close method
forms 309, 311
CloseQuery method 309, 310
closing applications 350
file-manager example 362
OLE example 404
text editor example 309–312
closing dialog boxes 87
closing windows 309, 309–310
code 27, 60–68, 150–151, 219
See also source code
browsing 13
case sensitivity 150
comments in 150
controlling flow 163–174
editing 19, 62
as ASCII text 94
event handlers 63, 66
while debugging 255,
262, 264
executing repeatedly 168
indenting 150, 165
line breaks 150
machine 210, 249
optimizing 183, 339
protecting 231–234
stepping through 252–253
statement by
statement 252
to first executable
statement 253
testing conditions 163, 166,
174
434
Delphi User’s Guide
viewing 12, 79, 139
Code Editor window 141
debugger and 251
shared events 65
specific event handlers 63
Code Editor 62–64, 124
adding pages 62
closing pages 141
deleting breakpoints 256
event handlers and 60, 63–64,
65
moving through 62
overview 11–12
renaming components 44
running projects to specific
locations 251
saving project files 138
setting breakpoints 254
setting watches 259
switching to forms 62
viewing pages 62–63
colon (:)
function declarations 161
variable declarations 155
Color common dialog box 41
color grids 42, 344
Color property
brushes 316, 345
pens 315, 343
ColorDialog component 41
ColorGrid component 42
colors 42
brushes 316
pens 315, 343
pixels 314, 315
ColWidths property 368
combo boxes 39, 41
data-aware 40
items See string lists
owner-draw controls 365–369
measure-item events 368
variant styles 365
ComboBox component 39
command buttons See buttons;
speed buttons
command-line options See
compiling options
comments in code 150
common dialog boxes 85, 206,
228, 295–304
See also specific
adding 41
Help buttons 296
listed 41
options 296
Comp data type 156
comparing values 158, 164
compatibility of types 157
Compile command
(Compile) 142
Compile menu 141
compiler directives 120
conditional compilation 143
range checking 199
Compiler Options dialog
box 249
Compiler page (Project
Options) 128
compiler-generated files 117
compiling options 32, 128, 129
command-line
arguments 250
compiling projects 141–144
returning status 143
specific parts 143
starting compiler 142
COMPLIB.DCL 42
component classes 72
component exceptions 242
Component Expert 71–72
Component Expert dialog
box 71
component libraries 42, 71
adding components 69, 70
creating 68, 72
customizing 68–73
deleting components 68, 69
rebuilding 42, 68, 69, 70
replacing 73
reverting to previous
versions 71
Component list 11
Component palette 37, 38–42
adding components 42
customizing 68
deleting components 68
moving components 69
overview 10
pointer icon 38
components 37–60, 221–222
See also specific types
accessing 223
adding 44–45, 209
container 48
multiple 44, 47
new 121
overview 15
third-party 42, 68, 69, 70
aligning 50–52
with grids 52
copying 47, 49–50
to containers 48
customizing 10, 11, 53, 59, 71
data-aware 40
database 40
default, listed 38–42
deleting 49, 50
deletion, undoing 50
displaying 11
enabling/disabling 91
grouping 47–48
locking position 52
moving to different pages 69
naming 44, 55
third-party 70
nonvisual 37, 38–42, 52
overview 9, 10
parent-child
relationships 48, 49
pasting 49–50
DDE links 384, 389
OLE objects 394, 415–421
removing from tab order 91
renaming 44, 49, 218–219
resizing 45, 46, 58
selecting 38, 46, 48
setting tab order 90–91
sharing events 65–67
visual 37, 38–42
without events 60
compound statements 165
Concat function 201
concatenating strings 201
conditional breakpoints 256,
257–258
conditions, testing 163, 166, 174
configuring Delphi 28–32
confirmation dialog boxes 80,
374
deleting files 370–371
saving files 310
ConnectMode property 387
const reserved word 157, 194
constant parameters 194
constants 153
assigning sequential
values 335
declaring 157–158
giving a type 157
naming 157, 335
constructors 229
contacting Borland 3
container applications See OLE
applications
container components 47–48
removing components in 49
selecting components in 46
containers, panels as 346
control bar See tool bars
Control menu 86
removing from forms 87
control variables 170
controls 221–222
See also components
labeling 38
owner-draw 275, 365–369
drawing 367–369
resizing 367
styles 365
scrollable regions 348
sharing events 343
conversations See DDE
conversations
converting
case, strings 272
types 155, 238
coordinates
current drawing position 324
origin 314
Copy command (Edit) 49
Copy function 201
CopyFile function 373
copying
components 47, 49–50
to containers 48
files 373
graphics 355
project files 138
strings 272
text 291
with DDE links 389
CopyToClipboard method 291,
389
corrupted data, preventions 231
Count property 270
counters 170
counting example 171
counting strings 270
Create method 229
Create Submenu command
(Menu Designer) 103, 105
CreateChild method 404
creating
See also adding
backup files 302–303
component libraries 68, 72
DDE applications
client 383–388
server 388–390
dialog boxes 80–84, 85
forms
at run time 113–114
file-manager
example 360–362
MDI applications 281
OLE example 400–401
memos 288
message boxes 43
new projects 19, 30, 122–123
new units 120, 134, 209
nonvisual components 52
nonvisual objects 228–229
OLE objects 391, 400
string lists 273–275
current drive and directory
displaying 363, 366
resetting 376
updating 364
current operation, stopping 243
current settings 116, 117
cursors
editing 14
position in file 300
custom templates 126–127
customer assistance 3
customizing components 10, 11
Cut command (Edit) 49
cutting graphics 355
cutting text 291–292
See also deleting
CutToClipboard method 291
D
data
accessing
DDE applications 41, 385,
386
OLE applications 41, 392
corrupted, preventing 231
displaying 40
in columns and rows 172
editing 40, 392
exchanging 381
formatting 39
initializing 208, 210
loss, preventing 231
relating varied elements 216
sharing 390, 396
updating
DDE applications 386,
388–390
OLE applications 395
valid characters 39
Data Access page (Component
palette) 40
Data Controls page (Component
palette) 40
data grids 40
data types See types
data-aware components 40
Database component 40
database components 40
Database Form Expert 10
database links 40
Index
435
database servers 40
databases 40
querying 40
DataSource component 40
DBCheckBox component 40
DBComboBox component 40
DBEdit component 40
DBGrid component 40
DBImage component 40
DBListBox component 40
DBLookupCombo
component 40
DBLookupList component 40
DBMemo component 40
DBNavigator component 40
DBRadioGroup component 40
DBText component 40
.DCL files 68
.DCU files 117, 121, 210
DDE applications 381–390
accessing data 41, 385, 386
client 41, 383–388
defined 382
executing macros 387
updating data 386,
388–390
items, defined 383
linking data 383, 384–386, 389
at run time 383, 385, 388
OLE applications vs. 396
poking data 386
server 41, 388–390
activating
disconnected 387
connecting to 384–386
defined 382
receiving data 386
services, defined 382
topics, defined 383
DDE conversations 382–383
initiating 41, 383
DDE Info dialog box 384
DDE links 385
pasting 384, 389
testing 389
DDEClientConv component 41,
383, 384, 385
DDEClientItem component 41,
383
DDEConv property 383
DDEItem property 385
DDEServerConv component 41,
388
DDEServerItem component 41,
388
DDEService property 385
DDETopic property 385
436
Delphi User’s Guide
deallocating memory 229, 234,
235, 273
debugger 13, 247
exception handing 238
restarting 253, 264
standalone 249
starting 249, 250
debugging options 32, 249
debugging projects 247–265
bugs, types 247–248
changing breakpoint
properties 257–258
coloring breakpoints 258
editing code 255, 262, 264
examining variables 258–263
disabling watches 260
setting watches 259–261
values, changing 261,
262–263
execution point 251, 253, 258
flickering screens 250
generating debugging
information 249–250
handling exceptions 264
invalid breakpoints 255, 258
releasing system
resources 254
running applications 250, 251
pausing execution 253,
254, 264
to breakpoints 253, 254,
258
to specific locations 251,
254
setting breakpoints 254–255
after execution begins 255
conditional 257–258
stepping over statements 252
stepping through code
252–253
statement by
statement 252
to first executable
statement 253
strategy 248
turning off breakpoints 256
viewing function calls
263–264
decimal numbers 156, 262
declarations 174, 177, 186, 206
arrays 200
as types 199
begin..end blocks 175
constants 157–158
forward 189–190
functions 161, 185, 189
identifiers 153–157, 189
as enumerated types 196
not within scope 178
object types 188
objects 217, 222, 224, 228
exception 244
procedures 158, 185, 189
type 26, 185, 186, 195–205
enumerated 335–336
variables 154–157, 217
character arrays 200
example 226
for statements and 170
procedures and 160
text editor example 299
decrementing values 172
default buttons 88
Default property 88
defaults 123, 127
brushes 316
component names 55
components 38–42
form names 55
forms 86
pens 315
restoring 127
defining new types 185, 186,
195–205
DEFPROJ.OPT 127
Delete All Breakpoints command
(Breakpoint List window) 256
Delete All Watches command
(Watch List window) 260
Delete Breakpoint command
(Breakpoint List window) 256
Delete command (Edit) 50
Delete command (Menu
Designer) 105
Delete method
strings 271, 276
Delete procedure 201
Delete Templates command
(Menu Designer) 105, 107
Delete Templates dialog box 107
Delete Watch command (Watch
List window) 260
DeleteFile function 370
deleting
borders 289
breakpoints 256
components 49, 50
from libraries 68, 69
event handlers 67–68
files 135, 370–371
forms from projects 135
graphics 355
menu items 102, 105
menu templates 107
strings 271
substrings 201
text 291–292
units from projects 135
Delphi
configuring 28–32
installing 1, 123
saving desktops 31
starting 8
Delphi Image Library 118
descendant objects 221, 223, 226
See also inheriting from objects
design tools 14
designing forms 15–17
design-time properties 53–56
overriding 59
desktop 117, 124
saving 31
Desktop Contents option 31
Destroy method 229
destroying objects 229, 240, 242
destructors 229
developing applications 7–33,
37, 80
fundamentals 14–22
tools 9–10, 121
.~DF files 117
.DFM files 26–27, 116, 121–122
dialog boxes 80–93
See also common dialog boxes
accepting input 87
adding buttons 87–89
specifying default 88
as main form 60, 85–93
closing 87
confirmation 310, 374
deleting files 370–371
file-attribute 371–372, 373
labeling 87
masking characters 83
message See message boxes
modal 81, 85–86
modeless 85–86
predesigned 80, 85
property editors as 56
specifying active
component 92
tab order 90–91
testing 91
Dialogs page (Component
palette) 41
dialogs See dialog boxes
Dialogs unit 80
dimming menu items 292
directives
compiler 120, 143, 199
forward 189
public vs. private 224–225
directories 115–116, 122
building drive lists 362–365
changing 41, 376
displaying structures 42, 363,
366
project 133, 136
specifying 115
updating 364
Directories/Conditionals page
(Project Options) 129
directory lists 41, 42
Project Manager 133
DirectoryListBox component 41
DirectoryOutline
component 42, 361
Disable All Breakpoints
command (Breakpoint List
window) 256
Disable All Watches command
(Watch List window) 260
Disable Breakpoint command
(Breakpoint List window) 256
Disable Watch command
(Watch List window) 260
disabling borders 289
disabling menu items 292
disabling tool bars 340–342
disk drives See drives
display options See preferences
displaying
bitmaps 39, 42
breakpoints 255, 258
child windows 287
code 12, 79, 139
Code Editor window 141
debugger and 251
shared events 65
specific event handlers 63
components 11
data 40
in columns and rows 172
data types 153
directories 42, 363, 366
files 280
in list boxes 297
project 12, 23, 25
forms 79–80, 139
grids 31
menus 104, 105
messages 80, 409
non-textual information 39
OLE objects as icons 411, 414
property values 54
shared 54, 55
text 39
in columns and rows 39
tool bars 342
displays, flickering 250
distributable libraries 115
distributing applications 22
divide-by-zero errors 235, 237,
238, 239
DLLs 77, 117
creating 134, 141
dmAutomatic constant 376, 387
dmManual constant 376, 387
.DMT files 106, 108
documentation, printing
conventions 3
Double data type 156
Down property 333
downloading fonts 306
downto reserved word 172
.~DP files 116
.DPR files 22–24, 116, 118–119
editing 132
viewing 141
drag-and-drop 376–379
example 227, 228
OLE objects 395, 421–423
DRAGDROP.DPR 227
DragMode property 376
DrawGrid component 39
drawing 14, 347
current pen position,
setting 315, 324
large images 348
lines 315, 316–317, 328–331
changing pen width 344
event handlers 324, 325
owner-draw controls 367–369
painting vs. 314
shapes 39, 317–318, 337
fill patterns 316, 344
Drawing flag 351
drawing modes 330
drawing surfaces 314
See also canvases
drawing tools 334–340
changing 336
customizing 340–345
testing for 335, 336
draw-item events 368–369
See also owner-draw controls
drive lists 41, 42
adding bitmaps 366–367,
368, 369
building 362–365
changing directories 376
updating 364
DriveComboBox component 41
drives, returning valid 362–363
Index
437
drop-down lists See combo
boxes; lists boxes
drop-down menus 38, 103
See also menus
.DSK files 117
duplicate accelerators 103
duplicate identifiers 181, 223
Dynamic Data Exchange See
DDE applications
dynamic-link libraries 77, 117
creating 134, 141
E
EAbort exception 243
EBreakpoint exception 238
EConvertError exception 238
edit boxes 38, 83, 225
See also combo boxes
data-aware 40
DDE applications and 386,
390
incremental values 42
Edit Breakpoint command
(Breakpoint List window) 257
Edit Breakpoint dialog box 257
Edit command (Watch List
window) 259
Edit component 38
Edit Source command
(Breakpoint List window) 256
Edit Source command (Call
Stack) 264
Edit Tab Order dialog box 90
editing
See also changing
code 19, 62
as ASCII text 94
event handlers 63, 66
while debugging 255,
262, 264
data 40, 392
forms as ASCII text 94–95
graphics 14
menu items 105
project files 23, 132
text 38
Editor Colors page (Environment
Options) 258
Editor files option 124
editors 279
Code See Code Editor
Filter 298
Image 14
Picture 332, 333
property See property editors
438
Delphi User’s Guide
EDivByZero exception 237
EFault exception 238
EGPFault exception 238
EInOutError exception 237
EIntError exception 237, 241, 242
EIntOverflow exception 237
EInvalidCast exception 238
EInvalidOp exception 238
EInvalidOpCode exception 238
EInvalidPointer exception 237
Ellipse method 317
ELLIPSE.BMP 333
ellipses 39, 317
ellipsis (...) in Value column 56
else reserved word
case statements and 167
except reserved word
and 241
if statements and 164
EMathError exception 237
embedding OLE objects 392
Enable All Watches command
(Watch List window) 260
Enable Breakpoint command
(Breakpoint List window) 256
Enable Watch command (Watch
List window) 260
Enabled property 91
menus 110, 292
speed buttons 333
end reserved word 165, 167, 175
exception handling 232
standing alone 210
Enter key 88
enumerated types 166, 195–197
constants vs. 335
declaring 335–336
identifiers as 196
environment 232
options 123–124
Environment command
(Options) 28, 123
Environment Options dialog
box 28, 68, 123
environment preferences,
setting 28–32
EOutOfMemory exception 237
EOverflow exception 238
EPageFault exception 238
EProcessorException
exception 238
equal sign (=)
as relational operator 164
constant declarations 158
type declarations 186
equal values 158
ERangeError exception 237, 242
erasing images 355
erasing lines 330
error codes 237
error messages 141
disabling 243
generating 240, 242
getting help with 142
ErrorAddr variable 244
errors 231, 244
See also exceptions
checking 232
clearing conditions 232
divide-by-zero 235, 237, 238,
239
fatal application 240
logic 248
out-of-range 199, 237, 243
overflow 237, 238
range 199
run-time 247–248
syntax 154, 158, 159
type mismatch 155
undefined forward 67
Esc key 88
ESingleStep exception 238
EStackFault exception 238
EUnderflow exception 238
Evaluate/Modify command
(Run) 261
Evaluate/Modify dialog
box 261–263
event handlers 49, 60, 188, 218
allocating memory 235
associating events with 64–67
shared events 65
calling procedures and
functions 20–21
changing tabs in
notebooks 363
defined 158
deleting 67–68
drawing lines 324, 325
editing 63, 66
locating specific 63
menus 109–110
as templates 108
handling events 294
naming 66
overview 18–19
redrawing images 316
renaming files 353
responding to button
clicks 334, 336
reusing 64, 65
saving files 353
selecting items in lists 364
sharing 339, 343
writing 18, 60–62, 222
code blocks and 175
shared events 66
events 64–67
components without 60
default 60, 63
defined 17
draw-item 368–369
handling See event handlers
measure-item 367
mouse 322–326
dragging and
dropping 376–379, 395,
421
handling 322, 323, 324, 325
testing for 326, 351
objects and 227
overview 18–19
owner-draw controls
and 367, 369
responding to multiple 64
sharing 65–67
testing for 227
timing 41
Events page (Object
Inspector) 11, 18, 65
except reserved word 239
else reserved word and 241
exception classes 241
exception handlers 232, 239–242
default 241
defining 239, 240
derived types 244
generating messages 240,
242, 243
local 242
nesting responses 233–234
scope 241
setting exception address 244
stepping through 32
exception instance 240
Exception object 236, 244
exception objects 232
destroying 240
preserving 242
types, declaring 244
exceptions 231–245
component 242
debugging sessions and 32,
264
defined 231
defining new 244–245
hardware 238, 264
overriding 233
raising 232, 235, 239, 242
syntax 244–245
responding to 231, 232
run-time library 236–242
conversion 238
floating-point math 237
hardware 238
heap 237
input/output 237
integer math 237
typecast 238
silent 243
exchanging data 381
.EXE files See executable files
executable files 17, 117
building 141
DDE applications and 382
including debug
information 249
Execute method 295
ExecuteFile function 375–376
ExecuteMacro method 387
ExecuteMacroLines method 387
executing applications 17, 143,
250, 251, 375–376
pausing execution 253, 254,
264
to breakpoints 253, 254, 258
to specific locations 251, 254
executing code repeatedly 168
exiting applications 350
file-manager example 362
OLE example 404
text editor example 309–312
exiting dialog boxes 87
Experts See Component Expert;
Form Experts; Project Experts
expressions 155
defined 259
evaluating 261–262
format specifiers 262
returning current value 259
Extended data type 156
ExtractFileName function 300
EZeroDivide exception 238
F
fatal application errors 240
faults 238
fields 26, 204
accessing 224, 225
adding to forms 326–328
objects and 205, 216, 218,
222, 224
file lists 41
dragging items 377, 378
dropping items 378
executing files 375–376
filtering 41, 297–298
getting current drive and
directory 362–365
updating 364
File menu 133
creating 283, 361, 369
file names 59, 118, 119, 137
changing 353, 373–375
default 136
returning 364
file types (project) 116–118
file-attribute dialog box 373
creating 371–372
FileGetAttr function 371
FileListBox component 41
file-manager application
359–379
adding menus 361–362, 369
building drive lists 362–365
creating main form 360–362
drag-and-drop
operations 376–379
manipulating files 369–376
responding to events
363–365, 377
files 234, 352, 383
See also file lists
accessing 117, 237
attributes 371–373, 376
reading 371
setting 373
backing up 139, 302–303
binary 116
converting to binary
formats 95
copying 373
deleting 135, 370–371
displaying 280
in list boxes 297
executable 17, 117
building 141
DDE applications and 382
including debug
information 249
graphics 121–122, 352–354
moving 373
OLE applications and 392
opening 297–300
automatically 375
printing 305–309
to files 307
project See project files
reading from 301
redistributable ii
renaming 353, 373–375
resource 112, 117
routines 369
Index
439
saving 301–303, 310, 353
automatically 31
selecting types 297
size, returning 364
swap 238
writing to 301
FileSetAttr procedure 373
fill patterns 316, 344
FILMANEX.DPR 359
Filter editor 298
FilterComboBox component 41
filters 41, 297–298
Filters property 298
finally reserved word 235
Find common dialog box 41
FindDialog component 41
finding event handlers 63
finding specific strings 270–271,
276
finding substrings 201
flags
drawings 351
file attributes 371
flickering screens 250
floating-point numbers 260, 262
overflow errors 238
floppy disk drives See drives
fmtId constant 416, 419
fmtIsLinkable constant 416, 419
fmtMedium constant 416, 419
fmtName constant 416, 419
fmtResultName constant 416,
419
FMXUtils unit 369
focus
container components and 48
dialog boxes 88
setting 92–93
moving 90, 92
OLE objects 413
Font common dialog box 41,
303–304
Font property 303, 304
FontDialog component 41, 303
fonts 269, 305
downloading 306
setting 303–304
for loops vs. 199
for reserved word 170
for statements 170–174
arrays and 199
nesting 172–174
Form command (View) 63, 79
form components 38, 77
Form Designer options 31
Form Experts 10, 125
440
Delphi User’s Guide
form files 116, 129
backup 117
sharing 134–135
form grid 52
Form SpeedMenu 93
Form Templates 10, 29
See also Forms Gallery
adding to galleries 93,
126–127
adding to projects 78–79
loading 29
opening for reference 79
specifying as default 125
Form Templates page (Gallery
Options) 125, 126
formal parameters 191, 193, 194
actual parameters vs. 191
formats
Clipboard 416, 418–420
registering 417, 418
returning 419
OLE registration 422
formatting data 39
forms 9, 38, 48, 75
adding fields 326–328
adding to projects 26, 59, 76,
220, 224
assigning icons to 94
auto-creating at run
time 113–114
borders 44, 86
resizable 87
building 80–98
changing 26
in text files 94
shared 77
child See child windows
customizing 59, 75
defaults 86
defined 76
deleting 135
designing 15–17
displaying 79–80, 139
editing as ASCII text 94–95
frame See MDI applications,
main form
input 82–83
instantiating 207
main 9
changing 112
dialog boxes as 60, 85–93
file-manager
application 360–362
MDI applications
and 280, 281
OLE example 400–401,
403
specifying at run time 112
specifying default 125
moving among 79, 140
multi-page 39
naming 17, 55, 59
objects and 216–218
OLE objects and 393, 395, 401
predesigned 10
referencing 77
resizing 44
reusing 38, 76
saving 58
as ASCII text 94
as templates 93–94
sharing 76–94
source code, viewing 23, 141
specifying default 125–126
testing 112
Forms Gallery 29, 77–79, 80
adding templates 93
enabling/disabling 78
Forms page (Project
Options) 127
FormStyle property 85, 96, 281
forward declarations 189–190
forward reserved word 189
fractional numbers 156, 262
frame windows See MDI
applications, main form
Free method 229
freeing allocated resources 234,
235
freeing memory 229, 234, 235,
273
FreeMem procedure 235
fsMDIChild constant 97
fsMDIForm constant 97, 281
fsNormal constant 97
fsStayOnTop constant 85, 97
function reserved word 161, 185
functions 121, 183–195, 207
as standalone program 134,
135
availability 187
calling 20–21, 161–163
recursively 189–190
viewing order 263–264
declaring 161, 185, 189
defined 161
headers 185, 208
short form 208
predefined 158
Result variable and 187
return type, omitting 208
return values 161–163, 185,
186
G
Gallery 122
adding custom
templates 126–127
options 29–31, 124
changing 122
GALLERY directory 122
Gallery Options dialog box
124–127
Gauge component 42
gauges 42
adding 42
moving incrementally 39
general protection fault 238
geometric shapes See shapes
GetDriveType function 362
GetFileSize function 365
GetMem procedure 235
getting help 2, 3
data types 153
global scope 177
global symbols 13
global variables 181–183
glyphs 117, 332–333
GPFs 238
GRAPHEX.DPJ 321
Graphic property 349, 354
graphical user interfaces 76
graphics 117, 313–319, 321, 365
See also bitmaps; images;
shapes
copying 355
deleting 355
drawing surfaces See canvases
drawing vs. painting 314
editing 14
loading 352
pasting 355
printing 351
replacing 353
resizing 58, 353
saving 353
string lists and 275, 366–367
graphics files 121–122, 352–354
graphs 42, 318
grids 31, 368
calendar 42
color 42, 344
data 40
form 52
string See string grids
group boxes 39
as containers 47
data-aware 40
radio buttons and 38
GroupBox component 39, 47
GroupIndex property
menus 111, 284, 402
OLE applications 403
speed buttons 333
grouping components 47–48
grouping speed buttons 333–334
GUI applications 76
See also applications
H
handlers See event handlers;
exception handlers
handles around components 46
hard disk drives See drives
hardware exceptions 238, 264
HasAttr function 376
HasFormat method 293, 356
Header component 39
headers
procedures and
functions 185, 208
short form 208
units 206
heap 237
Help 2
data types 153
error messages 142
Help buttons 89, 296
Help Compiler (Microsoft) 118
Help files 118, 128
specifying 297
HelpContext property 296
hidden images 366
hiding borders 289
hiding tool bars 340–342
hierarchies 13
.HLP files 118
horizontal scroll bars 290
I
I/O See input; output
I/O devices 237
.ICO files 117
icons 39, 42, 117
alignment 51
application 94, 116, 128
child windows and 287
Component palette 38–42
editing 14
OLE objects as 411, 414
IDE 28
customizing 123–129
minimizing 32
moving among windows 140
starting 8
identifiers
See also naming
constants 157, 335
data types 186, 335
declaring 153–157, 189
as enumerated types 196
defined 153
duplicate 181, 223
file attributes 372
global 177, 181–183
invalid 101
local 177, 180
objects and 222, 223
period (.) in names 152
qualifying 152
restrictions 154
scope 177–183
redeclaring 181
unknown 159, 179
valid characters 154
variables 154
if reserved word 163
else reserved words and 164
if statements 163–166
case statements vs. 166
else reserved word and 164
nesting 165–166
$ifdef conditional directive 143
Ignore buttons 89
illegal typecasting 238
Image component 39, 56,
348–350
Image Editor 14
Image Library 128
images 117, 314
See also graphics
changing 353
data-aware 40
drawing large 348
erasing 355
hidden 366
loading 56–57
redrawing 316
regenerating 317
resizing 58
saving 353
implementation reserved
word 187, 207, 208
form references and 77
uses reserved word and 209
in operator 204
incorrect output 248
incremental values 42
example 171
indenting code 150, 165
Index
441
indexes 199
See also arrays
defined 199
range errors 243
string lists 270, 275, 276
string values 201
IndexOf method 270
Information command
(Compile) 143
Information dialog box 143
inheriting from objects 219–222
initialization reserved
word 208, 210
initializing
applications 116
array elements 200
data 208, 210
objects 336
OLE containers 412–413, 415,
422
in-place activation (defined) 391
See also OLE applications
input
dialog boxes 87
exception handling 237
masking 83
input focus
container components and 48
dialog boxes 88
setting 92–93
moving 90, 92
OLE objects 413
input forms 82–83
InputBox function 82
InputQuery function 82
Insert command (Menu
Designer) 105
Insert From Resource command
(Menu Designer) 105, 112
Insert from Resource dialog
box 112
Insert From Template command
(Menu Designer) 105, 107
Insert method
menus 110
strings 271
Insert Object dialog box 394,
410–411
options 411
Insert procedure 201
Insert Template dialog box 107
inserting a string in a string 201
InsertOLEObjectDlg
function 410, 411
Install Components command
(Options) 69
442
Delphi User’s Guide
Install Components dialog
box 69, 73
Install VBX File dialog box 70
installing component libraries 73
installing Delphi 1, 123
installing third-party
components 42, 68
instance variables 26
instantiation
forms 207
objects 217, 229
instructions, undefined 238
Integer data type 156
integer types 156, 166
exception handling 237, 239,
241
integers 156, 260, 262
See also constants; numbers
integrated debugger 13, 247
exception handing 238
restarting 253, 264
starting 249, 250
integrated development
environment 28
customizing 123–129
minimizing 32
moving among windows 140
starting 8
interactive tutors 2–3
interface reserved word 77, 187,
206, 207
interfaces 76
testing 248
interrupts 238
IntToStr function 155, 161, 238
Invalid Breakpoints dialog
box 255
invalid component names 44
invalid drives 362
invalid identifiers 101
invalid types 153
invalid variable references 194
invisible images 366
is reserved word 227, 228
items (defined)
DDE conversations 383
OLE objects 393
iterating strings in lists 272
K
keyboard shortcuts 43
accessing property values 54
adding to menus 102–103
menu commands 12
viewing Code Editor
pages 62
keywords See reserved words
Kind property
bitmap buttons 88
L
Label component 38
labels 38, 40
See also captions
lavender “exit” doors 89
Length function 201
libraries 42
adding components 69, 70
application icons 128
backing up 68
creating 68, 72
customizing 68–73
deleting components 68, 69
distributable 115
dynamic-link (DLLs) 77, 117
creating 134, 141
multiple versions 68
rebuilding 42, 68, 69, 70
replacing 73
reverting to previous
versions 71
run-time 158
exceptions 236–242
saving 71
Library page (Environment
Options) 71
line breaks in code 150
LINE.BMP 333
lines
drawing 315, 316–317,
328–331
changing pen width 344
event handlers 324, 325
erasing 330
Lines property
DDE items 385, 388
memos 308
LineTo method 316
linker options 128, 249
Linker page (Project
Options) 128
linking database tables 40
linking DDE items 383, 384–386,
389
See also DDE links
at run time 383, 385, 388
linking OLE objects 392
list boxes 38, 41
See also combo boxes
data-aware 40
dragging items 377, 378
dropping items 378
executing files 375–376
file types 297
getting current drive and
directory 362–365
items See string lists
owner-draw controls 365–369
draw-item events 369
measure-item events 368
variant styles 365
ListBox component 38
lists 365
See also string lists
literal values 153
Load Picture dialog box 57
LoadFromFile method 160
graphics 352
OLE objects 396, 424
strings 272, 276
LoadFromStream method
OLE objects 426
loading files See opening, files
loading images 56–57
loading OLE objects 396,
424–426
loading string lists 272
local exception handlers 242
local menus See pop-up menus
local symbols 249
local variables 177, 180
locating event handlers 63
locating specific strings
270–271, 276
locating substrings 201
Lock Controls command
(Edit) 52
locking components 52
logic errors 248
Longint data type 156
lookup tables (databases) 40, 273
loop statements 168–174
arrays and 199
debugging 258
losing data, preventions 231
M
machine code 210, 249
macros 387
main form 9
changing 112
dialog boxes as 60, 85–93
file-manager application
360–362
MDI applications 280, 281
OLE example 400–401, 403
specifying at run time 112
specifying default 125
main menu See menu bars;
menus
MainMenu component 38, 99,
109, 403
MaskEdit component 39
masking input characters 83
math exceptions 237, 239, 241
Maximize button 44, 86
removing from forms 87
maximum numeric ranges 197
MaxPage property 306
MCI drivers See media players
MDI applications 96–98
child windows 280, 287
accessing 287–288
adding 281, 401, 404
at run time 285
closing 309, 310
closing 309–312
defined 280
displaying documents 288,
298
entering text 288–295
main form 400–401
creating 281
defined 280
menus
adding 282–284, 288, 294
merging 111, 283, 284, 402
specifying active 111
OLE example 399–427
parent–child relationships 97
text editor example 279–312
measure-item events 367
See also owner-draw controls
Media Control Interface drivers
See media players
media players 41
MediaPlayer component 41
Memo component 38, 288
memory 52, 234
addresses 154
allocating 113, 229, 234, 235
character strings 201
string lists 273
checking 262
deallocating 229, 234, 235,
273
uninitialized 238
memos 38
changing 300
creating 288
data-aware 40
entering text 83, 269, 289–295
loading text 300
printing 305–309
selected text 307
saving 301, 310
menu bars 38
See also menus
MDI applications 282, 288
moving items 104
menu commands
See also menu items;
SpeedMenus
accessing 292
shortcuts 12
menu components 99, 109
adding 100
Menu Designer 13, 99–100, 109
SpeedMenu 105–106
menu items 101–103
adding 101, 110
check marks and 289
defined 99
deleting 102, 105
editing 105
enabling/disabling 292, 370
grouping 102
moving 104
naming 101, 108
nesting 103
placeholders 105
selecting 109, 292
separator bars 102
setting properties 104–105
specifying shortcuts 102–103
Menu property 111
menu templates 100, 106–109
loading 106
menus 98–109
adding 38, 100–104, 350–351
drop-down 103
file-manager
example 361–362, 369
from other
applications 112
MDI applications 282–284,
288, 294
OLE example 402–408
pop-up 38, 294
displaying 104, 105
handling events 108, 109–110
merging See merging menus
moving among 106
naming 101
reusing 105, 110
saving as templates 105, 106,
108
merging menus 111, 283, 284,
402
See also MDI applications
Index
443
message boxes 80–82, 310, 374
See also status bars
confirming file deletions
370–371
creating 43
predefined 209
MessageDlg function 81–82, 310
MessageDlgPos function 82
messages 81
See also message boxes
exception-handling 240, 242,
243
modeless forms as 85
status bar 409
metafiles 39, 42, 348
methods 20, 339–340
See also functions; procedures;
routines
accessing 224, 225
constructor 229
defined 158
deleting event handlers
and 67
destructor 229
objects and 205, 216, 218,
222, 224
overriding 223
Microsoft Help Compiler 118
MIDI sequencers See media
players
Minimize button 44, 86
removing from forms 87
minimum numeric ranges 197
MinPage property 306
mismatch errors 155
modal dialog boxes 81, 85–86
ModalResult property 88
Mode property
pens 315
modeless dialog boxes 85–86
Modified property
memos 300, 310
modifying See changing
mouse buttons 323, 326
clicking 323, 324, 326, 334
mouse events 322–326
defined 322
dragging and dropping
376–379
OLE objects 395, 421–423
handling 322, 323, 324, 325
testing for 326, 351
Move method
strings 271, 276
MoveFile function 373
MoveTo method 315
444
Delphi User’s Guide
moving
components to different
pages 69
files 373
input focus 90, 92
menu items 104
pens 315, 324
strings in lists 271
moving among IDE
windows 140
moving among menus 106
moving through Code Editor 62
moving through databases 40
mrOK constant 88
MsgDlg unit 209
multidimensional arrays 200
multimedia players See media
players
multi-page forms 39
See also notebooks
multiple components
adding 44, 47
copying to containers 48, 49
removing from containers 49
resizing 46
selecting 46
setting properties 54, 55
sharing events 65–67
Multiple Document Interface See
MDI applications
multiple tool bars 342
multiplication example 178
multitasking 381
mutual recursion 189
mutually exclusive options 38,
333
N
name conflicts 44
Name property 16, 27, 44
Caption property vs. 17
multiple components and 54
scope 55
naming
See also identifiers
applications 128
component classes 72
components 44, 55
third-party 70
event handlers 66
files See file names
forms 17, 55, 59
menu items 101, 108
menus 101
tabs 269
nesting
begin..end blocks 176
exception handlers 233–234
for statements 172–174
if statements 165–166
menu items 103
networks 116
New Component command
(File) 71
new forms 29
New Project command (File) 19
New Unit command (File) 209
non-resizeable borders 87
non-textual information 39
nonvisual components 37,
38–42, 52
nonvisual objects 228–229
Notebook component 39, 47
notebooks 39
See also tabs
adding pages 39
as containers 47
changing pages 363
null-terminated strings 156
numbers 156
See also constants
debugging 260, 262
overflow errors 237, 238
range checking 157, 237, 241
subranges 197
O
ObjClass property 394
ObjDoc property 394
Object Browser 13
Object Inspector 54, 218
See also property editors
accessing properties 54
displaying components 11
editing code 19
overview 11
renaming components 44
selecting menus 106
setting properties 54, 55
writing event handlers 18, 60
Object Linking and Embedding
See OLE applications
Object Pascal language 149–214
Object selector 11
object types 205, 244
declaring 188
ObjectMenuItem property 407
object-oriented
programming 215–230
accessing components 223
adding fields and
methods 224, 225
constructors 229
declarations 217, 222, 224, 228
defined 215
destructors 229
event handlers 218, 219, 222,
227
renaming components 218
scope 222–226
startup code 216
objects 120, 215–230, 234, 376
See also components
accessing 222–226
allocating memory 229
ancestor vs. descendant 221,
223, 226
Clipboard 291
customizing 220
debugging 262
defined 215
destroying 229, 240, 242
events and 218, 219, 222, 227
exception 232, 240, 242, 244
fields in 205
form 216–218
hierarchies, viewing 13
inheritance 219–222
initializing 336
instatiating 217, 229
nonvisual 228–229
OLE See OLE objects
properties 216, 225
string lists and 275–276
type, defining 217, 218, 224,
226, 228
Objects property
string lists 275, 276, 368
ObjItem property 395
OK buttons 88, 89
OLE applications 390–397, 421
accessing data 41, 392
adding text 419, 422
building 399–427
closing 404
container 393–395, 399
adding menus 402–408
creating 401
defined 390
initializing 412–413, 415,
422
DDE applications vs. 396
editing data 392
merging menus 111
registering as drop
target 421–422
saving data 395
server
defined 390
displaying messages 409
status bars, adding 409–410
tool bars, adding 408–409
version differences 391
OLE objects 390
activating 391, 400
adding 393, 395, 401, 410–
413, 421
class, defined 393
Clipboard formats 416,
418–420
registering 417, 418
returning 419
creating 391, 400
deactivating 412, 413–414
displaying as icons 411, 414
document, defined 393
dragging and dropping 395,
421–423
initializing 412
item, defined 393
linking vs. embedding 392
loading 396, 424–426
multiple 401
pasting 394, 415–421
restricting access to 392
run-time properties 407
saving 392, 396, 424
selecting 411
updating 395
OLE.DPR 399
OLEContainer component 41,
393, 401
adding OLE objects 410
initializing 412–413, 415, 422
OLEFrame unit 403
OLEObj unit 406
OnChange event
list boxes 364
outlines 364
OnClick event 334
buttons 217, 222, 334
menus 109, 370
tab sets 363
OnCloseQuery event 311
OnDblClick event 334
OnDragDrop event 378
OLE example 422, 423
OnDragOver event 377
OnDrawItem event 369
OnEndDrag event 378
online help 2, 118
data types 153
error messages 142
OnMeasureItem event 368
OnMeasureTab event 368
OnMouseDown event 323
parameters passed to 322
OnMouseMove event 325
parameters passed to 322
OnMouseUp event 324
parameters passed to 322
OnPaint event 316
OnPopup event 109, 294
OnStatusLineEvent event
OLE applications 409
OOP See object-oriented
programming
Open common dialog box 41,
297–300
Open Library command
(Options) 73
Open Library dialog box 73
Open method 298, 300
OpenDialog component 41, 297,
424
opening
files 297–300
automatically 375
project 134
templates for reference 79
OpenLink method 387
operators
assignment 151, 158
bitwise, file attributes
and 372
relational 158, 164
.OPT files 116
optimizing code 183, 339
Options button (Project
Manager) 131
Options command (Project
Manager) 127, 131
Options property
dialog boxes 296
printing 306, 307
Outline component 39
outlines 39, 269
directory See directory lists
events 364
file-manager application 364,
378
outlining shapes 315
out-of-range errors 157, 199, 237
indexes 243
output 250
exception handling 237
incorrect 248
overflow errors 237, 238
overriding methods 223
overriding property settings 59
Index
445
owner-draw controls 275,
365–369
drawing 367–369
events and 367, 369
resizing 367
styles 365
P
.~PA files 116
pages
Code Editor 12
moving through 62–63
Component palette 10, 38–42
notebook 39
changing 363
text, printing options 306
Pages property 275
Paint Box component 41
painting (defined) 314
See also repainting
Palette page (Environment
Options) 68
palettes
Alignment 50
Component See Component
palette
Panel component 39, 47
panels 39, 331, 332, 345, 408
adding buttons 39
aligning text 346
as containers 47
multiple 331
subdividing 346
three-dimensional 346
parameters
actual 191, 193
changing values 193, 194
constant 194
formal 191, 193, 194
functions 185
mouse-event 322, 323
omitting 208
passing 190–195
procedures 160, 185
specifying 160
value 191–193, 194
variable 193–194
Parameters command (Run) 250
parent-child relationships
components 48, 49
MDI applications 97
.PAS files 24–26, 116, 119–121
pass counts 258
passing parameters 190–195
password entry screens 82, 83
password invalid exceptions 245
446
Delphi User’s Guide
PASSWORD.PAS 84
PasswordChar property 83, 84
Paste command (Edit) 50
Paste Special dialog box 395,
415, 417
PasteFromClipboard
method 291
PasteSpecialDlg function
415–417, 418
pasting components 49–50
DDE links 384, 389
OLE objects 394, 415–421
pasting graphics 355
pasting text 291
paths See directories
Pause Program command
(Run) 253
PChar data type 156
Pen property 315
PEN.BMP 333
PenPos property 315
pens 315–316
colors 315, 343
default settings 315
drawing modes 330
position, setting 315, 324
styles 342
width 344
period (.)
declarations not within
scope 178
identifiers and 152
method calls 159
subrange types 197
Picture editor 332, 333
Picture Editor dialog box 57
Picture property 349
pictures 117
See also graphics
loading 56–57
pie slices 318
pie-shaped gauges 42
pixels
reading 314
setting 315
Pixels property 314
plus sign (+) concatenating
strings 201
pmCopy constant 330
pmNotXor constant 330
Pointer data type 156
pointer icon 38
pointers 156, 237
debugging 262, 263
PokeData method 387
PokeDataLines method 387
Polygon method 318
polygons 318
PolyLine method 317
polylines 316, 317
poPageNums constant 306
poPrintToFile constant 307
pop-up menus 38
See also menus
displaying 104
drop-down menus and 103
handling events 109, 110, 294
MDI applications 294–295
PopupMenu component 38, 99,
109, 294
PopupMenu property 295
Pos function 201
poScreenCenter constant 44
poSelection constant 307
predefined procedures and
functions 158
predefined types 156
predefined units 206, 210
predesigned applications 10
predesigned forms 10, 29
adding to galleries 93,
126–127
adding to projects 78–79
opening for reference 79
specifying as default 125
predesigned menus 100,
106–109
loading 106
predesigned projects 10, 115,
122–123
adding to galleries 126–127
saving 136
specifying as default 124
preexisting units 135
Preferences page (Environment
Options) 28–32, 123
preferences, setting 28–32, 123
pressing mouse buttons 323,
324, 326, 334
See also mouse events
preventing data corruption and
loss 231
Print common dialog box 41,
305, 306–307
PrintDialog component 41
Printer object 305
Printer Setup common dialog
box 41, 305, 307
printers
setting up 307
specifying 305
Printers unit 209, 305, 351
PrinterSetupDialog
component 41
printing conventions
(documentation) 3
printing graphics 351
printing text files 305–309
to files 307
PrintRange property 307
private standard directive
224–225
procedure reserved word 158,
185
procedures 116, 121, 183–195,
207
as standalone program 134,
135
availability 187
calling 20–21, 158–161
recursively 189–190
declaring 158, 185, 189
headers 185, 208
short form 208
parameters 160
predefined 158
Program Reset command
(Run) 253
programming See code; objectoriented programming
programs See projects
progress indicators 42
Project command (Options) 127
project directory 122
Project Experts 10, 125
Project Experts page (Gallery
Options) 125
project files 22–27, 115, 116–122
See also projects
adding 131
backing up 139
backup 116, 117
binary 116
saving as text 94
copying 138
debugging See debugging
projects
default names 136
displaying 12, 23, 25
editing 23, 132
naming 59, 118, 137
non-Delphi 117
opening 134
removing from project 131,
135
caution 135
saving 136, 138–139
sharing 134–135, 144
storing 115–116, 132
types 116–118
Project Manager 129–133
editing forms and units 140
overview 12
SpeedBar buttons 131
SpeedMenu 130
starting 130
viewing forms and units 140
Project Manager command
(View) 130
Project Manager window 130
Project Options dialog box
127–129
Project Templates 10, 29, 30, 115,
122–123
See also Projects Gallery
adding to galleries 126–127
saving 136
specifying as default 124
Project Templates page (Gallery
Options) 125, 126
projects 22–28, 115–145
See also project files
adding forms 76, 220, 224
to multiple 59
adding units 25, 27, 119, 209,
210
building 14–22, 133–135, 143
new 19, 30, 122–123
compiling See compiling
current composition 132
debugging See debugging
projects
default 118, 119, 120
specifying 124–125
defined 115
main program 116
moving among forms and
units 140
options 116, 123–129
overview 115–118
predesigned 10
saving 58, 115, 135–139
Projects Gallery 19, 30
properties 9, 49, 116
See also property editors
brushes 316
canvases 313
changing 54, 55, 56, 225
design-time 16, 27
run-time 151
debugging 261
displaying 54
shared 54, 55
multiple components 54, 55
objects and 216, 222, 225
overriding 59
pens 315
read-only 153
setting 16, 43, 55
design-time 53–56
in code 151, 152, 157
run-time 59–60
Properties page (Object
Inspector) 11
property editors 56–58
protected blocks 231–232, 233
syntax 235
protecting system
resources 233, 234–236
prototypes 14
prPageNums constant 307
prSelection constant 307
public standard directive
224–225
PVCS Version Manager 144
Q
qualifying
identifiers 152
method calls 159, 197
property names 222
queries 40
Query component 40
R
$R directive 119, 120, 199
radio buttons 38, 39
RadioButton component 38
RadioGroup component 39
raise reserved word 244
raising exceptions 235, 239, 242
defined 232
syntax 244–245
range checking 157, 199
exceptions and 237, 241
Range Checking option 199
.RC files 112
README.TXT 1
read-only properties 153
Real data type 156
real types 156
exception handling 237
rebuilding libraries 42, 68, 69, 70
record types 204–205
records 216
assigning fields to 205
debugging 262
defined 204
recovering from error
conditions 232
Index
447
RECT.BMP 333
Rectangle method 317
rectangles 39, 317
recursion 189
redeclaring identifiers 181
redistributable files ii
redrawing images 316
references (third-party
books) 429
referencing forms 77
referencing units 26, 286
regenerating images 317
RegisterClipboardFormat
function 418
RegisterFormAsOLEDropTarget
function 421–422
registering Clipboard
formats 417, 418
registering OLE
applications 421–422
relational operator (=) 164
assignment operator vs. 158
ReleaseOLEInitInfo function 412
releasing memory 229, 234, 235,
273
releasing mouse buttons 324
See also mouse events
releasing system resources 234,
235
remote database servers 40
Remove button (Project
Manager) 131
Remove File command (Project
Manager) 131
removing See deleting
RenameFile function 373
RenameFile method 302
renaming components 44, 49,
218–219
renaming files 353, 373–375
repainting backgrounds 317
repeat reserved word 168
repeat statements 168–169, 174
for statement vs. 170
while statements vs. 169
Replace common dialog box 41
ReplaceDialog component 41
replacing existing libraries 73
Report component 40
ReportSmith 40
RequestData method 384, 386
reraising exceptions 242
.RES files 116
reserved words 154
at 245
begin 165, 167, 175
448
Delphi User’s Guide
case 166
const 157, 194
downto 172
else 164, 167, 241
end 165, 167, 175, 210, 232
except 239, 241
finally 235
for 170
forward 189
function 161, 185
if 163, 164
implementation 187, 207, 208,
209
initialization 208, 210
interface 187, 206, 207
private 224–225
procedure 158, 185
public 224–225
raise 244
repeat 168
restrictions 154
string 200
try 232, 235, 239
type 120, 185, 335
unit 206
until 168
uses 76, 77, 207, 208, 209
var 120, 155, 193
while 169
with 205
resizable borders 87
resizing components 45, 46, 58
graphics 58, 353
owner-draw controls 367
resizing forms 44
resource files 112, 117
loading 112
resources 116, 129, 234
system See system resources
responding to exceptions 231,
232
responding to multiple
events 64
restoring deleted components 50
Result variable 187
Retry buttons 89
return values See functions
reusing event handlers 64, 65
reusing forms 38, 76
reusing menus 105, 110
Rewrite procedure 308
robust applications 231
rounded rectangles 39, 318
ROUNDREC.BMP 333
RoundRect method 318
routines 20, 121, 338
See also functions; methods;
procedures
accessing 209
file operations 369
string-handling 201
visibility in units 207, 208
RowHeights property 368
Run command (Run) 17
Run Parameters dialog box 250
Run to Cursor command
(Run) 251
running applications 17, 143,
250, 251, 375–376
pausing execution 253, 254,
264
to breakpoints 253, 254, 258
to specific locations 251, 254
run-time errors 247–248
run-time graphics 313–319
run-time libraries 158
exceptions 236–242
run-time properties
OLE objects 407
setting 59–60
S
sample applications 267
Samples page (Component
palette) 42
Save As command (File) 138
Save As dialog box 136, 302
Save as Form Template dialog
box 94
Save as Template command
(Menu Designer) 105, 108
Save command (File) 138
Save common dialog box 41,
301–303
Save File command (File) 58
Save Project As command
(File) 137
Save Project command (File) 58
Save Project Template dialog
box 126
Save Template dialog box 108
Save Unit As dialog box 136
SaveDialog component 41, 301,
424
SaveToFile method 353
OLE objects 396, 424
strings 273, 276
SaveToStream method 426
saving 71
component libraries 71
desktops 31
files 301–303, 310, 353
automatically 31
forms 58
as ASCII text 94
as templates 93–94
graphics 353
menus as templates 105, 106,
108
OLE objects 392, 396, 424
projects 58, 115, 135–139
string lists 272
scope 174, 177–183
component names 55
data types 186
defined 177
exception handlers 241
form names 55
objects 222–226
redeclaring identifiers 181
screen coordinates
current drawing position 324
origin 314
screens, flickering 250
scroll bars 39, 240, 290
scroll boxes 39, 348
as containers 47
ScrollBar component 39
ScrollBox component 39, 47
scrolling bitmap images 348
SDI applications 96
searching for text
in string lists 270–271, 276
secondary tables (databases) 40
Select All command (Edit) 46
Select Bitmap dialog box 94
Select Menu command (Menu
Designer) 105, 106
Select Menu dialog box 106
SelectAll method 291
selecting
components 38, 46, 48
in containers 46
file types 297
IDE windows 140
menu items 109, 292
tabs 363
text 291
SelLength method 291
SelStart method 291
SelStart property 300
SelText property 291
semicolon (;)
end of statements 151, 165
if statements 165
Sender parameter 64–65
See also event handlers
example 343, 344
objects and 227
separator bars (menus) 102
sequential values, assigning to
constants 335
server applications See DDE
applications; OLE applications
ServerConv property 388
servers 40
services (defined) 382
See also DDE conversations
set types 203–204
Set Watch command (Code
Editor window) 259
SetFocus method 88, 92
SetLink method 385
sets 203
constructing 204
setting colors 42
setting environment
preferences 28–32
setting property values 16, 43, 55
design-time 53–56
in code 151, 152, 157
run-time 59–60
settings 116, 117
Shape component 39
shapes 39, 317–318, 337
See also graphics
filling 316, 344
outlining 315
sharing data 390, 396
sharing events 65–67, 339, 343
sharing forms 76–94
sharing project files 134–135, 144
ShortCut property 102
shortcuts
accesssing property values 54
adding to menus 102–103
menu commands 12
viewing Code Editor
pages 62
Shortint data type 156
Show method 85
ShowHelp property 296
ShowMessage procedure 81
ShowModal method 61, 85
silent exceptions 243
Single data type 156
Single Document Interface See
SDI applications
single quotation marks (‘) 200
Size command (Edit) 46
Size dialog box 46
sizing handles 46
Snap To Grid option 52
sorting strings 271
sound files See media players
source code 116, 117, 118, 119
See also code
checking syntax 141
debugging 247–265
viewing 12, 79, 139
Code Editor window 141
spacing in code 150
speed buttons 39
adding to tool bars 331–334
assigning glyphs 332–333
engaging as toggles 334
event handlers 227, 334, 336
grouping 333–334
initial state, setting 333
operational modes 332
SpeedBars 12
See also tool bars
Project Manager 131
SpeedButton component 39
SpeedMenus
Form 93
Menu Designer 105–106
Project Manager 130
spin boxes 42
SpinBox component 42
SpinEdit component 42
spreadsheets 280
SQL databases 40
SQL queries 40
stack 238
standalone debugger 249
Standard page (Component
palette) 38–39
starting Delphi 8
starting the debugger 249, 250
starting the Project Manager 130
statements 186
assignment 151–153
enumerated types and 195
for loops vs. 199
function calls 161
object variables 226
type compatibility 157
blocks 175
branching 162, 163–167
case 337
checking 248
compound 165
exception-handling 239
loop 168–174
arrays and 199
debugging 258
multiple 165, 167
debugger and 251
nested for 172–174
Index
449
nested if 165–166
stepping over 252
stepping through 252
terminating character 151,
165
with 225–226
status bars 39, 345–347
adding panels 346
aligning text 346
file-manager example 360,
364
OLE example 409–410
Project Manager 131
subdividing 360
updating information in 347
status lines 47
Stdctrls unit 291
Step Over command (Run) 252
stepping through code
(debugger) 252–253
statement by statement 252
to first executable
statement 253
stopping project execution 253,
264
Stored Procedure component 40
storing project files 115–116, 132
streams 426
Stretch property 58
string arrays 171, 270
string grids 39, 269
displaying data 172
string lists 269–277, 368
accessing strings 270, 276
at run time 274
adding objects 275–276,
366–367
copying 272
counting strings 270
creating 273–275
deleting strings 271
inserting strings 271, 276
iterating 272
loading 272
locating specific string
270–271, 276
manipulating strings 269–272
owner-draw controls
and 365, 366–367
saving 272
string reserved word 200
string types 156, 200–203
StringGrid component 39
string-handling routines 201
strings 200
See also string lists; substrings
accessing characters 201
450
Delphi User’s Guide
allocating memory 201
assigning values 200
associating graphics with 367
concatenating 201
debugging 262
finding length 201
inserting strings 201
null-terminated 156
size 201, 291
returning 201
starting position 201, 291
Strings property 270
StrPCopy function 387
StrToFloat function 238
StrToInt function 238
Style property
brushes 316, 344
owner-draw variants
365–366
pens 315, 343
subrange types 166, 197–199
subranges 197
subroutines 158
substrings
deleting specific 201
finding 201
returning position 201
string lists and 272
swap files 238
symbol tables 249
symbolic debugging
information 249–250
symbols 13, 154
local 249
Syntax Check command
(Compile) 142
syntax errors 154, 158, 159
System menu 86
removing from forms 87
System page (Component
palette) 41
system resources
preventing loss 231
protecting 233, 234–236
releasing 234, 235
SysUtils unit 236, 372
T
Tab key 54, 90, 91
tab order 90–91
changing 90
testing 91
Tab Order command (Edit) 90
TabbedNotebook
component 39, 47
tabbing through dialog
boxes 90–91
tabbing through forms and
components 54
Table component 40
TabOrder property 90
tabs 39
See also notebooks
changing 363–364
default width 368
draw-item events 369
file-manager application 362,
363–364
measure-item events 368
naming 269
owner-draw styles 365
TabSet component 39
TabStop property 90, 91
TCheckBox component 222
TComponent type 221
TDragDropEvent type 422
technical support 3
templates 29, 30
adding to projects 78–79
forms 10
adding to galleries 93,
126–127
opening for reference 79
specifying as default 125
MDI applications 281
menus 100, 106–109
loading 106
projects 10, 115, 122–123
adding to galleries
126–127
saving 136
specifying as default 124
saving forms as 93–94
user-defined 126–127
Templates page (Browse
Gallery) 78
temporary windows 60
terminating applications 350
file-manager example 362
OLE example 404
text editor example 309–312
testing applications 141, 143, 248
testing forms 112
text 200, 381
See also lists; memos; outlines
aligning 289
in panels 346
changing 300
copying 291
with DDE links 389
deleting 291–292
displaying 39
in columns and rows 39
editing 38
entering 38, 83, 269
MDI applications 288–295
OLE applications 419, 422
owner-draw controls and 365
printing 305–309
specified 307
searching for
in string lists 270–271, 276
selecting 291
status bars 346
word wrapping 290
text editors 279
See also Code Editor
text files See files
text gauges 42
Text property
DDE items 385, 388
text strings See string lists; strings
TEXTEDIT.DPR 279
TextOut method 323
TForm class 76
TForm component 216, 219
instantiating 217
third-party books 429
third-party components 42, 68,
69, 70
naming 70
third-party help compilers 118
three-dimensional panels 346
tiling child windows 287
time 38
Timer component 38, 41
timers 38, 41, 228
title bars 87
Code Editor 12
Title property 64
titles 38
See also captions
TObject type 221
Toggle Breakpoint command
(Code Editor window) 254, 256
Toggle Form/Unit command
(View) 140
toggles 42, 334
TOLEDropNotify objects 422,
423
tool bars 39, 47, 331
adding buttons 331–334
displaying 342
hiding 340–342
multiple 342
OLE example 408–409
status bars vs. 345
tools 9–10, 121
See also drawing tools
topics (defined) 383
See also DDE conversations
TPrinter object 209, 305
Trace Into command (Run) 252
tracking text changes 300
transactions (SQL) 40
triangles 318
try reserved word 232
except reserved word
and 239
finally reserved word
and 235
TStrings type 274
Turbo Debugger 249
tutors 2–3
two-dimensional arrays 200
type checking 103, 153
ranges 157, 199
type declarations 228
type reserved word 120, 185, 335
typecasting
exceptions 238
string lists 368
types 153
See also specific predefined
array 199–203
assigning 157
constants 158
variables 154
compatibility 157
converting 155, 238
declaring 26, 185, 186,
195–205
enumerated 195–197
declaring 335–336
exception handling 237
mismatch errors 155
naming 186, 335
object 188, 205, 244
objects and 217, 218, 224,
226, 228
predefined, listed 156
record 204–205
returning values 195
scope 186
set 203–204
string 200–203
subrange 197–199
typography 3
U
undefined forward errors 67
undefined instructions 238
Undelete command (Edit) 50
underlining letters in menu
commands 102
uninitialized memory 238
unit files 24, 116, 117, 119–121,
129
associating with projects 119,
120
backup 116
naming 119
opening 134
sharing 134–135
unit reserved word 206
units 119, 187, 206–210
accessing 206, 207, 209
adding to projects 25, 27,
119, 209, 210
browsing 13
creating new 120, 134, 209
custom components 71
defined 206
deleting 135
moving among 79, 140
predefined 206, 210
preexisting 135
private vs. public 225
referencing 26, 286
restricting access 209
source code, viewing 12, 23,
25, 139, 140
visibility of routines 207, 208
without forms 27, 121
writing 206–208, 209
begin..end blocks 175–176
headers 206
Units command (View) 23, 62,
79
unknown identifiers 159, 179
until reserved word 168
untyped pointers 156
Update button (Project
Manager) 131
Update command (Project
Manager) 131
updating data
DDE applications 386,
388–390
OLE objects 395
updating file lists 364
uppercase characters 272
user interactions 17
See also events
user interfaces 76
testing 248
user options 39, 331
mutually exclusive 38, 333
user-defined exceptions 244–245
user-defined templates 126–127
Index
451
user-defined types 185, 186,
195–205
uses reserved word 76, 77, 207
implementation reserved
word and 209
interface reserved word
and 208
V
valid characters in
identifiers 154
valid drives, getting 362–363
value parameters 191–193, 194
values 203
See also constants
assigning 151–153
fields in records 205
functions 161
placing limits 197
to properties See setting
property values
to strings 200
type compatibility
and 157
zeros, to arrays 199
changing while
debugging 261, 262–263
comparing 158, 164
declaring as identifiers 196
decremental 172
equal 158
incremental 42, 171
numeric, valid ranges 156
return See functions
sequential 335
string 201
True/False 156
types, returning 195
var reserved word 120, 155, 193
variable parameters 193–194
variables 26, 179
assigning values 151, 152, 157
control 170
declaring 154–157
character arrays 200
example 217, 226
for statements and 170
procedures and 160
text editor example 299
defined 154
examining 258–263
giving a type 154
global 177, 181–183
invalid 194
452
Delphi User’s Guide
local 177, 180
naming 154
objects and 222, 226–228, 229
values, limiting 197
watching 259–261
VBX controls 42, 70
VBX page (Component
palette) 42
VCL See Visual Component
Library
VCRs See media players
version control 94, 144
vertical scroll bars 290
video files See media players
View Form button (Project
Manager) 131
View Form command (Project
Manager) 131
View Form dialog box 63, 79
View menu 139
View Source command
(Breakpoint List window) 256
View Source command (Call
Stack) 264
View Unit button (Project
Manager) 131
View Unit command (Project
Manager) 131
View Unit dialog box 23, 62, 80
viewing
bitmaps 39, 42
breakpoints 255, 258
child windows 287
code 12, 79, 139
Code Editor window 141
debugger and 251
shared events 65
specific event handlers 63
components 11
data 40, 172
data types 153
directories 42, 363, 366
files 280
in list boxes 297
project 12, 23, 25
forms 79–80, 139
grids 31
menus 104, 105
messages 80, 409
non-textual information 39
OLE objects as icons 411, 414
property values 54
shared 54, 55
text 39
in columns and rows 39
tool bars 342
Visible property
Enabled property vs. 292
menus 110
tool bars 342
Visual Basic controls 42, 70
Visual Component Library
(VCL) 42
adding components 69, 70
customizing 68–73
deleting components 69
visual components 37, 38–42
W
Watch List window 259–261
opening 259
Watch Properties dialog
box 259, 260
watches 259–261
setting 259
stopping 260
Watches command (View) 259
while reserved word 169
while statements 169–170, 174
for statements vs. 170
whole numbers 156, 260, 262
Width property
pens 315, 344
Window List command
(View) 140
Window List dialog box 140
Window menu, creating 283,
287
WindowMenu property 288
windows
closing 309–310
flickering 250
moving among IDE 140
temporary 60
Windows applications See
applications
Windows common dialog boxes
See common dialog boxes
Windows resources 116, 234
with reserved word 205
with statements 225–226
.WMF files 117
See also metafiles
Word data type 156
word wrapping 290
word-processing
applications 280
WordWrap property 290
writing units 206–208, 209
begin..end blocks 175–176
headers 206
User’s Guide
Delphi
™
Borland International, Inc., 100 Borland Way
P.O. Box 660001, Scotts Valley, CA 95067-0001
Redistributable files
For a list of redistributable files, please see the REDIST.TXT file in the DELPHI\DOC directory.
Borland may have patents and/or pending patent applications covering subject matter in this document. The
furnishing of this document does not give you any license to these patents.
COPYRIGHT © 1995 Borland International. All rights reserved. All Borland products are trademarks or registered
trademarks of Borland International, Inc. Other brand and product names are trademarks or registered trademarks of
their respective holders.
Printed in the U.S.A.
1E0R195
9596979899-987654321
W1
Contents
Introduction
1
The uses clause in the .PAS file . . . . . . .
The form (.DFM) file. . . . . . . . . . . . . .
The type declaration in the .DFM file . . .
Source code for units without forms . . . .
Installing Delphi . . . . . . . . . . . . . . . . . . . 1
Documentation overview . . . . . . . . . . . . . . 2
Using this manual . . . . . . . . . . . . . . . . . .2
Using Help. . . . . . . . . . . . . . . . . . . . . . .2
Using Interactive Tutors . . . . . . . . . . . . . . .2
25
26
26
27
Accessing environment options preferences . 28
Gallery options . . . . . . . . . . . . . . . . . . 29
Use On New Form option .
Use On New Project . . . .
Enabling the Gallery options .
Desktop Contents option . . .
Desktop Only . . . . . . . .
Desktop And Symbols . . .
Autosave Options . . . . . . .
Editor Files . . . . . . . . . .
Desktop . . . . . . . . . . . .
Form Designer options (grid).
Debugging options . . . . . . .
Integrated Debugging . . .
Step Program Block . . . . .
Break On Exception . . . . .
Minimize On Run . . . . . .
Compiling option. . . . . . . .
Part I
5
Chapter 1
Introducing Delphi
.
.
.
.
Setting environment preferences . . . . . . . . . 28
Manual conventions . . . . . . . . . . . . . . . . . 3
Contacting Borland. . . . . . . . . . . . . . . . . . 3
Getting started with Delphi
.
.
.
.
7
The Delphi programming environment . . . . . 7
Starting Delphi . . . . . . . . . . . . . . . . . . . .8
Elements of the Delphi interface . . . . . . . . . . 8
Elements visible upon starting Delphi. . . . . . .9
Form . . . . . . . . . . . . . . . . . . . . . . . . . 9
Form tools. . . . . . . . . . . . . . . . . . . . . 9
Component palette. . . . . . . . . . . . . . . . 10
Object Inspector . . . . . . . . . . . . . . . . . 11
Object selector . . . . . . . . . . . . . . . . . 11
Code Editor . . . . . . . . . . . . . . . . . . . . 11
SpeedBar . . . . . . . . . . . . . . . . . . . . . 12
Elements not visible upon starting Delphi . . . 12
Project Manager . . . . . . . . . . . . . . . . . 12
Menu Designer . . . . . . . . . . . . . . . . . . 13
Integrated debugger . . . . . . . . . . . . . . . 13
ObjectBrowser . . . . . . . . . . . . . . . . . . 13
Image editor. . . . . . . . . . . . . . . . . . . . 14
.
.
.
.
.
.
.
.
.
.
.
.
.
.
.
.
.
.
.
.
.
.
.
.
.
.
.
.
.
.
.
.
.
.
.
.
.
.
.
.
.
.
.
.
.
.
.
.
.
.
.
.
.
.
.
.
.
.
.
.
.
.
.
.
.
.
.
.
.
.
.
.
.
.
.
.
.
.
.
.
.
.
.
.
.
.
.
.
.
.
.
.
.
.
.
.
.
.
.
.
.
.
.
.
.
.
.
.
.
.
.
.
.
.
.
.
.
.
.
.
.
.
.
.
.
.
.
.
.
.
.
.
.
.
.
.
.
.
.
.
.
.
.
.
29
30
31
31
31
31
31
31
31
31
32
32
32
32
32
32
Summary . . . . . . . . . . . . . . . . . . . . . . . 32
Part II
Fundamental skills
35
Chapter 2
Using components and code
37
Delphi components . . . . . . . . . . . . . . . . . 37
The form component . . . . . . . . . . . . . . . 38
Default Component palette pages. . . . . . . . 38
Installing additional components . . . . . . . . 42
The Delphi development model . . . . . . . . . 14
Designing a form . . . . . . . . . . . . . . . . . . 15
Creating a new form. . . . . . . . . . . . . . . 15
Adding components to the form. . . . . . . . 15
Setting component properties . . . . . . . . . 16
Manipulating components in your forms . . . . 43
Setting form properties . . . . . . . . . . . . .
The Name property . . . . . . . . . . . . . .
Adding components to the form . . . . . . .
Sizing a component as you add it . . . . . .
Selecting components in the form . . . . . . .
Resizing components in the form . . . . . .
Adding multiple copies of a component . .
Grouping components . . . . . . . . . . . . .
Cutting, copying, and pasting components .
Deleting and restoring components. . . . . .
Aligning components . . . . . . . . . . . . . .
Using the form grid as an alignment guide.
Locking the position of components. . . . .
Controlling the creation order of nonvisual
components . . . . . . . . . . . . . . . . . . .
The Name property . . . . . . . . . . . . . . 16
Running the program . . . . . . . . . . . . . . 17
Handling events . . . . . . . . . . . . . . . . . . 18
Starting a new project . . . . . . . . . . . . . . . 19
Calling procedures and functions from
event handlers . . . . . . . . . . . . . . . . . 20
Distributing your application . . . . . . . . . 22
Overview of Delphi projects . . . . . . . . . . . 22
The project (.DPR) file . . . . . . . . . . . . . . . 22
Viewing the .DPR file . . . . . . . . . . . . . . 23
The uses clause in the .DPR file . . . . . . . . 24
The unit (.PAS) file . . . . . . . . . . . . . . . . . 24
Viewing the .PAS file . . . . . . . . . . . . . . 25
i
.
.
.
.
.
.
.
.
.
.
.
.
.
43
44
44
45
46
46
47
47
49
50
50
52
52
. 52
Setting component properties . . . . . . . . . . 53
Viewing forms and units. . . . . . . . . . . . . . 79
Building forms. . . . . . . . . . . . . . . . . . . . 80
How the Object Inspector displays
properties . . . . . . . . . . . . . . . . . . . . . 54
Tab-jumping to property names in the Object
Inspector . . . . . . . . . . . . . . . . . . . . . . 54
Displaying and setting shared properties. . . . 55
Scope of the Name property . . . . . . . . . . 55
Using property editors. . . . . . . . . . . . . . . 56
Dialog box editors . . . . . . . . . . . . . . . . 56
Using routines to display dialog boxes . . . . . 80
Displaying message boxes . . . . . . . . . . . 80
ShowMessage procedure.
MessageDlg() function . .
Creating simple input forms
Masking input characters . .
.
.
.
.
.
.
.
.
.
.
.
.
.
.
.
.
.
.
.
.
.
.
.
.
.
.
.
.
.
.
.
.
.
.
.
.
81
81
82
83
Developing custom dialog boxes . . . . . . . . 85
Making a dialog box modal or modeless . . . 85
Loading an image . . . . . . . . . . . . . . . 56
Sizing an image . . . . . . . . . . . . . . . . 58
Displaying a dialog box modelessly . . .
Displaying a dialog box modally . . . . .
Setting form properties for a dialog box . .
Specifying a caption for the dialog box. .
Providing command buttons . . . . . . . . .
Executing button code on Esc . . . . . . .
Executing button code on Enter. . . . . .
Closing a dialog box when the user
chooses a button . . . . . . . . . . . . . .
Creating standard-command buttons . . . .
Setting the tab order . . . . . . . . . . . . . .
Testing the tab order . . . . . . . . . . . . . .
Removing a component from the tab order
Enabling and disabling components . . . .
Setting the focus in a dialog box . . . . . . .
Setting focus at design time . . . . . . . .
Setting focus at run time . . . . . . . . . .
Saving your project. . . . . . . . . . . . . . . . . 58
Setting properties at run time. . . . . . . . . . . 59
Using properties to customize forms at run
time. . . . . . . . . . . . . . . . . . . . . . . . . 59
Working with code . . . . . . . . . . . . . . . . . 60
Generating the default event handler . . . . . . 60
Displaying the form as a dialog box. . . . . . 60
Working with the Code Editor . . . . . . . . . . 62
Viewing pages in the Code Editor. . . . . . . 62
Locating an existing event handler. . . . . . . . 63
Locating default event handlers . . . . . . . . 63
Modifying an existing event handler . . . . . 63
Associating an event with an existing event
handler . . . . . . . . . . . . . . . . . . . . . . . 64
Using the Sender parameter . . . . . . . . . . 64
Displaying and coding shared events. . . . . 65
Modifying a shared event handler . . . . . . 66
Deleting event handlers . . . . . . . . . . . . . 67
Saving a form as a template . . . . . . . . . .
Saving form files as ASCII text. . . . . . . . .
Converting text files back to .DFM format .
Sample ASCII Form file . . . . . . . . . . . .
MDI and SDI forms . . . . . . . . . . . . . . .
Customizing the Delphi Visual Component
Library (VCL) . . . . . . . . . . . . . . . . . . . 68
Adding and removing components from the
library. . . . . . . . . . . . . . . . . . . . . . . . 69
Adding VBX controls . . . . . . . . . . . . . . 70
Handling an unsuccessful compilation . . . . . 70
Saving library source code . . . . . . . . . . . 71
Using the Component Expert. . . . . . . . . . . 71
Using customized libraries . . . . . . . . . . . . 72
.
.
.
.
.
.
.
85
86
86
87
87
88
88
.
.
.
.
.
.
.
.
.
.
.
.
.
.
88
88
90
91
91
91
92
92
92
93
94
95
95
96
Creating form menus. . . . . . . . . . . . . . . . 98
Opening the Menu Designer . . . . . . . . . .
Building menus . . . . . . . . . . . . . . . . .
Naming menus . . . . . . . . . . . . . . . . .
Naming the menu items. . . . . . . . . . . .
Adding, inserting, and deleting menu
items . . . . . . . . . . . . . . . . . . . . . .
. 99
.100
.101
.101
.101
Adding separator bars . . . . . . . . . . . .102
Specifying accelerator keys and keyboard
shortcuts . . . . . . . . . . . . . . . . . . .102
Creating nested (sub)menus . . . . . . . . . .103
Creating nested menus by demoting
existing menus. . . . . . . . . . . . . . . .103
Moving menu items . . . . . . . . . . . . . . .104
Viewing the menu . . . . . . . . . . . . . . . .104
Summary. . . . . . . . . . . . . . . . . . . . . . . 73
Chapter 3
Building forms and menus
.
.
.
.
75
What is a form? . . . . . . . . . . . . . . . . . . . 76
Designing usable forms . . . . . . . . . . . . . . 76
Sharing forms . . . . . . . . . . . . . . . . . . . . 76
Making forms visible to other forms . . . . . 76
Enabling forms to reference each other . . . . 77
Modifying a shared form . . . . . . . . . . . . 77
Using the Form Templates of the Browse
Gallery . . . . . . . . . . . . . . . . . . . . . . . 77
Adding a template form to a project . . . . . 78
Opening a Form Template for reference
only . . . . . . . . . . . . . . . . . . . . . . 79
Editing menu items without opening the
Menu Designer . . . . . . . . . . . . . . . .
Using the Menu Designer SpeedMenu . . .
Commands on the SpeedMenu . . . . . .
Switching among menus at design time .
Using menu templates . . . . . . . . . . . .
Saving a menu as a template . . . . . . . . .
ii
.
.
.
.
.
.
.104
.105
.105
.106
.106
.108
Naming conventions for template menu
items and event handlers . . . . . . . . . . . 108
Adding templates to the Gallery . . . . .
Project options . . . . . . . . . . . . . . . .
Default check box. . . . . . . . . . . . . .
Form options . . . . . . . . . . . . . . . .
Application page . . . . . . . . . . . . . .
Associating menu events with code . . . . . . 109
Menu component events . . . . . . . . . . . . 109
Handling menu item events . . . . . . . . . . 109
Associating a menu item with an existing
event handler . . . . . . . . . . . . . . . . . . 110
Adding menu items dynamically . . . . . . . 110
Merging menus . . . . . . . . . . . . . . . . . . 111
Title . . . . . . . . . . . . . . . . .
Help file. . . . . . . . . . . . . . .
Icon . . . . . . . . . . . . . . . . .
Compiler page . . . . . . . . . . . .
Linker page . . . . . . . . . . . . . .
Directory and Conditional options
Specifying the active menu: Menu
property . . . . . . . . . . . . . . . . . . . 111
Determining the order of merged menu
items: GroupIndex property . . . . . . . 111
.
.
.
.
.
.
.
.
.
.
.
.
.
.
.
.
.
.126
.127
.127
.127
.128
.
.
.
.
.
.
.
.
.
.
.
.
.128
.128
.128
.128
.128
.129
Managing project content . . . . . . . . . . . . 129
Using the Project Manager . . . . . . . . . . . .129
Displaying the Project Manager . . . . . . . .130
The Project Manager window . . . . . . . . .130
Importing resource (.RC) files. . . . . . . . . . 112
Managing run-time behaviors of forms . . . . 112
Specifying a form as the project main form. . 112
Specifying forms to auto-create. . . . . . . . . 113
Controlling the form auto-create order . . . . 113
Project Manager SpeedBar . . .
Project Manager status bar. . .
Project Manager file list. . . . .
Project Manager Path column .
Summary. . . . . . . . . . . . . . . . . . . . . . 114
.
.
.
.
.
.
.
.
.
.
.
.
.
.
.
.
.
.
.
.
.
.
.
.
.131
.131
.132
.132
Integrating forms and units into a project . . .133
Creating new form units . . . . . . . . . . . .134
Creating new source code units . . . . . . . .134
Creating new component units. . . . . . . . .134
Sharing files from other projects or
directories . . . . . . . . . . . . . . . . . . . .134
Using Borland Pascal source code units. . . .135
Removing constituent files from a project . . .135
Saving projects and individual project files . .135
Saving a project . . . . . . . . . . . . . . . . . .136
Chapter 4
Managing projects, files,
and directories
.
.
.
.
.
.
.
.
.
.
.
115
What is a project? . . . . . . . . . . . . . . . . . 115
Project directories. . . . . . . . . . . . . . . . . 115
Constituent files of a project. . . . . . . . . . . 116
Files generated at design time . . . . . . . . . 116
Compiler-generated project files. . . . . . . . 117
Non-Delphi resource files. . . . . . . . . . . . 117
First project save. . . . . . . . . . . . .
Subsequent saves . . . . . . . . . . . .
Naming unit and project source code
files . . . . . . . . . . . . . . . . . . .
Saving a separate version of the project
file. . . . . . . . . . . . . . . . . . . . . .
Saving files. . . . . . . . . . . . . . . . . .
File|Save versus File|Save As . . . .
Creating a backup of an entire project. .
Understanding the files in a project . . . . . . 118
The project source code (.DPR) file. . . . . . . 118
Unit source code (.PAS) files . . . . . . . . . . 119
Form-associated unit files. . . . . . . . . . . . 120
. . .136
. . .136
. . .136
. .
. .
. .
. .
Navigating among project components . . .
Viewing forms and units . . . . . . . . . . .
Toggling between form image and unit
source code. . . . . . . . . . . . . . . . .
Bringing a window to the front. . . . . . . .
Using the Project Manager to view or edit
units . . . . . . . . . . . . . . . . . . . . . .
Viewing the project source code (.DPR)
file. . . . . . . . . . . . . . . . . . . . . . . .
Form unit type declaration . . . . . . . . . 120
Form unit var declaration. . . . . . . . . . 120
Form unit compiler directive. . . . . . . . 120
Unit files for procedures and functions . . . . 121
Unit files for components . . . . . . . . . . . . 121
Unit object code (.DCU) files . . . . . . . . . . 121
Graphical form (.DFM) files. . . . . . . . . . . 121
Beginning new projects . . . . . . . . . . . . . 122
Beginning a project with a Project Template . 122
Customizing project options . . . . . . . . . . 123
Environment options. . . . . . . . . . . . . . . 123
Environment preferences . . . . . . . . . . . . 123
.137
.138
.138
.139
.139
.139
.140
.140
.140
.141
Compiling, building, and running projects . . 141
Autosave options . . . . . . . . . . . . . . 123
Gallery. . . . . . . . . . . . . . . . . . . . . 124
Checking source code syntax . . . . . . .
Compiling a project . . . . . . . . . . . . .
Obtaining compile status information. .
Building a project . . . . . . . . . . . . . .
Running a project . . . . . . . . . . . . . .
Executing a project from Windows . . .
Gallery options . . . . . . . . . . . . . . . . . . 124
Specifying the default new project . . . . . . 124
Specifying a Project Template . . . . . . . 124
Specifying a Project Expert . . . . . . . . . 125
Specifying the default new form. . . . . . . . 125
Specifying the default main form . . . . . . . 125
iii
.
.
.
.
.
.
.
.
.
.
.
.
.141
.142
.143
.143
.143
.143
Managing multiple project versions and
team development . . . . . . . . . . . . . . . 144
Enabling team development support . . . . . 144
A scope example . . . . . . . . . . . . . . . . . .178
Redeclaring identifiers in a different scope . .181
Using a global variable . . . . . . . . . . . . .181
Summary. . . . . . . . . . . . . . . . . . . . . . 145
Writing a procedure or function . . . . . . . . 183
Writing a procedure or function header . . . .185
Writing a procedure or function block . . . . .185
Declarations within a procedure or
function block . . . . . . . . . . . . . . . . . .185
Part III
Programming topics
147
Type declarations . . . . . . . . . . . . .
Variable and constant declarations . . .
Ordering the declaration parts . . . . .
Writing the statement part . . . . . . . . .
Assigning a return value in a function .
Chapter 5
Writing Object Pascal code
149
Writing readable code . . . . . . . . . . . . . . 150
Coding style . . . . . . . . . . . . . . . . . . . . 150
Commenting your code . . . . . . . . . . . . . 150
Writing assignment statements. . . . . . . . . 151
Assigning values to properties and variables 152
Declaring identifiers . . . . . . . . . . . . . . . 153
Declaring variables . . . . . . . . . . . . . . . . 154
Naming a variable . . . . . . . . . . . . . . . . 154
Giving a variable a type . . . . . . . . . . . . . 154
.
.
.
.
.
.185
.186
.186
.186
.186
Positioning a procedure or function in your
code . . . . . . . . . . . . . . . . . . . . . . .
Forward declarations . . . . . . . . . . . . .
Passing parameters . . . . . . . . . . . . . . .
Value parameters. . . . . . . . . . . . . . . .
Variable parameters . . . . . . . . . . . . . .
Constant parameters . . . . . . . . . . . . . .
Deciding which kind of parameter to use .
.187
.189
.190
.191
.193
.194
.194
Defining new data types . . . . . . . . . . . . . 195
Data types. . . . . . . . . . . . . . . . . . . 156
Type and assignment compatibility. . . . 157
Enumerated types . . . . . . . . . . . . . .
Subrange types . . . . . . . . . . . . . . . .
Array types . . . . . . . . . . . . . . . . . .
Multidimensional arrays . . . . . . . . .
String types: Arrays of characters . . . .
Declaring constants. . . . . . . . . . . . . . . . 157
Calling procedures and functions . . . . . . . 158
Calling procedures . . . . . . . . . . . . . . . . 158
Cut, Copy, Paste, and Clear All: An
example . . . . . . . . . . . . . . . . . . . . . 159
Calling procedures with parameters . . . . . 160
Calling functions . . . . . . . . . . . . . . . . . 161
Assigning a function’s returned value . . . . 161
Using functions that return a Boolean
value to branch code. . . . . . . . . . . . . . 162
.
.
.
.
.
.
.
.
.
.
.195
.197
.199
.200
.200
Finding the length of a string . . . . . . . .201
Set types . . . . . . . . . . . . . . . . . . . . . . .203
Record types . . . . . . . . . . . . . . . . . . . .204
A few words about objects . . . . . . . . . . . .205
Understanding Object Pascal units. . . . . . . 206
What is a unit? . . . . . . . . . . . . . . . . . .
The structure of a unit. . . . . . . . . . . . . .
Interface part . . . . . . . . . . . . . . . . . .
Implementation part . . . . . . . . . . . . . .
Initialization part . . . . . . . . . . . . . . . .
How units are used . . . . . . . . . . . . . . .
The uses clause in the implementation part
Writing a unit “from scratch” . . . . . . . . .
Adding an existing unit to a project. . . . . .
Controlling the flow of code execution . . . . 163
The if statement . . . . . . . . . . . . . . . . . . 163
Using an else part in an if statement . . . . . 164
Writing multiple statements within an if
statement . . . . . . . . . . . . . . . . . . . . 165
Nesting if statements . . . . . . . . . . . . . . 165
The case statement . . . . . . . . . . . . . . . . 166
Writing loops . . . . . . . . . . . . . . . . . . . 168
The repeat statement. . . . . . . . . . . . . . . 168
The while statement . . . . . . . . . . . . . . . 169
The for statement. . . . . . . . . . . . . . . . . 170
.206
.206
.207
.208
.208
.209
.209
.209
.210
Summary . . . . . . . . . . . . . . . . . . . . . . 210
Chapter 6
A counting example . . . . . . . . . . . . . 171
Using nested for loops. . . . . . . . . . . . . . 172
Deciding which loop to use. . . . . . . . . . . 174
Programming with Delphi objects
215
What is an object? . . . . . . . . . . . . . . . . . 215
Examining a Delphi object . . . . . . . . . . . .216
Changing the name of a component. . . . . .218
Object Pascal blocks . . . . . . . . . . . . . . . 174
Blocks within event handlers . . . . . . . . . . 175
Blocks within units . . . . . . . . . . . . . . . . 175
Blocks within blocks . . . . . . . . . . . . . . . 176
Inheriting data and code from an object. . . . 219
Understanding scope. . . . . . . . . . . . . . . 177
Object scope . . . . . . . . . . . . . . . . . . . . 222
Accessing declarations that are not within
scope . . . . . . . . . . . . . . . . . . . . . . . 178
Accessing components on another form . . . .223
Scope and descendants of an object . . . . . . .223
Objects, components, and controls . . . . . . .221
iv
Overriding a method . . . . . . . . . . . . . . 223
Public and private declarations. . . . . . . . . 224
Accessing object fields and methods. . . . . . 225
Assigning values to object variables . . . . . . 226
Creating nonvisual objects . . . . . . . . . . . 228
Restarting the program. . . . . . . . . . . . . . 253
Using breakpoints. . . . . . . . . . . . . . . . . 254
Creating an instance of an object . . . . . . . . 229
Destroying your object. . . . . . . . . . . . . . 229
Setting breakpoints . . . . . . . . . . . . . .
Invalid breakpoints. . . . . . . . . . . . . .
Setting breakpoints after starting a
program . . . . . . . . . . . . . . . . . . .
Working with breakpoints . . . . . . . . . .
Viewing and editing code at a breakpoint
Disabling and enabling breakpoints . . . .
Deleting breakpoints . . . . . . . . . . . . .
Modifying breakpoint properties . . . . . .
Creating conditional breakpoints . . . . .
Summary. . . . . . . . . . . . . . . . . . . . . . 230
Chapter 7
Writing robust applications
231
Protecting blocks of code . . . . . . . . . . . . 231
Responding to exceptions . . . . . . . . . . . . 232
Executing cleanup code . . . . . . . . . . . . . 232
Handling the exception . . . . . . . . . . . . . 232
Exceptions and the flow of execution . . . . . 232
Nesting exception responses . . . . . . . . . . 233
.255
.255
.255
.256
.256
.257
.257
Examining program data values . . . . . . . . 258
Watching expressions . . . . . . . . . . . . . .
Formatting watch expressions . . . . . . . .
Disabling a watch. . . . . . . . . . . . . . . .
Deleting a watch . . . . . . . . . . . . . . . .
Evaluating and modifying expressions. . . .
Evaluating expressions . . . . . . . . . . . .
Modifying the values of variables . . . . . .
Handling RTL exceptions . . . . . . . . . . . . 236
What are the RTL exceptions? . . . . . . . . . 236
Creating an exception handler . . . . . . . . . 239
Providing default exception handlers. . . . . 241
Handling classes of exceptions . . . . . . . . . 241
Reraising the exception . . . . . . . . . . . . . 242
.259
.260
.260
.260
.261
.261
.262
Viewing function calls . . . . . . . . . . . . . . 263
Handling component exceptions. . . . . . . . 242
Silent exceptions . . . . . . . . . . . . . . . . . 243
Defining your own exceptions . . . . . . . . . 244
Navigating to function calls . . . . . . . . . . .264
Handling hardware and language
exceptions. . . . . . . . . . . . . . . . . . . . . 264
Summary . . . . . . . . . . . . . . . . . . . . . . 265
Declaring an exception object type. . . . . . . 244
Raising an exception . . . . . . . . . . . . . . . 244
Setting the exception address . . . . . . . . . 244
Part IV
Summary. . . . . . . . . . . . . . . . . . . . . . 245
Sample applications
Chapter 8
267
Chapter 9
247
Working with string lists
Types of bugs . . . . . . . . . . . . . . . . . . . 247
Run-time errors . . . . . . . . . . . . . . . . . . 247
Logic errors . . . . . . . . . . . . . . . . . . . . 248
269
Manipulating the strings in a list . . . . . . . . 269
Counting the strings in a list . .
Accessing a particular string . .
Finding the position of a string
Adding a string to a list . . . . .
Moving a string within a list . .
Deleting a string from a list. . .
Copying a complete string list .
Iterating the strings in a list. . .
Planning a debugging strategy . . . . . . . . . 248
Starting a debugging session . . . . . . . . . . 249
Generating debugging information . . . . . . 249
Before you begin . . . . . . . . . . . . . . . . . 250
Running your program . . . . . . . . . . . . . 250
Specifying program arguments . . . . . . . . 250
Controlling program execution. . . . . . . . . 251
.
.
.
.
.
.
.
.
.
.
.
.
Customizing the breakpoint and execution
point colors . . . . . . . . . . . . . . . . . . . .258
What kind of resources need protection? . . . 234
Creating a resource-protection block . . . . . 235
Running to the cursor location .
The execution point . . . . . .
Stepping through code. . . . . .
Trace Into . . . . . . . . . . . .
Step Over . . . . . . . . . . . .
. .254
. .255
Setting Boolean conditions. . . . . . . . . .257
Using pass counts . . . . . . . . . . . . . . .258
Protecting resource allocations . . . . . . . . . 234
Using the integrated debugger
Debugging your application startup code . .253
Running to a breakpoint . . . . . . . . . . . . .253
Pausing the program . . . . . . . . . . . . . . .253
.
.
.
.
.
.
.
.
.
.
.
.
.
.
.
.
.
.
.
.
.
.
.
.
.
.
.
.
.
.
.
.
.
.
.
.
.
.
.
.
.
.
.
.
.
.
.
.
.
.
.
.
.
.
.
.
.
.
.
.
.
.
.
.
.270
.270
.270
.271
.271
.271
.272
.272
Loading and saving string lists . . . . . . . . . 272
Creating a new string list . . . . . . . . . . . . 273
. . . . . . . 251
. . . . . . . . 251
. . . . . . . 252
. . . . . . . . 252
. . . . . . . . 252
Short-term string lists . . . . . . . . . . . . . . .273
Long-term string lists . . . . . . . . . . . . . . .274
v
Adding objects to a string list . . . . . . . . . . 275
Loading the file . . . . . . . . . . . . . . . .300
Using the Save dialog box . . . . . . . . . . . .301
SaveDialog component properties. . . . . . .301
Saving the text file . . . . . . . . . . . . . . . . .301
Creating a backup file . . . . . . . . . . . . . .302
Using the Font dialog box . . . . . . . . . . . .303
Font dialog box component properties . . . .303
Changing the font in the Memo component. .304
Operating on objects in a string list . . . . . . 276
Accessing associated objects . . . . . . . . . . 276
Adding associated objects . . . . . . . . . . . 276
Summary. . . . . . . . . . . . . . . . . . . . . . 277
Chapter 10
Text editor example
279
Printing the text file . . . . . . . . . . . . . . . . 305
Multiple Document Interface (MDI)
applications . . . . . . . . . . . . . . . . . . . 280
Using the printer object . . . . . . . . . . . . . .305
Canvas . . . . . . . . . . . . . . . . . . . . .305
Fonts. . . . . . . . . . . . . . . . . . . . . . .305
Creating the MDI frame form. . . . . . . . . . 281
The FormStyle property. . . . . . . . . . . . . 281
Creating the MDI child form . . . . . . . . . . 281
Creating the application menus . . . . . . . . 282
Creating the frame form menu. . . . . . . . . 283
Creating the child form menu . . . . . . . . . 283
Merging the application menus . . . . . . . . 284
Creating child windows at run time . . . . . . 285
Referencing other units . . . . . . . . . . . . . 286
Using the printer dialog box(es) . . . . . . . . .306
Print dialog box component properties . . . .306
MinPage / MaxPage . . . . . . . . . . . .
Options | poPageNums . . . . . . . . . .
Options | poPrintToFile . . . . . . . . . .
Options | poSelection . . . . . . . . . . .
PrintRange . . . . . . . . . . . . . . . . . .
Using the Printer Setup dialog box
component. . . . . . . . . . . . . . . . . . .
Handling the File | Print Setup OnClick
event. . . . . . . . . . . . . . . . . . . . .
Directing your text file to the printer . . . .
Downloading the text . . . . . . . . . . . . .
Working with open child windows . . . . . . 287
Arranging and accessing open child
windows . . . . . . . . . . . . . . . . . . . . . 287
Coding the Window menu commands . . . . 287
Including a list of open documents in a
menu . . . . . . . . . . . . . . . . . . . . . . . 288
Providing an area for text manipulation . . . 288
Adding the Memo component . . . . . . . . . 288
.306
.306
.307
.307
.307
.307
.307
.307
.308
Printing the contents of the memo . . . . . . .308
Exiting gracefully . . . . . . . . . . . . . . . . . 309
Closing a window . . . . . . . . . . . . . . .
Closing the child window. . . . . . . . . .
Determining whether the file has been
modified. . . . . . . . . . . . . . . . . . . .
Exiting the application . . . . . . . . . . . .
Manipulating text in a Memo component . . 289
Setting text alignment and word wrapping . 289
Setting text alignment . . . . . . . . . . . . . . 289
Adding scroll bars dynamically . . . . . . . . 290
Using the Clipboard with text . . . . . . . . . 291
Selecting text . . . . . . . . . . . . . . . . . . . 291
Cutting, copying, and pasting text. . . . . . . 291
Deleting text without changing the
contents of the Clipboard . . . . . . . . . . . 292
Dimming menu items . . . . . . . . . . . . . . 292
. .309
. .310
. .310
. .311
Summary . . . . . . . . . . . . . . . . . . . . . . 312
Chapter 11
Drawing graphics at run time
313
Drawing versus painting. . . . . . . . . . . . . 314
Using the pixel array . . . . . . . . . . . . . . . 314
Declaring a method . . . . . . . . . . . . . 293
Calling a procedure from an event
handler . . . . . . . . . . . . . . . . . . . 293
Manipulating pixels . . . . . . . . . . . . . .
Reading a pixel’s color. . . . . . . . . . . .
Setting a pixel’s color. . . . . . . . . . . . .
Using pens . . . . . . . . . . . . . . . . . . .
Using brushes . . . . . . . . . . . . . . . . .
Providing a pop-up menu. . . . . . . . . . . . 294
Handling the OnPopup event . . . . . . . . . 294
Specifying the pop-up menu for the form . . 295
Using common dialog boxes . . . . . . . . . . 295
.
.
.
.
.
.314
.314
.315
.315
.316
Drawing lines and polylines. . . . . . . . . . . 316
Common dialog box options in the Object
Inspector . . . . . . . . . . . . . . . . . . . . . 296
Enabling the Help button from a common
dialog box . . . . . . . . . . . . . . . . . . . . 296
Using the OpenDialog component. . . . . . . 297
OpenDialog component properties . . . . . . 297
Specifying file filters . . . . . . . . . . . . . . . 297
Drawing straight lines. . . . . . . . . . . . . . .316
Drawing polylines . . . . . . . . . . . . . . . . .317
Drawing shapes . . . . . . . . . . . . . . . . . . 317
Drawing rectangles and ellipses. . . . . . . . .317
Drawing rounded rectangles. . . . . . . . . . .318
Drawing polygons. . . . . . . . . . . . . . . . .318
Drawing special parts . . . . . . . . . . . . . . 318
Summary . . . . . . . . . . . . . . . . . . . . . . 319
The Filter property. . . . . . . . . . . . . . 298
Opening an existing text file . . . . . . . . . . 298
Declaring a form-level variable . . . . . . . . 299
vi
Chapter 12
Using the Clipboard with graphics. . . . . . . 354
Graphics example
Copying graphics to the Clipboard . . . . . . .355
Cutting graphics to the Clipboard. . . . . . . .355
Pasting graphics from the Clipboard . . . . . .355
321
Responding to the mouse . . . . . . . . . . . . 322
What’s in a mouse event? . . . . . . .
Responding to a mouse-down action
Responding to a mouse-up action . .
Responding to a mouse move . . . .
.
.
.
.
.
.
.
.
.
.
.
.
.
.
.
.
.
.
.
.
322
323
324
325
Summary . . . . . . . . . . . . . . . . . . . . . . 356
Chapter 13
File manager example
Adding a field to a form object . . . . . . . . . 326
Refining line drawing . . . . . . . . . . . . . . 328
Creating the file-manager form . . . . . . . . . 360
Laying out the form . . . . . . . . . . . . . . . .360
Placing the controls . . . . . . . . . . . . . . . .360
Designing the menu . . . . . . . . . . . . . . . .361
Tracking the origin point . . . . . . . . . . . . 328
Tracking movement . . . . . . . . . . . . . . . 329
Adding a tool bar to a form . . . . . . . . . . . 331
Adding speed buttons to a tool bar . . . . . . 331
Building the drive list. . . . . . . . . . . . . . . 362
Determining valid drives . . . . . . . . . . . . .362
Connecting the controls. . . . . . . . . . . . . .363
Adding a speed button to a tool bar . . . . . . 332
Assigning a speed button’s glyph . . . . . . . 332
Setting the initial condition of a speed
button. . . . . . . . . . . . . . . . . . . . . . . 333
Creating a group of speed buttons. . . . . . . 333
Allowing toggle buttons . . . . . . . . . . . . 334
Creating an owner-draw control . . . . . . . . 365
Setting the owner-draw style . . . . . . . . . .365
Adding graphical objects to a string list . . . .366
Drawing owner-draw items . . . . . . . . . . .367
Manipulating files. . . . . . . . . . . . . . . . . 369
Responding to clicks . . . . . . . . . . . . . . . 334
Deleting a file . . . . . . . . . . . . . . . . . .
Confirming file deletions . . . . . . . . . .
Changing a file’s attributes . . . . . . . . . .
Reading file attributes . . . . . . . . . . . .
Changing individual file attributes . . . .
Setting file attributes . . . . . . . . . . . . .
Moving, copying, and renaming files. . . .
Executing an application . . . . . . . . . . .
Responding to a button click . . . . . . . . . . 334
Drawing with different tools . . . . . . . . . . 334
Declaring an enumerated type . . . . . . . . . 335
Changing the tool with speed buttons. . . . . 336
Using the drawing tools . . . . . . . . . . . . . 337
Drawing the appropriate shapes. . . . . . . . 337
Customizing pens and brushes. . . . . . . . . 340
Adding hidden tool bars . . .
Hiding and showing tool bars
Changing the pen style . . . .
Changing the pen color . . . .
Changing the pen width. . . .
Changing the brush style . . .
Changing the brush color . . .
.
.
.
.
.
.
.
.
.
.
.
.
.
.
.
.
.
.
.
.
.
.
.
.
.
.
.
.
.
.
.
.
.
.
.
.
.
.
.
.
.
.
.
.
.
.
.
.
.
.
.
.
.
.
.
.
.
.
.
.
.
.
.
340
342
342
343
344
344
345
.
.
.
.
.
.
.
.
.
.
.
.
.
.
.
.
.
.
.
.
.
.
.
.
.
.
.
.
.
.
.
.
.
.
.
.
.
.
.
.
.
.
.
.
Starting a drag operation .
Accepting dragged items .
Dropping items . . . . . .
Ending a drag operation .
.370
.370
.371
.371
.372
.373
.373
.375
.
.
.
.
.
.
.
.
.
.
.
.
.
.
.
.
.
.
.
.
.
.
.
.
.
.
.
.
.
.
.
.
.
.
.
.
.
.
.
.
.
.
.
.
.376
.377
.378
.378
Summary . . . . . . . . . . . . . . . . . . . . . . 379
Chapter 14
345
346
346
347
Exchanging data with DDE or OLE
381
Using DDE . . . . . . . . . . . . . . . . . . . . . 381
DDE conversations . . . . . . . . . . . . . .
DDE services . . . . . . . . . . . . . . . . .
DDE topics. . . . . . . . . . . . . . . . . . .
DDE items . . . . . . . . . . . . . . . . . . .
Creating DDE client applications . . . . . .
Establishing a link with a DDE server. . .
Requesting data. . . . . . . . . . . . . . . .
Poking data . . . . . . . . . . . . . . . . . .
Controlling other applications . . . . . . .
Creating DDE server applications. . . . . .
Establishing a link with a DDE client
application. . . . . . . . . . . . . . . . . .
Drawing on a bitmap. . . . . . . . . . . . . . . 347
Adding a scrollable region . . .
Adding an image control . . . .
Placing the control . . . . . . .
Setting the initial bitmap size.
Drawing on the bitmap . . . .
.
.
.
.
.
.
.
.
Dragging and dropping . . . . . . . . . . . . . 376
Adding a status bar. . . . . . . . . . . . . . . . 345
Placing a status-bar panel .
Subdividing a panel . . . .
Creating 3-D panels . . . .
Updating the status bar . .
359
. . . . . . . . 348
. . . . . . . . 348
. . . . . . . . . 348
. . . . . . . . . 349
. . . . . . . . . 349
Adding a menu . . . . . . . . . . . . . . . . . . 350
Printing graphics . . . . . . . . . . . . . . . . . 351
Working with graphics files. . . . . . . . . . . 352
Loading a picture from a file . . . . . . . . . . 352
Saving a picture to a file . . . . . . . . . . . . . 353
Replacing the picture. . . . . . . . . . . . . . . 353
.
.
.
.
.
.
.
.
.
.
.382
.382
.383
.383
.383
.384
.386
.386
.387
.388
. .389
Using OLE . . . . . . . . . . . . . . . . . . . . . 390
What is OLE? . . . . . . . . . . . . . . . . . . . .390
vii
OLE 1.0 and OLE 2.0. . . . . . . . . . . . . . . 391
Design-time and run-time object creation . . 391
Linking and embedding . . . . . . . . . . . . 392
Linked objects . . . . . . . . . . . . . . . . 392
Embedded objects . . . . . . . . . . . . . . 392
OLE classes . . . . . . . . . . . . . . . . . . . . 393
OLE documents . . . . . . . . . . . . . . . . . 393
OLE items . . . . . . . . . . . . . . . . . . . . . 393
Creating OLE container applications . . . . . 393
OLE data in files . . . . . . . . . . . . . . . . . 395
Comparing DDE and OLE . . . . . . . . . . . 396
Summary. . . . . . . . . . . . . . . . . . . . . . 397
Inserting objects . . . . . . . . . . . . . . . . . . 410
Using the Insert Object dialog box . . . . . . .410
Initializing the OLE container . . . . . . . . . .412
Deactivating objects . . . . . . . . . . . . . . . .413
Pasting objects . . . . . . . . . . . . . . . . . . . 415
Using the Paste Special dialog box . . . . .
Using OLE objects with the Clipboard . . .
Registering Clipboard formats . . . . . . .
Specifying OLE formats . . . . . . . . . . .
Pasting the OLE object . . . . . . . . . . . .
.
.
.
.
.
.415
.417
.418
.418
.420
Dropping objects . . . . . . . . . . . . . . . . . 421
Chapter 15
OLE example
Adding the tool bar . . . . . . . . . . . . . . .408
Adding the status bar . . . . . . . . . . . . . .409
399
Creating the MDI framework. . . . . . . . . . 400
Creating the frame and child forms . . . . . . 400
Adding the OLE container component . . . . 401
OLE application menus . . . . . . . . . . . . . 402
Creating the frame form menu. . . . . . . . . 403
Creating the child form menu . . . . . . . . . 405
The OLE object menu item . . . . . . . . . . . 407
OLE tool bars and status bars. . . . . . . . . . 408
Setting up tool bars and status bars . . . . . . 408
viii
Registering a form as an OLE drop target . . .421
Dropping an OLE object onto the OLE
example application . . . . . . . . . . . . . . .422
Working with objects in files . . . . . . . . . . 423
Saving objects to files . . . . . . . . . . . . . . .424
Loading objects from files . . . . . . . . . . . .424
Summary . . . . . . . . . . . . . . . . . . . . . . 426
Appendix A
Selected Bibliography
429
Index
431
Tables
1
2.1
2.2
2.3
2.4
2.5
2.6
2.7
2.8
2.9
3.1
3.2
3.3
3.4
3.5
3.6
3.7
4.1
4.2
4.3
5.1
5.2
7.1
7.2
7.3
7.4
8.1
Typefaces and symbols in these manuals.
Components on the Standard page . . . .
Components on the Additional page . . .
Controls on the Data Access page . . . . .
Components on the Data Controls page .
Components on the Dialogs page . . . . .
Components on the System page . . . . .
Components on the VBX page . . . . . . .
Components on the Samples page. . . . .
AboutBox component properties . . . . .
MessageDlg parameters . . . . . . . . . . .
Alternate form settings. . . . . . . . . . . .
Delphi’s predefined bitmap button types
Property settings for demonstrating
ActiveControl . . . . . . . . . . . . . . . . .
FormStyle property settings. . . . . . . . .
Sample captions and their derived names
Menu Designer SpeedMenu commands .
Design-time project files . . . . . . . . . . .
Compiler-generated project files . . . . . .
Project Manager SpeedBar buttons . . . .
Object Pascal predefined data types . . . .
String procedures and functions . . . . . .
Heap exceptions. . . . . . . . . . . . . . . .
Integer math exceptions . . . . . . . . . . .
Floating-point math exceptions . . . . . .
Hardware exceptions . . . . . . . . . . . .
Expression format specifiers . . . . . . . .
.
.
.
.
.
.
.
.
.
.
.
.
.
.
.
.
.
.
.
.
.
.
.
.
.
.
.3
38
39
40
40
41
41
42
42
53
81
87
89
.
.
.
.
.
.
.
.
.
.
.
.
.
.
. 93
. 97
101
105
116
117
131
156
201
237
237
238
238
262
9.1
10.1
10.2
10.3
10.4
10.5
10.6
10.7
10.8
10.9
12.1
12.2
12.3
12.4
13.1
13.2
13.3
13.4
13.5
13.6
ix
Corresponding string and object methods
in string lists . . . . . . . . . . . . . . . . . .
Text editor property values . . . . . . . . .
Child form property settings for the text
editor example . . . . . . . . . . . . . . . . .
Frame form menu items . . . . . . . . . . .
Child form menu items . . . . . . . . . . . .
Naming the project files . . . . . . . . . . .
GroupIndex property settings. . . . . . . .
Memo component settings. . . . . . . . . .
File filter settings for the text editor. . . . .
SaveDialog component properties . . . . .
Mouse-event parameters . . . . . . . . . . .
Property settings for pen and brush
tool bars . . . . . . . . . . . . . . . . . . . . .
Image control properties for GRAPHEX .
Graphics example File and Edit menus . .
Property values for the file manager
example’s main form . . . . . . . . . . . . .
Property values for the main-form
components in FILMANEX . . . . . . . . .
File-menu items for the file manager
example . . . . . . . . . . . . . . . . . . . . .
Fixed vs. variable owner-draw styles . . .
Property values for the file-attribute
dialog box form . . . . . . . . . . . . . . . .
Property values for the file-attribute
dialog box components . . . . . . . . . . . .
. 276
. 281
. 282
. 283
. 284
. 284
. 285
. 288
. 298
. 301
. 323
. 341
. 349
. 350
. 360
. 360
. 362
. 366
. 371
. 372
Figures
1.1
1.2
1.3
1.4
1.5
1.6
1.7
1.8
1.9
1.10
1.11
1.12
1.13
1.14
2.1
2.2
2.3
2.4
2.5
2.6
2.7
2.8
2.9
2.10
2.11
2.12
2.13
2.14
2.15
2.16
2.17
2.18
2.19
3.1
3.2
3.3
3.4
3.5
3.6
3.7
3.8
The Delphi programming environment . .
Object Inspector with Caption property
selected . . . . . . . . . . . . . . . . . . . . . .
Events page . . . . . . . . . . . . . . . . . . .
Browse Gallery dialog box displaying
application templates. . . . . . . . . . . . . .
A default Delphi project . . . . . . . . . . . .
Default project source code . . . . . . . . . .
Modified project file source code. . . . . . .
Default unit source code. . . . . . . . . . . .
Form type declaration . . . . . . . . . . . . .
Modified type declaration. . . . . . . . . . .
Environment Options dialog box,
Preferences page . . . . . . . . . . . . . . . .
The Forms Gallery . . . . . . . . . . . . . . .
The Projects Gallery . . . . . . . . . . . . . .
The Compiling dialog box. . . . . . . . . . .
About box . . . . . . . . . . . . . . . . . . . .
AboutBox with BitBtn component. . . . . .
Sizing handles . . . . . . . . . . . . . . . . . .
Form with Panel component . . . . . . . . .
AboutBox with Panel and Label
components . . . . . . . . . . . . . . . . . . .
Panel with Labels and Image components .
Alignment palette. . . . . . . . . . . . . . . .
Alignment dialog box . . . . . . . . . . . . .
Aligned Label components . . . . . . . . . .
Form grid. . . . . . . . . . . . . . . . . . . . .
Form2 with two Button1 component
captions. . . . . . . . . . . . . . . . . . . . . .
Picture Editor dialog box . . . . . . . . . . .
Image displayed in Picture Editor dialog
box. . . . . . . . . . . . . . . . . . . . . . . . .
About box with image . . . . . . . . . . . . .
About box with sized image . . . . . . . . .
Run-time About box . . . . . . . . . . . . . .
About box displaying program name in
form title bar . . . . . . . . . . . . . . . . . . .
About box with run-time icon . . . . . . . .
The Component Expert dialog box . . . . .
Standard Delphi Form Templates in the
Browse Gallery . . . . . . . . . . . . . . . . .
Example ShowMessage message box . . . .
Confirmation message dialog box . . . . . .
Sample input box in running form. . . . . .
Password Dialog Template at design time .
Password dialog box at run time. . . . . . .
Password dialog box displaying masked
characters. . . . . . . . . . . . . . . . . . . . .
Edit Tab Order dialog box. . . . . . . . . . .
. .8
3.9
3.10
3.11
3.12
3.13
3.14
3.15
3.16
3.17
. 16
. 18
.
.
.
.
.
.
.
19
22
23
24
25
27
27
.
.
.
.
.
.
.
.
29
30
30
32
43
45
46
47
3.18
3.19
4.1
4.2
4.3
4.4
4.5
5.1
5.2
5.3
.
.
.
.
.
.
49
50
51
51
52
52
5.4
5.5
5.6
5.7
5.8
5.9
. 56
. 57
.
.
.
.
5.10
5.11
5.12
5.13
57
57
58
62
5.14
5.15
5.16
5.17
. 64
. 67
. 71
.
.
.
.
.
.
78
81
82
83
84
84
5.18
5.19
5.20
5.21
5.22
5.23
. 84
. 90
x
Save Form Template dialog box. . . . . . .
Sample MDI child and parent forms . . . .
Delphi menu terminology . . . . . . . . . .
MainMenu and PopupMenu components
Menu Designer for a main menu . . . . . .
Menu Designer for a pop-up menu. . . . .
Nested menu structures . . . . . . . . . . .
Select Menu dialog box . . . . . . . . . . . .
Sample Insert Template dialog box for
menus . . . . . . . . . . . . . . . . . . . . . .
Delete Templates dialog box for menus . .
Save Template dialog box for menus. . . .
Project Manager window. . . . . . . . . . .
Example Project Manager project listing. .
Example project directory tree. . . . . . . .
The Window List dialog box. . . . . . . . .
Syntax or compile error display. . . . . . .
A sample form for assigning a property
value to another property . . . . . . . . . .
A sample form for the Cut, Copy, Paste,
and Clear All example . . . . . . . . . . . .
A form for an example that uses the
Execute function . . . . . . . . . . . . . . . .
A sample form to illustrate an if
statement . . . . . . . . . . . . . . . . . . . .
A form for a case statement example. . . .
A form for a repeat statement example . .
A form for a while statement example . . .
A sample form to illustrate a for loop . . .
A form with string grid displaying
column and row coordinates . . . . . . . .
A form for a nested for loop example . . .
Blocks within blocks. . . . . . . . . . . . . .
Blocks within a simple project. . . . . . . .
A form for multiplying two numbers
together . . . . . . . . . . . . . . . . . . . . .
A form for a scope example . . . . . . . . .
A form that uses a global variable . . . . .
A form for a value parameter example . .
The value of Number and CalcNo when
Calculate begins running. . . . . . . . . . .
The values of Number and CalcNo after
Calculate runs . . . . . . . . . . . . . . . . .
The value of Number and CalcNo when
Calculate begins running. . . . . . . . . . .
The value of Number and CalcNo after
Calculate runs . . . . . . . . . . . . . . . . .
A form for an enumerated type example .
A form for a subrange example . . . . . . .
A form for a string-handling example . . .
. .94
. .97
. .99
. .99
. 100
. 100
. 103
. 106
. 107
. 107
. 108
. 130
. 133
. 139
. 140
. 142
. 152
. 159
. 162
. 163
. 166
. 168
. 169
. 171
. 172
. 173
. 176
. 177
. 178
. 179
. 181
. 191
. 192
. 193
. 194
. 194
. 196
. 198
. 202
5.24
6.1
6.2
6.3
7.1
7.2
8.1
8.2
8.3
8.4
8.5
8.6
10.1
10.2
10.3
10.4
10.5
10.6
10.7
10.8
10.9
12.1
12.2
12.3
12.4
12.5
A form for a set type example . . . . . . . .
A simple form . . . . . . . . . . . . . . . . . .
Inheriting from TForm. . . . . . . . . . . . .
A simplified hierarchy diagram . . . . . . .
Nested resource protections . . . . . . . . .
Nested exception handlers . . . . . . . . . .
The Breakpoint List window . . . . . . . . .
The Edit Breakpoint dialog box . . . . . . .
The Watch List window . . . . . . . . . . . .
The Watch Properties dialog box. . . . . . .
The Evaluate/Modify dialog box . . . . . .
Call Stack window . . . . . . . . . . . . . . .
The finished text editor program,
TEXTEDIT.EXE . . . . . . . . . . . . . . . . .
Text editor application menu with no
child windows open . . . . . . . . . . . . . .
Text editor application menu with child
window open . . . . . . . . . . . . . . . . . .
Open child window . . . . . . . . . . . . . .
Font dialog box component options . . . . .
OpenDialog component properties . . . . .
The Filter editor . . . . . . . . . . . . . . . . .
Font dialog box component properties . . .
Print dialog box component properties . . .
The finished graphics program,
GRAPHEX.EXE . . . . . . . . . . . . . . . . .
Drawing text at the point clicked. . . . . . .
Graphics application with lines drawn . . .
Graphics application following the mouse .
Line with lost origin . . . . . . . . . . . . . .
203
217
221
221
233
234
255
257
259
260
261
263
12.6 Straight line with intermediate drawing. .
12.7 Persistent intermediate lines . . . . . . . . .
12.8 Line after rubber banding . . . . . . . . . .
12.9 The tool bar with 6 buttons: . . . . . . . . .
12.10 The tool bar buttons with glyphs assigned
12.11 The pen and brush tool bars . . . . . . . . .
12.12 Bitmap-dimension dialog box from the
BMPDlg unit. . . . . . . . . . . . . . . . . . .
13.1 The complete file manager example . . . .
13.2 File-manager form with controls . . . . . .
13.3 Confirming a file deletion . . . . . . . . . .
13.4 The file-attribute dialog box . . . . . . . . .
13.5 The change-file dialog box . . . . . . . . . .
14.1 A DDE conversation between a Delphi
application and Microsoft Word 6.0. . . . .
14.2 The DDE Info dialog box . . . . . . . . . . .
14.3 The WordPerfect Paste Special dialog box
14.4 The Insert Object dialog box . . . . . . . . .
14.5 The Paste Special dialog box. . . . . . . . .
15.1 The completed OLE container application
15.2 The OLEFrameForm and OLEObjectForm
windows . . . . . . . . . . . . . . . . . . . .
15.3 The OLE container application menu . . .
15.4 The OLE container application tool bar
and status bar. . . . . . . . . . . . . . . . . .
15.5 The Insert Object dialog box . . . . . . . . .
15.6 A Paintbrush picture OLE object . . . . . .
15.7 The Paste Special dialog box. . . . . . . . .
15.8 The Save As dialog box . . . . . . . . . . . .
15.9 The Open dialog box . . . . . . . . . . . . .
280
282
283
286
296
297
298
304
306
321
324
325
326
328
xi
. 329
. 330
. 331
. 332
. 333
. 341
. 354
. 359
. 361
. 371
. 372
. 374
. 382
. 384
. 389
. 394
. 395
. 399
. 405
. 408
. 410
. 410
. 414
. 415
. 425
. 426
xii