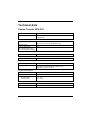
1
Handheld EasyGuide Pharos Traveler GPS 535 English Are there ... ... any technical problems or other questions which you would like to be clarified? Please contact: our Hotline/Help Desk your sales partner your sales outlet The latest information on our products, tips, updates, etc., can be found on the internet at: www.pharosgps.com 1 Your Pharos Traveler GPS 535 Important notes Operating the Pharos Traveler GPS 535 Pharos Traveler GPS 535 Configuring the Pharos Traveler GPS 535 Connecting and networking the Pharos Traveler GPS 535 with other devices EasyGuide Troubleshooting and tips Technical data Index September 2007 2 Adobe and Acrobat are trademarks of Adobe systems Incorporated and may be protected in certain countries. Intel is a registered trademark, XScale is trademark of Intel Corporation, U.S.A. Microsoft, Windows and ActiveSync are registered trademarks of the Microsoft Corporation. Windows Mobile is a trademark of Microsoft Corporation. The SD Logo is a trademark of Secure Digital. All other trademarks referenced are trademarks or registered trademarks of their respective owners, whose protected rights are acknowledged. All rights, including rights of translation, reproduction by printing, copying or similar methods, in part or in whole, are reserved. Offenders will be liable for damages. All rights, including rights created by patent grant or registration of a utility model or design, are reserved. Delivery subject to availability. Right of technical modification reserved. 3 Contents Notational conventions ...................................................................................................................... 7 Software overview ............................................................................................................................. 8 Important notes ................................................................................................................................. 9 Safety notes ...................................................................................................................................... 9 Underway with the Pharos Traveler GPS 535 ................................................................................. 10 Transporting Pharos Traveler GPS 535................................................................................... 10 Using the Pharos Traveler GPS 535 ............................................................................................... 11 Cleaning the Pharos Traveler GPS 535 .......................................................................................... 11 Disposal and recycling .................................................................................................................... 11 Liability ............................................................................................................................................ 11 CE marking ..................................................................................................................................... 12 Operating the Pharos Traveler GPS 535 ...................................................................................... 14 Overview of the controls, connections and displays ........................................................................ 14 Front of the Pharos Traveler GPS 535 .................................................................................... 14 Back of the Pharos Traveler GPS 535..................................................................................... 15 Displays (power-on display and radio display) ......................................................................... 16 Initial start-up .................................................................................................................................. 16 Inserting battery ...................................................................................................................... 17 Connecting Power adapter ...................................................................................................... 18 Installing ActiveSync on your PC/notebook ............................................................................. 20 Start the Pharos Traveler GPS 535 for the first time ............................................................... 21 First data synchronization between the Pharos Traveler GPS 535 and the PC/notebook ........ 22 Switching Pharos Traveler GPS 535 off and on .............................................................................. 22 Switching Pharos Traveler GPS 535 off and on during normal use ......................................... 22 Switching the Pharos Traveler GPS 535 on and off to save the batteries ................................ 23 Switching on and off with soft reset (warm boot) ..................................................................... 24 Resetting the Pharos Traveler GPS 535 (Cold start) ............................................................... 25 Resetting Pharos Traveler GPS 535 to delivered state ............................................................ 26 Using standard operating elements ................................................................................................. 27 Using the pen .......................................................................................................................... 27 Using navigation key ............................................................................................................... 27 Using the application buttons .................................................................................................. 28 Making the display lighting lighter and darker .................................................................................. 28 Inserting and removing expansion card ........................................................................................... 29 Inserting expansion card ......................................................................................................... 29 Removing expansion card ....................................................................................................... 30 Underway with the Pharos Traveler GPS 535 ................................................................................. 31 Using GPS .............................................................................................................................. 31 Charging the battery ................................................................................................................ 31 Charging the battery via a USB port ........................................................................................ 34 Optimizing battery operating time ............................................................................................ 34 Synchronizing data with ActiveSync ................................................................................................ 35 Connecting the Pharos Traveler GPS 535 with PC/Notebook ................................................. 36 Synchronizing data with new PC/notebook .............................................................................. 36 Configuring the Pharos Traveler GPS 535 .................................................................................. 37 Energy management optimizing ...................................................................................................... 37 General information on energy management .......................................................................... 37 Using energy-saving functions ................................................................................................ 38 Adjusting menus ............................................................................................................................. 39 Password protection ........................................................................................................................ 39 Configuring hardware keys .............................................................................................................. 40 4 FSC KeyLock: Preventing switch-on with application buttons .................................................. 40 Assigning chosen functions to the hardware buttons ............................................................... 40 Connecting and networking the Pharos Traveler GPS 535 with other devices ......................... 41 Wireless data transfer with infrared interface ................................................................................... 41 Wireless connection via Wireless LAN ............................................................................................ 41 Troubleshooting and tips ................................................................................................................. 42 Installing new software............................................................................................................. 42 The Pharos Traveler GPS 535’s time or date are not correct ................................................... 42 The display of the Pharos Traveler GPS 535 remains dark ...................................................... 42 The display is hardly readable ................................................................................................. 42 The Pharos Traveler GPS 535 switches off ............................................................................. 42 The Pharos Traveler GPS 535 does not start after switch on ................................................... 43 The Pharos Traveler GPS 535 stops working .......................................................................... 43 The battery discharges too quickly ........................................................................................... 43 The Suspend/Resume button does not respond properly ........................................................ 43 No sound or minimal volume ................................................................................................... 44 Poor reception via GPS ........................................................................................................... 44 Contact with hotline/help desk ................................................................................................. 44 Technical data................................................................................................................................ 45 Pharos Traveler GPS 535 ................................................................................................................ 45 Battery (Li-Ion) ................................................................................................................................. 46 Power adapter ................................................................................................................................. 46 Index ............................................................................................................................................... 47 5 Your Pharos Traveler GPS 535 … ... is equipped with the Office applications Microsoft Word, Excel and Outlook. In Outlook you cannot only receive and send e-mails, but also manage your appointments and be reminded of your tasks. You can access names, e-mail addresses and telephone numbers while you are away from your home or office. You can store notes in written form or verbally. Memory cards ensure that even large amounts of data can be carried along reliably. Install ActiveSync on your notebook or PC, connect the Pharos Traveler GPS 535 to your notebook or PC and you can synchronize your data. In the office you can then effortlessly transfer all your data and newly created documents to your notebook or PC. Read your favorite book quite comfortably away from home on the display or use the MP3 player. Insert the memory card of a digital camera in the slot and you can view the photos on the display. With infrared or wireless LAN you can establish a connection to other devices at the office and away from it without bothersome cables. For example, you can access the Internet using the Pharos Traveler GPS 535 with a wireless LAN connection at your favorite coffee shop. You can call up both web and WAP pages with the Internet Explorer. With the built-in GPS receiver and navigation software you can use the Pharos Traveler GPS 535 as a navigation system. The following documentation contains additional information on your Pharos Traveler GPS 535 and the Windows Mobile operating system: in the help on your Pharos Traveler GPS 535 in the files on the Microsoft Getting Started CD (e.g. *.TXT, *.PDF) 6 Notational conventions The meanings of the symbols and fonts used in this manual are as follows: ! i pay particular attention to texts marked with this symbol. Failure to observe this warning may endanger your life, destroy the system, or lead to loss of data. Failure to follow the instructions may lead to loss of data, invalidate your warranty, destroy the Pharos Traveler GPS 535, or endanger your life. indicates important information which is required to use the system properly. ► text which follows this symbol describes activities that must be performed in the order shown. This font indicates program names, commands, or menu items. "Quotation marks" indicate names of chapters, data carriers, and terms that are being emphasized. 7 Software overview The following table provides an overview of the most important programs which are already installed on your Pharos Traveler GPS 535 and where you can find information on using these programs. Software Used for Operating information Word Mobile For word processing Help file on Pharos Traveler GPS 535 Excel Mobile For spreadsheet functions Help file on Pharos Traveler GPS 535 Outlook Mobile Contacts/calendar//things to do Help file on Pharos Traveler GPS 535 PowerPoint Mobile Opening and displaying presentations created on a PC. Help file on Pharos Traveler GPS 535 ActiveSync For data synchronization Help file on the notebook or PC on which you installed ActiveSync Internet Explorer Mobile Browser for websites and WAP sites Help file on Pharos Traveler GPS 535 Windows Media Player Mobile 10 For playing audio and video files Help file on Pharos Traveler GPS 535 8 Important notes This chapter contains safety notes and important information you must observe when using your Pharos Traveler GPS 535. This Pharos Traveler GPS 535 complies with the relevant safety regulations for data processing equipment. If you have questions as to whether you can set up and operate the Pharos Traveler GPS 535 in the intended environment, please contact your sales point or our hotline/help desk. Safety notes ! Observe the safety notes in the "Safety" manual and the following safety notes to prevent damage to your device, data loss or injuries. During installation and before operating the device, observe the instructions on environmental conditions in the "Technical data" chapter. The included Power adapter complies with the requirements of the country in which you purchased the Pharos Traveler GPS 535. Make sure the Power adapter is approved for the country in which it is used. The Power adapter may only be connected to an electrical outlet when the Pharos Traveler GPS 535 or the cradle is connected to the Power adapter. Do not use the Power adapter for other devices. When transporting the device and on a trip, observe the information in the section "Underway with the Pharos Traveler GPS 535". The high transmitting power of the consumer infrared interface (CIR) may cause technical problems for infrared devices (e.g. mobile phone, PDA) which are not suitable for CIR or are too close to the transmitter. Before you set up an Infrared data connection to a device such as a mobile phone or PDA, check that the CIR is not active or not currently being used by another program. The WLAN radio components are initialized and become active for a short period if the batteries of the Pharos Traveler GPS 535 are changed or it is reset (cold boot or returned to delivery condition). Be aware of this if you are in an environment where radio components must not be used (e.g. hospital, aircraft). Do not use power adapters which are not specially approved for this Pharos Traveler GPS 535. You may only operate the Pharos Traveler GPS 535 with the Power adapter if the nominal voltage of the Power adapter (100 V to 240 V) matches the local mains voltage. 9 Underway with the Pharos Traveler GPS 535 Observe the following information when you travel with your Pharos Traveler GPS 535. Transporting Pharos Traveler GPS 535 Switch the Pharos Traveler GPS 535 off. Use the pouch for transporting the Pharos Traveler GPS 535 that provides protection against jolts and impacts (the protective pouch is available as an accessory). Protect the Pharos Traveler GPS 535 from severe shocks and extreme temperatures (e.g., direct sunlight in a car). If you wish to use your Pharos Traveler GPS 535 during a flight, check first with the airline if this is allowed and under which conditions. If you are travelling abroad, ensure that the Power adapter can be operated with the local mains voltage. Do not use any other voltage converter! If you use a modem, incompatibilities with the local telecommunications system may result. Disconnect the cables from the Pharos Traveler GPS 535. If the device needs to be shipped, use the original packaging or other suitable packaging to protect it from damage caused by mishandling. 10 Using the Pharos Traveler GPS 535 Store the Pharos Traveler GPS 535 in a fully charged state in a dry environment. If you store the Pharos Traveler GPS 535 for up to a month, the storage temperature should be between -20°C and +60°C. If you store the Pharos Traveler GPS 535 for up to three months, the storage temperature should be between -20°C and +45°C. The lower the temperature at which the batteries are stored, the lower is the rate of self-discharge. i Avoid leaving your Pharos Traveler GPS 535 lying in direct sunlight in a car. The temperature could exceed the permissible 60°C in such cases! To protect the battery, battery charging is interrupted at excessively high temperatures (over 48°C). Please note that batteries discharge themselves over time. Therefore, recharge the battery of your Pharos Traveler GPS 535 at regular intervals during the storage period. Protect the slots for expansion cards and the ActiveSync connection of the Pharos Traveler GPS 535 from soiling. Soiling can lead to contact problems. Cleaning the Pharos Traveler GPS 535 ► Switch the Pharos Traveler GPS 535 off. ► Pull the Power adapter out of the electrical outlet. ! Do not use any cleaning agents that contain abrasives or may corrode plastic. Please ensure that no liquid enters the Pharos Traveler GPS 535. The device surface can be cleaned with a dry cloth. If it is very dirty, you can clean the device and the display with a damp cloth. Disposal and recycling You will find further information about country-specific recycling and disposal options in the Internet or on the Microsoft Getting Started CD. Liability We cannot be held responsible for radio or television faults arising from unauthorized changes made to this device. We are, furthermore, not responsible for replacing and / or exchanging connector cables and devices which have not been specified by us. You are solely responsible for repairing faults arising from such unauthorized changes made to a device and for replacing and/or exchanging devices. 11 CE marking Products bearing the CE marking comply with the R&TTE Directive (1999/5/EC), EMC Directive (89/336/EEC), and the Low Voltage Directive (2006/95/EEC) issued by the Commission of the European Community. CE compliance of this device is valid only if powered with by a CE-marked AC Adapter provided by HTC. Compliance with these directives implies conformity to the following European Norms (in parentheses are the equivalent international standards and regulations): EN 55022 (CISPR 22) — Electromagnetic Interference EN 55024 (IEC 61000-4-2, 3, 4, 5, 6, 8, 11) — Electromagnetic Immunity EN 61000-3-2 (IEC 61000-3-2) — Power Line Harmonics EN 61000-3-3 (IEC 61000-3-3) — Power Line Flicker EN 60950 (IEC 60950) — Product Safety ETS 300 328-2 — Technical requirements for 2.4 GHz radio equipment EN 301 489-1, -17 — General EMC requirements for radio equipment The IEEE 802.11b wireless LAN functionality of this product can be used in the following EU countries, EU candidate countries and EFTA countries: Belgium, Denmark, Germany, Estonia, Finland, France, Greece, Great Britain, Ireland, Iceland, Italy, Lichtenstein, Latvia, Lithuania, Luxemburg, Malta, Netherlands, Norway, Austria, Poland, Portugal, Sweden, Switzerland, Slovakia, Slovenia, Spain, Czech Republic, Hungary and Cyprus. ! The user is responsible for radio interference that may occur when operating the device. For IEEE 802.11b wireless LAN operation of this product, only a limited band is available in France (Channels 10, 11, 12, and 13 only). The Autorité de régulation des télécommunications (ART) has special regulations for hotspots allowing other channels, too. Please check with ART (http://www.arttelecom.fr) on this for local rulings and for authorization. 12 13 Operating the Pharos Traveler GPS 535 In this section you will find a description of the operating controls of your Pharos Traveler GPS 535 and how you operate the Pharos Traveler GPS 535. ! Follow the instructions in the chapter "Important notes". Overview of the controls, connections and displays Front of the Pharos Traveler GPS 535 1= 2= 3= 4= 5= 6= 7= 8= 9= 14 Suspend/Resume button Power-on indicator (battery, message) Display ActiveSync port Opening for soft reset Infrared interface Record button Microphone opening Radio indicator (WLAN, GPS) 1= 2= 3= 4= 5= Navigation button (N) Today button Navigation key Contacts button Calendar button Back of the Pharos Traveler GPS 535 1= 2= 3= 4= 5= 15 Pen Slot for SD/MMC expansion cards Port for headphones or active loudspeakers Battery compartment cover Port for external GPS antenna (optional) Displays (power-on display and radio display) Indicator Color Description Indicator state Status: battery charge level orange Battery fully charged on Battery is being charged flashing Battery charger not connected off Status: message green Message present flashing Radio indicator: WLAN green WLAN activated flashing Radio indicator: GPS orange GPS activated flashing i If the battery is being charged and a message is present at the same time, the power-on indicator flashes orange and green alternately. Initial start-up i Please follow these steps in the given order! Before the first data synchronization between your Pharos Traveler GPS 535 and your PC/notebook, you must install the ActiveSync program on your PC/notebook. In just a few steps your Pharos Traveler GPS 535 is ready to use the first time: Insert the battery Connect the power adapter Install ActiveSync on the PC/notebook Start Pharos Traveler GPS 535 for the first time Start the initial data synchronization between the Pharos Traveler GPS 535 and the PC/notebook You will learn more about the individual steps in the following sections. 16 Inserting battery ► Pull the cover (1) off the Pharos Traveler GPS 535 in the direction of the arrow. ► Lay the battery in the battery compartment (2 +3). When doing so, watch the contact connections and hold onto the tab (4). ► Slide the cover (5) in the direction of the arrow as far as it will go. i The battery is not charged at the time of delivery. Therefore, charge the battery for 12 hours before the first mobile use (see "Connecting Power adapter " section). 17 Connecting Power adapter ! Follow the instructions in the chapter "Important notes". You can connect the Power adapter directly to the Pharos Traveler GPS 535. ► 18 If your power adapter includes a separate plug as shown in the figure, slide the power adapter plug into the Power adapter in the direction of the arrow until it engages. 3 2 1 ► Connect the ActiveSync cable (1) to the ActiveSync port on the Pharos Traveler GPS 535. ► Connect the power adapter cable (2) to the DC socket of the ActiveSync cable. ► Connect the Power adapter (3) to an electrical outlet. The installed battery will now be charged. The power-on indicator flashes orange. i Please note that: Do not connect your Pharos Traveler GPS 535 to your computer (PC/notebook) yet. Before the first data synchronization between your Pharos Traveler GPS 535 and your PC/notebook, you must install the ActiveSync program on your PC/notebook. 19 Installing ActiveSync on your PC/notebook Data synchronization helps you always keep your data on your Pharos Traveler GPS 535 and your PC/notebook up to date when you work alternately with your PC/notebook and your Pharos Traveler GPS 535. The ActiveSync cable and the ActiveSync software are provided for data synchronization. ActiveSync is already installed on your Pharos Traveler GPS 535. You need only install ActiveSync on your PC or notebook. You will find the ActiveSync program and the necessary driver on the Microsoft Getting Started CD. Insert the Microsoft Getting Started CD in the optical drive of your PC/notebook. ► The installation program of ActiveSync will start. ► If the installation program of ActiveSync does not start automatically, you must double-click on the Setup.exe file. ► Follow the instructions on the screen. ► Prepare the Pharos Traveler GPS 535 as described in the section "Start the Pharos Traveler GPS 535 for the first time". During the installation the software attempts to establish a connection to the Pharos Traveler GPS 535. i If you have not yet installed Outlook on your PC/notebook, you must install it on your PC/notebook before the first data synchronization between your Pharos Traveler GPS 535 and your PC/notebook. 1 ► Connect the ActiveSync cable to a USB port (1) of your PC/notebook. The Pharos Traveler GPS 535 is now connected to your PC/notebook. The ActiveSync partnership between your Pharos Traveler GPS 535 and your PC/notebook will be established. 20 Start the Pharos Traveler GPS 535 for the first time ► Press the Suspend/Resume button (1) to switch on the Pharos Traveler GPS 535. ► Pull out the pen (2) in the direction of the arrow. Adjusting touchscreen The display of your Pharos Traveler GPS 535 is a touchscreen. To ensure that the touchscreen of your Pharos Traveler GPS 535 reacts correctly when touched with the stylus, you will be asked to align the touchscreen after the initial start-up. Touch the center of the cross hairs that appears on the display with the stylus. This procedure must be repeated several times, whereby the cross hairs appear at different locations on the display each time. Follow the instructions on the display. Becoming familiar with basic operation Next the operating system provides a brief introduction to the operation of the Pharos Traveler GPS 535 with the stylus after the initial start-up. Follow the instructions on the display. ► Today screen Following the introduction the Today screen appears. The Today screen shows all important current information at a glance. From this screen you have access to all programs and to the system settings. i Please also use the help function available on your Pharos Traveler GPS 535 if you want to know more about running the programs contained in the operating system. 21 First data synchronization between the Pharos Traveler GPS 535 and the PC/notebook After you have specified the desired and required settings for synchronization in the ActiveSync Setup Wizard, the first synchronization starts automatically. Switching Pharos Traveler GPS 535 off and on Switch the Pharos Traveler GPS 535 on or off with the Suspend/Resume button. After certain applications or the installation of new programs, it may be necessary to restart the Pharos Traveler GPS 535 with the soft reset. It is rarely necessary to reset the Pharos Traveler GPS 535 to the delivered state. 1 = Suspend/Resume button Switching Pharos Traveler GPS 535 off and on during normal use Switching off with Suspend/Resume button Briefly press the Suspend/Resume button to switch off the Pharos Traveler GPS 535. ► The Pharos Traveler GPS 535 is switched to suspend mode. i If you have specified a switch-off time with the system settings, your Pharos Traveler GPS 535 will automatically switch into the Suspend mode after this specified time. There are two ways to switch on your Pharos Traveler GPS 535: Switching on with Suspend/Resume button ► Briefly press the Suspend/Resume button to switch on the Pharos Traveler GPS 535. Switching on with application buttons By default, you can also switch your Pharos Traveler GPS 535 on by briefly pressing one of the application buttons. The application assigned to the respective button appears on the screen. 22 i With the appropriate setting in FSC KeyLock you can prevent the Pharos Traveler GPS 535 being started by pressing the application button. Switching the Pharos Traveler GPS 535 on and off to save the batteries Switching off ► Press the Suspend/Resume button (1) for more than 1 second. All programs are closed and the Pharos Traveler GPS 535 is completely switched off. The Pharos Traveler GPS 535 does not use any more power. You can store the Pharos Traveler GPS 535 for several weeks. Switching on ► Press the Suspend/Resume button (1) once. 23 Switching on and off with soft reset (warm boot) After certain applications or the installation of new programs, it may be necessary to restart the Pharos Traveler GPS 535 with the soft reset. i Unsaved data is lost. Shut down all programs before you restart the Pharos Traveler GPS 535. ► Briefly press the stylus tip (1) into the soft reset opening. The warm boot is carried out. 24 Resetting the Pharos Traveler GPS 535 (Cold start) If your Pharos Traveler GPS 535 locks up and switching it on and off with the suspend/resume button and soft reset has no effect, you can reset your Pharos Traveler GPS 535. i ► Unsaved data is lost. Shut down all programs before you reset the Pharos Traveler GPS 535. Simultaneously press the Suspend/Resume button (1) and the stylus tip (2) into the soft reset opening. 25 Resetting Pharos Traveler GPS 535 to delivered state ► Simultaneously press and hold the Suspend/Resume button (1) and the Calendar application button (2). ► Briefly press the stylus tip into the soft reset opening (3). Continue to hold down the Suspend/Resume button and the Calendar application button for a few seconds. The reset can take a few minutes. At the end an acoustic signal sounds. Please follow the further instructions on the display. i When you reset your Pharos Traveler GPS 535 to the delivered state, the battery switches off so that the RAM content is lost. This means: You lose all data (documents, additionally installed programs, personal settings) that you haven't saved elsewhere. Back up your data regularly. 26 Using standard operating elements Using the pen ► Briefly touch the desired element on the display with the stylus to trigger an action. ► To activate popup menus, also touch the desired element with the stylus; however allow the stylus to rest on the element for a moment. The popup menu appears and you can select an element by touching it. Using navigation key With the navigation key (1) you scroll within the menus (up, down, to the left and right) and activate menu entries by pressing the center of the navigation key. 27 Using the application buttons 1= 2= 3= 4= Navigation button Today button Contacts button Calendar button With the application buttons and the appropriate preset (see chapter "Configuring the Pharos Traveler GPS 535"), you can open your preferred programs and applications directly from suspend mode or from within an application. Because the application button react differently to short or long keystrokes you can assign a total of eight different programs or applications to the application buttons. Making the display lighting lighter and darker You can adjust the display lighting to make it darker or brighter using a combination of keys. Reduce the display brightness to save energy. To make the display lighting brighter: ► Press the Today application button and keep it pressed down. ► Press the left arrow key on the navigation button until you obtain the desired brightness. To make the display lighting darker: ► Press the Today application button and keep it pressed down. ► Press the right arrow key on the navigation button until you obtain the desired brightness. 28 Inserting and removing expansion card A slot enables the operation of an SD (Secure Digital I/O) or MMC (MultiMediaCard) expansion card. ! Observe the manufacturer's instructions when using the expansion cards. Never use force when inserting or removing an expansion card. Make sure that no foreign objects enter the slot. Inserting expansion card ► Press on the edge of the placeholder (1) so that the placeholder is pushed out of the slot somewhat. ► Pull the placeholder out of the Pharos Traveler GPS 535 (2). ► Carefully push the expansion card (3) into the slot. The expansion card can protrude by one to several millimeters (depending on the type of expansion card). i Keep the placeholder for the expansion card in a safe place. When you remove the expansion card again, you should reinsert the expansion card placeholder. This prevents foreign matter from getting into the slot. 29 Removing expansion card ► Press on the edge of the expansion card (1) so that the expansion card jumps out of the slot slightly. ► Slide the expansion card out of the Pharos Traveler GPS 535 (2). ► Insert the placeholder (3) again into the slot if necessary. The placeholder protrudes one to two millimeters. 30 Underway with the Pharos Traveler GPS 535 Using GPS With the built-in GPS receiver and navigation software you can use the Pharos Traveler GPS 535 as a navigation system. You have two options for using the navigation software on your Pharos Traveler GPS 535: You can use the navigation software on a preinstalled expansion card. You can install the navigation software via your PC, e.g. from a DVD. ● ● i To register your navigation software you require the serial number of the navigation software and possibly also the device ID of your Pharos Traveler GPS 535. The device ID will be displayed after the initial start-up of the navigation software if necessary. Register your navigation software as described in the instructions for the navigation software. ► A description of how to use the navigation software is provided in the instructions on the navigation software. i If the reception signal is weak, you can connect an external GPS antenna. The external GPS antenna improves performance in difficult reception conditions. The external GPS antenna is available as an accessory. Charging the battery Your Pharos Traveler GPS 535 is equipped with a powerful battery. When you're on the road your Pharos Traveler GPS 535 is supplied with power by the integrated battery. i The battery is not charged on delivery and should be charged for 12 hours prior to the first mobile use. The battery charging time is otherwise approx. 4 hours. When the Pharos Traveler GPS 535 is operating, the charging time is extended. You have two ways of re-charging the battery: You can connect the Pharos Traveler GPS 535 directly to an electrical outlet with the Power adapter. You can connect the Pharos Traveler GPS 535 to a computer’s USB port using the ActiveSync cable. 31 You can continue to work with the Pharos Traveler GPS 535 during charging. This extends the charging time. i Follow the instructions on the Power adapter in the section "Connecting Power adapter ". Charging the battery directly via the Power adapter You can connect the Power adapter directly to the Pharos Traveler GPS 535. There are two ways to do this: You can use the ActiveSync cable. You can use the adapter. Connecting Power adapter to Pharos Traveler GPS 535 with ActiveSync cable 3 2 1 ► Connect the ActiveSync cable (1) to the ActiveSync port on the Pharos Traveler GPS 535. ► Connect the power adapter cable (2) to the DC socket of the ActiveSync cable. ► Connect the Power adapter (3) to an electrical outlet. The installed battery will now be charged. The power-on indicator flashes orange. When the battery is fully charged, the power-on indicator lights continuously orange. 32 Connecting Power adapter to Pharos Traveler GPS 535 with adapter 3 2 1 ► Connect the adapter (1) to the ActiveSync port of the Pharos Traveler GPS 535. ► Connect the power adapter cable (2) to the adapter. ► Connect the Power adapter (3) to an electrical outlet. The installed battery will now be charged. The power-on indicator flashes orange. When the battery is fully charged, the power-on indicator lights continuously orange. 33 Charging the battery via a USB port ► Connect the ActiveSync cable to your Pharos Traveler GPS 535. ► Connect the ActiveSync cable to the computer’s USB port. i The computer’s USB port must deliver no less than 500 Ma of power. Because of the low charging current, the charging process will take longer than it does using the power adapter. Optimizing battery operating time When you have completely charged the battery, you can operate the Pharos Traveler GPS 535 for up to 12 hours without a power connection. However, it is not possible to exactly specify the maximum operating time, as different applications use more or less energy. In the system settings you can make settings that help you save energy when using your Pharos Traveler GPS 535. These settings enable you to use the battery operating time optimally. i In the default setting, a setting is activated that automatically switches the Pharos Traveler GPS 535 into the Suspend mode after three minutes when working without a power connection if no entries are made during this time. You can switch on the Pharos Traveler GPS 535 again at any time by briefly pressing the Suspend/Resume button and then continue working where you left off. 34 Synchronizing data with ActiveSync To have the current version of the data you have processed on the road on your Pharos Traveler GPS 535 available on your PC/notebook, you must copy this data to your PC/notebook. This procedure is conveniently enabled with data synchronization: In the ActiveSync program you can specify that the respective latest version of a file be detected and then automatically updated on the respective data carrier - regardless of whether it is the Pharos Traveler GPS 535 or a PC/notebook. You can synchronize your data between your Pharos Traveler GPS 535 and your PC/notebook via the ActiveSync cable or via infrared, Bluetooth or wireless LAN. You will find information on how you synchronize data using ActiveSync, in the ActiveSync help file on your PC/notebook. i If you have not yet installed the ActiveSync program on your PC/notebook, you must install it on your PC/notebook before the first data synchronization between your Pharos Traveler GPS 535 and your PC/notebook (see section "Initial start-up"). 35 Connecting the Pharos Traveler GPS 535 with PC/Notebook 4 3 1 2 ► Switch your PC or notebook on. ► Connect the ActiveSync cable (1) to the ActiveSync port on the Pharos Traveler GPS 535. ► Connect the ActiveSync cable to a USB port (2) of your PC/notebook. The Pharos Traveler GPS 535 is now connected to your PC/notebook. The ActiveSync partnership between your Pharos Traveler GPS 535 and your PC/notebook will be established. Synchronizing data with new PC/notebook If you intend to synchronize data with a new PC/Notebook, then you must first install ActiveSync on the new PC/notebook and then create a new ActiveSync partnership (on this point, see the corresponding explanations in the section "Initial start-up"). 36 Configuring the Pharos Traveler GPS 535 You can already choose from a large number of programs when you use the Pharos Traveler GPS 535 for the first time. In addition, proven default settings are defined for the menu structure, energy management, memory management and security functions. But, of course, you can add and remove programs and configure the Pharos Traveler GPS 535 as desired. You will find out how to use some of the functions (e.g. energy management) in this section. For information on removing and adding programs, please refer to the documentation from the software manufacturer and the ActiveSync help file that you can call at any time after installing ActiveSync on your notebook/PC. Energy management optimizing General information on energy management The battery operating time is considerably dependent on the applications used. Please consider that a particularly large amount of energy is required to play sound files or make sound recordings. Therefore, if you want to work for up to 12 hours without a power connection, limit the use of energyintensive applications. Data exchange with a PC or notebook also consumes additional battery power. Therefore, always connect your Pharos Traveler GPS 535 to an electrical outlet during data exchange if possible. 37 Using energy-saving functions You can save energy in several ways to optimally utilize the battery operating time: ● Switch the Pharos Traveler GPS 535 into the Suspend mode when you are not using it. ● Reduce the processor speed. ● Switch the display lighting off or reduce the brightness. ● Switch off the sound, reduce the volume or only allow acoustic signals for certain applications. Switching the Pharos Traveler GPS 535 into Suspend mode Select the number of minutes after which the Pharos Traveler GPS 535 is to switch into the Suspend mode when it is not used under Start - Settings - System - Power. ► i Press the Suspend/Resume button to deactivate the Suspend mode. The Pharos Traveler GPS 535 returns to the point at which you interrupted your work. Switching off display lighting ► Select the number of minutes after which the display lighting is to be switched off in the battery mode when the Pharos Traveler GPS 535 is not used under Start - Settings - System - Backlight. Reducing brightness ► Reduce the display brightness under Start - Settings - System - Backlight. Switching on the sound and setting the volume ► Touch the loudspeaker symbol in the navigation bar. A popup window for the loudspeaker settings appears. ► Set the desired volume on the slide control with the stylus. ► To switch off the sound, activate the selection field for Off with the stylus. ► Touch the display anywhere outside the popup window. 38 Adjusting menus Frequently used programs appear in the Start menu. You can adjust the Start menu to meet your needs. ► Touch the Menus symbol under Start - Settings - Personal. A list of programs/applications appears. To remove programs from the Start menu, clear the checkbox for the program. To add programs to the Start menu, click in the checkbox of the desired program. A check mark appears in the checkbox. You can also use the program FSC SpeedMenu as an alternative for fast access to programs and files. You can quickly and simply adapt FSC SpeedMenu to your requirements. Additional information on this subject is provided in the user manual on the Microsoft Getting Started CD. Password protection You can protect your Pharos Traveler GPS 535 from unauthorized access with a password. This makes your data accessible only to persons who know the password. ► Touch the Password symbol under Start - Settings - Personal. ► Select the type of password you prefer: A password consisting of four numbers (simple 4-digit password). A password of alphanumeric characters (a complex alphanumeric password). If a password has been entered, you will have to enter this password the next time you switch on. If you have forgotten your password, you can restart your Pharos Traveler GPS 535 by resetting it to the delivered state (see section "Resetting Pharos Traveler GPS 535 to delivered state"). 39 Configuring hardware keys FSC KeyLock: Preventing switch-on with application buttons By default, your Pharos Traveler GPS 535 starts up if the Suspend button and an application button are pressed. Using the FSC KeyLock program you can specify that the Pharos Traveler GPS 535 only starts if the Suspend button is pressed. You can find the FSC KeyLock program under Start – Settings – Personal – Keys - FSC KeyLock. You will find further information in the help file on your Pharos Traveler GPS 535 and in the user manual on the Microsoft Getting Started CD. Assigning chosen functions to the hardware buttons The buttons of your Pharos Traveler GPS 535 are assigned certain functions such as running programs. However, you can change these default settings and assign the buttons the functions of your choice. ► Tap Start. ► Select the Settings entry in the menu. ► Touch the Buttons symbol on the Personal tab. A list of the hardware buttons and the assigned programs or functions appears. The four application buttons appear in the list twice. This is because you can assign different applications to these buttons for short and for long keystrokes. ► Select the button in the list for which you want to change the assignment. ► Select the program you want to assign to this button from the list below it. ► Touch OK (navigation bar) to confirm your setting. The button is now assigned the desired program. If you want to change the function of several buttons, we advise you to make a note of the new functions. 40 Connecting and networking the Pharos Traveler GPS 535 with other devices The Pharos Traveler GPS 535 offers a wide range of ways to exchange data with other devices or to work in a network. You are already familiar with data synchronization via ActiveSync and the ActiveSync cable in the section "Synchronizing". You can connect the supplied ActiveSync cable to all PCs notebooks with a USB interface. In addition, the infrared interface and wireless LAN are available for wireless communication. This chapter provides you with information on wireless data transfer ● via infrared interface ● via wireless LAN Wireless data transfer with infrared interface The infrared interface (IrDA) permits wireless serial data transfer with up to 115 Kbits/s. For data transfer, you must align the infrared interface of your Pharos Traveler GPS 535 with that of the partner device. The devices must not be more than one meter apart. The infrared interface of one device must be in the range of influence (horizontally approx. 30° and vertically approx. 15°) of the infrared interface of the other device. The infrared interface is simultaneously a consumer infrared interface (CIR). The CIR interface can transmit over greater distances. As a result, you can also use the Pharos Traveler GPS 535 as a remote control with suitable software. You will find information on how to create an IR connection and exchange data in the Help on your Pharos Traveler GPS 535. Wireless connection via Wireless LAN Your Pharos Traveler GPS 535 is equipped with an integrated wireless LAN. Information on this topic is provided in the help file on your Pharos Traveler GPS 535. You can also activate and deactivate the integrated Wireless LAN just as you wish. ► Touch the WLAN Power symbol under Start - Settings - System. 41 Troubleshooting and tips If a fault occurs in your Pharos Traveler GPS 535, try to eliminate it with the measures described in this chapter. If you fail to correct the problem, proceed as follows: ► Make a note of the steps and the circumstances that led to the fault. Also make a note of any error messages displayed. ► Switch the Pharos Traveler GPS 535 off. ► Contact your sales outlet or our hotline/help desk. Installing new software You will find information on installing supplementary programs in the ActiveSync help file that you can call up after installing ActiveSync on your PC/notebook. ► When installing programs or drivers important files can be overwritten and modified. In order to gain access to the original files if any problems occur after installation, you should make a backup before installing (see section "Synchronizing"). The Pharos Traveler GPS 535’s time or date are not correct ► Touch the Clock symbol under Start - Settings - System. ► Change the time. or ► Connect your Pharos Traveler GPS 535 via ActiveSync to your PC/Notebook. ► Synchronize data between the Pharos Traveler GPS 535 and the PC/notebook. The time and date are also synchronized in the process. The display of the Pharos Traveler GPS 535 remains dark Display lighting is switched off. ► Press the Suspend/Resume button longer than 1 second. The display is hardly readable Reflection ► Turn the Pharos Traveler GPS 535 until you can see the information in the display again. The Pharos Traveler GPS 535 switches off If you operate the Pharos Traveler GPS 535 too long with only the battery, the Pharos Traveler GPS 535 switches into the Suspend mode when the battery charge level is too low. ► Connect the Power adapter to charge the battery. ► Press the Suspend/Resume button. 42 The Pharos Traveler GPS 535 does not start after switch on If the Pharos Traveler GPS 535 does not start after switch on, this may be due to one of the following: The battery is dead. ► Charge the battery. ► Connect the Power adapter to the Pharos Traveler GPS 535. ► Check whether the power cable is plugged properly into the power adapter and into the electrical outlet. The indicator on the power adapter should illuminate. The battery is charged. The power-on indicator flashes orange. Power adapter is not properly connected. ► Switch the Pharos Traveler GPS 535 off. ► Check whether the Power adapter is properly connected to the Pharos Traveler GPS 535 and the electrical outlet. ► Then switch the Pharos Traveler GPS 535 on again The Pharos Traveler GPS 535 stops working If the Pharos Traveler GPS 535 stops working, this may have the following reasons: An application program has caused the fault. ► Restart the Pharos Traveler GPS 535 (see section "Switching on and off with soft reset (warm boot)"). or ► If the restart does not function, reset the Pharos Traveler GPS 535 to the delivered state (see section "Resetting the Pharos Traveler GPS 535 (Cold start)"). Battery is empty. ► Connect the Power adapter to the Pharos Traveler GPS 535 to charge the battery. The battery discharges too quickly The battery is either too hot or too cold. ► Bring the Pharos Traveler GPS 535 up / down to a normal temperature again. If the operating time of the battery mode is extremely short, the battery is probably old and should be replaced. Please contact your dealer for a new battery. The Suspend/Resume button does not respond properly You have pressed and held the Suspend/Resume button too long to switch the Pharos Traveler GPS 535 on or off. ► Briefly press the Suspend/Resume button until the Pharos Traveler GPS 535 switches on or off. 43 No sound or minimal volume Check whether the volume is set correctly. ► Touch the loudspeaker symbol in the navigation bar. A popup window for the loudspeaker settings appears. ► Activate the selection field for Off with the stylus. or ► Set the desired volume on the slide control with the stylus. Poor reception via GPS The installation position of the Pharos Traveler GPS 535 in your vehicle is unfavorable. ► Change the installation position of the Pharos Traveler GPS 535. Contact with hotline/help desk If you are unable to solve a certain problem, please contact the hotline/help desk. Additional details are contained in the "Safety" and "Warranty" manuals. Please have the following information ready when you call: The model name and serial number of the Pharos Traveler GPS 535. The serial number is located on a sticker on the backside of the Pharos Traveler GPS 535. Notes of any messages that appear on the screen and information on acoustic signals. Your system configuration and all peripheral devices connected to your system (e. g. keyboard). Your sales contract. Any changes you have made to the hardware or software after receiving the Pharos Traveler GPS 535. 44 Technical data Pharos Traveler GPS 535 Processor: Intel PXA270 312 MHz Main memory: 128 Mbyte ROM 64 Mbyte RAM Electrical data Regulations complied with: Protection class: CE, FCC Part 15 Class B, EN 60950, UL, cUL III Maximum power draw: 10 W (when Pharos Traveler GPS 535 is on with battery charging) Display Transreflective TFT display: 3.5 inch QVGA, 240 x 320 pixels, 65,536 colors Card slots 1 x slot: "Secure Digital I/O", "MultiMediaCard" Ports/interfaces Audio: Microphone, loudspeaker, headphones (3.5 mm) or remote control Data: Consumer IrDA, USB 1.1 Host/Client, serial (RS232; supports DTR/DTS), Wireless LAN (IEEE 802.11g), GPS Sirf Star 3 Environmental conditions Environment class 3K2, 2K2 DIN IEC 721 EN 60721 Housing class 7M2 DIN IEC 721 EN 60721 Temperature: Operating (3K2) Transport (2K2) 0°C – 40°C -20°C – 60°C Dimensions Height/width/depth: 115.7 mm x 70.2 mm x 14.6 mm Weight: approx. 145 g 45 Battery (Li-Ion) Rated capacity: 1200 mAh Charging time (when not in operation): Max. 3 hours Operating time: up to 12 hours up to 350 hours in stand-by mode Power adapter Primary: Rated voltage: Frequency: 100 V to 240 V (automatic) 50 Hz to 60 Hz (automatic) Secondary: Rated voltage: Max. rated current: 5 V ±5% 2.0 A ±5% 46 Index infrared, 41 Wireless LAN, 41 Date, not correct, 42 Date/Time incorrect, 42 Delivered state, 25 Display, 14 cleaning, 11 difficult to read, 42 reflected glare, 42 remains dark, 42 Display lighting, 38 switching off, 28 switching on, 28 Displays, 14 Disposal, 11 A ActiveSync partnership, establishing, 20 ActiveSync port, 14 ActiveSync, installing, 20 Adjusting touchscreen, 21 Application button Calendar button, 15 CONNECTMOBILITY-E2C button, 15 Contacts button, 15 navigation button, 15 switching on, 22 Today button, 15 B E Battery capacity, 11 charging with PSC11R-050 power adapter, 32 discharges, 43 inserting, 17 storing, 11 technical data, 46 Battery compartment cover, 15 Bluetooth indicator, 16 Electromagnetic compatibility, 12 Energy management optimising, 37 Expansion card handling, 29 inserting, 29 removing, 30 Expansion card slot, 15 F First start, 21 FSC KeyLock, 40 C G Calendar button, 15 CE marking, 12 Charging the battery, 31 Cleaning, 11 Configuring hardware keys, 40 Configuring the Pocket PC, 37 Connecting the Pocket PC with PC/Notebook, 36 Connections, 14 CONNECTMOBILITY-E2C button, 15 Contacts button, 15 Controls, 14 GPS, 31 indicator, 16 GPS antenna, 15 H Hardware reset, 25 Hardware, overview, 14 Headphones port, 15 Hotline/Help Desk, 44 I D Indicator battery charge level, 16 Bluetooth, 16 GPS, 16 message, 16 WLAN, 16 Dark display, 42 Data technical, 45 Data synchronisation, 35 Data transfer 47 Infrared interface, 14, 41 Initial start-up, 16 basic operation, 21 first start, 21 Today screen, 21 touchscreen, 21 technical data, 46 with ActiveSync cable on Pocket PC, 32 with adapter on Pocket PC, 33 R Radio indicator, 14 Record button, 14 Recycling, 11 M Microphone, 14 N S Navigation button, 15 Navigation key, 15 No sound, 44 Notational conventions, 7 Notes CE marking, 12 cleaning, 11 disposal, 11 safety, 9 Safety notes, 9 Screen too bright, 42 Signs and symbols, 7 Soft reset carrying out, 24 opening, 14 Software installing new software, 42 new installation, 42 Overview, 8 Standard operating elements, using, 27 Start menu, customising, 39 Start-up connect PSC11R-050 power adapter, 18 Status battery charge level, 16 message, 16 Storage, battery, 11 Stylus removing, 21 Summer time, 42 Suspend mode, 22 Suspend/Resume button, 14 does not react, 43 switching off, 22 switching on, 22 Switching off sound, 38 O On/off time, 22 Operating, basically, 21 Optimising battery operating time, 34 Overview Hardware, 14 software, 8 P Password protection under Pocket PC, 39 Pen, 15 Pocket PC before you travel, 10 cleaning, 11 connecting with other devices, 41 does not start, 43 does not work, 43 networking, 41 operating, 14 switches itself off, 42 switching off, 22 switching on, 21, 22 transporting, 10 Power saving possibilities, 38 Power-on indicator, 14, 16 Preparing for use first time, 16 inserting battery, 17 PSC11R-050 power adapter connecting, 18 T Technical data, 45 battery, 46 Pocket PC, 45 PSC11R-050 power adapter, 46 Time not correct, 42 Time not correct, 42 Time, daylight savings, 42 Tips, 42 Today button, 15 Today screen, 21 48 Transport, 10 Travel, Pocket PC, 10 Troubleshooting, 42 V Volume, minimal, 44 W U Warm boot, 24 Wireless data transfer, 41 Wireless indicator, 16 Wireless LAN, 41 WLAN, 41 indicator, 16 Using navigation key, 27 Using the application buttons, 28 Using the pen, 27 49