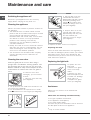
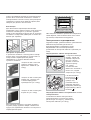
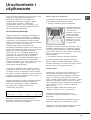
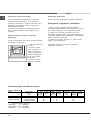
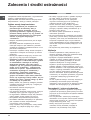
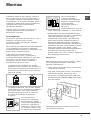
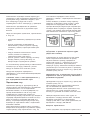
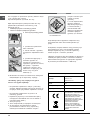
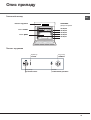
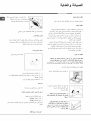
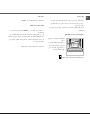
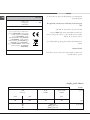
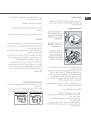
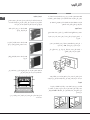
1
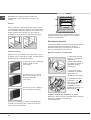
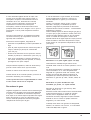
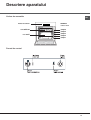
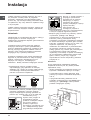
Operating Instructions OVEN Contents GB English, 1 PL Polski, 33 RS , 11 UA RO Romanian,22 AR Installation, 2-4 Electrical connection Gas connection Data plate Description of the appliance, 5 Overall view Control panel Start-up and use, 6-7 Starting the oven How to use the timer Burner and nozzle specifications Cooking modes, 8 FZ G /HA FZ G IX /HA FB G /HA FB G IX /HA FR G /HA FR G IX /HA FR G0 /HA FR G0 IX /HA FH G /HA FH G IX /HA FHR G /HA FHS G IX /HA Cooking modes Practical cooking advice Cooking advice table Precautions and tips, 9 General safety Disposal Respecting and conserving the environment Maintenance and care, 10 Switching the appliance off Cleaning the appliance Cleaning the oven door Replacing the light bulb Assistance GB Installation ! Before operating your new appliance please read this instruction manual carefully. It contains important information for safe use, installation and care of the appliance. ! Please keep these operating instructions for future reference. Pass them on to possible new owners of the appliance. Fitting the appliance Centring and fastening Position the 4 tabs on the side of the oven according to the 4 holes on the outer frame. Adjust the tabs according to the thickness of the cabinet side panel, as shown below: 20 mm thick: take off the removable part of the tab (see diagram). Use a suitable kitchen unit to ensure that the appliance functions properly. • The panels adjacent to the oven must be made from heat-resistant material. • Cabinets with a veneer exterior must be assembled with a glue that can withstand temperatures of up to 100°C. • To install the oven under the counter (see diagram) or in a kitchen unit, the cabinet must have the following dimensions: 18 mm thick: use the first groove, which has already been set in the factory (see diagram). 16 mm thick: use the second groove (see diagram). . min mm 45 m m. mm . 5 mm. 567 mm. 558 593 mm. 23 mm. . 547 595 mm. GB 595 mm 24 545 . mm Secure the appliance to the cabinet by opening the oven door and fastening 4 screws into the 4 holes of the outer frame. . mm . ! The appliance must not come into contact with electrical parts once it has been installed. The figures indicated on the data plate have been calculated for this type of installation. Ventilation To ensure adequate ventilation, the back panel of the cabinet must be removed. It is advisable to install the oven so that it rests on two strips of wood, or on a completely flat surface with an opening of at least 45 x 560 mm (see diagrams). . 560 2 mm 45 m m. ! All parts ensuring the safe operation of the appliance must not be removable without the aid of a tool. Electrical connections ! Ovens equipped with a three-pole power supply cable are designed to operate with alternating current at the voltage and frequency indicated on the data plate located on the appliance (see below). Fitting the power supply cable 1. Open the terminal board by inserting a screwdriver into the side tabs of the cover. Use the screwdriver as a lever by pushing it down to open the cover (see diagram). 2. Loosen the cable clamp screw and remove it, using a screwdriver as a lever (see figure). 3. Remove the wire contact , then fasten screws L-Nthe wires under the screw heads, respecting the colour code: Blue (N), Brown (L) and Yellow-Green Verde ( ). Connecting the supply cable to the mains Install a standardised plug corresponding to the load indicated on the data plate (see adjacent box). The appliance must be directly connected to the mains using an omnipolar circuit-breaker with a minimum contact opening of 3 mm installed between the appliance and the mains. The circuit-breaker must be suitable for the charge indicated and must comply with current electrical regulations (the earthing wire must not be interrupted by the circuitbreaker). The supply cable must not come into contact with surfaces with temperatures higher than 50°C. ! The installer must ensure that the correct electrical connection has been made and that it is compliant with safety regulations. • the voltage is in the range between the values indicated on the data plate (see below). • the socket is compatible with the plug of the appliance. If the socket is incompatible with the plug, ask an authorised technician to replace it. Do not use extension cords or multiple sockets. GB ! Once the appliance has been installed, the power supply cable and the electrical socket must be easily accessible. ! The cable must not be bent or compressed. ! The cable must be checked regularly and replaced by authorised technicians only (see Assistance). ! The manufacturer declines any liability should these safety measures not be observed. Gas connection The appliance should be connected to the main gas supply or to a gas cylinder in compliance with current National regulations. Before carrying out the connection, make sure the cooker is compatible with the gas supply you wish to use. When using liquid gas from a cylinder, install a pressure regulator that complies with current National regulations. ! Check that the pressure of the gas supply is consistent with the values indicated in Table 1 (“Burner and nozzle specifications”) since this will ensure the safe operation and longevity of your appliance while maintaining efficient energy consumption. ! Should you need to install a gas hob on top of a built-in gas oven, it is strictly forbidden to connect the two or to use a single cut-off tap. The two appliances should be connected separately, and each one should have its own stop tap in order to make them completely independent from one another (see figures). NO OK Before connecting to the power supply, make sure that: • the appliance is earthed and the plug is compliant with the law. • the socket can withstand the maximum power of the appliance, which is indicated on the data plate (see below). Connection with a rigid pipe (copper or steel) ! Connection to the gas system must be carried out in such a way as not to place any strain of any kind on the appliance. 3 GB There is an adjustable L-shaped pipe fitting on the appliance supply ramp and this is fitted with a seal in order to prevent leaks. The seal must always be replaced after rotating the pipe fitting (the seal is provided with the appliance). The gas supply pipe fitting is a threaded 1/2 gas cylindrical male attachment. Connecting a flexible jointless stainless steel pipe to a threaded attachment The gas supply pipe fitting is a threaded 1/2 gas cylindrical male attachment. These pipes must be installed so that they are never longer than 2000 mm when fully extended. Once connection has been carried out, make sure that the flexible metal pipe does not touch any moving parts and is not compressed. ! Only use pipes and seals that comply with current National regulations. Checking the tightness of the connection ! When installation has been completed, check the pipe fittings for leaks using a soapy solution. Never use a flame. 4 DATA PLATE Dimensions width 43.5 cm height 31 cm depth 43.5 cm Volume 58 l This appliance conforms to the following European Economic Community directives: 2006/95/EEC dated 12/12/06 (Low Voltage) and subsequent amendments - 2004/108/EEC dated 15/12/04 (Electromagnetic compatibility) and subsequent amendments - 93/68/EEC dated 22/07/93 and subsequent amendments. 2009/142/EEC dated 30/11/09 (Gas) and subsequent amendments. 2002/96/EC and subsequent amendments. Description of the appliance Overall view GB GUIDES for the sliding racks Control panel position 5 position 4 position 3 position 2 position 1 GRILL DRIPPING PAN Control panel GRILL indicator light TIMER knob 0 0 1 Min 15 45 Max 150 220 180 OVEN/GRILL knob 30 OVEN LIGHT button 5 Start-up and use GB ! The first time you use your appliance, heat the empty oven with its door closed at its maximum temperature for at least half an hour. Ensure that the room is well ventilated before switching the oven off and opening the oven door. The appliance may produce a slightly unpleasant odour caused by the burning away of protective substances used during the manufacturing process. Switching the oven on manually In the event of a power failure, the oven burner can be lit manually: 1. Open the oven door. Starting the oven This knob is used not only to select the different oven modes, but also to choose the right cooking temperature for various foods from among the temperatures shown on the knob itself (the range is from 140°C to 240°C inclusive). The electronic ignition device of the oven is built into the control knob. To light the oven burner, press the OVEN knob in as far as possible and turn it anti-clockwise, setting it to position (keeping the oven door shut). The oven is equipped with a safety device. After lighting the burner allow the gas to circulate until the safety thermocouple is heated by keeping the OVEN knob pressed in for about 6 seconds. ! The electronic ignition device of the oven burner must not be activated for more than 15 seconds. If the burner fails to light after 15 seconds, stop pressing the OVEN knob, open the oven door and wait for at least one minute before you try to light the burner again. The cooking temperature is selected by matching the desired temperature with the reference mark on the control panel; the complete range of temperatures is shown below: Min • 140 145 150 • 160 180 • 200 220 • Max 230 240 The oven will automatically reach the temperature set, and the thermostat, which is controlled by the knob, will keep the temperature constant. F 2. Hold a match or lighter near the burner hole as shown in the figure, press knob F (see figure) in fully and turn it anticlockwise, setting it to the Max position.. The oven is equipped with a safety device. After lighting the burner allow the gas to circulate until the safety thermocouple is heated by keeping the OVEN knob pressed in for about 6 seconds. 3. Once the burner is lit, shut the oven door. ! If the burner flame is accidentally extinguished, turn the OVEN control knob to the off position, open the oven door and wait for at least one minute before trying to light the burner again. The GRILL knob Your oven is equipped with an electric grill. The extremely high and direct temperature of the grill makes it possible to brown the surface of meats and roasts while locking in the juices to keep them tender. The grill is also highly recommended for dishes that require a high surface temperature: beef steaks, veal, rib steak, fillets, hamburgers etc... Some examples of how the grill may be used are included in the “Practical Cooking Advice” section. ! When using the grill, the oven door must be kept shut. ! Never put objects directly on the bottom of the oven this could result in damage to the enamel coating. ! Always place cookware on the rack(s) provided. 6 Cooling ventilation Oven light In order to cool down the external temperature of the oven, some models are fitted with a cooling fan that blows air out between the control panel and the oven door. ! Once the cooking has been completed, the cooling fan remains on until the oven has cooled down sufficiently. This is switched on by pressing the LIGHT button. GB How to use the timer 1. To set the buzzer, turn the TIMER knob clockwise almost one complete revolution. 2. Turn the knob anticlockwise to set the desired time: align the minutes shown on the knob with the indicator on the control panel. 3. The timer operates in minutes: when the selected time has elapsed, a buzzer will sound. Turnspit (only available in certain models) To operate the rotisserie (see diagram) proceed as follows: 1. Place the dripping pan in position 1. 2. Place the rotisserie support in position 3 and insert the spit in the hole provided on the back panel of the oven. ! The timer does not switch the oven on or off. 3. Start the rotisserie using the knob to select Burner and Nozzle specifications Table 1 Burner Liquid gas By-pass 1/100 Nozzle 1/100 (mm) Oven Supply pressures 49 78 Nominal (kPa) Minimum (kPa) Maximum (kPa) Flow* g/h Nominal Reduced 185 65 30 25 35 7 Cooking modes GB Cooking modes GRILL GRILL mode The top heating element comes on. The extremely high and direct temperature of the grill makes it possible to brown the surface of meats and roasts while locking in the juices to keep them tender. The grill is also highly recommended for dishes that require a high surface temperature: beef steaks, veal, rib steak, fillets, hamburgers etc... Always cook in this mode with the oven door closed. • Place the grill in position 3 or 4, making sure that the food is in the centre of the grill. • We recommend that you set the maximum power level. The top heating element is regulated by a thermostat and may not always be on. PIZZA • Use a light aluminium pizza pan. Place it on the rack provided. For a crispy crust, do not use the dripping pan (prevents crust from forming by extending cooking time). Practical cooking advice ! In the GRILL cooking mode, place the dripping pan in position 1 to collect cooking residues (fat and/or grease). • If the pizza has a lot of toppings, we recommend adding the mozzarella cheese to the top of the pizza halfway through the cooking process. Cooking advice table S ele c to r knob s e ttin g F o o d to b e co o ke d Ov e n L as ag n e C a n ne llo n i P a sta b a ke s V ea l C h ic ke n T u rkey ro ll D uck R ab b it P o rk lo in L eg of lam b M ac ke re ls D e n tex T ro ut b ake d in fo il N e a p olitan -style p izz a D ry b isc u its T a rt C h o co la te c ake L ea ve n e d ca ke s Grill S o le s a nd cu ttle fish S q u id a n d p ra w n keb ab s C o d file t Grille d ve g e ta b le s V ea l ste a k C hops H a m b u rg e rs S a u sag es T o a ste d sa nd w ic he s W ith ro tis s erie (w he re p re se nt) V ea l o n th e sp it C h ic ke n o n th e sp it L am b o n th e sp it W eig h t (in kg ) C o o kin g ra c k p o s itio n fro m o v en b o tto m P re h ea tin g tim e (m in u te s ) T h e rm o sta t knob s e ttin g C o o k in g tim e (m in u te s) 2 ,5 2 ,5 2 ,2 1,7 1,5 2 ,5 1,8 2 ,0 1,5 1,8 1,3 1,5 1,0 0 ,6 0 ,5 1 ,1 1,0 1,0 3 3 3 2 3 3 3 3 3 3 3 3 3 3 4 3 3 4 10 10 10 10 10 10 10 10 10 10 10 10 10 15 15 15 15 15 2 00 2 00 2 00 2 10 2 00 2 00 2 00 2 00 2 00 2 00 2 00 180 2 00 2 10 180 180 165 165 5 5-6 0 4 0-4 5 5 0-5 5 8 0-9 0 7 0-8 0 8 0-9 0 9 0 -10 0 8 0-9 0 7 0-8 0 8 0-9 0 3 0-4 0 3 0-4 0 3 0-3 5 1 5 -2 0 2 5-3 0 3 0-3 5 5 0-6 0 5 0-6 0 1 1 1 1 1 1,5 1 1,7 n.° 4 4 4 4 4 4 4 4 4 4 5 3 3 5 5 3 5 3 - 6 4 10 8 -10 2 0-2 5 2 0-2 5 1 0 -1 5 2 0-2 5 2-3 1.0 1.5 1.0 - - - 8 0-9 0 8 0-9 0 8 0-9 0 ! C oo kin g tim e s a re a p p ro xim a te an d m a y va ry a cc o rd ing to p erso n a l tas te. W h en c o ok ing usin g the g rill, th e d rip p in g p a n m us t alw ay s b e p la ce d o n th e 1s t ov en ra ck fro m th e b ottom . 8 Precautions and tips ! This appliance has been designed and manufactured in compliance with international safety standards. The following warnings are provided for safety reasons and must be read carefully. General safety • This is a class 3 built-in appliance. • Gas appliances require regular air exchange to maintain efficient operation. When installing the cooker, follow the instructions provided in the paragraph on “Positioning” the appliance. • The appliance was designed for domestic use inside the home and is not intended for commercial or industrial use. • The appliance must not be installed outdoors, even in covered areas. It is extremely dangerous to leave the appliance exposed to rain and storms. • When moving or positioning the appliance, always use the handles provided on the sides of the oven. • Do not touch the appliance with bare feet or with wet or damp hands and feet. • The appliance must be used by adults only for the preparation of food, in accordance with the instructions outlined in this booklet. Any other use of the appliance (e.g. for heating the room) constitutes improper use and is dangerous. The manufacturer may not be held liable for any damage resulting from improper, incorrect and unreasonable use of the appliance. • Do not touch the heating elements and parts of the oven door when the appliance is in use; these parts become extremely hot. Keep children well away from the appliance. • Ensure that the power supply cables of other electrical appliances do not come into contact with the hot parts of the oven. • The openings used for ventilation and dispersion of heat must never be covered. • Always grip the oven door handle in the centre: the ends may be hot. • Always use oven gloves to place cookware in the oven or to remove it. • Do not use aluminium foil to line the bottom of the oven. • Do not place flammable materials in the oven: if the appliance is switched on by mistake, it could catch fire. • Always make sure the knobs are in the “”/“” position when the appliance is not in use. • When unplugging the appliance always pull the plug from the mains socket, do not pull on the cable. • Never carry out any cleaning or maintenance work without having unplugged the plug from the mains. • In case of malfunction, under no circumstances should you attempt to repair the appliance yourself. Repairs carried out by inexperienced persons may cause injury or further malfunctioning of the appliance. Contact a Service Centre (see Assistance). • Do not place heavy objects on the open oven door. • The appliance should not be operated by people (including children) with reduced physical, sensory or mental capacities, by inexperienced individuals or by anyone who is not familiar with the product. These individuals should, at the very least, be supervised by someone who assumes responsibility for their safety or receive preliminary instructions relating to the operation of the appliance. • Do not let children play with the appliance. Disposal • When disposing of packaging material: observe local legislation so that the packaging may be reused. • The European Directive 2002/96/EC on Waste Electrical and Electronic Equipment (WEEE), requires that old household electrical appliances must not be disposed of in the normal unsorted municipal waste stream. Old appliances must be collected separately in order to optimise the recovery and recycling of the materials they contain and reduce the impact on human health and the environment. The crossed out “wheeled bin” symbol on the product reminds you of your obligation, that when you dispose of the appliance it must be separately collected. Consumers should contact their local authority or retailer for information concerning the correct disposal of their old appliance. Respecting and conserving the environment • By using the appliance in the hours between late afternoon and early morning, you can help reduce the workload placed on electrical companies. • Always keep the oven door closed when using the GRILL mode in order to attain the best results and to save energy (approximately 10%). • Regularly check the door seals and wipe clean to ensure they are free of debris so that they stick properly to the door and do not allow heat to disperse. 9 GB Maintenance and care GB Switching the appliance off Disconnect your appliance from the electricity supply before carrying out any work on it. F Cleaning the appliance ! Never use steam cleaners or pressure cleaners on the appliance. • The stainless-steel or enamel-coated external parts as well as the rubber seals may be cleaned using a sponge that has been soaked in lukewarm water and neutral soap. If these stains are difficult to remove, use only specialised products. After cleaning, rinse and dry thoroughly. Do not use abrasive powders or corrosive substances. • Ideally, the inside of the oven should be cleaned after each use, when it is still lukewarm. Use hot water and detergent, rinse and dry with a soft cloth. Do not use abrasive products. • The accessories can be washed like everyday crockery and may even be cleaned in the dishwasher. Cleaning the oven door Clean the glass part of the oven door using a sponge and a non-abrasive cleaning product, then dry thoroughly with a soft cloth. Do not use rough abrasive material or sharp metal scrapers as these could scratch the surface and cause the glass to crack. To clean the oven more thoroughly, you can remove its door: 1. Open the oven door fully (see diagram). 2. Lift up and turn the small levers situated on the two hinges (see diagram).* 2. Use a screwdriver to lift up and turn the small levers F located on the two hinges (see diagram).* 3. Grip the door on the two external sides and close it approximately half way. Unlock the door by pressing on the clamps F, then pull the door towards you lifting it out of its seat (see diagram).* 3. Grip the door on the two external sides and close it approximately half way. Pull the door towards you, extracting it from its hinges (see diagram).* To replace the door, reverse this sequence. Inspecting the seals Check the door seals around the oven regularly. If the seals are damaged, please contact your nearest After-sales Service Centre (see Assistance). We recommend that you do not use the oven until the seals have been replaced. Replacing the light bulb To replace the oven light bulb: 1. Remove the glass cover of the lampholder. 2. Remove the light bulb and replace it with a similar one: Wattage 25 W, cap E 14. 3. Replace the glass cover (see diagram). Assistance ! Never use the services of an unauthorised technician. Please have the following information handy: F • The type of problem encountered. • The appliance model (Mod.). • The serial number (S/N). The latter two pieces of information can be found on the data plate located on the appliance. * Only on certain models 10 GB PL RS UA Óêðà¿íñüêîþ, 44 RO AR RS ! ! ! ! ! 12 45 mm 24 545 . mm . . . min . mm 558 567 mm. 595 mm . mm mm . 593 mm. 547 5 mm. 23 mm. 595 mm. RS ! RS m. m 560 ! 45 m m. ! 13 RS ! ! ! NO OK ! ! ! ! 14 ! ! ! ! V ! ! ! ПАСПОРТНАЯ ТАБЛИЧКА Габаритные размеры: ширина 43,5 см высота 31 см глубина 43,5 см Объем л 58 Электропитание См. таблицу характеристик Характеристики газа См. таблицу характеристик Данное изделие соответствует следующим Директивам Европейского Сообщества: 2006/95/CEE от 12/12/06 (Низкое напряжение) с последующими изменениями – 2004/108/СЕЕ от 15/12/04 (Электромагнитная совместимость) с последующими изменениями – 93/68/СЕЕ от 22/07/93 с последующими изменениями. 2009/142/CEE от 30/11/09 (Газ) с последующими изменениями 2002/96/CE с последующими изменениями 15 RS RS 16 ! ! Min • 140 145 150 • 160 180 • 200 220 • Max 230 240 RS F ! ! ! ! 17 RS ! ! Š=Kë,ö= 1 c%!åë*= q›,›å……/L ã=ƒ ŠåCë%2"%!…= “C%“%K…%“2ü *b2 a=L-C=“ 1/100 m%ì,…=ëü…= q%*!=?å……= (mm) d3.%"*= 2,60 1,00 49 d="ëå…, å C%ä=÷, m%ì, …=ëü…%å (ìK=! l, …, ì=ëü…%å (ìK=!) l=*“, ì=ëü…%å (ìK=!) 18 t%!“3…*= 1/100 78 o!,!%ä…/L ã=ƒ p=“.%ä* ã!/÷=“ a=L-C=“ 1/100 *** ** (mm) 189 186 119 28-30 20 35 37 25 45 p=“.%ä* ë/÷= 248 20 17 25 ! RS 19 RS ! • 20 F ! F F ! * 21 RS CUPTOR RO GB PL RS UA RO AR ! ! ! ! ! .m mm in. m. 45 m mm . 5 mm. 567 mm. 558 593 mm. 547 595 mm. A 23 mm. sub blat pe coloanã 595 mm 24 545 . mm . mm . ! 23 RO RO . 560 mm 45 m ! m. ! 24 ! ! ! NO OK ! ! ! ! ! ! 25 RO RO ! ! V ! 26 ! ! PLĂCUŢA DE CARACTERISTICI Dimensiuni lăţime cm 43,5 înălţime cm 31 adâncime cm 43,5 Volum ll 58 Conexiuni electrice vezi eticheta Caracteristici gaz vezi eticheta Această aparatură este conformă cu următoarele Directive Comunitare: 2006/95/CEE din 12/12/06 (Tensiune Joasă) cu modificările succesive – 2004/108/CEE del 15/12/04 (Compatibilitate Electromagnetică) cu modificările succesive 93/68/CEE din 22/07/93 cu modificările succesive. 2009/142/CEE din 30/11/09 (Gaz) cu modificările succesive 2002/96/CE cu modificările succesive Panou de control Raft GRĂTAR Raft TAVĂ RO GHIDAJE culisare rafturi poziţia 5 poziţia 4 poziţia 3 poziţia 2 poziţia 1 27 RO ! ! Min • 140 145 150 • 160 180 • 200 220 • Max 230 240 F ! ! ! ! 28 ! RO ! Tabelul 1 Arzãtor Gaze lichefiate Putere termicã kW (p.c.s)* By-pass 1/100 Nominal Redus (mm) Cuptor 2,60 1,00 49 Presiunea de alimentare Nominal (mbar) Minimum (mbar) Maximum (mbar) Duza 1/100 78 Gaz natural Debit* g/h Duza 1/100 *** ** (mm) 189 186 119 28-30 20 35 37 25 45 Debit* l/h 248 20 17 25 29 RO GRÃTAR GRÃTAR ! Pozitia Alim ente gãtite la cuptor selectorului cuptorului Cuptor Lasagne Cannelloni tãitei Vitel Pui Curcan Ratã Iepure Porc Miel Macrou Plãticã Pãstrãv Pizza napoletanã Biscuiti uscati Tartã Prãjiturã cu ciocolatã Bezele Grill Caracatitã Frigãrui de caracatitã si creveti File de macrou Legume Fripturã de vitel Cotlete de porc Hamburger Cârnati Sandwisuri toast La rotisor (dacã este prezent) Vitel Pui Miel Greutate (în kg) Nivele de coacere, de sus în jos Duratã de preîncãlzire (minute) Pozitia term ostatului Durata de coacere (minute) 2,5 2,5 2,2 1,7 1,5 2,5 1,8 2,0 1,5 1,8 1,3 1,5 1,0 0,6 0,5 1,1 1,0 1,0 3 3 3 2 3 3 3 3 3 3 3 3 3 3 4 3 3 4 10 10 10 10 10 10 10 10 10 10 10 10 10 15 15 15 15 15 200 200 200 210 200 200 200 200 200 200 200 180 200 210 180 180 165 165 55-60 40-45 50-55 80-90 70-80 80-90 90-100 80-90 70-80 80-90 30-40 30-40 30-35 15-20 25-30 30-35 50-60 50-60 1 1 1 1 1 1,5 1 1,7 n.° 4 4 4 4 4 4 4 4 4 4 5 3 3 5 5 3 5 3 - 6 4 10 8-10 20-25 20-25 10-15 20-25 2-3 1.0 1.5 1.0 - - - 80-90 80-90 80-90 N.B.: durata de coacere este aproxim ativã si poate varia în functie de exigentele personale. Când gãtiti retete folosind grill-ul, tava de colectare a grãsim ilor trebuie introdusã pe prim ul nivel de jos. 30 ! Aparatul trebuie sa fie utilizat numai pentru coacerea alimentelor si numai de persoane adulte, conform instructiunilor din manual. Orice alta utilizare (de exemplu: încalzirea locuintei) este considerata improprie si deci periculoasa. Fabricantul nu va putea fi considerat responsabil pentru eventuale daune provenite din utilizarea improprie, gresita sau irationala a aparatului. 31 RO RO F ! F ! 32 PIEKARNIK GB RS UA PL RO AR PL ! ! ! ! ! 34 45 mm 24 545 . mm . . min . mm . . mm 558 567 mm. 595 mm mm . 593 mm. 547 5 mm. A 23 mm. 595 mm. PL ! PL . 560 mm 45 m m. ! 35 PL ! ! ! NO OK ! ! ! ! 36 ! ! ! PL ! V ! ! ! TABLICZKA ZNAMIONOWA Rozmiar szerokość 43,5 cm wysokość 31 cm głębokość 43,5 cm Objętość 58 litrów Podłączenia elektryczne patrz tabliczka znamionowa Cechy gazu patrz tabliczka znamionowa - To urządzenie jest zgodne z następującymi Dyrektywami Wspólnotowymi: 2006/95/EWG z dnia 12/12/06 (Niskie ciśnienie) wraz z późniejszymi zmianami – 2004/108/EWG z dnia 15/12/04 (Kompatybilność elektromagnetyczna) z późniejszymi zmianami 93/68/EWG z dnia 22/07/93 z późniejszymi zmianami. 2009/142/EWG z dnia 30/11/09 (Gaz) z późniejszymi zmianami. 2002/96/WE z późniejszymi zmianami. 37 PL Panel sterowania Poziom RUSZT Poziom BLACHA UNIWERSALNA 38 PROWADNICE boczne poziom 5 poziom 4 poziom 3 poziom 2 poziom 1 ! ! Min • 140 145 150 • 160 180 • 200 220 • Max 230 240 PL F ! ! ! ! 39 PL ! ! Tabela 1 (dla Polski) Palnik Piekamik Ciśnienia zasilania Moc cieplna (p.c.i.*) kW ? minimalne (mbar) nominalne (mbar) maksymalne (mbar) * A 0°C e 1013 mbar – gaz suchy G20 (GZ50) p.c.i. = 35.9 MJ/m³ GZ350 (GZ35) p.c.i. = 25.8 MJ/m³ p.c.i. = 123.6 MJ/m³ G30 (GPB) 40 G20 (GZ50) Dysza Przepływ* 1/100 l/godz (w mm) ? ? 16 20 25 GZ350 (GZ35) G30 (GPB) Dysza Przepływ* Moc cieplna Dysza Przepływ* 1/100 l/godz (p.c.i.*) 1/100 g/godz (w mm) kW (w mm) ? ? ? ? ? 10 29 13 36 16 44 GRILL ! PL Położenie pokrętła wyboru Przygotowywana potrawa Piekarnik Lasagne cannelloni Makar on z piekarnika Cielęcina Kurczak Rolada z indyka Kaczka Królik Biodrówka wieprzowa Udziec jagnięcy Makrele Kielec właściwy Pstrąg w folii Pizza neapolitańska Suche biszkopty Kruche ciasto Ciasto czekoladowe Ciasto drożdżowe Grill Sole i mątwy Szaszłyki z kalmarów i raków Filet z dorsza Warzywa z rusztu Befsztyk cielęcy Kotlety smażon e Hamburger y Kiełbaski Tost Na rożnie (jeśli jest) Cielęcina z rożna Kurczak z rożna Jagnięcina z rożna Waga (kg) 2,5 2,5 2,2 1,7 1,5 2,5 1,8 2,0 1,5 1,8 1,3 1,5 1,0 0,6 0,5 1,1 1,0 1,0 1 1 1 1 1 1,5 1 1,7 szt. 4 Położenie pieczenia ruszt od dołu 3 3 3 2 3 3 3 3 3 3 3 3 3 3 4 3 3 4 4 4 4 4 4 4 4 4 4 Czas wstępnego ogrzewania (minuty) 10 10 10 10 10 10 10 10 10 10 10 10 10 15 15 15 15 15 5 3 3 5 5 3 5 3 Położenie pokrętła termostatu Czas pieczenia (minuty) 200 200 200 210 200 200 200 200 200 200 200 180 200 210 180 180 165 165 - 55-60 40-45 50-55 80-90 70-80 80-90 90-100 80-90 70-80 80-90 30-40 30-40 30-35 15-20 25-30 30-35 50-60 50-60 6 4 10 8-10 20-25 20-25 10-15 20-25 2-3 1.0 1.5 1.0 ! Wskazany czas jest tyl ko czasem przykładowym i może być zmieniany według osobistych upodobań. W systemie gotowania „Grill ” brytfanna powinna być ustawiona na 1 poziomie od dołu. 80-90 80-90 80-90 41 PL ! 42 F ! F F F F ! * 43 PL GB PL RS UA RO AR ! ! ! ! ! Maggiorazione della fessura fra porta e pavimento Locale adiacente Locale da ventilare mm . min . m. 45 m 567 mm. 558 mm . 593 mm. 547 5 mm. A Esempi di aperture di ventilazione per l’aria comburente 23 mm. Direttamente all’esterno 595 mm. In camino o in canna fumaria ramificata (riservata agli apparecchi di cottura) 595 mm 24 545 . mm . mm . ! 45 . 560 mm 45 m m. ! ! 46 ! ! NO OK ! ! ! ! ! ! ! ! 47 ! V ! 48 ! ! ТАБЛ ИЧКА З ТЕХНІЧНИМИ ДАНИМИ ширина 43,5 см Розмiри висота 31 см глибина 43,5 см Об’єм 58 л Елек тричн і з'єднання Див. на табличці з даними Характеристики газу Див. на табличці з даними Цей прилад вiдповідає таким Директивам ЄС: 2006/95/CEE від 12/12/06 (Н изька напруга) з подальшими внесеними змінами - 2004/108/CEE від 15/12/04 (Електром агнітна сумісність) з подальшими внесеними змінами - 93/68/CEE від 22/07/93 з подальшими внесеними змінам и. 2009/142/CEE від 30/11/09 (Газ) з под альшими внесеними змінами. 2002/96/CE з подальшим и внесеними змінам и. НАПРЯМНІ для дек та ґраток Панель керування позиція 5 позиція 4 позиція 3 позиція 2 позиція 1 Рівень ГРИЛЬ Рівень ДЕКО Індикатор ГРИЛЮ Регулятор ТАЙМЕРУ 0 0 1 Min 15 45 Max 150 220 180 Регулятор ДУХОВКА/ГРИЛЬ 30 Кнопка ОСВІТЛЕННЯ ДУХОВКИ 49 ! ! Min • 140 145 150 • 160 180 • 200 220 • Max 230 240 F ! ! ! ! 50 ! ! Таблиця 1 Пальник Духовка Тиск, що подається Зріджений газ Теплова потужність кВт (p.c.s.=теплота згоряння за вищою межею*) Байп ас 1/100 Номінальна Зменшена (мм) 2,60 1,00 49 Пальник 1/100 Природний газ Витрати* г/год Пальник 1/100 Витрати* л/ год *** ** (мм) 189 186 119 Номінальний (мбар) 28-30 37 20 Мінімальний (мбар) 20 25 17 Максимальний (мбар) 35 45 25 78 248 51 ! Положення регулятору для вибору Продук ти для готування Духовка Лазан'я Каннеллоні Запечена у духовці паста Телятина Курка Рулет зіндичого м’яса Качка Кріль Огузок свинини Ягняче стегно Скумбрія Зубатка Форель в обгортці Неаполітанська піцца Печиво Пирiг Шоколадний торт Дріжджове тісто Гриль Камбала і каракатицi Шампуризкальмарівтакреветок Філе мерлузи Овочі гриль Біфштекс з телятини Відбивне м’ясо Гамбургери Домашні ковбаски Тости На рожні (якщо наявний) Телятина на рожні Курка на рожні Молода баранина на рожні Ваг а (кг) Позиція полиці, відраховуючи знизу Час попереднього нагрівання (у хвилинах) Положення ручки термостату Час приготування (у хвилинах) 2,5 2,5 2,2 1,7 1,5 2,5 1,8 2,0 1,5 1,8 1,3 1,5 1,0 0,6 0,5 1,1 1,0 1,0 3 3 3 2 3 3 3 3 3 3 3 3 3 3 4 3 3 4 10 10 10 10 10 10 10 10 10 10 10 10 10 15 15 15 15 15 200 200 200 210 200 200 200 200 200 200 200 180 200 210 180 180 165 165 55-60 40-45 50-55 80-90 70-80 80-90 90-100 80-90 70-80 80-90 30-40 30-40 30-35 15-20 25-30 30-35 50-60 50-60 1 1 1 1 1 1,5 1 1,7 4 шт. 4 4 4 4 4 4 4 4 4 5 3 3 5 5 3 5 3 - 6 4 10 8-10 20-25 20-25 10-15 20-25 2-3 1.0 1.5 1.0 - - - 80-90 80-90 80-90 ! У таблиці наведено приблизний час готування, який може змі нюватися відповідно до власного смаку. При готування на грилі деко має завжди займати 1-й рівень, відраховуючи зниз у. 52 ! 53 F ! ! F F 54 55 وسائل حذر ونصائح AR ! تم تصميم هذا الجهاز وتصنيعه طبقا لمواصفات األمان العالمية .يتم تزويد التحذيرات التالية ألسباب وقائية ويجب قراءتها بعناية. • في حال حدوث خلل في عمل الجهاز ،ال تحاول ،بأي شكل من األشكال، تصليح الجهاز بنفسك .يمكن إلجراء التصليحات من قبل أشخاص قليلي الخبرة أن يلحق األذى أو حتى إلى تعطيل الجهاز .اتصل بمركز الخدمة (انظر المساعدة). • هذا الدليل معد للطراز 3من الطباخ المبني. • ال تضع أغراضا ثقيلة على باب الفرن وهو مفتوح. أجهزة الغاز تحتاج إلى تهوئة عادية للتأكد من األداء الخالي من المشاكل. عند تركيب الطباخ ،اتبع التعليمات الزودة في فقرة "تحديد موضع" الجهاز. • يجب عدم تشغيل الجهاز من قبل أشخاص (بمن فيهم األطفال) الذين يعانون انعدام القدرات الجسدية أو الحسية أو النفسية ،من قبل األشخاص عديمي التجربة أو أي شخص ال يعرف المنتج. يجب على هؤالء األشخاص ،على األقل أن يتلقوا النصح من قبل شخص يتحمل المسؤولية عن أمانهم أو الحصول على التعليمات المتعلقة بتغشيل الجهاز مسبقا. الوقاية العامة • تم تصميم الجهاز لالستعمال البيتي داخل المنزل وهو غير مع ّد لالستعمال التجاري أو الصناعي. • يجب عدم تركيب الجهاز خارج المنزل ،حتى وإن كان ذلك في مناطق مغطاة .من الخطر جدا إبقاء الجهاز عرضة للشتاء والعواصف. • ال تدع األطفال يعبثون بالجهاز. • عند إزالة أو تغيير موضع الجهاز ،استخدم دائما المسكات المزودة على جانبي الفرن. التخلص • ال تالمس الجهاز وأنت حافي القدمين أو بيدين ورجلين مبللتين أو رطبتين. • يجب استخدام الجهاز قبل البالغين فقط ،لطبخ الطعام وفقا للتعليمات المدرجة في هذا الدليل. • ال تلمس عناصر التسخين وأجزاء باب الفرن بينما يكون الجهاز قيد االستخدام؛ هذه األجزاء تصبح ساخنة جدا .أبق األطفال بعيدا عن الجهاز. • تأكد من أن كبالت تزويد الطاقة الخاصة باألجهزة الكهربائية األخرى ال تالمس األجزاء الساخنة من الفرن. • يمنع تغطية الفتحات المعدة للتهوئة ولعزل الحرارة منعا باتا. • عند التخلص من مواد التعبئة :تقيّد بالقوانين المحلية حيث يمكن لمواد التعبئة أن يعاد تصنيعها. • تقضي التوجيهات األوروبية 2002/96/ECالمتعلقة باألجهزة اإللكترونية التالفة ( )WEEEبعدم التخلص من األجهزة اإللكترونية البيتية القديمة بواسطة دورة جمع النفايات البلدية غير المصنفة .يجب جمع األجهزة القديمة على انفراد بهدف إنجاع عملية استرداد وإعادة تدوير المواد التي تحتوي عليها وتقليل تأثيرها على صحة اإلنسان والبيئة .إشارة "السلة الدائرية" المشطوبة على المنتج تذكرك بالتزامك بأنه عند تخلصك من الجهاز ،يجب تجميعه على حدة. يتوجب على المستهلكين االتصال بسلطتهم المحلية أو بتاجر التجزءة فيما يتعلق بالمعلومات المتعلقة بالطريقة الصحيحة للتخلص من جهازهم القديم. • أمسك مقبض باب الفرن من الوسط دائما :األطراف يمكن أن تكون ساخنة. احترام البيئة والحفاظ عليها • استخدم قفازات الفرن دائما عند إدخال إناء الطهي إلى الفرن أو عند إخراجه منه. • عند استخدام الجهاز بين الساعات المتأخرة ما بعد الظهر وبين ساعات الصباح الباكر ،فبإمكانك أن تساعد على تقليل العبء الملقى على شركات الكهرباء. • ال تستخدم رقائق األلومنيوم لتغطية أرضية الفرن. • ال تضع المواد القابلة للاشتعال في الفرن :إذا تم تشغيل الجهاز عن غير قصد، فمن الممكن أن يسبب الحريق. • تأكد دائما من أن المفاتيح موجودة بوضع “ ”¡“/”lعندما ال يكون الجهاز قيد االستخدام. • عند فصل الجهاز عن الكهرباء ،اسحب دائما القابس من مقبس الشبكة الرئيسية ،ال تسحب الكبل. • ال تقم بأي عملية تنظيف أو صيانة دون فصل الجهاز عن شبكة الكهرباء الرئيسية. • دع باب الفرن مغلقا دائما عند استخدام نمط الشواء ،فهذا سيحرز نتائج أفضل وسيوفر الطاقة (حوالي .)10% • افحص مطاط الباب بشكل منتظم وامسحه ونظفه لضمان خلوه من البقايا بحيث يحكم التصاقه بالباب كما ينبغي ،هذا سيمنع تسرب الحرارة. أساليب الطهي أساليب الطهي الشواء GRILL يتم تشغيل عنصر التسخين العلوي .درجة الحرارة العالية جدا والمباشرة للشواء تتيح تحمير وجه اللحوم والمشاوي بينما يتم حبس العصارات لتبقى سهلة المضغ .الشواء موصى به جدا لألطباق التي تحتاج إلى درجة حرارة وجه عالية :شرائح لحم البقر ،لحم العجل ،األضالع ،الستيك ،الشرائح الطرية (الفيليه) ،الهامبرغر وما شابه ...قم بالطهي بهذا النمط دائما بينما يكون باب الفرن مغلقا. • أدخل المشواة في الوضع 3أو 4وتأكد من أن الطعام في مركز المشواه. نصائح طهي عملية ! في أسلوب طهي الشواء ،ضع صينية التنقيط في الوضع 1لجمع بقايا الطهي (السمن و/أو الشحوم). AR • نحن نوصي بضبط مستوى الطاقة إلى الحد األقصى .تتم معايرة عنصر التسخين العلوي بواسطة ثرموستات ومن الممكن أال يتم تشغيله بشكل متواصل. البيتزا • استخدم صينية بيتزا من األلومنيوم الخفيف .ضعها على الحامل المزود. للحصول على قشرة هشة ،ال تستخدم صينية التنقيط (تمنع القشرة من التكوّن بسبب إطالة وقت الطهي). • إذا كانت البيتزا تحتوي على الكثير من اإلضافات العلوية ،نحن نوصي بإضافة جبنة الموزاريال في وسط وجه البيتزا خالل عملية الطهي. جدول نصائح الطهي الطعام المطبوخ إعدادات مفتاح االختيار إعداد مفتاح الثرموستات وقت الطهي (دقائق) الوزن (كغم) وضع رف الطهي من وقت اإلحماء المسبق (دقائق) أسفل الفرن 2,5 2,5 2,2 1,7 1,5 2,5 1,8 2,0 1,5 1,8 1,3 1,5 1,0 0,6 0,5 1,1 1,0 1,0 3 3 3 2 3 3 3 3 3 3 3 3 3 3 4 3 3 4 10 10 10 10 10 10 10 10 10 10 10 10 10 15 15 15 15 15 200 200 200 210 200 200 200 200 200 200 200 180 200 210 180 180 165 165 55-60 40-45 50-55 80-90 70-80 80-90 90-100 80-90 70-80 80-90 30-40 30-40 30-35 15-20 25-30 30-35 50-60 50-60 4 4 4 4 4 4 4 4 4 5 3 3 5 5 3 5 3 - 6 4 10 8-10 20-25 20-25 10-15 20-25 2-3 - - - 80-90 80-90 80-90 فرن الزانيا كونيلوني باستا مخبوزة لحم العجل لحم الدجاج ّلفة الديك الرومي بط لحم األرنب خاصرة الخنزيل رجل خروف سمك المكاريل سمك الدنيس سمك سلمون مخبوز بالتغليف بيتزا نابولي بسكويت جاف تورتة كعكة شوكوالطة كعكات الخميرة الشواء سمك موسى والصبيدج كباب السبيدج والقريدس فيليه سمك القد خضروات مشوية شرائح العجل أضالع هامبرغر نقانق ساندويشات محمرة 1 1 1 1 1 1,5 1 1,7 n.° 4 مع مشواة (إن وجدت) عجل على السيخ دجاج على السيخ خروف على السيخ 1.0 1.5 1.0 األول في األسفل. رف الفرن AR تهوءة التبريد إضاءة الفرن بهدف خفض درجة حرارة الفرن الخارجية تقوم هناك بعض الطرازات يتم تشغيلها بواسطة الضغط على زر .LIGHT مزودة مروحة تبريد توليد تيارا من الهواء يجري بين لوحة التحكم في كيفية استخدام ساعة التوقيت الفرن وباب الفرن. ! عند اكتمال الطهي ،ستواصل مروحة التبريد عملها حتى يبرد الفرن بما .1إلعداد جرس التنيبه ،أدر زر TIMERباتجاع عقارب الساعة دورة فيه الكفاية. كاملة تقريبا. السيخ (متوفر في طرازات معينة فقط) .2أدر المفتاح بعكس اتجاه عقارب الساعة إلعداد الوقت المطلوب :قم لتشغيل المشواة (انظر الرسم) اتبع ما يلي: .1ضع صينية التنقيط بالوضع .1 .2ضع داعم المشواة بالوضع 3 وأدخل السيخ في الشق المزود في اللوحة الخلفية من الفرن. .3قم بتشغيل المشواة باستخدام مفتاح االختيار . بمالءمة الدقائق المبينة على المفتاح مع المؤشر الموجود على لوحة التحكم. .3تعمل ساعة التوقيت بالدقائق :عند حلول الوقت المختار ،فسيقوم جرس التنيبه بإسماع صوت. ! ال تشغل ساعة التوقيت الفرن أو توقف تشغيله. التشغيل واالستخدام ! عند استخدامك لجهازك ألول مرة ،قم بإحماء الفرن الفارغ بينما يكون بابه مغلقا ،بدرجة الحرارة القصوى ولنصف ساعة على األقل .تأكد من أن الغرفة مهوئة جيدا قبل إطفاء الفرن وفتح باب الفرن .يمكن للجهاز أن يطلق رائحة كريهة قليال بسبب المواد الواقية المستخدمة خالل عملية التصنيع بسبب الحرق. تشغيل الفرن يدويا AR في حال فشل التشغيل ،يمكن إشعال محرق الفرن يدويا: .1افتح باب الفرن تشغيل الفرن ال يستخدم هذا المفتاح الختيار أنماط الفرن المختلفة فقط ،ولكنه يستخدم أيضا الختيار درجة حرارة الطهي لمختلف األطعمة من خالل درجات الحرارة المبينة على المفتاح نفسه (النطاق هو ما بين 140°Cوحتى 240°Cويشملها) .أدات إشعال الفرن اإللكترونية مضمنة داخل مفتاح التحكم .إلشعال محرق الفرن ،اضغط مفتاح الفرن إلى الداخل قدر اإلمكان وأدره بعكس اتجاه عقارب الساعة ،ليصل إلى الوضع ( 1مع إبقاء باب الفرن مقفال) .الفرن مزود بجهاز أمان .بعد إشعال المحرق ،دع الغاز يدور حتى يتم تسخين المزدوجة الحرارية بأمان مع إبقاء مفتاح الفرن مضغوطا لحوالي 6ثوان. ! أدات اإلشعال اإللكتروني لمحرق الفرن يجب عدم تشغيلها ألكثر من 15 ثانية .إذا لم يشتعل المحرق بعد 15ثانية ،قم بتحرير مفتاح الفرن ،افتح باب الفرن وانتظر لمدة دقيقة واحدة على األقل قبل محاولة إشعال المحرق ثانية. يتم اختيار درجة حرارة الطهي عن طريق مالئمة درجة الحرارة المرغوب بها مع العالمة المرجعية في لوحة البيانات؛ النطاق الكامل لدرجات الحرارة مبين أدناه: الحد األدنى • • 220 • 180 • 150الحد األقصى 240 230 200 160 145 140 سيصل الفرن إلى درجة الحرارة التي تم إعدادها أوتوماتيكيا ،وسيبقي الثرموستات ،الذي يتم التحكم به بواسطة المفتاح ،درجة الحرارة ثابتة. F .2أمسك بعود كبريت أو بقداحة بجانب فتحة المحرق ،كما هو مبين في الرسم ،اضغط المفتاح ( Fانظر الرسم) ضغطا كامال وأدره بعكس اتجاه عقارب الساعة، وضعه بوضع الحد األقصى. الفرن مزود بجهاز أمان .بعد إشعال المحرق ،دع الغاز يدور حتى يتم تسخين المزدوجة الحرارية بأمان مع إبقاء مفتاح الفرن مضغوطا لحوالي 6ثوان. .3بعد أن تم إشعال المحرق ،اغلق باب الفرن. ! إذا انطفأ لهب المحرق بالصدفة ،أدر مفتاح الفرن إلى وضع إيقاف التشغيل ،افتح باب الفرن وانتظر لمدة دقيقة واحدة على األقل قبل محاولة إشعال المحرق ثانية. مفتاح الشواء الفرن مزود بجهاز بمشواه كهربائية .درجة الحرارة العالية جدا والمباشرة للشواء تتيح تحمير وجه اللحوم والمشاوي بينما يتم حبس العصارات لتبقى سهلة المضغ .الشواء موصى به جدا لألطباق التي تحتاج إلى درجة حرارة وجه عالية :شرائح لحم البقر ،لحم العجل ،األضالع ،الستيك ،الشرائح الطرية (الفيليه) ،الهامبرغر وما شابه... بعض أمثلة طريقة الشواء التي يمكن استخدامها مدرجة في فصل "نصائح الطهي العملية". !عند استخدام المشواة ،يجب إبقاء باب الفرن مغلقا. ! ال تضع أبدا أغراضا في الجهة السفلية من الفرن؛ وذلك لتحاشي إتالف طالء المينا. ! ضع إناء طهي دائما على الحامل(ات) المزود/ة. وصف الجهاز نظرة عامة إدخال مسارات GUIDES for the الصينيات sliding racks Control التحكمpanel لوحة 5position الوضع5 4position الوضع4 3position الوضع3 2position الوضع2 1position الوضع1 GRILL الشواء صينية التنقيط DRIPPING PAN لوحة التحكم ضوء مؤشر GRILL الشواء indicator light مفتاح ساعة TIMER التوقيت knob 0 0 1 Min 15 45 Max 150 220 180 /الفرن مفتاح OVEN/GRILL الشواء knob 30 المشواة OVENزر LIGHT and الفرن وإضاءة ROTISSERIE button AR موصل غاز الصمام (الصمام مزود مع الجهاز) .تثبيت أنبوب الغاز هو بواسطة ّ AR لوحة البيانات اسطواني 1/2ذكري. توصيل أنبوب فوالذي مقاوم للصدأ ودون توصيالت مرحيلة بملحق داخل فتحة. األبعاد العرض 43.5سم االرتفاع 31سم العمق 43.5سم الحجم 58لتر موصل غاز 1/2ذكري. تثبيت أنبوب الغاز هو بواسطة ّ يذعن هذا الجهاز إلرشادات السوق األوروبية المشتركة التالية 2006/95/EEC :من تاريخ ( 12/12/06جهد منخفض) والتعديالت الالحقة 89/336/EEC -من تاريخ ( 03/05/89تطابق المغناطينسية الكهربائية) والتعديالت الملحقة 90/369/EEC -من تاريخ ( 29/06/90الغاز) والتعديالت الملحقة 93/68/EECمن تاريخ 22/07/93والتعديالت الملحقة 2009/142/EEC .من تاريخ ( 30/11/09الغز ) والتعديالت الالحقة. 2002/96/EC هذه األنابيب يجب تثبيتها بحيث ال يتعدى طولها 2000ملم مع كل اإلطاالت .بعد إتمام التركيب ،تأكد من أن األنبوب المعدني المرن ال يالمس أية أجزاء متحركة وهو غير مضغوط. ! استخدم فقط األنابيب والصمامات التي تتوافق مع األنظمة الوطنية سارية المفعول. فحص قوة التوصيل ! عند االنتهاء من التركيب ،افحص األنبوب لوجود تسربات بواسطة محلول صابوني .ال تستخدم اللهب أبدا. مواصفات المحارق والفوهات الجدول 1 المحرق الغاز السائل األنبوب المرحلي 1/100 الفوهة 1/100 (ملم) الفرن ضغط التزويد 78 49 عادي ()kPa الحد األدنى ()kPa الحد األقصى ()kPa التدفق* غرام/ساعة الفعلي منخفض 185 65 30 25 35 AR NO OK التركيب !قبل تشغيل جهازك الجديد ،يرجى قراءة دليل المعلومات هذا بعناية .إنه يحتوي على معلومات هامة لالستخدام اآلمن ،لتركيب الجهاز والعناية به. !الرجاء االحتفاظ بمعلومات التشغيل هذه لمراجعتها في المستقبل .قم بتحويلها إلى مالكي الجهاز الجدد الممكنين. المركزة والتثبيت AR قم بموضعة األلسنة األربعة الموجودة على جانب الفرن بحيث تدخل في الشقوق األربعة الموجودة على اإلطار الخارجي .قم بضبط األلسنة بما يتوافق مع سمك لوحة الخزانة الجانبية ،كما هو مبين أدناه: 20ملم سمك :انزع جزء اللسان القابل لإلزالة (انظر الرسم). مالءمة الجهاز استخدم وحدة المطبخ المالئمة للتأكد من أن الجهاز يعمل بشكل صحيح. • الحوافي القريبة من الفرن يجب أن تكون مصنوعة من مواد مقاومة للحرارة. • على الخزائن المغطاة بقشرة خشبية أن تكون ملصقة بغراء مقاوم لدرجات الحرارة التي تتعدى 100درجة مئوية. 18ملم سمك :استخدم الثلم األول الذي تم إعداده مسبقا في المصنع( ،انظر الرسم). • لتركيب الفرن تحت رف (انظر الرسم) أو في وحدة مطبخ ,على مقاييس الخزانة أن تكون كالتالي: 16ملم سمك :استخدم الثلم الثاني (انظر الرسم). 593 mm. 567 mm. 558 595 mm. . mm 23 mm. m. 45 m 5 mm. . mm mm . 545 . mm 595 قم بتثبيت الجهاز بالخزانة عن طريق فتح باب الفرن وإدخال 4براغي داخل 4ثقوب موجودة على اإلطار الخارجي. 24 ! على الجهاز أال يالمس األجزاء الكهربائية ابتداء من لحظة تركيبه. تم حساب األرقام المشار إليها على لوحة البيانات لهذا النوع من التركيب. التهوئة للتأكد من تزويد تهوئة كافية ،يجب إزالة اللوحة الخلفية من الخزانة. يجب تركيب الفرن بحيث يكون موضوعا على شريحتين من الخشب ،أو على مسطح مستو تماما بفتحة تكون على األقل 560 x 45ملم (انظر الرسومات). ! على كافة األجزاء التي تضمن أمان الجهاز أال تتم إزالتها من دون مساعدة أداة. m. 45 m . mm 560 تعليمات التشغيل فرن المحتويات AR التركيب، AR عربي، التوصيالت الكهربائية توصيل الغاز لوحة البيانات مواصفات المحارق والفوهات وصف الجهاز, نظرة عامة لوحة التحكم التشغيل واالستخدام, تشغيل الفرن كيفية استخدام ساعة التوقيت أنماط الطهي، FZ G /HA FZ G/HA FZ G IX /HA FZ G IX/HA FB G /HA FB G/HA FB G IX /HA FB G IX/HA FR G /HA FR G/HA FR G IX /HA FR G IX/HA FR G0 /HA FR G0/HA FR G0 IX /HA FR G0 IX/HA FH G /HA FH G IX /HA FHR G /HA أساليب الطهي نصائح طهي عملية جدول نصائح الطهي وسائل حذر ونصائح, الوقاية العامة التخلص احترام البيئة والحفاظ عليها الصيانة والعناية، إيقاف تشغيل الجهاز تنظيف الجهاز تنظيف باب الفرن تبديل مصباح اإلنارة المساعدة AR AR 04/2010 - 195061698.04 XEROX FABRIANO AR