1
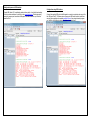
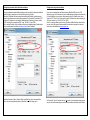
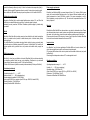
Návod na použitie RFID čítačky
BlueGate 1 a BlueGate Mini
User Manual for BlueGate and
BlueGate Mini RFID readers
Úvod
Preface
RFID čítačka BlueGate1 a BlueGate Mini je netradičnou čítačkou, ktorá sa podobá
známemu systému bezkľúčového prístupu používaného v moderných autách. Je tu použitá
technológia BlueTooth, umožňujúca rozoznávanie RFID značiek do vzdialenosti cca 10m.
Každé zariadenie vybavené BlueTooth modulom (smartfóny, tablety, notebooky, handsfree
zariadenia, televízne prijímače, atd.) obsahujú jedinečnú MAC adresu, ktorá slúži ako
identifikátor zariadenia. Vďaka tejto vlastnosti môžu užívatelia použiť svoje zariadenie na
identifikačné účely.
BlueGate 1 a BlueGate Mini je možné použiť ako prístupové zariadenie, ako
súčasť parkovacieho systému, alebo ako RFID čítačku pre zabezpečovací systém. Ďalšou
aplikáciou môže byť napríklad spúšťanie nejakého elektrického spotrebiča len vo vašej
prítomnosti, príprava teplej vody v kotli, len ak ste doma, atď. Veľkou výhodou je aj to, že
zariadenie môže byť skryté na bezpečnom mieste na rozdiel od klasických RFID čítačiek,
ktoré sa často stávajú terčom vandalov. Vďaka USB alebo Ethernetovému interfejsu je
možné túto čítačku integrovať do iných systémov.
BlueGate RFID reader is an unconventional reader which uses Bluetooth
technology instead of commonly used 125kHz or 13,56Mhz RFID tags. It works very similar
to Keyless Entry systems used in modern cars. Every Bluetooth enabled device
(smartphone, tablet, notebook, handsfree, TV set, etc) has its own ID number (MAC
address), which is used to identify the certain device. Thanks to this feature, users can
easily use their Bluetooth enabled devices for identification purposes.
BlueGate can be used as a gate opener, a part of a parking system, an RFID
reader for attendance system, a personal tracking system, etc. Easy operation, USB or
Ethernet interface provide a highly flexible solution to your identification needs. A great
advatage comparing to conventional readers is, that this reader can be placed inside the
building behind the wall and thus it could be absolutely safe against vandal attacks.
Hlavné vlastnosti
1.
2.
3.
4.
5.
6.
7.
Malé rozmery, montáž na zvislé plochy, napr, na stenu
Pamäť až na 250 zariadení
Dosah do cca 10m
Napájanie 12-14V/max0,5A
USB alebo Ethernet interfejs
Zabudované hodiny reálneho času
2x výstupné relé s rôznymi režimami spínania
Prehľad
RFID čítačka BlueGate1 a Bluegate Mini predstavuje nový prístup k RFID čítačkám.
Používa aktívne - batériou napájané značky (BlueTooth moduly) pre identifikáciu užívateľov.
Vďaka tejto technológii môže byť dosah čítačky až 10-15m v otvorených priestoroch a tiež
veľkou výhodou tohto prístupu je, že nie je potrebné používať žiadne špeciálne značky
(RFID karty, kľúčenky), užívateľ môže mať jednoducho svoj smartfón/tablet vo vrecku
a čítačka ho spoľahlivo identifikuje v dosahu zariadenia. Pre pripojenie čítačky do
nadradených systémov je možné použiť USB alebo Ethernet interfejs. V prípade
Ethernetového interfejsu je možné dáta z čítačky zasielať kamkoľvek vo svete a tiež je
možné konfigurovať čítačku odkiaľkoľvek.
Main characteristics
1.
2.
3.
4.
5.
6.
7.
Small dimensions, wall mounted enclosure
Up to 250 devices memory
Up to 10m operating range (depending on used antenna)
Simple power supply 12-14V/0,1A
USB or Ethernet interface
Internal Real Time Clock
Two programmable output relays
Overwiev
BlueGate sets a new approach to RFID readers, it uses active (battery powered) RFID tags
– Bluetooth modules to identify the users. Thanks to Bluetooth technology the reading range
can be up to 10-15m in open space and also a big advantage of the system is, that the user
can use his smartphone/tablet/notebook for identification purposes, no extra RFID tag is
required. For data collection purposes BlueGate is equipped with a USB or Ethernet
interface (must be specified at order), this interface is used also for configuration purposes.
Konfigurácia BlueGate1 pomocou klávesnice
1. Zapnite zariadenie a počkajte kým sa objaví nasledujúca obrazovka
BlueGate configuration using keyboard
1. Turn on the device and wait while it starts up
2.
3.
Stlačte tlačidlo OK
Tlačidlami UP/DOWN nastavte správny PIN kód a stlačte OK
2.
3.
Push the „OK“ button once
Input the correct PIN code using navigation buttons UP and DOWN and push OK
4.
V menu vyberte potrebnú položku pomocou tlačidie UP/DOWN a stlačte OK
4.
Choose the certain menu option using UP and DOWN buttons and push OK
Napríklad ak chcete pridať nové bluetooth zariadenie do pamäte zariadenia zvoľte
Add BT Device a stlačte OK, čítačka vyhľadá všetky BlueTooth zariadenia
v dosahu a zobrazí ich na displeji. Ak ich je viac ako jeden, použite tlačidlá
UP/DOWN a vyberte požadovaný BlueTooth modul zo zoznamu, potom stlačte
a podržte tlačidlo OK po dobu 2s.
6. Pre vymazanie Bluetooth zariadenia z pamäte čítačky zvoľte možnosť Del BT
Device a stlačte OK. Vyberte zo zoznamu BlueTooth zariadenie, ktoré chcete
odstrániť z pamäte čítačky a stlačte a podržte tlačidlo OK po dobu 2s.
7. Nastavenie PIN kódu: Každá čítačka je dodávaná s jedinečným PIN kódom, ktorý
nájdete na zadnej strane zariadenia, môžete ho zmeniť pomocou Set PIN možnosti
v menu.
8. Režim relé: celkovo sú 4 rôzne režimy, pre každé relé je možné nastaviť režim
individuálne:
a. Režim č.1 – zopnuté trvalo ak je niektoré z BlueTooth zariadení uložených
v pamätí zariadenia v dosahu čítačky
b. Režim č.2 – zopnuté relé po dobu 5s, ak niektoré z BlueTooth zariadení
uložených v pamätí zariadenia v dosahu čítačky
c. Režim č.3 – zopnuté relé po dobu 5s, ak niektoré z BlueTooth zariadení
uložených v pamätí zariadenia v dosahu čítačky a súčasne je aktivovaný
vstup č.1
d. Režim č.4 – relé nespína ani v prípade ak niektoré z BlueTooth zariadení
uložených v pamätí zariadenia v dosahu čítačky
e. Režim č.5 – relé č.1 zopne na 1s ak je oprávnené BT zariadenie v dosahu
a zaktivujete vstup č.1, potom dôjde k zopnutiu relé č.2 na 1s po
deaktivácii vstupu č.2. tento režim je určený pre ovládanie brán alebo
rámp, v tomto prípade je potrebné dať snímač pred bránu a za ňu
a pripojiť ich na vstup č. 1 a vstup č.2.
9. Searching Time: you can set a different searching time for bluetooth devices, the
default setting is 20sec.
10. Set Clock: using this menu option you can set the actual time.
11. If you do not push any button for 30sec, the device returns to operating mode
automatically
5.
5.
E.g. to add a new BT device to the memory push OK button and wait while
Bluegate searches for the devices in range (cca 20s). Then choose the right BT
device from the list (if there are more then one BT device in range) and push the
OK button for 2sec.
6. To delete a BT device from the memory choose Del BT Device option from the
menu a push OK button. Then scroll the list of the devices in memory and choose
the device to delete. Push OK button for min. 2sec.
7. Set PIN: Your Bluegate reader is supplied with a unique PIN code which is printed
on the sticker on the backside of the device. You can change the PIN code using
Set PIN menu option.
8. Relay Mode: there are 4 relay modes for each of two relays:
a. Mode No.1 – closed continuously if a stored BT device is detected within
the range of Bluegate
b. Mode No.2 – closed for 5sec if a stored BT device is detected within the
range of Bluegate
c. Mode No.3 – closed for 5sec if a stored BT device is detected within the
range of Bluegate and Input No.1 is asserted simultaneosly
d. Mode No.4 – Relay is open even if a stored BT device is detected in range
of BlueGate
e. Mode No.5 – Relay No.1 is switched on for 1s if a stored BT device is
detected in range and input No.1 is triggered, Relay No.2 is switched on
for 1s after input No.2 is released. This mode should be used with gate
openers, input No.1 should be asserted by a sensor in front of the gate
and input No. 2 should be asserted by a sensor behind the gate
9. Searching Time: you can set a different searching time for bluetooth devices, the
default setting is 20sec.
10. Set Clock: using this menu option you can set the actual time.
11. If you do not push any button for 30sec, the device returns to operating mode
automatically
Konfigurácia pomocou USB interfejsu
Configuration using USB interface
Pripojte USB kábel k PC a nainštalujte potrebné drivere ak ich už vaš počítač neobsahuje.
Drivere je možné nainštalovať zo stránky výrobcu www.ftdichip.com. Použite jednoduchý
terminálový program pre komunikáciu s Bluegate1 alebo BlueGate Mini, napr. DockLite
alebo BlueTerm.
Connect the supplied USB cable to the Bluegate’s connector (see picture) and connect it to
the USB port of the PC. If Windows does not recognize USB serial converter, install them
manually from manufacturer’s website www.ftdichip.com. Use a simple terminal program,
e.g. DockLite or BlueTerm to configure BlueGate or read data from it.
Konfigurácia pomocou sieťového Ethernet adaptéra
Configuration using network interface
Ak je vaše zariadenie osadené Ethernet modulom, potom je možné konfigurovať zariadenie
alebo čítať údaje z neho pomocou Telnet klienta (napr. putty). Pripojte
BlueGate 1 (BlueGate Mini nemá možnosť komunikácie cez Ethernet) do vašej domácej
alebo firemnej siete pomocou patch kábla s konektormi RJ45 a spusťte Telnet alebo PuTTY
klienta na PC pripojenom v rovnakej sieti. Zadajte správnu IP adresu (je ju možné získať z
DHCP servera) a ako port nastavte 10001, napr. 192.168.2.101 port 10001
Tip: ak neviete IP adresu čítačky, môžete použiť pre jej vyhľadanie program DeviceInstaller,
ktorý je možné stiahnúť zo stránky www.lantronix.com v sekcii Download.
If your device is equipped with an Ethernet module (BlueGate MINI uses only USB
interface), you can use Telnet client to connect to Bluegate and configure or read data from
it. Connect BlueGate to your home or office network using a RJ45 patch cable. Launch
Telnet or PuTTY client on a PC and input the correct IP address of the device following by
10001 port number, e.g. 192.168.2.101 port 10001
Note: If you facing problem to get the correct IP address of BlueGate from network router,
you can use for this purpose a freely available DeviceInstaller program from Lantronix,
which can be downloaded from www.lantronix.com
Nastavte Connection Type na Telnet a kliknite na tlačidlo Open. Otvori sa komunikačné
okno, v ktorom môžete posielať príkazy do BlueGate1 alebo čítať údaje z neho.
Set Connection Type to Telnet and click on Open button. A communication window opens
and you can start immeadetely type commands or read status information from BlueGate.
Zoznam príkazov:
1. at+help – zoznam všetkých príkazov
2. at+time – prečíta nastavený čas z BlueGate1
3. at+setpin=1234 – nastavenie PIN kódu
4. at+rl1mode – prečíta aktuálne nastavenie pre REL1
5. at+rl2mode – prečíta aktuálne nastavenie pre REL2
6. at+dump – zobrazí kompletnú konfiguráciu zariadenia
7. at+time=12:25 – nastaví čas v zariadení na 12:25
8. at+rl1mode=1 <2,3,4> - nastavenie režimu pre REL1
9. at+rl2mode=1 <2,3,4> - nastavenie režimu pre REL2
10. at+rl1switch=1 – zapne REL1
11. at+rl2switch=0 – vypne REL2 (tieto príkazy funguje len v prípade, že režim pre
REL je nastavený na 4)
12. at+add=0F123456789 BlueTooth – uloženie nového zariadenia do pamäte
13. at+del=0F123456789 BlueTooth – vymazanie uloženého zariadenia z pamäte
14. at+inrange – vyhľadávanie všetkých BT zariadení v dosahu zariadenia
15. at+format – nastavenie výrobných hodnôt a vymazanie všetkých zariadení z
pamäte
Command List:
1. at+help – list of all commands
2. at+time – reads set time from BlueGate
3. at+setpin=1234 – sets pin code
4. at+rl1mode – reads REL1 mode
5. at+rl2mode – reads REL2 mode
6. at+dump – displays complete configuration of BlueGate
7. at+time=12:25 – set time to 12:25
8. at+rl1mode=1 <2,3,4> - sets REL1 mode
9. at+rl2mode=1 <2,3,4> - setsREL2 mode
10. at+rl1switch=1 – switch REL1 on
11. at+rl2switch=0 – switch REL2 off (these commands works only when REL1 or
REL2 set to mode No.4)
12. at+add=0F123456789 BlueTooth – store a new Bluetooth device to memory
13. at+del=0F123456789 BlueTooth – delete Bluetooth device from memory
14. at+inrange – searching for BT devices in range and list all devices in operating
range
15. at+format – factory settings + deleting all stored BT devices from memory
Pridanie BT zariadenia do pamäte
Aktuvujte Bluetooth vo vašom telephone, príp. inom zariadení a nastavte možnosť “always
visible”. Ak Vaše zariadenie osahuje aj voľbu “Visible to all nearby devices”, zaškrtnite túto
možnosť. Pošlite príkaz at+inrange cez komunikačný program a čakajte na odozvu.
Zariadenie pošle zoznam BT zariadení v dosahu ako odpoveď na príkaz at+inrange.
Vyberte požadované zariadenie zo zoznamu BT zariadení a pošlite nasledujúci príkaz do
čítačky: at+add=XXXXXXXXXXX NAME, kde XXXXXXXXXXX je MAC adresa BT
zariadenia a NAME je meno BT zariadenia. Odpoveďou je OK, ak je zariadenie uspešne
pridané do pamäte. Zopakujte tento postup ak potrebujete pridať ďalšie BT zariadenia do
pamäte. Skontrolujte uložené zariadenia pomocou príkazu at+dump.
Adding a BT device to memory
Activate Bluetooth in your smartphone/tablet etc. and make it discoverable (continuously).
Make sure your device is visible also for not paired devices. Send an at+inrange command
to BlueGate and wait for response. Select the BT device you want to add to memory and
input the following command: at+add=XXXXXXXXXXX NAME, where XXXXXXXXXXX is
the MAC address of the BT device and NAME is the BT name of the device. Response is
OK, if the BT device is correctly stored in the memory. Repeat the procedure with other BT
devices if required. Check stored devices with at+dump command.
Deleting BT device from memory
Vymazanie BT zariadení z pamäte
Zobrazte všetky BT zariadenia uložené v pamätí čítačky pomocou príkazu at+dump. Zvoľte
BT zariadenie, ktoré chcete vymazať z pamäte a zadajte nasledujúci príkaz: at+del=
XXXXXXXXXXX NAME , kde XXXXXXXXXXX je MAC adresa BT zariadenia a NAME je BT
meno zariadenia. Odpoveď by mala byť OK ak sa BT zariadenie korektne vymaže z pamäte
čítačky. Skontrolujte vymazanie BT zariadenia pomocou príkazu at+dump.
List all BT devices stored in memory with at+dump command. Select the BT device from list
you want to delete and send the at+del= XXXXXXXXXXX NAME command to Bluegate ,
where XXXXXXXXXXX is the MAC address of the BT device and NAME is the BT name of
the device. Response should be OK, if the device is correctly deleted from memory. Check
stored devices with at+dump command.
Output relay mode selection
Výber režimu relé
BlueGate1 má 2 výstupné relé, každé z nich môže pracovať v 4 režimoch. Mode1 – relé je
zopnuté stále, ak je v dosahu čítačky BT zariadenie uložené v jeho pamätí. Mode2 – relé
zopne na 5s, ak sa do jeho dosahu dostane BT zariadenie uložené v pamätí čítačky. Mode3
– relé zopne ak je v dosahu čítačky BT zariadenie uložené
BlueGate has two output relays, which can be set to 4 different modes. Mode 1 – relay
switched on continuously if a stored BT device is detected in operating range. Mode 2 –
relay switched on for 5sec if a stored BT device entered operating range. Mode 3 – relay
switched on if a stored BT device is detected in operating range and input No. 1 is toggled
simultaneously. Mode 4 – relay can be switched ON and OFF only via USB port or via
network using at+rl1<2>switch=ON<OFF> command.
v pamätí a súčasne je aktivovaný vstup č.1. Mode4- relé ostane trvalo rozopnuté, aj keď je
v dosahu čítačky nejaké BT zariadenie uložené v pamäti. V tomto režime je možné spínať
relé na diaľku cez USB alebo Ethernet port pomocou príkazu at+rl1<2>switch=ON<OFF>.
Požiadavky na napájací zdroj
Bluegate1 a BlueGate Mini je možné napájať stabilizovaným zdrojom 12V, cca 200mA ak
čítačka nie je osadená Ethernetovým modulom. V opačnom prípade výkonové
požiadavky na zdroj vzrastú na 12V/500mA. Zariadenie je možné napájať aj z batérie ak je
to potrebné.
Montáž
BlueGate1 a BlueGate Mini je možné namontovať na akúkoľvek zvislú alebo horizontálnu
plochu. Je potrebné mať na pamätí, že každá kovová plocha v blízkosti antény čítačky
znižuje jej dosah.
Pre montáž BlueGate1 je potrebné odmontovať dosku plošných spojov a pripevniť zadný
kryt krabice na stenu. Následne pripevnite DPS pomocou 4 skrutiek späť. Pre montáž krytu
na stenu použite skrutky s plochou hlavou, aby nedoslo ku kontaktu skrutky a spojov na
DPS.
Dôležité upozornenia
BlueGate1 je určený len pre inštaláciu v budovách, BlueGate Mini je možné namontovať aj
vo vonkajšom prostredí avšak len napr. pod prístreškom. Zariadenie nie je vodotesné!
Priame slnečné žiarenie a teploty nad 40°C môžu poškodiť čítačku!
PIN kód a MAC adresa sú vytlačené na zadnej strane zariadenia (Platí len pre BluGate1).
Prevádzkové podmienky
Prevádzková teplota: -10.............+40°C
Relatívna vlhkosť: 0..........95% (nekondenzujúca)
Rozsah napájacieho napätia: 9-14VDC/500mA
Výstup: max 6A/250V (max. spínaný výkon125VA, napr. 250V/0,5A alebo 6A/20V)
Rozmery BlueGate1: 110x140x35mm
Rozmery BlueGate MINI: 80x60x40mm
Power supply requirements
BlueGate1 and BlueGate MINI is powered externally from a 12V, minimum 200mA power
supply for the model without Ethernet module. If you have an Ethernet enabled model, the
power requirement is at least 12V/500mA. module is The power consumption is cca 3050mA, depending on relays (switch on or off). The device can be operated also from a 12V
battery if required.
Mounting
BlueGate1 and BlueGate MINI can be mounted on any vertical or horizontal surface. Please
note that metal parts close to reader’s antenna can significantly decrease operating range of
the reader. Any metal surface close to the reader reduces operating range of the device.
Please unmount the main PCB releasing 4 screws. Use flat top screws to fasten BlueGate
to the wall to avoid contact between the screws and PCB!
Important notes
Use BlueGate1 only for indoor applications, BlueGate MINI can be used outdoors, but it
should be mounted at least under the roof because its not waterproof.
PIN code and MAC address of the device is printed on the backside of the device (only valid
for BlueGate1).
Direct sunlight and temperatures above 40°C can damage the device!
Operating conditions
Operating temperature range: 0..........+40°C
Humidity: 0............95% (non condensing)
Operating voltage: 9-14V/500mA DC
Output: max 6A/250V (max. power 125VA, e.g. 250V/0,5A or 6A/20V)
Dimensions: 110x140x35mm (WxLxT)
Dimensions of BlueGate MINI: 80x60x40mm
Foto zariadenia (BlueGate 1)
Foto zariadenia (BlueGate Mini)
BlueGate1
BlueGate MINI
Zapojenie svorkovnice pre BlueGate1
BlueGate1 wiring diagram
X4 konektor (vľavo) –
X4 connector (left) -
X5 konektor (vľavo) -
1. Záporný pól napájania (zem)
2. Kladný pól napájania (+12V)
3. Vstup č.1, kladný pól
4. Vstup č.1, záporný pól
5. Vstup č.2, kladný pól
1. Vstup č.2, záporný pól
2. pre budúce použitie
3. pre budúce použitie
4. pre budúce použitie
X5 connector (left)-
1. Negative power supply (ground)
2. Positive power supply (+12V)
3. Input No.1, positive pin
4. Input No.1, negative pin
5. Input No.2, positive pin
1. Input No.2, negative pin
2. for future use
3. for future use
4. for future use
X1 konektor (vpravo) -
5. pre budúce použitie
1. Katóda LED (červená)
2. Katóda LED (zelená)
3. – 4. Spojené v kľudovom stave REL1
3. – 5. Spojené v aktívnom stave REL1
6. – 7. Spojené v kľudovom stave REL2
6. – 8. Spojené v aktívnom stave REL2
X1 connector (right)-
5. for future use
1. LED red negative pin
2. LED green negative pin
3.-4. NC REL1
3.-5. NO REL1
6.-7. NC REL2
6.-8. NO REL2
Zapojenie svorkovnice pre BlueGate MINI
BlueGate MINI wiring diagram
X2 konektor (vľavo) –
X2 connector (left)
X6 konektor (vpravo) -
1. Záporný pól napájania (zem)
2. Kladný pól napájania (+12V)
3. Vstup č.1, kladný pól
4. Vstup č.1, záporný pól
5. Vstup č.2, kladný pól
6. Vstup č.2, záporný pól
1-2. Spojené v kľúdovom stave
2-3. Spojené v aktívnom stave
USB port konektor
Vyrába a dodáva:
STAR electronic s.r.o.
Košice, SLOVAKIA
Tel. +421 905 423372
email: [email protected]
www.starelectronic.sk
X6 connector (right)-
1. Power supply negative pin (Ground)
2. Power supply positive pin (+12V)
3. Input No.1 positive pin
4. Input No.1 negative pin
5. Input No.2 positive pin
6. Input No.2 negative pin
1.-2. NC REL
2.-3. NO REL
USB port connector
For more information please contact [email protected]
www.starelectronic.sk