1
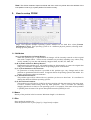
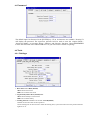
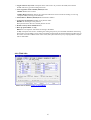
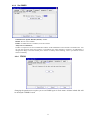
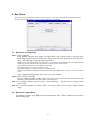
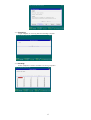
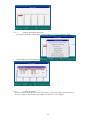
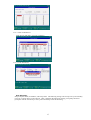
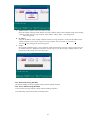
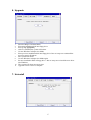
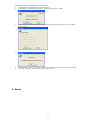
Magic Card
Extra v2.5
User Manual
Table of Contents
System Requirements........................................................................ 1
1. Start Installation .......................................................................... 2
1.1 Installation Steps: ................................................................. 2
1.2 Supervisor Mode (Open Mode)............................................ 4
1.3 User Mode:........................................................................... 4
2. How to setup FDISK ................................................................... 5
2.1 Attributes.............................................................................. 5
2.2 Name .................................................................................... 5
2.3 Size....................................................................................... 5
2.4 File System:.......................................................................... 6
2.5 Restore Period ...................................................................... 6
2.6 Buffer: .................................................................................. 6
3. Install Operating System ............................................................. 7
3.1 Boot Menu:........................................................................... 7
4. Option Menu................................................................................ 8
4.1 Password .............................................................................. 9
4.2 Tools..................................................................................... 9
4.2.1 Settings ............................................................................. 9
4.2.2 Disk Info ......................................................................... 10
4.2.3 Set CMOS....................................................................... 11
4.2.4 FDISK............................................................................. 11
5. Net Clone................................................................................... 12
5.1 Net Clone running steps ..................................................... 12
5.2 Net Clone Logon Menu...................................................... 12
6. Upgrade ..................................................................................... 17
7. Uninstall .................................................................................... 17
8. About......................................................................................... 18
9. Hotkey ....................................................................................... 19
10. Hardware Mode...………………………………………………21
System Requirements
PII and above IBM compatible PC.
Minimum 500 MB of free hard disk space.
BIOS must be able to support Hard Disk size over 8.4GB
64MB of Memory
Color monitor
Operating System Support
Instant Restore Mode
Supports DOS/98/ME/NT/2000/XP
Back Up Restore Mode
Supports almost all operating systems
No Restore Mode
Supports almost all operating systems
1
1. Start Installation
Express Installation: Supplies an instant restore for DOS and all Windows operating systems. All of the
original data on the hard disk may be preserved. The default setting after Express installation is Instant Restore
for every reboot. Express Installation can only be used when a Windows operating system has been pre-installed
on the hard drive.
Custom Installation: Supports multi-boot functions by using the built-in FDISK utility. Each partition may
be setup with the preferred restore type and restore interval. When choosing this installation type, all data and
partitions will be destroyed and the hard disk will need to be repartitioned and formatted.
Keep C: When this installation method is selected, only data on partition C will be kept. All other partitions
will be deleted.
Note! Before using Express installation, remember to run the SCANDISK and DISK
DEFRAGMENTER utilities provided by Windows for best performance. Also disable any anti-virus
programs to avoid any possible conflicts.
1.1
Installation Steps:
1) Turn off the computer and remove the casing. Insert the Magic Card PCI card into a slot. Secure the
computer casing. Turn on the computer and insert the Magic Card installation diskette or CD to start
installation.
2) The Installation Setup menu will appear. Select [Express Installation] [Custom Installation] or
[Keep C] to start.
3) During the installation, please do not restart or power off your computer.
2
4) When [Installation completed] appears, remove the installation diskette and press Enter key to
restart the computer.
5) If the card is installed using [Express Installation], you will only have three seconds to press F10
to enter Setup menu and change the preferred settings. After saving the preferred settings, reboot
and press [Ctrl + Enter], in order to enter the Supervisor Password to enter Windows in Supervisor
Mode. The default password is [ENTER] key. Once operating system is up, insert Magic Card
installation diskette into the floppy drive. Click [Start\Run] and type A:\Setup.exe to install
Magic Card setup.
Note! By default the Magic Card Menu is disabled and instead of the Menu you can see the points in
the left upper corner of the screen for 3 seconds. During this time you can press on any of the
Hotkeys.
6) If the card is installed using [Custom Installation], the system will reboot into the FDISK setup
menu. Please refer to Section 2: How to setup FDISK to complete the hard disk partitioning and
press [ESC] key to save and exit. You can then start to install the Operating System and execute
Setup.exe in every partition. Please refer Section .3: Install Operating System)
7) The following menu will pop up. Check the check box of the function that you would like to have.
3
z
Move SWAP To D Drive (Recommended)
Checking this box will move SWAP files to Drive D. This will improve performance.
Move Outlook Express Mail To D:\mail (Recommended)
Checking this box will move Outlook Express Mail folder to Drive D. Setting Drive D to be an
unprotected partition will preserve the files of your e-mail. For a mail system other than Outlook
Express, please set it manually.
Move Address Book To D:\Add_Book (Recommended)
Checking this box will move the Address Book folder to Drive D. Setting Drive D to be an unprotected
partition will preserve the data files of your Address Book.
Move IE5.0 Favorites To D:\Favorites (Recommended)
Checking this box will move the Favorites folder to Drive D. Setting Drive D as an unprotected partition
will preserve the web data Favorites.
z
z
z
8) After executing Setup.exe, The magic Card Icon will be added when you are in the User Mode.
Moving the mouse to the icon. Will show you the buffer status.
When the free space available is less than 20%, the system will warn you with a beeping sound.
Please save all files and restart the computer immediately or operate Restore function to release the
new buffer zone.
9) When you are in the Supervisor Mode, the following message will appear to warn you that Windows
is up.
1.2
Supervisor Mode
In Supervisor Mode the Magic Card is not active and allows full Read/Write access to all partitions
on the hard disk drive. All of the changes are permanent. This Mode is only accessible from MIS or
administrators. To enter Supervisor Mode press [Ctrl + Enter] when you are in the boot menu of the
Magic Card. The supervisor Password is required to enter this mode. The default supervisor
password is [ENTER] key.
1.3
User Mode:
In User Mode the Magic Card is active and governs the write access to the partitions on the disk
drive. Any changes made in this mode will be restored to their original settings after the PC is rebooted on a preset schedule.
4
Note! The division between Supervisor Mode and User mode only exists when the attribute of the
boot partition is set to (A): system partition for instant recovery.
2.
How to setup FDISK
Magic Card supports multiple operating systems installed on one hard drive when [Custom
Installation] is used. Each operating system is in a different physical partition, allowing multibooting up to 40 partitions.
2.1 Attributes
(1) A: System Partition for Instant Restore:
When this partition type, is implemented all changes will be instantly restored to their original
state with a simple reboot. Various restore schedules are provided, including every reboot, daily,
weekly, monthly, a given date and manually. Supports DOS, 98, ME, NT, 2000, XP.
(2) B: System Partition for Backup Restore:
Implementing this partition type, will enable backing-up data manually, or restore the original data
using preset schedules. It supports almost all operating systems in the market.
(3) C: System Partition for No Restorate:
No protection or backup function is provided in this partition type. Any changes made in this
partition are permanent and will remain. It supports almost all operating system in the market. It is
mainly used for networking environments.
(4) S: Shared Data Partition:
This partition type will be visible with every partition you choose to boot from. It is excellent for
sharing data between different operating systems.
(5) P: Private Data Partition:
This partition type will only be visible for the boot partition with the same name in the setup menu.
It will be invisible when booting from any other partitions. This is excellent for constantly
changing data that is exclusive to one operating system. For example, if the name of boot partition
is [Win98], then the name of its private data partition must be [Win98] as well.
2.2 Name
Identity of the partition in the boot menu. Maximum length is 10 characters
2.3 Size
Setup preferred partition size.
Enter the preferred size or press [Page Up / Page Down] to adjust.
5
2.4 File System:
Choose the appropriate file system for each operating system
FAT32: Supports Win98/ME/2000/XP (Recommended)
FAT16: Supports Win95/NT hard disks under 8.4GB. Total partition size cannot be more than
2000MB.
NTFS/HPFS: Supports WinNT4.0/Win2000/XP.
The boot sector of WinNT4.0 cannot be located over 2000MB. Total partition size cannot be more
than 4300MB. Win2000/XP does not have such a restriction.
LINUX: Supports LINUX file system.
LINUX/SW: Supports LINUX Swap file system.
2.5 Restore Period
Set up restore time for System / data recovery.
z Disable: Shuts down Instant Restore function
z Every: The system will be instantly restored to its original state with every reboot.
z Daily: The system will be instantly restored to its original state at the first boot of every day.
z Weekly: The system will be auto restored to its original status at the first boot of every Sunday.
z Monthly: The system will be auto restored to its original state at the first boot of the first of
every month.
z Manually: Every access write to the hard disk will be kept temporarily. The system will be
restored to its original status by pressing [Ctrl+R] and by entering the restore or supervisor
password.
z A Given date (1st~31st): The system will be auto restore to its original status at the first boot on
a specified date
.
z
Auto-Clear: Data partition will be auto cleared with every reboot. Supports FAT16 and FAT32
file systems only. With System: Private data partition will follow the restore period of its boot
partition.
2.6 Buffer:
z
z
z
For Instant Restore type:
Maximum buffer size is 1004MB and Minimum is 0MB. Default value is 502MB.
Move the cursor to the selected option and adjust the size by PageUP/PageDown.
For Backup Restore type:
This requires a buffer zone that is equal in size to the protected partition. The buffer zone will be
automatically preserved within the remaining unpartitioned hard disk space.
For No Restoration type or Data partition:
No buffer is required.
Note! When the settings in the FDISK are saved, the partition size cannot be changed. Please
think twice before saving and exiting.
6
3. Installing Operating System
3.1 Boot Menu:
After FDISK setup completed, press [ESC] key to save and exit. PC will automatically restart and
will show the Magic Card boot menu as follows.
Note: By default the Magic Card boot menu is disabled and you can see three points in the left upper
corner of the screen.
3.1.1 Installing the OS
Move the light bar to the selected partition and follow the steps below to start OS installation.
Note! Please prepare a boot CD or Diskette and format all
system and data partitions.
3.1.2 For boot partition set to attribute (A)
z
z
Windows Operating System installation steps for [Instant Restorate Partition]:
After rebooting your computer, the Magic Card boot menu will appear showing all the partitions
you setup. At that time you can choose a partition and install the operating System. Follow the
steps listed below:
Step 1. Start PC with boot diskette or boot CD.
Step 2. Select the desired partition with [Ctrl+Enter] and login using the Supervisor Password
(default Password is [ENTER] key).
Step 3. Format C:
Step 4. Start installing desired operating system.
Note! During installation, windows will reboot several times. Make sure all the install
procedures are performed in the Supervisor Mode.
Step 5. Install Magic Card Setup Driver in Windows.
Make sure you are in Supervisor Mode first.
Step 6. Insert Magic Card install diskette in floppy drive.
Step 7. Click [Start\Run] and type A:\Setup.exe
Installed Buffer Monitor utility enables the user to view the amount of free resources
remaining for use by the card until a restart operation is required.
Installing other applications and programs:
7
To install other applications and programs please press [Ctrl+Enter] to go into desired partition
in the Supervisor Mode to begin installation.
3.1.3 For boot partition set to attribute (B)
Operating System installation steps for <Backup Restore Partition>
Step 1. Start PC with boot disk or boot CD.
Step 2. Select the desired partition with [Enter] key.
Step 3. Format C:
Step 4. Install the OS.
Step 5. Reboot computer.
Step 6. Select the same partition again with [Ctrl+B] keys and login with Supervisor Password
(default Password is ENTER key) to backup the current partition’s data
Note! To restore the Backup Restore partition,
please select the partition with [Ctrl+R]
keys and login with Supervisor Password. This will restore the system to its current backup.
3.1.4 For boot partition set to attribute (C)
Attribute C is “No Restoration Partition”. In this partition, the operating system installation
procedure is the same as if no card were installed. No protection is provided under this partition.
Step 1. Start PC with boot disk or boot CD.
Step 2. Select this partition with [Enter] key
Step 3. Format C:
Step 4. Install the OS.
Step 5. Reboot computer.
4. Option Menu
After completing the Magic Card installation, press [F10] key when in the boot menu to enter the Option
Menu. Supervisor password will be asked for in order to enter the Option Menu. All the settings in this
menu go into effect after saving the changes and restarting the computer.
8
4.1 Password
The default Supervisor Password is the [ENTER] key. UP to 10 characters are available. Pressing F1
will display the password. The supervisor password will be used to enter the <Option Menu>,
<Supervisor Mode>, or executing <Keep> <Backup> and <Restore> functions. Please REMEMBER
to write this Password down and NEVER lose it or you will need to reinstall everything!
4.2 Tools
4.2.1 Settings
1. Boot Menu: Show/Hide (default)
Show: Shows boot menu
Hide: Do not show boot menu
2. Logon Hotkey Hint: Show (default)/Hide
Show: Shows hotkeys on boot menu
Hide: Do not show hotkey.
3. Loading Timeout: Disable/1-99 seconds/ 3second(default)
Disable: Do not auto enter the boot partition.
Set the waiting time in the boot menu. After this waiting time, system will auto boot to the partition that the
light-bar is on.
9
4. Logon name for Net Clone: Computer Name of Net Clone. If you leave this blank, the LOGON
NAME will show [?] while running Net Clone.
5. Auto Logon Net Clone: Disable (default)/Enable
Disable: Disable auto connect.
Enable: Magic Card auto detects the connection and allows card to search for sending or receiving
computers when powering on the machine.
6. Packet Driver: Disable (default)/Realtek 8139/Intel 100 Pro
7. Assign boot up partition: Disable / boot partition name
Disable: Do not assign a boot partition.
Boot partition name: Pre-set a desired partition to boot.
8. Double security check: Enable/Disable
9. Boot up option: BIOS / C only
BIOS: the boot sequence will follow the setting in the BIOS.
C only: Computer boots from C. Enabling this setting will protect your hard disk information from being
destroyed in case the Magic Card is removed without going through the formal uninstall procedure first. If
the card is removed or undetected for some reason, the system will warn you by beeping and the computer
will be unbootable.
4.2.2 Disk Info
Please refer to Section 2. How to setup FDISK.
10
4.2.3 Set CMOS
CMOS Restore Option: Disable (default) / Enable
Disable: Do not restore CMOS.
Enable: If CMOS DATA is modified, it will be restored.
Analyze/Save CMOS data
It makes a comparison of current CMOS data and the saved CMOS data on the hard drive for differences. You
can run this selection when some settings or peripherals have been changed or replaced. If CMOS data is
changed, the Magic Card will remind you to restore or backup when rebooting, even if you did not run this
selection manually.
4.2.4 FDISK
Changing the partition size requires you to use FDISK again in Tools menu. All data in hard disk will
be destroyed if FDISK is used.
11
5. Net Clone
Net Clone allows you to maintain 200 PCs at the same time. You can use this function to transfer hard drive
data through a master computer to the rest of the computers in the network.
5.1
Net Clone running steps
Step 1. [F10]> [Upgrade]
From Sending computer, enter Magic Card Boot menu, enter [option] menu by pressing [F10].
Insert Magic Card LAN driver diskette into floppy drive and select [Upgrade] to load the packet
driver. The following are the supported packet drivers.
Realtek 8139x, Intel 10/100 PRO**, 3Com 3C905c, 3Com 3C905 (b), D-Link 500, D-Link 510TX, D-Link
530TX-A1, D-Link 530TX-B1, D-Link 530TX-C, D-Link 538TX, D-Link 550TX,
Accton MPX EN1207D-TX, Accton MPX EN1207F-TX,
VIA Rhine Family 4.26, VIA 1G (VT6122) V1.08,
VIA Tahoe Family (2), VIA PCI 10/100 V3.27, SMC 9432TX
AdmTek AN983B-NIC, RE100PD, Realtek 8029, DAVICOM DM9X Series, C83815 v12.2, IC Plus IP100
v3.03.
After completing loading packet driver step, restart your computer.
Step 2. [F10]> [Tools]> [Settings]
For the sending computer, enable [Auto Logon Net Clone] and select the packet driver that
matches to your Network Card. Press ESC to save and exit.
Step 3. For Sending computer, run [Net Clone]. Select [Sending],
and then refer to section 6.3 Net
Clone Logon.
Step 4. For receiving computers, run [Net Clone] > [receiving]. Then refer to section 6.3 NET CLONE
Login.
5.2
Net Clone Logon Menu
For Sending computer, press [F10] and enter Option menu. Run [NET CLONE] and you will see
the following figure.
12
5.2.1 Receiving:
Target computer for receiving data from Sending Computer.
5.2.2 Sending:
Source Computer is used to send data to receiving computers.
13
5.2.2.1
Sending Option Menu & All Data
Copies and sends all data and the Magic Card information to receiving Computers. Highly
recommended for first time installation.
5.2.2.2
Sending Option Menu
Send only Magic Card parameters to receiving computers. Copies only Magic Card information to
receiving computers. Recommend usage: Magic Card software version upgrades.
14
5.2.2.3 Data of Hard Drives
Send partition and data to receiving computers.
5.2.2.4 Auto Allocate IP
Auto Allocation
Setup Computer Name, IP Address, and Group name. The following settings can be setup one by one manually
(press F1 to option menu) or auto allocate. After completing the following settings, press [ESC] and select
[Complete Auto IP Allocation] or select [Auto Allocation] to start IP allocating.
15
A.
Machine Name: Computer Name after NET CLONE
Setup the sending computer name and the receiving computer name. If the Computer Name of the sending
computer is ABC, the receiving computer will be ABC1, ABC2, ABC3…after using [Auto
Allocation] option.
B.
IP Address:
Setup the IP address of the sending computer and the receiving computers. If setup the IP address of the
sending computer to be 192.168.1.1, the receiving computer will be 192.168.1.2, 192.168.1.3,
192.168.1.4, after using [Auto Allocation] option.
C.
Group:
Group name used during login. Only computers in this selected group can login. Many groups can be set
for separate purposes. If the NET CLONE is setup Group to be A, the receiving computer will be in the
same group A after using [Auto Allocate] option.
5.2.3 Restart Receiving Machine
Restart the standby receiving computers along with the sending computer.
5.2.4 Power Off Receiving Machine
Power off the receiving computers along with the sending computers.
Press EXIT key will Exit from NET CLONE function.
16
6. Upgrade
1.
2.
3.
4.
5.
6.
7.
8.
9.
10.
11.
Enter the Magic Card boot Menu.
Place new installation disk into floppy drive
Press [F10]>[Upgrade]
After it is finished, the system will reboot.
Go into Windows in Supervisor Mode.
Place previous installation disk into floppy drive. Run A:\setup.exe to uninstall the
previous setup in Windows.
The system will reboot.
Go into Windows in Supervisor Mode again.
Put new installation Disk in floppy drive. Run A:\setup.exe to install the new driver
into Windows.
The system will reboot one more time.
Upgrade to new version is complete.
7. Uninstall
17
To uninstall Magic Card functions from computer.
1.
2.
Place Magic Card Installation disk into floppy drive.
In Windows, click Start/Run and type A:\>setup.exe in Supervisor Mode
3.
Click Uninstall and the following screen will popup. Enable the checkbox to move the folder
back to drive C.
4.
5.
6.
System reboots. Press [F10] during booting. Input Supervisor password and select [Uninstall].
Uninstall completed. You can now power off the system.
8. About
18
Information about Magic Card version.
9. Hotkeys
(1) F10
(2) Ctrl+Enter
(3) Enter
(4) Ctrl+B
(5) Ctrl+R
(6) Ctrl+K
10.
Enters the “Option Menu”
Enters “Supervisor Mode”
Enters “User Mode”
Executes the partition’s “Backup” Function.
Executes the partition’s “Restore” Function.
Enters “Keep Mode” and saves the
changes temporarily in the next boot.
Hardware Mode
To change hardware mode, press ALT+ M before Magic Card Menu (after the BIOS). You can select A, B
or C mode to adjust. Default password is Enter Key.
A = default mode (equal to mode 5 on Extra v2.3)
B = equal to normal mode
C = equal to mode 7
19