1
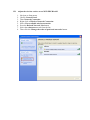
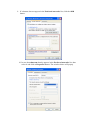
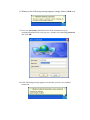
Instructions for connecting to the wireless network service Eduroam
For proper configuration of your computer, please follow the procedure below.
I.
Confirm that the wireless network card is enabled
Most laptop have a switch for easy activation \ deactivation of the wireless
network card. This switch is usually located on the front or side of the laptop.
II.
Automatic acquisition of ip address (not required if DHCP is enabled).
1.
2.
3.
4.
5.
6.
7.
8.
Navigate to Start menu.
Choose Control Panel.
Then Network Connection .
Right click at Wireless Network Connection.
Select Properties.
Select Internet Protocol (TCP\IP).
Click at Properties button.
A new window will appear (shown bellow) where you should enable the
options Obtain an IP address automatically and Obtain DNS server
address automatically.
9. Close all open windows by pressing OK.
III.
Adjust the wireless card to access WiFi EDUROAM
1.
2.
3.
4.
5.
6.
7.
8.
Navigate to Start menu.
Choose Control Panel.
Then Network Connection .
Right click at Wireless Network Connection.
Select View available wireless networks.
Press the Refresh Network List button.
Select the eduroam network from the list.
Then click the Change the order of preferred networks button.
9. If eduroam does not appear in the Preferred networks list, click the ADD
button.
10. In case that eduroam already appears in the Preferred networks list, then
select it and click at Properties button. The window below will popup.
11. In Network name (SSID) field, type eduroam, in Network
Authentication choice menu, choose WPA2 and for Data encryption
choose the AES option.
12. Select the Authentication tab, for EAP Type choose PEAP and then
click at the Properties button.
13. Uncheck the Validate server certificate checkbox, check Enable Fast
Reconnect and click Configure.
14. Uncheck the Automatically use my Windows logon name and
password option and click the ΟΚ button.
15. Close all open windows by clicking OK.
16. Whenever the following message appears (image bellow) click on it.
17. Enter your username (should be in the form [email protected],
[email protected] etc.) and the corresponding password
and click ΟΚ.
18. If the following message appears, means that you have successfully
connected.