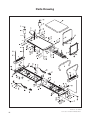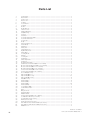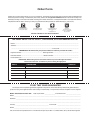
1
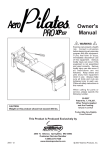
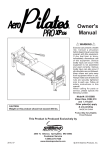
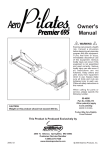
Performer 695
Assembly & User Manual
model: SPPP-AE695
reference no. 55-4695U
10/08
1-IN-SPPP-AE695-UK/1.1
Introduction
Dear AeroPilates Customer
Congratulations on your smart decision to include a fitness regime into your life.
Not only have you chosen the most sensible way to exercise, but you have made
a wonderful commitment to your health and well-being that will make you proud.
Incorporating my AeroPilates routine into your life, at least three days a week and more
if possible, will change your life as it has dramatically changed mine.
Consistent use, attention to the quality of each movement and dedication to the belief
that your body is capable of healing itself, in-particular, that your body is able to correct
imbalanced movement patterns, will help bring you the freedom from pain and injury
that we all hope for as we age.
Allowing our bodies to weaken and fall into disrepair is a condition that a regular
AeroPilates discipline will help prevent.
Join me, and the hundreds of thousands of AeroPilates users worldwide, in enjoying
the ease of movement and youthfulness that comes with this simple and enjoyable
20 minute a day system that tones and strengthens your body, calms your mind and
rejuvenates and enlivens your spirit so that you may easily live a life filled with vitality,
beauty and grace.
Give yourself this small gift every day and watch your body become the most beautiful
body, designed to move with freedom and without pain. Watch the aches and stiffness
disappear and enjoy the compliments that everyone around you will give as they too
begin to notice your shape improve and your energy level soar.
I wish you well on your journey to becoming your most beautiful you.
Much love and motivation,
2
Contents
Introduction...................................................................................................................................................... 2
General Information.......................................................................................................................................... 3
Before You Start............................................................................................................................................... 4
Safety............................................................................................................................................................... 4
Parts Identification............................................................................................................................................ 5
Assembly.......................................................................................................................................................... 6
Operation......................................................................................................................................................... 9
Storage.......................................................................................................................................................... 10
Maintenance................................................................................................................................................... 11
Parts Drawing................................................................................................................................................. 12
Parts List........................................................................................................................................................ 13
Order Form/Guarantee................................................................................................................................... 14
General Information
quality
This exercise product has been designed and manufactured to comply with the latest British and European
Safety Standards.
questions and customer care
If you have any difficulty with assembling or using this product, please DO NOT return it to your retailer. Our
Customer Care helpline will be more than happy to answer all your queries and arrange for missing parts to be
sent to you. Customer Care is open from 9.00am–5.00pm Monday to Friday.
Please have the product model and number ready for Customer Care staff.
3
Before You Start
tools
This product is supplied with the basic tools required for assembly.
assembly
Assemble in a clean, clear area. Give yourself plenty of space to easily move around the product, as this will reduce your chance of getting injured while assembling. You might also find it quicker and safer if you work with a
friend when handling large parts.
check you have everything
Carefully unpack each component and check that you have all the parts against the Parts List before starting to
assemble your product. Remember, a number of parts will be factory fitted to the larger component. If any are
missing, please contact our Customer Care staff for assistance.
safety
Before you begin any programme of exercise, please be sure to consult with your doctor. Proper use of your product
is also essential. Please read this manual carefully before starting assembly of your product or starting to exercise.
•
•
•
•
•
•
•
•
•
•
•
•
•
•
Use this product only as described in this manual (or on video).
Refer to illustrations or video for any complicated manoeuvres.
Make sure that all nuts, bolts, screws, and knobs are tight prior to each use.
Do not exercise at an intensity that causes the product to move. This could result in damage to joints and
the product.
Setup on a level surface. Do not position on loose rugs or uneven surfaces.
Tighten/replace loose or worn components prior to use.
Choose a workout which best fits your physical strength/flexibility level. Use common sense while exercising.
Injuries may result from incorrect or excessive exercise.
Wear appropriate clothing when exercising; do not wear loose clothing that could become caught or trapped. Keep hands clear of any folding or pinch points.
Keep all children and pets away from the product at all times including while using or while assembling.
Be careful to maintain your balance while using, mounting, dismounting, or assembling
the product. Loss of balance may result in a fall and serious bodily injury.
Please use this product one person at a time.
Ensure a free space of 3.5m x 2.0m is available before use
Make sure all adjustment devices are not left protruding where they may be accidentally changed or caught upon.
storage and use
This product is designed for indoor use in clean dry conditions. Do not store in cold or damp conditions as this
may cause corrosion. It is recommended that two people move the AeroPilates. Attach one of the TENSION
CORDS(10) in the slot on the FRONT FRAME(1) to prevent the CARRIAGE(7) from moving. Lift from the REAR
FRAME(2) and use the Wheels(27) on the FRONT FRAME(1).
weight limit
This product is suitable for users weighing 300lbs/21.5 stones/136kg or less.
4
Parts Identification
Part no. Description
Qty
38 Screw, Round Head (M5 x 0.8 x 35mm)
4
42 Nylock Nut (M8 x 1.25)
2
47 Washer (M8)
6
26
Locking Knob
4
27
Plastic Wheel
2
62 Rubber Foot
4
Components
a
u
s
r
v
b
t
w
c
d
e
q
f
p
x
g
h
o
i
n
j
m
k
l
a.
b.
c.
d.
e.
f.
Left Pulley Hook
Pulley Set
Rope
Hand Strap
Foam Shoulder Pad Ass.
Headrest
g.
h.
i.
j.
k.
l.
Cushion
Cardio Rebounder
Front Cover
Locking Knob
Wheels
Locking Knob
m.
n.
o.
p.
q.
r.
Front Frame
Tension Cord
Plastic Snap Hook
Carriage
Rear Frame
Right Pulley Hook
s.
t.
u.
v.
w.
x.
Pulley Riser
Rear Cover
Pulley Riser
Front Cover
Warning Label
Footbar
Combination Wrench
The following tools are required for assembly:
5
Socket Wrench
Assembly
Step 1
Remove your AeroPilates from its packaging placing the product on its side, with the
LOCKING PIN(29) side upward. Remove the LOCKING PIN(29) and unfold the MAIN
FRAMEASSEMBLYseparatingthehalfthathastheattachedLOCKINGPIN(29).When
completed, the frame should be separated approximately 3 feet at the end.
Step 2
AttachthefourRUBBERFEET(62)totheFRONTFRAME(1)andREARFRAME(2)with
ROUNDHEADSCREWS(M5x0.8X35mm)(38).AttachtheWHEELS(27)totheFRONT
FRAME(1)withWASHERS(M8)(47)andNYLOCKNUTS(M8X1.25)(42).
Step 3
UnfoldyourAeroPilatestoaflatpositionbymovingtheFRONTFRAME(1)awayfromthe
platform end of the product in a clockwise position until fully extended.
6
Assembly
Step 7
Step 5, Note
Step 4, 5, 6 and 7
Step 4
RemovethepapercoveringfromthefoamtapeinsidetheFRONTCOVER(3)andREAR
COVER(4). Place the FRONT COVER(3) over the FRONT FRAME(1). Place the REAR
COVER(4)overtheREARFRAME(2).Pressthecoverssecurelyinplace.
Step 5
Insert the FOOTBAR(5) into the mounting holes located in the FRONT COVER(3) and
FRONTFRAME(1).LockinplacewiththeLOCKINGKNOBS(26).
Note:YoucanchoosetoinserttheCARDIOREBOUNDER(50)intotheFRONTFRAME(1)
andlockinpositionwiththeLOCKINGKNOBS(26).Refertotheinsetdrawing.
Step 6
InsertthePULLEYRISERS(25)intothemountingholeslocatedontheREARCOVER(4)and
REARFRAME(2)andlockinpositionwiththeLOCKINGKNOBS(26).
Step 7
(seeillustration)
HooktheLEFTPULLEYHOOK(23)intooneofthefiveattachmentholesonthePULLEY
RISER(25)atleftside.HooktheRIGHTPULLEYHOOK(24)intooneofthefiveattachment
holesonthePULLEYRISER(25)atrightside.
7
Assembly
Step 8
Insert the FOAM SHOULDER PAD ASSEMBLIES(16) into the holes located on the
CARRIAGE(7).
Place the HAND STRAPS(20) onto the FOAM SHOULDER PAD ASSEMBLIES(16) for
storage.
8
Operation
load adjustment
The resistance of the CARRIAGE(7) can be adjusted by securing
the TENSION CORDS(10) in the slots located on the FRONT
FRAME(1). You can achieve various levels of resistance by
securing different numbers of the TENSION CORDS(10) in the
slots.
Slots
Note: Over time your TENSION CORDS(10) will relax. To increase resistance in the TENSION CORDS(10), stretch and
re-tie the tension cords in a more taut position.
rope length adjustment
The ROPES(18) feed through the PULLEY SETS(22) then thread
through the loops on the underside of both outer edges of the
CARRIAGE(7). PLASTIC SNAP HOOKS(19) on the end of each
rope are used to adjust the ROPE(18) length. If more length is
needed, attach the PLASTIC SNAP HOOKS(19) to loop D. To
shorten, bring the ROPES(18) around the last loop D and secure
to loops A, B or C with the PLASTIC SNAP HOOKS(19). Wrap
ROPES(18) through the loops and attach where needed to
shorten ROPES(18) even more.
A
B
C
D
Both ropes should be set to an equal length. This is best achieved
by placing the HAND STRAP (20) over the FOAM SHOULDER
PAD ASSEMBLIES (16) and adjusting the length so the rope is
taut.
head rest adjustment
The HEAD REST(14) on the CARRIAGE(7) can be positioned at an
incline by simply pivoting the Support Bracket onto the flat surface
of the CARRIAGE(7) and then the HEAD REST(14) can be hinged
onto the Support Bracket.
You are now ready to exercise! Follow the exercise
chart or DVD.
9
Support
Bracket
Storage
To store simply keep in a clean dry place. The AeroPilates can be folded as illustrated for easy storage.
Step 1
Remove the LOCKING KNOBS(26) and CARDIO REBOUNDER(50), or the FOOTBAR(5), from the
FRONT FRAME(1).
Step 2
Remove the TENSION CORDS(10) from the slots on the FRONT FRAME(1). Move the CARRIAGE(7) back to the
REAR FRAME(2).
Step 3
Fold the AeroPilates up from the FRONT FRAME(1).
50
13
10
29
26
Step 4
Insert the LOCKING PIN(26) into the hole in the REAR FRAME(2) to lock the
frames in folded position.
Warning: When folding or unfolding the AeroPilates, keep all children away and
make sure your hands are clear of any folding or pinch point.
10
Maintenance
The safety and integrity designed into the AeroPilates can only be maintained when regularly examined for
damage and wear. Special attention should be given to the following:
1.
It is the sole responsibility of the user/owner to ensure that regular maintenance is performed.
2.
Worn or damaged components shall be replaced immediately or the AeroPilates removed from service
until repair is made.
3.
Verify that the ROPES(18) are properly installed on the PULLEY SETS(22).
4.
Check the condition of the ROPES(18). Replace the Rope if it is frayed or worn.
5.
Check the PLASTIC SNAP HOOKS(19) on the ends of the ROPES(18). Replace the ROPES(18) if
PLASTIC SNAP HOOKS(19) are damaged or deformed.
6.
Check the TENSION CORDS(10). If a TENSION CORD(10) is stretched and loose, re-tie the knot on the
end of the cord. Replace TENSION CORDS(10) that are frayed or worn.
7.
Check the BUNGEE CORD(52) on the CARDIO REBOUNDER(50) for wear. Replace the CARDIO
REBOUNDER(50) if the BUNGEE CORD(52) is frayed or worn.
8.
Check the PULLEY SETS(22) for excessive wear. Replace worn PULLEY SETS(22).
9.
Check the HAND STRAPS(20) for damage. Replace damaged parts.
10. Check the FOAM SLEEVE(6) and FOAM SHOULDER PADS(16) and replace if damaged or worn.
11. Check the STOP PLATES(30, 31) for looseness or damage and replace any damaged parts.
12. Check the CUSHION(13) and replace if it is damaged or worn.
13. Check and clean the ROLLERS(8) and the rolling surfaces on the rails. Clean by wiping with a dry cloth.
14. Keep clean by wiping with an absorbent cloth after use.
11
Parts Drawing
12
Model no: 55-4695U
Part code: 1-IN-SPPP-AE695-UK/1.1
Parts List
1
2
3
4
5
6
7
8
9
10
11
12
13
14
15
16
17
18
19
20
21
22
23
24
25
26
27
29
30
31
32
33
34
35
36
37
38
39
40
41
42
43
44
45
46
47
48
49
50
51
52
53
54
55
56
57
58
59
60
61
62
13
Front Frame........................................................................................................................ 1
Rear Frame......................................................................................................................... 1
Front Cover......................................................................................................................... 1
Rear Cover.......................................................................................................................... 1
Footbar............................................................................................................................... 1
Foam Sleeve....................................................................................................................... 1
Carriage.............................................................................................................................. 1
Roller................................................................................................................................... 4
Roller Spacer...................................................................................................................... 4
Tension Cord....................................................................................................................... 4
Support Bushing................................................................................................................. 4
Stop Bushing...................................................................................................................... 4
Cushion............................................................................................................................... 1
Headrest............................................................................................................................. 1
Foam Shoulder Pad Tube.................................................................................................... 2
Foam Shoulder Pad............................................................................................................ 2
Foam Cap........................................................................................................................... 2
Rope................................................................................................................................... 2
Plastic Snap Hook............................................................................................................... 2
Hand Strap......................................................................................................................... 2
Grip Pad.............................................................................................................................. 2
Pulley Set............................................................................................................................ 2
Left Pulley Hook.................................................................................................................. 1
Right Pulley Hook................................................................................................................ 1
Pulley Riser......................................................................................................................... 2
Locking Knob...................................................................................................................... 4
Wheels................................................................................................................................ 2
Locking Pin......................................................................................................................... 1
Stop Plate........................................................................................................................... 2
Small Stop Plate.................................................................................................................. 2
Stop Pad............................................................................................................................. 4
Round Plug (25mm)............................................................................................................ 4
Shaft Bolt, Socket Head (M8 x 1.25 x 20mm)...................................................................... 2
Bolt, Socket Head/w hole (M8 x 1.25 x 20mm)................................................................... 1
Bolt, Socket Head (M8 x 1.25 x 20mm)............................................................................... 7
Bolt, Round Head (M8 x 1.25 x 25mm)............................................................................... 4
Screw, Round Head (M5 x 0.8 x 35mm).............................................................................. 4
Screw, Flat Head (M5 x 0.8 x 25mm)................................................................................... 3
Acorn Nut (M5 x 0.8)........................................................................................................... 4
Nylock Nut (M6 x 1)............................................................................................................. 2
Nylock Nut (M8 x 1.25)...................................................................................................... 12
Nylock Nut (M5 x 0.8).......................................................................................................... 9
Nut (M8 x 1.25).................................................................................................................. 4
Washer (M5)........................................................................................................................ 9
Washer (M6)........................................................................................................................ 2
Washer (M8)...................................................................................................................... 20
Washer (M10)...................................................................................................................... 4
Lock Washer (M8)............................................................................................................... 4
Cardio Rebounder............................................................................................................... 1
Mat..................................................................................................................................... 1
Bungee Cord....................................................................................................................... 1
Warning Label..................................................................................................................... 1
Rubber Stand...................................................................................................................... 2
Screw, Flat Head (M5 x 0.8 x 16mm)................................................................................... 2
Combination Wrench (not shown)........................................................................................ 1
Socket Wrench (not shown)................................................................................................. 1
Manual (not shown)............................................................................................................. 1
Workout Chart (not shown).................................................................................................. 1
AeroPilates Level 1 Workout DVD (not shown)..................................................................... 1
AeroPilates Cardio Workout DVD (not shown)...................................................................... 1
Rubber Foot........................................................................................................................ 4
Model no: 55-4695U
Part code: 1-IN-SPPP-AE695-UK/1.1
Order Form
Please do not return the product. For your convenience, The Dezac Group Limited has a Customer Service Department.
Should a part be missing or a defective part found, please call +44 (0)1242 702360 between 9.00am and 5.00pm on
Monday to Friday or fill out the fax sheet ordering form below and fax it to +44 (0)1242 702301. Our Customer Service
Department will be able to assist you with your problem and the part will be mailed directly to your house.
TELEPHONE
FAX
CUSTOMER SERVICE
Tel: +44 (0)1242 702360
CUSTOMER SERVICE
Fax: +44 (0)1242 702301
ONLINE
CUSTOMER SERVICE
[email protected]
or
www.bodi-tek.co.uk
MAIL
BODI-TEK
The Dezac Group Ltd
P.O. Box 17, Cheltenham
Glos. GL53 7ET
Detach and Mail or Fax the Form Below
THE DEZAC GROUP LTD P.O. BOX 17, CHELTENHAM, GLOUCESTERSHIRE GL53 7ET
Name: ..............................................................................................................................................................
Address: ..........................................................................................................................................................
...................................................................................................... Post Code: ...............................................
IMPORTANT: We must have your phone number in order to process the order!
Daytime number: .................................................... Evening number: ..............................................................
Date Purchased: ...................................................... Model number: ..............................................................
Purchased From: .............................................................................................................................................
IMPORTANT: Before filling out the form below make sure you have the right information.
Refer to the ‘Parts List’ to make sure you're ordering the right parts!
PART #
EXAMPLE:
1
DESCRIPTION
QUANTITY
Rear Unit Assembly
YOUR TWO YEAR GUARANTEE
On receipt of the completed guarantee registration slip below, The Dezac Group Limited will guarantee this
product for two years against failure due to faulty workmanship or components. Please complete in block capitals.
Model: AeroPilates Premier 695
Date of purchase: _____________ Purchased from: __________________
Name: ___________________________________________________________________________________
Address: _________________________________________________________________________________
________________________________________________________________________________________
Country: _________________________________________ Post Code: _____________________________
Email: ___________________________________________________________________________________
Page 5
Cut out and send completed form to: The Dezac Group Ltd, PO Box 17, Cheltenham, Glos, GL53 7ET, England