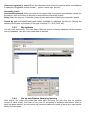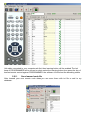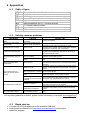
1
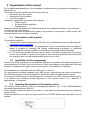
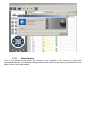
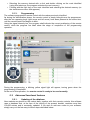
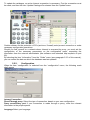
IR-100 Programmable Remote Control
User’s Manual
1. Contents
1.Contents
2.Organisation of the manual
3.Initial start-up of the system
3.1.Description of the product
3.2.Installation of the programmer
3.3.Inserting the batteries in the remote control
3.4.Installation of the software
4.Description of the interface
4.1.Messages area
4.2.Progress area
4.3.Operations area
4.4.Remote control memory area
5.Use of the program
5.1.Basic functional features
5.2.Advanced functional features
6.Appendices
6.1.Table of types
6.2.Solving common problems
6.3.Rapid start-up
6.4.Correlation table of keys
2. Organisation of the manual
For an abbreviated description of the installation and programming, go directly to paragraph 6.3,
Rapid start-up
The present manual is divided into three main sections:
• Initial start-up of the system
• Description of the interface
• Use of the program
followed by Appendices structured in this manner:
• Table of types
• Solving common problems
• Rapid start-up
Reference should be made to the individual sections for a detailed description of the contents.
3. Initial start-up of the system
This section describes the preliminary steps to the activation of the system. Under normal use,
these procedures are no longer necessary.
3.1. Description of the product
The product consists of:
• The software for the programming of IR-100 (you can download it from the following link (
http://www.remotecontrols.gr )
• The IR-50 USB Programmer. The programmer, used in combination with the software,
makes it possible to eliminate the lengthy programming procedures of traditional
universal remote controls, in addition to providing a constantly updated database
• An IR-100 Programmable Remote Control. Once it has been programmed, the remote
control can be used to replace the original. It does not lose its memory when batteries
are changed, and it can be reprogrammed at any point in time.
3.2. Installation of the programmer
Connect the IR-50 programmer to an available USB port; the system shall signal recognition of
the peripheral unit, but only on the first occasion. After a few instants the programmer shall start
to blink at a frequency of roughly one blink per second. The installation is complete.
The programmer is compatible with the USB ports 1.1 and 2.0.
The programmer has been designed as an HID device, meaning that the system recognises it
as a common peripheral (mouse, keyboard?, without the need for supplementary drivers.
In the case of continued use of the programmer, it is best to set it fast, using an adhesive strip,
in a position that facilitates frontal alignment of the remote control, at a distance of
approximately 1 centimetre.
3.3. Inserting the batteries in the remote control
The remote control functions with two mini-flashlight batteries at 1.5 volts (LR03/AM4/AAA)
(preferred batteries Konnoc ALK-03).
Close attention should be paid to the polarity of the batteries when placing them inside the
remote control.
When the batteries have been correctly inserted, the POWER button turns red when a key is
pushed.
3.4. Installation of the software
Download the program from the following link (same as above http://www.remotecontrols.gr ),
unzip it and run the SETUP.EXE program. The program will guide you through the steps to be
followed.
4. Description of the interface
After approximately three seconds, during which the start-up screen is displayed,
you will find yourself in the program interface.
There are four main areas in the interface:
A. MESSAGES AREA
B. PROGRESS AREA
C. OPERATIONS AREA
D. REMOTE CONTROL MEMORY AREA
See the individual paragraphs for detailed descriptions.
4.1.
Messages area
This zone displays the messages that guide the user through the individual operations,
indicating the current operation and the action required. There are two parts to this area: the
one on the left presents the message in text format; the one on the right a support image or
animation.
4.2. Progress area
The progress area, in the central portion of the screen, displays the buttons, that allow to
activate an operation and that indicate, with green led, the stage reached with the programming
operations for the remote control.
4.3. Operations area
This area holds the indicators and lists available for selection, based on the phase active at any
given point in time. There are two possible options:
• Dialogue with the remote control, displayed during the Identification phase (see
paragraph 5.1.1) and the programming phase (see paragraph 5.1.3)
• Selection of the codes, displayed during the memorisation phase (see paragraph 5.1.2)
4.4. Remote control memory area
This zone displays the updated memory situation for the remote control being used, indicating
the make and model, if set, for each memory.
5. Use of the program
This section presents descriptions of the functional features used inside of the software once it
has been installed. These features are subdivided into two groups:
• Basic functional features: the set of functions necessary and sufficient for the
programming of the remote control
• Advanced functional features: features not strictly necessary, but capable of updating
the database and customising a number of parameters.
5.1. Basic functional features
The programming software is designed for rapid performance of the three fundamental steps in
the programming of the remote control. These are:
• Identification of the remote control to be programmed
• Memorisation of the device(s) to be controlled
• Programming of the remote control
Reference should be made to the paragraphs that follow for a detailed description.
5.1.1.
Identification
During this phase, the software recognises the remote control to be programmed and procures
(if present) the codes already programmed in the remote control.
The remote control is simply brought near the programmer, after simultaneously pushing the left
and the right arrow keys, until the remote control led starts blinking.
5.1.2.
Memorisation
This is the phase during which the devices to be entered in the memory or memories
(represented by the four squares holding codes at the centre of the video) are identified on the
basis of their make and model).
There are a number of modes for finding the code, based on the known information regarding
the device:
Known
What to do
information
Select the make from the list on the right side of the screen
make and/or
Find the model of the device in the central column
model
Double click on the model identified
Enter the model, or a portion of the model, in the "SEARCH" field and
press the related key
only the
Scroll the list obtained in this fashion to find the model from among the
model
possible makes
Double click on the model identified
Enter the code directly in the field of the memory desired
Code
There are also a number of possible methods for selecting and entering the code
• Selecting the memory desired with a click and entering the code manually
•
•
Selecting the memory desired with a click and double clicking on the code identified
(using this technique, the program activates the next memory)
Clicking with the right key on the code identified and selecting the desired memory (on
the simultaneous menu that appears).
5.1.3.
Programming
The software programs the remote control with the codes previously identified.
As during the identification phase, the remote control is simply brought near the programmer,
after the two opposing keys (right arrow and left arrow) have been pressed at the same time,
until the remote control led begins to blink.
Using the signal intensity bar, the program shall indicate the correct positioning of the remote
control, while the progress bar shall show the stage of completion of the programming
operation.
During the programming, a blinking yellow signal light will appear, turning green when the
programming is completed.
At the end of this operation, the remote control is ready to be used normally.
5.2. Advanced functional features
5.2.1.
Updating of the database
New markets are placed on the market daily, together with their remote controls; this software
uses a database that, at the time of the writing of the present booklet, contains more than
100,000 entries and is constantly updated. If you wish to add new codes to your software,
simply carry out the few easy-to-follow steps described below.
To update the catalogue, an active Internet connection is necessary. First the connection must
be made, and then the item ‘Update Catalogue?is selected from the ‘Update?menu.
Certain software for the protection of PCs (antivirus / firewall) could prevent connection or make
necessary configuration operations.
Should you find yourself on a network where Internet is accessed by proxy, you must set the
configuration of the necessary parameters on the configuration menu, requesting the
information from the network administrator (the software uses standard http requests on port
80).
By selecting the item “Information” from the “Guide” menu (see paragraph 5.2.3 of this manual),
you can control the date on which the database was last updated.
5.2.2.
Configuration
When the item “configuration “is selected from the “configuration” menu, the following mask
shall appear
Internet Connection
Direct/Through proxy: Select the type of connection, based on your own configuration.
Proxy server/Proxy port If your connection is made through a proxy, enter the relevant
information in the proper spaces
Language Select your language
Characters ignored in search Enter the characters that should be ignored while the database
is searched. Suggested entries include: -. (space, minus sign, period)
Automatic search
Activated/Deactivated While you write in the search field, the system automatically carries out
the search; click on the box to activate or deactivate the automatic search.
Delay Select the amount of time the system should wait before initiating the automatic search
Search by type Activated/Deactivated: Makes available or withholds the field for filtering the
display of the codes on the base of the type of device (TV, VCR, DVD, etc)
5.2.3.
My database
You can have own library. The code data of Remote control in factory database can be inserted
into my database, can also is the code data of learned.
5.2.4.
Set up own Remote library by learning
After search, the make and model you need can’t be found yet, you may look for another
remote of same model, then learn it into your PC according to software instructions. After all
keys has been learned, you may store this remote’s make and model to setup your own remote
library for later usage.
Usb cable connected to your computerusb first, then learning button will be enabled.The led
lamp of PROGRAMMER will be turned on when select the learning button,then press the key of
learned remote control against PROGRAMMER. the software UI will show the decoding status.
5.2.5.
Save learned code file
After learned your own remote code datas,you can save them with txt file or add to my
database.
5.2.6.
Open ir code file
5.2.7.
Uploading own Remote library to library server
If you are kind enough, you may upload your own remote library to library server. Once one or
some of remote data is adopted, your name perhaps will be appear in library origin.
5.2.8.
Information
When the “Guide” Menu is selected, followed by the item “Information” a mask containing the
following information shall appear:
• Name and version of the program
• Date on which the database was last updated
• Version and serial number of the connected programmer
6. Appendices
6.1. Table of types
COMBI
DVD
HIFI
RTV
RVC
SAT
TV
VCR
DVR
TV models with built-in Dvd/Vcr readers
Dvd, Vcd models
Hi-fi stereo, video dsp models and audio devices in general
Original TV remote control models
Original Vcr, Dvd, Vcd remote control models
Analogue/satellite and DTT receiver models
Tv, Lcd and Plasma models
Vcr models
DVR models
6.2. Solving common problems
PROBLEM
The remote control does not
blink
The remote control blinks
continuously
Certain keys do not work
I cannot find a function/key
The programmer does not
blink
The programmer blinks
continuously
The software does not
dialogue with the remote
control
The update does not function
The software does not display
any of the table columns
CAUSE
Batteries dead or inserted
incorrectly
The remote control has not
been correctly programmed
SOLUTION
Control the batteries
Program the remote control
Depending on the code programmed, the same
functions as the original remote control will be available,
meaning that some keys may not be active
An appendix to the section Map of standard
keys/functions contains the table with the functions of
the original remote control
The operating system has not The programmer may be used with the WINDOWS
been recognised
systems, version 98SE onward.
The USB port used is not
Consult the documentation for your PC or try another
active
port
The programmer blinks at a frequency of approximately
This is normal
one second to indicate that it is correctly inserted and in
operation
To operate properly, the remote control must be placed
Distance too far
roughly a centimetre from the programmer and aligned
with it
Control that the programmer blinks more rapidly during
The programmer is not active
the recognition phase
The remote control is not
Make sure that the remote control led blinks
active
The remote control and the
The programmer and the related software are designed
programmer are not correctly
to program only compatible remote controls
matched
Lack on Internet connection
Make sure that the connection is active
Control that the software protecting the pc is not
Firewall or antivirus
preventing connections to the program
The software carries out the update only through a direct
Proxy not configured or
connection or by means of a proxy without an access
protected by a password
control
Modify the size of the columns by selecting the far upper
Non-standard font size
right
This is correct
For any other problems or doubts, please contact us directly or via email ([email protected]) .
6.3. Rapid start-up
•
•
•
Connect the IR-50 programmer to an available USB port
Download the software from http://www.remotecontrols.gr and unzip it.
Install the program.
•
•
•
Start-up the program.
Insert the batteries in the IR-100 programmable remote control.
Push the right and left arrow buttons of the remote control together, until the led starts to
blink, and position the remote control roughly two centimetres from the programmer
• Wait for recognition by the program
• Select the make and the model of the device(s) desired
• Push the “PROGRAM” button
• Push the right and left arrow keys of the remote control together, until the led starts to
blink, and position the remote control roughly two centimetres from the programmer
When the light turns green, indicating that the programming has been completed
The remote control is ready to be used normally.
The memory is not lost when batteries are changed.
It may be reprogrammed at any point in time.
6.4. Correlation table of keys
Search for the symbol of the desired function in the columns; once you have found it, push the
corresponding key on the remote control (shown in the first column), having first activated the
SHIFT key if it belongs to a red column.