1
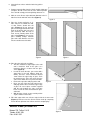
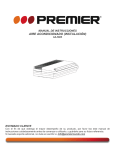
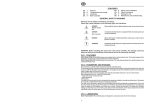
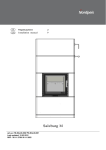
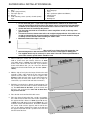
SHOWER WALL INSTALLATION MANUAL
The wall package contains:
1. Glass
2. U-laths (long and short)
3. Telescopic pipe set
4. Silicone
5. U-lath fastening screws (3,5x30) + dowels (5x25) –
5 pcs.
!
Following instruments are necessary:
1. Measuring tape
2. Level
3. Drill + perforators (Ø5mm and Ø8mm)
4. Silicone pistol
5. Screwdriver
6. Marking tool
In case of frosted glass – if you install a right-handed door in addition to the shower wall,
leave the frosted side to the outer side of the shower corner. If you install a left-handed door
in addition to the shower wall, leave the frosted side to the inner side of the shower corner.
Shower wall must be installed by two persons
The glass edge should in no circumstances contact tough floor or wall, as this may cause
glass break-up
This manual assumes shower room walls to be straight and perpendicular. If the walls are not
straight and perpendicular, the measurements mentioned in this manual should be changed
according to actual situation when installing the shower cabin
Maximum allowed floor slope is 1cm/1m
The shower cabin can be installed on floor as well as on shower base with appropriate size
Before drilling holes in wall check that there are no wires or water pipes in drilling place
The supplied dowels may be used only on stone walls. If the wall is made of plasterboard or
some other material, special dowels should be used
1. When installing the shower wall, you should consider the
width of shower door (80 or 90cm). Measure off 79cm
(door width 80cm) or 89cm (door width 90cm) from the
shower room corner and mark the wall. If you install the
shower wall without door, you can choose the distance
between the U-lath and the wall at your discretion (79cm –
100cm).
2. With the help of level, place the longer U-lath on the wall
vertically. U-lath’s edge should be on the same level with
marked dot and U-lath’s end should rest against floor
(Figure 1). Mark the lath’s holes on the wall and take the
lath away from the wall (if the marks are on edges of
ceramic tiles, try to turn the lath and make new marks).
3. Drill holes in marked places (Ø5mm, depth 30-35mm). Do
not use drill’s percussion mode in order to avoid tile breakup. Then blow dust off the holes, push the dowels into
the holes, and ensure that the outer end of dowel does
not jut out of the wall.
Figure 1
4. Place the lath on the wall and fix it with screws.
5. Place the shorter U-lath on the floor, set lath’s end against
the U-lath fixed on the wall. Place the U-lath in parallel with
the opposite wall at a distance of 79cm (door width 80 cm)
or 89cm (door width 90cm) from the wall (Figure 2). If you
install the shower wall without door, the distance between
the shorter U-lath and the opposite wall should be the
same as the distance between the U-lath on the wall and
the opposite wall. Mark the lath’s position on the floor and
take the lath off the floor.
Figure 2
6. Clean the floor surface under the lath using spirit or
acetone.
7. Remove protective film from the U-lath’s double-sided tape
and place the lath on the floor in to the marked position.
Press the lath strongly and evenly during about 30 sec.
8. Make an even silicone stripe with 6mm diameter in the Ulaths fixed on the wall and on the floor (Figure 3).
Figure 3
9. Place the shower wall glass in Ulaths and press it towards the wall,
so that silicone should stick the
glass (Figure 4). Do not push the
glass too strongly towards the U-lath
fixed on the wall as this may cause
glass break-up! With the help of
level, ensure vertical position of the
glass edge (Figure 5). If necessary,
place auxiliary wedges between
glass and U-lath. Remove excessive
silicone extruded out of the laths.
Figure 4
10. Place the telescopic tube as follows:
The tube should be at right angles to the wall
and it should be fixed on the glass at a
maximum distance of 20cm from the glass
corner (Figure 6).
In order to fasten the tube, you need to drill a
dowel hole in the wall (Ø8mm, depth 4550mm), the hole’s center should be situated
17mm above the upper edge of glass. Push
the dowel into the hole and ensure that the
outer end of dowel does not jut out of the wall.
Fix the telescopic tube wall plug on the wall.
Place one end of the telescopic tube into the
wall plug and the other end on the upper edge
of glass. Be sure to place cushions supplied
with the tube between the glass and tube
brace in order to avoid contact between glass
and metal.
With the help of level, ensure vertical position
of glass and then fix the tube.
Figure 5
Figure 6
11. Fill U-lath edges with even silicone stripe inside the shower room
(Figure 7). Remove excessive silicone. Silicon shall dry completely
in 24H. Do not spill water over silicone until it is completely dry.
Andrese Klaasi ja Dekoori AS
Betooni 7/9, Tallinn 11415
Telefon: 6 061 320
Faks: 6 061 332
Figure 7