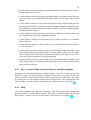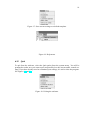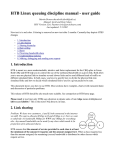
1
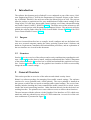
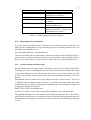
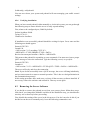
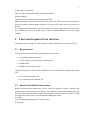
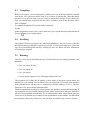
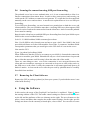
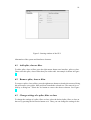
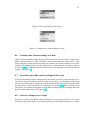
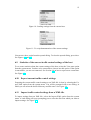
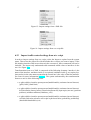
User’s Manual
Linux Traffic Control-Graphical User Interface – Group paketti2
Helsinki 18th December 2004
Software Engineering Project
UNIVERSITY OF HELSINKI
Department of Computer Science
Course
581260 Software Engineering Project (6 cr)
Project Group
Fabian Fagerholm
Janne Johansson
Markku Manner
Niko Mikkilä
Client
Jukka Manner
Project Masters
Juha Taina
Marianne Korpela
Homepage
http://www.cs.helsinki.fi/group/paketti2
Change Log
Version Date
Modifications
1.0
8.12.2004 First version
i
Contents
1 Introduction
1
1.1
Purpose . . . . . . . . . . . . . . . . . . . . . . . . . . . . . . . . . . .
1
1.2
Structure . . . . . . . . . . . . . . . . . . . . . . . . . . . . . . . . . . .
1
2 General Overview
2.1
Security Considerations . . . . . . . . . . . . . . . . . . . . . . . . . . .
1
2
3 Quick Install
2
4 Server
3
4.1
Requirements . . . . . . . . . . . . . . . . . . . . . . . . . . . . . . . .
3
4.2
Detailed Installation Instructions . . . . . . . . . . . . . . . . . . . . . .
4
4.2.1
Compiling . . . . . . . . . . . . . . . . . . . . . . . . . . . . .
4
4.2.2
Installing with Make Install . . . . . . . . . . . . . . . . . . . .
4
4.2.3
Configuration . . . . . . . . . . . . . . . . . . . . . . . . . . . .
4
4.2.4
Running the server manually . . . . . . . . . . . . . . . . . . . .
5
4.2.5
System Startup and Init Scripts . . . . . . . . . . . . . . . . . . .
5
4.2.6
Verifying installation . . . . . . . . . . . . . . . . . . . . . . . .
6
Removing the Server Software . . . . . . . . . . . . . . . . . . . . . . .
6
4.3
5 Client and Graphical User Interface
7
5.1
Requirements . . . . . . . . . . . . . . . . . . . . . . . . . . . . . . . .
7
5.2
Detailed Installation Instructions . . . . . . . . . . . . . . . . . . . . . .
7
5.3
Compiling . . . . . . . . . . . . . . . . . . . . . . . . . . . . . . . . . .
8
5.4
Installing . . . . . . . . . . . . . . . . . . . . . . . . . . . . . . . . . .
8
5.5
Running . . . . . . . . . . . . . . . . . . . . . . . . . . . . . . . . . . .
8
5.6
Securing the connection using SSH port forwarding . . . . . . . . . . . .
9
5.7
Removing the Client Software . . . . . . . . . . . . . . . . . . . . . . .
9
6 Using the Software
9
6.1
Add qdisc, class or filter . . . . . . . . . . . . . . . . . . . . . . . . . .
10
6.2
Remove qdisc, class or filter . . . . . . . . . . . . . . . . . . . . . . . .
10
6.3
Change settings of a qdisc, filter or class . . . . . . . . . . . . . . . . . .
10
ii
6.4
Connecting to a host from the GUI . . . . . . . . . . . . . . . . . . . . .
12
6.5
Disconnect from the host . . . . . . . . . . . . . . . . . . . . . . . . . .
13
6.6
Commit your current settings to a host . . . . . . . . . . . . . . . . . . .
14
6.7
Load current traffic control settings from a host . . . . . . . . . . . . . .
14
6.8
Current settings as a tc script . . . . . . . . . . . . . . . . . . . . . . . .
14
6.9
Statistics of the current traffic control settings of the host . . . . . . . . .
15
6.10 Export current traffic control settings . . . . . . . . . . . . . . . . . . . .
15
6.11 Import traffic control settings from a XML-file . . . . . . . . . . . . . . .
15
6.12 Import traffic control settings from a tc script . . . . . . . . . . . . . . .
17
6.13 Save current traffic control settings as a default template . . . . . . . . .
18
6.14 Help . . . . . . . . . . . . . . . . . . . . . . . . . . . . . . . . . . . . .
18
6.15 Quit . . . . . . . . . . . . . . . . . . . . . . . . . . . . . . . . . . . . .
19
References
20
1
1 Introduction
The software development project Paketti2 is was conducted as part of the course “Software Engineering Project”, held by the Department of Computer Science at the University of Helsinki. Paketti2 is the successor to the first Paketti project of 2003. The projects
aimed to produce a graphical tool for easy modification of traffic control settings in the
Linux kernel. To learn more about traffic control settings, read Linux Advanced Routing
and Traffic Control (LARTC) HOWTO [Hub04]. The future users of the software are the
various research groups at the Department of Computer Science. The university will also
publish the software under either the GNU General Public License [FSF91] or the GNU
Lesser General Public License [FSF99].
1.1 Purpose
This user’s manual describes how to compile, install, configure and use the Paketti software on a personal computer running the Linux operating system kernel. Software and
hardware requirements, installation and uninstallation procedures, and an explanation of
the user interface are covered in this document.
1.2 Structure
Section 2 gives an overview of the software and security considerations regarding the software. Section 4 describes how to install, configure and uninstall the Control Component
of the software. Section 5 describes how to install and uninstall the graphical user interface. Section 6 decribes how to use the graphical user interface in order to successfully
change the traffic control settings.
2 General Overview
This section provides an overview of the software and related security issues.
Paketti is a software package for managing Linux traffic control settings. The software
consists of a server (pakettid) and a client (paketti). The server pakettid is installed on
the systems on which the user needs to manage traffic control settings. The service functionality includes invoking the Linux command line traffic control tool tc which, in turn,
invokes the kernel networking interface. Other functions directly invoke the kernel networking interface. The pakettid server runs with root access to achieve these functions.
The user interacts with the software via the Graphical User Interface or GUI, which communicates with any pakettid server using a TCP/IP connection. An overview of the software architecture is presented in Figure 1.
2
Software
STCCP
Control component
GUI
(client)
Abstractionlevel
(LQL)
tc
Linuxkernel
User
Figure 1: Overview of the software.
2.1 Security Considerations
This software does not provide methods of any kind for authenticating or encrypting the
data communication between the software components. In addition, the Control Component runs under system administrator (root) privileges. Even the ordinary use of the
software should be considered a severe security hazard.
The user of this software must acknowledge all the potential security risks that it has. The
authors of this software take no liability of any possible damages or harm of any kind
caused by the use of the software.
3 Quick Install
Use these instructions to install both the paketti GUI and the pakettid server on your
Linux system. The software will be installed with default options and is suitable for most
cases. If you want more control over the installation process, please refer to the detailed
instructions in the following sections.
Note that these instructions are mostly for trying out the software. For a complete installation, refer to the detailed instructions in Section 4.
3
• Extract the paketti project package using tar xzf paketti-project.tar.
• cd to the paketti-<version> directory, created in the previous step.
• Run the make command to build the software.
• Run the make install command to install the software.
Should the first two steps fail, please consult your system documentation on how to extract
tar files and navigate the file system. If the last two steps fail, please try the detailed
instructions below.
For instructions on how to run the programs, please refer to sections 4.2.4 and 5.5.
4 Server
The server (control component) is a daemon that runs on the Linux machine subject to
management of the traffic control settings. The server manages the settings and makes
sure they are loaded on startup. This requires running the server at all times, and not
changing the settings using any other tool.
4.1 Requirements
Your system must meet the following minimum hardware requirements:
• A standard personal computer
• 64 MB RAM
• 20 MB hard disk space
Your system must also have the following software installed:
• CSL 2 Linux, supported kernel version is 2.6.x.csl. (Other Linux distributions may
work, but are not supported. Specifically, you need the Advanced Routing and
Traffic Control options turned on. Please see [Hub04] for details.)
• TCP/IP networking interface
• Linux software package iproute2, inludes the tc binary
• GNU glibc 2.3.1
The following software is also required for compiling the software:
• gcc 3.3.3
• libxml-library
• libxslt-library
4
4.2 Detailed Installation Instructions
Before following these instructions, please extract the pakettid-<version> package and
change to the created directory as follows. The following instructions assume that you
have the Paketti project CD mounted on /mnt/cdrom and have some free space available
in /tmp for temporary actions such as extracting and building the source.
$ cd /tmp
$ tar xzf /mnt/packages/pakettid-<version>.tar.gz
$ cd pakettid
4.2.1 Compiling
Before you compile, you can change the variables at the top of the file Makefile to match
your needs. Use a plain text editor such as vi or Emacs to edit the file. Note that unless
you have a very special setup, you won’t need to touch these settings.
To compile the pakettid server, run the make command:
$ make
If the compilation causes errors, please make sure your system meets the requirements in
Section 4.1 and try to compile again.
4.2.2 Installing with Make Install
Before installing, make sure you have successfully compiled the server. If you have not,
the build system will attempt to do so. The pakettid program is installed in the location
specified by the BINDIR variable in the Makefile. To install, run the following command:
$ make install
The installation will also create a number of directories to keep the server’s private files, as
well as a default configuration file. Note that you need root access to run the installation.
After the installation is complete, proceed to configure and start it.
4.2.3 Configuration
The server’s configuration file is installed as /etc/pakettid.conf by default. You may
choose any location, but unless you know what you are doing, it is advisable to keep
the default location.
The parameters that can be set in the configuration file in described in Table 1.
Unless you have very specific needs, the default values should be kept. The most common
thing to change is probably the port number. If you experience connection problems, this
is one of the things to look out for.
5
Variable and default
IP=127.0.0.1
PORT=20000
LOGDIR=/var/log
STATEDIR=/var/lib/pakettid
IDLE=0
Comment
The IP address of the interface
which the server listens to.
The port to which the server listens.
The directory to which log files will
be written.
The directory in which the server
state file will be saved.
Number of seconds until an idle
connection should be closed. Not
implemented in version 2.
Table 1: pakettid configuration file parameters.
4.2.4 Running the server manually
If you just want to try pakettid, you can choose to run it when you want. In this case, just
make sure the configuration is set up, and when you want to start the pakettid server, run
the following command as root:
$ /usr/local/sbin/pakettid -f /etc/pakettid.conf
The server will fork into the background. Note that it will run until excplicitly killed, or
until you reboot. Also note that if you kill the server, the traffic control settings will be in
place. If you reboot, however, they will not be loaded until you start the pakettid server.
4.2.5 System Startup and Init Scripts
For the pakettid server to work properly, it should be started as part of the system initialization process. The so-called init process runs at system startup, and will start init scripts
to spawn the different servers and programs that you are used to seeing when you boot
up your Linux system. Please consult your system documentation for details on the init
process.
The pakettid software comes with a ready-made init script to start the server. This script
is installed in the installation phase. However, if you have choosen to place the server
configuration file in another location than /etc/pakettid.conf, you will need to edit the init
script and modify the line that says
PAKETTID_CONF=/etc/pakettid.conf
to reflect your choice. If you haven’t made this modification, you can ignore this.
The pakettid installation does not automatically activate the pakettid server. This choice
reflects the fact that this server is considered insecure by default, and you must be aware of
the implications of running it. If you decide to run it, please issue the following commands
as root:
6
$ chkconfig –add pakettid
You can now reboot your system and pakettid will start managing your traffic control
settings.
4.2.6 Verifying installation
When you have started pakettid, either manually or via the init system, you can go through
the following steps to ensure that the server is really up and running.
First, telnet to the configured port, 20000 by default:
$ telnet localhost 20000
Trying 127.0.0.1...
Connected to localhost.
If installation was successfull, pakettid should be waiting for input. Press enter and the
following text should appear:
Protocol:STCCP/2
Length:120
<?xml version="1.0" encoding="UTF-8"?>
<MESSAGE><TYPE>ERROR</TYPE><DATA>
Reveiced an unexepted newline.</DATA></MESSAGE>
This ensures that pakettid is responding to your commands. You must now issue a proper
QUIT message to close the connection. Type the following exactly as specified:
Protocol:STCCP/2
Length:64
<?xml version="1.0"?><MESSAGE><TYPE>QUIT</TYPE><DATA/></MESSAGE>
The server will reply and close the connection.
Note! If you do not successfully issue a QUIT message, the server will hang indefinitely,
and you must restart it to return to normal operation. This is due to a design limitation in
the communication protocol.
If this testing procedure fails, make sure you have all the necessary software installed. If
neccessary, remove the software and reinstall it. Then try to test again.
4.3 Removing the Server Software
If you decide to remove the pakettd server from your system, please follow these steps.
Note that if you changed the Makefile variables in the installation step, you should make
sure they are set that way before proceeding.
First, disable the starting of the server in the init process. You don’t need to do this if you
decided to run the server manually only. Issue the following command as root:
7
$ chkconfig –del pakettid
Then, to remove all installed files, run make uninstall:
$ make uninstall
This will remove all files that the program installed.
Note! The traffic control state file will also be removed! This means that if you haven’t
saved your traffic control settings using the GUI, they will be gone when you restart your
system.
To complete the uninstallation, you can restart your system. This only needs to be done
if you installed the server as an init service. This step ensures that the server is no longer
running.
5 Client and Graphical User Interface
The traffic control settings are edited with the client’s Graphical User Interface (GUI).
5.1 Requirements
Your system must meet the following hardware requirements:
• A standard personal computer.
• A CPU capable of running Swing applications.
• 64MB RAM.
• 20MB of free hard disk space.
The following software must also be installed on your system prior to installing the paketti
GUI:
• Java 2 Standard Edition 5.0
• Java 2 Runtime Environment 5.0
5.2 Detailed Installation Instructions
Before following these instructions, please extract the paketti-<version> package and
change to the created directory as follows. The following instructions assume that you
have the Paketti CD mounted on /mnt/cdrom and have some free space available in /tmp
for temporary actions such as extracting and building the source.
$ cd /tmp
$ tar xzf /mnt/packages/paketti-<version>.tar.gz
$ cd paketti
8
5.3 Compiling
Before you compile, you can change the variables at the top of the file Makefile to match
your needs. Use a plain text editor such as vi or Emacs to edit the file. Note that unless
you have a very special setup, you won’t need to touch these settings. Even if that is the
case, you should only need to modify the JAVA variable to point to the directory where
Java is installed.
To compile the paketti GUI, run the make command:
$ make
In the compilation causes errors, please make sure your system meets the requirements in
Section 4.1 and try to compile again.
5.4 Installing
The paketti GUI does not require any additional installation. You can, however, take the
file named paketti.jar and place it anywhere you like. If your system supports it, you could
copy it to your desktop and start it by clicking its icon. See below for more information
on running the program.
5.5 Running
The GUI can be run in four different ways, of which three involve starting from the command line:
• java -jar paketti IP Port
• java -jar paketti IP
• java -jar paketti
• If your system supports it, by clicking the paketti.jar icon.
The parameter IP is either the IP address or host name of the target system where the
pakettid server is running. Use localhost if you are running the GUI on the same machine
as the pakettid server and the server is configured to listen to address 127.0.0.1. The Port
parameter is the port to which pakettid listens.
The first command form will try to connect to the specified host and port during startup. If
the connection was successfull, paketti will start with a connection to that host. Otherwise
paketti will start without a connection. The second command form works like the previous
except it will, by default, try to connect to the specified host on port 20000. The third form
starts paketti without any connection. The last form is available only on some systems.
9
5.6 Securing the connection using SSH port forwarding
The pakettid server has no user authentication, so it is not recommended to allow it to
listen to connections from remote hosts. In order to have some privacy and security you
could run the GUI without a connection and generate TC scripts that can be transferred
manually on the server and run there. A much easier option however is to use SSH port
forwarding.
To use SSH port forwarding, you need normal user permissions on both the server and
client machines. The server machine must have a working SSH server that supports SSH
protocol version 2 and can be connected to from the client host. And of course the pakettid
server must be running.
Run ssh on the client host to establish SSH port forwarding from local port 10000 to port
20000 on the server localhost interface:
$ ssh -N -L 10000:localhost:20000 username@serverhost
Here -N tells SSH to only forward ports and not to open a shell. Port 10000 is the local
port which ssh listens to on the client machine. Rest of the -L parameter, localhost:20000
correspond to parameters that you would give to the GUI when it is run on the server.
Now start the GUI:
$ java -jar paketti.jar localhost 10000
When SSH notices that the GUI tries to connect to port 10000, it forwards the connection
to the server machine, port 20000. Pakettid will only see a local connection to its port and
has no idea that someone could be using it from the other side of the world.
There are some things to note: even as the connection is now encrypted between the
client and server machines, messages are converted to clear text as soon as they arrive to
the SSH server or the client. Locally the connection is still unencrypted and open to all
kinds of attacks. At least on the server side the port used by pakettid must be carefully
firewalled from outsiders.
5.7 Removing the Client Software
Remove the GUI jar package (paketti.jar) from your system, if you decided to move it out
of the build directory.
6 Using the Software
In this section, the usage of the Graphical User Interface is explained. Figure 2 shows
the starting window of the GUI. The traffic control settings are shown as an editable tree
on the left and the attributes of the tree elements on the right. The tree elements are the
qdiscs, classes and filters that comprise the traffic control settings. On the right, specific
settings are shown for the currently selected qdisc, class or filter. You can also see some
10
Figure 2: Starting window of the GUI.
information of the system and interfaces elements.
6.1 Add qdisc, class or filter
To add a qdisc, class or filter, press the right mouse button on a interface, qdisc or class.
Then, select the qdisc, class or filter that you wish to add. An example is shown in Figure
3.
6.2 Remove qdisc, class or filter
To remove a qdisc, class or filter, press the right mouse button on it and select remove.Doing
this will remove every qdisc, filter and class beneath the selected one. The removal is verified by a dialog box. Select the Yes button to remove the chosen element. See Figure
4.
6.3 Change settings of a qdisc, filter or class
To change the settings of a qdisc, filter or class, select the desired qdisc, filter or class on
the tree by pressing the left mouse button on it. Then, you can change the settings in the
11
Figure 3: How to add qdiscs, filters and classes.
Figure 4: How to remove qdiscs, filters or classes.
12
Figure 5: How to change settings of qdiscs, filters or classes.
right hand detail view. Some settings are shown as drop-down, some as a drop-down and
a text field (settings that have a value in different untits such as bits or bits/s) and others
as a plain textfield. See Figure 5.
When editing the value of a textfield, the text will be shown in red if the value is invalid
and in black if it is valid. From the drop-down menu, simply choose the value you want
for this setting.
When changing a setting of a field that has a drop-down with variables bytes, kbits, kbytes,
mbits or mbytes, you can enter the desired value in the textfield, and set the unit of your
choice by choosing from the drop-down menu. You can also write the desired value,
followed by the letter k to automatically change the setting to kbytes or by the letter m to
change the setting to mbytes.
Similar keyboard shortbuts are provided for fields with units bits/s, bytes/s, kbits/s, kbytes/s,
mbits/s or mbytes/s. The keyboard shortcuts for these are kbit for kbits/s or mbit for mbits
per second. To choose the other units, please make a selection in the drop-down menu.
6.4 Connecting to a host from the GUI
You can connect to a new host from inside the GUI by selecting the connect option from
the system menu. The connect option will only be available if you are not currently
13
Figure 6: How to connect to a host from inside the GUI.
Figure 7: Connection dialog.
connected. If you are connected to a host, you have to disconnect from it before opening
another connection. A connection dialog will open, prompting you for a host address and
a port. Press the connect button in order to connect. If you want to cancel the connect,
press cancel. If the connection was successfully established, you will be asked if you
want to load current traffic control settings from the host. See Figures 6 and 7.
6.5 Disconnect from the host
To disconnect from the current host, select the disconnect option from the system menu.
A confirmation dialog will be displayed, to ensure that you do now disconnect by mistake.
See Figure 8.
14
Figure 8: How to disconnect from a host.
Figure 9: Commit your current settings to a host.
6.6 Commit your current settings to a host
When you have finished making changes to the current tree and you want to commit your
traffic control settings to a host, select the commit option from the system menu. This
requires having a connection open to the host to which you want to commit your current
settings. The commit option is not available if you are not connected. In order to connect,
see Section 6.4. A confirmation dialog will ask for your permission to commit the current
settings. See Figure 9.
6.7 Load current traffic control settings from a host
To load current traffic control settings from a host when you have a connection open to it,
select the Load from daemon option from the system menu. A confirmation dialog will
ask for your permission to replace the current settings in the GUI with the settings from
the chosen host. If you do not have a connection, see Section 6.4. When opening a new
connection, you will have the option of immediately loading the current settings from the
host you have connected to. See Figure 10.
6.8 Current settings as a tc script
In order to see the current traffic control settings as a tc script, select the View as tc script
option from the system menu. A new dialog will open, showing the settings as a tc script.
15
Figure 10: Loading settings from the current host.
Figure 11: Tc script demonstration of the current settings.
You can save the tc script from the opened dialog. To close the opened dialog, press close.
See Figures 11 and 12.
6.9 Statistics of the current traffic control settings of the host
To see some statictics about the current settings of the host, select the View stats option
from the system menu. You have to be connected to a host to use this option. If the option
is unavailable, you are not connected. See Section 6.4 on how to open a new connection.
See Figure 13.
6.10 Export current traffic control settings
Exporting the current traffic control settings to an XML-file is done by selecting the Export XML option from the system menu. You will be prompted with a save dialog, in
which you can select the desired directory and file name. See Figure 14.
6.11 Import traffic control settings from a XML-file
To import settings from an XML file, select the Import XML option from the system
menu. A load dialog will open, prompting you to select the file from which you want to
import settings. See Figure 15.
16
Figure 12: Tc script dialog.
Figure 13: View statistics of host’s current traffic control settings.
Figure 14: Export settings to a XML-file.
17
Figure 15: Import settings from a XML-file.
Figure 16: Import settings from a tc script file.
6.12 Import traffic control settings from a tc script
In order to import settings from a tc script, select the Import tc option from the system
menu. Then select the proper file which includes the tc scripts you want to import. If the
file includes interfaces that are not shown in the current tree, those commands will not be
included. The import only understands add commands which relate to interfaces in the
tree. See Figure 16.
Transformation from tc to XML is composed of the following elements: interface is the
name of the interface, attributes inside () are optional, attributes inside [] are required options and twice the same name means that the second one is the value of the first attribute.
See Lartc for more information [Hub04]. The syntax understood by the transformation
from tc to xml is of the following form:
• tc qdisc add dev interface parent parent (handle handle) (estimator interval timesec)
[pfifo | bfifo] (limit limit)
• tc qdisc add dev interface parent parent (handle handle) (estimator interval timesec)
tbf (limit limit) (latency latency) burst burst(/burstcell) (mpu mpu) (rate rate) (peakrate
peakrate) (minburst minburst(/minburst_cell))
• tc qdisc add dev interface parent parent (handle handle) (estimator interval timesec)
red limit limit min min max max avpkt avpkt burst burst (probability probability)
(bandwidth bandwidth) (ecn)
18
• tc qdisc add dev interface parent parent (handle handle) (estimator interval timesec)
htb (default default) (r2q r2q)
• tc qdisc add dev interface parent parent (handle handle) (estimator interval timesec)
cbq (allot allot) avpkt avpkt bandwidth bandwidth (cell cell) (mpu mpu) (ewma
ewma)
• tc class add dev interface parent parent classid classid cbq (weight weight) prio prio
allot allot avpkt avpkt rate rate (bandwidth bandwidth) (maxburst maxburst) (minburst minburst) (minidle minidle) (bounded) (isolated) (split split defmap defmap)
(estimator timesec interval)
• tc class add dev interface parent parent classid classid htb rate rate (burst burst) (ceil
ceil) (cburst cburst) (prio prio) (quantum quantum)
• tc filter add dev interface parent parent prio prio protocol protocol u32 (estimator
interval timesec)
• tc filter add dev interface parent parent prio prio handle handle protocol protocol
u32 divisor divisor
• tc filter add dev interface protocol parent prio u32 ht handle handle:(hashtable_entry):
order order (match selector pattern (mask) (offset at (nexhdr+)offset)) (police (index
index) (buffer buffer) (burst burst) (maxburst maxburst) (mtu mtu) (avrate avrate)
(rate rate) (peakrate peakrate) action) flowid flowid
• tc filter add dev interface protocol parent prio u32 ht handle handle:(hashtable_entry):
order order (match selector pattern (mask) (offset at (nexhdr+)offset)) hashkey mask
mask at offset (link link)
6.13 Save current traffic control settings as a default template
Saving current bandwidth settings as a default template will set the current tree to be the
default tree when you open the software without a connection. Every time you open the
software without a connection, the saved default settings will be loaded. This can be done
by selecting the save as template option from the system menu. The command does not
check whether or not the current computer has the current interfaces. See Figure 17.
6.14 Help
You can get additional help from the Help menu. The About option shows information
about the software versions and the authors. The Table of contents option will open the
help browser, in which you can see more details of the software. See Figure 18.
19
Figure 17: Save current settings as a default template.
Figure 18: Help menu.
6.15 Quit
To quit from the software, select the Quit option from the system menu. You will be
prompted to make sure you want to quit and possibly lose the current traffic control settings. If you have already saved or committed your settings, it is safe to close the program.
See Figures 19 and 20.
Figure 19: Exiting the software.
20
Figure 20: Quit confirmation.
References
FSF91
Gnu general public license, 1991.
licenses/gpl.html.
URL http://www.gnu.org/
FSF99
Gnu lesser general public license, 1999. URL http://www.gnu.org/
licenses/lgpl.html.
Hub04
Hubert, B. et. al., Linux advanced routing and traffic control (lartc) howto,
2004. URL http://lartc.org/howto/.