1
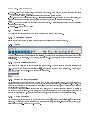
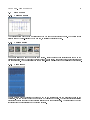
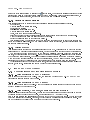
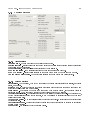
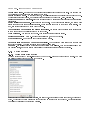
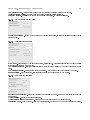
Ksenos DVR User's Manual, release D © Turun Turvatekniikka Oy September 11, 2008 Contents 1 User Interface 1.1 1.2 1.3 1.4 1.5 3 Main window . . . . . . . . . . . . . . . . . . . . . . . . . . . . . . . . . . . . . . . . . . . . . . . 3 1.1.1 Icons . . . . . . . . . . . . . . . . . . . . . . . . . . . . . . . . . . . . . . . . . . . . . . . . 3 1.1.2 Menus . . . . . . . . . . . . . . . . . . . . . . . . . . . . . . . . . . . . . . . . . . . . . . . 3 Camera views . . . . . . . . . . . . . . . . . . . . . . . . . . . . . . . . . . . . . . . . . . . . . . . 4 1.2.1 Organizing cameras . . . . . . . . . . . . . . . . . . . . . . . . . . . . . . . . . . . . . . . 4 1.2.2 Menus . . . . . . . . . . . . . . . . . . . . . . . . . . . . . . . . . . . . . . . . . . . . . . . 4 1.2.3 Saving customized views . . . . . . . . . . . . . . . . . . . . . . . . . . . . . . . . . . . . . 4 1.2.4 Saving an individual image 4 1.2.5 Device functions . . . . . . . . . . . . . . . . . . . . . . . . . . . . . . . . . . . . . . . . . . . . . . . . . . . . . . . . . . . . . . . . . . . . . . . . . . . . 4 1.2.5.1 XeCap settings . . . . . . . . . . . . . . . . . . . . . . . . . . . . . . . . . . . . . 5 1.2.5.2 Remote settings 5 . . . . . . . . . . . . . . . . . . . . . . . . . . . . . . . . . . . . Live image . . . . . . . . . . . . . . . . . . . . . . . . . . . . . . . . . . . . . . . . . . . . . . . . . 5 1.3.1 Menus . . . . . . . . . . . . . . . . . . . . . . . . . . . . . . . . . . . . . . . . . . . . . . . 5 1.3.2 Pan/Tilt/Zoom Camera Control . . . . . . . . . . . . . . . . . . . . . . . . . . . . . . . . 5 . . . . . . . . . . . . . . . . . . . . . . . . . . . . . . . . . . . . . . . . . . . . . . . . 6 1.4.1 Calendar search . . . . . . . . . . . . . . . . . . . . . . . . . . . . . . . . . . . . . . . . . . 6 1.4.2 Camera search . . . . . . . . . . . . . . . . . . . . . . . . . . . . . . . . . . . . . . . . . . 6 1.4.3 Time search . . . . . . . . . . . . . . . . . . . . . . . . . . . . . . . . . . . . . . . . . . . . 6 1.4.4 Area search . . . . . . . . . . . . . . . . . . . . . . . . . . . . . . . . . . . . . . . . . . . . 7 1.4.5 Viewer controls . . . . . . . . . . . . . . . . . . . . . . . . . . . . . . . . . . . . . . . . . . 7 1.4.6 Exporting video 7 Recordings 1.4.6.1 Single camera image . . . . . . . . . . . . . . . . . . . . . . . . . . . . . . . . . . 7 1.4.6.2 Multiple cameras in a single clip . . . . . . . . . . . . . . . . . . . . . . . . . . . 8 1.4.6.3 Creating a backup . . . . . . . . . . . . . . . . . . . . . . . . . . . . . . . . . . . 8 Image and Video Gallery 1.5.1 . . . . . . . . . . . . . . . . . . . . . . . . . . . . . . . . . . . . . . . . . . . . . . . . . . . . . . . . . . . . . . . . . . . . . . . . . . . . . . . . . 8 1.5.1.1 ... Using a recordable CD or DVD (Windows) 8 1.5.1.2 ... Using a recordable CD or DVD (Linux) . . . . . . . . . . . . . . . . . . . . . 8 1.5.1.3 ... Using a diskette, USB memory, or a ash memory card (Windows) . . . . . . 8 1.5.1.4 ... Using a USB memory, or a ash memory card (Linux) . . . . . . . . . . . . . 9 . . . . . . . . . . . . . . . . . . . 2 Installation and Settings 2.1 8 Exporting images and video clips from the recorder . . . . . . . . . . . . . . . . . . . . . . Settings 10 . . . . . . . . . . . . . . . . . . . . . . . . . . . . . . . . . . . . . . . . . . . . . . . . . . 10 2.1.1 Menus . . . . . . . . . . . . . . . . . . . . . . . . . . . . . . . . . . . . . . . . . . . . . . . 10 2.1.2 Program settings . . . . . . . . . . . . . . . . . . . . . . . . . . . . . . . . . . . . . . . . . 11 2.1.2.1 Visual settings . . . . . . . . . . . . . . . . . . . . . . . . . . . . . . . . . . . . . 11 2.1.2.2 2.1.3 Program settings . . . . . . . . . . . . . . . . . . . . . . . . . . . . . . . . . . . . 11 Device Settings . . . . . . . . . . . . . . . . . . . . . . . . . . . . . . . . . . . . . . . . . . 12 2.1.3.1 Adding or removing a device 12 2.1.3.2 General capturing devices . . . . . . . . . . . . . . . . . . . . . . . . . . . . . . . 13 2.1.3.3 XeCap series devices . . . . . . . . . . . . . . . . . . . . . . . . . . . . . . . . . . 13 2.1.3.4 Ksenos DVR server . . . . . . . . . . . . . . . . . . . . . . . . . . . . . . . . . . 13 2.1.3.5 Ksenos web server . . . . . . . . . . . . . . . . . . . . . . . . . . . . . . . . . . . 13 . . . . . . . . . . . . . . . . . . . . . . . . . . . . . 1 2 CONTENTS 2.1.4 2.1.5 Camera Settings . . . . . . . . . . . . . . . . . . . . . . . . . . . . . . . . . . . . . . . . . 13 2.1.4.1 Adding or removing a camera . . . . . . . . . . . . . . . . . . . . . . . . . . . . . 13 2.1.4.2 General Settings . . . . . . . . . . . . . . . . . . . . . . . . . . . . . . . . . . . . 14 2.1.4.3 XeCap cameras . . . . . . . . . . . . . . . . . . . . . . . . . . . . . . . . . . . . 16 2.1.4.4 General network cameras . . . . . . . . . . . . . . . . . . . . . . . . . . . . . . . 16 2.1.4.5 General settings for network cameras . . . . . . . . . . . . . . . . . . . . . . . . 16 2.1.4.6 Ksekam network cameras . . . . . . . . . . . . . . . . . . . . . . . . . . . . . . . 16 2.1.4.7 MPG440 network cameras . . . . . . . . . . . . . . . . . . . . . . . . . . . . . . 17 2.1.4.8 Axis network cameras . . . . . . . . . . . . . . . . . . . . . . . . . . . . . . . . . 17 2.1.4.9 Sony network cameras . . . . . . . . . . . . . . . . . . . . . . . . . . . . . . . . . 17 User Settings . . . . . . . . . . . . . . . . . . . . . . . . . . . . . . . . . . . . . . . . . . . 18 2.1.5.1 Adding and removing users . . . . . . . . . . . . . . . . . . . . . . . . . . . . . . 18 2.1.5.2 User permissions . . . . . . . . . . . . . . . . . . . . . . . . . . . . . . . . . . . . 18 3 Remote control 19 3.1 General information about remote control . . . . . . . . . . . . . . . . . . . . . . . . . . . . . . . 3.2 Installing a server . . . . . . . . . . . . . . . . . . . . . . . . . . . . . . . . . . . . . . . . . . . . . 19 3.3 Installing the client application 19 3.3.1 3.4 3.5 . . . . . . . . . . . . . . . . . . . . . . . . . . . . . . . . . . . . . Establishing a connection . . . . . . . . . . . . . . . . . . . . . . . . . . . . . . . . . . . . 19 . . . . . . . . . . . . . . . . . . . . . . . . . . . . . . . . . . . . . . . . . . . . . . . 20 Troubleshooting . . . . . . . . . . . . . . . . . . . . . . . . . . . . . . . . . . . . . . . . . . . . . . 20 HTTP server 3.5.1 Testing the TCP/IP connection . . . . . . . . . . . . . . . . . . . . . . . . . . . . . . . . . 20 3.5.2 Firewall . . . . . . . . . . . . . . . . . . . . . . . . . . . . . . . . . . . . . . . . . . . . . . 20 4 Appendices 4.1 19 21 Appendix A: Recommendations . . . . . . . . . . . . . . . . . . . . . . . . . . . . . . . . . . . . . 21 4.1.1 21 Hardware . . . . . . . . . . . . . . . . . . . . . . . . . . . . . . . . . . . . . . . . . . . . . 4.2 Appendix B: Technical details . . . . . . . . . . . . . . . . . . . . . . . . . . . . . . . . . . . . . . 22 4.3 Advanced settings 22 . . . . . . . . . . . . . . . . . . . . . . . . . . . . . . . . . . . . . . . . . . . . 4.3.1 Program settings . . . . . . . . . . . . . . . . . . . . . . . . . . . . . . . . . . . . . . . . . 22 4.3.2 Ksekam camera settings . . . . . . . . . . . . . . . . . . . . . . . . . . . . . . . . . . . . . 22 4.3.3 Remote control settings 22 . . . . . . . . . . . . . . . . . . . . . . . . . . . . . . . . . . . . . English translation of manual: $Revision$, based on Finnish (Revision 1.39). Chapter 1 User Interface 1.1 Main window The main window is the central part of Ksenos DVR, and it is always open. Normally, recording starts at the very moment the main window opens. Closing the main window halts all recording. however, does not have to be on top or visible. 1.1.1 Icons There are ve icons in the main window, which open the main parts of the program: Live - opens the current live view (see 1.3 on page 5) Recordings - opens the recordings viewer, (see 1.4 on page 6) Settings - opens the settings window, (see 2.1 on page 10) Gallery - opens the image and video gallery, Remote connections - opens the servers list window. 1.1.2 Menus Menus of the main window: Recorder 3 The main window, CHAPTER 1. 4 USER INTERFACE - Log out logs out the current user, the recording keeps going. After this, the program requires a new login to accept commands from the user. - Open backup folder opens the recordings viewer showing desired backups - Quit shuts down the recording system. All recording will stop. Depending on the chosen setting, the program either saves the current setup, queries the user about saving, or leaves changes unsaved. Help - About shows the version and compile date of the program. This information is needed when contacting Ksenos product support. - Contents... opens the HTML help 1.2 Camera views The basic camera views are attached to quick buttons in the camera view windows. 1.2.1 Organizing cameras Single camera windows can be freely dragged around and resized as any normal windows. 1.2.2 Menus Cameras - from this menu, a single camera can be opened (or all can be opened or closed simultaneously). the toolbar. The last button opens all cameras just like All Cameras There are presets for camera organizing in selection in the Cameras menu. Next to these, there is a drop-down menu, from which the user can open saved user layouts. 1.2.3 Saving customized views User can save an unlimited amount of customized camera views. When the cameras have been organized (see 1.2.1), the Save View button can be selected ( ). The program asks for a name for the view. After this, the view can be found in the drop-down menu next to the button. 1.2.4 Saving an individual image An individual image can be saved from the live view, or from the recordings viewer. The image is saved by clicking the right mouse button on top of the image, and choosing Save image... from the pop-up menu. This will open two dialogs: the rst one will show the still image which will be saved, and the second one will query a location for the output le. The program will suggest saving the image in the Gallery, and by default denes the lename to consist of camera name and a timestamp. If you prefer, you can change the lename to something else, or choose another le format (default is JPG). By clicking the Save button, the image is saved to the selected location. 1.2.5 Device functions On the toolbar, there are buttons on the right for each device ( ) or remote connection ( ) having specic functions. To access the camera functions of an individual camera, please right-click on the camera image, and select Image controls... from the pop-up menu. CHAPTER 1. 5 USER INTERFACE 1.2.5.1 XeCap settings XeCap settings can be used to control the analog video outputs. The numbered buttons will select the camera image that is sent to a monitor (either to output 1 or 2).set the OSD type - use this menu to select some information that is shown on the monitor. OSD: Show REC - show an on-screen symbol when video data is being recorded. OSD: Show clock - show current time on the monitor. 1.2.5.2 Remote settings Remote settings window allows the user to connect or disconnect to a remote server and view the connection status. Additionally this window contains remote command buttons if the advanced settings are selected in the program settings. 1.3 Live image 1.3.1 The Menus Cameras menu can be used to open camera images or to pick a specic camera. 1.3.2 Pan/Tilt/Zoom Camera Control If a dome protocol and address have been set to a camera, the camera can be controlled directly by dragging the mouse on the camera window. Panning and tilting: press down the left mouse button on top of the camera image (begin from the center), and drag the pointer to dierent directions. Horizontal motion will pan the camera horizontally, while vertical motion tilts the camera vertically. Panning and tilting (alternative): click a point in the image, and the camera attempts to center itself to that point. Due the dierences in protocols and cameras, this is only an approximation, and not intended to be very accurate. Zooming: please use the scroll wheel of the mouse to zoom in and out. Scrolling forward zooms in, scrolling backward zooms out. You can increase the zoom speed by holding down the Ctrl key on the keyboard while scrolling. Stopping: click the scroll wheel of the mouse (or the middle button). This will instantaneously stop camera movement and zooming. Selecting a preset: click the right mouse button on a camera image. You can quickly choose one of the rst eight presets from the pop-up menu. More presets can be found from the Dome control sub-menu. Saving a preset: click the right mouse button on the camera window. The option Save dome preset can be found in the Dome control sub-menu of the pop-up menu. Pick a preset slot, and assign a name for it. Now the preset is included in the pop-up menu. The preset settings will be saved on hard disk along with the other settings, therefore you should open the setup window and save settings from the menu after setting the dome presets. NOTE! Dome presets are saved in the camera. Thus, if you erase camera settings, only preset names will be lost. If you change the camera to another one, the presets will be lost, although the preset names still are visible in the program. CHAPTER 1. 1.4 1.4.1 6 USER INTERFACE Recordings Calendar search The calendar search window shows a circle around the day numbers with recorded image. The desired date is selected either by double-clicking the day number, or pressing the Select button. 1.4.2 Camera search The camera list can be used to open camera windows. Select cameras whose recordings are shown on the timeline (as green color) by checking the checkboxes of the camera(s). If none is checked, recordings from all cameras are shown. You can also select cameras by right-clicking a camera window and selecting Quick search. 1.4.3 Time search The time search window presents the hours of a day on the vertical axis, and the minutes of hours on the horizontal. You can choose the exact moment of time by clicking on the grid. The blue color indicates existing recordings for those cameras that are currently selected in the camera search list. The color will not be added if disable time buer is selected in the program settings. CHAPTER 1. 1.4.4 7 USER INTERFACE Area search You can activate the area search mode by pressing the area search button ( ). This mode allows the user to draw blocks directly on the camera windows by using the left mouse button, which causes the system to search for recordings which have movement on the drawn areas. The found recordings will be updated automatically on the timeline. Be aware that the area search requires above normal resources and thus may be slow. You can erase the drawn areas by using the right mouse button. You can return to the normal mode by pressing the area search button again. The drawn regions will remain on the memory until the record viewer is closed. 1.4.5 Viewer controls When record viewing is started, a viewer controls window will also open: The viewer controls window has the following buttons: - fast rewind (click multiple times to increase speed) - reverse play - stop - step one frame forward - play - fast forward (click multiple times to increase speed) - use this button to reselect the day to search (Calendar search, see 1.4.1 edellisellä sivulla) - this buttons opens the time search window (Time search, see 1.4.3 edellisellä sivulla) - this button is used to open the camera search window (Camera search, see 1.4.2 edellisellä sivulla) - this button is used to activate area search mode (area searcg, see 1.4.4) The lower row of buttoms are used to adjust the scale of the timeline, i.e. how long a time is shown. The scale can also be changed by scrolling the mouse wheel on the timeline. On the bottom of the window is a timeline, which can be dragged with the mouse in to choose the exact moment of time. The line in the middle of the timeline represents the current position in the recordings. The blue color indicates existing recordings. 1.4.6 Exporting video A video clip can be exported in MPEG format. 1.4.6.1 Single camera image First, the desired camera window must be activated by clicking the image, after which the button (Save video le) is pressed. The program suggests the Gallery folder as the default saving location. Type in a name for the video clip and press the Save button. A bar with red light will appear on the bottom of the camera window whose image is being saved to the MPEG le. If you are saving from the recordings, start playing recordings as usual. When saving is in progress, you can choose another camera on the y by clicking its window. The red bar will switch to this window, and the images from the new window are now saved to the le. CHAPTER 1. 8 USER INTERFACE Saving the video clip is nished by clicking the button again. The actual compression operation may still continue for a while, in which case a dialog will open to show the progress. After the progress dialog is gone, or if it doesn't show in the rst place, the video le can be found from the chosen location. 1.4.6.2 Multiple cameras in a single clip This function allows you to create a video clip containing multiple cameras multiplexed together. Stop playback. Move timeline to the desired clip begin. Right-click the timeline. Select Select begin from the menu. Move timeline to the desired clip end. Again, open the menu and select Select end. Select the cameras you wish to include using camera search or leave everything empty to include all. Open the timeline menu again and select Create a video clip. Enter the desired le name on the dialog and press Ok. Clip creation begins. The process can take a very long time depending on the amount of cameras and the length of the selected time period. You may close the record viewer at this point, the clip creation dialog will remain open until it completes. 1.4.6.3 Creating a backup This function creates backups with the internal le format of the DVR. This allows you to watch the backups using Ksenos DVR with all the normal search options, but you cannot watch the video with any other software. You can create a backup the same way as you create a multiplexed video clip. Select the time area and cameras, but this time select Take backup... from the timeline menu instead. The dialog that opens requests you to enter the target directory. The backup consists of multiple les and thus needs a dedicated directory. When the backup process begins and you see the progress dialog, you may close the record viewer. Backup recordings can be viewed by selecting Open backup folder from the Recorder menu in main window. Attention! Depending on the amount of record space, creating backups from all recordings can take a very long time, even days. This function is meant to be used to backup single events. 1.5 1.5.1 Image and Video Gallery Exporting images and video clips from the recorder 1.5.1.1 ... Using a recordable CD or DVD (Windows) Save an image or video clip to the Gallery. Next, the le(s) can be burned on a CD-R/RW or DVD±R/RW disc using the software provided with the drive. 1.5.1.2 ... Using a recordable CD or DVD (Linux) Save an image or cideo clip to the Gallery. Then you can select the desired les to be copied and burn them on a disk by pressing the button Burn CD. 1.5.1.3 ... Using a diskette, USB memory, or a ash memory card (Windows) Diskette: Insert a diskette into the drive. You can copy an individual image or a short video clip to the disk by clicking the right mouse button on the le, and choosing Send To USB memory or memory card: → 3½ Floppy (A:). Insert the memory to the USB port, or the card reader. The computer will detect and install it automatically. After this, the card will show as a separate disk drive in the system. You can move les from the Gallery to the memory as you could to any disk drive. CHAPTER 1. USER INTERFACE 9 1.5.1.4 ... Using a USB memory, or a ash memory card (Linux) Open the gallery and select the le(s) to be copied. Insert the memory to the USB port, or the card reader and wait until the button Save to USB stick appears to be enabled and press it. Chapter 2 Installation and Settings 2.1 2.1.1 Settings Menus You can save the current settings from the Options menu by using the Save settings... option. You should always do this after making changes to settings that you wish to be permanent. The settings can also be saved to an external le by selecting Export settings... from the menu. To adjust the settings, select a category from the tree view on the left, and a respective setting window will open to the right. Setting windows are grouped to subcategories, such as Visual settings, Program settings, Viewer settings, and Serial communication in the program settings. A setting group may have a ... button on its top-right corner, which opens a menu. Selecting Apply to all from this menu will copy the settings from the current setting group to every device or camera of the same type. Example: By using this method, settings from one camera can be quickly assigned to other cameras. 10 CHAPTER 2. 2.1.2 11 INSTALLATION AND SETTINGS Program settings 2.1.2.1 Visual settings Recorder name - the name that is shown on title bars of windows. Restore last view - stores the last camera window layout and applies it after program restart or switching between live view and recordings. Record indicator - Select the desired record indicator type or disable it. Show camera status - Show status information on the image on all camera windows. Show PTZ overlay - Display helper graphics on the image when moving a dome camera with a mouse. Camera window aspect ratio - The aspect ratio assigned to camera windows on default layouts. 2.1.2.2 Program settings Save settings - you can select, what to do when exiting the program; save settings automatically, ask before saving, or no saving. Startup mode - in which mode should the program start in: Main window only opens the main window and Live view opens the live view automatically. Main window - what should be done to the main window when another window, such as record viewer or settings, is opened. The main window can either be kept visible, or it can be minimized. Video export resolution - the resolution that is used when saving to external video les. The default is CIF, but if a higher resolution is used for the cameras, it may be necessary to increase this value to get the same quality for exported les. Video export quality - The compression quality of exported video clips. but larger le size. Higher value means better quality Global recording rule - The rule that is used to determine whether video should be recorded or not instead of using motion detection. Dongle check - The name of the copy protection dongle. CHAPTER 2. 12 INSTALLATION AND SETTINGS Access group count - Sets the number of access groups assignable to users and cameras. The program has to be restarted for the changes in this setting to take eect. Enable advanced mode - by checking this box, advanced settings that are usually hidden will be shown. These settings are rarely needed, and usually there is no reason to change them. See 4.3 sivulla 22. Search for Ksenos DVR servers - search and add all Ksenos DVR servers that are congured as automatically discoverable. Search for network cameras - Search network for cameras. When this option is selected, the system will search for network cameras on regular intervals. Found cameras are added to the system automatically. For now, this option will only nd Ksekam brand cameras. Viewer settings Fade inactive cameras on recordings - the camera windows will be faded if the images in them are not from the currently viewed moment of time. Week begins on - The rst day of the week. This option aects the calendar search. Serial communication Com x - set speed for serial port x, and make it active. Event source port - a port that is used to receive custom events. Automatic login and logout Log out automatically - You can select a delay after which the user will logout automatically. The delay is counted from the last mouse motion. Log in as - The user that system should log in automatically when it starts. Note that this list is lled when the program starts, and newly created users will not be selectable until you restart the program. 2.1.3 Device Settings 2.1.3.1 Adding or removing a device Adding a device is done by double-clicking the Add new device... item in the tree view on the left. You will see a list of devices that can be added to the system. Please choose the desired device from the list, and click OK. If the selected device is not found, it will not be added. Otherwise the device will appear in the tree view on the left edge of the window. Device settings can be accessed by selecting the device from this list. CHAPTER 2. 13 INSTALLATION AND SETTINGS 2.1.3.2 General capturing devices Recording watchdog - Restart capturing if nothing has been recorded in a certain period. Recording watchdog timer - How many minutes to wait before restarting capturing. 2.1.3.3 XeCap series devices Watchdog - if the watchdog is enabled, the card will reset the whole recorder in case the recorder has jammed for some reason. Watchdog timer - how many seconds to wait before resetting the recorder. Switching - the switching function of an analog video output. This will activate image circulation on analog video outputs (plugs 17 and 18). Switch time - for how long a certain camera is active on the analog output. Invert digital input - invert the digital input to its complement. Enable DI/O extension - if this is not selected, the digital input/output expansion boards will not work.. RS-485 port speed - speed of the RS-485 controller. This rate has to be the same as set in the controlled device. 2.1.3.4 Ksenos DVR server Server port - the TCP port used for remote connections. Set as 9191 by default. Max. Connections - the maximum number of simultaneous connections. Automatically discoverable - Allows this server to be discoverable by using the automatic server search function. Apply settings - restart the server and apply the new settings. 2.1.3.5 Ksenos web server Server port - sets the TCP port through which e.g. web browsers can connect. It is recommended (sometimes even mandatory) to use a port number above 1024. Require authentication - Require the user to login before showing cameras. 2.1.4 Camera Settings 2.1.4.1 Adding or removing a camera Cameras can be added by double-clicking the Add new camera... item in the tree view on the left. This item can be found below each device pick the one that matches the device for which you are adding new cameras. Cameras cannot be added if there are no devices in the system. After you have double-clicked Add new camera..., the following window will appear: This window allows you to select the number of the cameras to be added. Select an appropriate amount, click OK, and the cameras will be added to the system. CHAPTER 2. INSTALLATION AND SETTINGS 14 2.1.4.2 General Settings Almost all camera types have the same customizable settings. This section describes the settings common to all camera types. Some of them may have no eect on certain camera types (such as color settings for network cameras). General settings Camera title - a name that is shown on camera windows' title bars and when searching for recordings. E.g. Corridor, Front door. Access group - Allow this camera to be viewed only by those users who have rights for this access group. CHAPTER 2. 15 INSTALLATION AND SETTINGS Blank value gives everyone access. Image compression Image compression settings apply only to analog cameras. IP cameras will use camera specic settings. Codec - the codec to be used for compressing. MPEG-4 is normally the better choice. Quality - image compression quality. This aects on the quality (and size) of the recorded images. A proper default value is 50. A greater value is recommended for improved image quality (i.e. people are to be recognized from its image), and a smaller one to reduce hard disk usage. Image adjustments Framerate - how many images per second to capture from the camera. Depending on the hardware, the framerates of cameras may aect on each other. For instance, with HiCap100 and XeCap100 cards, every fourth camera is in the same group, and the four cameras of a group share 25 frames per second. The program will not allow setting greater framerates than supported by the hardware, except for network cameras. Brightness, contrast - these are used to adjust the image not to be too bright nor too dark. Motion detection Motion detection settings are set for each camera separately. If the default values cause extraneous, unnecessary recordings, the four sliders will help to solve the problem. First enable the Show motion checkbox, so you will see a surface indicating detected motion on top of the camera image (red: a lot of motion, green: some motion). Sensitivity - rough tuning of motion detection sensitivity. Moving the slider right makes motion detection less sensitive. Sensitivity (ne) - a ner sensitivity tuner. Noise lter: removes noise from the image prior to performing motion detection. There are ve values to choose from; the leftmost one removes least noise, while the rightmost one removes most noise. Tolerance - How much motion is tolerated before recording Detection type - Normal setting will compare the current image to the last recorded one. Light change lter will make the comparison between the last two captured images. Masking an area If you want motion not to be detected in a certain area of the camera image, you can mask out that area. Masking is started by checking the Masking checkbox next to the camera image. Then, you can use the mouse to draw an area on the camera image, which will be covered by a mask grid. The left mouse button does masking, while right button erases it. The size of the brush can be adjusted using the slider. When masking is done, uncheck the Masking checkbox. The visible mask will be hidden, but remains active. PTZ settings PTZ control - if the camera has pan/tilt/zoom control, connected to a serial port, it is activated by selecting a dome control protocol here. Supported protocols are listed in Appendix B (4.2). COM port - the serial port number that the dome control uses (1..4 if enabled, 0 for disabled). Address - the physical address of the dome camera (dened by the dip switches of the camera). Usually 1..32, disabled when 0. Dome speed settings - These sliders adjust the sensitivity of the PTZ controls. Capturing settings Motion record by rule - If selected, when the rule is true, override any other rules and record by motion detection. Continuous record by rule - If selected, record continuously when the rule is true. Continuous framerate - The framerate to be used when the Motion record by rule-setting is in eect. Motion record framerate - The framerate to be used when the Continuous record by rule-setting is eect. in Post motion recording - Species how many frames should be recorded after the rule that started a recording in the rst place is no longer in eect. CHAPTER 2. 16 INSTALLATION AND SETTINGS Image size Resolution - the dimensions of the image. This setting aects on the sizes of captured and recorded images, as well as the hardware requirements of the program. Usually CIF quality (352×288 pixels) is used as the resolution. interlaced. NOTE! All resolutions, whose vertical resolution is equal to or greater than 480, are In such images the changes show individually on every other horizontal line, and the motion looks more blurred. 2.1.4.3 XeCap cameras XeCap cameras do not have settings of their own. 2.1.4.4 General network cameras General network camera support is for network cameras, for which ocial support has not yet been written. Only single JPEG images can be read from the camera, and therefore framerate may be low. Camera type - the brand and model of a network camera. Generic URL means a link to a JPEG image. Host - the IP address or host name of the network camera. Port - the TCP port number of the HTTP server of the network camera, default is 80. Enable - when the camera settings are done, you can enable the camera by checking this checkbox. Quality - JPEG quality setting for the camera. Values over 80 are recommended in LANs (Local Area Networks). Image path - This is the whole URL from where the image is fetched from. 2.1.4.5 General settings for network cameras Hostname or IP address - address to the camera. Usually a local area network IP address. Port - image and/or control HTTP connection port. Other ports are set separately. Usually 80. Username - user name for the camera, one that has rights to receive image stream and change settings. Password - password for the user. Image resolution - camera image resolution. Connect to the camera - open a new connection to the camera. If a connection is currently open, it will be closed rst. Bitrate / MPEG4 Bitrate - image stream bitrate. 2.1.4.6 Ksekam network cameras Orientation - camera orientation and mirroring. Usually has a direct eect to the image quality. CHAPTER 2. 17 INSTALLATION AND SETTINGS Compression type - variable bitrate might drop and increase the stream bitrate when needed. Variable bitrate quality - denes the image quality, if variable bitrate is selected. Constant bitrate - quality of the camera image stream connection, in kilobits per second. 2.1.4.7 MPG440 network cameras Mpeg4 compression - quality of the camera image stream connection, smaller compression equals to better picture quality. 2.1.4.8 Axis network cameras RTSP port - port required by the image connection, default is 554. This setting should not be changed unless it has also been changed in the camera. Compression priority - selects whether the stream speed is being maitained by the cost of framerate or vice versa. Compression quality - image quality for the connection. Has a direct eect to the required bandwidth. Image rotation - with this setting, it is possible to rotate the camera image by 180 degrees. 2.1.4.9 Sony network cameras Backlight compensation when needed. - turns the backlight compensation on or o. Enhances dark areas of the image White balance - camera white balance selection. White balance trigger (one push) - calibrates the white balance from the current picture. Resolution mode - Field or frame. Field removes interlacing, but frame mode has a bit better image quality. CHAPTER 2. 2.1.5 18 INSTALLATION AND SETTINGS User Settings If there is only one user in the system, (s)he should have full user rights. If there is no need for having separate user accounts or a password for login, the one and only user account can be removed, after which the program operates in userless mode. 2.1.5.1 Adding and removing users Double-click the Add new user... item under the User control branch to add a new user. The program asks for a user account. This is the account that is used to log in. When the account name has been entered, it will appear on the user list. Pick the user from the list, and enter a visible name and a password for them. 2.1.5.2 User permissions The user permissions list can be used to select the program parts and tasks that the user is allowed to access. Live view - the user can view live image and arrange camera windows. Record viewing - the user has the permission to view recordings. Settings - the user has access to the Settings window. Gallery - the user can open the image and video gallery. Remote access - this user account can be used to connect the recorder through network. Add/Remove hardware - the user is able to add and remove hardware Adjust hardware - the user is able to adjust hardware settings Add/Remove cameras - the user is able to add and remove cameras Adjust cameras - the user is able to adjust camera settings Rule settings - the user is able to adjust rule settings User control - the user is able to add and remove users, or modify existing ones. Save image - the user is able to save images from camera windows Export video - the user is able to export video clips from recordings Quit program - the user is able to stop all recording and exit the recorder Camera preset control - the user is able to control PTZ cameras with presets Camera PTZ control - the user is able to control PTZ cameras with no limits Käyttäjäryhmä 1..256 - users can be restricted to specic camera groups. The number adjusted from program settings. of groups can be Chapter 3 Remote control 3.1 General information about remote control Regardless of the type of the server, the remote control feature requires the server to have an open TCP port. If the recorder is connected to a public network (Internet), or a relatively big local area network, it is essential that the recorder is protected by a rewall. The ports required by the remote control feature must be directed through the rewall to the server. For more information about port (re)direction and rewalls, please contact your reseller or a computer store. 3.2 Installing a server The remote control server can be enabled by entering the settings and adding a new device of type TCP/IP Server. The server port (default is 9191) must be set from the settings, as well as the maximum allowed number of simultaneous connections. NOTE! The remote control feature will not work unless a user account for remote control has been created on the server. Accountless remote control has been disabled due to security reasons. 3.3 Installing the client application The client application is installed from the Ksenos DVR installation CD the same way the actual recorder. When the installer queries about installation method, choose Remote client / Server upgrade. This way the installation program will not reserve hard disk space for recording. (On Mac OS X, please double-click the kse_xxxx.dmg and drag the Ksenos DVR icon to the Programs folder.) One TCP/IP client per each recorder (server) shall be added to the settings of the client application. At minimum, the following elds should be lled in: Name - the name with which the remote target is listed on the remote target list Address - the IP address or host name of the server Port - the TCP port to connect to on server (default is 9191) Username and Password - an user account that has been given permission for remote control on the server Keyframe rate - the number of frames after which the server sends a whole image Image quality - the quality for image compressed for the connection Max. Bandwidth (kbps) - network bandwidth limit for the remote connection Video transfer codec - the codec used for images sent to the remote client (MPEG4 or MJPEG) Autoconnect - connect this host automatically when the program starts 3.3.1 Establishing a connection After installing and conguring the client application, the remote control button ( will activate. 19 ) of the main window CHAPTER 3. 3.4 20 REMOTE CONTROL HTTP server The HTTP server is enabled by adding a new device of the type HTTP Server. This way the recorder can be connected to using a Web browser. The functionality is limited compared to the TCP/IP client, though, only live image can be viewed. Port - the TCP port on which the server responds to the browser. The default port is 8080, and the URL should therefore be entered in the format http://address-of-the-recorder:8080/ . Max. number of threads - this setting can be used to limit the load caused by the HTTP server. The number of threads can be lowered from the default (16) to even 1, but this way the connections will get slower. 3.5 Troubleshooting In case the remote control using the TCP/IP client or using the browser fails to work for reason or another, here are a few methods examine the problem. 3.5.1 Testing the TCP/IP connection If the TCP/IP connection from client to server fails to work, it should be rst checked whether these computers can communicate with each other at all. If the computers are on the same local area network, use the following steps to test the connection: Find out the recorder's IP address from the network settings of the operating system. Windows: Open the command prompt (Start→ Run Linux: Open the terminal (Alt-F2→ xterm and Enter) Enter the command Mac OS X: Open Applications→Utilities → cmd and Enter) ping 1.2.3.4 (replace 1.2.3.4 with the recorder's IP address) →Network Utility -> the Ping tab 1. If the recorder does not respond, the network connection between these computer does not work. Please contact your network administrator to check your network settings. 2. Make sure that there is either a switch/hub or a cross-over cable between the computers. 3. If there is a rewall between the server and the client, the ping does not necessarily get through the rewall. In this case, please check settings at both ends as well as rewall settings. 3.5.2 Firewall If there is a rewall between the computers, ports required by the server should be redirected to the server. How to achieve this varies a lot between dierent rewall models. Please see your rewall manual. (The feature is often called Virtual server.) Chapter 4 Appendices 4.1 Appendix A: Recommendations 4.1.1 Hardware Ksenos DVR requires at minimum the following conguration in order to operate properly: Intel Pentium 4 2.8 GHz or faster 512 MB of RAM A dedicated disk partition for recordings, with 20 GB of free disk space Ubuntu 6.06 (Dapper) (x86), Windows 2000 / XP (also Windows 98 is suitable for remote control), Mac OS X 10.4 or newer 21 CHAPTER 4. 4.2 22 APPENDICES Appendix B: Technical details Video capturing Camera inputs 4 to 32 (+network cameras) Frame rate 25 to 200 frames per second Image resolution QCIF(160×144), CIF(352×288), 2CIF(704×288), 4CIF(704×576), ... Video encoding method MPEG-4, MJPEG Supported network cameras Sony, MPG440, Ksekam, Axis Network cameras with limited support Arecont Color noise reduction yes Customizable sensitivity yes Masking out unwanted areas yes Calendar search, and exact time search yes Per-camera search yes (also for a camera group) Creation of MPEG clip compilation yes Export formats for an individual image JPEG, PNG, TIFF, BMP Logins with password control yes Number of users unlimited Per-user permissions yes Freely customizable camera views yes Saving of camera views unlimited Network server (and client) TCP/IP (client application) HTTP (web browser) Simultaneous connections 32 Encrypted connections by using a separate SSH client Supported dome control protocols Pelco-D, Pelco-P,Sony network cameras Motion detection Search tools Security User Interface Remote Access Dome control 4.3 Advanced settings Advanced settings are enabled by checking the Enable advanced mode checkbox in Program settings, see 2.1.2.2 4.3.1 Program settings Draw mode - OpenGL or GDI. If there is no hardware acceleration for OpenGL, the GDI interface can be used as a (deprecated) alternative. Keyframe interval - sets keyframe interval. Show buer state - show memory buer size on the timeline. 4.3.2 Ksekam camera settings Stream ID - Some cameras may have multiple video stream. 4.3.3 Select the desired stream id here. Remote control settings Custom remote commands - Remote control may have custom commands. the host from live picture viewer's remote control settings. These commands can be sent to