1
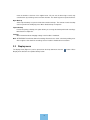
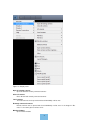
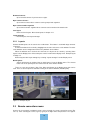
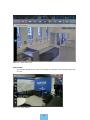
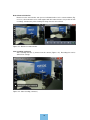
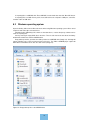
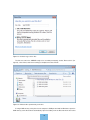
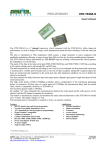
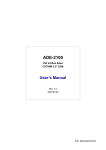
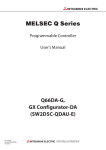
User’s Guide
Valvova Oy
May 2, 2014
Contents
1 Timeline
1.1 Program startup . . . . . . . . .
1.2 Calendar . . . . . . . . . . . . .
1.3 Go to an exact time in recordings
1.4 Pop-up menu from the timeline .
1.5 Bookmarks . . . . . . . . . . . .
1.6 Notification events . . . . . . . .
1.7 Fullscreen mode . . . . . . . . .
.
.
.
.
.
.
.
.
.
.
.
.
.
.
.
.
.
.
.
.
.
.
.
.
.
.
.
.
.
.
.
.
.
.
.
.
.
.
.
.
.
.
.
.
.
.
.
.
.
.
.
.
.
.
.
.
.
.
.
.
.
.
.
.
.
.
.
.
.
.
.
.
.
.
.
.
.
.
.
.
.
.
.
.
.
.
.
.
.
.
.
.
.
.
.
.
.
.
.
.
.
.
.
.
.
.
.
.
.
.
.
.
.
.
.
.
.
.
.
.
.
.
.
.
.
.
.
.
.
.
.
.
.
.
.
.
.
.
.
.
.
.
.
.
.
.
.
.
.
.
.
.
.
.
.
.
.
.
.
.
.
.
.
.
.
.
.
.
.
.
.
.
.
.
.
.
.
.
.
.
.
.
.
.
.
.
.
.
.
.
.
.
.
.
.
.
.
.
.
.
.
.
.
.
.
.
.
.
.
.
2
3
3
4
4
5
5
6
2 Menus
2.1 Recorder menu . . . . . .
2.2 Display menu . . . . . . .
2.2.1 Layouts . . . . . .
2.3 Remote connections menu
2.4 Help menu . . . . . . . . .
.
.
.
.
.
.
.
.
.
.
.
.
.
.
.
.
.
.
.
.
.
.
.
.
.
.
.
.
.
.
.
.
.
.
.
.
.
.
.
.
.
.
.
.
.
.
.
.
.
.
.
.
.
.
.
.
.
.
.
.
.
.
.
.
.
.
.
.
.
.
.
.
.
.
.
.
.
.
.
.
.
.
.
.
.
.
.
.
.
.
.
.
.
.
.
.
.
.
.
.
.
.
.
.
.
.
.
.
.
.
.
.
.
.
.
.
.
.
.
.
.
.
.
.
.
.
.
.
.
.
.
.
.
.
.
.
.
.
.
.
.
.
.
.
.
.
.
.
.
.
7
7
8
10
10
11
.
.
.
.
.
.
.
.
.
.
.
.
.
.
.
3 Camera window
12
4 Monitor window
4.1 Monitor window properties . . . . . . . . . . . . . . . . . . . . . . . . . . . . . . . . .
21
21
5 Map View
5.1 Starting map editor . . . .
5.2 Creating a Map View . . .
5.3 Adding/removing cameras
5.4 Links . . . . . . . . . . . .
5.5 Map window . . . . . . . .
.
.
.
.
.
23
23
23
24
25
26
6 Backups
6.1 Taking backups . . . . . . . . . . . . . . . . . . . . . . . . . . . . . . . . . . . . . . .
6.2 Viewing backups . . . . . . . . . . . . . . . . . . . . . . . . . . . . . . . . . . . . . .
6.3 Import backup . . . . . . . . . . . . . . . . . . . . . . . . . . . . . . . . . . . . . . . .
27
27
28
29
7 Creating a video clip
7.1 Creating a video clip with either one or many cameras . . . . . . . . . . . . . . . . . .
7.2 Creating a multiplexed video clip . . . . . . . . . . . . . . . . . . . . . . . . . . . . . .
7.3 Privacy mask . . . . . . . . . . . . . . . . . . . . . . . . . . . . . . . . . . . . . . . .
30
30
30
31
8 Saving snapshots and video clips to an empty CD or USB memory stick
8.1 Linux operating system . . . . . . . . . . . . . . . . . . . . . . . . . . . . . . . . . . .
8.2 Windows operating system . . . . . . . . . . . . . . . . . . . . . . . . . . . . . . . . .
32
32
33
9 Common error scenarios
36
.
.
.
.
.
.
.
.
.
.
.
.
.
.
.
.
.
.
.
.
.
.
.
.
.
.
.
.
.
.
.
.
.
.
.
.
.
.
.
.
1
.
.
.
.
.
.
.
.
.
.
.
.
.
.
.
.
.
.
.
.
.
.
.
.
.
.
.
.
.
.
.
.
.
.
.
.
.
.
.
.
.
.
.
.
.
.
.
.
.
.
.
.
.
.
.
.
.
.
.
.
.
.
.
.
.
.
.
.
.
.
.
.
.
.
.
.
.
.
.
.
.
.
.
.
.
.
.
.
.
.
.
.
.
.
.
.
.
.
.
.
.
.
.
.
.
.
.
.
.
.
.
.
.
.
.
.
.
.
.
.
Chapter 1
Timeline
Timeline is one of the main elements of Ksenos (See figure 1.1).
Figure 1.1: Timeline.
Present time (live image) is the default mode. It is selected when the button
is active.
Recorded motion is indicated with blue color on the timeline. The time range can be adjusted by
mouse wheel on the timeline or by clicking the
buttons located on the left side of the timeline
window.
The white bar on the timeline together with the time on the right side of the timeline show the
current viewing time.
Timeline can be dragged to the desired time with the left mouse button or playback control buttons
under the timeline. Playback control buttons are shown in the image 1.2.
Figure 1.2: Playback buttons.
Explanations for the playback control buttons from left to right (Image 1.2):
1. Rewind
2. Play backwards
3. Step one frame backward
4. Stop
5. Step one frame forward
6. Play
7. Fast forward
8. Skip to present time
The playback buttons can also be controlled by the keys 1–8 from the keyboard in the order that
the image 1.2 shows.
Speed up the “Rewind” and “Fast forward” actions by clicking the buttons again. The speed is
shown in the upper left corner of the timeline (
1x, 2x, 4x, 8x).
2
1.1
Program startup
Figure 1.3: Login window.
Login window (Image 1.3) does not appear unless users have been created and the automatic login is
disabled.
Pay attention to upper and lower case letters because login name and password are case sensitive.
If defined, a user-specific layout is recalled after logging in.
1.2
Calendar
The calendar window can be opened by clicking the date (Figure 1.4) on the right side of the timeline
window with the left mouse button. Also, when viewing recordings, there is a timestamp on the upper
right corner of the camera windows, which you can click to open the calendar window.
Figure 1.4: Open the calendar by clicking the date.
The calendar window is shown in the image 1.5. The desired date can be chosen from the calendar.
The playback will jump to 12:00:00 on the selected date. If the calendar window was opened from a
camera window detached from the main window, the playback is only affected in that particular camera
window.
3
Figure 1.5: The calendar window.
1.3
Go to an exact time in recordings
By left-clicking the time on the right side of the timeline window (Image 1.6) you can change the viewing
time by typing in the exact hours, minutes and seconds. By pressing enter, the playback will stop to
the exact time in the recordings.
Figure 1.6: Go to an exact time in recordings.
1.4
Pop-up menu from the timeline
Right-clicking the timeline will open a pop-up menu which is shown in image 1.7.
4
Figure 1.7: Pop-up menu from the timeline.
Take a backup or create a videoclip by selecting the beginning and ending points from the timeline
context menu. The beginning or the end will be placed on the white vertical bar in the middle of the
timeline by selecting them from the menu. Select the entire recording by choosing “Select all” and
remove the selection by choosing “Clear selection”. More information about backups in chapter 6 and
about creating video clips in chapter 7.
1.5
Bookmarks
Bookmarks can be used when a certain event needs to be marked for later browsing.
Place a bookmark on the white vertical bar on the timeline by right-clicking the timeline and selecting “Place a bookmark” from the menu or by pressing the spacebar. It is also possible to place a
bookmark by pressing
button from the notification event window. Example image of a bookmark
shown in a picture 1.8.
Figure 1.8: Example bookmark on the timeline.
The list of saved bookmarks can be opened under the Recorder menu (See chapter 2.1) or under
the timeline’s pop-up menu (See chapter 1.4).
Name the bookmarks by right-clicking the bookmark on the bookmark list and selecting “Edit description”.
Remove a bookmark by right-clicking it on the bookmark list and selecting “Remove bookmark”.
Remove all bookmarks by choosing “Clear bookmarks” under the timeline’s pop-up menu or the
bookmark list.
1.6
Notification events
Pre-programmed notifications are shown in the notification events window. Open the window by clickbutton on the right side of the timeline window.
ing the
5
This feature is designed for real-time supervision only. Events are not stored in the database.
However the desired event can be saved as a bookmark.
Open the notification viewer by clicking the notification event. The notification viewer shows the
recordings of the related camera. Drag the timeline and use playback control buttons to browse the
recordings. (Figure 1.9)
Figure 1.9: Notification events
The playback of the notification viewer will be independent from the main timeline if the “Notifications” setting “Detach notification viewer from the main timeline” is checked. Otherwise the notification
selection will synchronize all cameras to the event’s time.
Clicking the
on the right upper corner of the notification event creates a bookmark of the desired
notification.
To set or change the rules that trigger notifications, see Installer’s Handbook.
1.7
Fullscreen mode
You can open the camera windows in fullscreen mode by pressing F11 key. You can exit the fullscreen
mode by pressing F11 key again. If there are multiple displays, the cameras will open on fullscreen
mode on the same displays where the camera windows are placed.
If there is a multiplexer view or monitor windows on the display, a fullscreen mode will not be
opened on that display.
6
Chapter 2
Menus
2.1
Recorder menu
The recorder menu (Figure 2.1) can be opened from drop down menu from
Recorder menu functions are explained briefly below.
-button. All the
Figure 2.1: Recorder menu.
Log out
Log out if a user is logged in. Shortcut is Ctrl+L.
Gallery
The taken screenshots and videoclips can be found from the Gallery.
List bookmarks
The browsing window of saved bookmarks.
View log
The log contains internal status messages. Useful for diagnosis when contacting the technical
support.
Show alarm log
Alarm log contains all the notifications/alarms created by rule actions. You can click an entry to
7
move the timeline to the time of the original event. You can use the alarm log to search only
certain alarms by restricting sources and time intervals. The alarm log can be exported to Excel.
Open Backup
Select “Open backup” to open the folder that contains backups. The cameras from the backup
can be opened from the Display menu. More about backups in chapter 6.
Import Backup
Instead of opening a backup, this option allows you to merge the backup with local recordings.
More details in chapter 6.3.
Settings
More information about changing settings in the Installer’s Handbook.
Quit ATTENTION! This will shut down all recording. Restrict the use of this selection by adding users
with no rights to shut down the recording. See the Installer’s handbook for instructions.
2.2
Display menu
The display menu (Figure 2.2) can be opened from the drop down menu from the
Display menu functions are explained briefly below.
8
-button. All the
Figure 2.2: Display menu.
Open all existing cameras
Open all local and remotely connected cameras.
Close all cameras
Close all local and remotely connected cameras.
Local cameras
The local cameras can be opened and closed individually or all at once.
Remotely connected cameras
Remote cameras can be opened and closed individually or all at once. In the image 2.2 “Remote 1” is the name given to remote server.
Monitor windows
Open monitor windows
9
Removed cameras
Open removed cameras if you have access rights
Open camera selector...
Open camera selector where cameras can be grouped and organized
Open camera number organizer
Open camera number organizer where cameras can be numbered in wanted order.
Save layout
Name and save layouts. More about layouts in chapter 2.2.1.
Layout manager
Remove layouts from layout manager.
2.2.1
Layouts
Camera window layouts can be stored to be recalled later. This feature is useful with larger amounts
of cameras.
A camera window can be resized by dragging from the sides and corners of the window. The order
of the windows can be changed and unnecessary windows can be hidden.
When the windows are in desired size and order, the layout can be stored by selecting “Save
layout” from the Display menu. All stored layouts can be found from the Display menu. Example layout
in image 2.3.
Remove layouts with Layout manager by selecting “Layout manager” from the Display menu.
Quick layouts
Save 4 quick layouts by clicking “Save as quick layout x” from the Display menu. The shortcut
buttons for these quick layouts are found on the left of the timeline window.
There are some preset layouts (One, Four, Nine and Sixteen) in the Display menu that can be
used. There is also an option for automatic resizing of the camera windows (Autofit equally.
Figure 2.3: Example layout.
2.3
Remote connections menu
Connect to the previously configured remote servers through the remote connections menu (Figure 2.4). After selecting the server, log in by typing in the login name and password. The login in10
formation can be pre-set in the settings. In this case the login name and password are not requested.
See the Installer’s handbook for more information about setting up remote connections.
Figure 2.4: Remote connections menu.
Disconnect from the remote servers from the remote connections menu (Figure 2.5).
Figure 2.5: Disconnect from the remote servers.
2.4
Help menu
The help menu can be opened from the drop down menu opening from
(Image 2.6) features are explained briefly below.
-button. All the Help menu
Figure 2.6: Help menu.
About
Version information.
User’s guide
User’s guide for Ksenos.
Installer’s Handbook
Guide for Ksenos installation and setup.
Enter product key
Entering and activation of product key
License texts
End user license agreement and license texts of several third party components used in Ksenos.
11
Chapter 3
Camera window
The camera number, title and status of the camera are marked on the top bar of the camera window
(Figure 3.1).
Figure 3.1: Camera window running number is 6, name is Dahua IPC-HDBW3202P and it is showing
live image.
The camera window menu appears on the left side of the camera window when moving the mouse
cursor over the camera image. All the camera window menu actions are explained briefly below.
Fullscreen
Enlarge the camera window to full screen by clicking the “Fullscreen” button (Figure 3.2).
12
Figure 3.2: Fullscreen.
Take a snapshot
Take a snapshot from the currently shown image by clicking the “Take a snapshot” button in the
camera window (Figure 3.3).
Figure 3.3: Snapshot.
Picture settings can be set in the snapshot window. You can choose resolution and add additional information like timestamp, camera name and text. You can also take several snapshots
and save them as a multiplex picture. Save snapshot by clicking “Save”-button, opened dialogbox allows you to choose recording location and format. Ksenos supports JPG-, PNG and
PDF-formats. (Figure 3.4)
13
Figure 3.4: Snapshot window
14
Figure 3.5: Snapshot window with several snapshots
Figure 3.6: Preview of multiplex snapshot
15
You can create a snapshot from several cameras by clicking “Take a snapshot”-button in a cameraview, thus in “Snapshots”-list will be added more cameras with timestamps.
Snapshots can also be taken in live mode.
Create a video clip with one or more cameras
Create a video clip with one or more cameras. Start the video clip by clicking the “Create a
video clip” button (Figure 3.7). Continue recording video from another camera by selecting
another camera window. Stop recording by clicking the “Create a video clip” button again. More
information about creating video clips in chapter 7.
Figure 3.7: Create a video clip.
Quick search for this camera
Choose one or multiple cameras for quick search (Figure 3.8) by clicking the “Quick search for
this camera” button from the desired camera windows. The timeline will show only the motion
events of the selected cameras.
16
Figure 3.8: Quick search for this camera.
Area search
Draw search areas on one or multiple camera windows. The timeline will show only the motion
events in the specified areas. The playback will ignore everything else. Click “Area search”
button (Image 3.9) and then draw the desired area on the camera window by pressing and
holding the left mouse button while dragging the cursor over the camera image. Erase the areas
with right mouse button. Clear the drawn areas by clicking the “Area search” button again.
Figure 3.9: Area search.
Example:
The timeline of the camera is full of motion events as shown in the image 3.10. The timeline is
full of events because the camera also records motion through windows. Area search is useful
when searching only for motion events happening inside.
17
Figure 3.10: Timeline full of events.
Drawing a search area on the camera image narrows down the motion events on the timeline.
The timeline will show the motion events only in the selected area. See image 3.11.
18
Figure 3.11: Area search used.
Clone window
Open another window with the same camera image by clicking the “Clone window” button (Figure 3.12).
Figure 3.12: Clone window.
19
Detach from main timeline
Detach from the main timeline and open an individual timeline for the camera window (Figure 3.13). “Clone window” tool is useful together with this feature because it is possible to view
recordings simultaneously while showing live image from the same camera.
Figure 3.13: Detach from main timeline.
Start recording (x minutes)
Start recording that lasts (x) minutes from this camera (Figure 3.14). Recording time can be
defined from settings.
Figure 3.14: Start recording (x minutes).
20
Chapter 4
Monitor window
Monitor windows are camera windows, that can be switched to display another camera by, for example,
a joystick. You can enable the monitor windows in the program settings from “General Settings” /
“Monitor window count” (Figure 4.1).
Figure 4.1: Set monitor window count
You can open the monitor windows by opening the “Display” menu and selecting the monitor windows. You can open either all the monitors or only a single one (Figure 4.2).
Figure 4.2: Set monitor window count
4.1
Monitor window properties
The main property of monitor windows is camera switching. You can select a new camera to the
window by right-clicking the window, selecting the submenu “Select camera” and selecting the camera
you wish to switch to from the menu that opens Figure 4.3).
21
Figure 4.3: Attach a camera to the monitor window.
22
Chapter 5
Map View
Map View allows you to place cameras on a plane. The plane can be, for example, a floor plan of a
building or an aerial photo. Map View consists of two portions: The editor and the map windows.
Editor
The editor is used to create maps and insert cameras to desired locations.
Map window
Map windows are used to open the maps created with the editor to separate windows, and save
them to layouts.
5.1
Starting map editor
Map View editor is started from the Map View button (
) on the right side of the main window. If
the button is not visible, you need to activate it from the settings, from “General settings” / “Map View”
(Image 5.1).
Figure 5.1: Enable Map View
5.2
Creating a Map View
Make sure you are signed in as an administrator. Press “New map...” button (Image 5.2). You will
need to enter a name and select an image for the map in the opening dialog (Image 5.3). You can
select the image by pressing the “Browse...” button. The Map View supports common image formats.
When you have filled all the fields, press OK.
23
Figure 5.2: New map
Figure 5.3: Settings for the new map
5.3
Adding/removing cameras
Select a map from the map list, to which you wish to add cameras. Press “Add camera...” button from
the “Edit” menu (Image 5.2). From the opening window you can select the cameras, that you wish to
add to the selected map (Image 5.4). Select the cameras and press ok. The camera icons are now on
the image. You can move them to the desired locations with your mouse.
24
Figure 5.4: Select cameras.
If you wish to remove all the cameras, press “Remove cameras” button. You can remove the
cameras one by one by right-clicking the camera and selecting “Remove camera”.
5.4
Links
Links allow you to move quickly from one map image to another. You can create a link by selecting a
map and right-clicking the image. Select “Create link” from the opening menu. A new menu appears,
from which you can select a map image you want to create a link to. Select an item and press ok
(Image 5.5). Remove a link by right-clicking it and selecting “Remove link”.
25
Figure 5.5: Create link
5.5
Map window
Map windows are opened from the Display menu from the Maps submenu. Properties of a map
window:
Zooming and dragging
You can zoom the map with the mouse wheel. The zooming always centers on the mouse cursor.
When a map has been zoomed, it can be dragged by moving the mouse while keeping the right
mouse button pressed.
Resizing icons
You can alter the size of the camera and link icons by pressing Ctrl button while scrolling with
mouse wheel.
Previewing camera image
The camera image preview is opened by moving the mouse cursor over the camera icon, and
waiting a moment.
Opening the camera window
You can open the camera window by double clicking the camera icon or the camera image
preview.
26
Chapter 6
Backups
6.1
Taking backups
Leave the desired camera windows open. All other cameras will be ignored when taking the backup.
Unnecessary motion events can be ignored by using the “Area search” function. This reduces the
size of the backup.
Select the desired starting point from the pop-up menu (Image 1.7) which can be opened by clicking
on the timeline in desired point with the right mouse button. The timeline changes color from that point
on.
Select the desired ending point from the same pop-up menu (Image 1.7) which is opened by
clicking on the timeline in desired point with the right mouse button. Now the selected period is
highlighted on the timeline.
Desired time periods can be selected several at the same time by adding from the menu new time
period selecting “Add new period” and repeating selection of start and end time.
Save the backup by clicking the selected period with the right mouse button and selecting “Take
backup” from the pop-up menu as shown in image 6.1. Select the location (for example external
HDD) and create a folder for the backup. The backup of selected cameras can be viewed later on the
recorder itself or by using a Ksenos client installation.
27
Figure 6.1: Taking a backup from the selected period.
6.2
Viewing backups
Open the Backup folder from the Recorder menu. Open the backup cameras from the display menu
(Image 6.2). The playback and search tools work the same way as in the actual recordings. Also video
clips and snapshots can be taken from the backups.
Figure 6.2: Open the backup from the display menu.
28
6.3
Import backup
Instead of just viewing the backup, they can be merged back to the local recordings. This allows the
backup to show as part of the recordings of the existing cameras, and the backup doesn’t need to be
opened separately.
You can import the backups by selecting “Import Backup...” from the Recorder menu. This will
open a dialog where you can select the folder of the backup to be imported. After choosing the folder,
the backup will be copied to the local recording storage.
If there are already recordings in the local storage, the backup might be copied over the existing
recordings. Importing a large backup will thus erase all current recordings!
29
Chapter 7
Creating a video clip
7.1
Creating a video clip with either one or many cameras
Create a video clip from one or more cameras. Start the video clip by clicking the “Create a video clip”
button in camera window (Image 3.7). Continue recording video from another camera by selecting
another camera window. Stop recording by clicking the button again. The default location is the
Gallery which is found from the Recorder menu. The quality and resolution of the video clip can be
selected after the recording has been stopped.
7.2
Creating a multiplexed video clip
-button on the right side of the time line, then appears on the left side of the playback
Push
buttons tools for making a video clip. Drag timeline to desired starting point and push
-button,
then drag timeline to desired end point and push
-button. Start- and end times can also be
selected by pushing buttons with start and end times on. When desired time period is selected, create
-button. More time periods can be added to same video clip by selecting
video clip by pushing
from drop down menu “Add...”, selected timeperiod can deleted by pushing
-button.
Alternatively a videoclip can be made directly on timeline. Drag the timeline to the desired starting
point and choose “Select begin” from the pop-up menu (Image 1.7) which can be opened by rightclicking on the timeline. The timeline changes color from that point on.
Select the desired ending point from the same pop-up menu (Image 1.7) which can be opened
by right-clicking on the timeline in the desired point. Now the selected period is highlighted on the
timeline.
Save the video clip by clicking the selected period with the right mouse button and select “Create
a video clip” from the pop-up menu (Image 7.1). Name the file and select quality and resolution. The
default location is the Gallery which can be found in the Recorder menu.
Pay attention that only the open cameras are included to the video clip. The camera views are
fitted automatically to the video clip.
30
Figure 7.1: Create a multiplex video clip.
7.3
Privacy mask
You can add a privacy mask to a camera from the camera settings. Clicking the “Set privacy mask...”
button next to the camera image opens the privacy mask configuration window.
You can add a new mask by pressing the upmost button (with the plus icon) on the menu on the
left. Once the mask is added, shape can be chosen between rectangle and a circle by clicking the
rectangle or circle buttons on the menu on the left.
You can move the mask by dragging it with the right mouse button pressed.
You can alter the size of the mask by pressing Ctrl button while scrolling with mouse wheel.
If there are multiple masks added, you can select the mask to modify by left-clicking it.
Once the mask is set, you can close the window from the cross at the upper right corner. The mask
on the camera is enabled by default for all users, excluding administrators. However, it is possible to
set a group for which the mask is disabled. The setting is “Disable privacy mask on users in group”
under the “Set privacy mask...” button.
The privacy masks are unabled in the images of the web server.
31
Chapter 8
Saving snapshots and video clips to
an empty CD or USB memory stick
All saved snapshots and video clips can be easily exported to a CD or USB memory stick when using
Linux or Windows operating systems.
8.1
Linux operating system
Open the Gallery from the Recorder menu. All saved files are located in the left side of the Gallery
window (Image 8.1). Preview images and videos before exporting them by selecting file and clicking
“Open” button. Select files and click the “Add »” button for every file you want to export.
Figure 8.1: Gallery folder when using Linux operating system.
If exporting files to an empty CD-R disk, place the disk in the computer and click “Burn CD”.
32
If exporting files to a CD-RW, click “Erase CD-RW” if needed and after that click “Burn CD” button.
If exporting files to a USB memory stick, insert USB stick to the computer’s USB port, select files
and click “Save to USB stick”.
8.2
Windows operating system
Open the Gallery folder from the Recorder menu when using Windows operating system. All the saved
snapshots and video clips are located here.
Windows built-in CD writing tools, which are introduced here, or other third-party software can be
used for exporting files.
Start by entering an empty CD-R disc in the drive. There is a file view on the left side of the Gallery
window that should now show the CD/DVD drive.
Drag and drop the files you want from Gallery folder into a CD/DVD drive (Image 8.2). A dialog will
appear, allowing you to select a name and type of the disc. The “With a CD/DVD player” option will
work with most hardware and is thus the safer choice (Image 8.3).
Figure 8.2: Drag and drop files to the CD/DVD drive.
33
Figure 8.3: Select the type of the disc.
The files are now in the CD/DVD ready to be recorded permanently. Select “Burn to disc” (Image 8.4), select “Next”, wait for the burning to complete and select “Finish”.
Figure 8.4: Write the files permanently to the disc.
If using a USB memory stick, place it to the computer’s USB port and wait for Windows to open the
USB memory stick’s file browser automatically. Open the Gallery from the Recorder menu and select
34
files. Drag and drop them from the Gallery to the USB memory stick’s file browser. Make sure you
remove the USB memory stick properly from the system.
35
Chapter 9
Common error scenarios
There is an issue with the camera windows:
Close all camera windows and reopen them.
Username/password for the system:
The username and password are set by system maintainer or installer.
Setting the time in Ksenos:
Ksenos uses the system clock, allowing you to alter the time in Ksenos by altering the system
time. The system clock switches to daylight saving time and back automatically.
The maximum amount of cameras allowed by my license:
The About choice in the Help menu will show you information about the license. For example,
“License: 32 16 0 0” means that you can use 32 analog and 16 IP cameras.
There is no image in analog cameras in the live view:
Restart Ksenos. (Note! A username and a password are required if a user has been defined.)
You cannot watch over a week old recordings, but the recordings from yesterday are shown:
There is only enough capacity in the system for one week of recordings.
36