1
eRAISE Installation and User Guide∗
Marieta Fasie
January 30, 2014
Abstract
This is a short installation and user guide for the eRAISE plug-in for
Eclipse. It describes the steps that need to be taken to install eRAISE
and use this plug-in to typecheck an RSL specification, translate it to
SML, execute its test cases and generate LATEX documentation for it. It
also presents the output format and the GUI elements involved in each
action, with screenshots for better understanding.
Contents
1 Installation
2
2 Writing RSL specification
2.1 Create a new RSL project . . . . . . . . . . . . . . . . . . . . . .
2.2 Create a new RSL file . . . . . . . . . . . . . . . . . . . . . . . .
2.3 Edit the RSL file . . . . . . . . . . . . . . . . . . . . . . . . . . .
3
3
4
4
3 Type check a RSL specification
5
4 Translate RSL specification to SML
6
5 Run test cases
7
6 Generate Latex document
8
7 Actions on more than one file
7.1 RSL menu . . . . . . . . . . . . . . . . . . . . . . . . . . . . . . .
7.2 Context menus on multiple files . . . . . . . . . . . . . . . . . . .
8
8
9
∗ This guide is an excerpt made and edited by Linh Vu Hong and Anne Haxthausen of
the M.Sc. thesis An Eclipse based Development Environment for RAISE, DTU Compute
report M.Sc.-2013-16, made by Marieta Fasie, June 2013. The thesis is available from http:
//www2.imm.dtu.dk/pubdb/views/edoc_download.php/6568/pdf/imm6568.pdf.
1
1
Installation
1. Download and install the latest version of Eclipse classic (Kepler) on your
machine. The installation files can be downloaded from http://eclipse.
org/downloads/. When using Eclipse, it stores your projects in a folder
called a workspace. Note that the path to this folder must not contain blank
spaces.
2. Ensure that you have the Java Runtime Environment jre7 installed.
3. To install eRAISE do the following:
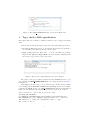
a. Download one of the files eRAISEUpdate.zip for 32 bit installations and
eRAISEx64Update.zip for 64 bit installations. These files can be found
in the file sharing on CampusNet. The first file can also be found in the
eRAISE repository at https://github.com/kiniry/eRAISE.
b. If you have downloaded eRAISEx64Update.zip, this should be renamed
to eRAISEUpdate.zip
c. Open Eclipse, go to Help→Install New Software, a new window will be
opened
d. Click Add and then select Archive
e. Browse to the location on your machine where the file eRAISEUpdate.zip
was stored in the previous step and select it, then click Open 1
f. Select OK
g. Click Select All, then click Next
h. Select eRAISE Feature and click Next
i. Check I accept the terms of the license agreement, then click Finish
j. A security warning appears, click OK
k. The software is being installed and a request to restart Eclipse is shown.
Select Yes to restart Eclipse
1 The
Open action may not be needed for some Linux systems.
2
2
Writing RSL specification
In order to write a RSL specification the next steps can be followed:
1. Create a new RSL Project
2. Create a new RSL file
3. Edit the RSL file
Each of these steps is further described in a separate subsection.
2.1
Create a new RSL project
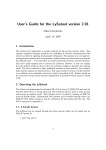
Figure 1: New wizard
Figure 2: New RSL Project
3
Figure 3: The Package Explorer window displaying the Database project
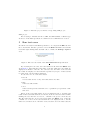
Go to File → New and click on Other (or just press the keyboard shortcut
Ctrl+N). A new window appears asking to select a wizard. Type in rsl, like
in Figure 1 and select RSL Project.
A new window appears and the name of the new project and its location
must be filled. Fill in the project name as Database and leave the location as
default, just like in Figure 2 and then press Finish.
A new RSL project was created and it can be seen in the Project Explorer
window in the left. Double click on the Database folder to see its internal
structure. In this moment it only has a subfolder named src Figure 3.
2.2
Create a new RSL file
Right click on the src folder that was created in the previous step and select
New → File. A new window opens asking for the name of the new file. Write
SET DATABASE.rsl and click Finish. As a result a new file is created under
the src folder and opened inside the RSL editor.
2.3
Edit the RSL file
Having the SET DATABASE.rsl file opened inside the RSL editor, add the
following lines2 :
scheme SET_DATABASE =
class
type
Database = Person-set, Person = Text
value
register : Person >< Database -> Database
register(p,db) is db union {p}
test_case
[t1] register("Henrik", register("Anne", {}))
end
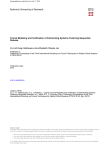
The text should look like the one in Figure 4. The * symbol before the file
name inside the editor means that the file changes has not been saved. Pressing
Ctrl+S will save the file and automatically trigger the type checker. More
about the type checking is presented in section 3.
2 Note
that the name right after the keyword scheme must be the same as the prefix in
the file name.
4
Figure 4: The SET DATABASE.rsl file opened in the RSL editor
3
Type check a RSL specification
The syntax and type checking of a RSL specification can be triggered in many
ways:
• Every time a RSL specification is saved it is automatically typechecked.
• Pressing the TC button in the toolbar menu, triggers the typechecking of
the currently active RSL specification in the editor.
• Right clicking inside the RSL editor or on the file inside the Package
Explorer will display the Type check context menu item. Clicking it will
also trigger a type check on the selected file.
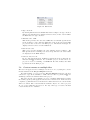
Figure 5: Type check output displayed in Console window
The result of the type checking is displayed in the Console window e.g.by
type checking the SET DATABASE.rsl file, the output presented in Figure 5
is displayed.
If the RSL specification is not correct, then the type checker output contains
error messages in the File:line:column:error message format. For example
replacing the union in line 7 in SET DATABASE.rsl with the mathematical
symbol + and saving the file displays the following output in the Console:
rsltc version 2.5 of Sat Jul 12 11:03:56 2008
Checking SET_DATABASE ...
D:/eRAISE/src/eRAISE/runtime-EclipseApplication/Database/src/
SET_DATABASE.rsl:7:26: Argument types Database (i.e. Text-set)
and Person (i.e. Text)-set incompatible with ‘+’ type
Int >< Int -> Int or
5
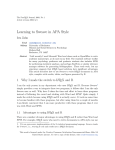
Figure 6: Errors displayed in the Problems view and in the RSL editor
Real >< Real -> Real or
Int -> Int or
Real -> Real
Finished SET_DATABASE
rsltc completed: 1 error(s) 0 warning(s)
The error is also displayed in the Problems view and the editor is updated
to show the RSL line that generated the error. Figure 6 illustrates how the
Problems and editor are changed after type checking an erroneous specification.
The error in the problems view shows the error message, the file name that was
type checked, the path to that file relative to the workspace, the line number of
the content that generated the error and the type of the problem. By double
clicking the error in the Problems view the cursor is moved inside the editor to
the RSL line that generated the error.
Replacing + back with union in SET DATABASE.rsl and saving the file
will remove all the editor markers and errors in the Problems view, since the
RSL specification is now correct.
4
Translate RSL specification to SML
An RSL specification can be translated to SML by using the file’s Translate
to SML context menu. This context menu can be seen by right clicking inside
the RSL editor or on the file inside the Package Explorer view. As a result of
the SML translation, two new SML files are being created. One has the same
name as the RSL specification and the other has the same name plus the suffix
. These two files are stored in an SML project that has the same name as the
project containing the RSL specification plus the suffix SML.
Figure 7 captures the new SML project and the two SML files that were
created as a result of translating the SET DATABASE.rsl file to SML.
If the RSL specification file has another path inside the RSL project e.g.files/
src, then the SML files will have the exactly same path, files/src, inside the
6
Figure 7: Database project and its corresponding SML project
SML project.
Before trying to translate the file to SML, the SML translator calls the type
checker, so if the RSL specification contains errors no SML files are created.
5
Run test cases
To run the test cases from an RSL specification, one can press the RT button in
the toolbar menu. Another option is to select the Run test cases context menu
item after right clicking inside the RSL editor or inside the Package explorer
view.
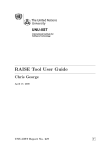
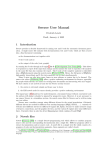
Figure 8: The test case result of the SET DATABASE.rsl specification
By executing the test cases, the tests results are shown in the RTest view
as in Figure 8. The first line is the name of the file, while the test results are
displayed as children of the file. For each test case, the name of the test and
the result are displayed on the same line separated by a space. If the test has
no name, then only its result is displayed.
A test can be in one of the three states:
• success
if a test value is true or any other value that is not false.
• false
if the test value is false.
• error
if the test has generated run time error e.g.division by 0 generates a runtime error
Based on the test result status, an icon is displayed next to its name and
result. If the test is false then the icon is blue, if an error was encountered while
running the test, then the icon is red , otherwise it is green to show success.
The file name has also an icon associated inside the RTest view. If the file
contains one or more erroneous tests then the icon displayed next to the file
name is red. If there are no run time errors, but there are some false tests, the
7
icon is blue. And if all tests are successful then a green icon is displayed in the
RTest view next to the file name. In Figure 8 there is only one test, named t1
whose value is {”Anne”,”Henrik”}. Since this caused no run time error and
it is not false, the test is considered a success and thus a green icon is displayed
next to it. Since the SET DATABASE specification has only one test and it
is successful, then it is also considered a success and a green icon is displayed
next to its name.
If the RSL specification has no test cases, but the user has chosen any way
to try to execute the file, then no output is displayed in the RTest view.
6
Generate Latex document
Figure 9: The doc project associated to the Database project
The RSL specification can be included in a LATEXdocument by pressing the
Latex button from the toolbar menu or by choosing the Generate Latex item
from the editor context menu or from the Package Explorer. As a result of
this action a new project is created with the same name as the RSL project
plus the suffix Doc. Inside the newly created project, under the src folder,
the user can see a main.tex file which contains the LATEXtext for including
the RSL specification. Figure 9 captures the structure of the project that was
created after the Latex button was pressed with SET DATABASE.rsl being
the active file. The main.tex file can be directed compiled with LATEXand if
no other text is added, the only thing the document will contain is the RSL
specification.
7
Actions on more than one file
So far in this user guide, all the actions were concerned with only one RSL
file: the type check of one file, the SML translation of one file, running the test
cases from one file and generating LATEX for one RSL file. But sometimes, when
projects contain a large number of RSL files, it is nice to be able to execute
action on multiple files without having to click on each of them separately. The
following subsections describe how to do so.
7.1
RSL menu
The RSL menu in the main menubar offers the possibility to take actions on
all RSL files inside the workspace. The RSL menu has four submenu items
presented in Figure 10 and further explained:
8
Figure 10: RSL menu
• Type check all
By clicking this menu item, all RSL files in the workspace are type checked.
All type check messages are displayed in the Console, in the order in which
the RSL files were type checked.
• Translate all to SML
This menu generates the associated SML files for all RSL specifications
in the workspace. Once with the SML files creation, the associated SML
projects are also created for each RSL project. Informative messages are
displayed in the Console for all translations.
• Run all test cases
This option executes all RSL test cases available in the workspace. All
RSL specifications containing test cases, along with the test cases results
are displayed in the Test window.
• Generate Latex for all
By choosing this menu item, all RSL specifications in the workbench are
included in LATEXdocuments. For each RSL project, an associated doc
project is created containing one main.tex file that includes the RSL
specifications in the RSL project.
7.2
Context menus on multiple files
The user can apply actions on multiple resources at once, by using the context
menus available in the Project Explorer window.
By right clicking on a project in the Project Explorer window, the user
can select to type check, translate to SML, run test cases or generate LATEX for
all RSL specifications available inside that project.
The user can also select multiple projects or multiple RSL files(by holding
the Ctrl key pressed) and apply the four actions on the selection. If the selection
comprises e.g.RSL files and one file that is not RSL, then the four context menus
will not be visible. The context menus are available only for one or more projects
or one or more RSL files are selected. For any other type of resource the RSl
context menus are not available.
9