1
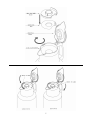
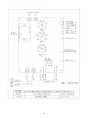
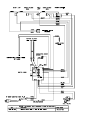
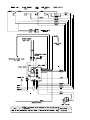
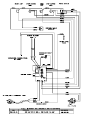
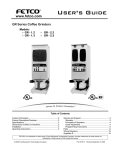
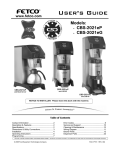
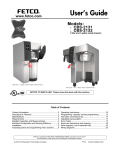
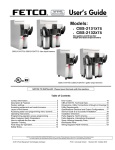
FOOD EQUIPMENT TECHNOLOGIES COMPANY
640 Heathrow Drive • Lincolnshire • IL • 60069 • USA
3
Phone: (800) 338-2699 • (847) 719-3000 • Fax: (847) 821-1178
Emergency Service Only: (800) 660-0035 (U.S. & Canada)
E-mail: [email protected] • Internet: http://www.fetco.com
Coffee
Brewing
Systems
User’s Guide
Installation - Operation - Service
Model: CBS-18
Table of Contents
Product Description/Features ........................................ 2
Technical Data ............................................................... 2
Brewing Specifications ............................................... 2
Factory Settings.......................................................... 2
Weights and Capacities.............................................. 2
Electrical Configurations & Brewing Capacities ......... 2
Installation ...................................................................... 3
Keys To A Successful Installation .............................. 3
Installation Check List................................................. 3
Operating Procedures ....................................................6
Cleaning..........................................................................6
Settings and Adjustments...............................................8
Replacement Parts .......................................................10
Drawings.......................................................................11
FETCO®, and EXTRACTOR® are trademarks or trade names of Food Equipment Technologies Company.
Part # P007
Revised February 27, 2004
Product Description/Features
•
•
•
•
•
Fully Automatic, With Pulsebrew, Pre-Wetting, and Dripping Indicator
Stainless Steel, Gourmet Size Brew Basket
1.5 or 1.8 Liter, Glass Lined Thermal Server With Brew Thru Feature
Hot Water Service
All Stainless Steel Body Construction
Technical Data
Brewing Specifications
Brew Volume: 1.5 or 1.8 liters (0.4 or 0.5 gallon)
Coffee Filter Size: 11 ¼ X 3 ¾” Product # F007
Water Requirements: 20-75 psig
Factory Settings
Water Temperature: 205°F in tank
Brew Temperature Protection: Disabled
Brew time: 3 minutes
Pulse: 20 seconds on, 10 seconds off
Pre-wetting: Disabled
Weights and Capacities
Brewer Weight
(empty)
Water Tank
Capacity
Brewer Weight
(filled)
Server Weight
(empty)
Server
Capacity
Server Weight Total Weight Brewer
(filled)
& Server Filled
21 lbs.
9.5 kg
2.0 gal.
7.5 liters
38 lbs.
17.3 kg
2.0 lbs.
0.9 kg.
0.4 / 0.5 gal.
1.5 / 1.8 ltr.
5.9 lbs.
2.7 kg.
43.9 lbs.
20.0 kg.
Electrical Configurations & Brewing Capacities
Domestic
Model
Heater
Configuration
CBS-18 (-1)
CBS-18 (-2)
CBS-18 (-3)
1 X 1500 watt
1 X 2100 watt
1 X 2700 watt
CBS-18 (-5)
1 X 3700 watt
Voltage
Phase
Wires
KW
Maximum
Amp draw
120
120
120/208
120/220
120/240
120/208
120/220
120/240
1 ph.
1 ph.
1 ph.
1 ph.
1 ph.
1 ph.
1 ph.
1 ph.
2 + ground
2 + ground
3 + ground
3 + ground
3 + ground
3 + ground
3 + ground
3 + ground
1.6
2.2
2.1
2.4
2.8
2.9
3.3
3.8
13.0
18.0
10.2
11.2
11.8
13.8
15.1
15.9
Batches per Hour*
1.5L Batch
1.8L Batch
6.3
7.9
7.7
8.4
9.1
9.2
10.0
10.7
5.4
6.8
6.7
7.4
8.0
8.2
8.9
9.6
Export Model
CBS-18 (-4)
1 X 2700 watt
220
1 ph.
2 + ground 2.4
11.2
8.4
7.4
CBS-18 (-6)
1 X 3700 watt
220
1 ph
2 + ground 3.3
15.1
10.0
8.9
*Batches per hour are based on standard factory settings: No pre-wetting / 3 minute spray over / Pulse - 20 sec.
With pre-wetting feature enabled, subtract ¼ batch per hour.
With no pulse (continuous spray over), add 1 - 1 ½ batches per hour for 120 volt units and 2 - 3 batches per
hour for 208-240 volt units.
2
Installation
(For Qualified Service Technicians Only)
Keys To A Successful Installation
FETCO brewers are rugged and reliable machines that will provide many years of service. However, if not
installed correctly by qualified personnel, the brewer will not operate properly and damage to the brewer may
result. Damages resulting from improper installation are not covered by the warranty.
Here are the key points to consider before installation:
General: Utilize a qualified beverage equipment service technician for installation.
Place the brewer on a level surface.
Do not adjust the thermostat setting unless absolutely necessary. It is set at the factory for optimum
performance- 205°F. It should only be lowered at high altitude installations.
Plumbing: This equipment is to be installed to comply with the applicable federal, state, or local plumbing
codes.
The water line must be flushed thoroughly prior to connecting it to the brewer to prevent debris from
contaminating the machine.
A taste and odor filter is highly recommended for this and all beverage equipment
Verify that the water line will provide at least 2 gallons per minute before connecting it to the brewer.
Electrical: 120 volt units are supplied with appropriate cords and plugs for 15 amp or 20 amp service.
Dual voltage units (120/208-240VAC) are not supplied with a cord or plug. The terminals must be wired as
follows:
Located next to
Located on the
L-1: 120 VAC
L-3: 120 VAC
control board
the control board.
ground (green)
L-2: neutral (white)
Both neutral (white) and ground (green) must be provided.
The electrical drawing for is located at the back of this manual and inside the rear cover of the brewer.
Installation Check List
The installation must comply with applicable federal, state, and local codes having jurisdiction at your location.
Check with your local inspectors to determine what codes will apply to the installation and operation of FETCO
products.
1. Review the Dimensional Drawings and the Operating Procedures for the unit you are installing. Verify
the brewer will fit in the space intended for it. Verify that the counter or table will support the weight of
the brewer and servers when filled and that the surface is level.
2. Verify that the actual voltage at the electrical service connection is compatible with the specifications on
the brewer’s serial number plate. Make sure the electrical service includes neutral. Ensure at this time
that the circuit breaker to the brewer and the power switch on the brewer are in the off position.
3. Remove the white plastic protective coating from the brewer body.
3
4. The thermostat, timer, and the water tank fill level are pre-set at the factory. There is no need to turn off
the heaters during the installation process. The heaters are disabled by the liquid level control board
circuits on the main board until water is sensed. The heating process will start automatically when the
tank has filled with water.
5. Remove the top and rear panel to inspect for leaks, loose wires, etc., and for adjustments.
6. Water connection:
• Water inlet is a 1/4 inch male flare fitting
• The brewer can be connected to a cold or hot water line. Cold water is preferred for best coffee
flavor, but hot water will allow for faster recovery times. Hot water should not exceed 160°F.
• We discourage the use of softened water. Softened water will give poor brew performance in any
drip coffee system using a paper filter.
• Install a water shut off valve near the brewer to facilitate service. If an in-line water filter is used, it
should be installed after the water shut off valve and in a position to facilitate filter replacement.
• Flush the water supply line and filter before connecting it to the brewer.
• Verify that the water line will provide at least 3/4 gallons per minute, and that the water pressure is
between 20 and 75 psig.
• Use a wrench on the factory fitting when connecting the incoming water line. This will reduce stress
on the internal connections and reduce the possibility of leaks developing after the install has been
completed.
7. Power connection:
• A fused disconnect switch or circuit breaker on the incoming power line must be conveniently
located near the brewer, and its location and markings known to the operators.
• All brewers require neutral. Damage to the brewer may result if neutral is not present.
• The body of the brewer must be grounded to a suitable building ground. A ground lug is provided in
the brewer on the floor of the chassis. Use suitable gauge copper wire for grounding.
• Electrical connections must be secured in-place within the unit to meet national and local standards.
8. Turn on the incoming water supply line and inspect both inside and outside of the brewer for leaks in all
fittings and tubes.
9. Plug in brewer and turn on the incoming power
10. Turn on the brewer with the power switch.
• Within 6 seconds, the internal tanks will begin filling until the water is sensed by the water level
probe.
• The heaters will be disabled by the L.L.C. circuits on the main board until water is sensed by the
water probe at the top of the tank.
On initial startup, from dry tank conditions, the green "READY" will flash 45 seconds after turning unit on,
indicating a fault (low water level). Turn the power switch off and back on to reset this. Repeat one additional time
if necessary
The brewer will be ready for operation as soon as the ready light comes on to signify that the water tank is up to
temperature.
Depending on the cost of electricity in your area, very little savings may be had by turning the brewer off
between shifts. The water tank is well insulated and may actually use less electricity to keep the tank hot, than
re-heating the tank from a cold condition. Leaving the brewer in the on position will also avoid delays at the
beginning of shifts for the brewer to reach operating temperature.
11. Brew one server (water only) to confirm proper fill levels.
• The brewer is factory set to deliver 1.9 liters to the serving dispenser.
• Each ounce of coffee retains up to two ounces of water, therefore your brew level will be reduced
proportionally to the amount of coffee used.
4
12. Review the entire operating procedures with whoever will be using the brewer. Pay particular attention
to the following areas.
• Don't remove the brew basket until it has stopped dripping.
• Don't remove the spray plate until it has cooled from the brewing operation. It may still be hot, and
hot brew water may be retained behind it.
• Make sure the server is empty before brewing into it.
• Show the location and operation of the water shut off valve as well as the circuit breaker for the
brewer.
• Never unplug the coffee brewer (or any high wattage equipment) while it is operating. Push the
power switch to the off position first. The resulting electrical pulse may cause a burn or shock
hazard, or damage the computer operating circuits on the control board.
• Steam from the tank will form condensation in the vent tube. This condensation will drip into and
then out of the brew basket. Up to 1/4 cup discharging overnight is possible. Place an appropriate
container under the brew basket when not in use.
Warning: Avoid sudden changes in temperature in the server, which may cause the glass liner to
shatter. Do not rinse a warm server in cold water. Use only warm or hot water.
5
Operating Procedures
1. Turn brewer on/off switch to the on position
• The power switch will illuminate to indicate that the brewer has power and is operating.
• When the ready light illuminates, the brewer is fully up to temperature. The amount of time
required to gain full operating temperature will vary depending on the electrical configuration that
was ordered, and the temperature of the incoming water.
2. Prepare the brew basket.
• Place a paper filter in the brew basket. Pour the appropriate amount of pre-measured, ground
coffee into the paper filter, and distribute it evenly. The amount of coffee used will depend on your
personal tastes and the recommendation of your roaster.
• Slide the brew basket into place.
3. Place the server in position under the brew basket.
• Make sure the server is empty. Overflowing may result if it is not completely empty when the brew
cycle begins.
• Ensure that the brew-though cover is in place and the lever is in the open position.
4. Start the brew cycle.
• When the ready light illuminates, start a brew cycle by pressing the start switch.
• The brew light will illuminate during the brew cycle. At the end of the brew cycle, the brew light will
flash for 90 seconds, indicating that coffee is still dripping from the brew basket.
• CAUTION! Do not remove the brew basket until the brew light stops flashing and dripping from the
bottom of the brew basket has stopped. Carefully remove the brew basket while inspecting the
inside of the basket for hot coffee that may have been trapped or has not finished draining.
• To interrupt the brew cycle at any time, press the stop switch. This will reset all functions.
Optional Setting: Brew Temperature Protection
The CBS-18 may be set so that it cannot brew unless the water is at the proper temperature. If a
brew cycle is started without the ready light on, no water will be dispensed and the brew light will
begin flashing. Once the water heats to the proper temperature, the brew cycle will begin normally.
See the Settings & Adjustments section for instructions on setting this feature.
Optional Setting: Pre-wetting
The CBS-18 has an optional pre-wetting feature. When the brew cycle is started, water will be
sprayed over the coffee grounds for 5 seconds, followed by a 30 second delay before the regular
brew cycle begins. See the Settings & Adjustments section for instructions on setting this feature.
Cleaning
Brewer: The spray pan should be removed and cleaned periodically to remove hard water deposits. In areas
with extremely hard water, it may be necessary to do this weekly. Monthly cleaning may be sufficient in areas
with average water conditions.
Servers: The servers should be cleaned daily with mild detergent and a soft brush or sponge. Never allow
coffee to sit inside the server overnight to prevent deposits from forming. Do not use wire brushes.
Do not place the servers in a dishwasher
Warning: Avoid sudden changes in temperature in the server, which may cause the glass liner to
shatter. Do not rinse a warm server in cold water. Use only warm or hot water.
6
7
Settings and Adjustments
Caution! Always unplug or disconnect power to the brewer before changing any settings or adjustments.
All settings and adjustments are made on the control board, which is accessible from the back of the unit. (See
the control board diagram.) To remove the cover, remove 6 screws from the back and 2 screws from the top.
Dispense System
The CBS-18 features a system which dispenses a factory calibrated amount of water completely before refilling
the tank. This amount of water (1.8 or 1.5 liters) is determined by the distance between the water level probe
and the dispense tube. The water tank will not refill until the brew cycle is finished and the dispense valve has
closed.
The volume of water dispensed is not adjustable.
Brew Time (bottom dial)
The brew time is adjustable from 2 to 12 minutes and is factory set at 3 minutes. The brew
time always defaults to the nearest full minute on the dial.
The brew time must be set long enough to dispense the full volume of water, however, a
setting that is longer than necessary will delay the next brew cycle. See the next section,
Pulse Feature, for a full explanation.
Pulse Feature (top dial)
The optional pulse feature allows the spray of water over the coffee bed to cycle on and off
throughout the brew cycle. The setting is made on the top dial on the control board,
labeled “ON TIME”. The total pulse cycle is 30 seconds in length.
Examples:
1.) The factory setting, 20 seconds, will give 20 seconds of spray over followed by
a 10 second pause.
2.) A setting of 15 seconds will give 15 seconds of spray over followed by a
15 second pause.
3.) A pulse setting of 30, the maximum, will give a constant spray of water
throughout the brew cycle. In other words, no pulse at all.
The Pulse and Brew settings must be synchronized so that the dispense valve is open long
enough to dispense all of the brew water, without being open longer than is necessary.
The brew setting is on the bottom dial of the control board.
Use the following chart to determine the proper settings.
On Time Setting (Pulse)
Brew Time Setting (minimum)
5 sec.
12 min.
10 sec.
6 min.
15 sec.
4 min.
Factory
Settings
20 sec.
3 min.
25 sec.
3 min.
30 sec*.
2 min.
* No pulse
8
Temperature
The brew water temperature is adjustable from 190°F to 205°F and is factory set at 205°F. The adjustment is
made on the center dial of the control board. Adjustment should only be necessary at high altitudes to prevent
boiling.
Brew Temperature Protection
When this feature is enabled, a brew cycle cannot begin unless the water is at the proper
temperature. If a brew cycle is started without the ready light on, no water will be dispensed and
the brew light will begin flashing. Once the water heats to the proper temperature, the brew cycle
will begin normally.
The brewer is factory set with this feature disabled. To enable it, locate the yellow wire near the
lower right side of the control board. Move the wire from the terminal labeled START 2 to the
terminal labeled START 1.
Pre-wetting Feature
When this feature is enabled, water will spray over the coffee bed for 5 seconds at the beginning
of the brew cycle to pre-wet the grounds. After a 30 second delay, the normal brew cycle will
begin.
The brewer is factory set with this feature disabled.
Pre-wetting is controlled by Jumper #2, near the bottom of the control board. To enable pre-wetting, remove the
jumper connector and place it on both of the pins. This closes the circuit, allowing pre-wetting to occur.
Jumper 2 in open position.
Pre-wetting disabled.
(Factory setting)
Jumper 2 in closed position.
Pre-wetting enabled.
Do not change Jumper #1. This jumper must always be in the open position for the CBS-18.
9
Replacement Parts
CBS-18 Brewer Parts
Part Number
Description
23073
plastic stand, CBS-18
51018
control board, pulse brew, 120VAC
107013
heater element, 1.5KW, 120VAC, bottom mount
107014
heater element, 2.1KW, 120VAC, bottom mount
107015
heater element, 2.7KW, 240VAC, bottom mount
107016
heater element, 3.7KW, 240VAC, bottom mount
54020
temperature probe, 8"
53061
57058
thermostat, temperature limit, 230°F
fill valve, S-53, 0.75 GPM, 120VAC
58017
lamp, "brew" 120VAC
58019
lamp, "ready", 220VAC
58061
switch, brew 240VAC
58062
switch, stop 240VAC
58063
switch, power, 240VAC
71044
faucet, hot water
71003
faucet seat cup, hot water
71039
faucet upper assy., hot water
101151
brew basket assy., CBS-18
With wire insert
101152
brew cone assy., CBS-18
Without wire insert
9018
23074
102013
24002
brew basket wire insert, CBS-18,11 1/4" X 3 3/4"
brew basket handle, CBS-18
tank cover assy.
tank cover gasket
102080
spray housing assy, 120VAC, CBS-18, TBS-21H
102081
spray plate assy.
57047
spray housing coil service kit, DSV-11, 120 VAC
24054
o-ring, 4.237" I.D., #156
K027
water level probe assy., 1.8 L
K026
water level probe assy., 1.5 L
Server Parts
Part Number
Description
99005
glass liner, 1.8 liter server
99006
glass liner, 1.5 liter server
99007
rubber sealing ring, CBS-18 server
99008
chrome jacket, 1.8 liter server
99015
black lid, CBS-18 server
99011
orange lid, CBS-18 server
23077
brew through funnel, CBS-18 server
23078
service disc, CBS-18 server
23079
cover plug, CBS-18 server
10
Includes coil, o-ring,
and spray plate assy.
Drawings
11
12