1
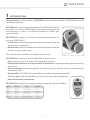
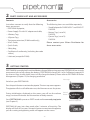
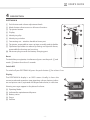
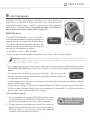
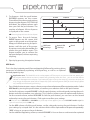
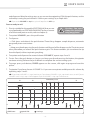
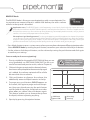
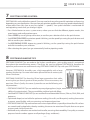
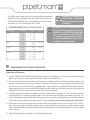
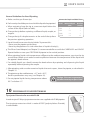
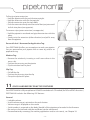
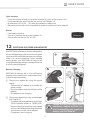
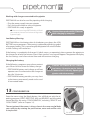
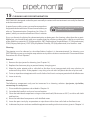
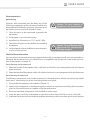
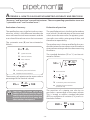
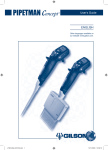
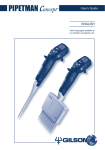
User's Guide Contents Page 1 - INTRODUCTION 3 2 - 4 PARTS CHECK LIST AND ACCESSORIES 3 - GETTING STARTED 4 4 - DESCRIPTION 5 5 - PIPETTING JUST LIKE WITH PIPETMAN 6 6 - PIPETTING MODES 7 7 - PIPETTING SPEED CONTROL 11 8 - PIPETMAN DIAMOND Tips 11 9 - GUIDELINES FOR GOOD PIPETTING 12 10 - PERSONALIZE YOUR PIPETMAN M 13 11 - GOOD LABORATORY PRACTICE FEATURES 14 12 - PIPETMAN M POWER MANAGEMENT 15 13 - CONFIGURATION 16 14 -maintenance of your pipetman 17 15 -cleaning and decontamination 22 16 -leak test 24 Warranty 17 - TROUBLESHOOTING 24 Gilson warrants this product against defects in material under normal use and service for a period of 12 months from the date of purchase. 18 - SPECIFICATIONS 25 19 - SAFETY PRECAUTIONS AND LIMITATIONS OF USE 26 Gilson is not responsible for incidental damage resulting from physical shock, continuous exposure to corrosive reagents or technical handling not in accordance with the guidelines described in the User’s Guide. 20 - REPLACEMENT PARTS 26 27 APPENDIces ec declaration of conformity -2- 31 EN User's Guide ENGLISH 1 introduction Congratulations on the purchase of Pipetman® M the natural evolution of Pipetman, the world standard for pipetting. Pipetman M is a new motorized member of the Pipetman® P family from Gilson. It is a fusion of Pipetman’s renowned accuracy, precision and robustness as well as user-friendly functions to simplify your professional life. Mode-button Pipetman M is so easy to use that you will have the feeling that you are using a Pipetman P: • Push-button: set the volume by turning the button left or right and pipette with a simple push. • Mode-button: to access additional features like repetitive mode, mix function or easy readjustment. That’s all you need to perform your pipetting tasks easily! Push-button Pipetman M is nothing less than a Pipetman and much more: • Easy to use: only one push-button for all pipetting functions. • More pipette techniques for a large number of applications: standard pipetting, repetition, mixing and reverse. • Maximal comfort: motorized aspiration and dispensing, easy ejection of tips to avoid repetitive strain injuries (RSI). • Minimal effort: Pipetman M is much lighter than other motorized pipettes (RSI). • “No user” effect: high reproducibility and accuracy due to motorized pipetting. • More fun for better performance. Pipetman M is available in 4 models covering a range from 0.5 µL to 1000 µL: Model P10M P20M P200M P1000M Reference F81001 F81002 F81003 F81004 Range 0.5 µL to 10 µL 2 µL to 20 µL 20 µL to 200 µL 100 µL to 1000 µL Color code Red Pale yellow Yellow Blue -3- 2 PARTS CHECK LIST AND ACCESSORIES Contents: Accessories: Just take a moment to verify that the following items are present: The following items are available separately: • Stand Adapter for Carrousel™ and Single™ F807023 • Pipetman M pipette, • Power Supply 5V with AC adapter and cable, • Battery Tags (set of 4) F807013 • 4 Battery Tags, • Ejector Tags (set of 4) F807014 • 4 Ejector Tags, • Tip ejector extension (P10M model only), • User’s Guide, Please contact your Gilson Distributor for these accessories. • Quick Guide, • Safety bag, • Certificate of conformity (including bar-code sticker), • Lubricant (except for P10M). 3 GETTING STARTED Pipetman M is provided with a minimal battery charge. Before using your new Pipetman M, we strongly recommend you to fully charge the battery. Pipetman M charges 80 % of its full battery capacity in less than an hour, it takes three hours to fully charge the battery. Please refer to Pipetman M Power Management (Chapter 12) for charging procedure. Volume range Switch on your Pipetman M: Press the push-button to activate the pipette. The start-up screen appears: The pipette will do a self calibration test, the firmware resets the piston. During initialization, displayed on the screen, you will see the volume range, version of firmware and the number of readjustments. Your Pipetman M is preset on PIPET mode and is now ready to pipette (see Chapter 5). Pipetman M goes into sleep mode after 3 minutes of inactivity. The display will shut off. Just press the push-button to reactivate the pipette, your last setting and pipetting mode will appear on the screen. -4- Version of firmware Number of readjustments EN User's Guide ENGLISH 4 description Pipetman M Push-button and volume adjustment knob Mode-button: direct access to all menu functions Tip ejector button Display Identity-tag clip Identity-tag window Connecting nut – attaches handle to lower part Tip ejector: removable to access piston assembly and tip holder Optimized tip-holder to reduce tip fitting and ejection forces, removable for cleaning and servicing Elastomer plug to cover the battery charging port Reset: To reinitialize your pipette, simultaneously press on the push- and mode- button for at least 5 seconds Switch Off: To switch off your Pipetman M, press the push-button for at least 5 sec. Display The Pipetman M display is an OLED screen. Usually, it shows the current mode and operation step, pipetting volume, battery indicator and piston status (aspirated and dispensed volume) in real time. Warning messages appear in the place of volume. Pipetting Mode Indicator for aspiration and dispense Battery status Purge Volume -5- 5pipetting just like with pipetMAN Using Pipetman M is as easy as using a mechanical Pipetman. Your Pipetman M is set by default on “PIPET Mode”, that means forward pipetting. You can select a volume and start to pipette. Switch on Press push-button. Adjust the volume setting • Hold your Pipetman M in pipette position. • Turn the push-button half way, the screen will display: “click to change vol.” • Now press the push-button; the volume on the display will start blinking, you can now adjust the volume: • Turn the push-button either clockwise to decrease volume or counter clockwise to increase volume, like indicated on the button. • Press the push-button one time when finished. The volume is locked. You are ready to pipette! PIPET Mode This is the classic pipette mode (forward pipetting), your pipette is simply aspirating and dispensing. Application note: You can use the PIPET Mode for all standard applications like DNA extraction, Plasmid Isolation, Cloning, Dilution, PCR, qPCR and many others. You can easily pipette aqueous liquids like buffer, chemical solutions (MgCl2, KCl …) and biological samples like blood, DNA and RNA. • Fit a tip suitable for the model of Pipetman M that you are using (preferably use PIPETMAN DIAMOND Tips for assurance of accurate and precise results; refer to Chapter 8). Caution: You must always fit a tip before using any pipette! • Press the push-button to aspirate the selected volume. • To dispense: Click (press and release) the push-button. Three things happen: sample dispense, automatic purge and piston reset to zero. or Keep your thumb pressing the push-button until the end of the dispense cycle: The piston reset takes place after releasing the push-button again. This feature enables you to remove the tip from the liquid, without aspirating anything. V • Eject tip by pressing the ejection button. Purge Your Pipetman M is ready again for next pipetting cycle while maintaining the volume and the last settings! You have been pipetting like with your mechanical Pipetman and only needed 2 pushes on the push-button! -6- 0 START button Optional STOP EN User's Guide ENGLISH 6pipetting modes Pipetman M offers more pipette techniques for a large number of applications: You will find all pipetting modes in the menu (for system settings refer to the Chapters 7 and 13). Access the menu by pushing the Mode-button. To choose one of the pipetting modes, turn the pushbutton and confirm your selection by a simple click! Mode-button REPETITIVE Mode The REPETITIVE Mode allows you to distribute a same volume repeatedly in predefined number (N) of equal aliquots. You supply the aliquot volume (AV) and the pipette automatically calculates the number of aliquots possible from the nominal volume (NV) of the pipette as follows: Push-button N = NV/AV (e.g. 100 μL x 10 for P1000M). You also can decrease the number of repetitions (e.g. 100 μL x 10-(n ≥1) for P1000M). Application notes: The REPETITIVE Mode is ideal for dispensing aliquots, e.g.; dispensing a PCR master mix into PCR tubes or 96 plates, pipetting elution buffer for DNA extraction, preparing a target for spectrometric analyses, distributing loading buffer into samples, etc. • Press Mode-button to access system menu, where you can choose between different pipette modes. Select REPETITIVE Mode by turning the push-button. To confirm your selection click on the pushbutton. • Turn the push-button half way, the screen will display: “click to change vol.” • Now press the push-button; the volume on the display will start to blink, you can now adjust the volume: • Set the aliquot volume: click the push-button, set the volume by turning the push-button and click again to confirm your settings. • Set the aliquot number: The maximal number of aliquots has been calculated by your Pipetman M. The number of aliquots flashes and you can decrease this number (N – (n ≥1)) by turning the push-button. Click again to confirm your settings. You are ready to pipette! 1. Fit a tip suitable for the model of Pipetman M that you are using (preferably use PIPETMAN DIAMOND Tips for assurance of accurate and precise results; refer to chapter 8). 2. Click push-button to aspirate total volume. The volume aspirated will be a little bit more than required (extra volume). The extra volume is necessary to ensure equal operating conditions for each dispensed aliquot. -7- Caution: You must always fit a tip before using any pipette! 3.To dispense: click the push-button. DISCARD appears on the screen. Discard the extra volume and continue dispensing the aliquots. Pipetman M distributes the aliquot volume each time you click the push-button. The number of aliquots left to dispense is displayed on the screen. DISCARD ALIQUOTES PURGE V (+ extra vol)* V (vol) A warning beep indicates the last aliquot! 4.To purge: Press the push button, PURGE appears on the screen, click again to purge and reset the piston. Keep your thumb pressing the pushbutton until the end of the purge: the piston reset takes place after you release the push-button again. This feature enables you to remove the tip from the liquid, without aspirating anything. 0 Purge START button Click to Purge Optional STOP Start Purge Discard 5.Eject tip by pressing the ejection button. MIX Mode This is the classic pipette mode (forward pipetting) followed by a mixing phase, composed of repeatedly aspirating and dispensing, as well as an optional forward pipetting step. Application notes: The Mode MIX can be used to prepare a PCR master mix, enzyme restriction mix, protein solution, oligonucleotide dilution and to mix samples with gel loading buffer and so on…you can mix two different solutions or homogenize one solution. If you work with higher viscosity than water (e.g. restriction enzyme) you may change the aspiration speed (refer to chapter XX). If you work with genomic DNA you should always pipette very carefully to avoid shearing and nicking. • Press Mode-button to access menu, where you can choose between different pipette modes. Select MIX Mode by turning the push-button, to confirm your selection click on the push-button. • Set the first volume, named VOLUME 1: click the push-button, set the volume by turning the pushbutton and click to confirm your selection. This is the first volume you will aspirate and dispense. Set the second volume, named VOLUME 2: click the push-button, you can now set the second volume by turning the push-button. Click again to confirm your settings. You can set the VOLUME 1 or VOLUME 2= 0 µL the step will not appear. If you set the VOLUME 1 and 2 = 0 µL the cycle will start directly with the MIX step. • Set the MIX volume: click the push-button, set the volume by turning the push-button. Confirm your settings by a simple click. It is the volume which will be aspirated and dispensed repeatedly. “MIX” as long as you press the push-button. • Set the additional pipetting volume, named VOLUME 3: You can choose a volume to be aspirated -8- EN User's Guide ENGLISH and dispensed after the mixing step, so you can continue pipetting! Click the push-button, set the volume by turning the push-button. Confirm your settings by a simple click. If you set the VOLUME 3 = 0 µL the cycle will stop after the MIX step. You are ready to mix! 1. Fit a tip suitable for the model of Pipetman M that you are using (preferably use PIPETMAN DIAMOND Tips for assurance of accurate and precise results; refer to chapter 8). Caution: You must always fit a tip before using any pipette! 2.To aspirate VOLUME 1 press the push-button 3.To dispense: Click (press and release) the push-button: Three things happen: sample dispense, automatic purge and piston reset to zero or Keep your thumb pressing the push-button until the end of the dispense cycle: The piston reset takes place after you release the push-button again. This feature enables you to remove the tip from the liquid, without aspirating anything. 4.To aspirate and dispense the second volume “VOLUME 2”, repeat steps 2 and 3. 5. To mix: Press the push-button; as long as you keep your thumb pressing the button, the pipette continues mixing. Release the push-button to complete the current mixing cycle. 6.To purge: press push-button, PURGE appears on the screen, click again to purge and reset the piston. 7. To pipette: If you have chosen a VOLUME 3 > 0 you can now aspirate and dispense this volume by repeating steps 2 and 3. If you choose VOLUME1 = 0, step 2 won’t occur, if you choose VOLUME 2 = 0 µL, step 4 won’t occur, as well if you set VOLUME 1 and 2 = 0 µL, step 1-4 will disappear. If you set VOLUME 3 = 0 µL step 7 will not occur. Push-button pressed V2 V1 V 0 Purge START button Optional STOP Start Purge -9- V3 REVERSE Mode The REVERSE Mode is like reverse mode pipetting with a manual pipette. During aspiration an amount of liquid is added. After delivery the excess volume remains in the tip and is discarded. Application notes: The REVERSE Mode is ideal for pipetting viscous liquids; liquids with high vapour pressure or those which tend to foam. Your Pipetman M aspirates a selected volume and an excess. This excess compensates for the liquid that remains as a film inside the tip during dispensing. For example: protein extraction, cell lysis, plasmid isolation, cell culture, buffer preparation and many others… Electrophoresis gels loading protocol: First change the pipetting speed of your pipette (see chapter X). Aspiration can be done by using the standard speed (by default speed 6). Dispensing should be done very slowly and carefully, to prevent swirling and spilling of the samples, so select the lowest speed 1. Your pipette is now ready to load your gel! Please be aware that if you purge without pulling out the tip air bubbles could get into your gel! • Press Mode-button to access system menu, where you can choose between different pipette modes. Select REVERSE Mode by turning the push-button, to confirm your selection click the push-button. • Set the volume: click the push-button, set the volume by turning the push-button and click again to confirm your settings. You are ready to do reverse pipetting! 1. Fit a tip suitable for the model of Pipetman M that you are using (preferably use PIPETMAN DIAMOND Tips for assurance of accurate and precise results; refer to Chapter 8). 2. Click push-button to aspirate the selected volume. An amount of liquid equal to the amount of purged air is added, the volume aspirated will be a little bit more than the set volume. Caution: You must always fit a tip before using any pipette! V (+ extra vol)* 3. Click push-button to dispense the volume, the additionally amount of liquid remains in the tip. 4.To purge: press push-button, PURGE appears on the screen, click again to purge and reset the piston. Keep your thumb pressing the push-button until the end of the purge: the piston reset takes place after you release the push-button again. This feature enables you to remove the tip from the liquid, without aspirating anything. 5.Eject tip by pressing the ejection button. - 10 - 0 Purge START button Optional STOP Click to Purge Start Purge EN User's Guide ENGLISH 7 PIPETTING SPEED CONTROL Pipetman M is set by default on speed 6. You may need to change the speed of aspiration or dispensing depending on your application. You can change aspiration speed and dispensing speed independently of one other: from very slow to very fast (speed 1 – speed 6). Your speed selection is memorized for each pipetting mode until you change it again. • Press Mode-button to access system menu, where you can find the different pipette modes, the speed menu and configuration menu. • Select SPEED by turning the push-button, to confirm your selection click on the push-button. • Set aspiration speed: aspiration speed is blinking, set the speed by turning the push-button and click to confirm your selection. • Set dispensing speed: dispensing speed is blinking, set the speed by turning the push-button and click to confirm your selection. • After selecting the speed you go automatically back to pipetting mode. 8 PIPETMAN DIAMOND Tips PIPETMAN DIAMOND Tips are made to the highest specifications; strict quality control is maintained throughout the manufacturing process. these tips are used to calibrate Pipetman M, therefore for optimum performance we recommend using PIPETMAN Diamond Tips with your Pipetman M. However, Pipetman M also offers you a high compatibility with a large number of other tips. For more information please feel free to contact your Gilson Distributor. Gilson logo ID Number PIPETMAN Diamond Tips have the Gilson logo engraved on their collar, ensuring that you have a genuine Gilson product. To ensure accuracy and precision, Gilson’s Quality Assurance System focuses on the following critical parameters. • PIPETMAN Diamond Tips are made from pure polypropylene (virgin, metal-free, to avoid the possibility of contamination). They are available sterilized and with filters. • Sterilized PIPETMAN Diamond Tips are certified free of detectable RNases, DNases, DNA, RNA, and proteases. • Optimized shape (revised collar for optimum sealing, thin walls, and fine point), making them easier to mount, more flexible, with no vortexing, and improved precision. • PIPETMAN Diamond Tips are free from even microscopic defects, especially at the orifice. All surfaces are smooth and hydrophobic, thereby avoiding the excessive retention of liquids that causes poor accuracy and a lack of precision. • Mold and cavity references are marked on the collar, ensuring the traceability. For quality assurance purposes batch numbers appear on all packages (bags and boxes). - 11 - • They form an air-tight seal with the tip-holder, preventing the leaks that cause poor accuracy and a lack of precision. • PIPETMAN Diamond Tips (except filter tips) may be autoclaved at 121°C for 20 minutes at 0.1 MPa To ensure the best performance from your Gilson pipette, you shoud ALWAYS use PIPETMAN DIAMOND Tips (in accordance with ISO8655) to complete your pipetting system, because DIAMOND Tips were used to establish the specifications. PIPETMAN DIAMOND Tips to use for best results Pipette model Tips model Range Color code P10M D10 DL10 DF10 DFL10 0.1 – 10 μL 0.1 – 20 μL 0.1 – 10 μL 0.1 – 10 μL Red P20M D200 DF30 2 – 200 μL 2 – 30 μL Pale yellow P200M D200 DF100 2 – 200 μL 10 – 100 μL Yellow P1000M D1000 D1200 DF1000 DF1200 100 – 1000 μL 100 – 1200 μL 100 – 1000 μL 100 – 1200 μL Blue Caution: Do not autoclave PIPETMAN DIAMOND filter tips, they have been sterilized! 9 GUIDELINES FOR GOOD PIPETTING Aspirate and Dispense 1) Fit new PIPETMAN Diamond Tip for the best results (see Chapter 18). Push the tip-holder into the tip using a slight twisting motion to ensure a firm and airtight seal. 2) Pre-rinse the tip. Pre-rinsing consists of aspirating the first volume of liquid and then dispensing it back into the same vessel (or to waste). Subsequent volumes that you pipette will have levels of accuracy and precision within specifications. Some liquids (e.g. protein-containing solutions and organic solvents) can leave a film of liquid on the inside the wall of the tip; pre-rinsing the tip minimizes any errors that may be related to this phenomenon. 3) Hold the pipette vertically and immerse the tip in the liquid (see page 13). Press the push-button to aspirate the set volume of liquid. Wait a few seconds (time depends on model, see page 13); then withdraw the pipette-tip from the liquid. You may wipe any droplets away from the outside of the tip using a medical wipe, however if you do so take care to avoid touching the tip’s orifice. 4) Place the end of the tip against the inside wall of the recipient vessel (at an angle of 10° to 40°). Press the push-button. Wait for at least a few seconds before releasing the push-button to expel any residual liquid from the tip. While removing the pipette draw the tip along the inside surface of the vessel. 5)Eject the tip by pressing firmly on the tip ejector button. - 12 - EN User's Guide ENGLISH General Guidelines for Good Pipetting a.Make sure that you fit new tips. Immersion Depth and Wait Time Model Immersion Depth Wait Time (mm) (seconds) b.Each new tip should be pre-rinsed with the liquid to be pipetted. c. When aspirating, keep the tip at a constant depth below the surface of the liquid (refer to Table). P10M P20M P200M P1000M d.Change the tip before aspirating a different liquid, sample, or reagent. e.Change the tip if a droplet remains at the end of the tip from the previous pipetting operation. 1 2-3 2-4 2-4 1 1 1 2-3 f. Liquid should never enter the tip holder. To prevent this: • Never turn the pipette upside down, • Never lay the pipette on its side when there is liquid in the tip(s), g.The Gilson Stand Adapter (see Chapter 2) is recommended for use with the Carrousel and Single Pipette Holder to store your Pipetman M pipette in the vertical position. h.When pipetting liquids with temperatures different to the ambient temperature, pre-rinse the tip several times before use in order to reach equilibrium between the temperatures of the liquid and the pipette’s dead-volume. i. For volatile liquids you should saturate the dead-volume by aspirating and dispensing the liquid repeatedly before aspirating the sample. j.After pipetting acids or other corrosive liquids that emit vapors, clean the pipette, as described in Chapter 15. k.The pipette can be used between + 4 °C and + 40 °C, but the specifications may vary (see Chapter 18). l.Do not pipette liquids having temperatures above 50 °C or below 4 °C. Caution: Extreme temperatures can affect accuracy and precision! 10 PERSONALIZE YOUR PIPETMAN M Tip-ejector Extension for use with P10M In order to eject D10 tips, tip ejector extensions are supplied with P10M pipettes. The tip-ejector extension which is made of PVDF (polyvinylidene Fluoride), is autoclavable. - 13 - Slot To fit a tip-ejector extension: • Hold the pipette with the push-button upright. • Hold the extension with the slot upright. • Slide the extension over the tip-holder. • Push the extension firmly onto the end of the tip-ejector until it clicks into place (see opposite). To remove a tip-ejector extension (see opposite): • Hold the pipette in one hand and grip the extension with the other. • Gently twist the extension (either direction) and pull it away from the pipette. Personal Label – Name and/or Application Tag: Your Pipetman M offers you two options to mark your pipette. You can personalize your pipette with a name tag and/or an application tag: Clip-tag Window-Tag: •Remove the window by inserting a small screw-driver in the access slot. • Position the name tag on the pipette • Clip the window back in place. Clip-Tag: • Pull off the clip. • Position the name tag into the clip • Clamp the clip back in place. Window-tag 11 GOOD LABORATORY PRACTICE FEATURES Your Pipetman M is fully compliant to ISO8655 standard and is CE marked (for IVD and EMC directives). Pipetman M includes the following GLP features. General • • • • • • Lockable volume. Useful volume-range is printed on the push-button Volume range is displayed on the screen Serial number is engraved on the body (handle) of the pipette and encoded in the firmware. Bar code: on the box and with the certificate (can be transferred). Personalization by nametags (for marking application and/or user name), see Chapter 10. - 14 - EN User's Guide ENGLISH Cycle counters • • • • From last volume setting (to count the number of cycles in the current “run”), From manufacture and since the last service (see Chapter 14). By indicators (R1, R2, R3 … Rx) each time pipette is readjusted Maintenance intervals can be specified by weeks or number of cycles elapsed. Alarms • Low battery warning • Service is overdue warning (see Chapter 14). • Service Alert can be set “On” or “Off”. 12 PIPETMAN M POWER MANAGMENT The Pipetman M battery has been designed to ensure 800 pipetting cycles at maximum speed (up to seven 96 well plates) between two charge cycles. For service continuity when needing more capacity, your Pipetman M can also be used while charging with the same performance as a fully charged pipette! USB port Battery Charging Pipetman M charges 80 % of its full battery capacity in less than an hour, it takes three hours to fully charge the battery. Plug Charge your pipette by using the power supply: - Connect the AC adapter to a suitable AC power supply - Plug the adapter into the USB port of the pipette. -The pipette starts charging. Charge your pipette by using stand adapter (see Chapter 2): - First place the stand adapter on your Gilson Single pipette holder or Carrousel. -Remove the plug. Now place your pipette on the stand adapter and plug the power transformer into the stand adapter. -The pipette starts charging. Stand adapter Caution: Use only the original power transformer supplied by Gilson. Use of an incompatible power supply can damage your PIPETMAN M! - 15 - Working with charger connected to the pipette Pipetman M can also be used for pipetting while charging. - Plug the power supply into your pipette. - Press the push-button to start your pipette. - Pipetman M is ready to pipette. You can also recharge Pipetman M by USB with Caution: Never work with Pipetman M while charging by computer! your computer; however it will take much longer than by power supply. Low Battery Warning: Pipetman M has a low battery alert. As the battery runs down, the low battery message appears.The warning is replaced by a blinking symbol of an empty battery. If it is not recharged, the pipette will switch off after a while. Settings will not be lost. If the battery is completely discharged (= black screen, no operation) please connect the pipette to the charger for at least five minutes, then a “batt. too low” message will appear. The pipette will display the last settings used a few minutes later and will continue charging. Changing the battery If the following symptoms occur, please contact your Gilson Service Center for battery change: Caution: Pipetman M uses LithiumIon battery. Operation on the battery is done at user’s risk only. Opening the pipette voids the warranty! - Pipetman M battery won’t charge or will not operate even if connected to the charger at least for 10 minutes. - Pipetman M battery provides you very short cycle time or permanently needs to be used in connected mode. Mode-button 13 configuration Enter the menu using the Mode-button. You will find not only the pipetting programs (PIPET, REPETITIVE, MIX and REVERSE) and the speed control but also the menu “CONFIGURATION”, including “SERVICE” and “ADJUSTMENT” (refer to Chapter 14). The navigation of the menus is always done in the same way Make your selection by rotating the push-button, enter and confirm with a simple click! - 16 - Push-button EN User's Guide ENGLISH The configuration menu allows you to set up following items: 1. Volume limit: Here you can fix the maximal volume of the pipette (by default = nominal volume). For example you have a P200M pipette, but you would like to use it with your PIPETMAN Diamond Filter tips DF100, you can set the maximal volume at 100 µL and you won’t risk contamination of your pipette. 2. Beeper: You can switch the tone of your pipette on or off. 3. Contrast: You can choose between values of 1 to 5 to set up the contrast of the screen. 4. Service see Chapter 14. 5. Adjustment see Chapter 14. 14 MAINTENANCE OF YOUR PIPETMAN M Pipetman M requires very little maintenance. However, to ensure pipette accuracy, precision and robustness for timeless use please proceed periodically with a Two-minute Inspection as recommended by Gilson. Your Pipetman M allows you to: • • • • • Get service information. Readjust the pipette to user settings. Return to factory settings. Replace spare parts (for detailed information see Chapters 14 and 19). Prepare the pipette for cleaning or autoclaving by “disassembly” of the parts specified (see Chapter 15). Service Information Pipetman M provides you with all required service information. It will help you establish an easy diagnosis and plan any service operation with your accredited Gilson Service Center. You will find in the “service” menu following sub menus: a.Disassembly b.Service Info c.Service Settings d.Pipette Info The navigation of the menus is always done in the same way Make your selection by rotating the push-button, enter and confirm with a simple click! - 17 - a. Disassembly: Caution: You must first ensure that the pipette has been correctly reassembled (see “User Maintenance”) before you “click to exit”. The software then resets the piston and the display returns to the last mode used! This option allows you to disassemble the lower part safely (protection of the piston and the motor). If you select Disassembly, the following screen appears: Now, you can remove the lower part of your pipette with complete security. b. Service Info provides you with maintenance information; you cannot modify any of the items: • Number of pipetting cycles since last maintenance. • Number of weeks since last maintenance. c. Service Settings gives you the option to organize your maintenance, you can set following service points: • • • • Number of cycles until next maintenance. Number of weeks until next service. Service date. Activate or deactivate the Service alert. Changes of service settings will reset all the service info to zero. d. Pipette Info provides information about your pipette, you cannot modify any of the items: • • • • Version of firmware. Serial number. Total number of cycles (one cycle: up and down of the piston). Number of readjustments carried out by this pipette. Adjustment Press the mode-button to enter the menu. Select “configuration” by rotating the push-button and click to confirm your selection. Enter the sub-menu in the same way and select the “adjustment” menu. The adjustment menu allows you to access the following items: • Standard Readjustment • Reset Settings Standard Readjustment This menu allows you to adjust the pipette using 3 calibration points: 10 %, 50 % and 100 % of nominal volume (in according with ISO8655 recommendations). You may want to calibrate your pipette for solutions with a density, viscosity, surface tension or vapour pressure that are different to that of water. To return to the factory settings, choose “Reset Settings”, your Pipetman M will be reset to the three factory calibration values which are permanently stored in the pipette’s firmware. - 18 - EN User's Guide ENGLISH In accordance with ISO 8655 Gilson recommends a gravimetric procedure for pipette calibration. This gravimetric method is used to establish the mean mass of a given volume of water (taking into account evaporation losses, where necessary). After converting the mean mass to a volume (using the Z factor, see appendix II), enter the measured volumes(s) into the pipette’s memory and the software readjusts the pipette accordingly. This method requires the strict monitoring of environmental conditions and the use of routinely controlled equipment that is adapted to the volume being measured. Conversion to volume must take into account the density of the liquid as well as evaporation during the cycle time. For each measurement, the corresponding volume (Vi) can be calculated as follows: Vi = (Wi + e) Z Wi is the weight as read on the balance e is the mean evaporation loss during the cycle time Z expressed in L/mg, is a conversion factor incorporating density of water buoyed in air, at test temperature and barometric pressure (see Appendix II) For volumes greater than 20 μL, the evaporation factor can be disregarded. For more information please refer to “Verification Procedure for Accuracy and Precision” which you can download from the Gilson website (www.gilson.com). Maintenance operations (disassembly of your Pipetman M to change and clean parts) It is best to inspect your pipette regularly and to routinely clean and change parts as required. To help you to keep up a regular schedule and in the interests of GLP, you can configure your pipette to display an alarm before servicing is due (refer to Service Settings, page 18). Caution: The following maintenance operation should only be done when the pipette is in Mode DISASSEMBLY (see page 18)! Maintenance Warning: Pipetman M notifies you, when maintenance is due (service alert is set by default to “ON”). The following message will appear: after validation by a click, the following message appears: If you click to confirm within 10 sec. the pipette will automatically switch to “disassembly” mode so you can carry out your maintenance safely. Wait longer than 10 seconds and the option to have a reminder in one week will appear: Click to confirm. Your pipette will be operational again. Tip-Holder and Tip-ejector These parts must be changed if they are damaged. You may also remove these parts for cleaning or decontamination purposes. Changing the Tip-ejector 1) Keep the tip-ejector button depressed and grip the top of the tip-ejector with the other hand. - 19 - 2) Gently rotate the tip-ejector counter clockwise and separate its connector from the operating rod. 3) Pull the tip-ejector away from the body of the pipette. 4) Clean or autoclave the tip-ejector and refit or replace it by reversing the procedure. Changing the Tip-holder (lower part) After removing the tip-ejector, you may remove the lower part of the tip-holder, which is more likely to become contaminated or damaged than the upper part. Removal of the lower part is shown below; for the upper part see “Removing the Piston” (special precautions are necessary). 1) Gently rotate the lower part of the tip holder counterclockwise to unscrew it from the upper part. 2) Separate the parts and remove the O-ring (see “Changing O-ring”) 3) Clean and if required autoclave the lower part of the tip-holder (autoclaving: 20 min. at 121°C and 0.1MPa) 4) If required, lubricate the piston (see “How to Lubricate the Piston”) and fit a new O-ring. 5) Screw the two parts together, making sure that the two parts are fully tightened, by hand. Tip-holder (upper) Piston Tip-holder (lower) 6) Refit the tip-ejector. After autoclaving the tip-holder and tip-ejector may change color, however this has no impact on the performance. Changing the seal and/or O-ring (see Chapter 20) The O-ring is positioned on the piston; it should not be autoclaved, if worn or damaged in any way, it must be replaced. O-ring To access the O-ring, remove the tip-ejector and unscrew the lower part of the tip-holder. You should now be able to remove the O-ring from the piston. Sometimes, the O-ring may be found in the recess at the topend of the lower part of the tip-holder. If required, lubricate the piston (see “How to Lubricate the Piston”) then fit a new O-ring by sliding it onto the piston. Reassemble the pipette. Depending on the pipette model the dimensions of the O-ring will vary (refer to Chapter 20). Servicing the Piston You may remove the piston-assembly to clean, lubricate, or change the piston. - 20 - Caution: The specifications of the pipette must be checked after changing any part! EN User's Guide ENGLISH Removing the Piston 1)Remove the tip-ejector and (optionally) the lower part of the tip-holder. If you remove the lower part, take care to remove the O-ring as described in “Changing the O-ring”. 2) Unscrew the connecting nut (turn by hand, counterclockwise). 3) Gently remove the connecting nut and upper tip holder. 4) Pull off the piston assembly from the body of the pipette – separate the parts (see below). 5) Clean and autoclave (if required) the piston and holder, together with any other parts that may need to be treated in the same way (see Chapter 15). Caution: Don’t pull on the piston to remove the assembly! Tip-holder (lower) Connecting nut Tip-holder (upper) In the case of P1000M, the piston holder, piston and guide are a unit. Don’t try to separate them! 6) Lubricate the piston, see below. Piston holder Piston 7) Reassemble the piston and guide; then carefully insert the assembly into the body of the pipette. The guide should hold the piston assembly inside the body of the pipette. You can hear a“click”when the piston is back in place. Guide Take care not to touch the piston, and that it is dust-free. If needed, clean the assembly with a dust-free cloth. 8)Reassemble the upper part of the tip-holder and the connecting nut, and then refit to the body of the pipette by rotating the connecting nut clockwise until it is finger tight. Fit the O-ring (for P10M, the seal) and reassemble the lower part of the tip-holder. Refit the tip ejector. Guide Connecting nut The seals for P10M are fragile and can be used only once. So, after unscrewing the lower part of the tip-holder you must fit a new seal. How to Lubricate the Piston (except P10M) Use only Gilson lubricant (ref: F2070902, as supplied). Squeeze a small quantity from the tube onto a clean, lintless cloth. Use the cloth to transfer the lubricant to the piston. Ensure that the piston is evenly lubricated and that you wipe away any excess – remember only a fine film of lubricant is required (over the entire piston). - 21 - 15 cleaning and decontamination Pipetman M is designed so that the parts normally in contact with contaminants can easily be cleaned and decontaminated. As part of your quality system, you may have procedures for pipette decontamination. We recommend that you refer to “Decontamination Procedures for Gilson Pipettes”, which you can download from Gilson’s website. Caution: Liquid must not enter the handle of the pipette! If you use chemical solutions for decontamination or detergents for cleaning, other than those specified below, you should check with your supplier that the solution or detergent is safe for use with one of the following materials: PP (Polypropylene), PBT (Polybutylene Terephthalate), PC (Polycarbonate), POM (Polyoxymethylene), PVDF (Polyvinylidene Fluoride), PEI (Polyetherimide) and stainless steel. Cleaning The pipette must be cleaned, as described below, before it is decontaminated. For cleaning your Pipetman M you may use a simple soap solution or any of the solutions mentioned in“Decontamination Procedures for Gilson Pipettes”. External 1) Remove the tip-ejector for cleaning (see Chapter 14). 2)Replace the elastomer plug to protect battery charging port. 3) Wipe the entire pipette with a soft-cloth or lint-free tissue impregnated with soap solution, to remove all dirty marks. If the pipette is very dirty, a brush with soft plastic bristles may be used. 4)To rinse, wipe the entire pipette with a soft-cloth or lint-free tissue impregnated with distilled water. 5) Leave to air dry. Internal The following components only can be immersed in a cleaning solution: tip-ejector, tip-holder, connecting nut and piston. 1) Disassemble the pipette as described in Chapter 14. 2)Set aside the handle in a dry and secure location. 3) Clean the individual components using an ultrasonic bath (20 minutes at 50 °C) or with a soft-cloth and brushes. 4)Rinse the individual components with distilled water. 5) Leave the parts to dry by evaporation or wipe them with a clean soft-cloth or lint-free tissue. 6) Lubricate the piston and reassemble the pipette according to the instructions given in Chapter 14. - 22 - EN User's Guide ENGLISH Decontamination Autoclaving However, after separation from the body, any of the following components of the volumetric module may be autoclaved individually: tip-ejector, connecting nut, tip-holders, pistons and seals (except O-rings). Caution: The body (handle) of the pipette is not autoclavable! 1) Clean the parts to be autoclaved, especially the tip-holders. 2) Put the parts in an autoclaving bag. 3) Autoclave for 20 minutes at 121°C and 0.1 MPa. 4) Check that the parts are dry before reassembling the pipette. 5)Set the pipette aside to stabilize at room temperature for at least 6 hours. Caution: The specifications of the pipette must be checked after changing any part! Chemical Decontamination You may choose to decontaminate your pipette chemically, in accordance with your own procedures. Whatever decontaminant you use, check that it is compatible with the plastics used in the construction of the pipette (see page 22). Parts that may not be immersed 1) Wipe the handle of the pipette with a soft-cloth or lint-free tissue impregnated with the chosen decontaminant. 2) Wipe the handle of the pipette with a soft-cloth or lint-free tissue impregnated with distilled water. Parts that may be immersed The following components only can be immersed in a decontaminant solution: tip-ejector, tip holder (both parts), connecting nut, piston (including holder) and guide. 1) Disassemble the pipette as described in Chapter 14. 2)Immerse the components in the decontaminant solution or wipe them according the instructions given by the manufacturer or supplier of the decontaminant. 3)Rinse the individual components with distilled or sterile water. 4) Leave the parts to dry by evaporation or wipe them with a clean, lint-free tissue or soft-cloth. 5) Lubricate the piston and reassemble the pipette according to the instructions given in this chapter. - 23 - 16 leak test This test may be performed at any time to check that the pipette does not leak, especially after performing a maintenance or decontamination procedure. If a pipette fails this test, you should replace the faulty part (e.g. O-ring, tip-holder...) and repeat this test, after making sure that the pipette is correctly reassembled. • • • • • • • Fit a PIPETMAN Diamond Tip, Set the pipette to the nominal volume, Aspirate the nominal volume from a beaker of distilled water. Hold the pipette in the vertical position and wait for 20 seconds, If a water droplet appears at the end of the tip there is a leak (see Chapter 17). If you see no droplet, re-immerse the tip below the surface of water, The water level inside the tip should remain constant; if the level goes down there is a leak (see Chapter 17). Problem 17 troubleshooting In case of malfunction, first reset the pipette by pressing on the push-button and the Modebutton simultaneously at least for 8 seconds. If the problem persists, you may consult the following table which identifies potential problems and their solutions. Caution: Before returning any pipette to your local Gilson Service Center, ensure that it is completely free of chemical, biological, or radioactive contamination. Please use the included safety bag. Possible Cause Pipette is leaking sample. Worn O-ring. Pipette won’t aspirate. Worn O-ring. Unscrewed lower part of tip-holder. Damaged or corroded piston. Damaged tip-holder. Improper repair or assembly. Connecting nut is loose. Software needs to be reset. Refer to page 20 20 20 21 20 19-21 21 5 Noisy operation. Piston needs lubricating. Pipette is inaccurate. Improper repair or assembly. Unscrewed lower part of tip-holder. Pipette is out of adjustment. Connecting nut is loose. 19-21 20 18 21 Pipette is not precise. Tips fall or don’t fit. No OLED display. No operation possible. Calibration impossible. Unscrewed lower part of tip-holder. Incorrect operator technique. Worn O-ring. Connecting nut is loose. Damaged or corroded piston. Damaged tip-holder. 20 12 20 21 21 20 - 24 - Low quality tips. Damaged tip-holder. Damaged tip-ejector. 21 11 19-20 19-20 Pipette is in sleep mode. Battery needs recharging. Software needs to be reset. 4 15 5 Battery needs recharging. Software needs to be reset. 15 5 Software needs to be reset. 5 EN User's Guide ENGLISH 18 specifications Pipetman M is a high quality pipette that offers excellent accuracy and precision; it is fully compliant with ISO 8655 and is CE marked (for IVD and EMC directives). The figures given in the “Gilson Maximum Permissible Errors” table were obtained using “PIPETMAN DIAMOND Tips”. These figures are only guaranteed when using Genuine PIPETMAN DIAMOND Tips. Each pipette is inspected and validated by qualified technicians according to the Gilson Quality System. Gilson declares that its manufactured pipettes comply with the requirements of the ISO 8655 Standard, by type testing. The adjustment is carried out under strictly defined and monitored conditions (ISO 8655-6): • • • • • • Basis of adjustment, Ex. Reference temperature, 20 °C Relative humidity, 50 % Barometric pressure, 101 kPa Use of distilled water grade 3 (ISO 3696) Ten measurements for each test volume, which are Nominal Volume, 50 % of Nominal Volume and 10 % of Nominal Volume. Maximum Permissible Errors Model Volume Gilson ISO 8655 (Reference) Systematic Random Systematic Random error (μL) error (μL) error (μL) error (μL) P10M Min. 0.5 ± 0.04 ≤ 0.013 (F81001) 1 ± 0.025 ≤ 0.012 5 ± 0.060 ≤ 0.020 Max. 10 ± 0.080 ≤ 0.025 ± 0.12 ± 0.12 ± 0.12 ± 0.12 ≤ 0.08 ≤ 0.08 ≤ 0.08 ≤ 0.08 P20M Min. 2 ± 0.075 ≤ 0.025 ± 0.20 ≤ 0.10 (F81002) 10 ± 0.100 ≤ 0.035 ± 0.20 ≤ 0.10 Max. 20 ± 0.150 ≤ 0.05 ± 0.20 ≤ 0.10 P200M Min. 20 ± 0.40 ≤ 0.15 ± 1.60 ≤ 0.60 (F81003) 100 ± 0.80 ≤ 0.22 ± 1.60 ≤ 0.60 Max. 200 ± 1.00 ≤ 0.26 ± 1.60 ≤ 0.60 P1000MMin. 100 ± 2.50 ≤ 0.4 (F81004) 500 ± 3.50 ≤ 0.7 Max.1000 ± 5.00 ≤ 1.1 ± 8 ≤ 3.0 ± 8 ≤ 3.0 ± 8 ≤ 3.0 19 Safety precautions and limitations of use For safety reasons, it is important to observe the following instructions: 1. Battery and electrical specifications: We strongly recommend you fully charge the battery before using the pipette. pipetman M is supplied with an AC adaptor that is suitable for your country. You must only use an original Gilson AC adaptor specific to this product. Charge the battery in the pipette, using the AC-adapter or the stand adapter. Use AC-adaptor and stand adapter indoors. Pipetman M uses Lithium-Ion battery. Operation on the battery is done at user’s risk only. Opening the pipette voids the warranty. Dispose of used batteries in accordance with legal regulations. Batteries may not be disposed of with household waste and may explode if disposed in fire ! • Li-ion battery pack; 1 Ah / 3.6 V Charging time: approx. 3 hours for a fully discharged battery (80% in one hour). • AC adaptor Input voltage, country-specific: 100-240 V, 50/60 Hz (0.5A max.) Output voltage: +5 V DC; 3.5A (17.5W max.) • Class II this device is double insulated. - 25 - 2. Do not use PIPETMAN M in a potentially explosive environment or with potentially explosive chemicals. 3. When pipetting infectious, radioactive, toxic and other hazardous solutions, please observe all the safety precautions (e.g. wear protective clothing, goggles and gloves) and regulations appropriate for your country. 4. Do not allow the liquid to enter the body of the pipette. 5. Storage conditions Temperature: -20°C to 50°C - Humidity max: 80% 6. Temperature of use Between 4°C and 40°C (specifications may vary). 7. Use only original Gilson’s DIAMOND tips, accessories and spare parts. If the equipment is used in a manner not specified by Gilson in the user’s guide, the protection provided in the equipment may be impaired. 8. Equipment disposal This equipment must not be disposed of with unsorted municipal waste. Instead, it is your responsibility to correctly dispose of your waste equipment by handing it over to an authorised facility for separate collection and recycling. It is also your responsibility to decontaminate the equipment in case of biological, chemical, and/or radiological contamination so as to protect from health hazards the persons involved in the disposal and recycling of equipment. For more information about where you can drop off your waste equipment for recycling, please contact your local dealer from whom you originally purchased the product or your local council. By Description P10M P20M P200M doing so, you will help conserve natural Connecting nut F807012 F807012 F807012 resources and you will ensure that your Battery tag, 1x4 F807013 F807013 F807013 waste equipment is recycled in a manner that protects human health and the Ejector tag, 1x4 F807014 F807014 F807014 environment. Thank you. Power supply USB F807015 F807015 F807015 9. Pipetman M can be used indoor and outdoor, if precautions are respected as described above in this handbook and in the GLP. 20 rePLACEMENT parts P1000M F807012 F807013 F807014 F807015 USB cable F807016 F807016 F807016 F807016 Power tub cover F807022 F807022 F807022 F807022 Battery window F807005 F807005 F807005 F807005 Ejector window F807006 F807006 F807006 F807006 Lubricant tube 3.5g F3070902 F3070902 F3070902 Seal, 1x5 F161902 Seal & O-ring, 5 sets F144863 O-ring,1x5 F2070501 F2070601 Tip-holder, upper part F2070117 F2070117 F2070517 F2070617 Tip-holder, lower part F2070218 F2070318 F2070518 F2070618 Button assembly F807001 F807002 F807003 F807004 Tip-ejector assembly F807008 F807009 F807010 F807011 Piston assembly F807017 F807018 F807019 F807020 - 26 - EN User's Guide ENGLISH aPPENDIX 1 - Example of a performance check Below is an example of how to evaluate the performance of Pipetman P10M at 1 µL. 4. Calculate the mean volume 1. Determine the mean value e of the evaporation loss ei that occurs during your pipetting cycles. Proceed as described in Appendix 3 to determine ei V = ( W+e ) x Z _ V _ = (0.964+0.018) x 1.0032 V = 0.985 µL For a temperature of 21.5 °C and an air pressure of 1013 hPa, the Z factor is equal to 1.0032 µL/ mg (see table in Appendix 2). 5. Evaluate accuracy E = V - V0 Systematic error (E): V0 true value set on the instrument 2. Change the pipette tip and perform the first weighing. Then, keep a regular cycle and perform the 10 following measurements. wr = 0.957 mg w1 = 0.968 mg w2 = 0.960 mg w3 = 0.984 mg w4 = 0.942 mg w5 = 0.969 mg Relative error (E%): E% = (-0.015 x 100) / 1 = - 1.50 % Standard Deviation (SDW) n SDw = i=1 2 SDw = 3. Calculate the mean weight n E% = (V - V0) x 100 / V0 6. Evaluate precision (repeatability) w6 = 0.966 mg w7 = 0.955 mg w8 = 0.972 mg w9 = 0.958 mg w10 = 0.967 mg wr rinsing measurement which is disregarded for the calculation _ 1 W= n E = 0.985 - 1 = - 0.015 µL 1 n-1 (Wi - W) 2 n-1 n 2 ( Wi - W ) i=1 2 Wi 2 SDw = i=1 n number of weighings Wi weighing results _ W = (0.968+0.960+0.984+0.942 SDw = 0.011 mg Random error (SDv) : + 0.969+0.966+0.955+0.972 + 0.958+0.967) / 10 SDv = SDw x Z _ W = 0.964 mg SDv = 0.011 x 1.0032 = 0.011 µL - 27 - 2 2 (0.968-0.964) + (0.960-0.964) + (0.984-0.964) + 1 (0.942-0.964)2+ (0.969-0.964)2+ (0.966-0.964)2+ 2 2 2 9 (0.955-0.964)2+ (0.972-0.964) + (0.958-0.964) + (0.967-0.964) aPPENDIX 2 - Z FACTOR The reference calculation equation is : Z = [1/(PW-PA)] [1-(PA/PB)] Where :PA = density of air at t°C. PW = density of the test liquid at t°C. PB = density of the balance weights. Use 8 g/cc for PB Weights conforming to International Recommendation N°33 of OIML have been adjusted to give results when weighing in air as if the density of the weights were 8.0 g/mL. Values of the conversion factor Z (µL/mg) as a function of temperature and pressure for distilled water. Temperature (°C) 15 15.5 16 16.5 17 17.5 18 18.5 19 19.5 20 20.5 21 21.5 22 22.5 23 23.5 24 24.5 25 25.5 26 26.5 27 27.5 28 28.5 29 29.5 30 - 28 - 800 853 1.0018 1.0018 1.0019 1.0020 1.0021 1.0022 1.0022 1.0023 1.0024 1.0025 1.0026 1.0027 1.0028 1.0030 1.0031 1.0032 1.0033 1.0034 1.0035 1.0037 1.0038 1.0039 1.0040 1.0042 1.0043 1.0044 1.0046 1.0047 1.0049 1.0050 1.0052 1.0018 1.0019 1.0020 1.0020 1.0021 1.0022 1.0023 1.0024 1.0025 1.0026 1.0027 1.0028 1.0029 1.0030 1.0031 1.0032 1.0033 1.0035 1.0036 1.0037 1.0038 1.0040 1.0041 1.0042 1.0044 1.0045 1.0046 1.0048 1.0049 1.0051 1.0052 Air pressure (hPa) 907 960 1013 1067 1.0019 1.0019 1.0020 1.0021 1.0022 1.0023 1.0024 1.0025 1.0025 1.0026 1.0027 1.0028 1.0030 1.0031 1.0032 1.0033 1.0034 1.0035 1.0036 1.0038 1.0039 1.0040 1.0042 1.0043 1.0044 1.0046 1.0047 1.0048 1.0050 1.0051 1.0053 1.0020 1.0020 1.0021 1.0022 1.0023 1.0024 1.0025 1.0026 1.0027 1.0028 1.0029 1.0030 1.0031 1.0032 1.0033 1.0034 1.0035 1.0036 1.0038 1.0039 1.0040 1.0041 1.0043 1.0044 1.0045 1.0047 1.0048 1.0050 1.0051 1.0052 1.0054 1.0020 1.0021 1.0022 1.0023 1.0023 1.0024 1.0025 1.0026 1.0027 1.0028 1.0029 1.0030 1.0031 1.0032 1.0033 1.0035 1.0036 1.0037 1.0038 1.0039 1.0041 1.0042 1.0043 1.0045 1.0046 1.0047 1.0049 1.0050 1.0052 1.0053 1.0055 1.0019 1.0020 1.0021 1.0022 1.0022 1.0023 1.0024 1.0025 1.0026 1.0027 1.0028 1.0029 1.0030 1.0031 1.0032 1.0033 1.0035 1.0036 1.0037 1.0038 1.0039 1.0041 1.0042 1.0043 1.0045 1.0046 1.0048 1.0049 1.0050 1.0052 1.0053 EN User's Guide ENGLISH aPPENDIX 3 - Evaporation Loss Procedure for the determination of evaporation loss Use the same distilled water, weighing vessel and balance as you will be using for the gravimetric check. 1. Half fill the weighing vessel with distilled water. 2. Cover the weighing vessel with its lid and place it on the balance using a pair of tweezers. 3.Aspirate a sample. 4.Tare the balance and take the weighing vessel out of the balance. 5.Take off the lid with tweezers. 6.Dispense the sample into a dummy vessel. 7.Replace the lid on the weighing vessel and, using tweezers, replace the vessel on the balance. 8.Read the negative result e1 (record the absolute value). 9.Repeat steps 3 to 8, three times to obtain e2, e3, and e4. 10. Calculate the evaporation loss e using the formula: In normal conditions, this value is usually between 0.01 mg and 0.03 mg. - 29 - e = 1 (e1 + e2 + e3 + e4) 4 aPPENDIX 4 - HOW TO CALCULATE VOLUMETRIC ACCURACY AND PRECISION “Accuracy” and “precision” are qualitative terms. The corresponding quantitative terms are “systematic error” and “random error”. Evaluation of accuracy Evaluation of precision The specified accuracy is the limit to the systematic error, which is the difference between the mean volume of actual measurements and the true value of the volume set on the instrument. The specified precision is the limit to the random error, which is the distribution of the measured values around a mean value. For pipettes, precision refers to a within-series group of data, and therefore to repeatability. The systematic error (E) can be estimated as follows : The random error is then quantified by the standard deviation of measurements performed at a given volume setting under the same measuring conditions. E = V - V0 E systematic error V0 nominal volume V mean volume 1 V= n Vi n n The standard deviation (SD or “s”) can be estimated as follows: n SD = Vi i=1 i=1 individually measured volume V number of measurements mean volume V= The accuracy of a pipette can be expressed as a percentage of the nominal volume: Vi n E% = V - V0 x 100 V0 (V - Vi) 2 n-1 1 n n Vi i=1 individually measured volume number of measurements (minimum 10) The precision of a pipette can also be expressed as a percentage of the mean volume. This is known as relative standard deviation (RSD) or coefficient of variation (CV), and is estimated as follows : Important: The mean value and number of replicates must be stated, and the experimental procedure used must be described in such a way that other workers can repeat it! RSD = - 30 - SD x 100 V EN User's Guide ENGLISH EC dECLARATION OF CONFORMITY The company GILSON S.A.S. 19, avenue des Entrepreneurs BP 145 - 95400 VILLIERS LE BEL FRANCE Tel.: +33(0)1 34 29 50 00 Fax: +33(0)1 34 29 50 20 Hereby certifies on its sole responsibility that the products listed below: PIPETMAN® M P10M, P20M, P200M, P1000M comply with the requirements of the following European Directives: 98/79/EC* In Vitro Diagnostic Medical Devices 2004/108/EC Electromagnetic Compatibility, EMC 2006/95/EC Low Voltage Directive, LVD * Annex III, self declared Villiers-le-Bel, September 1st, 2009 Atika El Sayed General Manager Hervé Ledorze Quality Manager - 31 - www.gilson.com [email protected] [email protected] [email protected] LT801527/D - ©2010 Gilson SAS All rights reserved August 2010 English Printed in France Specifications subject to change without notifications - errors omitted. Gilson, Inc. World Headquarters I 3000 Parmenter Street I P.O. Box 620027 Middleton, WI 53562-0027, USA I Tel: (1) 800-445-7661 or (1) 608-836-1551 I Fax: (1) 608-831-4451 Gilson S.A.S. I 19, avenue des Entrepreneurs I BP 145, F-95400 Villiers-le-Bel, France Tel: (33-1) 34 29 50 00 I Fax: (33-1) 34 29 50 20