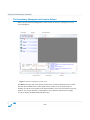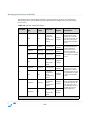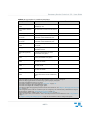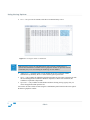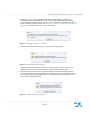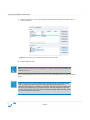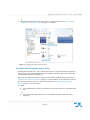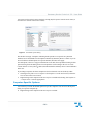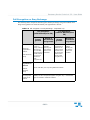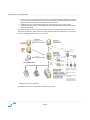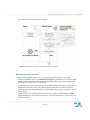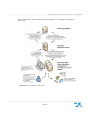
1
User Guide Sanctuary Device Control v4.3.2 02_103_4.3.2.60 Lumension Security 15880 North Greenway Hayden Loop, Suite 100 Scottsdale, AZ 85260 Phone: 480.970.1025 Fax: 480.970.6323 www.lumension.com Copyright © 1997-2008 Lumension Security® Inc. ALL RIGHTS RESERVED. U.S. Patent No. 6,990,660, Other Patents Pending. This manual, as well as the software described in it, is furnished under license. No part of this manual may be reproduced, stored in a retrieval system, or transmitted in any form—electronic, mechanical, recording, or otherwise—except as permitted by such license. LIMIT OF LIABILITY/DISCLAIMER OF WARRANTY: LUMENSION® CORPORATION MAKES NO REPRESENTATIONS OR WARRANTIES IN REGARDS TO THE ACCURACY OR COMPLETENESS OF THE INFORMATION PROVIDED IN THIS MANUAL. LUMENSION® CORPORATION RESERVES THE RIGHT TO MAKE CHANGES TO THE INFORMATION DESCRIBED IN THIS MANUAL AT ANY TIME WITHOUT NOTICE AND WITHOUT OBLIGATION TO NOTIFY ANY PERSON OF SUCH CHANGES. THE INFORMATION PROVIDED IN THE MANUAL IS NOT GUARANTEED OR WARRANTED TO PRODUCE ANY PARTICULAR RESULT, AND THE ADVICE AND STRATEGIES CONTAINED MAY NOT BE SUITABLE FOR EVERY ORGANIZATION. NO WARRANTY MAY BE CREATED OR EXTENDED WITH RESPECT TO THIS MANUAL BY SALES REPRESENTATIVES OR WRITTEN SALES MATERIALS. LUMENSION® CORPORATION SHALL NOT BE LIABLE FOR ANY LOSS OF PROFIT OR ANY OTHER DAMAGES ARISING FROM THE USE OF THIS MANUAL, INCLUDING BUT NOT LIMITED TO SPECIAL, INCIDENTAL, CONSEQUENTIAL, OR OTHER DAMAGES Trademarks: Lumension® Corporation, Sanctuary™, Lumension Security, Sanctuary, Sanctuary Application Control Suite™, securing the enterprise™, Sanctuary Device Control™, Sanctuary Application Control Server Edition™, Sanctuary Application Control™, Sanctuary for Embedded Devices™, Sanctuary Application Control Terminal Services Edition™, and their associated logos are registered trademarks or trademarks of Lumension® Corporation. RSA Secured® is a registered trademark of RSA Security Inc. Apache is a trademark of the Apache Software Foundation In addition, other companies' names and products mentioned in this document, if any, may be either registered trademarks or trademarks of their respective owners. Feedback: Your feedback lets us know if we are meeting your documentation needs. E-mail the Lumension Technical Publications department at [email protected] to tell us what you like best, what you like least, and to report any inaccuracies. - ii - Sanctuary Device Control v4.3.2 - User Guide - iii - - iv - Sanctuary Device Control v4.3.2 - User Guide Table of Contents Complete Security ............................................................................................... xv What’s in this Guide .......................................................................................... xvi Document Conventions ......................................................................................xvii Contacting Lumension Security ............................................................................ xix Lumension Security Corporate Offices ............................................................... xix Product Pricing ............................................................................................... xx Lumension Security Sales and Support ............................................................. xx Chapter 1: Introducing Sanctuary Device Control ___________________ 1 Welcome to Sanctuary Device Control ......................................................................1 What is Sanctuary Device Control ............................................................................1 What can you do with Sanctuary Device Control ........................................................2 Benefits of using Sanctuary Device Control ...............................................................3 Major Features of Sanctuary Device Control .............................................................3 What is New on this Version ...................................................................................6 Device Types Supported .........................................................................................6 Conclusions ..........................................................................................................9 Chapter 2: Using the Sanctuary Console _________________________ 11 Starting the Sanctuary Management Console .......................................................... 11 Connecting to the Server ................................................................................. 11 Log in as a Different User ................................................................................ 13 The Sanctuary Management Console Screen ........................................................... 14 Customizing your Workspace ............................................................................ 15 The Sanctuary Device Control Modules ................................................................... 19 Device Explorer Module ................................................................................... 20 Log Explorer Module ........................................................................................ 21 Media Authorizer ............................................................................................ 21 The Sanctuary Management Console Menus and Tools ............................................. 22 File Menu ....................................................................................................... 22 View Menu ..................................................................................................... 23 Tools Menu .................................................................................................... 23 Endpoint Maintenance ..................................................................................... 24 Reports Menu ................................................................................................. 27 Explorer Menu ................................................................................................ 28 Window Menu ................................................................................................ 29 Help Menu ..................................................................................................... 29 Other Administrative Functions ............................................................................. 30 Setting and Changing Default Options ............................................................... 30 Synchronizing Domain Members ....................................................................... 31 -v- Table of Contents Synchronizing with Novell eDirectory ................................................................. 31 Adding Workgroup Computers .......................................................................... 32 Performing Database Maintenance .................................................................... 33 Defining Sanctuary Administrators .................................................................... 34 Sending Updated Permissions to Client Computers .............................................. 39 Everyday Work ................................................................................................... 40 Identifying and Organizing Users and User Groups .............................................. 40 Identifying the Devices to be Managed .............................................................. 41 Working with the Sanctuary System’s Pre-Defined Device Classes ........................ 41 Adding your Own, User-Defined Devices to the System ........................................ 42 Identifying Specific, Unique, Removable Devices ................................................. 43 Organizing Devices into Logical Groups .............................................................. 45 Identifying Specific Computers to be Managed .................................................... 46 Defining Different Types or Permissions ............................................................. 46 Encrypting Removable Media & Authorizing Specific DVDs/CDs ............................. 48 Forcing Users to Encrypt Removable Media ......................................................... 49 Practical Setup Examples ..................................................................................... 49 DVD/CD Burner Permissions Assignments .......................................................... 49 Removable Permissions Assignments ................................................................. 50 Assigning Permissions to Groups Instead of Users ............................................... 51 Shadowing Notes ................................................................................................ 52 Chapter 3: Using the Device Explorer ___________________________ 55 How Does the Device Explorer Work ...................................................................... 56 Restricted and Unrestricted Devices ....................................................................... 58 Optimizing the Way you use the Device Explorer ..................................................... 60 Context Menu and Drag & Drop ........................................................................ 60 Keyboard Shortcuts ........................................................................................ 61 Adding Comments to an Entry .......................................................................... 62 Computer Groups ........................................................................................... 62 Renaming Computer Groups/Device Groups/Devices ........................................... 63 Event Notification ........................................................................................... 64 Device Groups ................................................................................................ 69 Supported Devices Types ..................................................................................... 70 Managing Permissions .......................................................................................... 70 Chapter 4: Managing Permissions and Rules ______________________ 71 Using the Permissions Dialog ................................................................................ 72 Special case: Working with Removable Storage Devices ....................................... 74 Using file filters ................................................................................................... 77 To remove File Filtering settings from a permission ............................................. 84 File Filtering examples ..................................................................................... 84 - vi - Sanctuary Device Control v4.3.2 - User Guide Adding a user or group when defining a permission ................................................. 88 To assign default permissions ............................................................................... 89 Root-level permissions .................................................................................... 89 To assign default permissions to users and groups .............................................. 91 Priority of default permissions ......................................................................... 93 Read/Write Permissions ................................................................................... 96 To Assign Computer-Specific Permissions to Users and Groups .................................. 97 To modify permissions ................................................................................... 100 To remove permissions .................................................................................. 101 To assign scheduled permissions to users and groups ............................................ 101 To remove scheduled permissions ................................................................... 105 To Assign Temporary Permissions to Users ........................................................... 105 To Assign a Temporary Permission .................................................................. 105 To Remove Temporary Permissions ................................................................. 108 To Assign Temporary Permissions to Offline Users ................................................. 108 To Assign Online and Offline Permissions .............................................................. 116 To Remove Offline or Online Permissions ......................................................... 119 To Export and Import Permission Settings ............................................................ 119 To Manually Export or Import Permissions Settings ........................................... 120 Shadowing Devices ........................................................................................... 121 To Shadow a Device ...................................................................................... 122 To Remove the Shadow Rule .......................................................................... 125 To View a ‘Shadowed’ File ............................................................................. 125 Copy Limit ....................................................................................................... 125 To Add a Copy Limit ...................................................................................... 126 To Remove a Copy Limit ................................................................................ 128 Applying Multiple Permissions to the Same User .................................................... 128 Forcing Users to Encrypt Removable Storage Devices ............................................. 130 Setting Permissions to Force Users to Encrypt Removable Storage Devices ........... 131 Managing Devices ............................................................................................. 138 To Add a New Device .................................................................................... 139 To Remove a Device ..................................................................................... 141 Specific, Unique, Removable Devices ............................................................... 142 Changing Permissions Mode ........................................................................... 143 Priority Options when Defining Permissions ...................................................... 143 Informing Client Computers of Permission Changes ............................................... 145 Chapter 5: Using the Log Explorer _____________________________ 149 Introduction ..................................................................................................... 149 Monitoring user input/output device actions ..................................................... 149 Monitoring administrator actions ..................................................................... 151 Accessing the Log Explorer ................................................................................. 152 Log Explorer templates ...................................................................................... 155 - vii - Table of Contents To use an existing template ........................................................................... 155 Predefined templates .................................................................................... 156 To create and use a new template ................................................................... 160 Backing-up your templates ............................................................................ 162 Log Explorer window ......................................................................................... 163 Navigation/Control Bar .................................................................................. 164 Column headers ........................................................................................... 164 Results Panel / Custom Report Contents .......................................................... 171 Criteria/Properties Panel ................................................................................ 176 Control Button Panel ..................................................................................... 176 Select and Edit Templates Window ...................................................................... 177 Template Settings Window ................................................................................. 181 General Tab ................................................................................................. 182 Query & Output Tab ...................................................................................... 182 Criteria ........................................................................................................ 183 The Advanced View ....................................................................................... 187 Schedule Tab ............................................................................................... 195 Viewing Access Attempts to Devices .................................................................... 199 Viewing Client Error Reports ............................................................................... 202 Viewing Shadow Files ........................................................................................ 202 When the Data File Directory is not Available .................................................... 205 Shadowing File Names Only ................................................................................ 206 DVD/CD Shadowing ........................................................................................... 207 Forcing the Latest Log Files to Upload .................................................................. 207 To Manage Devices Using the Log Explorer Module ................................................ 208 Viewing Administrator Activity ............................................................................ 209 Audit Events ................................................................................................ 209 Chapter 6: Using the Media Authorizer _________________________ 213 Introduction ..................................................................................................... 213 Creating a DVD/CD hash .................................................................................... 214 What happens when a user wants access to the DVD/CD ................................... 215 Accessing the Media Authorizer ........................................................................... 216 Authorizing users to use specific DVDs/CDs ......................................................... 217 Pre-requisites ............................................................................................... 217 To authorize the use of a specific DVD/CD ....................................................... 217 Encrypting removable storage devices ................................................................. 218 Pre-requisites ............................................................................................... 219 Decentralized encryption ............................................................................... 220 Limitations ................................................................................................... 220 To encrypt a specific removable storage device ................................................. 222 Removable device encryption methods comparison ........................................... 224 Problems encrypting a device ......................................................................... 224 - viii - Sanctuary Device Control v4.3.2 - User Guide Authorizing access. ........................................................................................... 227 Selecting users for a device. ........................................................................... 227 Selecting devices for a user ............................................................................ 231 Removing media from the database ..................................................................... 232 To remove a DVD/CD .................................................................................... 233 To remove an encrypted removable storage device .......................................... 233 To remove lost or damaged media from the database ........................................ 234 Other Media Authorizer utilities ........................................................................... 235 To rename a DVD, CD, or removable storage device .......................................... 235 Exporting encryption keys .............................................................................. 236 Ejecting a CD or DVD .................................................................................... 236 Recovering a password for decentralized encryption when connected ................... 237 Permissions Priority ........................................................................................... 243 Encrypting devices without a Certificate Authority .................................................. 247 To encrypt a removable media without installing a Certificate Authority ............... 247 Chapter 7: Accessing encrypted media outside of your organization __ 249 Exporting encryption keys .................................................................................. 249 Exporting encryption keys centrally ................................................................. 249 Exporting encryption keys locally ......................................................................... 250 To export the encryption key to a file .............................................................. 251 To export the encryption key to the device itself .............................................. 253 Accessing encrypted media outside your organization ............................................ 254 Accessing media on a machine with Sanctuary client installed ............................. 254 Accessing media without using Sanctuary client ................................................ 262 Using encryption inside and outside your organization ....................................... 269 Decentralized encryption .................................................................................... 269 How to configure Sanctuary so that users can encrypt their own devices .............. 270 Recovering a decentralized encryption password without Sanctuary Client ............ 270 Chapter 8: Setting and Changing Options _______________________ 281 Options Set in Old Sanctuary Versions ................................................................. 281 Default Options ................................................................................................. 282 Computer-Specific Options ................................................................................. 283 To Change an Option Setting .............................................................................. 284 Sending Updates to Client Computers .............................................................. 285 Individual Option Settings .................................................................................. 285 Certificate Generation ................................................................................... 285 Client Hardening ........................................................................................... 285 Device Log ................................................................................................... 286 Device Log Throttling ................................................................................... 287 eDirectory Translation .................................................................................. 287 - ix - Table of Contents Encrypted Media Password ............................................................................. 288 Endpoint Status ........................................................................................... 288 Log Upload Interval ....................................................................................... 289 Log Upload Threshold .................................................................................... 289 Log Upload Time ........................................................................................... 289 Log Upload Delay .......................................................................................... 289 Online State Definition .................................................................................. 289 Server Address ............................................................................................ 291 Shadow Directory ......................................................................................... 291 Update Notification ....................................................................................... 292 USB Keylogger ............................................................................................. 292 Checking Settings on a Client Machine ................................................................. 294 Chapter 9: Generating Sanctuary Reports _______________________ 295 User Permissions Report .................................................................................... 297 Device Permissions Report ................................................................................. 297 Computer Permissions Report ............................................................................. 298 Media by User Report ........................................................................................ 299 Users by Medium Report .................................................................................... 300 Shadowing by Device Report .............................................................................. 301 Shadowing by User Report ................................................................................. 302 Online Machines Report ...................................................................................... 302 Machine Options Report ..................................................................................... 304 Server Settings Report ....................................................................................... 305 Chapter 10: Comprehensive encryption for securing all your DVD/CD data 309 Introduction ..................................................................................................... 309 How it Works .................................................................................................... 309 Limitations and Supported Media ......................................................................... 310 Pre-Requisites .................................................................................................. 311 Encrypting a DVD/CD ........................................................................................ 312 To Assign a User Permission to Encrypt a DVD/CD ............................................. 312 To assign a user permission to read an already encrypted DVD/CD ...................... 314 To encrypt a DVD/CD .................................................................................... 314 Using an Already Encrypted DVD/CD .................................................................... 320 To use an Already Encrypted DVD/CD on a Machine Protected by Sanctuary ......... 320 To use an Already Encrypted DVD/CD on a Machine not Protected by Sanctuary .... 320 If you Forget the DVD/CD Password .................................................................... 321 DVD/CD Icons .................................................................................................. 321 Chapter 11: Using PGP-Encrypted Removable Devices _____________ 323 -x- Sanctuary Device Control v4.3.2 - User Guide Introduction ..................................................................................................... 323 Defining Permission Using the Sanctuary Management Console ............................... 324 To Allow Users to Encrypt a Device Using PGP WDE ........................................... 326 To Allow User to Use a PGP WDE Encrypted Removable Device ........................... 327 To Check the Client Status ................................................................................. 328 To Decrypt a Removable Device Using PGP’s Console ............................................. 328 Shadow ........................................................................................................... 330 Reports ............................................................................................................ 330 Using the Log Explorer ....................................................................................... 330 Auditing Logs ................................................................................................... 331 Appendix A: DVD/CD Shadowing ______________________________ 333 Introduction ..................................................................................................... 333 Operation of the Sanctuary client .................................................................... 333 Disk Space Requirements .............................................................................. 334 Supported formats when shadowing .................................................................... 334 Handling of Unsupported Shadowing Formats ........................................................ 335 CD Image Analysis ............................................................................................ 336 Files ............................................................................................................ 336 Logs ........................................................................................................... 336 Saved Image ............................................................................................... 336 Sample Analysis Log .......................................................................................... 337 Supported and Unsupported CD Formats .............................................................. 339 Summary .................................................................................................... 339 Supported data block formats and recording modes .......................................... 339 Supported and Unsupported File System Features ............................................. 339 Supported DVD/CD Burning Software .............................................................. 342 Appendix B: Important Notes ________________________________ 345 Appendix C: Sanctuary Device Control Encryption ________________ 349 Introduction ..................................................................................................... 349 Sanctuary Device Control Encryption ................................................................... 349 Centralized Encryption using the Full Encryption Method ......................................... 349 Centralized Encryption using Easy Exchange ......................................................... 350 Decentralized Encryption .................................................................................... 351 How is the Medium Assigned to a User or User Group ............................................. 352 Centralized Versus Decentralized Encryption ......................................................... 353 Full Encryption vs. Easy Exchange ....................................................................... 355 Other Available Encryption Methods ..................................................................... 356 Access to Encrypted Data Using the Sanctuary client ............................................. 358 If a MS Enterprise Certificate Authority (CA) is Installed ..................................... 358 If no MS Enterprise Certificate Authority (CA) installed ....................................... 359 - xi - Table of Contents Access to Encrypted Data Outside the Network ...................................................... 361 Accessing Encrypted Data Outside the Network when Using Full Encryption .......... 361 Sanctuary Stand-Alone Decryption Tool, SADEC ................................................ 362 Accessing Encrypted Data Outside the Network when using Easy Exchange .......... 363 Encryption Scenarios ......................................................................................... 368 Simple Examples .......................................................................................... 368 Complex examples ........................................................................................ 370 Understanding Cryptography .............................................................................. 373 Defining cryptography ................................................................................... 373 How do we achieve privacy? .............................................................................. 374 Signing communications ................................................................................ 375 The security principles of SDC encryption explained ............................................... 377 The AES algorithm ........................................................................................ 377 Public/private key based communication between SDC tiers ............................... 377 The Key Pair Generator ................................................................................. 378 Symmetric AES key public/private key based encryption .................................... 378 Digital Signatures ......................................................................................... 379 Digital Signatures & Certificate Authorities (CA) ................................................ 380 Understanding the AES Algorithm ........................................................................ 380 What is AES? ............................................................................................... 380 How does AES work? ..................................................................................... 380 AES and Sanctuary Device Control .................................................................. 382 Why is AES so Secure? .................................................................................. 382 Other useful info ............................................................................................... 382 What is Considered as a Removable Media? ..................................................... 382 What Happens if I Forget my Password? ......................................................... 382 Recovering a Password When Using Decentralized Encryption ............................. 383 What Happens to my Unencrypted Data when I Encrypt the Device it is on? ........ 383 How do I Decrypt a Device? .......................................................................... 383 Appendix D: Sanctuary’s Architecture __________________________ 385 The Whitelist Approach ...................................................................................... 385 Concepts ..................................................................................................... 385 Advantages/disadvantages of using a white list ................................................. 386 Whitelist and blacklist examples ..................................................................... 387 A complete portfolio of security solutions .............................................................. 388 Sanctuary Application Control Suite ................................................................ 389 Sanctuary Device Control .............................................................................. 389 Sanctuary for Embedded Devices ................................................................... 389 Sanctuary Components ...................................................................................... 389 The Sanctuary Database ............................................................................... 391 The Sanctuary Application Server .................................................................... 391 Sanctuary client .......................................................................................... 394 Protocol and ports ......................................................................................... 396 - xii - Sanctuary Device Control v4.3.2 - User Guide Operation overview ....................................................................................... 398 Key usage ................................................................................................... 398 If the Sanctuary Application Server is not Reachable ......................................... 399 The Sanctuary Management Console ............................................................... 405 Administration Tools ..................................................................................... 406 Network Communications .............................................................................. 407 How Sanctuary Works ........................................................................................ 408 Sanctuary Application Control Suite ................................................................. 408 Sanctuary Device Control ............................................................................... 411 Appendix E: Glossary _______________________________________ 417 Appendix F: Index _________________________________________ 423 - xiii - Table of Contents - xiv - Sanctuary Device Control v4.3.2 - User Guide About this Guide Sanctuary provides policy-based control for all devices and applications that can be used on enterprise endpoints. Using a whitelist approach (see a detailed explanation in the Architecture section), Sanctuary enables the development, enforcement, and auditing for application and device use in order to maintain IT security, reduce the effort and cost associated with supporting endpoint technologies, and ensure compliance with regulations. By using a whitelist approach, administrator can concentrate in approving a list of a few selected device/application accesses instead of banning devices/applications and maintaining endless blacklist subscriptions. Sanctuary links application and device policies to eDirectory and Active Directory based identities, dramatically simplifying the management of endpoint application and device resources. As a security officer or network administrator, you are not only aware but also concerned of the potential damage a typical user can cause on your network. It has been proven that most attacks and damage come from within the bound of the internal firewall performed by employees, intentionally or unintentionally. If the typical end user can be limited in its ability, then it scope of damage can also be restricted and, most probably, stopped. This is what the “Least Privilege Principle” advocates: give users only the access and privileges needed to complete the task at hand. Sanctuary Device Control controls access to devices by applying permission rules to each device type. Based on the Least Privilege Principle, access to any device is prohibited by default for all users. To grant access, the administrator associates users or user groups with the devices. complete device classes, for which they should have read and/or write privileges. In this way, Sanctuary Device Control extends the standard Windows security model to control input/output (I/O) devices. The Sanctuary Device Control approach contrasts traditional security solutions that use ‘black lists’ to specify devices that cannot be used. With Sanctuary Device Control, your IT infrastructure is protected from unauthorized devices until you decide to include them in the whitelist and, thus, authorize them. Complete Security Lumension offers a portfolio of security solutions for regulating your organization’s applications and devices. • Our Sanctuary Application Control Suite, which includes any of the following programs depending on your needs: Sanctuary Application Control lets you control application execution in your corporate environment. Sanctuary Application Control Terminal Services Edition extends application control to Citrix or Microsoft Terminal Services environments, which share applications among multiple users. Sanctuary Application Control Server Edition delivers application control to protect your organization’s servers, such as its Web server, email server, and database server. - xv - About this Guide • Sanctuary Device Control prevents unauthorized transfer of applications and data by controlling access to input/output devices, such as memory sticks, modems, and PDAs. • Sanctuary for Embedded Devices moves beyond the traditional desktop and laptop endpoints and onto a variety of platforms that include ATMs, industrial robotics, thin clients, set-top boxes, network area storage devices and the myriad of other systems running Windows XP Embedded. What’s in this Guide This guide explains how to use Sanctuary Device Control to control end user access to I/O devices, including floppy disk drives, DVD/CD drives, serial and parallel ports, USB devices, hot swappable and internal hard drives as well as other devices. We have divided this manual in three sections: Part I contains a general introduction to the Sanctuary Device Control program. It is strongly recommended that you review this section: • Chapter 1, “Introducing Sanctuary Device Control” provides a high-level overview of Sanctuary Device Control, how it works and how it benefits your organization. • Chapter 2, “Using the Sanctuary Console” describes the basic principles of how to use Sanctuary Device Control. Part II contains reference material. It provides information about how to use each of the Sanctuary Device Control modules. The functionality of each module is explained in detail. • Chapter 3, “Using the Device Explorer” explains how to set the Access Control List permissions on I/O devices. • Chapter 4, “Managing Permissions and Rules” shows you how to create, delete, modify, organize, combine permissions and rules, and how to force a user to encrypt removable storage devices. • Chapter 5, “Using the Log Explorer” provides information on both how to view a copy of traced files, errors, access attempts on client computers, and how to display administrative logs and copies of files (known as “shadow files”) users have been written to or read from specific devices. • Chapter 6, “Using the Media Authorizer” illustrates how to create a database of known DVD/ CDs and encrypted media and how to assign their rights to individual users and groups. • Chapter 7, “Accessing encrypted media outside of your organization” explains how to use encrypted media outside the company. • Chapter 8, “Setting and Changing Options” describes how to customize default and computerspecific options for your organization. • Chapter 9, “Generating Sanctuary Reports” explains how to obtain the HTML reports generated by Sanctuary Device Control. • Chapter 10, “Comprehensive encryption for securing all your DVD/CD data” demonstrates how to encrypt DVDs/CDs and use then outside your organization in a secure way. - xvi - Sanctuary Device Control v4.3.2 - User Guide • Chapter 11, “Using PGP-Encrypted Removable Devices” show you how to define permissions to use removable devices encrypted with PGP (Pretty Good Privacy) in a Sanctuary-protected environment. Part III contains additional information to help you in day-to-day operations. • Appendix A, “DVD/CD Shadowing” describes how to copy the contents of files written/read to/from DVD/CD (shadowing), the DVD/CD disk and file formats supported by the shadowing operations, and how to interpret the files written to the Log Explorer module. • Appendix B, “Important Notes” shows some key comments you should take into account when using Sanctuary Device Control. • Appendix C, “Sanctuary Device Control Encryption” provides an overview of the architecture of the Sanctuary solution. • Appendix D, “Sanctuary’s Architecture” you can find a complete behind the scene comparison between the different encryption methods available in Sanctuary Device Control and an explanation of how this encryption is achieved. • The “Glossary” provides definitions of standard acronyms and terms used throughout the guide. • The “Index” provides you with a quick access to specific figures, tables, information, items, or topics. Tip: Lumension documentation is updated on a regular basis. To acquire the latest version of this document, please refer to the Lumension Support Documentation Web site (www.lumension.com/support/documentation.html). Document Conventions The following conventions are used throughout Lumension documentation to help you identify various information types: Document Conventions Convention Usage bold Command names, database names, options, wizard names, window and screen objects (i.e. Click the OK button) italics New terms, variables, and window and page names UPPERCASE SQL commands and keyboard keys monospace File names, path names, programs, executables, command syntax, and property names - xvii - About this Guide The icons used throughout Lumension documentation identify the following types of information: Icons Used Icon Alert Label Note: Tip: Warning: Description Identifies paragraphs that contain notes or recommendations. Identifies paragraphs that contain tips, shortcuts, or other helpful product information. Identifies paragraphs that contain vital instructions, cautions or critical information. - xviii - Sanctuary Device Control v4.3.2 - User Guide Contacting Lumension Security Lumension Security Corporate Offices Global Headquarters European Headquarters 15880 North Greenway Hayden Loop, Suite 100 Scottsdale, AZ 85260 United States of America Phone: +1 480.970.1025 Fax: +1 480.970.6323 E-mail: [email protected] Atrium Business Park Z.A. Bourmicht 23 rue du Puits Romain L-8070 Bertrange, Luxembourg Phone: +352 265 364 11 Fax: +352 265 364 12 Hong Kong Office Florida Office 2290 West Eau Gallie Suite 212 Melbourne, FL 32935 Fax: +1 321 751 6454 18/F, One International Finance Centre 1 Harbour View Street, Central, Hong Kong Phone: +852 2166 8145 Fax: +852 2166 8999 E-mail: [email protected] United Kingdom Office Australia Office Unit C1, Windsor Place Faraday Road, Crawley West Sussex, London RH10 9TF United Kingdom Phone: +44 (0)1293 558 880 Fax: +44 (0)1293 558 881 E-mail: [email protected] Level 20, Tower II, Darling Park 201 Sussex Street Sydney, NSW Australia 2000 Phone: +61 2 9006 1654 Fax: +61 2 9006 1010 E-mail: [email protected] India Office Spain Office Paseo de la Castellana, 141 pl.20 ed. Cusco IV 28046 Madrid Spain Phone: +34 91 749 80 40 Fax: +34 91 570 71 99 E-mail: [email protected] 51 Kalpataru Court Dr. C.G. Road Behind R.K. Studio, Chembur Mumbai 400 074 India Phone: +91 22 6515 5403 E-mail: [email protected] Singapore Office US Federal Solutions Group Level 27, Prudential Tower 30 Cecil Street Singapore 049712 Phone: +65 6725 6415 Fax: +65 6725 6363 E-mail: [email protected] Virginia Office - Federal Solutions Group 13755 Sunrise Valley Drive, Suite 203 Herndon, VA 20171, USA Phone: +1 443 889 3291 Fax: +1 301 441 2212 E-mail: [email protected] - xix - About this Guide Product Pricing To receive pricing and licensing information, please visit the Lumension: How Do I Purchase? ( http://www.lumension.com/purchase/purchase_form.html ) Web page or contact the Lumension Sales Department. Lumension Security Sales and Support North America Sales Phone: E-mail: +1 480.970.1025 (Option 1) [email protected] International Sales Phone: E-mail: +1 480.970.1025 (Option 1) [email protected] PatchLink Technical Support Phone: E-mail: +1 480.970.1025 (Option 2) +44 (0) 1908 357 897 (United Kingdom) +61 (02) 8223 9810 (Australia) +852 3071 4690 (Hong Kong) +65 6622 1078 (Singapore) [email protected] [email protected] (APAC) [email protected] (EMEA) Sanctuary Technical Support Phone: E-mail: +352 265 364 300 +1 877 713 8600 (US Toll Free) +44 800 012 1869 (UK Toll Free) [email protected] Business Partnerships Phone: E-Mail: +1 480 444 1681 [email protected] Professional Services Phone: E-mail: +1 480 663 8702 [email protected] - xx - Sanctuary Device Control v4.3.2 - User Guide 1 Introducing Sanctuary Device Control This chapter introduces Sanctuary Device Control, and explains how it benefits your organization, protects your data, and improves your productivity. It also contains an overview of the entire Sanctuary system and an explanation of the how the program works. Welcome to Sanctuary Device Control Sanctuary Device Control eliminates many of the dangers associated with the abuse of network resources and mission critical information from within your organization. Sanctuary Device Control enhances security by controlling end user access to I/O devices, including: • Floppy disk drives • DVD/CD drives • Serial and parallel ports • USB devices • Hot swappable and internal hard drives • Other devices This is a very effective way of preventing data leakage and theft of electronic intellectual property and proprietary information. Sanctuary Device Control also prevents the upload and installation of malicious code, unlicensed software, and other counterproductive applications on your system preventing inappropriate use of corporate resources, which can incur unnecessary expenses. Sanctuary Device Control allows you to increase employee productivity and lower corporate legal liabilities while protecting your organization’s reputation, image, and assets. What is Sanctuary Device Control Sanctuary Device Control controls access to I/O devices by applying an Access Control List (ACL) to each device type. By default, access to any device is prohibited for all users. Designated administrators can assign access and permissions to specific users or groups of users for the devices that they require in their day-to-day tasks. These permissions can be temporary, online or offline, scheduled, copy limit, shadow (a copy of transferred data), read, read/write, and so on. The Sanctuary Device Control approach works in contrast to traditional security solutions that utilize a list of specific devices that cannot be used which have administrators scrambling to update systems whenever some new class of device is introduced. With Sanctuary Device Control, your IT infrastructure is protected from any kind of device until you sanction it use. -1- Introducing Sanctuary Device Control What can you do with Sanctuary Device Control As previously stated, using Sanctuary Device Control you can boost your IT security levels by: • Controlling and managing I/O devices through any port including USB, firewire, WiFi, Bluetooth, etc. • Preventing data theft and data leakage • Preventing malware introduction via removable media usage • Auditing I/O device usage • Blocking USB keyloggers (hardware artifacts that captures and save all keystrokes) • Blocking the PS/2 ports • Encrypting removable media • Enabling regulatory compliance And many other features that we will be enumerated in this introductory chapter. With Sanctuary Device Control, you can add or change access rights quickly and without the need to reboot the computer while controlling and monitoring all activities from a central location. This solution is network friendly and uses a three-tiered architecture that minimizes policy-checking traffic. Actual control is performed within the client computer itself and is transparent to the user. Because the implementation of the control feature is also local, the power of Sanctuary Device Control extends to employees using disconnected laptops delivering the same security regardless of their physical location. Sanctuary Device Control allows you to do the following: • Define user and group-based permissions on all or specific machines. • Prevent unknown devices from being installed on your networks. • Authorize particular device types within a class. • Uniquely identify individual devices. • Schedule I/O access for a predefined time or day of the week. • Create a temporary device access (same day or planned for future timeframe). • Restrict the amount of data copied to a device. • Assign administrator’s roles. • Create shadow files (i.e. copies of transferred data) of all data written or read, to or from external devices or specific ports. • Encrypt media with the powerful AES algorithm. • Block some media (DVDs/CDs) while permitting other specific ones to be used. • Enforce specific users and user groups to encrypt their removable devices. You can find a full list of characteristics in the “Major Features of Sanctuary Device Control ” section on page 3. -2- Sanctuary Device Control v4.3.2 - User Guide Benefits of using Sanctuary Device Control The advantages of using Sanctuary Device Control include the following: • Strict user policy enforcement: With no more data leakage, you are in control of the four w’s: who, where, what, and when. • Specific device permission rules: Permissions enforce a specific organization-approved model. • Administrators’ actions logging: A complete report of what your administrators are doing. • Comprehensive reporting: Useful information to keep everything under the strictest control. For example you can create a daily or weekly scheduled report of all user attempts to access an unauthorized device. • Data scrutiny: You can optionally enable a copy (shadow) of all data written/read to/from certain devices. • Copied data restrictions: You have the choice of establishing a daily limit on, or simply stopping, data being written to external devices. • Media restrictions: Define in advance which DVDs/CDs can be used in your company. • Data encryption: Encrypt data as it is being written to a device. Major Features of Sanctuary Device Control Sanctuary Device Control is designed for large organizations with complex needs. It offers many powerful features such as: • Centralized device access management Sanctuary Device Control's core functionality is its ability to centrally define and manage user, user groups, computers and computer groups access to devices on the computer. • Intuitive user interface Access to devices is controlled using a native Access Control List, arranged in the same way as navigating through files and folders in Windows Explorer. You can apply permissions at different levels: users, user groups, all machines, machine groups, specific machines, groups of devices, or even specific devices. • Novell support Sanctuary Device Control fully supports Novell’s eDirectory/NDS structure. The Novell’s eDirectory trees are synchronized using an external script. These objects appear on the Device Explorer structure and permissions and rules can be assigned to them explicitly. Administrators can schedule the synchronization script using Windows’s scheduler task manager (see Sanctuary's Setup Guide). • Support for a wide variety of device types and buses You can grant or deny access permissions for a wide variety of devices using USB, FireWire, ATA/IDE, SATA, SCSI, PCMCIA (or Cardbus), Bluetooth and IrDA buses. See Device Types Supported on page 6 for a list of the supported device types. -3- Introducing Sanctuary Device Control • Read-only access Sanctuary Device Control lets you define a particular device as read-only. You can set readonly permissions for all file-system based devices, for example, a floppy drive, DVD/CD writer, PCMCIA hard drive, and so on. Other device permissions you can set restrict writing, encrypting, decrypting, exporting data to file/media and importing data. • Copy limit You can limit the quantity of data users can write to floppy disks and removable storage devices on a daily basis so they cannot abuse their writing permissions. • Temporary access Sanctuary Device Control lets you grant users temporary access to their devices. This means that you can switch access on without having to remember to switch it off again later. You can also use it to grant access “in the future” for a limited period. • Scheduled device access Sanctuary Device Control lets you grant or deny permissions to use a device during a specific period. This lets you develop sophisticated security policies where certain devices can only be used from, for example, 9 A.M. to 5 P.M., Monday to Friday. • Context-sensitive permissions You can apply different permissions depending on their context while others are valid regardless of the connection status. However, you can create others that are only relevant when the machine either is or is not connected to the network. For example, this allows you to disable the WiFi cards when laptops are connected to the company network and enable them when the machine does not have a wired connection to the system. • File shadowing Sanctuary Device Control shadow technology enables full auditing of all data written and/or read to/from file-system based devices such as Recordable DVD/CD, removable storage devices, floppy disks, Zip and PCMCIA drives, as well as to serial and parallel ports (only written data). This feature is available on a per user basis. Some of these devices only support a partial shadowing: only the file’s name and not the complete content. • User-defined devices Sanctuary Device Control gives you the ability to manage other kind of devices in addition to those supported by default. You can add any device that is not managed by the default installation to the database as a user-defined device and apply permissions in the usual way. • Offline updates You can update the permissions of remote machines that cannot establish a network connection to your corporate network. New permissions can be exported to a file that is later imported onto the client computer. • Per-device permissions Sometimes a device type is too general for you to control access to sensitive data effectively. Therefore, you may want to implement greater control at a lower level: a device model or even for a specific device within a model. For instance, rather than grant permissions to use any type of removable media, you can restrict access to a specific device of a company-approved model. -4- Sanctuary Device Control v4.3.2 - User Guide • Unique, serial identified, removable devices Administrators can control devices by defining permissions at a class level (for example, all DVD/CD devices), classify devices in logical entities called device groups, or include a device model. When working with removable devices, administrators can go up to a fourth level by defining permissions for a unique, serial identified removable device. • Per-device encryption Restricting access for a specific device to a particular user also incorporates an encryption process to ensure that sensitive data is not inadvertently exposed to those without authorized access. • Centralized and/or decentralized encryption Using Sanctuary Device Control you, as an administrator, can not only grant user(s)/group(s) access to a removable storage device (defined at the class, group, model, or uniquely identified device level) but can also force users to encrypt their devices locally. This decentralized encryption schema is a work-around for those organizations that do not want (or need) to manage device encryption centrally while ensuring that the company’s data is not inadvertently exposed. • DVD/CD recorder shadowing Shadowing, a copy of the file’s data, can be used in the following writable media formats: CDR, CD-RW, DVD-R, DVD+R, DVD-RW, DVD+RW and DVD-RAM. Shadowing means that data written/read to/from these media is intercepted and made available to the administrators. By default, Sanctuary Device Control disables writing to such media and, when writing must be enabled, you can optionally select to shadow the data. Note: DVD/CD Recorder shadowing is supported from Windows 2000 (Service Pack 4 or later) onwards. Windows NT4 is no longer supported by Sanctuary Device Control. • Administrators’ roles Sanctuary’s User Access module allows you to set precise controls to determine who can access the different components of the Sanctuary Management Console. For example, you can restrict the access to the shadowing information to only the company’s auditors. You should also consult Sanctuary Setup Guide to learn how to set rights to control Organizational Units, Users, Computers and Groups. • Tamper-proof client component The Sanctuary Device Control, installed on each protected computer or server, is a critical part of Sanctuary Device Control. This driver is protected against unauthorized removal— even by authorized administrators. Sanctuary Administrators may emit an “endpoint maintenance ticket” (see and “Endpoint Maintenance” on page 24) or explicitly deactivate this protection. • File filtering You can use this feature to control which file types can be copied to and/or from removable devices (see “Using file filters” on page 77.) -5- Introducing Sanctuary Device Control What is New on this Version See the Readme.txt file located on your CD installation disk for a full list of features and changes. Device Types Supported Sanctuary Device Control supports a wide range of device types that represent key sources of security breaches. For some of these devices, you can allow access and activate the shadowing option for that class of device. If this is done, Sanctuary Device Control enables the administrators to view the content of the files written/read to/from that authorized device. You can set up permissions for devices that connect using USB, FireWire, PCMCIA, ATA/IDE, SATA, SCSI, Bluetooth, and IrDA bus types. Devices attached to these bus types recognized based on their device type, not on the way they are connected. For example, an external DVD/CD-ROM drive attached to a PC using the USB port is recognized as device type DVD/CD-ROM and is, therefore, controlled using the same mechanism and settings as an internal DVD/CD-ROM drive. It is possible to define a permission at device class level and restrict it to a specific device type, such as USB, FireWire, and so forth. Sanctuary Device Control is able to detect Plug and Play devices. These devices are subject to the same access controls set for fixed devices of the same type. Note: During the plug and play process, Windows registers the device into a class. Sanctuary Device Control uses this information to apply permissions to the device. For example, if Windows registers a camera in the Removable Storage Devices class, the access to this camera is controlled by the permissions set in that class in the Device Explorer module. Device types currently managed by Sanctuary Device Control include: • Biometric devices You can find Password Managers and FingerPrint readers in this class of devices. They are connected to the computer using the USB port. • COM/serial ports These include serial ports and devices that make use of COM device drivers, such as some types of modems (including null modems) and terminal adaptors. Some PDA cradles also make use of the serial port, even when they are connected through the USB port. Note: Some devices, like the Bluetooth print server, only work if the COM port is also enabled. If you use a printer that is configured to use a particular COM port (even if this port is provided by a Bluetooth adapter), then you may need to give access to the COM port as well. -6- Sanctuary Device Control v4.3.2 - User Guide • DVD/CD drives CD-ROM and DVD access can be managed in several ways. Sanctuary Device Control allows for full device lock/unlock, access to music CDs only, or access only for uniquely identified DVDs/CDs previously authorized. You can also restrict write privileges to CD-R/W and DVD /+R/W devices. • Floppy disk drives You can manage access to the floppy drive as either completely locked/unlocked or on a readonly basis. Floppy disk drive devices include conventional diskette drives, as well as highcapacity drives such as the LS-120. This applies regardless of how the devices are connected to the system, whether IDE, parallel, USB, or by other methods. • Imaging devices/Scanners Access to these USB or SCSI devices can be managed using Sanctuary Device Control. A scanner or a Webcam are examples of this kind of devices. Note: Some all-in-one models include a printer, a scanner and a memory card reader. There are cases where the scanner functionality cannot be used if the USB Printer functionality is disabled by the Sanctuary client. • LPT/parallel ports You can control conventional parallel printer ports, as well as variants such as ECB. Dongles are also included. • Modems/Secondary network access devices Access to these internal or external devices can be managed with Sanctuary Device Control. ‘Secondary’ network devices are those that do not connect directly through ‘normal’ channels. Note: Different modems operate in different ways. Depending on your brand, you may need to allow access to the COM port, to the Modem port, or, possibly, to both, so that you can use your modem. You should experiment with the settings in order to see what works best in your case. Note: If your users connect via dialup you may need to set a permission rule to the Local System account for the Modem. Note: The FireWire (IEEE 1394) net adapters devices are managed by the Modem/ Secondary Network Access Devices class as found in the Device Explorer Module (see Chapter 3, “Using the Device Explorer” on page 55). A reboot is required to apply new permissions. -7- Introducing Sanctuary Device Control • Palm handheld devices Create permissions rules at your convenience for this type of devices using Sanctuary Device Control. • Portable Devices Here you can find the new breed of convergent device. This class categorizes smart storage devices like the new MP3 players, digital still cameras, mobile phones, storage devices, and so forth. • Printers (USB/Bluetooth ) Sanctuary Device Control allows you to control the access to USB/Bluetooth printers connected to client computers. Note: Some all-in-one models of devices include a printer, a scanner and a memory card reader. There are cases where the scanner functionality cannot be used if the Sanctuary client disables the USB Printer functionality. • PS/2 ports PS/2, the port traditionally used to connect a keyboard, is being rapidly superseded by the USB port for keyboard connections. If you are only using USB keyboards and USB mice in your network, you can opt to block definitely all PS/2 ports. This will render the use of PS/2 Keyloggers (which capture data typed at the keyboard, including passwords and other sensitive data) impossible. Please consult Chapter 8, “Setting and Changing Options” on page 281 for more information. • Removable storage devices This device type includes disk-based devices that are not floppy or CD-ROM drives. Devices such as Jaz and PCMCIA hard drives fall in this category, as well as USB memory devices such as memory stick, Disk on Key, ZIP, as well as most USB-connected MP3 players and digital cameras. Note: Secondary hard disks drives (including SCSI drives) are treated as Removable Storage Devices. By specifying if the permission that applies to ‘Hard Drive’ or ‘Non Hard Drive’ you can distinguish between memory keys and secondary hard drives. You can also restrict the permissions to devices that connect through a given bus, such as, USB, SCSI, or PCMCIA. • RIM BlackBerry handhelds Handheld computers/mobile phones from the RIM (Research in Motion) BlackBerry are connected to the computer through a USB port. Access to these PDA/GSM devices can be managed with Sanctuary Device Control. • Smart Card readers Access to readers for smart cards, such as eToken or fingerprint readers, can be managed with Sanctuary Device Control. -8- Sanctuary Device Control v4.3.2 - User Guide • Tape drives Access to internal and external tape drives of any capacity can be managed with Sanctuary Device Control. Note: Some backup units that do not use the Microsoft supplied drivers cannot be controlled by Sanctuary Device Control. • User Defined devices Devices that do not fit into the standard categories can also be managed with Sanctuary Device Control. Devices such as some PDAs (non Compaq IPAQ USB, non Palm handheld USB), Qtec, HTC, and Web cams can be specified as a user-defined device and permissions added to them in the usual way. • Windows CE handheld devices Access to these devices can be managed with Sanctuary Device Control. The HP iPAQ or XDA are Windows Mobile 5 CE Devices (running Windows PocketPC 2002/2003 OS). Handheld Windows CE computers (using PocketPC OS) connected to the PC through a USB port. • Wireless network interface cards When installing the Sanctuary client, you have the option to configure the client’s permissions to use a Wireless LAN adaptor. Note: This permission applies only to Wireless cards for which Windows does not require a manufacturer-specific driver or administrative privilege to install. Conclusions Sanctuary Device Control eliminates the majority of the danger associated with insiders abusing their access to network resources and mission critical information. It significantly increases the security level on your operating system controlling and auditing end-user access to I/O devices. Using the control console, the security administrator(s) can allow access to an I/O device by assigning permission rules to users/groups. With the optional ‘shadowing’ feature, it is possible to track down data written/read to/from certain I/O devices. You can also access a log of what files were copied to various I/O devices on any given day. Sanctuary Device Control’s non-obtrusive and flexible nature protects and prevents with very little overhead for your users or system. Using our products, you can be assured that your company is safe. -9- Introducing Sanctuary Device Control - 10 - Sanctuary Device Control v4.3.2 - User Guide 2 Using the Sanctuary Console This chapter explains how Sanctuary Device Control approaches I/O security. It describes the components of the Sanctuary Device Control and explains how they contribute to the enforcement of your company’s security policies. When you first install Sanctuary Device Control, default permission rules are created and configured. These rules include shadow restrictions and read/write permissions for some of the devices. Although these settings meet the needs of some users, most people require additional access rights to carry out their day-to-day jobs. One of the first tasks of an administrator is to define new permissions rules for users, groups, computers, or devices in their network. Using the Sanctuary Management Console you can: • Set default options. • Grant general access to all available devices. • Define specific rights for certain users. • Authorize media types and specific media on a general or user-by-user basis. • Send updates to all users or to certain computers. • Maintain the database where all information is stored. • Synchronize domain users. • Configure centralized and decentralized encryption, etc. • Generate standard reports showing user permissions, device permissions, computer permissions, media by user, users by medium, shadowing by device, shadowing by user, online machines, user options, server settings, and machine options. • Generate custom reports of device use or device-attempted use. • See the content of a copied or read file (only if shadow is active). • View the log of all administrator’s changes to users’ policies. • Review any attempt to access the configured devices in a computer. Starting the Sanctuary Management Console To start the Sanctuary Management Console: 1. Click the Windows START button. 2. Select Programs → Sanctuary → Sanctuary Management Console. You can also create a shortcut in Windows’ desktop for your convenience. Connecting to the Server When you initially launch the Sanctuary Management Console, you need to connect to a Sanctuary Application Server. The Connect to SXS Server dialog is displayed. - 11 - Using the Sanctuary Console To connect to the server, follow these steps: Figure 2.1 Connecting to the server 1. Select the Sanctuary Application Server to which you want to connect from the list (if available) or type in the name. You can use the IP address, the NetBios name, or the fully qualified domain name of the Sanctuary Application Server. If your Server is configured to use a fixed port, you have to append the port number to the server name as in this example: secrsrv.secure.com[1234] Note: Please refer to the description of the registry key settings of the Sanctuary Application Server in Sanctuary Setup Guide for more information about how to configure the server to use a fixed port. Warning: When the Sanctuary Application Server is installed on Windows 2003 SP1 computer, you should configure the Windows Firewall to allow the communication between Sanctuary Application Server and the Sanctuary Management Console. Please see Sanctuary Setup Guide for more details. 2. Choose to log in as the current user or specify a different user’s details, using the Log in as option. 3. Click OK. The Sanctuary Management Console screen is displayed. If the Sanctuary Management Console screen does not appear, an error message is displayed. This indicates a problem occurred during an internal test. Check that you have the required permissions to connect to your selected server, domain rights, and Sanctuary Management Console rights. See “Defining Sanctuary Administrators” on page 34. - 12 - Sanctuary Device Control v4.3.2 - User Guide Log in as a Different User By default the system establishes the connection using your own credentials but you can change this behavior by clicking on the Log in as option. Note: A local account is created on a single computer and is stored in its Security Account Manager (SAM) database on its hard disk. Domain accounts are created on the domain controller and stored in the Active Directory. To log onto the local machine, you need a local account. To log onto the domain you need a domain account. If you selected the Log in as option, instead of using your credentials you must enter the user name and password. Prefix the user name by a workstation name and backslash for local accounts, and by a domain name and backslash for domain accounts (e.g. DOMAIN1\ADMIN1). Once the connection established, the user’s credentials are shown in the Output panel while the Connection window show the license details — if you do not see these windows, select the VIEW → CONNECTION command: Figure 2.2 Connection / Output window - 13 - Using the Sanctuary Console The Sanctuary Management Console Screen When you start a Sanctuary Management Console session, the Sanctuary Management Console screen is displayed. Figure 2.3 Sanctuary Management Console screen The Menu in the upper part of the window provides access to different Sanctuary Device Control functions and commands. Some of these depend on the module you are currently using. For example, the contents of the Explorer menu depend whether you are in the Exe Explorer of the Log Explorer. You can use shortcut key combinations to access different commands. For example, ALT+R+O displays an HTML Online Machine report. - 14 - Sanctuary Device Control v4.3.2 - User Guide The Control Panel displays in the left-hand side of the window. This lets you select the available modules and options without using the menu. If the Control Panel is not visible, use the View Control panel command to display it. The contents displayed in the Main window panel depend on the module currently selected on the left panel. You can refine the information displayed in some modules. Every time you open a module its stays open and arranged in stacked tabs until explicitly closed. You can use the Window command of the menu bar to organize your workspace. The Connection window shows information about the current user. You can use the scrollbar to navigate through the text. If the Connection window is not visible, use the View Connection to display it. The Output window displays important information messages, for example, messages generated by updates sent to the clients, file fetching, I/O failures, as well as error messages. Use the scrollbar to navigate through the text. If the Output window is not visible, use the View Output command to display it. The Status bar, at the bottom of the screen, displays information about the condition of the console. If you do not see it, use the View Status Bar to display it. If you are using a time-limited license for Sanctuary then once a day, when starting the management console, you get the following screen informing you of your license status: Figure 2.4 License status warning This information is also reported in the Connection window of the main screen and generates a log that you can see using the Windows event viewer. Customizing your Workspace You can resize and reposition the panels in the main Sanctuary Management Console window to suit your needs. To do this, use the Pin icon to ‘pin down’ or ‘float’ ( ) the Control Panel, Connection, or Output windows. When a window is ‘parked’ the icon changes to . - 15 - Using the Sanctuary Console Alternatively, you can ‘dock’ each window or minimize the panel. In Dock mode, the window hides itself as a tab at the edge of the Sanctuary Management Console screen, leaving more space for the main window panel. Click again on the pin to ‘float’ the window panel again. Figure 2.5 Docked Control Panel Figure 2.6 Docked window In Floating mode, the windows can be moved to any position in the screen, sharing the working area with whatever module is opened. - 16 - Sanctuary Device Control v4.3.2 - User Guide You can resize and drag the windows panes to whatever zone you prefer as in the following example: Figure 2.7 Floating Control Panel - 17 - Using the Sanctuary Console Figure 2.8 Floating windows Double click on a window’s title bar to dock it to its previous position. You can also drag the window to any edge of the Sanctuary Management Console screen in which case it docks itself — guide yourself with the rectangle shape preview before letting go the mouse button. All open modules occupy the main window area and can be ‘floated’ or ‘docked’ at will. You can use the Window menu to arrange those opened module’s windows in a tile, cascade, or iconize mode. Each window can also be closed, maximized, or iconized independently as needed. If several modules are already open (as shown inFloating Control Panel ), you can choose between them using the stacked tab bar. You can reorder the windows located at the main window panel by dragging them using their title . bar or traverse them using the Scroll Left or Scroll Right icons To close the active window, click on its cross icon, right-click on the title bar and select Close, or press Ctrl+F4. - 18 - Sanctuary Device Control v4.3.2 - User Guide To minimize a window, right-click on the title bar and select Minimize. You can also use the Restore and Maximize icons and commands as on any Windows’ program. Figure 2.9 Minimized windows The Sanctuary Device Control Modules When you are using Sanctuary Device Control the Sanctuary Management Console screen gives access to the three Sanctuary Device Control modules. These are summarized in the following table: - 19 - Using the Sanctuary Console Table 2.1 The Sanctuary Device Control modules Module Icon Used to... See... Device Explorer • Grant access to I/O devices for specific users or groups. • Establish copy limits and activate shadowing. • Allows users to encrypt removable devices ‘on the fly’ (decentralized encryption) Chapter 3, “Using the Device Explorer” Log Explorer • View records of files copied from any PC to authorized I/O devices, and view the contents of the files themselves (two way ‘Shadowing’). • View attempts to access • or connect unauthorized devices. • Create custom reports, for example you can create a daily or weekly scheduled report of all user attempts to access an unauthorized device. Chapter 5, “Using the Log Explorer” Media Authorizer • Recognize specific DVD/CDs which users can be permitted to use, even where they have not been granted access rights to access the DVD/CD drive, as well as establish specific (encrypted) removable media which users can be permitted to use. • Give permission to use specific • DVD/CDs for users who have been barred from using the DVD/CD drive. • Establish permission to use specific (encrypted) media. • Centrally encrypt removable devices. Chapter 6, “Using the Media Authorizer” Device Explorer Module The Device Explorer module is the main nucleus of the Sanctuary Management Console program when used under Sanctuary Device Control. Sanctuary’s administrators can use it to: • Modify assigned permissions and rules. • Create new permissions and rules. • Delete already defined permissions and rules. • Check permissions and rules. • Define the user who must encrypt removable storage devices before using them (decentralized encryption). • Add unique, serially identify, removable storage devices to further control the working environment. • Define the bus type where the permission will apply (depending on the device class). • The rules can be applied in any of the following combinations — depending on the device: - 20 - Sanctuary Device Control v4.3.2 - User Guide • Read data. • Read/Write data. • No data access. • Only allow access to encrypted removable storage devices. • Online permission. • Offline permission. • Scheduled permission. • Temporary permission. • Shadow permission (a copy of all data written/read to/from certain I/O devices). • Data Copy limit permission. • Encrypt/decrypt, export encryption key to file/media, import encryption key (when using removable devices). You can find more information in Chapter 3, “Using the Device Explorer”. Log Explorer Module The Log Explorer module forms the core of the housekeeping control routines that are carried out by Sanctuary administrators. It displays the information stored in the log files in the format you specify in a template. You can create custom reports showing: • User actions: For example, users accessing floppy drives or other device types. • Administrator actions: For example, permissions granted for particular devices. Note: In previous versions of Sanctuary administrator actions were reported in the Audit Log Viewer. Although the driver enforces defined permissions, administrators can use this module to check the usage of granted permissions and to view who is trying to access non-authorized devices. For more information about the Log Explorer module see Chapter 5, “Using the Log Explorer”. Media Authorizer Administrators can use the Sanctuary Management Console’s Media Authorizer module to scan a DVD/CD and enter its details into the Database of Authorized DVDs/CDs. You can perform the following actions on the existing DVD/CD in this database: • Assign them to a user or user group • Remove a user or user group previously assigned to a DVD/CD • Rename the medium • Remove or add media from the list. This is equivalent to add it or remove it from the database - 21 - Using the Sanctuary Console When a DVD/CD is scanned, the DVD/CD Authorizer calculates a checksum to uniquely identify it. There is no limit to the number of Authorized CDs that can be added to the database. Authorization of multi-session CDs is only supported when the client and the console are installed on the same machine. When a DVD/CD is inserted into a client computer, the driver verifies the checksum. If it coincides with the Authorized DVDs/CDs that the user is allowed to access, then the DVD/CD is made available. If the checksum does not correspond to one in the white list, access is denied. You can find more information in Chapter 6, “Using the Media Authorizer”. You can also use this module to encrypt removable storage devices connected to a computer using one of the three proposed methods to cipher the device. As an alternative, you can use the Device Explorer module to define permissions that force the user to encrypt any removable storage device plugged to their computer. The third and last use of this module is to add an externally encrypted device (Import) to the database of previously encrypted devices and then define permissions for a user to use it. You can also force the user or user group to use only encrypted devices minimizing the risk of losing information if the device is lost. For more information, see Chapter 7, “Accessing encrypted media outside of your organization”. The Sanctuary Management Console Menus and Tools This section describes all those commands you can directly access using the Menu bar. File Menu Use the File menu to connect or disconnect from a Sanctuary Application Server, save the contents of the main page, or close the program. The items on the file menu are explained in the following list: • Connect Communicates with a Sanctuary Application Server running on another machine or using a different user name in order to carry out administrative tasks. • Disconnect Detaches the Sanctuary Management Console from the current Sanctuary Application Server before using the Connect option. • Save As Saves the contents of the main window in CSV format (only available for specific modules). You can use this option to export data to any CSV compliant program, for example Excel. • Print Prints the active report window. The standard Internet Explorer print dialog is displayed. • Exit - 22 - Sanctuary Device Control v4.3.2 - User Guide Exits the Sanctuary Management Console application. This command does not stop the Sanctuary Application Server, just your administrative session. View Menu The View menu controls how the main elements of the Sanctuary Device Control window are displayed. The items on the view are explained in the following list: • Modules Displays a sub menu from which you can select any available module. • Control Panel Shows or hides the Control Panel, which lets you select modules, tools, reports, and help from a convenient list. • Output Shows or hides the Output window, which displays a log of system activity. • Connection Shows or hides the Connection window, which displays real-time operating information. • Status bar Shows or hides the status bar, which displays program’s conditions, clock, and messages. Tools Menu The Tools menu is used to update the database, send permissions to Sanctuary clients and so on. The tools menu items are explained in the following list: • Synchronize Domain members Updates the Sanctuary Database with the current list of users and groups of a domain or machine. • Database Maintenance Deletes the device logging entries, audit logs, machine scans, shadow files, and key recovery information created before a given date from the database and data file directory. • User Access Defines Sanctuary Enterprise Administrators and Sanctuary Administrators. This option lets you restrict the right to set permissions, view audit information about administrators’ actions or shadowing information. See Sanctuary Setup Guide to learn how to set rights to control Organizational Units/ Users/ Computers/ Groups. • Key Recovery Accesses the administrator’s tool to recover a password to unlock an encrypted storage device. See “Recovering a password for decentralized encryption when connected” on page 237. • Default Options Changes the default options settings for computers. See Chapter 8, “Setting and Changing Options”. • Send Updates to All Computers - 23 - Using the Sanctuary Console Dispatches the latest setting and permission changes to all computers on the network. Changes can be sent in synchronous or asynchronous mode. • Send Updates to • Export Settings Transmits the latest setting and permission changes to a specific computer on the network. Places all settings and permissions in an external file that can be sent to all those who are working offline with no connection, and need an update of their permissions. If placed in a special file — policies.dat — it is possible to do a ‘Serverless’ client installation (see the Setup Guide for more details). See “To Export and Import Permission Settings” on page 119. • Purge Online Table Erases all information regarding connected clients. Sanctuary Application Server keeps a record of connected clients. Sometimes, clients are disconnected without notifying their server that they are not available anymore. In this case orphan entries are left in the online table affecting the performance of the Send Updates to all computers functionality. When you purge the online table, the Sanctuary Application Server deletes all information it has concerning connected clients. Every time a user logs on/off or unlocks his station the online table is modified. • Endpoint Maintenance Creates and save maintenance ‘tickets’ for computers/computer groups allowing protected files and/or registries to be modified. • Temporary Permission Offline Accesses the administrator’s tool for generating a code that can be communicated to a user by phone to enable them to increase their permissions on a temporary basis while offline. See “To Assign Temporary Permissions to Offline Users” on page 108. Note: All the commands in the Tools menu can also be accessed using the Tools module of the Control Panel. Sanctuary keeps a copy of user information in its database. When a new user logs on, Sanctuary stores its Security Identifier (SID) but not its name. The same applies when you add a new computer to the domain: Sanctuary identifies the computer and stores its name in the database. For performance reasons, new user names are not resolved during logon but require an explicit synchronization (Tools → Synchronize Domain Members). The synchronization process varies depending on whether the protected computers are on a domain or a workgroup. Endpoint Maintenance When the client starts, it generates a 15-byte random value used for protection purposes. This key — which we call Salt — is used to guarantee that only authorized process/users can perform maintenance. The Endpoint Maintenance dialog is used to create and save a ‘ticket’ for this service. This provisional permission to modify, repair, or remove the client, registry keys, or special directories, can be sent to computers or users. - 24 - Sanctuary Device Control v4.3.2 - User Guide This key value works in conjunction with the Client Hardening value configured in the Default Options dialog (see Chapter 8, “Setting and Changing Options” on page 281). If the client hardening option is set to ‘Basic’ you do not need salt. If the client hardening option is set to “Extended” you need to enter or query the salt and lower the protection level using the endpoint maintenance. You can save and transport the generated “ticket” to the client computer(s) by any available means (shared directory, email, or removable device). Note: If the client machine is not reachable, you can always get the “salt” value and “hardening” status of the client computer by right-clicking its Sanctuary client’s icon — located on the system bar — and selecting ‘Endpoint Maintenance’ from the contextual menu. Note: You must enable the “Remote Registry” service on Windows Vista machines if you want to query the “Salt” value using the Sanctuary Management Console. This service is disabled by default in this operating system. As a workaround, you can ask the user to provide this value. Note: Do not use the “Send to” right-click menu option to transfer the Maintenance ticket file, use copy and paste instead. Client Ticket Rules The client ticket follows these rules: 1. The maintenance ticket is unique and per machine. You cannot generate the same ticket for several computers (even though you are allowed to do so if the client hardening option is set to ‘Basic’). 2. You can define a validity period for the ticket. After this period, if the ticket has not been accepted it is no longer legitimate for the clients. Once the ticket is accepted, there is no time limit for its use. To deactivate the ticket you must reboot the machine. 3. If the maintenance ticket is generated for a specific user, this user must be logged to accept it. If this is not the case, the ticket is rejected. 4. If you choose to “relax” (lower) the client hardening value by creating and using a maintenance ticket for a computer without choosing a user and another user logs into the same machine, the computer continues in a “relaxed” (modified) state until the next reboot. - 25 - Using the Sanctuary Console 5. Your comments appear on the audit log. You can review them by using the Log Explorer module (see Chapter 5, “Using the Log Explorer” on page 149). 6. The client protection mechanism can also be temporary deactivated when using the Sanctuary Client Deployment Tool. The protection is reactivated — and reset to its previous setting — after the client’s reboot. Please consult the Sanctuary Setup Guide for more details. To Create and Save Maintenance ‘Tickets’ for Endpoint Machines/Users 1. Select the TOOLS ENDPOINT MAINTENANCE item from the menu bar (or from the Tools section of the Control Panel). 2. Select the Salt value. (If the client hardening option is set to “Basic” you do not need salt. If the client hardening option is set to “Extended” you need to enter or query the salt for the machine you are using to relax.) Use the QUERY button to obtain the salt value directly from the client computer. Use the right-click contextual menu of Sanctuary client’s icon when the machine is not connected to the network. 3. Select the validity period for the ticket. 4. Select the user(s) and/or computer for which this ‘ticket’ is valid. 5. Add any additional comments in the corresponding field. 6. Click on the SAVE button, choose a suitable location, click on SAVE and then on CLOSE. Figure 2.10 Endpoint maintenance - 26 - Sanctuary Device Control v4.3.2 - User Guide You can save this ticket (ticket.smt) and transfer it to selected computers by means of an external device — the machine(s) needs to have the required permissions to access the device . This ‘maintenance ticket’ must then be copied to the predefined ticket directory in the client computer(s). See the Sanctuary Setup Guide for a description of the registry keys. As previously explained, this ticket also depends of the Client Hardening option value. Reports Menu The Reports menu can be used to save or print many types of information. The reports menu items are explained in the following list: • User Permissions Generate a report of the device permissions associated with one or more users. • Device Permissions Generate a report of users’ permissions for each device. • Computer Permissions Generate a report of the permissions assigned to each user for the use of the different devices associated with a particular computer. • Media by User Generate a report of the types of DVDs/CDs a selected user is allowed to access. Note: DVDs/CDs authorized as a result of a User being a member of a Group are not listed. Specific (encrypted) media that users have permission to use are also listed in this report. • Users by Medium Generate a report of the users or groups allowed to use each authorized DVD/CD. Users who have been granted the right to access a specific encrypted media are also listed in this report. • Shadowing by Device Create a report showing the users copying and/or reading data to and/or from particular devices. • Shadowing by User Generate a report showing the total amount of data copied and/or read to and/or from different devices for all users. • User Options Generate a report with all related permissions and settings for a specified user. • Machine Options Generate a report showing all computers’ options as currently defined in the system. These can be changed using the command Tools → Define Options. - 27 - Using the Sanctuary Console • Online Machines • The Sanctuary Application Server(s) keep record of the connected clients. The online table is updated every time a user logs on or unlocks his/her station. This report shows a list of connected machines. • Server Settings Generate a report showing how your Sanctuary Application Server(s) is configured. This is provides you with very useful troubleshooting information. See Chapter 9, “Generating Sanctuary Reports” on page 295 for more detailed information. Note: In addition to the standard reports that are available through the Reports menu, you can define your own criteria for selecting log entries and producing reports using the Log Explorer module. For more information see Chapter 5, “Using the Log Explorer” on page 149. Explorer Menu The Explorer menu contains different menu options, depending on which module you are currently using. The explorer menu items are explained in the following list: In the Device Explorer module • Manage Devices Add and remove devices that can be administrated using permissions. • Insert Computer Add a machine to the machine-specific settings section or a computer group. • Add/Modify Permissions Define and change general permissions. • Add/Modify Online Permissions Define and change device permissions to apply when a computer is connected to the network. • Add/Modify Offline Permissions Define and change device permissions to apply when a computer is not connected to the network. • Add/Modify Scheduled Permissions Define and change programmed permissions. • Add/Modify Shadow Settings Create and modify the rules used to obtain a copy of those files users have copied and read to and from certain devices. • Add/Modify Copy Limits Define and change copying quota limits. - 28 - Sanctuary Device Control v4.3.2 - User Guide • Temporary Permissions Define provisional permissions. • Remove Delete the current selected permission, device group, computer, or computer group. • Add Event Notification Define a message to inform the user of an incident. • Insert Device Group Add a device-classifying group. • Rename Device Group Change the name of device-classifying group. • Insert Computer Group Add a computer-classifying group. • Rename Computer Group Change the name of a computer-classifying group. In the Log Explorer module • Fetch log Obtain the latest log entries from a client computer. Window Menu The Window menu controls how the panels and windows in the Sanctuary Management Console screen are displayed. The window menu items are explained in the following list: • Cascade Place all open windows in an overlapping arrangement. • Tile Lay all open windows side by side in a non-overlapping fashion. Help Menu The Help menu is used to access information about the Sanctuary Management Console and Sanctuary Device Control. The help menu items are explained in the following list: • Contents Go directly to the contents tab of the help file. • Search… Look up information in the help file. • Index… Show the help index. • About… - 29 - Using the Sanctuary Console Display information about the current version of Sanctuary Device Control, when contacting Lumension technical support staff. • Lumension on the Web Go to the Lumension’s home page, where you can find updated information about all Sanctuary products. • Lumension Knowledgebase Go directly to Lumension’s knowledge database. This includes tips, questions and answers, and how-to articles. Other Administrative Functions This section explains the use of other administrative functions. Setting and Changing Default Options Sanctuary Device Control allows you to set default options for various aspects of the Sanctuary client behavior. You can do this using the Default Options dialog. You can access the Default Options dialog by selecting Default Options from the Tools menu (or from the Tools section of the Control Panel): Figure 2.11 The Default Options dialog Please refer to Chapter 8, “Setting and Changing Options” on page 281 for detailed information. - 30 - Sanctuary Device Control v4.3.2 - User Guide Synchronizing Domain Members If Sanctuary Device Control is protecting the computers in a domain, and you wish to synchronize to that domain, then select Synchronize Domain members from the Tools menu (or from the Tools section of the Control Panel). The following dialog appears. Figure 2.12 The Synchronizing Domains dialog To Synchronize Domain Members 1. Type the name of the domain you want to synchronize. 2. Click the OK button. The list of users and groups held by Sanctuary Device Control is updated. Note: If a machine name is used instead of a domain name, and the machine is a domain controller, this particular domain controller is used for domain synchronization. This can be useful when the replication between the various domain controllers is slow and you cannot wait for the user account information to replicate between all of them. Synchronizing with Novell eDirectory If you are using Sanctuary Application Control Suite in a Novell environment, you should periodically run the synchronization script. This can be done manually (provided there are not too many changes in your eDirectory structure) or automatically using scheduler software. See Sanctuary's Quick Setup and Configuration Guide for more information. - 31 - Using the Sanctuary Console Adding Workgroup Computers If Sanctuary Device Control is protecting the computers in a workgroup instead of a domain, then there is no domain controller from which you can obtain a list of users. In this case, you need to add the computers in the workgroup individually. To do this, select Synchronize Domain members from the Tools menu (or from the Tools section of the Control Panel). The following dialog appears: Figure 2.13 Adding workgroup computers To Add Workgroup Computers 1. Enter the name of the computer you want to add 2. Click on different user name. The following dialog is displayed: Figure 2.14 The Connect As dialog 3. Type in the user name and password for the local administrator for the computer you want to add. Make sure you include the computer’s name in the user name. 4. Click the OK button twice (to close the corresponding dialogs). This adds the computer to the database and you can then proceed to assign permissions to its users through the Device Explorer module. - 32 - Sanctuary Device Control v4.3.2 - User Guide Note: Windows XP has a feature called ‘Simple File Sharing’ which can sometimes interfere with the process of synchronizing a computer with Sanctuary Device Control. If the process described above does not make the computer visible to Sanctuary Device Control, you should turn off this option and try again to synchronize the computer. To access the ‘Simple File Sharing’ option, open ‘Windows Explorer’ on the target machine, select ‘Folder Options’ on the ‘Tools’ menu (or from the Tools section of the Control Panel) and then go to the ‘View’ tab. It should be the last option in the list. Note: You can also synchronize the local users/groups of one or more workstations when a domain is used in case you want to enforce policies on a local user despite being in a domain. Performing Database Maintenance After you have been using Sanctuary for a while, your database will have accumulated a large number of activity logs, scan results, shadow files and key recovery information. Older records take up unnecessary database space and may no longer be needed for your daily operations. If this is the case, you can periodically clean up the database by removing obsolete records. To Delete Database Records Prior to a Given Date from the Database 1. Open the Database Maintenance dialog, accessible from the Tools → Database Maintenance menu (or from the Tools section of the Control Panel): Figure 2.15 Performing database maintenance - 33 - Using the Sanctuary Console 2. Click on the arrow to the right of the date field to select the date from a calendar. The maintenance you can do when using Sanctuary Device Control is to delete device log information, audit logs, shadow files (if they exist) and any key recovery information. 3. Click on the OK button to delete the database records written before the chosen date. Warning: If you delete Medium recovery information you cannot recover lost passwords nor give temporary offline permissions to encrypted USB memory sticks given prior to DB maintenance. Warning: Database maintenance operations cannot be undone. If you wish to keep this information for future reference, you should first do a backup using the SQL Server utilities. You also need to make a backup of the data file directory. Warning: You should make sure that there is enough free space on the database server hard disk BEFORE starting database maintenance. If the operation fails because the database engine cannot create the transaction logs, you should perform the maintenance on a shorter period basis. Defining Sanctuary Administrators Before using the program, we recommend that you define the administrators. You can assign different roles for each one of them, but you should have at least one user assigned to the “Enterprise Administrator” role. Warning: You should be careful not to lockout yourself out when modifying these roles. Note: Local machine users cannot manage Sanctuary Management Console even if they are assigned as Enterprise Administrators. They cannot connect the Sanctuary Management Console to the Sanctuary Application Server using such an account. - 34 - Sanctuary Device Control v4.3.2 - User Guide Note: Since all programs in our suite share the same database, some options you set for the Console users are also enforced for other programs of our Suite. For instance, changing a user from the role of a Enterprise Administrator to a “normal” Administrator for Sanctuary Device Control also changes his role for Sanctuary Application Control Suite. Note: Sanctuary Administrators cannot manage built-in accounts (Everyone, LocalSystem, etc.). Only Enterprise Administrators can manage them. All members of the local Administrators group on servers running Sanctuary Application Server are Sanctuary Administrators and have access to all roles by default. To Change User’s Roles 1. Select Tools User Access from the menu (or from the Tool section of the Control Panel). This will open the User Access dialog as shown below. Figure 2.16 Searching for users 2. Enter a user name in the User Name field. 3. Click on SEARCH to locate the user or group to whom you want to grant administrative rights. You can use wildcards (* or ?) in the name. - 35 - Using the Sanctuary Console Figure 2.17 Defining the administrators' roles 4. Select the user in the Users list and click on the Access column. 5. Click on the down arrow icon located at the right side of the field to view a menu with all available options. 6. Set a user to Enterprise Administrator to grant him or her the right to connect to the Sanctuary Application Server and manage any object (Users/Groups/Computers/Default Options). Note: Only the ‘Enterprise Administrators’ can assign other users as ‘Administrators’ and use the Tools menu. User set as ‘Administrator’ can use the console without being able to assign other users as administrators. If you are delegating administrative rights using Active Directory Organizational Units, the Sanctuary Management Console Administrators have the following permissions: Table 2.2 Administrator's prerogatives Action Type of Administrator Comments View all permissions. All Administrators - Modify global-level permissions. Enterprise Administrators - Members of the ‘Manage Device Control Settings’ role ONLY for the users that the administrator is allowed to manage - 36 - Sanctuary Device Control v4.3.2 - User Guide Table 2.2 Administrator's prerogatives Action Type of Administrator Comments Modify machine-level permissions. Enterprise Administrators(for ALL accounts, including the WELL-KNOWN accounts) - Members of the ‘Manage Device Control Settings’ role (for ALL accounts, including the WELL-KNOWN accounts) ONLY for the machines that the administrator is allowed to manage Enterprise Administrators (for ALL accounts, including the WELL-KNOWN accounts) - Members of the ‘Manage Device Control Settings’ role(for ALL accounts, including the WELL-KNOWN accounts) IF AND ONLY IF the administrator is allowed to manage ALL the machines in the machine group for ALL accounts in BOTH CASES, including the WELL-KNOWN accounts Modify machine-group permissions. Note: When you define at least one user as Enterprise Administrator, the members of local Administrators group (default setting) no longer have access to Sanctuary Application Server /Sanctuary Management Console. Be careful when adding or removing ‘Administrators’ from the list and ensure that there is always at least one Enterprise Administrator. Sanctuary Management Console administrators’ access can be restricted to pre-defined roles when activating the ‘Yes’ option. These are summarized in the following table (please see also the notes after the table): Table 2.3 Administrator's roles Option Administrator actions available when option set to ‘Yes’ Comments Settings (Device Control) Change permissions and options for the objects of the Active Directory. Requires write access to these objects. Can also see the ‘Media Authorizer’ module. Time based settings (Device Control). Set temporary and scheduled permissions. Administrator cannot set standard permissions. This option is a sub group of ‘Settings (Device Control)’. Devices (Device Control) Add new devices in the system using the manage devices functionality. Organize devices into groups. - - 37 - Using the Sanctuary Console Table 2.3 Administrator's roles Option Administrator actions available when option set to ‘Yes’ Comments Media (Device Control) Encrypt and authorize media but cannot change permissions in the Device Explorer module. Can also see the ‘Media Authorizer’ module and get more reports (‘Media by User’ and ‘Users by Medium’). This option is a sub group of ‘Settings (Device Control)’. Audit (Device Control) View and search Audit Logs. Can also see the Administrator actions, if you have the appropriate priveleges, using the Log Explorer module. Logs (Device Control) Review central logging and access shadow files. Can also see the Log Explorer module and get more reports (‘Shadowing by Device’ and ‘Shadowing by User’). Logs without File Access (Device Control) Same actions done by the Logs (Device Control) option but can also see the content of shadow files. This option is a sub group of ‘Logs (Device Control)’. Key Recovery (Device Control) Generate a passphrase used to access an encrypted device when the user has forgotten a decentralized encryption password. This is done with a lower security risk when the user is connected to your network as Sanctuary client can provide a Security Code containing the public key (whereas Secure Volume Browser cannot). Temporary Permissions Offline (Device Control) Set temporary permissions for users who are not connected to the Sanctuary Application Server yet require extended access permissions for a short time. Administrator cannot set standard permissions. - Endpoint maintenance Create tickets to update, delete, and install the client. See “Endpoint Maintenance” on page 24. Scheduled Reports Generate custom reports at prescheduled intervals between start and end dates. See “Schedule Tab” on page 195. Synchronize Computer Can synchronize domain or computers (local accounts) Only Enterprise Administrators - 38 - Sanctuary Device Control v4.3.2 - User Guide Note: The “Compatible” option is a legacy. It only appears for those users updating from previous versions. This option is changed to “Yes” or “No” when edited. There are no restrictions for an administrator that has the “Compatible” mode assigned. Note: There are default rights that apply to all Administrators: see the Device Explorer module and get some ‘Reports’ (‘Users Permissions’, ‘Device permissions’, ‘Computer permissions’, ‘Online Machines’, and ‘Options’). When selecting the ‘Yes’ option, you add to this default rights. Note: You can only change these options for ‘Administrators’. All other user types, are set to ‘No’. Note: Consult the Sanctuary's Setup Guide to learn how to set rights to control Organizational Units/ Users/ Computers/ Groups. Sending Updated Permissions to Client Computers Administrators use the Device Explorer module in the Sanctuary Management Console to modify permissions and rules. When a policy changes, the Sanctuary Client downloads it at the next event. For example, when the user logs in. However, if the administrator wishes the changes to take effect immediately, they can be transmitted to the affected clients by updating the database using the Sanctuary Application Server. At the same time, the Sanctuary Application Server sends a message to the connected client computers to indicate that the client should contact the Sanctuary Application Server and download the latest permissions rules. If the permissions are the same, no changes are applied and the existing rules remain intact. If the permissions differ, the client contacts the Sanctuary Application Server and downloads the latest ones. When the client receives the new set of permissions, the kernel mode driver activates the changes immediately. There is no requirement for the user to reboot or log-off and log-back onto their system — except for certain devices, see Table 3.2, “Possible assignments by device” on page 58 . - 39 - Using the Sanctuary Console Use the Send Updates to All Computers or Send Updates to items from the Tools menu (or from the Tools section of the Control Panel) to communicate immediately the changed rules and permissions to the client computers. You can send permissions updates to computers not connected to the network using a file transfer. See “To Export and Import Permission Settings” on page 119. for more information. Alternatively users can temporarily increase their offline permissions by contacting an administrator and obtaining a passphrase. See “To Assign Temporary Permissions to Offline Users” on page 108. Everyday Work In this section, we present you with the most common cases encountered in your daily work with Sanctuary Device Control. You can find practical tips and advices in the following subsections. Identifying and Organizing Users and User Groups Only members of the Domain Administrators or Enterprise Administrators group can create, modify, or delete users and user groups in Windows using the Active Directory Users and Computers Microsoft Management Console snap-in. To Activate the Active Directory User and Computers Snap-in 1. Select Start → Programs → Administrative Tools → Active Directory Users and Computers from Windows’ desktop. 2. By opening this snap-in console all users and user groups are automatically published across the network. Publishing is the act of making an object publicly browseable and accessible. Most objects are automatically published, but you must explicitly publish Windows NT shared printers and computers outside the domain. Published resources allow users to find and use objects (users, groups, printers, servers, etc.) without knowing their host server. Published resources are seen across subnets. The Computer Management or Active Directory Users and Computers administrative tool is used to publish resources in the Active Directory structure. When you make changes to a domain, such as adding groups, users, or computers, you must publish them, if necessary — some of them are automatically published as stated before. You should use the Synchronize Domain Members item on the Tools menu (or from the Tool section of the Control Panel) in Sanctuary’s console to refresh the content of the devices, users, and group information before modifying permissions and rules. This is especially true if you are not the only member of the Administration group. On a Novell network, you should use the synchronization script described in the Sanctuary Setup Guide. - 40 - Sanctuary Device Control v4.3.2 - User Guide Identifying the Devices to be Managed When first installing Sanctuary Device Control, all those devices belonging to the standard Windows classes are identified and fill-in with the default permissions and rules. However, if you add new devices to a computer or an independent computer that forms part of a subnet and is not included in the active directory structure, some of the devices will not be accessible since the most restrictive policy applies. Please see Table 3.1, “Default settings following installation (these apply to ‘Everyone’)” on page 57 and Table 3.2, “Possible assignments by device” on page 58 for details. If this policy suits your needs, you do not have to take any action. If you want to change the rules and permissions for a specific computer or a specific model of device, you first need to publish it (see previous section) or add the devices. To add new devices from a specific computer do one of the following actions: • If you are in the Device Explorer module, select Explorer menu to open the Manage Devices dialog. • While in the Device Explorer module, right-click on the Default Settings header in the Device Explorer window and select the Manage Devices item. • From the Log Explorer, right-click on a Device Attached entry. Manage Devices item from the See “Managing Devices” on page 138 for more details. You should only add the models of devices that will receive specific permissions. If you only want to set permissions at the class-level, you do not need to add specific device models. Do not add devices if you are not going to define access permissions for them. Working with the Sanctuary System’s Pre-Defined Device Classes Once you install the program, the standard Windows’ device classes are created: Table 2.4 Standard Windows' device classes as seen on the Device Explorer module in the Default Settings section Standard Windows’ device classes Biometric Devices LPT/Parallel Ports PS/2 Ports User Defined Devices COM/Serial ports Modem/Secondary Network Access Devices Removable Storage Devices Windows CE Handheld Devices DVD/CD Drives Palm Handheld Devices RIM BlackBerry Handhelds Wireless NICs Floppy Disk Drives Portable Devices Smart Card Readers - Imaging Devices Printers (USB/Bluetooth) Tape Drives - - 41 - Using the Sanctuary Console These classes are given access rights according to Table 3.1, “Default settings following installation (these apply to ‘Everyone’)” on page 57 . You DO NOT have to do anything else if you are satisfied with this or if a new device is connected to a computer. The most restrictive access rules already apply for new devices and they will have no access whatsoever (except for PS/2, WiFi, and IrDA). If you need to adapt permissions rules for certain users or groups, you just do a right-click and select the type of permission you want to add. Depending on the device type, you can add: • Read or Read/Write permissions. see “Read/Write Permissions” on page 96 for more information. • Enforced encryption for removable storage devices. Define permissions so that users are forced to encrypt all removable storage devices plugged to their computers. See “Forcing Users to Encrypt Removable Storage Devices” on page 130. • Online/Offline permissions. See “To Assign Online and Offline Permissions” on page 116. • Scheduled permissions.See “To assign scheduled permissions to users and groups” on page 101. • Temporary permissions. See “To Assign Temporary Permissions to Users” on page 105. • Temporary permissions for offline users.See “To Assign Temporary Permissions to Offline Users” on page 108. • Shadow. See “Shadowing Devices” on page 121. • Copy limit. See “Copy Limit” on page 125. Note: When upgrading from older versions of Sanctuary it is possible that some wireless cards appear in the ‘Modem/Secondary Network Access Devices’ device class rather than the ‘Wireless NICs’ class. To correct this, simply delete the wireless card from the ‘Modem/Secondary Network Access Devices’ device class and add it again using the Device Explorer’s Explorer Manage Devices menu option. Adding your Own, User-Defined Devices to the System Permissions rules for all other devices that do not fall into the ‘normal’ categories, such as iPaq, Qtec, HTC, or webcams, are defined in the User Defined Device class. Imagine that a user connects a webcam to a computer, a webcam that needs no special drivers to be identified and make it work. In an unprotected environment, the user can immediately begin recording and sending potentially illegal images over email or other medium. Since this webcam is not included on the other device classes, the policies defined here, if they exist, control the access behavior of this device. This user is forced to ask for special permissions in order to use the device since no rule has been defined and the most restrictive applies – no access at all. On the other hand, if you need to administrate an uncategorized device connected to a computer, you can do so by adding it to the list of the managed devices that appear in the Default Settings section of the Device Explorer module. Please refer to “Managing Devices” on page 138 for more details. - 42 - Sanctuary Device Control v4.3.2 - User Guide You can add specific models to all the base device classes located on the Default Setting section of the Device Explorer module with exception of Wireless NICs and PS/2 Ports, since they already form part of the standard device classes you find there. You can also define permissions at the device class level (the nodes of the Default Settings tree shown in the Device Explorer module), computer level (the nodes of the Machine-Specific Settings tree shown in the Device Explorer module) and even at deeper levels (Computer Groups or Device Groups). The final permission that applies depends on the user and priority settings. Identifying Specific, Unique, Removable Devices Administrators have the option to manage device permissions at different levels depending on the company’s needs: Table 2.5 Managing unique individual removable devices Level Permissions applies to Example Base class All devices classified in that class including groups, models, and specific devices A temporary permission defined for the ‘Removable Storage devices’ class Device Group: a group defined in the base class (only available for some classes) and used as an aid to rearrange your devices into logical clusters All devices included in that precise group (see“Organizing Devices into Logical Groups” on page 45 for an explanation) A read permission created for a device group named ‘Marketing USB keys’ defined in the base class ‘Removable Storage Devices’ Specific device model included in the class itself or in a group. All devices belonging to the same, exclusive, model Offline permissions for a device model Sony Storage Media USB Device’ Precise, unique individual device identified by its serial number That specific device Online permissions for a user device with a serial # 4ed552fd755cefd3f1db4de2 91e16aeaacb9d177 • The Vendor ID (VID), Product ID (PID), and serial number are obtained from the standard Device Descriptor that every USB device must support. • Some cheap devices do not comply with the USB standards and do not have unique numbers. Others do not comply with the rules as all devices produced in a single batch have the same identical ‘unique’ serial number. - 43 - Using the Sanctuary Console The following image shows this four level structure: Figure 2.18 The four level removable device class structure As an example of the permission structure depicted in Table 2.5, “Managing unique individual removable devices” on page 43 , consider the following model: Figure 2.19 The four level removable device class structure with permission examples As you can see, at the last level of the ‘Marketing USB Devices’ hierarchy there is a unique serialized device. Defining permissions for a unique, serialized, USB key allows you to deny or allow a user or group the right to use this device. To insert a device model: 1. Attach the user device to a computer that has Sanctuary’s client installed. 2. Activate the Device Explorer module by clicking the icon located on the Modules section of the Control Panel in the main window. 3. Use the Explorer 4. Click the ADD NEW button. Manage Devices item from the menu. - 44 - Sanctuary Device Control v4.3.2 - User Guide 5. Enter the name of the computer where the device is attached or search for it using the ellipsis button. 6. Click the GET DEVICES button. 7. Select the device model from the list. 8. Click the ADD DEVICES button. To insert a specific, unique, device or a device model: 1. Activate the Log Explorer module by clicking on the icon located on the Modules section of the Control Panel in the main window. 2. Search for the attached device in the list using the filters, templates, or by manually traversing the list. Once the register is located, right-click on it and select Manage Devices from the popup menu. You can also use the ADD DEVICES button located at the lower right corner of the Log Explorer window. See a detailed description in Chapter 5, “Using the Log Explorer” on page 149. 3. Follow steps 4 to 8 of the previous method. Organizing Devices into Logical Groups Sometimes you want to organize your devices in logical units within a device class and assign them special permissions (rules, notifications, etc.). For example, you can do the following: 1. Create a new Device Group in the DVD/CD Drives class on the Default Settings section of the Device Explorer module 2. Label this freshly created device group with the name of your preference 3. Add comments 4. Place here all your double-sided high-capacity DVD burners 5. Create an Offline permission rule and, finally, 6. Create an Online permission rule This strict classification is not strictly necessary, but it helps visualize and organize your permissions and rules more effectively. Not all device classes accept this organization. Please refer to“Device Groups” on page 69 for more information. - 45 - Using the Sanctuary Console Identifying Specific Computers to be Managed Sometimes you require special rules for specific computers. In this case, you can add them directly on the Machine-Specific Settings section of the Device Explorer module. All computers that are added go directly to their Workgroup or Domain tree structure. From there, you can proceed to define all needed rules or organize them in computer groups like those shown in the following image: Figure 2.20 Computers and computer groups Here we add a new group in the ‘Workgroup’ section, rename it ‘Marketing’, add a comment (Special rules), and then proceed to add computers to this group and change the permissions rules (expanding the Group Settings tree and modifying the rules for each device class). Be aware that if they are conflicting rules in the Default Settings and in the Machine-Specific Settings sections, they apply depending on the priority selected. Please refer to “Priority Options when Defining Permissions” on page 143 for further details. Defining Different Types or Permissions You are normally confronted with what kind of permissions you can define for a device class. Take for example the Floppy Disk Drives, Sanctuary Device Control offers the best of both worlds: total control and flexibility when the time comes to assign multiple permissions to access devices. For this specific example, you can add independent Read, Read/Write, Online, Offline, Schedule, Temporary, Copy Limit, and Shadow rules and permissions: define only one or a combination of them at the same time (depends on the device class as specified on Table 2.6, “Simultaneous permissions definitions for all Windows’ standard device classes in the Device Explorer module” on page 47 ). To extend our example further, let us consider a user called Emily who works in the Sales Department and who has a Floppy Disk Drive on her company’s laptop: • She has Read/Write permission for this device. • She can use the floppy only when connected to the network (online permissions). • She can only use the device from 8 A.M. to 5 P.M., Monday to Friday (temporary permissions). - 46 - Sanctuary Device Control v4.3.2 - User Guide • We want to know what she writes to the floppy. Not only do we need the name of the file, but also the content. • To limit her a bit, we only allow her to copy a maximum of 5 MB per day. All this is done using the Device Explorer module and defining the corresponding permission rules: • Permissions: read/write access. • Online Permissions: read/write access. • Offline Permissions: no access. • Schedule permissions: define the days (Monday to Friday) and timeframe (from 8 A.M. to 5 P.M.). • Shadow rule: Enable it in the Write Permissions panel. • Copy Limit rule: define 5 MB. We can frame even more her behavior by adding — as needed — event notifications, encryption, file filtering, etc. The following table summarizes the type of simultaneous permissions by Windows’ standard device classes you can define in the Device Explorer module: Table 2.6 Simultaneous permissions definitions for all Windows’ standard device classes in the Device Explorer module Section in the Device Explorer module* Default Settings Class name Machine-Specific Settings ON OF SC TP SH CL ON OF SC TP SH CL Biometric devices COM/Serial ports DVD/CD drives Floppy disk drives Imaging devices LPT/Parallel ports Modem/Secondary Network Access Devices Palm handheld devices Portable Devices Printers (USB/Bluetooth) PS/2 Ports - 47 - Using the Sanctuary Console Table 2.6 Simultaneous permissions definitions for all Windows’ standard device classes in the Device Explorer module Section in the Device Explorer module* Default Settings Class name Machine-Specific Settings ON OF SC TP SH CL ON OF SC TP SH CL Removable storage devices RIM BlackBerry handhelds Smart Card Readers Tape drives User defined devices Windows CE handheld devices Wireless NICs * Code used: ON=Online permissions; OF=Offline Permissions; SC=Schedule; TP=Temporary Permissions; SH=Shadow; CL=Copy limit. Permissions can include one or several of the following: file filters, encryption, decryption, drive & bus type, export & import key file. Encrypting Removable Media & Authorizing Specific DVDs/CDs If you deal with media containing sensible data that is moved around between computers or leaves the company premises, you should consider encrypting it. If the medium is lost or stolen, the intruder must defeat several layers of protection before having access to the actual data. The encryption process alters the data in such a way that it is not useful. Encryption makes data unreadable to those not having the correct password and deciphering information. The first step in this process consists in activating the Media Authorizer module and use the Add Removable button to centrally encrypt a removable media. Once the procedure is finished and the associated users are defined the access to the device is completely transparent for the user(s). Among the encryption options, you can find our ‘Easy Exchange’ method that formats and ciphers the media so that the user can use it in another computer without the need to install software and without being an administrator. Note: You cannot associate User Groups with encrypted removable media. - 48 - Sanctuary Device Control v4.3.2 - User Guide You can also authorize the use of specific media in your company. You can precisely determine which DVDs/CDs are allowed in your organization. For example, you can allow the use of a data warehouse DVD or authorize the use of music CDs to certain users or groups. Once the media is encrypted in the Sanctuary Database, ‘malicious’ users that may want to add other kind of information to the CD or DVD – for example, by duplicating it and then including programs, images, music, or other kind of info – are unable to do so since the media does not correspond to what was initially encrypted and registered. The result is that the user can no longer access the DVD/CD. Tip: You can also consider using DVD/CD encryption as defined in Chapter 10, “Comprehensive encryption for securing all your DVD/CD data” on page 309. Forcing Users to Encrypt Removable Media As an alternative to centrally controlling all removable media management, the administrator can opt for a distributed schema. In this scenario, users who plug removable media in their computers are forced to encrypt them before they can be used. This is controlled by defining a simple permission for the ‘Removable Storage Devices’ class located in the Device Explorer module . An administrator can force the encryption of a hard disk, memory stick, or any other device recognized as removable storage (depending on their respective drivers: cameras, phones, etc.). See “Decentralized encryption” on page 220. Note: Data recorded on a removable storage device before it is encrypted can be read following encryption using the Data Retention option. Practical Setup Examples You can see different common uses of Sanctuary Device Control in this section. For example you can learn how to: • Control device use and installation. • Restrict the use of MP3 players, video players, etc. • Enforce compliance with internal security policies and external regulations. DVD/CD Burner Permissions Assignments We illustrate here with a simple example how can Sanctuary Device Control block device use with no action of your part. In this first example, an employee — let us call him Bob — without the permission to use a DVD/CD writer assigned to him or the groups he belongs to, brings in to work a DVD USB burner and wants to use it at work by connecting it directly to his computer. In a - 49 - Using the Sanctuary Console ‘standard’ situation, he can immediately begin burning DVDs with all kind of data, even your confidential information. Sanctuary Device Control blocks and denies this kind of access. He now has to ask the administrator for this permission. The administrator has several choices: • He can grant Bob access to the DVD by making him a member of an Active Directory Group that has received access to the device class (DVD/CD drives, in this case). To do this, he only changes the domain group membership using the Microsoft Management Console (MMC) —no modification to the Sanctuary permission rules is required. • If a computer group exists (a one-click operation to create using Sanctuary) and access to DVD/ CD drives has been defined, the administrator can move Bob's computer into this group. His machine automatically receives the permissions that apply to the existing computer group. • Assign Bob the necessary permissions (temporarily, scheduled, or definitive ones). • Grant Bob Read & Write access on the DVD burner. • Give permissions for using the device, except during working hours. • Allow access to the device only when the computer is offline (or online). • Decide that Bob can only use specific DVD/CD media. • Allow Bob to read but not to write data. • Give Read/Write permissions but store the contents (shadow) of the copied/read files to control what has been done. • The administrator can decide to do NOTHING. Bob has no right to use the DVD/CD burner and it should stay that way… As you can see from this simple example, the possibilities are endless and flexible enough to adapt to each kind of imaginable situation. Removable Permissions Assignments For our second example, we consider another real-life case: Rather than grant permissions to all removable media in exactly the same way, you may want to allow access only to a specific company-approved model. For example, if the corporate standard USB memory stick is a SanDisk 2GB, it is possible to define it in the Sanctuary Device Control and assign group or user permissions to that specific model. Access is denied to any other type of removable media connected. In this way, it is possible to build up a ‘White List’ of corporateapproved devices and deny everything else. Permissions for a newly defined device can be assigned without having to log off/log on. Note: You can apply device class permissions and device type permissions at the same time. You can go a step further by managing unique user devices identified by their exclusive serial number. This way, your control boils down to a specific device. - 50 - Sanctuary Device Control v4.3.2 - User Guide Assigning Permissions to Groups Instead of Users When you begin to use Sanctuary Device Control, you are probably tempted to traverse the Device Explorer module assigning permissions to individual users for different classes and devices as you go. Although this is practical when the number of assigned permissions are kept small and while you get accustom to the inner works of the program, this becomes quickly unmanageable as the deployment grows and you control more and more users and devices in your organization. You will have the double task of maintaining Windows’ users and their possible Sanctuary Device Control assignments. A more pragmatic approach is to invest more time in the designing phase deciding which devices and classes should be restricted beforehand. The object of this exercise is to define Windows’ Groups to control device access. Once this determined, you should proceed to define a naming convention, the actual groups, and all necessary group nesting so that it meets your business requirements. You should aim to create the fewest possible groups. This first phase design pays off as you can define Windows’ user groups precisely and then proceed to grant permissions to these groups instead of assigning them directly to specific users. The user, of course, should then be member of one or more of these previously defined groups. As soon as your groups are determined, you can then proceed to define permissions for them in Sanctuary Device Control. You get the distinguished advantage of controlling device access by assigning permissions directly to one or more specific Windows’ groups. You can also use these same groups to do all kind of housekeeping (Windows’ public folder and mailboxes permissions for example). By defining a small number of user groups in your domain, granting those groups permissions, and then assigning users to groups, you can manage a small number of groups instead of a large number of users. Another benefit of this approach is that you are keeping User Management where it belongs: in your Directory structure (Windows’ Active Directory or Novell’s eDirectory). Table 2.7 Best practice when assigning permissions to users and user groups To do To avoid Invest time in the design phase deciding device use policies Jump-in and begin assigning permissions indiscriminately to individual users Define Windows’ user groups to control device access Use no naming convention at all for your user groups Define a naming convention Create user groups as needed with no planning or order Create the fewest possible groups - Assign, when possible, permissions to groups instead of to users - - 51 - Using the Sanctuary Console As a possible naming convention, you can use the following two examples: • Group’s name based on the device classes, Ex. SDC_Floppy_Grp. • Group’s name based on the ‘Access-Profile’, Ex. SDC_Standard or SDC_Laptop. Shadowing Notes The ‘Shadowing’, or creating copies of transferred data, of removable devices gives you a clear advantage when trying to decide who has to be controlled more closely. As you have a complete control of the copied (read) data or the file names, you can quickly decide on corrective or preventive actions or limit access to certain groups or users. Although this is a very powerful feature, it should be used with care. The hard disk drive assigned to contain the data file directory should be ample enough to receive all copied data. This can amount to several Mbytes, read Gbytes, very quickly not to mention the possible network saturation in case of using slow lines. A judicious compromise between receiving all data or just the file name should be made. As there is no rule or thumb here, there has to be a case-by-case analysis for each organization’s needs. Note: Since secondary hard disk are consider as removable devices, you should consider shadowing repercussion — as described in the previous paragraph — when applying a general rule to the ‘Removable Storage Devices’ class. Note: Even if you control shadow upload frequency, shadowed files are not sent to the Sanctuary Application Server while the device is still connected unless explicitly demanded by a Sanctuary administrator. This is done so that the device is not unmounted and mounted repeatedly by the client leading to sever operation disruption (while copying or reading data, a possible format or encryption process, etc.). You have to be careful with permissions priorities conflicts when defining shadowing rules. Write and read permissions follow this priority: Table 2.8 Shadow permissions priorities Permission Disable (highest) Enabled Filename (lowest) - 52 - Priority order Sanctuary Device Control v4.3.2 - User Guide For example, let us say that you define shadow permission for the same user and the same device class, one at the Default Setting node stating a “Disabled Write permission” permission and another one for a specific machine at the Machine-specific Settings node defining an “Enabled Write permission” one. The prevailing one will be the higher — disabled — priority. Remember this simple conventions to avoid surprises when defining, otherwise conflicting, Shadowing rules. - 53 - Using the Sanctuary Console - 54 - Sanctuary Device Control v4.3.2 - User Guide 3 Using the Device Explorer Sanctuary Device Control’s Device Explorer module allows you to assign permissions to users and groups to use any kind of I/O devices available in your network. However, you can also use the Device Explorer to setup and maintain device types. Using the Device Explorer module, you can define the rules and permissions that determine which devices users and groups can use. Users (or groups of users) can gain access to I/O devices as long as they have the appropriate permissions to do so. You can access the Device Explorer module by clicking the icon located on the Modules section of the Control Panel in the main window. Figure 3.1 Device Explorer main window Note: When you make changes to a domain, such as adding groups, users or computers, you must use the ’Synchronize Domain Members‘ item on the ‘Tools’ menu (or from the Tools section of the Control Panel) to refresh the content of the database. If you want to synchronize Novell’s objects, you should use our Synchronization Script instead of this command. See Sanctuary Setup Guide for instructions on how to do this. - 55 - Using the Device Explorer Note: If the ‘Settings (Device Control)’ access of the Sanctuary Management Console Administrator User Access is set to ‘No’, the administrator has limited access. See Table 2.2, “Administrator's prerogatives” on page 36 and Table 2.3, “Administrator's roles” on page 37 . Note: In some cases you must use the ‘Send Updates to All Computers’ or ‘Send Updates To’ option on the ‘Tools’ menu (or from the Tools section of the Control Panel) or the right-click (context) menu of a specific computer to be sure all modifications are effective immediately. The Device Explorer module allows you to decide who can access to I/O devices on the network. For instance, you might want to do the following: • Grant read-only access to the DVD/CD-ROM to all members of the group ‘Domain Users’. • Make a floppy disk drive read-only for everyone. • Explicitly deny access to a specific user. You simply need to select a user and leave the Read and Write checkboxes unchecked. This might be appropriate to permit a user access to the floppy drive in normal circumstances, but deny it on a specific machine containing sensitive data. • Grant read/write access to the DVD/CD-ROM for all members of group ‘Marketing’ from 9h00 to 17h00, Monday to Friday – after 17h00 access is denied. This is called ‘scheduled permission’. • Add a temporary permission for a group/user to use a particular device. • Deny access to a device when a user is online but allow it when offline (or vice versa). • Copy (shadow) all data written, or read, to, or from, a device for a specific computer or user. • Limit the quota of data written to a device for a user or group. • Create an Event Notification rule that informs the user when someone is trying to gain access to an otherwise unauthorized device. • Force a user or user group to encrypt a decentralized removable storage device. How Does the Device Explorer Work When you first install the software, all permissions have their default settings (see Table 3.1, “Default settings following installation (these apply to ‘Everyone’)” on page 57 ). The main task you carry out using Sanctuary Device Control is to assign the proper permissions to each user/group/ computer as needed. - 56 - Sanctuary Device Control v4.3.2 - User Guide You can do this using the two available parts of the tree shown on the right panel of the Device Explorer module: Figure 3.2 The Device Explorer module two main sections • Default Settings contains the permissions that apply to every machine. You can modify all authorizations used as general settings for the computers in your network. You must take into account that not all combinations of users/groups are valid for every device listed in this section. Please refer to the table located in the“Restricted and Unrestricted Devices” section on page 58 for a complete description of the different kinds of groups/users that you can add to a device. If one of your computers has a specific device not listed in this section, you can add it using the Manage Devices dialog as described in the “Managing Devices” section on page 138. Machine-Specific Settings contains specific permissions granted to users/groups that apply to a specific computer or group of computers. These set of rules combine with those located in the Default Settings section — as defined in Table 4.7, “Resulting access” on page 144 . Here you can also add a ‘computer group’ to reorganize some computers in a logical way that lets you to define special permissions for them. For instance, you can add a new computer group called ‘Special scheduled access’ that includes some computers that only have restricted access to their floppy disk drive during working hours (from 8:00 A.M. to 5:00 P.M.). Table 3.1 Default settings following installation (these apply to ‘Everyone’) Permissions Shadow Copy limit COM/serial port * Disable * DVD/CD drives * Disable * Floppy disk drive * Disable * LPT/Parallel port * Disable * Modem/Secondary Network Access Devices * Disable * Portable Devices * * * Read/Write with Low priority * * * Disable No limit Read/Write with High priority * - Device PS/2 port (normally the keyboard and mouse) Removable Storage Devices Wireless Network Interface Cards *No permissions, copy limit, or shadow rules are defined - 57 - Using the Device Explorer Note: Do not block the PS/2 port unless you only use USB keyboards. Most laptops use an internal PS/2 port to control the keyboard and touchpad. Note: If you are using a Wireless NIC as a unique network card in some clients and you change its permissions to ‘None’ (leaving the Read and Write checkboxes empty) for Everyone you will have no way to send updates to the block-out users — unless done by exporting permissions — and you must reinstall the client. Restricted and Unrestricted Devices By the nature of the drivers designed by Microsoft, or the manufacturer of each device known to Windows, there can be some restrictions when assigning permissions to those devices. The following table shows the possible assignments, for each class of device: Table 3.2 Possible assignments by device Device class Allowed permissions Applies to Notes Biometric devices Read-Write /None; Select bus type Only to Local System or Everyone. Device re-plug might be required to grant access for an already blocked device. COM/Serial ports Read-Write /None; Select bus type Any user or group. - DVD/CD drives Read only/Read-Write/None; Select bus type Any user or group. - Floppy disk drives Read only/ Read-Write/None; Select bus type Any user or group. - Imaging devices (such as scanners) Read-Write /None; Select bus type Any user or group. - LPT/Parallel ports Read only/Read-Write/None; Select bus type Any user or group. - - 58 - Sanctuary Device Control v4.3.2 - User Guide Table 3.2 Possible assignments by device Device class Modem/Secondary Network Access Devices Allowed permissions Applies to Notes Regular modems Read-Write / None; Select bus type Any user or group - ISDN modems or network adapters Only the Everyone group Device re-plug or reboot required to enforce updated permissions. Read-Write / None; Select bus type Palm handheld devices Read-Write /None; Select bus type Any user or group - Portable Devices Read-Write /None Any user or group - Printers (USB/Bluetooth) Read-Write /None Any user or group - PS/2 Ports Read-Write /None Only to Local System or Everyone Reboot required to enforce updated permissions. Removable storage devices Read-only/Read-Write/none Any user or group - Encrypt, Decrypt, Export, Import; Select bus and drive type - RIM BlackBerry handhelds Read-Write /None Any user or group - Smart Card Readers Read-Write /None; Select bus type Only the Local System or Everyone A device re-plug or machine restart might be required to grant access for an already blocked device. Tape drives Read-Write /None; Select bus type Any user or group Some backup units do not use the Microsoft supplied drivers and cannot be controlled by Sanctuary Device Control. User Defined Devices Read-Write /None Any user or group - Windows CE handheld devices Read-Write /None Any user or group - Wireless NICs Only the Everyone group - Read-Write /None - 59 - Using the Device Explorer Note: It is important to distinguish between the absence of permission and a negative permission (‘None’ — the most restrictive access). In the latter case, when creating a permission for which neither the Read nor the Write flags are selected, you deny the user access to the device even if they are indirectly authorized to use the device. You specifically deny the access to a device for the user. Note: The File Filtering dialog is only available for the DVD/CD Drives, Floppy Disk Drives, and Removable Storage Devices classes. Optimizing the Way you use the Device Explorer This section explains how to use your mouse and keyboard effectively within the Device Explorer module. Context Menu and Drag & Drop You can assign permissions using the right-click context menu: Figure 3.3 Contextual menu - 60 - Sanctuary Device Control v4.3.2 - User Guide Keyboard Shortcuts A number of keyboard shortcuts are available in the Device Explorer module. The convention used in this guide to represent keyboard shortcuts in which you press two or more keys simultaneously, is a plus sign (+) between the key characters. The following list explains the available keyboard shortcuts: • CRTL+D Add/Modify permission for the selected item(s). • CRTL+P • CRTL+I Add/ Modify offline permission for the selected item(s). Add/ Modify online permission for the selected item(s). • CRTL+N • CRTL+L Add/ Modify a schedule for the selected item(s). Add/ Modify a temporary permission for the selected item(s). • CRTL+W • CRTL+M Add/ Modify shadow settings. Define the copy limit for the selected item(s). • CRTL+E • F2 Insert a device group. Define or modify a comment for a computer, group, or device. • CRTL+R • Delete Rename a computer or device. Delete an entry (see note below). • CRTL+A • Ctrl+C Insert a computer. Copy and cut a computer(s) from a computer group to place in another one (same as CTRL+X). • Ctrl+V Paste a computer(s) previously cut or copied from a computer group to place in the selected one. • Ctrl+X Cut and copy a computer(s) from a computer group to place in another one. - 61 - Using the Device Explorer • Ctrl+Q Add/ Modify event notifications. • F5 Refresh screen information. Note: Using Delete for a computer entry in a computer group, erases all permissions, shadows, copy limits, etc. for this machine. This computer is not visible but still exists in this computer group; you can use the right-click menu to display it again. See “Show All Members” on page 63 for more information. Adding Comments to an Entry You can add a comment to remind yourself why you made an entry or as a useful note for other Sanctuary administrators. You can add comments to every entry. To Modify or Add a Comment to an Item 1. Select the permission line that you want to add a comment to. 2. Click once more on the Comments column to edit it. You can also click on the Comments column and press the F2 key. 3. Type a brief explanatory notice and finish by pressing ENTER. Computer Groups Computer groups are ‘virtual’ groupings, formed by several computers not having any relation with those in the Active Directory structure. These ‘virtual computer groups’ help you organize your permissions in a more logical way - reorganizing several machines that should share permissions to specific devices. A good permission policy is to FIRST define as many ‘Default Settings’ as possible to apply to all computers and then define ‘Computer groups’ for the exceptions. You can then proceed to set permissions to specific machines. Computer groups are defined to make the same exceptions for a series of machines. Note: It is a good idea to add comments to the permission modifications you make. It helps you remember why each modification was made as your permission structure grows in complexity. - 62 - Sanctuary Device Control v4.3.2 - User Guide Renaming Computer Groups/Device Groups/Devices Computer Groups, Device Groups, and devices in a device class (those belonging to the Default Settings tree in the Device Explorer module) can be renamed. While renaming a Computer Group, Device Groups, or Device, you should be aware that internal names are not case sensitive: ‘My Device Name’ is the same as ‘MY device NAME’. This can cause errors when trying to change lower to uppercase letters in descriptions. Show All Members Sometimes you may find that there are ‘hidden’ computers in a computer group inside the MachineSpecific Settings section of the Device Explorer module. This happens mainly when inserting computers but not assigning them rights. These computers are hidden to avoid crowding the computer group with data that is not meaningful. When you delete a group with ‘invisible’ computers, they are all moved back to their domain along with those that have permissions rules and are shown. If you need to change permissions, move them to other computer groups, or display them, right-click and select Show all members. If the Show all members item right-click menu is grayed-out, this indicates that you do not have ‘invisible’ computers in that computer group. To delete or change permissions for a computer that is ‘hidden’ in the computer group 1. Right-click on the computer group that you want to view. 2. Select the Show All Members. This displays the ‘hidden’ computer(s). Figure 3.4 Show all members 3. Select the computer on which you want to erase permissions. - 63 - Using the Device Explorer 4. Press the DELETE key. As an alternative, you can also select the computer and then use the Remove item of the Explorer menu. If you do not want to delete the machine, you can rightclick on the computer’s name or on the device classes and change its permissions. Event Notification If you want your users/user groups to receive a message when trying to gain access to an otherwise unauthorized device, you can create an Event notification rule. You can create this rule at following levels: • Root level — when selecting the Default Setting node. The notification applies to all devices for the user(s)/user group(s) defined. • Device class root level — when selecting any of the sub-nodes of the Default Settings root node, for example, the DVD/CD Drives class. The event notification applies only for the devices belonging to that particular class. • Device level — when selecting a specific device within a device class, for example, a XXXX 48x DVD drive contained in the DVD/CD Drives class. The event notification applies only in the case of the specific device use. • Device Group level — when selecting a group created within a device class, for example, the Marketing DVD Rewritable previously created in the DVD/CD Drives class. • Computer level — for a specific computer in the Machine-Specific Settings node and following the guidelines establish in all previous points (at the computer’s root level, computer’s device class, computer’s device within a device class, computer’s Device Group within a device class). Note: If you set an event notification for the Everyone group, your users may receive constant messages when some programs try to access their removable devices. For example, an antivirus application trying to scan for devices. Setting it for specific users/ groups instead resolves this issue. Note: When event notifications using the same priority are defined at the root-level and the computer-specific level, only one of the rules is taken into account. The priority of event notification rules are not handled based on machine vs. global settings, they are ordered purely based on their priority. To Create an Event Notification To add an event notification for a user 1. Activate the Device Explorer module by clicking on the icon in the Modules option of the Control Panel. 2. Select the device class where you want to create the rule. - 64 - Sanctuary Device Control v4.3.2 - User Guide 3. Use Crtl+Q or right-click and select the Event Notification item from the context menu. 4. Click the Add button. 5. Choose the users/groups for which you want to create the rule by typing the name or clicking on the SEARCH or BROWSE button. 6. Click OK. Figure 3.5 Event notification: selecting the users/groups 7. Choose between not notifying (default behavior) or the Notify option. 8. Select the Priority. 9. Enter a message (optional). - 65 - Using the Device Explorer 10. Click on Next. Figure 3.6 Event notification: options 11. Click on Finish to accept rule. Figure 3.7 Event notification: finish the rule definition - 66 - Sanctuary Device Control v4.3.2 - User Guide You can now see a new event notification defined for the device class. The following image shows an example for the DVD/CD Drives class for user Bill: Figure 3.8 Event notification: new permission rule as shown for the device class Note: Event notifications can also be created, modified or deleted at root level — by right-clicking directly on the ‘Default Settings’ icon. You can assign, this way, a notification for all illegal access to devices. To Delete an Event Notification If you want to remove the Event Notification rule defined for a device class and assigned to a user(s)/group(s), you can do one of the following: • Select the permission and then press the Delete key. • Right-click on the permission and then select the Remove Event Notification item from the context menu. To Modify an Event Notification To change the Event Notification rule defined for a device class and assigned to a user(s)/group(s), you can do one of the following: • Select the permission and then press the Ctrl+Q shortcut key. • Right-click on the permission and then select the Modify Event Notification item from the context menu. This opens a dialog where you actually modify the Event Notification. You then need to: 1. Change the setting (to notify or not), priority, and message as needed. 2. Click on the Next button. 3. Click Finish. Some Practical Examples You can use the event notification rule to your advantage by carefully planning some rules. For example, let us say that you establish an event notification rule at the root level informing the members of the group ‘Marketing’ with a general message ‘You cannot use this device’ with a ‘Medium’ priority. Furthermore, you established a copy limit rule for these same users that you cluster in two distinctive device groups called ‘Removable with copy limit rule. German section’ - 67 - Using the Device Explorer and ‘Removable with copy limit rule. English section’. You can now proceed to add two new event notification messages (one in German and the other one in English) with ‘High’ priority informing those users: ‘If you think you need to extend your quota limit, please dial extension 200’. You also assigned a temporary permission for user ‘Bill’ for a specific device in the Removable Storage Devices class of his computer, defined in the Machine-Specific Settings, and you decide to improve communication defining also an event rule specifying ‘To obtain new temporary permissions, dial 310’. This can be as complicated or as simple — No message at all, a simple message, or a complicated set of rules defining every possible deny access scenario imaginable. Limiting the Number of Messages a User Receives You will notice that the event notification dialog on the client side has a “Do not notify me again” checkbox to limit the number of messages the user receives when trying to, intentionally or unintentionally, break a defined policy. This limits the messages displayed since some applications — once the user tries to access or open a file — insist on accessing the data and/or files on the users’ behalf generating a very high quantity of notification error messages that the user must bear. Figure 3.9 Event notification: limiting the number of messages a user receives Note: This message will reappear, even when using the Do not notify me again option, when the user plugs again the device, starts a new session, or restarts the computer. It is only there to limit the number of messages the Sanctuary reports back to the user. - 68 - Sanctuary Device Control v4.3.2 - User Guide Device Groups Device groups are used to organize your devices into logical units with special permissions. You can, for example, create a new device group for the Imaging Devices class and then place in this new group all your HP scanners. Furthermore, you can then add special permission rules for particular device group. Note: Permissions cannot be applied to an empty device group. You must first add a device to it. To Add a Device Group To add device groups to any device class inside the Default Settings section of the Device Explorer module do one of the following actions: • Select any device, at its upper level or class, and use the shortcut key Ctr+E. • Right-click on any device, at its upper level or class, and select Insert Device Group from the popup menu. • Select any device, at its upper level or class, and use Insert Device Group from the Explorer menu. You can group for any device class you desire (upper level of a device) and add any device of the same class to this newly created class group. You can move devices among different groups by using the Shift or Ctrl keys and then the Drag & Drop functionality. You can also use the shortcut key commands: Cut (Ctrl+X), Copy (Crtl+C), and Paste (Ctrl+V) for the same purpose. These commands are also available from the right-click context menu: Figure 3.10 Using Drag & Drop to move devices to a newly created group Remember that you can extend this classification further by adding device models and, in the case of removable storage devices, unique — serialized — devices. - 69 - Using the Device Explorer Supported Devices Types The Device Explorer module can be used to control access to a variety of I/O devices. Setting access at the Default settings level class allows the user to access that device class on any computer in the network. Information about the device types supported is given in “Device Types Supported” on page 6. Note: If you notice an unexpectedly blocked device consider giving it LocalSystem access. Some devices are not accessed directly but through a service running under the Local System account and Sanctuary Device Control might block this access. For example, this is the case for some printer models connected through the LPT or COM ports. Managing Permissions The main purpose of the Device Explorer module is to manage permissions and rules for every conceivable device and then associate them with user(s)/user group(s). A second use is to define decentralized encryption in organizations that do not need/want a centralized control of this aspect of our solution. Since Sanctuary Device Control offers a great range of options in this respect, we dedicated a chapter describing in detail the process. Please refer to the next chapter for a complete description on how to administrate permissions/rules using the Device Explorer module. Note: When there is no permission or rule defined, the default applies: the user has no access at all to the device. - 70 - Sanctuary Device Control v4.3.2 - User Guide 4 Managing Permissions and Rules This chapter explains the different types of permissions and rules that can be administered using the Device Explorer module. Please refer to Chapter 3, “Using the Device Explorer” on page 71 for a detailed description on how to use the Device Explorer module. You can access the Device Explorer by clicking on the icon located on the Modules section of the Control Panel in the main window. As explained in the previous chapter, the Device Explorer lets you administer the rules and permissions that determine which devices your users and user groups can use and cannot use. Users (or groups of users) can only gain access to I/O devices if they have the appropriate permissions to do so. To define permissions, you: 1. Select the appropriate section of the Device Explorer tree, either Default Settings or MachineSpecific Settings. 2. Choose the desired device class. 3. Use the Explorer menu or right-click on the item. From there you can select all type of permissions and rules to assign to a device and associated user(s)/user group(s). If you double-click on the device class (the higher level of the tree nodes), the Permissions dialog opens from where you can define Read, Read/Write, or None rights — and set decentralized encryption and filters on some classes. Warning: You should not use permissions other that Read and Read/Write when working on a system that uses older versions of the Sanctuary client. The client cannot interpret these types of permissions, resulting in ‘no permissions applied’. - 71 - Managing Permissions and Rules Using the Permissions Dialog When defining permissions the following dialog is displayed as the first screen (except for Shadow where a subset is used as depicted in Figure 4.2): Figure 4.1 Main permissions dialog Figure 4.2 Bus dialog used for Shadow - 72 - Sanctuary Device Control v4.3.2 - User Guide Choose between Read Only, Read/Write, Encrypt, Decrypt, Export to file, Export to media, Import, and/or None (not selecting any option). The Encrypt, Decrypt, Export to file, Export to media, and Import options as well as the Encryption and Drive panels are only available for the Removable Storage Devices class. (They are fully explained in the corresponding sections of this chapter.) Once you have selected the user(s) or group(s) — using the ADD button (see “Adding a user or group when defining a permission” on page 88) — you can reselect all, or some, of them to define Permissions, Encryption, Drive, and Bus type (if applicable) individually or globally. You can add as many permissions to user(s) or user group(s) as you want without closing the dialog. To do this, repeatedly click the ADD button. Figure 4.3 General Permissions dialog exceptions The options available in this dialog depend on the device class for which you are defining the permission. The Bus panel displays the available interface standards for the class you are working with. For example, if you are working with the Tape Drives class, you can choose among SCSI, USB, FireWire, ATA/IDE, and All. The All option indicates that SCSI, USB, FireWire, and ATA/IDE bus, and any other from which the tape drive works. The User/Group panel, at the top of the Permissions dialog, contains the following fields: • Name — shows the user/group name. • Location — indicates the user domain or workgroup (if available). This is the same field that is shown in the Select User dialog (opened with the ADD button). - 73 - Managing Permissions and Rules • Permissions — reflects the options selected on the Permissions panel (lower left side of the dialog). • Priority — shows if the permission is applied with a high or low priority (depending whether the Low Priority option is selected). See the description of priorities and how do they apply in “Priority of default permissions ” on page 93. • Filters — shows which types of files the user can access. • Scope — changes to reflect the extent of this permission definition. It is adjusted when you modify the options located on the Encryption, Bus, or Drive panel. Tip: You can add permissions to multiple users/groups without closing the dialog. To do this: 1. Click on Add to select the required user(s)/group(s). 2. Click on OK to close the user selection dialog. 3. Select the desired options from the permission dialog and file filters (if available). Special case: Working with Removable Storage Devices If you are defining permissions or a ‘Shadow’ rule for removable storage devices, you can choose to apply the permission(s) to encrypt and/or decrypt devices. To further limit permissions, you can also choose the required scope options from the Encryption and Drive panels. Warning: Some USB memory sticks are recognized as external hard disk drives. This may lead to confusion and undesirable behavior if you select ‘All’ in the Bus panel and/ or ‘Both’ in the Drive panel sections while defining permissions or a ‘Shadow’ rule. You may accidentally specify that ‘real’ secondary hard disk drive(s) may be blocked/ allowed/shadowed or forced to be encrypted/decrypted. You can use the following settings when working with the removable storage devices: • None (neither read nor write) • Read The user or group is specifically denied access to the device The user or group can do read operations • Read/Write • Encrypt The user or group can read and/or write to/from the removable media The user or group is allowed to encrypt the device, This option is related with the Export and Import settings • Decrypt The user or group can decrypt a device - 74 - Sanctuary Device Control v4.3.2 - User Guide • Export to file The public key used to encrypt the device can be exported to a file. A secure channel can then be use to transmit this file. You must first choose the Self Contained Encryption setting in the Encryption panel. • Export to media The public key used to encrypt the device can be exported to the medium itself. If you do this, the device can be decrypted directly without the need of providing an external key. You must first choose the Self Contained Encryption setting in the Encryption panel. • Import The user/group can import data from an external encrypted key. You must first choose the Self Contained Encryption setting in the Encryption panel. Examples 1. The user/group has read only rights for all USB memory key devices with a high priority. Figure 4.4 Removable permissions settings example 1 2. Read/Write permissions for Sanctuary-encrypted SCSI hard disks with a low priority. Figure 4.5 Removable permissions settings example 2 3. User has Read/Write permissions for all Sanctuary-encrypted removable devices in all kind of buses with high priority. The user can also locally encrypt and export the key to the encrypted - 75 - Managing Permissions and Rules device or a file. In this case we force the user to encrypt all his removable devices but the user cannot read (nor write) them unless they are already encrypted (two permissions are needed). Figure 4.6 Removable permissions settings example 3 – Encrypted Figure 4.7 Removable permissions settings example 3 – Unencrypted 4. The user can format (Decrypt) his USB memory key, have Read/Write permissions only for encrypted devices connected to the USB port (Bus) and can export and/or import the device’s encryption key, all this with high priority. Figure 4.8 Removable permissions settings example 4 - 76 - Sanctuary Device Control v4.3.2 - User Guide See “Decentralized encryption” on page 220 to define permissions that force the user to encrypt Removable Storage Devices. See Chapter 11, “Using PGP-Encrypted Removable Devices” on page 323 for instructions on how to use PGP-encrypted device. Using file filters The Permission dialog includes a FILTER button. This is used to limit access to certain file types depending on the nature of the permission defined (see Table 4.3, “File filter settiings and permission relation” on page 83 ). Filters are ONLY available for the Removable Storage Devices, Floppy Disk Drives, and DVD/CD Drives classes. To define a filter, select it from the list in the File Type Filtering dialog that opens when you click on the FILTERS button. To delete a filter, deselect the desired row. Once a filter is set, click on the OK button in the Permissions dialog to accept (or on CANCEL to close the dialog without selecting the filter). The filter details are shown in the corresponding field of the permission dialog. Once filter permissions have been defined, their details are also visible in the Filters column of the Device Explorer module window. When using permissions that include File Filters you can use the following file type filtering: Table 4.1 File type filtering options File type filtering Not defined when creating the permission Result The type of file is not taken into account to enforce permissions settings as defined in the dialog. The ‘All File Types (Import/Export)’ and ‘Only files selected from this list’ parameters control if the permissions are applied solely to all types of files (even those not included in the list) or to those files selected in the list panel. - 77 - Managing Permissions and Rules Table 4.1 File type filtering options File type filtering Result Deny file copy from floppy Import disks, removable Export storage devices, and CDs/DVDs to the local HDD Read Write ‘None’ (neither Read nor Write) File filter is enforced in a ‘deny’ state Deny file copy from the local Import HDD to floppy Export disks, removable storage devices, and CDs/DVDs Filters are not enforced. The Import end result is like Export not defining filters at all. Defined when creating the permission Read Write Read Write Read only Read /Write File filter is enforced in a ‘grant’ state and controlled ONLY by the Import/Export settings — plus the state of the file types selected in the list. The Read/Write part of the permissions only controls directory access (Read = directories & files can be listed, Write = directories can be created, deleted and renamed). Allow file copy from floppy Import disks, removable Export storage devices, and CDs/DVDs to the local HDD Allow file copy from the local Import HDD to floppy Export disks, removable storage devices, and CDs/DVDs Filters are not enforced. The Import end result is like Export not defining filters at all. The ‘All File Types (Import/Export)’ and ‘Only files selected from this list’ parameters control if the permissions are applied solely to all types of files (even those not included in the list) or to those files selected in the list panel. See “File Filtering examples” on page 84 for a complete set of examples showing how to use file filtering - 78 - Sanctuary Device Control v4.3.2 - User Guide Note: You can define different file filters for read, write, or read/write permissions. Note: The Filters button is disabled when you select more than one user/group in the permissions dialog. Nevertheless, you can define different file filters for each user/group individually. Warning: Users cannot copy files directly from a FTP disk to an external device, or vice versa, if file content filtering is active. Users should first copy the files to the hard disk drive. Note: Permissions without file filtering always have priority over those where file filtering is defined. Note: The ‘File Type Filtering’ dialog contains the two options: ‘All Known Files’ and ‘All File Types’. These control whether the filters apply only to the files selected in the list panel or to all types of files (even those not included in the list). Warning: If you activate the File Filtering feature for the DVD/CD class, the user will not be able to burn such media. This also explains why you cannot select the Export Permission option (right corner panel, see Figure 4.9) when this feature is activated for this class. The user will be able to burn DVD/CD once the file filtering is deleted. Note: User who have an active File Type Filtering rule can always copy a file or group of files from a hard disk to a removable device using the command line (with COPY or XCOPY), but not the other way around. They can always use Windows Explorer for this task —either way — with no problem at all. - 79 - Managing Permissions and Rules Warning: File Type Filtering rules cannot be combined with Encrypt, Decrypt and Busspecific permissions inside the same rule. ONE permission cannot have both file type filtering defined and Encrypt / Decrypt / Bus-specific options selected, but SEPARATE permissions can, and will be properly enforced. If no filter is defined or the Import/Export options of the filter dialog are not activated — even if some files are selected — the profiled permission applies to all type of files. Figure 4.9 Defining a file filter - 80 - Sanctuary Device Control v4.3.2 - User Guide File filters can be used to limit access to the files listed in the following table: Table 4.2 File types for filtering File types ‘Families’ File types Microsoft Word Microsoft Excel Microsoft Visio Microsoft PowerPoint Slideshow Microsoft Office Microsoft PowerPoint Microsoft PowerPoint Presentation Microsoft PowerPoint Template Microsoft PowerPoint Add-in Microsoft Graph Microsoft Project Microsoft Access Database Microsoft Office Open XML Word Microsoft Office 2007 Microsoft Office Open XML Excel Microsoft Office Open XML PowerPoint OpenOffice.org Writer OpenOffice.org Math OpenOffice Text Document OpenOffice Text Template OpenOffice Formula OpenOffice Formula Template OpenOffice.org Base Open Office OpenOffice.org Calc OpenOffice.org Draw OpenOffice.org Impress Adobe Acrobat Archives Zip Protected Zip - 81 - OpenOffice Spreadsheet OpenOffice Spreadsheet Template OpenOffice Graphics OpenOffice Graphics Template OpenOffice Presentation OpenOffice Presentation Template Managing Permissions and Rules Table 4.2 File types for filtering File types ‘Families’ Executables File types Application Dynamic Link Library Microsoft Windows OS/2 Bitmap Graphics Joint Photographic Experts Group Graphics Interchange Format Tagged Image File Format Images Microsoft Windows Metafile Microsoft Windows Icon Microsoft Windows Cursor Enhanced Microsoft Windows Metafile Format Portable Network Graphic Corel vector Graphic Drawing Moving Picture Experts Group Moving Picture and Associated Audio Video MPEG Audio Stream Layer II MPEG Audio Stream Layer III Windows Animated Cursor Audio Video Interleave Audio-Video Resource Interchange File Format Downloadable Sounds Musical Instrument Digital Interface DirectMusic Style WAVEform audio format Advanced Streaming Format Standard MIDI File RealNetworks Content RealMedia Streaming Media RealAudio Streaming Media Markup languages - - Rich Text Format - - - 82 - Sanctuary Device Control v4.3.2 - User Guide Table 4.2 File types for filtering File types ‘Families’ File types Microsoft Windows Installer File Microsoft Windows Setup Microsoft Windows Installer Patch Microsoft Windows SDK Setup Transform Script File filters work in combination with the permission type that you have set: Table 4.3 File filter settiings and permission relation Permission type Example Device access set to ‘None’ If you select Microsoft Word in the File Type Filtering dialog then access is denied for all .doc files. Device access set to ‘Read’ If you select MPEG Audio Stream Layer III in the File Type Filtering dialog then read access is allowed for .mp3 files. Device access set to ‘Read/Write’ If you select Microsoft Word in the File Type Filtering dialog then read/write access is allowed for .doc files. Once a filter has been assigned, you can modify it by editing the related permission. To do this, click on the FILTERS button, and change the required file type(s). Alternatively, you can choose one of the following settings from the Permissions panel: • Export — allows copying from the system hard disk drive to an external device. • Import — allows copying from an external device to the system hard disk drive. Note: Currently Sanctuary does not support file filtering for the new format *.wim (Windows Imaging Format) introduced with Windows Vista. Note: When defining File filters, you cannot open files directly from the external device. You must first copy them to your system (or another authorized hard disk drive). - 83 - Managing Permissions and Rules To remove File Filtering settings from a permission Occasionally situations arise where you want to delete all file filtering conditions from a permission rule but keep all its other settings (bus, encryption, drive type, etc.). Obviously, you can do this by deleting the permission and recreating it without using File Filtering, however this solution is unacceptable for all but the simplest cases. For more complicated permissions, use the following procedure: 1. Open the Permissions dialog. To do this, double-click the permission rule in the Device Explorer module, right-clicking the Removable Storage Device, Floppy Disk Drives, or DVD/ CD Drives class, or use the Ctrl+D shortcut. 2. Select the desired register by clicking on it or by navigating through the registers using your keyboard Up or Down arrow keys. 3. Click on the FILTERS button. 4. If the permission is defined using the All file types (Import/Export) option, deselect the Import and Export checkboxes. If the permission is valid for a specific file type(s) (Only files selected from this list), click on the UNCHECK ALL button. 5. Close the File Type Filtering dialog by clicking CLOSE. File Filtering examples In this section, we consider several common cases where you can use File Filtering to block or allow user file access by file type. Allow ‘Marketing’ users to access all kind of files with the exception of MP3. To grant ‘Marketing’ users access all kind of files with the exception of MP3, we first need to define the following rules: • Domain users have ‘Read/Write’ access to removable devices. (This is a File Filtering rule with All File Types and Import/Export activated.) • The ‘Marketing’ user group has a ‘None’ permission for the Removable Storage Devices class with a File Filter defined for file type MPEG Audio Stream Layer III. Activate the Import/Export settings. These two rules mean that: • ‘Marketing’ users can copy everything they want to removable devices except MP3 files since there is a ‘negative’ permission defined from them (despite the ‘positive’ permission due to the first rule). • All other users (not belonging to ‘Marketing’) can copy whatever they want to removable devices with no limitation whatsoever. There is no ‘negative’ rule limiting their behavior. - 84 - Sanctuary Device Control v4.3.2 - User Guide Allow ‘Sales’ users to copy PDF files to removable media. To let ‘Sales’ users to copy PDF files to removable media simply define a ‘Read/Write’ permission and, using the File Type Filter dialog, define Export permissions for files with a file type ‘Abode Acrobat’ for the user group ‘Sales’ in the ‘Removable Storage Devices’ class. Users belonging to this group can now write and export (copy) PDF files. If no other permission is defined, this is the only type of files that ‘Sales’ can copy. Allow ‘Marketing’ users to copy PDF files to removable media and read Microsoft Word and Excel documents. To let ‘Marketing’ users copy PDF files to removable media and read Microsoft Word and Excel documents define a ‘Read/Write’ permission and, using the File Filter dialog, define Export permissions for files with a file type ‘Abode Acrobat’ and Import permissions for Microsoft Word and Microsoft Excel files Users in the user group ‘Marketing’ can now copy PDF files to their external devices (but not the other way around) and copy Microsoft Word and Microsoft Excel files to their system hard disk drive (from their external devices). The files can be opened once they reside in the hard disk drive. Allow all users to copy in/out of the company any Microsoft Office documents, PDF files, and images but not MP3 files. To do this, define a ‘Read/Write’ permission for domain users to the Removable Storage Devices class with a File Filter set for Microsoft Office, Adobe Acrobat, and Image files. Select the Import and Export checkboxes from the Permissions panel in the File Type Filtering dialog. Since MP3 files are not included in the File Filter, they are NOT accessible. Remember that in all these examples: Note: You cannot define several different permissions relating to the same device class for a single user or user group. For example, ‘Marketing’ cannot have a ‘Read/Write’ permission for the Removable Storage Devices (no file filtering) and a ‘None’ with an import file filter for MP3 files for this same device class. In this case, you MUST use two different groups and include users in one or another. Note: If you define a file filter authorization, all files not in the list are denied. If you deny access to a specific type of file (using the File Filter dialog), all other file types are NOT be denied by this rule. They can be denied by default or by defining another rule. - 85 - Managing Permissions and Rules The following table contains further examples to clarify file filtering. (In these, users Jack and Jill both belong to the user group ‘Marketing’ and all permissions are defined for the removable storage devices class.): Table 4.4 File filter settings examples Example 1 2 Permission User/ type Group File Filter Read Jack Only files selected from this list Microsoft Word selected Import Export Read Everyone All file types Import Export Read/Write Marketing All file types Import Export None No_Access* All file types Import Export Only files selected from this list Adobe Acrobat selected Read Jill Read/Write Marketing Read/Write Import Export Jack Only files selected from this list Microsoft Word selected Import Export Marketing Only files selected from this list Microsoft Word selected Import Export Jill Only files selected from this list Adobe Acrobat selected Import Export 4 Read/Write *Auxiliary file groups created to serve as a ‘bridge’ to define required permissions. - 86 - Jack can copy Word documents to his local hard disk drive. All other file types are blocked. All other users cannot read nor write from removable devices. Jill can copy PDF files to her local hard disk drive. All other members of Marketing can read or write from removable devices. Everyone else can only read from removable devices. Import Export All file types 3 None Import/ User’s Resulting Export Permission Jack cannot copy Word documents to his local hard disk drive, all other users belonging to the user group Marketing can read or write from removable devices. Jill can copy PDF files from/to her local hard disk to removable devices. All other users of the user group Marketing can only copy DOC files to their local hard disk drive. Sanctuary Device Control v4.3.2 - User Guide Table 4.4 File filter settings examples Example Permission User/ type Group File Filter Import/ User’s Resulting Export Permission 5 Read/Write Jack Not defined n/a Read/Write Marketing Not defined n/a None Jack Not defined n/a Marketing Only files selected from this list Microsoft Word selected 6 7 8 Read/Write Read Import Export Marketing Not defined None Jack Only files selected from this list Microsoft Word selected Import Export Read/Write Access* All file types Import Export 9 None Jack Read/Write Access* 10 Only files selected from this list MPEG Audio Stream Layer III selected All file types n/a Import Export Import Export *Auxiliary file groups created to serve as a ‘bridge’ to define required permissions. - 87 - Jack can read or write from removable devices without limitation. Jack is blocked from reading or writing to removable devices. On the other hand, all other users belonging to the user group Marketing can read or write to removable devices with no limitation at all. Jack and Jill — and all other users in the user group Marketing — can only copy Word documents from removable devices to their local hard disk drive. Jack and Jill — and all other users in the user group Marketing — can only read data from removable devices. Jack cannot copy Word documents to/from removable devices but can copy all other type of files from removable devices. Jack cannot copy to/from removable devices mp3 files but, on the other hand, can copy to/from his removable devices all other kind of files (even those not in the file filter list). Managing Permissions and Rules Table 4.4 File filter settings examples Example 11 Permission User/ type Group File Filter Import/ User’s Resulting Export Permission Read/Write Marketing All file types Import Export Read Marketing All file types Import Export Only files selected from this list Microsoft Word selected Import Export 12 Read/Write Jill Jack and Jill — and all other users belonging to the user group Marketing — can only copy data to removable devices. All Marketing user group users can copy all kind of files from their removable devices to their local HDD, but Jill can also copy Word documents from her HDD to removable devices. *Auxiliary file groups created to serve as a ‘bridge’ to define required permissions. Adding a user or group when defining a permission When adding a new permission, no matter what kind of permission, you need to associate it with one or several users or group of users. This is done using the Select Group, User, Local Group, or Local User dialog. Figure 4.10 The Select Group, User, Local Group or Local User dialog The contents of the Select Group, User, Local Group, or Local User dialog are explained in the following list: • Name field Used to type in the user or group name. It accepts wildcard symbols. - 88 - Sanctuary Device Control v4.3.2 - User Guide • Search button To search for the user or group. • Browse button To browse in the Active Directory for users/groups. Not available for Novell objects • List box Once the Name field is validated, a list of all possibilities is shown here to select from. • OK button Accepts the selected user/group and close the dialog. • Cancel button Interrupts the add user/group operation and close the dialog. You can select one or more users or user groups by doing one of the following: Leaving the NAME field empty and clicking on the SEARCH button. You can see a complete list of available users, groups, or objects in the list box. Double click to select one user or group or use the SHIFT and CTRL keys to do a multiple selection. Once your selection is done, click on OK or ENTER to accept and close the dialog. Typing the complete name of the user or group in the NAME field and pressing ENTER (or clicking on SEARCH). The name of the user or group is verified and, if valid and present, appears in the list box. Double click on it or select it and then click on OK or ENTER to accept and close the dialog. Typing a partial name in the NAME field and pressing ENTER (or clicking on SEARCH). You can use the wildcards * and ? in the name. Double click to select one user or group or use the SHIFT and CTRL keys to do a multiple selection. Once your selection is done, click on OK or ENTER to accept and close the dialog. Clicking on the Browse button. The standard Windows Select Users or Groups dialog opens. Follow Windows procedures to select the desired user or group. Click on OK or ENTER to accept the selection and close this dialog and then once more on OK or ENTER to close the first dialog and accept the selection. If the user or group you are looking for is not displayed, make sure you synchronize the domain and check you have the appropriate permissions on the object in the Active Directory (delegation) or Novell’s eDirectory. Remember to run the synchronization script if working in a Novell environment as described in the Sanctuary Setup Guide. To assign default permissions This section describes default permissions. These permissions are usefull when dealing with general devices that apply to all your users or user groups. Root-level permissions You can apply ‘root-level permissions’ using the Device Explorer module. These permissions are not attached to a particular device class or type, but to the root of the Device Explorer tree (or to a specific device class, device group, computer, or group settings of a computer group in the Machine- - 89 - Managing Permissions and Rules Specific Settings tree). They, therefore, apply to all devices for a specific user(s) or user group(s). For example, you can have a non-blocking mode (Read/Write permissions) for all devices at user or user group level. Of course, applying an all-blocking mode (no Read or Read/Write permissions) is equally possible. Warning: Since access to certain devices (notably those connected to the PS/2 port) is performed in the context of the built-in ‘LocalSystem’ user, we recommend not using the built-in ‘Administrators’ group — that includes that user — for root-level permissions. If you do this, you may allow unexpected users to access certain devices (depending on the particular machine’s configuration). A safer approach is to define a specific user group for assigning these types of root-level permissions. For example, if you grant ‘Administrators’ read/write access at the root level, you are also implicitly granting the ‘LocalSystem’ user — and, therefore, everyone — the same permissions for the PS/2 port. Where default permissions apply Default permissions can be apply to the following levels: • The root node of the Default Settings tree. • The Device Class node of the Default Settings tree. For example, for the DVD/CD Devices class. • The Device Group within an existing Device Class node in the Default Settings tree. For example, a previously defined device group called ‘DVD recorders Marketing Dept.’ of the DVD/CD Devices class in the Default Settings tree. • In the Group Settings of a previously defined Computer Group within the Machine-Specific Settings tree. • A computer previously added to an existing domain or workgroup within the Machine-Specific Settings tree. When applying the non-blocking mode (Read/Write permissions for a user or user group) you have the advantage of creating a log of device usage (see Chapter 5, “Using the Log Explorer” on page 149 for more details) without denying them access. You can combine this feature with a ‘shadow’ (see“Shadowing Devices” on page 121 for more details) at device class level for a full log control. Assigning default permissions To assign permissions to a node in a tree, follow the steps outlined in the next section. The only difference is that you should select the nodes described on the previous list (root of the Device Explorer tree, a specific device class, device group, computer, or group settings of a computer group in the Machine-Specific Settings tree). - 90 - Sanctuary Device Control v4.3.2 - User Guide If you assign default permissions at the root-level, they combine with those defined at the class level (the branches of the Default Settings tree) depending on the chosen priority (Low or High) — see Table 4.5, “Applied permissions” on page 95 . To assign default permissions to users and groups You can set the access permissions to devices for users and groups so that they apply to any computer that the user uses. Do this using the following procedure: 1. Select a devices class within the ‘Default settings’ list. 2. Right-click on the selection and choose Add / Modify Permissions from the popup menu. Alternatively, select the class and then select Add / Modify Permissions from the Explorer menu or use the CTRL+D shortcut key. Figure 4.11 Assigning default permissions to users and groups - 91 - Managing Permissions and Rules The Permissions dialog is displayed (some options may or may not be available depending on the class where you are defining the permissions): Figure 4.12 The Permissions dialog 3. The first step consists on adding the user(s)/group(s) for which this permission applies. Click on the ADD button. The Select Group, User, Local Group, or Local User dialog is displayed. Figure 4.13 The Select Group, User, Local Group or Local User dialog when adding default permissions - 92 - Sanctuary Device Control v4.3.2 - User Guide 4. Select the user(s) or group(s). See “Adding a user or group when defining a permission” on page 88 for a complete description on how to use this dialog. 5. Back in the Permissions dialog, select the user(s) or group(s) you want to assign permissions to (you can use the SHIFT and CTRL keys to do a multiple selection), and then activate the appropriate options. You can define different permissions for each group of selected users or groups. See “Using the Permissions Dialog” on page 72 for more details (especially if you are working on the Removable Storage Devices class). 6. If required, select the file filter options by clicking on the FILTERS button. See a description in the “Using file filters” section on page 77. 7. Click OK to finish. The Permissions column in the main window now shows which options are active for the selected users or groups. Note: When setting read-only permissions on the DVD/CD Drives class, some applications may not notice that access was denied by Sanctuary and erroneously report to the user that a CD has been burnt properly when it was not the case. In these circumstances, we recommend that you use Event Notification (see “Event Notification” on page 64) to warn users. Note: If Smart Card readers are used to authenticate the user then they should be granted Read/Write access to the group ‘Everyone’. Note: The list of changes is not sent to the client computer immediately. This list is downloaded the next time a user logs onto that computer. You can, alternatively, send the list immediately by selecting the ‘Send Updates to All Computers’ or ‘Send Updates To’ option on the ‘Tools’ menu (or from Tools item of the Control Panel). Some devices, such as the Tape and the Smart Card Reader, require a reboot in order to apply the new permissions. See the notes in Table 3.2, “Possible assignments by device” on page 58 for those devices that require a reboot. Priority of default permissions The priority flag can only be set for default permissions. It determines if a negative permission – ‘None’ — defined at the default permission level can be overwritten by a computer-specific permission. - 93 - Managing Permissions and Rules Note: It is important to distinguish between the absence of permission and a negative permission (‘None’ — the most restrictive access). In the latter case, when creating a permission for which neither the Read nor the Write flags are selected, you deny the user access to the device even if they are indirectly authorized to use the device. You specifically deny the access to a device for the user. You should be aware that: • When a ‘None’ permission has a High priority, it cannot be overidden by a computer-specific one. • When a ‘None’ permission has a Low priority, it can be overidden by computer-specific one only when its priority is ‘High’. • When different positive (Read, Read/Write) permissions are defined at the Default and computer-specific levels, the resulting one is an addition of both of them. The permission priority property only applies to negative ones. • When a negative permission is defined at the computer-specific level, it takes precedence over the default one, depending on the priority. - 94 - Sanctuary Device Control v4.3.2 - User Guide The following table explains how permissions are applied when they are defined for the same user or group(s) where the user is a member, at the Default level and computer-specific level: Table 4.5 Applied permissions Default settings Default permission priority ComputerComputerspecific Resulting specific permissions permission permissions priority Read/Write High None Read-only Read only Read/Write Low None Read-only Read/Write High None Read-only Read/Write Read/Write Low None Read-only - 95 - High Read/Write Low Read/Write High None Low Read-only High Read-only Low Read-only High Read/Write Low Read/Write High None Low None High Read-only Low Read-only High Read/Write Low Read/Write High None Low Read/Write High Read/Write Low Read/Write High Read/Write Low Read/Write High None Low None High Read/Write Low Read/Write Explanation See below for the steps to follow to find out which priority applies. Managing Permissions and Rules Table 4.5 Applied permissions Default settings Default permission priority ComputerComputerspecific Resulting specific permissions permission permissions priority Read/Write High None Read-only None Read/Write Low None Read-only High None Low None High None Low None High None Low None High Read/Write Low None High None Low None High Read-only Low None Rules: None 1. Combine both permissions. Read/Write 2. Sort them according to their priority. 3. The one with the highest one is applied. Read-Only 4. If both permissions have the same priority, follow this precedence: Explanation Highest Lowest Note: You can substitute the 'Default Setting' column heading with 'Class Setting' & 'Computer Specific Permission' with 'Device Permission'. This substitution works for any group subgroup you create, for example, Class Device; Class Device Group; Device Group Model; Model Specific device, etc. Note: Please refer to“Permissions Priority” on page 243 for an explanation of the priority rules interacting between those permissions defined at the Device Explorer level and those defined at the Media Authorizer level. Read/Write Permissions Only those devices that support a file system can be set to read-only mode. For all others, the only possible permission is either None or Read/Write. Read-only applies to floppy drives, DVD/CD drives, and Removable media. See Table 3.2, “Possible assignments by device” on page 58 for device’s restrictions. - 96 - Sanctuary Device Control v4.3.2 - User Guide To Assign Computer-Specific Permissions to Users and Groups You can assign permissions on a per-computer basis in a similar way on how you assigned default permissions. Settings that are specific to a particular computer override the Default Settings for the given machine. To assign permissions computer-specific permissions to users and groups. 1. If the computer is not listed in the Machine-Specific Settings section, right-click on the section title and select Insert Computer. Alternatively, select Insert Computer from the Explorer menu or use the CRTL+A shortcut key. Note: The Device Explorer does not show every computer in the domain. It includes those computers for which permissions or options are set. Administrators are limited to the users or computers they are allowed to manage when using Active Directory. Permissions for most computers are managed using the ‘Default settings’ section. The Select Computer dialog is displayed: Figure 4.14 The Select Computer dialog showing multiple selection in action 2. Select the desired computer(s). See “Adding a user or group when defining a permission” on page 88 for a complete description on how to use this dialog (although the description in that section describes how to select users/groups, the procedure is just the same). - 97 - Managing Permissions and Rules You return to the Device Explorer window. Figure 4.15 Assigning permissions in the Device Explorer module 3. Select the computer you want to assign permissions to, and click the + box to the left of it to expand the list of devices (or use the –, +, and arrow keys to navigate the tree). 4. Right-click on the device class and then select the Permissions option from the popup menu. Alternatively, open the tree structure, select the device, and then select Permissions from the Explorer menu or use the shortcut key CTRL+D. - 98 - Sanctuary Device Control v4.3.2 - User Guide The Permissions dialog is displayed (some options may or may not be available depending on the class where you are defining the permissions). Figure 4.16 Defining Read, Read/Write, or None permissions when adding permissions 5. Click on ADD. The Select Group, User, Local Group or Local User dialog is displayed. Figure 4.17 The Select Group, User, Local Group or Local User dialog 6. Select the user(s)/group(s). See on page for a complete descripAdding a user or group when defining a permissiontion on h88ow to use this dialog. - 99 - Managing Permissions and Rules 7. Back in the Permissions dialog, select the user(s) you want to assign permissions to, and then activate the appropriate options from the list. Use the SHIFT or CTRL key to make multiple selections. See “Using the Permissions Dialog” on page 72 for more details (especially if you are working on the Removable Storage Devices class). 8. Click OK to finish and close the dialog. Note: The list of changes (options, permissions, and rules) is not sent to the client computer immediately. This list is downloaded the next time a user logs onto that computer. You can, alternatively, send the list immediately by selecting the ‘Send Updates to All Computers’ or ‘Send Updates To’ item on the ‘Tools’ menu (or from the Tools section of the Control Panel). Some devices require a reboot in order to apply the new permissions. To modify permissions To modify the permission assigned to a user or group, proceed as follows: 1. Right-click on the user or group. 2. Select Modify Permissions from the pop-up menu. Alternatively, select the Add/Modify Permissions from the Explorer menu, or use the shortcut key CTRL+D. Figure 4.18 Modifying permissions 3. In the Modify Permissions dialog, change the permissions as appropriate. 4. Click OK. Note: The list of changes (options, permissions, and rules) is not sent to the client computer immediately. This list is downloaded the next time a user logs onto that computer. You can, alternatively, send the list immediately by selecting the ‘Send Updates to All Computers’ or ‘Send Updates To’ item on the ‘Tools’ menu (or from the Tools section of the Control Panel). Some devices require a reboot in order to apply the new permissions. - 100 - Sanctuary Device Control v4.3.2 - User Guide To remove permissions To delete the permission to use a device from a user or group: 1. Right-click on the user or group. 2. Select Remove Permissions from the pop-up menu. Alternatively use the Remove option from the Explorer menu, or press the DELETE key. Figure 4.19 Removing permissions To assign scheduled permissions to users and groups You assign this kind of permission when you want to limit the use of certain devices to specific hours and days of the week. The procedure is the same for assigning global or computer-specific scheduled permissions. Note: When assigning scheduled permissions (for example, from Monday to Friday, 8 A.M. to 5 P.M.), the local client’s time applies. To assign scheduled permissions: 1. Right-click on the device in the Default Settings section. - 101 - Managing Permissions and Rules 2. Select Add Schedule from the popup menu. Alternatively, select the device and select Add/ Modify Scheduled Permission on the Explorer menu, or use the shortcut key CTRL+N. Figure 4.20 Add a Scheduled permission The Choose User dialog is displayed: Figure 4.21 The Choose User dialog when adding a scheduled permission - 102 - Sanctuary Device Control v4.3.2 - User Guide 3. Select the user(s)/group(s). See “Adding a user or group when defining a permission” on page 88 for a complete description on how to use this dialog. Click on NEXT: the Choose Permissions dialog is displayed: Figure 4.22 Defining Read or Read/Write permissions when adding scheduled permissions 4. Choose the permissions that you want to apply to the schedule (Read or Read/Write) and then click NEXT. The Choose Timeframe dialog is displayed: Figure 4.23 The Choose Timeframe dialog when adding a scheduled permission 5. Define when the permissions will apply: using the From and To fields enter the period of the day; then, using the checkboxes, specify the days of the week. 6. Click on the NEXT button. 7. Click on FINISH. - 103 - Managing Permissions and Rules Warning: If you define scheduled or temporary access for a dial-up modem (using either a COM port or a Modem port), when the access expires, the communication with the modem is immediately terminated. One side effect is that the program that is using the modem does not have the time to send a ‘disconnect’ command to the modem. Therefore, the modem may remain on-line for a long time, leading to a large call charge. Note: You cannot set a scheduled permission that runs past midnight. If you need a schedule that allows somebody to access a device through midnight, it is necessary to define two scheduled sessions, one up to midnight and one the next day immediately after midnight. Note: The list of changes (options, permissions, and rules) is not sent to the client computer immediately. This list is downloaded the next time a user logs onto that computer. You can, alternatively, send the list immediately by selecting the ‘Send Updates to All Computers’ or ‘Send Updates To’ item on the ‘Tools’ menu (or from the Tools section of the Control Panel). Some devices require a reboot in order to apply the new permissions. To modify scheduled permissions To modify an existing schedule proceed as follows: 1. Right-click on the user or group with the schedule in the Default Setting section, and select Modify Schedule from the pop-up menu. Alternatively, you can select Add/Modify Scheduled permission from the Explorer menu. Figure 4.24 Modifying a scheduled permission 2. In the Choose Permissions dialog, change the options if appropriate, and click NEXT. 3. In the Choose Timeframe dialog, modify the schedule if appropriate, and then click NEXT. 4. Click FINISH. - 104 - Sanctuary Device Control v4.3.2 - User Guide To remove scheduled permissions To delete an existing schedule: 1. Right-click on the user or group with the schedule. 2. Select the Remove Schedule item from the pop-up menu. Alternatively, you can select Remove from the Explorer menu, or press the DELETE key. Schedule permissions also disappear automatically once they become due. To Assign Temporary Permissions to Users It is possible, on a computer-specific basis only, to assign a one-off time-limited permission to access a device. The main purpose is to allow you to grant access to a device for a limited period without having to go back and delete the permission afterwards. Note: When assigning temporary permissions as a deferred value (for example, from Monday to Friday, 8 A.M. to 5 P.M.), the local time on the console is converted to UTC (Coordinated Universal Time) and sent to the client who converts his local time to UTC before comparing these values. Note: You can only define temporary permissions for a computer previously added to the ‘Machine-Specific Settings’ branch of the ‘Device Explorer’ tree. To Assign a Temporary Permission 1. Right-click on the device in the Machine-Specific Settings section and select Temporary Permissions from the pop-up menu — you must first insert the computer. Alternatively, select - 105 - Managing Permissions and Rules the device and use the Temporary Permissions option on the Explorer menu, or use the CTRL +L shortcut key. Figure 4.25 Adding a Temporary permission The Choose User dialog is displayed: Figure 4.26 The Choose User dialog when adding a temporary permission - 106 - Sanctuary Device Control v4.3.2 - User Guide 2. Click on the ADD button. Select the user(s)/group(s). See “Adding a user or group when defining a permission” on page 88 for a complete description on how to use this dialog. Click on NEXT: the Choose Permissions dialog is displayed: Figure 4.27 Defining Read or Read/Write permissions when adding a temporary permission 3. Choose the permissions that you want to apply, then click NEXT. The Choose Period dialog is displayed: Figure 4.28 The Choose Period dialog when adding a temporary permission 4. Choose the period when you want to apply the permissions, by selecting either Immediately or From, and then specifying the times and dates involved. The minimum duration is 5 minutes. 5. Click NEXT and then click FINISH. - 107 - Managing Permissions and Rules To Remove Temporary Permissions To delete an existing temporary permission: 1. Right-click on the user or group with the permission. 2. Select Remove Temporary Permissions item from the popup menu. Alternatively, you can select Remove from the Explorer menu, or press the DELETE key. Temporary permissions also disappear automatically once their time limits are reached. To Assign Temporary Permissions to Offline Users In some cases users need to modify their permissions while they are not connected to your network, i.e. they are ‘out of band’. For example, a user who has no access to the Internet may want to read a file stored on a removable storage device, or may be meeting a customer at an airport and needs authorization to install the customer’s software application on his laptop. If a user needs new permissions when working offline, a phone line can be used to communicate with a Sanctuary administrator (since there is no way for the machine to obtain permissions from the Sanctuary server), explain the required permissions, and quote a key code provided by the Sanctuary Client. The administrator enters these details into the Sanctuary Management Console and, if the request is approved, provides an unlock code which, when entered by the user, grants the required permissions. These permissions are valid until either they expire or the computer reconnects to the protected network. Note: To grant temporary permissions to offline users the administrator requires the appropriate access rights; The Sanctuary Management Console administrator’s User Access must have ‘Temporary Permission Offline (Device Control)’ set to ‘Yes’. See “Defining Sanctuary Administrators” on page 34 for more information. The procedure to assign a temporary permission for an offline user involves steps carried out by the user requesting permissions, denoted [Offline user] below, and the administrator authorizing the changes, denoted [Administrator]. To assign offline permissions: 1. [Offline user] Right-click on the Sanctuary Client icon, in the Windows system tray (at the bottom right of the Sanctuary Client computer’s screen) and select the Request temporary - 108 - Sanctuary Device Control v4.3.2 - User Guide access offline option in the context menu. The Request Temporary Access Offline dialog is displayed, showing the Introduction page: Figure 4.29 Sanctuary Client’s Request Temporary Access Offline dialog – Introduction page - 109 - Managing Permissions and Rules 2. [Offline user] Telephone your Sanctuary administrator and then click on the NEXT button. The Input page is displayed: Figure 4.30 Sanctuary Client’s Request Temporary Access Offline dialog – Input page 3. [Administrator] Open the Request Temporary Permissions dialog on the Sanctuary Management Console. To do this, select Temporary Permissions Access Offline from the Tools - 110 - Sanctuary Device Control v4.3.2 - User Guide menu (or from the Tools section of the Control Panel). The Authorize Temporary Access Offline dialog is displayed: Figure 4.31 Sanctuary Management Console’s Authorize Temporary Access Offline dialog 4. [Administrator and offline user] Agree and enter the settings for the device, the required permissions, user, and, in the case of the administrator, the computer. Note: The offline user specifies the settings in the Input page of Sanctuary Client’s Request Temporary Access Offline dialog. The administrator enters them in Sanctuary Management Console’s Authorize Temporary Access Offline dialog. Note: The settings specified by the offline user and the administrator must be identical for the Unlock Key generated by the administrator to work when entered by the offline user. - 111 - Managing Permissions and Rules The contents of the offline user’s and administrator’s dialogs are explained in the following list: • Device Class Select the type of device that the offline user wants permission to use, for example, ‘Removable Storage Device’ for a USB memory stick. • Permissions Select the permissions that the user requires, for example ‘Read/Write’ and/or ‘Encrypt’. The available options depend on the device class selected above. Administrators can browse for the appropriate permission by clicking on the PERMISSIONS button. • Lifetime of the Permissions Select the Day(s), Hour(s), and/or Minute(s) for which the temporary offline permission is required. For example, the lifetime of the permission may be one hour. • For which user? [Offline User] Select whether the permission change should be made just for the user’s login account or for everyone logging into the particular computer within the lifetime of the permission. You should choose the ‘For everyone’ option when the computer is logged in to a network that is not known to the administrator. Although this makes the device control less secure, it enables administrators to change the offline permissions in some situations where it otherwise would not be possible. • Computer [Administrator] Either enter the name of the computer directly or click on the COMPUTERS button and browse for it. The computer name is not case sensitive. • User [Administrator] Either enter the name of the user directly or click on the USERS button and browse for it. When the Offline user has chosen the ’For everyone’ option then the Administrator must select the ‘Everyone’ user. - 112 - Sanctuary Device Control v4.3.2 - User Guide 5. [Offline user] On the Input page, click on the NEXT button. The Unlock page is displayed showing a Client key: Figure 4.32 Sanctuary Client’s Request Temporary Access Offline dialog - Unlock page 6. [Offline user] Read out the 27-character Client Key value to the administrator. Note: The client key is valid for up to an hour. If the requested permission is not granted in this time the offline user needs to click on the CANCEL button and repeat steps 1, 2, 4, 5, and 6. 7. [Administrator] Enter the alphanumeric string provided by the offline user in the Client Key field of the middle section of the Authorize Temporary Access Offline dialog. The Client key value is validated by the Sanctuary Management Console. If correct, the message ‘Client key is valid’ is displayed at the bottom of the Administrator Authorize Temporary Access Offline dialog. If an error is identified, ask the offline user to repeat the Client key and reenter it. - 113 - Managing Permissions and Rules Note: The client key generated by the Sanctuary Client depends on the settings entered in step 4. This enables the Sanctuary Management Console to check whether the same settings were entered by the administrator in the Authorize Temporary Access Offline dialog and the offline user in his Request Temporary Access Offline dialog. If this is not the case, an error is displayed, the offline user must click on the BACK button and you must repeat step 4 onwards. 8. [Administrator] Enter any comments about the temporary offline permission in the Comments text field at the bottom of the Authorize Temporary Access Offline dialog. For example, you can enter ‘Requested for project 1042’. This comment is viewable in the audit log entries. 9. [Administrator] If you approve the offline user’s permission request, click on the GENERATE button. An Unlock Key is generated by the Sanctuary Management Console and displayed in the Authorize Temporary Access Offline dialog. Note: The GENERATE button is disabled until all the information in the Authorize Temporary Access Offline dialog is complete and has been validated. 10. [Administrator] Read out the 46-character Unlock Key value to the offline user. 11. [Offline user] Enter the alphanumeric string provided by the administrator in the Unlock code field of the Request Temporary Access Offline dialog and click on the NEXT button. Note: The offline user is limited to 15 tries at entering the correct Unlock code before a lockout period comes into effect. Note: A lockout period also comes into effect if the Sanctuary Client’s Request Temporary Access Offline dialog is used to generate a Client key 15 times without a valid unlock code being entered. - 114 - Sanctuary Device Control v4.3.2 - User Guide Once the unlock key is successfully entered, the Finish page is displayed (and a system tray message informs you that the permission status has been changed up to a certain time): Figure 4.33 Sanctuary Client’s Request Temporary Access Offline dialog – Finish page 12. [Administrator and offline user] If the temporary permission was successfully granted to the offline user, you can end your phone call and click on the CLOSE/FINISH button. - 115 - Managing Permissions and Rules A message is displayed in the Sanctuary Management Console informing administrators that the temporary offline permissions are deleted when the computer next connects to your Sanctuary server. This reminds you that you may need to create a normal temporary permission (see “To Assign Temporary Permissions to Users” on page 105) if you want the permissions to continue once the user is online again. Figure 4.34 Temporary Access Offline reminder to administrators Note: If you change your key pair (public and private; see Sanctuary Setup Guide) after installing your Sanctuary Application Server, your temporary offline permissions code may not work correctly. Please contact technical support for further instructions. To Assign Online and Offline Permissions You assign this kind of permission to control the use of devices in a different way when the user is offline, as opposed to when they are online. For example, you may let an individual use the DVD/ CD writer when at home but not when online at the company, or you may ban a user from establishing a WiFi/Modem connection to Internet when his machine is connected to the company’s network (so that he does not circumvent your firewall). The way the ‘online’/’offline’ state is detected depends on the ‘Online state definition’ option. See Chapter 8, “Setting and Changing Options” on page 281. You should be aware that: • An ‘online’ state applies when the client computer is under the control of your server, or is connected to the computer network. • An ‘offline’ state (the opposite to ‘online’) applies when the client computer is not under the control of your server, or is not connected to the computer network. The Sanctuary client ‘discovers’ when a computer is online or offline when one of the following occurs: • The machine boots (and the Sanctuary client starts). The initial state is ‘offline’. • The user logs on. • The user uses the ‘Refresh Settings’ item of the right-click menu of the system tray’s Sanctuary Device Control icon. - 116 - Sanctuary Device Control v4.3.2 - User Guide • A ‘Refresh’ message is received from a Sanctuary Application Server. • The shadow upload time is due. • A network interface changes its state. For example, when a network cable, WiFi card or modem is connected or disconnected, a VPN connection is established or terminated, an address (DHCP) is used or released, or a network card is disabled, enabled, deleted, or added. • One hour after the different online/offline permissions were set (if none of the above happened in the meantime). Note: If you are using different online and offline permissions and the Sanctuary Application Server is stopped or disconnected, clients who are already logged in retain their online permissions for up to one hour. This happens because the Sanctuary client checks updates with the Sanctuary Application Server each hour. When the online and offline permissions become effective, they are treated the same way as a ‘regular’ permission. That is, the online/offline permissions combine with the regular ones, in accordance with their mutual priorities. Use the following procedure to assign online and offline permissions: 1. Right-click on the device (general type or a specific device on the list) in the Default Settings section. - 117 - Managing Permissions and Rules 2. Select Online Permissions (or Offline Permissions) from the popup menu. Alternatively, select the device and select Add/Modify Online Permission on the Explorer menu, or use the shortcut key CTRL+I (for online) or CTRL+P (for offline). Figure 4.35 Defining Read, Read/Write, or None permissions when adding online/offline permission 3. Click on the ADD button and select the user(s)/groups(s) from the Select Group, User, Local Group or Local User dialog. See Adding a user or group when defining a permission on page88 for a complete description on how to use this dialog. Enable the desired options and accept these by clicking on OK. See “Using the Permissions Dialog” on page 72 for more details (especially if you are working on the Removable Storage Devices class). Note: The list of changes (options, permissions, and rules) is not sent to the client computer immediately. This list is downloaded the next time a user logs onto that computer. You can, alternatively, send the list immediately by selecting the ‘Send Updates to All Computers’ or ‘Send Updates To’ item on the ‘Tools’ menu (or from the Tools section of the Control Panel). Some devices require a reboot in order to apply the new permissions. - 118 - Sanctuary Device Control v4.3.2 - User Guide To Remove Offline or Online Permissions To remove an existing offline or online permission: 1. Right-click on the user or group with the permission. 2. Select Remove Online Permissions (or offline) from the pop-up menu. Alternatively, you can select Remove from the Explorer menu, or press the DELETE key. To Export and Import Permission Settings The export and import permission settings are used to export a group of carefully crafted permissions for a range of devices and then import them onto a computer to synchronize them. You can use this feature to change permissions when a computer is not connected to the network (and cannot be connected for the time being), but it still has access to the Internet. The rules apply when you import them into the target computer. There is also a special case when you export to a file called ‘policies.dat’. Please consult Sanctuary Setup Guide for more information. Warning: Files containing exported permissions have a limited usability period of two weeks. After this the file of exported authorization settings is no longer valid. Contact support if you want to extend the validity of your exported permission files. To export/import your settings: 1. Select the Export Settings item from the Tools menu (or from the Tools section of the Control Panel). 2. Select the name and destination of the file in the standard Save As Windows dialog. Normally the destination is a network drive, floppy disk, or any other kind of removable media. - 119 - Managing Permissions and Rules 3. Go to the client computer where you want to import the permission settings and right-click on the Sanctuary client icon to display a popup menu. This image may change depending on your license type and installed programs. Figure 4.36 Importing permission settings 4. Select the Import settings option. 5. Select the source of the file to import from the 6. Import Settings dialog. To Manually Export or Import Permissions Settings If you try to export (or import on the client side) a big database containing probably thousands of permissions, settings, and rules, or using a very busy connection (or low bandwidth), you may get a timeout. If you are experiencing this kind of problems, you may try to manually set a special registry key on the machine where the console is installed (or where the client is if you are trying to import permissions). See Appendix B of the Sanctuary Setup Guide for more details on how to configure these registry keys. You can do this export process using the console (from the Tools Export Settings item) or manually using the following command: export.exe -f export_filename -s server_name [-e TLS] [-t connection_timeout] • -f (compulsory): Defines the file name where the permissions are saved. • -s (compulsory): Defines the name of the Sanctuary Application Server from where the permissions are recovered. • -e TLS (optional): Use Transport Layer Security protocol. • -t (optional): Set connection timeout in milliseconds. Three minutes is used if this parameter is not specified. Thirty seconds is used if less than 30,000 milliseconds or a wrong parameter is specified. - 120 - Sanctuary Device Control v4.3.2 - User Guide Examples: export.exe -f corporate -s secure:65229 -e TLS -t 240000 Export permissions, rules, and settings to a file named "Corporate" contacting the Sanctuary Application Server named "secure" on port 65229 (default TLS port) using TLS protocol and waiting a maximum of 4 minutes (240,000 milliseconds) before timing-out. export.exe -f backup -s secure Export permissions, rules, and settings to a file named "backup" contacting the Sanctuary Application Server named "secure" on the default port. No TLS protocol is used (but the communication is still signed) and a maximum timeout of 3 minutes is used. Shadowing Devices When you need to control the files and content written/read to/from a device, use the shadowing rule. You can analyze the file(s) using the Log Explorer module (see Chapter 5, “Using the Log Explorer” on page 149). This rule is available for the following: • COM/Serial ports. • LPT/Parallel ports. • DVD/CD drives. • Modem/Secondary network access devices. • Removable storage devices. • Floppy disk drives. You can define shadowing for a user or group of users on a: • Class of devices. • Group of devices. • Specific model or device for a computer. Note: If a user does an operation involving shadowing while the computer is disconnected from the network, shadow information is transferred to the server as soon as the machine is reconnected. Note: You must choose the ‘Encrypted’ setting in the first dialog so that the Shadow rule applies to this kind of device. See Chapter 6, “Using the Media Authorizer” on page 213 for more information. - 121 - Managing Permissions and Rules Note: If a user traverse a ‘shadowed’ device folder by using his mouse (or the keyboard), Windows Explorer recovers part of the file to display its thumbnail and extended info. This behavior causes partial shadow files to show in the Log Explorer module. The shadow permission details are displayed in the Permissions column of the Device Explorer module. A value of ‘R’ means that shadowing is on for files read from the device, ‘W’ means that it is on when files are written to it, and no letter means that it is on for both reading and writing files. Note: When editing a file previously copied to a ‘shadowed’ device (in the same user’s session), no read shadow data is created since Windows saves the file in its cache and, therefore there is no new read operation request. This does not apply if the file initially resides in the device or in a new user session (the cache is empty). To Shadow a Device To activate a shadowing rule for a device: 1. Right-click on the device, device class, or device type in the Default Settings section and select Shadow from the popup menu. Alternatively, select the device and select Add/Modify Shadow Settings on the Explorer menu, or use the shortcut key CTRL+W. Figure 4.37 The Choose User dialog when adding a shadow rule - 122 - Sanctuary Device Control v4.3.2 - User Guide 2. Click on the ADD button and select the user(s)/groups(s) from the Select Group, User, Local Group or Local User dialog. Click on the NEXT button. The Choose Bus dialog opens: Figure 4.38 Selecting the bus when defining shadow rules 3. The first part of the dialog is only active when you are adding a shadow rule for a removable device and DVDs/CDs. It lets you select if the shadow applies to all type of devices or just encrypted or unencrypted ones. The Drive panel lets you select between shadow for hard disk, non hard disks, or all types. Select among the available bus types (they vary from one class to another) or all of them. See “Using the Permissions Dialog” on page 72 for more details (especially if you are working on the Removable Storage Devices class). 4. Click on NEXT to continue. The Choose Permissions dialog is displayed. 5. Select either Enabled, Disabled, or Filename (some devices only support Enable and Disable) to switch shadowing on or off. Select these options either on the Read Permission and/or in the Write Permission panel. When selected on the Read Permission side, the shadow is only activated during the read operations. The same applies to the Write Permission panel. If you use the File Name option, you just get the name of the file being copy to the medium but not the content. In this case, the ‘Attachment’ field in the Log Explorer module is set to ‘False’. This option uses very few network and no hard disk storage resources on the data file directory. When you use the Enabled option, you get the name of the file being copied (read) by the user to the device and an exact copy of what is written. This content is stored on the local client directory and then transmitted to the server. Please note that high capacity devices, such as DVDs, can consume a lot or resources and hard disk space. When full shadowing is enabled, the ‘Attachment’ field in the Log Explorer module is set to ‘True’. - 123 - Managing Permissions and Rules Some classes only have the Write panel active because no data can be read from them — LPT & COM. Figure 4.39 Defining the type of shadow for a device 6. Click NEXT to display the Finish dialog where you can review the settings. Figure 4.40 Finishing the shadow rule definition 7. Click FINISH to close the dialog and apply the changes. - 124 - Sanctuary Device Control v4.3.2 - User Guide Note: The list of changes (options, permissions, and rules) is not sent to the client computer immediately. This list is downloaded the next time a user logs onto that computer. You can, alternatively, send the list immediately by selecting the ‘Send Updates to All Computers’ or ‘Send Updates To’ item on the ‘Tools’ menu (or from the Tools section of the Control Panel). Some devices require a reboot in order to apply the new permissions. To Remove the Shadow Rule To remove an existing shadow permission: 1. Right-click on the user or group with the permission. 2. Select Remove Shadow Permissions from the pop-up menu. Alternatively, you can select Remove from the Explorer menu, or press the DELETE key. To View a ‘Shadowed’ File When the rule to create shadow (read/write) files is selected, these files are kept in the client computer until a transfer is done to the Sanctuary Application Server and its associated Data File Directory. You can review these files using the Log Explorer module. Please see Chapter 5, “Using the Log Explorer” on page 149 for more information. Copy Limit You can use this rule to limit the quantity of data a user can write to a device on a per-day basis. Warning: Copy limit can also be applied to administrators. If you do not want this restriction to apply to them, you should modify the default copy limit rule as defined in the ‘Device Explorer’ module. Warning: The copy limit rule is defined per user/per machine. A user that exhausts the established quota can always login in another machine to renew it. You can only limit data for floppy disk drives or removable devices and only for a device class (the upper level of a device). When a user reaches their copy limit, Sanctuary prevents them from copying, moving, or replacing files on a device. If the user is replacing a file, Sanctuary removes the file that is being replaced. - 125 - Managing Permissions and Rules To Add a Copy Limit To change the limit of data copied to such types of devices: 1. Right-click on the device class (the upper level of a device) in the Default Settings section (to define this rule for all users) or in the device class of the Machine-Specific Settings (to create a rule at a computer level) and select Copy Limit from the popup menu. Alternatively, select the device and select Add/Modify Copy Limits from the Explorer menu, or use the shortcut key CTRL+M. Figure 4.41 The Choose User dialog when adding a copy limit rule 2. Click on the ADD button and select the user(s)/groups(s) from the Select Group, User, Local Group or Local User dialog. 3. Once you have finished adding the users or groups, click on the NEXT button to continue the process. - 126 - Sanctuary Device Control v4.3.2 - User Guide 4. Assign the copy limit (in MB) to the user(s)/group(s): Figure 4.42 Defining a copy limit 5. Click on the FINISH button to create and apply the rule. The copy limit rule is reset daily at midnight, local hour. Note: Copy limit permissions cannot be defined at the device-type level, only at the device class level (the topmost category of the device). - 127 - Managing Permissions and Rules When users select the Status item of the icon tray pop-up menu in the client machine, they can see how many bytes have been copied and how many remain for their working day. This only applies to those devices that have the copy limit rule set as the example shown on the following figure. Figure 4.43 The status screen on the client's side: copied/remaining bytes To Remove a Copy Limit To remove an existing copy limit permission: 1. Right-click on the user or group with the permission. 2. Select Remove Copy Limit from the pop-up menu. Alternatively, you can select Remove from the Explorer menu, or press the DELETE key. Applying Multiple Permissions to the Same User It is possible to apply several sets of permissions to a user for a specific device. This can happen if the user is a member of different groups. Permissions can be set for domain groups, domain users, well-known groups, local groups, or local users. Note: You need to synchronize computers so that the local groups and users appear in the system. By default, only well-known groups and users as well as domain groups and users are visible to the system. Please refer to the “Synchronizing Domain Members” section on page 31 for more information. Overlapping permissions have the following effects: • The default setting is ‘no access available’. If you do not take any further action, you are accepting this default scenario for a user or group. • You can explicitly authorize access to a user or group. - 128 - Sanctuary Device Control v4.3.2 - User Guide • You can explicitly deny access to a user or group – negative permission – ‘None’. The overall effect is that you deny access if any of following cases is true: • The default setting is still in effect (i.e., no permissions have been set). • You explicitly deny access with high priority at the default or computer-specific level to a user or any of the groups he or she belongs. This is also true if you explicitly allow access to other groups. • You explicitly deny access with low priority at the default level to the user or any of the groups he or she belongs to and none of the groups is explicitly allowed access at the computer-specific level. Note: If access to a particular device has been explicitly denied with high priority at the default permission level, then the ‘Scheduled’ and ‘Temporary’ permissions are ignored. When a user logs onto a machine, the sum of all permissions assigned directly to him and to the groups the user belongs are applied (refer to Table 4.5, “Applied permissions” on page 95 ). Example: The domain user Bill, uses the computer ‘BillLaptop’, he is member of the domain groups ‘Marketing’ and ‘Remote users’. The company policy for device access is the following one: • Read-only access to DVD/CD for ‘Everyone’. • ‘None’ – Low priority access to DVD/CD for ‘Remote Users’. You want everybody to have read-only access to the DVD/CD except the members of the ‘Remote Users’ group. The low priority means that you accept computer-specific exceptions to this rule. • Read/Write access to Floppy for ‘Domain Users’. • Read/Write access to Modem for ‘Remote Users’. • Read-only access to Removable storage devices for ‘Domain Users’ Monday to Friday from 07h00 to 18h00. • Read/Write access to Removable storage devices for ‘Marketing’. • Read/Write access to BlackBerry (USB) for user ‘Bill’ on ‘BillLaptop’. • Read/Write – High priority access to DVD/CD for user ‘Bill’ on the computer ‘BillLaptop’. Since Bill is a member of the ‘Remote Users’, he would otherwise not be able to access the DVD/CD. By setting this permission, you let him have R/W access to his DVD/CD drive but only on his laptop. - 129 - Managing Permissions and Rules The next table summarizes these permissions: Table 4.6 Permissions example Permission Filter Priority User/User Group DVD/CD Read Low Everyone DVD/CD None Low Remote Users DVD/CD Read/Write High Bill* in computer BillLaptop Floppy Read/Write Low Domain Users Modem Read/Write Low Remote Users Removable Storage Devices Read Low Domain Users from Monday to Friday, 7h00 to 18h00 Removable Storage Devices Read/Write Low Marketing BlackBerry (USB) Read/Write Low Bill* in computer BillLaptop *Bill uses computer BillLaptop and is member of user groups Marketing and Remote Users (as well as member of Everyone, as all users, and Domain Users if he belongs to the Domain) **There is no File Filter defined Bill logs onto his laptop. He has the following permissions (refer to previous table and to Table 4.5, “Applied permissions” on page 95 ): • Read/Write access to DVD/CD only on his laptop, Read everywhere else. The priority of ‘None’ is low and can be overwritten by computer-specific permissions (only when setting its priority as ‘High’). • Read/Write access to Floppy. He gets this right from the ‘Domain Users’ group. • Read/Write access to Modem. He has access to the modem because he is also a member of the ‘Remote Users’ group. • Read/Write access to Removable storage devices. This is the result of the combination of ‘Marketing’ and ‘Domain Users’ rights. • Read/Write access to BlackBerry (USB). Here there is an exception made just for Bill, and only on his laptop. Forcing Users to Encrypt Removable Storage Devices Permissions can also be used to force users to encrypt all or some removable storage devices that they use. This decentralized approach can be used for those companies that do not need or do not want to handle a centralized encryption schema using the Media Authorizer module (see Chapter 6, “Using the Media Authorizer” on page 213 and Chapter 7, “Accessing encrypted media outside of your organization” on page 249). - 130 - Sanctuary Device Control v4.3.2 - User Guide The encryption process itself uses our ‘Easy Exchange’ method to cipher the medium. Please refer to the “Easy Exchange” section on page 265 for more information. Setting Permissions to Force Users to Encrypt Removable Storage Devices Forcing a user to do a decentralized encryption is as simple as defining permissions from the Device Explorer module. Once these permissions have been defined, a user that plugs in a removable storage device must encrypt it before being able to use it. In the following sections, we analyze how this encryption is achieved and the vast available alternatives an administrator has. Note: Decentralized encryption can only be used for removable storage device between 16MB and 4GB in size. To Force Decentralized Encryption The process to force a user to do a decentralized device encryption consists of two main phases: • The first phase consists of defining permissions for the specific user that must do the encryption. There are two case here: In a first case you can assign a unique user or group that must do the encryption but do not have access to the media itself. This ‘middle agent’ can be someone designated to do this ciphering process for all other users. Since this encryption is done in the Easy Exchange mode (see “Easy Exchange” on page 265), other users do not need to have the Sanctuary client installed nor have administration rights to use these, as the device has already been encrypted by somebody else. As a second case, you define permissions for each user or group that must do a device encryption before using the media. You define as many permissions as you need and always two per use/group: one to define that the user must encrypt the device and the other one defining the mode (read/write, etc.). • The second, optional phase is to set the Device Log option to 'Enabled' (see “Device Log” on page 286). This means that MEDIUM-INSERTED log events are generated when the user inserts a device on his computer. You can use these log events to generate a message pop-up that invites the user to encrypt their device. In the most complex case, there should be two permission settings for a user or group plus an — optional — Event Notification. These permissions can be defined at any level of the Removable Storage Devices class: root level, device group, device model, or a specific — uniquely identified — device. Notice that you can define these permissions at the Default Settings level of the Device Explorer module (effective for all computers), at the Machine-Specific Settings level (to activate decentralized encryption for a specific computer) or at the computer group level. - 131 - Managing Permissions and Rules The following steps summarize this procedure (please refer to “Using the Permissions Dialog” on page 72 for a complete description on how to define permissions): 1. Activate the Device Explorer module by clicking on the icon located on the Modules section of the Control Panel in the main window. 2. Right-click on the Removable Storage Devices class icon and select Permissions (or select the class and use the Ctrl+D shortcut key). 3. Turn on the Device Log option (see Chapter 8, “Setting and Changing Options” on page 281). 4. Proceed to define encryption permissions for the required user or group with the Encrypt, Export, and Import options activated and the Unencrypted option of the Encryption panel selected. Choose the type of drive and bus. This must be done so that the user/group is force to encrypt all those unencrypted devices plugged to the computer. 5. Define Read/Write permissions as required. Activate the Decrypt and Import options so that the user can unblock the medium afterwards. Do not forget to add the Self Contained Encryption option in the Encryption panel. 6. Optionally — if you want to inform the user of other possible actions or a help message — define an Event Notification for the user/group or class. Please see “Event Notification” on page 64 for a full description on how to define Event Notifications. The user now receives a Deny Access message along with an invitation to encrypt the device when trying to access the removable media. Encryption is carried out using the Encrypt contextual menu option. The following images are displayed in this process: Figure 4.44 Decentralized encryption: The Access Denied message and inviting the user to encrypt it - 132 - Sanctuary Device Control v4.3.2 - User Guide Figure 4.45 Password complexity is required to encrypt the device Figure 4.46 Decentralized encryption: The Encryption option of the contextual menu Figure 4.47 Decentralized encryption: Encryption begins Examples All examples apply to Sanctuary encryption. See Chapter 11, “Using PGP-Encrypted Removable Devices” on page 323 for instruction on how to use Pretty Good Privacy encryption schemas - 133 - Managing Permissions and Rules Example 1: In this first example, we define a decentralized encryption rule for a group at the Removable Storage Devices class root level. All users of the group ‘Management’ must encrypt their own USB keys and have Read/Write access to encrypted devices. A notification must be defined to inform these users that they must encrypt their devices and should include a help desk number. The procedure involves the following steps: 1. Define a device group called ‘Management removable devices’ where all permissions are going to be defined. You can also add some device models here to further classify and outline devices. 2. Define an encryption permission for the group ‘Management’ at the devices group level. 3. Define a Read/Write permission for the group ‘Management’ at the devices group level. 4. Define an Event Notification for the group ‘Management’ informing the need to encrypt removable devices and providing a help phone number. Figure 4.48 Decentralized encryption for a group defined at a device group level (1/2) - 134 - Sanctuary Device Control v4.3.2 - User Guide Figure 4.49 Decentralized encryption for a group defined at a device group level (2/2) Example 2: The second example deals with a particular user that MUST encrypt a unique device: User ‘Bill’ must encrypt the USB key that he daily uses to show sales info to selected customers. He must, of course, have also read/Write permissions for this, uniquely identified, USB key. He is not informed since he already knows that he must cipher this USB key. The procedure involves the following steps: 1. Define an encryption permission for ‘Bill’ for the specific model. 2. Define a Read/Write permission for ‘Bill’ for the specific model. Figure 4.50 Decentralized encryption at the unique device level (1/2) - 135 - Managing Permissions and Rules Figure 4.51 Decentralized encryption at the unique device level (2/2) Example 3: The next example shows how to force everyone to encrypt all devices recognized by the system in the Removable Storage Device class. All users must encrypt their own USB keys and have Read/ Write access to encrypted devices. The procedure involves the following steps: 1. Define an encryption permission for Everyone at the Removable Storage Devices class root level. 2. Define a Read/Write permission for Everyone at the Removable Storage Devices class root level. 3. Optionally define an Event Notification for Everyone informing the need to encrypt removable devices. Figure 4.52 Decentralized encryption at the class level (1/2) - 136 - Sanctuary Device Control v4.3.2 - User Guide Figure 4.53 Decentralized encryption at the class level (2/2) Example 4: The next example shows how to ‘delegate’ the encryption process to a user and then force all those belonging to a particular group to use only encrypted media. A user is assigned as ‘middle agent’ to encrypt all Sony USB keys (only approved model for the company). This user has no access to these devices. All user of the ‘Marketing’ group have Read/Write access for encrypted devices. The procedure involves the following steps: 1. Define an encryption permission for ‘Bill’ at the ‘Sony USB devices’ level. 2. Define a Read/Write permission for ‘Marketing’ at the ‘Sony USB devices’ level. 3. Optionally define an Event Notification for ‘Marketing’ exclusively for the USB Bus informing the need to encrypt removable devices — this should be done at the ‘Sony USB devices’ level. Figure 4.54 Decentralized encryption using a ‘delegated’ user (1/2) - 137 - Managing Permissions and Rules Figure 4.55 Decentralized encryption using a ‘delegated’ user (2/2) Note: If the 'Device Log' option is set to ‘Enabled’, the users that insert a non-encrypted device is automatically prompted to encrypt the device. If the 'Device Log' option is ‘Disabled’, you must inform the user(s)/group(s) that they receive a ‘Drive not accessible message’ when trying to access a non-encrypted device. The user must right-click on the device in a Windows Explorer window and choose ‘Encrypt medium’ to do the device ciphering. You can inform the user via an 'Event Notification' rule. Once the device encrypted, all authorized users have direct access to its data (see “Easy Exchange” method on page 265). Managing Devices All kinds of devices can be attached to the computers in your network. You do not need to know them all in order to protect your company from abuse. When you first install our product, you get a standard list of devices. You can define a general policy for all devices based on the classes of devices that appear by default in the Device Explorer module. If a particular device is not recognized in one of the classes listed in the Device Explorer module — or if it belongs to a class for which the user has no access defined — then the user cannot access the device even though it is attached to the computer. Nevertheless, if you want to define permissions more precisely, you can set rules for certain models of devices (device types) or specific ones in some cases (removable devices). In this case, and only in this case, it is your responsibility to set up and manage the different models and specific devices for which you want to define permissions. You do not need to do that for all possible devices plugged to your network. To add new devices from a specific computer do one of the following actions: • If you are in the Device Explorer module, select Explorer menu to open the Manage Devices dialog. • While in the Device Explorer module, right-click on the Default Settings header in the Device Explorer window and select the Manage Devices item. - 138 - Manage Devices item from the Sanctuary Device Control v4.3.2 - User Guide • Activate the central logging for all machines or a specific one — it is turned off by default —, proceed to the Log Explorer module and check the attached device registers. You can then use the right-click menu to open the Device dialog (or use the ADD DEVICES button). You can enable central logging either for all computers (Tools Default Options Device Log) or for a specific one by means of the detailed options of that computer. Note: You can sometimes find a ‘de-synchronization’ between the time shown in the ‘Manage Device’ dialog, the ‘Device’ dialog, and your local clock. This is due to the dialogs showing respectively the ‘connect’, ‘managed’, and ‘system’ times — not necessary the same in all cases. To Add a New Device You can add specific models to all the base device classes with exception of the PS/2 ports classes. When you initially connect a new type of device (e.g. a webcam) to a computer controlled by Sanctuary Device Control, the Sanctuary client may initially block it and log the device type. Once this done, the administrator can then add and set permissions for the new device at the Sanctuary Management Console. Follow this procedure to recognize a new device: 1. Open the Manage Devices dialog by selecting EXPLORER MANAGE DEVICES or by rightclicking on the DEFAULT SETTINGS item. The following dialog (with all the already managed devices) is displayed: Figure 4.56 Managing devices 2. Click on the ADD NEW button. - 139 - Managing Permissions and Rules 3. Type the computer name and press ENTER. You can use wildcards (*,?) to do a search or click the ellipsis button to show all available computers logged on to the network: Figure 4.57 Managing devices - selecting the computer 4. Select a computer from the list by double-clicking or by selecting and pressing ENTER or clicking the OK button. 5. Click the GET DEVICES button. Another dialog is displayed in which you can select the devices you want to add to your Device Explorer control list. 6. Click on the column heading to classify by that field. You can also click the heading of the Time column to order the list by the most recent device connected to that computer. Figure 4.58 Managing devices - choosing the devices from the selected computer - 140 - Sanctuary Device Control v4.3.2 - User Guide Note: The available devices may include different ones within the same or different classes. The list might include, for example, one or more types of digital cameras, and a DiskOnKey memory device, all as separate Removable storage devices. Select the device and use the RENAME button to change to your own description. 7. Select the devices that you want to add by clicking on the checkbox of the device and then click the ADD DEVICES button. The checkbox disappears and the line grays-out, indicating that the device is now on the list. If you want to keep a log of all devices plugged to the computer, click the SAVE LOG button. 8. Click on the CLOSE button. Once you close the Devices dialog, you return to the Manage Device window. This now shows the newly added device(s) as well as the old ones. Once the new device is listed in the Device Explorer window, permissions can be assigned for it just as for any other device. Note: The list of changes (options, permissions, and rules) is not sent to the client computer immediately. This list is downloaded the next time a user logs onto that computer. You can, alternatively, send the list immediately by selecting the ‘Send Updates to All Computers’ or ‘Send Updates To’ item on the ‘Tools’ menu (or from the Tools section of the Control Panel). Some devices require a reboot in order to apply the new permissions. To Remove a Device You can delete a device from the list of those available in the Device Explorer list. To do this: 1. Open the Manage Devices dialog by selecting EXPLORER clicking on the DEFAULT SETTINGS item. - 141 - MANAGE DEVICES or by right- Managing Permissions and Rules 2. Select the device(s) you want to remove. Use the SHIFT/CTRL key to make multiple selections. Figure 4.59 Removing devices 3. Click on the REMOVE button. The following warning message is displayed. Click the YES button to close it. Figure 4.60 Confirming the removal of a device Sanctuary Device Control reverts to the device class permissions for those deleted devices. Specific, Unique, Removable Devices The administrator can also opt for adding a specific, unique, removable USB device identified by its serial number. This has the clear advantage of unmistakably denying/allowing a user or group the right to use this device in a personalized fashion. For example, the administrator can choose to block the access to all removable devices but allow offline access to a personal USB memory key. Follow the steps depicted in “Identifying Specific, Unique, Removable Devices” on page 43 to add a particular removable device. Alternatively you can do this in the Log Explorer module by rightclicking on Device-attached entries (see “To Manage Devices Using the Log Explorer Module” on page 208). - 142 - Sanctuary Device Control v4.3.2 - User Guide Changing Permissions Mode Some devices you add fall into common existing device types. For instance there are various types of removable drives, including devices such as the Iomega Zip drive, notebook PCMCIA card drives and USB DiskOnKey devices, all of which fall into the general category of Removable drives. Note: Digital cameras are normally classified as removable drives by Windows. If this is not the case for one of your digital cameras, install the latest drivers of the camera and try again. On rare occasions, some models are classified as Scanners. The Device Explorer module lets you apply permissions to a device type as a whole or to control individual devices within the general type. This would allow you, for instance, to permit access to the users members of the domain group ‘Marketing’ to the Zip drives while prohibiting them access to the DiskOnKey devices and any other removable device for this group. At the same time, your administrators have access to all types of devices whatever their model is. In order to do this, you would have to set permissions on the ‘Removable Storage Devices’ class for the group ‘Administrators’ while you add all the different models of zip drives in use to the list of managed devices (see “Managing Devices” on page 138 for more information). You would ideally place all different models of Zip drive readers in a device group (see “Device Groups” on page 69 for details) and set permissions for this group of devices for the domain group ‘Marketing’. • To set permissions to the whole class, select the device on the Default settings section and rightclick on it selecting the type of Permissions you need from the popup menu. You can assign general, online, offline, schedule, shadow, and copy limit permissions to the device as a whole. • To set a per-device permissions within the type, open the class (use the + key) on the Default settings section, right-click on the device, and select Permissions. You can assign general, online, offline, and schedule permissions to specific devices in the general class. Follow the previously described procedure to assign the desired type of permission needed. Priority Options when Defining Permissions When you change permissions, you can see an option for setting the priority of the rule assigned to a device (at the class or specific level): Figure 4.61 Priority setting The following practical example clarifies its purpose: - 143 - Managing Permissions and Rules In your ‘example’ company, every domain has the right to burn CDs. To allow this, you define a Read/Write access for domain users at the Default Settings level. You want to make an exception to this recently created rule: a group of users called ‘Key data owners’ should not be allowed to burn CDs on every machine. You define a negative permission (None) for this group at the Default Settings level. Now you are set and they cannot burn CDs anymore. Extending our example further, you want them to be able to burn CDs using a specific computer especially prepared to do this job. This machine should also have a Shadowing rule for all burned data, for all users. You now need to define for this computer or group of computers a special permission with Read/Write rights on the CD for all the ‘Key data owners’ plus a rule to Shadow the data being burnt (write). This new rule does not work UNLESS you define a ‘None’ permission (not Read nor Read/Write) at the Default Settings level with a Low priority. This Default Settings permission rule is overridden by a machine-specific permission rule. The following table explains the resulting access when permissions are defined between protecting a general device type (class) and a specific device from that class (see also Table 4.5, “Applied permissions” on page 95 ): Table 4.7 Resulting access Device level where the permission is defined Permission set Priority Class None High Model Read/Write Low Class None Low Model Read/Write High Class Read/Write High Model None High Class None Low Model Read/Write Low Class Read High Model Read/Write Low Class Read Low Model Read/Write High Class Read/Write High Model Read High - 144 - Result to apply to the specific device None Read/Write None None Read/Write Read/Write Read/Write Sanctuary Device Control v4.3.2 - User Guide Table 4.7 Resulting access Device level where the permission is defined Permission set Priority Class Read Low Model Read/Write Low Class None High Model Read High Class None Low Model Read High Result to apply to the specific device Read/Write None Read Permission settings go from high to low level in this order: Table 4.8 Permission settings priority Permission settings Order None Read/Write Read Note: You can also distinguish between two removable devices of the same make by using the Media Authorizer module to centrally encrypt the devices. Informing Client Computers of Permission Changes Whenever you make a change to the device permissions in the Device Explorer module, the client computers need to be notified that something has changed in the list of authorized devices. You can do this manually, or leave the system to do it automatically at the next client logon or re-boot. Generally, it is advisable to send updates to computers manually. If you have made a change to a global device class, then select Send Updates to All Computers from the Tools menu (or from the Tools section of the Control Panel). - 145 - Managing Permissions and Rules The following dialog is displayed when you choose the Send Updates to All Computers command: Figure 4.62 Sending updates to client computers If you click on the YES button, the program may take a lot of time sending updates since this process is done synchronously. The console has to wait until the Sanctuary Application Server finishes sending the updates to all machines in the online table. If, on the other hand, you choose NO, then the process is done asynchronously and the Sanctuary Management Console does not wait for the Sanctuary Application Server to finish. You can continue working while the update is done in the background. If you made a change to an individual computer and want o send updates to it: 1. Right-click on the computer in Device Explorer module. 2. Select Send Updates to: <computername> from the popup menu (or select the same option from the Tools menu or from the Control Panel). Figure 4.63 The send update item from the contextual menu You do not need to use the Send command when you set Temporary Permissions. This type of permission is sent out automatically as soon as it is set. - 146 - Sanctuary Device Control v4.3.2 - User Guide Any computer that is switched off or disconnected from the network receives the updates next time it is connected or booted. Note: If a computer does not receive updates when you select ‘Send Updates to All Computers’ or ‘Send Updates To’, open the ‘Online Machines Report’ and check if the machine is present in the list (see “Online Machines Report” on page 302.) A machine that is not in the list will never receive updates when you select to send them. You can ask the user to select the ‘Refresh settings’ command in the right-click (contextual) menu of the Sanctuary client icon located on the system tray. If the user does not get the latest permissions, you should try rebooting the client computer. After rebooting, it should appear in the online table. If not, check the connectivity between the client machine and the Sanctuary Application Server. You can use the pingsxs.exe utility on the client machine to check the communication. This tool is located under the BIN\Tools directory of your Sanctuary Device Control Media. Note: Your users can request the latest permissions from the Sanctuary Application Server by using the ‘Refresh Settings’ command from the right-click (contextual) menu of the Sanctuary client icon located in the system tray. - 147 - Managing Permissions and Rules - 148 - Sanctuary Device Control v4.3.2 - User Guide 5 Using the Log Explorer In the chapter we analyse the use of the Log Explorer module, the program unit used for audit and tracing purposes. Introduction The Log Explorer module is used by Sanctuary Device Control for three distinct purposes: • To view information about input/output device actions that users have attempted to, or actually, carried out. For example, you can review attempts to access or connect unauthorized devices, or view records of files copied to authorized devices (shadow). • To view audit information about the actions carried out by administrators, including changing user access rights and device permissions. Note: In previous versions of Sanctuary this second function, to audit administrator actions, was carried out using the Audit Log Viewer module. The functionality of this module has been incorporated into the Log Explorer module. The Audit Log Viewer module no longer exists. • To generate automatic reports containing either details of I/O device actions or administrator actions. These can be scheduled to run at regular intervals between specified start and end dates. You can set up templates in the Log Explorer module that enable you to generate customized reports quickly and easily. These templates contain the criteria you want to use to select the results in the report. They also contain details of what information is displayed for each result in your report. Reports can either be generated on demand or you can schedule Sanctuary to generate them in a particular format and deliver them either to a particular shared folder or email recipients. For example, you can specify that you want to receive an email each Monday containing a custom report of the previous week’s activities. Monitoring user input/output device actions There are four main types of information that you typically focus on when reviewing the I/O actions of users. These are: • Unsuccessful attempts to access I/O devices on the client machines: When a user tries to read from, or write to, a device for which no permissions are defined, the operation is traced. Other user actions such as reaching a data transfer quota, attaching a device to the computer, or trying to use a protected WLAN interface are also traced. By default, central device logging is turned off. It can be enabled for all computers (Tools Default Options Device Log) or for a specific machine, by means of the detailed options of that computer. - 149 - Using the Log Explorer • When a device is connected or disconnected from a computer: This information is always logged. It is reported as Device Attached, you can then choose to add the device immediately by selecting the device entry and then clicking on the Add device button located on the lower right part of the screen. (If the log file was generated using a previous version of the client, this option might not be available.) Please see “Managing Devices” on page 138 for a full description on how to add specific devices. • Client errors: Log entries are generated by events such as failure to burn a DVD/CD in an unsupported format, or failure to communicate with the Sanctuary Application Server because of a mismatch between the server private key and a client public key. By default, device logging is turned off. It can be enabled for all computers (Tools Default Options Device Log) or for a specific one by means of the detailed options of that computer. • Files copied from a PC to an authorized device: Sanctuary uses shadowing to record either the names or contents of the copied files. By default, shadowing is turned off. You can enable it for either all users or a particular one. To do this: 1. Go to the Device Explorer module 2. Right-click on the device you want to shadow 3. Select Shadow. (Alternatively, use the shortcut key CTRL+W). Typically, you should monitor what authorized end-users copy or read, to or from a floppy, recordable DVD/CD, or removable drives. You may also want to extend such control over LPT and COM ports. Note: Shadowing is available for files copied/read to/from the following device types: Floppy disk, DVD/CD-ROM, Removable Media (depending on the shadowing rules defined, encrypted media can also be shadowed), Modem, LPT and COM. Shadowing a Modem or the LPT or COM ports results in a raw binary data shadow file. In some of these devices, you can only activate the ‘name’ option, not the full copy. See Appendix A, “DVD/CD Shadowing” on page 333 for details of what can and cannot be shadowed when writing or reading, to or from a recordable DVD/CD. Shadowing and Device logging rules are defined per-device and per-user. You can define different settings for users logging on the same machine. Note: If the ‘Log (Device Control)’ access of the Sanctuary Management Console Administrator User Access is set to ‘No’, the currently logged administrator cannot use the Log Explorer module. Furthermore, if the ‘Logs w/o File Access (Device Control)’ is set to ‘No’, the administrator cannot see the contents of the file (even when enabling full shadowing). See “Defining Sanctuary Administrators” on page 34 for more details. - 150 - Sanctuary Device Control v4.3.2 - User Guide Note: If the ‘Attachment’ field of a file is set to ‘true’, then the content file has been shadowed. This only happens if full shadowing is active. You may or may not have access to this entry, depending on the role assigned to you by the ‘Enterprise Administrator’. The administrator has the option of explicitly requesting the log files from any client computer to display them using the ‘Log Explorer’ module. Although this is a very practical way of analyzing log entries of a specific machine, it can also cause some file operations to fail at the client side. Use this command cautiously and privilege the criteria settings (computer field) or change the log options in the ‘Default Options’ dialog (see Chapter 8, “Setting and Changing Options” on page 281 for more details). Some external WiFi cards are reported twice in the Log Explorer records. This is because they are first classified as Modem/Secondary Network Access Devices and then as Wireless NICs. Sanctuary Device Control monitors data as it is generated by the client application. For instance, shadowing a USB memory stick fetches the files copied/read — name or name and content, depending on the selected shadowing option — and places an entry in the log. The files are automatically transferred from the client to the Sanctuary Application Server according to the transfer options. By default, files are transferred every sixty minutes. You can also retrieve the latest shadow and log files from the client computers by: • Selecting Fetch Log in the Explorer menu • Clicking on FETCH LOG, • Clicking the QUERY button. Warning: If you choose ‘Fetch Log’ while a user is copying data to a media, or if the automatic transfer of shadow files occurs while the user is copying data, the copy may fail. In addition to using the Log Explorer module to view user I/O actions, you can also use it to add specific, uniquely identified devices and afterwards assign them permissions using the Device Explorer module (see Chapter 3, “Using the Device Explorer” on page 55). Monitoring administrator actions Sanctuary Device Control provides full auditing of all administrator actions including changes of user and/or system access rights to certain devices. You can also use the Log Explorer module to display the changes made to device permissions as well as any DVD/CD and Encrypted media added or removed from the database and any DVD/CD and Encrypted media assignment done. - 151 - Using the Log Explorer For example, you can view the following information about administrator actions: • Dates and times when changes were made. • Domains and usernames of the people who made the changes. • Domains and users/user groups to which the changes apply. • Names of target computers, where rules are applied to specific computers. • Devices to which the changes apply. • Permissions applied to the devices. Note: If the ‘Audit (Device Control)’ option of the Sanctuary Management Console Administrator User Access is set to ‘No’, the currently logged-in administrator is not able to see or use the Log Explorer module to view administrator actions. Please refer to the “Defining Sanctuary Administrators” on page 34 for more details. Note: Comments (added in the Device Explorer module) are not shown in the Log Explorer. Accessing the Log Explorer You can access the Log Explorer module by clicking on the icon located on the Modules section of the Control Panel in the main Sanctuary Management Console window. Alternatively, you can use the View Modules Log Explorer menu command Figure 5.1 The Log Explorer main window - 152 - Sanctuary Device Control v4.3.2 - User Guide The following limitations apply when using the Log Explorer module under various user/domain accounts: Table 5.1 Limitations while using the Log Explorer module under other user/domain account Possible configurations Sanctuary Application Server and Sanctuary Management Console are running on the same machine Sanctuary Application Server and Sanctuary Management Console are running on different machines Sanctuary Application Server and Sanctuary Management Console are running on different machines Domain type Logged user* Result Notes Current user Works properly - Other user Works properly User has to use either localhost or the local computer name in NetBios format in the Sanctuary Management Console login dialog. Current user Works properly Only if DCOM is configured correctly** (if using Microsoft™ Windows™ XP SP2 or later, Windows 2003 SP1 or SR2, or Windows Vista). Other user Works properly Only if DCOM is configured correctly** (if using Windows XP SP2 or later, Windows 2003 SP1 or SR2, or Windows Vista). Current user Would not work Other user Works properly n/a Trusted domain Un-trusted domain Only if DCOM is configured correctly** (if using Windows XP SP2 or later, Windows 2003 SP1 or SR2, or Windows Vista). * Current User means that you have logged in to the Windows session and the Sanctuary Management Console as the same user. **A user needs to have both permissions on machine wide DCOM security, and the permissions set in DCOMCNFG to successfully use DCOM. See www.microsoft.com/technet/prodtechnol/winxppro/maintain/mangxpsp2/mngsecps.mspx. - 153 - Using the Log Explorer Table 5.1 Limitations while using the Log Explorer module under other user/domain account Possible configurations Domain type Logged user* Result Notes To correctly configure machine-wide DCOM (Group Policy): 1. Run gpedit.msd (Start è Run). 2. Go to Computer Configuration\Windows Settings\Security Settings\Local Policies\Security Options. 3. Double click on ‘DCOM: Machine Access Restrictions in Security Descriptor Definition Language (SDDL) syntax’ on the right pane, click on ‘Edit Security’ and add users and groups who are allowed Local/Remote access. 4. Double click on ‘DCOM: Machine Launch Restrictions in Security Descriptor Definition Language (SDDL) syntax’ on the right pane, click on ‘Edit Security’ and add users and groups who are allowed Local/Remote activation. 5. Close Group Policy Object Editor. Run gpupdate.exe to refresh group policy. To correctly configure DCOM (dcomcnfg.exe): 1. 2. 3. 4. 5. Run dcomcnfg.exe (Start è Run). Select ‘Component Services’ and open the ‘Computer’ branch. Right-click on the specific computer on the right panel and select ‘Properties’. Select the ‘COM Security’ tab, click on ‘Edit Limits’ in the ‘Launch and Activation Permissions’ panel. Select the user you want to define as the Sanctuary Management Console administrator and activate the 'Remote Activation' option. 6. Verify that the chosen user has 'Remote Access' activated in the ‘Access Permissions’ panel. * Current User means that you have logged in to the Windows session and the Sanctuary Management Console as the same user. **A user needs to have both permissions on machine wide DCOM security, and the permissions set in DCOMCNFG to successfully use DCOM. See www.microsoft.com/technet/prodtechnol/winxppro/maintain/mangxpsp2/mngsecps.mspx. Note: The DCOM settings, as described in the above table must be modified on all machines where the Sanctuary Application Server is installed. DCOM does not work across non-trusted domains. This is especially true when using Workgroups. This is a Windows limitation and one possible workaround for this issue is to use the same login/password for the Sanctuary user, Windows user on the Sanctuary Application Server (SXS), and Windows user on the Sanctuary Management Console. The Log Explorer module works better when using an account with administrative rights. - 154 - Sanctuary Device Control v4.3.2 - User Guide Log Explorer templates The operation of the Log Explorer module is based on templates. These templates let you generate custom reports containing results that match particular criteria. As you use the Log Explorer module - changing criteria options, column size and order, which columns are displayed in the Results panel (and custom reports), and the whole set of configurable options - you are actually creating a template. A template is, in this context, a set of rules to use when displaying data in the Log Explorer module. Once satisfied with your log report, you can save this template for future use. You can create your own templates and save them as you progress in your work. Alternatively, you can opt for a simpler approach using predefined templates created by Lumension. Note: If you have upgraded from a previous version of Sanctuary, your existing templates were stored in the registry (or elsewhere). In this case, when you start the Log Explorer module you can specify how you want to update them. You can migrate some or all of the existing templates stored in the registry, import any that are stored elsewhere, or remove templates from the registry. The Select and edit templates window displays a list showing the templates you can access that have been set-up, migrated, or imported. Note: The list of predefined templates may include some that do not apply to the type of license you purchase and, thus, have no use for you. To use an existing template 1. Choose the template you want to use, created by Lumension or by you. To do this, select the template from the list of recently used ones in the top left corner of the Log Explorer navigation/control bar or click on the Templates button, highlight the one you need in the list in the Select and edit templates window and click on the Select or Execute button. 2. Execute the template to create a report that is shown in the main Log Explorer window. To do this, click on the Query button. A table of results displays in the main Log Explorer window. Each row represents one or more log entries that match your query criteria. For each log entry or group of log entries, the columns represent the display information that was chosen for the template. 1. - 155 - Using the Log Explorer Note: The query only returns results if you have appropriate access rights to view it. See “Defining Sanctuary Administrators” on page 34 for more details. Predefined templates You can use the following predefined templates: Table 5.2 Log Explorer’s predefined templates Template's name Use to list See notes Audit by Administrator 'adm' All actions done by a specific administrator 3; You must first change the “adm” user for a real one in the “Settings” section. The result is classified by user. Audit for PC xyz Audit trace for a specific computer You must first change the “xyz” computer for a real one in the “Settings” section. Audit for user 'abcd' Audit trace for a specific user You must first change the “abcd” user for a real one in the “Settings” section. Audit today Today’s audit trace 3 CD-DVD in use this month All DVD/CDs that have been used this month 4 Copy limit met this week All copy limit rules that have been met or exceeded this week 5 Denied device acc. this week All denied device access this week 4 Devices connected this month List of all devices that were connected this month 4 Notes: 1 This only applies to user for which the “Execution Blocking” option is properly configured. 2 Entries are only logged when the “Execution Log” option is properly configured. 4 You must first enable the “Device Log” option. 5 You must first define a “Copy Limit” rule; see “Copy Limit” on page 125. 6 You must first configure the “Client Hardening” option. 7 You must first configure the “USB Key Logger” option. 8 You must first define the appropriate permissions for the removable device. See Chapter 4, “Managing Permissions and Rules” on page 71. 9 This encryption is done in the user’s machine by the user assigned by one of the Sanctuary’s administrators using the “Device Explorer” module. See “Decentralized encryption” on page 220. 10 You must first define a “Shadow” rule. See “Shadowing Devices” on page 121. 11 This only applies when you also define a “Filter” rule in the permission of a removable device. See “Using file filters” on page 77. See Chapter 8, “Setting and Changing Options” on page 281 for instruction on how to configure the options. - 156 - Sanctuary Device Control v4.3.2 - User Guide Table 5.2 Log Explorer’s predefined templates Template's name Use to list See notes Devices denied/user this month All denied device access this month classified by user 4 Devices often used this month The most often used devices this month 4 Everything today Everything that has been going on today - Files DVD/CD this month All files being transferred from DVD/CD to PCs this month classified by user 10 All files being transferred from Floppies to PCs this month classified by user 10 Hardening violations this month All client hardening violations detected this month 6 Keylogger this week All key logger violations and intrusions detected this week 7 Medium Encrypted by user All media encrypted by the users (decentralize encryption) 8 Medium Encrypted this month All media encrypted by the users this month (decentralize encryption) 8,9 PC DVD/user this month Write granted by DVD/CD device, PC, and user this month 4 PC Floppy/user this month Write granted by Floppy device, PC, and user this month 4 PC Remov/user this month Read granted by removable device, PC, and user this month 4 Remov month All read operations done from removable storage devices this month classified by user 10 Files Floppy this month PC/user PC/user PC/user this Notes: 1 This only applies to user for which the “Execution Blocking” option is properly configured. 2 Entries are only logged when the “Execution Log” option is properly configured. 4 You must first enable the “Device Log” option. 5 You must first define a “Copy Limit” rule; see “Copy Limit” on page 125. 6 You must first configure the “Client Hardening” option. 7 You must first configure the “USB Key Logger” option. 8 You must first define the appropriate permissions for the removable device. See Chapter 4, “Managing Permissions and Rules” on page 71. 9 This encryption is done in the user’s machine by the user assigned by one of the Sanctuary’s administrators using the “Device Explorer” module. See “Decentralized encryption” on page 220. 10 You must first define a “Shadow” rule. See “Shadowing Devices” on page 121. 11 This only applies when you also define a “Filter” rule in the permission of a removable device. See “Using file filters” on page 77. See Chapter 8, “Setting and Changing Options” on page 281 for instruction on how to configure the options. - 157 - Using the Log Explorer Table 5.2 Log Explorer’s predefined templates Template's name Use to list See notes Shadow by file type this month A shadow (carbon copy) of the whole file or its name — as the administrator defined it — of all files copied this month classified by file type 10 Shadow by user per month A shadow (carbon copy) of the whole file or its name — as the administrator defined it — of all files copied this month classified by user 10 Shadow exp by size dsc this month A shadow (carbon copy) of the whole file or its name — as the administrator defined it — of all files copied to an external device (exported) this month classified by size 10, 11 Shadow files > 10MB this month A shadow (carbon copy) of the whole file or its name — as the administrator defined it — of all files bigger than 10 MB copied this month 10 Shadow imp by size dsc this month A shadow (carbon copy) of the whole file or its name — as the administrator defined it — of all files copied from an external device (imported) this month classified by size 10, 11 Shadow mp3, mp4 by user A shadow (carbon copy) of the whole file or its name — as the administrator defined it — of all music and video files copied today classified by user 10 Notes: 1 This only applies to user for which the “Execution Blocking” option is properly configured. 2 Entries are only logged when the “Execution Log” option is properly configured. 4 You must first enable the “Device Log” option. 5 You must first define a “Copy Limit” rule; see “Copy Limit” on page 125. 6 You must first configure the “Client Hardening” option. 7 You must first configure the “USB Key Logger” option. 8 You must first define the appropriate permissions for the removable device. See Chapter 4, “Managing Permissions and Rules” on page 71. 9 This encryption is done in the user’s machine by the user assigned by one of the Sanctuary’s administrators using the “Device Explorer” module. See “Decentralized encryption” on page 220. 10 You must first define a “Shadow” rule. See “Shadowing Devices” on page 121. 11 This only applies when you also define a “Filter” rule in the permission of a removable device. See “Using file filters” on page 77. See Chapter 8, “Setting and Changing Options” on page 281 for instruction on how to configure the options. - 158 - Sanctuary Device Control v4.3.2 - User Guide Table 5.2 Log Explorer’s predefined templates Template's name Use to list See notes Shadowing today A shadow (carbon copy) of the whole file or its name — as the administrator defined it — of all files copied today 10 Users denied app. device this week All applications and device denied this week 1, 2, 4 Notes: 1 This only applies to user for which the “Execution Blocking” option is properly configured. 2 Entries are only logged when the “Execution Log” option is properly configured. 4 You must first enable the “Device Log” option. 5 You must first define a “Copy Limit” rule; see “Copy Limit” on page 125. 6 You must first configure the “Client Hardening” option. 7 You must first configure the “USB Key Logger” option. 8 You must first define the appropriate permissions for the removable device. See Chapter 4, “Managing Permissions and Rules” on page 71. 9 This encryption is done in the user’s machine by the user assigned by one of the Sanctuary’s administrators using the “Device Explorer” module. See “Decentralized encryption” on page 220. 10 You must first define a “Shadow” rule. See “Shadowing Devices” on page 121. 11 This only applies when you also define a “Filter” rule in the permission of a removable device. See “Using file filters” on page 77. See Chapter 8, “Setting and Changing Options” on page 281 for instruction on how to configure the options. Note: You should also consult the corresponding Sanctuary Application Control User Guide section if you have a Sanctuary Application Control Suite license. - 159 - Using the Log Explorer To create and use a new template 1. Click on the TEMPLATES button in the Log Explorer window. The Select and edit templates window is displayed. Figure 5.2 The Select and edit templates window - 160 - Sanctuary Device Control v4.3.2 - User Guide 2. Click on the NEW button. The Templates settings window is displayed. Figure 5.3 The Templates settings window 3. Enter a name for your new template in the Template name field. 4. Type a brief explanation in the Description field. 5. Choose whether you want the new template to be accessible only to yourself and Enterprise Administrators (Private), to be usable but only editable by the owner and Enterprise Administrators (Published), or to be editable by anyone (Shared). 6. Proceed to the Query & Output tab to specify your query columns and criteria. These determine which log entries are selected as results in the Log Explorer report, and the information that is displayed in each. To select log entries that match certain criteria, select the Column to which the criteria apply, by clicking on the appropriate box, clicking (ellipsis) in the Criteria column, and specifying what you want to match entry details to. See “Criteria” on page 183 for instructions on how to define query criteria. You can choose which information to display for each entry, the display size of the columns and how the results are grouped or sorted in particular ways. - 161 - Using the Log Explorer Note: If you select the Count column then the results are automatically grouped. 7. For more information about criteria, displaying and sorting results and so on, see “Criteria” on page 183. If you are creating a template for a regularly generated report, specify the schedule, i.e. when the report is automatically produced, the format of the report and the recipients of the report. To do this, complete the fields on the Schedule tab of the Template settings window. 8. For more information, see “Schedule Tab” on page 195. Execute the query. To do this, click on the QUERY button in the Log Explorer window, or the EXECUTE button in the Template settings window. Note: All fields act interactively: when you change one of them, it does a logical AND with all the others. If, for example, you select a range of traced dates and then a user, the resulting data includes all events for the selected user that occurred between the selected dates. Note: The template is stored when you execute the query. If there are any records that match your query criteria, they appear in the Results panel list of the Log Explorer window (and your custom reports). The query only returns results if you have appropriate access rights to view it. See “Defining Sanctuary Administrators” on page 34 for more details. Backing-up your templates Even though this is one of the most important tasks of the IT department, it is also one of the most neglected. A regular backup saves a lot of time, even if you only have done a few personalized templates. Recreating them after only a few weeks takes considerable time and effort and you will probably have forgotten by then how you did them. Backing-up you data and templates only takes a few minutes and saves you a lot of grief. All templates are saved in your SQL database so when you do a Sanctuary Database backup, you are also doing a template backup. Microsoft provides its own tools for SQL backup or you can also use third-party software for this task. Whatever your decision is, do not forget to do it in a regular basis safeguarding, this way, your valuable hash, application use policy, and template information. - 162 - Sanctuary Device Control v4.3.2 - User Guide Log Explorer window The main Log Explorer window contains the following five main elements: • Navigation/Control bar. • Column headers. • Results panel (the contents of which can scheduled for sending/storing as a custom report). • Criteria/Properties panel. • Control button panel. Figure 5.4 Components of the Log Explorer window - 163 - Using the Log Explorer Navigation/Control Bar You can use the button bar on the upper part of the main window to select a template and navigate through or control your results: Figure 5.5 Navigation/Control bar • Template list — selects a template from your recently used templates list, shown in the dropdown list. Note: In previous versions of Sanctuary the templates list included all templates created by you or by Lumension. All templates can be accessed by clicking on the Templates button. • TEMPLATES button — used to create a new template or select an existing one from the list in the Select and edit templates window. • (Previous) button — navigates to the preceding result list from the ones internally stored, if you are carrying out multiple queries. • (Next) button — navigates to the following result list, if you are carrying out multiple queries. • FETCH LOG button — retrieves logs and shadow files from a computer or a list of computers running the Sanctuary Client Driver. The Select Computer window is displayed. See “Forcing the Latest Log Files to Upload” on page 207. • SETTINGS button — goes directly to the advanced settings dialog for the template you are currently using. Here you can select columns and define criteria. See “Template Settings Window” on page 181. • STOP button — cancels the current query. This is used if you want to interrupt a lengthy sorting operation involving a large number of log entries. • PAUSE button — cancels the screen output, with any sorting processes continuing in the background. To resume the screen display, click on this button again. • QUERY button — retrieves all log entries that match the criteria defined in the current template. Column headers The column headers display the title of the columns. In addition, you can use them to: • Sort results — classify the results and display them in a specified depending on the value for the log entry (or log entries) in one or more columns. • Show/hide columns — determine what information is displayed for each result in the report. - 164 - Sanctuary Device Control v4.3.2 - User Guide • Change the size of the displayed columns — by dragging the column header dividers to the left or right. • Change the order in which the columns are displayed — by dragging and dropping the column titles in the column headers. • Group log entries — display a single report row corresponding to multiple log entries grouped according to the values in one column. • Display computed columns — display calculated values such as a count of the number of log entries in a grouped result, the maximum value, minimum value, sum of values, or average value. Note: You can make changes to the columns to display different information from the log entries without re-executing the query. Tip: Any on-the-fly changes you make to the column headers are saved in the template. For example, if you use the column context menu to group the results the next time you run a query using the template the results are automatically grouped. Note: You can also use the column context menu to access the advanced query settings for the template. For more information about defining complex queries see “The Advanced View” on page 187. Sorting results To sort results in an ascending by a value in a particular column, click once on the header — click again to sort in descending order. Click on another heading to change the sorting order to that column. You can see the result as a green arrow in the column’s title with the sorting order number. The direction of this arrow shows whether sorting is in ascending or descending order. If you want to sub classify your results click on the SETTINGS button, select the Multi-column sorting checkbox, and, in the right-click menu for the relevant Column, select either ‘Ascending’ or ‘Descending’. When you save the settings a blue arrow, with the number ‘2’ on it is displayed in the column’s title bar. You can set up further sub classifications in the same way. Figure 5.6 Column headers showing multiple classifications - 165 - Using the Log Explorer Show/hide columns If you want to show or hide particular columns of log entry information, right-click on the column headers and select/deselect the required column(s) in the context menu respectively. Figure 5.7 Columns context menu The names of the columns in the Columns context menu, shown above, depend on the installed license. - 166 - Sanctuary Device Control v4.3.2 - User Guide Group Log Entries You can group multiple log entries into single report rows according to the values in one or more columns log entries. To do this, select the Group By option in the Columns context menu and check the column you want to group your results by. For example, if you check the device type column then all log entries for devices of a particular type are combined into a single result in the report. Figure 5.8 Group By option - 167 - Using the Log Explorer A green ‘circle’ in the column’s title shows when a column is used to group results. Figure 5.9 Column headers showing grouped results You can also set up sub groups in the same way. Secondary subgroups are denoted by a blue ‘circle’ with the number ‘2’ displayed in the column’s title bar. You can set up further sub groups in the same way. Figure 5.10 Column headers showing sub groups Computed Columns In addition to the columns corresponding to information stored in the log entries, you can also include computed columns in your report, for example, you can display the number of log entries with a particular value or the average value for the column in a group. The operations supported by computed columns are: • Count — calculates the number of log entries in which a certain type of value exists, for example Count (Device Class) shows how many log entries contain device information. Count (Any) simply shows the total number of log entries. • Min, Max — calculates the minimum or maximum value in a column in a given set of results. • Sum — (only valid for the file size column) calculates the sum of numerical data. • Average — (only valid for the file size column) calculates the numerical average in a given set of results. Note: Not all of these operations work for all columns. - 168 - Sanctuary Device Control v4.3.2 - User Guide To set up a computed column, right-click on the column header, highlight the Computed Columns option in the Column context menu, highlight the type of calculation you want to carry out in the Computed Columns sub menu, and then select the column that contains the data you want to use to calculate computed values from. For example, the following figure illustrates the selections required to display a column showing the number of devices of each device class. Figure 5.11 Computed columns - 169 - Using the Log Explorer The title of the computed column is displayed in the column header and the calculated values in the Results panel (or custom report). Figure 5.12 Column headers showing a computed and a sorted column Clear Column Settings If you want to clear the sorting filters and groups, you can either: • Proceed to the Template settings window. For more information see “Template Settings Window” on page 181. - 170 - Sanctuary Device Control v4.3.2 - User Guide • Change the column settings of the currently selected column. To do this, select the Current Columns option in the Column context menu and select the relevant choices, for example Unsort or Ungroup. Figure 5.13 Resetting column headers Results Panel / Custom Report Contents The Results panel is the main area of the Log Explorer window where the results are displayed and classified. You can save the information displayed as a CSV file using the SAVE AS button of the Control button panel (in the bottom right corner of the Log Explorer window). - 171 - Using the Log Explorer When you generate scheduled custom reports the results, rather than being displayed in the Results panel, are sent to specified email recipients or stored in a specified directory. Columns in Results Panel / Custom Report You can control whether columns of information from log entries are displayed and their size, and position from the Template settings window. Some columns are specific to device logging or shadowing options while others are common to both of them. There are a number of log entry columns that are only applicable when monitoring administrator actions, for example, Audit event, Target user, Target computer, and Target. The following table summarizes the meaning of the log entry information columns: Table 5.3 Log Explorer module column meaning Column Description Failed access attempt Client Error report Shadowing Administrat or audit Attachment If true, then a shadowed content can be visualized. No No Yes No Audit Event The nature of the event that triggered the audit log. See Audit Events on page209 for a description of the different audit events that can be recorded. No No No Yes Audit Type The type of action the administrator carried out. This can be ‘Device Control’ or ‘Application Control’. No No No Yes Computer Machine name where the event was recorded. Yes Yes Yes No Count If grouping is active, shows how many log entries are hidden. Otherwise is a column of computed data. Yes Yes Yes Yes Device Class When available, device class. The device class can be Removable Storage Devices, Floppy, DVD/CD, etc. Yes No Yes No If available (deviceattached event) No No No Device Model Manufacturer’s device name. - 172 - Sanctuary Device Control v4.3.2 - User Guide Table 5.3 Log Explorer module column meaning Column Description Failed access attempt Client Error report Shadowing Administrat or audit File Ext Contains the extension of the file involved in the access to the device, if any. Yes No Yes No File Name Contains the name of the file involved in the access to the device, if any. Yes No Yes No File Name (Full) Contains the full name (including path) of the file involved in the access to the device, if any. Yes No Yes No File Path When relevant, path to the file on the device. If available No Yes No Hash Unique identifier of the medium (DVD/CD or removable) inserted. If available (DVD/CDs and encrypted media) No No No Managed Device name as defined in the Device Device Name Explorer module. This is useful if you renamed devices, say replacing the standard names of some devices with say ‘Sony key used by developers’ in order to define a policy for them. No No No No Model Id Indicates the model of device on which the user performed some action. Yes Yes Yes No NT Account Name Domain user name of the person who triggered the event, for example ‘MyDomain/MyUser’ or LocalSystem. Yes Yes Yes Yes Other This may contain the access mask or DVD/ CD serial number details, or additional information, in the case of an audit event, for example if an administrator erases a scheduled permission, this may contain its parameters. Yes No No Yes Process Name Process involved in the access to the device. Yes No No No Reason Indicates whether an action was granted or denied. This can have a value of ‘NoPermission’, ‘Granted’ or ‘Denied’. Yes Yes Yes Yes - 173 - Using the Log Explorer Table 5.3 Log Explorer module column meaning Column Description Failed access attempt Client Error report Shadowing Administrat or audit SID The Secondary Identifier of the user. This is useful when attributing actions recorded in log files to users who have has left your organization. Yes Yes Yes Yes Size Size of the shadowed file. N/A N/A Yes No Target The device for which the permissions were modified. No No No Yes Target Computer Name of the computer that was the target of the administrator action. No No No Yes Target User Name of the user or group to which the administrator action was applied. No No No Yes Traced On (Console time) * Date the event occurred on the console computer. Yes Yes Yes Yes Traced On (Endpoint time) * Date the event occurred on the client computer. Yes Yes Yes Yes, if available Traced On (UTC)* Date (Coordinated Universal Time) the event occurred on the client computer. Yes Yes Yes Yes Transferred On (Console)* Date the event record was transferred from the client computer to the Sanctuary Application Server. Yes Yes Yes Yes, if available Transferred On (UTC)* Date (Coordinated Universal Time) the event record was transferred from the client computer to the Sanctuary Application Server. Yes Yes Yes Yes Type The nature of the event that triggered the log. For audit events see page 209. No No Yes Yes Unique ID The serial number of the device on which the user performed some action. Yes Yes Yes Yes - 174 - Sanctuary Device Control v4.3.2 - User Guide Table 5.3 Log Explorer module column meaning Column Description Failed access attempt Client Error report Shadowing Administrat or audit User Name of the user who triggered the event, e.g. ‘MARVIN/johns’. Also see note after table. The same information is displayed even if a user is removed from the Active Directory providing the log entries were generated by a Sanctuary 4.2 client. This enables the person who triggered an event to be ientified after they have left your organisation. If available No Yes Yes Volume Label Tag of the volume for which an event was recorded. If available No No No X.500 User Name The username in Lightweight Directory Access Protocol format. This reflects the directory tree in which the user information is stored, for example, the X.500 user name may be ‘CN=John Smith, CN=Users, DC=Marvin…’. Yes, if available Yes, if available Yes, if available Yes, if available *Old clients drivers provide time only in UTC format. This leads to incomplete data in these fields. Note: If the ‘User Name’ column is empty for some shadow records, you must use the ‘Synchronize Domain Names’ command from the ‘Tools’ menu. If this does not display the user names, you could try to synchronize directly to the machine’s domain where the shadow files were created (using the same command). It could be a local user who created the shadow files. If you are using a Novell environment, you should try running the synchronization script described in the Sanctuary's Setup Guide. You can also automate this script execution for your convenience. Note: Columns with names starting ‘Count’, ‘Min’, ‘Max’, ‘Sum’ and ‘Average’ may also be displayed. These contain computed data based on the values in the specified columns. see “Computed Columns” on page 6. - 175 - Using the Log Explorer Note: Ellipses (…) in the Results panel indicate hidden log entries. For example, if you group a set of results using the value in one column, then multiple values in some other columns for the results group are shown as […]. Criteria/Properties Panel The Criteria/Properties panel has two tabs. These are: • Props tab — displays the log entry information corresponding to a selected results row in the Results panel. Figure 5.14 Props tab • Criteria tab — displays the criteria used by the template to select log entry results to show in the Results panel. Figure 5.15 Criteria tab Control Button Panel On the lower right part of the main window, you can find the following control buttons: • VIEW – to see shadow data. see “Viewing Shadow Files” on page 202. • SAVE AS – to save the information in the Log Explorer Results panel data as a CSV file. - 176 - Sanctuary Device Control v4.3.2 - User Guide • ADD DEVICES – to directly manage and add those devices not recognized and shown in the Log Explorer Results panel. Figure 5.16 Control button bar Select and Edit Templates Window The Select and edit templates window is used to select, add, edit, import, export, schedule, and execute templates. To display the Select and edit templates window, simply click on the Log Explorer´s TEMPLATES button. Figure 5.17 Select and edit templates window The Select and edit templates window contains the following elements: • List of all the existing templates that you can access assuming this list is not filtered — see below). These may be created by yourself, one of your colleagues, or Lumension. You can select a template and right-click to display a Templates context menu. - 177 - Using the Log Explorer Note: The asterisk (*) in the Selected column indicates the template that is currently selected. You can either change the settings of this, or another highlighted template. To select a different template, highlight it in the list and click on the SELECT button. Note: The Permissions column in the Select and edit templates window indicates whether the template can be viewed or changed by people other than the owner. The Scheduled and Format/Delivery columns indicate whether the template is used to create automatic reports periodically and, if so, who these are emailed to and/or where they are stored. Tip: You can click on the column headers to sort this list, or drag and drop the column titles to reorder the column information. • New — to create a template (see “To create and use a new template” on page 160.) • Clone — to create a new template based on an existing template (with the Shared and Scheduled flags removed, if these were present in the original template). • Settings — go directly to the Template settings window for the selected template. Here you can define the criteria used to select results and choose how the results are displayed or if they are schedule or not. For more information see “Template Settings Window” on page 181. • Delete — to remove a selected template. • Import — to import templates in XML format or to import legacy templates (*.tmpl) from the registry. • Export — to export the highlighted template to an XML file. • Filter — to choose which templates are displayed in the Select and edit templates window. See below. • Select — to select the highlighted template as the current template and return to the main Log Explorer window. • Execute — to retrieve all log entries that match the criteria defined in the current template and display these in the Log Explorer window. • Close — to return to the Log Explorer window without changing the current template. - 178 - Sanctuary Device Control v4.3.2 - User Guide To determine which templates are listed in the Select and edit templates window, click on Filter, select the appropriate check boxes and click OK. Selecting multiple filtering criteria shows a more focused set of templates, i.e. reduces the number of templates that are listed. Figure 5.18 Filter templates dialog The following template filters checkboxes can be used: • Private • Published Templates that are only visible to the owner (and Enterprise Administrators). Templates that are visible to all Sanctuary Management Console users within your Sanctuary system, but can only be changed by the owner (and Enterprise Administrators). • Shared Templates that can be seen and changed by all Sanctuary Management Console users within your Sanctuary system. • Non-Scheduled Templates used to generate ad hoc reports. • Scheduled Templates that are automatically executed periodically to generate regular reports. These are either saved in a shared folder on your Network or emailed to specified recipients. • Created by others Templates created by other people. This is unchecked, for example, by Enterprise Administrators when they want to display only their own templates. - 179 - Using the Log Explorer When you right-click on the main panel of the Select and edit templates window, the Templates context menu is displayed. Figure 5.19 Templates context men Note: The options that are available in the Templates context menu depend on whether you have a template highlighted or not when you right-clicked. You can use the Templates context menu to: • Create a new template either from scratch (New) or based on an existing template (Clone). • Change the settings of the highlighted template. • Delete the highlighted template. • Import either templates in XML format or legacy templates (*.tmpl) from the registry. • Export the highlighted template to an XML file. • Execute the query to retrieve all log entries that match the criteria defined in the current template, and display these in the Log Explorer window. This makes the highlighted template the currently selected template. • Filter the templates shown in the Select and edit templates window. Tip: You can also carry out the same actions on the highlighted template using the following shortcut keys: Insert creates a new template, Delete removes a template, F2 opens the Template settings window, Ctrl+C clones the template, Ctrl+I imports a template, Ctrl+E exports the template, Ctrl+F filters the list of templates, and Ctrl+X executes the highlighted template. - 180 - Sanctuary Device Control v4.3.2 - User Guide Template Settings Window The Template settings window is used to define the settings used for a new template, or one highlighted in the Select and edit templates window: Figure 5.20 Template settings window – Simple Query tab You can use the Template settings window to do the following: • Name of a new template and specify who is allowed to see it and edit it — by selecting one of the Private, Published, or Shared options. Note: Template names are not required to be unique; however, we recommend they are to avoid confusion. • Choose whether the template is used to generate reports automatically on a periodic basis — by changing the parameters in the Schedule tab and checking the Scheduled box. • Specify the selection and display settings for the template — using the Query & Output tab. - 181 - Using the Log Explorer • Specify complex selection and display settings for the template — by clicking on Advanced and using the Query & Output tab. • Schedule the production of periodic reports using the template — using the Schedule tab. • Define the format of scheduled reports — using the Schedule tab. • Choose who you want the reports to be emailed to — using the Schedule tab. • Execute the query specified by the template and display the results in the main Log Explorer window. To do this, click Execute query (this also makes the template you are editing the currently selected one). • Save the changes made to the template settings — by clicking OK. General Tab The General tab is displayed by default when the Template settings window opens. You can use it to do the following: • Define the template’s name — simply write the name on the Template name field. • Describe the template — type a short explanation on the Description field. • Define the access type — Choose whether you want the new template to be accessible only to yourself and Enterprise Administrators (Private), to be usable but only editable by the owner and Enterprise Administrators (Published), or to be editable by anyone (Shared). Query & Output Tab In the Query & Output tab you can do the following tasks: • Show/hide columns — simply check/uncheck the column names in the Columns list. The column name moves to the top section of the list when you check it. • Change the display size of a column — click on the Size cell of the row corresponding to the appropriate results column (or highlight the row and click on the Size button) and type in the size you want. You can also change the size of a column in the main Log Explorer window by dragging the column header divider left or right. • Sort ascending/descending — click on the Sort/Group by cell of the row corresponding to the appropriate results column (or highlight the row and click on the Sort/Group By button) and choose either Ascending or Descending from the drop-down list options. If you want to sort the results of the query by the values in more than one column, check the Multi-column sorting box in the lower left of this tab and choose the columns that you want to sort your results by in turn. - 182 - Sanctuary Device Control v4.3.2 - User Guide • Group the results according to the value in a particular column — click on the Sort/Group by cell of the row corresponding to the appropriate results column (or highlight the row and click on the Sort/Group By button) and choose the Group by option from the drop-down list. When grouping results, all log entries in the Log Explorer Results panel/custom report are ‘piled’ into single entries corresponding to the unique values in the column. Figure 5.21 Grouping results in the query In the above image, results are grouped according to their File Type value. The ellipses indicate hidden log entries and the Count column indicates how many log entries have the same File Type. • Specify the criteria used to select results to be shown in the report — click on the Criteria cell of the row corresponding to the appropriate results column (or highlight the row and click on the Criteria button) and select the criteria you want to use to select results to display in the main Log Explorer Results panel/custom report. For more information about setting criteria, see next section. Note: If you want to use specify a complex set of selection criteria or display settings, click on the Advanced button and enter information on the Query & Output tab. For more information see “The Advanced View” on page 187. • Decide the column display order — using the Move up and Move down buttons located on the right of the window. • Clear sorts, groups, add or remove criteria, change the size of any column, and execute the query — using the corresponding buttons located on the lower and right part of the window. Criteria A criterion makes it easier for you to find the result or results you are interested in. Typically the more specific you are with your search criteria, the fewer results are returned, i.e. the Results list in the main Log Explorer window is less clogged up with results that are irrelevant to your search. You specify the criteria you want to use for a particular template using one or more contextdependent Criteria dialogs. For example, when you are specifying that a log entry must match one (or more) or a fixed set of values the Criteria dialog displays a list of the possible values you may want to match. Alternatively when you are specifying a match to a free text data field the appropriate Criteria dialog lets you type in what is needed using wildcards to delimit the criterion, for example, you can say enter ‘wind*.*’ to search for all files with names starting with ‘wind’ and with any file extension. - 183 - Using the Log Explorer In some Criteria dialogs, you can also choose to exclude results that match a criterion. Others contain a Select or Search button, for example, where specifying criteria involves matching to one or more particular computers or users. Various different types of Criteria dialogs are explained in the following sections: • Criteria List This form of the Criteria dialog is displayed when log entry fields contain one of a fixed set of values. Check or uncheck the boxes that correspond to the values you are looking for. For example, using the ‘Type’ column, if you are searching for log entries related to devices being attached to your network, check the ‘Device-Attached’ box and clear all others. If you additionally want to see all read denied events, set this checkbox as well. The query returns log entry results for events of these two types. Figure 5.22 Criteria list dialog • Free-text criteria This form of the Criteria dialog is used to filter the query results based on any text that you type in. Enter the text you want to use to search in the field. You can use wildcards (? to match any single character and * to match any sequence of zero or more characters). If entering several strings, separate them using semicolons (;) to get log entries matching any of the strings specified. You can further specify — using the options on the right of the dialog — whether the search should be case-sensitive, and whether the query should return entries that include or exclude the specified strings. - 184 - Sanctuary Device Control v4.3.2 - User Guide For example, to search all log entries that contain main executables run by users, enter ‘*.exe’ (without the quotes). To additionally return results concerning XP Service Pack Message DLLs (xpsp1res.dll, xpsp2res.dll...), enter ‘*.exe;xpsp?res.dll’ (without quotes). Figure 5.23 Free-text criteria dialog • Size criteria This form of the Criteria dialog is used to show event logs for shadow files based on their size. The query returns log entries concerning files with the size specified in the ‘minimum’ and ‘maximum’ values. Alternatively, you can select one of the predefined common sizes by clicking the corresponding checkboxes. Figure 5.24 Size criteria dialog • Time criteria - 185 - Using the Log Explorer This form of the Criteria dialog is used to search for log entries that were produced, or uploaded to the server, at a certain date/time. You can enter any period into the ‘From’ and ‘Until’ controls, or click one of the commonly used time range settings. You can further specify how these time criteria are stored in the template (this influences they are interpreted when you execute the query). If you chose to save your settings as absolute values, there are considered as unconditional parameters. For example, a query for log entries between May 21st 2007 and May 23rd 2007 returns the log entries produced between these dates. If, on the other hand, you select to store the values as relative ones, the values are converted to a comparative time relative to the current date and time. For example, if on May 23rd 2007 at 10h00 you query for entries generated after May 23rd 2007 9:00, and select ‘relative time’, the criterion is stored as ‘return all entries generated in the last hour’. If you run this query again on June 12th 2007 at 11h30, you get log entries generated during the last hour, i.e. after June 12th 2007 10h30. Figure 5.25 Time criteria dialog - 186 - Sanctuary Device Control v4.3.2 - User Guide Once you have set up the criteria used in your template, these are displayed in the Criteria column of the Template settings window after closing the Criteria dialog and clicking on the QUERY button (or by clicking on the Execute button of the Template settings window). Figure 5.26 Example of criteria settings The Advanced View You can also have an advanced view when clicking on the To Advanced View button while in the Query & Output tab. You can use it to carry out the same actions as a simple query, but with more complex criteria and specifications. Once you are on the Advanced View, you can revert to the Simple view by clicking on the To Simple View button. Note: You can normally switch back to the Simple query tab by clicking on the To Simple View button. This is not possible when you have defined a complex query that cannot be represented correctly in the Simple Query tab. In this case, the To Simple View button is disabled. - 187 - Using the Log Explorer Figure 5.27 Advanced view In the Query & Output tab, you enter complex queries using a Tree control structure. The tree representing the query has seven top-level nodes. These are used to: • ‘Filter on raw data (OR’d criteria)’ — specify the criteria, based on information actually in the log entries, used to select results to be included in reports generated using the template. For example, if you specify an ‘AND’d criteria’ of Type and the criteria MEDIA-INSERTED the report includes events when a user inserts a DVD/CD in their computer’s drive. • ‘Filter on derived data (OR’d criteria)’ — specify the criteria, based on information derived from the Sanctuary Management Console, used to select results to be included in reports. For example, you can specify an ‘AND’d criteria’ of Traced On (Console time) or User. • ‘User defined aggregate functions’ — such as the sum, minimum, maximum, or average of values contained in the log entries. • ‘Grouped data’ — produce a single result corresponding to multiple log entries with the same value for a particular field. You can, for example, group log entries by Type or Traced On (UTC) date. • 'Filter on grouped data (OR’d criteria)’ —determine whether the report generated using the template only displays results where the values for the computed columns match specified criteria. - 188 - Sanctuary Device Control v4.3.2 - User Guide • Displayed columns — determine which columns are displayed and their order. • Sorting — determine the order in which rows of results are displayed. The Insert button adds a new node into the highlighted node of the tree. If the nodes in the group cannot be reordered then the new node is positioned below any existing nodes. When nodes representing columns are highlighted a set of controls is displayed to its right. These can be used to select columns, criteria, and so on. To set up and use a complex query: 1. Click on the Advanced button in the Template settings window. 2. Choose the criteria you want to use to select results. To add each criterion, click on the ‘AND’d criteria’ node of the top-level node ‘Filter on raw data (OR’d criteria)’, click on the Insert button and select the column and the criteria you want to use (using the drop-down list and the Criteria dialog opened when you click on the button). Repeat for derived data by setting up criteria under the top-level node ‘Filter on derived data (OR’d criteria)’. Tip: You can also use shortcut keys: Insert creates a new clause or term, Delete removes a clause or term, and Ctrl+Up or Ctrl+Down move a clause up or down respectively. 3. 4. 5. 6. Select computed information you want to display, if required. For example, you may want to display a count, an average value, or a maximum value for a column when you have grouped results. These computed information columns are named C1, C2, and so on. (They may be selected in step 5.) To add each computed column, click on the top-level node ‘User defined aggregate functions’, click on the Insert button and select the column and the calculated function you want to use (using the drop-down list). Define how you want your results grouped, if appropriate. To add each result grouping, click on the top-level node ‘Grouped data’, click on the Insert button and select the column you want to group results by (using the drop-down list). You can group results by the values in several columns. Specify that the values in your computed columns match particular criteria, if required. For example, you may only want to include results in your report where the value of a computed field exceeds a particular value. To specify criteria based on the computed column values, click on the ‘AND’d criteria’ node of the top-level node ‘Filter on grouped data (OR’d criteria)’, click on the Insert button, select the computed column and criteria you want to use, and enter an appropriate value. Choose the columns of information you want to display and their ordering. To select each column you want to display, click on the top-level node ‘Displayed columns’, click on the Insert button and select the column (using the drop-down list). - 189 - Using the Log Explorer 7. 8. You can reorder the displayed columns by clicking on the Move up and Move down buttons. Specify how you want to sort the results in the report. To add a level of sorting, click on the toplevel node Sorting, click on the Insert button and select the column you want to sort by and how you want this sorted (using the drop-down lists). You can sort results using several columns. Click on the Execute query button to close the Template settings window and execute the query. Examples In this section, we analyze some examples you can do using the Advanced View designer. Although you can always use the simple view designer, sometimes is quicker to just proceed to this view, quickly select what you want from each section, and execute your new or modified template. Tip: You can switch from one view to another to check your progress and gain confidence as you go along with the first examples, but as they get more and more complex you cannot go back to the simple view to verify your work. You can always delete the last element to get back to the simple view or save your work as you go. In our first example, we want to show all devices connected this month for all computers classified by device model and showing the following fields: Device class, Computer, Model ID, Traced on (endpoint time; the local UTC time when the device was connected at the user’s machine). So let us proceed: 1. Open the Log Explorer by clicking on its icon. 2. Click on the TEMPLATE button on the control bar of the Log Explorer main window. 3. Click on the NEW button to create a template. The Template Setting dialog opens. 4. In the General tabs, enter the name for the template in the Template Name field. We choose EXAMPLE1 for this example. 5. Enter a description and the access type. 6. Change to the Simple Query tab. 7. Since we are now advanced users, we immediately change to the advanced view designer by clicking the TO ADVANCED VIEW button. 8. Right click on the “AND’d” criteria in the “Filter on raw data (OR’d criteria)” branch — since we are using two conditions that must be simultaneously true: the device and that it must have been connected this month — and select the INSERT item. 9. Click on the chevron in the list to display all available fields and select TYPE (our first, partial, condition). - 190 - Sanctuary Device Control v4.3.2 - User Guide 10. Click on the ellipsis on the right side of the TYPE field and select DEVICE-ATTACHED and click on OK to accept our, now, full condition. 11. Right click on the “AND’d” criteria in the “Filter on raw data (OR’d criteria)” branch — since we need to add a second condition here — and select the INSERT item. 12. Click on the chevron in the list to d isplay all available fields and select TRACED ON (ENDPOINT TIME) — our second, partial, condition. 13. Click on the ellipsis on the right side of the TRACED ON (ENDPOINT TIME field, select This Month, Relative to the current…, and click on OK to accept our, now, full condition. 14. Right click on Grouped Data and select the INSERT item. 15. Click on the chevron in the list to display all available fields and select DEVICE MODEL. 16. Right click on Displayed Columns and select the INSERT item. 17. Click on the chevron in the list to display all available fields and select DEVICE CLASS. 18. Repeat the last two steps selecting the following fields: COMPUTER, MODEL ID, TRACED ON (ENDPOINT TIME). - 191 - Using the Log Explorer You can now proceed to execute your query. This saves your work so that you can use your template in the future without the need to redesign it. Figure 5.28 Advanced view: Example 1 In this second example, we build from our first experience and take advantage of all its options but we slightly change the conditions: we want to reorganize the displayed columns, display only for the Removable Storage Devices class, and count by computer (we suppose that you first created the template for the previous example): 1. In the Query & Output tab, click on the TO ADVANCED VIEW button. 2. Right click on the “AND’d” criteria in the “Filter on raw data (OR’d criteria)” branch and select the INSERT item. 3. Click on the chevron in the list to display all available fields and select DEVICE CLASS. 4. Click on the ellipsis on the right side of the DEVICE CLASS field and select REMOVABLE STORAGE DEVICES and click on OK to accept the condition. 5. Right click on the “User defined aggregate functions” branch and select the INSERT item. 6. Click on the chevron in the list to display all available fields and select Computer. The second list should show Count, if this is not the case, select the list and change it. - 192 - Sanctuary Device Control v4.3.2 - User Guide 7. Go to the “Displayed columns” branch and play with the fields selecting them and using the MOVE UP and MOVE DOWN buttons. Once satisfied with your template, click on OK or EXECUTE QUERY to close the dialog and obtain the results in the Log Explorer main window. As a third, and last, example, we analyze how the operators in the query work. You need to remember that the AND operator takes precedence over the OR and that: • AND is and operation where the result is true if and only if all its operands are true • OR is and operation where the result is true if any of its operands are true Table 5.4 AND and OR logical operations Operand A Operand B Logical AND result Logical OR result false false false false false true false true true false false true true true true true Let us suppose we have the following results displayed by an empty query: Figure 5.29 Empty template example We now create a new template in which we add a TYPE field and modify its criteria to “DEVICEATTACHED” (use Figure 5.30, “Template with AND and OR conditions (1/3)” on page 194 as a guide): 1. In the Query & Output tab, click on the TO ADVANCED VIEW button. 2. Right click on the “AND’d” criteria in the “Filter on raw data (OR’d criteria)” branch and select the INSERT item. 3. Click on the chevron in the list to display all available fields and select TYPE. 4. Click on the ellipsis on the right side of the TYPE field and select DEVICE-ATTACHED and click on OK to accept the condition. 5. Click on OK or EXECUTE QUERY to close the dialog and obtain the results in the Log Explorer main window - 193 - Using the Log Explorer Data will now show only those events related to DEVICE-ATTACHED excluding those of MEDIUM-ENCRYPTED, as expected. As a second step, we modify our query, add a COMPUTER field modifying its criteria to show only “computer1” — all this in a separate AND criteria sub branch (use Figure 5.30, “Template with AND and OR conditions (1/3)” on page 194 as a guide). An unexpected thing happens here if we do not take into account logical operator priority: the first OR filters every record for the DEVICEATTACHED condition, while the second one filters all records for “computer1”, the results of both are combined in an OR expression: (Everything of TYPE “DEVICE-ATTACHED”) OR (Every COMPUTER equal to “Computer1”) This is why we see DEVICE-ATTACHED and MEDIUM-ENCRYPTED records in the results. We now modify this second branch and add a TYPE filed with a DEVICE-ATTACHED criteria (use Figure 5.30, “Template with AND and OR conditions (1/3)” on page 194 as a guide). The results are now only those DEVICE-ATTACHED for all computers since the two ANDed operators are then united by an OR operator: (Everything of TYPE “DEVICE-ATTACHED”) OR ((Everything of TYPE “DEVICE-ATTACHED”) AND (COMPUTER equal to “Computer1”)) Now we only see the records corresponding to the TYPE= DEVICE-ATTACHED for all computers. Figure 5.30 Template with AND and OR conditions (1/3) Figure 5.31 Template with AND and OR conditions (2/3) - 194 - Sanctuary Device Control v4.3.2 - User Guide Figure 5.32 Template with AND and OR conditions (3/3) As you see from the previous examples, you have at your hands a powerful tool to analyze all log entries, client or otherwise. Remember that you can also proceed to the Schedule tab to program your template for added control as explained in the next section. Schedule Tab The Schedule tab is used to define the following: • Start and end dates between which reports are automatically generated using this template. • How often the report is generated and the pattern for its production. For example, you can choose for it to be produced on a daily basis, every so many hours, on a weekly basis (on chosen days) or on a monthly basis. • To whom or where (if needed) is this information going to be sent or stored and its format. Note: In order for the information in this tab to have an effect the Scheduled checkbox in the top right corner of this tab must be activated. Note: You cannot schedule a Log report if you do not have the required privileges. You will note that the options are grayed-out and a warning message adverting you of this situation. See “Defining Sanctuary Administrators” on page 34 for more details. - 195 - Using the Log Explorer Figure 5.33 Schedule tab Report Format Within the Schedule tab, you can also select the format in which Log reports can be sent by email or written to a shared folder. You can define the following: • The format of the output file (using the Format field). • The appropriate output file extension. Choose among XML, Comma Separated Value (CSV), or HTML (mainly for emails). Delivery targets The Delivery Targets panel of the Schedule tab is used to define how and where reports are sent via email or where they are saved in a shared folder on your network. The Active status determines whether the report is sent to an email address or to a specified shared folder. The Method of delivery is either ‘Share’ or ‘E-mail’ indicating whether the report is saved to a shared folder on the network or emailed to ‘To’, ‘Cc’, and ‘From’ recipients specified in the Information column. - 196 - Sanctuary Device Control v4.3.2 - User Guide The Mail Server must be specified for emailed reports. Its connection status can be checked by ‘pinging’ it and it can be used for all target email address you define for the scheduled reports if activating the ‘Apply for every target’ option when defining the email addresses. Warning: If you select the Apply for every target option, the server field of every delivery target is changed. You lose whatever information is already stored there. Tip: You can also use the following shortcut keys: Insert creates a new target. Delete removes a target. F2 edits a target. Note: You must be careful when setting email delivery options. If not correctly set, all report can end up in the junk–email folder. Note: The chosen email server should accept anonymous connections or the reports delivery option may not work properly. - 197 - Using the Log Explorer To set up a new target 1. Click on the NEW button to the right of the Schedule tab. The Edit target dialog is displayed. Figure 5.34 Edit target dialog 2. If you want to save the scheduled reports in a shared folder on your network, select the Method ‘Share’, click on the field below, click on the BROWSE button and select the shared folder. Figure 5.35 Share folder selection - 198 - Sanctuary Device Control v4.3.2 - User Guide Tip: Alternatively you can use the Ctrl+B shortcut key to browse for a folder. 3. If you want to send the scheduled report as an email, select the Method ‘E-mail’ and specify the ‘To’, ‘Cc’, and ‘From’ recipients in the resulting Edit target dialog. Figure 5.36 Edit target dialog (E-mail) 4. Click on the OK button. Viewing Access Attempts to Devices The Computer, Traced On, and Transferred On fields are always present in the logs for every event associated with input or output devices. You can list the following access event types when specifying the criteria for matching with log entry Type information: • MEDIUM-INSERTED: This event occurs when a user inserts a DVD/CD in their computer’s drive or a media in a removable media reader, for example, this event is logged when a user inserts a Zip disk in a Zip drive . The following information is normally available: • Device type: For example ‘CD’. • Volume label: Contains the medium tag. This is empty for encrypted media. • Medium hash: Contains the hash number of the inserted medium (used by Lumension technical support). - 199 - Using the Log Explorer • Other: Contains the serial number of the medium (used by Lumension technical support). Note: This event can take place when no user is logged in or when several users are logged in at the same time (remote desktop). In Sanctuary 4.3.2 the user name provided for this event is the name of the currently logged on interactive user. If nobody is logged on when the device is inserted, the LocalSystem user is logged on. • DEVICE-ATTACHED: This event occurs when a device is connected to a computer, for example a memory stick may be plugged into a USB port. The device name is logged. Note: This event can happen without any logged user or with several of them logged at the same time (remote desktop). In Sanctuary 4.3.2 the user name provided for this event is the name of the currently logged on interactive user. If nobody is logged on when the device is inserted, the LocalSystem user is logged on. • READ-DENIED: This event occurs when a user tries to access an unauthorized device. The following information is normally available: • Device type: For example, DVD/CD, floppy disk, removable storage devices, COM, LPT, etc. • Volume label: The floppy disk, DVD/CD, or removable device label. • File Name: The name of the file the user was attempting to read. A backslash indicates that the read attempt was carried out on the root folder of the medium. • User Name: The name of the user who tried to access the protected device. • Process Name: The application used by the user to try to access to the protected device. • Other: The exact access mask, in hexadecimal format, used by the application to try to access the protected device (used by Lumension technical support). Note: Several identical log entries may appear as some applications, for example Windows File Explorer, retry automatically when there are unsuccessful access attempts to protected devices. An appropriate setting of the Device log throttling option significantly reduces the volume of redundant information logged. See the option description in “Device Log Throttling ” on page 287. Note: System or svchost can execute not impersonated mount requests for an encrypted media when the media encryption keys are not present on the client machine. As these requests are not identified, the User Name field cannot be retrieved and the corresponding field in the log is empty. - 200 - Sanctuary Device Control v4.3.2 - User Guide • WRITE-DENIED: This event occurs when a user tries to write a file on a read-only device. The following information is normally available: • Device type: For example, DVD/CD, floppy disk, removable storage devices, COM, LPT, etc. • Volume label: The floppy disk, DVD/CD, or removable device label. • File Name: The name of the file the user was attempting to write to the media. • User Name: The name of the user who tried to access the protected device. • Process Name: The application used by the user to try to access the protected device. • Other: The exact access mask, in hexadecimal format, used by the application to try to access to the protected device (used by Lumension technical support). Note: Several identical log entries may appear as some applications, for example Windows File Explorer, retry automatically when there are unsuccessful access attempts to protected devices. An appropriate setting of the Device Log Throttling option significantly reduces the volume of redundant information logged. See “Device Log Throttling ” on page 287. Note: System or svchost can execute not impersonated mount requests for an encrypted media when the media encryption keys are not present on the client machine. As these requests are not identified, the User Name field cannot be retrieved and the corresponding field in the log is empty. • KEYBOARD-DISABLED: This event occurs when a user’s keyboard is disabled because the Sanctuary client suspected the presence of a keylogger. • KEYLOGGER-DETECTED: This event occurs when a Keylogger is detected. This is a device that captures all data typed at the keyboard, including passwords and other sensitive data. • MEDIUM-ENCRYPTED: This event occurs when a removable storage device is encrypted. Note: MEDIUM-ENCRYPTED events are logged even if the Device Log option is set to ‘Disabled’. They are required for the password recovery functionality, see “Recovering a password for decentralized encryption when connected” on page 237. • ADMIN-AUDIT: This event occurs when an administrator carries out an action such as changing permissions, adding or modifying users, user groups, file groups, accesses a shadow file and so on. The following information is normally available: • User Name: The name of the administrator who carried out the action. - 201 - Using the Log Explorer • Audit Event: The type of action that the administrator carried out. See Audit Events on page209 . • Target: The device for which the permissions were altered. • Target Computer: The computer that was the target of the administrator’s action. • Target User: The name of the person or user group to which the administrator’s action was applied. Viewing Client Error Reports The Computer, Traced On, and Transferred On fields are always present for every error logged. The other columns are populated when additional information is available. The following error types can be used as criteria: • SHADOW-BAD-DIRECTORY: This error occurs when the ‘Shadow directory’ cannot be created by the Sanctuary client, or when the shadow directory is not accessible. See “Shadow Directory” on page 291 for information on how to set up the directory location. • SHADOW-FILE-MALFUNCTION: This type of error occurs when the Sanctuary client cannot proceed with the shadowing. Contact Lumension Technical Support service to find out the cause of the problem. • SHADOW-CD-R-MODE-UNSUPPORTED: This error occurs when the Sanctuary client prevented the writing of a DVD/CD because the format used was unsupported. See “Supported formats when shadowing” on page 334 for more details. • SHADOW-CD-R-MALFUNCTION: Sanctuary client generates this error when it was unable to carry out the shadowing of a DVD/CD. Contact Lumension Technical Support service to find the cause of the problem. • BAD-PUBLIC-KEY: You get this error when default RSA (Ron Rivest, Adi Shamir, and Len Adleman) keys are used to protect the communication between the clients and the Sanctuary Application Server. See Sanctuary Setup Guide for an explanation on how to create custom sxpublic.key and sx-private.key and where to store them in the server and client machines. Warning: You should generate you own set of public and private keys before deploying the clients in the production network. It is recommended that you do not change the public and private keys in a production environment. Changing the keys in an environment where encrypted media are used, means they must be reformatted and encrypted using the Media Authorizer. Viewing Shadow Files When you want to view shadow files, we recommended that you first filter your data so that only log entries that have attachments are displayed. You can either use one of the predefined templates to do this, or you can: 1. Click on the SETTINGS button (or on the right part of any heading of any field). - 202 - Sanctuary Device Control v4.3.2 - User Guide 2. Select the Attachment field. 3. Click on the CRITERIA or the ellipsis 4. Select With and close the dialog by clicking the OK button. 5. Click on the EXECUTE button to close the Template settings window and execute the query. button. The listed entries have attached files that are exact copies of the files copied or read by the users, from or to protected devices when the ‘Shadow’ rule was in effect. Depending on the selected fields, the date the files were copied/read to/from the media (Traced On) and the date the file was transferred to the Sanctuary Database (Transferred On) are displayed. Sanctuary Device Control also tracks the name of the user that copied the file, the filename (and content), the computer where the copy took place, as well as the device. Note: Sanctuary Device Control does not open big files (exceeding 350 MB) unless sufficient resources are available. Once you list the files, you can right-click on any of them that has an ‘Attachment’ value of ‘True’ (indicating that the full content has been shadowed), and carry out one of the following operations (by selecting the appropriate context menu option): • Save as — allows you to save the file to a local or network drive and use an external utility or program to open the file. - 203 - Using the Log Explorer • View — lets you view the contents of the file in an internal binary viewer: Figure 5.37 Viewing the content of a shadow file Note: Sanctuary logs the file and administrator name each time a shadowed file is opened. This information is available in the Log Explorer module. (In previous versions of Sanctuary they were viewed using the Audit Logs Viewer module.) • Add device(s) — using this option you can include the device(s) in the list of those administrated by Sanctuary Device Control and then grant it permissions. • Open — (only available for full shadow and when selecting one log registry) opens the file with the associated application (defined in Windows’ Explorer). If there is no association, this command is equivalent to Open With. • Open with — (only available for full shadow and when selecting one log registry) lets you choose the application that opens the file. You can also do some of these actions using the Control Button panel located on the lower right of the main Log Explorer window. - 204 - Sanctuary Device Control v4.3.2 - User Guide When the Data File Directory is not Available There are some cases where the Sanctuary Application Server cannot find its associated Data File Directory, for example, when it resides in a different machine that is temporarily unavailable, or when the Sanctuary Application Server account does not have rights over this directory. When this happens, a warning message indicates that the program has not found the shadow file for the log entry. The administrator can check for these events in Windows Event Viewer as shown in the following image: Figure 5.38 Error message when a shadow file is not found - 205 - Using the Log Explorer Figure 5.39 Windows’ Event Viewer when a shadow file is not found Shadowing File Names Only Files that have been shadowed specifying the option File name for the Removable Shadow Mode, DVD/CD Shadow Mode or Floppy Shadow Mode cannot be opened in the Log Explorer module. You only see the name of the file and the ‘Attachment’ value is shown as ‘False’ (indicating that there is no available content for the file). Note: The full content of the file is always shadowed and compressed locally on the client-side. The entire file (or name, depending on the shadow rule) is transferred to the Sanctuary Application Server during client synchronization. When the ‘File name only’ option is selected, only the name is transmitted to the server. This is particularly important for users connected to the company network occasionally or with a low-speed connection as sometimes (depending on the shadowing rule) the whole content of the shadow file has to be transferred to the server. - 206 - Sanctuary Device Control v4.3.2 - User Guide DVD/CD Shadowing When CDs or DVDs are written or read, the CD image files are interpreted locally and sent to the server during synchronization. Appendix A, “DVD/CD Shadowing” provides details of how these shadowed files appear in the Log Explorer module. Forcing the Latest Log Files to Upload Sanctuary-protected clients upload their log information to the Sanctuary Application Server at the time specified in the system options. However, you may need to view up-to-the-minute log information to help you quickly troubleshoot application problems or to verify that authorizations have been set correctly for new software. To force the immediate retrieval of the latest logs from any client, you can: 1. Activate the Log Explorer module, if it is not already open. To do this, click on the Log located in the Modules section of the Control Panel or use the Explorer icon View Modules command. 2. Click on the FETCH LOG button or select Fetch Log from the Explorer menu. The system prompts you to specify the machine from which you want to fetch all logs present on the client. You can only fetch logs from those computers that have the Sanctuary client installed. Figure 5.40 Fetching New Logs - 207 - Using the Log Explorer 3. Select the target machine from the drop-down list and click OK. Note: You may need to wait up-to half a minute before the latest logs are available when using ‘Fetch log’. When the log entries are retrieved from the client machine they are processed by the server, put into a database insertion queue and inserted in a batch. The time between retrieving the log entries from the client and the latest logs becoming available depends on the queue size and the database availability at the time of upload. To Manage Devices Using the Log Explorer Module Once the log entries are displayed in the Results panel, you can right-click on Device –Attached entries and use the context menu or the Control button panel to add device models or uniquely identified devices to the list of devices managed by the Device Explorer module. To add a uniquely identified removable device: 1. 2. 3. Traverse the list until you locate the device model or unique id of the device you want to add to the managed devices list. Keep an eye on the ADD DEVICES button. If it is active, this means that the device can be integrated into the managed devices list. Right-click on the item or use the ADD DEVICES button. Select either the model of device or the specific device from the list by selecting the checkbox to the left of the entry (as shown below): Figure 5.41 Adding devices to the managed devices list 4. Click on the ADD DEVICE button. - 208 - Sanctuary Device Control v4.3.2 - User Guide Viewing Administrator Activity In addition to using the Log Explorer module to monitor the use of I/O devices, you can also use it to monitor the actions of your administrators including changing user access rights and device permissions. See “Monitoring administrator actions” on page 151 for more information. Note: In previous versions of Sanctuary this was done using the Audit Log Viewer module. The functionality of this module has now been incorporated into the Log Explorer module and the Audit Log Viewer module no longer exists. Note: Sanctuary Enterprise Administrators have access to all audits. When running under a Windows Active Directory based domain, the Sanctuary Administrator is only shown audits of computers and users he/she is allowed to manage. To view audit information about the actions carried out by administrators: 1. Click on the Log Explorer icon located in the Modules section of the Control Panel or use the View Modules command. The system opens the Log Explorer window. 2. Select (or amend, if required) the template that you want to use to generate a report showing the administrator activity. 3. Execute the system administrator activity query. To do this, click on the QUERY button in the Log Explorer window (or the EXECUTE button in the Template settings window).The system displays a list of audit events showing, for example, all changes made to permissions between specified dates. Audit Events Audit events describe the actions performed by administrators as described in the following list: • ACCESSED SHADOW FILE This event is traced every time an administrator accesses a shadow file / Central logging file. The fields available are: User, machine, device, file name, copy date. • ACCESSED DEVICE LOG When an administrator accesses a device log. • ADD COMPUTER GROUP The administrator created a computer group. - 209 - Using the Log Explorer • ADD DEVICE GROUP The administrator created a device group. • ADD MANAGED DEVICE This event corresponds to the adding of a new device by an administrator with the Manage Devices functionality. The device name is logged. • ADDED MEDIA Corresponds to the adding of a new device with the Media Authorizer; the label and description are logged. • ADDED TEMPORARY PERMISSION OFFLINE When a temporary permission is added for devices used in computers that are temporarily not connected (offline) to your network. • ADDED PERMISSION This action corresponds to the adding of a permission in the Device Explorer, the information available is user, machine, device, read/write, or priority. • ADDED SCHEDULED PERMISSION The fields available are user, machine, device, read/write, begin time, end time, or weekdays. • ADDED TEMPORARY PERMISSION The fields available are user, machine, device, read/write, begin time, or end time. • AUTHORIZED MEDIA This action occurs every time a user is granted the right to use a specific media in the Media Authorizer. The user, label and description are logged. • AUTOMATIC USER ACCESS UPGRADE Means that the Sanctuary Management Console user was implicitly a Sanctuary Enterprise. Administrator, because no other Sanctuary Enterprise Administrator was defined. When the user creates an explicit Sanctuary Enterprise Administrator, he loses his implicit Enterprise Administrator privilege, which means he may block himself out. To prevent that from happening, the Sanctuary Application Server makes this user an Enterprise Administrator explicitly, a message is displayed on screen and the user name and role will be traced. See also “Defining Sanctuary Administrators” on page 34. • CHANGE COMPUTER GROUP The administrator changed an existing computer group. • CHANGE DEVICE GROUP The administrator changed an existing device group. • DELETED DEFAULT OPTION Whenever a default option that applies to all the machines is deleted (in the Tools Options menu), the option and the user/machine are traced. • Default DELETED OPTION Whenever an option specific to a machine is deleted, the option and the user/machine are traced. • GENERATE MAINTENANCE TICKET - 210 - Sanctuary Device Control v4.3.2 - User Guide The administrator created a new maintenance ticket. see “Endpoint Maintenance” on page 24. • MODIFIED SCHEDULED PERMISSION The available fields are user, machine, device, read/write, begin time, end time, or weekdays. • MODIFY USER ACCESS • PURGED DB AND FILE STORAGE When changes are made to the Sanctuary Administrator’s roles, the user and role are logged. This action is recorded every time maintenance is performed on the system. • REMOVE COMPUTERGROUP • REMOVE DEVICE GROUP The administrator removed an existing computer group. The administrator removed an existing device group. • REMOVE MANAGED DEVICE This event corresponds to the removal of a device from the list of managed devices, the device name is logged. • RENAME COMPUTER GROUP • RENAME DEVICE GROUP The administrator renamed an existing computer group. The administrator renamed an existing device group. • REMOVED MEDIA • REVOKED PERMISSION When a media is suppressed from the database. The label and description are logged. This corresponds to the removal of a permission in the Device Explorer; user, machine and device are traced. • REVOKED SCHEDULED PERMISSION The available fields are user, machine, device, read/write, begin time, end time, or weekdays. • REVOKED TEMPORARY PERMISSION • SET DEFAULT OPTION The available fields are user, machine, device, read/write, begin time, or end time. A default option is one that applies to all the machines. Whenever a change is done by the administrator to one of these options (by using the Tools Default Options menu), the option being changed and the user/machine are traced. • SET OPTION This action is traced whenever a change to the system options is made, the option, user/machine are logged. • UNAUTHORIZED MEDIA When a user is prevented from using a specific media in the Media Authorizer, the user, label and description are logged. - 211 - Using the Log Explorer • UPDATED MEDIA When a media label or description is updated, the label and description are logged. • UPDATED PERMISSION This action appears in the Audit Logs Viewer when a permission is modified in the Device Explorer, the information available is: user, machine, device, read/write, priority. • UPLOADED SHADOWS This event is traced every time an administrator chooses to specifically retrieve the latest shadow files from a given machine. The machine name is logged. - 212 - Sanctuary Device Control v4.3.2 - User Guide 6 Using the Media Authorizer This chapter explains how you can use Media Authorizer to allow access to specific users for using individual CDs, DVDs, and encrypted removable media. ‘Removable media’ in this context means any device recognized as ‘Removable Storage Devices’ by Windows, including flash memory devices, zip drives, etc. You can find more information on encryption is done in Appendix C, “Sanctuary Device Control Encryption” on page 349. Introduction You can use the Media Authorizer for three main purposes: • To add individual CDs, DVDs and removable storage devices to the system database and then grant permission to use them for users who would otherwise be barred by the defined policies. Each removable device is encrypted to suit your security preferences. • To carry out centralized data encryption for removable devices used outside the organization. This provides an effective way to protect your data in case the device is lost or stolen. • To do centralized data encryption for removable devices used in-house on computers which run Sanctuary client. Warning: The Sanctuary Client must be installed on the machines where the Administration tools are used to perform encryption and authorization of multi-session DVDs/CDs. Tip: You can also consider using DVD/CD encryption as defined in Chapter 10, “Comprehensive encryption for securing all your DVD/CD data” Although we recommend that you have a Microsoft Certificate Authority installed in your network for security reasons, a user can access the encrypted data without the need of one provided that he has the physical encrypted medium, its associated public key, password, and permission to access the removable device class. - 213 - Using the Media Authorizer Note: You may encounter problems decrypting keys that were encrypted using an older version of Sanctuary Device Control. Previous versions of the Sanctuary Application Server did not store the media keys encrypted using user certificates. Instead, clients requested those of currently plugged media (which is not suitable for the new differential update schema available in recent versions) storing the media keys encrypted with user certificates and sending the encrypted media keys to all the clients differentially. Sanctuary Application Server checks user’s certificates published in AD at startup — and periodically — and, whenever it finds users’ certificates for those user who have been authorized an encrypted media and that are NOT currently used to encrypt media keys, stores them. The periodicity of this verification is controlled by an optional registry value 'CertificateQueryPeriod' (in minutes; see Sanctuary Setup Guide), defaulting to 180 minutes (three hours). This certificate ‘refresh’ mechanism ensures that when a Sanctuary installation is upgraded, media keys are created and communicated to clients. It also ensures that if some user certificate expires, Sanctuary Application Server will detect them and use a new one when it becomes available. When doing central encryption you can choose one of a number of methods. You can use the Easy Exchange schema to encrypt a device and access it on computers that do not have the Sanctuary client installed. The user does not need to install any program or have administrative rights. See “Easy Exchange” on page 265 for more information. This schema is also used when doing decentralized encryption on removable storage devices. Please see “Decentralized encryption” on page 220 for more information. Creating a DVD/CD hash A practical use of Sanctuary, besides defining all kinds of permissions for device I/O access, is to create a library of DVDs/CDs and assign each volume to a User(s)/Group(s). As an example, take an internal demo DVD that has to be used over an over again by marketing to show to your clients or an installation CD. You can also extend this to music DVDs/CDs. When a DVD/CD is added to a library of available media, Sanctuary calculates a hash number based on the complete digest of its contents. If someone modifies even 1 bit of the content, the hash number changes radically and the DVD/CD is considered as a different one that is no longer in the library. This means that previously assigned users no longer have access to the modified medium. Once this hash is created, the result is saved in the Sanctuary Database. - 214 - Sanctuary Device Control v4.3.2 - User Guide What happens when a user wants access to the DVD/CD When a user wants to access a DVD/CD the following process applies: Figure 6.1 Using a DVD/CD from the library We recommend that you follow this general process when authorizing media: 1. Set up as many CDs, DVDs, or removable storage devices as you want. - 215 - Using the Media Authorizer 2. For each device, grant access to all appropriate users. Note: You can grant access permissions to Novell accounts on CDs/DVDs, but you cannot grant access permissions to Novell accounts on centrally encrypted media. This limitation is caused by the lack of user certificates published for Novell users. Accessing the Media Authorizer You can access the Media Authorizer by clicking on the the Control Panel in the main window. icon located on the Modules section of Figure 6.2 The Media Authorizer main window Note: The Media Label column represents the actual media label as found in the medium properties dialog. The Media Label and the Label columns have the same content when the media has just been added. These labels may differ when a user with access to the encrypted device has changed it. In this case, an administrator connecting the media to his computer sees that the Label column has kept the original value while the Media Label column holds the modified one. - 216 - Sanctuary Device Control v4.3.2 - User Guide Authorizing users to use specific DVDs/CDs The default-installed configuration denies access to CDs and DVDs drives. You must grant the administrator permission to access the DVD/CD in Read or Read/Write mode. If not, the administrator cannot add them to the database. There is no need to modify your policies regarding the use of DVD/CD media for the users, just authorize them to use the individual DVD/CD the administrator adds to this ‘library’ (the only exception to this rule being generic Music CDs). Note: Since Movie DVDs behave as DVD-ROMs, their treatment differs from the procedure used for Music CDs. You need to authorize each DVD separately. Note: You cannot authorize blank optical media. Pre-requisites Before adding multisession DVDs/CDs, you must install the Sanctuary Client on the machine where you are going to authorize them. If this is not done, the output window displays ‘Error opening driver: please make sure that Sanctuary client is installed’ and the Add Removable button is disabled. It is not possible to calculate the signature of multisession DVDs/CDs when the Sanctuary Client is not installed on the Sanctuary Management Console machine. The Media Authorizer module is significantly slower when the Sanctuary client is not installed. To authorize the use of a specific DVD/CD To authorize (add to the system database) the use of a specific DVD/CD, proceed as follows: 1. In the Sanctuary Management Console, switch to the Device Explorer module. Be sure to grant the Sanctuary administrator the required permissions to at least read the DVD/CD. 2. Switch to the Media Authorizer module. 3. Click the Add CD/DVD button. You are prompted to insert a DVD/CD. 4. Insert the DVD/CD. - 217 - Using the Media Authorizer The Media Authorizer calculates a unique cryptographic signature of the DVD/CD and displays its label: Figure 6.3 Adding an encrypted DVD or CD This name is used to register this DVD/CD on the system. You can change it if you need to make it more meaningful. 5. Click the OK button. The DVD/CD is included in the database so that permission to use it can be assigned to individual users or groups. Its details are now shown on the Media Authorizer window. The exact copies of the DVD/CD will also work on the client machines if authorized, but the slightest modification (names, file sizes, number of sessions, number of files and directories, etc.) will require a new authorization. Note: Adding a multisession CD may take several minutes. Encrypting removable storage devices Even though the general computing term ‘removable media’ may include any device that can be detached from your computer, such as floppy disks, Sanctuary Device Control refers to removable media as any device that declares itself to Windows in the class 'removable storage devices' through the Plug and Play mechanism. Therefore, removable storage devices include flash memory keys (USB sticks/pens), ZIP drives, Jaz drives, and some MP3 players and digital cameras. If you have a secondary internal ATA/IDE hard disk, it is recognized as a Removable Storage Device and you should define permissions for it. - 218 - Sanctuary Device Control v4.3.2 - User Guide Note: All non-system hard drives are treated as Removable Media and can be encrypted. If you have a secondary hard drive with multiple partitions, you will need to encrypt each partition independently. Sanctuary Device Control uses encryption to control the use of specific removable storage devices. Encryption achieves the following two goals: • It ensures tamper-proof device identification by associating the identifier of a device with its encryption key. • It prevents access to the data stored on the device when the device is attached to a computer not protected by Sanctuary Device Control. Advanced Encryption Technology (AES) is the encryption algorithm used to cipher the media; Sanctuary Device Control uses 32 bytes (256 bits) disk encryption keys. The encryption process relies on the Microsoft Certificate Authority of the Active Directory domain for the delivery of encryption keys to the users, much in the same way as the NTFS file encryption does. When a user has received the proper access rights to encrypted media, the Sanctuary client provides a transparent access to the media. Data copied to the media is encrypted and decrypted transparently when the media is accessed. Note: Users who have not received access to the encrypted media are not able to read its content (not even the Sanctuary Administrators). There are two steps required to authorize the use of a specific removable storage device: 1. Make the specific removable storage device unique through its encryption. 2. Grant rights to use the device to specific users. Both of these steps are carried out using the Media Authorizer module. In the event that access to a specific device is required on a computer where the Sanctuary Client is not installed, Lumension provides the administrator with a tool to grant such access. See Chapter 7, “Accessing encrypted media outside of your organization” on page 249 for more details. Pre-requisites In order for encryption to work properly, there are a number of pre-requisites that your system must meet: • Encryption is available under Windows 2000, XP, 2003, and Vista Active Directory Domains. This feature can be used, with difficulties, under non-Active Directory domains or Workgroups. • The Sanctuary administrator must have administrative rights on the computer where encryption is performed. - 219 - Using the Media Authorizer A Microsoft Certificate Authority must be available and published, and the DNS (Domain Name System) server must be properly configured. This can be avoided, but we do not recommend it. Please refer to Sanctuary's Setup Guide for more details. The Sanctuary Client must be installed on the machines where the Administration tools are used to perform encryption. Note: You should ensure that the Sanctuary administrator has Read and Write and Encrypt access to the removable storage devices. Please refer to “Using the Permissions Dialog” on page 72 for more details on how to set device permissions. Note: When performing centralized encryption in a network with parent and child domains, the child does not normally inherit the certification authority (CA) from the parent domain. You, as an administrator, must modify this default behavior. You will need the Enterprise CA service installed in each domain where centralized encryption is used. See http://support.microsoft.com/kb/281271 for more information. Decentralized encryption The Media Authorizer module is not used to carry out distributed encryption – only centralized encryption. Decentralized encryption is done using Easy Exchange (see “Removable device encryption methods comparison” on page 224 and “Easy Exchange” on page 265). Easy Exchange encryption can be used to do both centralized and decentralized encryption of media. See “Decentralized encryption” on page 269 for a full description of how to implement this option. You can also consider using DVD/CD encryption as described in Chapter 10, “Comprehensive encryption for securing all your DVD/CD data” on page 309. Limitations There are some limitations that you should be aware when encrypting removable storage devices: • Due to the nature of some devices and the way they are handled by Windows, there may be some limitations to the use of Zip media and certain types of Flash memory cards. • These specific types of removable storage devices are not always mounted when the media is plugged into the media reader. If a change has been made to the media permissions while the device is inserted in the reader, access may be denied when trying to read or write to an encrypted removable storage device. This happens because media access rights are retrieved from the Sanctuary Application Server and applied when the removable storage device is mounted by the operating system. There are three possible ways to resolve this issue: The user logs off and logs on again, forcing the system to mount the device. - 220 - Sanctuary Device Control v4.3.2 - User Guide The user unplugs and re-plugs the device. The user removes the media from the reader, tries to access the media with Windows Explorer and re-inserts the media after Windows displays the ‘Please insert disk into drive’ message. Note: This limitation only affects devices where the media can be separated from the reader. USB DiskOnKey devices, for example, are not subject to this limitation. • The Sanctuary client must be installed on the machine where the Sanctuary Management Console is installed. Memory card readers integrated to cameras, printers, or scanners may not work properly if encrypted. Note: The users do not need to be assigned permissions to the Removable Storage Devices class for the device in order to use encrypted devices — just assign the media to the user in the ‘Media Authorizer’ module. Note: By design, Windows assigns removable drives to the next free volume letter. Unfortunately, Novell clients may also map this same volume letter to a Novell’s server folder. When trying to access a removable device in a Novell system, you may need to assign another letter to it using the ‘Disk Management’ function of the ‘Computer Management’ dialog (using the Windows Control Panel ‡ Administrative Tools command). Note: There is a 4 GB limit when encrypting with our Easy Exchange option. See “Easy Exchange” on page 265 for more information. Note: You cannot use our encryption methods on those keys that already offer their own ‘embedded encryption’ option (see next section). - 221 - Using the Media Authorizer To encrypt a specific removable storage device Before an encrypted device can be assigned to the users, you (the administrator) must configure it by attaching the media to your computer and, using the Sanctuary Device Control administration tool, adding the device to the database. During this process, a unique identifier is written to the device and it is encrypted. To add a removable storage device to the database and encrypt it: 1. Attach the removable storage device to the computer. Check for the presence of any sensitive data that should be preserved during the encryption process since all data will be erased and lost. 2. In the Sanctuary Management Console, switch to the Media Authorizer module. 3. Click ADD REMOVABLE. The Add Removable Media dialog is displayed. Figure 6.4 Adding a specific removable storage device 4. Select the letter corresponding to the Drive you want to encrypt. 5. Enter a free text Description for the device. 6. Enter a Label. This information is used to label the device after it is formatted. This information appears in the media properties and can be viewed by any user having proper access to the device. The Label text field can be a maximum of 11 alphanumeric characters (including uppercase, lowercase letters, and digits). Note: We strongly recommend that you apply a physical label (sticker, note, mark) to encrypted devices to distinguish them easily. Each sticker ideally has the label or part of the description on it. This is a safety precaution as the media properties cannot be read by users who do not have access to the device. If users complain they do not have access to an encrypted device, this reduces the administrator’s work identifying why access is denied. - 222 - Sanctuary Device Control v4.3.2 - User Guide Note: Users cannot format an already centrally encrypted device unless the adequate permission is granted in the Device Explorer module (in the Removable Storage Devices’ class). The ‘Encryption’ panel should be set to ‘Both’ and the Read/Write permissions activated. 7. Choose the appropriate Encryption method as described in the following table: Table 6.1 Available encryption methods Method Description Notes Full & Slow (secure for existing data) This method is used to encrypt the media while preserving any data already there. This operation can be time-consuming on high capacity removable media as all the sectors of the media are accessed during the encryption. Encryption is applied to all free sectors of the device. All the data, including erased but still recoverable files, are encrypted. Therefore, in general terms, this option is recommended. Quick Format (insecure for existing data) Used to quickly encrypt the device while deleting all existing data. All files written to the device are logically erased. However, the physical sectors of the device are not encrypted. A malicious user can use a data recovery tool to read the sectors and gain access to potentially sensitive data. This also applies when sensitive data has previously been deleted — it may still be recoverable. We therefore recommend that this encryption mode is only used when the device never contained sensitive data, or it has been securely wiped. Easy Exchange (insecure for existing data) A fast encryption method with the added advantage of being able to access the device in computers that do not have the Sanctuary client installed. - Although you can use our Sanctuary Stand-Alone Decryption Tool (SADEC) to install on a computer and access devices encrypted with the first two methods, the user needs administrative rights, not always a good choice. Using Easy Exchange, the user can use the encrypted device — with the password and the original encryption key used to encode the peripheral — without installing software and without requiring administrative rights. See also Table C.5, “All Sanctuary encryption methods comparison” on page 357 , Table C.3, “Full encryption vs. Easy Exchange comparison 1/2” on page 355 , Table C.4, “Full encryption vs. Easy Exchange - comparison 2/2” on page 356 , and next section for more details. - 223 - Using the Media Authorizer Removable device encryption methods comparison When you encrypt a removable device (add it to the database and then assign it to user(s) or groups(s)), you can choose among three proposed methods: • Quick format encryption. • Full format encryption. • Easy Exchange encryption. Each of them has its own advantages and disadvantages as summarized in Table C.5, “All Sanctuary encryption methods comparison” on page 357 . See also Table C.3, “Full encryption vs. Easy Exchange - comparison 1/2” on page 355 , Table C.4, “Full encryption vs. Easy Exchange comparison 2/2” on page 356 for further details. Problems encrypting a device • You need a Certificate Authority server installed before proceeding to encrypt a media (for an alternative method, please refer to on page ). You can continue without installing the Certificate Authority, but the recommended procedure is to install it before pEncrypting devices without a Certificate Authorityroceeding247 to encrypt devices or media. The device must not be in use. If there is a program accessing the device (e.g. a Flash drive when Windows Explorer is displaying the device’s content), then the device cannot be encrypted. Close the program that is accessing the medium to make this error disappear. Figure 6.5 ‘Inaccessible medium’ error message - 224 - Sanctuary Device Control v4.3.2 - User Guide • To encrypt a device, it must be attached to the Sanctuary administrator’s computer; the administrator must have administrative rights on his machine and Read/Write and Encrypt access to the Removable Storage Devices class or to the sub class corresponding to the device model in the Device Explorer. Please refer to Chapter 4, “Managing Permissions and Rules” on page 71 for more details on how to set device permissions. Figure 6.6 ‘Not enough privileges’ error message • If the device has already been encrypted, you get the following message. Figure 6.7 ‘Already authorized’ error message Only non-encrypted media can be encrypted. If you are trying to re-encrypt a device, you should first remove it from the system database using the REMOVE MEDIA button. • If the device has previously been encrypted and then removed from the database while not physically attached to the administrator machine (perhaps because it was thought lost, and you try to encrypt it again using ‘Quick Format’) you are warned that any encrypted data on the device will be permanently deleted. Figure 6.8 ‘Already encrypted’ error message - 225 - Using the Media Authorizer Select either YES to encrypt it again, and lose access to any previously encrypted data on the device, or NO cancel the operation. If you wish, you can import it to the database and re-encrypt again using the same key and password only if you previously exported its encryption key to the file or media itself, and remember the password. • Although the correct procedure to remove a device is to attach it to the administrator’s computer before removing it, there are situations when this is not possible. When you remove it from the database without first attaching it to the computer, the physical device remains encrypted. As there are no longer permissions for these devices in the system, the Sanctuary client will consider them as encrypted media coming from other organizations and will prevent access to them unless the users has the media password, the media encryption key, and received proper permission access. See “Locally managed access to unauthorized encrypted media ” on page 256. When a device is in this particular state (still encrypted but removed from the database), the administrator can: • Add the device back into the database without losing its content providing its encryption key has been exported before the device removal, either to the device or to a file, and that its password is known. In this case, you can use the Import (secure for existing data) command. The device is inserted in the database again and its content preserved. See “Centrally managed access to unauthorized encrypted media ” on page 255. • Reuse the device and re-encrypt it. In this case, you can use the Quick Format (insecure for existing data) command. This operation will erase the device content. If you remove the media when it is not connected to the computer, you get the following message: Figure 6.9 ‘Identification record cannot be deleted’ error message - 226 - Sanctuary Device Control v4.3.2 - User Guide Figure 6.10 Importing back an already encrypted device Authorizing access. Once you have added CDs/DVDs/encrypted removable storage devices to the system database, you can authorize access to them for specific users to: 1. Grant permissions to use specific DVDs/CDs for those users who do not normally have access to the DVD/CD drive. 2. Allow specific users to access encrypted media. Note: Although it is possible to grant read-only access to an encrypted media, it will not work. You will need to assign at least Read AND Import permissions to give a user effective Read permissions over an encrypted device. Note: You cannot grant access permissions to Novell accounts. The process applies to DVDs/CDs/removable storage devices that have already been authorized using the Media Authorizer. In addition to these devices, there is a category — Any Music CD — that you can select to allow user access all audio CDs. This does not apply to removable devices encrypted using our Easy Exchange method. Selecting users for a device. You can select each of the CDs, DVDs, and removable storage devices that you have added to the system database to assign them permissions - 227 - Using the Media Authorizer To grant access to use DVDs/CDs/encrypted removable media To assign permission to users to enable them to use a DVD/CD or removable media 1. Select the Users by Medium tab in the Media Authorizer module. 2. Select the DVD/CD/removable device for which you want to grant access. Figure 6.11 A specific medium with its related users and groups - 228 - Sanctuary Device Control v4.3.2 - User Guide 3. Click the ADD USER button. The Select Group, User, Local Group, Local User dialog is displayed. Figure 6.12 Adding a group or user to a selected medium 4. Select the users or groups you want. 5. Enter the name or part of the name (or use wildcards, such as * and ?). 6. Click on SEARCH or BROWSE. 7. In the list that appears, select one or several users or groups (using the CTRL or SHIFT keys). 8. Click OK. Note: You cannot assign access for encrypted removable media to groups, only to users. To deny access to DVDs/CDs/encrypted removable media To remove the permission to use a DVD/CD/encrypted removable media from users or groups 1. Select the Users by Medium tab in the Media Authorizer module. 2. Select the DVD/CD/removable storage device to which you want to deny access. - 229 - Using the Media Authorizer 3. In the Associated Users area, select the users (and/or groups) from who you want to remove access permission. Figure 6.13 Denying access to DVDs/CDs/encrypted removable media 4. Click on REMOVE USER. Tip: If you want to remove all users assigned to a medium, simply select the medium and click REMOVE ALL. Users are removed from the list of Associated Users, preventing them from accessing the selected media. Note: The entire list of authorized DVDs/CDs/removable media is downloaded on the client. A disconnected user can only access the media permissions which were downloaded when the user’s machine was last online. These may include media the user has never used, which become accessible to the user. This has changed since previous versions of the product, where the entire list of authorized DVDs/CDs/removable media was not downloaded onto the client. - 230 - Sanctuary Device Control v4.3.2 - User Guide Selecting devices for a user You can select each individual user on your system, and grant them access to the CDs, DVDs, and removable storage devices that you have added to the system database. To grant access to use DVDs/CDs/encrypted removable media 1. Select the Media by User tab in the Media Authorizer module. Figure 6.14 Media by user authorization 2. Click the ADD button. The Select Group, User, Local Group, Local User dialog is displayed. 3. Type in the name or part of it. 4. Click on SEARCH or BROWSE. 5. In the list that appears, select one or several users or groups (using the CTRL or SHIFT keys). 6. Click OK. 7. In the Media by User tab, select the user or group to which you want to assign permissions. Note: You cannot assign access for encrypted removable media to groups, only to users. 8. Select the DVDs/CDs/removable media that you want from the Not Authorized list (using the CTRL or SHIFT keys). - 231 - Using the Media Authorizer 9. Click AUTHORIZE. Tip: If you want to authorize all devices in the ‘Not Authorized’ List, simply select the user and click Authorize All. The selected media is added to the Authorized list. To deny access to DVDs/CDs/encrypted removable media To remove permission from a user or group to use one or more DVDs/CDs/ encrypted removable media, proceed as follows: 1. Select the Media by User tab in the Media Authorizer module. 2. Select the user or group from which you want to remove permissions. 3. Select the DVDs/CDs/removable media from the Authorized list (using the CTRL or SHIFT keys). 4. Click REMOVE. Tip: If you want to remove all media assigned to a user, simply select the user and click Remove All. Note: Changes in permissions to access DVDs/CDs/removable media are read by the client computer next time the DVD/CD/removable media is inserted. The entire list of authorized DVDs/CDs/removable media is downloaded at user logon. This means that a disconnected user can access the media permissions that were downloaded when the user’s machine was last online. These can include media the user have never used. These will be accessible to the user. Removing media from the database This section describes how to remove the following three categories of media from the system database: • CDs and DVDs. • Encrypted removable storage devices. • Lost or damaged media. - 232 - Sanctuary Device Control v4.3.2 - User Guide To remove a DVD/CD 1. Select the Users by Medium tab in the Media Authorizer module. 2. Select the DVD/CD in the Authorized list on the Media panel. 3. Click REMOVE MEDIA. The media is removed from the database. If there are users associated with the DVD/CD, a warning message is displayed: Figure 6.15 'Users still associated with medium' warning message 4. If this is your case, and you are sure, click YES to proceed to remove the media from the database. To remove an encrypted removable storage device 1. Attach the device to your (the Sanctuary administrator) computer. 2. Select it from the Authorized list on the Media panel. 3. Click REMOVE MEDIA. Figure 6.16 'Deleting medium' warning message Warning: All encrypted data present on the device will be lost. The device is formatted after being removed from the database. - 233 - Using the Media Authorizer To remove lost or damaged media from the database You may want to remove a media from the database if it is lost or damaged. Although you have no physical access to it, you can still delete it by selecting it and clicking on the REMOVE MEDIA button. Note: Only delete lost or damaged devices that cannot be recovered. A warning message is displayed: Figure 6.17 'Cannot delete identification record' error message The physical media remains encrypted. As there are no active permissions for these devices in the system, the Sanctuary client considers them as encrypted media coming from other organizations and prevents access to them. This happens unless the user has the password, encryption key, and has received proper access for using them in the Device Explorer module. See “Locally managed access to unauthorized encrypted media ” on page 256. When a device is in this particular state (still encrypted but removed from the database), the administrator can: • Add the device back into the database without losing its content. This is only possible if you import its encryption key before the device removal either to the device or to a file, and that you remember its password. In this case, you can use the Import (secure for existing data) command. The device is once more inserted into the database while preserving its content. See “Centrally managed access to unauthorized encrypted media ” on page 255. • Reuse the device and re-encrypt it. This operation erases the device content. In this case, you can use the Quick Format (insecure for existing data) command. - 234 - Sanctuary Device Control v4.3.2 - User Guide Note: In case an encrypted device is no longer used for Device Control and you are unable to format it again in Windows Explorer (using the right-click format option), make sure you use the Disk Administrator on a computer without the Sanctuary client installed, to reformat the media (the standard FAT file system, not FAT32, is recommended). Other format methods may fail and render the media unusable until it has been reformatted properly. Alternatively, check it with the diskprobe.exe tool found in the Windows resource kit if you are not sure that your media is working properly. You can also use Lumension’s diskrec.exe tool found in the TOOLS folder on your installation CD. Other Media Authorizer utilities In addition to the main utilities provided in the Media Authorizer to help you authorize and encrypt CDs, DVDs, and removable media, you can carry out a few more tasks: • Rename a DVD, CD, or removable storage device. • Export an encryption key. • Recover a password for decentralized encryption for an online user. • Eject a DVD/CD drive. To rename a DVD, CD, or removable storage device 1. Select the Media by User tab in the Media Authorizer module. 2. Select the DVD/CD/removable storage device you want to rename. 3. Click RENAME MEDIA. A dialog is displayed: Figure 6.18 Renaming a DVD/CD/Removable storage device 4. Confirm or type a new description for the media. Use the GET DEVICE LABEL button to recover the information directly from the medium. 5. If the media is a removable storage device, confirm or type a new label, using up to 11 alphanumeric characters (uppercase and lowercase letters and digits). - 235 - Using the Media Authorizer 6. Click OK. The media is renamed. Exporting encryption keys There are situations where encrypted removable storage devices need to be exchanged between people working in different organizations. Sanctuary Device Control allows you to export the media encryption key to permit its access outside of the company network. The Media Authorizer allows an administrator to export the encryption key of an encrypted device. Although this is summarized below, for full details please refer to the “Locally managed access to unauthorized encrypted media ” section on page 256. Note that a user can also be allowed to export the encryption key when doing decentralized encryption (see “Forcing Users to Encrypt Removable Storage Devices” on page 130). 1. On the Users by Medium tab, select an encrypted removable storage device. 2. Click EXPORT KEY. A dialog is displayed. Figure 6.19 Exporting a medium key 3. Choose either Medium to export the key to the device itself or select a Folder to export the key to a folder on your computer or network. 4. Type a Password and then Confirm it. 5. Click OK to export the device key. Ejecting a CD or DVD To eject a CD or DVD from the drive attached to your computer, simply click the Eject CD/DVD button. It is immediately ejected. - 236 - Sanctuary Device Control v4.3.2 - User Guide Recovering a password for decentralized encryption when connected Sometimes a user forgets the password they have set up to access an encrypted removable storage device that they want to attach to their computer, or fails to enter this password correctly five times in a row. The user must then contact a Sanctuary administrator with the identity of the device and a security code. Using this information the Administrator, if the access is approved, can generate a passphrase. The device that the user needs to access is decrypted using the passphrase and reencrypted using a new password. Note: To provide the passphrase required to access the encrypted device without the password the administrator needs the appropriate access rights; The Sanctuary Management Console administrator’s User Access must have ‘Key Recovery (Device Control)’ set to ‘Yes’. See “Defining Sanctuary Administrators” on page 34 for more information. Note: If the user forgets their encryption password when they do not have access to Sanctuary Client see “Recovering a decentralized encryption password without Sanctuary Client” on page 270. Note: You cannot recover a password if the Device Log option is disable (see Chapter 8, “Setting and Changing Options”) and you have not recover the machine’s log at least once after encrypting the device (see “Forcing the Latest Log Files to Upload” on page 207). - 237 - Using the Media Authorizer The procedure for recovering a password for decentralized encryption when you have access to Sanctuary Client involves a number of steps carried out by the user who wants to access the encrypted removable storage device, denoted [User] below, and a number of steps carried out by the administrator authorizing the decryption and re-encryption, denoted [Administrator]. To recover an encryption password: 1. [User] Click on the RECOVER PASSWORD button in the Unlock Medium window (in which the user normally enters the password required to access their encrypted device). Figure 6.20 Unlock Medium window Note: If the user attempts to guess their password more than the allowed number of times then the following message is displayed. In this case, the user must click on OK before it is possible to use the Recover Password button. Figure 6.21 User exceeded allowed number of attempts to unlock medium message - 238 - Sanctuary Device Control v4.3.2 - User Guide The Recover Password dialog is displayed: Figure 6.22 Recover Password dialog 2. [User] Telephone a Sanctuary administrator (with ‘Key Recovery’ access rights), explain your problem, and read out the 32-character Encrypted Medium ID. 3. [Administrator] If you need to check whether the person on the telephone is allowed to access the encryption media (rather than trusting their word for it), recover information about the user and computer from when the removable storage device was originally encrypted. To do this, carry out the following steps: • Activate the Log Explorer module, if it is not already open. • If the media has only recently been encrypted, force an upload of the latest log files. See “Forcing the Latest Log Files to Upload” on page 207. • Select and run a template that generates a report of encrypted media. See “Log Explorer templates” on page 155. • Identify the log entry in the report that corresponds to the original encryption event, using the first characters of the hash number that the caller reads out. • Check the user and computer details and compare these with the details of the indi • vidual who is on the telephone, if required. Tip: You can click on the Props tab in the Criteria/Properties panel of the Log Explorer window to view all the details of the log entry. See “Criteria/Properties Panel” on page 176 for more information. - 239 - Using the Media Authorizer • Check the full hash number in the report corresponds with that you have been given over the phone. Tip: You can ‘cut and paste’ the hash number from the log into the Encrypted Medium ID field the following step to save time. 4. [Administrator] Open the Sanctuary Password Recovery wizard on the Sanctuary Management Console. To do this, select Key Recovery from the Tools menu (or from the Tools section of the Control Panel). The Sanctuary Password Recovery wizard is displayed: Figure 6.23 Sanctuary Password Recovery wizard - Encrypted Medium ID and Security Code page 5. [Administrator] Enter the 32-character alphanumeric string provided by the user (or paste in the hash number from the previous step) in the Encrypted Medium ID field. 6. [Administrator] Request a Security Code from the caller and, when this is read out to you, enter the 44-character alphanumeric string in the Security Code field. 7. [Administrator] Click on the NEXT button. - 240 - Sanctuary Device Control v4.3.2 - User Guide Note: The Next button is only available if the Encrypted Medium ID and Security Code are the correct length. If the Encrypted Medium ID and the Security Code were incorrectly entered, an error message is displayed explaining which one needs correcting. This can be edited and the NEXT button clicked on again. If the Encrypted Medium ID and the Security Code were correctly entered, the Sanctuary Password Recovery wizard displays the Passphrase page. This provides details of the device and the person who originally encrypted the device, along with a Passphrase that can be used to decrypt the encrypted medium. Figure 6.24 Sanctuary Password Recovery wizard - Passphrase page 8. [Administrator] If you approve the user’s rights to access the encrypted removable storage device, read out the 52-character Passphrase. - 241 - Using the Media Authorizer 9. [User] Enter the alphanumeric string provided by the administrator in the text field in the middle section of the Recover Password dialog. Figure 6.25 Recover Password dialog – entering passphrase 10. [User] Enter a New Password, retype this in the Confirm Password field, and click on the OK button. The following messages are displayed: Figure 6.26 Sanctuary password recovered message - 242 - Sanctuary Device Control v4.3.2 - User Guide Figure 6.27 Sanctuary medium unlocked message 11. [Administrator] Once the user has confirmed that these messages are displayed, click on FINISH. Permissions Priority Permissions to access DVD, CD and Removable Storage Devices can be defined in the Device Explorer and the Media Authorizer modules. This section explains how the Sanctuary client controls access when permissions are defined in both modules. Example 1: In this first example, you have authorized the ‘OfficeXP’ DVD/CD using the Media Authorizer. The next table summarizes the resulting access when permissions are defined at the Device Explorer and Media Authorizer module levels. Note that in this example, permissions can be assigned directly to user Bill or to the user groups he belongs. Table 6.2 Resulting access when permissions are defined at the Device Explorer and Media Authorizer levels (Example 1) Device Explorer DVD/CD access defined for user Bill No access is defined (default) Permission Resulting Resulting defined in access access when Media when Bill Bill inserts Authorizer inserts any other CD for user Bill ‘OfficeXP’ in his drive to ‘OfficeXP’ in his drive Access granted to ‘OfficeXP’ Yes Denied No access to ‘OfficeXP’ Denied Denied - 243 - Comments When nothing is defined in the Device Explorer, Bill can only access the DVDs/CDs granted to him in Media Authorizer. Using the Media Authorizer Table 6.2 Resulting access when permissions are defined at the Device Explorer and Media Authorizer levels (Example 1) Device Explorer DVD/CD access defined for user Bill Read-Only Read/Write ‘None’ Permission Resulting Resulting defined in access access when Media when Bill Bill inserts Authorizer inserts any other CD for user Bill ‘OfficeXP’ in his drive to ‘OfficeXP’ in his drive Access granted to ‘OfficeXP’ Read-Only Read-Only No access to ‘OfficeXP’ Read-Only Read-Only Access granted to ‘OfficeXP’ Read/Write Read/Write No access to ‘OfficeXP’ Read/Write Read/Write Access granted to ‘OfficeXP’ Denied Denied No access to ‘OfficeXP’ Denied Denied Comments The permissions defined in the Device Explorer take precedence. A ‘negative’ permission, with High or Low priority takes always precedence on Media Authorizer permissions, the access to the DVD/CD drive has been specifically denied. If a user already has permission to use the DVD/CD-ROM drive assigned in the Device Explorer module, assigning permission to use specific DVDs/CDs in the Media Authorizer has no further effect. - 244 - Sanctuary Device Control v4.3.2 - User Guide Example 2: In this second example, you have encrypted the ‘DiskOnKey8’ removable storage device using the Media Authorizer. The table summarizes the resulting access when permissions are defined at the Device Explorer and Media Authorizer module levels: Table 6.3 Resulting access when permissions are defined at Device Explorer and Media Authorizer levels (Example 2) Device Explorer Removable Storage Devices access defined for user Bill No access is defined (default) Read-Only Permission defined in Media Authorizer for user Bill to ‘DiskOnKey8’ Resulting access when Bill connects ‘DiskOnKey 8’ to his computer Resulting access when Bill connects any unencrypted storage device Access granted to ‘DiskOnKey8’. Read/Write Denied Denied Denied Access granted to ‘DiskOnKey8’. Read/Write Read-Only No access to ‘DiskOnKey8’. The user does not have the encryption key nor the password. Denied Read-Only No access to ‘DiskOnKey8’. The user has the encryption key and password. Read/Write Read-Only No access to ‘DiskOnKey8’. - 245 - Comments Even though nothing is defined in the Device Explorer, Bill (as an example user) can read and write to the encrypted media he has been granted access. When an access is granted in the Media Authorizer, it allows read and write operations even if there is a read only permission defined in the Device Explorer. Using the Media Authorizer Table 6.3 Resulting access when permissions are defined at Device Explorer and Media Authorizer levels (Example 2) Device Explorer Removable Storage Devices access defined for user Bill Read/Write ‘None’ Permission defined in Media Authorizer for user Bill to ‘DiskOnKey8’ Resulting access when Bill connects ‘DiskOnKey 8’ to his computer Resulting access when Bill connects any unencrypted storage device Access granted to ‘DiskOnKey8’. Read/Write Read/Write No access to ‘DiskOnKey8’. The user does not have the encryption key nor the password. Denied Read/Write No access to ‘DiskOnKey8’. The user has the encryption key and password. Read/Write Read-Only Access granted to ‘DiskOnKey8’. Denied Denied No access to ‘DiskOnKey8’. The user does not have the encryption key nor the password. Denied Denied No access to ‘DiskOnKey8’. The user has the encryption key and password. Denied Denied Comments The Read/Write permission defined in the Device Explorer, does not allow access to an encrypted media, this operation is done solely by the Media Authorizer. A ‘negative’ permission takes always precedence on any other permission, the access to a removable storage device has been specifically denied. The access to an encrypted media is controlled in the Device Manager module and the Media Authorizer module. The ‘No access’ (‘None’ in the Permissions column) rule defined in the Device Manager module always take precedence over the ‘Media Authorizer’ rule. Likewise, device rules alone may grant access to encrypted media even when no rules are defined in the Media Authorizer module; in this last case, however, media access is not transparent and the user must have the media key and password. While this scenario may be useful in certain situations, it should generally be avoided since it is difficult to control and because password-protected keys are inherently weak. - 246 - Sanctuary Device Control v4.3.2 - User Guide If you specifically denied access to the DVD/CD Drives class, the Removable Storage Devices class, or one of their respective sub classes using a ‘None’ permission in the Device Explorer, whatever its priority, then the permission granted with the Media Authorizer is ignored. When a permission has been set with no Read nor Write access in the Device Explorer, it takes precedence and prevents access to the media whatever other permissions set. Please refer to “Priority of default permissions ” on page 93 for more details on how permission priorities are applied. Rights defined in Media Authorizer are cumulative. If a user is member of ten different groups, he has access to all CDs authorized to the groups from which he is a member. Note: Encrypted media cannot be granted to user groups. Encrypting devices without a Certificate Authority Sometimes there is no Certificate Authority present and you are not willing to install one on your computer. You can still benefit from the encryption of removable media using the procedure described on the following section. To encrypt a removable media without installing a Certificate Authority 1. Proceed to a machine that has both the Sanctuary Management Console and the client installed. Open the console and plug an USB memory key to the machine. You should have previously given access to the memory key —activate the Export to Media option. Please see Chapter 4, “Managing Permissions and Rules” for more information. 2. Close all programs that might use the media, including Windows Explorer. You are now ready to encrypt the device. 3. Encrypt the device in the normal way. See the procedure in “Encrypting removable storage devices” on page 218. 4. Export the media encryption keys on the media itself and provide a password. 5. Check the permissions to be sure that you have the right to do this. 6. Important step: Remove the USB key from the machine. 7. Delete the newly created encrypted key from the list. You are deleting all traces of this key. 8. At this stage, you have an encrypted memory key with a password-controlled access containing an encryption key. This is equivalent to a key encrypted by another company using Sanctuary Device Control. 9. Define Read/Write and Import permissions on the Encrypted removable media class using the Device Explorer module so that your users can access this key. Users with permissions defined - 247 - Using the Media Authorizer in this class can access the encrypted device, providing they also know the appropriate password. Warning: Limitation: You can also access other devices that come from other companies and were encrypted using Sanctuary Device Control. Note: If you plan to use this feature, please remember to ‘Disable’ the ‘Certificate Generation’ option for the client machine. Otherwise, a new one is created because it does not exist and you end up with unused client certificates. Please refer to Chapter 8, “Setting and Changing Options” on page 281 for more information on how to do this. - 248 - Sanctuary Device Control v4.3.2 - User Guide 7 Accessing encrypted media outside of your organization There may be situations when data on a specifically authorized (encrypted) device would need to be accessed from a machine that is not part of your organization. This machine may or may not be protected by Sanctuary Device Control. Exporting encryption keys In order to make a device accessible its encryption key must be imported. Before an encryption key may be imported, it must be exported from Sanctuary Device Control. The Sanctuary administrators can export device encryption keys centrally or grant users the right to export the encryption keys of their devices locally. There are two different ways to export encryption keys: • The most secure way is to export the media encryption key to a file and send it via a different channel (email for example) to the person that needs to access the encrypted media outside the organization. • The second way is to export the key to the encrypted media itself. This method is significantly less secure as the level of difficulty to access the data is directly linked to the media password complexity Exporting encryption keys centrally With Sanctuary Device Control, the administrator can export encryption keys for any device in the system. - 249 - Accessing encrypted media outside of your organization In the Media Authorizer, it is easy to select a device and export its encryption key. You can export the encryption key, either by creating a password-protected encryption key file that can be sent to another computer or user, or by writing the encryption key to the media, where it will also be password-protected. See “To export the encryption key to a file” on page 251 and “To export the encryption key to the device itself ” on page 253 respectively for details. Figure 7.1 Exporting encryption keys Exporting encryption keys locally Using Sanctuary Device Control, the administrator can give users the option to export an encryption key. A user may only export encryption keys locally if he has been given the rights to do so (using the Permissions dialog - see “Using the Permissions Dialog” on page 72 for more details). There are three conditions that must be met before a user to export a medium encryption key locally: • The user must have received proper access to the media. Please refer to “Using the Media Authorizer” on page 213 for more details on granting user access to encrypted media. • The user must be logged on a computer with the permissions set to Export To file or Export to media. Please refer to “Special case: Working with Removable Storage Devices” on page 74 for more details. • The media must be attached to the user’s computer. If those three requirements are met, the Export medium key option is available in the context menu of the encrypted drive in Windows Explorer. (This option is not available if the key was exported to a file and its location given to the user.) The user can then export the encryption key, either by: • Creating a password-protected encryption key file that can be sent to another computer or user. See “To export the encryption key to a file” on page 251. - 250 - Sanctuary Device Control v4.3.2 - User Guide -or• Writing the encryption key to the media, where it is password-protected. See “To export the encryption key to the device itself ” on page 253 for details. Figure 7.2 Exporting encryption keys (by the user) To export the encryption key to a file Exporting the encryption key to a file is the most secure way to export the medium encryption key. You can send it via a different channel (email for example) to the person that needs to access the encrypted media outside the organization. In the case of a central encryption key export, it is the Sanctuary administrator who does this (see “Exporting encryption keys centrally” on page 249 for more details). On the other hand, in the case of a local encryption key export, it is the user who does this (see “Exporting encryption keys locally” on page 250 for more details). 1. Either: For an administrator, centrally, select the device in the Media Authorizer, and click EXPORT KEY. –or– For a user, locally, right-click the device in the Windows Explorer, and select Export medium key. - 251 - Accessing encrypted media outside of your organization The Export Medium Key dialog is displayed. Figure 7.3 Export Medium Key dialog - to export the encryption key to a file 2. Select the Folder option. 3. Type the folder location or click the ellipsis button (...) to find the location, to which you want to export the keys. 4. Type a password in the Password and Confirm fields. Note: In the case of a local export, password complexity checks may be performed to guarantee that a secure password is chosen by the user. The check performed on the password strength depends on the settings of the Encrypted media password option as described in “Encrypted Media Password” on page 288. This option does not apply for administrators performing central export. Note: If the Sanctuary administrator has set the Encrypted media password option (see “Encrypted Media Password” on page 288) to ‘Require Password complexity’, the password chosen by the user when doing a local export must meet certain requirements. It must: Be at least eight characters long. Contain upper and lower case letters. Contain digits. Contain at least one non-alphabetical character (!@#$%*...). 5. Click OK. 6. Communicate the password and send the key file and the encrypted device to the person who needs to access the encrypted media from outside the organization. We recommend you use separate channels to send the encryption key, the medium and the password. For example, you - 252 - Sanctuary Device Control v4.3.2 - User Guide could send the device by post, the encryption key by email and communicate the password by phone. To export the encryption key to the device itself You can also export the encryption key directly to the encrypted device itself. This second method is significantly less secure as the level of difficulty required to access the data is directly linked to the device password complexity. In the case of a central encryption key export, it is the Sanctuary administrator who does this (see “Exporting encryption keys centrally” on page 249 for more details). For local encryption key export, it is the user who does this (see “Exporting encryption keys locally” on page 250 for more details). 1. Either: For an administrator, centrally, select the device in the Media Authorizer, and click EXPORT KEY. –or– For a user, locally, right-click the device in the Windows Explorer, and select Export medium key. The Export Medium Key dialog is displayed. Figure 7.4 Export Medium Key dialog - to export the encryption key on the device itself 2. Select the Medium option. 3. Type a password in the Password and Confirm fields. - 253 - Accessing encrypted media outside of your organization Note: Password complexity checks may be performed to guarantee that a secure password is chosen. The check performed on the password strength depends on the settings of the Encrypted media password option as described in “Encrypted Media Password” on page 288. This option does not apply for administrators performing central export Note: If the Sanctuary administrator has set the Encrypted media password option (see “Encrypted Media Password” on page 288) to ‘Require Password complexity’, the password chosen by the user when doing a local export must meet certain requirements. It must: Be at least eight characters long. Contain upper and lower case letters. Contain digits. Contain at least one non-alphabetical character (!@#$%*...). 4. Click on OK. 5. The user must communicate the password and send the encrypted device to the person who needs to access the encrypted device from outside the organization. If the device is lost or stolen, the password strength is the only barrier to access the data. Accessing encrypted media outside your organization This section explains various scenarios and options for accessing media outside of your organization. Note: Users cannot use the encrypted medium outside of the company network if they do not have the medium encryption keys and password. The exporting of media encryption keys is controlled by the organization through the means of the local and central export of encryption keys. Accessing media on a machine with Sanctuary client installed You typically access media on a machine with Sanctuary client when two separated organizations protected by Sanctuary Device Control want to exchange data on Sanctuary Device Control encrypted media. We define Unauthorized Encrypted Media as media encrypted using Sanctuary in another organization with a separate implementation of Sanctuary Device Control. - 254 - Sanctuary Device Control v4.3.2 - User Guide You can let your Sanctuary Administrators centrally control and authorize devices that come from other organizations or grant trusted users the right to use them. Centrally managed access to unauthorized encrypted media You should follow this procedure when you want your Sanctuary Administrator to manage the access to the devices coming from other organizations. With this method, users, even if they have the unauthorized encrypted media, its encryption key, and password, cannot use ‘foreign’ keys unless the administrator has authorized the device and granted them the right to use it with the Media Authorizer module. The central authorization is done in two steps. The administrator first adds the device in the Media Authorizer module, and then grants users access to it. To add a device in the Media Authorizer 1. Attach the device to the administrator computer. This must have installed the Device Control Client and Console, and have read/write access to the Removable Storage Devices category. See “Encrypting removable storage devices” on page 218 for more details. 2. Using the Media Authorizer, click ADD REMOVABLE. The following dialog appears: Figure 7.5 Adding a device with an external key - 255 - Accessing encrypted media outside of your organization Figure 7.6 Adding a device where the key resides on the medium 3. Type the media Description. We strongly recommend that a physical label is stuck to the device identify it in the future. 4. In the Encryption field, choose to import the encrypted device (the default option). All information on the device is kept. Alternatively, you can choose to format the device when you want to re-use it while loosing its information. 5. In the Key location field, browse for the file using the ellipsis button (...). This field is not available when the key was exported to the medium itself. 6. Type the media password in the Password field. 7. Click OK. Provided you have entered the right key and password, the device appears in the list of encrypted media in the Media Authorizer. The encrypted medium is now included in the database and can be assigned to the required user(s). Granting user access to the device After adding the media, you can use the Media Authorizer to grant users the right to access the media. See “To grant access to use DVDs/CDs/encrypted removable media” on page 231 for details. Locally managed access to unauthorized encrypted media You may want to delegate to trusted users the right to access Sanctuary Device Control encrypted media coming from other organizations. This permission is controlled using the Removable Storage Devices class of the Device Explorer. See Chapter 4, “Managing Permissions and Rules” on page 71 and “To Assign Computer-Specific Permissions to Users and Groups” on page 97 for more information about setting up permissions. You can set the following permissions: • Scheduled and temporary permissions – to restrict access to the Removable Storage Devices for a given time period. - 256 - Sanctuary Device Control v4.3.2 - User Guide • Offline and online permissions – to assign Read or Read/Write permissions applying when the user is directly connect or not to the network. • Permissions for the Removable Storage Devices class – to restrict access to these devices. These can be defined as a Global permission (Default Settings section) or at the computer-specific level (Machine-Specific Settings section). • Read-only or Read/Write permissions. If a permission is read-only, your users can only read the content of the unauthorized encrypted media, not right to them. • Negative permissions (‘None’). You can use these to specifically deny access to unauthorized encrypted media to a user or group. • You can add File Filtering to the Removable Storage Devices to further control access. The priorities that apply for the Removable Storage Devices class are the same as the ones described in “Priority of default permissions ” on page 93. To access unauthorized encrypted media from other organizations, your user needs the following: • Appropriate permissions in the Removable Storage Devices class. This must include the right to Import on encrypted media devices. Note: If a medium has an exported key, for example if it was encrypted using decentralized encryption, then a user with 'Import' permission can 'unlock' and import that medium. • The encrypted device to be attached to his computer. • The encryption key file, if the disk encryption key is not stored on the device. • The password to access the device. Providing these conditions are met, the users can access the unauthorized encrypted media. To access unauthorized encrypted media Users can access unauthorized encrypted media using the following steps: 1. Attach the device to the computer. - 257 - Accessing encrypted media outside of your organization 2. In Windows Explorer, select the Unlock medium option from the right-click (contextual) menu of the encrypted drive. Figure 7.7 Accessing unauthorized encrypted media The Import Medium Key dialog is displayed. Figure 7.8 The Import Medium Key dialog (importing from the medium or a folder) 1/2 - 258 - Sanctuary Device Control v4.3.2 - User Guide Figure 7.9 The Import Medium Key dialog (importing from the medium or a folder) 1/2 3. If the disk encryption key was exported on the encrypted media, select Medium. If the key was exported to a file, select Folder and browse for it using the ellipsis button (...). 4. Type in the media password in the Password field. 5. Click OK. Provided you have entered the right key and media password, the media is now unlocked and accessible using Windows Explorer. Note: All data copied from the media to the computer’s hard drive is decrypted during the copy operation and will be copied on the hard disk drive unencrypted. Make sure you store the copied files in a secure location. All data copied from the hard drive to the media will be encrypted during the copy operation. To format an encrypted device Once a key is encrypted, the user can use it, if the appropriate rights are given. However, they cannot format it as Windows Format command needs the key to be unlocked with the correct password. To format an encrypted key, the user must right-click on the device and select the DECRYPT MEDIUM menu option. Note: Take care not to click this option if you know the password unless, of course, you need to format the disk. - 259 - Accessing encrypted media outside of your organization Figure 7.10 Formatting an encrypted key using the Decrypt Medium command Differences between locally and centrally managed access to Unauthorized Encrypted Media Centrally managed access to unauthorized devices has the following characteristics: • The media, its encryption key, and password have to be provided to the SanctuaryAdministrator. The password and encryption key file are only required when adding the media to the list of encrypted ones. • The administrator cannot grant read-only access, because the Media Authorizer only allows read/write access. • The administrator cannot grant user groups access to a specific device. Access has to be granted to each user individually. • The administrator controls the access to each encrypted device individually. It is not possible for the users to use a device that is not specifically authorized. • The access cannot be restricted to a given computer (except if the permission was given to the local user of a computer). The locally managed access to unauthorized devices has the following characteristics: • The media, its encryption key, and password have to be directly provided to the user. The user needs to specify the encryption key location and password every time the media is inserted. - 260 - Sanctuary Device Control v4.3.2 - User Guide • The password and encryption key file are required only by the user. The administrator has no control over the unauthorized encrypted media origin. • The administrator can grant read-only / read-write and temporary / scheduled / permanent access to Encrypted Removable devices. He can control when and how unauthorized encrypted media is accessed, but he has no control over which device is accessed. This control is delegated to the user. • The administrator can grant users or user groups access to Encrypted Removable devices, allowing them to use any unauthorized encrypted media. This permission can be set at the default permissions level (Default Settings section) or at the computer-specific level (MachineSpecific Settings section). Therefore, allowing access to such devices on a specific computer is possible. • The administrator can grant Offline and Online permissions to the user. He can assign Read or Read/Write permissions depending if the user is directly connect or not to the network. To import an externally encrypted device to the database 1. Plug the device in a computer that has the client and the Sanctuary Management Console. The Sanctuary Administrator also needs the encryption key file (on the device or externally) and the password. 2. Select the Media Authorizer module from the Control Panel or the View menu. 3. Click the ADD REMOVABLE button. The following dialog appears: Figure 7.11 Importing an external device 4. Select the Import (secure for existing data) option from the list. Type the password. The medium is added to the database and is displayed in the upper panel: Figure 7.12 Importing an external device - 261 - Accessing encrypted media outside of your organization 5. Select the medium in the upper panel and click on ADD USER. 6. Choose the user(s) that will be using this device (either by typing the name or using the SEARCH or BROWSE button) and click on OK. The user is now associated with the device and can use it directly on its computer. The following image shows a user (Bill) assigned to an imported medium: Figure 7.13 Importing an external device Accessing media without using Sanctuary client You typically want to access encrypted media from a computer that does not have Sanctuary client installed on it when encrypted devices are exchanged between a company protected by Sanctuary Device Control and an organization that is not. To access a device encrypted by Sanctuary from a machine where the Sanctuary client is not installed, a user can either: • Use the Sanctuary Stand-Alone Decryption Tool (SADEC). -or- • Encrypt using the Easy Exchange encryption option. Sanctuary Stand-Alone Decryption Tool (SADEC) Before using the Sanctuary Stand-Alone Decryption Tool, a user requires the following: • The Sanctuary Stand-Alone Decryption Tool installed on his computer. This tool can be found on the Sanctuary CD under the SADEC folder, or downloaded from the Lumension web site (www.lumension.com). - 262 - Sanctuary Device Control v4.3.2 - User Guide Note: The Sanctuary Stand-Alone Decryption Tool cannot be installed on computers protected by the Sanctuary client. Note: The Sanctuary Stand-Alone Decryption Tool can only be installed on Windows 2000, Windows XP Professional (32- and 64-bit), Windows XP Home Edition, Windows 2003 (32- and 64-bit), and Vista (32- and 64-bit). Note: Please refer to the SADEC.pdf guide on the Sanctuary distribution media for details on how to install the Sanctuary Stand-Alone Decryption Tool. • The encrypted device attached to his computer. • If the disk encryption key is not stored on the device, the encryption key file is needed. • The password to access the device. To use Sanctuary Stand-Alone Decryption Tool Providing the requirements described in the previous section are met, you can use this procedure to access the encrypted device using the Sanctuary Stand-Alone Decryption Tool: 1. Check that the Sanctuary Stand-Alone Decryption Tool is installed on the computer. 2. Attach the device to the computer, if this has not already been done. - 263 - Accessing encrypted media outside of your organization 3. In Windows Explorer, select the Unlock medium option from the right-click (contextual) menu of the encrypted drive. Figure 7.14 Using the Sanctuary Stand-Alone Decryption Tool The Import Medium Key dialog is displayed: Figure 7.15 The Import Medium Key dialog when using the Stand-alone decryption tool - 264 - Sanctuary Device Control v4.3.2 - User Guide Figure 7.16 4. If the disk encryption key was exported on the encrypted media, select Medium. If the key was exported to a file select Folder and browse for it using the button. 5. Type in the media password in the Password field. 6. Click OK. Provided you have entered the right key and media password, the media is now unlocked and accessible using Windows Explorer. Note: All data copied from the media to the computer’s hard drive is decrypted during the copy operation and will be copied on the hard disk drive unencrypted. Make sure you store the copied files in a secure location. All data copied from the hard drive to the media will be encrypted during the copy operation. Easy Exchange As an alternative to the Sanctuary Stand-Alone Decryption Tool for using data outside your company, you can use the Easy Exchange encryption option during the removable media encryption. Please see “To encrypt a specific removable storage device” on page 222 for more information. To encrypt a medium using Easy Exchange 1. Connect the medium to a computer that has the console and click the ADD REMOVABLE button. 2. Type-in the description and label. Select the Easy Exchange (insecure for existing data) option from the pull-down list. 3. Once the removable media has been encrypted, you can export the encryption key to the media or to a file, using the EXPORT KEY button. - 265 - Accessing encrypted media outside of your organization Once you encrypt the medium this way, you can transport it safely to another machine. When inserting the medium and running the included Secure Volume Browser application (SVolBro.exe), there are two possible cases: • The key is located in the medium itself: in this case, the program only asks for a valid password. • The key was exported to a folder: you should first import the key and then provide a valid password to unblock the medium. The following table summarizes these settings: Table 7.1 Easy Exchange encryption options Key’s action Key’s location To access the medium the user must On the media Know the password (the key is available in the medium itself). A good compromise between security and safety. Try using a strong password schema. In a folder Know the password and have the key. Best security setting since the user has to have two elements to access the media’s data. n/a Know the password and have the key. The administrator must eventually export the key so that the user can access the medium. Key Exported Key not exported - 266 - Notes Sanctuary Device Control v4.3.2 - User Guide In both cases, and only if the user has the correct elements (password plus key), an explorer is shown in the Secure Volume Browser from where all file extract, add, or remove operations are done: Figure 7.17 Secure Volume Browser The behavior and functionality of this browser is similar to Windows Explorer. You can: • Copy & paste. • Select multiple files. • Use a context menu with the most common file operations. • Double-click to save a file to your local hard disk and modify it. • Rename a file. • Create and erase folders. • Move files within the same volume. • Drag & drop internally or externally to the desktop, Windows Explorer, or any other application as per Windows’ rules (see notes at the end of this section). The user can use his data without needing to install any kind of software whatsoever, and without having administrative privileges. Secure Volume Browser can also be run manually or automatically from the command line using different parameters: SVolBro.exe [-p password] [-t target] [-k exported key] - 267 - Accessing encrypted media outside of your organization Where: • -p is the password for the medium. • -t is the path where the encrypted folder is located (for example, d:\) • -k is the path where the exported encryption key is located. If not specified, the program looks on the path specified by the –t parameter. If Secure Volume Browser is called using another program, all required parameters (password, path of the encrypted folder, and encryption key location) are transparently interchanged, if provided. Note: You should tell users not to remove USB devices directly without using the ‘Safely Remove Hardware’ icon (double or single click) located on the System Tray. If the user removes the device without warning, some files may be lost as Windows may not have written them from temporary memory to the volume. You should also insist that users close the Secure Volume Browser window before unplugging the device. Note: Strong password policy is always enforced for the ‘Easy Exchange’ schema — unless you use it in the Media Authorizer module and change the Encrypted Media Password option (as described in “Encrypted Media Password” on page 288). The password is at least eight characters that shall include at least one letter, digit, and one symbol. Note: You cannot use Windows’ ‘Send to’ command (right-click menu) to directly copy files to a Sanctuary-encrypted medium (encrypted using the Easy Exchange method) — it must first be cipher using the proper algorithm, password, and key — this is only done using Secure Volume Browser interface. Any of the other methods proposed by Secure Volume Browser are valid (copy and paste, drag and drop, etc.). Note: Associated file icon images are lost inside Secure Volume Browser since Windows does not have access to extract file resources inside an encrypted medium (or folder). - 268 - Sanctuary Device Control v4.3.2 - User Guide Warning: The combined file + path name should not exceed 256 characters. Warning: SVolBro can only create a maximum of 30 root directories. Using encryption inside and outside your organization Full Encryption and Easy Encryption have both advantages and disadvantages that you must be aware of. They also depend if you are using or not Sanctuary to protect your client computer or if you have or not a Microsoft Certification Authority (MS Enterprise CA) installed. You may want to consult Table C.3, “Full encryption vs. Easy Exchange - comparison 1/2” on page 355 and Table C.4, “Full encryption vs. Easy Exchange - comparison 2/2” on page 356 to fully understand the potentially of both methods before making a decision on using one or the other in a precise situation. Decentralized encryption Decentralized encryption is an alternative schema used when the organization does not need or want to control device encryption centrally using the Media Authorizer module. Users can directly encrypt devices following the policies that Sanctuary administrators set. Administrators are not the only ones that can set encrypted devices for users' usage — users themselves or a designated agent can alternatively do this. Note: Data recorded on a removable storage device before it is encrypted can be read following encryption. To enable this the user should select the appropriate checkbox when encrypting the removable storage device. Once administrators have set the rules, users are now on their own. The rules can be defined at the following different levels: • Class level — all data that a user copies to a removable device must be encrypted. • Model level — the data a user copies to certain types of devices must be encrypted. • Device level — anything a user writes to a specific, uniquely identified device, i.e. a particular serialized removable media, must be encrypted. Decentralized encryption is backed-up by the Secure Volume Browser tool (SVolBro.exe) allowing access to the device on unprotected machines. There are several important points regarding Secure Volume Browser: - 269 - Accessing encrypted media outside of your organization • It is stored on the removable media itself. • It does not require any drivers. • It does not require administrative rights. • It does not mean that the USB key is recognized as a CD or floppy for authentication, as most of the external USB keys with embedded encryption do. The size of the Secure Volume Browser application is only 300KB, small enough considering the high capacity of most modern USB removable media. The encryption process itself uses our ‘Easy Exchange’ method to cipher the medium. See “Easy Exchange” on page 265 for more information. How to configure Sanctuary so that users can encrypt their own devices Please refer to “Forcing Users to Encrypt Removable Storage Devices” on page 130 for more information, examples, and a step-by-step guide on how to set up decentralized encryption. Recovering a decentralized encryption password without Sanctuary Client Sometimes users who are working on computers that do not have Sanctuary installed on them forget their encryption passwords for decentralized encrypted devices, or they fail to enter an encryption password correctly after a specified number of attempts. In such a case, the user needs to use Secure Volume Browser (since they do not have Sanctuary Device Control) and contact a Sanctuary administrator with the identity of the device and a security code. Using this information the Administrator, if the access is approved, can generate a passphrase. The device that the user needs to access is decrypted using the passphrase and re-encrypted using a new password. Note: To provide the passphrase required to access the encrypted device without the password the administrator needs the appropriate access rights; The Sanctuary Management Console administrator’s User Access must have ‘Key Recovery (Device Control)’ set to ‘Yes’. See “Defining Sanctuary Administrators” on page 34 for more information. Note: If the user forgets their encryption password when connected to the network see “Recovering a password for decentralized encryption when connected” on page 237. - 270 - Sanctuary Device Control v4.3.2 - User Guide Note: You cannot recover a password if the Device Log option is disable (see Chapter 8, “Setting and Changing Options” on page 281) and you have not recover the machine’s log at least once after encrypting the device (see “Forcing the Latest Log Files to Upload” on page 207). The procedure for recovering a password for decentralized encryption without Sanctuary Client involves steps carried out by the user who wants to access the encrypted removable storage device, denoted [User] below, and the administrator authorizing the decryption and re-encryption, denoted [Administrator]. You can recover an encryption password without Sanctuary Client using the following steps: 1. [User] From Windows Explorer, launch the Secure Volume Browser application (SVolBro.exe) that is stored on the encrypted device. Figure 7.18 Accessing the Secure Volume Browser application on the encrypted media - 271 - Accessing encrypted media outside of your organization The Secure Volume Browser window is displayed: Figure 7.19 Secure Volume Browser - 272 - Sanctuary Device Control v4.3.2 - User Guide 2. [User] Highlight the encrypted medium that you want to access. To do this, click on the appropriate icon in the Folders list. Figure 7.20 Secure Volume Browser – encrypted medium selected 3. [User] Attempt to enter a Password five times. Note: If the user has forgotten their password they must press their keyboard Enter key five times to display the Recover key link. - 273 - Accessing encrypted media outside of your organization Figure 7.21 Secure Volume Browser - Allowed attempts to unlock medium exceeded message 4. [User] Click on the Recover key link. - 274 - Sanctuary Device Control v4.3.2 - User Guide The Recover Password dialog is displayed: Figure 7.22 Recover Password dialog 5. [User] Telephone a Sanctuary administrator (with ‘Key Recovery’ access rights), explain your problem and read out the 32-character Encrypted Medium ID. 6. [Administrator] If you need to check whether the person on the telephone is allowed to access the encryption media (rather than trusting their word for it), recover information about the user and computer from when the removable storage device was originally encrypted. To do this, carry out the following steps: • Activate the Log Explorer module, if it is not already open. • Select and run a template that generates a report of encrypted media. See “Log Explorer templates” on page 155. • Identify the log entry in the report that corresponds to the original encryption event, using the first characters of the hash number that the caller read out. • Check the user and computer details and compare these with the details of the individual who is on the telephone, if required. Note: You can click on the Props tab in the Criteria/Properties panel of the Log Explorer window to view all the details of the log entry. See “Criteria/Properties Panel” on page 176 for more information. • Check the full hash number in the report corresponds with that you have been given over the phone. - 275 - Accessing encrypted media outside of your organization Tip: You can ‘cut and paste’ the hash number from the log into the Encrypted Medium ID field the following step to save time. 7. [Administrator] Open the Sanctuary Password Recovery wizard on the Sanctuary Management Console. To do this, select Key Recovery from the Tools menu (or from the Tools section of the Control Panel). The Sanctuary Password Recovery wizard is displayed: Figure 7.23 Sanctuary Password Recovery wizard - Encrypted Medium ID and Security Code page 8. [Administrator] Enter the 32-character alphanumeric string provided by the user (or paste in the hash number from the previous step) in the Encrypted Medium ID field. 9. [Administrator] Request a Security Code from the caller and, when this is read out to you, enter the 14-character alphanumeric string in the Security Code field. - 276 - Sanctuary Device Control v4.3.2 - User Guide Warning: The Security Code is shorter for a user wanting to recover a password for encrypted media outside your network than for a user connected to your network. This is due to the fact that Secure Volume Browser does not have the public key required for tighter security. A message is displayed notifying the administrator about the potential security risk involved in recovering a password for encrypted media when not connected to the network. 10. [Administrator] Confirm that you want to continue to provide the caller with access to the encrypted media despite the potential security risk. 11. [Administrator] Click on the NEXT button. If the Encrypted Medium ID and the Security Code were incorrectly entered, an error message is displayed explaining which one needs correcting. This can be edited and the NEXT button clicked on again. If the Encrypted Medium ID and the Security Code were correctly entered, the Sanctuary Password Recovery wizard displays the Passphrase page. This provides details of the device and the person who originally encrypted the device, along with a Passphrase that can be used to decrypt the encrypted medium. Figure 7.24 Sanctuary Password Recovery wizard - Passphrase page - 277 - Accessing encrypted media outside of your organization 12. [Administrator] If you approve the user’s rights to access the encrypted removable storage device, read out the 52-character Passphrase. 13. [User] Enter the alphanumeric string provided by the administrator in the text field in the middle section of the Recover Password dialog. Figure 7.25 Recover Password dialog – entering passphrase 14. [User] Enter a New Password, retype this in the Confirm Password field, and click on the OK button. The following messages are displayed: Figure 7.26 Sanctuary password recovered message - 278 - Sanctuary Device Control v4.3.2 - User Guide Figure 7.27 Sanctuary medium unlocked message 15. [Administrator] Once the user has confirmed that the above messages are displayed, click on the FINISH button. - 279 - Accessing encrypted media outside of your organization - 280 - Sanctuary Device Control v4.3.2 - User Guide 8 Setting and Changing Options There are various options that you would not want to change very often but which let you tailor Sanctuary Device Control to suit you and your organization. These options can be change for all computers or a specific one. These options can be used to: • Define rules governing USB KeyLoggers detection and notification. • Control if the user can see or not the client icon. • Decide if users are notified or not when updates are done. • Define the Shadow Directory. • Change or add Sanctuary Application Control addresses. • Define the complexity of the password needed to encrypt media. • Choose if the client generates a certificate if none exists. • If unauthorized access to devices are logged or not. • Discard similar log events or not. • Send endpoint maintenance ‘tickets’ to selected computers/users — which permits uninstalling the Sanctuary Client. • Select how the online/offline state is detected. You can find a detailed description of each option and instructions for changing them in the following sections. Note: Changing options does not generate a popup window on the client icon informing the user of these modifications. Options Set in Old Sanctuary Versions Options have changed from previous versions of Sanctuary. You can find a complete detail log in the readme file located in your installation CD. The following table summarizes these changes. Table 8.1 Option name comparison New name Old name (version 3.x or previous) Device Log Centralized Device Control Log Device Log Throttling Suppress Recurring Log Events Notes: * discontinued ** new - 281 - Setting and Changing Options Table 8.1 Option name comparison New name Old name (version 3.x or previous) eDirectory translation ** Encrypted Media Password Encrypted Media Export Password Endpoint Status Device Control Status Window, Sanctuary Status Log Upload Delay ** Log Upload Interval ** Log Upload Threshold ** Log Upload Time ** Offline/Online state definition ** Server Address Sanctuary Application Server Address * Shadow File Upload Delay * Encrypted Media Key Export Notes: * discontinued ** new Default Options Sanctuary Device Control allows you to set default options for various aspects of the Sanctuary client behavior. You do this using the Default Options dialog. - 282 - Sanctuary Device Control v4.3.2 - User Guide You can access the Default Options dialog by selecting Default Options from the Tools menu (or from the Tools section of the Control Panel). Figure 8.1 The Default Options dialog The tab label is simply ‘Computer’ indicating that the options are not specific to a particular machine, but are the defaults for all computers controlled by Sanctuary Device Control. If you do not override these default options for a specific machine, then these ones apply. For each option, if the Not configured checkbox has a tick mark, then a predefined setting for that option is being used. The dialog shows for each option the current setting in the Current Value column. If there is a star symbol shown, this indicates that the Sanctuary Device Control default is still in use. If you change an option, the client computers need to be informed. You can do this by either: • Selecting Send Updates to All Computers or Send Updates to on the Tools menu (or from the Tools section of the Control Panel) • Right clicking on the computer in the Device Explorer module and selecting Send Updates to <computername> from the popup menu. Computer-Specific Options You can always override the default options for a specific computer. You can access the Options dialog for a specific computer by: 1. Right clicking on the computer in the Device Explorer module. - 283 - Setting and Changing Options 2. Selecting Options. Figure 8.2 Setting computer-specific options Notice that the tab label is Computer Options for <computername>, to show for which computer you are changing the options. If there is a star symbol shown in the current value column of the option, this indicates that the Sanctuary Device Control default is still in use. If there is a tick mark in the Not configured checkbox, then the default setting applies for that option. To Change an Option Setting 1. Do either of the following: To change default options for all computers, select Tools Tools section of the Control Panel). Default Options (or use the –orTo change an option for a specific computer, right-click on the computer in the Device Explorer module, and then select Options. 2. The Options dialog is displayed, with the tab name indicating whether you are changing default settings for all computers or computer-specific settings. Select the option you want to change in the list of option. 3. Uncheck the Not configured checkbox. 4. In the drop down list or field, set the option to the required value. 5. Click the OK button to save the setting and close the dialog, or the APPLY button to save the setting and keep the dialog open. - 284 - Sanctuary Device Control v4.3.2 - User Guide Sending Updates to Client Computers After you have made changes, you can update the client computers by doing either of the following: • Selecting Send Updates to All Computers or Send Updates to on the Tools menu (or from the Tools section of the Control Panel), to update every computer with the changes. • Right-clicking on the computer in the Device Explorer module and selecting Send Updates to <computername> from the popup menu, to update a specific computer with the changes. Individual Option Settings The remaining sections in this chapter describe the settings available for each option. Certificate Generation Windows Certificates are a prerequisite for using Sanctuary Device Control when centrally encrypting media, using the Media Authorizer module. See Sanctuary Setup Guide for instructions on how to install it. If a user has no certificate, the Sanctuary Client automatically creates one, using rtnotify.exe. This option allows you to disable this automatic behavior. The possible settings are: • Automatic — (default value) The Sanctuary Client automatically creates a certificate for those users that do not have one. • Disabled — The Sanctuary Client does not create a user certificate. You should set this option to ‘disabled’ if your Windows Certificate Authority is not published. Note: If this option is disabled and the user does not have a certificate available, access to an encrypted media is not possible — even if the permission has been granted. This does not apply when using the Easy Exchange method. Client Hardening The Client Hardening option controls if a user with administrative privileges on a machine can uninstall the Sanctuary Client or not, and whether a user with administrative privileges shadow files or log entries prior to their upload to the Sanctuary Application Server. When the client starts, it generates a 15-byte random value used for protection purposes. This key, we call it Salt, is used to guarantee that the machines are uniquely identified. You can choose from these settings: • Disabled — (default value) Sanctuary Client protection mechanism is deactivated. • Basic — Client protection mechanism is enabled and can be deactivated with a signed ticket. - 285 - Setting and Changing Options • Extended — Client protection mechanism is enabled and can be deactivated with a signed ticket but the administrator must include a valid salt value. Use the Endpoint Maintenance command to send maintenance ‘tickets’ to selected computers/users (“Endpoint Maintenance” on page 24 for more information). The Client Hardening feature fully protects all Sanctuary Client executables, DLLs, registry keys, and the %Windows%/sxdata folder (temporary repository used by the client) from the user with administration rights. It also prevents that the user deletes the shadow files and log entries. Note: You must disable client hardening before you can run a ‘check disk’ (chkdsk) on a client machine. Note: When you have set the client hardening option to 'Extended' and you want to create a relaxation ticket with a salt for a given machine, if the client machine is running a different operating system than the administrator's machine, the user specified must be 'Administrators'. This limitation is caused by file ownership changes when files are copied to the ticket directory under these operating systems. Warning: Windows Vista restore points, if enabled, can revert the Sanctuary Client protected files, registry keys, and directories to previous states. Device Log The device log determines what is recorded in the log system when the user attempts to access a protected device. The possible settings are: • Disabled — (default value) Nothing is written to the log. • Enabled — Attempts to access prohibited devices and client errors are written to the log system and can be viewed in the Log Explorer module. See Chapter 5, “Using the Log Explorer” on page 149 for more details. Note: Some programs like Windows Explorer or some anti-virus programs may attempt repeatedly devices access. The Sanctuary client can filter out similar access occurrences; see Device Log Throttling on the next section for more details. - 286 - Sanctuary Device Control v4.3.2 - User Guide Note: Even if the Device Log option is set to ‘Disabled’ MEDIUM-ENCRYPTED events, which are generated when a user encrypts a device, are always logged. These events are required for the password recovery functionality; see “Recovering a password for decentralized encryption when connected” on page 237. Note: While you are reviewing the entries in the Log Explorer module, you may see a ‘Write deny’ or ‘Read deny’ record for removable drives or the floppy disk drive, for the ‘NT AUTHORITY\SYSTEM’ user. This is caused by the ‘LocalSystem’ account trying to access these devices — to ‘block’ them temporarily while the log is uploaded to make sure the user is not copying data — and not having the right permissions set. You should assign Read/Write permissions for the LocalSystem account of the machine where the ‘Device Log’ option is active so that this account can mount/dismount these types of devices. Device Log Throttling When the device logging option is enabled, the Sanctuary client logs all access attempts to protected devices. Some programs, like Windows Explorer or some antivirus, may try to access devices repeatedly, causing massive volume of similar information to be logged in the system with this Read/Write-Denied operation. The Device log throttling option allows you to define a period during which all similar occurrences of an already logged-on event are ignored. The default setting is sixty minutes (3600 seconds). If you clear the Not configured checkbox, you can type in another value. You should increase this value if you see repetitive occurrences of similar events in the Log Explorer module. Note: This setting applies only to Read/Write denied events. Every time another event occurs, such as when a device is plugged in, an error is reported, the logging of one read/ write event is allowed and the logging history period is reset. You can use this feature to your advantage to see if a read/write event occurred after a new device has been connected to the computer. eDirectory Translation The eDirectory translation option is only effective in machine where a Novell client is also installed. The possible settings are: • Enabled (default value) — The eDirectory account information is shown along with the Windows account information. • Disabled — eDirectory account information is not shown, only Windows accounts are shown. - 287 - Setting and Changing Options Encrypted Media Password The Encrypted media password option defines the strength of the password used to protect encryption keys when authorized users export them. The possible settings are: • Require password complexity — (default value). The password needs to meet the following requirements: Be at least eight characters long. Contain upper and lower case letters. Contain digits. Contain at least one non alphabetical character (!@#$%*...). • Allow weak password — Any password except a blank field is accepted Note: The Encrypted media password option only applies when the ‘Export to File’ and/ or ‘Export to Media’ option of the removable class permissions is also used. Endpoint Status The Endpoint status option allows you to select whether the Sanctuary client icon is displayed in the system tray of the client computer and control what is reported to the client in the Sanctuary Device Control status window. The possible settings are: • Do not Show — The Sanctuary client icon is not displayed. • Show All — (default value) The Sanctuary client icon is displayed. All information is shown to the client user. • Show All without Shadow — The Sanctuary client icon is displayed. All information except shadowing details can be viewed. • Show Allowed — The Sanctuary client icon is displayed. Only the information about those devices allowed for the client can be viewed. • Show Allowed without Shadow — The Sanctuary client icon is displayed. Only the information about the devices allowed for the client can be viewed. There is no information shown about shadowing details. Note: When the option is set to ‘Show Allowed’ or ‘Show Allowed without shadow’, the user can only see the devices for which he/she, or the group he/she belongs to, has permission to see. - 288 - Sanctuary Device Control v4.3.2 - User Guide Log Upload Interval The Log upload interval option defines the time, in seconds that log entries are collected before being uploaded to the Sanctuary Application Server. The Sanctuary client accumulates the log entries during this period; once uploaded, the next log entry triggers the interval again (default of 3 min.). The default value of 180 seconds applies when this option is not configured. Select this option and type any valid numerical value (in seconds) in the field. Log Upload Threshold The Log upload threshold option defines how many log entries are gathered before being automatically uploaded to the Sanctuary Application Server. The default value of 10,000 lines applies when this option is not configured. Select this option and type any valid numerical value (# of lines) in the field. Log Upload Time The Log upload time option determines the hour when log entries are uploaded to the Sanctuary Application Server, if the other log upload thresholds have not already been reached. The default value of 05:00, 5 A.M., applies when this option is not configured. Select this option and type any valid numerical value (24-hour clock format; HH:mm) in the field. Log Upload Delay The Log upload delay option defines a random upper limit value, in seconds, to wait before uploading log files. It is use to reduce network and server congestion when there are simultaneous uploads. A random value between zero and 3600 seconds — 1 hour — applies when this option is not configured. Select this option and type any valid numerical value (in seconds) in the field. Online State Definition The Online State Definition option is used to define the criteria that prevail to determine if a machine is online or offline. There are two possible settings for this option: • Server connectivity: State is determined whether the client can communicate or not with a Sanctuary Application Server. • Wired connectivity: State is determined whether the network cable is plugged or not. The Online State Definition option works in conjunction with the Offline/Online permissions that should already be defined for the required device class(es) — see “To Assign Online and Offline Permissions” on page 116. As an example, you may want to use this option when the client machine uses several network cards (NICs), one of them wireless, to apply the following scenario: 1. User ‘EndPointClient’ logs on to the corporate network at his desk in the office (through a wired connection) - online wireless permissions applied: wireless card is disabled. - 289 - Setting and Changing Options 2. User ‘EndPointClient’ unplugs his laptop from the corporate network to go to a meeting in a conference room (no system boot) - offline wireless permissions apply: wireless card is now enabled. 3. User ‘EndPointClient’ logs into a wireless network in the conference room and uses a VPN connection to the corporate network (no system boot) - offline wireless permissions continue to apply: wireless card is now enabled. 4. User ‘EndPointClient’ returns to his office after the meeting and plugs back into the corporate network at his desk (through a wired connection) (no system boot) - online wireless permissions applied: wireless card is now disabled. Figure 8.3 Online/Offline state detection option as applied to Wireless NICs The objective here is to let the user use his wireless NIC when the cabled one is unplugged from the network and vice versa. The following table clarifies this point (taking the Wireless NICs class as an example): Table 8.2 Offline/Online state definition configuration as applied to Wireless NICs Offline/Online state definition setting Server connectivity Wireless NIC permission Resulting permission Offline R/W User can use his wireless connection only when Sanctuary Application Server is not detected (even when there is a physical cable plugged to the machine’s network card). Online disabled User can use his wireless connection only when there is no physical cable connected to the other computer’s network card or no communication can be established with a Sanctuary Application Server. - 290 - Sanctuary Device Control v4.3.2 - User Guide Table 8.2 Offline/Online state definition configuration as applied to Wireless NICs Offline/Online state definition setting Wired connectivity Wireless NIC permission Resulting permission Offline R/W User cannot use his wireless connection when a Sanctuary Application Server is detected (through the cable or wireless network card). Online disabled User cannot use his wireless connection when there is a physical cable connected to the other computer’s network card (even when the Sanctuary Application Server cannot be detected). Server Address The Server address option defines the IP address of the Sanctuary Application Server(s) to which the Sanctuary client should connect. You normally use this option when: • A new server is placed in the working environment. • You change the IP address or name of the Sanctuary Application Server. • You want to specify more than three servers for your clients (done during the client installation, see the Sanctuary Setup Guide for more information). When no default setting or computer-specific settings are defined, the client uses the server addresses provided when the Sanctuary Client was installed. If you clear the Not configured checkbox, you can type in one or more alternative addresses. Separate multiple servers by a space. Each IP address and port combination must be entered in the form 1.2.3.4:5001. You can also use the NetBIOS name or the Fully Qualified Domain Name (FQDN), compulsory if you are using TLS protocol (see the Sanctuary Setup Guide ). Shadow Directory The shadow directory is the temporary folder where shadow and log files are stored before being uploaded to the Sanctuary Application Server. The default setting for this folder is \SystemRoot\sxdata\shadow\. If you clear the Not configured checkbox, you can type in an alternative shadow directory. - 291 - Setting and Changing Options Warning: Changing this option requires extreme care. You must ensure that the directory, and its subdirectories, exists. The driver reverts to the previous directory if the path provided is not valid. You must also be sure that the Shadow directory is set to a fixed, writable hard-drive. DVD/CD-ROM, removable media (even large external Firewire/USB hard disks), etc., will cause Shadow to misbehave. The shadow directory can never be a UNC path or a directory on a mapped drive. Furthermore, folders not included under %Windows%/sxdata are not protected by the Client Hardening feature, you should provide other methods to protect these folders. Update Notification The Update notification option allows you to determine which messages are shown to the end-user when permissions change in one way or another. The possible settings are: • No messages — No warnings are displayed to the user. • Temporary permission changes — Display a message when temporary permissions are changed. This also sends a message three minutes before the permission expires and, finally, when the permission is no longer valid. • All device permission changes — (default value) A message is displayed when any change is made to permissions that affect the user, including permanent, scheduled, offline, online, and temporary ones. USB Keylogger As the PS/2, the standard port to connect a keyboard and/or mouse, is being rapidly superseded by the USB port. The hardware Keylogger™ is a device that captures all data typed at the keyboard, including passwords and other sensitive data. There is also a software version of the Keylogger. You can check the presence of software Keyloggers using a commercially available program and block it using our Sanctuary Application Control Suite. The USB hardware version of this device can be blocked, either as a general option or as a computer specific one. The possible settings are: Table 8.3 USB Keylogger options Notify user Option Description Disabled Default value. Do not react in any way to the detection of a Keylogger. Notify user Only inform the user of the presence of a Keylogger. This does not notify the use when the keylogger is attached to a computer using Vista. Log event Only log the event if a Keylogger is detected. The keyboard is not disabled. - 292 - Block Keyboard Log Event Sanctuary Device Control v4.3.2 - User Guide Table 8.3 USB Keylogger options Notify user Option Description Notify event and log user If a Keylogger is detected, log the event and inform the user. The keyboard is not disabled. This does not notify the use when the keylogger is attached to a computer using Vista. Block keyboard and notify user Blocks the keyboard and notify the user if a Keylogger is detected. This does not notify the use when the keylogger is attached to a computer using Vista. Block keyboard and log event Blocks the keyboard and log the event if a Keylogger is detected. Block keyboard, notify, and log event Blocks the keyboard, log the event, and notify the user if a Keylogger is detected. This does not notify the use when the keylogger is attached to a computer using Vista. Note: Changing from one setting to another requires a client reboot. - 293 - Block Keyboard Log Event Setting and Changing Options Checking Settings on a Client Machine As long as the Endpoint Status option is not set to ‘Do not Show’ then a user on the client computer can double-click on the icon located in the system tray to see the current status settings for the machine. Figure 8.4 Checking the settings on a client machine Depending on the settings you define, the client user can see all details, all details but without the Shadowing column, or just the allowed permission rules without the Shadowing column. The Copy Limit column only shows details if a permission of this type has been assigned to a device, including how much has already been consumed from the assigned quota. - 294 - Sanctuary Device Control v4.3.2 - User Guide 9 Generating Sanctuary Reports The Reports menu (or the Reports section of the Control Panel) allows you to generate a variety of reports about Sanctuary Device Control with information that includes permissions, shadowing, options, and media. The generated reports are HTML files displayed in an internal window. Simply select the Reports menu item or section in the Control Panel of the console and choose the required one. Once saved, the Sanctuary reports can be viewed using Internet Explorer or any other Web browser defined on your system. The reports can be printed, copied, converted, saved, and modified as required. Reports are provisional created and saved in the Report folder located in your temporary directory — %TEMP%. Note: Once a Sanctuary Report is shown in the window, you can use the ‘File Save as’ or ‘Print’ commands to keep a backup record of your reports. You also have access to the same right-click menu as shown for a Web page in Microsoft Internet Explorer. Note: You can change the way the date is formatted in a Sanctuary Report by using the ‘Regional and Language’ options of the ‘Control Panel’ of your Windows system. Consult Windows Help for details. The following list summarizes the types of reports that can be obtained by user roll (controlled in the 'User Access Manager' dialog; see “Defining Sanctuary Administrators” on page 34): • Enterprise Administrator All • Administrator with no other options set in the ‘User Access Manager’ dialog. These are the ‘default’ options for all Administrators. ‘Users Permissions’, ‘Device permissions’, ‘Computer permissions’, ‘Online Machines’, ‘User Options’, and ‘Machine Options’ • Administrators with ‘Media (Device Control)’ setting of the ‘User Access Manager’ dialog set to ‘Yes’ or ‘Compatible’. All those of the ‘default’ Administrator plus the ‘Media by User’ and ‘Users by Medium’ reports • Administrators with ‘Logs (Device Control)’ setting of the ‘User Access Manager’ dialog set to ‘Yes’ or ‘Compatible’. All those of the ‘default’ Administrator plus the ‘Shadowing by Device’ and ‘Shadowing by User’ reports • Administrators with ‘Scheduled Reports’ setting of the ‘User Access Manager’ dialog set to ‘Yes’ or ‘Compatible’. - 295 - Generating Sanctuary Reports All custom reports that are scheduled to run automatically using templates you have created or updated. See Chapter 5, “Using the Log Explorer” on page 149. Note: In addition to the standard reports that are available through the Reports menu, you can define your own criteria for selecting log entries and producing custom reports using the Log Explorer module. See Chapter 5, “Using the Log Explorer” on page 149 for more information. Figure 9.1 Obtaining a report To close the report window do one of these actions: • Click on its cross icon • Right-click on the title bar and select Close - 296 - Sanctuary Device Control v4.3.2 - User Guide • Press Ctrl+F4. User Permissions Report The User Permissions report displays all permissions rules defined for a specific user(s). To generate this report: 1. Select User Permissions from the Reports menu (or from the Reports section of the Control Panel). 2. Select one or more users in the Select Domain User or Group dialog. You can use wildcards (*, ?) in the name field. Use the SHIFT key to select consecutive items or CTRL for nonconsecutive ones. An example of the User Permissions report is shown below: Figure 9.2 User Permissions report Device Permissions Report The Device Permissions report displays all permissions rules for the devices defined in the Device Explorer module. To generate this report, select Device Permissions from the Reports menu (or from the Reports section of the Control Panel). - 297 - Generating Sanctuary Reports An example of the Device Permissions report is shown below: Figure 9.3 Device Permissions report Computer Permissions Report The Computer Permissions report displays all permissions rules defined for a specific computer(s). To generate this report, proceed as follows: 1. Select Computer Permissions from the Reports menu (or from the Reports section of the Control Panel). 2. .Select one or more computers in the Select Computer(s) dialog. You can use wildcards (*, ?) in the name field. Use the SHIFT key to select consecutive items or CTRL for nonconsecutive ones. - 298 - Sanctuary Device Control v4.3.2 - User Guide An example of the Computer Permissions report is shown below: Figure 9.4 Computer Permissions report Media by User Report The Media by User report displays all permissions rules defined for a user(s) classified by medium. To generate this report, proceed as follows: 1. Select Media by User from the Reports menu (or from the Reports section of the Control Panel) 2. Select one or more users in the Select User(s) and/or Group(s) dialog. You can use wildcards (*, ?) in the name field. Use the SHIFT key to select consecutive items or CTRL for nonconsecutive ones. - 299 - Generating Sanctuary Reports Note: The ‘Media by User’ report does not list the DVD/CDs indirectly authorized when a User is a member of a Group. Note: Since Movie DVDs behave as DVD-ROMs, their treatment differs from the procedure used for Music CDs. You need to authorize every DVD separately. An example of the Media by User report is shown below: Figure 9.5 Media by User report Users by Medium Report The Users by Medium report displays all permissions rules defined for removable media — using the Media Authorizer module — classified by user(s). To generate this report, select Users by Medium from the Reports menu (or from the Reports section of the Control Panel). - 300 - Sanctuary Device Control v4.3.2 - User Guide An example of the Users by Medium report is shown below: Figure 9.6 Users by Medium report Shadowing by Device Report The Shadowing by Device report displays a summary of all data being copied or read by user. It is sorted in ascending order in the device section. To generate this report, select Shadowing by Device from the Reports menu (or from the Reports section of the Control Panel) and then the dates from the dialog. An example of the Shadowing by Device report is shown below: Figure 9.7 Shadowing by Device report - 301 - Generating Sanctuary Reports Shadowing by User Report The Shadowing by User report displays the total size of data copied or read by user and device class. It is sorted in ascending order by data size. To generate this report, select Shadowing by User from the Reports menu (or from the Reports section of the Control Panel) and then the dates in the dialog. An example of the Shadowing by User report is shown below: Figure 9.8 Shadowing by User report Online Machines Report The Online Machines report displays all machines that are online when the report is generated. It also serves as a troubleshooting help: You can find why a machine is not receiving updates when you send them. If the machine is not in the list, it does not receive updates. If the machine is in the list but its Failed Out counter is different from ‘N/A’, it can indicate a communication problem, misconfiguration, networking problems, misconfigured network timeouts, etc. To generate this report, select Online Machines from the Reports menu (or from the Reports section of the Control Panel). An example of the Online Machines report is shown below: Figure 9.9 Online Machines report - 302 - Sanctuary Device Control v4.3.2 - User Guide Below is an explanation of the columns: • Machine This column holds the computer’s name of the machine found in the online table. A machine not listed in this table does not receive updates when using the Send Updates to All Computers or Send Updates to command on the Tools menu. The table updates when the client machine reboots or logs. • Type Build This column holds the kind of client driver installed on the client computer: SN for Sanctuary Client Driver version 3.1 or older; SX for Sanctuary Client Driver version 2.1; SU for Sanctuary Client Driver version 3.2 or later. • IP Address This column holds the IP address of the machine as registered in the online table. • Boot The date and time the Sanctuary Application Server last received a boot notification from the client machine. A value of ‘N/A’ indicates that the Sanctuary Application Server did not receive a boot notification but did receive a logon or unlock notification. This notification applies for machines that could not contact a Sanctuary Application Server at boot.When the user selects the Refresh settings, all modifications done by the administrator to his machine/profile are updated. • Inbound This field contains the date and time the Sanctuary Application Server last accepted a connection from the client computer. • Count (Referring to the Inbound connection) Contains the number of connections accepted from the client computer by the Sanctuary Application Server. • Outbound This field contains the date and time of the last connection initiated from the Sanctuary Application Server towards the client computer. • Count (Referring to the Outbound connection) Contains the number of connections that the Sanctuary Application Server initiated with the client computer. • Failed out This field contains the date and time of the last unsuccessful connection between the Sanctuary Application Server and the client computer. • Count (Referring to the failed out connection) Contains the total number of connections that failed between the Sanctuary Application Server and the client computer. This number increases in the case of poor connections between the client and the server or in the case of high load on the server side. - 303 - Generating Sanctuary Reports • Consecutive Contains the number of consecutive connections failed between the Sanctuary Application Server and the client computer. After four unsuccessful connection tries, the client machine is considered as being offline and automatically removed from the online table. Machine Options Report The Machine Options report displays how the default program’s option changed. To generate this report, select Machine Options from the Reports menu (or from the Reports section of the Control Panel). Please refer to Chapter 8, “Setting and Changing Options” on page 281 for more details on the meaning of each option. An example of the Machine Options report is shown below: Figure 9.10 Machine options report Note the asterisk (*)indicating that the option has not been configured explicitly and has its default value. The default value in the Machine column means that this option is configured for all computers. - 304 - Sanctuary Device Control v4.3.2 - User Guide Server Settings Report The Server Settings report displays how your Sanctuary Application Server(s) is set providing you with invaluable configuration and troubleshooting info. To generate this report, select Server Settings from the Reports menu (or from the Reports section of the Control Panel). Please refer to Sanctuary Setup Guide for more details on the meaning of each option. An example of the Server Settings report is shown below: - 305 - Generating Sanctuary Reports Figure 9.11 Sanctuary Application Server Settings report - 306 - Sanctuary Device Control v4.3.2 - User Guide Note the asterisk (*) indicating that the option has not been configured explicitly and has its default value. - 307 - Generating Sanctuary Reports - 308 - Sanctuary Device Control v4.3.2 - User Guide Comprehensive encryption for securing all your DVD/CD data In this chapter you will find all the information needed to encrypt DVD/CD and use them outside your company in a secure fashion. Introduction When invented in the early 1980s, no one could imagine what a versatile information carrier a CD will become. Over the years CDs and DVDs have quickly become the market standard choice to transport or archive huge data quantities ranging from a few MB to 8.5 GB and even more. Although an economical and practical solution for transporting, mailing, and/or archiving data, DVD/CD are not intrinsically secure when storing sensitive data. Consider now, if you will, what is happening throughout your company with your sensitive information: employees are constantly exchanging and copying it in a variety of means that surely include DVD/CD when the quantity to transmit or archive goes beyond several MB. This puts your whole data and compliance at a risk. Lumension's Sanctuary, with the aid of the Secure Volume Browser tool (SVolBro), can lock down the full content of your company's DVD/CD data disk assuring safe sensitive information when transporting or archiving it. This is also an invaluable asset when the media is lost or stolen. You can also use DVD/CD encryption in combination with Sanctuary's Sanctuary Application Control Suite to provide multiple layers of security in your company, effectively blocking both applications and device use. When encrypting data contained in your DVDs/CDs you gain: • Protection of your data even if you lose your media • Help meeting regulatory concerns • Transparency for the users, they only need to provide a password when accessing their data There is only an extra step to be done when encrypting data and before burning the disk, but the added security you gain is well worth it. Vice versa, when decrypting your data, you will first need to run our tool so you need an extra step before you can actually use your data, but on the other hand, you are protected against peeping eyes. How it Works Our solution works by creating a set of encrypted files in a virtual disk, which are then written to the physical media of your choice (CD or DVD) in various available formats. These files are created from the ones you choose to be protected and need to archive or transport. This encryption is transparent to the end user and assures a full automatic protection. On the other side of the chain, when trying to access your unencrypted data, you do not need to install any software at all. You - 309 - Comprehensive encryption for securing all your DVD/CD data simply insert your encrypted DVD/CD in the drive and an autorun file triggers the volume browser where, after typing the correct password in the provided dialog, you have instant and transparent access to all your data. All data is burnt to your DVD/CD without using the IMAPI (Image Mastering Application Programming Interface) service found in your Windows operating system. Even If this service is not present or activated, you can record DVD/CD. Limitations and Supported Media The logged user needs to have burn and read write access to the DVD/CD device. We support the following formats: ISO9660 image format (includes Redbook Audio) Joliet format Universal Disk Format (UDF) Disk at once We supports the following media devices (depending of your hardware): Recordable CD (CD-R). Formerly known as CD Write Once Rewritable CD (CD-RW) Recordable single, dual, and double layer DVD (DVD-R and DVD+R) Rewritable DVD (DVD-RW and DVD+RW) Random-access DVD (DVD-RAM) Creates and burns single-session - 310 - Sanctuary Device Control v4.3.2 - User Guide Pre-Requisites The supported operating systems are summarized in the following table. You should also consult the Sanctuary Setup Guide for more details. Naturally, you will also need a DVD/CD writer to burn the media. Table 10.1 Operating systems where you can do DVD/CD encryption/decryption When working in a Sanctuary When working outside a Sanctuary environment: In the client side (to environment (only to decrypt DVDs/ burn, encrypt, and decrypt DVDs/ CDs)* CDs)* • • • • • Windows Windows Windows Windows Windows 2000 Professional 2000 Server XP Professional** Vista all editions** Server 2003** • • • • Windows Windows Windows Windows 2000 all editions XP all editions** Vista all editions** Server 2003** *You must install the latest service packs ** 32 and 64-bit editions All the encryption/decryption process is done using our Secure Volume Browser tool (SvolBro.exe). To use it you will need the following elements: Table 10.2 Extra tools needed to do a DVD/CD encryption/decryption In a Sanctuary environment Outside a Sanctuary environment To write Install SVolBro (and authorize it if you are using Sanctuary Application Control) N/A To read No installation or administration privileges are needed. SVolBro is executed directly from the DVD/CD using and autorun or activated by the user. No installation or administration privileges are needed. SVolBro is executed directly from the DVD/CD using and autorun or activated by the user. Note: You will not have access to the encryption facilities if you do not have a DVD/CD writer. - 311 - Comprehensive encryption for securing all your DVD/CD data Encrypting a DVD/CD As with any other kind of device controlled by Sanctuary Device Control, users cannot use them unless a Sanctuary administrator previously authorize them to do so. This is always done using the Device Explorer module accessible from the View Modules Device Explorer or directly by clicking the Device Explorer icon on the Modules section of the Control Panel on the main window. You grant all permissions on the DVD/CD drive class and can assign them to a user or user group. You can - as with many of the device classes - define device groups to further classify and organize your permissions, and grant permissions directly at the class level, to a device model, or to a specific device identified by a serial number. To Assign a User Permission to Encrypt a DVD/CD Before a user can encrypt a DVD/CD you must assign him or her the correct permissions. The only case when you need to do this is if the user will be encrypting the medium on a machine where the Sanctuary Client is installed. Note: A user cannot encrypt a DVD/CD using Sanctuary if the Sanctuary Client is not installed in his/her machine. However, the DVD/CD can be unencrypted even if the machine is not protected by Sanctuary. See “To use an Already Encrypted DVD/CD on a Machine Protected by Sanctuary” on page 320 for more information on how to use this feature. 1. Go to the Device Explorer module - if already opened - or open it. You can find detailed information on how to use this dialog in Chapter 3, “Using the Device Explorer” on page 55. 2. Click on the DVD/CD Drives class to open that class. You can use the Default settings or Machine-specific settings branch depending if you want to define permissions for all machines or for specific ones. 3. Select the user or user group you are allowing to do encryption. 4. You can now proceed to define the permissions. You need to select Write (the Read option is automatically selected) and Sanctuary Encryption (in the Encryption section). 5. Once all rules and options established, click OK to close the dialog and accept the permission. 6. You will now see the new permission definition on the Device Explorer under the DVD/CD Drives class. - 312 - Sanctuary Device Control v4.3.2 - User Guide Note: The list of changes (options, permissions, and rules) is not sent to the client computer immediately. This list is downloaded the next time a user logs onto that computer. You can, alternatively, send the list immediately by selecting the ‘Send Updates to All Computers’ or ‘Send Updates To’ item on the ‘Tools’ menu (or from the Tools section of the Control Panel). Some devices require a reboot in order to apply the new permissions. You can also assign other permissions types and rules as stated in the following sub-sections. Shadowing You can use this rule to have a full copy of what is written to the medium. See “Shadowing Devices” on page 121 for detailed information on how to assign this rule. Note: All shadow files are send to the server even if the burn process fails (due to an error or not enough space to save temporary files). File Filtering (Only Import) You set this rule using the permission dialog. Use it to limit the type of files that can be copied from the DVD/CD. See “Using file filters” on page 77 for detailed information on how to assign this rule. Event Notification You can use this feature to warn the user when a DVD/CD is inserted and needs to be encrypted. See “Event Notification” on page 64 for detailed information on how to define this rule. Temporary offline permission You can use it instead of a "regular" permission when the user cannot reach the Sanctuary Application Server directly. See “To Assign Temporary Permissions to Offline Users” on page 108 for detailed information on how to define this type of permissions. Reports You can find a detailed list of all permissions definitions in the User Permissions report - located on the Reports module. See Chapter 9, “Generating Sanctuary Reports” on page 295 for detailed information on how to obtain this report. - 313 - Comprehensive encryption for securing all your DVD/CD data To assign a user permission to read an already encrypted DVD/CD Note: You must remember that this is only necessary if the user will be using the DVD/ CD in a machine protected by Sanctuary. In other computers, the work is done by a component called Secure Volume Browser (SVolBro). See Chapter 7, “Accessing encrypted media outside of your organization” on page 249 for more information. 1. Go to the Device Explorer module - if already opened - or open it. You can find detailed information on how to use this dialog in Chapter 3, “Using the Device Explorer” on page 55. 2. Click on the DVD/CD Drives class to open that class. You can use the Default settings or Machine-specific settings branch depending if you want to define permissions for all machines or for specific ones. 3. Select the user or user group you are allowing to read from the encrypted media. 4. You can now proceed to define the permissions. You need to select Read (do not select Write unless you also want the user or user group to be able to encrypt the DVD/CD) and Encrypted (in the Encryption section). 5. You can also define here the File Filter rules to limit the type of files the user can copy to the local hard disk. If you want to do so right now, click on the FILTERS button. 6. Once all rules and options established, click OK to close the dialog and accept the permission. 7. You will now see the new permission definition on the Device Explorer under the DVD/CD Drives class. Note: The list of changes (options, permissions, and rules) is not sent to the client computer immediately. This list is downloaded the next time a user logs onto that computer. You can, alternatively, send the list immediately by selecting the ‘Send Updates to All Computers’ or ‘Send Updates To’ item on the ‘Tools’ menu (or from the Tools section of the Control Panel). Some devices require a reboot in order to apply the new permissions. To encrypt a DVD/CD Once the required permissions are set for the user or user group, you are ready to encrypt a DVD or CD. Files can be copied to and from the DVD/CD just like in Windows' Explorer, for example with a simple drag and drop operation. Similarly, files are being decrypted on the fly when copied back from the medium to your hard disk. The only difference here is that the user must provide a - 314 - Sanctuary Device Control v4.3.2 - User Guide password before the actual access can begin. All the process starts using Lumension's Secure Volume Browser (SVolBro) as the tool to encrypt/decrypt and burn the medium. The process is as follows: 1. Activate SVolBro.exe (Secure Volume Browser) either by clicking on the desktop shortcut or by activating it directly from the installation directory. You will see the initial screen. If you know your way around Windows' Explorer, you will surely fill comfortable using SvolBro since it has all its basic functionalities: copy and paste, drag and drop, tree structure, two-panel view, etc. Note: The user will not have access to encrypt on a Sanctuary protected environment if the required permissions are not previously set. See “To Assign a User Permission to Encrypt a DVD/CD” on page 312 for more details. Figure 10.1 Secure Volume Browser 2. Select, on the left panel, the DVD/CD. - 315 - Comprehensive encryption for securing all your DVD/CD data 3. Select from your Windows' Explorer or from any other branch of the left panel, all the files you will need to encrypt and drag them to the empty right panel representing the content of your DVD/CD. Note: You will always see the file list bar and field grow even when you delete files from the list. If you exceed the DVD/CD capacity (as indicated in the Total Data Size field and file indicator bar), you must restart your compilation or empty the list by right clicking on the DVD/CD icon on the left panel and selecting the CLEAR LIST item. Once all files have been selected, you are now ready to burn your DVD/CD: 4. Right click on the disk letter representing your DVD/CD burner and select the BURN item from popup menu. Notice that you also have an option to clear all the files that you previously drop in this panel - CLEAR FILE LIST. Figure 10.2 Burning a DVD/CD - 316 - Sanctuary Device Control v4.3.2 - User Guide Note: The burn menu is not available if there is no media inserted. 5. You are now ready to type-in your password. You must confirm it before proceeding. Click on OK to continue. You need to provide a complex password (upper and lowercase letters plus numbers and symbols). Figure 10.3 Enter your password 6. A new dialog appears. Select the required options from this dialog as needed: Erase method (only applies to R/W disks) • Quick:Only erases the table of contents (TOC) • Full: All data in the disk is completely erased. Use the Eject option to eject the media at the end of the process. Use the Details button to show more information about your recorder and the media that it contains. Note: You must provide the proper media to contain ALL the selected data. If you see a red bar, you must first close the dialog, erase some of the files in the DVD/CD, or try with a higher capacity medium, and retry the process begging from step 4 - 317 - Comprehensive encryption for securing all your DVD/CD data Figure 10.4 The burning dialog 7. Enter a name for the disk in the Label field (up to 16 characters). - 318 - Sanctuary Device Control v4.3.2 - User Guide 8. Click on Burn. The Burn button will not be active unless the media is big enough to contain ALL your data. Figure 10.5 Burning a DVD/CD Once this burning process ends, a message informs the user and the DVD/CD is ejected (if the option has been chosen). 9. Click on CLOSE to exit from this dialog. Note: Once the disk is burn, the program considers its capacity as zero. If you eject the media and insert a new one, without closing the final dialog, you can rewrite the contents on the new media keeping the same password. This will only works if the media is empty (the Erase button will activate if you are using a rewritable disk). If you close the dialog and reopen it (using right click Burn), you can keep the same file structure but with the added advantage of changing the password. - 319 - Comprehensive encryption for securing all your DVD/CD data Note: You can interrupt the process at any time by clicking on the CANCEL button. If you are not using a rewritable media, the disk will be unusable. Using an Already Encrypted DVD/CD Once a DVD/CD has been encrypted, it is ready to be used in any other machine since it now contains all necessary elements needed to be used autonomously - regardless if it has or not the Sanctuary components installed or not. There are two distinctive cases here: • The user is going to use the encrypted DVD/CD on a machine protected by a Sanctuary and, thus, there is a client installed. • The user uses the DVD/CD in a machine where there is no Sanctuary protection. In the first case, the administrator must first authorize the user to use such a media while in the second case, the user only requires the Secure Volume Browser tool - which requires no administrative right to install or use it. To use an Already Encrypted DVD/CD on a Machine Protected by Sanctuary This has to be done using the Secure Volume Browser (SVolBro) interface. Follow the instructions provided on the next section. To use an Already Encrypted DVD/CD on a Machine not Protected by Sanctuary 1. Insert the DVD/CD in your reader. It does not matter if you are working on an environment that is protected or not by Sanctuary. SvolBro should start automatically, if it does not, open your Windows Explorer, navigate to your DVD/CD reader and double click on the icon representing the program to launch it. A password dialog is shown. 2. Type-in the correct password. 3. The Secure Volume Browser (SVolBro) initial screen is shown with the list of all files and directories on the left panel - all of them already decoded and ready to be used as usual. Note: You can open directly an encrypted file using SVolBro (Secure Volume Browser). The file is placed in the user's temporary directory. You can modify the file but you cannot return it to the medium. You can, on the other hand, save it to your hard disk drive and then do a copy and paste or a drag & drop operation. - 320 - Sanctuary Device Control v4.3.2 - User Guide If you Forget the DVD/CD Password If you forget your password or if you type it wrong 5 times, you must recover it using the Password Recovery dialog. The process is the same one depicted in “Recovering a decentralized encryption password without Sanctuary Client” on page 270. DVD/CD Icons The following table show the icons used to represent different DVD/CD states as shown in the SvolBro browser. Table 10.3 DVD/CD icons Icon Definition The media can be written to. The media is encrypted and locked. The user must provide a valid password to unlock it and gain access to its files. The media is encrypted and has been unlocked by the user by providing a valid password. Access to its contents is now possible. - 321 - Comprehensive encryption for securing all your DVD/CD data - 322 - Sanctuary Device Control v4.3.2 - User Guide 11 Using PGP-Encrypted Removable Devices This chapter explains you how to use removable devices encrypted with PGP (Pretty Good Privacy) in a Sanctuary-protected environment. Introduction PGP Desktop is an application that provides cryptographic privacy and authentication and it was primarily developed for signing, encrypting, and decrypting e-mails. It is now also used to encrypt file and removable devices. In order to use PGP with Sanctuary, you will first need to install PGP Desktop v9.7.x or v9.8.x. For further instructions on how to install this product, you will need to refer to the PGP help file or user manual. Note: If you are using Sanctuary Application Control Suite you must first need to authorize the PGP Desktop files. Refer to the Sanctuary Application Control User Guide for information on how to do this. When using an encrypted removable device on one of the three following modes (see also Figure 11.1, “Encryption modes” on page 323 ): • Self Contained Encryption — You use the Sanctuary Management Console to assign permissions and one of the several methods proposed in this manual to encrypt and decrypt the device. • PGP WDE — You use the PGP console to encrypt and decrypt the device and the Sanctuary Management Console to assign access permissions. • Unencrypted — The device is not cypher; the Sanctuary Management Console is used to assign Read and Write access permissions but not to encrypt or decrypt the device. Figure 11.1 Encryption modes You use the Sanctuary Management Console to: • Authorize the use of PGP-encrypted removable devices. • Grant general access to all PGP-encrypted removable devices assigning the appropriate permissions. - 323 - Using PGP-Encrypted Removable Devices • Define specific rights to use PGP-encrypted removable devices for specific users and/or user groups. • Define Shadow rules for PGP-encrypted removable devices. • Use the Log Explorer module to review all attempts to access or use PGP-encrypted removable devices by all or certain users or computers. • Use the Log Explorer module to view audit logs of all changes done to permissions related with PGP. • Review PGP permissions using the Reports module. Each of these functions is described in detail in the following sections. Defining Permission Using the Sanctuary Management Console As with all permission and rules used in Sanctuary, you use the Sanctuary Management Console to define, change, delete, or view permissions. All PGP permissions are only relevant for removable devices and are accessible from the Removable Devices class of the Device Explorer module of the console. Permissions can be defined at two levels for all user or users belonging to a group or for a specific computer. You can do this using the two available parts of the tree shown on the right panel of the Device Explorer module: Figure 11.2 The Device Explorer module two main sections Once in the console go to the Device Explorer module and proceed as follows: 1. Select the Removable Device Class located within the Default Settings branch the in the right side panel of the console. 2. Right-click on the class and choose Add / Modify Permissions from the popup menu. Alternatively, select the class and then select Add / Modify Permissions from the Explorer menu - 324 - Sanctuary Device Control v4.3.2 - User Guide or use the CTRL+D shortcut key. The Permissions dialog is displayed. Figure 11.3 Defining permissions 3. The first step consists on adding the user(s)/group(s) for which this permission applies. Click on the ADD button. The Select Group, User, Local Group, or Local User dialog is displayed. 4. Select the user(s) or group(s). See “Adding a user or group when defining a permission” on page 88 for a complete description on how to use this dialog. 5. Back in the Permissions dialog, select the user(s) or group(s) you want to assign permissions to (you can use the SHIFT and CTRL keys to do a multiple selection), and then activate the appropriate options). You can define different permissions for each group of selected users or groups. See “Using the Permissions Dialog” on page 72 for more details (especially if you are working on the Removable Storage Devices class). 6. Select the encryption type from the Encryption panel: Self Contained Encryption – Permissions are applied to a removable device encrypted using the methods described in this manual to cipher and control de removable device. PGP WDE – Permissions are applied to a removable device encrypted using Pretty Good Privacy. The device is encrypted and decrypted using PGP’s own unlocking mechanism and control console. Unencrypted – Permissions are applied to a removable device not encrypted. You can select several encryption methods from the panel. - 325 - Using PGP-Encrypted Removable Devices Note: Encrypt, Decrypt, Export to File, Export to Media, and Import are not used when selecting the PGP WDE option. Note: File Filtering is not available for PGP-encrypted devices. As soon as the permission is defined and send to the computer(s) involved, the user can begin to use the device. When the user plugs a PGP-encrypted device and if the PGP WDE option has been selected, the following dialog appears: Figure 11.4 Unlocking a PGP WDE encrypted removable device Note: This unlocking dialog corresponds to PGP WDE and is not related to Sanctuary. Note: After encrypting or decrypting a device using PGP WDE, you must unplug and replug the device to your machine so that Sanctuary can recognize it. To Allow Users to Encrypt a Device Using PGP WDE Follow these steps to give users the minimum permissions to encrypt a removable device using PGP: 1. Select Read from the Permissions panel. - 326 - Sanctuary Device Control v4.3.2 - User Guide 2. Select Write from the Permissions panel. 3. Check the Unencrypted option from the Encryption panel. 4. Click on the Add button and Select the LocalSystem user from the list. Follow the procedure describe in “Adding a user or group when defining a permission” on page 88. Note: Encrypt, Decrypt, Export to File, Export to Media, and Import are not used when selecting the PGP WDE option. Note: The Media Authorizer module cannot be used for PGP WDE encrypted devices. When you give these permissions, the device is not accessible from Windows’s Explorer. The user must use PGP’s explorer (see Figure 11.6, “The PGP desktop window” on page 329 ) to encrypt the device. To Allow User to Use a PGP WDE Encrypted Removable Device Follow these steps to give user or user group the minimum permissions to allow them to use a PGPencrypted removable device: 1. Select Read from the Permissions panel. 2. Optionally: Select Write from the Permissions panel. Do not use this option if you want to limit the user privileges. 3. Define the user or user group by clicking the ADD button and selecting the appropriate one(s). Follow the procedure describe in “Using the Permissions Dialog” on page 72. 4. Check the PGP WDE option from the Encryption panel. - 327 - Using PGP-Encrypted Removable Devices To Check the Client Status If the client icon is activated on the client computer, as determined by the general options, the user can check its status by clicking on the icon. This will display the following dialog: Figure 11.5 Client status dialog To define or change the options, see Chapter 8, “Setting and Changing Options” on page 281. To Decrypt a Removable Device Using PGP’s Console In this special case, you do NOT need to define permissions in Sanctuary. Warning: The user will have access to the PGP-encrypted removable device, using PGP’s console, even if None is explicitly assigned to the user or user group using Sanctuary’s console. Sanctuary will not recognize the device you encrypt or decrypt this way unless you unplug it and replug it again. - 328 - Sanctuary Device Control v4.3.2 - User Guide Figure 11.6 The PGP desktop window - 329 - Using PGP-Encrypted Removable Devices Shadow It is possible to define shadow rules for all PGP-encrypted removable devices Figure 11.7 Defining shadow rules for a PGP-Encrypted device You must follow the procedure depicted in “Shadowing Devices” on page 121 to define a shadow rule. Reports PGP-Encrypted removable devices permissions can be found in the Device Permissions report. For more information, please read Chapter 9, “Generating Sanctuary Reports” on page 295. Using the Log Explorer You can use the Log Explorer module on the Sanctuary Management Console to find out the use given to removable devices by user and user groups. You can use the pre-defined reports or create your own, personalized, ones by following the procedure described in Chapter 5, “Using the Log Explorer” on page 149. You have at your disposal the following keys: • Medium-Inserted • PGP-Encrypted and Sanctuary-Encrypted (in the Reason column) - 330 - Sanctuary Device Control v4.3.2 - User Guide Auditing Logs You can control all administrator actions using the Log Explorer module on the Sanctuary Management Console. This includes all permissions revoking, changes, deletes, and grants. Follow the procedure described in Chapter 5, “Using the Log Explorer” on page 149 to obtain all kind of useful reports. - 331 - Using PGP-Encrypted Removable Devices - 332 - Sanctuary Device Control v4.3.2 - User Guide A DVD/CD Shadowing Introduction DVD/CD shadowing is the term used to describe the capture of data written/read to/from CD-R, CD-RW, DVD-R, DVD+R, DVD-RW, DVD+RW and DVD-RAM media, its analysis, and extraction. The information is stored by the Sanctuary Application Server and can be retrieved in summary form or with full file data using the Log Explorer module of the Sanctuary Management Console. Warning: HD-DVD shadowing is not supported. Operation of the Sanctuary client If you enable the Shadowing option for the client computer and the user attempts to write (read) data to a CD-R or similar device, a local copy of the entire data stream is normally saved to a file in the temporary shadow files folder on the client computer. This file is submitted to a special component of client (SCC) for parsing purposes and submitted to an available Sanctuary Application Server during the next available upload time-frame operation. Additionally, one or two log files are added describing progress and problems encountered during this phase. If a serious error is found, the entire image is added to the shadow files list under a special file name. If necessary, you can easily retrieve this file for manual analysis using third party tools. If the analysis failed altogether for a reason such as lack of disk space or memory, the Sanctuary client keeps the file and resubmits it during the next upload window. In either case, the analysis logs detailing the problems found are created. There are two cases for a shadow data transmission: 1. A full shadow mode is in effect and all data must be transmitted to the server for archive and, possible, further analysis. The file is deleted once successfully sent. 2. A file name only shadow mode is active. Only the name and size of the file(s) is transmitted before deleting it. If the written/read data is in a format that cannot be decoded with reasonable effort, the attempt to write to the medium is denied. Individual files embedded in the data stream are extracted by the Sanctuary Application Server and added to the ’shadow files’ list. - 333 - DVD/CD Shadowing Warning: The priority of shadowing options has changed for Sanctuary Device Control version 4.x: In previous versions the 'Filename only' and 'Enabled' options took priority over 'Disabled'. In version 4.x the 'Disabled' option takes priority over other options. User upgrading from previous versions should modify their permissions accordingly, especially if there is a shadowing 'Disabled' rule defined in their policy set. Disk Space Requirements The analysis of CD and DVD images can, by its nature, consume huge amounts of disk space. For filename shadowing — where the files themselves are not stored – the temporary space needed is the same size as that of the image being analyzed. If ‘full’ shadowing is enabled (i.e., the contents of files recorded onto CD or DVD media are stored), the Sanctuary client requires three times the space of the file, or even more if there are many small files. With current DVD recorders storing up to 8.5 GB on a single disc and higher-capacity solutions (Blu-Ray, HD-DVD) even up to 50 GB, it is necessary that you carefully monitor disk space. Supported formats when shadowing Current CD recording standards allow for a bewildering array of formats, ranging from plain user data in a simplified ISO file system to a UDF/ISO+Joliet bridge DVD with interleaving, extended attributes, security descriptors, and associated files. Common recording software uses only a small subset of those combinations, and Sanctuary Device Control concentrates on those; the following table offers an overview of what is and what is not supported in each of the two possible shadow modes. Table A.1 Supported formats for the full shadow or file name only shadow modes Format Full shadow mode File name only shadow mode Audio tracks (not interpretable) × Scrambled tracks (not interpretable) × Raw-mode data (not interpretable) × Packet writing, Mount Rainier × ISO, ISO/Joliet UDF × Legend: × Not supported, writing blocked by the Sanctuary client Shadowed and fully supported; individual files are extracted and made available Shadowed, partially supported; individual files are extracted and made available Shadowed, but individual files not extracted - 334 - Sanctuary Device Control v4.3.2 - User Guide Table A.1 Supported formats for the full shadow or file name only shadow modes Format Full shadow mode File name only shadow mode UDF+ISO/Joliet bridge ISO+El Torito bootable CDs ISO+Rock Ridge extensions High Sierra Group format Apple HFS × Legend: × Not supported, writing blocked by the Sanctuary client Shadowed and fully supported; individual files are extracted and made available Shadowed, partially supported; individual files are extracted and made available Shadowed, but individual files not extracted Handling of Unsupported Shadowing Formats Sometimes the Sanctuary Application Server stores an entire image of a recording session, for instance. Administrators may want to look at such images immediately. To do so, an image can be retrieved from the Shadow File Explorer in the Sanctuary Management Console and recorded onto a suitable medium. As an alternative, there are other commercially available products that can ’mount’ an image, making it appear as a virtual CD-ROM or DVD-ROM drive. Among those programs simulating virtual media we can find ImageDrive (a utility that is part of Nero AG Software's Nero recording software: http://www.nero.com), Daemon Tools (http:// www.daemon-tools.cc), and Microsoft's VirtualCD (not available on-line; distributed usually to Beta customers and to Premier support accounts on request). There are three technical limitations caused by the peculiarities of recording; the information needed to determine whether they apply to a particular recording session is included in the header of the analysis log file. 1. For multi-session CDs, only the first session can be used without further conditioning. 2. A recording that starts at, let us say, block number 10,000 cannot be read correctly if it does not have exactly 10,000 blocks preceding it (otherwise, all the block numbers within the session would be off). Therefore, such a recording cannot be used in a virtual disk drive. If you need to write again to the same medium, you must first create a session with the proper number of blocks (9,999 in our example). Only Track-At-Once recordings can be used. Recordings in Disc-At-Once mode carry a ‘pre-gap’ sequence of 150 blocks before the start of the actual data for the session. This has the same effect as a session that is not the first one on the medium (i.e., that does not start at the very first block). This case, technically speaking, is just a special case of the previous limitation. - 335 - DVD/CD Shadowing 3. Only recordings with a data block size of 2048 bytes can be used. Virtual disk drives and recording software expect an image to process having 2048 bytes per block, at least for data recordings. Yet they often use block sizes different from this quantity when actually writing information to a medium. This behavior has also been noticed when copying discs using hybrid CD-RW/DVD ROM drives. CD Image Analysis The analysis of a CD or DVD image always creates at least one file: the analysis log file. This file is discussed in the following sections. All files added to the database, including the log files, an eventual image file, and any data files extracted from the image, have a number prefixed to their names; for example, the file ‘foo.dat’ that was written to a CD-R would, thus, appear as ‘[000055394] foo.dat’. All files created from the same recording session have the same ID number, and distinct recording sessions are guaranteed to be assigned distinct numbers. This allows for easy grouping of related files. We represent this prefixed ID number as ‘[#########]’ in the remaining part of this document. Files The files in the recorded session are stored in the database and, if full shadowing is enabled for the analysis, their contents are copied to the Data File Directory used by the Sanctuary Application Server. Files whose data is absent (see Multi-session media) are logged but not added to the database as individual entries. Logs The Sanctuary client always produces a shadow file named ‘[#########] CD-or-DVD-analysislog.txt’, a Unicode text file that can be read with Notepad or any other Unicode-enabled editor or viewer. This file contains information on the write settings, additional file systems (e.g., the ISO file system accompanying a Joliet file system), any errors encountered, and the full list of directory entries found, including files with data residing in an earlier recording session. We recommend reviewing this log file as it contains, near the end, any non-zero and unused portions of the image that might be use as a covert channel. If any errors are encountered, the Sanctuary client also creates an error log (‘[#########] CD-orDVD-error-log.txt’) containing just the error messages. We strongly recommend reviewing this file if it does appear. Saved Image Should a fatal error be encountered during the analysis (e.g. unreadable directory, invalid image format), the entire image file is added as a shadow file ‘[#########] Unparsed-CD-or-DVDimage.iso’. You can record this file onto a suitable medium for manual analysis. To record such a file, it is essential to get the write mode right – the log header shows you that information. For more details, seeHandling of Unsupported Shadowing Formats on page335 . - 336 - Sanctuary Device Control v4.3.2 - User Guide Sample Analysis Log The following is an actual analysis log of a small recording (two directories with six nearly empty files using a Joliet file system). Comments are mingled with actual log entries. Image parsing started: copydate .......... Thu 29-May-2003 16:05:04 device ............ 1 user SID .......... S-1-5-21-725345543-1275210071-1644491937-1106 computer .......... FTA image size ........ 1224704 bytes (approx. 2 MB) first sector ...... 0 write type ........ 1 (track-at-once) data block type ... 8 (2048 bytes -- mode 1 (ISO 10149)) multi-session ..... 3 (B0 pointer indicates next PMA -- next session allowed) block size ........ 2048 bytes In this first stage, the Sanctuary client just received the initial message of an intercepted recording. Note the write parameters. At this stage, the client parses the entire image data and sends it to the Sanctuary Application Server that stores it in a temporary file. Image blocksize is 2048 bytes, logical block size is 2048 bytes. The logical block size for data recordings must be 2048 bytes, but the size of a physical block may vary with the recording mode: Analysing volume descriptors. Primary Volume Descriptor found at block 16. Supplemental Volume Descriptor found at block 17. Supplemental Volume Descriptor type: Joliet. Volume Descriptor Set Terminator found at block 18. On a pure ISO or ISO+Joliet recording, the Primary Volume Descriptor always points to the ISO file system. Joliet file systems are always referenced through a Secondary Volume Descriptor. There are other arrangements. For example, a bootable CD or DVD shows a Boot Volume Descriptor in the first position, followed by PVD and any SVD entries. On an ISO+Joliet recording, the client prioritizes Joliet over ISO. If the ISO file system structure is not read, some blocks are considered ‘unused’. To avoid this, the client reads unused file system structures: Touching directory tree for VD #2. <ROOT>: touching subtree. Found subdir: THIS_IS2 Found subdir: THIS_IS_ THIS_IS2: touching subtree. THIS_IS_: touching subtree. Having done that, the Joliet directories are read to build a list of files, subdirectories, their lengths, and their location in the image: - 337 - DVD/CD Shadowing Building directory tree. <ROOT>: building subtree. Found file: This is the first file in the root directory Found subdir: This is the first subdirectory Found file: This is the second file in the root directory Found subdir: This is the second subdirectory This is the first subdirectory: building subtree. Found file: This is the first file in the first subdirectory Found file: This is the second file in the first subdirectory This is the second subdirectory: building subtree. Found file: This is the first file in the second subdirectory Found file: This is the second file in the second subdirectory The next stage adds those files to the shadow files known to the client and, if full-contents shadowing is enabled, extracts the actual data for those files: Extracting files from image. <ROOT>: extracting files from directory. [000000004]This is the first file in the root directory: Added file name and data (path "\", shadowid 10823, location 1;0;3;cdshadow;000\000\00000003.cdshadow) The above entry (all this data is in only one line in the original log) shows the file ‘This is the first file in the root directory’ being added to the list of shadow files. Had the file been imported from an earlier recording session on the same disc, the entry would have read ‘[000000004] This is the first file in the root directory: file data are in an earlier session (LBA NNN) -- skipping this file.’, where 12345 would have given the block number of the file's data on the disc itself. [000000005] This is the second file in the root directory: Added file name and data (path "\", shadowid 10824, location 1;0;4;cdshadow;000\000\00000004.cdshadow) <ROOT>: extracting files from subdirs. This is the first subdirectory: extracting files from directory. Having processed all the files in the root directory, the first of the subdirectories (in this case ‘This is the first subdirectory’) is examined in the same way. We omit here all other entries of this type to save space, but they do appear fully in the analysis log. The final stage consists in checking any block that contains data (i.e., not filled with zeros) but is not part of any file or subdirectory, and to check for partially-unused blocks, in whose unused portions data may be hidden. Since this image has not been manually falsified, no such blocks exist: Verifying that unused blocks do not contain any data. 0 hidden blocks with data were dumped to the log. 0 partial blocks with extra data were dumped to the log. Image analysis completed. Image parsing ended (result 0). Log closed. Once this is done, the analysis of the image is now complete. If a fatal error occurs (one for which the client cannot guarantee that the shadow files and the log contain all data recorded to the disc), the image file itself would also have been added as a shadow file. You can easily verify this condition, since the name of these files in the shadow files list is deliberately chosen to be distinctive. - 338 - Sanctuary Device Control v4.3.2 - User Guide Supported and Unsupported CD Formats Summary A track-at-once (TAO) recording for data generally works fine. Ahead's Nero (we tested from 5.5.10.15a onwards) data CDs written in disc-at-once mode (DAO, but not DAO/96!) is also compatible with CD shadowing. Roxio's Easy CD Creator 5.2 and 5.3 often decide to use raw mode for SAO recordings, which is unsupported and is not allowed by the Sanctuary Kernel (client kernel driver). The same applies for Roxio's CD Copier, which is a part of Easy CD Creator. The IMAPI built-in CD-recording of Windows XP is compatible with Sanctuary Device Control. Audio recordings are generally blocked, as they could be abused as a large-capacity covert channel to hide data. UDF recordings cannot be analyzed (UDF/ISO bridge sessions can and will be analyzed), but CD shadowing will at the very least provide an image that can be inspected for further information. Supported data block formats and recording modes In TAO mode, most recording applications use data block types 8, 10, or 13, all of which are acceptable to Sanctuary Device Control. In SAO mode, recording applications sometimes use data block type 0 for non-audio data. The details of a session's track mode, write type, and data block type are logged at the beginning of the analysis log. Supported: ISO and Joliet ISO 9660:1988 defines the simplest of all supported file systems. File names are restricted to eight characters, file name extensions to three; subdirectory names are also limited to eight characters and cannot have an extension; allowed characters are uppercase characters, digits, and the underscore (plus the dot to separate a file name from its extension). A less restrictive version (standard ‘level 2 compliance’) allows thirty-one characters in filenames including extensions, but maintains all other limitations. Sanctuary Device Control is level 2 compliant. Joliet is, from the analysis point-of-view, a trivial extension to ISO and is not discussed separately; any noticeable differences are mentioned in the text. As mentioned above, Joliet supports the full Unicode character set, file and directory names of up to 64 characters, multiple dots in a file or subdirectory label, and a much deeper directory hierarchy. Supported and Unsupported File System Features Sanctuary Device Control supports all basic file system features of the ISO and Joliet file systems. Interleaving and extended attributes are unsupported; neither of them is used by recording software today. If used, they show up among the unused blocks dumped to the analysis log. Associated files (akin to NTFS streams or Macintosh data and resource forks) show up as separate files of the same name. If a Joliet file system is present, it takes precedence over the accompanying ISO file system. - 339 - DVD/CD Shadowing UDF/ISO Bridge A ‘bridge’ CD is one that unifies features of two normally separate media or file system types. In this case, it is a CD or DVD with a UDF file system as its primary directory structure, but the files are reflected in an additional ISO (or ISO+Joliet) file system, which UDF allows for, and which Sanctuary Device Control can read. Sanctuary Device Control performs the analysis for this type of medium, considering it as a regular ISO or ISO + Joliet. The data blocks containing the UDF file system information (subdirectories, path tables, etc.) are dumped as ‘unused blocks’: Sanctuary Device Control regards them as unused because the ISO or Joliet file systems do not reference them in any way. Multi-session Media Multi-session recordings have a special property: Earlier recording sessions on the same disc may be ‘imported’; the files in such an imported session show up in the new session being recorded, but their data blocks continue to reside in the original session. In short, for an imported file, the filename is part of the new session but not the file data, and the same applies to the image. The analysis reports such files in both the main and the error logs, but they will not be entered as shadow files into the database. No security problem arises from this behavior: The file name is logged and traceable, and since the file data is already on the disc, Sanctuary Device Control reports it when the old session was recorded. The exception is a media recorded before Sanctuary Device Control was installed, and which allows adding additional sessions. In such a case, it is possible (but difficult) to force the recording application to create a local image file, manually modify it to disguise the older files’ names, and record that in a medium. The log shows the false name and the data is absent. The countermeasure is to finalize such media with the installation of Sanctuary Device Control. This ensures that no further sessions can be written, making it impossible to disguise the name of a sensitive file. Unsupported: UDF-Only Recordings UDF is generally unsupported. Since the Sanctuary client has no way to determine, at recording time, the type of file system contained within the data stream, such an image is submitted to Sanctuary Application Server. The client analysis will have failed, as UDF does not even have a ’Primary Volume Descriptor‘ (the hook off which, in an ISO/Joliet file system, all other data structures hang). Sanctuary Application Server then adds the image file in its entirety to the shadow files and makes appropriate notations in the main and error logs. Usually, such images can be recorded to a suitable medium or mounted as a virtual disk volume. Unsupported: Audio Tracks Audio tracks are not permitted since Sanctuary Device Control cannot interpret them. The raw track format allows writing completely unstructured data in any format a user might choose and would thus circumvent monitoring or shadowing the information recorded to disc. - 340 - Sanctuary Device Control v4.3.2 - User Guide Partially Supported: Disc-At-Once Recordings Depending on the make and version of the recording software used and on the version and service pack of the underlying operating system, some recording software uses data block type zero to write data media in DAO mode. These recordings are indistinguishable from audio recordings and, for the same reasons, are not permitted by Sanctuary Kernel (client kernel driver). Unsupported: Scrambled Tracks Data tracks can be recorded in the same mode as audio tracks. To do so, a recording application calculates the error-correcting CIRC and shuffles the data appropriately. These are the same steps that a CD recorder performs internally when instructed to write a normal data block. Sanctuary Kernel (client kernel driver) does not permit data tracks recorded in such mode. Unsupported: Packet Writing, Mount Rainier Packet writing does not record an image as such. Rather than that, it writes a block here, a few more over there, and so on in a more or less random fashion. This mode and any software implementing it are, therefore, unsupported. Unsupported: ISO Interleaving, Associated Files The ISO file system was originally designed to support interleaving — a file would be spread out to every second, third, or, generally, Nth block, instead of occupying a number of consecutive blocks according to its length,. This schema was intended to allow delay-free playback on drives that cannot handle two data blocks without a pause. The feature was proposed even before the first CDROM drives were marketed. To the best of our knowledge, there is no recording software using this feature, and analyzing an image recorded in this manner causes Sanctuary Application Server to log an error and store the entire image file. Unsupported: ‘El Torito’ Bootable CDs ‘El Torito’ is a specification that builds on and expands the ISO 9660:1988 standard to accommodate bootable media. Generally speaking, ‘El Torito’ media can either provide an embedded image of some other media (for example, of a bootable floppy disk) with the computer's BIOS emulating a floppy disk drive using the contents of this embedded image. It can also provide a boot loader that then proceeds to read additional files from the medium, just as the computer's hard disk boot does. In the former case, the embedded image is separate from, and unreferenced by, the ISO or Joliet file system and are, therefore, considered as consisting of ‘unused blocks’ by Sanctuary Device Control; these blocks are dumped to the analysis log as usual. Since the format and file system of the embedded bootable image are not standardized, no attempt is made to interpret the contents. - 341 - DVD/CD Shadowing In the latter case (simple boot loader without emulation of a bootable floppy disk), the files read by the loader must be referenced like any other file in the ISO or ISO+Joliet file systems and will be analyzed like any other file. Unsupported: Rock Ridge Extensions Rock Ridge extensions provide several Unix-like capabilities for ISO-formatted media (hard links & file attributes used for soft links). The files themselves are accessible normally and are listed as shadow files; the control blocks used by the Rock Ridge extensions show up in the main log as ‘unused blocks’. Unsupported: HSG (High Sierra Group) Format The High Sierra Group format was the predecessor and basis for the ISO 9660:1988 standard; the latter is a superset of the former. There is no current application that records media in High Sierra Group format; in the worst case, Sanctuary will simply file the entire image. Partially Supported: HFS HFS refers to Apple's Hierarchical File System. It uses the System Use Sharing Protocol to set aside a part of each directory entry for Macintosh-specific information (flags, Mac file type, and Mac file creator); these fields are ignored. Macintosh CD-ROMs also use associated files, which are not allowed for level 2 compliance; this ISO mechanism is intended to let a file have multiple ’subfiles‘, like NTFS streams. Associated files are recorded as multiple files bearing the same name and special flags. In particular, the ‘resource fork’ of a Macintosh-file is represented by such an associated file, while the main portion (‘data fork’) corresponds to the main entry for that file on the disc. Associated files are added to the shadow files list as separate files with the same name as the main file. Note: In case the write process fails even before starting (‘SCSI command aborted’ or ‘ASPI failing’), check the log files of the CD writer software and also the Windows Event Log to see if the write mode the drive used (if logged) is compatible with Shadowing. Some drives will automatically switch from hardware-wise to a raw write mode when copying on the fly CDs. This is often the case with hybrid ‘combo’ units, which support CD-RW writing and DVD reading in a single unit. A workaround in such a case is disabling shadowing completely, use a different dedicated CD or DVD burner, or copy the individual files first to the local hard disk and recreate the disc with your recording software. Supported DVD/CD Burning Software As DVD/CD burning operations depend heavily on the software used to do the writing, we are only currently supporting the following companies’ programs when blocking DVD/CD devices: - 342 - Sanctuary Device Control v4.3.2 - User Guide • NERO AG Nero burning ROM • Sonic Roxio Easy Media Creator • Microsoft Corp. Windows XP built-in CD burning software Other programs may cause some issues when the user tries to burn a DVD/CD. The reason for this is that some of them use ‘non standard’ drivers that interact directly with the hardware bypassing the ‘normal’ Windows channel. You can avoid this situation if you take care on not allowing the user to be Administrator of his own machine. You can also use other cost-effective solutions, like Sanctuary Application Control Suite, to prevent the execution of non-authorized software. In this way, you avoid two potential dangers: • Jeopardizing the system security. • Avoiding the installation of non-approved and/or non-licensed software. Warning: Windows’ CD recording capacity is controlled by a service called Image Mastering Applications Programming Interface (IMAPI; run by LocalSystem). If you give R/W access to LocalSystem for the ‘DVD/CD Drive’ class in the ‘Default Settings’ or ‘Machine-Specific Settings’ using the ‘Device Explorer’ module or add LocalSystem to the users of a music CD using the ‘Media Authorizer’ module and the service is running, then the user can create DVD/CD copies — using Windows Media Player, Windows Explorer, or any other program that uses this service — of any file from the hard disk, including private data, proprietary information, music, etc. See details in Chapter 3, “Using the Device Explorer” on page 55 and Chapter 6, “Using the Media Authorizer” on page 213. Some third-party burning software do not need the IMAPI service and can be controlled or bloqued using our Sanctuary Application Control Suite. Note: When setting read-only permissions on the DVD/CD Drives class some applications, notably CD-R applications, may not notice that access was denied by Sanctuary and erroneously report to the user that a DVD/CD has been burned properly when it was not. In this case, we recommend that you use Sanctuary’s Event Notification to warn users of this situation. - 343 - DVD/CD Shadowing - 344 - Sanctuary Device Control v4.3.2 - User Guide B Important Notes In this appendix, you will find the most common difficulties that you will encounter when using Sanctuary Device Control. • If you define a copy limit rule for a specific user that is lower than that set for Everyone, then the ruling one will be that specified for the user. If, on the other hand, the specified copy limit rule for the user is greater than that of Everyone, the prevailing rule will be that of Everyone. • Be aware if you modify or create a new permission rule for the PS/2 port. The PS/2 port permission rule is enabled (Read/Write) by default for Everyone. If you define a new rule for a client, send the update, and reboot (to apply the rule), the PS/2 port is blocked for everybody until the login sequence is finished. • Reports may take too long to generate if you have too many rules in the Media Authorizer module or SX database. • If you need an access to external modems, depending on your brand, you may also need to allow access to the COM port. • Some cashier workstations use a COM-connected printer running as a service under LocalSystem context. You will have to define explicit permissions rule for Local Systems and COM ports to make them work. • If you are using computers in different time zones, be aware that when using Date filter settings in the Reports and Log Explorer modules you may ‘lose’ some of the records where the day has not changed yet. • Some users may find poor performance in their server machines when servicing a large number of users. This occurs when using standard desktop machines as servers and, normally, this is traced down to a slow hard disk system. We recommend using a server-grade machine with a fast disk system, and a dedicated SQL machine. In some situations, it may also help adding more memory. • If a remote user logs off incorrectly, by simply turning the machine off or closing the terminal service (remote desktop connection), those devices for which the user identity cannot be determined with 100% certainty are blocked. You should try to persuade all users to logoff correctly to prevent this kind of problems. • Sometimes the Sanctuary Management Console will block when the Device Explorer is open. This problem has been tracked down to machines running Windows 2000 Professional edition with Service Pack 4 installed. As stated on Microsoft’s Web site: http://support.microsoft.com/ default.aspx?scid=kb;en-us;318731, removing Clbcatq.dll will fix the problem. • Occasionally the installation of some COM+ products corrupts. Microsoft COM (Component Object Model) technology enables software components to communicate between them, for example, Word and Excel. You should consult Microsoft’s Web site for instructions on how to reinstall the COM+ component (http://support.microsoft.com/default.aspx?scid=kb;enus;318731 removing Clbcatq.dll). • Scanners can only be blocked if they are connected using TWAIN or WIA COM interfaces. You can normally find those scanners listed in the Windows’ Control Panel → Scanners and Cameras dialog. Direct access scanners (not using TWAIN or WIA interfaces) cannot be blocked during remote sessions. - 345 - Important Notes • If you are trying to connect a HP Omnibook notebook to your system, you should assign LocalSystem Read/Write permission rule on the LPT/Parallel port because there is a bug in the OMNI97.sys driver that controls the device. Otherwise, your system could block. Since the LPT class controls the machine, you cannot assign shadow and copy limits rules. • The Sanctuary Command & Control can now dismount volumes without any explicit permissions. However, volumes are dismounted only when the Sanctuary Command & Control receives an explicit request from Sanctuary Application Server to upload current shadow/log files. When Sanctuary Command & Control uploads files in the normal course of operations, volumes are never dismounted. Take into account that in some special cases you will not get the latest shadow files for your administrators to review. This happens, particularly, when the client uploads files in the normal course of operations (as governed by the Log Upload Interval, Log Upload threshold, Log Upload Time, and Log upload Delay options). In order to upload shadow files, the client needs to dismount the drive (this will force all information in Windows caches to be committed to the drive). Dismounting drives during a lengthy copy operation would interrupt the copy and disrupt the user. This is why, in the case of normal course operation, volumes are never dismounted, and the files are transmitted as soon as the media is removed. However, volumes are dismounted when the client receives an explicit request from the server to upload current shadow/log files (i.e. the administrator clicks on the FETCH LOG button in Log Explorer and selects the client machine). This means that using the Fetch Log functionality while users are busy copying data can interrupt the copy. • When the Media Authorizer exports a key to a file, it does not use Sanctuary Kernel to do so — it obtains the key directly from the server. This is done for administrative purposes. However, it still has to use Sanctuary Kernel to export the key to the medium — but Sanctuary Kernel does not know about the administration status of the user and refuses to export it if the Export permissions on the Removable Device class is not configured properly. See “Special case: Working with Removable Storage Devices” on page 74 for more information. • If a Copy Limit rule (see “Copy Limit” on page 125) exists for a device and this quota is exceeded during a file copy, the Shadow system only sends those bytes established under that rule, not the complete file. • You can experiment some ‘strange’ behavior when connecting some hardware not recognized as removable device but as a 'hard drives'. The Sanctuary client does not dismount hard drives to avoid interference with applications already using the device. Some shadow files may be unavailable until the device is unplugged (dismounted). When multiple files are copied, only the most recent are not transmitted, older files become transmittable. Please notice that if the hard drive is unplugged, it is dismounted and does not represent a security hole: as soon as the files TRULY leave the machine, they will be made available for the Log Explorer module. The only problem arises when the machine is SWITCHED OFF without notifying first the OS (some files are not transmitted). If a full shadow rule is defined, there is no information loss. However, if only the file name is requested, file size info will not be available. • Notes on the Portable Device Class It is not possible to give "on the fly" read-only permissions to this kind of devices. You must disconnect them and re-plug them to apply the new permissions. You must also update Sanctuary’s Database and Sanctuary Application Server to the latest version. Windows Vista supports these devices by default, but you must install Windows Media Player v11 or later to use them on Windows XP. • Notes on the Removable Storage Devices class: - 346 - Sanctuary Device Control v4.3.2 - User Guide The shadow and copy limit rule applies, among others to the Removable Storage Devices class. It cannot be activated for the User Defined Device class. The removable memory of those Smart Phones that use Windows CE as OS is included on the Removable Storage Devices class - the internal device memory can be treated and acceded with alternative methods. Therefore, what is copied to this removable memory can be shadowed and controlled with the same flexibility and granularity as for all those devices included in this class. Smart Phones, that do not use Windows CE as their operating system, are sometimes defined on the User Defined Devices class or the Portable Devices class (depending if the user has Windows Media Player 11 installed or not the device will not work at all or will work as a simple removable device, depending of the device). Consequently, only 'R/W' or 'No Permission' can be assigned to their memory and I/O data transfer cannot be shadowed. Recent models, however, adhere to the 'standard' schema of declaring their memory to the Removable Storage Device class (ex. Sony Ericsson W800). For those devices that are classified as Portable Devices class, they usually need Windows Media Player 11 installed to work, if the client machine does not has it, the device lets the user decide which kind of connectivity should the device have when the user connects it (this depends on the device). Please see “Managing Devices” on page 138 for more details. • A practical example for the User Defined Devices class: A user buys a mobile phone with a non Windows CE OS. As these devices have high memory capacity (going into the GBs), they can be a potential data leakage hole in your security system. Windows, when installing these devices through the PnP mechanism, proposes up to eight (or more, depending on the functionalities offer by the device: MP3, photo, radio, USB memory stick, etc.) internal drivers, ranging from modems to USB generic drives passing through generic phones. No direct connection is allowed for this kind of devices since no default permissions is set. Sanctuary Device Control is denying access to this (yet) unknown peripheral. To grant permissions for using all/some of the device’s functionalities, you must first add it — and all its internal drivers, as recognized by the PnP mechanism — using the Manage Devices dialog. The memory of these peripherals, since they do not use Windows CE as OS, is not included on the Removable Storage Devices class not allowing the definition of a Shadow rule. If you only define permissions for one type of class — for example, the memory included on the Removable Storage Devices class —, the device will not connect or have a partial functionality. The same is true if you grant permissions for the part included in the Modem/Secondary Network Access Devices and Wireless NICs class. To have a complete access to this kind of device, you must define permissions for all those classes where the drivers that Windows recognized for this peripheral belongs — for example, one permission on the Modem/Secondary Network Access Devices class, one for the Wireless NICs class, one for the Removable Storage Devices class, and one for the Portable Devices class (if the device allows for it). Conclusion: Although there is no shadow rule and copy limit for the memory of those devices that do not use Windows CE as their OS, you can grant them full/partial functionality when defining permissions on those classes where the proposed Windows’ drivers belong. Please see “Managing Devices” on page 138 for more details on how to do this. You can rest assured that you are protected for those future devices not yet on the market place. - 347 - Important Notes - 348 - Sanctuary Device Control v4.3.2 - User Guide C Sanctuary Device Control Encryption In this chapter you can find a complete behind the scene comparison between the different encryption methods available in Sanctuary Device Control and an explanation of how this encryption is achieved. Introduction Using Sanctuary Device Control it is possible to grant specific user the access to authorized DVDs/ CDs or specific removable media. Removable media can also be encrypted centrally or locally at the user desktop so that it can be safely used and transported without the fear of exposing your confidential data to unauthorized users. Centralized and decentralized encryption schemas provide the Sanctuary administrator with the flexibility to centrally encrypt removable media or enable users to encrypt removable media on their own and, more importantly, enforce the use of that encrypted media. With a wide range of centralized and decentralized encryption schemas, it is up to you, the Sanctuary administrator, to make your choice: take full control applying a centralized strategy or decide who should encrypt and use encrypted devices in their dept. or group. Using Sanctuary, only authorized users can copy data onto encrypted removable media with a complete auditing of that action. Users can have access to their encrypted data even in computers that do not have our client software installed. You can limit the corporate use of DVDs/CDs to those specifically authorized denying the access to all the rest. In this way, an optional, additional level of security can be applied to removable media. Sanctuary Device Control Encryption In addition to using Sanctuary Device Control to regulate access to devices, you can also use it to encrypt removable storage devices such as USB memory sticks. Encryption, not only guarantees that authorized users are the only ones that can access the data contained in such devices, but also makes this data unusable to trespassers and unauthorized personal. Sanctuary Device Control supports a number of different versatile encryption methods to suit your needs when ciphering this kind of media. All of them use a powerful, ‘unbreakable’, AES 256-bit encryption coding method to guarantee that your data is always kept safe. Centralized Encryption using the Full Encryption Method Full Encryption coding is done centrally and offers those having a Microsoft Enterprise Certificate Authority installed a transparent device handling within the network. This means that a user using an encrypted removable storage device — ciphered using the Full Encryption method — in a - 349 - Sanctuary Device Control Encryption computer that has the Sanctuary client installed, will not notice that the device (e.g. a memory stick) is coded. Users can freely use their USB stick at any PC within the organization’s network, if permissions to do so are granted. Yet, if the user loses the device, privacy is still ensured. There is no need for the user to have the encryption key, know the password, or take any other measures. Authentication automatically takes place in the background, between Sanctuary and the certification management (Microsoft Enterprise CA installed in a Windows server). If there is no MS Enterprise CA available, you can access the coded data device using a password. This password is defined when encrypting the device and exporting the symmetrical encryption key. The key can be sent to the user by a different channel (e.g. email) or exported to the medium itself. The Full Encryption method ciphers the entire medium (sectors and data). If someone tries to access this data outside your organization’s network and/or from a computer that does not have Sanctuary client installed, an extra software component — included with Sanctuary Device Control, is needed (Sanctuary Stand-Alone Decryption Tool, SADEC). The user requires administration rights to install it. Figure C.1 USB memory key using the Full Encryption method Centralized Encryption using Easy Exchange Easy Exchange is the simplest way to cipher and transport your data within and outside the company network. The entire storage area of the medium (e.g. USB memory stick) is used for encoded data and the deciphering program (Secure Volume Browser — SVolBro.exe). Devices encrypted using the Easy Exchange method can be transparently deciphered when accessing them on a machine that has Sanctuary client installed (if there is a MS Enterprise CA present). Users are not required to provide a password or take any other action. - 350 - Sanctuary Device Control v4.3.2 - User Guide If there is no MS Enterprise CA installed in the network, the handling is the same one as for the Full Encryption method (see “Centralized Encryption using the Full Encryption Method” on page 349). When a user is working outside your organization’s network, they must use the decoding program (SVolBro.exe) which is included on the storage medium to access their encrypted data. This program does not require administration rights to be used, however a password and an encryption key file are needed. The Secure Volume Browser program is automatically copied on to the media when it is encrypted. The administrator can then chose to include the key in the media itself or externally. If the key is not saved to the media, it must be sent to the user before the decryption process can start. A simple, secure, process can recover lost or forgotten passwords. Figure C.2 Easy Exchange method Decentralized Encryption Using Sanctuary Device Control in a decentralized way, administrators have the option to pass on the encryption control to the user. Encryption must then done at the user’s workstation (rather than using Sanctuary Management Console), forcing users to cipher and administer their own removable storage devices. This functionality is defined using a central rule (which defines users have access to removable storage devices or not, whether they are forced to encrypt them, whether they are granted access to a device that is not encrypted, and so on). A user, depending on the defined rule, can read/ write data, cipher, and/or format the device. Users encrypt their devices using the Easy Exchange method (all existing data is erased; see “Centralized Encryption using Easy Exchange” on page 350). The handling of the coded data medium outside the organization’s network follows the same principles as it would if the device was encrypted using the Easy Exchange method. - 351 - Sanctuary Device Control Encryption How is the Medium Assigned to a User or User Group Once a device is encrypted, it should be assigned/authorized to a particular user(s). This process is different depending whether you are using centralized or decentralized encryption and whether the medium is connected to a computer that is protected by Sanctuary or not. Table C.1 How to assign permissions rights to encrypted media Schema Full Encryption* Centralized Quick Encryption* Easy Exchange** Decentralized Easy Exchange** When used in a computer protected by Sanctuary The administrator, using the Sanctuary Management Console’s Media Authorizer module, assigns the encrypted device to a user(s). This authorization gives the right to use this device through a unique identification that is saved in the Sanctuary Database. There is no need to assign extra read/write permissions for the removable storage device. If the medium comes from another organization, its data should first be imported. The administrator, using the Sanctuary Management Console’s Device Explorer module, assigns permissions to copy data from/to the device to a user(s). The administrator can also force device encryption. When used in a computer not protected by Sanctuary *The user must install (and have the right to do so) an external tool — SADEC — to decipher the medium. ** The user does not need authorization nor administrator rights. All browsing is done using the included SVolBro.exe tool. If a user with the necessary rights formats or modifies a removable storage device, its identification changes, i.e. it corresponds to a different device as far as Sanctuary is concerned. No access is allowed to this ‘new’ medium. This mean that, no new data (encrypted or not) can leave your organization’s premises on this device without authorization being given to manage it. As an additional security measure when transporting the medium, an administrator can also choose to export the key to an external file — that can be sent separately to the final user — instead of storing it in the medium itself. - 352 - Sanctuary Device Control v4.3.2 - User Guide Centralized Versus Decentralized Encryption Different versatile encryption methods are provided within Sanctuary to suit your needs when ciphering removable media. All of them use a powerful AES 256-bit encryption coding method to guarantee that your data is always safe. - 353 - Sanctuary Device Control Encryption The following figure summarizes the characteristics of each available method: Table C.2 Encryption schemas The administrator: • Controls every aspect of the encryption process • Grants permissions to use specific devices • Is responsible for the creation/initial encryption of each media • Assigns the media to a user(s) • Decides if external data can be imported/exported • Can grant several users the access to a specific media • • • • It is a low level encryption Devices are limited to 32 GB when using FAT32 All media sectors are encrypted Assigned users transparently access the media, all data copied/ read from/to the device is encrypted/decrypted on the fly Notes • The user needs to install a driver to access data outside the organization. The required tool, SADEC, should be installed by the administrator • The media does not present a visible structure when it is opened using Windows Explorer • • • • • • • The device size is limited to 4GB The encryption is done in a single file using a FAT structure There is no need to install software to access data outside the organization. The required tool, SVolBro.exe, is copied on the media itself The user does not requires admin rights to access data outside the organization The user can change the password Media content appears in Windows Explorer as a FAT removable device with SVolBro.Exe and a single file the size of the media Assigned user transparently access the device - 354 - The administrator: • Creates the rules to define who should use and encrypt devices • Do not creates the encrypted media itself. This is done by the user • The user: • Provides the password (can change it later if needed) • Can import/export data freely • Can share the media by giving the password to other users Notes • The device size is limited to 4GB • The device is encrypted using our “Easy Exchange” technology • The encryption is done in a single file using a FAT structure • There is no need to install software to access data outside the organization. The required tool, SVolBro.exe, is included in the media itself • The user does not require admin rights to access data outside the organization • Media content appears in Windows Explorer as a FAT removable device with SVolBro.Exe and a single file the size of the media Sanctuary Device Control v4.3.2 - User Guide Full Encryption vs. Easy Exchange The following tables compare the Full Encryption and Easy Exchange encryption methods when using an encrypted device inside and outside your organization’s network. Table C.3 Full encryption vs. Easy Exchange - comparison 1/2 Full Encryption (with MS Enterprise CA) Access to the medium not granted Access granted Within the organization’s network (with Sanctuary client) Transparent access; i.e. directly read and write from/to the removable storage device is possible without the need of a password or public encryption key. There is a message informing the user that the device is not accessible. Full Encryption (without MS Enterprise CA) Access granted The user is prompted for a password. The medium can be unlocked if the user knows the password and has the public encryption key. Access to the medium not granted There is a message informing the user that the device is not accessible. Outside the organization’s network Cannot read data; user only sees garbled information. (without Sanctuary client) Measures for accessing data outside of the network The user must install the Sanctuary Stand-Alone Decryption Tool (SADEC) and have the password/public encryption key — administrator rights are needed to install the software. - 355 - Sanctuary Device Control Encryption Table C.4 Full encryption vs. Easy Exchange - comparison 2/2 Easy Exchange (with MS Enterprise CA) Access to the medium not granted Access granted Within the organization’s network (with Sanctuary client) Outside the organization’s network (without Sanctuary client) Measures for accessing data outside of the network Transparent access; i.e. directly read and write from/to the removable storage device is possible without the need of a password or public encryption key. There is a message informing the user that the device is not accessible. Easy Exchange (without MS Enterprise CA) Access granted The user is prompted for a password. The medium can be unlocked if the user knows the password and has the public encryption key. Access to the medium not granted There is a message informing the user that the device is not accessible. The device includes a copy of SVOLBRO.EXE (Secure Volume Browser), no data is available. The user must start the included SVolBro.exe browsing program (a Windows’ Explorer look-alike with similar look, use, and functions). The user must provide a valid password to decrypt media’s data. If the public encryption key is available, the user is given access to copy/read the device’s data using Sanctuary Volume Browser — no software to install, no administrator rights needed. See also Table C.5, “All Sanctuary encryption methods comparison” on page 357 . Other Available Encryption Methods When you encrypt a removable device (add it to the database and then assign it to user(s)), you can choose among three proposed methods: • Quick format encryption — can only be used when doing centralized media ciphering. • Full format encryption — can only be used when doing centralized media ciphering. - 356 - Sanctuary Device Control v4.3.2 - User Guide • Easy Exchange encryption — can be used when doing centralized or decentralized media ciphering. Each of these encryption methods has its own advantages and disadvantages. These are summarized in the following table: Table C.5 All Sanctuary encryption methods comparison Method Quick format Full & Slow Easy Exchange Advantages Disadvantages Comments It is very fast • Existing data is lost • A malicious user • The device’s can still recover sectors are not the previously encrypted erased files • The user needs to • If the user is use the device in using the a computer where removable media the Sanctuary in a machine client is already where Sanctuary installed or where client is installed, our SADEC tool the encryption can be installed key is not needed • Should be used — only the only in fully, password wiped, formatted devices Limitations • Is based on partitions • Limited to devices ≤32GB using FAT32 due to design restrictions of the Windows Format command (depending on the operating system you are using) Use NTFS if you need larger volumes. • Data already stored in the device is not lost • All sectors are encrypted • May take a long time to finish in large capacity devices • The user needs to use the device in a computer where the Sanctuary client is installed or where our SADEC tool can be installed Use on any kind of device that needs solid encryption; if the user is using the removable media in a machine where Sanctuary client is installed, the encryption key is not needed — only the password. None; the format (NTFS or FAT) is not lost, only data and sectors are encrypted. • It is very fast • The user has access to the device’s data even in computers where Sanctuary client is not installed • No need to install software to use the device The user does not need administrator’s rights to use the device, only the password and the encryption key. If • Existing data is the device is used in lost • Device’s sectors a system that has are not encrypted the Sanctuary client installed, LocalSystem should have R/W access to the removable device class. • This encryption is limited for removable devices which size is between 16 MB and 4 GB • Typically used for USB memory keys but can be used for any device recognized as a removable • Since the encryption is volume based, you can divide the whole available space in 4 GB partitions - 357 - Sanctuary Device Control Encryption Access to Encrypted Data Using the Sanctuary client If a MS Enterprise Certificate Authority (CA) is Installed When encrypting a removable storage device using a network on which a MS Enterprise Certificate Authority (CA) is installed, the media receives a unique identification (with no relation whatsoever to the symmetrical encryption key used for the encryption process itself). This exclusive identification is used by Sanctuary to determine which user has access to the specific removable device (whose ID corresponds to the one stored in Sanctuary Database). The computer that is trying to gain access to this encrypted removable device also receives the encryption key ciphered using the user’s certificate public key. The Sanctuary client automatically recovers the device encryption key using the user’s certificate private key. Access to a coded medium (the next figure shows an example using a USB stick called ‘TEST2’) is completely transparent. A user accessing the medium with Windows Explorer does not even notice that the data is encrypted. Figure C.3 Transparent access to the encrypted data when a Sanctuary client is installed If a user who has no access to removable storage devices attaches an unauthorized device, the Sanctuary client denies access. - 358 - Sanctuary Device Control v4.3.2 - User Guide If a user tries to access an encrypted medium on a machine where Sanctuary client is installed and has no permissions over the device class, access is refused. (This also happens when using Easy Exchange or Full Encryption without a MS Enterprise Certificate Authority if the device is not unlocked using the right-click context menu. The user receives a message inviting him to unlock the device.) Figure C.4 A user without permissions tries to access an encrypted medium on a machine where Sanctuary client is installed If no MS Enterprise Certificate Authority (CA) installed Although installing a CA is easy and recommended, it requires some extra effort to administer and configure it and some companies simply do not have the personal or the need for one. If there is no MS Enterprise CA installed in your organization’s network, administrators can still use the Full Encryption or the Easy Encryption method to cipher removable storage devices. If a user attaches an encoded device to an endpoint, access can be allowed to authorize users, based on the device’s unique identification. However, the AES key cannot be sent over the network to the terminal in encrypted form using the PKI (Public Key Infrastructure; that would otherwise be - 359 - Sanctuary Device Control Encryption available through the CA installation). Therefore, the symmetrical encryption key must be exported beforehand, either into a file or to the encoded device itself, so that the user can import it when unlocking the device. Figure C.5 Unlocking a device using Windows Explorer contextual menu If the Sanctuary client is installed, the Windows Explorer context menu includes an ‘Unlock medium’ option that can be used by the user to access the device when no CA is available. The user receives a message inviting him to unlock the device. - 360 - Sanctuary Device Control v4.3.2 - User Guide To unlock the encrypted device, the user must provide the password (defined when the encryption key is exported) and have the public key (if not included in the device itself). Figure C.6 Importing the key from the medium Access to Encrypted Data Outside the Network Removable storage devices, such as USB memory sticks, are frequently used to transport data between a computer within an organization’s own network – that has the Sanctuary solution installed — and an external one that does not. In this case, certain conditions must be met before having access to the encrypted data. These conditions depend on the encryption method used (either Full Encryption or Easy Exchange): If the user can install software on the computer where the data is going to be used (for example a home PC), the Full Encryption method is advised since all device’s sectors and data are ciphered. If there is no possibility of installing software in the target machine, Easy Exchange should be used — where the device’s sectors are not encrypted but all your data is safe. Accessing Encrypted Data Outside the Network when Using Full Encryption If the removable storage device was encrypted using the Full Encryption method, then the data is not directly available through the file system since all sectors and data is cipher. On the other hand, if Easy Exchange is used, the content of the volume is immediately available. - 361 - Sanctuary Device Control Encryption No useful data is accessible without the use of suitable software as shown on the next figure. Figure C.7 Coded data on a removable storage device when using Full Encryption Sanctuary Stand-Alone Decryption Tool, SADEC Lumension offers a free software tool called SADEC (Sanctuary Stand-Alone Decryption Tool) which, once installed, allows immediate access to the encrypted data. This program can be found in the installation CD.After installing this tool (local administrator rights are required) and restarting the computer, there is a new contextual menu item in Windows Explorer called ‘Unlock Medium’ available for all Sanctuary encrypted removable storage devices.This tool can also be used for external HDD that are recognized as removable media in the Sanctuary Management Console’s Device Explorer module. - 362 - Sanctuary Device Control v4.3.2 - User Guide Selecting the ‘Unlock Medium’ item of the Windows Explorer contextual menu will open another dialog where the user must input a valid password and define the location of the AES encryption key to completely unlock the data contained on the device: Figure C.8 SADEC’s interface Accessing Encrypted Data Outside the Network when using Easy Exchange Easy Exchange, besides encrypting your data, places a decoding program in the medium itself. This is called Secure Volume Browser, SVolBro.exe. There is no need to install extra tools or software when using Easy Exchange. The user does not need to have administrator rights on the computer where the data is going to be used. - 363 - Sanctuary Device Control Encryption If a user accesses the removable storage device using Windows Explorer, the Secure Volume Browser program icon is the only one visible. Figure C.9 Using Secure Volume Browser to access data ciphered using the Easy Exchange method - 364 - Sanctuary Device Control v4.3.2 - User Guide After starting the SVolBro.EXE program, providing the password, and the location of the key (external file or located directly on the device itself; see Figure C.13, “Browsing for the media key using Secure Volume Browser” on page 367 ), the encrypted data is now ready to be accessed using the Secure Volume Browser tool. Figure C.10 Secure Volume Browser starting dialog - 365 - Sanctuary Device Control Encryption Figure C.11 Using Secure Volume Browser to access data ciphered in a removable storage device - 366 - Sanctuary Device Control v4.3.2 - User Guide Access to a media encrypted by the Easy Exchange method is provided by an interface that is similar to Windows Explorer. The user can change the medium password as shown in the following image: Figure C.12 Changing user’s password in Secure Volume Browser Figure C.13 Browsing for the media key using Secure Volume Browser - 367 - Sanctuary Device Control Encryption Encryption Scenarios This section contains a number of examples where removable media encryption is required. Simple Examples This section contains simple, every-day, examples to cover all encryption modes available in Sanctuary. Decentralized Encryption All required permissions for these examples are defined using the Device Explorer module of the Sanctuary Management Console. All permissions are created for the Removable Storage Devices class in the Default Settings tree as described. Example 1 a. Scenario Since marketing representatives travel all around the world to promote the company’s product using ready-made presentations, the IT department has decided to give marketing users USB memory sticks for their required data. These users have no administration rights on the machines from where presentations are made. The IT department has also decided to let user encrypt their devices if they want to. b. Requirements • All users who are members of the user group ‘Marketing’ must encrypt their own USB keys and have Read/Write access to encrypted devices in their machines. • An extra notification message is defined to provide users with a help desk number. • Since users are allowed to encrypt their own devices, decentralized encryption is used. c. Procedure • (Optional) Define a device group called ‘Marketing removable devices’ which will be used to define all the required permissions. You can also add some device models here to further classify and outline devices. • Make sure the ‘Device Log’ option is set to ‘Enabled’ if you want users to be automatically prompted to enter a password when they insert their encrypted devices. • Define encryption permissions for the group ‘Marketing’ at the devices group level. The Marketing group should be given: Read/Write, Decrypt, Import, Export (To File), and Export (To Media) permissions on encrypted devices. AND Read/Write, Encrypt, Import, Export (To File), and Export (To Media) permissions on unencrypted devices. • Define an Event Notification for the group ‘Marketing’ providing a help desk phone number. - 368 - Sanctuary Device Control v4.3.2 - User Guide Example 2 a. Scenario This second example deals with a particular user that MUST encrypt a unique device. b. • Requirements User ‘Bill’ must encrypt the USB key that he uses on a daily basis to show sales information to selected customers. He must, of course, also have Read/Write permissions for this uniquely identified USB key. If he inserts an unencrypted device, he is informed that it must be encrypted before using it. c. Procedure • Make sure the ‘Device Log’ option is set to ‘Enabled’ if you want Bill to be automatically prompted to enter a password when he inserts his encrypted device. • Define encryption permissions for ‘Bill’ for the specific device model. The Marketing group should be given: Read/Write, Decrypt, Import, Export (To File), and Export (To Media) permissions on encrypted devices. and Encrypt, Import, Export (To File), and Export (To Media) permissions on unencrypted devices (i.e. no Read/Write permission on unencrypted devices). Centralized encryption Example 3: a. Scenario The general policies of a small organization have determined that Sanctuary Administrators should centrally encrypt all removable devices and only allow users (with a few exceptions) to have read access to these kinds of devices. b. Requirements No media should leave the premises unencrypted and information is not going to be shared outside the company. The company does not use Certificate Authorities but has an Active Domain defined. c. Procedure Define permission for Administrators for the Removable Storage Devices: Read, Write, Encrypt, Decrypt, Export to File, Export to Media, Import (with Encryption=Both, Drive=NonHard Drive, and Bus=USB options selected). If the Sanctuary Administrator is not the administrator of the machine, also define Read/Write Encrypt, Decrypt permissions for the LocalSystem account. This is necessary since users are not normally administrators of the machine they work with but the central encryption process itself needs to format the device. The administrator should then encrypt the removable devices using the Sanctuary Management Console’s Media Authorizer module (see the Sanctuary Device Control User Guide for more information). Since the information is not going to be shared, the administrator uses a Full Encryption method, exports the encryption key to the device itself, and enforces the use of a strong password by modifying the corresponding Default Option. - 369 - Sanctuary Device Control Encryption Once the media is encrypted, it should be assigned to the user/user group that is going to use it. This is also done in the Media Authorizer module. The user is then prompted to enter the medium password. They must know their password but do not need to remember the encryption key since it has been exported to the device. Once the medium is unlocked, the user can access it as a normal disk using Windows Explorer. Complex examples This section contains three complex examples that may occur in very large organizations. Decentralized encryption Example 4 a. Scenario A sales organization requires that all of its mobile marketing team users hold their data on USB pens. This is necessary as confidential data concerning marketing strategy, market share information, and competitors are held on these devices, which would be extremely damaging to the company should they be lost or fall into the hands of a competitor. The marketing team work across the country both internally in sales, and with newspaper editors, and re-sellers. The users are members of a Windows 2003 Active Directory and Microsoft’s Certificate Services are in use. The encrypted devices can be used in machines where Sanctuary Device Control is not installed. b. Requirements • A key requirement is to minimize the administrative overhead. No centralized approving or encrypting of devices is to be done by Sanctuary administrators. • Also a key requirement is ease of access to their USB pens for the marketing team. • When an unencrypted removable media device is plugged into a client PC by a member of marketing, they are forced to encrypt that device (otherwise they should receive an ‘access denied’ message). • A strong password is to be enforced for the encryption key export. • The marketing users need access to their encrypted USB pens on PCs where Sanctuary client may not be installed and where they are not members of the local administrator group. c. Implementation • The administrator creates an ‘Encryption’ rule for those members of the ‘marketing’ group giving them the right to encrypt their own media. A Read/Write permissions rule is also created for the Encrypted Device class so they can use the resulting media. • When a member of the marketing group attaches an unencrypted removable media device to the PC, the user receives a notification inviting him to encrypt the device. Note that unencrypted removable media devices are not allowed in the network. If the user refuses to encrypt the medium, the data in the device is inaccessible. The procedure for accessing the USB on a ‘foreign’ PC is as follows: • Users insert their USB pen into the USB port on the client machine. They wait for the device to be discovered by Windows Plug and Play, and then locate the appropriate drive letter in Windows Explorer, for example ‘Removable Disk (E: )’. - 370 - Sanctuary Device Control v4.3.2 - User Guide The user needs to run Secure Volume Browser — Svolbro.exe — which is installed on the removable device. To do this, they click on the Secure Volume Browser icon in Windows Explorer. There are two possible scenarios here, either: The key is located in the medium itself - the program only asks for a valid password. or The key was exported to a folder – the user should first import the key and then provide a valid password to unblock the medium. Device access is now possible on the ‘foreign’ PC as usual. Centralized encryption Example 5 a. Scenario A large multi-national bank, Bank A, with 50,000 employees has recently acquired a smaller bank, Bank B, with around 10,000 employees. The finance group of the large bank uses USB pens to store/copy data to and from the offices at both banks. Active Directory is in use in both locations, however they remain in separate domains for the time being. Microsoft’s Certificate Services is not installed. b. Requirements • The finance group of Bank A is working with highly sensitive data and sometimes need to transfer/store it using USB pens. • Finance employees in Bank A sometimes work at the offices of Bank B, where they need access to data stored on their USB pens that they encrypted at Bank A. c. Procedure • The level of encryption to be implemented is Full Encryption: As strong encryption levels are required, Full Encryption is the more appropriate of the encryption methods. There is no need to install any software since both banks use Sanctuary. • Since Active Directory is in use in both banks, Certificate Services can be readily installed. No licensing charge is incurred for using Microsoft’s Certificate. Installing this is a simple task (see the Setup Guide for more information). • USB pens are encrypted in advance at a central location, using the Media Authorizer module in Sanctuary Management Console. The machine where devices are encrypted must have both the Sanctuary Management Console and the Sanctuary client installed. See the Setup Guide for more information. • As the data is sensitive, it is not advisable to store the decryption key on the device itself. Therefore, the encrypted media needs an external key file to be decrypted. The key should be exported to a file (in this case, it has been decided that the decryption key will be held on a floppy disk). By default, a strong password must be entered and confirmed. - 371 - Sanctuary Device Control Encryption • When pens encrypted in Bank A need to be used on Bank B computers, the administrator has to grant the rights to use the USB pens in Bank B by importing the medium and assigning it to the correct user(s)/user group(s). Since the decryption key is held on a floppy disk for security reasons, this floppy disk should be available whenever administrators are trying to import the medium. Example 6 a. Scenario A large regional police force, Police Force A, uses USB pens to store vehicle registration number information for known or wanted criminals. This information is shared between client computers and, from time to time, other police forces. Microsoft’s Certificate Services are not in use in Police Force A, and the users are members of a Windows Domain. The users in the Police Force A domain are not local administrators on any computers in any police force. Sanctuary Device Control has been widely deployed to many police forces, however, it is not deployed to all police forces within the country at the present time. b. Requirements • A key requirement is ease of access to the USB pens for all Police Force A employees. Decryption keys should not be held separately. • There is a requirement to use encrypted USB pens on the PCs of other police forces from time to time. Such computers may or may not have Sanctuary client installed on it. The level of encryption used is not as important as the ease of access of the device, when working on a ‘foreign’ computer, i.e. one that is not the Police Force A domain. When accessing a USB pen on a foreign PC, a strong password is highly desirable for device access. It has been decided that the encryption process is carried out centrally and on a case-by-case basis. c. Procedure • The requirements indicate that Easy Exchange encryption should be used. The users do not have local administrator rights on any PC, thus Sanctuary Stand-Alone Decryption Tool (SADEC) cannot be used to access the encrypted USB pens when working on PCs that are not in the Police Force A domain. • Microsoft’s Certificate Services is not installed, nor is Active Directory, thus the devices should be encrypted on a PC in the Police Force A domain where both the Sanctuary Management Console and Sanctuary client are both installed. The procedure for encrypting devices without having a Certificate Authority installed can be found in XXX. • Ease of access for the USB pens is a key requirement, so the decryption key is exported to the device itself, rather than an alternative location. • A complex password is required for device access. This means that the default setting of ‘Require password complexity’ for ‘Encrypted media password’ are selected (using Sanctuary Management Console’s Tools Default Options menu). This ensures a complex password is used for media key export, containing case-sensitive letters, numbers and non-alphanumeric characters. - 372 - Sanctuary Device Control v4.3.2 - User Guide • The procedure for accessing USB pens on a foreign PC is as simple as plugging the USB pen into the USB port of the client machine. Users must wait for the device to be discovered by Windows Plug and Play functionality, and then locate the appropriate drive letter in Windows Explorer, for example ‘Removable Disk (E: )’. The user needs to run Secure Volume Browser — Svolbro.exe — which is installed on the removable device. To do this, they click on the Secure Volume Browser icon in Windows Explorer. There are two possible scenarios here, either: The key is located in the medium itself (the case in this example), and the program only asks for a valid password. or The key was exported to a folder – the user should first import the key and then provide a valid password to unblock the medium. Device access is now possible on the ‘foreign’ PC as usual. Understanding Cryptography Defining cryptography Cryptography is a field of mathematics concerned with the study of algorithms for encrypting and decrypting data so that only specific individuals can recognize it. The transformation of a message — called plain text — into a coded one — the cipher text — involves two processes: 1. Encryption 2. Decryption Encryption In very basic terms, encryption is a way to send a plain text message in code or cipher. The only person/program who can decode the message is the person who has the correct key or knows the method used to encrypt the message. To anyone else, the message looks like a random series of letters, numbers, and characters. There are several ways to achieve encrypt information, ranging from a simple substitution or transposition algorithm to a complex asymmetric key pair method. Decryption The inverse process of encrypting a message is called decryption. This recovers the original paint text message from the encrypted code. There are several ways people can use to try to decode a message, the most common being the ‘Brute force attack’ approach of trying every possible combination of characters. - 373 - Sanctuary Device Control Encryption Cryptography measures There are four main criteria by which to measure how good the cryptography used to transmit a message is. These are: 1. Confidentiality (privacy), i.e. only the authorized recipient should be able to extract the message from its encrypted form. 2. Integrity, i.e. the recipient should be able to tell if the message has been altered during the transmission. 3. Authentication, i.e. the recipient should be able to unmistakably identify the sender and verify that it was he who actually sent the message. 4. Non-repudiation, i.e. the sender should not be able to deny sending the message. Not all cryptographic systems achieve all those goals. How do we achieve privacy? In order to decrypt a message, the receiver has to know the key that was used to encrypt it. A critical part of this process is how such a key is distributed, since if intercepted, the message can be recovered by an unauthorized user. With a symmetrical key, the same key is used by the underlying algorithm of both the sender and receiver and therefore the key can be kept secret. - 374 - Sanctuary Device Control v4.3.2 - User Guide By contrast, when using an asymmetrical key algorithm, two pairs are used in the process: one for encrypting and one for decrypting the message. Some algorithms have also the peculiarity of that one of the keys can be freely distributed since the other one cannot be inferred from this ‘public’ key. The other key is kept secret and is called the ‘private’ key. Figure C.14 Public key cryptography There are several ways to generate asymmetrical public keys. The most well known is the one based on the RSA Algorithm (which is named after its inventors, Rivest, Shamir, and Adelman), which relies for its security on the difficulty of factoring large prime numbers. Sanctuary uses the RSA algorithm with a key size of 2048 bits, making it very difficult (impossible for the time being) to crack. The security of a strong cryptographic system depends on the secrecy of the key. This is why it is so important to generate your own key pair — using a long ‘seed’ value — before deploying Sanctuary in a working environment. The private key should not be communicated to the clients. It should reside on the Sanctuary Application Server computer or stored on an external medium for added security. Signing communications The RSA algorithm can also be used to sign a message. A hash value (or message digest) of the message to be sent is created, encrypted with the secret key, and attached as a ‘signature’ to the message. - 375 - Sanctuary Device Control Encryption The signature can only be decrypted with the public key. When the message is received, the signature is decrypted with the public key, and the resulting hash value is compared to the message's actual hash value. If the two are identical then the message is said to be authenticated and safe. Sanctuary uses this method for all communication between the Sanctuary Application Server and its clients. These keys are generated before installing the clients during the setup phase. See the Sanctuary Setup Guide.. Figure C.15 Signing a message - 376 - Sanctuary Device Control v4.3.2 - User Guide The security principles of SDC encryption explained The AES algorithm SDC uses the AES (Advanced Encryption Standard) Algorithm (see “Understanding the AES Algorithm” on page 380.) to encrypt the data on removable devices. AES is a symmetric key-based algorithm. This algorithm uses the same key for encryption and decryption. Figure C.16 Encrypting a message using the AES algorithm Public/private key based communication between SDC tiers Sanctuary uses a private/public key algorithm for ensuring data integrity between the three levels of Sanctuary Device Control (Sanctuary Application Server, Sanctuary Database, and Sanctuary client). Note: You can find a complete explanation of Sanctuary’s internal components in Appendix D, “Sanctuary’s Architecture”. - 377 - Sanctuary Device Control Encryption The Key Pair Generator The Key Pair Generator is used to create an encryption key pair. Sanctuary Application Server uses an asymmetric encryption system to communicate with the Sanctuary client. Sanctuary Application Server and kernel clients for Sanctuary Device Control contain a default embedded encryption key pair that is only suitable for evaluation purposes. You should create your own key pair before deploying the Sanctuary client on the first client computer of a working environment. You can do it using the Key Pair Generation utility. Please note that these keys are not used to encrypt or decrypt media. They are only used to protect the communication between the Sanctuary Application Server and the client computers. See the Sanctuary Setup Guide for more details on how to use this tool. Symmetric AES key public/private key based encryption To ensure that the symmetric AES key is not visibly stored in the Sanctuary Database, and can be read by anyone who has access to it, Sanctuary Device Control uses a public/private key-based encryption to encode the symmetric key. The public/private key is the same than the one used to secure communication between Sanctuary Application Server and Sanctuary clients. - 378 - Sanctuary Device Control v4.3.2 - User Guide Digital Signatures Sanctuary Device Control uses digital signatures to ensure the private/public key system integrity. A digital signature is a ‘stamp’ attached to a message that can be used to find out if it has been tampered with during the transmission (e.g. through the intervention of a malicious user). Figure C.17 Using digital signatures The message’s digital signature is generated in two steps: 1. Generation of a message digest (hash). A message digest is a 'summary' of the data being transmitted. It has the following two important properties: It is always smaller than the message itself. and Even the slightest change in the data produces a different digest, i.e. can be detected. 2. The message digest is generated using a set of hashing algorithms. The sender's private key is used to encrypt the message digest. The resulting encrypted message digest is the digital signature. The digital signature is attached to the message and sent to the receiver. The receiver then does the following: 1. Uses the sender's public key to decrypt the digital signature and obtain the message digest generated by the sender. - 379 - Sanctuary Device Control Encryption 2. Uses the same sender’s message digest algorithm to generate another message digest of the received message. 3. Compares the two message digests (one sent by the sender as a digital signature and one generated by the receiver). If they are not exactly the same, a third party has tampered with the message or there was a problem with the transmission. We can be sure that the digital signature was sent by the sender (and not by a malicious user) because only the sender's public key can decrypt the digital signature. If the decryption using the public key renders a faulty message digest, either the message, or the message digest, is not exactly what the sender sent. Digital Signatures & Certificate Authorities (CA) Using a digital signature guarantees, to a certain extent, the authenticity of the sender. Since only the sender's public key can decrypt the digital signature (encrypted with the sender's private key). However, the only thing this guarantees is that whoever sent the message has the private key corresponding to the public key we used to decrypt the digital signature. Although this public key might have been advertised as belonging to the sender, how can we be certain? Maybe the sender is not really who he claims to be, but just someone impersonating the sender. This authentication issue is solved by the use of digital certificates. A digital certificate is an electronic document that certifies that a particular user owns a certain public key. A third party, called the certificate authority (or CA), signs this document. Some well-known CA’s are VeriSign and GlobalSign. You need to install the Microsoft CA service to setup your own CA for use with the encryption feature of Sanctuary Device Control. Understanding the AES Algorithm The encryption functionality in Sanctuary Device Control uses the AES (Advanced Encryption Standard) algorithm for encoding data in removable devices. Although it is not strictly necessary to know what is going inside the program, it helps understand how security is achieved in your encrypted data. What is AES? AES is a symmetric data encryption technique, adopted in 2000 by the USA government as its standard encryption technique. AES was originally developed by Joan Daemen and Vincent Rijmen of Belgium and is called the Rijndael Algorithm. How does AES work? The elementary operation behind this encryption algorithm is astonishingly simple: security is achieved by doing a byte wise substitution, a byte exchange, and an XOR function. For simplicity sake, we suppose the use of 128-bit keys and 128-bit blocks in the following discussion. Before encrypting, the 128-bit key is used to generate 10 sub keys of 128 bits (16 bytes) each. E sub key bytes are written column-wise into a 4x4 matrix. There are ten of such matrices. - 380 - Sanctuary Device Control v4.3.2 - User Guide In the same way, a plaintext block of 128 bits (16 bytes) is written row-wise into a 4x4 matrix, called a state by Daemen and Rijmen. Each turn generates a new state from the old one; the state after the 10th step contains the cipher text. After this, the procedure restarts again with the next 128 bits of the plaintext. We are not going to describe this in detail, but the next figure illustrates the method with a simple example. Figure C.18 The AES algorithm Each step of the Rijndael algorithm executes sequentially the following steps: 1. ByteSub: The individual bytes in a state matrix are substituted according to a fixed scheme, i.e. they are replaced by other bytes (with the help of a ‘codebook’). This is a fixed transformation and there is still no encryption. 2. ShiftRow: The lines in the state matrix are rotated end-around to the left, namely the 1/2/3/4 lines by 0/1/2/3 bytes, respectively. For instance, if we have ‘a b c d’ in line 2 of the state matrix, after ShiftRow this row will read ‘b c d a’. - 381 - Sanctuary Device Control Encryption 3. MixColumn: The state columns are shuffled by a complicated, nevertheless, fixed scheme. 4. AddRoundKey: The round key will apply a bitwise XOR with the state. Only this transformation puts some secret into the state; we can thus now speak of an encryption. AES and Sanctuary Device Control Lumension works with a 256 bits block. In this case, the algorithm uses 8x6 matrices as states and sub keys. The 256-bit algorithm executes 14 rounds. Why is AES so Secure? The Rijndael (AES) security is based, essentially, on the number of rounds. Cracking a Rijndael with only one round is a simple exercise for a cryptanalyst. Such an encryption can be cracked within millisecond. However, Rijndael is a product algorithm. Similar transformations (differing only by the subkeys used in the AddRoundKey step) are applied repeatedly, one after the other. The recurring execution of such transformation groups (in 14 rounds) creates a problem that cryptanalysts cannot solve yet. Neither differential, linear cryptanalysis, nor interpolation attacks work in this case. Other useful info What is Considered as a Removable Media? Even though the general computing term ‘removable media’ may include any device that you can remove from your computer, such as floppy disks, Sanctuary Device Control refers to removable media as any device that declares itself to Windows in the class 'removable storage devices' through the Plug and Play mechanism. Therefore, removable storage devices include flash memory keys (USB sticks/pens), ZIP drives, Jaz drives, and some MP3 players and digital cameras. If you have a secondary internal IDE hard disk, it is recognized as a Removable Storage Device and you should define permission rules for them. What Happens if I Forget my Password? You can make several attempts to enter your correct password in order to decrypt an encrypted device. If you exceed this number of incorrect attempts (typically 5) a ‘lockout period’ of say 15 minutes must elapse before you can try again. This prevents brute force attacks. The number of attempts and the time of the lockout period depend on configuration settings of your system. If you have completely forgotten a password that you set when encrypting your medium yourself, you can recover the situation as described in the next section. - 382 - Sanctuary Device Control v4.3.2 - User Guide Recovering a Password When Using Decentralized Encryption Sometimes you may forget the device password when trying to access an encrypted removable storage device or fail to enter this password correctly after a specified number of attempts. If this happens, you must then contact a Sanctuary administrator with the identity of the device and a security code. Using this information the Administrator, if the access is approved, can generate a new passphrase. The device can then be decrypted using the passphrase and re-encrypted using a new password. To recover an encryption password: 1. Click on Recover Password in the Unlock Medium window (in which you will normally enter the password required to access the encrypted device). If any other dialog is still open, you must first close it. 2. Phone a Sanctuary administrator, explain your problem, and read out the 32-character Encrypted Medium ID. The administrator will need to check whether you are allowed to access the encryption media (rather than trusting your word for it) and recover your user and computer information from when the removable storage device was originally encrypted. This may take a few minutes, so please be patient. 3. Once the administrator finishes, they tell you a 52-character alphanumeric string passphrase. Enter the passphrase in the text field in the middle section of the Recover Password dialog. 4. Enter a New Password, retype it in the Confirm Password field, and click on the OK button. You will see two consecutive dialogs, one to confirm that the encrypted medium has been recovered and the other one to inform you that the medium has been unlocked. See Chapter 7, “Accessing encrypted media outside of your organization” for more information about what the Sanctuary administrator needs to do to generate the passphrase. What Happens to my Unencrypted Data when I Encrypt the Device it is on? When you encrypt a device that already has information stored on it, this information is preserved and remains accessible to you, providing you have the correct permissions for the device. How do I Decrypt a Device? When you right-click on an encrypted device, such as a USB pen, in Windows Explorer a ‘Decrypt Medium’ option is available on the context menu. This lets you decrypt the medium (providing you have the right permissions to do so, i.e. the device was given Decrypt permissions in Sanctuary Management Console’s Device Explorer module). Note that the standard Windows ‘Format’ command does not work on machines that have Sanctuary Client installed. - 383 - Sanctuary Device Control Encryption - 384 - Sanctuary Device Control v4.3.2 - User Guide D Sanctuary’s Architecture In this chapter you will find a complete overview of Sanctuary solution architecture: - Sanctuary Application Control Suite (Sanctuary Application Control, Sanctuary Application Control Server Edition, or Sanctuary Application Control Terminal Services Edition), Sanctuary Device Control, and Sanctuary for Embedded Devices. Without this basic information - although it is still possible to use the application - you cannot exploit Sanctuary's full potential. The Whitelist Approach This section analyses the whitelist concepts and how they are decisive arguments when choosing a security solution. Concepts When working with security application it is useful to grasp the following concepts: • A black list is a register of applications/devices that, for one reason or other, are being denied execution/access privileges. • White lists are the exact opposites of blacklists. Where a blacklist specifies which device/ application is not allowed, while granting permissions to all others, a white list only allows access/execution rights to those who are already on the list, while denying permissions to all others. • A grey list is everything in between white and black lists. If application control cannot identify the application, then the user may place it on a grey list with extra auditing vigilance enabled so that IT can make a subsequent decision whether to authorize it or not. Sanctuary works on the basis that the use of all executables and peripherals are denied unless explicitly authorized. An administrator initially creates and then maintains, as needed, a white List of authorized executables/devices. This overcomes the time consuming administrative burden of constantly updating and maintaining a black list of executables that are not authorized to run. - 385 - Sanctuary’s Architecture Advantages/disadvantages of using a white list The following table shows the advantages and disadvantages of the different approaches: Table D.1 Whitelist vs blacklist approach Blacklists (Reject list or block list. This allows everything that is not on the list.) Advantages Easy to install. Disadvantages Whitelists (Accept list. This denies everything that is not on the white list.) Advantages Disadvantages Exponential growth consuming resources. Can be created at computer, user, or user group (or specific device) level. - Updates are futile since there are always new, unknown, application and devices. More secure. - - Costly and complicated to maintain. More accurate and granular. - - Can only detect what is already known. Inexpensive and simple to maintain. - - Constant updates are required (but these do not block everything). Easy to customize and manage. - - Not ‘future-proof’. Is only modified for specific cases. - - Usually only bans applications/devices when it is too late! Will not allow unknown application to execute or access to new devices not previously known. - - You typically give the control to a third party who creates the blacklist for you. Authorizing the use of a device/application is much easier than banning all those not accepted. - - Cannot respond to ‘dayzero’ attacks. It is a ‘future-proof’ approach. - It is almost ‘maintenancefree’ since the list only needs to be modified when a new application/ device authorization is needed. - - - - 386 - Takes longer to install and personalize. Sanctuary Device Control v4.3.2 - User Guide Table D.1 Whitelist vs blacklist approach Blacklists (Reject list or block list. This allows everything that is not on the list.) Whitelists (Accept list. This denies everything that is not on the white list.) Advantages Disadvantages Advantages Disadvantages - - You have complete control over what in included in the white list. - - - ‘Day-zero’ attacks are no longer a threat since everything is unless otherwise specified. - - - No definition updates are required. - Whitelist and blacklist examples The traditional approach to computer security is to design a program to block out undesirable applications. Let’s assume you write such a program that is responsible for determining applications run or not. To maintain control you must provide a daily list of applications that are not allowed to run. When a user tries to run an executable, your software searches for it on the list and if it is there, prevent it from running. If a valid program is contaminated, your program cannot detect it since its name is not on the undesirable list (black list). It can run and create havoc in your network. Additionally, just because the program is not in the list does not mean that it is not a threat. You spend your weekends identifying these programs and constantly updating your list. Let’s consider that you now try a different approach. You set a more flexible and general set of rules to determine what is allowed to run or not. Instead of only basing your assumption on a list, you instruct the program to also block all programs that behave strangely, have non-standard or suspicious names based on your experience-driven knowledge of computer security, and/or are on other black lists you can get your hands on. Your program now blindly blocks ‘almost’ all undesirable software but it also blocks some good ones in the process. Back to the drawing board to add even more rules and exceptions to your black list definition. You now try a third tactic: You create a list of programs that can run (a white list), everything else is banned. You now use your weekends for your hobbies. Unless you explicitly modify your list, new threats pose no problem to your blocking software. Since Sanctuary is based on a whitelist approach, you can configure it to authorize all acceptable applications/devices instead of blocking all those not tolerated. - 387 - Sanctuary’s Architecture A complete portfolio of security solutions While our application control series steps-in whenever a user launch an executable to issue an "approved" or "unapproved" stamp, device control focuses on all those external removable devices that can be used as an open door from where data could escape or malicious code can enter. Application control is a well-suited approach for those organizations that are looking for automated tools to help exercise tighter management execution control in their endpoints. On the other hand, device control goes from a simple device use blocking application to a full-blown device control application including encryption, auditing, logs, file filtering, shadowed data (a full copy of all data that enters/leaves premises), etc. Sanctuary combines the best of both worlds in a centrally administrated solution that can be used jointly or each one of them as a separate solution: Table D.2 A complete solution for all your needs Product Target Sanctuary Application Control Prevents/denies unwanted executables within your organization Sanctuary Application Control Server Prevents/denies unwanted executables within server environments, stopping attacks on mail servers, CRM applications, web and other critical database servers (Windows 2000 and Windows 2003) Sanctuary Application Control Terminal Services Edition Extends the power of Sanctuary to the complex thin client terminal environment (both Windows® and Citrix®) by providing granular application and access control over users on business critical terminal services, enhancing availability and stability. Sanctuary Application Control Suite Seals security breaches by providing a complete USB security, port protection, and control of all removable devices across your network Sanctuary Device Control Moves beyond the traditional desktop and laptop endpoints and onto a variety of platforms that include ATMs, industrial robotics, thin clients, set-top boxes, network area storage devices and the myriad of other systems running Windows XP Embedded Sanctuary for Embedded Devices - 388 - Sanctuary Device Control v4.3.2 - User Guide Each component is explained in the next sections. Sanctuary Application Control Suite Sanctuary Application Control Suite is an Application Execution Management solution that provides organizations with the capability of exercising total control over which applications can run on Microsoft and Novell based networks. Sanctuary Application Control Suite works on the basis that the use of all executables, scripts and macros is denied unless explicitly authorized. A white list of authorized files is created and maintained. This overcomes the time consuming administrative burden of constantly updating and maintaining a black list of executables, scripts and macros that are not authorized to run. Sanctuary Application Control Suite also protects against tampering by using file integrity checking to ensure that authorized executables cannot be tinkered with. Sanctuary Device Control Sanctuary Device Control is a software component that extends the control of I/O devices policies. Based on a positive model, device access for users is prohibited by default. Only explicitly authorized devices can be accessed. Sanctuary Device Control manages access to devices by applying an Access Control List (ACL) to each device type. To grant access, the Administrator only needs to associate Novell objects (organizational units, users, user groups) with the devices and/or device classes which they are allowed to access. Sanctuary for Embedded Devices Sanctuary for Embedded Devices establishes a trusted device and applications environment based on Microsoft Windows Embedded platforms and never worry about the risk of data loss or malicious attacks that could cost your organization thousands of dollars in damages. Easily control your organization's entire thin client desktop configuration from one central location. Sanctuary for Embedded Devices offers you endpoint Security and Policy Enforcement for ATMs, KIOSKS, POS, Terminals, etc. Sanctuary Components This section explains Sanctuary infrastructure in detail. A Sanctuary solution includes the following four main components: • One Sanctuary Database. This holds device and/or executable authorization information. • One or more Sanctuary Application Servers with one or more Data File Directories (DFDs). These act as an intermediate between the Sanctuary client (see below) and the Sanctuary Database. It distributes the list of devices and/or software permissions for each client computer and/or User/User Group. - 389 - Sanctuary’s Architecture • The Sanctuary client: This enforces the centrally-defined policies on the machines you want to protect from using unauthorized software/devices. The client communicates with the Sanctuary Application Server to get the list of authorized software/devices. • Administrative tools, in particular the Sanctuary Management Console. This centrally configures Sanctuary policies, and manages the day-to-day administrative tasks and procedures of policy enforcement. The following diagram shows a typical Sanctuary infrastructure. Each implementation may have more than one Sanctuary Application Server and a Sanctuary Database connected over a wide area, therefore making Sanctuary software very scalable: Figure D.1 Sanctuary components We explain each of these components in the following sections. - 390 - Sanctuary Device Control v4.3.2 - User Guide The Sanctuary Database The Sanctuary Database serves as the central repository of authorization information, such as lists of executable files, scripts and macros, the digital signatures (‘hashes’) that uniquely identify these files, File Groups, authorized users and User Groups, device permissions, and user policies. It also stores audit logs of administrator’s actions. This database is built on the Microsoft SQL Server 2000/2005 or 2005 Express Edition. For organizations with fewer than 200 users, the SQL Server 2005 Express Edition is sufficient. Larger organizations must use Microsoft SQL Server. The Sanctuary Application Server Each Sanctuary installation requires at least one Sanctuary Application Server and related Data File Directory (which may or may not be on the same machine) to store log information. All servers can either write to the same shared directory, or alternatively, a different one for each server (see Figure D.1, “Sanctuary components” on page 390 ). The Sanctuary Application Server communicates between the Sanctuary Database and the protected servers or computers. The Sanctuary Application Server component runs as a Windows Service under any domain user account capable of reading Domain users/groups/computers accounts from the Domain Controller. It performs the following functions: • Gets the latest information about access privileges and device I/O permissions from the database and stores it in its cache. • Signs or encrypts the list, compresses it, and passes the updated access information list to servers and computers, where it is also stored locally. (The updates contain the changes to the permissions rather than the whole list.) • Saves a log of administrators and, optionally, users actions (including information about where application or device access have been denied). The Sanctuary Application Server runs as a service and keeps track of the connected clients and their status, coordinating data flow between Sanctuary Application Servers — if you are using more than one — and the SQL database. As with other TCP-based services, Sanctuary Application Server cannot handle clients connecting through a firewall or proxy unless the required ports are opened. By default, it uses port 65129 or 65229 (for the TLS protocol) to listen to clients’ or other Sanctuary Application Server’s requests. Clients use port 33115, by default, to receive information (and - 391 - Sanctuary’s Architecture respond if it is the Sanctuary Application Server who initiated the communication). These three ports are required for a full two-way communication. You can configure these ports to suit your needs (see Sanctuary Setup Guide for more information). Figure D.2 Sanctuary Application Server-client-Sanctuary client intercommunication Up to three different Sanctuary Application Servers can be defined in the setup of a client — using fixed IP addresses or DNS aliases. Additional servers can be assigned either by changing an option in the management console or via a registry key. If no Sanctuary Application Server is available at logon, the client falls back on the permission list that was stored on disk during the last successful connection. If no such list exists, the client institutes a complete lockdown of all devices/ applications. Permissions lists can be imported into a computer if required, for example, when no server is available because the machine is disconnected from the network. DNS is only indirectly used to look up an IP addresses for a computer that must be accessed. If the corresponding entry in the server list is a DNS name, it is resolved, and the first returned IP address is chosen, as required by round-robin DNS conventions. A connection is then attempted. If it works, execution then proceeds normally. - 392 - Sanctuary Device Control v4.3.2 - User Guide If the connection fails, the client selects the next server from its list and repeats the process. If the end of the list is reached, the client uses the local permission list, as previously explained. This behavior is controlled by the FirstServer registry key. This server also receives client’s logs and shadow information — in compressed format — that is safely stored in a common data file directory (DFD) defined at setup time — also in compressed format. How permissions are defined, managed, and stored Once the Sanctuary client installed, it manifests itself as an icon on the system tray. This informs the user about permission changes, by means of pop-up messages. Using the limited user interface, users cannot change permissions, they can only ask for available updates that have been defined by an administrator. When using any of the components of Sanctuary Application Control Suite, the user also has the option, if the administrator decides to grant this privilege, of accepting or denying execution of applications, scripts and macros. If all decisions are left to the user’s discretion, they can control them using the client’s available options. Nothing else is allowed. To change permissions, a Sanctuary administrator uses a management console to interact with Sanctuary Application Server that, in turn, communicates with the database and the clients. Permission changes are sent to users at the next event, for example, when the user logs in, or, as an alternative, the administrator can ‘push’ them to all computers, specific ones, or export them for a later importation on the client(s). The Sanctuary Application Server informs all online clients when new permissions become available, or sends them if specifically asked by the user — a ‘push-pull’ mechanism. The following diagram shows a view of the client/application server relation: Figure D.3 Sanctuary client/Sanctuary Application Server relation - 393 - Sanctuary’s Architecture Sanctuary client The Sanctuary client is installed on each server & computer you want to protect. This client component runs as a kernel driver on Windows XP/2000/2003/Vista: If you are using Sanctuary Application Control Suite, the Sanctuary client does the following: • Calculates the digital signature (‘hash’) of files loaded for execution. • Checks that hash against the locally stored authorization list (of hashes for executables, scripts of application files in which VBA macros are embedded). • Ensures that only authorized executable files can run. • Bans and logs any attempts to run unauthorized files. • Optionally, permits local authorization of a denied file. • Generates log records of all application access attempts, approved and denied. The Log Access Denied option is enable by default. If you are using Sanctuary Device Control, the Sanctuary client also: • Ensures that only those I/O devices that the user has been authorized to use can be accessed on the computer. Any attempt to access an unauthorized device is barred, regardless of the computer the user logs on to. The communication component of the client, SCC, which runs as a service, sends log data that can be viewed via the management console. End-users cannot interact with the Sanctuary client, except to receive notifications when their permissions changes or to update them using the Refresh Settings command of the system tray icon. The user cannot change in any way its settings or permissions. The client is installed on each computer you want to control. The setup also installs an application that provides (optionally) device status information to the end-user. The administrator can also ask the user to show the ‘salt‘ value used to do endpoint maintenance when the computer is not connected to the network and this value cannot be obtained by alternative methods. See the administrator’s guides for more info. The client function (device and/or application blocking) is defined by the product license. Depending upon the licensed Sanctuary components, the client blocks devices/media and/or applications. The client is divided into three primary components (see Figure D.1, “Sanctuary components” on page 390 ): 1. Kernel driver (sk) — enforces defined Sanctuary policies. 2. Communication service (scomc) — provides communication with the Sanctuary Application Server(s). 3. User interface (RtNotify) — provides status information and notifications to the user. - 394 - Sanctuary Device Control v4.3.2 - User Guide The key is that even if the communication service or user interface is disabled, the kernel driver is still protecting the managed device. For example, should a user manage to disable the user interface, protection remains in force and the ‘least privilege principle’ — denying anything not expressly permitted — is applied. This means that components are protected against tampering by users (using Sanctuary’s client hardening functionality). The following diagram shows this layered relationship: Figure D.4 Client layered model Installed components The following client components are installed on a Sanctuary-protected computer: • RtNotify.exe (runtime notify) — This is the primary user interface that informs the user of updated policy changes completed by the administrator (these messages can be deactivated). It displays itself as an icon (that can optionally be disabled) in the Windows system tray. This component also fetches user certificates when needed/ - 395 - Sanctuary’s Architecture • Sk.sys (Sanctuary Kernel) — This is the kernel component that is responsible for enforcing the centrally defined policies, by determining which applications and/or devices can be accessed. It has no user interface. • Scomc (Sanctuary Command & Control) — This component is responsible for communication with the Sanctuary Application Server(s). It has no user interface. • Auxiliary DLLs — These provide features additional to the 3 core components defined above. The files contain support for RtNotify localization information, 16-bit application control, and macro and script protection. They have no user interface. Protocol and ports Sanctuary is based on standard TCP/IP protocols for all communication between clients and servers. TCP/IP was chosen due to its pervasive implementation throughout most IT infrastructures. Currently Sanctuary uses only two configurable ports for full two-way communication between the client and server components. Internet protocols were first developed in the mid-1970s. They are now the most widely used opensystem (nonproprietary) protocols since there are equally well suited for LAN or WAN communication. Internet Protocol (IP, layer 3 of the OSI model) contains addressing and control information and forms the heart of the Internet protocols, along with the Transmission Control Protocol (TCP, level 4 of the OSI model). Using the TCP/IP protocol offers some clear advantages over other protocols, including the following: • It allows enterprise networking connectivity between Windows and non-Windows based computers. • It can be used to create client/server applications. • It is reliable. • It is easily expandable. • It has good failure recovery. • It has a high error-rate handling. When installing the Sanctuary client on your protected machines, TCP/IP should already be activated and configured. Since almost all modern networks use these protocols, this should already be the standard setting in your network. As an alternative, to reinforce security levels, you can select the TLS communication protocol. This means that all communication between clients and the Sanctuary Application Server is encrypted rather than communications only being signed before transmitting. A Certificate Authority must emit a certificate if you plan to use TLS. Sanctuary Application Server incorporates a high-performance built-in TCP server. It uses this to maximize throughput for client requests. This TCP component can be fine-tuned to accommodate nearly all possible configurations. - 396 - Sanctuary Device Control v4.3.2 - User Guide Sanctuary’s client, by default, uses port 33115 to listen to the Sanctuary Application Server while this component uses port 65129 (or 65229 if you are using the TLS protocol) to communicate with the Sanctuary client. When installing the client on a Windows XP SP3 (or Windows 2003 SP1 or later with the firewall enabled) it is important to open these ports otherwise the client will be blocked with the most restrictive policies (those defined when installing it) or the last permission list locally stored. See Sanctuary Setup Guide for more information on how to open these ports. Figure D.5 TLS and non-TLS communication between the Sanctuary client and the Sanctuary Application Server - 397 - Sanctuary’s Architecture Operation overview As a user logs into the computer, several background actions are carried out before the operating system completely boots and can access the installed programs/devices. These are as follows: 1. The system checks that all client components are present and refuses to load the operating system if the one of them is missing or has been tampered with. 2. The client checks that a valid Sanctuary Application Server exists and is reachable over the network. If unavailable, the client uses the previously cached internal permissions list. If a Sanctuary Application Server can be reached, the client identifies itself and requests a permission list update. 3. If the client does not have the latest permissions, it requests an update. The Sanctuary Application Server reacts to this by retrieving the list from the database (only if its cache is empty or has been modified). The Sanctuary Database returns the requested list. 4. The Sanctuary Application Server stores the new permission list in its cache, selects what has changed, compresses it, signs or encrypts the resulting list (depending if you installed the clients with TLS communication or not) and then sends it to the client. 5. The client replaces its current permission list with the new one. 6. If the user logs off, the client informs the Sanctuary Application Server. The client sends activity logs (by request and subject to certain options defined by the administrator) to the Sanctuary Application Server. The client is also responsible for saving, parsing, compressing, and sending shadow (a copy of transferred data to devices) and log information to the Sanctuary Application Server. Since the Sanctuary client is the first one to be loaded, there is no potential risk of the user trying to intercept or deactivate it. To protect it further, a administrator can choose to select a ‘client hardening’ policy where even users with administrator’s rights cannot uninstall the client without a prior permissions ‘ticket’. See the corresponding chapter for more information on how to ‘harden’ the client and send ‘endpoint maintenance tickets’. Key usage As the Sanctuary Application Server is the one that sends all permissions/rules to the client, it is important to secure this communication. This is done by means of a public/private encryption key pair generated using the Rivest-Shamir-Adelman (RSA) algorithm with a key size of 2,048 bits. This key pair, usually generated during the Sanctuary installation process, is used to assure the integrity of the communication between the Sanctuary Application Server and its clients. The key pair is also used to encrypt media when using Sanctuary Device Control. When starting Sanctuary Application Server, it will check for the key pair in the following locations: 1. In the directory where the Sanctuary Application Server executable is (usually %SYSTEMROOT%\SYSTEM32). - 398 - Sanctuary Device Control v4.3.2 - User Guide 2. In the Sanctuary Application Server’s private directory (%SYSTEMROOT%\SXSDATA). 3. In all removable drives and DVDs/CDs, in alphabetical order. The search stops when the first valid key pair is found. If a higher level of protection is required, we strongly recommend storing the server’s private key externally to the Sanctuary Application Server — for example on a CD, USB key, or floppy disk. Only the public key is available to the clients. The private key should only be available to the Sanctuary Application Servers, either internally or externally. Figure D.6 Building the client package If the Sanctuary Application Server is not Reachable When the client tries to communicate with the Sanctuary Application Server, it does so by using the Fully Qualified Domain Name (FQDN) address(es) configured during the client setup (IP addresses do not work if you are using TLS protocol, see the Sanctuary Setup Guide for further details.) The FQDN addresses may or may not be active when the Sanctuary client tries to establish the communication. They may not be active, particularly when using remote clients through a Virtual Private Network (VPN) connection that does not have a physical cable connecting the server(s) to the client's machine or a firewall is blocking the required ports and they should not be opened for security reasons. In these cases, all communication is done using the Internet and, possibly, a proxy - 399 - Sanctuary’s Architecture that acts as a barrier between the internal network and Internet since many corporations use proxy servers to manage various communication protocols and add a higher level of security to their network environment. Figure D.7 Proxy use Using a Proxy to Establish Client-Sanctuary Application Server Communications If the Sanctuary client cannot establish communication using the defined FQDN, it tries to use the proxy configured for the Internet Explorer to reach the Sanctuary Application Server address(es) as shown in Figure D.7, “Proxy use” on page 400 . If this also fails, the Sanctuary Application Server is considered unreachable and cached local policies apply to control application/device use. Note: If you defined offline or online device permissions, they will be enabled (depending of the ‘Online/Offline State Detection’ option configuration). The use of a proxy is only valid when the Sanctuary client initiates the communication process — the user asks for a permissions refresh using the Sanctuary’s tray bar icon — and not the other way around. The client can upload shadow and log files as well as refresh permissions/options/rules. The downside of using a proxy is that Sanctuary administrators cannot initiate a communication to request shadow and log files, manage devices (except using the Log Explorer module of the Sanctuary Management Console), send updates, scan applications to authorize them (when using Sanctuary Application Control Suite), retrieve salt value for client hardening disabling, or synchronize machine accounts. - 400 - Sanctuary Device Control v4.3.2 - User Guide If you want to take advantage of using a proxy, you must install Sanctuary client in TLS mode and configure the Sanctuary Application Server’s TLSPort registry key to 443 (see Sanctuary Setup Guide). This port is used for secure web browser communications and should be configured for the Sanctuary client, Sanctuary Application Server, and proxy. To be able to use this port, a valid machine’s certificate must be present — which is already the case when installing Sanctuary Application Server and Sanctuary client in TLS mode. Data transferred across such connections are highly resistant to eavesdropping and interception. Moreover, the identity of the remotely connected server can be verified with significant confidence. Web servers offering to accept and establish secure connections listen on this port for connections from web browsers desiring strong communication security. When using the proxy, the client mimics Microsoft Internet Explorer proxy configuration. To configure, open Microsoft’s Internet Explorer and then select Tools Internet Options Connections LAN settings. This behavior can be done in three distinctive modes — please refer to Figure D.11, “Proxy configuration (from Microsoft’s IE)” on page 402 : • Automatic mode (Automatically detect settings) – proxy configuration is done using a DHCP (Dynamic Host Configuration Protocol) server — follow the steps outlined in section “Configuring your DHCP Server and Proxy” on page 402. Figure D.8 Proxy configuration: Automatic mode • Using the automatic configuration script (Use automatic configuration script — Web Proxy Automatic Discovery values, WPAD) — follow the steps outlined in section Configuring your DHCP Server and Proxy on page402 and then fill the address field with http:// name_of_your_proxy/wpad.dat. In our example, this is the address of the ISA proxy ‘ISA_Lumension’ http://ISA_Lumension.com/wpad.dat. Figure D.9 Proxy configuration: Automatic mode - 401 - Sanctuary’s Architecture • Manual configuration mode (Use a proxy server for your LAN) using Secure HTTPS address — type-in the proxy address: the only one that is going to be used will be the secure one (you can check them by clicking the Advanced button), all others are not used for Sanctuary (HTTP, FTP, Gopher, and Socks). Figure D.10 Proxy configuration: Automatic mode Figure D.11 Proxy configuration (from Microsoft’s IE) You must have Microsoft Internet Explorer version 7 for a proxy connection to work and the Sanctuary client should be installed on a Windows 2000 (SP4 or later) or Windows XP (SP2 or later) operating system. Configuring your DHCP Server and Proxy If you decide you want to use the proxy communication option, you must first configure your DHCP server and proxy. The manipulations are straightforward and simple: 1. Define a new Web Proxy Automatic Discovery option: in the DHCP console tree select the applicable DHCP server and then, on the Action menu, select Set Predefined Options. - 402 - Sanctuary Device Control v4.3.2 - User Guide 2. In the Predefined Options and Values dialog click Add and complete the values as shown in the following image and close all dialogs by clicking OK. Figure D.12 DHCP configuration: Define WPAD value 3. You must now activate the scope option. To do this, right click on the Server Options branch, select Configure Options, traverse the list until you find the WPAD value (the last one), and - 403 - Sanctuary’s Architecture type your proxy address in the String Value field (this example uses a Microsoft Internet Security and Acceleration Server 2006 — ISA — proxy): Figure D.13 DHCP configuration: Activate scope - 404 - Sanctuary Device Control v4.3.2 - User Guide Publish the ISA server information: Figure D.14 ISA configuration: Publish server info The Sanctuary Management Console The Sanctuary Management Console provides the administrative interface to the Sanctuary Application Server. This tool — which can be installed on one or more computers — is used to configure the solution and perform a range of day-to-day administrative tasks. You can install the console on one of the servers you are using for the Sanctuary Database or the Sanctuary Application Server. You will also need to install the Sanctuary client on the same computer if you are using Sanctuary Device Control and you want to encrypt removable devices or authorize DVDs/CDs. You can use the console to: • Define Administrator roles. • Monitor system activity logs and option settings. • Get standard reports or custom reports. If you are using Sanctuary Device Control, you can also: • Manage access to I/O devices. - 405 - Sanctuary’s Architecture • Authorize specific DVDs/CDs to be used in DVD/CD drives. • Encrypt removable media. • Grant users’ permission to use specific authorized DVDs/CDs or encrypted media. • View lists of files transferred using authorized I/O. • View the content of files transferred using authorized I/O. • View information about attempts to access or connect unauthorized devices. If you are using Sanctuary Application Control Suite, you can also: • Build lists of executable files, scripts and macros to be managed. • Organize those authorized files into logical File Groups. • Assign File Groups to users and User Groups. • Manage and maintaining the authorization database. The Sanctuary Management Console and Sanctuary Application Server are linked through the RPC level 6 protocol (fully encrypted messages). The unique architecture of the Sanctuary solution generates minimal network traffic, so you do not need high-speed connections. Each protected server and computer client maintains its own local authorization copy, so routine application requests do not have to traverse the network. Only log files and periodic differential updates are sent to them. Administration Tools When you install the Sanctuary Management Console, you also install other tools to manage the system. Tools that are common to all Sanctuary applications include the following (see Sanctuary Setup Guide for more information): • The Client Deployment Tool. This can be used to install the Sanctuary client on your protected computers and servers. It uses standard MSI technology. You can also use it to find out which computers already have the client installed and its status. • The Key Pair Generation. This utility is used to create a unique set of private and public keys to assure communication between the Sanctuary Application Server and the Sanctuary client. Note: You should always generate your own set of keys before deploying the product in a working environment. • The SXDomain command-line domain synchronization tool. This informs the Sanctuary Database of changes made to the domains, users, groups, and workstations within your network. • Novell’s Synchronization Script: This is the command-line tool used to synchronize Novell’s eDirectory objects (OU, group, user, and workstations) so that an administrator can manage them and deny/allow execution access to applications in a Novell environment. - 406 - Sanctuary Device Control v4.3.2 - User Guide If you are installing Sanctuary Application Control Suite, the following tools may also be installed (see the Sanctuary Setup Guide for more information): • The Authorization Wizard. The first step when authorizing a file to run is to identify its digital signature (hash) and compare this to a list of authorized file hashes. You can use the Authorization Wizard to spot files copied to computers by installation routines, and incorporate their hashes to the Sanctuary Database. The source can be either the original CD/DVD-ROM or the files held on a target system hard drive. • The Sanctuary Authorization Service Tool is used to monitor changes and create updates (using Microsoft’s SUS or WSUS). • The Versatile File Processor Tool is used, either with the Sanctuary Authorization Service Tool or independently, to scan files. • The File Import/Export Tool is used when updating from another Sanctuary system or to populate a Sanctuary Database with already defined File Groups and hashes. If you are installing Sanctuary Device Control, the following tool may also be installed: Sanctuary Stand-Alone Decryption Tool (SADEC). This can be used to decrypt removable devices in those organizations where Sanctuary is not installed. (The user needs administrative rights to install this tool. Alternatively, the administrator can opt to use another encryption schema that does not need this tool, or administrative rights.) Network Communications This section analyses how network communication is established. It is divided in two subsections: • Sanctuary Client communications • Sanctuary Application Server communications. Sanctuary Client Communications The Sanctuary client acts both as a client and as a server: • As a client, it contacts the Sanctuary Application Server whenever there is a need (requesting hash-lists, devices Access Control Lists (ACL), reporting log-on and log-offs, uploading log files, etc.). • As a server it awaits messages from the Sanctuary Application Server that update part or all of its local store of hash-lists, ACLs and option settings. Connections are created on a per-request basis since the time that the Sanctuary Application Server and the Sanctuary client spend in communication is negligible compared to the time they do not generate network traffic. - 407 - Sanctuary’s Architecture Sanctuary Application Server Communications The Sanctuary Application Server, internally, consists of two distinct subsystems. One handles requests from administrative clients and exposes its services via a secure, authenticated Remote Procedure Call (RPC), the other one communicates with clients: • RPC server: In the Sanctuary Application Server, authenticated RPC is used to expose administrative functionality, in particular the interfaces required to browse and manage the hashes and file groups in the database, and to offer control over driver behavior. • TCP Server: The Sanctuary Application Server offers a TCP/IP server based on Microsoft Windows I/O Completion Ports (IOCP), the highest-performance thread and I/O management option that Microsoft Windows offers to applications. The most important server tasks are responding to log-on and log-off notification messages from Sanctuary client, i.e. processing start (boot) and stop (shutdown) messages from them, and creating and dispatching hash-lists at a client's request. • TCP Client: The TCP/IP client built into the Sanctuary Application Server mainly serves to push updates to clients. When an administrator makes changes to options or permissions, clients may need to be notified of such changes immediately. For permission changes, this will typically also invalidate the hash-list cache mentioned before. • No broadcasting: Internally, the Sanctuary Application Server uses a thread pool to perform mass updates. It connects to each Sanctuary client individually according to the driver's state (the database keeps track of drivers and users that are on-line). This is more work than broadcasting, but offers the advantage of guaranteed delivery, a feature not found in broadcastcapable protocols. • Inter-server communications: The forcing of updates mentioned above also raises a need for multiple instances of the Sanctuary Application Server to communicate among themselves. In particular, when an administrator requests an immediate hash-list update, the instruction to flush the hash-list cache must be relayed to every server in order to keep the caches coherent. Since all servers share a common database, they all register themselves in that database. Intraserver notifications are sent through their TCP/IP channel. How Sanctuary Works This section contains a high-level summary of the behind-the-scenes workings of Sanctuary Application Control and Sanctuary Device Control. Sanctuary Application Control Suite Sanctuary is an operating system extension solution that enforces strict control over which executables, scripts and macros can be run, and by which user. This guarantees that only those applications that have been previously identified and authenticated will be authorized to run – anything, and everything else known or unknown, will fail to execute. - 408 - Sanctuary Device Control v4.3.2 - User Guide A Sanctuary client is installed on each machine that needs protection. This operates at the operating system kernel level. Every time a new file is loaded for execution, the kernel driver intercepts the attempt to load the file into memory, and determines the requesting user’s identity, the groups the user belongs to, and the logon session in whose context the call is made. The kernel driver then proceeds to positively authenticate the executable, script or macro file by means of a cryptographic digest called hash (SHA-1). It is important to emphasize that the authentication takes place when the file is loaded into memory for execution, rather than when the file is read or written to disk. Once the hash has been calculated, the driver checks whether the current user has been granted the right to run it. If so, then the execution is authorized, if not, access is denied. Before you Activate Sanctuary Application Control Suite Before protecting your organization against running undesirable executables, you must first: • Gather a list of executable files that are allowed to run. The system uses a special algorithm to calculate a unique digital signature for each file. You can also import predefined hash lists (Standard File Definitions) of those Windows operating systems supported by Sanctuary to quickly populate the database with all OS files needed. • Organize these file definitions into logical groups (File Groups), and specify which users/User Groups are authorized to run these files. The relationship here is Application File Group User/User Group. In large organizations, it is recommended to assign File Groups to User Groups instead of individual users. This has the clear advantage of transferring the administration back to you Windows’ user console instead of always using Sanctuary Management Console. This information is stored in the Sanctuary Database. When a Computer Signs on to the Network When a computer signs on to the network, the Sanctuary Application Server does the following (see Figure D.17, “How the Sanctuary solution work” on page 415 ): • Reads the Security ID (SID) of the machine or account. • Gets the latest authorizations from the central Sanctuary Database (only if its cache is empty or if permissions changed). • Selects only those parts that changed, compress the list, and signs (or encrypts, depending if you use TLS or not) this information for secure transmission across your LAN or WAN and to avoid tampering. • Automatically downloads this authorization information to the requesting user/machine. This authorization information is then stored locally in a secure location on the client’s hard disk, where it cannot be tampered with. - 409 - Sanctuary’s Architecture When a User Asks to Run an Application When a user asks to run an application the Windows operating system checks the file extension to determine if it is registered as an executable. Once Windows has determined that it is an executable file (for example, those files with.exe or .dll extension) or is a recognized script or macro file, Sanctuary takes action. The system checks the entire file at a binary level to calculate a 20-Byte hash code, checks it against the list of pre-approved hashes from authorized applications, scripts and macros, and determines whether the file can be run. This verification is transparent to the user and takes place virtually instantaneously. If the Application is on the Approved List If the application is on the approved list the application starts up with no user intervention required. Sanctuary, optionally, logs the successful application access. This feature in not activated by default. If Application Access is Denied If application access is denied Sanctuary sends a denial notification to the user and logs the incident. If the local machine has been configured to allow optional override, the user may choose to assume the risk of activating a denied application. This action will be logged as well. What Happens if a Computer is Taken off the Network Sanctuary is designed to protect computers at all times from running unauthorized programs. The same control and protection is provided to your users even when they are disconnected from the network, for example when laptops are taken off the network. Once a list of hashes has been downloaded, the local copy is used until the computer is reconnected to the network and able to receive automatic updates once again. The local copy is kept in an inaccessible folder and available even when disconnected from the network. - 410 - Sanctuary Device Control v4.3.2 - User Guide The following schema summarizes all these steps: Figure D.15 Sanctuary Application Control Suite authorization process Sanctuary Device Control When you first install Sanctuary Device Control default permission rules are created and configured. In addition, devices are automatically assigned to predefined device classes according to their Windows classification. The predefined permissions include Copy Limit restrictions and Read/Write permissions for some of the devices. Even though some users may already be satisfied with these settings, the majority of people prefer to change them to reflect the device policy their organization. Therefore one of the first tasks an administrator does is to change and define new permissions for users, groups, computers, or devices in their network. Administrators can also manage specific devices by type or brand, if required. They can assign rights and attributes by device class, specific device, or specific media to user(s) / user group(s) or to a specific computer. - 411 - Sanctuary’s Architecture Before you Activate Sanctuary Device Control • Before you activate Sanctuary Device Control, you need to: • Define your device access policies and decide who can use what and with which restrictions. • Create rules and permissions using Sanctuary Management Console. Each permission is an association Device Class User/User Group. You have several types to choose from: Read, Read/Write, None, Temporary, Scheduled, Copy Limit, Shadow file name or complete content in read/write operations, Offline, Online, etc. In large organizations, we recommend you assign permissions to User Groups instead of individual users. This has the clear advantage of transferring the administration back to you Windows’ user console instead of always using Sanctuary Management Console for this job. • The device authorization information is stored in the Sanctuary Database. • Communication between the Sanctuary Management Console and the Sanctuary Application Server is set to RPC (Remote Procedure Call) level 6. Messages interchanged between them are fully encrypted. • The Sanctuary Management Console connects to the Sanctuary Application Server to carry out administrative changes. Therefore, at no time does the Sanctuary Management Console connect directly to the database. All communication with the Database is through and by the Sanctuary Application Server(s). Traffic between the Sanctuary client and Sanctuary Application Server is authenticated based on Private/Public key technology. If you decide to use TLS, the communication is encrypted. When a Computer Signs on to the Network You do not have to worry about adding new permissions when an unknown device is connected to a computer in your network. Most devices are declared in one of the Sanctuary Device Control predefined classes during the plug and play discovery phase. Sanctuary Device Control can therefore apply existing device class permissions to the device in most cases. If a device is unknown and does not belong to a predefined device class, the most restrictive permission rule is applied and access is denied until specifically told otherwise. These permissions can even be extended to a specific model installed on a precise computer. Every time a user wants to access a device, the Sanctuary Device Control driver intercepts the Operating System request at the kernel level. If the device is not in the list of authorized classes and/ or specific devices, Sanctuary Device Control will deny its use. If the device is known (e.g., it is in the device class list), the driver checks the user rights in the Access Control List (ACL). In this case, if a user has the right to access a device (for instance a CD burner drive), either Read or Read/Write access is granted. If a user does not have rights on the device, an ‘access denied’ notification pops up to inform the user — the administrator can optionally define custom messages. The program can log this action, optionally, for the Administrators to analyze. - 412 - Sanctuary Device Control v4.3.2 - User Guide The following schema summarizes these steps: Figure D.16 Authorizing a device access When a User Asks to Access a Device All computers equipped with the Sanctuary client receive an administrator-created permissions list of all known devices reported by the Console. This is forwarded by the Sanctuary Application Server to the machine. It is delivered in one of several possible ways, depending on whether the computer is or not connected to the network: Table D.3 Permissions list updates depending on network connection status Network connection Is not available Permission updates are done: By importing them from a file. Using the list kept internally in the computer’s memory. - 413 - Sanctuary’s Architecture Table D.3 Permissions list updates depending on network connection status Network connection Permission updates are done: When the user logs on. When the user asks for them using the Refresh settings rightclick option in the client’s system tray. When the administrator makes changes and explicitly sends them to a specific computer or all on-line machines. Is available If another user logs on. Every 60 minutes. When communication starts between the Sanctuary Application Server and the client. Before triggering a shadow (carbon copy) file transfer. The Sanctuary Application Server, in turn, communicates with the Sanctuary Database to retrieve the whole list — only when its cache is empty. The Sanctuary Application Server then cryptographically signs the list or encrypts it if using TLS (Transport Layer Security channel), compresses it, select only those permissions that have changed, and forwards it to the client computer. The process is summarized in Figure D.17, “How the Sanctuary solution work” on page 415 . If the Device is on the Approved List If the device is on the approved list, device access starts with no user intervention required. Sanctuary, optionally, logs the successful access. This feature in not activated by default. If Device Access is Denied If device access is denied Sanctuary displays an optional event message to the user and, optionally, logs the incident. If a Computer is Taken off the Network Sanctuary Device Control protects all computers, at all times, using the Sanctuary client. Whenever a computer is disconnected from the network, it is still protected by the permissions that were downloaded from the Sanctuary system when it was last connected. This could be the case with laptop computers. The computer simply accesses its local copy until it is reconnected to the network and able to receive automatic updates once again. You can create ‘online’ and ‘offline’ permissions for any computer or device on your network, to be applied automatically, as appropriate. - 414 - Sanctuary Device Control v4.3.2 - User Guide There is no problem if users try to delete or tamper with the list — they simply would not have access at all. Figure D.17 How the Sanctuary solution work - 415 - Sanctuary’s Architecture - 416 - Sanctuary Device Control v4.3.2 - User Guide E Glossary ACL Access Control List. A list that keeps the permissions that each user or group has to a specific system object. Each object has a unique security attribute that identifies which users have access to it. ADSI Active Directory Service Interface. Previously known as OLE Directory Services, ADSI makes it easy to create directory management applications using high-level tools such as Basic, Java, or C/C++ without having to worry about the underlying differences between the dissimilar namespaces. AES Advanced Encryption Standard. A symmetric key encryption technique that is replacing the commonly used DES standard. It is the result of a worldwide call for submissions of encryption algorithms issued by NIST in 1997 and completed in 2000. CA Certificate Authority. Entity (trusted third party) that issues digital certificates used by other parties. Sanctuary uses Microsoft's CA that receives certificate requests, issues, revokes, and publishes certificates used in public key cryptography. CAB File extension for cabinet files. They are multiple files compressed into one and extractable with the extract.exe utility. Such files are frequently found on Microsoft software distribution disks. Client Computer A computer on your network that is supervised by the Sanctuary Device Control. Cscript.exe A command prompt-based version of WSH that sends its output to the command window in which it was started. CSV Comma Separated Value. A file format that allows easy data table retrieval into a variety of applications. It is often used to exchange data between disparate applications. The file format has become a pseudo standard throughout the industry, even among non-Microsoft platforms. Common examples of applications that use this format are spreadsheets and databases. You can also see and edit these files using an ASCII text editor (Notepad, Word, WordPad, Excel, etc.). DAO Disc-At-Once. A method of recording data on a CD that consists in a single write operation without turning the laser light off. - 417 - Glossary DCOM Distributed Component Object Model. A set of Microsoft concepts and interfaces built into Windows operating system in which client program objects can request services from server program objects on other computers in a network. The first versions of DCOM were exploited to introduce worms and Trojans into networks. Windows XP SP2 and Windows Server 2003 SP1 and later include many changes that enhanced security. Although these resolved problems present in earlier versions of Windows, they also changed some DCOM properties that must be finetuned. Delegation The act of assign responsibilities for management and administration of a portion of the resources or items used in a shared computing environment to another user, group, or organization. Dependencies Additional executable files (.exe, .dll, or others) required by executable files to run properly. Dependencies are split into two categories: static dependencies which are files declared explicitly in the executable file as being required, and dynamic dependencies which are additional files an executable may require at runtime. Direct cable connection (DCC) A RAS (Remote Access Service) networking connection between two computers, or between a computer and a Windows CE–based device, which uses a serial or parallel cable directly connected between the systems instead of a modem and a phone line. DN Distinguish Name. A name that uniquely identifies an object in the Directory Information Tree. Executable program A program that can be interpreted by itself directly on a computer. The term usually applies to a compiled program translated into machine code in a format that can be loaded in memory and run by a computer's processor. Exploit A piece of software that takes advantage of a bug, glitch or vulnerability, leading to privilege escalation (exploit a bug) or denial of service (loss of user's services) on a computer system. File Group Organizational groups used to cluster authorized executable files when using Sanctuary Application Control Suite. Files must be assigned to 'File Groups' before users can be granted permission to use them. You can choose to assign files to 'File Groups' from various modules throughout the Sanctuary Management Console, e.g. by double-clicking on a file in the Database Explorer, EXE Explorer, Log Explorer or Scan Explorer. - 418 - Sanctuary Device Control v4.3.2 - User Guide GUID A Global Unique Identifier number generated when the NDS object is created. It is simply an object’s NDS attribute. In order to ensure data consistency, Novell eDirectory implements a globally unique ID (GUID) for all objects within the directory. The total number of unique keys (2128 or 3.4028 x 1038) is so large that the possibility of using the same number twice is nearly zero. Hash A complex digital signature calculated by Sanctuary Application Control Suite components to uniquely identify each executable file that can be run. The hash is calculated using the SHA-1 algorithm that takes into account the entire contents of the file. iFolder A Novell client that runs on Windows-based computers. It allows a user to work on his files anywhere —online or offline. iFolder integrates encryption and file synchronization services. IMAPI Image Mastering Applications Programming Interface. A Windows’ operating system service assigned to LocalSystem used by some CD/DVD burning software. It should be disabled so that users cannot — using Windows Explorer, Windows Media Player or other programs that rely in this service — create CD/DVD copies in Windows XP & above. IOCP I/O (Input/Output) Completion Port. MAPI Messaging Application Programming Interface enables Windows applications to access a variety of messaging systems. MDAC Microsoft Data Access Components. A component required by computers using Windows to connect to SQL Server or SQL Server 2005 Express Edition databases. NDAP Novell Directory Access Protocol. The NDAP component gives Windows applications full access to the Novell eDirectory and administration capabilities for NetWare servers, and volumes. NDS Novell’s eDirectory previously called Novell Directory Services. eDirectory is a hierarchical, object oriented database that represents all the assets in an organization in a logical tree. Assets can include users, positions, servers, workstations, applications, printers, services, groups, etc. - 419 - Glossary Negative permission It is important to make a distinction between the absence of permission and a negative permission — ‘None’: In the first case, if no permission has been defined, the driver applies the most restrictive access. In the second case, when creating a permission for which neither the read nor the write flags are selected, you deny the user access to the device even if the group he is member of grants him this access. You specifically deny the access to a device for the user. NICI Novell International Cryptographic Infrastructure. NICI is a base set of cryptographic services available for Novell. NICI provides an API set that offers a consistent interface for application developers to use and deploy cryptography within their applications. OU Organizational Units. A part of the Active Directory (AD) structure inherited from Novell’s NDS structure. Within Novell’s NDS/eDirectory there are three classes of objects in the NDS database: Roots, Containers, and Leafs. There are three supported types of container objects: Country (C=), Organizations (O=), and Organizational Units (OU). Private Key One of the two keys used in public key encryption. In our case, the server keeps the private key secret and uses it to encrypt digital signatures and to decrypt received messages. Public Key One of the two keys used in public key encryption. In our case, the server releases this key to the client drivers. It is used to encrypt messages sent to the client and to decrypt his digital signature. RPC Remote Procedure Call. A protocol that allows a computer program running on one host to run a subroutine on another host. RPC is used to implement the client-server model of distributed computing. RSA Encryption In 1977, Ron Rivest, Adi Shamir, and Len Adleman developed the public key encryption scheme that is now known as RSA, after their initials. The method uses modular exponentiation, which can be performed efficiently by a computer, even when the module and exponent are hundreds of digits long. SADEC Sanctuary Stand-Alone Decryption Tool. Program used to decrypt removable devices on those organizations or machines where there is no Sanctuary Client Driver available. It requires to be installed on the machine where it is going to be used. SAO Session-At-Once. - 420 - Sanctuary Device Control v4.3.2 - User Guide SHA-1 Secure Hash Algorithm 1, as defined in the Federal Information Processing Standards Publication 180-1. This algorithm produces a one-way 160-bit hash that can be used for a variety of applications including authentication and cryptography. SID Security identifier, a security feature of Windows NT and 2000 operating systems. The SID is a unique name (alphanumeric character string) used to identify an object, such as a user or a group of users in a network. Windows grants or denies access and privileges to resources based on an ACL (Access Control List), which uses a SID to uniquely identify users and their group memberships. When a user requests access to a resource, the user's SID is verified by the ACL to determine if the user, or the group he belongs to, is allowed to perform that action. SQL Server Microsoft’s industry standard database server. You will need it, or the SQL Server 2005 Express Edition component, to run Sanctuary Device Control. Sanctuary Application Server The main component of all Sanctuary products. Beside calculating hashes, authorizing applications and devices, it serves as a bridge between the database and the Sanctuary Client Driver. SVolBro.exe Decryption tool used for the 'Easy Exchange' encryption method offered by Sanctuary. This tools is a stand-alone tool that does not requires installation nor administration privileges to be used TAO Track-At-Once. TCP/IP Transmission Control Protocol/Internet Protocol. The protocol used by the client computers to communicate with the Sanctuary Application Server. TLS Transport Layer Security. The Transport Layer Security (TLS) protocol (based on SSL - Secure Socket Layers) addresses security issues related to message interception during communication between hosts. The deployment of TLS, client and server side, is the primary defense against compromised clients or mixed networks where is possible to intercept transmitted messages. VBScript A scripting language created by Microsoft embedded in many applications used in Windows. Although it allows for powerful interoperability and functionality, it also creates a great deal of security risks unless it is tightly controlled. - 421 - Glossary Well-Known Security Identifiers A security identifier (SID) is a unique value used to identify a security principal or security group. The values of certain SIDs remain constant across all installations of Windows systems and for this reason are termed well-known SIDs. Everybody, Local, Guest, Domain Guest, etc. are some examples of SIDs. WMI Windows Management Instrumentation. WMI is a standard technology to access management information in an enterprise environment. WMI uses the Common Information Model (CIM) industry standard to represent systems, applications, networks, devices, and other managed components. You can use WMI to automate administrative tasks in an enterprise environment. WMI improves administrative control by allowing administrators to correlate data and events from multiple sources and vendors on a local or enterprise basis. It is used as a complement to ADSI. WSH Windows Script Host. Application provided with Windows operating systems to interpret plain text files containing a series of valid commands called scripts. It is language-independent, meaning that it will work with any modern scripting language. It has built-in support for JavaScript, XML, and VBScript, but can be extended to use almost any other language, such as Perl and Python. There are two versions of the Windows Script Host: a windows-based version (wscript.exe) dialog for setting script properties, and a command prompt-based version (cscript.exe). WScript.exe generates windowed output, while CScript.exe sends its output to the command window in which it was started. Z.E.N.works Zero Effort Networks. This lets you create a Workstation Policy Package and edit the Novell client configuration parameters, including the preferred tree and default print-capture settings, as well as client parameters, like opportunistic locking. Zero-Day exploit A zero-day exploit is a malicious code that takes advantages of a security vulnerability on the same day this vulnerability is known. Since the vulnerability is not known in advance, there is no way to guard against the exploit before it happens if you are using traditional solutions (e.g. blacklist antivirus programs). - 422 - Sanctuary Device Control v4.3.2 - User Guide F Index A Added permission ................. 210 Added scheduled permission... 210 Added temporary permission .. 210 Authorized media.................. 210 Automatic user access upgrade210 Change computer group ........ 210 Change device group ............. 210 Deleted default option ........... 210 Deleted option ...................... 210 Genreate maintenance ticket .. 210 Modified scheduled permission 211 Modify user access role .......... 211 Purged DB and file storage ..... 211 Remove computer group........ 211 Remove device group ............ 211 Remove managed device ....... 211 Removed media.................... 211 Rename computer group........ 211 Rename device group ............ 211 Revoked permission .............. 211 Revoked scheduled permission 211 Revoked temporary permission211 Set default option ................. 211 Set option............................ 211 Unauthorized media .............. 211 Updated Media ..................... 212 Updated permission .............. 212 Uploaded shadows ................ 212 Access rights Monitoring ............. 149, 151, 209 Accessing encrypted media outside of your organization............. 254 Achieving privacy....................... 374 Active directory ....... 36, 97, 209, 219 Delegation ............................. 36 Service Interface .................. 417 Add a specific removable device .... 222 Managed device.................... 210 Removable........................... 222 Adding DVD/CD ......................... 217 Pre-requisites....................... 217 Administration tools ............ 390, 406 Administrator ..................34, 36, 209 Monitoring ............. 149, 151, 209 Roles ...................................... 5 ADSI........................................ 417 Advanced Encryption Standard219, 417 AES ........................... 219, 377, 417 Description .......................... 380 Analysis of a CD image ............... 336 Assigning permissions to use DVD/CDs/ Encrypted Media ....... 228, 231 Audit logs ............149, 151, 172, 209 Attachment............................... 172 Authorization wizard................... 407 Audit events ...................... 172, Accessed device log .............. Accessed shadow file............. Add computer group ............. Add device group .................. Add managed device ............. Added media........................ Authorizing access ..................... 227 209 209 209 209 210 210 210 - 423 - B Biometric devices........................... 6 Index C Computed columns .................... 168 CA .................................... 380, 417 Computer groups ......................... 62 CAB ......................................... 417 Computer-specific Options ............................... 283 Permissions............................ 97 Calculated values....................... 168 Centralized device control log ...... 281 Centralized encryption.................... 5 Certificate authorities ................. 380 Certificate Authority ................... 417 Certificate generation Disabled .............................. 285 Connect As......................................... 32 Events................................. 150 To the Sanctuary Application Server 11 Context-sensitive permissions ......... 4 Certificates ............................... 219 Copy limit ...................... 4, 125, 345 Check settings........................... 294 Criteria.............................. 176, 183 Checklist see installation checklist Criteria dialog............................ 184 CIM ......................................... 422 Client computer93, 100, 104, 118, 125, 141, 145, 151, 232, 283, 313, 314, 333, 414, 417 Client Hardening.......................... 25 Client hardening ........................ 285 Client ticket ................................ 24 Create................................... 26 Rules .................................... 25 Column headers ........................ 164 COM ............................................ 6 Printers ............................... 345 Serial ports .............................. 6 COM+ ...................................... 345 Comments .................................. 62 Common Information Model ........ 422 Common problems..................... 333 Communication Signing................................ 375 Communication ports ................. 391 Compatible mode......................... 39 - 424 - Cryptography ............................ 373 Encryption ........................... 373 CryptographyDecryption ............. 373 Cscript.exe ........................ 417, 422 CSV ......................................... 417 Custom reports.......................... 155 D DAO......................................... 417 Data file directory ........................ 34 Database ........................... 389, 406 Maintenance........................... 23 Database maintenance ................. 33 DataFileDirectory ....................... 389 DCC ......................................... 418 Decentralized encryption... 5, 49, 220, 351 Decrypt medium ........................ 259 Decrypting medias ..................... 383 Default Options ............................... 282 Permissions............................ 91 Sanctuary Device Control v4.3.2 - User Guide Settings ...........................91, 97 DVD/CD hash ............................ 214 Default Permissions ..................... 89 DVD-ROM ................................. 407 Delegation ................................ 418 Dependencies............................ 418 Device Import ................................ 261 Management, Log Explorer..... 208 Monitoring ........................... 149 Device Attached ........................ 200 Device class .............................. 172 Device control status window ...... 282 Device Explorer . 20, 55, 71, 145, 146, 243, 244, 283, 285 Device groups ............................. 69 Add....................................... 69 Device log ........... 139, 149, 150, Disabled .............................. Enabled ............................... throttling ............................. 286 286 286 287 E Easy Exchange ................... 265, 363 Easy exchange .......................... 350 Encrypted data Accesing Outside the network ......... 361 Accessing Outside the network ......... 363 Full encryption...................... 361 SADEC ................................ 362 Using Sanctuary Client........... 358 Using Sanctuarys client CA installed..................... 358 Ca not installed ............... 359 Encrypted Media ........................ 227 Import ................................ 261 Device Model ............................ 172 Encrypted media Key recovery ........................ 237 Devices in logical groups............... 45 Encrypted media export password 282 DFD ......................................... 389 Encrypted media key export ........ 282 Digital signatures....................... 379 Encrypting media ......................... 48 Disconnected ............................ 410 Encryption ................................ 309 Adding removable drives........ 218 Centralized .............................. 5 Decentralized ..................... 5, 49 Examples.......................... 49 Decentralized encryption........ 351 DVD/CD............................... 309 Easy exchange ..................... 350 Easy exchange (insecure for existing data)......................... 223 Encrypt Removable ............... 222 Encrypting a DVD/CD ............ 312 Error messages .................... 224 Export key on medium........... 253 DN........................................... 418 DNS.................................. 220, 392 DVD/CD Drives ..................................... 7 Shadowing........................5, 207 Supported formats ......... 334, 339 Unsupported formats...... 335, 339 DVD/CD Encryption Limitations........................... 310 Requiered permissions........... 312 DVD/CD encryption Supported media .................. 310 - 425 - Index Export key to file .................. 251 Full & Slow (secure for existing data) 223 Full encrytion ....................... 349 Import (secure for existing data) .. 226, 234 Import a device .................... 261 Key Length .......................... 219 Limitations........................... 220 Lost or broken media ............ 234 Method................................ 223 Password ............................. 259 Password strength ......... 252, 254 Pre-requisites................ 219, 311 Quick Format (insecure for existing data)......................... 223 Scenarios ............................ 368 Users by medium.... 227, 230, 231 Encryption possibilities ............... 349 Endpoint Maintenance ........... 24, 286 Endpoint status ......................... 294 Enterprise Administrators.............. 36 Errors on client machines ................ 150 Event Log ................................. 286 Executable program ................... 418 Explicitly deny ...................... 56, 129 F Fetch Latest Log Files ................. 151 File filters ............................... 5, 77 Examples............................... 84 Remove ................................. 84 File Group................................. 418 File Menu.................................... 22 File shadowing........................4, 150 File type filtering...................... 5, 77 Examples............................... 84 Remove ................................. 84 FireWire ....................................... 7 Floppy disk drives .......................... 7 Format custom reports ............... 196 Full encryption........................... 349 G Grouping log entries................... 167 GUID ....................................... 419 H Hash .......................... 173, 410, 419 Help menu .................................. 29 How Sanctuary works ................. 408 Exploit ..................................... 418 I Explorer menu............................. 28 Identifying devices ....................... 41 Export Encryption key .............. 236, Key To file ............................ To media or file ............... Medium key ......................... Identifying users and user groups .. 40 249 IEEE 1394..................................... 7 250 250 250 iFolder...................................... 419 export.exe ................................ 121 Import ..................................... 261 Imaging devices ............................ 7 IMAPI....................................... 419 Incorrect logoff.......................... 345 Individual option settings ............ 285 - 426 - Sanctuary Device Control v4.3.2 - User Guide Informing client computers ......... 145 Media Authorizer 20, 21, 218, 219, 227, 243, 250 Media Description ................. 222 Media-inserted ..................... 199 Insert Computer .......................... 97 Internal structure ...................... 389 IOCP ........................................ 419 Microsoft Certificate Authority213, 220 Modem ......................................... 7 K Key logger See Keylogger Key Pair Generation ................... 406 Key pair generation.................... 378 Key recovery...................... 237, 240 Keyboard shortcuts ...................... 61 Keylogger ................................. 292 Monitoring Administrators........ 149, 151, 209 Devices ............................... 149 MSDE ....................................... 419 Multiple permissions................... 128 N Navigation/Control bar ............... 164 L Label ....................................... 222 Limiting messages ....................... 68 NDAP ....................................... 419 NDS ......................................... 419 Log entries ........................ 149, 176 Negative permission ....56, 60, 93, 94, 129, 244, 246, 247, 257, 420 Log entry fields ......................... 172 Network communication ............. 407 Log Explorer ........... 20, 21, 152, 163 Force latest log..................... 207 NICI......................................... 420 Log system ............................... 286 None56, 60, 62, 93, 94, 129, 244, 246, 247 LPT/Parallel ports........................... 7 Novell support ............................... 3 Lumension Security contacting.........................xix–xx Novells synchronization script ...... 406 M Offline updates .............................. 4 O Machine-Specific Settings ............. 97 Omnibook ................................. 346 Managing specific computers ......... 46 Online/Offline permissions........... 116 MAPI........................................ 419 Options ............................... 30, 282 Centralized device control log . 281 Certificate generation ............ 285 Change................................ 284 Changes .............................. 281 Client hardening ................... 285 Device control status window.. 282 MDAC....................................... 419 Media By user ............................... 231 Label................................... 222 Label column........................ 216 - 427 - Index Device log..................... 281, 286 Device log throttling....... 281, 287 eDirectory translation ..... 282, 287 Encrypted media export password. 282 Encrypted media key export ... 282 Encrypted media password282, 288 Endpoint.............................. 282 Individual options ................. 285 Log upload delay ........... 282, 289 Log upload interval ........ 282, 289 Log upload threshold ...... 282, 289 Log upload time............. 282, 289 Offline/Online state definition . 282 Online state definition ........... 289 Sanctuary Application Server address......................... 282 Sanctuary status .................. 288 Server address .............. 282, 291 Shadow directory.................. 291 Shadow file upload delay ....... 282 Suppress recurring log events 281 Update notification................ 292 USB Keylogger ..................... 292 Organizational Units ..................... 36 OU........................................... 420 Out of band permissions ............. 108 Overview .................................. 389 P Palm Handheld Devices .................. 8 Passphrase ........................ 241, 278 Password entry attempts ............ 382 Password recovery ..................... 237 PCMCIA .................................... 4, 8 Per-device Encryption ............................... 5 Permissions ......................4, 143 - 428 - Permissions............................91, 98 Define ................................. 393 Dialog ................................... 72 Manage ............................... 393 Monitoring changes . 149, 151, 209 None ................................... 420 Online/Offline ....................... 116 Priority ........................... 93, 243 Send to client ......................... 39 Store .................................. 393 Temporary ........................... 105 Temporary offline ................. 108 Types .................................... 46 PGP .................................. 133, 323 Administrator’s actions .......... 331 Audits ................................. 331 Encrypt a device ................... 326 Log Explorer......................... 330 Permissions.......................... 324 Reports ............................... 330 Shadow ............................... 330 Using a PGP-encrypted device. 327 Plug & Play ............................... 218 Plug and Play ............................ 382 Poor performance ...................... 345 Portable Devices ............................ 8 Pre-defined device classes............. 41 Pretty Good Privacy.................... 133 pricing product ................................. xx Private Key ............................... 420 product pricing................................... xx Protection process...................... 414 PS/2 Ports ................................8, 345 Public and private keys ............... 377 Sanctuary Device Control v4.3.2 - User Guide Public Key................................. 420 Shadowing by user........... 27, 302 User options........................... 27 User permissions ............. 27, 297 Users by medium ............. 27, 300 Purge Online Table....................... 24 Q Queries Simple ................................ 182 Quick Format (insecure for existing data) ................... 214, 226, 234 R RIM BlackBerry handhelds............... 8 Root-level permissions.................. 89 RPC ......................................... 420 RSA .................................. 202, 398 Definition............................. 420 Read denied.............................. 200 S Read-only ..................................... 4 SADEC ....................... 262, 362, 420 Recover password............... 239, 275 Salt..................................... 25, 394 Recovering passwords ................ 383 SAM ........................................... 13 Removable .....................8, 218, 382 Storage devices ........................ 8 Sanctuary Application Control Suite389 Internal workings.................. 408 Removable medias..................... 382 Sanctuary Application Server...22, 23, 389, 391, 421 Defining............................... 392 Remove Copy limit ............................ 128 DVD/CD/Encrypted Media ...... 232 DVD/CDs ............................. 233 Encrypted media................... 233 Offline and online permissions 119 Permissions to DVD/CD/Encrypted Media ................. 229, 232 Scheduled permissions .......... 105 Shadow ............................... 125 Temporary permissions ......... 108 Reports ...................... 155, 295, 345 Computer permissions ...... 27, 298 Device permissions .......... 27, 297 Machine options............... 27, 304 Media by user ................. 27, 299 Menu 27, 295, 297, 298, 299, 300, 301, 302, 304, 305 Online machines .............. 28, 302 Server Settings .................... 305 Shadowing by device........ 27, 301 - 429 - Sanctuary Application Server address . 282 Sanctuary Application Server Unreachable ............................... 399 Sanctuary Authorization Service Tool.. 407 Sanctuary Client ................. 390, 394 Basics ................................. 398 Components......................... 395 DHCP server......................... 402 Key pair............................... 398 Ports ................................... 396 Protocols ............................. 396 Proxy communications ........... 400 Proxy configuration ........ 399, 402 Sanctuary Client Deployment Tool 406 Sanctuary Client Driver Layered structure.................. 395 Index Sanctuary components ............... 389 Shadow file upload delay ............ 282 Sanctuary Database ..... 389, 391, 414 Sanctuary Device Control............ 389 Features .................................. 3 Offline control ...................... 414 Shadowing ......................... 150, 172 a device............................... 122 Devices ............................... 121 File Name ............................ 206 Sanctuary for Embedded Devices . 389 Show all members ....................... 63 Sanctuary Management Console . 390, 405 Connection window ............15, 16 Control panel ......................... 15 Main window .......................... 15 Menu .................................... 14 Modules................................. 19 Screen .................................. 14 Status bar ............................. 15 Show/hide columns .................... 166 Sanctuary status ....................... 288 SAO ......................................... 420 Scanners .................................. 345 Scheduled custom reports........... 195 Scheduled permissions .....4, 101, 104 Secondary hard disks ..................... 8 Secondary hard drives................ 219 Secondary network access devices ... 7 Secure Volume Browser.............. 266 Send updates ............................ 145 To a specific computer............. 24 To all computers 23, 93, 100, 104, 118, 125, 141, 145, 283, 285, 313, 314 SHA-1 ...................................... 421 Shadow Bad directory ....................... Bad public key...................... CD R malfunction.................. CD R mode unsupported ........ File malfunction .................... Files.................................... 202 202 202 202 202 151 - 430 - SID................................... 174, 421 Smart Card readers........................ 8 Sorting results........................... 165 Specifically deny access .. 60, 94, 244, 246, 247, 257, 420 SQL Server ............................... 421 Support contacting Lumension Support .. xx Supported devices ......................... 6 Types .................................... 70 Supported DVD/CD burning software .. 342 Suppress recurring log events ..... 281 SVolBro.exe ....................... 266, 421 SX ........................................... 389 SXDomain................................. 406 Synchronize Domain23, 24, 31, 32, 40, 55 Synchronizing Novell eDirectory .................... 31 System Components......................... 390 System Requirements ......... 345, 385 T TAO ......................................... 421 Tape drives ................................... 9 Target ...................................... 174 Sanctuary Device Control v4.3.2 - User Guide TCP/IP .............................. 396, 421 Template Email .................................. 196 Save to share....................... 196 Templates ................................ Adding ................................ Advanced view ..................... Backing-up .......................... Columns .............................. Criteria................................ Filtering............................... General parameters .............. Predefined ........................... Queries ............................... Select and edit templates....... Settings .............................. Simple view ......................... Using .................................. 155 160 187 162 172 183 179 182 156 182 177 181 187 155 Temporary Access..................................... 4 Permissions .................. 105, 292 Permissions offline ................ 108 Testing.......... 71, 149, 249, 281, 323 Ticket......................................... 26 Time zones ............................... 345 TLS.......................................... 421 Tools menu .......................... 23, 146 Traced ..................................... 174 Traced on ................................. 203 Transferred on .......................... 203 256, 257, 260, 261 Unencrypted data ...................... 383 Unique devices ........................ 5, 43 Unlock medium............ 238, 258, 264 Unsuccsessful attampts to access devices .................................. 149 USB ............................................. 7 Printer support ......................... 8 User Access..............................23, 35 defined classes ....................... 42 Defined devices ............. 4, 9, 138 User names............................... 175 Users ....................................... 410 V VBScript ................................... 421 Versatile File Processor tool ......... 407 View menu.................................. 23 Viewing Access attempts to devices .... 199 Client error reports ............... 202 Shadow files......................... 202 W Well-Known Security Identifiers ... 422 Window menu ............................. 29 Windows CE handheld devices ......... 9 Transport Layer Security............. 421 Windows Management Instrumentation 422 Troubleshooting......................... 333 Windows NT4 ............................ 419 Windows Script Host .................. 422 U Unable to communicate with WLD driver 217 Unauthorized Encrypted Media.... 255, - 431 - Wireless NICs ................................ 9 WMI......................................... 422 Workgroup................................ 219 Computers ............................. 32 Index Write denied ............................. 201 WScript.exe .............................. 422 WSH ........................................ 422 Z ZENworks ................................. 422 Zero-Day exploit........................ 422 - 432 - Lumension Security 15880 North Greenway Hayden Loop, Suite 100 Scottsdale, AZ 85260 www.lumension.com phone: 480.970.1025 fax: 480.970.6323 © Lumension Security, Inc. 1997 - 2008. ALL RIGHTS RESERVED. U.S. Patent No. 6,990,660. 02_103 Sanctuary Device Control v4.3.2 User Guide