1
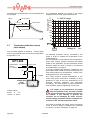
RESISTRON
UPT-606
GB
Operating
instructions
Important features
Microprocessor technology
•
Complete control via PROFIBUS-DP interface
•
Automatic zero calibration (AUTOCAL)
•
Automatic optimization (AUTOTUNE)
•
Automatic frequency adjustment
•
Large current and voltage range
•
Booster connection as standard
•
0…10VDC analog output for ACTUAL temperature
•
Alarm function with fault diagnosis
12.6.06
•
Industrie-Elektronik GmbH
Tel: +49/(0)7142/7776-0
Gansäcker 21
Fax: +49/(0)7142/7776-19
D-74321-Bietigheim-Bissingen (Germany)
E-Mail: [email protected]
Internet: www.ropex.de
Data subject to change
Contents
1
Safety and warning notes . . . . . . . . . . . . . . 3
8
Startup and operation . . . . . . . . . . . . . . . . 15
1.1
Use . . . . . . . . . . . . . . . . . . . . . . . . . . . 3
8.1
View of the controller . . . . . . . . . . . . . 15
1.2
Heating element . . . . . . . . . . . . . . . . . 3
8.2
Controller configuration . . . . . . . . . . . 15
1.3
Impulse transformer
8.3
Startup procedure . . . . . . . . . . . . . . . 17
1.4
Current transformer PEX-W2/-W3 . . . . 3
1.5
Line filter . . . . . . . . . . . . . . . . . . . . . . . 3
9.1
Indicators and controls
1.6
Warranty provisions . . . . . . . . . . . . . . . 3
9.2
Device master file (GSD) . . . . . . . . . . 20
1.7
Standards / CE marking
........... 4
9.3
PROFIBUS protocol
2
Application . . . . . . . . . . . . . . . . . . . . . . . . . . 4
9.4
Input data . . . . . . . . . . . . . . . . . . . . . . 22
3
System description . . . . . . . . . . . . . . . . . . . 5
9.5
Output data . . . . . . . . . . . . . . . . . . . . 23
3.1
Temperature controller . . . . . . . . . . . . 5
9.6
Parameter data . . . . . . . . . . . . . . . . . 24
3.2
Current transformer . . . . . . . . . . . . . . . 6
9.7
3.3
Booster . . . . . . . . . . . . . . . . . . . . . . . . 6
Temperature indication (actual value
output) . . . . . . . . . . . . . . . . . . . . . . . . 26
9.8
Booster connection . . . . . . . . . . . . . . 27
9.9
System monitoring/alarm output . . . . 27
4
.............. 3
9
Accessories and modifications . . . . . . . . . 6
4.1
Accessories . . . . . . . . . . . . . . . . . . . . . 6
4.2
Modifications (MODs) . . . . . . . . . . . . . 7
5
Technical data . . . . . . . . . . . . . . . . . . . . . . . 8
6
Dimensions . . . . . . . . . . . . . . . . . . . . . . . . . 9
7
Installation . . . . . . . . . . . . . . . . . . . . . . . . . . 9
7.1
Installation steps . . . . . . . . . . . . . . . . . 9
7.2
Installation procedure . . . . . . . . . . . . 10
7.3
Power supply . . . . . . . . . . . . . . . . . . . 11
7.4
Line filter . . . . . . . . . . . . . . . . . . . . . . 12
7.5
Current transformer PEX-W3
7.6
Wiring diagram (standard) . . . . . . . . . 13
7.7
Wiring diagram with booster
connection . . . . . . . . . . . . . . . . . . . . . 14
Page 2
Controller functions
. . . . . . . . . . . . . . . . . 19
. . . . . . . . . . . 19
. . . . . . . . . . . . . 20
9.10 Error messages . . . . . . . . . . . . . . . . . 27
9.11 Fault areas and causes . . . . . . . . . . . 29
10
Factory settings . . . . . . . . . . . . . . . . . . . . . 30
11
Maintenance . . . . . . . . . . . . . . . . . . . . . . . . 30
12
How to order . . . . . . . . . . . . . . . . . . . . . . . . 31
13
Index . . . . . . . . . . . . . . . . . . . . . . . . . . . . . . 32
. . . . . . 12
UPT-606
Safety and warning notes
1
Safety and warning notes
This CIRUS temperature controller is manufactured
according to DIN EN 61010-1. In the course of its
manufacture it passed through quality assurance,
whereby it was subjected to extensive inspections and
tests.
It left the factory in perfect condition.
The recommendations and warning notes contained in
these operating instructions must be complied with, in
order to guarantee safe operation.
The device can be operated within the limits indicated
in the "Technical Data" without impairing its operational
safety. Installation and maintenance may only be
performed by technically trained, skilled persons who
are familiar with the associated risks and warranty
provisions.
1.1
Use
CIRUS temperature controllers may only be used for
heating and temperature control of heatsealing
elements which are expressly suitable for them, and
providing the regulations, notes and warnings
contained in these instructions are complied with.
In case of non-compliance or use contrary to
the intended purpose, there is a risk that
safety will be impaired or that the heatsealing
element, electrical wiring, transformer etc. will
overheat. Ensuring such compliance is the
personal responsibility of the user.
!
1.2
Heating element
insulation) and have a one section bobin. When the
impulse transformer is installed, suitable shock
protection must be provided in accordance with the
national installation regulations for electrical
equipment. In addition, water, cleaning solutions and
conductive fluids must be prevented from seeping into
the transformer.
!
Incorrect installation of the impulse
transformer impairs electrical safety.
1.4
Current transformer PEX-W2/-W3
The current transformer supplied with the CIRUS
temperature controller is an integral part of the control
system.
Only the original ROPEX PEX-W2 or PEX-W3
current transformer may be used. Other
transformers may cause the equipment to
malfunction.
!
The current transformer may only be operated if it is
connected to the CIRUS temperature controller
correctly (see section 9, "Startup and operation"). The
relevant safety instructions contained in section 8.3,
"Power supply", must be obeyed. External monitoring
modules can be used in order to additionally increase
operating safety. They are not included in the scope of
supply of the standard control system and are
described in a separate document.
1.5
The temperature coefficient of a CIRUS temperature
controller is specially adapted to CIRUS heating
elements.
Line filter
The controller is not allowed to be operated
with any other heatsealing bands because
they could be overheated and damaged beyond
repair.
The use of an original ROPEX line filter is mandatory in
order to comply with the standards and provisions
mentioned in section 1.7 "Standards / CE marking" on
page 4. This device must be installed and connected
according to the instructions contained in section 8.3,
"Power supply" as well as the separate documentation
enclosed with the line filter.
1.3
1.6
!
Impulse transformer
A suitable impulse transformer is necessary to ensure
that the control loop functions perfectly. This
transformer must be designed according to VDE 0570/
EN 61558 (isolating transformer with reinforced
Warranty provisions
The statutory provisions for warranties apply for a
period of 12 months following the delivery date.
All devices are tested and calibrated in the factory.
Devices that have been damaged due to faulty
UPT-606
Page 3
Application
connections, dropping, electrical overloading, natural
wear, incorrect or negligent handling, chemical
influences or mechanical overloading as well as
devices that have been modified, relabeled or
otherwise altered by the customer, for example in an
attempt to repair them or install additional components,
are excluded from the warranty.
Warranty claims must be examined in the factory and
approved by ROPEX.
1.7
Standards / CE marking
The controller described here complies with the
following standards, provisions and directives:
DIN EN 61010-1
(VDE 0411-1)
Safety provisions for electrical
measuring, control and laboratory
devices (low voltage directive).
Overvoltage category III, pollution
severity 2, safety class II.
DIN EN 60204-1
Electrical equipment of machines
(machinery directive)
EN 50081-1
EMC interference emissions
according to EN 55011, group 1,
class B
EN 50082-2
EMC interference immunity:
ESDs, RF radiation, bursts, surges.
2
Application
This CIRUS temperature controller is an integral part of
the "series 600". Its sole purpose is to control the
temperature of CIRUS/UPT heating elements, wich are
used mainly for Impulse-heatsealing PP and RE films.
Page 4
Compliance with these standards and provisions is only
guaranteed if original accessories and/or peripheral
components approved by ROPEX are used. If not, then
the equipment is operated on the user's own
responsibility.
The CE marking on the controller confirms that the
device itself complies with the above-mentioned
standards.
It does not imply, however, that the overall system also
fulfils these standards.
It is the responsibility of the machine manufacturer and
of the user to verify the completely installed, wired and
operationally ready system in the machine with regard
to its conformity with the safety provisions and the EMC
directive (see also section 8.3, "Power supply"). If
peripheral components (e.g. the transformer or the line
filter) from other manufacturers are used, no functional
guarantee can be provided by ROPEX.
The most important applications are packaging
machines,
pouch-making
machines,
splicers,
machines for making pharmaceutical and medical
products etc.
UPT-606
System description
3
System description
The basic design of the overall system is shown in the
diagram above.
CIRUS heating elements, and in particular UPT heating
elements, are high-performance systems which operate efficiently and reliably providing all the components
in the control loop are optimally tuned to one another –
and to the task at hand. Exact compliance with the
installation and wiring instructions is essential. The
system has been evolved and optimized by ROPEX
GmbH in an intensive development process. Users
who follow our technical recommendations will profit
from the unique functionality of this technology, which
reduces the customer's effort for installation, commissioning and maintenance to a minimum.
3.1
Temperature controller
The controller calculates the resistance of the heating
element by measuring the current and voltage at a high
sampling rate (= line frequency), compares it with the
set point and – if the difference is not 0 – adjusts the
heating current with the help of a phase angle-controlled transformer so that set = actual.
The fact that purely electrical variables are measured in
quick succession and the small mass of the heating
UPT-606
Page 5
Accessories and modifications
layer of the UPT heating element together result in a
highly dynamic, thermo-electrical control loop.
temperature can thus be displayed on an external
temperature meter (e.g. ATR-x).
The UPT-606 features an integrated fault diagnosis
function, which tests both the external system (heating
element, wiring etc.) and the internal electronics and
outputs a selective error message in case of a fault.
To increase operational safety and interference
immunity, all PROFIBUS signals are electrically
isolated from the controller and the heating circuit.
The compact design of the CIRUS temperature
controller UPT-606 and the plug-in connections make
this controller easy to install.
3.2
Thanks to its microprocessor based technology, the
controller features an optimized control algorithm as
well as numerous functions tailored to the various
tasks, such as "AUTOCAL", ALARM with fault
diagnosis etc. These are described in detail below.
The CIRUS temperature controller UPT-606 is
equipped with a PROFIBUS-DP interface. This
interface can be used to control all the controller
functions and interrogate controller information.
The ACTUAL temperature of the heating element is
supplied to the PROFIBUS interface and to an analog
0 to 10V DC output. The real heating element
4
Current transformer
The PEX-W2 or PEX-W3 current transformer supplied
with the CIRUS UPT-606 controller is an integral part of
the control system. Only this original ROPEX current
transformer is allowed to be used.
Never attempt to operate the current transformer with
open connections!
3.3
Booster
If the maximum load exceeds the rated current of the
controller (ª section 5 "Technical data" on page 8), an
external switching amplifier (booster) must be used
(ª section 4.1 "Accessories" on page 6).
The other system components – UPT sealing bars,
transformers, filter, cooler etc. – are described in
separate brochures.
Accessories and modifications
A wide range of compatible accessories and peripheral
devices are available for the CIRUS temperature
controller UPT-606. They allow it to be optimally
adapted to your specific heatsealing application and to
your plant's design and operating philosophy.
4.1
Accessories
The products described below are only a few of the
wide range of accessories available for CIRUS
temperature controllers (ª"Accessories" leaflet).
Analog temperature meter ATR-x
For front panel mounting or mounting on a top hat rail (DIN TS35 rail).
Analog indication of the ACTUAL temperature of the heating element in °C. The
meter damping of the unit is optimized for the abrupt temperature changes that occur
in impulse mode.
Page 6
UPT-606
Accessories and modifications
Digital temperature meter DTR-x
For front panel mounting or mounting on a top hat rail (DIN TS35 rail).
Digital indication of the ACTUAL temperature of the heating element in °C, with
HOLD function.
Line filter LF-xx480
Essential in order to ensure CE conformity.
Optimized for the CIRUS temperature controller.
Impulse transformer ITR-x
Designed according to VDE 0570/EN 61558 with a one section bobbin.
Optimized for impulse operation with CIRUS temperature controllers.
Specified according to the heatsealing application
(ª ROPEX Application Report).
Booster B-xxx400
External switching amplifier, necessary for high primary currents (continuous
current > 5A, pulsed current > 25A).
Monitoring current transformer MSW-1
For detecting frame short-circuits on the heating element.
Used as an alternative to the standard PEX-W2 current transformer.
Measurement cable UML-1
twisted measurement cable for the UR-voltage measurement.
Trailing cable, halogene und silicone free.
4.2
Modifications (MODs)
MOD 01
Owing to its universal design, the CIRUS temperature
controller UPT-606 is suitable for a very wide range of
heatsealing applications.
One modification (MOD) is available for the CIRUS
temperature controller UPT-606 for implementing
special applications.
Amplifier
for
low
secondary
voltages
(UR = 0.25…16VAC). This modification is necessary,
for example, for very short or low-resistance heating
elements.
UPT-606
Page 7
Technical data
5
Technical data
Type of construction
Housing for installation in the electrical cabinet
Snaps onto a standard top hat rail (DIN TS35 rail, 35 mm) acc. to DIN EN 50022
Dimensions: 90 x 75mm; height: 135mm (incl. terminals)
Line voltage
All controllers manufactured as of January 2004:
115VAC version: 115VAC -15%…120VAC +10% (equivalent to 98…132VAC)
230VAC version: 230VAC -15%…240VAC +10% (equivalent to 196…264VAC)
400VAC version: 400VAC -15%…415VAC +10% (equivalent to 340…456VAC)
All controllers manufactured up to December 2003:
115VAC, 230VAC or 400VAC, tolerance: +10% / -15%
depending on version selected (ª section 12 "How to order" on page 31)
Line frequency
47…63Hz, automatic adjustment to frequencies in this range
Auxiliary supply
Terminals 5+7 or
PROFIBUS plug,
pins 2+7
24VDC, Imax = 30mA
Tolerance: +10 / -10%
The auxiliary supply can be fed either via terminals 5 and 7 or via the PROFIBUS
plug at pins 2 and 7.
PROFIBUS-DP
interface
Baud rates:
Analog output
(actual value)
Terminals 17+18
0…10V DC, Imax = 5mA
Equivalent to 0…300°C
Accuracy: ±1% add. 50mV
Alarm relay
Terminals 12, 13, 14
Umax = 50VDC, Imax = 0.2A, changeover contact, potential-free
Maximum load
(primary current of
impulse
transformer)
Imax = 5A (duty cycle = 100%)
Imax = 25A (duty cycle = 20%)
Power dissipation
max. 20W
Ambient
temperature
+5…+45°C
Degree of protection
IP20
Installation
If several controllers are installed on one top hat
rail (DIN TS35 rail), a clearance of at least 20mm
should be allowed between them.
Weight
Approx. 0.7kg (incl. connector plug-in parts)
Housing material
Plastic, polycarbonate, UL-90-V0
Page 8
9.6kbaud; 19.2kbaud; 45.45kbaud; 93.75kbaud; 187.5kbaud;
500kbaud; 1.5Mbaud; 3Mbaud; 6Mbaud; 12Mbaud
Plug acc. to IEC 61158
UPT-606
Dimensions
Connecting cables
Type / cross-sections
Rigid or flexible; 0.2…2.5mm² (AWG 24…12)
Plug-in connectors
If ferrules are used, they must be crimped in accordance
with DIN 46228 and IEC/EN 60947-1.
This is essential for proper electrical contact in the terminals.
!
75.0
7
135.0
Dimensions
113.0
6
90.0
Installation
ª See also section 1 "Safety and warning notes" on
page 3.
Installation and startup may only be
performed by technically trained, skilled
persons who are familiar with the associated risks
and warranty provisions.
!
7.1
Installation steps
1. Please refer to the safety and warning notes
(ª section 1 "Safety and warning notes" on page 3).
2. The information provided in the customized ROPEX
Application Report, which is prepared by ROPEX
specifically for each application, should be heeded
at all times.
3. All electrical components, such as the controller, the
impulse transformer and the line filter, should be
installed as close as possible to the UPT sealing
bar(s) in order to avoid long wires.
4. Connect the voltage measurement cable UR directly
to the UPT sealing bar and lay it twisted to the
controller (UML-1 voltage measurement cable
ª section 4 "Accessories and modifications" on
page 6).
5. Ensure an adequate cable cross-section for the
primary and secondary circuits (ª Application
Report).
6. Use only ROPEX impulse transformers or
transformers approved by ROPEX. Please note the
power, the duty cycle and the primary and
secondary voltages (ª Application Report).
UPT-606
Page 9
Installation
7.2
Installation procedure
data" on page 8 must be allowed between them.
Proceed as follows to install the CIRUS temperature
controller UPT-606:
1. Switch off the line voltage and verify that the circuit
is de-energized.
2. The supply voltage specified on the nameplate of
the CIRUS temperature controller must be identical
to the line voltage that is present in the plant or
machine. The line frequency is automatically
detected by the CIRUS temperature controller in the
range from 47Hz...63Hz.
3. Install the CIRUS temperature controller in the
electrical cabinet on a standard top hat rail (DIN
TS35 rail, according to DIN EN 50022). If several
controllers are installed on one top hat rail, the
minimum clearance specified in section 5 "Technical
Page 10
4. Wire the system in accordance with the instructions
in section 7.3 "Power supply" on page 11,
section 7.6 "Wiring diagram (standard)" on page 13
and the ROPEX Application Report. The information
provided in section 7.1 "Installation steps" on
page 9 must also be heeded additionally.
5. Connect the CIRUS temperature controller to the
PROFIBUS master using a cable according to
IEC 61158.
Check the tightness of all the system
connections, including the terminals for the
impulse transformer windings.
!
6. Make sure that the wiring conforms to the relevant
national and international installation regulations.
UPT-606
Installation
7.3
Power supply
L1 (L1)
N (L2)
GND/
Earth
LINE
ON
Line
115VAC, 230VAC, 400VAC
Circuit breaker
Double-pole, C characteristic
(ª ROPEX Application Report)
Short-circuit protection only.
! CIRUS temperature controller not protected.
K1
I>
OFF
I>
3
Ka
Relay Ka
For
"HEAT
ON - OFF"
"EMERGENCY STOP".
LINE
FILTER
Short wires
UR
IR
3
ROPEX
temperature
controller
2
3
U2
SEC.
1
2
R
(all-pole)
or
Line filter
The filter type and size must be determined according to
the load, the transformer and the machine wiring
(ª ROPEX Application Report).
Do not run the filter supply wires (line side) parallel
! to the filter output wires (load side).
CIRUS temperature controller belonging to the 4xx
Series.
Kb
U1
PRIM.
function
Relay Kb
Load break (all-pole), e.g. in combination with the alarm
output of the temperature controller.
Impulse Transformer
Designed according to VDE 0570/EN 61558 (isolating
transformer with reinforced insulation). Connect core to
ground.
Use transformers with a one section bobbin. The
! power, duty cycle and voltage values must be
determined individually according to the application
(ª ROPEX Application Report and "Accessories" leaflet
for impulse transformers).
Wiring
The wire cross-sections depend on the application
(ª ROPEX Application Report).
Guide values:
Primary circuit:
min. 1.5mm², max. 2.5mm²
Secondary circuit: min. 4.0mm², max. 25mm²
c These wires must always be twisted (>20/m)
d These wires must be twisted (>20/m) if several control
loops are laid together ("crosstalk").
e Twisting (>20/m) is recommended to improve EMC.
UPT-606
Page 11
Installation
7.4
Line filter
To comply with EMC directives – corresponding to
EN 50081-1 and EN 50082-2 – RESISTRON control
loops must be operated with line filters.
These filters damp the reaction of the phase-angle
control on the line and protect the controller against line
disturbances.
installed and wired correctly, they guarantee
compliance with the EMC limit values.
You can find the exact specification of the line filter in
the ROPEX Application Report calculated for your
particular heatsealing application.
For more technical information: ª "Line filter"
documentation.
The use of a suitable line filter is part of the
! standards conformity and a prerequisite of
the CE mark.
It is permissible to supply several
RESISTRON control loops with a single line
filter, providing the total current does not exceed
the maximum current of the filter.
ROPEX line filters are specially optimized for use in
RESISTRON control loops. Providing that they are
The wiring instructions contained in section 7.3 "Power
supply" on page 11 must be observed.
!
Large cross-section
wire to ground
max. 1m
PE
ROPEX
temperature
controller
LINE
Do not lay parallel
Large cross-section
wire to ground
7.5
Mounting plate (galvanized)
Large frame contact surface
Current transformer PEX-W3
The PEX-W3 current transformer supplied with the
RESISTRON temperature controller is an integral part
24
23
of the control system. The current transformer may only
be operated if it is connected to the temperature
controller correctly (ª section 7.3 "Power supply" on
page 11).
75
14
12
14
26
39
terminal
wires
60
28
terminal
block
Snap-on for DIN-rail 35 x 7,5mm or 35 x 15mm (DIN EN 50022)
Page 12
UPT-606
Installation
7.6
Wiring diagram (standard)
PROFIBUS-PLUG
SUB-D / 9-POLE
Line filter LF-xx480
Shield
1
(Auxiliary supply) M24
2
B
3
RTS
4
DGND
5
(+5V) VP
6
(Auxiliary supply) P24
7
A
8
NC
9
+24VDC
AUXILIARY SUPPLY
0V
5
7
UPT-606
LINE
2
15
16
PROFIBUS
controller
electrically
isolated
3
4
U1
prim.
Impulse
transformer
24V
IN
U2
sec.
5V
OUT
8
9
12
ALARM OUTPUT
max. 50V / 0,2A
1
UR
R
twisted
Heatsealing
band
13
10
14
GND
11
IR
Current transformer
PEX-W2/-W3
6
Ground
Must be grounded
externally to prevent
electrostatic
charging!
_
ATR
°C
ANALOG
OUTPUT
+0...10VDC
+
18
17
0V
(Internnal ground)
No external
grounding allowed!
UPT-606
Page 13
Installation
7.7
Wiring diagram with booster
connection
PROFIBUS-PLUG
SUB-D / 9-POLE
Line filter LF-xx480
Shield
1
(Auxiliary supply) M24
2
B
3
RTS
UPT-606
16
5
(+5V) VP
6
(Auxiliary supply) P24
7
A
8
NC
9
+24VDC
AUXILIARY SUPPLY
0V
5
7
PROFIBUS
controller
electrically
isolated
2
3 NC
Impulse
transformer
24V
IN
U2
sec.
5V
OUT
8
9
10
11
UR
R
twisted
_
+
18
17
IR
Current transformer
PEX-W2/-W3
6
Ground
Must be grounded
externally to prevent
electrostatic
charging!
Page 14
4
OUT
13
GND
ANALOG
OUTPUT
+0...10VDC
IN
U1
prim.
14
ATR
°C
Booster
3
1
4 NC
12
ALARM OUTPUT
max. 50V / 0,2A
LINE
2
15
4
DGND
1
0V
(Internnal ground)
No external
grounding allowed!
UPT-606
Heatsealing
band
Startup and operation
8
Startup and operation
8.1
View of the controller
PROFIBUS plug
LEDs
Terminals
Nameplate
Coding switches and
plug-in jumpers
8.2
Coding switch
8.2.1
Controller configuration
The controller must be switched off in order
to configure the coding switches and plug-in
jumpers.
!
Configuration of the DIP switches
for secondary voltage and current
Set the DIP switches for matching the secondary
voltage U2 and the secondary current I2 to the correct
position for your application.
You can find the exact configuration of the
DIP switches in the ROPEX Application
Report calculated for your particular application.
!
UPT-606
Page 15
Startup and operation
Factory settings
U2 ( V )
ON 1 2 3 4 5
12345
U2
I2
DIP switch
1
ON
OFF
3
4
SWITCH
ON
1-10
OFF
2
3
DIP switch
4
5
1...10V
ON
OFF OFF
30...100A
OFF
OFF
6...60V
OFF
ON
OFF
60...200A
ON
OFF
OFF OFF
ON
120...400A
ON
ON
20...120V
If the secondary current I2 is less than 30A, the
PEX-W2/-W3 current transformer must have two turns
(ª ROPEX Application Report).
2x
8.2.2
Configuration of the rotary coding
switch for the temperature range
and alloy
Switch
position
0
Temp.
range
Temp.
coefficient
300°C 1700ppm/K
Element
alloy
(CIRUS)
5
6
8
67 9
5
Page 16
2 34
The setting of the rotary coding switch for the
temperature range and alloy can be
overwritten with the parameter data (ª
ªsection 9.6
"Parameter data" on page 24).
!
1
2 34
0 = Factory settings
0
0
1
789
SWITCH POS. TEMP. RANGE
ALLOY
0
300°C
1700ppm/K (CIRUS)
8.2.3
Configuration of the rotary coding
switches for the station address
The station address of the UPT-606 in the PROFIBUS
network can be set between 0 and 99 with these coding
UPT-606
Startup and operation
switches. A new setting does not take effect until the
next time the controller is switched on.
5
789
6
789
5
5
6
5
6
2 34
Configuration of the alarm relay
DE-ENERGIZED / PC
AT ALARM
ENERGIZED
789
6
Please also refer to section 1 "Safety and warning
notes" on page 3 and section 2 "Application" on
page 4.
Installation and startup may only be
performed by technically trained, skilled
persons who are familiar with the associated risks
and warranty provisions.
!
Initial startup
Prerequisites: The controller must be correctly installed
and connected (ª section 7 "Installation" on page 9).
Proceed as follows to start up the controller for the first
time:
1. Switch off the line voltage and verify that all circuits
are de-energized.
2. The supply voltage specified on the nameplate of
the controller must be identical to the line voltage
5
that is present in the plant or machine. The line
frequency is automatically detected by the
temperature controller in the range from 47…63Hz.
!
Startup procedure
2 34
If the jumper is not inserted, the alarm relay
is permanently energized. The other
functions of the controller (e.g. heating, AUTOCAL
etc.) are not impaired by this.
0
CONFIGURATION
ALARM OUTPUT
1
Alarm relay energized
by alarm.
(factory setting)
8.3.1
x1
Top of housing
Alarm relay deenergized by alarm/
PC-CONFIGURATION.
8.3
PROFIBUS
STATION ADDRESS
1
789
2 34
0
x 10
2 34
6
0
1
1
0
2 34
8.2.4
0
1
01 = Factory setting
789
Station address im PROFIBUS network between
0 and 99.
3. The settings of the coding switches on the controller
depend on the ROPEX Application Report, the
heating element that is used and the required
station address in the PROFIBUS network
(ª section 8.2 "Controller configuration"
on
page 15).
4. Link the device master file into the PROFIBUS
master (ª section 9.2), select the required
communication module ("compact" or "extended"
protocol) and start the communication.
5. Make sure that the "ST" bit is not set.
6. Switch on the line voltage and the 24VDC auxiliary
supply (the order is arbitrary).
7. When the voltage is switched on, the yellow
"AUTOCAL" LED lights up for approximately
0.3seconds to indicate that the controller is being
powered up correctly. This LED blinks slowly (1Hz)
as long as no PROFIBUS communication is active.
It does not go out again until it detects an active
communication.
8. The green "DATA EXCHANGE" LED lights up to
indicate an active PROFIBUS communication.
UPT-606
Page 17
Startup and operation
9. One of the following states then appears:
"ALARM"
LED
"OUTPUT"
LED
successfully, the "AL" bit (alarm active) is set and
the red "ALARM" LED blinks slowly (1Hz). In this
case the controller configuration is incorrect
(ª section 8.2 "Controller configuration" on page 15
and ROPEX Application Report). Repeat the
calibration after the controller has been configured
correctly.
ACTION
OFF
Short pulses
every 1.2s
Go to 10
BLINKS fast
(4Hz)
OFF
Go to 10
Lit
continuously
OFF
Fault diagnosis
(ª section 9.10)
10.Activate the AUTOCAL function while the heating
element is still cold by setting the "AC" bit
(AUTOCAL)
in
the
PROFIBUS
protocol
(ª section 9.3 "PROFIBUS protocol" on page 20).
The yellow "AUTOCAL" LED lights up for the
duration of the calibration process (approx.
10…15s). The "AA" bit (AUTOCAL active) is set in
addition and a voltage of app. 0V appears at the
actual value output (terminals 17+18). If an ATR-3 is
connected, it indicates 0…3°C (corresponds to app.
0 VDC).
When the zero point has been calibrated, the
"AUTOCAL" LED goes out and a voltage of app.
0.66VDC appears at the actual value output
instead. If an ATR-3 is connected, it must be set to
"Z".
If the zero point has not been calibrated
Page 18
11.When the zero point has been calibrated
successfully, specify a defined temperature by
means of the PROFIBUS protocol (set point) and
set the "ST" bit. The "RA" bit (controller active) is
then activated and the "HEAT" LED lights up. The
heating and control process can be observed at the
actual value output:
The controller is functioning correctly if the
temperature (which corresponds to the signal
change at the analog output or the actual value in
the PROFIBUS protocol) has a harmonious motion,
in other words it must not jump abruptly, fluctuate or
deviate temporarily in the wrong direction. This kind
of behavior would indicate that the UR measuring
wire have been wired incorrectly.
If an error code is displayed, please proceed as
described in section 9.10 "Error messages" on
page 27.
UPT-606
The controller is now ready
Controller functions
9
Controller functions
See also section 7.6 "Wiring diagram (standard)" on
page 13.
9.1
Indicators and controls
Green LED, remains lit as long as
power supply is on.
1
POWER ON
2
3
4
Profibus
AUTOCAL
Yellow LED, remains lit for duration
of AUTOCAL process.
OUTPUT
HEAT
ALARM
Green LED, indicated pulses in measuring
mode. In control mode, luminous intensity
is proportional to heating current.
DATA
EXCHANGE
µP-Controller
ROPEX
INDUSTRIE - ELEKTRONIK
.
5 6 7 8 9 10 11
RESISTRON
12 13 14 15 16 17 18
!
Yellow LED, lit during heating phase.
Red LED, lights up or blinks to indicate alarm.
Green LED, remains lit as long as PROFIBUS
data is beeing exchanged with master.
UPT-606
Page 19
Controller functions
In addition to the functions shown in the diagram
above, various controller operating states are indicated
by the LEDs. These states are described in detail in the
table below:
LED
Blinks slowly (1Hz)
Blinks fast (4Hz)
Lit continuously
AUTOCAL
(yellow)
No PROFIBUS
communication
AUTOCAL requested, but
function disabled
AUTOCAL executing
HEAT
(yellow)
—
START requested,
but function disabled
START executing
OUTPUT
(green)
In control mode the luminous intensity is proportional to the heating current.
ALARM
(red)
Configuration error,
AUTOCAL not possible
Controller calibrated
incorrectly, run AUTOCAL
Fault, ª section 9.10
DATA EXCHANGE
(green)
—
—
Communication with
PROFIBUS master active
The following sections describe only
controller-specific functions. For general
information about PROFIBUS and the system
configuration, please refer to the description of
your PLC.
required GSD version
!
9.2
Device master file (GSD)
Configuring tools for the PROFIBUS-DP master that
must be configured interpret the contents of the slave
device master files and use them to create a master
parameter set for the PROFIBUS master, which is
responsible for useful data communication. The
ROP_07EA.GSD file of the UPT-606 contains all the
controller information needed for the configuration, e.g.
the possible baud rates, parameter descriptions, alarm
signals etc. The device master files and the associated
display files (.DIB, for visualizing states) are supplied
with the controller in German (.GSG) and English
(.GSD or .GSE). They can be requested by E-Mail
([email protected]) or they can be downloaded from
our website (www.ropex.de).
After the required device master file has been linked
into the configuring tool, you must select one of the two
communication modules ("compact" or "extended").
This determines which protocol will be used by the
UPT-606 to communicate with the PROFIBUS master.
If you want to use all features of the controller
make sure that the appropriate version of the
device master file is used.
!
Page 20
9.3
PROFIBUS protocol
The PROFIBUS protocol can be configured either as
"compact" (16bits for input data and 16bits for output
data) or as "extended" (2x16bits for input data and
2x16bits for output data). The protocol is determined at
the configuring stage by selecting a module ("compact"
or "extended"). The compact protocol is sufficient for
efficient communication with the UPT-606. The
extended protocol separates the set point and the
actual value of the UPT-606 from the status information
and the control functions, to enable it to be decoded
more easily by the PROFIBUS master.
!
UPT-606
Bits 0…7 form the low byte and bits 8…15 the
high byte ("INTEL format").
Controller functions
9.3.1
"Compact" protocol
The 16-bit input data from the PROFIBUS master to
the UPT-606 contains the set point and the control
functions and has the following structure:
Control function
Spare
Set point
Name:
RS
ST
AC
MP
0
0
0
Bit no.:
15
14
13
12
11
10
9
The 16-bit output data from the UPT-606 to the
PROFIBUS master contains the actual value or the
8
7
6
5
4
3
2
1
0
alarm code and the status information and has the
following structure:
Alarm code if AL = 1
Status information
Actual value (compact) if AL = 0
Name:
AA
AG
AL
TE
TO
RA
VZ
Bit no.:
15
14
13
12
11
10
9
9.3.2
8
7
6
5
4
A3
A2
A1
A0
3
2
1
0
3
2
1
0
"Extended" protocol
The extended protocol transfers 2x16bits. The 2x16bit input data contains the set point in word c and the
control functions in word d:
c
Spare
Set point
Name:
0
0
0
0
0
0
0
Bit no.:
15
14
13
12
11
10
9
d
8
7
6
5
4
Spare
Control function
Name:
0
0
0
0
0
0
0
0
0
0
0
0
MP
RS
ST
AC
Bit no.:
15
14
13
12
11
10
9
8
7
6
5
4
3
2
1
0
5
4
3
2
1
0
The 2x16-bit output data contains the actual value in
word c and the alarm code and status information in
word d:
c
Actual value (signed)
Name:
VZ
Bit no.:
15
d
14
13
12
11
Spare
10
9
8
Alarm code
7
6
Spare
Status information
Name:
0
0
0
0
A3
A2
A1
A0
0
0
AA
AG
AL
TE
TO
RA
Bit no.:
15
14
13
12
11
10
9
8
7
6
5
4
3
2
1
0
UPT-606
Page 21
Controller functions
9.4
Input data
5…7 occur at start-up. AUTOCAL cannot be
activated with error codes 5…7 if the controller has
operated correctly, at least one time, after start-up
(ª section 9.10 "Error messages" on page 27).
The term "input data" refers to the data that is
transferred from the PROFIBUS master to the
UPT-606. It contains the set point and the control
functions, such as START or AUTOCAL for the
UPT-606. These functions are explained in the
following.
If the AUTOCAL function is disabled ("AG"
bit = 1) and if you attempt to activate it ("AC"
bit = 1) then the "AUTOCAL" LED blinks fast (4Hz).
9.4.1
9.4.2
Automatic zero calibration
"AUTOCAL" (AC)
Because of the automatic zero calibration (AUTOCAL)
function, there is no need to adjust the zero point
manually on the controller. This function matches the
controller to the resistance of the system and calibrates
it to the value which is predefined in the parameter data
(section 9.6.4 "Variable calibration temperature" on
page 25). If no parameter data is transferred by the
PROFIBUS master, the default value is 20°C.
The AUTOCAL request ("AC" bit = 1) is executed by
the controller providing the AUTOCAL function is not
disabled.
The automatic calibration process takes about 10…15
seconds. The heating element is not heated during this
process. The yellow LED on the front panel lights up
while the AUTOCAL function is active and the controller
reports "AUTOCAL active" ("AA" bit = 1) in the output
data. The actual value output (terminals 17+18) is
0…3°C (corresponds to app. 0 VDC).
You should always wait for the heating
element and the bar to cool down (to ambient
temperature) before activating the AUTOCAL
function.
!
Reasons for disabled AUTOCAL function:
1. The AUTOCAL function cannot be activated until
10 seconds after the controller is switched on.
During this time the controller reports "AUTOCAL
disabled" ("AG" bit = 1) in the output data.
2. The AUTOCAL function is not activated if the
heating element is cooling down at a rate of more
than 0.1K/sec. If the "AC" bit is activated, the
function is executed automatically providing the
cooling rate has fallen below the above-mentioned
value.
3. If the "START" bit ("ST" bit = 1) is activated, the
AUTOCAL function is not executed ("HEAT" LED
lit).
4. AUTOCAL cannot be activated if error codes 1…3,
Page 22
!
Start (ST)
When the "START" bit is activated ("ST" bit = 1), the
controller-internal set/actual comparison is enabled
and the heating element is heated up to the SET
temperature. It remains at this temperature either until
the "ST" bit is reset or until the actual heating time
exceeds the preset heating time limit (ª section 9.6.5
"Heating time limit" on page 25).
The "HEAT" LED on the front panel of the UPT-606
lights up continuously for the duration of the heating
phase.
A start request is not processed if the AUTOCAL
function is active, the controller has reported an alarm,
the set point is less than 20°C higher than the
calibration temperature or the "RS" bit is set. In all these
cases the "HEAT" LED blinks.
The heating process is terminated if the "ST" bit is reset
or if a PROFIBUS fault occurs.
The "ST" bit is only accepted if the AUTOCAL
function is deactivated and there are no
alarms.
!
9.4.3
Reset (RS)
This bit resets the controller if the controller reports an
alarm.
No AUTOCAL or START requests are accepted as
long as the "RS" bit is set. The power section is not
activated in this state and no measuring impulses are
generated. Consequently, the actual value is no longer
updated. The reset request is not processed until the
"RS" bit is reset. The PROFIBUS communication is not
interrupted by a controller reset. The controller simply
requests the parameter data from the PROFIBUS
master again.
The controller performs an internal
initialization run lasting approximately
500ms after the "RESET" signal is deactivated. The
next heatsealing process cannot be started until it
has finished.
!
UPT-606
Controller functions
If a contactor K2 is used to deactivate the
control loop (ª
ª section 7.3 "Power supply"
on page 11), it must be energized again 50ms at the
latest after the "RESET" signal is deactivated. If it is
energized too late, an alarm signal will be output by
the controller.
9.5.2
9.4.4
9.5.3
!
Measurement pause (MP)
No more measuring impulses are generated by the
controller as soon as the "MP" bit is set. From then on,
only fault nos. 5, 6 and 7 are evaluated and output by
the fault diagnosis function. In addition, the actual value
is no longer updated. The last valid value before the bit
was set is output. As soon as the bit is reset, new
measuring impulses are generated, all error messages
are evaluated and the actual value is updated again.
This bit is only active in measuring mode. "ST", "RS"
and "AC" take priority. The bit is suitable for all
applications in which the electrical connections of the
heating element need to be disconnected during
normal operation without triggering an alarm (e.g.
sliding rail contacts).
In contrast with the "RS" bit (RESET), the "MP" bit does
not reset any alarm signals when it is set. The controller
is activated again as soon as the bit is reset, in other
words there is no initialization phase.
When the controller is started, it only
evaluates the "MP" bit if the system test
(including the functional test of the heating circuit)
is successful. This can take several 100 ms.
!
9.4.5
Set point
Alarm active (AL)
If the "AL" bit is set, an alarm has been triggered but not
yet reset. The alarm code provides information about
the exact cause of the fault (ª section 9.10 "Error
messages" on page 27).
9.5.4
Temperature reached (TE)
The "TE" bit is set if the actual temperature exceeds
95% of the set temperature. As soon as the control
mode is exited ("ST" bit = 0) or an alarm is signaled
("AL" bit = 1), this status bit is reset again.
9.5.5
Temperature OK (TO)
The UPT-606 checks whether the actual temperature is
within a settable tolerance band ("OK" window) on
either side of the set temperature. The lower
( ∆ϑ lower ) and upper ( ∆ϑ upper ) limits of the tolerance
band can be changed independently of one another by
means of the parameter data (ª section 9.6
"Parameter data" on page 24). If the actual
temperature is inside the specified tolerance band, the
"TO" bit is set (see graph below):
Actual value
Set
Set+ ∆ϑ lower
Output data
The term "output data" refers to the data that is
transferred from the UPT-606 to the PROFIBUS
master. It contains the current actual value and all
important information about the momentary status of
the controller. If an alarm is signaled, the fault can be
diagnosed accurately with the help of the alarm code.
9.5.1
If the "AG" bit is set, the AUTOCAL function is
temporarily disabled. This is the case if "START" is
active or if the heating element is still in the coolingdown phase.
Set+ ∆ϑ upper
A set point of up to 300°C is allowed. If you attempt to
enter a higher set point, it is limited to 300°C internally.
9.5
AUTOCAL disabled (AG)
"TO" bit
1
0
Time
Time
Unlike the "Temperature reached" status bit ("TE" bit),
the actual temperature is evaluated independently of
the control mode.
AUTOCAL active (AA)
The "AA" bit indicates that the AUTOCAL function is
currently executing.
9.5.6
Controller active (RA)
The UPT-606 has processed the "START" request
successfully and entered the control mode if the "RA"
bit = 1.
UPT-606
Page 23
Controller functions
9.5.7
Sign (VZ)
In the compact protocol, the sign bit indicates whether
the actual value is positive or negative.
9.5.8
Actual value
If you are using the compact protocol, the actual value
itself is always positive. The sign bit (VZ) then indicates
whether the amount of the actual value is positive or
negative. If an alarm is signaled, the actual value
contains the alarm code.
If you are using the extended protocol, all 16 bits of the
first word must be interpreted as a signed number (twos
complement notation). During the calibration procedure
or if an alarm is signaled, the actual value is 0. The
alarm code is contained in separate bits.
9.5.9
Function
Default
value1
Possible
values
0…3
Reserved, set to 0
0
0
4
Temperature range
/ alloy
10
0, 10
5
Lower temperature
OK threshold
10K
3…99K
6
Upper temperature
OK threshold
10K
3…99K
7
Calibration
temperature
20°C
0…40°C
8
Heating time limit
(100ms units)
0
0…50
(0…5.0s)
9
Extended controller
dignostis
activated
deactivated,
activated
10
Measuring impulse
duration
17
17…30
(1.7…3.0ms)
11
Data format
High/
Low
byte
(Intel)
High/Low
byte
(Intel),
Low/High
byte
(Motorola)
12
Correction factor
100%
25…200%
1. The default value is stored in the device
master file and transferred from the
PROFIBUS master to the UPT-606 when the
system is started up.
Parameter data
The parameter data contains values for selecting the
heating element alloy, the temperature range, the
upper and lower tolerance band limits for temperature
monitoring, the calibration temperature and the optional
heating time limit. It is transferred from the PROFIBUS
master to the UPT-606 each time the system is started
Page 24
No.
Alarm code
If an alarm is signalled ("AL" bit = 1), the alarm code
allows the exact cause of the fault to be determined.
In the compact protocol the alarm code appears
instead of the actual value in bits 0…3, while in the
extended protocol it is contained at bit positions 8…11
in the second word (ª section 9.10 "Error messages"
on page 27).
In addition to the alarm code, the PROFIBUS
diagnostics function also sends alarm signals to the
PROFIBUS
master.
The
error
messages
corresponding to the alarm codes are already stored in
the device master file, so that they appear
automatically in plain text on the PROFIBUS master
whenever the device diagnosis for the UPT-606 is
interrogated there. The language in which the error
messages are displayed depends on the selected
device master file.
9.6
up. If the parameter data is changed during operation,
the UPT-606 performs a reset. The PROFIBUS
communication is not interrupted. The parameter data
has the following structure:
9.6.1
Temperature range and alloy
This parameter selects both the temperature range and
the heating element alloy. You can overwrite the setting
UPT-606
Controller functions
of the rotary coding switch by changing the default
value (10).
Value
Temperature
range
Alloy
0
300°C
TCR = 1700ppm
10
Rotary coding
switch setting
Rotary coding switch
setting
!
You must always execute the AUTOCAL
function after changing this parameter.
9.6.2
Lower temperature OK threshold
Lower threshold value for the "OK" window.
9.6.3
Upper temperature OK threshold
Variable calibration temperature
The calibration temperature is set to 20°C as default.
You can change it to another value between 0°C and
40°C in order to adapt it to the temperature of the
cooled-down heating element.
You do not need to execute the AUTOCAL
function after changing the calibration
temperature.
!
9.6.5
Heating time limit
The heating time limit provides additional protection
against unwanted permanent heating. The controller
automatically deactivates the heating impulse after the
set heating time limit has elapsed if the start bit remains
set for longer than the time specified by this limit. The
start bit must be reset before the controller can be
started up again.
The heating time limit is deactivated as default (0), but
can be set to any value between 0s and 5.0s (0 and
50).
9.6.6
9.6.7
Extended controller diagnosis
The extended controller diagnosis uses the diagnostic
function of the PROFIBUS protocol to display several
Measuring impulse duration
The length of the measuring impulses generated by the
controller can be set with parameter no. 10. It may be
necessary to set a measuring impulse that is longer
than the default 1.7ms for certain applications.
9.6.8
Upper threshold value for the "OK" window.
9.6.4
faults of the UPT-606 on the PROFIBUS master
directly. For each fault there is a text message stored in
the device master file so the alarm codes appear on the
PROFIBUS master in plain text if the master has the
capability to display text messages.
With the help of parameter No. 9 the extended controller diagnosis can be activated or deactivated. The
default setting is "activated".
Although the extended controller diagnosis ist deactivated, there is the fault diagnosis which is coded in the
protocol.
Data format
This parameter specifies the order of the bytes (Intel:
"high/low byte", Motorola: "low/high byte") in the cyclic
data for both input and output data (ª section 9.3
"PROFIBUS protocol" on page 20). We recommend
setting "low/high byte (Motorola)" for Siemens
controllers.
9.6.9
Correction factor Co
The correction factor Co permits the UPT-640
controller to be adapted to the real conditions in the
machine (type of UPT heating element, impulse
transformer specification, length of connecting wires,
cooling etc.).
Proceed as follows to determine the optimum
correction factor Co (setting in section 9.6 "Parameter
data" on page 24):
Controller settings:
- Set temperature:
160…180°C
- Sealing time:
0.20…0.30s
Slowly increase the correction factor – starting either
with the lowest value (50%) or with the value
recommended in the ROPEX Application Report minus
25% – to the real temperature value at the end of the
sealing time (hold value) = set temperature.
The correction factor should be checked, and if
necessary corrected, whenever the machine is
UPT-606
Page 25
Controller functions
operated or the set temperature or the heatsealing time
are changed.
Temp.
Tset
Temperature T
Co too large
Hold value
x
The relationship between the change in the output
voltage and the ACTUAL temperature is linear.
x
Co too small
0 - 300°C range
°C
300
270
240
210
180
150
120
90
Time
60
20°C
9.7
Temperature indication (actual
value output)
The UPT-606 supplies an analog 0…10VDC signal,
which is proportional to the real ACTUAL temperature,
at terminals 17+18.
UPT-606
Actual value
output
0…10VDC
R=33ohms max. 5mA
24
0V
23
0…10VDC
-
Temperature
meter
e.g. ATR-3
Voltage values:
0VDC
Æ
0°C
10VDC Æ 300°C
+
1 2
0.66V
"ZERO"
3
4
5
6
7
8
Voltage U
9 10
VDC
An indicating instrument can be connected to this
output in order to visualize the temperature of the
heating element.
The characteristics of the ROPEX ATR-3 temperature
meter (size, scaling, dynamic response) are ideally
suited to this application and this instrument should
therefore always be used (ª section 4 "Accessories
and modifications" on page 6).
It not only facilitates SET-ACTUAL comparisons, but
also enables other criteria such as the heating rate, set
point reached within the specified time, cooling of the
heating element etc. to be evaluated.
This meter moreover permits disturbances in the
control loop (loose connections, contacting or wiring
problems) as well as any line disturbances to be
observed extremely effectively and interpreted
accordingly. The same applies if mutual interference
occurs between several neighboring control loops.
This output is not potential-free and might
have the potential of the secondary voltage
of the impulse transformer. External grounding is
not allowed. If this warning is ignored, the
controller will be damaged by frame currents.
Contact-voltage protection must be installed at the
terminals of the external temperature meter.
!
If an alarm is signaled, the analog output at terminals
14+18 is used to display a selective error message
(ª section 9.10 "Error messages" on page 27).
Page 26
UPT-606
Controller functions
9.8
Booster connection
C.)
The UPT-606 controller has a connection for an
external switching amplifier (booster) as standard. This
connection (at terminals 15+16) is necessary for high
primary currents (continuous current > 5A, pulsed
current > 25A). The switching amplifier should be
connected as described in section 7.7 "Wiring diagram
with booster connection" on page 14.
9.9
System monitoring/alarm output
To increase operating safety and to avoid faulty heatsealing, this controller incorporates special hardware
and software features that facilitate selective fault
detection and diagnosis. Both the external wiring and
the internal system are monitored.
These features assist the operator in identifying the
cause of abnormal operations.
A system fault is reported or differentiated by means of
the following indications.
A.)
Red "ALARM" LED on the controller with
three states:
1. Blinks fast (4Hz)
The AUTOCAL function should be executed (error
codes 8+9).
2. Blinks slowly (1Hz)
The system configuration is incorrect and the zero
calibration (AUTOCAL function) was unsuccessful
(ª section 8.2 "Controller configuration" on
page 15). It corresponds to error codes 10…12.
3. Lit continuously:
This indicates that a fault is preventing the controller
from being started (error codes 1…7).
As a rule, it refers to an external wiring fault.
B.)
Alarm relay (relay contact terminals
12+13+14):
This relay is set in the factory as follows:
•
•
DE-ENERGIZED in operating states A.1 and A.2,
but energized if the "ST" bit is activated in one of
these states.
ENERGIZED in operating state A.3.
If the alarm relay is configured opposite to the factory
setting (ª section 8.2.4 "Configuration of the alarm
relay" on page 17), these states are reversed.
Error code indication via the PROFIBUS
protocol
If a fault occures the "AL" bit is set and in the compact
protocol the alarm code appears instead of the actual
value in bits 0…3, while in the extended protocol it is
contained at bit positions 8…11 in the second word
(ª section 9.5.9 "Alarm code" on page 24).
D.)
Error code output via the 0…10VDC analog
output (terminals 17+18):
Since a temperature indication is no longer necessary
if a fault occurs, the analog output is used to display
error messages in the event of an alarm.
12 voltage levels are offered for this purpose in the
0…10VDC range, each of which is assigned an error
code (ª section 9.10 "Error messages" on page 27).
If a state that requires AUTOCAL occurs – or if the controller configuration is not correct – (error codes 8…12),
the signal at the analog output jumps back and forth at
1Hz between the voltage value which corresponds to
this error and the end of the scale (10VDC, i.e. 300°C).
If the "ST" bit is activated in one of these states, the
voltage value does not change any more.
Selective fault detection and indication can thus be
implemented simply and inexpensively using the
analog input of a PLC with a corresponding error message (ª section 9.10 "Error messages" on page 27).
9.10
Error messages
In addition to the fault diagnosis which is coded in the
protocol, you can also access the PROFIBUS
diagnostics function (extended controller diagnosis).
The alarm codes appear in the configuring tool in plain
text, because they are stored in the device master file.
The table below shows how the analog voltage values
correspond with the faults that have occurred. It also
describes the fault and the required corrective action.
The block diagram in section 9.11 "Fault areas and
causes" on page 29 permits each fault to be cleared
quickly and efficiently.
If the actual value output is evaluated in order
to identify an error message - in the higherlevel controller, for instance - the tolerance window
must be adjusted to prevent it from being
incorrectly interpreted. Please note the tolerances
of the actual value output (ª
ª section 5 "Technical
data" on page 8).
!
UPT-606
Page 27
Page 28
¯160«
ª300®
¯180«
ª300®
¯200«
ª300®
¯220«
ª300®
¯240«
ª300®
¯5.33«
ª 10 ®
¯6.00«
ª 10®
¯6.66«
ª 10®
¯7.33«
ª 10®
¯8.00«
ª 10®
9
10
11
12
120
100
8
3.33
5
80
140
2.66
4
60
4.66
2.00
3
40
7
1.33
2
20
4.00
0.66
1
Temp.
300°C
[°C]
6
Act. value
output;
Voltage [V]
Error
code
UPT-606
Blinks
slowly
(1Hz)
Blinks
fast
(4Hz)
Lit
Continuously
ALARM
LED
Open,
does not close
until "START"
signal
(voltage value
at analog
output then
no longer
changes)
Closed
STATUS
of alarm relay
(factory set.)
---
---
Fault area i,
check configuration
Fault areas ij,
check configuration
UR and IR signals incorrect,
calibration not possible
---
Fault area j,
check configuration
IR signal incorrect,
calibration not possible
UR signal incorrect,
calibration not possible
---
Run AUTOCAL
Fault areas fgh
Replace controller
Run RESET
Data error
Run AUTOCAL
UR and/or IR signal
incorrect
Check power supply
Frequency fluctuation,
inadmissible line frequency
Replace controller
Fault areas fgh
(loose contact)
Fault areas fgh
(loose contact)
Temperature step
Internal fault,
controller defective
Fault areas dk
Fault area d
UR and IR signals missing
Run RESET
Fault area e
Fault area e
UR signal missing
Internal fault
Fault area c
Fault area c
IR signal missing
Check power supply
Action if machine
already operating,
HS elem. not chang.
Action
if machine started
for first time
Cause
Controller functions
Controller functions
9.11
Fault areas and causes
5
1
2
6
2
9
3
Temperature
controller
4
8
UR
1
IR
8
7
123 45
HARDWARE
9
I2
8
U2
7
The table below explains the possible fault causes.
Fault area
c
Explanation
Possible causes
Load circuit interrupted after UR
pickoff point
- Wire break, heating element break
- Contact to heating element is defective
PEX-W2 current transformer
signal interrupted
- IR measuring wires from current transformer interrupted
Primary circuit interrupted
- Wire break, triac in controller defective
- Primary winding of impulse transformer interrupted
Secondary circuit interrupted
before UR-pickoff point
- Wire break
- Secondary winding of impulse transformer interrupted
e
UR signal missing
- Measuring wires interrupted
f
Partial short-circuit (delta R)
- heating element partially bypassed by conducting part
(clamp, opposite heating bar etc.)
g
Parallel circuit interrupted
- Wire break, heating element break
- Contacting to heating element defective
h
Total short-circuit
- heating element installed incorrectly, insulation at
heating bar ends missing or incorrectly installed
- Conducting part bypasses heating element completely
i
UR signal incorrect
- DIP switches 1 - 3 configured incorrectly (U2 range)
IR signal incorrect
- DIP switches 4 + 5 configured incorrectly (I2 range)
Turns through PEX-W2 current
transformer incorrect
- Check number of turns (two or more turns required for
currents < 30A)
Internal controller fault
- Hardware fault (replace controller)
d
j
k
UPT-606
Page 29
Factory settings
10
Factory settings
The CIRUS temperature controller
configured in the factory as follows:
DIP switches
for
secondary voltage
U2 and current I2
UPT-606
is
OFF
U2 = 6…60VAC
I2 = 30…100A
ON 1 2 3 4 5
DIP switches:2 ON
1, 3, 4, 5 OFF
Rotary coding switch
for
sealing element alloy
and
temperature range
2 34
5
6
0
SWITCH POS.
0
1
4
5
8
1
789
heating element alloy: 1700ppm
Temperature range: 300°C
Rotary coding switch: "0" position
300°C
9
Alarm relay is energized at alarm
5
6
2 34
300°C
9
x1
2 34
5
6
789
5
0
x 10
1
6
0
2 34
789
Station address = 01dec
1
Rotary coding
switches
for
station address
0
SWITCH POS.
0
1
4
5
8
1
789
Plug-in jumper
for
alarm relay
Top of housing
11
Maintenance
The controller requires no special maintenance.
Regular inspection and/or tightening of the terminals –
including the terminals for the winding connections on
Page 30
the impulse transformer – is recommended. Dust
deposits on the controller can be removed with dry
compressed air.
UPT-606
How to order
12
How to order
Contr. UPT - 606 / . . . VAC
115: Power supply 115VAC, Art. No. 660601
230: Power supply 230VAC, Art. No. 660602
400: Power supply 400VAC, Art. No. 660603
Scope of supply: Controller includes connector plug-in
parts (without current transformer)
Modification MOD . . (optional, if required)
e.g.
01: MOD 01, Art. No. 800001 (Amplifier for low voltage)
Please indicate the article numbers of the controller and the required modifications
(optional) in all orders,
e.g. UPT-606/400VAC + MOD 01
(controller for 400VAC power supply with amplifier for low voltage)
Art. No. 660603 + 800001 must be ordered
Current transformer PEX-W3
Art. No. 885105
Line filter LF- . . 480
06: Continuous current 6A, 480VAC, Art. No. 885500
35: Continuous current 35A, 480VAC, Art. No. 885506
Impulse transformer
See ROPEX Application Report
for design and ordering information
Temp. meter ATR- .
3: 300°C range, Art. No. 882130
5: 500°C range, Art. No. 882150
Booster B- . . . 400
075: Max. pulse load 75A, 400VAC, Art. No. 885301
100: Max. pulse load 100A, 400VAC, Art. No. 885304
UPT-606
Page 31
Index
13
Index
A
G
"AA" bit 23
"AC" bit 22
Actual value 24
Actual value output 26
"AG" bit 23
"AL" bit 18, 23
Alarm 23
Alarm output 27
Alarm relay 8, 17
Alloy 16
Ambient temperature 8
Analog temperature meter 6
Application 4
Application Report 10, 12, 15
AUTOCAL 18
Active 23
Disabled 22, 23
Starting 22
Automatic zero calibration 18, 22
Auxiliary supply 8
GSD
B
Booster 6, 7, 14, 31
Booster connection 27
C
Circuit breaker 11
Controller active 23
Controller configuration 15
Controller diagnosis 25
Correction factor 25
Current transformer 3, 6, 12, 31
D
Data format 25
Degree of protection 8
Device master file (GSD) 20
Digital temperature meter 7
Dimensions 9
DIP switches 15
E
Error messages 27
Extended controller diagnosis 25
External switching amplifier 7, 14
F
Factory settings 30
Fault areas 29
Fault diagnosis 6
Page 32
20
H
Heating element
3
I
Impulse transformer 3, 7, 11, 31
Installation 8, 9
Installation procedure 10
Installation regulations 10
L
Line filter 3, 7, 11, 12, 31
Line frequency 8
Line voltage 8
M
Maintenance 30
Measurement cable 7
Measurement pause 23
Measuring impulse duration 25
Modifications (MODs) 7, 31
MODs 7, 31
"MP" bit 23
P
PEX-W2 6
PEX-W2/-W3 3
PEX-W3 12, 31
Power dissipation 8
Power supply 11, 31
PROFIBUS-DP interface
Protocol
Compact 21
Extended 21
R
"RA" bit 18, 23
Reset 22
"RS" bit 22
S
Secondary current I2 15
Secondary voltage U2 15
Set point 23
Start 22
"START" bit 18
Startup 15
System monitoring 27
UPT-606
8
Index
T
"TE" bit 23
Temperature indication 26
Temperature meter 6, 26, 31
Temperature OK 23
Temperature range 16
Temperature reached 23
"TO" bit 23
Transformer 3, 7, 11, 31
Type of construction
8
V
View of the controller
15
W
Wiring 10, 11
Wiring diagram 13, 14
UPT-606
Page 33