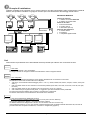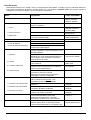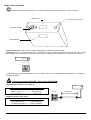
1
MANUALE D’USO
__________________________
OPERATING INSTRUCTIONS
__________________________
MANUEL D’INSTRUCTIONS
__________________________
BEDIENUNGSANWEISUNG
MANUALE
D’USO
INDICE
INDICE.................................................................................................................................................................................... 1
INTRODUZIONE .................................................................................................................................................................... 3
Contenuto dell’imballaggio ........................................................................................................................................................................ 3
Cosa contiene questo Manuale d’Uso....................................................................................................................................................... 3
A chi è rivolto il Manuale d’Uso ................................................................................................................................................................. 3
Cosa leggere ............................................................................................................................................................................................. 3
Convenzioni tipografiche ........................................................................................................................................................................... 3
NORME DI SICUREZZA ........................................................................................................................................................ 4
DATI DI MARCATURA........................................................................................................................................................... 4
DESCRIZIONE DELLA TASTIERA KEYPLUS ..................................................................................................................... 5
Sicurezza................................................................................................................................................................................................... 5
Gestione delle password ....................................................................................................................................................................... 5
Led e buzzer di segnalazione.................................................................................................................................................................... 5
Apparecchi collegabili con la tastiera KEYPLUS....................................................................................................................................... 5
Esempio di installazione............................................................................................................................................................................ 6
Cavi ........................................................................................................................................................................................................... 6
INSTALLAZIONE ................................................................................................................................................................... 7
Apertura dell’imballaggio ........................................................................................................................................................................... 7
Controllo della marcatura .......................................................................................................................................................................... 7
Accensione e spegnimento ....................................................................................................................................................................... 7
Connettori e collegamenti.......................................................................................................................................................................... 8
NOTE SULLA CONFIGURAZIONE DELLA TASTIERA ....................................................................................................... 9
PROCEDURA DI CONFIGURAZIONE .................................................................................................................................. 9
Procedura di configurazione...................................................................................................................................................................... 9
Lista dei menu ......................................................................................................................................................................................... 10
Modifica dei parametri di configurazione. ................................................................................................................................................ 11
Lingua della tastiera ................................................................................................................................................................................ 12
Configurazione della matrice................................................................................................................................................................... 12
Test dei canali di comunicazione......................................................................................................................................................... 13
Abilitazioni ............................................................................................................................................................................................... 14
Cambio delle password ........................................................................................................................................................................... 14
Numero di identificazione dell’operatore ................................................................................................................................................. 15
Buzzer della tastiera ................................................................................................................................................................................ 15
TASTI ................................................................................................................................................................................... 16
SELEZIONE DEGLI INGRESSI E USCITE ......................................................................................................................... 16
Selezione del monitor attivo .................................................................................................................................................................... 16
Selezione dell'ingresso............................................................................................................................................................................ 16
CONFIGURAZIONE DELLA MATRICE............................................................................................................................... 17
PROGRAMMAZIONE DELLA MATRICE SW164 STANDARD.......................................................................................... 17
Sequenze di ciclata ................................................................................................................................................................................. 17
Modifica dei testi di identificazione .......................................................................................................................................................... 18
Modifica dei parametri Data / Ora............................................................................................................................................................ 19
PROGRAMMAZIONE DELLA MATRICE SW164OSM ON SCREEN MENU..................................................................... 20
MANUTENZIONE................................................................................................................................................................. 21
Pag. 1
KEYPLUS9702
RISOLUZIONE DEI PROBLEMI DI INSTALLAZIONE........................................................................................................ 21
Test del collegamento tra Tastiera e matrice .......................................................................................................................................... 21
RISOLUZIONE DEI PROBLEMI DI CONFIGURAZIONE.................................................................................................... 22
PROBLEMI NELLA COMMUTAZIONE VIDEO................................................................................................................... 22
Gestione delle password ......................................................................................................................................................................... 23
Programmazione della matrice SW164 Standard ................................................................................................................................... 23
Programmazione della matrice SW164OSM........................................................................................................................................... 23
CARATTERISTICHE TECNICHE ........................................................................................................................................ 23
CARATTERISTICHE TECNICHE ALIMENTATORE........................................................................................................... 23
Il produttore declina ogni responsabilità per eventuali danni derivanti da un uso improprio delle apparecchiature
menzionate in questo manuale, si riserva inoltre il diritto di modificarne il contenuto senza preavviso. Ogni cura è stata
posta nella raccolta e nella verifica della documentazione contenuta in questo manuale: tuttavia il produttore non può
assumersi alcuna responsabilità derivante dall’utilizzo della stessa. Lo stesso dicasi per ogni persona o società
coinvolta nella creazione e nella produzione di questo manuale.
Pag. 2
KEYPLUS9702
Introduzione
Contenuto dell’imballaggio
• 1 tastiera KEYPLUS
• 1 alimentatore esterno
• 2 cavi telefonici 6/6 dritto dritto - Lunghezza ca.150 cm.
• 2 scatole di derivazione RJ jack
• 1 manuale d’uso
Alla consegna del prodotto verificare che l’imballaggio sia integro e non abbia segni evidenti di cadute o abrasioni. In
caso di danno all’imballaggio contattare immediatamente il fornitore.
Controllare che il contenuto sia rispondente alla lista del materiale sopra indicata.
Cosa contiene questo Manuale d’Uso
In questo manuale è descritta la tastiera di controllo KEYPLUS, con le particolari procedure di installazione,
configurazione e utilizzo.
E’ necessario leggere attentamente questo manuale, in particolar modo il capitolo riguardante le norme di sicurezza,
prima di installare ed utilizzare la tastiera.
A chi è rivolto il Manuale d’Uso
Le diverse parti di questo manuale sono intese a soddisfare due diverse necessità operative: quella del tecnico
installatore e quella dell’operatore.
Tecnico installatore: è un tecnico adeguatamente competente che esegue l’installazione dell’impianto di sicurezza e
ne verifica la funzionalità.
Dispone delle conoscenze tecniche necessarie a installare, collegare e configurare l’impianto. Solo il tecnico
installatore può effettuare quelle operazioni descritte in questo manuale come riservate al “Personale tecnico”.
Operatore: è l’utilizzatore finale che opera sulla tastiera di controllo per stabilire le modalità di operazione dell’intero
sistema. In sistemi multiutente possono essere presenti fino a 4 operatori che operano contemporaneamente sulle
risorse disponibili (ingressi video, monitor, ecc.).
Cosa leggere
Le procedure di installazione, prevalentemente rivolte al tecnico installatore, sono descritte a partire da pagina 7.
L’operatore deve leggere a partire da pagina 16, per la descrizione dell’uso della tastiera, della commutazione diretta e
della programmazione del sistema video controllato.
Convenzioni tipografiche
Nel presente manuale si fa uso di diversi simboli grafici, il cui significato è riassunto di seguito:
Rischio di scosse elettriche; togliere l’alimentazione prima di procedere con le operazioni, se non è
espressamente indicato il contrario.
Si prega di leggere attentamente la procedura o le informazioni indicate, ed eventualmente eseguire quanto
prescritto secondo le modalità previste. La non corretta esecuzione della procedura può portare a un errato
funzionamento del sistema o ad un danneggiamento dello stesso.
Si consiglia di leggere per comprendere il funzionamento del sistema.
Pag. 3
KEYPLUS9702
Norme di sicurezza
La tastiera KEYPLUS è conforme alle normative vigenti all’atto della pubblicazione del presente manuale, per
quanto concerne la sicurezza elettrica, la compatibilità elettromagnetica ed i requisiti generali.
Si desidera tuttavia garantire gli utilizzatori (tecnico installatore e operatore) specificando alcune avvertenze per
operare nella massima sicurezza:
• Collegare ad una linea di alimentazione corrispondente a quella indicata sulle etichette di marcatura (vedere il
successivo capitolo Dati di marcatura)
• L’installazione dell’apparecchio (e dell’intero impianto di cui esso fa parte) deve essere effettuata da personale
tecnico adeguatamente qualificato
• Per l’assistenza tecnica rivolgersi esclusivamente al personale tecnico autorizzato.
• L’apparecchio non deve mai essere aperto.
• La manomissione dell’apparecchio fa decadere i termini di garanzia.
• La presa di alimentazione deve essere connessa a terra secondo le norme vigenti
• Non sfilare la spina dalla presa tirando il cavo
• Prima di spostare o effettuare interventi tecnici sull’apparecchio, disinserire la spina di alimentazione: l’apparecchio
si considera disattivato soltanto quando la spina di alimentazione è disinserita e i cavi di collegamento con altri
dispositivi sono stati rimossi
• Non utilizzare cavi di prolunga con segni di usura o invecchiamento, in quanto rappresentano un grave pericolo per
l’incolumità degli utilizzatori
• Evitare di bagnare con qualsiasi liquido o di toccare con le dita bagnate l’apparecchio in funzione
• Non lasciare l’apparecchio esposto ad agenti atmosferici
• Non utilizzare l’apparecchio in presenza di sostanze infiammabili
• Non permettere l’uso dell’apparecchio a bambini o incapaci
• Accertarsi che l’apparecchio poggi sempre su una base sufficientemente larga e solida
Conservare con cura il presente manuale per ogni futura consultazione
Dati di marcatura
Sul retro della tastiera KEYPLUS sono riportate due etichette conformi alla marcatura CE.
La prima etichetta contiene il codice di identificazione del modello (Codice a barre EXT3/9).
La seconda etichetta indica il numero di serie del modello (Codice a barre EXT3/9).
Sull’alimentatore fornito in dotazione è riportata un’etichetta con le caratteristiche di alimentazione della tastiera.
All’atto dell’installazione controllare se le caratteristiche di alimentazione della tastiera corrispondono a quelle richieste.
L’uso di apparecchi non idonei può portare a gravi pericoli per la sicurezza del personale e dell’impianto.
Pag. 4
KEYPLUS9702
Descrizione della tastiera KEYPLUS
La tastiera KEYPLUS è un prodotto professionale per applicazioni nell’ambito della sicurezza e della
sorveglianza. In un sistema di sicurezza la tastiera consente il controllo della commutazione video (matrice video
SW164OSM) e la gestione di eventuali condizioni di allarme.
Caratteristiche:
• Display LCD 16 caratteri per 2 righe per il controllo delle operazioni
• Modalità di comunicazione RS232 e Current Loop
• Led di segnalazione attivati in caso di interruzione delle comunicazioni e su allarme
• Buzzer abilitabile in caso di interruzione delle comunicazioni e su allarme
• Velocità di comunicazione variabile per sistemi di trasmissione dati (matrice SW164OSM OSM e ricevitore DTRX).
• Facilità d’uso: le operazioni più comuni si attivano premendo soltanto uno o due tasti
• Configurazione completa della tastiera tramite setup a display
• Selezione a display della modalità di ricezione (RS232 / Current Loop)
• Controllo di entrambe le versioni SW164 (Standard e On Screen Menu)
• Selezione della lingua nazionale
• Menu di test delle comunicazioni verso la matrice
• Autotest dei canali di comunicazione
• Abilitazione / disabilitazione degli ingressi e uscite controllabili da ciascuna tastiera
• Tre livelli di password: collegamento, reset allarme, setup
Sicurezza
La gestione della sicurezza a livello di sistema è realizzata tramite 3 livelli di password, singolarmente configurabili
all’interno di ciascuna tastiera:
• password di collegamento: richiesta all’accensione della tastiera, per evitare l’uso da parte di personale non
autorizzato;
• password di reset allarme: richiesta al momento del reset della condizione d’allarme da tastiera;
• password di setup: è richiesta quando si richiede un setup (sia della tastiera che della matrice).
Gestione delle password
Alla richiesta di una password, è atteso un tempo massimo di 10 secondi per la pressione della prima cifra (da 0 a 9), e
5 secondi per le successive. Al termine di tale attesa, se l’introduzione della password non fosse completa, questa
verrà considerata errata.
• Un errore nell’introduzione della password di collegamento implica un blocco della tastiera per 25 secondi, dopo il
quale viene riproposta la richiesta di introduzione.
• Le password sono disabilitate se impostate a 000000.
Led e buzzer di segnalazione
La tastiera è dotata di due led di segnalazione, che si attivano automaticamente in caso di:
• interruzione delle comunicazioni con la matrice
• situazione di allarme della matrice.
Un buzzer interno alla tastiera consente di segnalare con un suono continuo tali eventualità.
Apparecchi collegabili con la tastiera KEYPLUS
• Matrice video SW164OSM: consente la commutazione di 16 ingressi video su 4 monitor, gestendo fino a 16
contatti di allarme. Un’unica matrice video può essere connessa ad un massimo 4 tastiere di controllo (anche in
configurazione mista DCS2/KEYPLUS). Fare riferimento al rispettivo manuale d’uso per una descrizione completa
delle caratteristiche dell’apparecchio.
Pag. 5
KEYPLUS9702
Esempio di installazione
Impianto controllato da tre operatori con un monitor ciascuno: oltre alla commutazione video e gestione dei contatti di
allarme, due operatori controllano un gruppo di ricevitori per la movimentazione dei brandeggi e delle ottiche:
PTH
PTH
DTRX
DTRX
DTRX
DTRX
MATERIALE IMPIEGATO
PTH
DTRX
DTRX
SW164OSM
SW16.4
DCMX
DCMX
DCS2
DCS2
P RES ET
SC AN
A UX 1
AU X 2
AU X 3
AUX 4
P RES ET
SC AN
A UX 1
AUX 2
AU X 3
A UX 4
COM FA ULT
COM FA ULT
ALA RM
WIPER
2
3
4
5
6
7
8
9
0
M /A
A LA RM
PR OG
PR OG
1
C OM FA ULT
M /A
M /A
ALA R M
-/--
KEYPLUS
KEYPLUS
DCS2
DCS2
Tastiere di controllo:
• 1 tastiera di controllo KEYPLUS
• 2 tastiere di controllo DCS2
Gestione del video:
• matrice SW164OSM
• 3 monitor (max 4)
• 3 telecamere (max 16)
Gestione della telemetria:
• 3 ricevitori DTRX
• 3 brandeggi
• 1 multiplexer digitale DCMX
PR OG
WIPER
C LEA R
IN
OPE N
NE AR
E NTE R
US ER
OUT
C LOSE
FA R
-/--
1
2
3
4
5
6
7
8
9
0
C LEA R
IN
OPE N
E NTER
US ER
OU T
C LOSE
NE AR
FA R
- /- -
1
2
3
4
5
6
7
8
9
0
C LE AR
E NTER
Cavi
Nello schema sopra illustrato sono stati utilizzati diversi tipi di tratto per indicare cavi con diverse funzioni:
cavo video:
Cavo coassiale RG 59 o cavo equivalente.
Per lunghe distanze si consiglia un sistema di trasmissione video su doppino twistato.
cavo multipolare:
Ogni funzione di controllo del brandeggio viene attivata / disattivata da un relè interno al ricevitore.
Per stabilire il numero dei conduttori del cavo multipolare:
• 7 fili per la movimentazione del brandeggio (230 V~ o 24 V~): destra, sinistra, alto, basso, autopan, comune, terra (solo
230 V~)
• 6 fili di controllo ottiche in caso di ottiche a inversione di polarità (zoom wide, zoom tele, focus near, focus far, iris open,
iris close)
• 4 fili di controllo ottiche in caso di ottiche a filo comune (zoom, focus, iris, comune)
• 2 fili di riferimento per la gestione del preset, e 1 aggiuntivo per ciascuna delle funzioni presettabili.
Per ciascuna funzione ausiliaria, wiper e washer, prevedere una coppia di fili.
Per ulteriori informazioni si faccia riferimento al manuale d’uso del DTRX.
cavo per la trasmissione digitale dei comandi:
Due coppie di doppino twistato di diametro minimo 0,6 mm (sez.0,22 mm² AWG 24):
una coppia Trasmissione / Massa + una coppia Ricezione / Massa.
La distanza massima di collegamento è di circa 15 m in RS232; 1500 m in Current Loop.
Il cavo telefonico fornito è di 1,5 m: per arrivare a distanze maggiori fare uso delle scatole di derivazione RJ, secondo la
procedura descritta al capitolo Installazione, Connettori e collegamenti (pagina 8).
Pag. 6
KEYPLUS9702
Installazione
Le seguenti procedure sono da effettuare in assenza di alimentazione, se non diversamente indicato.
La fase di installazione deve essere effettuata solo da personale tecnico qualificato.
Apertura dell’imballaggio
Se l’imballaggio non presenta evidenti difetti dovuti a cadute o abrasioni anomale, procedere al controllo del materiale
in esso contenuto, secondo la lista fornita al capitolo Introduzione, Contenuto dell’imballaggio (pag.3).
Sarà cura del tecnico installatore smaltire il materiale d’imballaggio secondo le modalità di raccolta differenziata o
comunque secondo le norme vigenti nel Paese di utilizzo.
Controllo della marcatura
Prima di procedere all’installazione controllare se il materiale fornito corrisponde alle specifiche richieste,
esaminando le etichette di marcatura, secondo quanto descritto al capitolo Dati di marcatura (pag. 4). Non effettuare
per nessun motivo alterazioni o collegamenti non previsti in questo manuale: l’uso di apparecchi non idonei può portare
a gravi pericoli per la sicurezza del personale e dell’impianto.
Accensione e spegnimento
Prima di fornire alimentazione:
• controllare se il materiale fornito corrisponde alle specifiche richieste, esaminando le etichette di marcatura,
secondo quanto descritto al capitolo Dati di marcatura (pag.4)
• controllare che la tastiera e gli altri componenti dell’impianto siano chiusi e sia quindi impossibile il contatto diretto
con parti in tensione
• il cavo di collegamento con la matrice non è necessario durante la fase di configurazione, fatta eccezione per il test
di collegamento; lasciarlo scollegato finché non espressamente richiesto
• la tastiera e gli altri apparecchi dell’impianto devono poggiare su una base ampia e solida
• i cavi di alimentazione non devono essere d’intralcio alle normali operazioni del tecnico installatore
• controllare che le fonti di alimentazione ed i cavi di prolunga eventualmente utilizzati siano in grado di sopportare il
consumo del sistema.
ACCENSIONE: collegare il connettore Mini Din 4 poli dell’alimentatore con la corrispondente presa presente
sul retro della tastiera. La tastiera è sprovvista di interruttore: inserire la spina nella presa di alimentazione.
All’atto dell’accensione un breve lampeggiamento dei due led di controllo indica l’avvenuta fase di autotest iniziale.
SPEGNIMENTO: togliere la spina dalla presa di alimentazione.
Pag. 7
KEYPLUS9702
Connettori e collegamenti
La tastiera KEYPLUS presenta un connettore RJ11 posto sul retro della meccanica, ed un connettore Mini Din
4 poli:
Mini Din 4 poli
Codice
Prodotto
Connettore RJ11 (canale matrice)
Numero di serie
La trasmissione dei dati digitali verso la matrice è effettuata contemporaneamente in RS232 e in Current Loop.
La modalità di ricezione è selezionabile in fase di configurazione della tastiera.
La tastiera KEYPLUS e la matrice video SW164OSM possono essere collegati direttamente tramite cavo telefonico
fornito dal fabbricante, per la verifica in laboratorio del funzionamento delle apparecchiature:
SW164OSM
SW16/4
KEYPLUS
KEYPLUS
COM FAULT
M/A
ALARM
PROG
- / --
1
2
3
4
5
CLEAR
6
7
8
9
0
ENTER
Per il collegamento con il cavo twistato, collegare gli apparecchi tramite le scatole di derivazione RJ, fornite dal
fabbricante, secondo le tabelle di riferimento riportate di seguito:
Collegamento KEYPLUS - matrice video SW164OSM
Collegamento Current Loop: max 1500 m
KEYPLUS
SW164OSM
TX CL
Giallo ------------- Nero
RX CL
GND CL
Rosso -------------- Verde GND CL
RX CL
Bianco --------- Azzurro
TX CL
SW164OSM
SW16/4
KEYPLUS
KEYPLUS
Collegamento RS232: distanza max 15 metri
KEYPLUS
SW164OSM
TX RS232
Nero -------- Giallo
RX RS232
GND RS232
Verde -------- Rosso GND RS232
RX RS232
Azzurro --- Bianco
TX RS232
COM FAULT
max 1500 m
Current Loop
M/A
ALARM
PROG
-/ - -
Pag. 8
1
2
3
4
5
6
7
8
9
0
CLEAR
ENTER
KEYPLUS9702
Note sulla configurazione della tastiera
La fase di configurazione della tastiera consente di predisporla ad un funzionamento ottimale, in base alle
necessità dell’impianto. La configurazione deve essere fatta solo al momento dell’installazione da parte del tecnico
installatore: i parametri configurati sono conservati anche ad apparecchio spento.
Si consiglia di procedere con ordine alla configurazione dei parametri, per evitare problemi di installazione: alcuni menu
sono automaticamente disabilitati se precedenti condizioni non sono soddisfatte ed in tal caso non è permessa la
variazione del loro contenuto.
I parametri impostati in fase di configurazione sono:
• Lingua nazionale della tastiera
• Tipo di matrice collegata (“standard” o “OSM”; se “standard” è in seguito richiesto il numero dell’operatore)
• Modalità di ricezione del canale di controllo matrice (RS232 o Current Loop)
• Selezione delle password (di collegamento, di reset allarme e di programmazione)
• Selezione degli ingressi e delle uscite controllabili da ciascuna tastiera
• Uso del cicalino di avvertimento, in caso di allarme o interruzione delle comunicazioni con la matrice
Sono presenti inoltre 2 menu di selezione dei test di comunicazione.
L'intera fase di configurazione della tastiera è effettuata senza il collegamento con la matrice, fatta eccezione per
l'eventuale test di collegamento tra i due dispositivi.
Per una configurazione completa, si consiglia di procedere in ordine secondo i menu proposti: iniziare dal menu
numero 1.Lingua fino al menu numero 8.Buzzer.
Procedura di configurazione
La procedura di configurazione deve essere effettuata soltanto da personale tecnico qualificato: l’uso di
parametri non corretti può comportare l’isolamento della tastiera dal resto del sistema.
Procedura di configurazione
La configurazione della tastiera è gestita tramite un sistema di menu a display. I tasti usati per lo spostamento sono i
seguenti:
P
U
D
E
C
inizio della programmazione
richiesta della voce precedente del menu
richiesta della voce successiva del menu
entrata nel menu indicato a display o conferma del valore mostrato
a seconda del menu, permette di variare i valori indicati a display
Pag. 9
KEYPLUS9702
Lista dei menu
Nella tabella seguente sono indicati i menu di configurazione della tastiera. Si prega di porre la massima attenzione
onde evitare la modifica di parametri in maniera errata. Con * sono indicati i parametri critici che possono impedire il
collegamento tra matrice e tastiera, se non configurati correttamente.
Menu
Significato
Valori impostabili
1.Lingua
Lingua dei menu di tastiera.
inglese (default),
italiano, francese,
tedesco, spagnolo
2.Setup matrice *
2.1 Tipo *
Configurazione delle caratteristiche della
matrice controllata.
Tipo di matrice controllata.
2.2 Comunicazioni *
Modalità di comunicazione.
2.3 Baudrate *
Velocità di comunicazione
(solo per la matrice OSM).
3. <non usato>
4. Test dei canali di comunicazione
4.1 Canale Matrice
4.2 Canale Matrice automatico
5. Abilitazioni
5.1 Ingressi
5.2 Uscite
5.3 Tastiera (Up/Down)
5.4 Altri parametri
6. Password *
6.1 Password di collegamento*
6.2 Password di reset allarme
6.3 Password di setup *
7. Numero operatore
8. Uso del buzzer
Procedure di controllo dei collegamenti.
Test del collegamento con la matrice .
Test automatico del canale di comunicazione,
usando una scatola Rjjack.
Per ciascun operatore può essere definito il
gruppo di ingressi e uscite commutabili, e l’uso
dei tasti Up/Down.
Ogni ingresso è attivabile o meno: gli ingressi
disattivati non sono selezionabili direttamente;
sono visibili in caso di allarme e se previsti
nelle sequenze di ciclata.
Selezione delle uscite richiamabili per la
commutazione.
Il blocco dei tasti è utilizzato quando ad un
operatore non è consentito l’uso completo di
tutte le funzioni della tastiera.
Click se attivo alla pressione di un tasto è
generato un suono di conferma.
Messaggi: se abilitato vengono mostrati i
messaggi di errore e avvertimento
Modifica delle password.
NB: le password sono private, e non
riguardano gli altri eventuali operatori.
È richiesta all’atto dell’accensione del
tastierino.
È richiesta quando si tenta di resettare una
condizione di allarme da tastiera.
È richiesta quando si vuole configurare la
tastiera o la matrice controllata.
Solo in caso di collegamento con la matrice
SW164OSM Standard è necessario
identificare univocamente i 4 operatori,
assegnando a ciascuno un numero diverso.
Attivazione del buzzer di segnalazione: su
allarme della matrice, su interruzione delle
comunicazioni della matrice, in entrambi i casi.
Pag. 10
SW164OSM
Standard (default) o
versione OSM
RS232 (default) /
Current Loop
300, 1200, 2400,
9600 (default) baud
Default: tutti gli
ingressi sono abilitati
Default: sono richiamabili
tutte le uscite
Default: tutti i tasti
sono attivati
Default: disabilitata
(000000)
Default: disabilitata
(000000)
Default: disabilitata
(000000)
Default: operatore
numero 1.
Default: attivato su
allarme della matrice
KEYPLUS9702
Modifica dei parametri di configurazione.
La modifica dei vari parametri segue le seguenti fasi:
• entrata in programmazione
• scelta del menu
• scelta dell’opzione desiderata tra quelle disponibili
• uscita dal menu
• uscita dalla programmazione.
Ecco un esempio delle varie fasi: modifica delle abilitazioni delle uscite.
Entrata in programmazione
Display
P
Accendere la tastiera. Tenere premuto il tasto
per 5 secondi, finché i led
iniziano a lampeggiare. Se richiesta, inserire la password di setup.
CONFIGURAZIONE
--- TASTIERA ---
Scelta del menu e modifica dei parametri
Display
Il menu è mostrato su due righe:
CONFIG.TASTIERA
1.Lingua
• il titolo del menu (in questo caso CONFIG.TASTIERA, il menu principale)
• la lista dei sottomenu disponibili
Con
Ue D selezionare il sottomenu desiderato (Abilitazioni)
E
Richiamare il sottomenu Abilitazioni premendo
, e scegliere quale
gruppo di abilitazioni si desidera impostare (ingressi, uscite, tasti, ecc.).
Per proseguire con l’esempio con
richiami con
E.
D scegliere il sottomenu Uscite, e lo si
La configurazione delle uscite abilitate consiste nello scegliere singolarmente
ciascuna delle quattro uscite, e definire se questa deve essere selezionabile dalla
tastiera:
• scegliere l’uscita con
U/D
E per abilitarla / disabilitarla.
Con una ulteriore pressione di C si torna al menu principale.
• premere
•
C salva le modifiche eventualmente apportate e torna al menu precedente.
CONFIG.TASTIERA
5.Abilitazioni
ABILITAZIONI 5.
Ingressi
ABILITAZIONI 5.
Uscite
¢
ABILITAZIONE 5.2
Uscita 1: SI ¤£
DDE
ABILITAZIONE 5.3
Uscita 3: NO ¤¢
ABILITAZIONI 5.
Uscite
Il salvataggio dei parametri è effettuato automaticamente all’uscita dal menu.
CONFIG.TASTIERA
5.Abilitazioni
Uscita da programmazione
Display
La fine della programmazione conferma il salvataggio dei parametri impostati e
pone la tastiera in modalità di funzionamento normale.Per uscire dalla
programmazione scegliere la voce Fine Setup nel menu
CONFIG.TASTIERA
Fine setup
principale, premendo ripetutamente
D e confermando con E.
Pag. 11
KEYPLUS9702
Lingua della tastiera
La lingua nazionale dei menu di tastiera è configurabile, scegliendola tra quelle preimpostate.
NB: La variazione della lingua di tastiera non influenza quella della matrice controllata.
Modifica della lingua della tastiera
Descrizione
Tasti
Display
Da menu principale selezionare il sottomenu Lingua
UE
E
C
CONFIG.TASTIERA:
1.Lingua
£
E per selezionare la lingua;
C per confermare ed uscire.
Lingua
1.
Italiano * ¢
Configurazione della matrice
La tastiera KEYPLUS consente il controllo delle matrici SW164 Standard e SW164OSM.
Il menu di configurazione della matrice è suddiviso in tre sottomenu:
• tipo di matrice collegata
• modalità di comunicazione tra tastiera e matrice
• velocità di comunicazione (solo per la matrice SW164OSM).
Configurazione della matrice
Descrizione
Tasti
Display
Da menu principale selezionare il menu Setup della
matrice
DE
P
E
C
CONFIG.TASTIERA:
2.Setup matrice¢
DE
E
C
SETUP MATR. 2.
Comunicazioni ¡
DE
E
C
SETUP MATR. 2.
Baudrate
¡
C
CONFIG.TASTIERA:
2.Setup matrice¢
1) Selezione del tipo di matrice controllata
E per variare il tipo
C per confermare ed uscire
2) Selezione della modalità di comunicazione
E per variare la modalità
C per confermare ed uscire
3) Selezione della velocità di collegamento (solo per
la matrice SW164OSM)
E per variare la velocità
C per confermare ed uscire
C ritorna al menu principale
Pag. 12
SETUP MATR. 2.
Tipo
£
TIPO MATRICE 2.1
Standard
¤
COM.MATRICE 2.2
RS232
£
BAUDRATE COM 2.3
9600 baud
¤
KEYPLUS9702
Test dei canali di comunicazione
La tastiera prevede il test dei canali di comunicazione, per consentire la verifica del sistema installato.
• Test del canale di comunicazione con una matrice: collegare direttamente la tastiera alla matrice SW164OSM.
Il test verifica le chiamate di polling (matrice STD) o un opportuno messaggio di test (matrice OSM), per controllare
la trasmissione bidirezionale tra i due dispositivi.
Attenzione: il tipo di matrice interessato dal test deve essere configurato al menu 2.1; la modalità di comunicazione
al menu 2.2.
Eventuali anomalie sono descritte a display.
• AutoTest del canale di comunicazione: senza dover collegare la matrice, si utilizza un apposito connettore di test e
si effettua automaticamente un controllo con opportuni comandi mandati e ricevuti dalla tastiera stessa.
Sono verificate entrambe le modalità di comunicazione, RS232 e Current Loop.
Eventuali anomalie sono descritte a display.
Test delle comunicazioni
Descrizione
Tasti
Display
Dal menu principale selezionare il menu Test delle
comunicazioni
DE
[D] E
E
CONFIG.TASTIERA:
4.Test comun. ¢
Selezionare il tipo di test desiderato
(con collegamento alla matrice o autotest)
E. La fase di test può durare una
Iniziare il test con
decina di secondi.
TEST DI COM. 4.
Matrice
£
CANALE MATRICE
[¤] per iniziare
TEST STD 232 RX (*)
test corretto
Controllare se i messaggi che compaiono a display
indicano problemi di comunicazione.
Per la risoluzione dei problemi fare riferimento al
capitolo Risoluzione dei problemi.
(*) Note: In caso di test con collegamento con la matrice, l’indicazione che compare a display durante il test permette di
verificare la corretta configurazione del sistema:
Test STD 232 RX
STD (collegamento con matrice standard) / OSM (collegamento con matrice OSM)
232 (test del canale RS232) / CL (test del canale Current Loop)
RX (test della ricezione) / TX (test della trasmissione)
CAVO PER L’AUTOTEST
Collegare i fili:
bianco con giallo
azzurro con nero
COM FAULT
M/A
ALARM
P ROG
-/--
1
2
3
4
5
CLEAR
6
7
8
9
0
E NTER
Pag. 13
KEYPLUS9702
Abilitazioni
Per evitare l’uso di password e nel contempo limitare la selezione di determinati ingressi o uscite video, si determinano
nel menu Abilitazioni quali sono le risorse accessibili a ciascun operatore. Se qualche operatore non deve avere
accesso all’intero gruppo di ingressi video, si consiglia di disabilitare la funzione Up/Down (tasti
altrimenti consentono di richiamare tutti gli ingressi attivi senza far uso del tastierino numerico.
U e D), che
Abilitazione degli ingressi, delle uscite e della tastiera
Descrizione
Tasti
Display
Dal menu principale, selezionare il sottomenu
Abilitazioni
DE
P
UD
EC
CONFIG.TASTIERA:
5.Abilitazioni ¢
DE
UD
EC
ABILITAZIONE 5.
Uscite
¢
ABILITAZIONE 5.2
Uscita 1:SI ¤£
3) Abilitare la funzione di Up/Down:
se qualche ingresso è disabilitato, si consiglia di
disabilitare la funzione.
DE
ABILITAZIONE 5.
Tasti tastiera ¢
E per abilitare / disabilitare la funzione
C per confermare ed uscire
E
C
ABILITAZIONE 5.3
Up/Down: SI ¤
1) Abilitare gli ingressi accessibili dall’operatore
U / D per identificare l’ingresso
E per abilitarlo / disabilitarlo; C per uscire
2) Abilitare le uscite accessibili dall’operatore
U / D per identificare uscita
E per abilitarla / disabilitarla; C per uscire
ABILITAZIONE 5.
Ingressi
£
Abilitazione 5.1
Ingr.1 : SI ¤£
Cambio delle password
La descrizione delle password è al capitolo Descrizione della tastiera KEYPLUS, Sicurezza.
Cambio delle password
Descrizione
Tasti
Display
Dal menu principale selezionare il sottomenu Cambio
Password
DE
E
[0 / 9]
1/0
CONFIG.TASTIERA
6.Cambio pwd ¢
1) Selezionare la password di Collegamento:
Inserire la password (6 cifre) e confermarla
reimmettendola.
Salvare la password quando richiesto; eventuali messaggi
a display avvertono se sono stati introdotti valori diversi o se
la password è stata disabilitata (000000).
CAMBIO PWD: 6.
Collegamento £
PWD COLLEG. 6.1
[****..]
Salva modifiche?
[1] Si [0] No
2) Selezionare la password di Reset Allarme e
procedere secondo la procedura sopra indicata
CAMBIO PWD: 6.
Reset allarme ¢
3) Selezionare la password di Programmazione e
CAMBIO PWD: 6.
Setup
¡
procedere secondo la procedura sopra indicata
Pag. 14
KEYPLUS9702
Numero di identificazione dell’operatore
Se la tastiera è collegata ad una matrice SW164 Standard è necessario identificare ciascuna KEYPLUS / DCS2
con un numero di identificazione diverso. Se due tastiere si trovano ad avere lo stesso numero possono insorgere
problemi di comunicazione.
Numero dell’operatore (solo per matrice Standard)
Descrizione
Tasti
Display
Dal menu principale selezionare il menu Numero
dell’operatore
UDE
E
C
CONFIG.TASTIERA
7.Numero oper. ¢
Selezionare il numero dell’operatore con
Confermare ed uscire con
E.
C.
Num.operat. 7.
Operatore 1 ¤
Buzzer della tastiera
La tastiera è dotata di un buzzer interno che può essere abilitato se si verificano problemi di collegamento con la
matrice (interruzione delle comunicazioni) o situazioni di allarme.
Abilitazione del buzzer interno
Descrizione
Tasti
Display
Dal menu principale selezionare il menu Buzzer
UDE
E
CONFIG.TASTIERA
8.Buzzer
¢
Selezionare il tipo di funzionamento del buzzer
premendo
E:
Buzzer
8.
Su allarme ¤
• non usato
• attivo su interruzione delle comunicazioni
• attivo su allarme
• attivo su interruzione delle comunicazioni e su
allarme.
C conferma la scelta e torna al menu precedente.
Pag. 15
KEYPLUS9702
Tasti
COM FAULT
M/A
ALARM
PROG
-/--
1
2
3
4
5
6
7
8
9
0
CLEAR
ENTER
La tastiera KEYPLUS consente di controllare la matrice video SW164OSM.
Tasti numerici
0 / 9: selezione diretta dell’ingresso
s: prepara l’inserimento di un numero a due cifre. Il display mostra l’attesa della seconda cifra indicando “1-”
Monitor m: selezione del numero dell’uscita attiva
Up / Down B / D: ingresso precedente/successivo a quello visualizzato
Prog P: entra in programmazione della matrice (eventualmente previa richiesta di una password).
Clear C: con la matrice SW164OSM effettua un refresh del monitor. Con la matrice SW164 standard non è usato.
Shift
Selezione degli ingressi e uscite
Selezione del monitor attivo
m
Monitor
prepara l’inserimento del numero monitor.
Ciascuna tastiera può controllare fino a 4 monitor, ma solo uno è definito “monitor attivo” e solo su questo saranno
eseguiti i comandi di commutazione video.
La lista dei monitor selezionabili è definita in fase di setup della singola tastiera.
Alla pressione del tasto compare un ? indicante l'atteso inserimento del numero (da 1 a 4).
Se l'uscita scelta fosse disabilitata per la tastiera, la pressione del numero è accompagnata da una segnalazione
d'errore acustica.
Ad esempio se si desidera controllare l’uscita numero 2:
Display attuale
Tasti
Display aggiornato
MONITOR 1
INGRESSO 3
m2
MONITOR 2
INGRESSO -
Selezione dell'ingresso
Tasti
0/9: selezione diretta degli ingressi sull’uscita attiva (indicata a display).
1 a 9).
Richiamo degli ingressi da 10 a 16: premere Shift (s) seguito dalla cifra delle unità (da 0 a 6).
Esempio: selezione dell’ingresso 13: s3; L’ingresso 10 può essere chiamato anche premendo 0
Up / Down B / D: selezionano sull’uscita attiva l’ingresso successivo / precedente a quello attualmente
Richiamo degli ingressi da 1 a 9: premere direttamente il tasto numerico corrispondente (da
visualizzato.
Ciclata automatica
M:attiva la ciclata automatica definita a livello di matrice.
Pag. 16
KEYPLUS9702
Configurazione della matrice
La tastiera KEYPLUS consente di controllare le due versioni SW164, Standard e OSM.
Nel caso della matrice Standard, la programmazione si limita ai parametri di base, che vengono visualizzati a display;
per quanto riguarda la matrice OSM, tutta la programmazione viene effettuata a video, e viene visualizzata sul monitor
numero 1.
Programmazione della matrice SW164 Standard
La programmazione della matrice Standard consiste nella definizione di:
• sequenze di ciclata
• testi di identificazione
• parametri di data/ora.
Entrata in programmazione (matrice
Standard)
Descrizione
P
Entrare in programmazione con
, ed
eventualmente introdurre la password di setup
Tasti
Display
P
-- MENU DI
CONFIGURAZIONE
Sequenze di ciclata
Per ciascuno degli operatori sono definite due sequenze di ciclata automatica, una diurna e una notturna.
Ciascuna sequenza è composta da un massimo di 16 passi, definiti da un ingresso da visualizzare e la durata della
visualizzazione (da 1 a 99 secondi). All’interno di ciascuna sequenza un medesimo ingresso può essere ripetuto più
volte, senza alcuna limitazione.
Definizione delle sequenze di ciclata
Descrizione
Selezionare la voce di menu Sequenze con
Entrare nel sottomenu con
UeD
E
Selezionare la sequenza desiderata con
confermando la modifica con
E.
U e D,
Se si desidera iniziare una nuova sequenza di ciclata,
confermare la cancellazione con
quella attuale premere
0
1; per modificare
[A] indica il passo della sequenza (i 16 passi sono
indicati con le lettere da A a P). Di seguito è indicato
l’ingresso da visualizzare, e la durata della
visualizzazione.
Selezionare i passi da modificare con
richiedere la modifica con
E.
Tasti
Display
UD
E
[U D] E
CONFIGURAZIONE
1.Sequenze £
1/0
Diurna, operat.1
[A] In:05 Sec.02
U D] E
Diurna, operat.1
[C] In:__ Sec.02
12E
3E
Diurna, operat.1
[C] In:12 Sec.__
[
SEQUENZE 1.
Oper.1,Diurna £
Canc.precedente?
[1] Si [0] No
U/D, e
E
Inserire il numero di secondi e confermarlo con E
Inserire il numero dell’ingresso e confermarlo con
Pag. 17
Diurna, operat.1
[C] In:12 Sec.03
KEYPLUS9702
Descrizione (continuazione)
Tasti
Display
Modificare secondo la procedura indicata tutti i passi di
programmazione (controllare che quelli non usati
abbiano la durata impostata a 0 secondi);
C
Salva modifiche?
[1] Si [0] No
1/0
SEQUENZE 1.
Oper.1,Diurna £
C
CONFIGURAZIONE
1.Sequenze £
premere
C per uscire
Confermare il salvataggio delle modifiche, ed
eventualmente modificare le altre sequenze di ciclata,
seguendo la procedura sopra indicata.
Uscire al menu principale con
C
Modifica dei testi di identificazione
La matrice SW164OSM STD consente di identificare ciascun ingresso con due testi di max 24 caratteri, usati
rispettivamente durante la ciclata normale e in caso di allarme.
Definizione dei testi di identificazione
Descrizione
Tasti
Display
Selezionare la voce di menu Testi di Identificazione
UD
CONFIGURAZIONE
2.Testi
¢
E
MODIF.TESTO 2.
Testo normale £
U D] E
TESTO IDENT. 2.1
Cambia testo __
3E
1/0
Canc.precedente?
[1] Si [0] No
U D C E]
T03:INGRESSO G_
[C]¢
[C]
¤ Clr Prg
con
UeD
Entrare nel sottomenu con
E
Scegliere se modificare un testo normale o di allarme
con
U/D, e confermare con E
Introdurre il numero del testo da cambiare
1 se si desidera riscrivere completamente il testo;
0 per modificare quello precedente
Cancellare l’ultimo carattere del testo con C, o
aggiungere alla fine del testo il carattere indicato tra
[x]
] premendo
[
[
E.
U o D.
Confermare il completamento dell’immissione con P
P
Salvare ed eventualmente procedere con la modifica
C
degli altri testi di identificazione, secondo la procedura
Cambiare il carattere tra [x]
] premendo
T03:¥ESSO GARAGE
[A]¢
[A]
¤ Clr Prg
Carattere da
aggiungere
Salva modifiche?
[1] Si [0] No
CONFIGURAZIONE
2.Testi
¢
sopra descritta.
Uscire al menu principale con
C
Pag. 18
KEYPLUS9702
Modifica dei parametri Data / Ora
I parametri data/ora consentono alla matrice di gestire l’inizio e la fine della ciclata diurna e notturna. Si faccia
riferimento al Manuale d’Uso della matrice SW164 Standard per ulteriori spiegazioni in proposito.
Attenzione: una possibile fonte di anomalie (sequenze di ciclata che non rispettano i valori impostati) è spesso da
ricercare nell’impostazione errata dei parametri di data / ora.
Parametri interessati dal menu:
- data attuale
- ora attuale
- ora di inizio della ciclata diurna nei giorni feriali
- ora di fine della ciclata diurna nei giorni feriali
- ora di inizio della ciclata diurna nei giorni semifestivi
- ora di fine della ciclata diurna nei giorni semifestivi
Nei giorni definiti festivi (la definizione di feriale, semifestivo o festivo è effettuata tramite SETUP DA PC a livello di
matrice) durante l'arco delle 24 ore viene eseguita la sequenza notturna.
Il caricamento da matrice ed il salvataggio delle modifiche dei parametri di data/ora sono effettuati in fase di entrata nel
menu o di uscita al menu principale.
Modifica della data e ora attuali
Descrizione
Tasti
UeD UD
Entrare nel sottomenu di modifica con E, e attendere
E
Selezionare la voce di menu Data / Ora con
Display
CONFIGURAZIONE
3.Data/Ora ¢
DATA/ORA 3.
Cambio data £
il caricamento dei dati da matrice
Richiedere il cambio della data con
formato Anno / Mese / Giorno
E; la data è nel
Introdurre la data
C uscire al sottomenu Cambio data/ora;
selezionare la voce Cambio Ora con D, ed entrare
con E; procedere con la modifica dell’ora secondo la
Con
E
DATA ATTUALE 3.1
95/11/01
96E
01E
02E
C [ U] D E
DATA ATTUALE 3.1
Mar 96/01/02
C
DATA/ORA 3.
Cambio ora £
ORA ATTUALE 3.2
12:00
modalità precedentemente descritta.
Tornare al sottomenu Cambio data/ora con
C
Pag. 19
KEYPLUS9702
I quattro orari di inizio/fine ciclata diurna hanno modalità di modifica simile.
La modifica dell’orario è fatta con passi di 10 minuti. Tenendo premuto il tasto l’orario scorre velocemente con passi di
30 minuti.
Attenzione: un inizio / fine errato della ciclata diurna può causare anomalie nelle sequenze di ciclata mostrate a video.
Sono state usate delle abbreviazioni a display:
Iniz.diur.lav.: Orario di inizio ciclata diurna nei giorni lavorativi
Fine diur.lav.: Orario di fine ciclata diurna nei giorni lavorativi
Iniz.diur.sem.: Orario di inizio ciclata diurna nei giorni semifestivi
Fine diur.sem.: Orario di fine ciclata diurna nei giorni semifestivi
Se si desidera disabilitare la ciclata notturna (rendere attiva la diurna nell’arco delle 24 ore) configurare l’inizio della
ciclata alle 00:00, e fine alle 23:59.
Modifica dell’inizio / fine ciclata diurna
Descrizione
Tasti
Selezionare l’orario che si desidera modificare con
e
D
Entrare in modifica orario con
U UD
E
UD
Premere
per variare l’ora; una pressione
prolungata consente uno scorrimento veloce dei valori
mostrati
C
Uscire dal menu con
, ed eventualmente
confermare il salvataggio dei valori modificati
Display
DATA/ORA 3.
Iniz.diur.lav. £
E
UD
INIZIO LAV. 3.3
¢ 06:00 Clr
C
DATA/ORA 3.
Iniz.diur.lav. £
C
C
Uscire dalla programmazione con C, o scegliendo la
C
voce Fine configur. e confermando con E
[D] E
Tornare al menu principale con
INIZIO LAV. 3.3
¢ 07:00 Clr
CONFIGURAZIONE
3.Data/Ora ¢
CONFIGURAZIONE
Fine configur. ¡
Programmazione della matrice SW164OSM On Screen Menu
Per la programmazione della matrice SW164OSM fare riferimento al rispettivo manuale d’uso.
Pag. 20
KEYPLUS9702
Manutenzione
La tastiera KEYPLUS non necessita di particolare manutenzione.
Si raccomanda di utilizzarla poggiata su una base solida, con i cavi di alimentazione e di collegamento in posizione tale
da non essere causa di intralcio all’operatore.
La pulizia deve sempre essere effettuata ad apparecchio spento. Pulire la tastiera periodicamente con un
panno di cotone asciutto, evitando l’uso di detergenti o di panni bagnati.
Risoluzione dei problemi di installazione
La tastiera KEYPLUS è caratterizzata da una notevole facilità d’uso, ma ciononostante possono insorgere dei problemi
sia in fase di installazione, di configurazione o durante l’uso.
Problema
All’accensione il display non mostra alcuna
scritta, i led non lampeggiano
Il collegamento con la matrice non funziona
Possibile causa
Non è fornita alimentazione
Soluzione
Controllare il cavo di alimentazione
Si sta fornendo
un’alimentazione sbagliata
La configurazione della
matrice è diversa da quella
della tastiera
Il cavo di collegamento tra
matrice e tastiera è interrotto
Controllate le caratteristiche di
marcatura
Controllare se la tastiera e la matrice
sono entrambe configurate in RS232
o Current Loop
Isolare il problema seguendo la
procedura di test indicata di seguito
Test del collegamento tra Tastiera e matrice
La tastiera trasmette contemporaneamente in RS232 e Current Loop: nella fase di test controllare sempre se eventuali
messaggi di errore si riferiscono ad una modalità o all’altra.
Per identificare le cause della mancata comunicazione tra tastiera e matrice, si consiglia di procedere effettuando le
seguenti prove:
• test delle comunicazioni sulla sola tastiera KEYPLUS (autotest)
• test del collegamento diretto tra tastiera e matrice
• test delle tratte di cavo di collegamento.
Autotest della tastiera KEYPLUS
• isolare la tastiera dal sistema
• connettere il cavo telefonico e la scatola Rjjack ponticellata, secondo i collegamenti descritti al capitolo
Configurazione della tastiera, Test delle Comunicazioni a pagina 13
• effettuare il test automatico, secondo la procedura descritta alla stessa pagina.
Se il test non da esito positivo (viene mostrato a display il messaggio Test fallito!):
• controllare i ponti sulla scatola Rjjack
• sostituire il cavetto telefonico.
Ripetere il test: se il problema persiste probabilmente il canale di trasmissione / ricezione a bordo della tastiera è
danneggiato. Contattare il fornitore.
Se l’autotest conferma il funzionamento della tastiera (messaggio Test corretto) controllare l’altro cavetto
telefonico, sostituendolo a quello usato in precedenza.
Pag. 21
KEYPLUS9702
Passare al controllo del collegamento diretto tra tastiera e matrice:
• collegare tastiera e matrice tramite un cavo telefonico diretto
• controllare le seguenti configurazioni:
• nella matrice: jumper di selezione della modalità di comunicazione
• nel setup di tastiera: tipo di matrice controllata, modalità di ricezione, eventuale velocità di collegamento (se si
ritiene che la velocità di collegamento possa essere stata variata nel setup della matrice SW164OSM
occorrerà procedere tentando le diverse possibilità nel setup di tastiera)
• effettuare il test del canale di matrice (non il test automatico)
Se il test non ha successo, controllare le configurazioni; in caso di matrice SW164OSM variare la velocità di
comunicazione a bordo della tastiera (tramite la procedura di setup ).
Se il problema persiste, con ogni probabilità le comunicazioni della matrice sono difettose. Contattare il fornitore.
Se il test ha successo il problema risiede nei cavi di collegamento: controllare le connessioni alle scatole Rjjack
secondo lo schema di pagina 8.
Se i problemi di collegamento persistono, contattare il fornitore.
Risoluzione dei problemi di configurazione
Problemi nella commutazione video
Problema
m
Premuto il tasto
per variare l’uscita attiva, non
viene data la possibilità di modificarla: il monitor
selezionato è fisso.
Sono stati abilitati solo 5 ingressi, ma è possibile
U D
e
vedere anche gli altri usando
Non si riesce a selezionare un ingresso maggiore
di 10, pur essendo stati correttamente configurati
come “selezionabili” tutti gli ingrssi.
Possibile causa
In fase di setup è stato
configurato un solo monitor
Soluzione
Abilitare altri monitor se fosse
necessario, nel menu Abilitazione,
Uscite
I tasti up/down non sono
stati disabilitati
Disabilitare i tasti up/down nel
menu Abilitazioni, Tasti Alto/basso
Non si sta indicando
correttamente il numero
dell’ingresso
s
per indicare le
Premere
decine, seguito dalla cifra delle
unità.
s 3: ingresso 13.
Si stanno usando i tasti $ I tasti $ e ( sono usati come
tasti freccia solo all’interno dei
e ( invece di U e D.
menu di configurazione della
Es.
U e D non funzionano, pur essendo
I tasti
abilitati.
Le funzioni di Up/Down sono abilitate
correttamente, ma vengono richiamate schermate
nere o alcuni ingressi sono saltati.
Non sono stati definiti
correttamente gli ingressi
attivi nel setup di matrice
OSM; la matrice Standard
mostra tutti i 16 ingressi
video, anche se il segnale è
assente.
Pag. 22
matrice.
Nel setup della matrice OSM
definire quali sono i segnali video
presenti (menu 4.Parametri di
sistema, 4.1 Ingressi attivi).
Per la matrice standard non si può
modificare l’impostazione della
funzione Up/Down.
KEYPLUS9702
Gestione delle password
Problema
Si vuole bloccare l’accesso alla tastiera da parte
del personale non autorizzato.
Le password delle tastiere sono diverse, pur
essendo tutte collegate alla stessa matrice.
Le password di una tastiera sono state
dimenticate o perse.
Si vuole disabilitare una password.
Possibile causa
In fase di setup è stata
disabilitata la password di
collegamento
Le password sono “locali” e
memorizzate all’interno della
tastiera.
-
Soluzione
In fase di setup impostare la
password di collegamento ad un
valore diverso da 000000.
Impostare (se necessario) le
stesse password su tutte le
tastiere.
Rivolgersi al fornitore
-
Impostarla a 000000. Attenzione:
per questioni di sicurezza si
consiglia di impostare almeno la
password di setup.
Programmazione della matrice SW164 Standard
Problema
Possibile causa
Le sequenze di ciclata impostate non funzionano Errata impostazione dei
parametri di Data/Ora: la
come previsto.
matrice sta mostrando la
ciclata notturna.
I parametri data/ora sono impostati
Alcuni giorni della settimana
sono stati definiti festivi da
correttamente, ma la matrice mostra sempre la
setup della matrice con il
ciclata notturna.
Personal Computer.
Soluzione
Controllare che l’ora impostata e
l’inizio/fine della ciclata diurna siano
impostati correttamente.
Reimpostare come lavorativi tutti i
giorni della settimana tramite setup
da PC; richiedere eventuali
informazioni al rivenditore.
Programmazione della matrice SW164OSM
Gli allarmi
Problema
Dopo aver configurato gli allarmi, la matrice esce
da programmazione ed entra subito in allarme,
anche se non è attivato alcun contatto di allarme
Chiudendo un contatto non si attiva l’allarme
corrispondente.
L’allarme cessa automaticamente, senza
l’intervento dell’operatore.
Altre opzioni
Problema
Il testo all’uscita del menu è notevolmente
spostato verso l’alto
Possibile causa
In fase di setup della matrice
qualche contatto di allarme è
stato definito Normalmente
Chiuso
Il contatto è stato definito
Non Usato
È stato attivato il reset a
tempo o i segnali di allarme
sono definiti “Continui”
Soluzione
Chiudere il contatto (mettere in
corto il contatto con il comune
allarmi) o impostarlo come
Normalmente Aperto.
Attivare il contatto come
Normalmente Aperto o Chiuso
Impostare le opzioni di reset
corrette.
Possibile causa
È stato impostato il sistema
video NTSC
Soluzione
Nel menu 4. Parametri di sistema
impostare Sistema Video: PAL.
Caratteristiche tecniche
Caratteristiche tecniche alimentatore
Dimensioni:
Peso:
Tensione primario:
Tensione secondario:
190 x 55 x 185 mm
980 g
Connettore:
230V~ 50Hz 30VA
9V~ 50HZ 8VA
14V~ 50HZ 8VA
Mini Din 4 poli
pin 1-3 9V~
pin 2-4 14V~
Pag. 23
KEYPLUS9702
OPERATING
INSTRUCTIONS
TABLE OF CONTENTS
TABLE OF CONTENTS......................................................................................................................................................... 1
INTRODUCTION .................................................................................................................................................................... 3
Packing contents ....................................................................................................................................................................................... 3
Contents of this manual............................................................................................................................................................................. 3
Who is this manual addressed to? ............................................................................................................................................................ 3
What to read.............................................................................................................................................................................................. 3
Typographical conventions........................................................................................................................................................................ 3
SAFETY RULES .................................................................................................................................................................... 4
OPERATING DATA ON RATING PLATE.............................................................................................................................. 4
KEYPLUS DESCRIPTION ..................................................................................................................................................... 5
Security ..................................................................................................................................................................................................... 5
Password management......................................................................................................................................................................... 5
Warning LED and buzzer .......................................................................................................................................................................... 5
Devices connectable to KEYPLUS keyboard ............................................................................................................................................ 5
Wires ......................................................................................................................................................................................................... 6
INSTALLATION ..................................................................................................................................................................... 7
Opening package ...................................................................................................................................................................................... 7
Checking keyboard operating data............................................................................................................................................................ 7
Turning On and Off the keyboard .............................................................................................................................................................. 7
Plugs and connections .............................................................................................................................................................................. 8
KEYBOARD CONFIGURATION NOTES .............................................................................................................................. 9
CONFIGURATION PROCEDURE ......................................................................................................................................... 9
Menu list .................................................................................................................................................................................................. 10
Changing configuration parameters ........................................................................................................................................................ 11
Keyboard language ................................................................................................................................................................................. 12
Matrix configuration ................................................................................................................................................................................. 12
Communication channels test ............................................................................................................................................................. 13
Enabling input and output selection and keys ......................................................................................................................................... 14
Password setup ................................................................................................................................................................................... 14
Operator identification ............................................................................................................................................................................. 15
Keyboard Buzzer ..................................................................................................................................................................................... 15
KEYS .................................................................................................................................................................................... 16
INPUT AND OUTPUT SELECTIONS .................................................................................................................................. 16
Active monitor selection .......................................................................................................................................................................... 16
Input selection ......................................................................................................................................................................................... 16
MATRIX CONFIGURATION ................................................................................................................................................ 17
SW164 STANDARD MATRIX SETUP ................................................................................................................................. 17
Sequence cycles ..................................................................................................................................................................................... 17
To modify identification texts ................................................................................................................................................................... 18
To modify Time / Date parameters .......................................................................................................................................................... 19
PROGRAMMING OF THE SW164OSM MATRIX ON SCREEN MENU ............................................................................. 20
MAINTENANCE ................................................................................................................................................................... 21
RESOLVING INSTALLATION PROBLEMS........................................................................................................................ 21
Page 1
KEYPLUS9702
Keyboard/matrix connection test ............................................................................................................................................................. 21
RESOLVING CONFIGURATION PROBLEMS.................................................................................................................... 22
Video switching problems........................................................................................................................................................................ 22
Password management........................................................................................................................................................................... 23
SW164OSM Standard matrix programming ............................................................................................................................................ 23
SW164OSM OSM matrix programming .................................................................................................................................................. 23
SPECIFICATIONS................................................................................................................................................................ 23
POWER SUPPLY SPECIFICATIONS.................................................................................................................................. 23
The manufacturer assumes no responsability for possible damages resulting from an improper use of the devices
mentioned in this manual; moreover he reserves the right to change the contents of the present manual without notice.
The documentation contained in this manual has been gathered and examined with great care; nevertheless the
manufacturer can not assume any responsability resulting from the use of such documentation. The same is valid for
any other person or society involved in the creation and in the production of the present manual.
Page 2
KEYPLUS9702
Introduction
Packing contents
• 1 KEYPLUS keyboard
• 1 external power supply
• 2 phone cables 6/6 - Lenght approx.150 cm.
• 2 junction box RJ jack
• 1 istruction manual
On delivery, please make sure that the packaging does not present damages or evident signs of falls or scratches. In
case of evident damages, contact immediately the supplier.
Please, make sure that the contents correspond to the components list mentioned above.
Contents of this manual
This manual contains the description of the KEYPLUS keyboard, with the relevant installation, configuration and use
procedures. Before installing and using the keyboard please read carefully the present manual, in particular the
section concerning the safety rules.
Who is this manual addressed to?
The several sections of the present manual are aimed to satisfy two different operative requirements: the one of the
installer and the one of the operator.
Installer: an adequately competent technician, able to install the security plant and to verify its functioning.
The installer is acquainted with the technical knowledge which is necessary to install, connect and configure the plant.
Only the installer can carry out the operations described in this manual in the section reserved for the “Technical
personnel”.
Operator: the final user, able to operate the control keyboard in order to define the operating mode of the whole
system. Multiuser systems can consist of a maximum of 4 operators controlling simultaneously all available units (video
inputs, monitors, etc.).
What to read
The installation procedures, prevalently addressed to the installer, are described from page 7.
The procedures concerning the keyboard use, the direct switching and the programming of the controlled video
system, prevalently addressed to the operator, are described from page 16.
Typographical conventions
The following section illustrates the meaning of the graphic symbols used in the present manual:
Risk of electric shock; before proceeding with the operations, if not otherwise stated, disconnect the unit.
Please read carefully the procedure or the information indicated and carry it out according to the prescribed
specifications. An inaccurate execution of the procedure can cause the wrong functioning or the damage of the system.
Description of the system features; we recommend to read carefully the sections marked with this symbol in
order to understand the system functioning.
Page 3
KEYPLUS9702
Safety rules
KEYPLUS keyboard complies with the rules in force at the time of publication of the present manual as regards
electric safety, electromagnetic compatibility and the other general requirements.
Nevertheless we would like to assure the users (installer and operator) illustrating some measures to be adopted in
order to guarantee the maximum safety:
• Connect the unit to a power supply corresponding to the one indicated on the rating plate (see next section
Operating data on the rating plate)
• The installation of the unit (and of the whole plant of which this unit is part) must be carried out by adequately skilled
technical personnel
• For the after-sales service, please contact exclusively the authorized technical personnel
• Never open the unit
• The warranty limits does not cover damages resulting from an improper use of the unit
• Outlet must be adequately grounded according to the rules in force
• Do not pull out the plug by tugging the cord
• Before moving or carrying out technical operations on the unit, disconnect it from power supply: the unit is
considered off-line only when the power supply is disconnected and the cables aimed to connect the unit with other
devices have been removed
• Do not use worn or damaged extension cables, since they represent a serious risk for the user’s safety
• Do not wet the unit and do not touch it with wet hands
• Do not expose the unit to atmospheric agents
• Do not use the device in areas containing inflammable substances
• Do not allow children or unskilled persons to use the unit
• Make sure that the unit is located on a solid and sufficiently large support.
Keep the present manual with care for any future consultation.
Operating data on rating plate
On the back of KEYPLUS there are two labels.
The first plate shows model identification code (Bar code EXT3/9).
The second plate shows the model serial number (Bar code EXT3/9).
On the external power supply a plate shows the electrical specifications.
When installing the appliance, check that the power supply specifications of the keyboard correspond to those
required. The use of improper appliances may seriously compromise the safety of the personnel and the installation.
Page 4
KEYPLUS9702
KEYPLUS description
KEYPLUS keyboard is a professional product for security and safety applications. In a security system the
keyboard controls the video matrix SW164OSM and all alarm conditions.
Specifications:
• Display LCD 16 digits X 2 rows for the control of the operations
• RS232 or Current Loop communication mode
• Warning LED activation in case of alarm or communication fault
• Buzzer activation in case of alarm or communication fault
• Variable baud rate for data transmission systems (SW164OSM matrix and DTRX receiver)
• Ease of use: most common functions can be activated by pressing a few buttons
• Full keyboard configuration by on-display setup
• Communication mode selectable from display (RS232 / Current Loop)
• The keyboard is able to control both versions of SW164 matrix (Standard and On Screen Menu)
• Different menu languages on-board
• Test menu for the communications towards the matrix
• Autotest for the communication channels
• Enabling/disabling of inputs and outputs selectable for each single keyboard
• Three password levels: connection, alarm reset, setup
Security
System security is guaranteed by a three-level password system. Each password can be easily configured in any
keyboard:
• connection password: requested to prevent access by unauthorized personnel, when the keyboard is turned on
• alarm reset password: requested when a keyboard calls an “alarm reset” operation
• setup password: requested each time a setup operation has begun (by keyboard or matrix)
Password management
If it is necessary to key in a password, in order to unlock the keyboard wait-state, the unit will wait for 10 seconds in
order to permit the operator to press the first digit (from 0 to 9) and 5 seconds for the following ones. At the end of
such waiting time, if the password has not been completely keyed in, the operation is considered “wrong”.
• A mistake in typing the connection password causes a keyboard lockout for 25 secs; after this time the prompt of
request will appear again.
• Passwords can be disabled if their value is set to 000000.
Warning LED and buzzer
Keyboard is provided with two warning LED’s, which blink automatically in case of:
• interruption of the communication between keyboard and matrix (between the effective interrumption of the
communications and the blinking of the led there is a brief delay, during which the keyboard tries to restore the
connection with the matrix)
• matrix alarm.
Internal buzzer can be set to advise you when the fault is still up.
Devices connectable to KEYPLUS keyboard
• Video Matrix SW164OSM: it lets 16 video inputs switching on 4 monitor outputs, handling up to 16 alarm signals. A
single video matrix can be connected to a maximum of 4 control keyboards (mixed configurations DCS2 /
KEYPLUS are permitted). Please, refer to SW164OSM instruction manual for a complete description of the matrix.
Page 5
KEYPLUS9702
Installation example
This is an example of a system controlled by three operators with a monitor for each one: they are controlling video
switching and alarm signals. Two of them are also controlling a group of receivers for P&T and lens motors:
PTH
PTH
DTRX
DTRX
LIST OF DEVICES
PTH
DTRX
SW164OSM
SW16.4
DCMX
DCMX
DCS2
DCS2
COMFAULT
DCS2
DCS2
PRESET
SCAN
AUX 1
AUX 2
AUX3
AUX4
2
3
4
5
7
8
9
0
AUX2
AUX4
COM FAULT
M/A
ALARM
PROG
WIPER
CLEAR
ENTER
AUX1
PROG
WIPER
1
6
AUX3
M/A
ALARM
PROG
-/ --
KEYPLUS
KEYPLUS
PRESET SCAN
COM FAULT
M/A
ALARM
Controlling keyboards:
• 1 keyboard KEYPLUS
• 2 keyboards DCS2
Video signals handling:
• 1 matrix SW164OSM
• 3 monitors (max 4)
• 3 cameras (max 16)
Telemetry data signal handling:
• 3 receivers DTRX
• 3 P&T motors
• 1 digital multiplexer DCMX
USER
IN
OPEN
NEAR
OUT
CLOSE
FAR
- /- -
1
2
3
4
5
6
7
8
9
0
CLEAR
ENTER
USER
IN
OPEN
NEAR
OUT
CLOSE
FAR
-/ --
1
2
3
4
5
6
7
8
9
0
CLEAR
ENTER
Wires
In the above diagram we have used wires of different types :
video cable:
Coax cable RG 59 or equivalent.
For long distances we suggest a twisted pair communication system.
multipolar cable:
Each control function is enabled /disabled by an internal relay.
Use following indications to establish the number of wires into multipolar cables:
• 7 wires aimed to handle P&T (230 V~ or 24V~): right, left, up, down, autopan, common, ground (only 230 V~
version)
• 6 wires for lenses handling, polarity inversion mode (zoom wide, zoom tele, focus near, focus, far, iris open, iris
close)
• 4 wires for lenses handling, common wire mode (zoom, focus, iris, common)
• 2 wires for preset handling and 1 more for each preset function. For auxiliary functions as wiper and washer 2
wires each are necessary. For further information please refer to DTRX instruction manual.
cable for digital data transmission:
Two pair of twisted pair wires, minimun diameter 0.6mm (or section 0.22 mm² AWG 24):
one pair for TX / Ground plus one pair for RX / Ground.
Maximun connection distance: approximately 15mt (RS232) and 1500mt (Current Loop).
Lenght of phone cable supplied is about 1.5 m: to reach bigger distances please use junction boxes as RJ,
following the procedure described in chapter Installation, Wires and plugs (page 8).
Page 6
KEYPLUS9702
Installation
Before carrying out the following operations, if not otherwise stated, always disconnect the unit from the
power supply!
Installation process must be carried out only by qualified personnel!
Opening package
If the package does not present evident defects, please control the contents of the box, following the list shown in
chapter Introduction, Contents of the package (page 3).
Packing material has to be disposed by the installer following waste disposal procedures operative in the Country of
use.
Checking keyboard operating data
Before proceeding with the installation, please check keyboard operating data label, as described in Operating
data on rating plate (page 4). Modifications of the units, if not described in this manual, are not allowed: the use of
unsuitable devices can lead to serious risk for the safety of the personnel and the security of the plant.
Turning On and Off the keyboard
Before connecting the unit to power supply:
• Check if the goods supplied correspond to the required specifications examining the rating plates according to the
chapter Operating data on rating plate.
• Make sure that the keyboard and the other elements of the plant are closed in order to avoid an accidental contact
with powered parts
• During configuration process, the cable between the keyboard and the matrix is not necessary, with the exception of
the connection test. Please, keep it disconnect until it is explicitly required.
• The keyboard and the other components of the plant must be located on a solid and sufficiently large support.
• Power cords must not hamper the normal operations of the installer
• Check if power supply sources and extension cables are compatible with system consumption.
TURNING ON: plug Mini Dini 4 poles connector in the rear of the keyboard. The keyboard has no switch; plug
it into the outlet.
TURNING OFF: pull out the plug from power network.
Page 7
KEYPLUS9702
Plugs and connections
KEYPLUS keyboard is fitted with RJ11 connector located at the rear and Mini Din 4 poles connector.
Model code
RJ11connector (video switcher)
Mini Din 4 poles
Serial number
Data Transmission to video matrix is made contemporary by RS232 and Current Loop.
Receiving mode is selectable during the configuration of the keyboard. KEYPLUS keyboard and video matrix
SW164OSM can be connected directly with a phone cable supplied by the manufacturer, for the first test of devices:
SW16 4
KEYPLUS
KEYPLUS
COM FA ULT
M/A
AL ARM
PROG
- /- -
1
2
3
4
5
CL EAR
6
7
8
9
0
ENTER
Using twisted pair cable on long distances, connect wires to Rj jack boxes, supplied by the manufacturer, according to
the following tables:
Connection between KEYPLUS - video matrix SW164OSM
Current Loop connection: max 1500 mt
SW164OSM
SW16/4
KEYPLUS
SW164OSM
TX CL Yellow ------------------------ Black RX CL
GND CL Red --------------------- Green GND CL
RX CL White--------------------------- Blue TX CL
RS232 connection: max 15 mt
KEYPLUS
SW164OSM
TX RS232 Black ------------- Yellow RX RS232
GND RS232 Green ---------- Red GND RS232
RX RS232 Light Blue -------- White TX RS232
Page 8
KEYPLUS
KEYPLUS
max 1500 m
Current Loop
COM FAULT
M/A
ALARM
PROG
-/ - -
1
2
3
4
5
6
7
8
9
0
CLEAR
ENTER
KEYPLUS9702
Keyboard configuration notes
Configuration process is very important to get best performances from the keyboard.
Setting must be carried out only during the installation phase by qualified personnel. Configuration settings will be keep
into keyboard RAM also without power supply connected.
We recommend proceeding with the configuration of the parameters in a systematic way in order to avoid installation
troubles. Some menus are automatically disabled if previous conditions are not satisfied and, in this case, it is not
possible to modify their content.
Configurable parameters are:
• Local keyboard language
• Release of the matrix connected (“standard” or “OSM”; if “standard” , the operator identification number is
subsequently required)
• Data serial communication mode: RS232 or Current Loop
• Password management (connection, reset alarm and programming)
• Choosing of inputs and outputs under the control of each keyboard
• Buzzer, in case of alarm or communication fault between keyboard and video matrix.
Besides, two menus are available in order to perform communication tests.
It’s not necessary to connect the keyboard to the matrix during the configuration: this connection has to be made only if
a communication test is performed.
For a complete configuration, we suggest to proceed following the order of shown menus, beginning from menu
no.1.Language to menu no. 8.Buzzer.
Configuration procedure
Configuration process must be carried out only by qualified personnel: wrong parameters could cause the
isolation of the keyboard from the rest of the system.
The configuration of the keyboard is controlled by means of a menu system displayed on the screen. The keys used to
move among the menu are the following:
P
U
D
E
C
to begin configuration
selection menu/field
selection next menu/field
to enter the selected menu or confirm a value
to return to the previous menu
Page 9
KEYPLUS9702
Menu list
Complete keyboard configuration is reassumed in the following table.
Take care to avoid miscomprehension in changing parameters.
* :critical parameters, which can prevent the connection between video matrix and keyboard if wrongly set.
Menu
Meaning
Selectable values
1.Language
Menu language
english (default),
italian, french,
german, spanish
2.Matrix setup *
2.1 Type *
Connected matrix features
Type of video matrix
2.2 Communications *
Communication mode
2.3 Baudrate *
Baudrate (only for OSM matrix).
3. <not used>
4. Communication channel test
4.1 Matrix Channel
4.2 Automatic Matrix Channel
5. Enablings
5.1 Inputs
5.2 Outputs
5.3 Keys (Up/Down)
5.4 Other parameters
6. Password *
6.1 Connection Password *
6.2 Alarm Reset Password
6.3 Setup Password *
7. Operator identification number
8. Buzzer
Connection test procedures
Connection matrix test
Automatic connection matrix test, by using RJ
junction box
Enabled inputs, outputs, and up/down keys:
user-defined
Every input can be enabled/disabled: disabled
inputs are not selectable directly from the
keyboard; they are visible only in case of alarm
or if included in switching cycles.
Selection of available outputs for video
switching.
Key locking is used when an operator isn’t
allowed to manage completely keyboard
function because of securecy reason.
Click: when enabled, a sound confirms the
pressed key. Messages: when enabled, error
and warning messages are shown.
Password management.
NB: passwords are private for each operator:
they can be different in each single keyboard.
Requested when the keyboard is powered up
to avoid the use by unauthorized personnel.
Requested when an alarm condition is going to
be reset.
Requested when configuring the keyboard or
the matrix.
If the controlled matrix is SW164OSM
Standard, it is necessary to identify all 4
operators
by a different identification number each.
Buzzer can be activated on alarm condition or
communication fault.
Page 10
SW164
Standard (default) or
OSM
RS232 (default) /
Current Loop
300, 1200, 2400,
9600 (default) baud
Default: all inputs are
enabled
Default: all outputs
are available.
Default: all keys are
enabled
Default: disabled
(000000)
Default: disabled
(000000)
Default: disabled
(000000)
Default:
operator no. 1.
Default: enabled only
in case of alarm.
KEYPLUS9702
Changing configuration parameters
To change parameters follow the next steps:
• get into configuration
• choose a menu; get into it
• choose the wished option value among the available ones
• exit from menu
• repeat the previous phase for each parameter
• exit from programming mode.
Example: to change enabled outputs, selectable from the keyboard.
To begin programming mode
Display
P
Switch on the keyboard. Press
for 5 seconds, until the leds begin to flash. If
necessary, insert the setup password.
CONFIGURATION
--- KEYBOARD ---
To choose a menu and to change parameters
Display
Menu is shown on two rows:
KEYBOARD MENU:
1.Language
• menu title (in this case KEYBOARD MENU)
• list of available submenus
Pressing
U and D select the menu (Enabled par.)
E
Recall the submenu Enabled par. by pressing
, choose which group of
parameters you want to set (inputs, outputs, keys, etc.).
To carry on with the example, by
by
E.
D choose the submenu Outputs and recall it
To configure enabled outputs, choose each of them and define it selectable or not
selectable:
• choose the output number by pressing
• press
KEYBOARD MENU:
5.Enabled par.
ENABLED PAR. 5.
Inputs
ENABLED PAR. 5.
Outputs
ENABLED OUTS 5.2
Output 1: YES ¤£
U and D
E to enable / disable it
Parameters are automatically saved exiting from the menu
ENABLED OUTS 5.2
Output 3: NO ¤¢
ENABLED PAR. 5.
Outputs
C to go back to the previous menu.
Return to main menu by pressing C.
KEYBOARD MENU
5.Enabled par.
To exit programming mode
Display
At the end of programming the keyboard confirms the saving of the set
parameters and restores the normal functioning.
KEYBOARD MENU
Exit setup
You can exit from main menu in two different ways:
• by pressing
C
• by choosing Exit Setup, and confirming by
E.
Page 11
KEYPLUS9702
Keyboard language
Keyboard provides the national language. During setup this language can be choosen.
When a local language is selected on keyboard, matrix local language remains unchanged.
Changing keyboard language
Description
Keys
Display
From main menu choose submenu Language
E
E
C
KEYBOARD MENU:
1.Language
£
E to select the language;
C to confirm and exit.
LANGUAGE
English
¢
Matrix configuration
KEYPLUS keyboard can control both matrixs: SW164 Standard and SW164OSM .
Matrix configuration menu has three submenus:
• type of connected matrix
• communication mode between keyboard and matrix
• baudrate (only for SW164OSM matrix).
Matrix configuration
Description
Keys
Display
From main menu choose submenu Matrix Setup
DE
E
E
C
DE
E
C
KEYBOARD MENU:
2.Setup matrix ¢
MATRIX COM.
RS232
2.2
£
DE
E
C
MATRIX SETUP
Baudrate
2.
¡
C
KEYBOARD MENU:
2.Setup matrix ¢
1) To select type of controlled matrix
E to change matrix type (Standard or OSM version)
C to confirm and exit
2) To select Communication Mode
E to change mode (RS232 or Current Loop)
C to confirm and exit
3) To select Baudrate speed (only for SW164OSM
OSM matrix)
E to change baudrate
C to confirm and exit
C to go back to main menu
Page 12
MATRIX SETUP
Type
2.
£
MATRIX TYPE
Standard
2.1
¤
MATRIX SETUP 2.
Communications ¡
BAUDRATE COM 2.3
9600 baud
¤
KEYPLUS9702
Communication channels test
Keyboard provides tests for communication channels aimed to test and verify the reliability of the installed system.
• Test of communication with video matrix: connect directly the keyboard to the video matrix SW164OSM. The test
process verifies polling calls (STD matrix) or a particular test message (OSM matrix), to check the bi-directional
communication between the devices. WARNING: you must configure the type of video matrix connected (submenu
2.1) and the communication mode (submenu 2.2). All problems will be displayed on the screen.
• Communication channel AutoTest: without the connection with the video matrix, a suitable Test Plug and the
keyboard, which will send and receive the relevant commands, will perform a special autotest. The Autotest will test
both communication mode (RS232 and Current Loop) at the same time. All problems will be displayed on the
screen.
Communications test
Description
Keys
Display
From main menu select Communications Test
submenu
DE
[D] E
E
KEYBOARD MENU:
4.Com Test
¢
Select the desired test (test with connection to the
matrix or autotest)
E
Begin test by pressing
.
Test time is about 10 seconds long.
COM TEST
Matrix
£
4.
MATRIX CHANNEL
[¤] to start
TEST STD 232 RX (*)
test succesful
Check if any message appears on display.
For troubleshooting please refer to chapter
Troubleshooting.
(*) Notes: in case of connection with video matrix, the display will show the current configuration of the system:
Test STD 232 RX
STD (connection with standard matrix) / OSM (connection with OSM matrix)
232 (testing RS232 communication) / CL (testing Current Loop communication)
RX (test of receiving) / TX (test of transmission)
CABLE FOR AUTOTEST
Connect wires:
white with yellow
blue with black
COM FAULT
M/A
ALARM
P ROG
-/--
1
2
3
4
5
CLEAR
6
7
8
9
0
E NTER
Page 13
KEYPLUS9702
Enabling input and output selection and keys
Each user can virtually select each of 16 inputs, and switch it on all 4 monitors. In order to avoid the use of passwords
and to limit, in the meantime, the selection of certain inputs or video outlets, it is necessary to define the set of
selectable inputs and outputs for each user by configuring the lists in Enabled par. menus.
If the set of inputs is not complete (a user has limited access to video inputs), disable Up/Down
keys for that user, which otherwise allow to recall the inputs without using the numeric keyboard.
U D function
Enabling inputs and outputs
Descriptions
Keys
Display
From the main menu select the submenu Enabled
par.
KEYBOARD MENU:
5.Enabled par. ¢
1) Enter Inputs menu
DE
E
U / D to select input number
3) E to enable / to disable ; C to save and exit
UD
EC
ENABLED INPUTS
5.1 Input 1 : Yes £
Enabling selectable outputs
1) Enter Outputs menu
DE
ENABLED PAR. 5.
Outputs
¢
U / D To select the outputs
E to enable / to disable; C to save and exit
UD
EC
ENABLED OUTS 5.2
Output 1:Yes ¤£
DE
ENABLED PAR. 5.
Up/Down keys ¡
Enabling selectable inputs
2)
2)
If some inputs are not selectable, disable up/down
function:
ENABLED PAR. 5.
Inputs
£
1) Enter Up/Down keys menu
E to enable/disable up/down keys
3) C save and exit
2)
E
C
ENABLED KEYS 5.3
Up/Down: Yes ¤
Password setup
KEYPLUS three-level password system is described in chapter KEYPLUS description, Security.
Changing passwords
Description
Keys
Display
From the main menu select the submenu Pwd
change
DE
E
[0 / 9]
1/0
KEYBOARD MENU
6.Pwd change ¢
1) Select the Connection password:
Type in the new Connection password (6 digits); when
required, retype it.
Save changes, when a prompt is displayed.
Possible messages displayed on the screen warn if
different values have been entered or if the password
has been set to 000000.
PWD CHANGE: 6.
Connection £
CONNECT. PWD 6.1
[****..]
Save changes?
[1] Yes [0] No
2) Select the Alarm reset password and proceed
as described above
PWD CHANGE: 6.
Reset allarme ¢
3) Select the Setup password and proceed as
described above
PWD CHANGE: 6.
Setup
¡
Page 14
KEYPLUS9702
Operator identification
When a KEYPLUS is controlling a Standard SW164 matrix, it’s necessary to identify each single user with a different
identification number. If more users are using the same identification number, communication problems can arise.
Operator identification (only for SW164 Standard matrix)
Description
Keys
Display
Select User number menu
DE
E
C
KEYBOARD MENU
7.user number. ¢
Select Operator number by pressing
Save and exit with
E.
C.
User number. 7.
User #1 ¤
Keyboard Buzzer
The keyboard is fitted with an internal buzzer that
communication fault (communication interruption).
can be automatically activated on alarm or in case of
Buzzer selection
Description
Keys
Display
Select Buzzer menu
DE
E
KEYBOARD MENU
8.Buzzer
¢
Select Buzzer mode by using
E:
BUZZER
8.
On alarm ¤
• buzzer not used
• buzzer active on communication fault
• buzzer active on alarm
• buzzer active on alarm and communication fault
C to save and exit.
Page 15
KEYPLUS9702
Keys
COM FAULT
M/A
ALARM
PROG
-/--
1
2
3
4
5
6
7
8
9
0
CLEAR
ENTER
The SW164OSM keyboard allows to control the SW164OSM video matrix.
Numerical Keys
Shift
0 / 9: used to select inputs
s: it’s used to select an input from 10 to 16. After pressing Shift, choose the second digit of the desired number:
i.e.
s3 to select input number 13.
m: to choose the monitor to be switched on
Up / Down B / D: selection of next or previus video inputs on active monitor
Prog P: to enter in programming mode (a password can be required).
Clear C: with the SW164OSM it carries out a screen refresh. It is not used with SW164 Standard.
Monitor
Input and output selections
Active monitor selection
m
Monitor
prepares the keying in of the monitor number.
Each keyboard can control up to 4 monitors, but only one can be used at a time as active monitor for switching
operations.
Selectable monitors can be configured during the keyboard setup.
Pressing this key, the symbol ? will appear indicating the necessity to key in the monitor number (from 1 to 4).
Selecting a disabled monitor an acoustic message will follow.
Example: select monitor 2 as active monitor
Current input
Keys
New input
MONITOR 1
INPUT 3
m2
MONITOR 2
INPUT -
Input selection
0/9: They are used to select directly a video input from 1 to 9.
To select video input from 10 to 16, press s and the second digit of the number: for example, s 3 to select input
number 13. Input 10 can be selected even pressing the key 0.
Up / Down B/ D: To select the previous or next input of the one shown on the monitor.
Automatic/ Manual M selection of automatic switching cycle, matrix-defined for each user.
Keys
Page 16
KEYPLUS9702
Matrix configuration
The KEYPLUS keyboard allows to control the two versions of the SW164 matrix: Standard and OSM.
As far as the Standard matrix is concerned, the programming is limited to the basic parameters displayed on the
screen; on the contrary, the whole programming phase of the OSM matrix is carried out by means of the video and is
displayed on the monitor number 1.
SW164 Standard matrix Setup
Matrix standard setup defines:
• automatic switching sequences
• ID texts
• time and date parameters.
To begin SW164 Standard setup procedure
Description
Press
Keys
P to enter in programming mode;
P
Display
-CONFIGURATIONSETUP
type setup password, if required.
Sequence cycles
SW164OSM video matrix switches on different sequences during day and night periods. Each monitor has its own
sequences (“day” sequence and “night” sequence): a sequence is defined as a set of a maximum of 16 steps,
identifying an input to be shown (1 to 16), and a dwell time (from 0 to 99 seconds). In each sequence, the same input
can be repeated without limitations.
Sequence definition
Description
Keys
Display
U and D to select Sequences menu
Press E to get into the menu
Select the sequence by using U and D , and confirm
UD
E
[U D] E
MATRIX SETUP
1.Sequences £
Type
1 to delete the old sequence and introduce the
new one, or type 0 to modify the old one.
1/0
User #1, Day seq.
[A] In:05 Sec.02
The first row indicates the sequence (Day sequence of
operator no.1, in the example); the second row indicates
the input to be displayed and the duration of the display.
[
U D] E
User #1, Day seq.
[C] In:__ Sec.02
12E
3E
User #1, Day seq
[C] In:12 Sec.__
Press
the choice.
SEQUENCES 1.
User #1,Day £
Erase old setup?
[1] Yes [0] No
[C] is the step to be modified (the 16 steps are indicated
with the letters: from [A], the first, to [P], the last);
select the steps to be modified by pressing
U/D.
Request the modification of current step by pressing Enter
Type in the input number, and press
Type in dwell time and press
E to confirm.
E to confirm.
Page 17
User #1, Day seq
[C] In:12 Sec.03
KEYPLUS9702
Description
Keys
Display
Select all the steps and modify them according to the
procedure described: all the disabled ones have dwell
time value set to 0 seconds.
C
Save changes?
[1] Yes [0] No
1/0
C
SEQUENCE 1.
User #1,Day £
Press
C to exit.
Save changes, and modify each desired sequence
according to the procedure described above.
Exit from the main menu pressing
C.
MATRIX SETUP
1.Sequence £
To modify identification texts
The SW164 Std Matrix can identify each single video input with a text of max 24 characters, used respectively
during the normal sequence and in case of alarm.
Text definitions
Description
Keys
Display
Select ID text from the menu using
UD
MATRIX SETUP
2. ID Texts
E
TEXT CHANGES 2.
ID Text
£
U/D, confirm with P
[
U D] E
ID TEXT. 2.1
Change text # __
Select the number of the text to be modified;
3E
Erase old setup?
[1] Yes [0] No
1 to delete and type the new text
0 to modify the existing text
C to delete the last character of the text
1/0
T03:¥N ENTRANCE_
[A]¢ ¤ Clr Prg
[
UD C E]
T03:MAIN ENTRA_
[C]¢ ¤ Clr Prg
P
Save changes?
[1] Yes [0] No
C
MATRIX SETUP
2.ID Texts
¢
U and D.
Get into the menu by pressing
E
Select alarm or normal text modification using
¢
The current character is displayed on the left: [C].
E.
To change it press U or D.
To add it to the text press
When the change is complete, confirm the exit with
P
Save and eventually proceed with the modification of
the other Identification Texts following the above
instructions
Exit from the main menu pressing
C
C
Page 18
KEYPLUS9702
To modify Time / Date parameters
Time and Date parameters are useful to define the start and the end of the day sequence (and conversely of the night
one) in the SW164OSM matrix.
Attention: wrong time/data parameters can cause apparent misbehaviours in matrix switching cycles!
A day of the week (from Monday to Sunday) can be defined as workday, halfday or holiday: this is made, on matrix
SW164OSM, using a Personal Computer Setup Program.
On holiday the night sequences are performed around the clock, and the “day” one is ignored.
It’s possible to define different start and end times for both workday and halfday.
The use of such day “types” has to be intended, for example, configuring the day sequence as the set of inputs to see
when people is working in a building, and the night one when they are off duty.
Time and Date parameters:
- Actual date
- Actual time
- Start time of day sequences on workdays
- End time of day sequences on workdays
- Start time of day sequences on halfdays
- End time of day sequences on halfdays.
The loading from the matrix and the saving of the changes introduced in date/time parameters are carried out when
the operator gets into or exits from the menu.
Time and date parameters
Description
Select Date/Time menu by pressing
U and D
E; wait till previous values are
Select menu using
loaded from matrix.
Type
E to change the actual date.
Keys
Display
UD
E
MATRIX SETUP
3.Date/Time ¢
E
ACTUAL DATE 3.1
95/11/01
96E
01E
02E
C [ U] D E
ACTUAL DATE 3.1
Thu 96/01/02
DATE/TIME 3.
Change date £
Date format: Year / Month / Day.
Type the new date
C to exit and get again in the Date/Time menu
Select Change time with D and press E, then
Press
ACTUAL TIME 3.2
12:00
modify the time according to the procedure described.
Press
C to exit and get again in the Date/Time menu C
Page 19
DATE/TIME 3.
Change time £
KEYPLUS9702
The same procedure can be used in order to modify all four start/end times of the day sequence.
Each pressing of the key changes the shown value of 10 minutes; by pressing the key more than 1 second the value
changes quickly of 30 minutes.
Note: a wrong start/end of the day sequence can give rise to anomalies in the sequence cycles displayed on the
screen.
List of abbreviations:
Wrkday start.: Start time of day sequance on workdays
Wrkday end.: End time of day sequence on workdays
Hlfday start: Start time of day sequence on halfdays
Hlfday end.: End time of day sequence on halfdays
If night sequence is not required set start time to 00:00, and end time to 23:59
To modify Start/end time of day sequence
Description
Select the time to be modified by pressing
Get into the menu by pressing
Press
U and D
E
U D to modify the time
Keys
Display
UD
E
UD
DATE/TIME
3.
Workday start. £
WRKDAY START. 3.3
¢ 07:00 Clr
C
DATE/TIME
3.
Iniz.diur.lav. £
C
C
[D] E
MATRIX SETUP
3.Date/Time ¢
WRKDAY START. 3.3
¢ 06:00 Clr
By pressing the key more than 1 second the value
changes quickly.
Exit from the menu by pressing
saving operation
Get back to main menu with
C, and confirm the
C
C, or
and confirm with E
Exit from matrix programming mode by pressing
choosing the voice Setup end
MATRIX SETUP
Setup end. ¡
Programming of the SW164OSM matrix On Screen Menu
To program the Matrix SW164OSM read the respective operating instructions carefully.
Page 20
KEYPLUS9702
Maintenance
The KEYPLUS keyboard does not require special maintenance operations.
We recommend placing it on a solid base, with the power cords and the connecting cables positioned such as they are
not likely to hamper the operator.
Before performing any cleaning operations, make sure that unit is switched off. At regular intervals clean the
keyboard with a dry cotton cloth avoiding the use of detergent or wet clothes.
Resolving installation problems
Although the KEYPLUS keyboard is characterized by a great ease of use, sometimes troubles may occur, especially
during the installation and configuration phases or using the unit.
Problem
The unit is on but the display does not show
any writing, LEDs do not blink
The connection with the matrix does not work
Possible cause
No power supplied to the unit
Remedy
Check the power cord
Wrong power supply
Check the operating data on the
rating plates
Check if the keyboard and the matrix
are both configured in RS232 or
Current Loop
Isolate the problem following the test
procedure described below
The configuration of the
matrix is different from the
one of the keyboard
The
connecting
cable
between the matrix and the
keyboard is cut off
Keyboard/matrix connection test
The keyboard transmits contemporarily in RS232 and Current Loop: during the test phase, control if possible error
messages refer to the RS232 mode or the Current Loop mode.
In order to identify the causes of the unsuccessful communication between the keyboard and the matrix, we
recommend proceeding with the following tests:
• communication test exclusively on the KEYPLUS keyboard (autotest)
• test of the direct connection between the keyboard and the matrix
• test of the sections of the connecting cable
Autotest of the KEYPLUS keyboard
• isolate the keyboard from the system
• connect the telephone cable and the Rj jack box fitted with jumpers according to the connections described in
chapter Keyboard configuration, Communication test at page 13.
• Carry out the automatic test according to the procedure described at page 13.
If the test is unsuccessful (the message Failed Test is displayed on the screen!):
• control the jumpers on the Rj jack box
• replace the telephone cable.
Repeat the test: if the problem persists, the transmission/reception channel of the keyboard is probably damaged.
Please contact the supplier.
If the autotest confirms the good functioning of the keyboard (message Successfull test), control the other telephone
cable, replacing it with the one previously used.
Page 21
KEYPLUS9702
Control the direct connection between the keyboard and the matrix:
• connect the keyboard and the matrix by means of a telephone cable
• check the following configurations:
• in the matrix: jumpers for the selection of the communication mode
• in the keyboard setup: type of controlled matrix, reception mode, connection speed (if the operator thinks that
the connection speed has been modified during the SW164OSM matrix setup, it is necessary to proceed
attempting the several possibilities offered by the keyboard setup)
• carry out the test of the matrix channel (not the automatic test)
If the test is unsuccessful, control the configurations; as far as the SW164OSM matrix is concerned, modify the
communication speed of the keyboard (with the setup procedure)
If the problem is still there, matrix communications are probably faulty. Please contact the supplier.
If the test is successful the problem concerns the connecting cables: control the connections with the Rj jack boxes
according to the diagramm at page 8.
If the connection problems persist, please contact the supplier.
Resolving configuration problems
Video switching problems
Problem
Possible cause
Remedy
During the setup phase a If necessary, enable other monitors
After having pressed the key
in order to single monitor has been using the Enabling, menu, Outputs
modify the active output, there are no possibilities configured.
to change it: the display is fixed.
Only 5 inputs have been enabled, but it is possible The function keys have not
Disable the function keys in the
been disabled.
Enabling menu, Up/down keys
to see even the other by pressing
and
Is not possible to select an input higher than 10, The input number has not
Press
followed by the digit of
even if all the inputs have been correctly been correctly indicated
units.
configured as “selectable”.
m
U
D
s
s3: input 13.
The keys $ and ( are used as
Example:
U
The keys
and
have been enabled.
D do not work, even if they
The operator is using the
$ and ( instead of
U and D.
keys
The Up/Down functions have been correctly Active inputs have not been
enabled but black screens are recalled or some correctly defined during the
OSM matrix setup; even if
inputs are skipped.
the signal is absent, the
Standard matrix shows all 16
video inputs.
Page 22
arrow keys only inside the matrix
configuration menus.
During the OSM matrix setup,
define the available video signals (
menu 4. System parameters, 4.1
Active inputs).
As far as the standard matrix is
concerned, it is not possible to
modify the setting of the Up/Down
function.
KEYPLUS9702
Password management
Problem
Possible cause
The operator wants to prevent unauthorized During the setup phase, the
connection password has
personnel from having access to the keyboard.
been disabled.
The passwords of the keyboards are different, The passwords are “local”
stored
into
the
even if they are all connected to the same matrix. and
keyboard.
The passwords of a
keyboard have been forgotten or lost.
The operator wants to disable a password.
-
Remedy
During the setup phase, set the
connection password to a different
value from 000000.
Set (if necessary) the same
passwords for all keyboards.
Please contact the supplier
Set it to 000000. Note: for safety
reasons, we recommend setting at
least the setup password.
SW164OSM Standard matrix programming
Problem
Possible cause
The preset sequence cycles do not work as Wrong
setting
of
the
time/date parameters: the
expected.
matrix is showing the night
sequence.
The time/date parameters have been set Some days of the week have
correctly but the matrix always shows the night been defined as holidays
during the matrix setup by
sequence.
means
of
Personal
Computer.
Remedy
Check if the set time and the
start/end of the day sequence have
been set correctly.
Redefine all days of the week as
working days during the setup by
means of PC; for further information
please contact the supplier.
SW164OSM matrix programming
Alarms
Problem
After having configured the alarms, the matrix
exits from the programming mode and gives
immediately an alarm signal even if no alarm
contact has been activated.
Closing a contact, the relevant alarm does not
activate.
The alarm ceases automatically without the
intervention of the operator.
Possible cause
During the matrix setup,
some alarm contacts have
been defined as Normally
Closed.
The contact has been
defined as Not Used
The time reset has been
activated or the alarm
signals have been defined
as “Continuous signals”
Remedy
Close the contact (short the
contact by means of the alarm
common wire) or define it as
Normally Open.
Activate the contact as Normally
Open or Closed
Set the correct reset options.
Other options
Problem
Possible cause
Remedy
The text on the menu output is considerably The NTSC video system has In the menu 4. System parameters
been set.
set the PAL video system.
shifted upwards.
Specifications
Dimensions:
Weight:
190 x 55 x 185 mm
980 g
Power supply specifications
Input voltage:
Output voltages:
Connector:
230V~ 50Hz 30VA
9V~ 50HZ 8VA
14V~ 50HZ 8VA
Mini Din 4 poli
pin 1-3: 9V~
pin 2-4: 14V~
Page 23
KEYPLUS9702
MANUEL
D’INSTRUCTIONS
INDEX
INDEX..................................................................................................................................................................................... 1
INTRODUCTION .................................................................................................................................................................... 3
Contenu de l’emballage............................................................................................................................................................................. 3
Contenu du Manuel d’Emploi .................................................................................................................................................................... 3
Destinataire du Manuel d’Emploi............................................................................................................................................................... 3
Ce qu’on doit lire ....................................................................................................................................................................................... 3
Conventions typographiques ..................................................................................................................................................................... 3
NORMES DE SÉCURITÉ....................................................................................................................................................... 4
CARACTÉRISTIQUES TECHNIQUES .................................................................................................................................. 4
DESCRIPTION DU PUPITRE KEYPLUS .............................................................................................................................. 5
Sécurité ..................................................................................................................................................................................................... 5
Gestion des passwords ......................................................................................................................................................................... 5
Leds et signaleur acoustique..................................................................................................................................................................... 5
Appareils qui se raccordent au pupitre KEYPLUS .................................................................................................................................... 5
Cablâge ..................................................................................................................................................................................................... 6
INSTALLATION ..................................................................................................................................................................... 7
Déballage .................................................................................................................................................................................................. 7
Contrôle des caractéristiques techniques ................................................................................................................................................. 7
Allumage et coupure ................................................................................................................................................................................. 7
Connecteurs et raccordements ................................................................................................................................................................. 8
NOTES SUR LA CONFIGURATION DU PUPITRE............................................................................................................... 9
PROCÉDURE DE CONFIGURATION ................................................................................................................................... 9
Procédure de configuration ....................................................................................................................................................................... 9
Liste des menus ...................................................................................................................................................................................... 10
Modification des paramètres de configuration......................................................................................................................................... 11
Langue du pupitre ................................................................................................................................................................................... 12
Configuration de la matrice ..................................................................................................................................................................... 12
Test des canaux de communication .................................................................................................................................................... 13
Habilitations............................................................................................................................................................................................. 14
Modification des passwords .................................................................................................................................................................... 14
Numéro d’identification de l’opérateur..................................................................................................................................................... 15
Signaleur acoustique du pupitre.............................................................................................................................................................. 15
TOUCHES ............................................................................................................................................................................ 16
SÉLECTION DES ENTRÉES ET DES SORTIES................................................................................................................ 16
Sélection du moniteur actif ...................................................................................................................................................................... 16
Sélection de l’entrée................................................................................................................................................................................ 16
CONFIGURATION DE LA MATRICE .................................................................................................................................. 17
PROGRAMMATION DE LA MATRICE SW164 STANDARD.............................................................................................. 17
Séquences de cycle de commutation...................................................................................................................................................... 17
Modification des textes d’identification .................................................................................................................................................... 18
Modification des paramètres Date / Heure .............................................................................................................................................. 19
PROGRAMMATION DE LA MATRICE SW164OSM ON SCREEN MENU ........................................................................ 20
ENTRETIEN ......................................................................................................................................................................... 21
Pag. 1
KEYPLUS9702
RÉSOLUTION DES PROBLÈMES D’INSTALLATION....................................................................................................... 21
Test du raccordement entre Pupitre et matrice ....................................................................................................................................... 21
RÉSOLUTION DES PROBLÈMES DE CONFIGURATION ................................................................................................ 22
PROBLÈMES DANS LA COMMUTATION VIDÉO ............................................................................................................. 22
Programmation de la matrice SW164 Standard..................................................................................................................................... 23
Programmation de la matrice SW164OSM ............................................................................................................................................ 23
DONNÉES TECHNIQUES .................................................................................................................................................. 23
DONNÉES TECHNIQUES ALIMENTATEUR..................................................................................................................... 23
Le producteur décline toute responsabilité pour les dommages éventuels dus à une utilisation non appropriée des
appareils mentionnés dans ce manuel; on réserve en outre le droit d’en modifier le contenu sans préavis. La
documentation contenue dans ce manuel a été rassemblée et vérifiée avec le plus grand soin: cependant, le
producteur ne peut pas s’assumer aucune responsabilité dérivante de l’emploi de celle-là. La même chose vaut pour
chaque personne ou société impliquées dans la création et la production de ce manuel.
Pag. 2
KEYPLUS9702
Introduction
Contenu de l’emballage
• 1 pupitre KEYPLUS
• 1 alimentateur extérieur
• 2 câbles téléphoniques 6/6 droit droit - Longueur 150 cm. environ
• 2 boîtes de dérivation RJ jack
• 1 manuel d’emploi
Lors de la livraison du produit, vérifier si l’emballage est intègre et si n’a pas de signes évidents de chutes ou
abrasions. Si l’emballage présente des signes évidents de dommage, contacter immédiatement le fournisseur. Vérifier
que le contenu correspond à la liste du matériel indiqué ci-dessus.
Contenu du Manuel d’Emploi
Dans ce manuel on décrit le pupitre KEYPLUS et les procédures particulières d’installation, configuration et emploi.
Il est nécessaire de lire attentivement ce manuel, surtout le chapitre cencernant les normes de sécurité, avant
d’installer et employer le pupitre.
Destinataire du Manuel d’Emploi
Les différentes parties de ce manuel veulent satisfaire deux exigences opérationnelles: celle du technicien installateur
et celle de l’opérateur.
Technicien installateur: c’est le technicien qualifié qui effectue l’installation de sécurité et en vérifie le caractère
fonctionnel.
Il a les connaissances techniques nécessaires pour installer, raccorder et configurer l’installation. Seulement le
technicien installateur peut effectuer les opérations contenues dans ce manuel réservées au “Personnel technique”.
Opérateur: c’est l’utilisateur final qui emploie le pupitre pour établir le fonctionnement de tout le système. Dans le cas
de systèmes pour plusieurs utilisateurs, jusqu’à 4 opérateurs peuvent employer les ressources disponibles en même
temps (entrées vidéo, moniteurs, etc.).
Ce qu’on doit lire
Les procédures d’installation , adressées principalement au technicien installateur, sont décrites à partir de la page 7.
L’opérateur doit lire à partir de la page 16, pour la description de l’emploi du pupitre, de la commutation directe et de la
programmation du système vidéo commandé.
Conventions typographiques
Dans ce manuel on emploie des symboles graphiques différents, dont le sens est résumé ci-dessous:
Hasard de décharge électrique; couper l’alimentation avant de procéder avec toute opération, si le contraire
n’est pas expressément indiqué.
Lire attentivement la procédure ou les reisegnements indiqués, et éventuellement les exécuter suivant les
modalités prévues. Une execution incorrecte de la procédure peut entraîner un fonctionnement erroné du système ou
un endommagement du même.
Lire attentivement pour comprendre le fonctionnement du système.
Pag. 3
KEYPLUS9702
Normes de sécurité
Le pupitre KEYPLUS est conforme aux normes en vigueur au moment de la publication de ce manuel pour ce
qui concerne la sécurité électrique, la compatibilité électromagnétique et les conditions requises generales.
On désire toutefois garantir les utilisateurs (technicien installateur et opérateur) en précisant certaines instructions pour
opérer en toute sécurité:
• Raccorder à un feeder suivant les indications des plaques des caractéristiques techniques (voir le chapitre suivant
Caractéristiques techniques)
• L’installation de l’appareil (et du système complet dont il fait partie) doit être effectuée par une personne qualifiée du
point de vue technique.
• Pour le service après-vente s’adresser exclusivement à personnel technique autorisé.
• L’appareil ne doit jamais être ouvert.
• L’altération de l’appareil fait déchoir les termes de garantie.
• La prise d’alimentation doit être raccordée à la terre conformément aux normes en vigueur.
• Ne pas tirer le cordon d’alimentation pour débrancher la fiche de la prise.
• Avant de déplacer ou effectuer des interventions techniques sur l’appareil, débrancher la prise d’alimentation:
l’appareil est désactivé seulement quand la prise d’alimentation est débranchée et les câbles de raccordement avec
d’autres dispositifs ont été enlevés.
• Ne pas employer de rallonges avec signes d’usure ou vieillissement, parce qu’ils peuvent compromettre
sérieusement la sécurité des utilisateurs.
• Éviter d’exposer l’appareil en fonction à tout liquide ou de le toucher avec les mains mouillées.
• Ne pas laisser l’appareil exposé aux agents atmosphériques
• Ne pas employer l’appareil en présence de substances inflammables
• Ne pas laisser que des enfants ou des personnes incapables utilisent l’appareil
• Vérifier si l’appareil est appuyé sur une base suffisament large et solide
Conserver soigneusement ce manuel pour toute consultation ultérieure
Caractéristiques techniques
Derrière le pupitre KEYPLUS il y a deux plaques conformes aux caractéristiques techniques CE. La première
plaque contient le code d’identification du modèle (Code à barres EXT 3/9). La deuxième plaque indique le numéro de
série du modèle (Code à barres EXT 3/9). Sur L’alimentateur fourni, on rapporte une plaque avec les données
d’alimentation du pupitre. À l’installation, contrôler si les données d’alimentation du pupitre correspondent aux
caractéristiques requises.
L’emploi d’appareils non appropriés peut compromettre sérieusement la sécurité du personnel et de l’installation.
Pag. 4
KEYPLUS9702
Description du pupitre KEYPLUS
Le pupitre KEYPLUS est un produit professionnel pour le domaine de la sécurité et de la surveillance. Dans un
système de sécurité, le pupitre permet le contrôle de la commutation vidéo (matrice vidéo SW164OSM) et la gestion
de possibles conditions d’alarme.
Caractéristiques:
• Display LCD 16 caractéres par 2 lignes pour le contrôle des opérations
• Mode de communicatione RS232 et Boucle de Courant
• Leds de signalisation activés en cas d’interruption des communications et en cas d’alarme
• Signaleur acoustique qui peut s’habiliter en cas d’interruption des communications et en cas d’alarme
• Vitesse de communication variable pour systèmes de transmission-données (matrice SW164OSM et récepteur
DTRX)
• Facilité d’emploi: les opérations les plus communes sont activées en appuyant seulement sur un ou deux touches
• Configuration complète du pupitre par setup à display
• Choix du mode de réception à display (RS232 / Boucle de Courant)
• Contrôle des deux versions SW164 (Standard et On Screen Menu)
• Sélection de la langue nationale
• Menu de test des communications vers la matrice
• Autotest des canaux de communication
• Habilitation / déshabilitation des entrées et des sorties contrôlables à partir de chaque pupitre
• Trois niveaux de passwords: connexion, reset alarme, setup
Sécurité
La gestion de la sécurité pour ce qui concerne le système est réalisée par 3 niveaux de passwords, répresentés
individuellement dans chaque pupitre:
• password de connexion: demandé à l’allumage du pupitre, afin d’eviter l’emploi par personnes non autorisées;
• password de reset alarme: demandé au moment du reset de la condition d’alarme du pupitre;
• password de setup: demandé quand un setup est requis (soit du pupitre soit de la matrice).
Gestion des passwords
Quand un password est demandé, on a 10 secondes au maximum pour introduire le premier chiffre (de 0 à 9), et 5
secondes pour les suivants. Après cette attente, si l’introduction du password n’est pas complète, le password sera
considéré erroné.
• Un erreur dans l’introduction du password de connexion cause un blocage du pupitre pour 25 secondes, après
lequel la demande d’introduction est proposée de nouveau.
• Si les passwords sont réglés à 000000 ils sont désactivés.
Leds et signaleur acoustique
Le pupitre est pourvu de deux leds de signalisation, qui s’activent automatiquement en cas de:
• interruption des communications avec la matrice
• situation d’alarme de la matrice.
Ces cas sont signalés par un son continu d’un signaleur acoustique.
Appareils qui se raccordent au pupitre KEYPLUS
• Matrice vidéo SW164OSM: cela permet la commutation de 16 entrées vidéo sur 4 moniteurs, contrôlant jusqu’à 16
contacts d’alarme. Une seule matrice vidéo peut être raccordée à un maximum de 4 pupitres (aussi bien en
configuration mixte DCS2 / KEYPLUS). Se rapporter au manuel d’emploi corréspondant pour une description
complète des caractéristiques de l’appareil.
Pag. 5
KEYPLUS9702
Exemple d’installation
Installation contrôlée par trois opérateurs avec un moniteur chacun: en plus de la commutation vidéo et la gestion des
contacts d’alarmes, deux opérateurs contrôlent un groupe de récepteurs pour le mouvement des tourelles et des objectifs;
PTH
PTH
DTRX
MATERIEL EMPLOYE
PTH
DTRX
DTRX
SW164OSM
SW16.4
DCMX
DCMX
DCS2
DCS2
PRESET
COMFAULT
AUX2
AUX3
AUX4
COMFAULT
2
3
4
5
6
7
8
9
0
AUX2
AUX4
COMFAULT
M/A
ALARM
PROG
WIPER
CLEAR
ENTER
AUX3
PROG
WIPER
1
AUX1
M/A
ALARM
PROG
- /- -
KEYPLUS
PRESET SCAN
SCAN
AUX1
M/A
ALARM
KEYPLUS
DCS2
DCS2
Pupitres
• 1 pupitre KEYPLUS
• 2 pupitres DCS2
Gestion du vidéo:
• matrice SW164OSM
• 3 moniteurs (max 4)
• 3 télécaméras (max 16)
Gestion de la télémetrie:
• 3 récepteurs DTRX
• 3 tourelles
• 1 multiplexeur numérique DCMX
USER
IN
OPEN
NEAR
OUT
CLOSE
FAR
- /- -
1
2
3
4
5
6
7
8
9
0
CLEAR
ENTER
USER
IN
OPEN
NEAR
OUT
CLOSE
FAR
- /- -
1
2
3
4
5
6
7
8
9
0
CLEAR
ENTER
Cablâge
Dans le schéma ci-dessus des traits différents ont été employés pour indiquer des câbles à fonctions diversifiées:
câble vidéo:
Câble coaxial RG 59 ou câble équivalent.
Pour longues distances employer un système de transmission vidéo à boucle.
câble multipolaire:
Chaque fonction de contrôle de la tourelle est activée / désactivée par un relais dans le récepteur.
Pour établir le nombre des conducteurs du câble multipolaire:
• 7 fils pour le mouvement de la tourelle (230 V~ ou 24 V~): droite, gauche, haut, bas, autopan, commun, terre
(seulement 230 V~)
• 6 fils de contrôle objectif en cas d’objectif à inversion de polarité (zoom grand-angle, zoom télé, focus près,
focus loin, iris ouvert, iris fermé)
• 4 fils de contrôle objectif en cas d’objectif à fil commun (zoom, focus, iris, commun)
• 2 fils de référence pour la gestion du preset, et 1 additionnel pour chaque possible fonction de preset.
Pour chaque fonction auxiliaire, wiper et washer, prévoir un couple de fils.
Se rapporte au manuel d’emploi du DTRX pour ultérieures informations.
câble pour la transmission numérique des commandes:
Deux couples de boucle de diamètre minimum 0,6 mm (sect. 0,22 mm² AWG 24):
un couple Transmission / Masse + un couple Réception / Masse.
La distance max. de raccordement est de 15 m environ en RS232; 1500 m en Boucle de Courant.
Le câble téléphonique fourni a 1,5 m de longueur: pour distances plus grandes employer les boîtes de dérivation
RJ, suivant la procédure du chapitre Installation, Connecteurs et raccordements (page 8).
Pag. 6
KEYPLUS9702
Installation
Les procédures suivantes sont effectuées hors tension, si le contraire n’est pas indiqué.
L’installation doit être effectuée seulement par un technicien qualifié.
Déballage
Si l’emballage ne présente pas d’évidents défauts dus à chutes ou abrasions anomales, procéder au contrôle du
matériel contenu, suivant la liste fournie au chapitre Introduction, Contenu de l’emballage (page 3).
Le technicien installateur devra éliminer l’emballage selon les modalités de recolte diversifiée ou en tout cas suivant
les normes en vigueur dans le Pays d’emploi.
Contrôle des caractéristiques techniques
Avant d’installer l’appareil, vérifier si les caractéristiques techniques du matériel fourni, figurant sur les plaques,
correspondent aux spécifications requises, en se rapportant au chapitre Caractéristiques techniques (page 4). Ne
jamais effectuer d’altérations ou de raccordements non prévus dans ce manuel: l’emploi d’appareils non appropriés
peut compromettre sérieusement la sécurité des personnes et de l’installation.
Allumage et coupure
Avant d’alimenter l’appareil:
• vérifier si le matériel fourni correspond aux spécifications requises, suivant les plaques des caractéristiques
techniques, en se rapportant au chapitre Caractéristiques techniques (page 4)
• vérifier si le pupitre et les composantes de l’installation sont fermés afin d’éviter le contact direct avec parties sous
tension
• le câble de raccordement à la matrice n’est pas nécessaire pendant la phase de configuration, à l’exception du test
de raccordement; ne pas le raccorder jusqu’à ce qu’on l’indique expréssement
• le pupitre et les autres appareils de l’installation doivent être appuyés sur une base large et solide
• les câbles d’alimentation ne doivent pas gêner les normales opérations du technicien installateur
• vérifier si les sources d’alimentation et les rallonges éventuellement employés sont aptes à supporter la
consommation du système.
ALLUMAGE: raccorder le connecteur Mini Din 4 pôles de l’alimentateur à la prise correspondante derrière le
pupitre. Le pupitre est dépourvu d’interrupteur: brancher la fiche dans la prise d’alimentation.
COUPURE: débrancher la fiche de la prise d’alimentation.
Pag. 7
KEYPLUS9702
Connecteurs et raccordements
Le pupitre KEYPLUS présente un connecteur RJ11 derrière la mécanique, et en connecteur Mini Din 4 pôles
d’alimentation.
Code Produit
Connecteur RJ11
(canal matrice)
Mini Din 4 pôles
Numéro de série
La transmission des données numériques vers la matrice est effectuée en même temps en RS232 et en Boucle de
Courant. Le mode de réception est sélectionné en phase de configuration du pupitre.
Vérifier si les pontets de sélection dans la matrice sont correctement placés, en se rapportant au manuel de
configuration correspondant.
Le pupitre KEYPLUS et la matrice vidéo SW164OSM peuvent être directement raccordés au moyen d’un câble
téléphonique fourni par le fabricant, pour la vérifie du fonctionnement des appareils en laboratoire:
SW164OSM
SW16/4
KEYPLUS
KEYPLUS
COM FAULT
M/A
ALARM
PROG
- / --
1
2
3
4
5
CLEAR
6
7
8
9
0
ENTER
Pour le raccordement au boucle, rélier les appareils par les boîtes de dérivation RJ, fournies par le fabricant, suivant
les tableaux de référence ci-dessous:
Raccordement KEYPLUS - matrice vidéo SW164OSM
Raccordement Boucle de Courant: max 1500 m
KEYPLUS
SW164OSM
TX CL
Jaune ------------ Noir
RX CL
GND CL
Rouge-------------- Vert
GND CL
RX CL
Blanc --------------Bleu
TX CL
Raccordement RS232: distance max 15 mètres
KEYPLUS
SW164OSM
TX RS232
Noir --------- Jaune
RX RS232
GND RS232
Vert ---------- Rouge GND RS232
RX RS232
Bleu --------- Blanc
TX RS232
Pag. 8
SW164OSM
SW16/4
KEYPLUS
KEYPLUS
COM FAULT
max 1500 m
Current Loop
M/A
ALARM
PROG
- /- -
1
2
3
4
5
6
7
8
9
0
CLEAR
ENTER
KEYPLUS9702
Notes sur la configuration du pupitre
La phase de configuration permet d’obtenir un fonctionnement optimal du pupitre, selon les nécessités de
l’installation. La configuration doit être effectuée par le technicien installateur seulement au moment de l’installation: les
paramètres configurés sont gardés même si l’appareil est éteint.
Procéder par ordre dans la configuration des paramètres, afin d’éviter des problèmes d’installation: certains menus
sont automatiquement désactivés si des conditions précédentes ne sont pas satisfaites. Dans ce cas le changement
de leur contenu n’est pas permis.
Les paramètres introduits en phase de configuration sont:
• Langue nationale du pupitre
• Type de matrice raccordée (“standard” ou “OSM”; si “standard” on demande le numéro de l’opérateur)
• Mode de réception du canal de contrôle matrice (RS232 ou Boucle de Courant)
• Sélection des passwords (de connexion, de reset alarme et de programmation)
• Sélection des entrées et des sorties contrôlables à partir de chaque pupitre
• Emploi du signaleur acoustique, en cas d’alarme ou d’interruption des communications avec la matrice
Il y a en outre 2 menus de sélection des tests de communication.
La phase complète de configuration du pupitre est effectuée sans le raccordement à la matrice, à l’exception de
l’éventuel test de raccordement entre les deux dispositifs.
Pour une configuration complète, procéder par ordre selon les menus proposés: commencer du menu numéro
1.Langue jusqu’au menu numéro 8.Signaleur acoustique..
Procédure de configuration
La procédure de configuration doit être effectuée seulement par un technicien qualifié: l’emploi de paramètres
incorrects peut entraîner l’isolation du pupitre du reste du système.
Procédure de configuration
La configuration du pupitre est effectuée par un système de menus à display. Les touches à employer pour le
déplacement sont indiquées ci-dessous:
P
U
D
E
C
début de la programmation
sélection de la voix précédente du menu
sélection de la voix suivante du menu
entrée dans le menu affiché à display ou confirmation de la valeur affichée
selon le menu, il permet de varier les valeurs affichées à display
Pag. 9
KEYPLUS9702
Liste des menus
Dans le tableau ci-dessous on indique les menus de configuration du pupitre.Lire très attentivement afin de ne pas
changer les paramètres d’une façon erronée. Par * on indique les paramètres critiques qui peuvent interdire le
raccordement entre pupitre, matrice et récepteur s’ils ne sont pas correctement configurés.
Menu
Signifié
Valeurs à introduire
1.Langue
Langue des menus de pupitre
anglais (default), italien,
français, allemand, espagnol
2.Setup matrice *
Configuration des caractéristiques de la
matrice contrôlée.
Type de matrice contrôlée.
2.1 Type *
2.2 Communications *
2.3 Baudrate *
3. <non utilisé>
4. Test des canaux de communication
4.1 Canal Matrice
4.2 Canal Matrice automatique
5. Habilitations
5.1 Entrées
5.2 Sorties
5.3 Pupitre (Up/Down)
5.4 D’autres paramètres
6. Passwords *
6.1 Password de connexion *
6.2 Password de reset alarme
6.3 Password de setup *
7. Numéro opérateur
8. Emploi du signaleur acoustique
Mode de communication.
Vitesse de communication
(seulement pour la matrice OSM)
Procédures de contrôle des raccordements.
Test du raccordement à la matrice.
Test automatique du canal de communication, en
employant une boîte Rjjack.
Pour chaque opérateur on peut définir le
groupe d’entrées/sorties commutables,
et l’emploi des touches Up/Down.
Chaque entrée peut être activée ou non: les
entrées désactivées ne peuvent pas être
directement sélectionnées; elles sont visibles
en cas d’alarme ou si prévues dans les
séquences de cycle de commutation.
Sélection des sorties qui peuvent être
appelées pour la commutation.
Le bloc des touches est utilisé quand
l’emploi complet de toutes les fonctions du
pupitre n’est pas consenti à un opérateur.
Click: si activé, à la pression d’une
touche, un son de confirmation est
produit.
Messages: si habilité, les messages
d’erreur et avvertissement sont affichés.
Modification des passwords.
NB: les passwords sont privés, et ne
concernent pas d’autres opérateurs.
Il est demandé à l’allumage du pupitre.
Il est demandé quand on rétablit une
condition d’alarme à partir du pupitre.
Il est demandé quand on configure le
pupitre ou la matrice contrôlée.
Seulement en cas de raccordement à la
matrice SW164OSM Standard il est
nécessaire d’identifier les 4 opérateurs,
en leur assignant un numéro chacun.
Habilitation du signaleur acoustique: en
cas d’alarme de la matrice, d’interruption
des communications de la matrice, en
tous les deux cas.
Pag. 10
SW164 Standard (default) ou
version OSM
RS232 (default) / Boucle de Courant
300, 1200, 2400, 9600
(default) baud
Default: toutes les entrées
sont habilitées
Default: on peut appeler
toutes les sorties
Default: toutes les touches
sont activées
Default: déshabilité (000000)
Default: déshabilité (000000)
Default: déshabilité (000000)
Default: opérator numéro 1.
Default: activé en cas
d’alarme de la matrice
KEYPLUS9702
Modification des paramètres de configuration
On effectue la modification des paramètres selon les phases suivantes:
• entrée en programmation
• choix du menu
• choix de l’option parmi celles à disposition
• sortie du menu
• sortie de la programmation.
Voici un exemple des différentes phases: modification des habilitations des sorties.
Entrée en programmation
Display
P
Allumez le pupitre. Appuyez sur la touche
pour 5 secondes, jusqu’à ce que les
leds commencent à clignoter. Si nécessaire,ajoutez la password de setup.
CONFIGURATION
--- PUPITRE ---
Choix du menu et modification des paramètres
Display
Le menu est affiché sur deux lignes:
CONFIG.PUPITRE
1.Langue
• le titre du menu (dans ce cas CONFIG.PUPITRE , le menu principal)
• la liste des sous-menus disponibles
Par
U et D on sélectionne le sous-menu désiré (Habilitations)
E
Rappeler le sous-menu Habilitations en appuyant sur
, choisir le
groupe d’habilitations qu’on désire afficher (entrées, sorties, touches, etc.).
Pour continuer avec l’exemple choisir par
par
E.
D le sous-menu Sorties et le rappeler
La configuration des sorties habilitées consiste à choisir individuellement chacune
des quatre sorties, et à définir si cela doit être sélectionnée à partir du pupitre:
• sélectionner la sortie par
• appuyer sur
U/D
CONFIG.PUPITRE
5.Habilitations
HABILITATIONS 5.
Entrees
HABILITATIONS 5.
Sorties
¢
HABILITATION 5.2
Sortie 1: OUI ¤£
DDE
E pour l’habiliter / déshabiliter.
Les paramètres sont sauvés automatiquement quand on sort du menu.
HABILITATION 5.3
Sortie 3: NON ¤¢
C sauve les modifications éventuellement apportées et retourne au menu
HABILITATIONS 5.
Sorties
précedent. Le sauvetage des paramètres est effectué automatiquement à la sortie
du menu.
En appuyant encore sur
C on retourne au menu principal.
CONFIG.PUPITRE
5.Habilitations
Sortie de la programmation
Display
La fin de la programmation confirme le sauvetage des paramètres introduits et
pose le pupitre en mode de fonctionnement normal.
CONFIG.PUPITRE
Fin setup
Pour quitter la programmation sélectionner la voix Fin Setup au menu principal, en
appuyant plusieurs fois sur
D et confirmer par E .
Pag. 11
KEYPLUS9702
Langue du pupitre
On peut sélectionner la langue nationale des menus du pupitre parmi celles qui sont préintroduites.
NB: Le changement de la langue du pupitre n’influence pas celle de la matrice contrôlée.
Modification de la langue du pupitre
Description
Touches
Display
Sélectionner le sous-menu Langue du menu principal
UE
E
C
CONFIG.PUPITRE :
1.Langue
£
E pour sélectionner la langue;
C pour confirmer et sortir.
Langue
1.
Italien * ¢
Configuration de la matrice
Le pupitre KEYPLUS permet le contrôle des matrices SW164OSM Standard et SW164OSM.
Le menu de configuration de la matrice est subdivisé en trois sous-menus:
• type de matrice raccordée
• mode de communication entre pupitre et matrice
• vitesse de communication (seulement pour la matrice SW164OSM ).
Configuration de la matrice
Description
Touches
Display
Du menu principal, sélectionner le menu Setup de la
matrice
DE
P
E
C
CONFIG.PUPITRE :
2.Setup matrice¢
DE
E
C
SETUP MATR. 2.
Communications ¡
DE
E
C
SETUP MATR. 2.
Baudrate
¡
BAUDRATE COM 2.3
9600 baud
¤
C
CONFIG.PUPITRE :
2.Setup matrice¢
1) Sélection du type de matrice contrôlée
E pour changer le type
C pour confirmer et sortir
2) Sélection du mode de communication
E pour changer le mode
C pour confirmer et sortir
3) Sélection de la vitesse de raccordement
(seulement pour la matrice SW164OSM OSM)
E pour changer la vitesse
C pour confirmer et sortir
C retourne au menu principal
Pag. 12
SETUP MATR. 2.
Type
£
TYPE MATRICE 2.1
Standard
¤
COM.MATRICE 2.2
RS232
£
KEYPLUS9702
Test des canaux de communication
Le pupitre prévoit le test des canaux de communication, afin de vérifier le système installé.
Test du canal de communication avec une matrice: raccorder directement le pupitre à la matrice SW164.
Le test vérifie les signaux de polling (matrice STD) ou un message convenable de test (matrice OSM), pour
contrôler la transmission bidirectionnelle entre les deux dispositifs.
Attention: le type de matrice concerné par le test doit être configuré au menu 2.1; le mode de communication au
menu 2.2.
D’éventuelles anomalies sont affichées à display.
• AutoTest du canal de communication: sans raccorder la matrice, on emploie un connecteur de test spécial et on
effectue automatiquement un contrôle par des commandes envoyées et réçues par le pupitre même.
Tous les deux modes de communication, RS232 et Boucle de Courant, sont vérifiés. D’éventuelles anomalies sont
affichées à display.
Test des communications
Description
Touches
Display
Sélectionner le menu Test des communications du
menu principal
DE
[D] E
E
CONFIG.PUPITRE :
4.Test commun. ¢
Sélectionner le type de test désiré
(avec raccordement à la matrice ou autotest)
E
Commencer le test par
. La phase de test peut
durer une dizaine de secondes
TEST DI COM. 4.
Matrice
£
CANAL MATRICE
[¤] pour commencer
TEST STD 232 RX (*)
test correct
Vérifier si les messages à display affichent des
problèmes de communication. Pour la résolution des
problèmes se rapporter au chapitre Résolution des
problèmes.
(*) Notes: Dans le cas de test avec raccordement à la matrice, le message à display pendant le test permet de vérifier
la correcte configuration du système:
Test STD 232 RX
STD (raccordement à la matrice standard) / OSM (raccordement à la matrice OSM)
232 (test du canal RS232) / CL (test du canal Boucle de Courant)
RX (test de la réception) / TX (test de la transmission)
CÂBLE POUR L’AUTOTEST
Raccorder les fils:
blanc avec jaune
bleu avec noir
COM FAULT
M/A
ALARM
P ROG
-/--
1
2
3
4
5
CLEAR
6
7
8
9
0
E NTER
Pag. 13
KEYPLUS9702
Habilitations
Afin d’éviter l’emploi de passwords et en même temps limiter la sélection d’entrées ou sorties vidéo, au menu
Habilitations les ressources accessibles à chacun opérateur sont affichées. Si quelques opérateurs ne doivent pas
avoir accès au groupe entier d’entrées vidéo, on consille de déshabiliter la fonction Up/Down (touches
autrement permet de rappeler toutes les entrées actives sans utiliser le pupitre numérique.
U et D), qui
Habilitations des entrées, Touche de pupitre et des sorties
Description
Touches
Display
Du menu principal, sélectionner le sous-menu
Habilitations
DE
CONFIG.PUPITRE:
5.Habilitations
¢
1) Habiliter les entrées accessibles à l’opérateur
E
UD
EC
HABILITATION 5.
Entrees
£
DE
UD
EC
HABILITATION 5.
Sorties
¢
3) Habiliter la fonction Up/Down:
si quelques entrées sont désactivées, déshabiliter la
fonction.
DE
HABILITATION 5.
Touches Up/Down
¡
Epour habiliter / déshabiliter la fonction
C pour confirmer et sortir
E
C
HABILITATION 5.3
Up/Down: OUI ¤
U / D pour identifier l’entrée
E pour l’habiliter / déshabiliter; C pour sortir
2) Habiliter les sorties accessibles à l’opérateur
U / D pour identifier la sortie
E pour l’habiliter / déshabiliter; C pour sortir
Habilitation 5.1
Entr.1 : OUI ¤£
HABILITATION 5.2
Sortie 1:OUI ¤£
Modification des passwords
La description des passwords se trouve au chapitre Description du pupitre KEYPLUS, Sécurité.
Modification des passwords
Description
Touches
Display
Du menu principal, sélectionner le sous-menu
Modification Passwords
DE
E
[0 / 9]
1/0
CONFIG.PUPITRE
6.Chang. pwd ¢
1) Sélectionner le password de connexion:
Introduire le password (6 chiffres) et le confirmer en
l’introduisant de nouveau.
Sauver le password si on le demande;
des message éventuels à display affichent si des
valeurs différentes ont été introduites ou si le password
a été activé (000000).
CHANG. PWD: 6.
Connexion
£
PWD CONNEX. 6.1
[****..]
Sauve
modifications?
[1] Oui [0] Non
2) Sélectionner le password de Reset Alarme et
procéder suivant la procédure sus-indiquée
CHANG. PWD: 6.
Reset alarme ¢
3) Sélectionner le password de Programmation et
procéder suivant la procédure sus-indiquée
CHANG. PWD: 6.
Setup
¡
Pag. 14
KEYPLUS9702
Numéro d’identification de l’opérateur
Si le pupitre est raccordé à une matrice SW164 Standard, il est nécessaire d’identifier chaque KEYPLUS / DCS2 par
un numéro d’identification différent. Si deux pupitres ont le même numéro, des problèmes de communication peuvent
se manifester.
Numéro de l’opérateur (seulement pour matrice Standard)
Description
Touches
Display
Du menu principal, sélectionner le menu Numéro de
l’opérateur
UD E
E
C
CONFIG.PIPITRE
7.Numero oper. ¢
Sélectionner le numéro de l’opérateur par
Confirmer et sortir par
E.
C.
Num.operat. 7.
Operateur 1 ¤
Signaleur acoustique du pupitre
Le pupitre est pourvu d’un signaleur acoustique intérieur qui peut être habilité si se présentent des problèmes de
connexion avec la matrice (interruption des communications) ou situations d’alarme.
Habilitation du signaleur acoustique intérieur
Description
Touches
Display
Du menu principal, sélectionner le menu Signaleur
Acoustique
UD E
E
CONFIG.PUPITRE
8.Sign.ac. ¢
Sélectionner le type de fonctionnement du signaleur
acoustique en appuyant sur
E:
Sign.ac. 8.
En cas d’alarme¤
• non utilisé
• activé en cas d’interruption des communications
• activé en cas d’alarme
• activé en cas d’interruption des communications
et en cas d’alarme.
C confirme le choix et retourne au menu précedent
Pag. 15
KEYPLUS9702
Touches
COM FAULT
M/A
ALARM
PROG
-/--
1
2
3
4
5
6
7
8
9
0
CLEAR
ENTER
Le pupitre KEYPLUS permet de commander la matrice vidéo SW164.
Touches numériques
Shift
0 / 9: sélection directe de l’entrée
s: prépare l’introduction d’un numéro à deux chiffres. Le display affiche l’attente du second chiffre par “1-”
m: sélection du numéro de la sortie active
Up / Down B / D: entrée précedente / suivante à celle affichée
Prog P: entre en programmation de la matrice (éventuellement après avoir demandé un password).
Clear C: avec la matrice SW164OSM , elle effectue un refresh du moniteur. Avec la matrice SW164 standard
Monitor
elle n’est pas utilisée.
Sélection des entrées et des sorties
Sélection du moniteur actif
m
Moniteur
prépare la sélection du numéro moniteur.
Chaque pupitre peut contrôler jusqu’à 4 moniteurs, mais seulement un d’eux est défini “moniteur actif” et seulement
sur cela on peut effectuer les commandes de commutation vidéo.
La liste des moniteurs à sélectionner est définie en phase de setup du chaque pupitre.
En appuyant sur la touche, un ? est affiché pour indiquer l’attente du numéro (de 1 à 4).
Si la sortie choisie est déshabilitée pour le pupitre, la sélection du numéro est accompagnée par un signal d’erreur
acoustique.
Par exemple, si l’on veut contrôler la sortie numéro 2:
Display présent
Touches
Display mis à jour
MON CAM RX
1
10 10
m2
MON CAM
2
-
RX
10
Sélection de l’entrée
Touches
0/9: sélection directe des entrées sur la sortie active (affichée à display).
1 à 9).
Rappel des entrées de 10 à 16: appuyer sur Shift (s) suivi par le chiffre des unités (de 0 à 6).
Exemple: sélection de l’entrée 13: s 3; L’entrée 10 peut être aussi applelée en appuyant sur 0
Up / Down B/ D: sélectionnent sur la sortie active l’entrée suivante / précedente par rapport à celle affichée à
Rappel des entrées de 1 à 9: appuyer directement sur la touche numérique corréspondante (de
présent.
Cycle de commutation automatique
M:active le cycle de commutation automatique définie au niveau de matrice.
Pag. 16
KEYPLUS9702
Configuration de la matrice
Le pupitre KEYPLUS permet de contrôler les deux vérsions SW164, Standard et OSM.
Pour la matrice Standard, la programmation est limitée aux paramètres de base, qui sont affichés à display; pour ce
qui concerne la matrice OSM, toute la programmation est effectuée à display, et est affichée sur le moniteur
numéro 1.
Programmation de la matrice SW164 Standard
Pour programmer la matrice Standard on doit définir:
• séquences de cycle de commutation
• textes d’identification
• paramètres de date / heure
Entrée en programmation (matrice Standard)
Description
P, et éventuellement
Entrer en programmation par
introduire le password de setup
Touches
Display
P
-- MENU DE
CONFIGURATION
Séquences de cycle de commutation
Pour chaque opérateur, on définit deux séquences de cycle de commutation automatique, diurne et nocturne.
Chaque séquence se compose d’un maximum de 16 pas, définis par une entrée à afficher et par la durée de
l’affichage (de 1 à 99 secondes). Dans chaque séquence, la même entrée peut être répétée plusiers fois, sans aucune
limitation.
Définition des séquences de cycle de
commutation
Description
Touches
Sélectionner la rubrique de menu Séquence par
D
Entrer dans le sous-menu par
E
Sélectionner la séquence désirée par
confirmant le changement par
U et U D
E.
U et D,
Si l’on désire commencer une nouvelle séquence de
cycle de commutation, confirmer l’effacement par
pour changer celle présente appuyer sur
0
1;
[A] indique le pas de la séquence (les 16 pas sont
indiqués par les lettres de A à P). Après on indique
l’entrée à afficher et la durée de l’affichage.
Sélectionner les pas à changer par
rappeler le changement par
E.
CONFIGURATION
1.Sequences £
E
[U D] E
SEQUENCES 1.
Oper.1,Diurne £
1/0
Diurne, operat.1
[A] En:05 Sec.02
U D] E
Diurne, operat.1
[C] En:__ Sec.02
12 E
3E
Diurne, operat.1
[C] En:12 Sec.__
[
Effac.precedent?
[1] Oui [0] Non
U/D, et
Introduire le numéro d’entrée et le confirmer par
E
Introduire le numéro de secondes et le confirmer par
E
Display
Pag. 17
Diurne, operat.1
[C] En:12 Sec.03
KEYPLUS9702
Description (continuation)
Touches
Display
Suivant la procédure indiquée, modifier tous les pas de
programmation (la durée des pas non employés doit
être réglée à 0 secondes);
C
Sauve changem.?
1/0
SEQUENCES 1.
Oper.1,Diurne £
C
CONFIGURATION
1.Sequences £
appuyer sur
[1] Oui [0] Non
C pour sortir
Confirmer le sauvetage des changements, et
éventuellement modifier les autres séquences de cycle
de commutation, suivant la procédure sus-indiquée.
Sortir au menu principal par
C
Modification des textes d’identification
La matrice SW164OSM STD permet d’identifier chaque entrée par deux textes de max. 24 caractéres, utilisés
respectivement pendant le cycle normal de commutation et en cas d’alarme.
Définition des textes d’identification
Description
Touches
Display
Sélectionner la rubrique de menu Textes
UD
CONFIGURATION
2.Textes ¢
E
MODIF.TEXTE 2.
Texte normal £
U/D, et confirmer par E
[
U D] E
TEXTE IDENT. 2.1
Change texte __
Introduire le numéro du texte à changer
3E
1/0
Effac.precedent?
[1] Oui [0] Non
U D C E]
T03:ENTREEE G_
[C]¢
[C]
¤ Clr Prg
d’Identification par
U et D
Entrer dans le sous-menu par
E
Choisir si modifier un texte normal ou d’alarme par
1 si l’on veut récrire complètement le texte;
0 pour modifier le texte précédent
Effacer le dernier caractére du texte par C, ou
[
ajouter à la fin du texte le caractère indique entre [x]
]
en appuyant sur
E.
Changer le caractére entre [x]
] en appuyant sur
ou sur
D.
Confirmer la fin de l’introduction par
T03:¥ESSO GARAGE
[A]¢
[A]
¤ Clr Prg
Caractère
à ajouter
U
P
P
Sauve
modifications?
[1] Oui [0] Non
Sauver et éventuellement procéder à la modification
des autres textes d’identification, suivant la procédure
sus-décrite.
Sortir au menu principal par
C
CONFIGURATION
2.Textes
¢
C
Pag. 18
KEYPLUS9702
Modification des paramètres Date / Heure
Les paramètres date/heure permettent à la matrice de contrôler le début et la fin du cycle de commutation diurne et
nocturne. Se rapporter au Manuel d’Emploi de la matrice SW164 Standard pour explications ultérieures.
Attention: une possible source d’anomalies (séquences de cycle de commutation qui ne respectent pas les valeurs
sélectionnées) est souvent due à l’introduction incorrecte des paramètres de date / heure.
Paramètres intéressés par le menu:
- date présente
- heure présente
- heure de début du cycle de commutation diurne dans les jours ouvrables
- heure de fin du cycle de commutation diurne dans les jours ouvrables
- heure de début du cycle de commutation diurne dans les jours demi-fériés
- heure de fin du cycle de commutation diurne dans les jours demi-fériés
Dans les jours fériés ( la définition d’ouvrable, demi-férié ou férié est effectuée par SETUP DU PC au niveau de
matrice) pendant les 24 heures la séquence nocturne est effectuée.
Le chargement à partir de la matrice et le sauvetage des modifications des paramètres de date/heure sont effectués
en phase d’entrée dans le menu ou de sortie au menu principal.
Modification de date et heure présentes
Description
Sélectionner la rubrique de menu Date/Heure par
et
D
U
E
Entrer dans le sous-menu de modification par
, et
attendre le chargement des données à partir de la
matrice
Rappeler le changement de date par
composée par An / Mois / Jour
E; la date est
Introduire la date
C sortir au sous-menu Changement date/heure;
sélectionner la rubrique Changement Heure par D,
et entrer par E; procéder à la modification de l’heure
Par
Touches
Display
UD
CONFIGURATION
3.Date/Heure ¢
E
DATE / HEURE 3.
Chang. date
£
E
DATE PRESENTE 3.1
95/11/01
96E
01E
02E
C [ U] D E
DATE PRESENTE 3.1
Mar 96/01/02
HEURE PRESENTE
3.2
12:00
suivant la procédure précédemment décrite.
Retourner au sous-menu Changement date/heure par
C
C
Pag. 19
DATE/HEURE 3.
Chang. heure £
KEYPLUS9702
Les quatre horaires de début/fin cycle de commutation diurne ont procédures de modification similaires.
La modification d’horaire est faite par pas de 10 minutes. En tenant la touche appuyée, l’horaire s’écoule rapidement à
pas de 30 minutes.
Attention: un début / fin incorrect du cycle de commutation diurne peut causer des anomalies dans les séquences de
cycle de commutation affichées à display.
Des abréviations ont été employées à display:
Deb.diur.ouvr.: Horaire de début cycle de commutation diurne jours ouvrables
Fin diur.ouvr.: Horaire de fin cycle de commutation diurne jours ouvrables
Deb.diur.dem. : Horaire de début cycle de commutation diurne jours demi-ouvrables
Fin diur.dem. : Horaire de fin cycle de commutation diurne jours demi-ouvrables
Si l’on désire déshabiliter le cycle de commutation nocturne (habiliter le cycle diurne pendant les 24 heures) configurer
le début du cycle de commutation à 00:00, et la fin à 23:59.
Modification du début/fin cycle de
commutation diurne
Description
Touches
Sélectionner l’horaire que l’on veut modifier par
D
Entrer en modification horaire par
U et U D
E
UD
Appuyer sur
pour changer l’heure; une
pression prolongée permet un écoulement rapide des
valeurs affichées
C
Sortir du menu par
, et éventuellement confirmer le
sauvetage des valeurs modifiées
C
Sortir de la programmation par C, ou sélectionnant
la rubrique Fin configur. et confirmant par E
Retourner au menu principal par
Display
DATE/HEURE 3.
Deb. diur.ouvr. £
E
UD
DEBUT OUVR. 3.3
¢ 06:00 Clr
C
DATE/HEURE 3.
Deb.diur.ouvr. £
C
C
[D] E
CONFIGURATION
3.Date/Heure ¢
DEBUT OUVR. 3.3
¢ 07:00 Clr
CONFIGURATION
Fin configur. ¡
Programmation de la matrice SW164OSM On Screen Menu
Pour la programmation de la Matrice SW164OSM lire attentivement le manuel d’intructions correspondant.
Pag. 20
KEYPLUS9702
Entretien
Le pupitre KEYPLUS n’a pas besoin d’un entretien particulier.
Le pupitre doit être appuyé sur une base solide, et les câbles d’alimentation et de raccordement ne doivent pas gêner
l’opérateur.
Le nettoyage doit toujours être effectué à appareil éteint. Nettoyer le pupitre périodiquement avec un chiffon
de coton sec en évitant l’emploi de détergents ou de chiffons mouillés.
Résolution des problèmes d’installation
Bien que le pupitre KEYPLUS se caractérise par une excellente fiabilité d’emploi, des problèmes peuvent se produire
en phase d’installation, de configuration ou pendant l’emploi.
Problème
À l’allumage le display n’affiche aucun
message, les leds ne clignotent pas
Cause éventuelle
Alimentation non raccordée
Alimentation fournie non
correcte
Le raccordement à la matrice ne fonctionne pas La configuration de la matrice
est différente de celle du
pupitre
Le raccordement entre
matrice et pupitre est
interrompu
Solution
Contrôler le câble d’alimentation
Contrôler les caractéristiques
techniques
Vérifier si le pupitre et la matrice
sont tous les deux configurés en
RS232 ou Boucle de Courant
Suivir la procédure de test indiquée
ci-dessous
Test du raccordement entre Pupitre et matrice
Le pupitre transmet en même temps en RS232 et Boucle de Courant: en phase de test vérifier toujours si des
messages éventuels d’erreur se réfèrent à un mode ou à l’autre.
Pour identifier les causes de la communication manquée entre pupitre et matrice, effectuer les tests suivants:
• test des communications seulement sur le pupitre KEYPLUS (autotest)
• test du raccordement direct entre pupitre et matrice
• test des câbles de raccordement.
Autotest du pupitre KEYPLUS
• isoler le pupitre du système
• raccorder le câble téléphonique et la boîte Rjjack à pontets, suivant les indications du chapitre Configuration du
pupitre, Test des communications à la page 13
• effectuer le test automatique, suivant la procédure décrite à la même page.
Si le test n’a pas un résultat positif (à display on lit le message Test manque!):
• contrôler les pontets sur la boîte Rjjack
• remplacer le câble téléphonique.
Répéter le test: si le problème persiste, probablement le canal de transmission / réception du pupitre est endommagé.
Contacter le fournisseur.
Si l’autotest confirme le fonctionnement du pupitre (message Test correct) contrôler l’autre câble téléphonique,
en le remplaçant à celui précédemment employé.
Pag. 21
KEYPLUS9702
Procéder au contrôle du raccordement direct entre pupitre et matrice:
• raccorder pupitre et matrice par un câble téléphonique direct
• contrôler les configurations suivantes:
• dans la matrice: pontet de sélection du mode de communication
• dans le setup de pupitre: type de matrice contrôlée, mode de réception, vitesse éventuelle de raccordement (si
on pense que la vitesse de raccordement a été variée dans le setup de la matrice SW164OSM , il faudra
essayer les différentes possibilités dans le setup de pupitre)
• effectuer le test du canal de matrice (pas le test automatique)
Si le test n’a pas de succès, contrôler les configurations; dans le cas de matrice SW164OSM modifier la vitesse de
communication dans le pupitre (par la procédure de setup).
Si le problème persiste, probablement les communications de la matrice sont défecteuses. Contacter le fournisseur.
Si le test a succès le problème concerne les câbles de raccordement: contrôler les connexions aux boîtes Rjjack
suivant le schéma de page 8.
Si les problèmes de raccordement persistent, contacter le fournisseur.
Résolution des problèmes de configuration
Problèmes dans la commutation vidéo
Problème
m
Après avoir appuyé sur
on n’a pas la
possibilité de modifier la sortie active: le moniteur
sélectionné est fixe.
Seulement 5 entrées ont été habilitées, mais on
U D
peut voir les autres aussi en utilisant
et
On ne peut pas sélectionner une entrée
supérieure à 10 même si l’on a configuré
correctement toutes les entrée comme
“sélectionnables”.
Cause éventuelle
En phase de setup un seul
moniteur a été configuré
Solution
Habiliter d’autres moniteurs, s’il est
nécessaire, au menu Habilitation,
Sorties
Les touches-fonction n’ont
pas été déshabilitées
Déshabiliter les touches-fonction
au menu Habilitations, Touches
Haut/bas
Le numéro de l’entrée n’est
pas correctement indiqué
s
Appuyer sur
pour indiquer les
dizaines, suivi par le chiffre des
unités.
s 3: entrée 13.
Les touches $ et ( sont utilisées
Ex.
U D ne fonctionnent pas,
Les touches
et
même si habilitées.
$ et
( au lieu de U et D.
On utilise les touches
comme touches flèche seulement
dans les menus de configuration
de la matrice.
Les fonctions Up/Down sont correctement
Les entrées actives n’ont
Dans le setup de la matrice OSM
définir les signaux vidéo présents
habilitées, mais des écrans noirs sont rappelés ou pas été correctement
définies dans le setup de
(menu 4.Paramètres de système,
des entrées ont sauté.
matrice OSM; la matrice
4.1 Entrées actives).
Standard affiche toutes les
Dans le cas de matrice standard,
16 entrées vidéo, même si le on ne peut pas modifier la fonction
signal est absent.
Up/Down.
Pag. 22
KEYPLUS9702
Gestion des passwords
Problème
On veut interdire l’accès au pupitre par le
personnel non autorisé.
Cause éventuelle
En phase de setup le
password de connexion a
été déshabilité
Les passwords des pupitres sont différents, même Les passwords sont “locaux”
et mémorisés à l’intérieur du
si raccordés à la même matrice.
pupitre.
Les passwords d’un pupitre ont été oubliés ou
perdus.
On veut déshabiliter un password.
-
Solution
En phase de setup sélectionner
pour le password de connexion
une valeur différente de 000000.
Introduire (si nécessaire) les
mêmes passwords sur tous les
pupitres.
S’adresser au fournisseur
Le sélectionner à 000000.
Attention: pour des raisons de
sécurité on conseille d’introduire au
moins le password de setup.
Programmation de la matrice SW164 Standard
Problème
Les séquences de cycle de commutation ne
fonctionnent pas comme prévu.
Les paramètres date/heure sont correctement
introduits, mais la matrice affiche toujours le
cycle de commutation nocturne.
Cause éventuelle
Introduction incorrecte des
paramètres de Date/Heure:
la matrice affiche le cycle de
commutation nocturne.
Dans le setup de la matrice
avec le P.C. des jours de la
sémaine ont été définis
comme fériés.
Solution
Vérifier si l’heure et le début/fin du
cycle de commutation diurne ont été
correctement introduits.
Sélectionner de nouveau les jours
de la sémaine comme ouvrables
par setup du PC; s’adresser
éventuellement au revendeur.
Programmation de la matrice SW164OSM
Les alarmes
Problème
Après la configuration des alarmes, la matrice sort
de la programmation et entre en état d’alarme,
même si aucun contact d’alarme n’est activé
En bouclant un contact, l’alarme corréspondant ne
s’active pas.
L’alarme s’arrête automatiquement sans
l’intervention de l’opérateur.
Cause éventuelle
En phase de setup de la
matrice des contacts
d’alarme ont été définis
Normalement Fermés
Le contact a été défini
comme Non Utilisé
Le reset à temps a été
activé ou les signaux
d’alarme sont définis comme
“Continus”
Solution
Boucler le contact (mettre le
contact en court-circuit avec le
commun alarmes) ou le
sélectionner comme Normalement
Ouvert.
Habiliter le contact comme
Normalement Ouvert ou Fermé
Introduire les options de reset
correctes.
D’autres options
Problème
Cause éventuelle
Solution
À la sortie du menu, le texte est considérablement On a sélectionné le système Au menu 4. Paramètres de
vidéo NTSC
système, sélectionner Système
déplacé vers l’haut
Vidéo: PAL.
Données techniques
Données techniques alimentateur
Dimensions:
Poids:
Tension primaire:
Tension secondaire:
190 x 55 x 185 mm
980 g
Connecteur:
230V~ 50Hz 30VA
9V~ 50HZ 8VA
14V~ 50HZ 8VA
Mini Din 4 poli
pin 1-3 9V~
pin 2-4 14V~
Pag. 23
KEYPLUS9702
BEDIENUNGSANWEISUNG
INHALTSVERZEICHNIS
INHALTSVERZEICHNIS ........................................................................................................................................................ 1
EINFÜHRUNG........................................................................................................................................................................ 3
Verpackungsinhalt..................................................................................................................................................................................... 3
Inhalt des vorliegenden Bedienungshandbuchs........................................................................................................................................ 3
An wen ist dieses Handbuch gerichtet? .................................................................................................................................................... 3
Was zum Lesen ........................................................................................................................................................................................ 3
Typographische Symbole .......................................................................................................................................................................... 3
UNFALLVERHÜTUNGSVORSCHRIFTEN............................................................................................................................ 4
BETRIEBSEIGENSCHAFTEN AUF DEN DATENSCHILDERN ........................................................................................... 4
BESCHREIBUNG DER TASTATUR KEYPLUS.................................................................................................................... 5
Sicherheit .................................................................................................................................................................................................. 5
Verwendung der Paßwörter................................................................................................................................................................... 5
LED-Anzeigelämpchen und Summer ........................................................................................................................................................ 5
Geräte, die an die Tastatur KEYPLUS angeschlossen werden können.................................................................................................... 5
Aufstellungsbeispiel.................................................................................................................................................................................. 6
Kabel ......................................................................................................................................................................................................... 6
AUFSTELLUNG ..................................................................................................................................................................... 7
Auspacken des Gerätes ............................................................................................................................................................................ 7
Kontrolle der Betriebseigenschaften auf den Datenschildern ................................................................................................................... 7
Ein- und Ausschalten ................................................................................................................................................................................ 7
Buchsen und Anschlüsse .......................................................................................................................................................................... 8
BEMERKUNGEN ÜBER DIE KONFIGURATION DER TASTATUR .................................................................................... 9
KONFIGURATIONSVERFAHREN......................................................................................................................................... 9
Konfigurationsverfahren ............................................................................................................................................................................ 9
Menüanzeige ........................................................................................................................................................................................... 10
Änderung der Konfigurationsparameter .................................................................................................................................................. 11
Sprache der Tastatur............................................................................................................................................................................... 12
Konfiguration der Matrix .......................................................................................................................................................................... 12
Test der Übertragungskanäle .............................................................................................................................................................. 13
Aktivierungen........................................................................................................................................................................................... 14
Änderung der Paßwörter ......................................................................................................................................................................... 14
Identifikationsnummer des Operators ..................................................................................................................................................... 15
Summer der Tastatur............................................................................................................................................................................... 15
TASTEN ............................................................................................................................................................................... 16
Auswahl der Ein- und Ausgänge ............................................................................................................................................................. 16
Auswahl des aktiven Monitors ................................................................................................................................................................. 16
Auswahl des Eingangs ............................................................................................................................................................................ 16
KONFIGURATION DER MATRIX........................................................................................................................................ 17
PROGRAMMIERUNG DER MATRIX SW164 STANDARD ................................................................................................ 17
Umschaltsequenz.................................................................................................................................................................................... 17
Änderung der Identifikationstexte ............................................................................................................................................................ 18
Änderung der Datum/Zeit-Parameter ...................................................................................................................................................... 19
PROGRAMMIERUNG DER MATRIX SW164OSM ON SCREEN MENU ........................................................................... 20
WARTUNG ........................................................................................................................................................................... 21
Seite 1
KEYPLUS9702
LÖSUNG VON INSTALLATIONSSTÖRUNGEN................................................................................................................. 21
Test der Verbindung zwischen der Tastatur und der Matrix .................................................................................................................... 21
LÖSUNG VON KONFIGURATIONSSTÖRUNGEN ............................................................................................................ 22
PROBLEME IN BEZUG AUF DIE VIDEO-UMSCHALTUNG .............................................................................................. 22
Anwendung der Paßwörter...................................................................................................................................................................... 23
Programmierung der Matrix SW164 Standard ........................................................................................................................................ 23
Programmierung der Matrix SW164OSM................................................................................................................................................ 23
TECHNISCHE EIGENSCHAFTEN....................................................................................................................................... 23
TECHNISCHE SPEISERSEIGENSCHAFTEN..................................................................................................................... 23
Der Hersteller übernimmt keine Verantwortung für eventuelle Schäden, die auf einen unsachgemäßen Gebrauch der in
diesem Handbuch erwähnten Einrichtungen zurückzuführen sind, und behält sich das Recht vor, den Inhalt dieses
Handbuchs ohne Vorankündigung zu verändern. Große Sorgfalt wurde auf die Sammlung und Prüfung der in diesem
Handbuch enthaltenen Unterlagen verwendet. Jedoch übernimmt der Hersteller keine Verantwortung, die auf den
Gebrauch derselben Unterlagen zurückzuführen ist. Dasselbe gilt auch für jede Person oder Gesellschaft, die an der
Schaffung oder Herstellung dieses Handbuchs teilgenommen hat.
Seite 2
KEYPLUS9702
Einführung
Verpackungsinhalt
• 1 Tastatur KEYPLUS
• 1 Externspeiser
• 2 Telefonkabel 6/6 - Länge: ungefähr 150 cm.
• 2 Abzweigdosen der Stecker RJ
• 1 Bedienungshandbuch
Am Warenerhalt stellen Sie sicher, daß die Verpackung keinen Schaden oder kein sichtbares Zeichen von Fall oder
Riß aufweist. Bei sichtbaren Schäden setzen Sie sich sofort in Verbindung mit dem Lieferant.
Danach sollten Sie sich vergewissern, daß sich alle hier aufgeführten Teilen im Verpackungskarton befinden.
Inhalt des vorliegenden Bedienungshandbuchs
Dieses Bedienungshandbuch enthält die Beschreibung der Bedienungstastatur CBT220/CBT24 mit
den
dazugehörigen Aufstellungs-, Konfigurations- und Anwendungsprozeduren.
Bevor Sie mit der Installation und der Anwendung der Tastatur beginnen, lesen Sie bitte aufmerksam das
vorliegende Bedienungshandbuch und, im besonderem, den Abschnitt über die Unfallverhütungsvorschriften.
An wen ist dieses Handbuch gerichtet?
Die mehreren Sektionen dieses Handbuchs bezwecken, die zwei verschiedenen Betriebsanforderungen des
Installateurs und des Operators zu befriedigen.
Installateur: Ein angemessen erfahrener Techniker, der die Anlage installiert und ihre Betriebsfähigkeit überprüft.
Er besitzt die notwendigen technischen Kenntnisse, um die Anlage zu installieren, verbinden und konfigurieren. Nur der
Installateur kann die Operationen durchführen, die im vorliegenden Handbuch als reserviert für das “technische
Personal” bezeichneten sind.
Operator: Der Endbenutzer, der durch diese Bedienungstastatur den Betriebsmodus des ganzen Systems festsetzt.
Ein Mehrbenutzersystem besteht aus maximal 4 Operatoren, die die verfügbaren Einheiten (Video-Eingänge, Monitore
und so weiter) gleichzeitig steuern.
Was zum Lesen
Die Aufstellungsoperationen, die vorwiegend an den Installateur gerichtet sind, werden auf Seite 7 und ff.
beschrieben.
Die Beschreibung der Operationen in bezug auf die Benutzung der Tastatur, die direkten Umschaltfunktionen und die
Programmierung des gesteuerten Video-Systems, die vorwiegend an den Operator gerichtet sind, befinden sich auf
Seite 16 und ff.
Typographische Symbole
Die vorliegende Sektion beschreibt die Bedeutung der verschiedenen graphischen Symbole, die in diesem
Bedienungshandbuch benutzt werden:
Elektrische Schläge; wenn nicht anders angegeben, schalten Sie die Einheit aus, bevor Sie mit den
beschriebenen Prozeduren beginnen.
Lesen Sie bitte aufmerksam die beschriebenen Prozeduren oder die angegebenen Informationen und führen
Sie die Operationen gemäß den vorgesehenen Betriebsvorschriften aus. Die unrichtige Durchführung der Prozedur
kann Betriebsstörungen oder die Beschädigung des Systems zur Folge haben.
Lesen Sie bitte die mit diesem Symbol versehenen Sektionen, um den Betrieb des Systems zu verstehen.
Seite 3
KEYPLUS9702
Unfallverhütungsvorschriften
Die Tastatur KEYPLUS entspricht den Rechtsvorschriften in Kraft zur Zeit der Veröffentlichung des
vorliegenden Bedienungshandbuchs in bezug auf die elektrische Sicherung, die elektromagnetische Kompatibilität und
die anderen allgemeinen Forderungen. Beachten Sie die folgenden Vorsorgemaßnahmen, um die Sicherheit der
Benutzer (Installateur und Operator) zu gewährleisten:
• Schließen Sie die Einheit an eine den Betriebseigenschaften auf den Datenschildern entsprechende Stromquelle an
(Siehe folgendes Kapitel Betriebseigenschaften auf den Datenschildern)
• Die Installation des Geräts (und der ganzen Anlage) muß nur von qualifiziertem Personal ausgeführt werden.
• Für den Kundendienst wenden Sie sich bitte an das autorisierte technische Personal.
• Die Einheit muß nie geöffnet werden.
• Von der Garantie sind Schäden ausgenommen, die auf unsachgemäßen Gebrauch des Geräts zurückzuführen
sind.
• Gemäß dem in Kraft befindlichen Gesetz muß die Steckdose geerdet sein.
• Ziehen Sie nicht am Kabel , um den Stecker aus der Steckdose herauszuziehen.
• Bevor Sie die Einrichtung verstellen oder technische Eingriffe vornehmen, stellen Sie sicher, daß das System
ausgeschaltet ist. Das Gerät wird für deaktiviert gehalten, wenn die Stromversorgung ausgeschaltet ist und die
Verbindungskabel, die das Gerät mit anderen Einheiten verbinden, entfernt worden sind.
• Keine beschädigten oder verschlissenen Verlängerungsschnüre benutzen, weil sie die Sicherheit der Benutzer
gefährden.
• Stellen Sie keine Flüssigkeit auf das System und vermeiden Sie, eingeschaltete Einheiten mit feuchten Händen
zu berühren.
• Setzen Sie nicht das Gerät den Witterungseinflüssen aus.
• Vermeiden Sie die Arbeitszone, die leicht entzündbare Stoffe enthalten.
• Kinder und ungelernte Arbeiter dürfen das Gerät nicht benutzen.
• Stellen Sie Ihre Anlage immer auf eine feste ung gerade Unterfläche.
Bewahren Sie das vorliegende Bedienungshandbuch sorgfältig für zukünftiges Nachschlagen auf.
Betriebseigenschaften auf den Datenschildern
Die Rückseite der Tastatur KEYPLUS ist mit zwei Schildern gemäß der EG-Markierung versehen.
Die e Rste Etikette enthält den Identifikationscode des Modells (Barrencode EXT 3/9)
Die zweite Etikette zeigt die Serie-Nr. Des Modells (Barrencode EXT 3/9).
An dem Serie-Speiser wird eine Etikette angebracht, dieSpeisungseigenschaften der Tastatur zeigt. Bei der Montage
ist zu kontrollieren, ob die Speisungseigenschaften der Tastatur den angeforderten Eigenschaften entsprechen. Die
Anwendung unzweckmäßiger Geräte kann die Sicherheit des Personals und der Anlage gefährden.
Seite 4
KEYPLUS9702
Beschreibung der Tastatur KEYPLUS
Die Tastatur KEYPLUS ist ein berufmäßiges Produkt für Sicherheits- und Überwachungsanwendungen. In
einem Sicherheitssystem erlaubt die Tastatur die Kontrolle von Video-Umschaltfunktionen (Video-Matrix SW164OSM)
und die Steuerung von möglichen Alarmzuständen.
Merkmale:
• LCD Display, 16 Ziffern x 2 Zeilen zur Steuerung der Operationen
• RS232- und Current Loop-Übertragungsmodus
• Aktivierung der Warn-LED bei Übertragungsunterbrechung oder bei Alarmzustand
• Aktivierung der Summer bei Übertragungsunterbrechung oder bei Alarmzustand
• Wechselnde Baudrate für Datenübertragungssysteme (Matrix SW164OSM OSM und Empfänger DTRX)
• Bedienerfreundlichkeit: die gewöhnlichsten Operationen werden durch Drücken einer einzigen Taste oder maximal
zweien Tasten aktiviert
• Komplette Konfiguration der Tastatur durch Display-Setup
• Auswahl des Empfangsmodus (RS232/Current Loop) durch Display
• Die Tastatur kann beide Versionen der Matrix SW164 (Standard oder On Screen Menu ) steuern
• Auswahl der Landessprache
• Test-Menü für die Kommunikationen nach der Matrix
• Autotest der Übertragungskanäle
• Aktivierung/Deaktivierung der Ein- und Ausgänge, die für jede einzige Tastatur ausgewählt werden
• Drei Paßwortstufen: Verbindungs-, Rücksetz- und Setup-Paßwort
Sicherheit
Die Sicherheit des Systems wird von der Anwendung dreier Paßwortstufen garantiert, die für jede Tastatur einzeln
konfiguriert werden :
• Verbindungspaßwort: Es wird beim Einschalten der Tastatur verlangt, um zu vermeiden, daß unbefugtes Personal
die Einheit benutzt;
• Alarmrücksetzpaßwort: Es wird beim Rücksetzen des Alarmzustands durch Tastatur verlangt;
• Setup-Paßwort: Es wird beim Setup (sowohl der Tastatur als auch der Matrix) verlangt
Verwendung der Paßwörter
Wenn es notwendig ist, ein Paßwort einzugeben, wird die Einheit maximal 10 Sekunden auf das Eintasten der ersten
Ziffer (von 0 bis 9) und 5 Sekunden auf das Eintasten der folgenden Ziffern warten. Falls das Paßwort am Ende dieser
Wartezeit nicht völlig eingetastet worden ist, wird das Paßwort für falsch gehalten.
• Ein Fehler beim Eintasten des Verbindungspaßworts verursacht die Sperre der Tastatur für 25 Sekunden. Nach
dieser Zeit wird die Anforderungsmeldung wiederholt.
• Paßwörter können auf 000000 gestellt und daher deaktiviert werden.
LED-Anzeigelämpchen und Summer
Die Tastatur ist mit zwei Led-Anzeigelämpchen versehen, die automatisch in folgenden Zuständen blinken:
• Unterbrechung der Kommunikationen mit der Matrix
• Alarmzustand der Matrix.
Ein in der Tastatur eingebauter Summer warnt mit einem kontinuierlichen Ton davor, daß die Störung noch vorliegt.
Geräte, die an die Tastatur KEYPLUS angeschlossen werden können
• Video-Matrix SW164OSM: Diese Matrix erlaubt die Umschaltung von 16 Video-Eingängen durch 4 Monitore und
die Steuerung von maximal 16 Alarmkontakten. Eine einzige Video -Matrix kann an maximal 4
Bedienungstastaturen angeschlossen werden (auch in einer gemischter Konfiguration: DCS2/KEYPLUS). Beziehen
Sie sich auf das dazugehörige Bedienungshandbuch für eine detaillierte Beschreibung der Eigenschaften des
Geräts.
Seite 5
KEYPLUS9702
Aufstellungsbeispiel
Die Anlage wird von drei Operatoren gesteuert: Jeder Operator hat einen Monitor; neben der Video-Umschaltung und
der Steuerung der Alarm-Kontakte steuern zwei Operatoren einen Satz Empfänger für die Positionierung der
Schwenkvorrichtungen und der Linsen:
PTH
PTH
DTRX
DTRX
DTRX
DTRX
GERÄTE:
PTH
Bedienungstastaturen:
• 1 Bedienungstastatur KEYPLUS
• 2 Bedienungstastatur DCS2
DTRX
DTRX
Video-Sektion:
• 1 Matrix SW164OSM
• 3 Monitore (maximal 4)
• 3 Kameras (maximal 16)
SW164OSM
SW16.4
DCMX
DCMX
DCS2
DCS2
P RES ET
SC AN
A UX 1
AU X 2
AU X 3
AUX 4
P RES ET
SC AN
A UX 1
AUX 2
AU X 3
A UX 4
COM FA ULT
COM FA ULT
ALA RM
WIPER
1
2
3
4
5
7
8
9
0
M /A
A LA RM
PR OG
PR OG
6
C OM FA ULT
M /A
M /A
ALA R M
-/--
KEYPLUS
KEYPLUS
DCS2
DCS2
Fernmessungssektion:
• 3 Empfänger DTRX
• 3 Schwenkvorrichtungen
• 1 Digital-Multiplexer DCMX
PR OG
WIPER
C LEA R
IN
OPE N
NE AR
E NTE R
US ER
OUT
C LOSE
FA R
-/--
1
2
3
4
5
6
7
8
9
0
C LEA R
IN
OPE N
E NTER
US ER
OU T
C LOSE
NE AR
FA R
- /- -
1
2
3
4
5
6
7
8
9
0
C LE AR
E NTER
Kabel
In den Exemplifizierungen wurden verschiedene Stricharten angewandt, um die mehreren Funktionen der Kabel zu
bezeichnen.
Video-Kabel:
Koaxialkabel RG 59 oder gleichartiges Kabel
Für lange Strecken wäre es empfehlenswert, ein Video-Übertragungssystem durch Doppelschnur zu verwenden.
Mehradriges Kable:
Jede Steuerfunktion der Schwenkvorrichtung wird von einem im Empfänger eingebauten Relais aktiviert/deaktiviert.
Die endgültige Kabelnummer folgendermaßen festlegen:
• 7 Drähte für die Bewegung der Schwenkvorrichtung (230 V~ oder 24 V~): rechts, links, oben, unten, autopan,
gemeinsam, Erde (nur für 230 V~)
• 6 Drähte für die Steuerung der Umpolungslinsen (zoom wide, zoom tele, focus near, focus far, iris open, iris close)
• 4 Drähte für die Linsen mit gemeinsamem Draht (zoom, focus, iris, gemeinsam)
• 2 Bezugsdrähte für die Steuerung der PRESET-Funktionen und 1 zusätzlicher Draht für jede vorgegebene Funktion
2 Drähte für jede zusätzliche Funktion (Wischer und Wascher)
Beziehen Sie sich auf das DTRX- Bedienungshandbuch für weitere Erklärungen.
Kabel für die digitale Übertragung von Befehlen:
2 Paare Doppelschnüre, Mindestdurchmesser von 0,6 mm (Querschnitt: 0,22 mm.² AWG 24):
1 Paar Übertragung/Erde + 1 Paar Empfang/Erde
Maximalverbindungsdistanz: 15 m bei RS232; 1500 m bei Current Loop.
Das gelieferte Kabel ist 1,5 m lang: um längere Strecken zurückzulegen, verwenden Sie die Anschlußdosen des Steckers RJ
gemäß der Prozedur, die im Abschnitt Aufstellung, Buchsen und Anschlüsse beschrieben wird (Seite 8).
Seite 6
KEYPLUS9702
Aufstellung
Bevor Sie mit den folgenden Operationen beginnen, vergewissern Sie sich, wenn nicht anders angegeben,
daß die Einheit ausgeschaltet ist.
Das Aufstellen des Geräts muß nur von qualifiziertem technischem Personal durchgeführt werden.
Auspacken des Gerätes
Weist die Verpackung keinen Fehler (wegen Falls oder anomaler Schramme) auf, vergewissern Sie sich, daß sich alle
unter Paragraph Inhalt der Verpackung, im Kapitel Einführung (Seite 3) aufgeführten Teile in Verpackungskarton
befinden.
Der Installateur wird die Verpackungsmaterialien gemäß den Recycling-Programmen oder, jedenfalls, gemäß dem
Gesetz in Kraft im Bestimmungsort beseitigen.
Kontrolle der Betriebseigenschaften auf den Datenschildern
Bevor Sie mit der Installation des Systems beginnen, sollten Sie sich vergewissern, daß die gelieferte Ware
den Forderungen entspricht: kontrollieren Sie dazu die Datenschilder gemäß der Beschreibung in Kapitel
Betriebseigenschaften auf den Datenschildern (Seite 4). Keine in diesem Bedienungshandbuch nicht vorgesehenen
Veränderungen oder Anschlüsse ausführen: die Anwendung von ungeeigneten Geräten kann die Sicherheit des
Personals und der Anlage gefährden.
Ein- und Ausschalten
Bevor Sie die Einheit anschalten:
• Vergewissern Sie sich, daß die gelieferte Ware den Forderungen entspricht: kontrollieren Sie dazu die
Datenschilder gemäß der Beschreibung im Kapitel Betriebseigenschaften auf den Datenschildern (Seite 4).
• Vergewissern Sie sich, daß die Tastatur und die anderen Komponenten der Anlage geschlossen sind, um den
direkten Kontakt mit stromführenden Elementen zu vermeiden.
• Während der Konfigurationsphase (mit Ausnahme des Verbindungstests) ist das Kabel zur Verbindung mit der
Matrix nicht nötig: Gehen Sie mit dem Anschluß dieses Kabels an, nur wenn diese Operation gefordert wird.
• Stellen Sie die Tastatur und die anderen Komponenten der Anlage immer auf eine feste und gerade Unterfläche.
• Die Stromkabel müssen die normalen Operationen des Installateurs nicht behindern.
• Vergewissern Sie sich, daß die Stromquellen und die Verlängerungskabel in der Lage sind, den Systemverbrauch
zu ertragen.
EINSCHALTEN: Der Verbinder Mini Din 4 Polen des Speisers wird mit der entsprechenden Steckdose
verbindet, die sich auf der Rückseite der Tastatur befindet. Die Tastatur ist ohne Schalter: dazu ist den Stecker in der
Steckdose einzuschalten.
AUSSCHALTEN: den Netzstecker aus der Steckdose herausziehen.
Seite 7
KEYPLUS9702
Buchsen und Anschlüsse
Die Tastatur KEYPLUS ist mit einer Buchse RJ11, die auf der Rückseite des Gehäuses sich befindet, und Mini
Din 4 polen:
Produkt-code
Mini Din 4 Polen
Buchse RJ11 (MatrixKanal)
Serie-Nr.
Die Datenübertragung nach der Matrix wird gleichzeitig in RS232 und in Current Loop duchgeführt.
Der Empfangsmodus kann während der Konfiguration der Tastatur eingestellt werden.
Vergewissern Sie sich, daß die in der Matrix eingebauten Auswahldrähtbrücken richtig positioniert sind: Beziehen Sie
sich auf das dazugehörige Konfigurationshandbuch.
Die Tastatur KEYPLUS kann mit der Video-Matrix SW164OSM mittels eines von dem Hersteller gelieferten Kabels
direkt verbunden werden, um die Leistungsfähigkeiten der Anlage zu prüfen:
SW164OSM
SW16/4
KEYPLUS
KEYPLUS
COM FAULT
M/A
ALARM
PROG
- / --
1
2
3
4
5
CLEAR
6
7
8
9
0
ENTER
Bei Anwendung von Doppelschnüren verbinden Sie die Einheiten durch die
Anschlußdosen RJ gemäß den nachfolgenden Tabellen:
von dem Hersteller gelieferten
KEYPLUS-Matrix SW164OSM-Anschluß
Current Loop-Anschlußplan: max 1500 m
KEYPLUS
SW164OSM
TX CL
gelb ------------- schwarz
RX CL
GND CL
rot -------------- grün
GND CL
RX CL
weiß --------- blau
TX CL
SW164OSM
SW16/4
max 1500 m
Current Loop
KEYPLUS
KEYPLUS
RS232-Anschlußplan: max 15 m
KEYPLUS
SW164OSM
TX RS232
schwarz -------- gelb RX RS232
GND RS232
grün -------- rot
GND RS232
RX RS232
blau --- weiß
TX RS232
COM FAULT
M/A
ALARM
PROG
-/ - -
Seite 8
1
2
3
4
5
6
7
8
9
0
C LEAR
ENTER
KEYPLUS9702
Bemerkungen über die Konfiguration der Tastatur
Ziel der Konfigurationsphase ist die Optimierung des Betriebs der Tastatur gemäß den Anforderungen der
Anlage. Die Konfiguration muß nur von dem Installateur während der Installationsphase ausgeführt werden: die
konfigurierten Parameter sind fest abgespeichert und bleiben auch nach dem Abschalten des Systems erhalten.
Es wäre empfehlenswert, mit der Konfiguration der Parameter ordnungsgemäß zu beginnen, um Installationsstörungen
zu vermeiden: falls die Vorbedingungen nicht erfüllt werden, werden einige Menüs automatisch deaktiviert. In diesem
Fall können diese Parameter nicht modifiziert werden.
Die bei der Konfigurationsphase gesetzten Parameter sind die folgenden:
•
•
•
•
•
Landessprache der Tastatur
Typ der angeschlossenen Matrix (“Standard” oder “OSM”; wenn es um eine Standard-Matrix handelt, wird die
Identifikationsnummer des Operators verlangt)
Empfangsmodus des Steuerkanals der Matrix (RS232 oder Current Loop)
Auswahl der Paßwörter (Verbindungspaßwort, Alarmrücksetzen-Paßwort und Programmmierungspaßwort)
Auswahl der Ein- und Ausgänge, die mittels jeder einzigen Tastatur gesteuert werden können.
Anwendung des Warnsummers bei Alarmzustand oder bei Unterbrechung der Kommunikationen mit der Matrix.
•
Außerdem stehen zwei Menüs für die Auswahl des Kommunikationstests zur Verfügung.
Die Konfiguration der Tastatur (mit Ausnahme des Verbindungstests zwischen den zwei Einheiten, der den Anschluß
mit der Matrix benötigt) wird durchgeführt, ohne die Einheit an der Matrix anzuschließen.
Für eine vollständige Konfiguration wäre es empfehlenswert, ordnungsgemäß nach den aufgeführten Menüs
vorzugehen: Beginnen Sie vom Menü Nummer 1.Sprache bis zum Menü Nummer 8.Summer.
Konfigurationsverfahren
Die Operationen für die Konfiguration der Tastatur müssen nur von qualifiziertem technischem Personal
durchgeführt werden: Die Anwendung von falschen Parametern kann die Isolierung der Tastatur von den anderen
Einheiten des Systems verursachen.
Konfigurationsverfahren
Die Konfiguration der Tastatur wird durch ein auf dem Display ausgegebenes Menü-System gesteuert. In der
nachfolgenden Liste finden Sie die Bedeutung aller Tasten, über die die Bewegung auf dem Display gesteuert werden
kann:
P
U
D
E
C
Programmierungsanfang
Aufruf des vorhergehenden Menukommandos
Aufruf des darauffolgenden Menukommandos
Ëintritt in das auf Display gezeigte Menu oder Bestätigung des gezeigten Werts
ermöglicht, nach dem Menu, die auf Display gezeigten Werte zu verändern
Seite 9
KEYPLUS9702
Menüanzeige
In der folgenden Tabelle werden die Konfigurationsmenüs der Tastatur aufgeführt. Es wäre empfehlenswert, bei dieser
Operation sehr aufmerksam zu sein, um eine falsche Modifizierung der Parameter zu vermeiden.
Die kritischen Parameter, die die Verbindung unter Tastatur, Matrix und Empfänger verhindern können, falls sie nicht
korrekt konfiguriert werden, sind mit einem Asteriskus * gekennzeichnet.
Menü
Bedeutung
Wählbare Werte
1.Sprache
Sprache der Tastaturmenüs.
Englisch (default), Italienisch,
Französisch, Deutsch, Spanisch
2.Matrix-Setup *
Konfiguration der Merkmale der gesteuerten
Tastatur.
Version der gesteuerten Tastatur.
2.1 Typ *
2.2 Kommunikationen *
2.3 Baudrate *
3 <nicht belegt>
4. Test der Übertragungskanäle
4.1 Matrix-Kanal
4.2 Automatischer Matrix-Kanal
5. Aktivierungen
5.1 Eingänge
5.2 Ausgänge
5.3 Pupitre (Up/Down)
5.4 Andere Parmeter
6. Paßwörter *
6.1 Verbindungspaßwort *
6.2Alarmrücksetzpaßwort
6.3 Setup-Paßwort *
7. Identifikationsnummer des
Operators
8. Summer
Übertragungsmodus.
SW164OSM Standard (default)
oder OSM-Version
RS232 (default) / Current Loop
Übertragungsgeschwindigkeit (nur für die
Matrix OSM).
300, 1200, 2400, 9600 (default)
Baud
Verfahren für das Testen der Verbindungen.
Test der Verbindung mit der Matrix .
Automatischer Test des Übertragungskanals
durch die Anwendung einer Dose des
Steckers RJ
Vom Benutzer definierbare Funktionen:
umschaltbare Eingänge und Ausgänge
sowie Anwendung der Pfeiltasten.
Jeder Eingang kann aktiviert oder deaktiviert
werden: Die deaktivierten Eingänge können
nicht durch Tastatur direkt ausgewählt
werden; sie können nur bei Alarmzustand
und beim Einschließen in
Umschaltsequenzen am Bildschirm gezeigt
werden.
Auswahl der Ausgänge, die für die
Umschaltung abgerufen werden können.
Der Tastenblock wird benutzt, wenn einem
Operateur die vollkommene Verfügbarkeit
über alle Funktionen nicht erlaubt ist.
Click: wenn es beim Drücken einer Taste
aktiviert wird, wird ein Bestätigungston
hörbar sein.
Meldungen: wenn sie befähigt sind, werden
Fehler-u.
Warnungsmeldungen visualisiert.
Änderung der Paßwörter.
NB: Die Paßwörter sind privat und können
für jeden Operator verschieden sein.
Beim Einschalten der Tastatur erforderlich.
Beim Rücksetzen eines Alarmzustands
durch Tastatur erforderlich.
Bei der Konfiguration der Tastatur oder der
gesteuerten Matrix erforderlich.
Nur bei Verbindung mit der Matrix
SW164OSM Standard ist es notwendig, die
4 Operatoren zu identifizieren und jeden
Operator mit einer verschiedenen
Identifikationsnummer zu versehen.
Aktivierung des Warnsummers: bei
Alarmzustand, bei Unterbrechung der
Matrix-Kommunikationen, bei beiden
Zuständen.
Seite 10
Default: Alle Eingänge sind
aktiviert
Default: Alle Ausgänge können
abgerufen werden
Default: alee Tasten sind
aktiviert
Default: deaktiviert (000000)
Default: deaktiviert (000000)
Default: deaktiviert (000000)
Default: Operator Nummer 1.
Default: Aktivierung nur bei
Alarmzustand
KEYPLUS9702
Änderung der Konfigurationsparameter
Die verschiedenen Konfigurationsparameter werden folgendermaßen geändert:
• Zugriff auf den Programmierungsmodus
• Auswahl des Menüs
• Auswahl der gewünschten Option unter den verschiedenen verfügbaren Optionen
• Menü-Ausgang
• Programmierung-Ausgang.
Nachfolgend werden verschiedene Beispiele angeführt: Änderung der aktivierten Ausgänge
Zugriff auf den Programmierungsmodus
Display
P
Tastatur auf, dabei Taste
5 Sekunden lang drücken bis zum Led-Blinken.
Wenn angefragt, Setup-Password eingeben.
TASTATUR
KONFIGURATION
Auswahl des Menüs und Änderung der Parameter
Display
Das Menü wird auf zwei Zeilen am Display gezeigt:
TASTATUR - MENU
1.Sprache
• Menü-Titel (in diesem Fall TASTATUR-MENU, der Hauptmenü)
• das Verzeichnis der verfügbaren Untermenüs
U und D wird das gewünschte Untermenü (E/A-Freigaben) gewählt
Drücken auf E, Untermenü E/A-Freigaben aufrufen und Wahl der
Mit
TASTATUR - MENU
5.E/A-Freigaben
FREIGABE 5.
Eingaben
Befähigungsgruppen (Ausgänge, Eigänge, Tasten), die anzuzeigen sind.
Um mit dem Beispiel fortführen zu können, mit
Es wird mit
E aufgeruft.
D Untermenu Ausgänge wählen.
Um die aktivierten Ausgänge zu konfigurieren, wählen Sie jeden der vier
Ausgänge und legen Sie fest, ob der einzige Ausgang durch Tastatur gewählt
oder nicht gewählt werden kann:
U/D
• Zu seinem Befugnis/Unbefugnis auf E drücken
• Drücken Sie nochmals die Taste C , um zum Hauptmenü zurückzukehren.
C rettet die eventuell ausgeführten Veränderungen und kehrt auf dem
• Wählen Sie den Ausgang durch
FREIGABE 5.
Ausgaben
FREIGABE 5.2
Eingabe 1: Ja ¤£
DDE
FREIGABE 5.3
Ausgabe 3: Nein ¤¢
FREIGABE 5.
Ausgaben
vorhergehenden Menu zurück. Die Parameten actung kommt direkt automatisch
am Ausgang vom Menu im Stande.
TASTATUR-MENU
5.E/A-Freigaben
Verlassen der Programmierung
Display
Beim Programmierungsende wird die Speicherung der gesetzten Parameter
bestätigt und die normalen Betriebsbedingungen der Tastatur werden
wiederhergestellt.
TASTATUR-MENU
Setup-ende
Um aus der Programmierung auszugehen, Wahl der Position Fine Setup im
Hauptmenu und wiederholender Druck von
D und Bestätitung mit E.
Seite 11
KEYPLUS9702
Sprache der Tastatur
Die Sprache der Menüs der Tastatur kann konfiguriert werden und Sie können sie unter den vorgegebenen Sprachen
wählen.
NB: Die Modifizierung der Sprache der Tastatur übt keinen Einfluß auf die Sprache der gesteuerten Matrix.
Änderung der Sprache der Tastatur
Beschreibung
Tasten
Display
Im Hauptmenü wählen Sie das Untermenü SPRACHE
UE
E
C
TASTATUR-MENU:
1.Sprache
£
E , um die Sprache auszuwählen;
Drücken Sie C , um die Operation zu bestätigen und
Drücken Sie
das Untermenü zu schließen.
Sprache
1.
English * ¢
Italienisch
Franzosisch
Deutsch
Konfiguration der Matrix
Die Tastatur KEYPLUS erlaubt die Steuerung der Matrix SW164OSM Standard und SW164OSM.
Das Konfigurationsmenü der Matrix besteht aus dreien Untermenüs:
• Typ der angeschlossenen Matrix
• Tastatur/Matrix-Übertragungsmodus
• Baudrate (nur für die Matrix SW164OSM).
Konfiguration der Matrix
Beschreibung
Tasten
Display
Im Hauptmenü wählen Sie das Untermenü Matrix
DE
P
E
C
TASTATUR_MENU:
2.Matrix¢
DE
E
C
MATRIX-SETUP 2.
Kommunikation ¡
DE
E
C
MATRIX-SETUP 2.
Baudrate
¡
MAT. - GESCHW. 2.3
9600 baud
¤
C
TASTATUR-MENU:
2.Matrix¢
1) Auswahl des Typs von gesteuerter Matrix
E , um den Typ zu ändern
C , um die Operation zu bestätigen und das
Untermenü zu verlassen
2) Auswahl des Übertragungsmodus
E , um den Modus zu ändern
C ,um die Operation zu bestätigen und das
Untermenü zu verlassen
3) Auswahl der Baudrate (nur für die Matrix
SW164OSM)
E , um die Geschwindigkeit zu ändern
C ,um die Operation zu bestätigen und das
Untermenü zu verlassen
C
Drücken Sie
, um zum Hauptmenü
zurückzukehren.
Seite 12
MATRIX-SETUP 2.
Typ
£
MATRIX-TYP
2.1
Standard
¤
MATRIX-COMM.
RS232
£
2.2
KEYPLUS9702
Test der Übertragungskanäle
Die Tastatur sieht den Test der Übertragungskanäle vor, um die Zuverlässigkeit des installierten Systems zu
überprüfen.
• Test des Kanals für die Übertragung mit einer Matrix: Die
Tastatur an die
Matrix SW164OSM direkt
anschließen.
Der Test prüft das Polling (STD-Matrix) oder eine besondere Test-Meldung (OSM-Matrix), um die bidirektionale
Übertragung zwischen den zwei Einheiten zu kontrollieren.
Warnung: Konfigurieren Sie den Typ von Matrix (Untermenü 2.1), und den Übertragungsmodus (Untermenü 2.2).
Alle mögliche Störungen werden am Display ausgegeben.
• AutoTest des Übertragungskanals: Ohne den Anschluß an der Matrix benutzen Sie den dazu bestimmten TestStecker . Durch geeignete Befehle, die von der Tastatur
gesandt und empfangen werden, wird der Test
automatisch durchgeführt.
Beide Übertragungsmodi (RS232 und Current Loop) werden getestet.
Alle mögliche Störungen werden am Display ausgegeben.
Test der Kommunikationen
Beschreibung
Tasten
Display
Im Hauptmenü wählen Sie das Untermenü Komm.Test
DE
TASTATUR-MENU:
4.Komm.-Test ¢
Den gewünschten Test wählen (mit Anschluß an der
Matrix oder Autotest)
[
D] E
E
KOMMUN. TEST
Mit Matrix
Starten Sie den Test durch Drücken der Taste
Der Test dauert ungefähr 10 Sekunden.
E.
4.
£
MATRIX-KANAL
[¤] Anfang
TEST STD 232 RX (*)
Test ist OK!
Prüfen Sie, ob die am Bildschirm gezeigten Meldungen
Übertragungsstörungen aufweisen.Für die Lösung der
Probleme beziehen Sie sich auf das Kapitel
Fehlersuche.
(*) Bemerkungen: Beim Testen mit Anschluß an der Matrix erlaubt die auf dem Display während des Tests erscheinte
Meldung, die korrekte Konfiguration des Systems zu überprüfen:
Test STD 232 RX
STD (Verbindung mit der Standardmatrix) / OSM (Verbindung mit der OSM-Matrix)
232 (Test des RS232-Kanals) / CL (Test des Current Loop-Kanals)
RX (Test des Empfangsbetriebs) / TX (Test der Übertragungsart)
KABEL FÜR DEN AUTOTEST
Drähte verbinden:
weiß mit gelb
blau mit schwarz
COM FAULT
M/A
ALARM
P ROG
-/--
1
2
3
4
5
CLEAR
6
7
8
9
0
E NTER
Seite 13
KEYPLUS9702
Aktivierungen
Um die Anwendung der Paßwörter zu vermeiden und gleichzeitig die Auswahl von bestimmten Video-Ein/Ausgängen,
einzuschränken, konfigurieren Sie im Menü Aktivierungen die wählbaren Ein- und Ausgänge, auf die jeder Operator
zugreifen kann. Sollte etwaiger Operateur nicht die ganze Eingangsgruppe betreten können, empfiehlt es sich die
U und D), welche ermöglichen die aktiven Eingänge anzurufen,
Funktionsdeshabitalisierung Up/Down (Tasten
ohne von der Zahlentaste Gebrauch zu machen.
Aktivierung der Ein- und Ausgänge
Beschreibung
Tasten
Display
ImHauptmenü wählen Sie das Untemenü E/A-Freigaben
DE
P
UD
EC
TASTATUR-MENU:
5.E/A-Freigaben ¢
1) Aktivierung der Eingänge, auf die der Benutzer zugreifen
kann
U / D , um den Eingang zu identifizieren
E , um den Eingang zu aktivieren/deaktivieren; C , um das
Untermenü zu verlassen
FREIGABE
Eingaben
5.
£
Freigabe
5.1
Eingabe 1 :Ja ¤£
FREIGABE
Ausgaben
U / D , um den Ausgang zu identifizieren
E , um den Ausgang zu aktivieren/deaktivieren; C, um das
DE
UD
EC
3) Aktivierung der Funktion der Pfeiltasten:
Falls einige Eingänge deaktiviert sind, wäre es empfehlenswert,
diese Funktion zu deaktivieren.
DE
FREIGABE
5.
Tastatur-Tasten ¢
E, um die Funktion zu aktivieren/deaktivieren
C , um die Operation zu bestätigen und das Untermenü zu
E
C
FREIGABE
5.3
Pfeiltast.:Ja ¤
2) Aktivierung der Ausgänge, auf die der Benutzer zugreifen
kann
Untermenü zu verlassen
verlassen
5.
¢
FREIGABE
5.2
Ausgabe 1:Ja ¤£
Änderung der Paßwörter
Die Paßwörter werden im Kapitel Beschreibung der Tastatur KEYPLUS, Sicherheit beschrieben.
Änderung der Paßwörter
Beschreibung
Tasten
Display
Im Hauptmenü wählen Sie das Untermenü Paßwort
DE
E
[0 / 9]
1/0
TASTATUR-MENU
6. Paßwort ¢
1) Das Verbindungspaßwort auswählen:
Das Paßwort (6 Zeichen) eintasten und es nochmals durch
Tastatur eingeben, um die Operation zu bestätigen
Auf Verlangen das Paßwort speichern; über auf dem Display
erscheinte Meldungen werden Sie darauf hingewiesen, daß
ein von Ihnen eingegebener Wert unpassend ist, oder daß
das Paßwort deaktiviert (000000) worden ist.
VERBINDUNG-PWT: 6.
Verbindung
£
VERBINDUNG-PWT 6.1
[****..]
Wechsel sichern?
[1] Ja [0] Nein
2) Das Alarmrücksetzpaßwort wählen und nach der oben
beschriebenen Prozedur fortfahren.
VERBINDUNG-PWT: 6.
Alarmreset-pwt ¢
3) Das Programmierungspaßwort wählen und nach der oben
beschriebenen Prozedur fortfahren.
VERBINDUNG-PWT: 6.
Setup-pwt
¡
Seite 14
KEYPLUS9702
Identifikationsnummer des Operators
Wenn die Tastatur an einer Matrix SW164OSM Standard angeschlossen ist, ist es notwendig, jede KEYPLUS/DCS2
durch eine verschiedene Identifikationsnummer zu identifizieren. Sollen die zwei Tastaturen durch dieselbe
Identifikationsnummer charakterisiert sein, können Übertragungsprobleme entstehen.
Nummer des Operators (nur für die Standard-Matrix)
Beschreibung
Tasten
Display
Im Hauptmenü wählen Sie das Untermenü Benutzer-nr
U DE
E
C
TASTATUR-MENU
7.Benutzer-Nr. ¢
Durch die Taste
E wählen Sie die Nummer des Operators.
C
Durch
die Operation bestätigen und das Untermenü
verlassen.
Benutzer-Nr. 7.
Benutzer 1 ¤
Summer der Tastatur
Die Tastatur ist mit einem eingebauten Summer versehen, der bei Übertragungsstörungen mit der Matrix
(Unterbrechuung der Kommunikationen) oder bei Alarmzustand aktiviert werden kann.
Aktivierung des eingebauten Summer
Beschreibung
Tasten
Display
Im Hauptmenü wählen Sie das Untermenü Summer
aus
U DE
E
TASTATUR-MENU
8.Summer
¢
Durch Drücken der Taste
Summer-Betriebsart:
E wählen Sie die
Summer
Bei Alarm
8.
¤
• unbenützt
• bei Kommunikationsunterbrechung aktiviert
• bei Alarmzustand aktiviert
• bei Kommunikationsunterbrechung und
Alarmzustand aktiviert
C bestätigt die Auswahl und kehrt zum
vorhergehenden Menü zurück.
Seite 15
KEYPLUS9702
Tasten
COM FAULT
M/A
ALARM
PROG
-/--
1
2
3
4
5
6
7
8
9
0
CLEAR
ENTER
Die Tastatur KEYPLUS erlaubt die Steuerung der Video Matrix SW164OSM.
Numerische Tasten
s
0 / 9: direkte Auswahl des Eingangs
Shift
: dient zum Eingaben einer zweistelligen Nummer. Nachdem Sie diese Taste gedrückt haben, wählen Sie die zweite Ziffer
der gewünschten Nummer. Das Display wartet auf die Eingabe der zweite Ziffer und zeigt die Schrift “1-”.
m: um die Nummer des aktivierten Ausgangs auszuwählen..
Up / Down B / D: Auswahl des vorhergehenden oder nächsten Eingangs.
Prog P: um auf den Matrix-Programmierungsmodus (gegebenenfalls nach vorherigem Verlangen eines Paßworts) zuzugreifen.
Clear C: mit der Matrix SW164OSM dient diese Taste zum Auffrischen des Monitors. Mit der Matrix SW164OSM Standard wird
Monitor
diese Taste nicht benutzt.
Auswahl der Ein- und Ausgänge
Auswahl des aktiven Monitors
Monitor vorbereitet das Eingaben der Monitor-Nummer.
Jede Tastatur kann bis 4 Monitore kontrollieren aber ein einziger Monitor wird als “aktiver Monitor” bezeichnet und nur auf diesem
Monitor werden die Video-Umschaltungsbefehle ausgeführt.
Die Liste der wählbaren Monitore wird während des Setup jeder Tastatur einzeln festgesetz.
Beim Drücken der Taste erscheint das Zeichen ? , das den Wartestatus für die Eingabe der Nummer (von 1 bis 4) anzeigt.
Sollte der ausgewählte Ausgang für die Tastatur deaktiviert sein, wird das Drücken der numerischen Taste von einem Warnton
begleitet.
Zum Beispiel, wenn der Operator den Ausgang 2 kontrollieren will:
Aktuelles Display
Tasten
MONITOR 1
Eingang 3
m2
Aktualisiertes Display
MONITOR 2
Eingang -
Auswahl des Eingangs
0/9: Direkte Auswahl der Eingänge auf dem aktiven Ausgang (am Display angegeben).
Auswahl eines Eingangs von 1 bis 9: Die entsprechende numerische Taste (von 1 bis 9) direkt drücken.
Auswahl eines Eingangs von 10 bis 16: Shift (s) und danach den Einer (von 0 bis 6) drücken.
Beispiel: Auswahl des Eingangs 13: s 3; Eingang 10 wird durch Drücken der Taste 0 ausgewählt .
Up / Down B / D: dienen zum Auswählen des nächsten/vorhergehenden Eingangs auf dem aktiven Ausgang.
Automatische Umschaltsequenz M: Diese Taste aktiviert die automatische matrix-spezifische
Tasten
Umschaltsequenz.
Seite 16
KEYPLUS9702
Konfiguration der Matrix
Die Tastatur KEYPLUS erlaubt die Steuerung beider Versionen der Matrix SW164OSM: Standard und OSM.
Bei Anwendung der Standard-Matrix ist die Programmierung auf die Grundparameter beschränkt, die auf dem Display visualisiert
werden. Was die OSM-Matrix betrifft, wird die ganze Programmierungsphase über den Bildschirm durchgeführt und auf dem
Monitor Nr. 1 visualisiert.
Programmierung der Matrix SW164 Standard
Um die Standard-Matrix zu programmieren, ist es notwendig, die folgenden Parameter zu konfigurieren:
• Umschaltsequenz
• Identifikationstexte
• Datum/Zeit-Parameter.
Zugriff auf den Programmierungsmodus (Standard-Matrix)
Beschreibung
P
Durch Drücken der Taste
auf den Programmierungsmodus zugreifen. Auf Verlangen das Setup-Paßwort eingeben.
Tasten
Display
P
-- MATRIX
KONFIGURATION
Umschaltsequenz
Für jeden Benutzer werden zwei automatischen Umschaltsequenzen (ein Tageszyklus und ein Nachtzyklus) definiert. Jede
Sequenz besteht aus maximal 16 Schriften, die durch einen auf dem Bildschirm zu visualisierenden Eingang (von 1 bis 16) und die
Anzeigedauer (von 1 bis 99 Sekunden) definiert werden. Innerhalb jeder Sequenz kann derselbe Eingang mehrmals und ohne
Beschränkungen wiederholt werden.
Definition der Umschaltsequenz
Beschreibung
U
Tasten
Display
UD
MATRIX-KONFIG.
1.Sequenzen £
E
SEQUENZEN
Oper.1,Tag
[
U D] E
Setup ersetzen?
[1] Ja [0] Nein
1/0
Oper.1,Tagesseq.
[A] E:05 Sek.02
[
U D] E
Oper.1,Tagesseq.
[C] E:__ Sek.02
E die
12E
Oper.1,Tagesseq.
[C] E:12 Sek.__
E die
3E
Oper.1,Tagesseq.
[C] E:12 Sek.03
D wählen Sie das Untermenü
Mit
und
Sequenzen
Durch Drücken der Taste
zugreifen
E auf das Untermenü
U
D
Wählen Sie die gewünschte Sequenz mit
und
,
Bestätigen Sie die Änderung durch Drücken der Taste
1.
£
E.
Wenn Sie eine neue Umschaltsequenz starten möchten,
1; um die
aktuelle Sequenz zu modifizieren, drücken Sie 0
bestätigen Sie die Löschung durch die Taste
[A] gibt den Schritt der Sequenz an (Die 16 Schrifte sind
mit den Buchstaben von A bis P gekennzeichnet)
Nachfolgend wird der zu visualisierende Eingang und die
Anzeigedauer angegeben.
UD
/
,
Wählen Sie die zu modifizierenden Schritte mit
und fordern Sie die Änderung durch Drücken der Taste
E an.
Die Nummer des Eingangs eingeben und mit
Operation bestätigen
Die Zeitdauer (in Sekunden) eingeben und mit
Operation bestätigen.
Seite 17
KEYPLUS9702
Beschreibung (Fortsetzung)
Tasten
Display
Alle Programmierungsschritte nach der angegebenen
Prozedur modifizieren (Vergewissern Sie sich, daß die
unbenutzten Eingänge eine auf 0 Sekunden gestellte
Zeitdauer anzeigen).
C
Wechsel sichern?
[1] Ja [0] Nein
1/0
SEQUENZEN 1.
Oper.1,Tag £
C
MATRIX-KONFIG.
1.Sequenzen £
Drücken Sie
C , um das Untermenü zu verlassen.
Bestätigen Sie die Speicherung der vorgenommenen
Änderungen und gegebenenfalls modifizieren Sie die
anderen Umschaltsequenzen nach der obengenannten
Prozedur.
Durch Drücken der Taste
Hauptmenü zurück.
C kehren Sie zum
Änderung der Identifikationstexte
Die Matrix SW164OSM STD erlaubt die Identifizierung jedes Eingangs durch zweiTexte mit max. 24 Zeichen, die
während der normalen Umschaltsequenz beziehungsweise bei Alarmzustand benutzt werden.
Definition der Identifikationstexte
Beschreibung
Wählen Sie den Menü-Begriff ID-Texte durch
D
Durch Drücken der Taste
U und
UD
UD
MATRIX-KONFIG.
2.ID-Texte
¢
TEXTANDERUNG 2.
ID-Text £
U D] E
ID-TEXT
2.1
Text aendern __
3E
1/0
Setup ersetzen?
[1] Ja [0] Nein
U D C E]
T03:EINGANG G_
[C]¢
[C]
¤ Clr Prg
[
E
Die Nummer des zu modifizierenden Texts eingeben.
Drücken Sie
wollen,
Display
E auf das Untermenü zugreifen E
Mit
/
wählen Sie , ob Sie einen normalen Text oder
einen Alarmtext modifizieren wollen und bestätigen Sie die
Operation durch
Tasten
1 , wenn Sie den Text ganz widerschreiben
0 , um den vorhergehenden Text zu ändern.
Das letzte Textzeichen mit C löschen oder am Text-Ende
das zwischen [x]
] angezeigte Zeichen hinzufügen, mit E
T03:¥ESSO GARAGE
[A]¢
[A]
¤ Clr Prg
Drücken Sie
[
Drücken. Das zwischen [x]
] angezeigte Zeiche tauschen,
mit Drücken von
Hinzufügendes
Zeichen
U oder D.
Die Fertigstellung der Operation durch
P bestätigen.
P
C
Die Änderungen speichern und gegebenenfalls mit der
Modifizierung der anderen Identifikationstexte nach der
oben beschriebenen Prozedur fortfahren.
Durch Drücken der Taste
zurück.
Wechsel sichern?
[1] Ja [0] Nein
MATRIX-KONFIG.
2.ID-Texte
¢
C kehren Sie zum Hauptmenu
Seite 18
KEYPLUS9702
Änderung der Datum/Zeit-Parameter
Die Datum/Zeit-Parameter erlauben der Matrix, den Anfang und das Ende des Tages- und Nachtzyklus zu steuern.
Nähere Informationen erhalten Sie beim Lesen des Bedienungshandbuchs der Matrix SW164 Standard.
Achtung: Werden die Datum/Zeit-Parameter falsch eingegeben, können mögliche Störungen bei den Umschaltzyklen
der Matrix entstehen.
Datum/Zeit-Parameter:
- Aktuelles Datum
- Aktuelle Zeit
- Anfangszeit des Tageszyklus während der Werktage
- Endzeit des Tageszyklus während der Werktage
- Anfangszeit des Tageszyklus während der Teilzeit-Arbeitstage
- Endzeit des Tageszyklus während der Teilzeit-Arbeitstage
Während der Feiertage (die Definition der Werktage, Teilzeit-Arbeitstage oder Feiertage wird während des MatrixSETUP durch PC festgestellt) ist der Zyklus ein Nachtzyklus den ganzen Tag über.
Beim Zugreifen auf das Menü oder beim Verlassen des Untermenüs werden die erforderlichen Daten von der Matrix
eingelesen und die an den Datum/Zeit-Parametern vorgenommenen Änderungen gespeichert.
Änderung der Datum/Zeit-Parameter
Beschreibung
Tasten
Display
Wählen Sie den Menü-Begriff Datum/Uhr durch
UD
MATRIX-KONFIG.
3.Datum/Uhr ¢
E
DATUM/UHR 3.
Datum andern £
E
TAGESDATUM 3.1
95/11/01
96E
01E
02E
C [ U] D E
TAGESDATUM 3.1
Mar 96/01/02
C
DATUM/UHR
Uhr andern
U und D
E
Durch Drücken der Taste
, auf das Untermenü
DATUM/UHR zugreifen und auf das Einlesen der
Daten von der Matrix warten.
E
Drücken Sie
, um das Datum zu ändern;
Datumsformat: Jahr/Monat/Tag.
Das Datum eingeben.
C zum Untermenü DATUM/UHR
zurückkehren; mit D den Menü-Begriff Uhr-Ändern
wählen und durch E auf das dazugehörige
Durch
UHRZEIT
12:00
3.2
Untermenü zugreifen; mit der Änderung des ZeitParameters nach der oben beschriebenen Prozedur
fortfahren.
Kehren Sie zum Untermenü Datum/Uhr-Änderung
durch Drücken der Taste
C zurück.
Seite 19
3.
£
KEYPLUS9702
Das gleiche Verfahren kann angewandt werden, um die vier Anfangs/Endzeiten des Tageszyklus zu modifizieren.
Bei jedem Drücken der Taste wechselt der angezeigte Wert in regelmäßigen Abständen von 10 Minuten. Falls die
Taste gedrückt gehalten wird, wechselt die Zeit schnell in regelmäßigen Abständen von 30 Minuten.
Achtung: Eine falsche Anfangs-/Endzeit des Tageszyklus kann mögliche Störungen bei den am Display angezeigten
Umschaltsequenzen verursachen.
Liste der auf dem Display visualisierten Abkürzungen:
WERKTAG-ANF: Anfangszeit des Tageszyklus während der Werktage
WERKTAG-ENDE: Endzeit des Tageszyklus während der Werktage
TEILZEIT-ANF: Anfangszeit des Tageszyklus während der Teilzeit-Arbeitstage
TEILZEIT-ENDE: Endzeit des Tageszyklus während der Teilzeit-Arbeitstage
Sollte der Nachtzyklus deaktiviert werden, um den Tageszyklus den ganzen Tag über zu aktivieren, stellen Sie die
Anfangszeit der Umschaltsequenz auf 00:00 und die Endzeit auf 23:59.
Änderung der Anfangs-/Endzeit des
Tageszyklus
Beschreibung
Tasten
Display
U und D die zu modifizierende Zeit wählen.
Durch Drücken der Taste E greifen Sie auf das
UD
E
DATUM/UHR 3.
Werktag-Anfang £
U D drücken, um die Uhr zu ändern. Falls die
UD
WERKTAG-ANF 3.3
¢ 07:00 Clr
C
DATUM/UHR 3.
Werktag-anf £
C
MATRIX-KONFIG.
3.Datum/Uhr ¢
C
[D] E
MATRIX-KONFIG.
Setup-Ende ¡
Durch
Menü für die Zeit-Änderung zu.
Taste gedrückt gehalten wird, wechselt die Zeit schnell
in regelmäßigen Abständen von 30 Minuten.
C
Durch
verlassen Sie das Menü und
gegebenenfalls bestätigen Sie die Speicherung der
geänderten Werte.
Durch Drücken der Taste
zurückkehren.
C zum Hauptmenü
C
Mit
den Programmierungsmodus verlassen oder
den Menü- Begriff Setup-Ende wählen und die
Auswahl durch
E bestätigen.
WERKTAG-ANF 3.3
¢ 06:00 Clr
Programmierung der Matrix SW164OSM On Screen Menu
Un die Matrix zu programmieren lesen Sie aufmerksam das Bedienungshandbuch.
Seite 20
KEYPLUS9702
Wartung
Die Tastatur KEYPLUS ist wartungsfreundlich.
Es wäre empfehlenswert, die Einheit auf eine feste und gerade Unterfläche zu stellen; Netz- und Verbindungskabel
müssen die normalen Operationen des Installateurs nicht behindern.
Schalten Sie Ihre Anlage immer aus, bevor Sie sie reinigen. Reinigen Sie die Tastatur regelmäßig immer nur
mit einem weichen Lappen aus Baumwolle; verwenden Sie kein Reinigungsmittel oder mit Reinigungsmitteln oder
Wasser getränktes Tuch.
Lösung von Installationsstörungen
Obwohl die Tastatur KEYPLUS durch eine hohe Zuverlässigkeit und gute Bedienbarkeit charakterisiert ist, können
manchmal Schwierigkeiten beim Installieren und Konfigurieren des Systems oder während Ihrer Arbeit auftreten.
Störung
Beim Einschalten zeigt das Display keine
Schrift; die LED-Anzeigen leuchten nicht auf
Die Verbindung mit der Matrix funktioniert
nicht
Wahrscheinliche Ursache
Der Netzstecker ist nicht an der
Steckdose angeschlossen
Falsche Stromversorgung
Die Konfiguration der Matrix
unterscheidet sich von der
Konfiguration der Tastatur
Der Verbindungskabel zwischen
der Matrix und der Tastatur ist
unterbrochen
Abhilfe
Netzkabel prüfen
Betriebseigenschaften auf den
Datenschilder überprüfen
Überprüfen Sie, ob die Tastatur
und der Matrix in RS232 oder
Current Loop konfiguriert sind
Gehen Sie gemäß der
nachfolgenden Test-Prozedur
beim Isolieren des Problems vor.
Test der Verbindung zwischen der Tastatur und der Matrix
Die Tastatur überträgt gleichzeitig bei RS232 und Current Loop. Beim Testen kontrollieren Sie immer, ob mögliche
Fehlermeldungen auf den RS232- oder Current Loop-Modus sich beziehen.
Um die Ursache der erfolglosen Übertragung zwischen der Tastatur und der Matrix zu definieren, wäre es
empfehlenswert, folgendermaßen beim Testen des Systems vorzugehen:
• Kommunikationstest der einzigen Tastatur KEYPLUS (Autotest)
• Test der direkten Verbindung zwischen Tastatur und Matrix
• Test der Sektionen des Verbindungskabels.
Autotest der Tastatur KEYPLUS
• die Tastatur von dem System isolieren
• das Telefonkabel und die mit Drahtbrücken versehene Anschlußdose des Steckers RJ gemäß den im Kapitel
Konfiguration der Tastatur, Kommunikationstest beschriebenen Anschlüssen (Seite 13) anschließen.
• Den automatischen Test nach der auf Seite 13 beschriebenen Prozedur durchführen.
Wenn der Test erfolglos ist (auf dem Display erscheint die Meldung Test-Fehler! ):
• prüfen Sie die Drahtbrücke der Anschlußdose des Steckes RJ
• das Telefonkabel ersetzen.
Den Test wiederholen: Falls der Fehler noch vorliegt, ist der Übertragungs-/Empfangskanal der Tastatur
wahrscheinlich beschädigt. Wenden Sie sich sofort an den Lieferant.
Wenn der Autotest die Betriebsfähigkeit der Tastatur (Meldung: : Test ist OK!) bestätigt, prüfen Sie das andere
Telefonkabel, indem Sie es an die Stelle des vorher benutzten Kabels setzen.
Seite 21
KEYPLUS9702
Dann überprüfen Sie die direkte Verbindung zwischen der Tastatur und der Matrix:
• die Tastatur an die Matrix durch ein direktes Telefonkabel anschließen
• die folgenden Konfigurationen kontrollieren:
• in der Matrix: Drahtbrücken für die Auswahl des Übertragungsmodus
• in
dem
Tastatur-Setup:
Typ
der
gesteuerten
Tastatur,
Empfangsmodus,
eventuelle
Übertragungsgeschwindigkeit (Sollte die Übertragungsgeschwindigkeit bei dem Setup der Matrix SW164OSM
geändert worden sein, ist es notwendig, die verschiedenen Möglichkeiten des Matrix-Setup zu versuchen)
• den Test des Matrix-Kanals (nicht den automatischen Test) durchführen.
Sollte der Test versagen, kontrollieren Sie die Konfigurationen; bei Anwendung der Matrix SW164OSM modifizieren
Sie die Übertragungsgeschwindigkeit der Tastatur (durch die Setup-Prozedur).
Falls der Fehler noch vorliegt, sind die Kommunikationen der Matrix wahrscheinlich fehlerhaft. Wenden Sie sich sofort
an den Lieferant.
Wenn der Test erfolgreich ist, liegt das Problem in den Verbindungskabeln: Überprüfen Sie die Anschlüsse an den
Anschlußdosen der Stecker RJ nach dem Schema auf Seite 8.
Sollten die Verbindungsstörungen noch vorliegen, wenden Sie sich sofort an den Lieferant.
Lösung von Konfigurationsstörungen
Probleme in bezug auf die Video-Umschaltung
Störung
m
Nach Drücken der Taste
, um den aktiven
Ausgang zu ändern, besteht es keine Möglichkeit,
den Ausgang zu modifizieren: Der ausgewählte
Monitor ist fest.
Obwohl nur 5 Eingänge aktiviert worden sind, ist
es möglich, durch Drücken der Tasten
D
U und
Wahrscheinliche Ursache
Während der Setup-Phase
wurde ein einziger Monitor
konfiguriert
Abhilfe
Notwendigenfalls aktivieren Sie
andere Monitore in dem Menü
Aktivierung, Ausgänge
Die Funktionstasten sind
nicht deaktiviert worden
Deaktivieren Sie die
Funktionstasten in dem Menü
Aktivierungen, Pfeiltasten
auch die anderen Eingänge zu sehen.
Es ist unmöglich, einen als 10 höheren Eingang zu Die Nummer des
gewünschten Eingangs wird
wählen, auch wenn alle Eingänge als “wählbar”
nicht korrekt eingegeben.
richtig dargestellt worden sind.
s
Drücken Sie die Taste
für die
Zehner und danach den Einer.
s3: Eingang 13
Dir Tasten $ und ( werden nur
Zum Beispiel:
U
D
Sie benutzen die Tasten
Die Tasten
und
funktionieren nicht, wenn
auch sie aktiviert worden sind.
$ und ( anstatt der
Tasten U und D.
Obwohl die Pfeiltasten korrekt aktiviert worden
sind, werden nur schwarze Schirme abgerufen
oder einige Eingänge werden übersprungen.
Während des Matrix-Setup
sind die aktiven Eingänge
nicht korrekt definiert
worden. Obwohl das Signal
fehlt, zeigt die StandardMatrix alle 16 VideoEingänge.
Seite 22
innerhalb der MatrixKonfigurationsmenüs als
Pfeiltasten benutzt.
Während des Setup der Matrix
OSM definieren Sie die
verfügbaren Video-Signale (Menü
4. Systemparameter, 4.1 Aktive
Eingänge).
Bezüglich der Standard-Matrix ist
es nicht möglich, die Einstellung
der Funktion der Pfeiltasten zu
modifizieren.
KEYPLUS9702
Anwendung der Paßwörter
Störung
Der Zugriff auf die Tastatur von nicht befugtem
Personal muß blockiert werden.
Wahrscheinliche Ursache
Während der Setup-Phase
ist das Verbindungspaßwort
deaktiviert worden
Die Paßwörter der Tastaturen sind alle
verschieden, obwohl sie an derselben Matrix
angeschlossen sind.
Die Paßwörter einer Tastatur sind vergessen oder
verloren worden.
Ein Paßwort muß deaktiviert werden.
Die Paßwörter sind “lokal”
und innerhalb der Tastatur
gespeichert
-
Abhilfe
Während der Setup-Phase setzen
Sie das Verbindungspaßwort auf
einen Wert, der anders als 000000
sein muß.
Notwendigenfalls setzen Sie
dasselbe Paßwort für alle Tastaturen
Wenden Sie sich an den Lieferant
-
Setzen Sie das Paßwort auf 000000.
Achtung: Aus Sicherheitsgründeden
wäre es empfehlenswert,wenigstens
das Setup-Paßwort zu setzen
Programmierung der Matrix SW164 Standard
Störung
Die eingestellten Umschaltsequenzen
funktionieren nicht wie vorgesehen.
Die Datum-/Zeit-Parameter sind korrekt
eingestellt worden, aber die Matrix zeigt immer
den Nachtzyklus
Wahrscheinliche Ursache
Falsche Einstellung der
Datum-/Zeit-Parameter: Die
Matrix zeigt den Nachtzyklus
Abhilfe
Vergewissern Sie sich, daß die
eingestellte Zeit und die Anfangs- und
Endzeit des Tageszyklus korrekt
eingestellt worden sind
Einige Tage der Woche sind Während des Setup durch PC
während des Matrix-Setup
definieren Sie neu alle Wochentage
durch Personal Computer als als Werktage; nähere Informationen
Feiertage definiert worden
erhalten Sie notwendigenfalls bei
dem Lieferant
Programmierung der Matrix SW164OSM
Alarme
Störung
Nach der Konfiguration der Alarme verläßt die
Matrix den Programmierungsmodus und
versetzt sich in Alarmzustand, obwohl kein
Alarmkontakt aktiviert worden ist
Wahrscheinliche Ursache
Während der Setup-Phase sind
einige Alarmkontakte als
“normalerweise geschlossene”
Kontakte definiert worden
Abhilfe
Schließen Sie den Kontakt (den
Kontakt durch den gemeinsamen
Alarmdraht kurzschließen) oder
definieren Sie den Kontakt als
“normalerweise offener” Kontakt.
Beim Schließen eines Kontakts wird der
Der Kontakt ist als “nicht belegter” Den Kontakt als “normalerweise
Kontakt definiert worden
offenen oder geschlossenen”
dazugehörige Alarm nicht aktiviert
Kontakt aktivieren
Ohne den Eingriff des Operators hört der Alarm Das Zeit-Rücksetzen ist aktiviert
Setzen Sie die korrekten
worden oder die Alarm-Signale
Rücksetzoptionen
automatisch auf.
sind als “kontinuierliche” Signale
definiert worden
Andere Optionen
Störung
Wahrscheinliche Ursache Abhilfe
Der Text am Menü-Ausgang ist beträchtlich nach Das NTSC-Video-System ist Im Menü 4. Systemparameter
gesetzt worden
oben verschoben.
setzen Sie das folgende VideoSystem: PAL
Technische Eigenschaften
Technische Speiserseigenschaften
Physische Daten:
Gewicht:
190 x 55 x 185 mm
980 g
Primärspannung:
Sekundärspannung:
Gewicht:
980 g
Verbinder:
230V~ 50Hz 30VA
9V~ 50HZ 8VA
14V~ 50HZ 8VA
Mini Din 4 polen
pin 1-3 9V~
pin 2-4 14V~
Seite 23
KEYPLUS9702