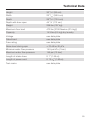
1
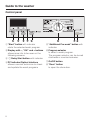
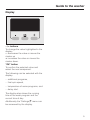
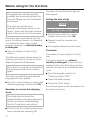
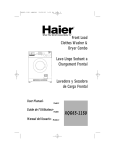
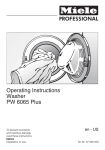
Operating Instructions
Washer
PW 5064
To prevent accidents
and appliance damage
read these instructions
before
installation or use.
en - US
M.-Nr. 07 704 080
Contents
IMPORTANT SAFETY INSTRUCTIONS. . . . . . . . . . . . . . . . . . . . . . . . . . . . . . . . . 4
Guide to the washer. . . . . . . . . . . . . . . . . . . . . . . . . . . . . . . . . . . . . . . . . . . . . . . . 8
Control panel . . . . . . . . . . . . . . . . . . . . . . . . . . . . . . . . . . . . . . . . . . . . . . . . . . . . . . 8
Display . . . . . . . . . . . . . . . . . . . . . . . . . . . . . . . . . . . . . . . . . . . . . . . . . . . . . . . . . . . 9
Before using for the first time. . . . . . . . . . . . . . . . . . . . . . . . . . . . . . . . . . . . . . . 10
Use . . . . . . . . . . . . . . . . . . . . . . . . . . . . . . . . . . . . . . . . . . . . . . . . . . . . . . . . . . . . 11
Selecting a spin speed . . . . . . . . . . . . . . . . . . . . . . . . . . . . . . . . . . . . . . . . . . . . 16
Delay Start . . . . . . . . . . . . . . . . . . . . . . . . . . . . . . . . . . . . . . . . . . . . . . . . . . . . . . 17
Program guide . . . . . . . . . . . . . . . . . . . . . . . . . . . . . . . . . . . . . . . . . . . . . . . . . . . 19
Program sequence. . . . . . . . . . . . . . . . . . . . . . . . . . . . . . . . . . . . . . . . . . . . . . . . 24
Changing the program sequence . . . . . . . . . . . . . . . . . . . . . . . . . . . . . . . . . . . . 26
Canceling a program . . . . . . . . . . . . . . . . . . . . . . . . . . . . . . . . . . . . . . . . . . . . . . . 26
Interrupting a program. . . . . . . . . . . . . . . . . . . . . . . . . . . . . . . . . . . . . . . . . . . . . . 26
Changing a program . . . . . . . . . . . . . . . . . . . . . . . . . . . . . . . . . . . . . . . . . . . . . . 26
Adding/removing laundry . . . . . . . . . . . . . . . . . . . . . . . . . . . . . . . . . . . . . . . . . . . 27
Detergent . . . . . . . . . . . . . . . . . . . . . . . . . . . . . . . . . . . . . . . . . . . . . . . . . . . . . . . 28
Water softener . . . . . . . . . . . . . . . . . . . . . . . . . . . . . . . . . . . . . . . . . . . . . . . . . . . . 28
Fabric softener, fabric conditioner, or liquid starch. . . . . . . . . . . . . . . . . . . . . . . . 28
Dye removers / Fabric dyes. . . . . . . . . . . . . . . . . . . . . . . . . . . . . . . . . . . . . . . . . . 28
External dispensing . . . . . . . . . . . . . . . . . . . . . . . . . . . . . . . . . . . . . . . . . . . . . . . . 29
Cleaning and Care . . . . . . . . . . . . . . . . . . . . . . . . . . . . . . . . . . . . . . . . . . . . . . . . 31
Frequently asked questions . . . . . . . . . . . . . . . . . . . . . . . . . . . . . . . . . . . . . . . . 34
After sales service . . . . . . . . . . . . . . . . . . . . . . . . . . . . . . . . . . . . . . . . . . . . . . . . 40
2
Contents
Installation instructions . . . . . . . . . . . . . . . . . . . . . . . . . . . . . . . . . . . . . . . . . . . 41
Installation . . . . . . . . . . . . . . . . . . . . . . . . . . . . . . . . . . . . . . . . . . . . . . . . . . . . . . 42
Installing the washer . . . . . . . . . . . . . . . . . . . . . . . . . . . . . . . . . . . . . . . . . . . . . . . 44
Installation site . . . . . . . . . . . . . . . . . . . . . . . . . . . . . . . . . . . . . . . . . . . . . . . . . . . . 45
Removing the shipping struts . . . . . . . . . . . . . . . . . . . . . . . . . . . . . . . . . . . . . . . . 45
Installing the shipping struts . . . . . . . . . . . . . . . . . . . . . . . . . . . . . . . . . . . . . . . . . 47
Leveling the washer . . . . . . . . . . . . . . . . . . . . . . . . . . . . . . . . . . . . . . . . . . . . . . . . 48
Installation on an elevated base . . . . . . . . . . . . . . . . . . . . . . . . . . . . . . . . . . . . . . 49
Water connection . . . . . . . . . . . . . . . . . . . . . . . . . . . . . . . . . . . . . . . . . . . . . . . . . . 50
Water drainage . . . . . . . . . . . . . . . . . . . . . . . . . . . . . . . . . . . . . . . . . . . . . . . . . . . 51
Electrical connection . . . . . . . . . . . . . . . . . . . . . . . . . . . . . . . . . . . . . . . . . . . . . . . 52
Technical Data . . . . . . . . . . . . . . . . . . . . . . . . . . . . . . . . . . . . . . . . . . . . . . . . . . . 53
Help to protect the environment. . . . . . . . . . . . . . . . . . . . . . . . . . . . . . . . . . . . . 54
Settings menu J. . . . . . . . . . . . . . . . . . . . . . . . . . . . . . . . . . . . . . . . . . . . . . . . . . 56
Contrast . . . . . . . . . . . . . . . . . . . . . . . . . . . . . . . . . . . . . . . . . . . . . . . . . . . . . . . . . 56
Brightness . . . . . . . . . . . . . . . . . . . . . . . . . . . . . . . . . . . . . . . . . . . . . . . . . . . . . . . 56
Settings menu - Supervisor level . . . . . . . . . . . . . . . . . . . . . . . . . . . . . . . . . . . . 57
Pre-rinse Minimum iron . . . . . . . . . . . . . . . . . . . . . . . . . . . . . . . . . . . . . . . . . . . . . 65
Temperature unit . . . . . . . . . . . . . . . . . . . . . . . . . . . . . . . . . . . . . . . . . . . . . . . . . . 65
Energy usage control. . . . . . . . . . . . . . . . . . . . . . . . . . . . . . . . . . . . . . . . . . . . . . . 65
3
IMPORTANT SAFETY INSTRUCTIONS
,WARNING - To reduce the risk
of fire, electric shock or injury to
persons while using your appliance
follow basic safety precautions,
including the following:
Read all instructions before
installation or use to prevent injury
and appliance damage.
This appliance conforms to all
uniform safety codes and
regulations.
Keep these operating instructions in
a safe place and pass them on to
any future user.
SAVE THESE INSTRUCTIONS
Correct usage
~ Only use the washing machine to
wash items which are specified by the
manufacturer to be machine washable
on the fabric care label. Any other
applications may be dangerous.
~ Persons who lack physical, sensory
or mental abilities, or experience with
the appliance should not use it without
supervision or instruction by a
responsible person.
~ The washer should only be operated
by trained and qualified personnel.
Public use, such as a laundromat is not
permitted.
Children
~ Do not allow children to play on or in
the appliance. Close supervision is
necessary when the appliance is used
near children.
~ The drum door glass will be hot
when washing at very high
temperatures.
Do not touch the glass. Danger of
burns! Keep children away from the
washer when in use.
4
IMPORTANT SAFETY INSTRUCTIONS
Technical safety
~ Check the packaging, the washer
and accessories for any signs of
damage. Do not use a damaged
appliance.
~ Before connecting the machine,
ensure that the connection data on the
data plate (fusing, voltage and
frequency) match the main electrical
supply. If in doubt contact an
electrician.
~ GROUNDING INSTRUCTIONS
This appliance must be grounded. In
the event of malfunction or breakdown,
grounding will reduce the risk of
electric shock by providing a path of
least resistance for electric current. This
appliance is equipped with a cord
having an equipment- grounding
conductor and a grounding plug. The
plug must be plugged into an
appropriate outlet that is properly
installed and grounded in accordance
with all local codes and ordinances.
~ WARNING - Improper connection of
the equipment-grounding conductor
may result in a risk of electric shock.
Check with a qualified electrician if you
are in doubt as to whether the
appliance is properly grounded.
~ Installation, repair and maintenance
work should be performed by a Miele
authorized service technician. Work by
unqualified persons could be
dangerous and may void the warranty.
~ Do not modify the plug provided
with the appliance - if it will not fit the
outlet, have a proper outlet installed by
a qualified electrician.
~ Do not repair or replace any part of
the appliance or attempt any servicing
unless specifically recommended in
these operating instructions.
~ Before servicing, cleaning or in the
event of a fault, disconnect the
appliance from the main power supply.
~ Only use a new hose kit to connect
the washer to the water supply. Old
hosing should not be re-used.
~ Faulty components must only be
replaced with genuine Miele spare
parts.
~ If the power cord is damaged it
must only be replaced by a Miele Service technician with a genuine Miele
power cord.
~ Under certain conditions, hydrogen
gas may be produced in a hot water
system that has not been used for 2
weeks or more. HYDROGEN GAS IS
EXPLOSIVE. If the hot water system has
not been used for such a period, turn
on all hot water faucets and let the
water flow from each for several
minutes before using the washing
machine. This will release any built-up
hydrogen gas. Do not smoke or use an
open flame during this time, the gas is
flammable.
5
IMPORTANT SAFETY INSTRUCTIONS
~ This appliance is not designed for
maritime use (e.g. ships) or for use in
mobile installations such as recreational
vehicles or aircraft. However, under
certain conditions it may be possible for
installation in these applications. Please
contact the Miele Technical Service
Department with specific requirements.
~ Before the appliance is removed for
service or discarded, remove the door.
Safety
~ Do not install or store this appliance
where it will be exposed to the weather.
~ Do not install the washing machine
in rooms where temperatures below
freezing may occur.
~ Before using the washer for the first
time, remove the shipping struts at the
back of the appliance (see "Installation
- Removing the shipping struts"). Failure
to remove the shipping struts can
damage the washer and surroundings
during spinning.
6
~ Close the water supply if the
machine is to be left for any length of
time (e.g. vacation), especially if there
is no floor drain (gully) in the immediate
vicinity.
~ Ensure that no foreign objects are
left in pockets (e.g. nails, coins, paper
clips, etc.) find their way into the
machine with the laundry. Soiling such
as metal shavings, etc. on cloths must
be shaken out before washing. These
may damage components of the
machine (e.g. suds container, drum),
which in turn can result in damage to
the laundry.
~ Proper dosing of the detergent will
eliminate the need to descale.
However, if you wish to descale the
machine only use proprietary
non-corrosive descaling agents.
Closely follow the instructions on the
product package.
IMPORTANT SAFETY INSTRUCTIONS
~ Do not wash articles that have been
previously cleaned, washed, soaked or
spotted with gasoline, dry-cleaning
solvents or other flammable
substances. These articles give off
vapors that could ignite or explode. Do
not add these items to the wash load.
~ Do not add gasoline, dry-cleaning
solvents, or other flammable or
explosive substances to the wash
water. These substances give off
vapors which could ignite or explode.
Accessories
~ Only use genuine Miele
accessories. If unapproved parts are
used, guarantee, performance and
product liability claims may become
void.
SAVE THESE INSTRUCTIONS
AND REVIEW THEM
PERIODICALLY
~ Do not use cleaning solvents on or
near the machine or the controls.
Contact with cleaning solvents will
damage the surface.
~ Do not reach into the appliance if
the drum is moving.
~ Do not tamper
with the controls.
7
Guide to the washer
Control panel
a "Start" button with indicator
starts the selected wash program.
e "Additional Pre-wash" button with
indicator
b Display with –, "OK" and + buttons
allows more info to be seen on the
following screens.
f Program selector
to select a wash program.
The program selector can be turned
clockwise or counterclockwise.
c m Delay Start button with indicator
d PC Indicator/Optical interface
allows a service technician to check
and update the wash programs
8
g On/Off button
h "Door" button
to open the drum door.
Guide to the washer
Display
– / + buttons
To change the value highlighted in the
display.
– decreases the value or moves the
marker up
+ increases the value or moves the
marker down.
"OK" button
To confirm the selected value and
select the next component.
The following can be selected with the
display:
– additional programs,
– final spin speed,
– temperature of some programs, and
– delay start.
The display also shows the running
time of the wash program and the
current time of day.
Additionally the "Settings J" menu can
be accessed by the display.
9
Before using for the first time
The appliance must be correctly
installed and connected before the
first use. Please see the "Installation
instructions."
This washing machine has
undergone thorough testing in the
factory, there may be some residual
water in the drum from this process.
Running a spin cycle before the first
use is, for safety reasons, not possible.
To activate the spin cycle a wash
program must be run without laundry
or detergent.
^ Turn the washer on with the K
button.
The Welcome screen shows when the
machine is turned on for the first time:
Miele Professional Willkommen
Once the first program is completed,
the welcome screen will not show
again.
The menu for selecting your desired
language will then appear.
^ Use the – and + buttons to select the
desired language, confirm with OK.
Reminder to remove the shipping
struts
The shipping struts must be
removed before using the appliance
for the first time to avoid damage.
See the "Installation instructions".
^ Confirm that the shipping struts have
been removed by pressing OK.
10
The menu to set the time of day will
then appear.
Setting the time of day
12:00
Set the time of day
^ Set the hours with the – and +
buttons and confirm with OK.
^ Repeat to set the minutes and
confirm.
^ The display shows the main menu.
First wash
The washer is now ready for the first
use.
A program must be run without
laundry or detergent to flush out any
residual water from the factory testing
process, as well as to activate the spin
cycle.
^ Turn the program selector to
"Cleaning cloths 140°F".
^ Open the water supply.
^ Press the "Start" button.
Once the program ends the washer can
be used for laundry.
Use
1. Sort the laundry
,Foreign objects (e.g. nails,
coins, paper clips) can damage
clothes as well as the machine.
Preparing mops, cloths etc.
^ Shake mops, cloths and pads well to
remove coarse soiling before placing
them in the drum.
Sorting laundry
,Do not use chemical solvents in
the machine.
^ Empty all pockets.
^ Tough stains (blood, egg, coffee, tea
etc.) or badly soiled areas (collars
and cuffs) should be pre-treated with
a stain remover or a paste made of
powder detergent and warm water.
Dab stains with a damp light colored
cloth. Do not rub.
^ Sort the laundry by color and by care
label. Most garments have a textile
care label in the collar or side seam.
Dark fabrics often bleed the first few
times they are washed. They should be
washed separately several times before
being included in a mixed load. Always
wash whites and colors separately.
Do not machine wash items if it is not
recommended on the fabric care label.
11
Use
2. Loading the washer
^ Close the drum door.
^ Press the K button to turn on the
washer.
^ Open the drum door by pressing the
"Door" button.
^ Load mops, cloths and pads loosely
into the drum.
For best results, wash mixed loads of
small and large items. This will improve
washing effectiveness and help
distribute the load evenly.
Note: Overloading the washer will
affect wash results and cause wrinkling.
12
To prevent damage to the door seal
and clothing, make sure that there is
nothing caught between the drum
door and the seal.
Use
3. Select a program
When selecting "Additional programs"
the display shows the list.
E
New mops
Conditioning mops
Conditioning cloths
H
^ Select the desired program with the –
and + buttons. Confirm with OK.
The display switches to the program
selection.
Curtains
^ Select the desired program with the
program selector.
The display shows the selected wash
program.
Cleaning cloths
The display switches to the program
selection.
105°F
Duration:
1400 rpm
0:51
h
^ To change the spin speed use the –
or + button. Confirm with OK.
86°F
600 rpm
Duration:
0:38
h
^ To change the selected spin speed
use the – or + button and confirm
with OK. In some programs the
temperature can also be changed
using – or +.
Additional pre-wash
^ For heavily soiled laundry select
"Additional pre-wash". If an additional
function cannot be selected, it is not
available for the chosen program.
Delay Start
^ Select a delayed start time if desired
(see "Delay Start").
13
Use
4. Adding detergent
Use detergent according to the level of
soiling and the water hardness.
Too little detergent may cause:
– ineffective cleaning of laundry;
fabrics may become gray and stiff
over time.
– grease deposits on the laundry.
– hard water deposits on the heating
elements.
Too much detergent may cause:
^ Pull out the detergent dispenser
drawer and add detergent.
– over-sudsing causing minimal drum
movement; poor cleaning, rinse and
spin results.
i = Detergent for pre-wash
(1/4 of the total recommended
amount of detergent)
– a higher environmental burden.
j = Detergent for the main wash
For additional information regarding
detergents and dosage see
"Detergent".
§
= Fabric softener or liquid starch
^ Close the detergent dispenser
drawer.
With disinfection programs, the
drawer § is not activated. Do not
put anything in it.
The washer can be connected to an
external dispensing system to
dispense liquid detergent and
additives (see "Detergent - External
Dispensing").
14
Use
5. Starting a program
"Start" flashes when a program can be
started.
^ Press the "Start" button.
The "Start" indicator lights up.
Check the drum for any missed
pieces of laundry. Items
inadvertently left in the washer may
be damaged (e.g. shrink or discolor)
during the wash cycle.
The display shows the likely program
duration unless Delay Start was
selected. It will count down in minutes.
In the first 10 minutes the washer
calculates the water absorbency of the
laundry. The overall program time may
be shortened or lengthened.
Additionally, the program sequence is
displayed. The washer shows the
current program cycle.
6. Removing the laundry
The drum will continue moving up to 30
minutes after the end of the program in
order to ensure even wetness of the
laundry and to avoid wrinkling
(anti-crease). You can open the washer
at any time.
The washer turns off automatically
15 minutes after the end of the
anti-crease cycle. Press the K
button to turn the washer on again.
^ Check the seal around the drum door
for foreign objects.
^ Turn the program selector to Finish.
^ Close the drum door. If it is left open,
objects may accidentally enter the
drum. They could be included in the
next wash cycle and damage the
laundry.
^ Turn off the washer using the K
button.
^ Open the drum door using the Door
button.
^ Remove the laundry.
15
Selecting a spin speed
Maximum final spinning speed
Omitting the final spin (Rinse hold)
Standard 140°F
1400
Standard plus
1400
^ Select Rinse hold. The laundry is not
spun after the last rinse cycle and
remains soaking in water.
High temp. disinfection
1400
– Starting a final spin:
Chemical disinfection
1400
Conditioning cloths Hygiene
1400
Conditioning cloths 140°F/105°F
1400
Pads 105°C
1400
Program
New mops
rpm
1400
Conditioning mops
no display
Conditioning cloths
no display
Curtains
600
Cottons universal
1400
Cottons hygiene
1400
Intensive
1400
Intensive +
1400
Minimum iron
1000
Quick wash
1400
Separate rinse
1400
Drain/Spin
1400
*The rpm depends on the settings Spin-treat,
standard, disinfection and Spin-treat cleaning
cloths.
The final spin speed can be reduced.
You cannot select a higher final spin
speed than that specified above.
Rinse spin
The laundry is spun after the main wash
and between the rinse cycles.
Reducing the final spin speed will also
reduce the rinse spin speed.
16
The washer automatically selects the
highest allowable spin speed.
However, you can select a lower
speed. Press Start to start the final
spin.
– Finishing the program:
Press the Door button. The water
drains. Press the Door button again
to open the door.
Omitting rinse spin and final spin
^ Select Without spin. The water drains
after the final rinse. The drum will
continue moving up to 30 minutes
after the end of the program in order
to ensure even wetness of the
laundry and to avoid wrinkling (not
with the programs Pads and New
mops).
With the programs High temp.
disinfection and Chemical
disinfection the settings Rinse hold
and Without spin are not possible.
Delay Start
The delay start feature allows you to
select the time you want the program to
end. Program start can be delayed by
30 minutes up to a maximum of 24
hours. This enables you, for instance, to
take advantage of night electricity
rates.
Pressing the button once delays the
program end to the next full or half
hour. Each subsequent touch delays
the program end time by 30 minutes.
The – button decreases the time.
^ Confirm the end time setting with OK.
The time of day must be correctly
set to allow the delay start feature to
function properly.
To delay the program start by up to
96 hours you can select the option
Time not displayed in the setting
Time of day in the menu Settings/
Supervisor level.
Setting delay start
^ After selecting a program, press the
m button.
7:51
7:51
Start:
9:19
Finish:
The display shows the current time of
day and the resulting program end
time.
7:51
Start:
10:32
Finish:
12:00
^ Select the desired program end time
with +.
17
Delay Start
Starting delay start
^ Press the Start button.
140°F
1200 rpm
Start in:
2:41 h
The display shows in how many hours
and/or minutes the wash program will
start.
Changing delay start
^ Press the m button.
^ Correct the program end time with
the – and + buttons.
^ Confirm with OK.
Canceling delay start
^ Press the m button.
^ Change the program end time with
the – button until the program start
time matches the current time of day.
^ Confirm with OK.
The program starts immediately.
The actual load size cannot be
measured until the program has
started. This may result in an earlier
program end time.
18
Program guide
Mops
Standard 140°F
max. 14.3 lbs
Items
Mops made of cotton, mixed fibers or micro fibers
Tips
– A finishing agent can be applied.*
Additional options
second pre-rinse
Detergent
suitable special detergents
Standard plus 140°F
max. 14.3 lbs
Items
Mops made of cotton, mixed fibers or micro fibers
Tips
– A finishing agent can be applied.*
– The temperature can be changed.*
Additional options
second pre-rinse
Detergent
suitable special detergents
High temp. disinfection 185°F / 15 min
max. 14.3 lbs
Items
Mops made of cotton, mixed fibers or micro fibers
Tips
– Further disinfection methods can be selected.*
– A finishing agent can be applied.*
Additional options
second pre-rinse
Detergent
suitable special detergents
Chemical disinfection 160°F / 25 min
max. 14.3 lbs
Items
Mops made of cotton, mixed fibers or micro fibers
Tips
– Further disinfection methods can be selected.*
– A finishing agent can be applied.*
Additional options
second pre-rinse
Detergent
suitable special detergents (please observe the pertinent
provincial specifications for disinfection).
* These settings can be selected in the "Settings - Supervisor level" menu.
19
Program guide
Conditioning cloths
Chemical disinfection 160°F / 10 min
max. 7.7 lbs
Items
Cleaning cloths made of cotton, mixed fibers or micro
fibers
Tips
– A finishing agent can be applied.*
– Further disinfection methods can be selected.*
Additional options
Pre-wash
Detergent
suitable special detergents (please observe the pertinent
provincial specifications for disinfection).
140°F
max. 7.7 lbs
Items
Cleaning cloths made of cotton, mixed fibers or micro
fibers
Tips
– A finishing agent can be applied.*
Additional options
Pre-wash
Detergent
suitable special detergents
105°F
max. 7.7 lbs
Items
Cleaning cloths made of cotton, mixed fibers or micro
fibers
Tips
– A finishing agent can be applied.*
Additional options
Pre-wash
Detergent
suitable special detergents
Pads
Pads 105°F
max. 2 lbs
Items
Waxing or polishing pads made of micro fibers
Additional options
second pre-rinse
Detergent
suitable special detergents
* These settings can be selected in the "Settings - Supervisor level" menu.
20
Program guide
Additional programs
New mops 140°F, 170°F, 185°F
max. 14.3 lbs
Items
Mops made of cotton or mixed fibers
Tips
– For breaking-in new cleaning mops. Production residues
are washed out of the fiber; this increases the absorbency
of the fiber when cleaning.
Detergent
Universal or detergents for colored fabrics
Conditioning mops
max. 14.3 lbs
Items
Mops made of cotton, mixed fibers or micro fibers
Tips
– For later application of a finishing agent to mops that are
clean.
– The finishing agent can be added through the fabric
softener drawer or externally.
Conditioning cloths
max. 7.7 lbs
Items
Cleaning cloths made of cotton, mixed fibers or micro fibers
Tips
– For later application of a finishing agent to clean cloths.
– The finishing agent can be added through the fabric
softener drawer or externally.
Self cleaning
no load
For cleaning the tub and the draining system.
– Run the program with no load.
– Detergent must be added.
– If you use disinfection programs frequently you should run
the Self Cleaning program regularly.
Detergent
Universal detergent
21
Program guide
Curtains 86°F
max. 7 lbs
Items
Curtains which according to the manufacturer are machine
washable.
Tips
– For curtains that wrinkle easily, reduce the spin speed or
cancel the spin.
Additional options
Pre-wash
Detergent
Curtains, universal and color detergents in powder form.
Separate rinse
Items
Drain/Spin
Tips
22
max. 14.3 lbs
Fabrics that you only want to rinse and spin
max. 14.3 lbs
– Drain only: Select Without spin.
– For spinning fabrics. Be sure to select an appropriate
speed for the fabric type.
Program guide
Select "Additional programs" to view and select additional programs. These
programs must be activated via "Settings - Supervisor level".
Cottons universal 60°C
max. 14.3 lbs
Fabrics
Cottons, linens or mixed fabrics
Tips
– Wash dark colored fabrics with detergent for colors or a
liquid detergent.
Additional options
Pre-wash
Detergent
Universal or detergents for colored fabrics
Cottons hygiene 190°F
Fabrics
max. 14.3 lbs
Cottons, linens or mixed fabrics
Additional options
Pre-wash
Detergent
Universal detergent
Intensive 105°F, 140°F, 160°F
Fabrics
Heavily soiled cottons, linen or mixed fabrics
Additional options
Pre-wash
Detergent
Universal or detergents for colored fabrics
Intensive + 140°F, 170°F, 185°F
max. 14.3 lbs
max. 14.3 lbs
Fabrics
Very heavily soiled cottons, linen or mixed fabrics
Additional options
Pre-wash
Detergent
Universal or detergents for colored fabrics
Minimum iron 105°F
max. 7.7 lbs
Fabrics
Fabrics made of synthetic fibers, mixed fibers or
wrinkle-free cottons
Additional options
Pre-wash
Detergent
Universal or detergents for colored fabrics
Quick wash 105°F
max. 7.7 lbs
Fabrics
Small load of lightly soiled items which can be washed with
the program Cottons universal
Detergent
Universal or detergents for colored fabrics
23
Program sequence
Pre-spin
Prerinse
Main wash
Water level
Water
level
Rinses
a
b
Rinses
Spinning
Mops
Standard 140°F
L
L
(
(
2
L
L
Standard plus
L
L
(
(
2
L
L
High temp.
disinfection
L
L
(
(
3
L
L
Chemical
Disinfection
L
L
e
(
3
L
L
Chemical
Disinfection
-
L
(
(
3
L
L
140°F, 105°F
-
L
(
(
2
L
L
-
L
(
(
3
L
L
New mops
-
-
d
(
2
L
L
Conditioning mops
-
-
-
(
2
L
L
Conditioning cloths
-
-
-
(
2
L
L
Curtains
-
L
(
(
3
-
L
Cottons universal
-
-
d
(
2
L
L
Cottons hygiene
-
-
d
(
2
L
L
Intensive
-
L
(
(
2
L
L
Intensive +
-
L
(
(
3
L
L
Minimum iron
-
-
(
e
2
L
L
Quick wash
-
-
d
d
2
L
L
Separate rinse
-
-
-
e
2
-
L
Drain/Spin
-
-
-
-
-
-
L
Cleaning cloths
Pads
Pads 105°F
Additional programs
d = low water level
( = medium water level
e = high water level
24
a = rinse and interim spin
b = final spin
Program sequence
The washer is equipped with an
electronic control which determines the
load size automatically. The washer
determines the required water
consumption depending on the load
size and water absorbency of the
laundry. This will result in different
program sequences and wash times.
The program sequences shown in the
chart represent the
factory-programmed basic program
with maximum load. Possible options
are not taken into account.
The washer's program sequence
display indicates the current step of the
selected wash program.
Draining
In the programs Standard, Standard
plus, High temp. disinfection and
Chemical disinfection the mops are
drained by a brief spin after the
program starts.
Additional pre-wash
Some programs include a pre-rinse to
remove coarse dirt and cleaning agent
residues. Depending on the program, a
second pre-rinse or pre-wash can be
selected if the laundry is very dirty.
Anti-crease
The drum will continue moving up to 30
minutes after the end of the program in
order to ensure even wetness of the
laundry and to avoid wrinkling (not with
the programs Pads and New mops).
You can open the washer at any time.
25
Changing the program sequence
Canceling a program
Changing a program
A wash program can be canceled any
time after a program has started.
To change a wash program
^ Turn the program selector to Stop.
The program cannot be changed after
a program has started.
The washer drains and the program is
canceled.
^ Press the Door button.
To select a different program, the
program that has started must be
canceled.
^ Remove the laundry
To change the temperature
or
^ close the door and start a new
program.
The washer locks immediately after
starting a mop or cloth disinfection
program. It is no longer possible to
cancel or change the program or to
open the door.
Interrupting a program
^ Turn off the washer with the K
button.
To continue:
Some programs allow you to change
the temperature up to 5 minutes after a
program has started.
^ Press OK, the temperature is
highlighted. To change the
temperature press – or +. Confirm
with OK.
To change the spin speed:
^ Press OK until the spin speed is
highlighted. Adjust the spin speed
with the – and + buttons. The spin
speed can be changed right up to
the start of the final spin.
^ Turn the washer on again with the K
button.
Additional Pre-wash
^ Confirm the displayed message and
press the Start button.
Selection or de-selection of an
Additional Pre-wash is not possible
after the program has started.
26
Changing the program sequence
Adding/removing laundry
The drum door cannot be opened if:
You can interrupt some programs to
add or remove items or laundry.
– the water temperature is over 120°F.
^ Open the drum door using the Door
button.
– the water level exceeds a certain
limit.
^ Add or remove the items of laundry.
– The program step Spin has been
reached.
^ Close the drum door.
– a disinfection program was started.
The program continues automatically.
Note:
Once a program has started, the
washer cannot detect changes to
the size of the load.
Therefore, if laundry is added or
removed the washer program will
proceed based on the maximum
load.
The indicated program running time
may be extended.
27
Detergent
Determining the amount of detergent
Follow the instructions of the
detergent manufacturer.
Fabric softener, fabric
conditioner, or liquid starch
^ Use the amount recommended by
the manufacturer.
For instructions on the use and amount
of detergent for a full load see the
detergent packaging.
The amount of detergent used
depends on:
– the size of the load
– the level of soiling
– the water hardness
If you do not know the water
hardness level in your area, contact
your local water utility company.
Water hardness
Hardness
level
Water
quality
Water
Water
hardness
hardness
in mmol/l
in gpg
(also German
hardness in °d)
0 - 8.4
0 - 1.5
I
soft
II
moderate
8.4 - 14
1.5 - 2.5
III
hard to
very hard
over 14
over 2.5
^ Add the fabric softener, fabric
conditioner or liquid starch to the
drawer §. Do not exceed the Max.
level mark.
The fabric softener, conditioner or liquid
starch is automatically dispensed in the
final rinse.
After several automatic starches,
clean the dispenser drawer and
especially the siphon.
Water softener
Dye removers / Fabric dyes
If the water hardness level is II or III,
you can add a water softener to reduce
the amount of detergent required. First
add the detergent, then add the water
softener.
^ Do not use dye removers in this
washer.
You can then use the recommended
amount of detergent for water hardness
level I.
28
^ When dying fabrics in the washer,
follow the dye manufacturer’s
instructions closely.
Detergent
External dispensing
The washer is equipped with an adapter for external detergent dispensing
systems. Up to six dispensing hoses can be connected. The external dispensing
pumps are controlled by relays in the washer. The respective relays are turned on
for 2 minutes.
A separate conversion kit is necessary to control the dispensing pumps and
must be installed by a Miele technicians.
Relay
1
Relay
2
Relay
3
Relay
4
Relay
5
Relay
6
Standard 140°F
-
MW
MW
-
-
FA
Standard plus
-
MW
MW
-
FA
-
High temp. disinfection
-
MW
MW
-
-
FA
Chemical disinfection
-
MW
MW*
-
-
FA
Conditioning cloths Hygiene
PW
MW
MW*
FA
-
-
Conditioning cloths 140°F
PW
MW
MW
FA
-
-
Conditioning cloths 105°F
PW
MW
MW
FA
-
-
Pads 105°F
-
MW
-
-
-
-
New mops
-
MW
-
-
-
-
Treat mops
-
-
-
-
-
FA
Conditioning cloths
-
-
-
-
-
FA
Intensive
PW
MW
MW
-
-
-
Intensive +
PW
MW
MW
-
-
-
-
MW
MW
-
-
-
Self Cleaning
Relay 1
Relay 2
Relay 3
Relay 4
Relay 5
Relay 6
=
=
=
=
=
=
special agents
detergent
bleaching/disinfection agents
surface disinfection agents
floor care products
surface disinfection agents
PW = Pre-wash
MW = Main wash
FA = Finishing agent
* Agent is dispensed once the
correct temperature has been
reached.
29
Detergent
Empty sensor
The relays are turned as shown in
the overview. The containers must
be filled with the respective
detergent and additional agents in
the specified sequence.
Do not use any detergents and
additional agents that contain
chlorine or acid.
The dispensing pumps are not
turned on in the programs Cottons
universal, Cottons hygiene, Minimum
iron, Curtains, Quick wash and
Separate rinse.
When the external liquid detergent
containers are empty, the washer
displays a message when the Empty
sensor is activated (see menu
Settings/Supervisor level).
When a container is empty, the
following appears prior to program start
or while the program is running:
i
Fill the dispensing
container
OK
If a program has started it will continue
until completed.
^ Press the OK button to delete the
displayed message, and refill the
containers.
With Disinfection programs, the
following appears:
i
Fault
Container empty
OK
The program is interrupted.
^ Press the OK button to delete the
displayed message, and refill the
containers.
^ Then re-start the program.
,When the dispensing container
is empty during disinfection
programs you can presume that no
disinfection has taken place.
Re-start the program.
30
Cleaning and Care
,Disconnect the appliance from
the electric power supply.
Cleaning the washer
,Do not use solvents, abrasive
cleaners, glass or all purpose
cleaners!
They can damage plastic surfaces
and other parts.
If you use the disinfection programs
often, the Self Cleaning. program
regularly.
Cleaning the detergent drawer
Regularly remove any detergent
residue.
Housing and control panel
^ Clean the housing and the control
panel with a moist cloth and mild
detergent or soap and water.
^ Clean all stainless steel parts with a
suitable stainless steel cleaner.
,Never spray the washer with a
hose.
Cleaning the drum, tub, and drain
system
^ Pull out the detergent drawer as far
as it will go. Press the release lever
and pull the drawer out of the
machine.
The drum, the tub and the drain system
can be cleaned if necessary.
^ Clean the detergent drawer with
warm water.
^ Start the Self Cleaning. program.
^ When the program has ended, check
the interior of the drum and remove
any remaining dirt.
31
Cleaning and Care
Cleaning the detergent drawer holder
^ Clean the siphon.
1. Remove the siphon from the drawer
§ and rinse with warm water. Clean
the pipe onto which the siphon is
attached.
2. Replace the siphon.
32
^ Use a bottle brush to remove any
detergent residue and lime deposits
from the feed nozzles in the
detergent drawer.
Cleaning and Care
Cleaning the inlet hose filter
Cleaning the filter in the inlet valve
The washer has two water inlet filters to
protect each inlet valve. Check and
clean these filters every 6 months. This
may have to be done more frequently
with some water supplies.
^ Using pliers carefully loosen and
remove the plastic hose connector
from the inlet valve.
Cleaning the inlet hose filters
^ Turn off the water supply.
Using needle nose pliers, remove the
plastic filter by pulling on the bar (see
illustration). Rinse under running water
and return. Replace the filter and seal,
then reconnect the hose.
^ Unscrew the inlet hose from the valve
by turning the connector
counterclockwise, use a wrench if
necessary.
Both filters must be put back in
place after cleaning.
^ Remove the rubber seal, 1, from the
connector.
^ Using needle nose pliers, grasp the
plastic filter, 2, and pull it out of the
hose connector.
^ Clean the filter under running water
and carefully remove any large
particles.
^ Replace the filter and seal and
reconnect the hose.
^ Slowly turn on the water supply and
check for leaks. If water leaks, tighten
the hose connection.
33
Frequently asked questions
,Repairs to electrical appliances must only be carried out by a qualified and
trained person in accordance with local and national safety regulations.
Repairs and other work by unqualified persons could be dangerous.
A wash program cannot be started
Issue
Possible cause
The display and the The washer has no
program selector
power.
remain dark.
Solution
Possible fault:
– the washer is not connected
to the electrical supply,
– the circuit breaker has
tripped.
Follow the instructions as described in the "Before using
for the first time" chapter.
When selecting the
program "Drain/
Spin" the program
does not start.
The display remains The machine has gone Press any button. The Standby
off.
into "Standby" mode.
function will end.
The display shuts off to
save energy.
34
Frequently asked questions
The display shows a fault message
Display message
p
,
Water intake fault
Solution A
Possible cause
The water intake/
inlet is blocked.
Check whether
– the water valve is open far
enough.
– the inlet hose is kinked.
The water pressure – Turn on the setting Low water
is too low.
pressure (menu Settings/
Supervisor level).
Technical fault.
Contact Technical
Service.
There is a defect.
Fault
Temperature. not
reached
The required
The washer did not disinfect
temperature was
properly.
not reached during Start the program again.
the disinfection
program.
o
Waterproof
system
activated
– Close the water valve.
– Contact Technical Service.
q
The waterproof
system was
triggered.
Drainage fault
The drain is
blocked.
Contact Technical Service.
Fill the dispensing
container
One of the
detergent
containers for
external
dispensing is
empty.
See "Detergent - Empty sensor".
,
I
or
Fault
Container empty
Start the program again.
If the fault message appears
again, call Customer Service.
A To cancel a fault message, press OK to confirm.
35
Frequently asked questions
General problems with the washer
Problem
Possible cause
The washer shakes during The washer feet are
spinning.
not resting evenly on
the floor and are not
locked.
Solution
Even out the feet so the
washer is stable and lock
the washer feet.
Large amounts of
detergent residue are left
in the dispenser drawer.
The water pressure is Clean the water inlet
too low.
screens.
The fabric softener is not
completely dispensed or
too much water remains
in the § drawer.
The siphon is either
Clean the siphon, see
incorrectly positioned "Cleaning and Care or clogged.
Cleaning the detergent
drawer".
The display shows a
foreign language.
A different language
was selected under
"Settings menu J Language J".
36
Powder detergents
used with water
softeners tend to
clump.
Clean the dispenser
drawer.
Put the detergent into the
drawer first, and then the
water softener.
Select the desired
language. Use the flag
symbol as a guide.
Frequently asked questions
Poor wash results
Problem
Possible cause
Solution
The laundry does
not get clean with
liquid detergent.
Liquid detergents do not – Use powder detergent
contain bleaching agents.
containing bleach.
Fruit, coffee and tea
(Be sure this is suitable
stains may not be
according the fabric care
removed.
labels of the laundry.)
– Fill powder bleach in
compartment j and use a
dispenser ball for the liquid
detergent.
– Never put liquid detergent
and bleach together in the
same wash compartment.
Laundry has a
gray sticky
residue.
– Not enough detergent – Add more detergent to
was used to dissolve
laundry with grease stains or
greasy deposits in
use a liquid detergent.
heavily soiled laundry.
– The laundry was soiled – Run a 140°F (60°C) program
with grease (oils,
with liquid detergent to clean
lotions).
the washer before using it for
laundry again.
There is white
detergent residue
on dark laundry.
The powder detergent
was not completely
dissolved because of
hard water. These
residues are difficult to
remove.
Items with greasy
soiling are not
clean after a wash
program.
– Add a Pre-wash to the program. Use liquid detergent for
the pre-wash.
– Use a powder detergent for the main wash.
Use detergent which is specially formulated for heavily
soiled work clothes. Contact the detergent manufacturer
for more information.
– After drying, remove white
residues with a clothes
brush.
– In the future, use liquid
detergent.
37
Frequently asked questions
The door will not open when the Door button is pressed
Possible cause
Solution
The washer has no
power.
Check whether:
– the washer is turned on.
– the washer is connected to the electric power
supply.
– the circuit breaker has tripped.
Power failure
Open the drum door as described in the following
section.
The door was not
properly closed.
Push firmly against the lock side of the drum door,
then press the Door button.
As a safeguard against scalding, the drum door cannot be opened if the
temperature of the wash water is over 50°C.
Continuing the program after a power failure
Possible cause
Power failure
The washer was turned
off and then on again
with the K button.
38
Solution
Confirm the displayed message and press the Start
button. The program will continue from the saved
status.
Frequently asked questions
Opening the door during a
power failure or when the drain
is blocked
,Disconnect the appliance from
the power supply.
On the inside of the detergent drawer
panel is an opener for the door to the
drain system.
^ Press and hold down the lever for
emergency draining until all the water
has drained.
Open the drum door
,Always make sure the drum is
stationary before reaching in to
remove laundry. A moving drum is
extremely dangerous.
^ Remove the opener.
^ Open the door to the drain system.
^ Pull the emergency release
downwards, for instance with a
spoon handle. The drum door will
open.
39
After sales service
Repairs
PC Update
In the event of a fault which you cannot
easily fix yourself, please contact
technical service using the information
on the back of this manual.
The indicator marked PC allows a
technician to make use of new
technology. When, for example, new
programs are developed or new fabrics
are introduced, a service technician will
be able to modify existing program
cycles accordingly.
^ Please quote the model and serial
number of your appliance when
contacting the Technical Service
Department.
Both can be found on the data plate
visible above the front glass on the
inside of the door.
Miele will provide information when
such possibilities become available.
Optional accessories
Optional accessories are available
through your Miele dealer or Miele.
40
Installation Instructions
To prevent accidents
and appliance damage
read these instructions
before
installation or use.
Installation
Front view
a Water intake hose cold
b Water intake hose hot
c Control panel
d Detergent dispenser drawer
e Drum door
42
f Access panel to drain pump and
emergency door release
g Height adjustable feet
h Stand
i Retaining clips (for concrete stand)
Installation
Rear view
a Mounting for:
– Water intake hose
– Shipping struts (when removed)
b Power cord
c Shipping struts with rotary protectors
d Adapter for external dispensing
system
e Water intake hose (cold)
f Water intake hose (hot)
g Drain pipe
h Height adjustable feet
43
Installation
Installing the washer
This washer cannot be built-in.
Do not install any devices that
automatically turn off the washer
(e.g. timers), as the washer must be
connected to the electric power
supply in order that the door can be
opened.
^ Move the washer to the installation
location.
,Ensure that the washer cannot
tip while moving it.
44
Put the enclosed sticker with the
following text somewhere close to the
washer: "In order for the door to open,
this machine must be connected to the
power supply. Do not force open."
,Do not install the machine
directly next to or over an open floor
drain or drain channel. Moisture
could penetrate the machine and
damage electrical parts.
Installation
Installation site
,To prevent slipping during
spinning, make sure the washer's
feet and the installation surface are
dry.
Removing the shipping struts
^ Remove the shipping struts before
operating the washer.
The best installation surface is a
concrete slab. In contrast to a wooden
joist floor or another type of "soft"
flooring, a concrete slab will rarely
vibrate during spinning.
^ The washer must be level and stable.
^ To avoid vibration while spinning, the
machine should not be installed on
soft floor coverings.
If installing the washer on a wooden
joist floor:
^ Install the unit on a 27 9/16" x 23 5/8" x
1 3/16" (70 x 60 x 3 cm) plywood
base. Ideally the base should be
large enough to span several joists
and should be anchored to the joists
and not just the floor boards.
^ Remove the left and right rotary
protectors.
1. Unhook the rotary protector with a
screw driver.
2. Remove the rotary protectors.
It is best to install the washer in the
corner of a room, where the stability of
the floor is at its greatest.
^ Turn the left shipping strut counter
clockwise 90° with the enclosed
wrench and
45
Installation
^ Pull the shipping strut out.
^ Pull the shipping strut out.
,Close the holes of the removed
shipping struts. There is a risk of
injury if the holes are left uncovered.
^ Turn the right shipping strut
clockwise 90° with the enclosed
wrench and
^ Close the holes with the rotary
protectors and their caps.
46
Installation
^ Fasten the shipping struts at the rear
side of the washer. Take care to
insert the holes b into the clamps a.
,The washer must never be
moved without the shipping struts in
place.
Store the shipping struts for future
use. They must be reinstalled on the
washer before moving.
Installing the shipping struts
Reinstall the struts by reversing the
removal procedure.
47
Installation
Leveling the washer
To ensure smooth operation the washer
must be level.
Failure to level the machine can result
in increased water and energy
consumption as well as the washer
"banging" during the spin cycle or
"walking" across the floor during use.
Adjust and secure the feet
Level the washer by adjusting the four
feet. The machine is delivered with the
feet completely screwed in.
^ Make sure that the machine is level.
^ Once level, use pliers to hold the foot
1 in position. Tighten the locking nut
2 against the machine with the
wrench.
,All four locking nuts must be
tight against the bottom of the
machine. Even if some feet were not
screwed out for leveling, they still
need to be checked for tightness.
Otherwise, the washer may wander.
Preventing the washer from slipping
^ Turn the locking nut 2 clockwise with
the enclosed wrench. Unscrew each
of the four feet as much as necessary
by turning both the foot 1 and the
locking nut 2.
^ Secure the front feet of the washer
with the provided retaining clips.
^ Follow the enclosed installation
instructions closely.
48
Installation
Washer/Dryer Stack
The Miele washing machine can be
installed in combination with a Miele
dryer as part of a washer-dryer stack.
An appropriate stacking kit is required
(optional accessory).
Installation on an elevated
base
The washer can be installed on an
open or closed elevated steel base
(optional accessory) or on an elevated
concrete base.
,If installing on an elevated base
the washer must be secured with
retaining clips. Otherwise, the
washer may fall off the base while
spinning.
Installation of the stacking kit must
be performed by a Miele Service
Technician.
Reinstallation of the machine lid
If the washer lid was removed for the
washer-dryer stack it must be properly
replaced after it is uninstalled from the
washer-dryer stack.
49
Installation
Water connection
Maintenance
Cold water connection
Replace the water hoses only with
genuine Miele hoses.
A water faucet with 3/4" thread must be
provided on-site. If none is available the
machine must be connected to a water
line by a qualified plumber.
The water pressure must be between
14.5 -145 psi (1 -10 bar). If the water
pressure is greater than 145 psi
(10 bar), a pressure reducer must be
installed. If the water pressure is below
15 psi (1 bar), there will not be enough
water available for a complete fill.
The cold water hose (blue mark) is
not suitable for a hot water
connection.
^ Connect the cold water intake hose
(blue mark) to the cold water valve.
^ Turn on the valve(s) and check for
leaks.
The water intake hoses are
equipped with screen filters. Do not
remove these filters except for
cleaning.
50
Extension hoses
Extension hoses (8’ 2" or 13’ [2.5 m or
4 m]) may be obtained from Miele.
Installation
Hot water connection
Connecting the machine to a hot water
supply will lead to low electrical
consumption during hot water
operation. The hot water temperature at
the water supply valve must not exceed
158°F (70°C).
The water in single water lines from the
hot water source cools down when not
in constant use. In that case, more
electricity will be used to heat the wash
water.
The same conditions apply for the hot
water connection as for the cold water
connection.
Connect the hot water inlet hose (red
mark) to the water supply.
Connecting the machine to a hot
water line only is not possible for
functional reasons.
If the washer is not to be installed with a
hot water connection, the settings
Main wash Water , Pre-wash Water and
Rinse Water must be adjusted
accordingly. The hot water inlet hose
must be removed.
^ In the menu Settings / Supervisor
level, select the option cold.
The program times may be
extended.
^ Unscrew the hot water inlet hose (red
mark).
^ Screw on the supplied stopper.
Water drainage
The machine is drained with a
motorized drain valve. A connection
can be made to an on-site floor drain
(gully with an air gap) on an angle.
51
Installation
Electrical connection
,Ensure that the connection data
on the data plate (fusing, voltage
and frequency) match the main
electrical supply. If in doubt contact
an electrician.
,This installation should be
performed by an experienced and
qualified technician, in accordance
with local codes and regulations.
,Do not install devices that
automatically turn the washer off
(e.g. a clock timer), as the appliance
must be connected to the power
supply network so that the drum
door can be opened.
52
The washer comes with a power cord
and NEMA 6-30 plug.
The machine is supplied as standard
for connection to a 208/240 V, 60 Hz,
30 A, 2-phase electrical supply.
For extra safety it is advisable to install
a residual current device (RCD) with a
trip current of 30 mA.
The machine must only be connected
to the voltage and frequency shown on
the data plate.
Technical Data
Height
33 7/16" (85 cm)
Width
23 7/16" (59.5 cm)
Depth
28 9/16" (72.5 cm)
Depth with door open
44 1/8" (112 cm)
Weight
236 lbs (107 kg)
Maximum floor load
472 lbs [2100 Newton (214 kg)]
Capacity
14.3 lbs (6.5 kg) dry laundry
Voltage
see data plate
Rated load
see data plate
Fuse rating
see data plate
Noise level during spin
< 70 dB re 20 μPa
Minimum water flow pressure
14.5 psi kPa (1 bar)
Maximum water flow pressure
145 psi (10 bar)
Length of intake hose
5' 1" (1.55 m)
Length of power cord
5' 10 7/8" (1.80 m)
Test marks
see data plate
53
Help to protect the environment
Disposal of the packing
materials
The cardboard box and packing
materials protect the appliance during
shipping.
To prevent suffocation of children
ensure that any plastic wrapping, bags,
etc. are disposed of safely and kept out
of the reach of children.
Please recycle.
54
Disposal of an old appliance
Old appliances may contain materials
that can be recycled. Please contact
your local recycling authority about the
possibility of recycling these materials.
Ensure that the appliance presents no
danger to children while being stored
for disposal. Before discarding an old
appliance, unplug it from the outlet, cut
off its power cord and remove any
doors to prevent hazards.
Menu Settings J
to adjust standard settings
The washer controls can be adjusted to changing demands through the
settings menu.
Settings menu J
Accessing the Settings J menu
^ Turn the program selector to Stop.
The main menu appears.
15:03
Contrast
Ten different contrast levels are
available for the display.
It is factory-set to Setting 4.
Select a program
The contrast changes immediately
when a different level is selected.
Settings F ...
^ Confirm with OK.
You are now in the Settings menu.
C
Ten different brightness levels are
available for the display.
Suds cooling
Contrast
H
^ Set the desired setting with the – and
+ buttons and confirm with OK.
Leaving the Settings menu
^ Select Back and confirm. The display
shows the initial menu.
Suds cooling
Cold water is added at the end of
the main wash to cool the wash
water.
Suds cooling is carried out when a
wash temperature of 158°F (70°C) or
more is selected.
Suds cooling should be activated when
the drain hose is hung into a sink, to
prevent scalding
Suds cooling is factory set "on".
56
Brightness
Back A
It is factory-set to Setting 5.
The brightness changes immediately
when a different level is selected.
Settings menu - Supervisor level
The Settings menu (except Suds
cooling, Contrast and Brightness) is
locked with a code to prevent
unauthorized access.
C
Contrast
You are now in the supervisor level.
You can now change the settings on
the previous and the following pages.
Change code
Brightness
Supervisor level
^ Select Supervisor level and confirm.
C
^ After entering the digits, press OK
and confirm the code by pressing
OK again.
Back A
You can change the code to prevent
unauthorized access to the settings.
C
Access via code...
Brightness
Change code...
^ Select Access via code and confirm.
Enter code
0
Supervisor level
^ Select Supervisor level and confirm.
C
A three digit code must be entered. The
code is factory-set to: 0 0 0.
_ _
Contrast
Back A
Change code...
^ Select Change code and confirm.
Follow the display prompts.
Enter code
^ Enter the first digit with the + button.
Confirm the digit with OK. Now enter
the second digit.
^ Repeat this process until all three
digits have been entered.
57
Settings menu - Supervisor level
Time of day
This selection allows you to select a
24 hour or 12 hour clock or no clock
at all. The time of day is also set
here.
If Time not displayed is selected, the
delay start can be shown as a
96 hour timer.
Selecting the clock display
^ Select the desired clock display and
confirm.
The selected clock display is shown.
Setting the time of day
^ Set the hour with the – and + buttons
and confirm with OK. Now set the
minutes and confirm. The display
changes to the Settings menu.
Language J
The display contents can be shown
in different languages.
^ Select the desired language and
confirm.
Standby
To save energy, the display goes
dark after 10 minutes and the Start
button flashes slowly.
The display is turned on again by
turning the program selector or
pressing any button.
Two options are available:
On
The display will go into standby mode:
– if no program is selected after the
machine is turned on.
– after a program has started.
– at the end of a program.
Not in current prog.
(factory default)
The Standby function will be turned on:
– if no program is selected after the
machine is turned on.
58
Settings menu - Supervisor level
Memory
The Memory function remembers the
addition of an extra feature to a
program or a change in spin speed
or temperature the next time that
program is selected.
Once the wash program is selected
again the washer displays the saved
options.
The washer comes factory-set with the
memory function turned off.
Auto load control
The washer is equipped with an
electronic control which
automatically determines the load
size. If "Auto load control" is turned
off the program will run as for a full
load.
The washer comes factory-set with this
option turned on.
Pre-wash water
You can select the water type (hot/
cold) for the pre-wash. The hot water
intake will only be accessible at a
wash temperature of more than 86
°F (30°C).
Main wash water
You can select the water type (hot/
cold) for the main wash. The hot
water intake will only be accessible
at a wash temperature of more than
86 °F (30°C).
The washer comes factory-set to water
type hot.
Rinse water
Certain programs allow you select
the water type (hot/cold) for the last
rinse cycle. The hot water intake will
only be accessible at a wash
temperature of more than 122°F
(50°C).
The washer comes factory-set to water
type cold.
Low water pressure
With generally low water pressure
(under 100 kPa), Low water
pressure can be activated to obtain
better water intake.
The washer comes factory-set with this
option turned off.
The washer comes factory-set to water
type hot.
59
Settings menu - Supervisor level
Standard plus temp.
The pre-set temperature can be
changed in the Standard plus
program. There are 4 different
temperature to choose from.
40°C
60°C (factory default)
70°C
90°C
Chemical disinfection
The pre-set disinfection process can
be altered in the Chemical dis.
program. There is a choice of 4
temperatures with corresponding
holding times.
40°C / 20 min
60°C / 20 min
70°C / 10 min
71°C / 25 min (factory default)
Pre-spin mops
Thermal disinfection
In the Standard, Standard plus, High
temp. disinfection and Chemical dis.
programs, wet mops are spun briefly
at the start of the program to remove
excess water.
The washer comes factory-set with this
option turned on.
60
The pre-set disinfection process can
be altered in the High temp.
disinfection program. There is a
choice of 2 temperatures with
corresponding holding times.
75°C / 10 min
85°C / 15 min (factory default)
Settings menu - Supervisor level
Hygiene disinfection
The pre-set disinfection process can
be altered in the Cleaning cloths
Hygiene program. There is a choice
of 4 temperatures with
corresponding holding times.
Conditioning Disinfection
In the High temp. disinfection and
Chemical dis. programs, the
chemical finishing process can be
activated to take place after the
wash cycles (option only available
with an external dispensing system).
40°C / 20 min
60°C / 20 min
70°C / 10 min (factory default)
85°C / 15 min
The washer comes factory set with the
No option activated (no chemical
finish).
Chemical dis. cloth
Conditioning Cleaning cloths
When processing micro fiber mops
in the Standard, Standard plus and
Chemical dis. programs, the suds
can be cooled down after the main
wash to 45°C by adding cold water
(Cool Down).
The machine is delivered with the No
option activated (no Cool Down).
In the Cleaning cloths Hygiene Dis.,
Cleaning cloths 60°C and Cleaning
cloths 40°C programs, the chemical
finishing process can be activated
to take place after the wash cycles
(option only available with an
external dispensing system).
The washer comes factory set with the
No option activated (no chemical
finish).
Conditioning Standard
In the Standard and Standard plus
programs, the chemical finishing
process can be activated to take
place after the wash cycles (option
only available with an external
dispensing system).
The washer comes factory-set with the
No option activated (no chemical
finish).
61
Settings menu - Supervisor level
Spin-conditioning standard
disinfection
The setting Condi. standard, disin.
and Disinfection allows you to set
the residual moisture level after
finishing in the program Mop Standard, in the mop disinfection
programs and in the program
Conditioning mops.
Four options are available:
,,,, (high level of residual moisture)
to
Spin & Conditioning cleaning
cloths
The setting Spin & Condit. cloth
allows you to select the level of
residual moisture after finishing in
the programs Cleaning cloths 140°F/
105°F and Conditioning cloths.
Four options are available:
,,,, (high level of residual moisture)
to
, (low level of residual moisture)
, (low level of residual moisture)
Empty sensor
Spin-conditioning standard +
The setting Condition standard +
allows you to select the level of
residual moisture after finishing in
the program Mops Standard plus.
Four options are available:
,,,, (high level of residual moisture)
to
, (low level of residual moisture)
62
You can activate the Empty sensor
of external liquid detergent
containers so that a message is
displayed when the containers are
empty.
The washer comes factory-set with this
option set to No (no empty sensor).
Settings menu - Supervisor level
Additional programs
Select Additional programs to
expand the choice of programs.
0 = no additional program (factory
default)
Add cottons = Cottons hygiene and
Cottons universal are added.
Minimum iron level
The water level for the main wash
can be increased in the program
Minimum iron.
The machine comes factory-set with the
option "Block Parameter" selected. (The
water level will be controlled according
to the factory set program data.)
Add Intensive / + = the programs
Intensive and Intensive + are added.
Minimum Iron / Quick wash = the
programs Minimum iron and Quick
wash are added.
Add all = all programs are added.
Cottons level
The water level for the main wash
can be increased in the programs
Cottons hygiene and Cottons
universal.
The machine comes factory-set with the
option "Block Parameter" selected. (The
water level will be controlled according
to the factory set program data.)
Pre-wash temp. cottons
The pre-wash temperature can be
selected in the programs Cottons
hygiene and Cottons universal.
The machine comes factory-set with the
option "Block Parameter" selected. (The
temperature will be controlled
according to the factory set program
data.)
Pre-wash duration
You can increase the pre-wash time.
The machine comes factory-set with the
option "Block Parameter" selected. (The
wash time will be controlled according
to the factory set program data.)
63
Settings menu - Supervisor level
Cottons duration
The wash time for the main wash
can be increased in the programs
Cottons hygiene and Cottons
universal.
No. rinses Cottons
The number of rinse cycles can be
changed in the programs Standard,
Cleaning cloths, Cottons hygiene
and Cottons universal.
The machine comes factory-set with the
option "Block Parameter" selected. (The
wash time will be controlled according
to the factory set program data.)
2 rinse cycles (factory default)
3 rinse cycles
4 rinse cycles
5 rinse cycles
Minimum iron duration
No. rinses Min. iron
The wash time for the main wash
can be increased in the program
Minimum iron.
The machine comes factory-set with the
option "Block Parameter" selected. (The
wash time will be controlled according
to the factory set program data.)
The number of rinse cycles can be
changed in the program Minimum
iron.
2 rinse cycles (factory default)
3 rinse cycles
4 rinse cycles
Pre-rinse Cottons
Pre-wash Cotton/Min-iron
Pre-wash can be permanently
added in the programs Cottons
hygiene, Cottons universal and
Minimum iron.
The machine comes factory-set with the
option Select from menu turned on.
64
Pre-rinse can be activated in the
programs Cottons hygiene and
Cottons universal.
The machine comes factory-set with
this option turned off.
Settings menu - Supervisor level
Pre-rinse Minimum iron
Pre-rinse can be activated in the
program Minimum iron.
The washer comes factory-set with this
option turned off.
Energy usage control
The programs Cottons hygiene,
Cottons universal and Minimum iron
ensure optimal energy consumption
when this option is turned on.
The washer comes factory-set with this
option turned on.
Temperature unit
You can choose whether you would
like the temperature displayed in °C/
Celsius or in °F/Fahrenheit.
Closing the Settings menu
Select Back and confirm. The display
shows the initial menu.
The washer comes factory-set with °F
selected.
65
66
67
Alteration rights reserved / 4010
M.-Nr. 07 704 080 / 00