1
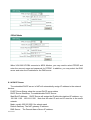
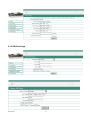
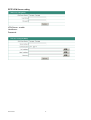
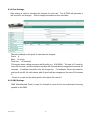
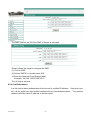
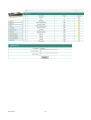
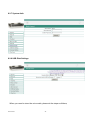
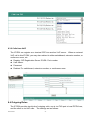
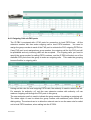
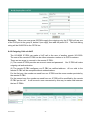
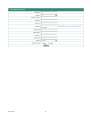
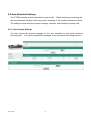
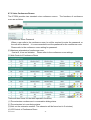
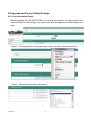
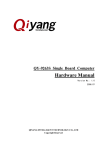
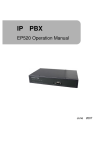
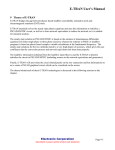
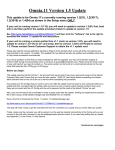
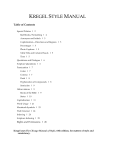
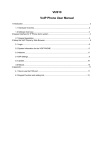
VOI-9300 SIP IP PBX User Manual Table of Content 1. INTRODUCTION............................................................................................................................ 4 1.1. OVERVIEW ........................................................................................................................ 4 2. FEATURES ..................................................................................................................................... 5 3. STANDARD COMPLIANCE ........................................................................................................ 5 4. PACKING CONTENT .................................................................................................................... 6 5. LED INDICATORS & INTERFACE CONNECTORS................................................................ 6 6. INSTALLATIONS ........................................................................................................................... 9 7. RESET TO FACTORY DEFAULT ............................................................................................... 9 8. IP PBX CONFIGURATIONS BY WEB BROWSER ............................................................... 10 8.1 NETWORK SETTINGS .........................................................................................................11 8.1.1 Network Status.........................................................................................................11 8.1.2 LAN Setting..............................................................................................................11 8.1.3 WAN Settings.......................................................................................................... 13 8.1.4 DHCP Server .......................................................................................................... 14 8.1.5 DDNS Settings........................................................................................................ 15 8.1.6 VPN Settings........................................................................................................... 16 8.2 SYSTEM CONFIGURATIONS ............................................................................................... 18 8.2.1 SIP Port................................................................................................................... 18 8.2.2 Rate Settings .......................................................................................................... 19 8.2.3 DMZ Settings .......................................................................................................... 19 8.2.4 Certified Address .................................................................................................... 20 8.2.5 Music ON Hold........................................................................................................ 21 8.2.6 Hot Lines................................................................................................................. 22 8.2.7 System Auth............................................................................................................ 24 8.2.8 USB Disk Settings................................................................................................... 24 8.2.9 Time-Zone Settings................................................................................................. 26 8.3 INCOMING CALLS SETTINGS .............................................................................................. 26 8.3.1 Calls from FXO ports .............................................................................................. 26 8.3.2 Calls from VoIP ....................................................................................................... 27 8.4 OUTGOING RULES ........................................................................................................... 27 8.4.1 Outgoing Calls via FXO ports ................................................................................. 28 8.4.2 Outgoing Calls via VoIP .......................................................................................... 29 8.5 AUTO ATTENDANT SETTINGS ............................................................................................. 31 8.5.1 Voice Prompt Settings ............................................................................................ 31 2007-08-02 2 8.5.2 Operator Settings.................................................................................................... 32 8.5.3 Auto Attendant ........................................................................................................ 32 8.6 USER MANAGEMENT ........................................................................................................ 34 8.6.1 Single User Account Opening ................................................................................. 34 8.6.2 Group Users Account Opening ............................................................................... 35 8.6.3 Extension Bindings ................................................................................................. 35 8.6.4 Delete User Accounts ............................................................................................. 36 8.6.5 User Information Update......................................................................................... 37 8.6.6 Function Settings .................................................................................................... 38 8.6.7 User List.................................................................................................................. 40 8.6.8 On-Line User List .................................................................................................... 40 8.7 ADVANCED SETTINGS ....................................................................................................... 42 8.7.1 Phone Self Config ................................................................................................... 42 8.7.2 Queue Settings ....................................................................................................... 43 8.7.3 Voice Conference Rooms ....................................................................................... 45 8.7.4 Upload XML File Procedure.................................................................................... 47 8.7.5 Network Parameter ................................................................................................. 47 8.7.6 Caller ID .................................................................................................................. 48 8.8 CALL RECORDS QUERY .................................................................................................... 50 8.8.1 System Call Records query .................................................................................... 50 8.8.2 User Call Records................................................................................................... 50 8.9 UPGRADE AND FACTORY DEFAULT SETTINGS ..................................................................... 51 8.9.1 User information Export .......................................................................................... 51 8.9.2 System Upgrade ..................................................................................................... 52 8.9.3 Reboot .................................................................................................................... 52 9. APPLICATIONS ........................................................................................................................... 53 2007-08-02 3 1. Introduction 1.1. Overview The VOI-9300 IP PBX is an embedded Voice over IP (VoIP) Server with Session Initiation Protocol (SIP) to provide IP extension phone connections for global virtual office of small-to-medium business (SMB) companys. Equipped with 4 x FXO ports, Ethernet LAN and WAN ports plus Life Line features, VOI-9300 combines the telephony network and the data network into a manageable converged network to provide an efficient and economical PBX for global long distance voice communications. VOI-9300 IP PBX works with various IP phones (Desktop, WiFi, Bluetooth, and DECT), VoIP gateways, and analog telephone adapters (ATA) to route calls among client phones, analog phones, and PSTN network. Call features such as conferencing, auto attendant, and voicemail can be seamlessly enabled to all phone devices. In addition, it also provides Internet access to all LAN devices through VPN NAT router. VOI-9300 IP PBX provides call control and media relay services to SIP clients, and it performs the following primary functions: SIP Registrar, SIP Outbound Proxy with media relay, SIP Gateways (FXO), SIP PBX for extension calls, Auto attendant Interactive Voice Response (IVR), Voice Mail IVR, and Meet-Me Conferencing. VOI-9300 IP PBX has a built-in suite of PBX applications for supplementary services. This lowers down the total cost of a converged network enabled by VOI-9300 IP PBX than building separated infrastructures for legacy telephony network and data network. In addition, with a web-browsable interface to the data network configuration and voice service provisioning, VOI-9300 brings the manageability of both networks together to facilitate administration locally and/or remotely. Note that VOI-9300 requires an IP address, a subnet mask, and its gateway Router IP address for its own use to connect to Internet. These three are available from your Internet service provider. VOI-9300 may enable PPPoE or DHCP features to automatically get an assigned dynamic IP from the ITSP. Please refer to Web Configurations for detailed information. 2007-08-02 4 2. Features The VOI-9300 IP PBX is equipped with RJ45 & RJ11 connectors and is featuring as the following: SIP Server supports 50 user registrations and 20 concurrent calls SIP v1 (RFC2543), v2 (RFC3261) with MD5 authentication (RFC2069 and RFC 2617) RJ45 x 2 for Ethernet WAN and LAN ports + RJ11 x 4 for FXO ports + Life Line FXS port Supports ITU-T G.711a, G.711u, GSM/MS-GSM, G.729A/B, VAD and CNG for Speech Codec Configurations by Web Browser with Embedded Web Call functions Embedded NAT/DHCP Server PPPoE/DHCP Client for Dynamic IP plus NAT, VPN, DNS, and DDNS Clients Support STUN server for NAT Traversal DMZ functions Support call features; Call Forward/Waiting/Transfer/Hold, and Voice Conference Room Support E.164 ENUM Dial number via SIP server Incoming Call Pickup for Group users Incoming Call Ringing for Group users Number Bonding and Call restrictions. Follow Me Function Extension Pickup for Attendant Bill Rate Table with Voice Mail Interactive Voice Recording (IVR) Settings for XML Programmable Prompt messages On-Line Subscriber Status Remote Firmware Upgraded with HTTP or TFTP server by Web PC Auto Provision Settings Out-Band DTMF (RFC 2833) / In-Band DTMF / Send DTMF SIP Info 3. Standard Compliance The VOI-9300 IP PBX supports for the following standards VoIP Protocol: IETF RFC3261 and RFC 2543 for SIP SIP Authentication: IETF RFC2069 and RFC 2617 for MD5 Speech Codec: ITU-T G.711, G.723, G.729A/B, VAD and CNG Echo Cancellation: ITU-T G.165/168 2007-08-02 5 4. Packing Content Inside the package you should find: (1) One VOI-9300 IP PBX (2) One AC to 12VDC/1A Power Adaptor (3) One User Manual CD ON 5. LED Indicators & Interface Connectors On the front panel of VOI-9300, there are 12 LED indicators as the following LED Status POWER ON Power is Normal. ACTIVE ON IP PBX is in Operation ALARM ON IP PBX is at alarm status VPN ON Virtual Private Network is ON FXO 1 ON PSTN Line 1 is enabled and IDLE Flashing FXO 2 ON Flashing FXO 3 ON Flashing FXO 4 ON Flashing LAN PSTN Line 1 is in use PSTN Line 2 is enabled and IDLE PSTN Line 2 is in use PSTN Line 3 is enabled and IDLE PSTN Line 3 is in use PSTN Line 4 is enabled and IDLE PSTN Line 4 is in use ON LAN Port is in connection Flashing LAN Ethernet data activity 10/100M ON LAN Ethernet port is in connection at 100Mbps WAN ON WAN Port is in connection Flashing WAN Ethernet data activity 10/100M 2007-08-02 Descriptions ON WAN Ethernet port is in connection at 100Mbps 6 RS232 Console Port The VOI-9300 provides an RS232C console port for firmware update and maintenance through a VT100 terminal. This section covers the operation procedures, settings and for all screen selections. Connect the RS232 cable to the COM port of the computer as shown in the following diagram. Set the Notebook PC to VT100 or VT102 type through HyperTerminal. Press the <ESCAPE> key and the main menu will be shown on the screen of the terminal. The terminal operations can then start. If the <ESCAPE> key is pressed and the screen of the terminal does not display, this may be due to the incorrect COM port setting. Choose the right COM port (COM1 or COM2) on the computer, and press the <ESCAPE> key again to make sure that the main menu appears on the terminal screen. Note that the COM port should be set as 57600 bps, none parity, 8 data bit, and 1 stop bit. Interface Connectors 1. DC Power 12Volt DC / 1A Power Adaptor with 100~240V AC power input 2. FXO ports 4 FXO ports are for connection to PSTN lines, and numbered 1, 2, 3 and 4 from left to right. 3. Life Line port Life Line FXS port connects to an analog telephone. When power down, the Life Line will switch to FXO port 1 for PSTN line 1. 4. WAN port Connect to a broadband ADSL/Cable modem or a WAN router. 5. LAN port Connection to PC for Web configurations or Laptop, extended IP Phones, or VoIP Gateways/ATA, etc. 2007-08-02 7 6. USB port 2007-08-02 Connect to an external USB drive for backup internal system storage. Click the Backup icon in Web configurations and follow instructions to insert the USB connector of an external USB drive. 8 6. Installations WAN LAN FXO LAN ADSL modem FXS PSTN IP Phones POTS Internet 7. Reset to Factory Default VOI-9300 can be reset back to factory default while IP address is not available for web configurations. Press the RESET button continuously, while turning power off and on, until all the LED indicators start flashing for 3 times. The RESET button can then be released and the LED indicators of VOI-9300 will begin flashing for 3 times again to activate the IP PBX. Note that the firmware version an IP settings will be reset back to factory defaults and users data base will be cleared. It is suggested that the user data base be backed up to USB memory disk storage. 2007-08-02 9 8. IP PBX Configurations by Web Browser You may enter the IP address from PC Web browser to configure VOI-9300. For example, enter http://192.168.1.1 from IE web browser to display login page as follows. Note that VOI-9300 does NOT support auto-MDIX for WAN and LAN port. To connect a notebook PC for web configurations, the user may need to use Ethernet Crossover cable included in the accessory for RJ45 connector. 1). Please enter the default IP address http://192.168.1.1 from PC Web browser. The following Web page shall be displayed on PC. If you have difficulties accessing the Web page from the PC Web browser, the subnet IP of PC might be different from 192.168.1.xxx. In this case, please refer to Chapter 9 for trouble shooting. 2). Please enter the username and password into the blank field. The default settings are: Username: admin Password: 123456 3). Click the ¡Login¡ button to enter the System information page for web configurations. Whenever you change the setting in each Web page, remember to click the ¡Submit¡ button in the page, and click the ¡Save¡ button to save into the non-volatile memory and click the ¡Reboot¡ button to activate the new settings. WAN & LAN Network IP Address and Mask NIC IP Address Mask WAN 192.168.139.3 255.255.255.0 LAN 192.168.1.1 255.255.255.0 Note that VOI-9300 does NOT support auto-MDIX for WAN and LAN port. To connect a notebook PC for web configurations, the user may need to use Ethernet Crossover cable included in the accessory for RJ45 connector. 2007-08-02 10 4). VOI-9300 provides 50 SIP extension accounts which can be configured as well by Web browser. The account numbers are from 2001~2010 with same password 123456. The SIP service port is at default 5060. 8.1 Network Settings 5). VOI-9300 IP-PBX provides 2 RJ45 connectors for LAN and WAN ports at 10/100MEthernet interfaces. Note that these 2 ports do NOT support auto-MDIX features, and the user needs to use crossover CAT 5 cable for connection to Notebook PC. 8.1.1 Network Status 6). Network Status shows all the IP address for LAN, WAN, VPN server and clients. 8.1.2 LAN Setting 7). LAN Port can be used for IP-PBX to connect to a Notebook PC for configurations. 8). The embedded DHCP Server will automatically assign IP address through the LAN port. 2007-08-02 11 MAC Address must be unique in the same network. IP Address must be xxx.xxx.xxx.xxx and xxx is from 0 to 255, e.g. 192.168.1.1. Subnet Mask is used for network segmentation. Please make sure the mask is correct and the all the VoIP devices are within the same network as VOI-9300. 2007-08-02 12 8.1.3 WAN Settings WAN port is to connect to ADSL modem for Internet access. There are 3 options for WAN settings; DHCP, Static IP, and PPPoE. The following example shows a Static IP type for WAN Setting. Static IP mode Dynamic IP Mode 2007-08-02 13 PPPoE Mode When VOI-9300 IP-PBX connects to ADSL Modem, you may need to select PPPOE and enter the account name and password for PPPOE. In addition, you may select the DNS server and enter the IP address for the DNS server. 8.1.4 DHCP Server The embedded DHCP server in NAT will automatically assign IP address to the network devices. DHCP Server Status: show the current DHCP server status DHCP Server Start/Stop: To enable/disable DHCP Server Start/End IP Address: DHCP Server will assign the IP within the start/end IP address, e.g. 192.168.1.100-192.168.1.200. Note that the start IP and end IP must be in the same network. Mask: usually 255.255.255.0 for subnet mask Default Gateway: The NAT gateway IP address. DNS Server: The Domain Name Server IP address. 2007-08-02 14 8.1.5 DDNS Settings 2007-08-02 15 8.1.6 VPN Settings 2007-08-02 16 PPTP VPN Server setting VPN Server : enable UserName : Password : 2007-08-02 17 8.2 System Configurations The VOI-9300 IP PBX system configurations can be set in this section. The settings include SIP Port, Billing rate, DMZ, System Authentications, Music on Hold. 8.2.1 SIP Port The SIP port number is for used with VoIP Applications. The default is 5060. The user may assign a value for SIP port from 1 to 65535. Note that the SIP port number must be the same for all the IP-PBX and VoIP phones. 2007-08-02 18 8.2.2 Rate Settings Rate setting is used to calculate the charges for each call. The IP PBX will generate a call record for the charges. All the charges are based on this rate table. The rate is based on the prefix to calculate the charges: Prefix: 0 Rate: 15 (cent) Time Unit: 60 (second) This means when calling a number with 0 prefix (e.g., 01010086),The rate is 15 cents for every 60 seconds , and the duration less than 60 seconds will be charged the same as 60 seconds. In addition, the prefix is for the longer one. For example, if there are rates for prefixes 0 and 00, the call number with 00 prefix will be charged per the rate of 00 instead 0. If there is no rate for the calling prefix, this implies the rate is 0. 8.2.3 DMZ Settings DMZ (Demilitarized Zone) is used for firewall to send all the non-authorized incoming packets to the DMZ. 2007-08-02 19 The DMZ must be set ON if the DMZ of firewall is activated. Please follows the steps to configure the DMZ: (1) Click on DMZ (2) Set the DMZ IP or domain name URL (3) Enter the Network IP and Subnet Mask Example: 192.168.1.0/255.255.255.0 The (3) step is optional. 8.2.4 Certified Address It is not need to have authentication from the call of certified IP Address. If the port is set at 0, all the ports from this certified address will not need authentications. The certified address could be either IP address or domain name. 2007-08-02 20 The certified address can be added or deleted, and need to be configured in case of the following conditions; (1) Need to work with FXO ports, (2) Need to connect with xNode, (3) Need to connect with another SIP Server. In summary, the certified address can be set whenever the authentication is not needed. 8.2.5 Music ON Hold The IP PBX will play music when a call is on hold due to the following situations; (1) When the call is transferred to attendant and waiting for answer. (2) When the call is hold and waiting for answer. (3) When the call is transferred and waiting for answer. You may choose one of the music files for MUSIC ON Hold. 2007-08-02 21 Music ON Hold requires a unique file format, and any MP3 files must be converted before upload for use of Music ON Hold. 8.2.6 Hot Lines Hot line numbers can be entered into the list. Make sure all the holiness are not the same as any extension number or PSTN numbers. For example, when an incoming call into the PBX with the prompt message ¡Press 1 for customer service, Press 2 for technical support, Press 0 for directory¡, then you may set as the following; (1) Call hold 1 for customer service and connect extension 1; (2) Call hold 2 for technical support and connect extension 2; (3) Modified the prompt voice messages. 2007-08-02 22 2007-08-02 23 8.2.7 System Auth 8.2.8 USB Disk Settings When you need to store the voice mails, please do the steps as follows; 2007-08-02 24 (1) Insert USB disk (2) Select ¡Insert USB Disk¡ in the current status (3) Select Yes to enable USB voice mail recording. (4) Click Update button. When the voice mails is not needed, please do the steps as follows; (1) Select ¡Insert USB Disk¡ in the current status (2) Select No to disable USB voice mail recording. (3) Click Update button. (4) Pull out the USB disk. 2007-08-02 25 8.2.9 Time-Zone Settings 8.3 Incoming Calls Settings The IP PBX provides two ways of incoming calls; one is from local PSTNthrough the FXO ports, and the other is from the calls from ITSP. In some case, the ITSP may provide the real PSTN numbers for the IP PBX from the VoIP. 8.3.1 Calls from FXO ports The IP PBX provides 4 FXO ports to allow PSTN incoming calls. For any PSTN incoming calls, you may configure to redirect to either switchboard, extension number, or conference room, etc. 2007-08-02 26 8.3.2 Calls from VoIP The IP PBX can register as a terminal CPE into another VoIP server. When an external VoIP call to this IP PBX, you may also redirect to either switchboard, extension number, or conference room, etc. Registry: SIP Registration Server IP/URL: Port number User Name: Password: Redirect To: switchboard, extension number, or conference room 8.4 Outgoing Rules The IP PBX provides two kinds of outgoing calls; one is via FXO port to local PSTN lines, and the other is via VoIP calls. The settings are as follows: 2007-08-02 27 8.4.1 Outgoing Calls via FXO ports The IP PBX is equipped with 4 FXO ports for connection to local PSTN lines. All the extension number can then make outgoing call to local PSTN numbers. You need to assign the group number to each of the FXO port to activate the FXO outgoing PSTN line. If any FXO port is not assigned any group number, the outgoing call for this FXO port will be prohibited and only incoming calls can be accepted. For outgoing calls, you need to specify the group number for calling PSTN numbers, and the IP PBX will select one of the available FXO ports from the group to make an outgoing calls. This make the grouping become flexible in outgoing calls. Having set the rules for local outgoing PSTN calls, the authority is used to restrict the call. For example, for authority >=5, only the user extension number with authority >=5 can make an outgoing call through the FXO ports in this group. The user extension prefix is used to indicate the group number for making an outgoing call. The delete digits is used to delete the group number with additional prefix before the dialing string. The external use is to allow the external user to use the same rule for redial out to local PSTN numbers, when calling into the IP PBX. 2007-08-02 28 Example: When one user press 056789 to apply the outgoing rule, the IP PBX will use one of the FXO port in the group 0, delete 0 (one digit), then add the prefix 024. The final dialing string will be 02456789 to the PSTN line. 8.4.2 Outgoing Calls via VoIP The VOI-9300 IP PBX can make a VoIP call to the user of another remote VOI-9300. The user of the remote IP PBX can be either extension number or its PSTN numbers. There are two ways to connect to the remote IP PBX: (1) The remote IP PBX provides an account name and password. Our IP PBX will make outgoing call authentication. (2) The remote IP PBX configures our IP PBX as certified address. All our calls to the remote IP PBX will be accepted without authentications. For the first way, the number we send from our IP PBX are the users number provided by the remote IP PBX. For the second way, the number we send from our IP PBX will be modified by the remote IP PBX per its rule. It will be much more convenient by this way to make calls between the two IP PBXs. 2007-08-02 29 2007-08-02 30 8.5 Auto Attendant Settings The IP PBX provides an Auto Attendant for user to call. When receiving an incoming call, the auto attendant will play a welcome prompt message or call another extension number. The settings include welcome prompt message, operator, and handling incoming calls. 8.5.1 Voice Prompt Settings You may choose the prompt message for the auto attendant to play while receiving incoming calls. You need to upload the messages to the prompt list for setting choices. 2007-08-02 31 8.5.2 Operator Settings When a transfer call can not be transferred to the desired extension number, the call will be transferred to operator. The operator can be any extension or PSTN number with assigned priority, and the call will be forwarded by priority. 8.5.3 Auto Attendant Auto Attendant will handle all the incoming calls when no one can answer in the company. There are two ways of answer; Answer by phone, and answer by machine with playing answering prompt messages. (1) Answer by Phone: All the incoming calls will be transferred to the preset phone number. The phone number can be either extension number or PSTN number. (2) Answer by machine: An answering prompt message will be played to answer the incoming call. Make sure the answering message is uploaded and chosen. The IP PBX provides many options for time durations. If the time durations are not set, the handling incoming call will be always effective. 2007-08-02 32 2007-08-02 33 8.6 User Management This section describes the account opening, closing, and management. The extension number will be referred to user name. The user name (or extension number) must not exceed 32 digits. For easy management, it is recommended to assign different prefix number for different departments. A user number should have the following; (1) User name: The user name is a string of number digits with length less or equal to 32. For easy management, it is recommended to assign different prefix for different departments. (2) Password: Every user name will have its own password with length less than or equal to 32 alpha-numeric digits. The CPE VoIP phone must use the same password for authentications. (3) Call Authority: from 0-15. This is used to restrict the call authority. The user authority must be equal or greater than the predefined authority to make the defined outgoing calls. (4) User Group: Each user name can belong to one or multi-groups. User can answer incoming calls for another user within the same group by pressing ¡*8¡. There are 16 groups can be assigned. 8.6.1 Single User Account Opening You may add single user account in this section by entering user name, password, groups, and call authority. Remember the length should not exceed 32. 2007-08-02 34 Note: when the number of registered users reach the limit, the function of add user will not work. 8.6.2 Group Users Account Opening You may create group users accounts and assign group numbers with priority to all the accounts. You may also assign password to each account or generated by IP PBX. After settings, you may display all the created accounts. 8.6.3 Extension Bindings Extension binding is used to bind many extension numbers together as a group. When calling to one of the extension, the other binding extension will ring as well. This is also referred to as Group Ringing. 2007-08-02 35 (1) User name: enter extension number (2) Binding group number: Enter the binding group number. The extension number with same binding number will belong to the same binding group. (3) The binding list will display the extension numbers. Note that one extension number can belong to multi-binding groups. 8.6.4 Delete User Accounts There are two ways for user account deletion; one is for single account deletion, and the other is for group account deletions. For single account deletion, you need only to enter the extension number. For group account deletions, you need to enter a range of extension numbers. The IP PBX will delete all the user information for the extension within the range. Note that the information will not be recovered once deleted. 2007-08-02 36 8.6.5 User Information Update In this section, you may modify password, name, department, authority and group. 2007-08-02 37 8.6.6 Function Settings There are three functions provided as follows; 2007-08-02 38 (1) Call Forward Unconditional Forward: Any incoming call to this extension will be forwarded directly to the set extension number. No-Response Forward: When no answer in one minute, the call will be transferred to the set extension number. Busy Forward: When busy, the new incoming calls will be transferred to the set extension number. Off-Line Forward: When the extension number is off-line (unregistered), all the incoming call will be transferred directly to the set extension number. (2) Follow Me When one user is set for ¡Follow Me¡, the call will be transfer to the first extension number when no answer for the incoming call. If no answer again, the call will be transferred to the next extension number until the call is answered. The maximum is 5 extensions numbers. After that, the call will be disconnected. (3) Telephone Binding The telephone binding is to bind the extension number with a PSTN number. For incoming call to the extension number, the PSTN phone number will ring simultaneously. (4) Voice Mail You may enable the voice mail for extension numbers. 2007-08-02 39 Note : (1) Every user may select only one at a time out of the three functions. (2) You need to check on the icon to select the desired function. (3) The dialing number must follow the rules for outgoing calls. 8.6.7 User List There are two kinds of list; one for all the users, and the other for the on-line registered users. The list will show the current setting status for each user as follows; (1) Normal (2) Unconditional Transfer (3) Call Transfer; including busy, off-line, and no answer transfer. (4) One number Through (5) Telephone Binding You may modify and update all the user settings directly from the entry of the list. 8.6.8 On-Line User List The on-line users are for the current registered users. 2007-08-02 40 2007-08-02 41 8.7 Advanced Settings The advanced Settings cover some call waiting, voice conference rooms, and IVR upload process. The advanced Settings cover some call waiting, voice conference rooms, and IVR upload process. 8.7.1 Phone Self Config 2007-08-02 42 8.7.2 Queue Settings Call waiting is to queue all the incoming calls and to assign based on rules to the desired extension numbers. If all the available extensions are busy, the system will play the waiting music for the queuing incoming calls. Once available, the system will connect to the desired extensions. 2007-08-02 43 The IP PBX provides 4 call waiting queues. The waiting queues can be set to a simple calling center, and the user may define individual waiting queues for its own purpose. The waiting queues can be configured by the IE Web browser to define the functions as follows; (1) Update new incoming calls; (2) Setting the password (3) Set the desired extension (3) Set the waiting time length (4) Add/Delete waiting number Functions: 1) Update the call waiting list 2) Modify the call waiting information The call waiting password will be required when the call is entering the waiting queue. For each waiting call, the IP PBX may provide one of the following call assignment: (1) Round-Robin: for any incoming call, the call will be forwarded to the next extension number. (2) Random: The incoming call will be randomly assigned to the extension numbers. (3) The least-answer: the new incoming call will be transferred to the extension with the least answering. (4) The longest idle: the new incoming call will be transferred to the extension with the longest idle time. (5) All Ringing: the new incoming call will ring all the extension numbers. Anyone pick up the phone will answer the call. Waiting length means the maximum numbers for call waiting. 3) To Add/Delete the waiting list The user may add/delete the call waiting queues. 2007-08-02 44 8.7.3 Voice Conference Rooms The IP PBX provides two standard voice conference rooms. The functions of conference room are as follow; (1) Conference Room Password When a user calls to the conference room, he will be required to enter the password, or the call will be denied. It is recommended to set the password for the conference room. Please refer to the conference room setting for password. (2) Maximum attendants of conference room If set at 0, it has no limitation. Please refer to the conference room settings. (3) Web Control of Conference Room There are three icons for the three operation functions; (1) The extension numbers are in conversation dialog status (2) The extension is in monitoring status. (3) Kick out the extension number. The extension will be forced out in 5 minutes.) (4) IVR Control of Conference Room 2007-08-02 45 The user after entering the conference room may press * key for an IVR playback. may interact with the IVR messages. The user General User Extension: 1, Make oneself mute. The user voice will not be heard in the conference room. To let one¡s voice heard in the conference, just repeat the same procedure as mute. Press * key for an IVR playback, then press 1 key to resume conference attending. 2, Make oneself manager. The user needs to enter the manager password. Please refer to conference room settings for the manager password. Manager may have the following functions: 1, Make oneself mute. The user voice will not be heard in the conference room. 2. Make the current conference room in lock, and any user trying to enter the conference room will hear the prompt message ¡Conference Room is in Lock¡, and get disconnected. To unlock the conference room, simply repeat the same procedure in lock. That means to press * first, and then press 2 to unlock the current conference room. 3. To kick out all the general users. (Note that all managers will not be kicked out.). 4. To mute all the general users. All the general users in the conference room will not be able to speak but to listen only. 5. To disable mute all the general users. All the general users in the conference room will be able to speak and listen. (Note that if the user mutes oneself he needs to disable mute by himself to speak in the conference room. The manager can not disable mute for the user.) 6. Conference Invitation. If you want to invite an outside user to join the conference room, you may follow the step by the IVR message operations. This outside user can be registered in the IP PBX or the PSTN number. Note: Conference invitation is making an invitation only and do not acknowledge if invitation is successful or not. If not successful, the invitation will repeat after 60 seconds. If not successful after three times of conference invitation, the invitation will stop without any notice. (5) Support IVR Conference Invitation You may make conference invitation by IVR. Please refer to the IVR conference room control. (6) Modify Voice conference room service number You may change the conference room service number if the default number is not desired. The conference room settings are as in the following page. 2007-08-02 46 The conference room password is used to enter the conference room. capacity is for the maximum number of users in the room. The maximum 8.7.4 Upload XML File Procedure In general, the corporate IP PBX will define a set of IVR procedures, or multi-stage interactive IVR for its own use. For this, the VOI-9300 provides a set of predefined IVR by XML, and can be added to become multi-stage interactive IVR. Examples are as in Appendix 1. In addition, the IP PBX also provides a graphical editor. The user could do the graphical connection to develop his own IVR. Please refer to the help file. When you finished IVR design with XML file, you may upload in this section and define an input number for this IVR. For example, if you want this IVR become the IVR for auto attendant, you simply set the IVR number in the auto attendant. Make sure you have uploaded all the necessary IVR message files. 8.7.5 Network Parameter The network parameters allow to enable/disable IP network functions. 2007-08-02 47 8.7.6 Caller ID This allow to configure the caller ID fuctions and to show the incoming call numbers. 2007-08-02 48 Default is ¡Caller ID after 1st Ring (FSK)¡. 2007-08-02 49 8.8 Call Records Query The IP PBX keeps call records for 2 months. You may have two ways for record queries. One is to query for the whole IP PBX, and the other is for the specific user. If you want to keep the call records, you may copy to USB disk before erased. 8.8.1 System Call Records query You may query all the calls during the specified time frame and export to local storages. 8.8.2 User Call Records You may query all the calls for certain user during the specified time frame and export to local storages. 2007-08-02 50 8.9 Upgrade and Factory Default Settings 8.9.1 User information Export Before upgrading the VOI-9300 IP-PBX or reset to factory defaults, you may export all the user information to local storage, and import back after the upgrade or default settings are done. Export: Click right button on the upper right corner and select ¡Save as New File¡. Import: Select the desired file, and upload. 2007-08-02 51 8.9.2 System Upgrade VOI-9300 IP-PBX provides WEB upgrading. Before upgrading, make sure the following; (1) Get the desired upgrade version. The VOI-9300 consists of three main parts; system, managing program, and self service. You must specify which part to be upgraded. (2) Backup a copy of user information by import/export data files. (3) Make sure the power is on while upgrading. Then you may upgrade per the web instruction procedures. 8.9.3 Reboot 2007-08-02 52 9. Applications Applications of IP PBX under Firewall with DMZ This will protect corporate network security while allowing VOI-9300 to work as IP-PBX for VoIP applications. When VOI-9300 IP-PBX is operating under the corporate firewall, remember to enable and open the following service port numbers for VoIP applications. TCP Port:22, 53, 80, 1723 UDP:53, 5060 (for SIP), 1194, 10000-20000 PSTN INTERNET Router FXO VOI-9300 DMZ WAN Corporate IP Phones 2007-08-02 Firewall 53 Ethernet Applications of IP PBX with ADSL This VOI-9300 supports PPPOE to work with ADSL and to integrate IP-PBX into the corporate network for VoIP applications. PSTN FXO VOI-9300 INTERNET ADSL Modem WAN LAN Corporate IP Phones 2007-08-02 54 Ethernet