1
User manual
JoyPad Plugin for Mach3
By Joakim Hjort and Nader Atifeh
Version 2
February 2011
Index
Background ..................................................................................................3
What’s new in version 2? ................................................................................4
Quick Setup Guide .........................................................................................6
Install hardware JoyPad or game device .........................................................6
Install Pre-requisite files ..............................................................................6
Install JoyPad plugin in Mach3 ......................................................................6
Activate the JoyPad Plugin............................................................................7
Configure Button Mapping ............................................................................8
Installation (full setup guide)......................................................................... 10
Installing the JoyPad or game device in Windows........................................... 10
Install JoyPad plugin in Mach3 .................................................................... 12
Configure JoyPad plugin in Mach3................................................................ 14
Jogging with the game device........................................................................ 18
Continuous jogging ................................................................................... 18
Step Jogging ............................................................................................ 19
Assigning the Buttons................................................................................... 21
Gamepad Components Definition................................................................. 21
Selecting Button Mapping........................................................................... 23
Selecting Button Layout ............................................................................. 28
Criteria for Assignments............................................................................. 29
Home, Zero, Offset and Referencing ............................................................ 29
Assigning script function to buttons ................................................................ 31
Example: Assigning script to an unused button ............................................. 32
How does it work?..................................................................................... 34
Some VBScript code for button macros ........................................................ 35
Use and copying .......................................................................................... 36
Contact and support..................................................................................... 36
Appendices ................................................................................................. 37
Appendix A: 2 Axis Foam Cutting Machine .................................................... 37
Appendix B: 2 Axis Laser Cutting Machine .................................................... 39
Appendix C: 3 Axis Milling Machine .............................................................. 41
Appendix D: 4 Axis Milling Machine.............................................................. 43
Appendix E: 5 Axis Milling Machine .............................................................. 45
Appendix F: Mach3 commands and groups ................................................... 47
Appendix G: Button assignment for a 3 Axis machine ..................................... 53
Appendix I: M800.m1s standard macro for script........................................... 59
User manual for JoyPad version 2
Page 2
February 2011
Background
Mach3 from ArtSoft is a very flexible software solution, offering a lot of options for
controlling CNC machines. After some use I found that jogging, probing and general
operations was a problem – how was it possible monitor the machine and operate it
with the keyboard, mouse and screen at the same time. Physically it was possible but
certainly not practical.
A standard Joystick could solve the problem, but it was limited to only controlling two
axes (X and Y), missing the third axe.
What I was looking for was:
•
•
•
•
•
Jogging of at least 3 axes (X, Y and Z).
Precision jog at low speeds not missing high speeds.
Lots of programmable buttons for common functions.
Some kind of safety mechanism preventing accidently operating the machine.
A low budget solution.
I found that a standard low budget solution would be a standard USB game pad – it is
simple to operate; has the needed axes and can be operated with one or two hands.
And the CNC machine can be monitored at the same time.
I got my hands on a Logitech Dual Action JoyPad. A quality game pad that was
compatible with all Windows versions - and at a low prize.
Great – now I only have to find the Mach3 plugin for the JoyPad… No luck…
As a software developer I decided to write my own plugin for the JoyPad. C++ is not
my preferred programming language, but it could be fun and an opportunity to brush
up my C++ programming skills. As said so done...
This was the base for version 0.5 and 1.0 of the JoyPad plugin which have been
presented earlier in this forum, but things evolve and version 2.0 has a lot of
improvements.
For most users the art of script writing is too hard to learn and can be very time
consuming; even for simple tasks. The focus in this version is simplicity – making it
easy to setup and do common tasks while still maintaining the depth of earlier
versions. Even when doing scripts, it is easier to maintain an overview and reuse code
between button scripts.
Standard setup templates have been devised - after the installation, you will be able
to select a standard button assignment to suit your machine; eliminating the need for
reading manuals, learning script or deciding which button layout to be used.
You could be up and running in a few minutes… ☺
User manual for JoyPad version 2
Page 3
February 2011
What’s new in version 2?
If your game device is supported in Windows Control Panel
properly supported by this plugin.
Game Controllers it is
New functionality:
-
Added step jogging with joysticks.
-
Jog speed is now scaled down with Slow Jog Rate from jogging screen.
-
Easy button assignments via Windows setup program (JoyPadSetup).
-
Build in standard templates with button layouts for common machines:
Foam Cutter
2 Axes Laser Cutter
3 Axes Milling
4 Axes Milling
5 Axes Milling
-
Buttons now works even when Mach is running G-Code or are in Reset mode.
-
Buttons works in any screen (Screenset and view independent).
-
Build in support for safety buttons (Shift + Alt)
-
Support for all relevant build in Mach functions.
-
Simplified button script programming in a single macro file.
-
Simple hardware button mapping for different game devices.
-
New extended User manual.
-
Layouts can easily be shared with others via single layout file.
All this in addition to earlier functionality (Version 0.5 and 1.0):
-
Jogging of up to 6 analog/digital axes.
-
Each joystick axe can be scaled, inverted and mapped to any Mach3 axe.
-
Precision jogging via third order dynamic scaling, which eliminates the need for
additional scaling.
-
Multi axe simultaneous jogging.
-
Single axe jogging with automatic active axe selection (intelligent).
-
Build in safety buttons preventing accidental jogging.
-
Full power of script programming of POV and buttons or combination of
buttons.
-
SmoothStepper 1.2 full jogging support (SS).
-
Works with standard Mach parallel port (PP).
-
Low cost hardware requirements – standard game pads can be used.
-
No additional software besides Mach3 is required.
-
Works with all Windows versions supported by Mach3.
-
Small footprint, low memory usage.
-
And did I mention – It is free software ☺
User manual for JoyPad version 2
Page 4
February 2011
While this manual covers most of the requirements for setting up and working with
the JoyPad Plugin, it was prepared for the version 2 (2.0). Subsequent releases and
updates will be reflected in a ReadMe file which will be associated with the newer
versions of the plugin. This manual shall be updated to conform to the latest version,
after felt inadequate.
User manual for JoyPad version 2
Page 5
February 2011
Quick Setup Guide
You are strongly encouraged to read the full setup guide for a complete setup;
however if you have experience from earlier versions or similar setups, use this Quick
Setup Guide for a fast setup.
Install hardware JoyPad or game device
Usually the device is recognized by Windows and installed automatically – in some
cases a driver from the vendor is required. When the device is listed in Control Panel
Game Controllers it is installed and ready for use.
Install Pre-requisite files
You will need Windows installer 3.1 and dotnetfx 3.5 to be installed on your
computer, prior to installing the JoyPad plugin. Download these components from
Microsoft website:
http://www.microsoft.com/downloads/
Install JoyPad plugin in Mach3
Download the JoyPad plugin (version 2.0 or later). It is a single packed file with file
extension .zip or .exe (self extracting) which contains all the necessary files.
Unpack the downloaded file and double-click the file with the extension .m3p – this
will install the plugin into Mach3 plugin directory.
The JoyPadSetup.exe program can be placed anywhere on the disk, but a good place
would be in Mach3 directory (C:\Mach3) or on the Desktop for easy access.
User manual for JoyPad version 2
Page 6
February 2011
Activate the JoyPad Plugin
Start Mach3 program and from the Config menu.
Select Config Plugins submenu.
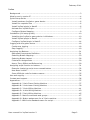
This will bring up a list of installed plugins. Locate the JoyPad plugin and enable it
(marked as3):
Disable all other plugins that may use the USB game device (ex. Joystick plugin) –
failing to do so may result in unexpected behavior.
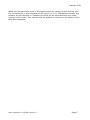
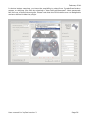
Select CONFIG to open JoyPad configuration and configure the Axe mappings to match
your machine setup:
User manual for JoyPad version 2
Page 7
February 2011
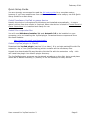
Configure Button Mapping
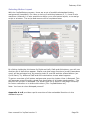
Open the JoyPadSetup program (on Desktop or Mach3 directory):
User manual for JoyPad version 2
Page 8
February 2011
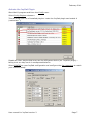
Press on the Device Button Map button at the bottom left side of the window and
select a device which conforms to your game device and click OK.
Select a Standard Assignment from the top combobox to match your configuration
and click Save.
Close Mach3.
Reopen Mach3.
Make a copy of the relevant Standard Assignment from appendices A to E.
Now you’re on!
User manual for JoyPad version 2
Page 9
February 2011
Installation (full setup guide)
Installing the JoyPad or game device in Windows
First, make sure the game device, you intend to use, is recognized by Windows.
Connect the device and let Windows try to recognize and install standard drivers
before installing any software from the vendor.
Game Controllers the
If the device is recognized and shows up in Control Pane
device is installed and there should be no need for vendor specific drivers and
software.
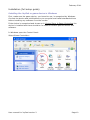
In Windows open the Control Panel:
Select Game Controllers:
User manual for JoyPad version 2
Page 10
February 2011
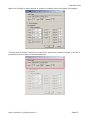
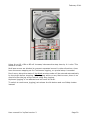
Select Properties for your game device (in this case the Logitech Dual Action):
Verify that the game device is functioning as expected.
User manual for JoyPad version 2
Page 11
February 2011
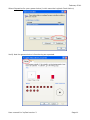
To avoid drifting, the game devices need calibrating before usage, select the Settings
tab:
Select Calibrate… and follow the directions to calibrate your game device.
The calibration process finds and sets the zero, min and max point for the joysticks,
avoiding floating when the joysticks are centered.
We are now ready to install the JoyPad plugin in Mach3.
Install JoyPad plugin in Mach3
Be sure Windows installer 3.1 and dotnetfx 3.5 is installed prior to installing the
JoyPad plugin. Download these components from Microsoft website:
http://www.microsoft.com/downloads/
Download the JoyPad plugin (version 2.0 or later). It is a single packed file with file
extension .zip or .exe (self extracting) which contains all the necessary files.
Unpack the downloaded file and double-click the file with the extension .m3p – this
will install the plugin into Mach3 plugin directory.
The JoyPadSetup.exe program can be placed anywhere on the disk, but a good place
would be in Mach3 directory (C:\Mach3) or on the Desktop for easy access.
User manual for JoyPad version 2
Page 12
February 2011
Start Mach3 program and select the Config menu:
Select Config Plugins submenu:
User manual for JoyPad version 2
Page 13
February 2011
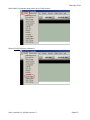
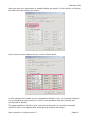
This will bring up a list of installed plugins. Locate the JoyPad plugin and enable it
(marked as3):
Be sure to disable all other plugins that may be using the game device (ex. Joystick
plugin) as they may disturb the communication between the JoyPad plugin and the
device. Failing to do so may give an unexpected behavior of the game device.
Always only enable plugins you intend to use, disable all other plugins.
Configure JoyPad plugin in Mach3
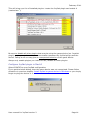
Select CONFIG to open JoyPad configuration:
If you get the below dialog, then the game device was not recognized. Please follow
directions in previous chapter Install JoyPad or game device in Windows or you simply
forgot to plug the device in ☺.
User manual for JoyPad version 2
Page 14
February 2011
When the JoyPad or game device is properly installed, then this dialog will appear:
The top part of JoyPad info tells you the driver name, the number of axes, if a POV is
present and the number of buttons detected.
User manual for JoyPad version 2
Page 15
February 2011
Next you have the opportunity to enable/disable the plugin. For the device to function
this field must be checked as shown.
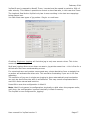
Up to 6 axes can be mapped to any of the 6 Mach3 axes:
In this example the JoyPad X-axe is mapped to Mach3 X-axe, not inverted (direction
not reversed) and max velocity is 100% of max speed for the given Mach3 axe
(configured in Mach3).
The same applies to JoyPad Y-axe, but here the direction is inverted (reversed).
JoyPad Z-axe is not mapped and is therefore ignored by the plugin.
User manual for JoyPad version 2
Page 16
February 2011
JoyPad R-axe is mapped to Mach3 Z-axe, inverted and the speed is scaled to 30% of
max velocity. This makes it possible to control a short fast axe, in this case the Z-axe.
The Logitech Dual Action JoyPad only has 4 axes resulting in the last two mappings
being grayed out.
You can select two types of jog action: Single- or multi-axe.
Checking Single axe jogging will limit the jog to only one axe at a time. This is the
recommended setting.
Multi axe jogging allows more than one axe to jog at the same time – this is fine for a
skilled user and more undemanding moves.
For untrained user and precise movements any minute deviation from a straight line
on action will activate the other axis. This would be frustrating if you are in for fine
adjusting.
The selection of jog axe in single axe jogging is done automatically and reselection
can only be done when the stick is at centered. This may sound complicated but in
real life it feels natural and intuitive.
Press OK to save the configuration in Mach3.
Note: Mach3 only saves its configuration physically on disk when the program exits;
until then, the configuration is saved internally in Mach3 memory.
The JoyPad is now configured for jogging!
User manual for JoyPad version 2
Page 17
February 2011
Jogging with the game device
Using the JoyPad plugin, jogging is done with the joysticks on the game device. The
purpose of jogging is typically to position the tool on the work piece before a cutting
job, or moving it away to make room for handling the work piece.
To do that effectively the jogging must support both be fast and slow with high
precision jogging. In JoyPad plugin this is achieved in two modes: Continuous and
Step jogging.
Jogging is a potentially dangerous operation and is therefore only activated using the
Safe or Alt buttons – this can prevent accidental activation if the game device is
pushed.
Only one of the Safety/Alt button combinations SL/SR or AL/AR needs to be activated
to enter Continuous or Step jogging, allowing for single hand operation – this is not
advisable but may be needed to do the positioning job. Be very careful when
operating machine and JoyPad at the same time!
Jogging operation is automatically blocked when Mach is in Reset state or running a
GCode file - it doesn’t make a lot of sense to jog in these situations.
Continuous jogging
Continuous jogging is enabled when one or two of the Safety buttons SL/SR is
pressed. Jogging will continue as long as you push the joystick and speed depends on
how far it is pushed.
Depending on the configuration for Single axe jogging (See Configure JoyPad plugin in
Mach3) jogging can be limited to one axe or allow multiple axes at the same time.
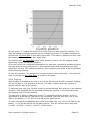
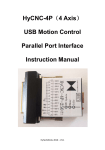
Motion is scaled by a third order dynamic function to give it high precision at low
speeds and still preserve the high speed moves.
This can be illustrated by the following graph, showing the relation between joystick
position and the resulting velocity:
User manual for JoyPad version 2
Page 18
February 2011
On the graph “1” means full stroke for joystick and max axe speed for velocity. The
max axe speed is actually reduced by the configured percent in JoyPad configuration
and current Jog Slow Rate in the Mach jog screen. This makes it possible to work with
fast machines and machines with short axes.
The scaling with Jog Slow Rate gives more dynamic control over the jogging speed
depending on the current job situation.
All moves honor the configured acceleration for each axe, preventing sudden direction
changes and resulting position error. On machines with slow acceleration and high
speed this will look like a delayed reaction, but is actually the effect of de-acceleration
before direction change.
As you will see later, it is possible to program buttons with script code – this could be
used to change the Jog Slow Rate at a push of a button…
Step Jogging
Step Jogging is enabled when one or two of the Alt buttons AL/AR is pressed. Jogging
will be one step in one direction at a time. The step is taken when the joystick is
approx half the way at full stroke.
To take the next step, the joystick must be moved towards zero and the in the desired
direction. Fast stepping can be achieved holding the joystick in a selected direction
and tapping one of the Alt buttons.
The step size is setup in Mach Jog Screen. To show/hide the Jog Screen, which is
equivalent to pressing the TAB key on the keyboard, press BE with only one of the
Safe or Alt button, i.e. SL, SR, AL and AR on the game device.
To cycle through the predefined step sizes, press BW with only one of the Safe or Alt
button, i.e. SL,SR,AL and AR on the game device. This will set the active step size
(0.0001 / 0.0010 / 0.0100 / 0.1000 / 1.0000 units).
User manual for JoyPad version 2
Page 19
February 2011
Using AL or AR + BN or BS will increase/ decrease the step sizes by 0.1 units. This
amount is fixed.
Multi axe moves are blocked to prevent unwanted moved in other directions. Axes
have the same mapping as for Continuous Jogging, no special setup is needed.
Don’t worry about the state of Jog Mode as step mode will be entered automatically
by the plugin before stepping. Step Jogging works on any Mach screen; there is no
need to show the jog screen before using step jogging.
Keyboard jogging is not affected and will work as usual.
To switch to continuous jogging just release the Alt button and use Safety button
instead.
User manual for JoyPad version 2
Page 20
February 2011
Assigning the Buttons
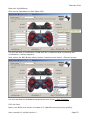
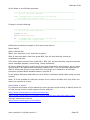
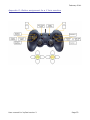
Gamepad Components Definition
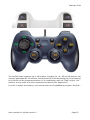
Different gamepads have different features. For example the face buttons have
different arrangement (so far 3 different layouts have been encountered which you
will find in the Device Button Mapping within the JoyPadSetup). In addition, you have
the option to define each button as appropriate.
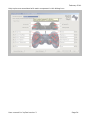
The following terms are used in the JoyPadSetup button assignment:
The Face Buttons (i.e. 1-2-3-4 or
buttons), disregarding their shape and
number are renamed as BN-BE-BS-BW, as referred to compass directions.
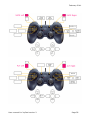
There are 2 buttons on the gamepads, i.e. 9 and 10, or Start and Select. These were
renamed to B1 and B2 respectively.
The joysticks, when pressed also act as buttons. These are referred to as 11 and 12.
These were renamed to B3 and B4 respectively.
Some gamepads have 4 directions on the POV (Point of View), HAT or D-Pad, while
others have 8 directions. Only the 4 major directions are used, hence named PN-PEPS-PW.
There are 4 more buttons at the front of the device, i.e. 5-6-7-8 (or in cases, 1-2 and
1-2). These were renamed as SL-AL-SR-AR, which refer to “Safe Left/Right” and “Alt
Left/Right”.
The Analog button, which usually has a LED associated, should always be on.
All other buttons, such as Turbo, Clear, Macro or any other buttons that may reside on
the gamepad will be disregarded. Using these buttons might give unpredictable
results.
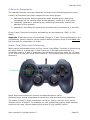
The following picture shows a typical gamepad with the defined buttons.
User manual for JoyPad version 2
Page 21
February 2011
The JoyPad plugin supports up to 16 buttons, including SL, AL, SR and AR buttons (an
ordinary gamepad has 12 buttons, including the POV and excluding the front buttons).
All of which can be programmed alone or in combination with the “Safe” and/or “Alt”
buttons, to any build in function supported by Mach3 (See Appendix F).
In order to assign the buttons, you need to open the JoyPadSetup program. But first...
User manual for JoyPad version 2
Page 22
February 2011
Selecting Button Mapping
Open the JoyPadSetup. The following dialog will open:
User manual for JoyPad version 2
Page 23
February 2011
Help topics are associated with each component in this dialog box:
User manual for JoyPad version 2
Page 24
February 2011
At the bottom left side there is a Device Button Map…. Click on it. The Device Button
Mapping dialog will open.
User manual for JoyPad version 2
Page 25
February 2011
In device button mapping, you have the possibility to select from 3 predefined button
setups, or defining your own by selecting a “User Defined Gamepad”. Most gamepads
fall into one of these three types. Please note that the POV buttons are not assignable
and are defined inside the plugin.
User manual for JoyPad version 2
Page 26
February 2011
If your gamepad allows, you can assign 4 more buttons (B5 to B8), shown at the
bottom part of the dialog box:
After selecting the suitable gamepad or assigning physically buttons positions, click
OK.
User manual for JoyPad version 2
Page 27
February 2011
Selecting Button Layout
With the JoyPadSetup program, there are a set of predefined standard button
assignments (template). You have a choice of selecting between 2, 3, 4 and 5 axis
machines. However it is also possible to define your own button layout, or to assign
script to a button. The script and macros will be explained later.
By clicking inside the tick boxes for Right and Left, Safe and Alt buttons, you will see
another set of definitions appear. Please note that some functions (mostly hazardous
ones) will be activated only by pressing both SL and SR and the related button (ex.
Cycle Start). Try different Safe and Alt combinations to see what happens.
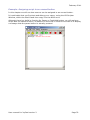
To get an overview of all button assignments press the button View in Notepad. This
will generate a text file with a short text description of all button assignments – The
text file will be open in Notepad. The shown text file is saved in the plugin directory
for future reference or to share with others (File: JoyPad.Button.txt).
Note: You have to close Notepad yourself.
Appendix A to E provides a quick overview of the embedded functions in the
standard layouts.
User manual for JoyPad version 2
Page 28
February 2011
Criteria for Assignments
The standard layouts have been designed considering the following aspects (rules).
Initially, all functions have been categorized into three groups:
1- Harmless functions. While in stand-by mode, activating the underlying
commands has no harmful effect to the operator, machine or work piece.
2- Potentially hazardous. Activating the underlying commands, needs close
attention of the operator.
3- Hazardous. Activating the underlying command can be dangerous or harmful.
Group 2 and 3 functions should be activated by an accompanying “Safe” or “Alt”
button.
Appendix F lists the groups of commands. Groups 1, 2 and 3 are implemented in the
JoyPadSetup. Other functions can be used by defining macros script in the M800.m1s
file (see later for explanation of script).
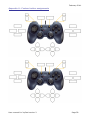
Home, Zero, Offset and Referencing
When setting coordinates either by Zero, Home, Part Offset, Touching or Referencing
the axes, there is a ruling logic. X and Y axis are in the same direction as in a
coordinate system. Z-axis is downward, the left button will either serve for “All axes”
or for A-axis in case you use a 4-axis machine. The following picture shows the axes
directions.
North and south buttons are used to increase/decrease a value.
Outbound keys should be assigned to those keys that are used more frequently.
The beauty is that, in order to activate a function, you do not have to be on the
relevant screen of Mach3. For example you can change the jogging mode between
continuous or step, without opening the screen 50 jog visibility screen.
User manual for JoyPad version 2
Page 29
February 2011
Appendix G shows the standard layout for a typical 3 Axis machine. It should be
noted that you might not actually use its full potential. For example you might not
have variable speed spindle, or a touch probe. Therefore you can change these
buttons to --Ignored-- and save it as a user defined standard assignment.
There is also a “debug/run” template using SR + AR which will prevent joystick
jogging (not activated with this combination). This mode will be used to test a Gcode.
While all the necessary functions are available, Joysticks is disabled.
Another useful combination that also prevents any movement of the axes, is SL+AL.
This combination is left blank for the user to make a complete level for some specific
purpose.
Appendix H has a schema which you might wish to fill in, print and have it
somewhere visible around your machine.
User manual for JoyPad version 2
Page 30
February 2011
Assigning script function to buttons
Unlike the previous versions, JoyPad plugin requires only one macro file. The macro
file is created when the plugin is loaded and the M800.m1s file is missing. It can hold
as many macros as you wish (only limited by file size, 64kb). This macro will be
located in the: \Mach3\macros\[current profile]
If you are using more than one profile on your computer, there will be a macro file for
each profile. Mach3 keeps track of each profile and only uses the macro associated
with the current profile.
The JoyPad plugin will automatically create a default macro file (M800.m1s) if it is
missing for a given profile.
Appendix I shows the standard M800.m1s macro for script
If the macro somehow gets messed up and you want to revert to the default macro,
just delete the M800.m1s file and restart Mach3. This way the default macro file will
be recreated.
A macro is simply VBScript created and written in a text editor as Windows Notepad
and saved with the macro name given in the table. You can write and test your macro
from within the VB Script Editor inside Mach3, and after assuring its functionality,
copy it into M800.m1s.
User manual for JoyPad version 2
Page 31
February 2011
Example: Assigning script to an unused button
In this chapter we will see how macros can be assigned to an unused button.
It is advisable that you first test and debug your macro, using the VB Scripter
Window, within the Mach3 and then copy it to the M800.m1s.
Although there is a build in function for Pause or Feed Hold button, we will assign a
script with the Pause function, in addition to the build in function we want it to display
a message that the pause button is actually pressed.
User manual for JoyPad version 2
Page 32
February 2011
Open the JoyPadSetup.
Click on the Checkbox for Safe Right (SR).
You will see that a combination of BW and SR is undefined and by pressing this
combination, nothing happens.
Now, select the BW (Button West) button Combobox and select --Execute script--.
You will see that the Standard Assignments now shows --User Defined--.
Click on Save.
Open your M800.m1s which is located in C:\Mach3\macros\[current profile].
User manual for JoyPad version 2
Page 33
February 2011
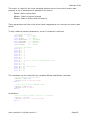
Scroll down to the following section:
'==========================================================================
' <-- Put your own script code here.
'END ' Uncomment END to end execution of script here.
' Or delete text to end of file.
'==========================================================================
Change it to the following:
'==========================================================================
' <-- Put your own script code here.
DoOEMButton 1001
Message "Pause Activated"
END
' Uncomment END to end execution of script here.
' Or delete text to end of file.
'==========================================================================
Delete the preceding example in the macro and save it.
Open Mach3
Open a GCode file.
While your machine is off, start the program.
After it has executed a few lines press BW. You will see that the execution
immediately pauses.
Click start again and this time press SR + BW. You will see that the execution pauses
and a message appears, announcing “Pause Activated”.
Of course Pause function might not be the best example for assignment, as you have
noticed that it will pause after executing several lines. This is a problem adherent to
Mach3. When the macro is executed from the plugin it is inserted in the GCode
execution list and Mach decides when to execute it.
It will always be faster and safer to use a build in functions rather than using a script
version.
Note: It is not possible to execute a macro from a macro as Mach will only allow one
macro to execute at a time.
How does it work?
It is beyond the scope of this manual to cover general script writing in Mach3 but a lot
of help can be found in Mach support forum and wiki:
http://www.machsupport.com/forum/index.php
http://www.machsupport.com/MachCustomizeWiki/index.php?title=Main_Page
Tutorial videos are found at:
http://www.machsupport.com/videos/
User manual for JoyPad version 2
Page 34
February 2011
Some VBScript code for button macros
In the following table are some VBScript macro commands with description:
DoButton 8
Zero X-axe value
DoButton 9
Zero Y-axe value
DoButton 10
Zero Z-axe value
DoButton 11
Zero A-axe value
DoButton 12
Zero B-axe value
DoButton 13
Zero C-axe value
DoButton 17
Go to zero (all axes)
DoButton 22
Home X
DoButton 23
Home Y
DoButton 24
Home Z
DoButton 25
Home A
DoButton 26
Home B
DoButton 27
Home C
GoSafeZ
Go to safe Z
Code(“G00 X0”)
Rapid move X to 0
Code(“M7”)
Mist cool on
Code(“G28”)
Return machine home
Code(“G31”)
Straight probe
Code(“G01 X0 Y0”)
Move in 10 unit square at federate and
Display message
Code(“X10”)
Code(“Y10”)
Code(“X0”)
Code(“Y0”)
Message “10 unit square”
Message "Hi"
Displays the message Hi
SetOEMDRO 818,
(GetOEMDRO 818 * 1.1)
Increase the feed rate by 10%
DoOEMButton 110
Toggle spindle on/off
DoOEMButton 113
Toggle flood on/off
DoOEMButton 114
Toggle mist on/off
These are only examples – only your imagination sets the limit for functionality in
macros.
User manual for JoyPad version 2
Page 35
February 2011
It is even possible to write macros performing complex operations such as pocket
milling or surface milling, including dialogs setting up parameters.
Follow the links given earlier to read more about macro programming in Mach3 with
VBScript.
Appendix F shows the commands that will be used to create macros.
Use and copying
You may use and copy the JoyPad plugin as long as User manual and all
accompanying files is included in the distribution and the software remains free of
charge.
Please don't remove any names from the distributions - I have put a lot of time and
effort in developing this plugin along with Nader Atifeh…
The source code is closed and not public – I had plans to release the source to the
public under an open source license, but can’t find the spare time to do so… sorry…
Contact and support
Mach forum thread: ““Topic: USB JoyPad and game device plugin - new version!””
Nader Atifeh and I can be contacted at the Mach3 forum
(http://www.machsupport.com), user Atifeh and Area51 respectively.
As the software is provided ”as is” there is no direct support; post your requests on
the forum or try searching it for answers.
Private messages will generally not be answered.
If you like the software, find errors or have suggestions to improvements, we would
like to hear about it.
No guarantee that it will be implemented or the code corrected - this is a spare time
project, but I feel pride in developing stable usable code ☺
During the development of this plugin I got a lot of help from skilled people
at the MachSupport forum – Big thanks to you all!
Hope you found this User manual useful – happy CNC machining ;-)
Best Regards.
User manual for JoyPad version 2
Page 36
February 2011
Appendices
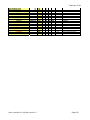
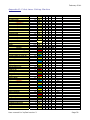
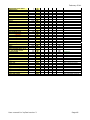
Appendix A: 2 Axis Foam Cutting Machine
Function
Flood toggle
Softlimits Toggle
--ignored-Auto Lim Override Toggle
--ignored---ignored---ignored-Regen Toolpath
Goto Safe Z
--ignored-CV feed toggle
--ignored---ignored---ignored-Stop
Reset
Function
Machine Coordinates toggle
Feed raise
Feed lower
Feedrate reset
Toggle visibility of screen 50
Slow Jog Up
Slow Jog Dn
Jog increment cycle
Toggle visibility of screen 50
Jog Inc Up
Jog Inc Down
Jog increment cycle
Toggle visibility of screen 50
Slow Jog Up
Slow Jog Dn
Jog increment cycle
Toggle visibility of screen 50
Jog Inc Up
Jog Inc Down
Jog increment cycle
--ignored---ignored---ignored-Cycle start
Clear error label
Rewind
Re-load last file
Close current file
Function
Program Run screen
Toolpath screen select
Diagnostics screen select
Offset Screen
Zero X
Zero Y
--ignored---ignored--
OEMCode
113
1029
149
160
104
247
1003
1021
256
108
109
1014
323
111
112
171
323
100
101
171
323
111
112
171
323
100
101
171
1000
172
1002
170
169
1
3
5
7
1008
1009
User manual for JoyPad version 2
Func:
B1
B1
B1
B1
B1
B1
B1
B2
B2
B2
B2
B2
B2
B2
B3
B4
Func:
BE
BN
BS
BW
BE
BN
BS
BW
BE
BN
BS
BW
BE
BN
BS
BW
BE
BN
BS
BW
BE
BN
BS
BW
BE
BN
BS
BW
Func:
PE
PN
PS
PW
PE
PN
PS
PW
SL
AL
SR
AR
Qualifier
Remarks
Hot wire On/Off
X
X
X
X
X
X
X
X
AND
AND
X
X
X
X
X
X
X
SL
AL
X
SR
AND
AND
AR
Remarks
X
X
X
X
X
X
X
X
X
X
X
X
X
X
X
X
X
X
X
X
SL
X
X
X
X
X
X
X
X
AL
SR
X
X
X
X
AR
AND
AND
AND
AND
AND
AND
AND
AND
Remarks
X
X
Page 37
February 2011
Part X Offset Touch
Part Y Offset Touch
--ignored---ignored-Ref X
Ref Y
--ignored---ignored-Function
Jog X axis
Jog Y axis
--ignored---ignored-Jog X axis in step
Jog Y axis in step
--ignored---ignored--
139
140
1022
1023
OEMCode
User manual for JoyPad version 2
PE
PN
PS
PW
PE
PN
PS
PW
Func:
S1V
S1H
S2V
S2H
S1V
S1H
S2V
S2H
X
X
X
X
SL
X
X
AL
X
X
SR
X
X
AR
X
X
OR
OR
OR
OR
OR
OR
OR
OR
Remarks
Stick 1 Vertical movement
Stick 1 Horizontal movement
Stick 2 Vertical movement
Stick 2 Horizontal movement
Stick 1 Vertical movement
Stick 1 Horizontal movement
Stick 2 Vertical movement
Stick 2 Horizontal movement
Page 38
February 2011
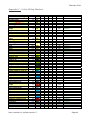
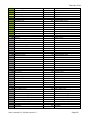
Appendix B: 2 Axis Laser Cutting Machine
Function
Goto Safe Z
Softlimits Toggle
Z inhibit toggle
Auto Lim Override Toggle
--ignored---ignored---ignored---ignored-Regen Toolpath
Goto Safe Z
--ignored-CV feed toggle
--ignored---ignored---ignored---ignored-Stop
Stop
Reset
Reset
Function
Machine Coordinates toggle
Feed raise
Feed lower
Feedrate reset
Toggle visibility of screen 50
Slow Jog Up
Slow Jog Dn
Jog increment cycle
Toggle visibility of screen 50
Jog Inc Up
Jog Inc Down
Jog increment cycle
Toggle visibility of screen 50
Slow Jog Up
Slow Jog Dn
Jog increment cycle
Toggle visibility of screen 50
Jog Inc Up
Jog Inc Down
Jog increment cycle
--ignored---ignored---ignored-Cycle start
Clear error label
Rewind
Re-load last file
Close current file
--ignored-Machine Coordinates toggle
Single Step
Cycle start
Function
Program Run screen
Toolpath screen select
Diagnostics screen select
Offset Screen
Zero X
OEMCode
104
1029
167
149
160
104
247
1003
1003
1021
1021
256
108
109
1014
323
111
112
171
323
100
101
171
323
111
112
171
323
100
101
171
1000
172
1002
170
169
256
1004
1000
1
3
5
7
1008
User manual for JoyPad version 2
Func:
B1
B1
B1
B1
B1
B1
B1
B1
B2
B2
B2
B2
B2
B2
B2
B2
B3
B3
B4
B4
Func:
BE
BN
BS
BW
BE
BN
BS
BW
BE
BN
BS
BW
BE
BN
BS
BW
BE
BN
BS
BW
BE
BN
BS
BW
BE
BN
BS
BW
BE
BN
BS
BW
Func:
PE
PN
PS
PW
PE
SL
AL
SR
AR
Qualifier
Remarks
Shut off laser beam
X
X
X
X
X
X
AND
AND
AND
Debug/Run
X
X
X
AND
AND
AND
Debug/Run
X
X
AND
Debug/Run
X
SR
X
AR
AND
Debug/Run
Remarks
X
X
X
X
X
X
X
X
X
X
X
SL
AL
X
X
X
X
X
X
X
X
X
X
X
X
X
X
X
X
X
X
X
X
X
X
X
X
X
X
X
X
SL
AL
X
X
X
X
SR
X
X
X
X
X
X
X
X
AR
AND
AND
AND
AND
AND
AND
AND
AND
AND
AND
AND
AND
Debug/Run
Debug/Run
Debug/Run
Debug/Run
Remarks
X
Page 39
February 2011
Zero Y
--ignored---ignored-Part X Offset Touch
Part Y Offset Touch
--ignored---ignored-Ref X
Ref Y
--ignored---ignored-CV feed toggle
Feed raise
Feed lower
Rewind
Function
Jog X axis
Jog Y axis
--ignored---ignored-Jog X axis in step
Jog Y axis in step
--ignored---ignored--
1009
139
140
1022
1023
247
108
109
1002
OEMCode
User manual for JoyPad version 2
PN
PS
PW
PE
PN
PS
PW
PE
PN
PS
PW
PE
PN
PS
PW
Func:
S1V
S1H
S2V
S2H
S1V
S1H
S2V
S2H
X
X
X
X
X
SL
X
X
AL
X
X
X
X
X
X
SR
X
X
X
X
X
X
AR
X
X
AND
AND
AND
AND
OR
OR
OR
OR
OR
OR
OR
OR
Debug/Run
Debug/Run
Debug/Run
Debug/Run
Remarks
Stick 1 Vertical movement
Stick 1 Horizontal movement
Stick 2 Vertical movement
Stick 2 Horizontal movement
Stick 1 Vertical movement
Stick 1 Horizontal movement
Stick 2 Vertical movement
Stick 2 Horizontal movement
Page 40
February 2011
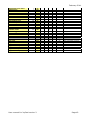
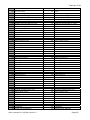
Appendix C: 3 Axis Milling Machine
Function
Machine Coordinates toggle
Softlimits Toggle
Z inhibit toggle
Auto Lim Override Toggle
--ignored-Flood toggle
--ignored-Spindle CW, reset THC
height
Regen Toolpath
Goto Safe Z
Go Home
CV feed toggle
Touch button for Tool length
offset
Mist toggle
Single Step
Flood toggle
Stop
Stop
Reset
Reset
Function
Pause (Feed Hold)
Feed raise
Feed lower
Feedrate reset
Toggle visibility of screen 50
Slow Jog Up
Slow Jog Dn
Jog increment cycle
Toggle visibility of screen 50
Jog Inc Up
Jog Inc Down
Jog increment cycle
Toggle visibility of screen 50
Slow Jog Up
Slow Jog Dn
Jog increment cycle
Toggle visibility of screen 50
Jog Inc Up
Jog Inc Down
Jog increment cycle
Spindle CW, reset THC
height
Raise spindle speed
Lower spindle speed
Cycle start
Clear error label
Rewind
Re-load last file
Close current file
Pause (Feed Hold)
Machine Coordinates toggle
Single Step
Cycle start
Function
Program Run screen
Toolpath screen select
OEMCode
256
1029
167
149
113
Func:
B1
B1
B1
B1
B1
B1
B1
110
160
104
138
247
B1
B2
B2
B2
B2
120
114
1004
113
1003
1003
1021
1021
B2
B2
B2
B2
B3
B3
B4
B4
Func:
BE
BN
BS
BW
BE
BN
BS
BW
BE
BN
BS
BW
BE
BN
BS
BW
BE
BN
BS
BW
1001
108
109
1014
323
111
112
171
323
100
101
171
323
111
112
171
323
100
101
171
110
163
164
1000
172
1002
170
169
1001
256
1004
1000
1
3
BE
BN
BS
BW
BE
BN
BS
BW
BE
BN
BS
BW
Func:
PE
PN
User manual for JoyPad version 2
SL
AL
SR
AR
Qualifier
Remarks
X
X
X
X
X
X
X
AND
AND
X
AND
Debug/Run
X
X
X
AND
AND
AND
Debug/Run
X
X
AND
Debug/Run
X
SR
X
AR
AND
Debug/Run
Remarks
X
X
X
X
X
X
X
X
X
SL
AL
X
X
X
X
X
X
X
X
X
X
X
X
X
X
X
X
X
X
X
X
X
X
X
X
X
X
X
X
SL
AL
X
X
X
X
SR
X
X
X
X
X
X
X
X
AR
AND
AND
AND
AND
AND
AND
AND
AND
AND
AND
AND
AND
Debug/Run
Debug/Run
Debug/Run
Debug/Run
Remarks
Page 41
February 2011
Diagnostics screen select
Offset Screen
Zero X
Zero Y
Zero Z
Zero All
Part X Offset Touch
Part Y Offset Touch
Part Z Offset Touch
--ignored-Ref X
Ref Y
Ref Z
Home Z then X then Y - set
machine coords
CV feed toggle
Feed raise
Feed lower
Rewind
Function
Jog X axis
Jog Y axis
Jog Z axis
Jog A axis
Jog X axis in step
Jog Y axis in step
Jog Z axis in step
Jog A axis in step
5
7
1008
1009
1010
1007
139
140
141
1022
1023
1024
105
247
108
109
1002
OEMCode
PS
PW
PE
PN
PS
PW
PE
PN
PS
PW
PE
PN
PS
PW
PE
PN
PS
PW
Func:
S1V
S1H
S2V
S2H
S1V
S1H
S2V
S2H
User manual for JoyPad version 2
X
X
X
X
X
X
X
X
X
X
X
SL
X
X
X
X
AL
X
X
X
X
X
X
X
X
X
SR
X
X
X
X
X
X
X
X
AR
X
X
X
X
AND
AND
AND
AND
OR
OR
OR
OR
OR
OR
OR
OR
Debug/Run
Debug/Run
Debug/Run
Debug/Run
Remarks
Stick 1 Vertical movement
Stick 1 Horizontal movement
Stick 2 Vertical movement
Stick 2 Horizontal movement
Stick 1 Vertical movement
Stick 1 Horizontal movement
Stick 2 Vertical movement
Stick 2 Horizontal movement
Page 42
February 2011
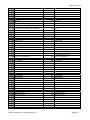
Appendix D: 4 Axis Milling Machine
Function
Machine Coordinates toggle
Softlimits Toggle
Z inhibit toggle
Auto Lim Override Toggle
--ignored-Flood toggle
--ignored-Spindle CW, reset THC
height
Regen Toolpath
Goto Safe Z
Go Home
CV feed toggle
Touch button for Tool length
offset
Mist toggle
Single Step
Flood toggle
Stop
Stop
Reset
Reset
Function
Pause (Feed Hold)
Feed raise
Feed lower
Feedrate reset
Toggle visibility of screen 50
Slow Jog Up
Slow Jog Dn
Jog increment cycle
Toggle visibility of screen 50
Jog Inc Up
Jog Inc Down
Jog increment cycle
Toggle visibility of screen 50
Slow Jog Up
Slow Jog Dn
Jog increment cycle
Toggle visibility of screen 50
Jog Inc Up
Jog Inc Down
Jog increment cycle
Spindle CW, reset THC
height
Raise spindle speed
Lower spindle speed
Cycle start
Clear error label
Rewind
Re-load last file
Close current file
Pause (Feed Hold)
Machine Coordinates toggle
Single Step
Cycle start
Function
Program Run screen
Toolpath screen select
OEMCode
256
1029
167
149
113
Func:
B1
B1
B1
B1
B1
B1
B1
110
160
104
138
247
B1
B2
B2
B2
B2
120
114
1004
113
1003
1003
1021
1021
B2
B2
B2
B2
B3
B3
B4
B4
Func:
BE
BN
BS
BW
BE
BN
BS
BW
BE
BN
BS
BW
BE
BN
BS
BW
BE
BN
BS
BW
1001
108
109
1014
323
111
112
171
323
100
101
171
323
111
112
171
323
100
101
171
110
163
164
1000
172
1002
170
169
1001
256
1004
1000
1
3
BE
BN
BS
BW
BE
BN
BS
BW
BE
BN
BS
BW
Func:
PE
PN
User manual for JoyPad version 2
SL
AL
SR
AR
Qualifier
Remarks
X
X
X
X
X
X
X
AND
AND
X
AND
Debug/Run
X
X
X
AND
AND
AND
Debug/Run
X
X
AND
Debug/Run
X
SR
X
AR
AND
Debug/Run
Remarks
X
X
X
X
X
X
X
X
X
SL
AL
X
X
X
X
X
X
X
X
X
X
X
X
X
X
X
X
X
X
X
X
X
X
X
X
X
X
X
X
SL
AL
X
X
X
X
SR
X
X
X
X
X
X
X
X
AR
AND
AND
AND
AND
AND
AND
AND
AND
AND
AND
AND
AND
Debug/Run
Debug/Run
Debug/Run
Debug/Run
Remarks
Page 43
February 2011
Diagnostics screen select
Offset Screen
Zero X
Zero Y
Zero Z
Zero A
Zero All
Part X Offset Touch
Part Y Offset Touch
Part Z Offset Touch
Part A Offset Touch
Ref X
Ref Y
Ref Z
Ref A
Home Z then X then Y, A, B,
C - set machine coords
CV feed toggle
Feed raise
Feed lower
Rewind
Function
Jog X axis
Jog Y axis
Jog Z axis
Jog A axis
Jog X axis in step
Jog Y axis in step
Jog Z axis in step
Jog A axis in step
5
7
1008
1009
1010
1011
1007
139
140
141
142
1022
1023
1024
1025
105
247
108
109
1002
OEMCode
PS
PW
PE
PN
PS
PW
PW
PE
PN
PS
PW
PE
PN
PS
PW
PW
PE
PN
PS
PW
Func:
S1V
S1H
S2V
S2H
S1V
S1H
S2V
S2H
User manual for JoyPad version 2
X
X
X
X
X
X
AND
X
X
X
X
X
X
X
X
X
SL
X
X
X
X
AL
X
X
X
X
X
X
X
X
SR
X
X
X
X
X
X
X
X
X
AR
X
X
X
X
AND
AND
AND
AND
AND
OR
OR
OR
OR
OR
OR
OR
OR
Debug/Run
Debug/Run
Debug/Run
Debug/Run
Remarks
Stick 1 Vertical movement
Stick 1 Horizontal movement
Stick 2 Vertical movement
Stick 2 Horizontal movement
Stick 1 Vertical movement
Stick 1 Horizontal movement
Stick 2 Vertical movement
Stick 2 Horizontal movement
Page 44
February 2011
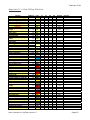
Appendix E: 5 Axis Milling Machine
Function
Machine Coordinates toggle
Softlimits Toggle
Z inhibit toggle
Auto Lim Override Toggle
--ignored-Flood toggle
--ignored-Spindle CW, reset THC
height
Regen Toolpath
Goto Safe Z
Go Home
CV feed toggle
Touch button for Tool length
offset
Mist toggle
Single Step
Flood toggle
Stop
Stop
Reset
Reset
Function
Pause (Feed Hold)
Feed raise
Feed lower
Feedrate reset
Toggle visibility of screen 50
Slow Jog Up
Slow Jog Dn
Jog increment cycle
Toggle visibility of screen 50
Jog Inc Up
Jog Inc Down
Jog increment cycle
Toggle visibility of screen 50
Slow Jog Up
Slow Jog Dn
Jog increment cycle
Toggle visibility of screen 50
Jog Inc Up
Jog Inc Down
Jog increment cycle
Spindle CW, reset THC
height
Raise spindle speed
Lower spindle speed
Cycle start
Clear error label
Rewind
Re-load last file
Close current file
Pause (Feed Hold)
Machine Coordinates toggle
Single Step
Cycle start
Function
Program Run screen
Toolpath screen select
OEMCode
256
1029
167
149
113
Func:
B1
B1
B1
B1
B1
B1
B1
110
160
104
138
247
B1
B2
B2
B2
B2
120
114
1004
113
1003
1003
1021
1021
B2
B2
B2
B2
B3
B3
B4
B4
Func:
BE
BN
BS
BW
BE
BN
BS
BW
BE
BN
BS
BW
BE
BN
BS
BW
BE
BN
BS
BW
1001
108
109
1014
323
111
112
171
323
100
101
171
323
111
112
171
323
100
101
171
110
163
164
1000
172
1002
170
169
1001
256
1004
1000
1
3
BE
BN
BS
BW
BE
BN
BS
BW
BE
BN
BS
BW
Func:
PE
PN
User manual for JoyPad version 2
SL
AL
SR
AR
Qualifier
Remarks
X
X
X
X
X
X
X
AND
AND
X
AND
Debug/Run
X
X
X
AND
AND
AND
Debug/Run
X
X
AND
Debug/Run
X
SR
X
AR
AND
Debug/Run
Remarks
X
X
X
X
X
X
X
X
X
SL
AL
X
X
X
X
X
X
X
X
X
X
X
X
X
X
X
X
X
X
X
X
X
X
X
X
X
X
X
X
SL
AL
X
X
X
X
SR
X
X
X
X
X
X
X
X
AR
AND
AND
AND
AND
AND
AND
AND
AND
AND
AND
AND
AND
Debug/Run
Debug/Run
Debug/Run
Debug/Run
Remarks
Page 45
February 2011
Diagnostics screen select
Offset Screen
Zero X
Zero Y
Zero Z
--ignored-Zero All
Zero A
Zero C
--ignored---ignored-Part X Offset Touch
Part Y Offset Touch
Part Z Offset Touch
--ignored-Part A Offset Touch
Part C Offset Touch
--ignored---ignored-Ref X
Ref Y
Ref Z
--ignored-Ref A
Ref C
--ignored-Home Z then X then Y, A, B,
C - set machine coords
CV feed toggle
Feed raise
Feed lower
Rewind
Function
Jog X axis
Jog Y axis
Jog Z axis
Jog A axis
Jog C axis
Jog X axis in step
Jog Y axis in step
Jog Z axis in step
Jog A axis in step
Jog C axis in step
5
7
1008
1009
1010
1007
1011
1013
139
140
141
142
144
1022
1023
1024
1025
1027
105
247
108
109
1002
OEMCode
PS
PW
PE
PN
PS
PW
PW
PE
PN
PS
PW
PE
PN
PS
PW
PE
PN
PS
PW
PE
PN
PS
PW
PE
PN
PS
PW
PE
PN
PS
PW
Func:
S1V
S1H
S2V
S2H
S2H
S1V
S1H
S2V
S2H
S2H
User manual for JoyPad version 2
X
X
X
X
X
X
X
X
X
X
AND
X
X
X
X
X
X
X
X
X
X
X
X
X
X
X
X
X
SL
X
X
X
X
AL
X
X
X
X
SR
AND
AND
AND
X
X
AND
AND
X
X
X
X
X
AR
AND
AND
AND
AND
AND
X
X
X
X
X
X
Debug/Run
Debug/Run
Debug/Run
Debug/Run
Remarks
Stick 1 Vertical movement
Stick 1 Horizontal movement
Stick 2 Vertical movement
Stick 2 Horizontal movement
Stick 2 Horizontal movement
Stick 1 Vertical movement
Stick 1 Horizontal movement
Stick 2 Vertical movement
Stick 2 Horizontal movement
Stick 2 Horizontal movement
Page 46
February 2011
Appendix F: Mach3 commands and groups
100
Not included as selectable command (special commands)
1
Harmless function
2
Potentially harmful
3
Harmful
DoButton 1 = DoOEMButton 1001
Total
Group:
Action:
DoOEMButton:
-- Ignore --
1
-- Execute script --
1
Auto Lim Override Toggle
149
Auto Lim Override Toggle
1
Clear Status
172
Clear status line
1
Close File
169
Close loaded G-code file
1
CV feed toggle
247
CV feed toggle
3
Cycle Start
1000
1
Feed Hold (Pause)
1001
1
Feedrate --
1
Feedrate ++
1
Feedrate Reset
2
Flood Toggle
3
Go Home
138
Go Home
2
Goto Safe Z
104
Goto safe Z position
1
Jog --
112
Jog pct. Down
1
Jog ++
111
Jog pct. Up
1
Jog Inc Cycle
171
Jog increment cycle
1
Jog Incr --
101
Jog step decrement
1
Jog Incr ++
100
Jog step increment
1
Jog Screen Toggle
323
Jog screen show/hide
1
Machine Coordinates toggle
256
Machine Coordinates toggle
2
Mist Toggle
114
Toggle mist cooling on/off
3
Part A Offset Touch
142
Part A Offset Touch
3
Part C Offset Touch
144
Part C Offset Touch
3
Part X Offset Touch
139
Part X Offset Touch
3
Part Y Offset Touch
140
Part Y Offset Touch
3
Part Z Offset Touch
141
Part Z Offset Touch
2
Ref A
1025
Reference A axe
2
Ref C
1027
Reference C axe
3
Ref All
105
2
Ref X
1022
Reference X axe
2
Ref Y
1023
Reference Y axe
2
Ref Z
1024
1
Regen Toolpath
1
Reload Last File
170
Reload last G-code file
1
Reset
1021
Reset (activate EStop)
2
Rewind
1002
Rewind G-code file
1
Screen 1 (Program)
1
Select Program screen 1
1
Screen 4 (ToolPath)
4
Select Toolpath screen 4
1
Screen 5 (Offset)
5
Select Offset screen 5
1
Screen 7 (Diagnostics)
7
Select Diagnostics screen 7
2
Single Step
User manual for JoyPad version 2
-1
Function (shown in Tooltip):
1
0
Ignore this button
Execute script in M800
Run/continue G-code execution
Pause G-code execution
109
Feedrate decrease (override)
108
Feedrate increase (override)
1014
Turn off feedrate override
113
Toggle flood cooling on/off
160
1004
Reference Z then X then Y, A, B and C
Reference Z axe
Regen toolpath in display
Execute single line
Page 47
February 2011
1
Softlimits Toggle
1029
Toggle softlimits on/off
1
Spindle --
164
Spindle speed decrease
1
Spindle ++
163
Spindle speed increase
2
Spindle Toggle
110
Toggle spindle on/off
1
Stop
2
Touch Tool
120
Touch button for Tool length offset
1
Z Inhibit Toggle
167
Toggle Z inhibit on/off
1
Zero A
1011
Zero A axe on current position
1
Zero C
1013
Zero C axe on current position
1
Zero All
1007
Zero all axes on current position
1
Zero X
1008
Zero X axe on current position
1
Zero Y
1009
Zero Y axe on current position
1
Zero Z
1010
Zero Z axe on current position
1003
103
Stop G-code execution
100
Jog Toggle ON/OFF
100
Screen 2 (MDI)
2
Toggle jog on/off
Select MDI screen 2
100
Screen 3
3
Select screen 3
100
Screen 6 (Settings)
6
Select Settings screen 6
100
RS274 Init
102
RS274 Init
100
mm/inch
106
Set units mm/inch (G20/G21)
100
Machine Coords Toggle
107
Toggle machine coordinates on/off
100
Edit G-code
115
Edit loaded G-code
100
Zero radius DRO on X
116
Zero radius DRO on X
100
Zero radius DRO on Y
117
Zero radius DRO on Y
100
Zero radius DRO on Z
118
Zero radius DRO on Z
100
SoftLimits Toggle
119
Toggle softlimits on/off
100
Tool Tab Save
121
Tool Tab Save
100
Fixture Tab Save
122
Fixture Tab Save
100
THC on/off
123
Toggle THC
100
Zero THC
124
Zero THC
100
Enc Load X
125
Encoder Load X
100
Enc To X
126
Encoder To X
100
Enc Load Y
127
Encoder Load Y
100
Enc To Y
128
Encoder To Y
100
Enc Load Z
129
Encoder Load Z
100
Enc To Z
130
Encoder To Z
100
Toggle Mill/Turn mode
131
Toggle Mill/Turn mode
100
Toolpath Toggle
132
Toggle toolpath on/off
100
Zero X Encoder
133
Zero X Encoder
100
Zero Y Encoder
134
Zero Y Encoder
100
Zero Z Encoder
135
Zero Z Encoder
100
Tool Offset Tog
136
Tool Offset Tog
100
Fixture Off
137
Fixture Off
100
Tool X Offset Touch
145
Tool X Offset Touch
100
Tool Z Offset Touch
146
Tool Z Offset Touch
100
Joy Throttle select
147
Joy Throttle select
100
Touch Corr Enable Toggle
148
Touch Corr Enable Toggle
100
Auto Lim Override Toggle
149
Auto Lim Override Toggle
100
Override Limits
150
Override limits
100
SS on Act4 Toggle
151
SS on Act4 Toggle
100
Units/rev - Units/min toggle
155
Units/rev - Units/min toggle
100
Set this line as next to execute
156
Set this line as next to execute
100
Jog Follow
157
Jog Follow
100
Joystick On
158
Joystick On
User manual for JoyPad version 2
Page 48
February 2011
100
Joystick Off
100
Zero X-Z to Stock
161
Joystick Off
Zero X-Z to stock as defined in DROs
(Turn)
100
Coord Mode Toggle
162
Coordinate mode toggle (G90/G91)
100
Laser Probe Enable Toggle
165
Laser Probe Enable Toggle
100
Zero laser grid at current location
166
Zero laser grid at current location
100
Ignore Tool Change toggle
168
Ignore Tool Change toggle
100
Spindle CCW Toggle
173
Toggle spindle CCW on/off
100
Parallel Port Encoder3 MPG Jog Toggle
174
Parallel Port Encoder3 MPG Jog Toggle
100
Cycle axis controlled by MPG 1
175
Cycle axis controlled by MPG 1
100
Block Delete Toggle
176
Toggle block delete on/off
100
Optional Stop Toggle
177
Toggle optional stop on/off
100
Online Toggle
178
Toggle online on/off
100
Display Abs Machine coordinates
179
Display Abs Machine coordinates
100
Display Work + G92 coordinates
180
Display Work + G92 coordinates
100
Display Work coords
181
Display Work coords
100
??? Toggle Spindle actual
182
??? Toggle Spindle actual
100
Home X, Home Z (Turn)
184
Home X, Home Z (Turn)
100
Select X for MPG 1
185
Select X for MPG 1
100
Select Y for MPG 1
186
Select Y for MPG 1
100
Select Z for MPG 1
187
Select Z for MPG 1
100
Select A for MPG 1
188
Select A for MPG 1
100
Select B for MPG 1
189
Select B for MPG 1
100
Select C for MPG 1
190
Select C for MPG 1
100
Select Jog Increment 1
191
Select Jog Increment 1
100
Select Jog Increment 2
192
Select Jog Increment 2
100
Select Jog Increment 3
193
Select Jog Increment 3
100
Select Jog Increment 4
194
Select Jog Increment 4
100
Select Jog Increment 5
195
Select Jog Increment 5
100
Select Jog Increment 6
196
Select Jog Increment 6
100
Select Jog Increment 7
197
Select Jog Increment 7
100
Select Jog Increment 8
198
Select Jog Increment 8
100
Select Jog Increment 9
199
Select Jog Increment 9
100
Select Jog Increment 10
200
Select Jog Increment 10
100
Feed override Off
201
Feed override Off
100
Feed override Jog
202
Feed override Jog
100
Feed override Feed
203
Feed override Feed
100
Jog Mode Continuous
204
Set jog mode to continuous
100
Jog Mode Step
205
Set jog mode step
100
Joystick On
206
Joystick On
100
Joystick Off
207
Joystick Off
100
Clear Z tool offset (Turn)
208
Clear Z tool offset (Turn)
100
Clear X tool offset (Turn)
209
Clear X tool offset (Turn)
100
Set stock correction to Zero (Turn)
210
Set stock correction to Zero (Turn)
100
Home X Home Z (Turn)
211
Home X Home Z (Turn)
100
Home X (Turn)
212
Home X (Turn)
100
Home Z (Turn)
213
Home Z (Turn)
100
Show Recent Files
214
Show recent G-code files
100
Display History
215
Display status history in notepad
100
Load File
216
Load G-code file from File Open dialog
100
Tool flip toggle (Turn front/rear toolposts)
217
Tool flip toggle (Turn front/rear toolposts)
100
Z-inhibit ON
218
Z-inhibit ON
100
Z-inhibit OFF
219
Z-inhibit OFF
100
Port Bit-Test Set (diagnostic)
220
Port Bit-Test Set (diagnostic)
User manual for JoyPad version 2
159
Page 49
February 2011
100
Anti-dive enabled toggle
221
Anti-dive enabled toggle
100
THC Anti-dive OFF
222
THC Anti-dive OFF
100
THC Anti-dive ON
223
THC Anti-dive ON
100
Flood ON
224
Flood ON
100
Flood OFF
225
Flood OFF
100
Mist ON
226
Mist ON
100
Mist OFF
227
Mist OFF
100
Load Teach File
228
Load teach file
100
Toolpath Machine/Job toggle
229
Toolpath Machine/Job toggle
100
Display Wizard selection window
230
100
Load the normal screens when Wizard done
231
Display Wizard selection window
Load the normal screens when Wizard
done
100
Simple Complex screen toggle
232
Simple Complex screen toggle
100
Output 4 ON
233
Output 4 ON
100
Output 4 OFF
234
Output 4 OFF
100
Output 5 ON
235
Output 5 ON
100
Output 5 OFF
236
Output 5 OFF
100
Output 6 ON
237
Output 6 ON
100
Output 6 OFF
238
Output 6 OFF
100
Set Help context
239
Set Help context
100
Def-Ref all axes
240
Def-Ref all axes
100
Tangential toggle
241
Tangential toggle
100
Save XYZ to G59.254 work offset
242
Save XYZ to G59.254 work offset
100
do G0G53 to G59.254 offset location
243
do G0G53 to G59.254 offset location
100
Move to G59.254 with midpoint selection
244
100
Jog Mode Cont/Step/MPG
245
Move to G59.254 with midpoint selection
Toggle between jog modes
continuous/step/MPG
100
Force Referenced on all axes
246
Force Referenced on all axes
100
CV feed OFF
248
CV feed OFF
100
CV feed ON
249
CV feed ON
100
Disable movement on axis X
250
Disable movement on axis X
100
Disable movement on axis Y
251
Disable movement on axis Y
100
Disable movement on axis Z
252
Disable movement on axis Z
100
Disable movement on axis A
253
Disable movement on axis A
100
Disable movement on axis B
254
Disable movement on axis B
100
Disable movement on axis C
255
Disable movement on axis C
100
Engine Offline
257
Engine Offline
100
Engine Online
258
Engine Online
100
Select encoder jog on axis X
259
Select encoder jog on axis X
100
Select encoder jog on axis Y
260
Select encoder jog on axis Y
100
Select encoder jog on axis Z
261
Select encoder jog on axis Z
100
Select encoder jog on axis A
262
Select encoder jog on axis A
100
Select encoder jog on axis B
263
Select encoder jog on axis B
100
Select encoder jog on axis C
264
Select encoder jog on axis C
100
Select Step value 1
265
Select Step value 1
100
Select Step value 2
266
Select Step value 2
100
Select Step value 3
267
Select Step value 3
100
Select Step value 4
268
Select Step value 4
100
Select Step value 5
269
Select Step value 5
100
Select Step value 6
270
Select Step value 6
100
Select Step value 7
271
Select Step value 7
100
Select Step value 8
272
Select Step value 8
100
Select Step value 9
273
Select Step value 9
100
Select Step value 10
274
Select Step value 10
User manual for JoyPad version 2
Page 50
February 2011
100
Set Jog mode STEP (same as button 205)
275
100
Set Jog mode CONT (same as button 204)
276
Set Jog mode CONT (same as button 204)
100
Increment feedrate
277
Increment feedrate
100
Decrement feedrate
278
Decrement feedrate
100
Run reverse
279
Run reverse
100
Switch to last used Wizard
280
Switch to last used Wizard
100
Cycle axis controlled by MPG 2
281
Cycle axis controlled by MPG 2
100
Toggle taper mode on MPG 2
282
Toggle taper mode on MPG 2
100
Toggle dual MPG flag
283
Toggle dual MPG flag
100
Toggle shuttle mode for MPG
284
Toggle shuttle mode for MPG
100
Return to paused state
285
Return to paused state
100
Remember paused state
286
Remember paused state
100
Toggle override of rapid feeds
287
Toggle override of rapid feeds
100
Crop current dwell now
288
Crop current dwell now
100
Inhibit jog of X axis
290
Inhibit jog of X axis
100
Inhibit jog of Y axis
291
Inhibit jog of Y axis
100
Inhibit jog of Z axis
292
Inhibit jog of Z axis
100
Inhibit jog of A axis
293
Inhibit jog of A axis
100
Inhibit jog of B axis
294
Inhibit jog of B axis
100
Inhibit jog of C axis
295
Inhibit jog of C axis
100
Do screw calibration routine
296
Do screw calibration routine
100
Unconditional crop any dwell now
297
Unconditional crop any dwell now
100
reserved
Toggle bypass feed (enables value in OEM
DRO 122)
298
reserved
Toggle bypass feed (enables value in OEM
DRO 122)
100
299
100
Toggle current tool is in front toolpost
Code for OEMTriggers runs the macro in
SetTriggerMacro
100
Cycle MPG jogging mode
302
Cycle MPG jogging mode
100
Set MPG jogging mode = Velocity
303
Set MPG jogging mode = Velocity
100
Set MPG jogging mode = Velocity/Step
304
100
305
100
Set MPG jogging mode = do single exact steps
Set MPG jogging mode = do multiple exact
steps
Set MPG jogging mode = Velocity/Step
Set MPG jogging mode = do single exact
steps
Set MPG jogging mode = do multiple exact
steps
100
Jog X+
307
Push jog X+
100
Jog X-
308
Push jog X-
100
Jog Y+
309
Push jog Y+
100
Jog Y-
310
Push jog Y-
100
Jog Z+
311
Push jog Z+
100
Jog Z-
312
Push jog Z-
100
Jog A+
313
Push jog A+
100
Jog A-
314
Push jog A-
100
Calibrate MPGs
315
Calibrate MPGs
100
Save tool table
316
Save tool table
100
Save work offset table
317
Save work offset table
100
Drag on toolpath does Zoom toggle
318
Drag on toolpath does Zoom toggle
100
Drag on toolpath does Pan toggle
319
Drag on toolpath does Pan toggle
100
Display Wizard select dialog
320
Display Wizard select dialog
100
Run Newfangled Wizard
321
Run Newfangled Wizard
100
Emergency bailout - tester use only
322
Emergency bailout - tester use only
100
324
100
Turn mode tool touch off X axis
Toggle use of spindle step line to control Torch
volts
325
Turn mode tool touch off X axis
Toggle use of spindle step line to control
Torch volts
100
Turn mode tool touch off Z axis
326
Turn mode tool touch off Z axis
100
User manual for JoyPad version 2
300
Set Jog mode STEP (same as button 205)
301
306
Toggle current tool is in front toolpost
Code for OEMTriggers runs the macro in
SetTriggerMacro
Page 51
February 2011
100
Select MPG jog mode
327
100
Toggle axis DROs display Dist to Go
333
Toggle axis DROs display Dist to Go
100
Toggle X jog off
334
Toggle X jog off
100
Toggle Y jog off
335
Toggle Y jog off
100
Toggle Z jog off
336
Toggle Z jog off
100
337
100
Toggle A jog off
Set a temporary softlimit minimum at current
location
Set a temporary softlimit maximum at current
location
341
Toggle A jog off
Set a temporary softlimit minimum at
current location
Set a temporary softlimit maximum at
current location
100
Turn off display of menu bar
348
Turn off display of menu bar
100
349
100
Turn on display of menu bar
Increment spindle speed by value not %
(Turn)
Decrement spindle speed by value not %
(Turn)
100
Jog X and A axis ++ together (foam machines)
352
100
Jog X and A axis -- together (foam machines)
353
100
Jog Y and A axis ++ together (foam machines)
354
100
Jog Y and A axis -- together (foam machines)
Turn on display of menu bar
Increment spindle speed by value not %
(Turn)
Decrement spindle speed by value not %
(Turn)
Jog X and A axis ++ together (foam
machines)
Jog X and A axis -- together (foam
machines)
Jog Y and A axis ++ together (foam
machines)
Jog Y and A axis -- together (foam
machines)
100
Resume
1005
Resume G-code execution
100
Edit File
1006
Edit G-code file
100
Zero B
1012
Zero B axe on current position
100
Zero C
1013
Zero C axe on current position
100
Simulate (Estimate)
1015
Simulate program run to estimate
100
Run from here
1016
Execute G-code from here
100
Goto Z's
1017
Goto Z
100
Coord System
1018
Coord system
100
Verify
1020
Verify
100
Ref B
1026
Reference B axe
100
Ref C
1027
Reference C axe
100
Joystick Toggle
1028
Toggle joystick enable/disable
100
Radius Tracking Toggle
1030
Toggle radius tracking on/off
100
Jog on/off
1031
Toggle jogging
100
100
User manual for JoyPad version 2
340
350
351
355
Select MPG jog mode
Page 52
February 2011
Appendix G: Button assignment for a 3 Axis machine
User manual for JoyPad version 2
Page 53
February 2011
User manual for JoyPad version 2
Page 54
February 2011
User manual for JoyPad version 2
Page 55
February 2011
User manual for JoyPad version 2
Page 56
February 2011
User manual for JoyPad version 2
Page 57
February 2011
Appendix H: Custom button assignments
User manual for JoyPad version 2
Page 58
February 2011
Appendix I: M800.m1s standard macro for script
The JoyPad plugin automatically generates a standard macro (M800.m1s) when it’s
missing for the current profile. It will be the base for developing your own script code
for buttons actions on your game device.
In contrast to earlier versions of the plugin, there is now only one macro to handle all
button actions.
This simplifies things and makes it easier to reuse code between different button
actions.
Each Mach profile will have its own M800 macro – Mach will keep track of which macro
to use for a given profile. This means that changes made in a macro for one profile
will not reflect on M800 macros for other profiles.
Normally M800 is located in C:\Mach3\macros\[current profile]\M800.m1s:
'-------------------------------------------------------------------------' JoyPad plugin version 2.0
' By Joakim Hjort 2009 - 2011.
'
' Auto generated macro from JoyPad plugin, M800.m1s.
'
' This macro is executed if a button is pressed and assigned script
' function in JoyPadSetup program.
'
' M800.m1s must be placed in Mach3 macros folder under the active
' machine profile.
'
' Documentation for JoyPad plugin can be found in JoyPad User manual.
' Script documentation can be found at Mach support web:
'
http://www.machsupport.com
'
' Three parameters are passed to this script:
'
'
EState: Mach engine state
'
Button: The button pressed, 0 .. 15
'
SState: Shift buttons pressed (SL, SR, AL and AR)
'-------------------------------------------------------------------------Option Explicit
' Constants for EState.
Const ESTOP
= 0 ' STOP
Const ERUN
= 1 ' RUN
Const EPAUSE
= 2 ' PAUSE
Const EFINISHING = 3 ' FINISHING
Const EMDISTATE = 4 ' MDISTATE
Const EWAITING
= 5 ' WAITING
Const ESINGLE
= 6 ' SINGLE
' Constants for Button.
Const BN = 0
Const BE = 1
Const BS = 2
Const BW = 3
Const B1 = 4
Const B2 = 5
Const B3 = 6
Const B4 = 7
Const B5 = 8 ' B5 to B8 not on standard game pads
Const B6 = 9
Const B7 = 10
Const B8 = 11
Const PN = 12 ' POV buttons
Const PE = 13
User manual for JoyPad version 2
Page 59
February 2011
Const PS = 14
Const PW = 15
'-------------------------------------------------------------------------' Variables to hold parameters passed from JoyPad plugin.
Dim EState As Integer ' Engine state (RUN, STOP, ...)
Dim Button As Integer ' Button pressed (BN, BE, BS, ...)
Dim SState As Integer ' Shift buttons pressed (SL, SR, AL and AR)
' SL, SR,
Dim SL As
Dim SR As
Dim AL As
Dim AR As
AL and AR. True if pressed:
Boolean
Boolean
Boolean
Boolean
' True if mach is acceptiong commands
Dim Idle as Boolean
'-------------------------------------------------------------------------' Read parameters passed from JoyPad plugin. Don't edit.
EState = CInt(Param1())
Button = CInt(Param2())
SState = CInt(Param3())
SL
SR
AL
AR
=
=
=
=
(SState
(SState
(SState
(SState
And
And
And
And
&h01)
&h02)
&h04)
&h08)
>
>
>
>
0
0
0
0
Idle = (EState = EStop)
'==========================================================================
' <-- Put your own script code here.
'END ' Uncomment END to end execution of script here.
' Or delete text to end of file.
'==========================================================================
'-------------------------------------------------------------------------' The following script code is an example/test acript and can be deleted.
'
' Writes a message to Mach with the parameters received from the plugin:
' Engine state, shift pressen and button pressen.
'
' To activate script for all buttons; run JoyPadSetup and select Standard
' Assignment: All buttons script
' Save and restart Mach3.
' Pressing POV or buttons will activate this macro and send message to Mach
' message field.
' Convert Engine state to text in EText
Dim EText as String
Select Case EState
Case ESTOP:
EText = "STOP"
Case ERUN:
EText = "RUN"
Case EPAUSE:
EText = "PAUSE"
Case EFINISHING: EText = "FINISHING"
Case EMDISTATE: EText = "MDISTATE"
Case EWAITING:
EText = "WAITING"
Case ESINGLE:
EText = "SINGLE"
End Select
'
'
'
'
'
'
'
Is idle
Running GCode
Paused in GCode
Plugin loading ?
?
?
Single step ?
' Convert Safety and Alt buttons to text in SText.
' There can be zero or more pressed at once.
Dim SText as String
If SL Then ' Is Safety Left pressed?
SText = "SL"
End If
User manual for JoyPad version 2
Page 60
February 2011
If SR Then ' Is Safety Right pressed?
If Len(SText) > 0 Then SText = SText & "+"
SText = SText & "SR"
End If
If AL Then ' Is Alt Left pressed?
If Len(SText) > 0 Then SText = SText & "+"
SText = SText & "AL"
End If
If AR Then ' Is
If Len(SText)
SText = SText
End If
If Len(SText) =
Alt Right pressed?
> 0 Then SText = SText & "+"
& "AR"
0 Then SText = "None"
' Convert button to text in BText.
Dim BText as String
Select Case Button
Case BN: BText = "BN" ' 4 face buttons
Case BE: BText = "BE"
Case BS: BText = "BS"
Case BW: BText = "BW"
Case B1: BText = "B1" ' 2 center buttons
Case B2: BText = "B2"
Case B3: BText = "B3" ' Under joystick buttons
Case B4: BText = "B4"
Case B5: BText = "B5" ' 4 extra buttons
Case B6: BText = "B6"
Case B7: BText = "B7"
Case B8: BText = "B8"
Case PN: BText = "PN" ' 4 POV buttons
Case PE: BText = "PE"
Case PS: BText = "PS"
Case PW: BText = "PW"
End Select
' Write parameters to Mach as a text message.
Message "JoyPad plugin -> Engine: " & EText & ", Shift: " & SText & ", Button: " &
BText
' End of example/test script.
'--------------------------------------------------------------------------
The macro is called when a button is pressed and assigned -- Execute script-- with the
JoyPadSetup program. Example of output from the standard script:
Wed - 01:17:52 ---JoyPad plugin -> Engine: STOP, Shift: SL+SR, Button: BW
Wed - 01:17:55 ---JoyPad plugin -> Engine: STOP, Shift: AL, Button: BW
Wed - 01:17:58 ---JoyPad plugin -> Engine: STOP, Shift: AL, Button: BE
Wed - 01:17:59 ---JoyPad plugin -> Engine: STOP, Shift: AL, Button: BN
Wed - 01:18:00 ---JoyPad plugin -> Engine: STOP, Shift: AL, Button: BS
Wed - 01:18:02 ---JoyPad plugin -> Engine: STOP, Shift: AR, Button: BW
Wed - 01:18:04 ---JoyPad plugin -> Engine: STOP, Shift: AR, Button: BN
Wed - 01:18:05 ---JoyPad plugin -> Engine: STOP, Shift: AR, Button: BE
Wed - 01:18:06 ---JoyPad plugin -> Engine: STOP, Shift: AR, Button: BS
Wed - 01:18:07 ---JoyPad plugin -> Engine: STOP, Shift: None, Button: PN
User manual for JoyPad version 2
Page 61
February 2011
The macro is called for all script assigned buttons and to know which button was
pressed, a set of parameters is passed to the macro:
Estate: Mach engine state
BState: Code for button pressed
SState: State of Safety and Alt buttons
These parameters tell the script writer what happened at the moment the macro was
called.
To help read the passed parameters, a set of constants is defined:
' Constants for EState.
Const ESTOP
= 0 ' STOP
Const ERUN
= 1 ' RUN
Const EPAUSE
= 2 ' PAUSE
Const EFINISHING = 3 ' FINISHING
Const EMDISTATE = 4 ' MDISTATE
Const EWAITING
= 5 ' WAITING
Const ESINGLE
= 6 ' SINGLE
' Constants for Button.
Const BN = 0
Const BE = 1
Const BS = 2
Const BW = 3
Const B1 = 4
Const B2 = 5
Const B3 = 6
Const B4 = 7
Const B5 = 8 ' B5 to B8 not on standard game pads
Const B6 = 9
Const B7 = 10
Const B8 = 11
Const PN = 12 ' POV buttons
Const PE = 13
Const PS = 14
Const PW = 15
The constants can be used with the variables EState and Button, example:
' Test if Mach is running GCode
If EState = ERUN then
Message "Mach is running GCode"
End If
' Test if Mach accepts commands (idle)
If EState = ESTOP then
Message "Mach is idle"
End If
And Button:
' Test if button B4 under joystick 2 is pressed
If Button = B4 then
Message "Joystick 2 button pressed"
End If
User manual for JoyPad version 2
Page 62
February 2011
To read the state of Safety and Alt buttons 4 Boolean variables is defined: SL, SR, AL
and AR. They can either be True or False depending on there state when the macro
was called.
To test if POV North (PN) and Safety Left (SL) was pressed you could write:
If SL Then ' Safety left pressed
If Button = PN then ' POV north pressed
Message "SL + PN pressed"
End If
End If
Or more compact:
If SL And (Button = PN) Then
Message "SL + PN pressed"
End If
Instead of the shown messages you would put your own action code, like:
' Rapid move Z to +10 when SL + PN pressed and turn off spindle
If SL And (Button = PN) Then
Code("G0 Z10")
DoSpinStop()
Message "Now in safe Z position and spindle stopped."
End If
To develop script code the internal Mach script editor can be used or you can use an
external editor as Notepad or the Freeware Notepad++. The later supports color
coding of your code as in Mach and can be downloaded from:
http://notepad-plus-plus.org/
Note: When you are editing script macro M800 there is no need to restart Mach to call
the new macro as Mach always uses the macro file.
Don’t forget to visit Mach support forum and Wiki as there is a lot of help writing
scripts. It is a complete programming environment and only your imagination sets the
limits for what can be done with script.
Happy scripting… ☺
User manual for JoyPad version 2
Page 63
Notes: