1
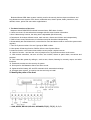
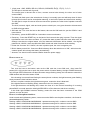
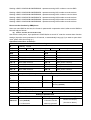
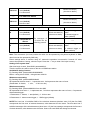
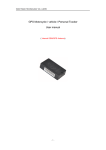
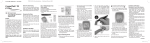
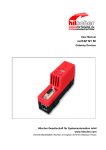
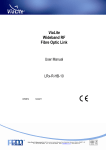
Business/Home GSM
Alarm systems
Installation and User Manual
Profile
For a better understanding of this product, please read this user manual thoroughly before using it.
Business/Home GSM alarm system is widely used in the security devices, data surveillance and
long-distance monitor system of the home, residential area, electric power, traffic, petroleum, coal,
railroad, citizen, police and some other organizations.
I. The basic functions of the host
⒈Adopts tri-band GSM/GPRS industrial communicator, SMS alarm function.
2. Users can record 10 seconds alarm message with the scene location information .
3. Arm & alarm delay function, the delay time is adjustable (00~99 second).
4.5 wired and 16 wireless defense zones, each can arm, disarm and 24-hour arm independently.
5. SMS of each zone(5 wired zones,16 wireless zones)can be edited independently.
6. Automatically arm and disarm time, convenient for users and alarm center to control the system work
regularly.
7. Can set 5 phone number. Can set 5 groups of SMS number.
8. Host power off warning function: SMS to inform users if power failure.
9. Intercom function: can communicate with the scene people ,duplex intercom.
10. Listen-in function : can hear the voice of people move, dig and other actions at the scene .
11. With remote controllers, can arm at home, arm outside, disarm or panic alarm, convenient and
practical.
12. Can control the system by calling-in, such as arm, disarm, listening-in, remotely output, and other
functions.
13. Password to make sure the security of system.
14. Siren port for shift between silence and siren sound.
15. Optional built-in battery, AC and DC automatic shift, automatical recharge.
16. Wireless alarm system, no need to set wire and easy to install.
II. Identify the ports of the host
1 . GND; SIREN; RELAY1;RELAY2; SPEAKER; O2(I5) ; O1(I4) ; I3; I2; I1
⒈ 10-pin ports : GND; SIREN; RELAY1; RELAY2; SPEAKER; O2(I5) ; O1(I4) ; I3; I2; I1
The first port is educed end of ground,
The second port is educed end of siren, connect sourced siren directly, the other end of siren
connect GND;
The third and fourth port is the educed end of relay, it is normally open and will keep close for three
minutes (this function can be closed)when alarming, it can link the power and video when working;
The fifth port is output of intercom that can connect the speaker, the other end of speaker connects
the GND,
The sixth, seventh, eighth, ninth and tenth port are wired input, every port shorted or disconnected
to GND will trigger alarm.
⒉ SIM card slot: Turn over the host to the bottom, take out the SIM card slot, put the GSM in it and
insert it back.
⒊ Record key : press the RECORD for 2 seconds to enter record status.
⒋ Reset key : Press the RESET key on the back of the host and then plug in power. Then the signal
light flashes once or the siren sounds a “di”, means the alarm system has been reset. After reset, all
settings come back to original status, all of the detectors information will be deleted , the original
password is 123456, it does not affect the SMS control and other functions while resetting.
⒌ Power slot: Connect 12V/1.2A DC, the core is positive pole, the crust is negative pole.
⒍ Built-in battery switch ON : Connect to Built-in battery when the switch turn to “ON”, at this time the
external power will recharge the battery automatically.
⒎ Antenna: You should connect antenna before insert the power supply.
How to power on
Turn over the host to the bottom, take out the SIM card slot, insert SIM card , then insert DC
power(12V/1.2A) into the host or open the power switch of internal battery, the light POWER becomes
red, the light STATUS becomes red then becomes orange flashing slowly, the host starts to search the
GSM network and check the status of SIM.
If the checking is successful and finding the stored phone numbers, the light becomes green flashing
slowly means the host has been armed.
If there is no phone number, the light becomes green, means the host is disarmed.
If the light becomes red flashing slowly, means the host is in alarming status,
if the light becomes red flashing fast, means the host is in the remote controlling of in-coming
phone/SMS. In normal status the third light RECORD is off, but becomes red when recording .
If the fourth light SIGNAL becomes flashing ,means the host has been connected to the GSM
network, and can be used.
How to set alarm phone numbers
Under normal arming/disarming status, users can send a SMS to set the phone numbers , the format is :
password#operating code# .
Sending a SMS: 123456#10#13905950000#,represents storing NO.1 number to receive SMS.
Sending a SMS: 123456#11#13905950001#,represents storing NO.2 number to receive SMS.
Sending a SMS: 123456#12#13905950002#,represents storing NO.3 number to receive SMS.
Sending a SMS: 123456#13#13905950003#,represents storing NO.4 number to receive SMS.
Sending a SMS: 123456#14#13905950004#,represents storing NO.5 number to receive SMS.
Sending a SMS: 123456#15#13905950005#,represents storing NO.1number to receive alarm.
Sending a SMS: 123456#16#13905950006#,represents storing NO.2 number to receive alarm.
Sending a SMS: 123456#17#13905950007#,represents storing NO.3number to receive alarm.
Sending a SMS: 123456#18#13905950008#,represents storing NO.4number to receive alarm.
Sending a SMS: 123456#19#13905950009#,represents storing NO.5number to receive alarm.
How to set the function by SMS/phone
Users can send SMS to the host, the format is :password # cooperation code # ,after receive SMS the
host will reply as follows :
Eg.
DisArm, Sms:ON, Phone:ON,Siren:ON,
User dial the host phone, input password 123456 #,after a sound “di” enter the remote alarm function
settings (input the correct password in 30 second, or automatically hang up),If you want to open alarm
voice, press :2#1# ,then hang up )
Operation instructions as follows :
General
settings
*
1#0#
Disarm
2#0#
Close scene siren sound
2#1#
Open scene siren sound
3#0#
Close monitor scene function
3#1#
Open monitor scene function
4#0#
Close intercom function
4#1#
Open intercom function
5#0#
Relay disconnected
5#1#
Relay connected
10#----#
Store SMS number 1
15#----#
Store phone number 1
11#----#
Store SMS number 2
16#----#
Store phone number 2
12#----#
Store SMS number 3
17#----#
Store phone number 3
13#----#
Store SMS number 4
18#----#
Store phone number 4
14#----#
Store SMS number 5
19#----#
Store phone number 5
Listening record
1#1#
Out Arm (all arm)
Home Arm (part arm)
1#2#
Advanced settings
30#--- #
New password (0-6 bits)
31#--#--#
Arm time
Disarm time
Set regular arm/disarm time
32#0#
No siren sound when alarming
32#1#
Need siren sound when alarming (default)
33#0#
Relay open and for 3 minutes
33#1#
Relay closed and last for 3 minutes when
alarming (default)
37#--#
Arm delay time (0-99 seconds)
default : 10 seconds
38#--#
Alarm delay time (0-99 seconds)
default : 0 second, no delay when alarming
39#0#
English version (default)
39#1#
Chinese version
Setting of wireless zone
Command
50#--#--#
Zone status
0: disarm
1 :arm (default)
2 : 24-hours arm
Message content
The messages of
1-16 zones can be
edited by yourself
Default message
Wireless activated(00)
(the time to alarm)
51#--#--#
......
65#--#--#
0: disarm
1 :arm (default)
2 : 24-hours arm
Wireless activated(01)
(the time to alarm)
The same as above
…
0: disarm
1: arm (default)
2: 24-hours arm
Wireless activated(15)
(the time to alarm)
Setting of wired zone
command
66#--#--#-#
......
70#--#--#-#
Zone status
Message content
0: disarm
1 :arm (default)
2 : 24-hours arm
The same as
above
0: disarm
1 :arm (default)
2 : 24-hours arm
The messages of
1-5 zones can be
edited by yourself
Default message
NC/NO choice
Wired activated(16)
(the time to alarm)
1: open trigger to
alarm
0: shorted trigger to
alarm (default)
......
Wired activated(20)
(the time to alarm)
......
1: open trigger to
alarm
0: shorted trigger to
alarm (default)
Note: The commands (2-6 lines) inside the order can be operated by the phone keyboard or SMS;
other lines can be operated by SMS only.
Phone settings above, if sounds a long “di”, means the operation is successful, if sounds “di” twice
means the operation is wrong, should re-input. Press the ‘’*’’ key to clear If the input is wrong.
Setting of the system time:
After host begin to work, Send SMS: password#31# .
Thus the system time will be same to the time of GSM base station.
Arm/disarm timing function:
Eg. Sending SMS : password#31#2200#0800#
Means : timing arm at 22:00;timing disarm at 08:00
Wireless zones setting:
Eg. Sending SMS : password#50#1#hall#,
50 represents wireless zone 0 ; 1 represents arm ; hall represents the name of zone .
(Parameters: 0: disarm; 1: arm; 2: 24-hour arm)
Wired zones setting:
Eg. Sending SMS : password#66#1# front door #0#,
66 represents wired zone 1 ; 1 represents arm ; front door represents the name of zone ; 0 represents
disconnected trigger .
1 Parameters: 0 : disarm; 1 : arm(default) ; 2 : 24-hour arm
2 Parameters: 0 : disconnected trigger; 1 : SMS trigger (default)
NOTE:The host has 16 solidified SMS of the wireless detectors,(wireless zone 0-15),the first SMS
corresponds the first zone of wireless detectors, other detectors are the same. The host also has 5
solidified messages of the wired detectors,(wired zone 1-5),the first message corresponds the first zone
of wired detectors, other detectors are the same. Users can send SMS and change its contents.
How to add new sensors.
If needs to add sensors as PIR detector, wireless door sensor, remote controller and so on :
1) The detectors of external zones: Powered the host, press the RESET key for 2 seconds, the
light becomes red. Then trigger the sensors, the wireless signal of the host will flash one time for
confirm. After 20 seconds, the alarm system turns into normal working automatically (green /
orange lights flashing)
2) The detectors of inner zones : First power the host, press the RESET key for 2 seconds, the
light becomes red ,then press the RESET key again, when the light changes from red to orange ,
trigger the sensors, the wireless signal of the host will flash one time for confirm. After 20
seconds, the alarm system turns to normal working automatically (green / orange lights
flashing)
If there are 3 detectors stored, represent wireless zones 1-3, if you add a new detector, this detector
represents zone 4.
Note: for the kits,door/window gap sensor is for external zone,PIR for inner zone .
If press Out Arm key, the detectors of external and inner zones will be in arming status.
If press Home Arm key, only the detectors of external zones will be in arming status.
How to delete the lost sensors
If the host needs to delete sensors in wireless zones (FIR detector,wireless door sensor,remote
controller and so on) :
Sending SMS: password # numbers(50-65)# **,will delete the sensors in this zones, the zone is
empty. Then the new sensors can be stored in this zone.
Resetting: After reset, all settings come back to original status, the original password is 123456 , the
other detectors must be stored in the host according to the above method, the first stored one takes
the first zone, other detectors are the same, the maximum number of zone is 16.
How to control the host with remote controller?
Disarm
Home Arm
Out Arm
Alarm
The remote controller has 4 keys: Out Arm, Home Arm , Disarm, Alarm
When press Out Arm, the light STATUS becomes orange flashing slowly, waiting for the arming
status, after 10 seconds the light becomes green flashing slowly, means the arming is successful. If
wireless detectors or wired ports triggered (all the wireless detectors are effective), then dial out phone
or send message, the light STATUS becomes red flashing.
When press Home Arm, the light STATUS becomes orange flashing fast, waiting for the arming
status, after 10 seconds the light becomes green flashing fast means the arming is successful. If
wireless sensors or wired ports trigger alarm(only the wireless detectors of Home Arm function effective,
Out Arm detectors are ineffective), then dial out phone or send message, the light STATUS becomes
red flashing.
When press Disarm, the light STATUS becomes green, wireless detectors or wired ports won’t
trigger alarm.
When press Alarm, regardless of the host in arming status (the light STATUS is green flashing),or
disarming status (the light STATUS is green ), will make the host trigger alarm immediately , dial out
phone and send message, the light STATUS becomes red flashing.
How to record 10 seconds voice message ?
Users can record geographical location, home address information as alarm voice, which will be
broadcast when alarming, convenient for the receiver to know the scene information.
Recording operation:
Press the record key for 2 seconds until the light Record is on, then speak by the microphone which
embedded in the left side of the host, then 10 seconds’ voice can be record. 10 seconds later the light
RECORD is off, then exits the recording status automatically. If you want to change the voice content,
repeat the operation.
How to test the alarm function ?
When the host is powered and disarmed, users can use remote controller(Out Arm, Home Arm key )
or send message (123456#1#1#) to arm. Under arming status, the green light flash, If the wired input
trigger alarm (any port of I1, I2, I3, I4, I5 shorted or disconnected to GND) or wireless sensors trigger
alarm (wireless FIR detector, wireless door sensor, Out Arm, Home Arm key of remote controller ),or
calling in the system from other places trigger alarm (input password 123456 #, then 2 # 1 #), will make
the host send alarm information.
⒈ If there are phone numbers stored to receive SMS, the host will send the corresponding SMS to the
SMS users based on the trigger port(wired I1,I2,I3,I4,I5,wireless sensors 1-16).
⒉ If there are phone numbers stored to receive alarm, the host can dial every number to alarm. When
replying, users can hear the alarm voice which recorded before. if the voice isn't clear, press “*”
key to listen again.
⒊ When alarming,users can open the listening-in function or control in long-distance, no need to input
the password,pressing 2#1# to make scene alarm immediately,pressing 2#0# to close on-site
alarm.
⒋ When alarming,users can open listening-in function or control in long-distance, no need to input
password,pressing 3#1# to open listening-in,pressing 3#0# to close listening-in.
⒌ When alarming,users can talk to people at the scene, after the phone getting through, there is no
need to input password,pressing 4#1# to make the host send out the voice of master immediately,
pressing 4#0# to close the voice at the scene.
⒍ When alarming,after users get through the phone, if it is not the intrusion, users can dial 1#1# to
make the host arm again, and the host will not go on dialing other phones.
⒎ When alarming,people at the scene can press the Disarm key to exit from alarm status.
⒏ Normal use, if there is built-in battery, when external power supply is off / on, the host will send
messages to inform users.
The message content :power change off/on(year/month/day, hour/minute/second)
⒐ Usually, users can remote control the host through phone, but input password first to continue other
operation.
Technical parameter
⒈
⒉
⒊
⒋
⒌
⒍
⒎
Static Current :50 mA
Power Supply :9-12 V
Working Temperature :-10℃ ~ +55℃
Receive Coding :ASK
Receive Frequency :315/433MHz
Remote Control Distance :No obstacle 100m
Detectors :16