1
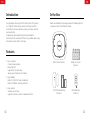
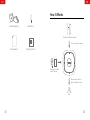
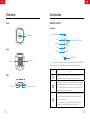
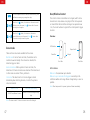
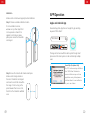
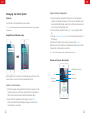
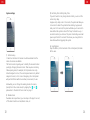
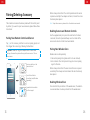
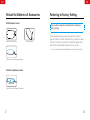
USER MANUAL
W020
© 2015 SMANOS HOLDING LTD. All Rights Reserved.
Printed in China
PA: W020-UM-EN-V1.0
WiFi Alarm System
EN
EN
Industry Canada Notice
This device complies with Industry Canada licence-exempt RSS standard(s).
1. Operation is subject to the following two conditions:
(1) this device may not cause interference, and
(2) this device must accept any interference, including interference that
may cause undesired operation of the device.
2. Changes or modifications not expressly approved by the par ty
responsible for compliance could void the user’s authority to operate
the equipment.
VIDEO
Please read this user manual carefully.
Be sure to keep this user manual handy for future reference.
Table of Contents
Introduction������������������������������������������������������������������������������������������������01
Features��������������������������������������������������������������������������������������������������������01
In the Box���������������������������������������������������������������������������������������������02~03
How It Works����������������������������������������������������������������������������������������������04
Overview�������������������������������������������������������������������������������������������������������05
Accessories������������������������������������������������������������������������������������������06~09
Remote Control������������������������������������������������������������������������������������� 06
Zone modes������������������������������������������������������������������������������������������� 07
Door/Window Contact ����������������������������������������������������������������������� 08
APP Operation������������������������������������������������������������������������������������10~14
Apple and Android App���������������������������������������������������������������������� 10
Managing Your Alarm System����������������������������������������������������������� 11
Pairing/Deleting Accessory�����������������������������������������������������������15~16
Pairing New Remote Control and Sensor��������������������������������������� 15
Deleting Sensors and Remote Controls������������������������������������������ 16
Pairing New Wireless Siren����������������������������������������������������������������� 16
Deleting Wireless Siren������������������������������������������������������������������������ 16
Reload the Batteries of Accessories��������������������������������������������������� 17
Restoring to Factory Setting�����������������������������������������������������������������18
Trouble Shooting���������������������������������������������������������������������������������������19
Maintenance���������������������������������������������������������������������������������������20~21
Specifications��������������������������������������������������������������������������������������22~23
W020 Control Panel ���������������������������������������������������������������������������� 22
RE2300 Remote Control���������������������������������������������������������������������� 23
DS2300 Door/Window Contact�������������������������������������������������������� 23
Disclaimer����������������������������������������������������������������������������������������������������24
EN
EN
Introduction
In the Box
Congratulations in buying the W020 alarm system. This product
is a totally D.I.Y. home security solution. It features automatic
connection to various accessories, putting your home under allround protection.
To experience this wonderful product, please follow the
instructions in the user manual. If there is any problem when using
the product, please contact us for help.
Please check whether the package includes the following items. If
not, please contact the distributor/ retailer.
Features
1. Easy to operate
Connect network quickly
Interact by APP
Support entry and exit delay
Two groups of timing arm and disarm
W020 Control Panel x 1
Battery of Control
Panel x 4
DS2300 Door/Window
Contact x 2
RE2300 Remote
Control x 1
2. High reliability
Built-in 1,000,000 RF codes combination
Built-in 105dB siren, deterring intruders
3. User-oriented
Standby over 60 hours
Support 10 remote controls, 30 wireless detectors
01
02
EN
EN
How It Works
SA-A12 Adapter x 1
Reset Pin x 1
Paired Door/Window Contact
Door or window is opened
User Manual x 1
Warranty Card x 1
Managed by remote
control / phone
Panel sounds / Sends a
push notification to users
Users
03
04
EN
EN
Overview
Accessories
Front
Remote Control
Overview
Status Indicator
LED Indicator
Arm
Guide Point For The Blind
Disarm
Stay
Rear
SOS
_
+
_
+
+ +_ _ _ + +_ _
+
+
Metal Ring
_
Battery
_
_
+
+ _
_
+
Reset Button
+
Note: If you press any button, the LED indicator is dusky and lights off after
flashing twice quickly, means the remote control battery is exhausted.
Button
Side
System Status
Press once to arm the system. The siren beeps once and the
red indicator will light on to confirm the system is armed.
Adapter Jack
network configuration button
Press once to disarm the system. The siren beeps twice and the
green indicator will light on to confirm the system is disarmed.
Note: System will alarm immediately if 24-hour zone detector
or tamper switch of sensor is triggered.
Press once to home arm the system, the siren beeps once after
3 seconds and the blue indicator will light on to confirm the
system is in home mode.
Note: System stops handling signal from home mode zone
detector, which enable users to move freely at home.
05
06
EN
EN
The control panel will hoot on-site with indicator flashing, users
will receive an emergency message from App.
Press the [stay
] button, the indicator on the remote control
blinks once, and then press [Arm ] button within 3 seconds
to mutely arm the system.
Press the [stay
] button, the indicator on the remote
control blinks once, and then press [Disarm ] button within
3 seconds to mutely disarm the system.
Door/Window Contact
The contact contains a transmitter and a magnet, which can be
mounted on a door, window or any objects that can be opened
or closed. When the transmitter and magnet are separated over
2 cm, the contact will send a signal to the control panel to trigger
an alarm.
Overview
LED Indicator
Zone modes
Tamper Switch
There are three zone modes available for the sensors.
Transmitter
Normal zone: In arm or home arm state, the detectors set to
normal zone work normally. Once intrusion is detected, the
detectors trigger an alarm.
Home mode zone: When system is in home arm state, the
detectors set to home mode zone are disarmed. The detectors set
to other zones are armed. That is, partial arm.
24-H zone: The detector set to 24-H zone trigger an alarm
immediately when detecting intrusion, no matter the system is
armed or disarmed.
Sensors in This Kit
DS2300 Door/Window Contact
Zone Mode (Default Setting)
Magnet
Front Side
Back Side
LED Indication
Blinks once: Door/window open detected.
Blinks once per 3 seconds after triggered: Low battery. Push
notification will be sent to App. Please change battery as soon as
possible.
Note: When tamper switch is pressed, system will alarm immediately.
Normal Zone (can be changed through
App)
Note: The zone mode of 24-hour zone sensor can not be changed.
07
08
EN
EN
Installation
Make sure the contacts work properly before installation.
Step 1: Choose a suitable installation location
APP Operation
Apple and Android App
It can be installed on doors,
windows or any other objects that
can be opened or closed. If it is
applied to metal doors, please
place spacer under the transmitter
and magnet.
Download App from App Store or Google Play by searching
keywords “W020 Alarm”.
W020 Alarm
The App can be bound with the alarm system through smart
phones. And this alarm system can be controlled by multiple
users.
Step 2: Secure the contacts with double-sided tapes
Make sure the triangle marks on
the side of transmitter and magnet
are closed to each other and within
the range of 1cm. As long as the
space between them is over 2cm,
the LED on the transmitter will blink
once.
09
Special Tips (For Iphone Only)
Tap “OK” to allow receiving notifications
from “W020 Alarm”.Forbidden to
receive notifications may result in an
application running failure, please reinstall and allow it to send notification
to you in case of alarm.
>2cm
10
EN
EN
Managing Your Alarm System
Option 2. Manual configuration
Power on
1.Hold the network configuration button on the control panel
until the control panel beeps once, then the red and blue status
indicators blink alternately, means the control panel has entered
into a manual configuration state.
2.Find and choose the Wi-Fi named W020 in your phone’s Wi-Fi
list.
3.Choose manual configuration in the one-click setup interface of
W020 App.
4.Input the local Wi-Fi name and its password, click [Start].
When the status LED indicator stops blinking but keeps on instead,
it means the configuration is successful.
Connect the control panel with a power socket.
Note: The control panel will be disconnected with network if only powered
by batteries.
Registration and Network setup
Note: One control panel can be controlled by multi users.
Remote control your alarm system
Network Reconnection
After registration, it enters into the network setup interface. There
are two ways to connect the control panel with Wi-Fi:
Arm
Pull-down
to Refresh
Disarm
Home Arm
Option 1. One-click setup
1.Click the network configuration button (refer to page 5) on the
control panel once, you’ll hear a beep from the control panel.
then the red and blue status indicators blink alternately.
2.Input the Wi-Fi’s password on the App, then tap [Start],
when the indicator stops blinking but keeps on instead, the
configuration is successful.
11
12
EN
EN
System settings
③ Exit Delay Time & Entry Delay Time
If you don’t want to carry along remote controls, you can set the
exit or entry delay.
Suppose entry delay is set at 30 seconds, the system will allow you
30 seconds to disarm the system before alarming. Suppose exit
delay is set at 35 seconds, the system will allow you 35 seconds to
leave before the system is armed. The “beep” is heard in every 2
seconds to remind you to leave. The pace of reminding sound will
speed up in the last 15 seconds. Thus leaves you enough time to
leave home without triggering the system.
④ User Deletion
Input the ID No. (on the back side of the control panel) to delete
all the users.
① Edit Accessory
10 remote controls and 30 sensors could be extended and the
names of sensors are editable.
This function aims at guiding user to identify the invasion location
quickly by changing the sensor name. Their sequence in naming
follows pairing order, for example, the first paired sensor is by
default assigned to zone 1, the second paired sensor is by default
assigned to zone 2, etc. In case of emergency, this control panel
will push notification with zone number (or new name) to user.
Meanwhile, you can change the working mode of accessory
(Except the 24-hour zone sensor) by tapping the [ ] or [ ],
please refer to the detail of “zone mode” on page 7.
② Wireless Siren
If wireless siren is purchased, you can setup on the app to turn on/
off the alarm function and arm/disarm tone, etc.
13
14
EN
EN
Pairing/Deleting Accessory
When a beep is heard from the control panel means the sensor
is paired successfully. If two beeps are heard, it means the sensor
has already been paired.
The included accessories have been paired with the control panel
by default, if you want to pair new accessories, please follow these
instructions:
Note: To pair other sensors, please refer to the related user manuals.
Pairing New Remote Control and Sensor
Tap [+] on the accessory interface to send out pairing signal, and
then trigger the accessory by following the illustration.
Important: Please don't trigger the tamper switch of sensor when
pairing, otherwise the system will recognize the sensor as a 24-hour
zone sensor.
Press any button on the
remote control
Press the test button
more than twice(Purchase
separately)
Separate the transmitter
and the magnet
15
Deleting Sensors and Remote Controls
Use the supplied reset pin to press the reset button for about
3 seconds, the control panel will beep once to indicate all the
sensors and remote controls have been deleted.
Pairing New Wireless Siren
Wireless siren is sold separately.
1.Siren enters pairing state (please refer to its user manual).
2.Arm or disarm the control panel on App to send out pairing
signal to the siren.
When a beep is heard from the siren means the siren is paired
successfully. If two beeps are heard means the siren has already
been paired.
Deleting Wireless Siren
Press and hold the pair button of the wireless siren, the deletion
is succeeded when one beep is heard from the wireless siren.
16
EN
EN
Reload the Batteries of Accessories
RE2300 Remote Control
Remove the rubber item
Restoring to Factory Setting
Please read the steps below carefully before restoring to
factory setting.
Loose the screw
Use the supplied reset pin to press the reset button ( refer to
page 5) for about 7 seconds, during the time, you will hear a beep
in the first 3 seconds, do not loose it until another beep is heard.
After that, the control panel is restored to factory setting.
Note: The accessories will not be deleted after restoring to factory setting.
Open the case and change the battery
DS2300 Door/Window Contact
Open the case and change the batteries
17
18
EN
EN
Trouble Shooting
Maintenance
If the alarm system cannot work properly, please first check the
following sheet.
The alarm system features unique and brilliant design and
craftwork. Please use it with caution. The following suggestions
will help prolong the service life of the system.
Problems
The control panel does
not respond to App
operation
Remote control does not
work
Reason/Solution
Check whether the local network is
working
Make sure the control panel is powered by
adapter
Check if the remote control has been
paired to the control panel successfully
The distance between the control panel
and the remote control is too far away
Check whether the system is in armed
state
Door/window contact is
triggered but the control
panel does not alarm
Check if the door/window contact
has been paired to the control panel
successfully
Check if the door/window contact is far
away from the control panel
No sound when alarming
19
Check if the volume of the control panel is
set to mute; Reset alarm ring volume on
App
1. Keep this product and accessories out of children’s reach.
2. Keep the product and accessories dry. Rainwater, moisture and
liquids are likely to contain minerals that will corrode electronic
circuits.
3. Do not use or store the alarm system in dusty or dirty places;
otherwise it may damage the electronic components.
4. Do not expose the alarm system to high temperature. High
temperatures can shorten the life of electronic components,
damage batteries, and cause melting and deformation of
plastic parts.
5. Do not store the alarm system in cold areas. Otherwise, when
the temperature of the alarm system rises to the normal level,
moisture appears inside, damaging PCB.
6. Test the alarm system regularly and perform troubleshooting in
time.
20
EN
EN
7. Check the built-in batteries of accessories regularly. If the
batteries are low, replace with new ones.
Specifications
8. The alarm system requires uninterrupted power supply for
working or standby. Therefore, you need to connect the AC
adapter to a reliable power outlet.
W020 Control Panel
9. Avoid placing the control panel and sirens in bedrooms or
offices, so as not to disturb your rest or work.
10.It is recommended to cut off the power if the system is not
used for long time.
11.If the alarm system is covered with dirt, wipe off the dirt with
soft cloth or tissue. For stains, apply diluted alkaline detergent
to soft cloth, wring the cloth out and wipe the product. Then,
dry the product with dry absorbent cloth.
Please carefully read and strictly follow the previous suggestions.
If the product remains faulty, you can send it to the place of
purchase or authorized maintenance center for maintenance. We
will provide help as soon as possible.
21
Power Supply
DC 12V 500mA
Battery
AA 1.5V LR 6 x 4pcs
Standby Current
<30 uA
Alarm Current
<200 mA
Internal Siren
105dB
Expandable Accessories
10 remote controls, 30 sensors
WiFi
IEEE 802.11b/g/n
Radio Frequency
868MHz or 915MHz (±75 KHz)
Housing Material
ABS plastic
Operating Condition
Temperature -10°C~+55°C
Relative humidity <80%
(non-condensing)
Dismensions
117 x 118.5 x 40.5 mm (L x W x H)
22
EN
EN
RE2300 Remote Control
Power Supply
DC 3V (CR2032 lithium cell battery x 1)
Transmitting Current
<9.5 mA
Transmitting Distance
<80 m (open area/no interference)
Radio Frequency
868MHz or 915MHz (±75 KHz)
Housing Material
PC+ABS plastic
Operating Condition
Temperature -10°C~+55°C
Relative humidity <80%
(non-condensing)
Dimensions
71 x 38 x 12 mm (L x W x H)
DS2300 Door/Window Contact
Power Supply
DC 3V (CR2032 lithium cell battery x 2)
Static Current
<1 uA
Alarm Current
<10.5 mA
Transmitting Distance
<80 m (open area/no interference)
Radio Frequency
868MHz or 915MHz (±75 KHz)
Housing Material
ABS plastic
Operating Condition
Temperature -10°C~+55°C
Relative humidity <80%
(non-condensing)
Disclaimer
Dear users,
We have reviewed this manual thoroughly in order to ensure
it’s clear and easy for you to operate the system. All statements,
technical information, recommendations in this manual are
reliable, but the accuracy and completeness are not guaranteed
or warranted.
The specifications and information regarding the products in this
document are subject to change without notice.
Photocopy, copy, reproduction, translation to any language,
modification, storage in a retrieval system or retransmission, in
any form or by any means, electronic, mechanical or otherwise, is
strictly prohibited without prior written permission.
In no event we are liable for any indirect, special, incidental, or
consequential damages, including, without limitation, lost profits
or loss or damage to data arising out of the use or inability to
use this document, even if the product has been advised of the
possibility of such damages.
Transmitter Dimensions 72.5 x 28 x 10 mm (L x W x H)
Magnet Dimensions
23
58 x 14 x 9.5 mm (L x W x H)
24

![[IT]W100 Manuale dell`utente](http://vs1.manualzilla.com/store/data/006154111_1-7a4b6d349fd0dcccc91edad3066002cb-150x150.png)