1
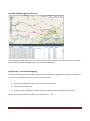
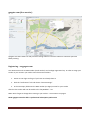
b
Microtracker EPS2
User Manual
Version 1.1
2013-05-27
Valid for Firmware 1.19 or newer
KEY 7 A/S
[email protected]
GPS / GSM tracker
This document describes the properties, configuration and
use of the EPS2 Microtracker
CONTENTS
1. GENERAL INFORMATION
3
2. SIM CARD AND BATTERIES
4
a. SIM CARD
4
b. BATTERIES
4
3. CONFIGURATION
6
a. GET STARTED, QUICK GUIDE
6
b. RESET
6
c. BASIC TERMS
7
d. BASIC CONFIGURATION
9
i. BASIC PARAMETERS
10
ii. STATUS COMMANDS
15
e. FUNCTIONS CONFIGURATION
16
i. WAKEUPS
16
ii. TRIGGERS
17
iii. ACTIONS
20
f.
ALTERNATIVE DATA TRANSFER
22
g. SELECTING A THEME
24
h. OPTIONS
26
4. DAILY USE
27
a. PLACING
27
b. SMS
27
c. IN CASE OF AN ALARM
27
d. LIVE TRACKING
29
i. WORLDTRACKING.ORG
30
ii. GPSGATE.COM
31
5. TROUBLESHOOTING
32
6. LIST OF COMMANDS
33
7. SPECIFICATIONS
34
EPS2 User Manual
Page 2
GENERAL INFORMATION
Congratulations with your new EPS2 Microtracker. EPS2 has been designed using the latest technology and
will give you many years of safe operation.
EPS2 is especially designed to use very little energy. A single set of batteries can last for up to 5 years
depending on how it’s used.
In order to have to most out of your EPS2 we encourage you to read all of this user manual so you fully
understand the possibility you are given to secure your valuable assets and to maximize the battery life
time.
If you should face the need for answers on certain questions we suggest you first read the FAQ on
www.microtracker.dk before you choose to contact your dealer as your question most probably is covered
here.
If you do not find the needed answer in the FAQ you can direct your question to [email protected].
Please include your product type, serial number, SIM card phone number, your live tracking e-mail and SIM
card provider.
Have fun
Microtracker Team, KEY7 A/S
EPS2 User Manual
Page 3
SIM CARD AND BATTERIES
In order to have the EPS2 communicating it needs a valid SIM card and batteries.
SIM CARD
The SIM card must be enabled for SMS and 2G GPRS (mobile internet). 3G SIM cards are not supported.
You can use prepaid cards or normal subscription cards. If you use prepaid cards then make sure it can’t be
drained without automatic refill so you do not risk losing communication with the tracker.
If you need guidance in choosing a SIM card you can ask your dealer.
The SIM card must be inserted before the batteries!
BATTERIES
EPS2 can be supplied with ordinary alkaline disposable batteries (included) or you can use re-chargeable NiMH batteries.
The battery life time you will experience depends on several factors as:
-
Battery type
-
Temperature (cold gives shorter battery time)
-
Number of SMS transmitted
-
Number of GPRS reports
-
How often the EPS2 wakes up
-
How good is the GSM reception
-
How good is the GPS reception
EPS2 User Manual
Page 4
Alkaline disposable batteries
EPS2 comes with 3 pcs AA super alkaline batteries, also known as penlight or LR6. Alkaline batteries are
cost effective and give a long battery life time in temperatures from 0-60°C. Alkaline batteries are not
commended at temperatures below 0°C.
The included batteries are special high grade quality and ensure longest operation of your EPS2.
A rule of thumb for alkaline batteries (@ 20°c):
-
If your EPS2 Microtracker wakes up twice a day to transmit its position you can expect battery life
time of 2 years or more.
-
If your EPS2 Microtracker only wakes up once a day to transmit its position the expected battery
life time is approximately 5 years!
-
If your EPS2 wakes up 20 times a day but only needs to send its position once a day you can expect
1 year battery life time.
It is important only to use fresh and equal alkaline batteries. Failing to do so can significantly reduce the
operating time or worse – it batteries might leak and destroy the electronics. If you are in doubt, please
contact us so we can send you fresh super alkaline batteries.
Ni-MH re-chargeable batteries
Ni-MH (Nickel-Metal Hydride) batteries are the preferred batteries if you plan to use your EPS2 below 0°C
and down to -20°C. Ni-MH batteries are re-chargeable and can thus be used for many times but suffer selfdischarge that shortens the operating time somewhat compared to alkaline batteries. Having this in mind
you should only use Ni-MH batteries when needed due to low temperatures.
If you need to run your EPS2 on Ni-MH batteries you need to configure it for this type of batteries using the
’BATTYPE’ command. Please see page 13.
Battery replacement
After inserting new batteries you should press the RESET-button. After this the red LED should flash fast for
a few minutes – it is then ready and can receive SMS if required.
Pressing RESET-button does not affect your configuration.
EPS2 User Manual
Page 5
CONFIGURATION
In order to have the longest possible battery life time the EPS2 is designed to only wake up in specified
intervals or if the EPS2 detects a motion. Only during these periods when awake the EPS2 can receive SMS
and this means it only then can be configured. If you can’t wait until it wakes up next time (wakeup interval
or motion) then you need to take out and re-insert the batteries. When inserting the batteries the EPS2 will
stay awake for 5 minutes.
Please note that SMS that are sent to the EPS2 while in sleep mode will not be lost. When the EPS2 wakes
up it will handle the SMS in queue but not necessary in the same order.
To ease the readability in this document the ∆-sign indicates a space.
GET STARTED, QUICK GUIDE
1. Inset SIM card after having removed its PIN code (This is easily done in an ordinary mobile phone)
2. Insert the batteries. Observe correct polarity!
3. Choose a theme on page 24 that best suit your application (e.g. theme 7 for a motorbike) and send SMS:
1234∆THEME∆7 to your EPS2 and wait for confirmation SMS.
4. Log into www.microtracker.dk and follow your EPS2 on the map.
It is strongly recommended to read the rest of the section Configuration to understand the behavior and
functionally of the tracker but also to have the most out of your tracker to best protect your assets.
RESET
If for some reason you need to bring back the EPS2 to its default settings then you can send this command:
1234∆INIT∆1234
After receiving an OK confirmation the EPS2 is reset back and all setting have their default values restored.
EPS2 User Manual
Page 6
BASIC TERMS
In this manual we operate with 4 terms that you need to understand to make full use of the EPS2 potential.
Wakeups:
Things that can wake up the EPS2 from sleep mode.
Triggers:
Things that can trigger an Action
Utils:
Other configuration of the EPS2
Actions:
The generation of REPORTS and SMS
The basic operation of your EPS2 is as follows:
1) EPS2 wakes up because of a Wakeups
2) EPS2 checks Triggers
3) EPS2 processes one or more Actions, if one or more Triggers are active.
In other words using an example:
EPS2 wakes up because the wakeup-time has run out (1) and while the tracker is awake it checks to all
possible things that could trigger an action (2). It sees the FENCE-trigger and when checking it decides to
send a SMS (3) to notify a breach of fence and then falls back to sleep mode.
To make the EPS2 Microtracker operate best in your specific application you need to configure this:
a) GPRS connection must be configured
b) The mobile number the EPS2 should call when needed.
c) How often should the EPS2 wake up automatically? (WAKEUP command)
d) Should motion cause the EPS2 to wake up? (MOTION command)
e) Do you need a geo-fence (FENCE command)?
f)
Would it be a good idea to require a minimum distance before a SMS/REPORT is generated? (DIST
command)
g) What should generate a SMS or REPORT? (WAKEUP, MOTION, FENCE, SPEED, DIST, TEMP, BAT)
EPS2 User Manual
Page 7
In the next section we go through the options in Basic configuration, Triggers and Actions.
As an alternative to the manual configuration it is possible to choose one of the many Themes (as seen on
page 20) and if needed make manual adjustments to the selected theme.
If you are impatient and want to get started in a hurry then revert to the previous page and read Get
Started, Quick Guide.
EPS2 User Manual
Page 8
BASIC CONFIGURATION
In order to make the EPS2 behave like described in the sections WAKEUPS, TRIGGERS and ACTIONS you
need first to specify some parameters:
PIN
- Change PIN-code in EPS2
APN **)
- APN name
IP *)
- IP address of live tracking server
URL *)
- Live Tracking server
DNS **)
- DNS
NAME
- Name of your EPS2 Microtracker
LOG
- How the internal log should operate (ALL / ERROR)
PHONE
- Defining mobile numbers the EPS2 will send SMS to
SMSTYPE
- Defining how position coordinates will be presented in SMS
BATTYPE
- Select battery type
*) These are default configured for use with live tracking and need thus not be changed**) These are default configured for use with TDC (Danish GSM network operator)
Some informative commands:
INFO
- Returns some useful information about the EPS2
HELP
- Returns a list of commands. HELP <command> return help for a specific command
On the following pages each command is described in detail.
EPS2 User Manual
Page 9
BASIC PARAMETERS
Basis parameters describe the required configuration to make the EPS2 work.
PIN:
1234 PIN [XXXX]
This command changes the 4-digit PIN code that is used in all SMS communication. The default code is 1234
and you should change this code for security reasons.
Example:
1234∆PIN∆4321
This will change the PIN code from 1234 to 4321.
Should you ever forget your code you can set it back by removing the batteries, take out the SIM card,
insert the batteries again and wait 60 seconds. After this you can take out the batteries, insert the SIM and
re-insert the batteries back in. Now the PIN code will be set back to 1234.
APN:
1234 APN [APNNAME] [USER] [PASSWORD]
This command configures the APN name that is used by your SIM card provider. In Denmark these APN’s
are used:
TDC’s network:
internet
Telenor’s network:
internet
Telia’s network:
www.internet.mtelia.dk
Example:
1234∆APN∆internet
Above example will set the APN name to be ’internet’.
If your SIM card provider demands a username and password you can add these – e.g.
Example:
1234∆APN∆internet∆user∆pass
Default value for APN is ’internet’ and blank username and blank password.
IP:
1234 IP [IPNUMMER] [PORTNUMBER]
This command configures the IP and PORT number of the live tracking server (www.worldtracking.org). If
you know the IP and PORT number then you do not need to configure DNS and URL. For our live tracking
server the IP number is 92.246.5.170 and the PORT number is 20000. If ever our server is moved the IP and
EPS2 User Manual
Page 10
PORT may change but we will always inform our customers in due time. If you will be sure not to lose the
GPRS connection even if we someday move the server you have to configure DNS and URL.
Example:
1234∆IP∆92.246.5.170∆20000
Above example configures IP to be 92.246.5.170 and PORT to be 20000.
Default IP and PORT numbers are: 92.246.5.170:20000 and need to be changed if you plan to use live
tracking on www.worldtracking.org. If you would like to use another live tracking server – e.g.
www.gpsgate.com, then you must change IP to:
1234∆IP∆69.10.131.178∆30175∆1
Note: If you require high data transfer security (e.g. data even if no GPRS) then see section ALTERNATIVE
DATA TRANSFER.
URL:
1234 URL [URLNAME] [PORTNUMBER]
This command configures the URL of the live tracking server. In order to use www.worldtracing.org live
tracking server you need to define both URL and port number:
Example:
1234∆URL∆www.worldtracking.org∆20000
Above example set the URL to www.worldtracking.org and port number to 20000.
Default values are URL: www.worldtracking.org and port number: 20000.
For the URL to work you also need to configure DNS.
Please note: Configuring URL and DNS is not required if you have configured IP.
DNS:
1234 DNS [DNS1] [DNS2]
This command configures the DNS servers used to lookup the URL. DNS servers are defined by their IP’s and
depend on the SIM card provider.
TDC’s network
DNS1: 193.162.153.164
DNS2: 194.239.134.83
Telenor’s network:
DNS1: 212.88.64.14
DNS2: 212.88.64.15
Telia’s network:
DNS1: 193.162.153.164
DNS2: 194.239.134.83
EPS2 User Manual
Page 11
Example:
1234∆DNS∆193.162.153.164∆194.239.134.83
Above example configures the EPS21 to use TDC’s DNS servers.
Default DNS values are: 193.162.153.164 and 194.239.134.83
Please note: Configuring URL and DNS is not required if you have configured IP.
LOG:
1234 LOG [LOGTYPE]
This command is used to define the type of log the EPS2 should make. The log can hold up to 100 positions
including time & date.
Logtype can be one of these 3:
OFF:
Log not used (saves battery and data traffic)
ERROR:
Only positions that should have been send but failed due to bad GPRS.
ALL:
In contrast to ’ERROR’ selecting ’ALL’ will make the EPS2 send all measured positions that it
has found but did not cause an SMS (alarm) or REPORT.
If the log gets full the oldest positions are overwritten by the newest. This means that only the newest 100
positions are transmitted.
Example:
1234∆LOG∆ERROR
Above example configures the EPS2 to send the acquired positions that failed to be transmitted next time
the tracker established GPRS connection.
Default value for LOG is ’ALL’.
PHONE:
1234 PHONE [X] [Y]
This command defines what mobile number the tracker has to contact in case of an alarm. The EPS2 can
send its messages to up to 8 mobile numbers. You can add, delete a number, delete all numbers or get a list
of the stored numbers.
Example1::
1234∆PHONE∆ADD∆+4512345678
This will add the mobile number +4512345678 to the EPS2 list of receivers of alarm SMS.
Example2:
1234∆PHONE∆DEL∆+4512345678
This will remove the mobile number +4512345678 from the EPS2 list of stored numbers.
EPS2 User Manual
Page 12
Example3:
1234∆PHONE∆DELALL
This will remove all the stored numbers in the EPS2 list of mobile numbers. Doing so will make the EPS2
sending alarms only to the mobile number it has last received a SMS from.
Example4:
1234∆PHONE
This will make the EPS2 return a SMS with a list of the stored mobile numbers.
If no number is stored the EPS2 will only send alarm the mobile number it as last received a valid SMS from.
NAME:
1234 NAME [NEWNAME]
This command changes the name of the EPS2 Microtracker. The default name is ‘EPS2’ and is shown in each
SMS from the tracker.
Example:
1234∆NAME∆CAR1
Above example will change the name of the EPS2 to ’CAR1’.
The name can be up to 15 characters/digits and may not include spaces or special characters.
SMSTYPE:
1234 SMSTYPE [TYPE]
This command is used to tell the EPS2 how it should send position coordinates in SMS.
Coordinates can be send in ordinary format (lat & long) or as a link to GoogleMaps. The latter is very useful
for smartphones (e.g. iPhone) in that you can tap the link in the SMS and are then directly taken to the
GoogleMaps with the location of the tracker. This is very convenient when doing field recovery.
The SMS type can be either of these two:
NORMAL:
Coordinates are presented as latitude & longitude.
GOOGLE:
Coordinates are presented as a link to GoogleMaps.
Example:
1234∆SMSTYPE∆GOOGLE
Above example instructs the EPS2 to present positions coordinates as links to GoogleMaps. An example of
such a link could look like:
http://maps.google.com/maps?F=q&hl=en&q=56.185673,09.580743
Default SMSTYPE is ’GOOGLE’.
EPS2 User Manual
Page 13
BATTYPE:
1234 BATTYPE [TYPE ]
This command configures the EPS2 to use a specified battery type. This is required in order to have the
EPS2 report low battery warning at the correct voltage levels.
This command is only needed if you change to Ni-MH batteries (or change back to alkaline).
Battery type can be one of two:
ALKALINE:
Ordinary alkaline batteries (included).
NIMH:
Re-chargeable Ni-MH (Nickel-Metalhydride) batteries.
Example:
1234∆BATTYPE∆NIMH
Default BATTYPE is ’ALKALINE’.
EPS2 User Manual
Page 14
STATUS COMMANDS
These commands are only used to retrieve information from the tracker and do not affect the behavior.
INFO:
1234 INFO
This command make the EPS2 return a SMS with some basic information about the tracker.
Example:
1234∆INFO
This example make the EPS2 return information:
Software version, Hardware version, IMEI number, GSM signal strength (RSSI), Battery voltage,
Temperature, total distance.
HELP:
1234 HELP [COMMAND]
If you do not specify a parameter then HELP will return a list of possible commands.
If you specify a parameter (a command) the HELP will return a brief explanation on how to use that
command.
Example:
1234∆HELP∆FENCE
Above example will make the EPS2 return a SMS with information on how to use the FENCE command.
EPS2 User Manual
Page 15
FUNCTIONS CONFIGURATION
WAKEUPS
EPS2 runs very long time on its battery by saving as much power as possible. This is done letting the tracker
being in sleep mode for most of the time and only letting it wake up in certain intervals or if the tracker is
moved. These two causes are called wakeups.
Wakeups commands:
WAKEUP:
1234 WAKEUP [XS/XM/XH]
The time interval for automatic regular wake up. The time is given in seconds, minutes or hours.
Example:
1234∆WAKEUP∆12h
Above example instructs the EPS2 to wake up every 12 hours.
Likewise would 30 minutes be given by 30m and 10 seconds by 10s.
MOTION:
1234 MOTION [ON INT OFF]
This command instruct the EPS2 Microtracker to wake up if in motion. The command specifies how long
time the tracker must be in motion to be recognized as ‘in motion’ , how long time before next time to
check for motion and how long time the tracker must be steady to not be ‘in motion’.
on – the time the tracker must be in motion to be recognized as ‘in motion’
Int – the time before next time to check for motion
off – the time the tracker must be steady to not be ‘in motion’
All 3 parameters are given in seconds or minutes.
Example:
1234∆MOTION∆1m∆15m∆10m
Above example configures the MOTION so: Must have been in motion for at least 1 minute to be identified
to be ‘in motion’ and thus wake up. After 15 minutes EPS2 wakes up again. The EPS2 must have been
steady for at least 10 minutes to be identified as ‘not in motion anymore’.
Note – if the tracker has woken up due to motion then the tracker will wake up at least 2 times. The first
time when it detects ‘in motion’ and the second time after the INT-time.
EPS2 User Manual
Page 16
TRIGGERS
Triggers are signals that can start an Action. Those trigger signals don’t do anything themselves but are
basis for decision of what to do. If a trigger is set or not is evaluated during the wake up period (see section
Wakeups).
EPS2 operates with 8 trigger signals and 6 of those have an associated parameter that is used to evaluate of
the trigger is set or not. The following trigger signals are available:
•
•
•
•
•
•
•
•
W
M
F
E
S
D
B
T
FENCE:
- Wakeup
- Motion
- Fence, unconditional
- Fence, conditional (Energy saving)
- Speed
- Distance
- Battery
- Temperature
1234 FENCE [D] [W]
D is a radius given in kilometers. If the tracker is outside this radius the FENCE trigger is set. The tracker
uses the last know position for this evaluation.
W is an optional parameter that is used to tell the tracker when to wake up again next time if it is outside
the FENCE radius. If W is not specified then the normal WAKEUP interval is used. Using the W parameter is
especially useful if you wish to have more frequent reports when the tracker is outside its normal area (e.g.
if it is stolen).
Example:
1234∆FENCE∆10
Above example configures the EPS2 for a invisible geo-fence with a radius of 10km using the current
position.
If no parameters are defined at all then the EPS2 will return with the current parameters. To disable fence
send 1234∆FENCE∆OFF
SPEED:
1234 SPEED [S]
Example:
1234∆SPEED∆130
S – maximum speed in km/t. If the EPS2 moves faster than S then the SPEED signal is set.
Above example configures the EPS2 to set the speed trigger signal if moving faster than 130km/h.
EPS2 User Manual
Page 17
If no parameters are defined at all (sending only 1234∆SPEED) then the EPS2 will return the current
parameters.
DIST:
1234 DIST [D]
D is the distance given in meters that the tracker has to move before setting the DIST trigger signal. The
previous position and the current position is used to make the decision. This trigger signal is used to limit
the REPORT in that there normally is no reason for transmitting the position if the tracker has not moved.
Example:
1234∆DIST∆250
Above example sets the minimum move distance to 250 meters before the DIST signal is set.
If no parameters are defined at all (sending only 1234∆DIST) then the EPS2 will return the current
parameters.
TEMP:
1234 TEMP [UNDER/OVER/OFF/C/F/K T]
The TEMP signal can be configured to be set if the temperature is too low and/or too high. Temperature
can be set to measure in Celsius (C), Fahrenheit (F) or Kelvin (K). Default the temperature is measured in
Celsius.
If for example you would like the signal to be set when the temperature goes below -5°C and also if it goes
above 35°C then you need to send two SMS:
1234∆TEMP∆UNDER∆-5
1234∆TEMP∆OVER∆35
If you want to turn off the TEMP signal you should use the parameter ‘OFF’.
If you want to use another scale you can do so by setting the parameter to ‘C’, ‘F’ or ‘K’ for respectively
Celsius, Fahrenheit or Kelvin:
1234∆TEMP∆F
Above example will use Fahrenheit as the scale. Note – you should change the scale before setting upper
and lower temperature limits.
If no parameters are defined at all (sending only 1234∆TEMP) then the EPS2 will return the current
parameters.
EPS2 User Manual
Page 18
E
(FENCE, CONDITIONED)
This trigger signal can’t be configured because it is a combined function based on the FENCE and MOTION
signals. The E-signal is set if the FENCE signal is set (that is if the EPS2 is outside the geo-fence) AND the
MOTION signal is set (that is if the EPS2 is in motion). If you would like to use the E-signal you have to
configure both the FENCE (the W-parameter is not needed) and the MOTION parameters.
The E-signal is especially useful if you want repeated REPORTs if outside the geo-fence but in order to save
battery power you only want REPORTs if the tracker is actually moving.
BAT
(NO PARAMETERS)
The BAT signal will be set when the battery voltage drops below a certain level and is typically used to send
warning SMS to inform the user to change batteries.
EPS2 User Manual
Page 19
ACTIONS
When the EPS2 wakes up from sleep mode it updates the trigger signals and then decides if:
•
•
•
•
Should it send its position the live tracking server?
Should the position be stored in the log?
Should it send a SMS?
Should nothing happen?
REPORT:
(REPORT-command)
(SMS-command)
1234 REPORT [TRIGGERS]
The REPORT command is used to configure when the EPS2 should send a report (via GRPS) to the live
tracking server.
Triggers that could cause a REPORT are:
W = WAKEUP signal
M = MOTION signal
F = FENCE signal
E = FENCE signal (but only when in motion)
S = SPEED signal
D = DIST signal
T = TEMP signal
B = BAT signal
Example 1:
1234∆REPORT∆WM
This example will make the EPS2 send a position report to the live tracking server when it:
•
Wakes up (WAKEUP interval) or
•
Detects a motion (MOTION)
Example 2:
1234∆REPORT∆WFD
This example will make the EPS2 send a position report to the live tracking server when it:
EPS2 User Manual
Page 20
•
Wakes up (WAKEUP interval) or
•
Has moved outside the geo-fence or
•
Has moved more than the DIST distance
Example 3:
1234∆REPORT∆WE
This example will make the EPS2 send a position report to the live tracking server when it:
•
Wakes up (WAKEUP interval) or
•
Has moved outside the geo-fence or
•
Continues to be outside the geo-fence area AND is in motion
This example is very useful to secure assets that are allowed to move inside a given area and to have
frequent position reports if it moves outside the allowed area and is in motion. If the tracker does not move
outside the allowed area it only will send reports with the WAKEUP intervals. This is a battery saving
configuration.
SMS:
1234 SMS [TRIGGERS]
The SMS command is used to configure when the EPS2 should send a SMS to the user(s). This command
works like the REPORT command but it sends the information by SMS instead of GPRS.
The trigger signals are the same as for the REPORT command.
Example: You wish to receive a SMS if the tracker leaves the geo-fence or if there is a temperature alarm or
if the battery level is to low:
1234∆SMS∆FTB
Note – Check the SMSTYPE command for the various presentation of position in SMS.
EPS2 User Manual
Page 21
ALTERNATIVE DATA TRANSFER
When EPS2 sends data to the live tracking server this normally happens via GPRS – se section Basic
Parameters. In some situations GPRS can’t be used (e.g. no GPRS or too costly) or there is a need for extra
high data transfer security. For these situations the EPS2 can send data to the live tracking server via an
alternative channel – SMS
In order to make use of the alternative data transfer you need to configure the tracker with the SMSDATA
command and optional with the SREPORT command. Both are described in below.
SMSDATA:
1234 SMSDATA [MODE] [PHONE]
This command is used to define an alternative data channel to the live tracking server and is very useful in
areas without GPRS or areas with very expensive GPRS rates. The alternative data channel is SMS. See also
the SREPORT command.
MODE can be one of these 5:
OFF:
Alternative data channel not used (Only GPRS is in use)
ROAMING:
Data are send via SMS if GSM networks is roaming (GPRS is disabled when roaming)
NOGPRS:
Data are sent via SMS if there is no GPRS.
SMS:
Data are sent via SMS only – GPRS is disabled. Use this in areas without GPRS!
SMSGPRS:
Data are sent both via SMS and GPRS. Can be used for 2 different live tracking servers.
The second parameter, PHONE, is the phone number to the live tracking server.
Example:
1234∆SMSDATA∆NOGPRS∆+4530970496
Above example configures the EPS2 to send data to the live tracking server via SMS if there is no GPRS.
Default value for MODE is ‘OFF’.
NOTE: If you are using SMS as your alternative data transfer channel you should change the LOG setting
to either ‘OFF’ or ‘ERROR’ to not risk receiving a bulk of SMS !!
EPS2 User Manual
Page 22
SREPORT:
1234 SREPORT [TRIGGERS]
The SREPORT command is used to configure when the EPS2 should send a report (via SMS) to the live
tracking server. If SREPORT is not configured the REPORT values are used. Normally you are interested in
less data when using the SMS data channel due to cost reasons and then you should define the required
triggers with SREPORT.
Triggers that could cause a SREPORT are:
W = WAKEUP signal
M = MOTION signal
F = FENCE signal
E = FENCE signal (but only when in motion)
S = SPEED signal
D = DIST signal
T = TEMP signal
B = BAT signal
Example:
1234∆SREPORT∆W
This example will make the EPS2 send a position report to the live tracking server when it:
•
Wakes up (WAKEUP interval)
This example is a typical configuration for alternative data transfer using SMS because only WAKEUP events
are transferred.
EPS2 User Manual
Page 23
SELECTING A THEME
To make a quick configuration it is possible to simply select a suitable Theme. A theme represents a typical
configuration for a specific use, e.g. for use in caravan select theme 3:
1234∆THEME∆3
Referring to below table above command will preset the tracker to use the parameter values that most
often are suitable for caravans. If you would like to make adjustments to the selected theme you can do
this by configuring the parameters using the normal commands.
WAKEUP, MOTION
REPORT
SMS
SPEED (km/h)
DISTANCE (meters)
30s/1h/1h
WD
B
OFF
100
0
5s/2m/5s
M
BM
OFF
OFF
3 Caravan
12h
10s/15m/5m
W
BM
OFF
500
4 Container (land/mobile)
12h 10s/15m/15m
WD
BD
OFF
500
5 Container (offshore)
24h
OFF
WD
B
OFF
500
6 Trailer
12h
10s/15m/5m
WD
BDS
90
100
7 Motorbike / ATV
12h
10s/15m/5m
WD
BF
OFF
100
8 Car - rental
12h
10s/15m/5m
WD
BS
135
200
9 Car - robery
0
5s/5m/5m
D
BSF
90
100
10 Car - leasing
24h
10s/10m/5m
WD
B
OFF
1000
11 Backhoe etc.
12h
10s/1h/1h
WE
BF
OFF
OFF
4h
OFF
WF
BF
OFF
OFF
13 Sport events
60s
OFF
D
B
OFF
50
14 Water scooter - rental
12h
30s/1h/1h
WF
BF
OFF
OFF
15 Pram
24h 10s/15m/15m
WD
BSF
35
100
16 Big bags
12h
OFF
W
B
OFF
OFF
4h
OFF
W
B
OFF
OFF
18 Furniture / Art / TV
24h
10s/5m/5m
WD
BD
OFF
1000
19 Sea sport security
3h
OFF
W
B
OFF
OFF
20 Cattle
12h
OFF
WF
BF
OFF
OFF
21 Sea mark / Buoy
24h
OFF
W
BF
OFF
OFF
22 Cable drum
12h
10s/15m/5m
WD
BM
OFF
500
99 TEST
10m
OFF
W
B
OFF
OFF
TEMA DESCRIPTION
24h
THEME NUMBER
WAKEUP, TIME
THEME overview
Transport of valuables
1 (default)
2 Store demo
12 Dement people / Wheel chair
17 Brief case
EPS2 User Manual
Page 24
Translated to text the theme 3 will give this configuration:
•
EPS2 wakes up every 12th hour.
•
EPS2 wakes up if it has moved for at least 10 seconds and then it will check each 15 minutes. Only
after being steady for 5 minutes it will go back to sleep mode.
•
A position report is sent to the live tracking server if it has moved at least 500 meters since the last
report. Also automatically each 12 hours it will send a report.
•
The EPS2 will also send a SMS if it detects a motion.
The default THEME is ’99’. This will make the EPS2 send a report every 10 minutes and is thus a good
configuration for starting to make your own configuration. No SMS are sent unless the battery voltage gets
low.
EPS2 User Manual
Page 25
OPTIONER
Besides the normal configuration of EPS2 there are some basic options to consider. Currently EPS2 offer
two options:
Option no.
1
2
Option
FlightSafe-mode
GSM-positioning
Description
For safe use onboard airplane
Alternative positioning using GSM signal
FlightSafe-mode (1) is used if the EPS2 is to be used oboard an airplane. Selecting this option the EPS2 will
not disturb the electronics of the airplane making it safe to use.
Note that this option could degrade the ability to track the EPS2 in case of a theft.
Also please note that using live electronics onboard airplanes normally is not allowed.
GSM-positioning (2) is used if you want to be able to receive positions via SMS even if GPS positioning is
not possible. Positioning is then done using the GSM signal but it less accurate. This option can make it
more likely to locate the EPS2 even if hidden inside e.g. a container.
Note that using this option could decrease battery life time and increase data traffic.
OPTION:
Example 1:
1234 OPTION [OPTION NO.] [ON/OFF]
1234∆OPTION∆1∆ON
This example will activate FlightSafe-mode.
Example 2:
1234∆OPTION∆2∆OFF
This example will de-activate GSM-positioning.
EPS2 User Manual
Page 26
DAILY USE
Daily use is straight forward since nothing has to be done! EPS2 is always on and can’t be turned off. Only in
when a special situation happens you can choose to do something. How the EPS2 responds to a special
situation depends on the configuration.
EPS2 does not require any special maintenance besides changing the batteries when notified by SMS.
PLACING
EPS2 has an IP64 rated enclosure and is thus suitable for harsh environments. The UV resilient enclosure is
also suitable for outdoor use.
The optimum orientation is with the lid up as the built-in GPS antenna faces upwards. There is no unique
way to place the tracker but you need to follow some basic rules: Do not place the tracker inside a closed
metallic compartment. Do not place the tracker just under a metallic surface. Having in mind that GPS
signals are extremely week signals you should try to place the tracker so it can “see” as much of the sky as
possible.
The EPS2 can be fastened with 2 screws that go through the box but outside the seal compartment.
SMS
SMS is used for both configuration and to send alarm from the tracker. Depending on the configuration the
tracker will send SMS if it moves too fast, moves outside an allowed area, measures too low or high
temperatures and if the battery level is too low.
When ever you receive a SMS you normally also will receive its position. This position can either be entered
in e.g. Google Maps or you can tap the link in the SMS and on your smartphone directly see the position on
a map. Even more easy is it to log into www.worldtracking.org and follow your tracker(s) directly on the
map.
If you need a SMS with the position regardless if the tracker is stolen or not you simple send an SMS only
containing the PIN code – e.g. 1234 . Next time the EPS2 wakes up it will send you its position.
IN CASE OF AN ALARM
In case your trackers gets stolen it will (depending on the configuration) send its position the both the live
tracking server and also to the store mobile numbers. Normally you would then log into worldtracking.org
and follow your tracker. If for some reason the reported intervals are not frequently enough (stolen or not)
EPS2 User Manual
Page 27
you can send SMS: 1234∆ALARM . This will make the EPS2 send reports every minute until it either
runs out of battery or until you turn back into normal operation by sending SMS: 1234∆ALARM∆OFF
Using above alarm mode should only be used as the last option to find a stole tracker as this will drain the
batteries quite fast. On fresh batteries using this alarm mode you can’t expect more than 2 days of
operation.
EPS2 User Manual
Page 28
Live Tracking
Live tracking is a service that gives you the option to see your tracker(s) directly on a map. You only need to
create a user login and then assign your tracker to your login.
There are several live tracking servers available – currently at least two of them support the EPS2 trackers.
Only one live tracking server can be chosen at a time. Take a look on the next pages and make your choice…
EPS2 User Manual
Page 29
worldtracking.org (free service)
Live tracking on worldtracking.org is a fast and convenient way to follow your tracker and even to evaluate
historic data. Using worldtracking.org is currently free and unlimited.
Registering - on worldtracking.org
Your EPS2 comes with an IMEI number (serial number) and a 6-digit registration key. In order to assign your
tracker to your account you need to enter those two numbers:
1) Create an user login and log in if you have not already done so
2) Click the ”Add tracker” link.
3) In the two empty field enter the IMEI number (15 digits) and the registration key (6 digits)
After this the tracker will now be visible in the ”My trackers” – list.
EPS2 User Manual
Page 30
gpsgate.com (free service)
Gpsgate.com offers both free and paid live tracking solutions. The free solution is limited for personal
buddy tracking.
Registering – on gpsgate.com
Your EPS2 comes with an IMEI number (serial number) and a 6-digit registration key. In order to assign your
tracker to your account you need to enter those two numbers:
1. Create an user login and log in if you have not already done so
2. Click the ”Preferences” link and choose “Device Settings”
3. In the two empty field enter the IMEI number (15 digits) a name for your tracker
After this the tracker will now be visible in the ”My Buddies” – list.
NOTE: Don’t forget to change the IP setting in your tracker – see section IP on page 9.
NOTE: gpsgate.com also offers a professional subscription paid service
EPS2 User Manual
Page 31
TROUBLESHOOTING
Should you ever encounter problems with your EPS2 Microtracker then please check below before you seek
help elsewhere.
Problem
Solution
No response on SMS
Check LED error codes
Note that SMS are only handled if the EPS2 is awake.
Make sure the EPS2 can see more of the sky. Try putting the tracker out
under open sky.
Is GPRS activated on the SIM card?
Is APN configured as per SIM card provider?
Is the tracker assigned to your account?
Try using a predefined theme and when it works modify if needed.
No GPS position
Not visible on live tracking
server
EPS2 does not react as
expected
Battery life time is not as
long as expected
EPS2 does not work after
changing batteries
Battery life time depends on the specific use. The more often you receive a
SMS and/or report to the live tracking server the shorter the battery live
time. Low temperatures have a significant impact on battery live time. Use
Ni-MH batteries if below 0°C.
Press RESET-button.
LED error codes
The red LED is normally off but if failure is detected it will flash with an error code:
Flash
Description
1
2
3
4
5
GSM error. Check GSM coverage.
PIN code not removed on SIM card.
SIM card locked. PUK code is required.
SIM card error.
Battery voltage too low.
The error code is only shown for 2 minutes after the failure is detected but will show again next time the
failure is detected.
EPS2 User Manual
Page 32
LIST OF COMMANDS
Command
ALARM
APN
BATTYPE
DIST
DNS
FENCE
HELP
INFO
IP
LOG
MOTION
NAME
PHONE
PIN
REPORT
RESET
SMS
SMSDATA
SREPORT
SMSTYPE
SPEED
THEME
TEMP
URL
WAKEEUP
Description
ALARM mode
APN name
Battery type
Distance trigger
DNS name server
FENCE trigger
SMS help
EPS2 Information
IP of live tracking server
LOG function
Motion trigger
Naming the EPS2
Mobile numbers
Changing PIN-code
Report specification
Reset procedure
SMS specification
Alternative data channel
Alternative data specification
Defining coordinates in SMS
Speed trigger
Pre-defined themes for easy use
Temperature trigger
URL of live tracking server
Normal automatic wake up
EPS2 User Manual
Page
23
9
13
17
10
16
14
14
9
11
15
12
11
9
19
6
20
23
23
12
16
21
17
10
15
Page 33
SPECIFICATIONS
Size
98 x 65 x 37mm
Weight
213g including batteries
Accuracy
< 5 meters (under open sky)
GSM
Tri-band
GPS
MTK, 64-channel, -161dBm
Data transfer
Primary: GPRS / Secondary: SMS
Battery life time
Typical > 1 year depending on use
Working temperature
-20° to +55° Celsius (Ni-MH batteries)
0° til +55° Celsius (Alkaline batteries)
Enclosure
IP65 rated, UV-resist
Batteries
3 pc alkaline AA / Penlight / LR6 (included)
Alternative batteries: Ni-MH (not included)
EPS2 User Manual
Page 34
Instructions on environment protection
Do not dispose this product in the usual household garbage at the end of its life cycle;
hand it over at a collection point for recycling of electrical and electronic appliances.
The symbol on the product, the instructions for use or the packing will inform about the
methods for disposal.
The materials are recyclable as mentioned in its marking. By recycling, material
recycling or other forms of re-utilization of old appliances, you are making an
important contribution to protect our environment.
Please inquire at the community administration for the authorized disposal location.
ALL RIGHTS RESERVED
COPYRIGHT © KEY7 A/S, DENMARK
www.keyseven.com
KEY7 A/S - Bavnehøjvej 19 - 8600 Silkeborg - Denmark
EPS2 User Manual
Page 35