1
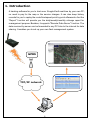
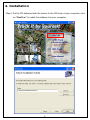
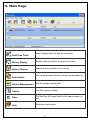
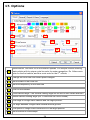
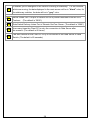
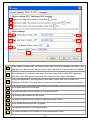
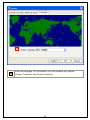
GooTrac
DIY Tracking Software
- Track over Google Earth -
User Manual
GoPass Technology Corp.
17F., 866-1 Chung-Cheng Road, Chung Ho City, Taipei, Taiwan
Tel: (886-2) 3234-8838
Fax: (886-2) 3234-9868
E-mail: [email protected]
Website: http://www.gopasstech.com
Table of Contents
1. Introduction ................................................................................. 2
2. Requirements............................................................................... 3
3. File Explanation ........................................................................... 3
4. Installation................................................................................... 4
5. Main Page..................................................................................... 6
6. Easy Steps 123 ............................................................................. 7
7. Status of GPS Tracker ................................................................ 10
8. Set Device .................................................................................. 11
9. Default Password....................................................................... 18
10. Vehicle Data Edit...................................................................... 20
11. History Replay.......................................................................... 21
12. History Display......................................................................... 23
13. Pipe to COM.............................................................................. 26
14. GPRS Receiver ......................................................................... 27
15. G-Mouse Mode ......................................................................... 28
16. Data Switch.............................................................................. 29
17. Options..................................................................................... 34
18. Export Log to Excel format ...................................................... 39
19. FAQs ......................................................................................... 42
1
1. Introduction
A tracking software for you to track over Google Earth real-time by your own PC;
no need to pay for the map or the service charges. It can also keep history
records for you to replay the route/time/speed point by point afterwards. And the
“Report” function will provide you the daily/weekly/monthly mileage report for
management purpose. Besides, it supports "Remote Data Server" function. The
data received by server can be forwarded to any PC links to the internet for data
sharing. It enables you to set up your own fleet management system.
GPRS
TCP/IP network
2
2. Requirements
(1) Make sure you did have installed a GSM SIM Card to AVL; and its GPRS
function had been enabled.
(2) FIX IP Address is required for GooTrac Server (the computer to receive the
GPS data sent by GPRS from the vehicle trackers); Intranet is not workable for
the operation.
(3) Your PC should be100% compatible with Windows O.S.
(4) Your PC must support 3D graphic.
(5) Google Earth Free Version (4.0 or later) should be installed in your PC in
advance.
(6) To display the route in different color/ width for different speed, please go to
Google Earth -> Tools -> Options -> 3D View -> Graphics Mode and choose
OpenGL mode. If you can not change it to OpenGL mode, please check if the
driver of your display card does support this function.
(7) Please check with your mobile operator for the latest & exact GPRS APN
settings.
3. File Explanation
(1) GooTrac.exe (main program)
(2) AVL900.dll (library)
(3) AVL9XXDS.dll (library)
(4) Config.ini (setting)
(5) VehicleDB.mdb (database)
3
4. Installation
Step1. Put the CD delivered with the tracker to the CD driver of your computer; click
on “GooTrac” to install the software into your computer.
4
Step2. The installation of GooTrac is completed.
Step3. Click “Start” → “All Programs” →“Gopass” → “GooTrac” to run the program
you have just installed.
5
5. Main Page
Real-Time Track
History Replay
History Display
Data Switch
Vehicle Management
Option
View
Help
Open Google Earth for real-time tracking.
Replay history position/ route point by point.
Display history position/ route (a line).
Link to the Remote GooTrac Server for data sharing.
Edit & manage vehicle data.
GooTrac options setting.
Put GooTrac & Google Earth in the same screen, or
not.
Operation instructions.
6
6. Easy Steps 123
First of all, run GooTrac software in your PC.
Step1. Set GPRS APN - send SMS command 600# to the tracker.
600#Password #APN#IP#User#APN_Password
(ex. 600#8888#airtelnet.es#0.0.0.0#vodafone#vodafone)
<Please check with your mobile operator for the APN data. You can find the right
command in http://www.gopasstech.com by clicking "send my GPRS APN command".>
Step2. Set IP Address - send SMS command 999# to the tracker.
999#Password#ServerIP#Port
(ex. 999#8888#59.120.2.234#3000 - send the data to your server)
<Go to http://www.gopasstech.com; click “See my IP Address” to get the data.>
Step3. Set transmission time interval - send SMS command 115# to the tracker.
115#Password#XX
(ex. 115#8888#20 - send the GPS data once each 20 seconds)
1. Set GPRS APN
2. Set IP Address
7
3. Set transmission
time interval
The position data will be prompted in GooTrac main screen; you can start to track
over Google Earth. Double click the vehicle icon Google Earth will “Fly to” the
vehicle position.
8
Right click the vehicle icon will enable you to configure the device by GPRS; to
edit the vehicle data; and to transmit the GPRS data to COM port for other
application.
Real Time Track
Select Button
Visible Box
For Live GPS Track over Google Earth, you must press down the icon for Real
Time Tracking
- Press down
; and pick the “Select Button
”; + tick the “Visible Box
”.
icon will have the GPS position data forwarded to Google Earth.
- Pick “Select Button
” will have the camera fly to the vehicle position automatically,
once when its GPS position data is received.
- Tick the “Visible Box
” will create a vehicle object in Google Earth. Un-tick it will
remove the object in Google Earth.
9
7. Status of GPS Tracker
The icon for SOS Alarm; will prompt when SOS function is
SOS Alarm
activated. (available for AVL-901(C) & GPS-911 only)
The icon for Geo-fence alarm; will prompt when the car moves
Geo-Fence Alarm
over the present geo-fence range.
The icon for over speed alarm; will prompt when the speed is
faster than what you set in “Tool – Option – General – Report &
Over Speed Alarm
Alarm”
The icon for dis-connected device; will prompt when not any
new data received from the device for continuously 10 minutes.
Maybe the device is in an area not covered by GSM/ GPRS
Disconnect Alarm
network (for example, in the basement, or in the tunnel…), or
the transmission interval set to the device is over 10 minutes.
10
8. Set Device
The below screen will prompt, when you right click the vehicle icon at the Main
Page (as detailed above); and select “Set Device”.
The messages received from the GPS Tracker will be displayed in the top
column.
NB:”Set Device” works over IP.
FIX IP is required for the operation.
11
(1) General
Get IMEI:
Get IMEI of the device.
Get version:
Get Firmware version
Set Time:
Set the time of the device.
Get Time:
Get the present time of the device.
Set APN:
To set APN for the SIM card installed
in the device, so that the device can
send back data via GPRS.
Get APN:
Get APN setting of the device.
Set Password:
To set the password for the device.
The default value is “8888”.
- Power Save Mode
- Wake up from Power Save
- Reboot the device
- Reset to default settings
- Clear all the data in SIM card
12
(2) Track
Get GPS Data once:
Get GPS data in GPRMC format.
Get position(X,Y):
Get GPS data in various formats.
<GPS>, <Google>, <Standard>, <Deg>
Set GIS Server parameters:
Change the IP/ Domain Name &
Listen Port of Call Center Server
Get GIS Server parameters:
Get IP/ Domain Name & Listen Port
of the Call Center Server.
Set delivery time interval:
Set the time interval in seconds for
the device to send back data.
Get delivery time interval:
Get the preset time interval for GPS
Tracker to send back data.
The below table allows you to add/ delete the phone numbers, which can get the position data
from the device, after it rings twice, and is not answered.
Set Phone-Track list:
Set up the phone numbers list for
phone-track function.
Enable: activate the phone#.
Add: Add new phone# to the list
Del: Remove from the list
Get Phone-Track list:
Get the phone numbers list for
phone-track.
Phone Track:
Activate or disable Phone Track
function.
13
Universal Command:
Reserved for factory use only.
(3) Phone
Set the first set phone
number:
Set the first set dial-out phone#
(can be with or without the Name)
Get the first set phone
number:
Get the phone number of the first
set
dial-out phone number.
Set the 2nd set phone
number:
Set the second set dial-out
phone#
(can be with or without the Name)
Get the 2nd set phone
number:
Get the phone number of the
second set dial-out phone
number.
Auto phone answering:
Set for Auto Answering mode.
“n” - into Auto Answering
mode, after rings “n” times.
Switch: On or Off
14
(4) Park
Set Geo-Fence Phones:
Set the phone# for device to call back,
when the vehicle is moved over the
geo-fence range.
Get Geo-Fence Phones:
Get the phone# for Geo-fence.
Set Geo-Fence alarm interval:
Set the time interval for the device to
send back the SMS alarming message,
when the vehicle is moved over the
preset range.
Time: interval in seconds to send.
Set Geo-Fence alarm distance:
Set geo-fence range in meters. Device
will send back alarming message to the
preset phone number, if the car is
moved over the preset distance range.
Get Geo-Fence settings:
Get the setting details of Geo-fence
function.
Geo-Fence alarm switch:
Switch: Off / On
Set notification mode:
Set the advising mode for geo-fence
function.
Mode: SMS / TEL
15
(5) SOS
Set SOS notification phone:
Set the phone numbers for device
to send back the SMS alarming
message, when SOS button is
pressed down.
Get SOS notification phone:
Get the phone number list of the
phone numbers can receive the
SOS emergency message.
Reset SOS status:
Cancel SOS status and return to
normal condition.
16
(6) Daily Call Back
Set Time Table:
Set the time table for device to send
back data automatically every day.
Sets: 5 sets in total can be used.
Set1 ~ Set5
Switch: On / Off
Get Time Table:
Get the time table for device to send
back data automatically every day.
Set daily call back recipient (phone):
Set the phone number(s) to receive the
data of daily call back.
Get daily call back recipient (phone):
Get the phone number list of the ones
who can receive the data of daily call
back.
Turn On/Off Daily Call Back:
Activate or shut off the function of daily
call back at the preset time(s).
17
9. Default Password
(1) Tool→ Default Password
Tick “Use Default Password”, if you want to use the default password “8888” to
send commands to the device.
If “Use Default Password” is un-ticked, the following screen will prompt for you to
set up the password, when you send a command to the device.
18
(2) Set password for this vehicle
Key-in the password twice; and click “OK” to save the password. If you want to
remove the saved password, clear all the data in the columns (keep them blank),
and click OK.
If "Use Default Password” is not ticked, and the password has not yet been set,
the following screen will prompt for you to key-in the password every time when
you send a command to the device.
19
10. Vehicle Data Edit
Click the red car on the top right to open “Icon List” screen; select the required icon;
click “OK”, and then “Save”. After then, the selected icon will be displayed on Google
Earth, when you are in Real-time Track, History Replay, and History Display modes.
20
11. History Replay
(1) Easy Replay
Select the vehicle (system will
display all the vehicle with
record in this month)
Select the month
Display all the tracks in the
selected month (Tracks will
break up as per the settings
in the Option. “Add a new
track when the vehicle was
disconnected over 30
minutes”)
21
(2) Universal Replay
To replay the route point
Set the starting
date & time
by point of the selected
car during the selected
period.
Set the ending
date & time
Get a position data every
1000ms (min. 100ms). It
Add a new Vehicle to the
will affect the reply speed.
list for history replay.
To have the route looked
neat on the Google Earth,
the interval of route dots
should be set to over 3
seconds.
22
12. History Display
(1) Easy Display
Select the vehicle (system will
display all the vehicle with
record in this month)
Select the month
23
(2) Universal Display
Set the starting
date & time
Set the ending
date & time
Add a new Vehicle to the
list for history replay.
24
(3) Color of various speed
(4) Mono color
25
13. Pipe to COM
To transfer the position data to a COM port for real-time track over the
navigation map installed in your PC. Please click here for the full details about
how to track with the navigation map.
26
14. GPRS Receiver
To activate GooTrac's GPRS Receiver function to receive position data from
the GPS Tracker for real-time track over Google Earth and/or over navigation
map. The default of GPRS Receiver function is enabled.
27
15. G-Mouse Mode
To activate GooTrac's Serial Port function to receive GPS position data from
our trackers or other GPS devices for navigation or for history replay. When you
use it for the first time, please set “Tool -> G-Mouse Option” in advance.
1
2
3
28
16. Data Switch
GooTrac can link to the Remote GooTrac Server for data sharing. The below
is the main screen of GooTrac program. The top column displays the GPS data
received directly from GPS Trackers via GPRS; while the bottom column displays
the GPS data received by the Local GooTrac from Remote GooTrac via internet.
Please select “Tool” – “Data Switch” from the function menu, and set it up as
detailed below.
29
(1) Data Server
Function: To forward the GPS Data received via GPRS from the GPS Trackers
to all the logged in computers (Clients) thru internet. The below image
illustrates how to set up the accounts in Data Server.
Server Activate
Activate or disable this account
Server Activate
Server Disable
Data Relay
How many users use this account to log-in
Users can log in this computer
Users can not log in this computer
Tick to activate the function for forwarding the data
received from other Server to the Clients.
30
(2) Client
Function: Link to Remote GooTrac Server to get the GPS Data received by the
Remote GooTrac Server. The below image explains how to link to the
server.
Please key-in the IP Address of Remote GooTrac Server; “8088” as the Delivery
Listen Port; and Username/ Password as set up in Data Server.
Client Activate
The delivery listen port of the server (8088 is default value)
The IP Address of the Data Server
Client Activate
Connection status
Log in the remote server to get the GPS data
Stop the connection;
Client Disable
stop receiving GPS data from the server.
31
(3) Active Client
Function: Link to the remote server, and forward the GPS data to the server
actively.
Application: For the data server with firewall. It avoids Clients unable to log-in
the data server protected by firewall.
The below image explains how to set up Activate Client. Please key- in the IP
Address of the remote server; “8088” as the Port; and Username/ Password as
set up in the remote server.
Client Activate
Log in the remote server for forwarding the
Client Active
Client Disable
GPS data actively.
Dis-connect to the remote server.
32
(4) Allow List (Data Server)
Function: To select the vehicle to be monitored by each account. Double click
the Username; the “Allow List” window will prompt. Select the vehicle
to be monitored by this Client; and move the data from the right
column to the left column. The below image illustrates the set up of
the allow list for user “gopass”.
Double click to open the “Allow List” window.
Tick “Use Allow List”
Un-tick “User Allow List”
Only the vehicle data in the left column (Allow List)
will be forwarded to this account.
All the vehicle data will be forwarded to this account.
33
17. Options
A1
A2
A3
A4
B4
B1
B5
B2
B6
B3
B7
A1
Monochrome. One color for all the different speeds. For multiple vehicles tracking,
each vehicle with its unique route line color for easier recognition. Ex. Yellow route
color for the first vehicle; and blue route color for the 2nd vehicle; …
A2
Change the route line color when speed changes.
A3
Set the width of the route line
A4
Set the transparency of the route line
B1
Tick for free camera.
B2
Fixed camera angle – the camera viewing angle will be fixed to one certain direction.
B3
Rotate camera viewing angle (B2: Fix Azimuth can not be ticked).
B4
The range of Google Earth camera and the target position.
B5
Tilt angle between Google Earth camera and the ground.
B6
The speed of Google Earth camera flies to the target position.
B7
Set the extent of time stamps
34
C1
C2
C3
C4
C5
C6
C7
D1
D2
D3
D4
C1
Fly to the new device when it is connected
C2
Do not fly to the position whe the speed is less than ? km/ hour.
C3
Add a new track when the vehicle was disconnected over ? minutes.
C4
Clear vehicle track that was disconnected over 30 minutes.
When the vehicle is stationary (parks/ does not move), then there will be a GPS
position drift. This kind of position drift is the nature for GPS application. It can not
be eliminated. The distance of drift varies to GPS signal strength, which relays to
C5
the environment/ parking place... (ex. if the GPS accuracy is 2 meters, then the
speed/ hour will be 2 meters * 60 seconds * 60 minutes = 7.2km/ hour. To remove
such data from the system, please tick this option, and set the speed to 7.2km/hour
to clear those in-valid position data.)
Tiick this option to prompt a description window, showing driver, license#, speed,
C6
lattitude, longitude, and the time…, on top of Google Earth window when double
click the vehicle icon in the main screen for real-time tracking
35
It enables you to distinguish if the vehicle is moving or stationary. For the vehicles
C7
which are moving, the data displayed in the main screen will be in "black" color; for
the stationary vehicles, the data will be in "gray" color.
D1
D2
D3
D4
Server Listen Port. The port to receive the GPS position data sent from the GPS
Trackers.
(The default is “3000”).
Data Switch Delivery Listen Port of Remote GooTrac Server. (The default is “8088”)
How many times the Client PC to retry the connection to Data Server after
dis-connect. (The default is 60 times)
The time interval for the Client PC to try to re-connect to the Data Server in Data
Switch. (The default is 60 seconds)
36
E1
E2
E3
F1
F3
F4
F5
E1
E2
E3
F7
If the speed is slower than the setting value, take it as GPS stationary drift data. Click
this option to remove such data from the report calculation to minimize the deviation.
If the distance of 2 points is less than 10 meters, take it as in-valid GPS stationary
drift data. Click this option to remove such data from the report calculation.
If the total distance of a drving route is less than 1.0KM, take it as in-valid GPS
stationary drift data. Click this option to remove such data from the report calculation.
F1
SOS Alarm switch on/ off button
F2
To select the path and file name for SOS alarm sound
F3
Geo-fence Alarm switch on/ off button
F4
To select the path and file name for Geo-fence alarm sound
F5
Over Speed Alarm switch on/ off button
F6
The speed limit set for Over Speed Alarm
F7
To select the path and file name for Over Speed alarm sound
37
G1
G1
Select the language. For the moment, GooTrac supports only English,
Chinese Traditional, and Chinese Simplified.
38
18. Export Log to Excel format
Step1. Open file VehicleDB.mdb
Win XP -> C:\Documents and Settings\All Users\Application Data\Gopass\GooTrac
Win Vista -> C:\ProgramData\Gopass\GooTrac
Step2. Choose “Log” in the Data Sheet.
39
Step3. Open Log in the Data Sheet.
Step4. File Æ Export
40
Step5. Choose the format of export, ex. Microsoft Excel 97-2003(*.xls).
Step6. Name of export file, ex. Log.
41
19. FAQs
Q1. Why I can’t find the IMEI# of my device in GooTrac main screen?
It is because the position data of your device still can not be sent back to GooTrac server by
GPRS. There must be some problem with the SIM card, or the GPRS APN settings, or some
other telecom problem. Following are some of the possible factors which may cause the
data can not be sent back to GooTrac server by GPRS.
1. The APN setting is not correct
Please check with your mobile operator for the latest & exact GPRS APN settings; if
User_Name & APN_Password required for the APN settings. Please note that the data
provided by us were what found in the internet, which maybe out of date. You must check
with your local telecom company for the correct APN data.
2. The SIM card does not support GPRS communication
Please check with the telecom company if the GPRS function of the SIM card has been
activated. Maybe the SIM card does support GPRS; but not yet been activated. You must
call & ask the telecom company to have the GPRS function opened.
(*Please note that one can link to internet by WAP, or MMS, or GPRS; but only GPRS is good for
real-time tracking; WAP & MMS are not workable - i.e. it is not for sure that the SIM Card does work on
GPRS, even though you can link to internet with the SIM Card.)
3. The GPRS communication is simplex, not duplex
Please check with your telecom company if the GPRS communication is duplex not simplex
- i.e. the device can both receive & send out GPRS data.
4. The 3 SMS commands to set up the GPS tracker were not sent correctly
Please double check the 3 SMS commands sent to the device, and make sure the
commands were sent correctly.
5. Firewall or Anti-virus Software
The operation of GooTrac is blocked by firewall or anti-virus software. We suggest you to
disable all the firewall/protection for the PC used for testing; and have this PC linked to
internet directly, not thru router/intranet... After the communication problem solved, then you
add on the required protection one by one, so that you can find out where the problem
resulted from.
42
Q2. How to set GPRS APN?
Please check with your telecom company for the following data beforehand.
z The Access Point Name (APN) of the telecom company.
z Is the User_Name and APN_Password required for the APN setting?
z You can refer to http://www.gopass.com.tw/other/APN_Table.pdf for the examples of the
GPRS APN set-up.
z Please make sure the SIM card does support GPRS communication; and the GPRS
function has been activated.
z Please note that WAP and MMS are not workable for real-time tracking; GPRS is a must
for the operation.
Please send the SMS command "600#Password#APN#IP#User#APN_Password"
referring to following examples.
Example 1:
Vodafone (Airtel) - from Spain
APN: airtelnet.es | Username: vodafone| Password: vodafone
600#8888#airtelnet.es#0.0.0.0#vodafone#vodafone
(*must key in "0.0.0.0" as the IP, when "User" & "APN_Password" is required)
Example 2:
Telefonica (Movistar)
- from Spain
APN: movistar.es | Username: movistar | Password: movistar
600#8888#movistar.es#0.0.0.0#movistar#movistar
Example 3:
Telmore (TDC) - from Denmark
APN: internet | Username: tdc
600#8888#internet#0.0.0.0#tdc
(*must key in "0.0.0.0" as the "IP", when "User" is required)
Example 4: Telia - from Denmark
APN: www.internet.mtelia.dk | Username: telia
600#8888#www.internet.mtelia.dk#0.0.0.0#telia
Example 5:
Taiwan Cellular
APN: internet
600#8888#internet
(*no need to key in the "IP", when "User" & "APN_Password" are not required)
43
Q3. When close Google Earth, a dialog box will prompt, asking if
you want to save the items in “Temporary Places” folders.
Please always select "No". Save "GooTracServer" and "Replay Server" will affect the
operation of GooTrac.
If you have already saved the data in Google Earth, please remove all the folders
of "GooTracServer" & "ReplayServer" from Google Earth Sidebar -> “Places” and
"Temporary Places”.
* Please do stop the function of “Real-time Tracking” before you close “GooTrac” software,
and/ or Google Earth.
44
Q4. Why the error message “Class not registered” prompt when I run
GooTrac program?
It is because you did not install the correct Google Earth software into your computer
beforehand. Please download Google Earth Free Version (4.0 or later)
from http://earth.google.com/ before you run GooTrac software for the tracking. Please
note that Google Earth Plus & Professional can not work with GooTrac.
Q5. Why Data Switch –> Client always shows Server Dis-connected?
There are 2 possible reasons resulted to server disconnected.
1. Password
Please note that the password is case sensitive; capitalized letters will be judged as
different letters. Please key-in the password again; make sure the input Password &
Confirm Password are not capitalized.
2. Firewall or Anti-virus Software
The operation of GooTrac may be blocked by firewall or anti-virus software. Please
check your PC settings. If you are using the ICF (Internet Connection Firewall) built-in
XP, please make sure "GooTrac" is allowed.
Q6. What is the connection status of 10060?
"10060" is a Connection Time-out error.
Generally, it happens when the computer
or service to be linked is turned off; or the IP set incorrectly that the link fails. For
GooTrac application, it is maybe owing to the IP is inside the firewall or router or
protected by anti-virus software.
For more details in this regard, please browse the following web page
http://help.globalscape.com/help/cuteftp6/index.html#socket_error_=__10060.htm
45
Q7. What is the connection status of 10051?
It indicates "Network is unreachable. A socket operation was attempted to an
unreachable network. This usually means the local software can not knows the route to
reach the remote host". Please check your IP & Port settings. For more data about the
networking error, please refer to http://msdn2.microsoft.com/en-us/library/aa450263.aspx
Q8. Can I use the vehicle icon created by myself ?
You can use the vehicle icon created by yourself , if the file format is GIF; the size is 32 *
32; and the image is saved at C:\Program Files\GoPass\GooTrac\images.
Q9. I can not use “History Replay” to replay my past driving routes.
Why?
Following are the basic requirements to replay your past driving routes.
1. The device installed in your vehicle must get a position fix - i.e. GPS LED should blink
once per second.
2. The vehicle must drive/ move around; and send the data back to GooTrac server (FIX
IP).
3. You must run GooTrac software in your PC when the vehicle is driving, so that the
records can be saved.
4. Please select Start -> History Replay -> Easy Replay -> select a vehicle -> select
a time period -> click "Reply" to prompt a new screen -> tick the Selection Box ->
double click on the data column -> the driving route will be display on Google Earth
map point by point.
46