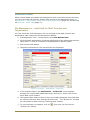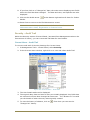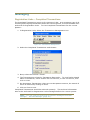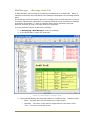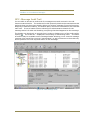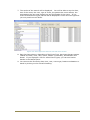
1
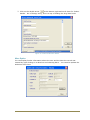
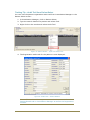
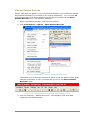
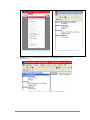
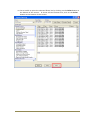
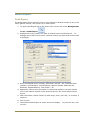
Vision 3 Audit Trails In Vision User Guide Copyright © INPS Ltd 2013 The Bread Factory, 1A Broughton Street, Battersea, London, SW8 3QJ T: +44 (0) 207 5017001 F:+44 (0) 207 5017100 W: www.inps.co.uk Copyright Notice © 2013 INPS All Rights Reserved. No part of this document may be photocopied, reproduced, stored in a retrieval system or transmitted in any form or by any means, whether electronic, mechanical, or otherwise, without the prior written permission of INPS. No warranty of accuracy is given concerning the contents of the information contained in this publication. To the extent permitted by law, no liability (including liability to any person by reason of negligence) will be accepted by INPS, its subsidiaries or employees for any direct or indirect loss or damage caused by omissions from or inaccuracies in this document. INPS reserves the right to change without notice the contents of this publication and the software to which it relates. Product and company names herein may be the trademarks of their respective owners. INPS Ltd. The Bread Factory 1a Broughton Street London SW8 3QJ Website: www.inps.co.uk Contents AUDIT TRAILS WITHIN VISION MODULES 5 Consultation Manager Viewing Audit Trails in Consultation Manager More Option Training Tip – Audit Trail from Patient Select Viewing Deleted Records Deselecting Show Deleted Records 5 5 7 8 9 11 Registration Registration Details Audit Trail Address/Contact Number Audit Trail 12 12 14 Control Panel File Maintenance – Audit trail for Staff, Practice and Organisation Security – Audit Trail Current Users – Audit Trail Note about Event Log Viewer 16 16 17 17 18 Messaging Registration Links – Completed Transactions Mail Manager - Message Audit Tab GPC - Message Audit Trail 19 19 20 21 Event Log Event Log 22 22 Audit Report Audit Report 26 26 INDEX 27 iii Audit Trails Within Vision Modules Consultation Manager Viewing Audit Trails in Consultation Manager Within Consultation Manager, you can view an audit trail for every type of data entered on the patient record: 1. In Consultation Manager, select a patient. 2. From any of the tabs which display data in Consultation Manager i.e. the journal tab, right click on any entry and select Audit trail. Figure 1: Right Click – Audit Trail 5 3. The Audit Trail screen displays showing the details of the data entry entered, by which user and on which date. Figure 2: Test Result Audit Trail 4. The original data, date and time of entry are initially displayed. Any fields that are coloured red have been changed at some time. The "Written on" line tells you the details of when the entry was originally created. 5. To view the history of editions of the record, click on see the "Changed on" history. . From here you can Figure 3: Expand audit trail 6. If you then click on a "Changed on" date, the main screen displays green fields where the field has changed. The date and time, and operator are also displayed. 6 7. Click on the double arrow at the bottom right and scroll down for further details. On a Therapy entry, this is a way of finding the drug Read code. Figure 4: Further audit trail details More Option You can display further information about the user and the date the record was created by right clicking on a data line and selecting More. You can also update the authoriser from here. 7 Training Tip – Audit Trail from Patient Select You can view the patient registration audit trail from Consultation Manager in the Patient Select screen: 1. In Consultation Manager, click on Patient Select. 2. Type the search details of a patient and select Find. 3. Right click on the results and select Audit Trail Figure 5: Patient Select – right click Audit Trail 4. The Registration audit trail for the patient is now displayed. Figure 6: Audit Trail - Patient Details Note – The audit trail for registration can also be accessed from the Patient Details tab in Consultation Manager as well as the Registration module. 8 Viewing Deleted Records Patient data does not appear in live Consultation Manager once it has been deleted. Any deleted information is recorded on the system indefinitely. You can view all records which have ever been deleted from the patient record from the Show Deleted Records view in Consultation Manager: 1. Open Consultation Manager, and select the patient. 2. Click Consultation - Options - Show Deleted Records. Figure 7: Consultation – Options – Show Deleted Records The display line at the top of the screen which shows the patient name, DOB, address etc displays in red to indicate that you are in the Show Deleted Records screen. Figure 8: For Show Deleted Records patient details display in red 3. Click on Summary – Medical Overview. categories with deleted items. This displays a list of all data 9 Figure 9: Summary – Medical Overview Figure 10: Medical Overview List 4. Double click on a category to select it; the deleted information will be displayed. Figure 11: Double click on category to display data 10 5. You can right click on the item and use Audit Trail to establish who created, amended and deleted the result. See Viewing Audit Trails in Consultation Manager (page 5) on page for further information. Figure 12: Audit Trail Note – You cannot add or update data whilst in Show Deleted Records mode. Training Tip – Restrict access to Consultation Manager You can restrict access to Consultation Manager for individual or groups of users i.e. if you want to restrict users from deleting information. This is configured in Management Tools – Control Panel – Security. Please see on screen help in the Control Panel Module for further information. Deselecting Show Deleted Records To return to the normal viewing mode for Consultation Manager: Click Consultation - Options - Show Deleted Records. This will remove the tick from the option and display the record in live Consultation Manager. You will notice that the banner displaying the patient details is now displayed on a blue background. Figure 13: Remove tick from Show Deleted Records Figure 14: Consultation Manager – Live Mode 11 Registration Within the Registration module, you can view an audit trail for all registration details, or specifically display an audit trail for address and contact number details. Registration Details Audit Trail To view an audit trail of the core Registration Details for a patient: 1. In the Registration module, select the patient. 2. Once the Registration Details screen is displayed, click on Actions – Audit Trail. Figure 15: Registration – Actions – Audit Trail 12 3. The Patient Details - Audit Trail screen displays showing the original registration data entry entered, by which user, and on which date. Figure 16: Audit Trail - Patient Details 4. The original data, date and time of entry are initially displayed. Any fields that are coloured red have been changed at some time. The "Written on" line tells you the details of when the entry was originally created. 5. To view the history of editions, click on "Changed on" history. . From here you can see any 6. If you then click on a "Changed on" line, the main screen displays green fields where the field has been changed. The date and time, and operator are also displayed. 7. Click on the double arrow details. at the bottom right and scroll down for further 8. Press Close to return to the active Patient Details screen. 13 Address/Contact Number Audit Trail If you want to specifically look at an audit trail of the patient’s address or contact numbers: 1. In the Registration module, select the patient. 2. On the active Registration Details screen, click on the Address tab. 3. If there is more than one entry, from the Addresses or Contacts for Patients windows, click on the address or telephone number you wish to view the audit trail for. Figure 17: Registration Details – Address Tab 4. Click on the Audit button. 14 5. The Address Entry – Audit Trail screen displays showing the original registration data entry entered, by which user and on which date it was created. Figure 18: Address Entry – Audit Trail 6. The original data, date and time of entry are initially displayed. Any fields that are coloured red have been changed at some time. The "Written on" line tells you the details of when the entry was originally created. 7. To view the history of editions, click on "Changed on" history. . From here you can see any 8. If you then click on a "Changed on" date, the main screen displays green fields where the field has been changed. The date and time, and operator are also displayed. 9. Click on the double arrow details. at the bottom right and scroll down for further 10. Press Close to return to the active Registration Details screen. 15 Control Panel Within Control Panel (accessed from Management tools on the front screen of Vision), you can view audit trail data for specific data entered in File Maintenance see File Maintenance – Audit trail for Staff, Practice and Organisation (page 16) and Security see Security – Audit Trail (page 17). File Maintenance – Audit trail for Staff, Practice and Organisation You can view Audit Trail information for any changes in the Staff, Practice and Organisation tabs, within the File Maintenance Module. 1. In Management Tools - Control Panel, select File Maintenance. 2. From the Staff, Organisation or Practice tab drill down the folders and select an entry form i.e. click on a member of staff/hospital or practice name. 3. Click on the Audit button. 4. The Audit trail details for the selected form are displayed. Figure 19: Example – Staff Details – Audit Trail 5. In the example above, the Staff Details – Audit Trail screen displays showing the original staff details data entry entered, by which user and on which date it was created. 6. The original data, date and time of entry are initially displayed. Any fields that are coloured red have been changed at some time. The "Written on" line tells you the details of when the entry was originally created. 7. To view the history of editions, click on "Changed on" history. 16 . From here you can see the 8. If you then click on a "Changed on" date, the main screen displays green fields where the field has been changed. The date and time, and operator are also displayed. 9. Click on the double arrow details. at the bottom right and scroll down for further 10. Press Close to return to the File Maintenance screen. Note - You can look at specific audit trails for the Identifier and Addresses tabs in Staff, Organisation or Practice forms. Security – Audit Trail Within the Security section of Control Panel, (accessed from Management tools on the front screen of Vision), you can view audit trail data for User Details. Current Users – Audit Trail To view an audit trail of Security Settings for Current Users: 1. In Management Tools - Control Panel, select Security. 2. In the Current Users window, right click on a user and select Audit Trail. Figure 20: Current Users – Audit Trail 3. The User Details audit trail is displayed. 4. The original data, date and time of entry are initially displayed. Any fields that are coloured red have been changed at some time. The "Written on" line tells you the details of when the entry was originally created. 5. To view the history of editions, click on "Changed on" history. . From here you can see the 17 6. If you then click on a "Changed on" date, the main screen displays green fields where the field has been changed. The date and time, and operator are also displayed. 7. Click on the double arrow details. at the bottom right and scroll down for further 8. Press Close to return to the Security screen. Note about Event Log Viewer Event Log Viewer in Control Panel is deprecated software and will be removed from Vision in the near future. To view system based audit trails, you should refer to the Event Log module which can be accessed from Management Tools on the front screen of Vision. See Event Log (page 21). 18 Messaging Registration Links – Completed Transactions The Completed Transactions screen is for viewing only but as it contains a copy of all incoming and outgoing transactions within the current quarter, it forms the basis of an audit trail for Registration Links. To view Completed Transactions for the current Quarter: 1. In Registration Links, Select the Transactions Management icon. Figure 21: Transactions Management 2. Select the Completed Transactions radio button. 3. Next, select the Process.. button. 4. The Transactions are listed in Transaction Date order. To view further details about a transaction, either double click on that line; or click on the line, then click on View. 5. On Acceptance Transactions, there are two Acceptance screens, the second of which is reached by clicking on More. 6. Click on Close to exit. Completed Transactions should be archived quarterly. This archived information acts as the audit trail for Registration Links messages before the current quarter. Note – You can view the audit trail for specific messages from Mail Manager. See Mail Manager (page 20). 19 Mail Manager - Message Audit Tab In Mail Manager, all incoming and outgoing messages have an Audit tab. When a message is selected, the Audit tab for the message is displayed in the message details pane. The Audit tab holds information about the message lifecycle and sequence of events including, transmission information including processing errors and general, message processing information i.e. when a message was viewed, allocated, assigned, actioned, marked as read, manually filed and completed. To View the Audit trail for a particular message: 1. In Messaging - Mail Manager, select a message. 2. In the Detail Pane, select the Audit tab. Figure 22: Mail Manager – Message Audit 3. The Audit tab displays the audit information in a table format. 20 Details include: Date - The date and time the audit record was written Operator - The name of the person responsible for the audit record Text - The text of the audit record Note - The Audit tab is accessible from both Mail Manager and Patient Mailbox in Consultation Manager. GPC - Message Audit Trail You are able to access an audit trail for messages sent and received in the GP Communicator Module. The audit trail in GPC primarily deals with transmission audit trail and does not show user details. When you select a message (from the Incoming, Outgoing or Attention folders), the bottom pane, shows the full details for the selected mail item. It has a header section showing the administrative details for the message and a full audit trail detailing everything that has happened to the message. The header can be shrunk to a single line in order to display more of the audit trail by clicking . The audit can displayed in ascending or descending order. A number of buttons may be available on the message header allowing you to view the message contents (the actual files received / transmitted), to add comments to the audit trail, and to perform the next required action on the message. Figure 23: GPC Message Audit 21 Event Log Event Log The Events Log gives information about system access, installations, versions of software, deleted records, and other events that have occurred on the system. In DLM 260, the Event Log was extended to search the audit trail for all high risk alert overrides, any drug warnings (dependent on settings) and any changes to the Drug Options set-up screen in Consultation Manager. The searches can be run for all users and/or on a per user basis and you are also able to search on specific date ranges. 1. From the front screen of Vision go to Management Tools - Event Log . 2. From the User picklist at the top left of the screen, select the user you would like to search on or leave the setting as All Users if preferred. 3. If required, you can enter a date range in From Date and To Date. The default date range is from one week ago to today. Note that you can use date shortcuts, e.g. 3M (three months ago), 1W (one week) 4D (four days), T (today). 4. You can select an individual patient using Select Patient. The Deselect Patient lets you cancel the current patient so you can move on to another patient. 5. Next, select the Event Type you would like to search on by clicking on it. You select more than one event type by holding the Control key down then clicking on the lines you want. For example, you could search for all users who in the last week have been prompted to enter a Reason for Drug Warning Override. 6. Click on Search to search in the audit trail. 22 7. The results of the search will be displayed. You will be able to see the date, time if the event, the user, type of event, the patient the event affects, the workstation the user was logged into and full Details of the event. If you multi-selected Event Types, the list will be displayed in order of Event Type and you may need to scroll down. Figure 24: Event types are listed on the left of the screen. 8. Each line has columns, depending of the Event Type, but those that are patient related are Date, Time, User, Event, Patient (if relevant), Workstation and Detail. If you highlight a line for some Event Types, you can see further details in the bottom pane. 9. You can sort the Events by date, time, user, event type, Patient workstation or detail by clicking on the relevant heading. 23 10. You are able to print the selected Event list by clicking on the Print button at the bottom of the screen. It shows a Print Preview first; click on the Print button at the bottom of the screen. 24 The Event Types are divided into sections: System Access : Unsuccessful Login, Successful Login, Logout, Password Re-enter Failed, Login Aborted. Note that unsuccessful logins should be investigated in case someone has been trying to log in on an unattended workstation. Installations : Drug and Read dictionary install dates, Software Installs, Prodigy Install (Prodigy was removed in DLM 240). Consultations : Consultation started, Consultation ended, Patient selected, Patient deselected. Prescribing : Drug Options Changed, High Level Drug Warning, Medium Level Drug Warning, Low Level Drug Warning, Reason for Drug Warning override (a drug warning is shown at the end of the Therapy Add process but the prescriber has decided to proceed anyway, entering a free text reason). Deleted Records : This lists any deleted records by date, deleted template letters, partnership reallocation, etc. Other Events : Module started, Module ended, Error message, FP10 Reprint, Over event, DA1 Rewrite failed causing duplicate records, Data Collection, Log Function usage, Login Failures cleared, Down Line Loading, GP Communicator, Report produced, Password changed, User lockout, Mail Manager message view, Screen saver invoked, Screen saver ended, Remote access dial in - INPS support, Acceptance onto caseload, Caseload self-referral, Forced Shutdown. New Practice events (to do with GP2GP) : PDS Patient Trace no match found, PDS Update Failures, Patient traced on PDS success but no HCP held, Requests Sent, Negative Acknowledgements received of Type 06, Negative Acknowledgements received of Type 07, Negative Acknowledgements received of Type 08, EHR Extracts Received (Electronic health records), Failed to integrate ENR Extract, Negative Acknowledgements sent of Type 09, Negative Acknowledgements sent of Type 11, Negative Acknowledgements sent of Type 12 Old Practice events (to do with GP2GP) : Requests Received, Total Negative Acknowledgements sent, Attempting to send EHR to a non-current HCP, EHR Extracts Sent, Total Negative Acknowledgements received New/Old Practice - GNC Code to Practice Code SDS Failures New Practice - Practice not GP2GP enabled Edit record, Off Formulary Prescription National Summary item edit, National Summary defer consent recording, National Summary defer initial send Scheduled Task Failure Audit Report View - Allows you to check when an Audit report was run, who ran it, what patient was viewed etc. Vision Online Services Configuration Change 25 Audit Report Audit Report The Audit Report allows searches to be run for audited or deleted records on any of the Vision patient entities, and prints out an audit report. 1. To open Audit Report got to the Vision front screen and select Management Tools - Audit Report . 2. Highlight the entity (data) you want to search from the following list. To highlight more than one at a time, hold the Control key down and click on each to highlight. 3. Acute and Repeat Issue Therapy, Addresses, Clinical – All, Communication numbers, Consultations, Immunisations, Patient, Recalls, Referrals and Requests, Repeat Masters, Test results – All 4. Optionally, further limit the search to a particular patient's records. Double click in the Patient window under Audit Criteria for the usual Select Patient screen. 5. Filter the search criteria further by date range, time, user and / or clinician, if required. 6. Click on Run. 7. The detailed Audit Report is shown as screen display. on Print. 26 To print this out, click R Index Registration • 12 Registration Details Audit Trail • 12 Registration Links – Completed Transactions • 19 S Security – Audit Trail • 16, 17 A T Address/Contact Number Audit Trail • 14 Audit Report • 26 Audit Trails Within Vision Modules • 5 Training Tip – Audit Trail from Patient Select • 8 V C Consultation Manager • 5 Control Panel • 16 Copyright Notice • ii Current Users – Audit Trail • 17 Viewing Audit Trails in Consultation Manager • 5, 11 Viewing Deleted Records • 9 D Deselecting Show Deleted Records • 11 E Event Log • 18, 22 F File Maintenance – Audit trail for Staff, Practice and Organisation • 16 G GPC - Message Audit Trail • 21 M Mail Manager - Message Audit Tab • 19, 20 Messaging • 19 More Option • 7 N Note about Event Log Viewer • 18 27