1
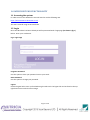
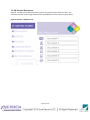
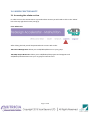
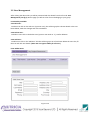
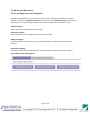
User Guide
Contents
1.0 WEB FRONT END FUNCTIONALITY............................................................................................... 2
1.1 Accessing the system ................................................................................................................ 2
1.2 Login .......................................................................................................................................... 2
1.3 Site Pages .................................................................................................................................. 3
1.4 National Evidence Library ......................................................................................................... 5
1.5 My Project Resources ............................................................................................................... 6
2.0 ADMIN FUNCTIONALITY ................................................................................................................. 7
2.1 Accessing the admin section ..................................................................................................... 7
2.2 User Management .................................................................................................................... 8
2.3 My Project Resources ............................................................................................................... 9
2.3.1 Creating Projects & Categories .............................................................................................. 9
2.3.2 Adding Documents................................................................................................................. 11
2.3.3 Deleting Documents............................................................................................................... 11
Page 1 of 12
1.0 WEB FRONT END FUNCTIONALITY
1.1 Accessing the system
In order to access the website the user will need to use the following URL.
https://4d-outcomes-malnutrition.co.uk
The site is secured using an SSL certificate.
1.2 Login
Once the URL above has been clicked you will be presented with a login page (as shown in fig 1)
below. Enter your credentials.
Fig 1: Login Page
Forgotten Password
Use this option to have your password sent to your email.
Reset Password
Use this option to change your password.
Logout
Click the logout link to once you finished using the web tool. The logout link can be found in the top
right hand corner under the main image.
Page 2 of 12
1.3 Site Pages
Once logged-in you will be taken to the Home Page (see Fig. 2).
Fig 2: Sections 01-06
Clicking on the Getting Started Page will open this User Guide.
Pages 02 Diagnose to 05 Demonstrate, are key Project Areas of the tool providing users with master
template documents to use. Clicking on the relative cube or Page number will link to the respective
Project Area.
Page 3 of 12
Fig 3: Page 02: Diagnose Project Area
Pages 02-05 contain the following areas (see Fig. 3):
Project Area: (For example: Diagnose)
This is the description of the Project Area in question.
Quantitative Data:
This is a hyperlink to the 4D Data Accelerator – a portal providing commissioning data
(separate login required)
Qualitative Data:
This is a hyperlink to the 4D ELC toolkit – a portal providing patient insights resources
(separate login required)
Main Document Panel:
All master documentation for use in this project area will be shown in this area along with
document descriptions.
Page 4 of 12
1.4 National Evidence Library
Page 06 – The National Evidence Library provides users with general resources uploaded by Nutricia.
Fig 4: Section 06 – National Evidence Library
Page 5 of 12
1.5 My Project Resources
Page 07 - The My Project Resources area contains all personal Project Area resources. Any
information shown on this page will have been uploaded by this user or his/her group ONLY.
Fig 4: Section 07 – My Resources
Page 6 of 12
2.0 ADMIN FUNCTIONALITY
2.1 Accessing the admin section
In order to access the commissioner or provider admin section you will need to click on the ‘Admin’
link in the top right hand corner (see fig 5).
Fig 5: Admin Link
After clicking this link you will be presented with a screen with 2 tabs.
TAB 1 User Management: Allows you to add/delete/edit users to your group.
TAB 2 My Project Resources: Allows you to add/delete/edit projects and categories and
add/delete/edit documents into your ‘my project resources area’.
Page 7 of 12
2.2 User Management
After clicking the admin link you will be presented with the details from the first tab: User
Management (see fig 6). On this page you will see a list of users belonging to your group.
Functionality available:
2.2.1 Edit User:
To edit a user click on the edit icon (a person icon), this will bring up the relevant details in the text
boxes below, make the changes and click save details.
2.2.2 Delete User:
To delete a user click on the delete icon (a person icon with an ‘x’), confirm deletion.
2.2.3 Add User:
To add a user click on the ‘Add User’ link this will bring up a set of text boxes below the users list, fill
these in and click save details. (Note: Set user type to admin for all users.)
Fig 6: Adding Users
Page 8 of 12
2.3 My Project Resources
2.3.1 Creating Projects & Categories
Documents uploaded to your ‘my project resources ’area must be associated with a Project &
Category. Select the ‘my project resources’ tab then click on the ‘Manage Project’ link (see fig 7).
Note: If you or one of your group members has created a Project you can skip this section.
Adding a Project:
Type in the Project Name and click Save Project
Removing a Project:
Select a Project from the drop down and click Remove Project
Adding a Category:
Select a Project from drop down, enter the Category Name in the empty field and click Save
Category.
Removing a Category:
Selecting a Project and then Category from the drop downs and then click Remove Category
Fig 7: Adding Projects & Categories
Page 9 of 12
Page 10 of 12
2.3.2 Adding Documents
To add a document; Select the ‘my project resources’ tab then click on the ‘Add Documents’ link
(see fig 7).
You will be presented with a number of fields to fill in. Complete the name and description of the
document. Select which Project/Category the document will be saved under and then select the
document by using the upload button. (Note: Large documents should be uploaded at quiet periods
early morning/late evening)
2.3.3 Deleting Documents
To delete a document; Select the ‘my project resources’ tab then click on the ‘Delete Documents’
Link.
Select a project and then category and click search documents.
This will bring up a list of documents in that project/category, simply click the icon on the left with
the document and cross.
Page 11 of 12