1
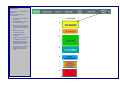
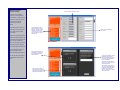
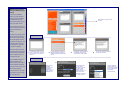
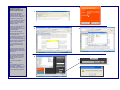
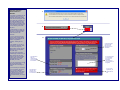
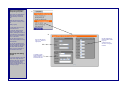
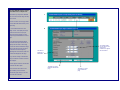
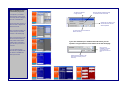
Lecturer overview
Set Project
milestones
The Lecturer overview page is
the most important and useful
page within PAM for markers to
use.
Individual
project mark
scheme page
2nd marker
Group project
mark scheme
Group project
mark scheme
CMT3992
supervisor mark
scheme
CMT3992 2nd
marker mark
scheme
CMT3992 3rd
marker mark
scheme
It provides you with all the
information you require as a
marker. Each panel represents a
different module and displays the
numbers of projects that have
3991 individual
projects you are
tutoring
Group projects
you are tutoring.
Group projects
you are 2nd
marking
CMT3992
projects you are
supervising
been assigned to you and how
many of those currently require
marking.
Clicking the red arrow next to the
number will take you to a
detailed list of the projects.
From there you can go to the
actual mark schemes where you
can view and mark the projects.
BIS4992
projects you are
supervising
BIS4992
supervisor mark
scheme
Set project
milestones and
deliverables
BIS4992
projects you are
2nd marking
BIS4992 2nd
marker mark
scheme
BIS4992
projects you are
3rd marking
BIS4992 3rd
marker mark
scheme
CMT3992
projects you are
2nd marking
CMT3992
projects you are
3rd marking
Marking status
Each project you are marking will have a
marking status.
This status is set depending upon
various conditions.
1
1. No project has been submitted
for marking
2. Project submitted but you have
not started marking it yet
3. Project submitted and you have
started marking it, but you have
not submitted a final assessment
yet
2
3
4. Marking complete and
assessment submitted
5. Grade overridden by the
coordinator
4
6. Plagiarism suspected and under
investigation by coordinator.
7. (BIS4992 only) Milestone or
stage submitted by student and
awaiting assessment by you.
8. (BIS4992 only) Last milestone or
stage assessed by you and
awaiting next submission by
student.
5
6
7
8
CMT3991 individual
proposal marking
Use the sliders to mark the criteria
As a tutor in the CMT3991
module you will be required to
mark students on their individual
proposal and enter their scores
and comments using the
individual proposal mark
scheme.
This mark scheme consists of a
double page to enter scores for
some criteria, and comments
other criteria.
This box displays a list of
other projects that you are
marking. Clicking on them
will save your scores and
comments on the current
mark scheme and open the
selected one.
Enter comments relating to
the criteria.
When this is completed, click the
‘Submit’ tab at the top right of the
mark scheme ‘book’ and this will
take you to the submissions
page. You can always go back to
the previous page by selecting
the tab at the top left of the book.
On the submissions page you
will need to answer some
questions relating to the project.
You can also flag if you suspect
Select the radio button as
appropriate if you think the
project will be suitable for
BCS exemption
that plagiarism in the students
work.
If you suspect that the student
plagiarized other peoples
work to complete their project
then it must be investigated
by the Coordinator.
To do this check the tick box
and enter a comment why you
suspect plagiarism.
Select the radio button as
appropriate if you think the
project is appropriate for the
programme the student is on.
Then click the submit button.
The mark scheme will then be
locked and coordinator will be
notified. The coordinator is
the only person able to unlock
the mark scheme.
CMT3991 group proposal
marking & CMT3992 project
marking
As a tutor in the CMT3991
module you will be required to
mark group projects submitted
by students and enter their
Use the tabs to go to the next set
of criteria
scores and comments using the
group project mark scheme.
This mark scheme consists of a
series of double pages each with
different criteria that need
marking.
The sliders of the previous mark
How to mark criteria
schemes have been replaced
with a system where the marker
selects a description level from
the ‘Notes for marking’ box. This
description is then copied into
the comments box. It can then
be amended or added to.
When all the criteria have been
completed, click the ‘Submit’ tab
on the right of the mark scheme
1
‘book’ and this will take you to
First select the criteria you which
to enter a comment for. The words
will turn orange to show that it is
selected.
2
From the ‘Notes for marking’ box
select the level that you think the
student achieved for that particular
criteria.
3
The definition for that level is then
automatically copied into the
comments box for that criterion.
4
You can than amend or add to this
comment as you desire.
the submissions page.
Submitting marks
On the submissions page you
will need to answer some
questions relating to the project
mark the individual contribution
of the group members and select
and submit a final grade.
To do this select from the range
of equivalent to the score range
and submit the grade.
1
3
2
Firstly mark the
individual
contributions of
the different
students in the
group. (This is for
CMT3991 only)
Each selected levels
for each criteria
represents a high and
low value. These
combine and are
weighted to produce a
high and low value.
These then correspond
to a range of grades.
Use the dropdown to
select the grade that
you think is appropriate
for the project that you
have marked.
Then click submit.
How to view a project
uploaded by students and
annotate it with comments.
2
1
If a student has uploaded a
document then this will be
viewable onscreen when you go
to the mark scheme related to
that student or group project.
1. When a student has uploaded
a document, an email will be
sent to you telling you that it is
available to mark.
2. When you open that students
mark scheme a document
symbol will appear in the top left
hand orange panel.
3
4
If the icon has a red ‘No go’
symbol through it then there is
no document to view.
3. Clicking the document symbol
will open the document as a
PDF. It can then be annotated by
you with comments. Acrobat 6 or
higher is required to do this.
4. You should then save the
marked up PDF to their local
machine.
5. This saved PDF can then be
uploaded back into PAM for the
student to see when their grades
are released.
This is done on the final submit
page. Click the browse button
and find the PDF on your local
machine where you saved it
previously.
5
6
6. Then click the ‘Upload’
button.
7. PAM will alert you when the
PDF has been uploaded
successfully. This document will
be viewable by the student (s)
when the grades are released.
7
Resolving contention
between markers in
CMT3992
1
As a marker in CMT3992 the will
be occasions when you are in
contention with another marker
of the same student project. This
occurs when the marks that you
have both submitted are more
than a certain number of grade
points apart or else bridge a high
or low threshold. If this happens
then the following actions will
take place:
2
3
1. PAM will notify you when you
submit your mark. It will then be
necessary to contact the other
marker and resolve the
contention.
2. On the ‘Lecturers Overview’
page the ‘Final grades needing
negotiation’ flag will display the
number of negotiations
necessary. Clicking the red
arrow.
4
If you have agreed
a revised grade
then you must
both select it here
and submit
3. This will take you to a list of
the projects in contention. Click
the ‘Contention’ flag in the
‘Marking status column and this
will take you to the ‘Negotiate
final grade’ page.
4. By going to the contention
resolution page in PAM then you
will be able to view the other
markers scores and comments
and the range of grades that
overlapped when you both
submitted your marks.
Click this link to
edit your
comments and
score to resolve
the resolution
If you can not agree than you will
have to notify the module
coordinator who will assign a 3rd
marker.
If you do resolve your contention
then it is necessary for both of
you to go to the contention
resolution screen in PAM. Here
you will both have to enter the
revised agreed grade and a
comment about how you arrived
at it.
Click this link to
view the other
markers scores
and comments
If you have agreed
a revised grade
then you must
both enter
comments as to
how you arrived at
that grade
If you can not
agree then you
should tick this
box
Setting up and managing
groups as a group tutor
1
Group tutors are responsible for
setting up and managing the
groups that they are involved
with.
Within the lectures area there
are screens to enable you to do
this.
Adding a group:
1. Select ‘Add new group’ from
the left hand menu.
2. Using the ‘Add new group’
page you can create a new
group by selecting the names of
the students from the dropdown
lists or by entering their student
ID’s in to the boxes.
You can set the tutor and 2nd
marker (if appropriate) in the top
left hand panel.
2
Here you can set the
tutor or 2nd marker as
appropriate
A student can only
ever be on one group
at a time.
You can also complete project
information relating to the group,
such as Programme, title, and
submission dates and details.
When you have completed all
the information click ‘Add’.
Searching and editing
groups
If you wish to search for and edit
groups then simply select the
‘Search & edit group’ menu item,
complete the search criteria.
From the results click on the
group ID and this will take you to
the edit group page.
Use the dropdowns to
edit the students within
the group.
To register a group
project submission,
click the check box
and select the date
Setting milestones for
CMT3992 students
1
PAM 4.1 now allows supervisors
in CMT3992 to mark off when
certain milestones within a
project were completed. They
are called Milestone 1, 2 & 3.
The milestones are recorded by
the supervising in the following
way:
From the ‘Lecturer Overview’
page select the list of Students
2
you are supervising, by clicking
the red arrow by the number.
1. There is now a new column
that specifies ‘Stage’. This lists
the last stage completed by the
student. Initially this will display
‘No milestones complete’ Click
on this and it will take you to a
page displaying the student and
their project details.
2. There is now a project
milestones panel containing a
check box and date control for
each milestone. This allows the
supervisor to set when the
milestone was completed and on
what date. When you have made
these changes, click submit.
Check box when the
milestone is complete
Set the date that the
milestone was
completed
Tracking BIS4992 student’s stages
and milestones as a Supervisor.
1
Each student you supervise in BIS4992
now has a record of each stage and step
in the module.
From the ‘Lecturer overview’ page select
the list of BIS 4992 students that you are
supervising.
2
1. In the student lists there is now a
‘Stage’ column. This displays the stage
that the student is at in their project.
Click on the stage will take you to the
‘Project stages and Milestones overview
page’.
2. This page lists the different stages,
from title to Final report assessment. It
displays the due dates for each stage,
The relevant dates.
You can also set the
dates for the
milestones as agreed
with the student.
the date the student submitted the stage,
and the date that the action took place.
As students submit their stages by
uploading their documents the dates are
recorded and displayed in this page.
The different
milestones &
deliverables
As you assess a stage or milestone the
date you submit the marks are recorded
and displayed.
At each stage the student is emailed that
a transition has taken place.
The two buttons at the bottom of the
page will take you to the relevant
assessment pages where you can use
the scores and comments.
This takes you to the
Milestone assessment
page
This takes you to the
report assessment
page
Marking a BIS4992 student
as the module progresses.
As a supervisor you will asses
The date the milestone
or stage was due
When the student uploads the stage
ore milestone it will set this date
students through out the module.
The marking scheme is displayed
in the form of a tabbed book.
Clicking this icon allows you to
view the document that the
student uploaded
Each tab of the book represents a
different module or stage that the
student has reached.
When you assess each stage you
need to record your comments
You will need to set the assessment
date as necessary.
and score on the relevant page.
When you have done this you will
need to submit the assessment.
At this point the student will be
emailed and they will be able to
log on and view your comments
If you have marked up the students document then you can
upload it using the buttons at the bottom of the left hand page
and marks.
Once you have
uploaded a document
you can view it by
clicking this document
icon
If you have marked up their
document and re-uploaded it then
this will also be available to be
viewed by the student.
Click this button to browse to the
saved document that you have
marked up
How to view a student’s grade.
To view students grades then simply
click the red arrow in the GD column.
This will take you to the grade details
page where you can see the scores and
grades form the other markers and view
their comments.
Clicking on the red arrows in the left
hand panel will load the comments and
BIS4992
CMT3991
scores appropriately.
CMT3991