1
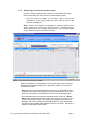
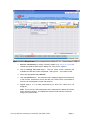
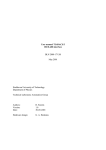
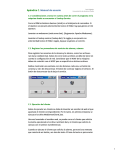
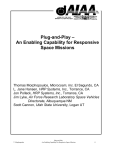
D.Cal Cardholder
User Guide
Table of Contents
1
2
2.1
3
3.1
3.2
3.3
3.4
3.5
3.6
3.7
3.8
4
INTRODUCTION
LOGGING IN TO D.CAL
Login steps
PROCESS TRANSACTIONS
Accessing the Process Transaction screen
Filter for New/Imported Transactions
How to Process a Transaction
Tax/VAT Processing
Transaction Split
Review Transaction(s)
How to Approve a Transaction(s)
Error! Bookmark not defined.
From and To Dates
Error! Bookmark not defined.
FILTERING
ERROR! BOOKMARK NOT DEFINED.
For any queries contact Jini Constant, 020 8891 7922
3
3
3
4
4
4
5
7
10
12
Page ii
1 INTRODUCTION
D.CAL is an online transaction management system that enables company
cardholders to log on and view transactions that have taken place on their card
and then process these transactions.
Users (Cardholders and Approvers) login to D.CAL to review cost allocation assigned
to their transactions, and make changes to the cost allocation where necessary. Once
users are satisfied that the transaction is a valid one and that the cost allocation is
correct, the transaction is marked as reviewed by the cardholder and ready for
approval by the appropriate department/company Approver. Cardholders who are also
Approvers review their own transactions as well as cardholders they are responsible
for.
Logon ID’s and passwords for D.CAL users are issued at D.CAL cardholder training.
2 LOGGING IN TO D.CAL
2.1
Login steps
To login to D.CAL do the following:
• Open Internet Explorer.
• In the address field type www.dcalonline.com. The D.CAL Login screen is
displayed.
• Click the Login button displayed on the screen. The User Login Step 1
screen is displayed.
• Enter the username assigned to you by your administrator in the Username
field.
• Click the Next button. The User Login Step 2 screen is displayed.
• Enter the password as assigned to you by your administrator into the
Password field.
Note: The first time a user logs onto D.CAL they will be asked to change
the password and validate it. The new password entered by the user must
be a combination of upper and lower case, alpha and numeric characters
and must be a minimum of 8 characters in length.
Example, Samp1e01 (this is a sample password only).
• Click the Next button.
• Depending on the question enter either, your Mothers maiden name, the last
four digits of your work telephone number, or the last four digits of your
credit card number.
Click the Submit button.
For any queries contact Jini Constant, 020 8891 7922
Page 3
Alerts screen
Ignore this screen and click on Process Transaction (tab on top of the
screen, left hand side)
3 PROCESS TRANSACTIONS
3.1
Accessing the Process Transaction screen
Click the Process Transactions button). The Process Transactions screen is
displayed.
3.2
Filter for New/Imported Transactions
1. Un-tick the View Addendum check box.
2. In the Trans Status drop down select New/Imported.
3. In the Trans drop down select All.
4. Click the Filter button. The Process Transactions screen is returned
containing details of New/Imported transactions for the current billing
cycle i.e. all un-processed transactions.
Figure 2: Processing Transactions screen
For any queries contact Jini Constant, 020 8891 7922
Page 4
3.2.1
Other Process Transactions Filters
Users may use other filters available within the Trans Status drop down as
follows:
A Cardholder user may filter on:
•
•
Reviewed - this will return only reviewed transactions
All - this will return all reviewed and new transactions
A Cardholder/Approver user may filter on:
•
•
3.3
The same as above
Approved - this will return all Approved transactions
How to Process a Transaction
The terminology ‘process a transaction’ for a Cardholder user means that the
cost allocation on New/Imported transactions must be checked and then given
the status of reviewed in order for their manager to approve the transaction(s).
The following are the process transaction steps:
3.3.1
1.
Filter for New/Imported transactions and validate
2.
View/change Cost Allocation codes (CAC’s)
3.
Tax/VAT processing
4.
Review transactions
Filter for New/Imported Transactions and Validate
Refer to section 3.2 of this document for details on how to filter for
New/Imported transactions.
When a list of new/imported transactions have been returned do the
following:
1.
Check the following is correct on each transaction:
• The billing amount
• Merchant/Supplier
• Goods purchased
If there is an issue with any of the above, users must not perform any
further processing steps on the transaction(s) on D.CAL, and contact the
supplier detailing the issue.
If there are no queries/issues with the transaction(s) or when a query/issue
has been resolved via the supplier the cardholder must check that the cost
allocation codes are correct on each part of the transaction.
For any queries contact Jini Constant, 020 8891 7922
Page 5
3.3.2
View/Change Cost Allocation Codes (CAC’s)
In order to view the Cost Allocation Codes on a transaction and change
them (if necessary) the user must carry out the following steps:
•
Using the scroll bar located on the bottom right of the Process
Transactions screen, scroll across the screen until the account code
columns are displayed.
Note: Account code details are displayed in columns named Account
Codes, Cost Centre, Project Code, and CAC level 4. Column names may
differ depending on your company specific set-up. See example in Figure
3: CAC columns Process Transactions screen.
Figure 3: CAC Process Transactions screen
Select a transaction to change/assign CAC’s by ticking the check box located
alongside the transactions’ Billing Amt. See point 2, Figure 3: CAC Process
Transactions screen.
Note: Account code changes/assignments may occur at TOPLINE level and
TRANSACTION SPLIT level only and not at LINE ITEM DETAIL level. One or
numerous transactions can be selected to have CAC’s changed/assigned.
Once the transaction(s) check boxes have been ticked, click on the Assign
CACs button located at the bottom of the screen. See point 3, Figure 3: CAC
Process Transactions screen. The Assign Cost Allocation Codes screen is
displayed, with Level 1 Subjective displayed by default in the Cost Allocation
Level field, with its related codes displayed in the list on screen. See Figure 4 –
Assign Cost Allocation Codes screen.
For any queries contact Jini Constant, 020 8891 7922
Page 6
Select the relevant Cost Allocation Level for which you wish to assign a code to
the transaction. See Figure 4: Assign Cost Allocation Code screen.
Select the relevant cost allocation Code to apply to the transaction.
Click the Submit button. The selected code is displayed against the transaction
in the Process Transactions screen and the Cost Allocation Codes screen is
minimised so that further CAC changes/assignments can take place for the
selected transaction(s).
Note: If no more CAC changes/assignments are to take place the Submit and
Close button should be clicked. This applies the selected code and then closes
the Cost Allocation Codes window.
When all CAC’s have been changed/assigned click the Close button.
Figure 4: Assign Cost Allocation Codes screen
Note: If a code does not return having entered and filtered on a valid code please
contact the D.CAL Corporate Administrator. The Administrator will check that the code is
available, if not he/she will add the valid code to the list.
3.4
Tax/VAT Processing
There are three types of suppliers that cardholders may purchase with. These
are:
• Non VAT capable (Level 1)
These types of suppliers do not send through LID or Tax/VAT detail on
transactions. Transactions that occur with this type of suppliers will require
For any queries contact Jini Constant, 020 8891 7922
Page 7
an invoice in order for Tax/VAT to be reclaimed by your company.
Transactions with this type of supplier will need to have Tax/VAT applied to
them manually in D.CAL.
• Summary VAT capable (Level 2)
Where the supplier sends through the VAT details with no Line Item Details
(LID). Tax/VAT does not need to be applied manually to these transactions
in D.CAL.
• VAT capable (Level 3)
VAT capable suppliers send through details of all the items purchased
(LID) with Tax/VAT details. Transactions that occur with this type of
supplier do not need to have Tax/VAT manually applied to them in D.CAL.
Within D.CAL either cardholders or approvers will carry out manual
Tax/VAT assignment on transactions from Level 1 type suppliers. If you
are unsure whether you should be assigning Tax/VAT details please
contact the D.CAL System Administrator for clarification.
3.4.1
Assign Tax/VAT Details
When checking Tax/VAT for your transactions the following steps should
be followed:
1.
In the Trans Status drop down in the Process Transactions screen
select New/Imported.
2.
In the Trans. Drop down in the Process Transactions screen select
‘Tax not Complete’. See Figure 5: Tax not Complete filter.
3.
Click the Filter button. A list of all transactions that require Tax/VAT
processing is displayed.
For any queries contact Jini Constant, 020 8891 7922
Page 8
Figure 5: Tax not Complete filter
1. Select a transaction(s) to assign Tax/VAT details to by ticking the check box
located alongside the transactions’ Billing Amt. See point 4, Figure 5.
2. Click the Assign Tax Code button. The Tax Codes screen containing the
available tax rates and codes is displayed. See Figure 6: - Tax Codes screen.
3. Select the appropriate Tax code/rate.
4. Click the Submit button. The selected code is displayed against the transaction
in the Process Transactions screen and the Tax Codes screen is minimised so
that Tax can be assigned to further transactions.
5. Repeat steps 4 to 7 for each transaction(s) for which Tax codes are to be
assigned.
Note: If no more Tax code assignments are to take place the Submit and Close
button should be clicked. This applies the selected code and then closes the
Assign Tax Code window.
For any queries contact Jini Constant, 020 8891 7922
Page 9
Figure 6: Tax Codes screen
3.5
Transaction Split
Transaction Split is the ability to divide top line transactions across multiple cost
centres and at different tax rates if required.
Figure 7: Transaction Split screen
Only transactions that are non-evidence for tax can be split. Split lines are
displayed in the same manner as LID’s in the Process Transactions screen and
are treated as addendum data. To view transaction split lines in the Process
Transactions screen the ‘View Addendum’ checkbox must be enabled. When a
filter is carried out with the View Addendum tick box enabled both LID’s and
Split lines will be displayed. Split line transactions are identifiable by a scissors
icon.
The following are the circumstances in which a Transaction Split can be applied:
• If the transaction is non-evidence for Tax (i.e. either came from Non Vat
capable supplier or failed a Vat rule).
For any queries contact Jini Constant, 020 8891 7922
Page 10
• Once a transaction has been approved the splits cannot be undone –
transactions must be unapproved first.
• When a transaction is split and the VAT codes and amounts are calculated at
detail level then the top VAT amount is the sum of the split line VAT
amounts.
• When all the VAT codes in the split lines are all the same then the top line
VAT code is the same. If there are a mixture of VAT rates then the top
line display MIXED.
3.5.1
Split a Transaction
1. In the Process Transactions screen, select a single Non-Evidence Top
Line transaction.
2. Click the Split button.
The Split pop-up box is displayed with information from the top line
transaction including the Merchant Name, Original (Source) Amount,
Exchange Rate (only displayed for foreign transactions), Billing Amount,
Tax Receipt Amount, Net Amount, Tax Rate and Tax Code. This
information is used as a reference when applying the split information and
is static and non-editable.
3. Enter the number of split lines required.
.
4. Select a format for the split by choosing the ‘Billing Amount Split’ or
‘Percentage Split’ radio buttons.
‘Billing Amount Split’ is set as the default on entering the screen and
applies the split based on an amounts specified. Percentage Split applies
the split based on percentages of the billing amount.
5. Click the Create Split Lines button.
On submission, the required number of split lines is displayed in the main
panel. By default the new split lines have a default description applied. E.g.
Split 1, Split 2, Split 3 etc. Users may edit the default descriptions if
required.
6. Depending on the choice of radio buttons, the ‘Billing Amount’ or
‘Percentage’ columns are editable form fields. Enter the relevant amounts
in the fields.
7. Click the Submit or Submit and Close buttons to save the Transaction
Split lines to the main Process Transaction screen.
Note: Cost Allocation codes can be assigned to the split lines via the
applied Process Transactions screen. Refer to section 3.3.2 ‘View/Change
Cost Allocation Codes. If no CACs are assigned the split lines take all
default cost allocation codes from the top line.
Click the Delete Split button to delete all split lines.
For any queries contact Jini Constant, 020 8891 7922
Page 11
In the main Process Transactions screen, a scissors icon denotes a new
split line. Once a non-evidence for tax transaction is split its status remains
as a non-evidence transaction and can be filtered upon accordingly.
3.6
Review Transaction(s)
Once a cardholder is satisfied that all components of the transaction(s) are
correct and Tax/VAT has been assigned, they must review the transaction(s) so
that their designated transaction Approver can ‘approve’ the transaction(s).
To review a transaction(s) do the following:
1.
2.
3.
Select the transaction(s) to review by ticking the check box located
alongside the transactions’ Billing Amt. See point 2, Figure 3: CAC Process
Transactions screen.
Click the Review button. The transaction(s) will disappear from the Process
Transaction screen, and will appear in your approver’s ‘in-tray’ with a status
of Reviewed.
To view transactions that have been reviewed, filter on the Trans Status
‘Reviewed’. Refer to section 3.2.1 for more details.
Note:
All cardholders should note that their designated Approver, cannot approve their
transactions until they have reviewed them.
For any queries contact Jini Constant, 020 8891 7922
Page 12