1
Agile Product Lifecycle Management for Process
Global Specification Management User Guide
Release 6.0.0.3.0
Part No. E18532-01
September 2010
Agile Product Lifecycle Management for Process
Copyrights and Trademarks
Agile Product Lifecycle Management for Process, Release 6.0.0.3.0
E18532-01
Copyright © 1995, 2010, Oracle and/or its affiliates. All rights reserved.
This software and related documentation are provided under a license agreement containing restrictions on use and disclosure
and are protected by intellectual property laws. Except as expressly permitted in your license agreement or allowed by law, you
may not use, copy, reproduce, translate, broadcast, modify, license, transmit, distribute, exhibit, perform, publish, or display
any part, in any form, or by any means. Reverse engineering, disassembly, or decompilation of this software, unless required by
law for interoperability, is prohibited.
The information contained herein is subject to change without notice and is not warranted to be error-free. If you find any
errors, please report them to us in writing.
If this software or related documentation is delivered to the U.S. Government or anyone licensing it on behalf of the U.S.
Government, the following notice is applicable:
U.S. GOVERNMENT RIGHTS
Programs, software, databases, and related documentation and technical data delivered to U.S. Government customers are
“commercial computer software” or “commercial technical data” pursuant to the applicable Federal Acquisition Regulation
and agency-specific supplemental regulations. As such, the use, duplication, disclosure, modification, and adaptation shall be
subject to the restrictions and license terms set forth in the applicable Government contract, and, to the extent applicable by
the terms of the Government contract, the additional rights set forth in FAR 52.227-19, Commercial Computer Software
License (December 2007). Oracle USA, Inc., 500 Oracle Parkway, Redwood City, CA 94065.
This software is developed for general use in a variety of information management applications. It is not developed or intended
for use in any inherently dangerous applications, including applications which may create a risk of personal injury. If you use
this software in dangerous applications, then you shall be responsible to take all appropriate fail-safe, backup, redundancy, and
other measures to ensure the safe use of this software. Oracle Corporation and its affiliates disclaim any liability for any
damages caused by use of this software in dangerous applications.
Oracle is a registered trademark of Oracle Corporation and/or its affiliates. Other names may be trademarks of their respective
owners.
This software and documentation may provide access to or information on content, products, and services from third parties.
Oracle Corporation and its affiliates are not responsible for and expressly disclaim all warranties of any kind with respect to
third-party content, products, and services. Oracle Corporation and its affiliates will not be responsible for any loss, costs, or
damages incurred due to your access to or use of third-party content, products, or services.
September 2010
ii
Global Specification Management User Guide
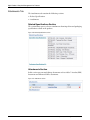
D OCUMENT C ONTROL
Change Record
Date
Author
Version
Change Reference
Sept-07
Agile/Oracle
1.0
Initial release, Part No. TPPR-0019-5.1A
Feb-08
Oracle
2.0
Second release, Part No. E11004-01
Sept-09
Oracle
3.0
Third release, Part No. E12389-01
Feb-10
Oracle
4.0
Fourth release, E12389-01
Sept-10
Oracle
5.0
Fifth release, E18532-01
iii
Agile Product Lifecycle Management for Process
iv
Global Specification Management User Guide
Contents
C ONTENTS
About This Manual
Agile Product Lifecycle Management for Process Documentation . . . . . . . . . . . . . . . . . . . . . . . . . . . . . . . . . . . . . . . . . . xvii
TTY Access to Oracle Support Services . . . . . . . . . . . . . . . . . . . . . . . . . . . . . . . . . . . . . . . . . . . . . . . . . . . . . . . . . . . . . xvii
Agile Training Aids . . . . . . . . . . . . . . . . . . . . . . . . . . . . . . . . . . . . . . . . . . . . . . . . . . . . . . . . . . . . . . . . . . . . . . . . . . . . . xvii
Accessibility of Code Examples in Documentation . . . . . . . . . . . . . . . . . . . . . . . . . . . . . . . . . . . . . . . . . . . . . . . . . . . xvii
Accessibility of Links to External Web Sites in Documentation . . . . . . . . . . . . . . . . . . . . . . . . . . . . . . . . . . . . . . . . . xvii
Audience . . . . . . . . . . . . . . . . . . . . . . . . . . . . . . . . . . . . . . . . . . . . . . . . . . . . . . . . . . . . . . . . . . . . . . . . . . . . . . . . . . . . . . . . xviii
Variability of Installations . . . . . . . . . . . . . . . . . . . . . . . . . . . . . . . . . . . . . . . . . . . . . . . . . . . . . . . . . . . . . . . . . . . . . . . . . . xviii
Where to Find Information . . . . . . . . . . . . . . . . . . . . . . . . . . . . . . . . . . . . . . . . . . . . . . . . . . . . . . . . . . . . . . . . . . . . . . . . . xviii
Document Conventions . . . . . . . . . . . . . . . . . . . . . . . . . . . . . . . . . . . . . . . . . . . . . . . . . . . . . . . . . . . . . . . . . . . . . . . . . . . . . .xix
Chapter 1
Introduction
The Global Specification Management Application . . . . . . . . . . . . . . . . . . . . . . . . . . . . . . . . . . . . . . . . . . . . . . . . . . . . . . . 1-1
Overview . . . . . . . . . . . . . . . . . . . . . . . . . . . . . . . . . . . . . . . . . . . . . . . . . . . . . . . . . . . . . . . . . . . . . . . . . . . . . . . . . . . . . . 1-1
Formulation and Compliance Tools . . . . . . . . . . . . . . . . . . . . . . . . . . . . . . . . . . . . . . . . . . . . . . . . . . . . . . . . . . . . 1-1
Key Global Specification Management Capabilities . . . . . . . . . . . . . . . . . . . . . . . . . . . . . . . . . . . . . . . . . . . . . . . . . . . 1-2
Touch Points with Other Applications . . . . . . . . . . . . . . . . . . . . . . . . . . . . . . . . . . . . . . . . . . . . . . . . . . . . . . . . . . . . . . . . . . 1-3
Computer Aided Compliance Screening . . . . . . . . . . . . . . . . . . . . . . . . . . . . . . . . . . . . . . . . . . . . . . . . . . . . . . . . . . . . 1-3
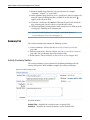
eQuestionnaire . . . . . . . . . . . . . . . . . . . . . . . . . . . . . . . . . . . . . . . . . . . . . . . . . . . . . . . . . . . . . . . . . . . . . . . . . . . . . . . . . 1-3
Document Reference Library . . . . . . . . . . . . . . . . . . . . . . . . . . . . . . . . . . . . . . . . . . . . . . . . . . . . . . . . . . . . . . . . . . . . . 1-3
New Product Development . . . . . . . . . . . . . . . . . . . . . . . . . . . . . . . . . . . . . . . . . . . . . . . . . . . . . . . . . . . . . . . . . . . . . . . 1-3
Nutrition Surveillance Management . . . . . . . . . . . . . . . . . . . . . . . . . . . . . . . . . . . . . . . . . . . . . . . . . . . . . . . . . . . . . . . 1-3
Product Quality Scorecard. . . . . . . . . . . . . . . . . . . . . . . . . . . . . . . . . . . . . . . . . . . . . . . . . . . . . . . . . . . . . . . . . . . . . . . . 1-3
Reporting. . . . . . . . . . . . . . . . . . . . . . . . . . . . . . . . . . . . . . . . . . . . . . . . . . . . . . . . . . . . . . . . . . . . . . . . . . . . . . . . . . . . . . 1-3
Supply Chain Relationship Management . . . . . . . . . . . . . . . . . . . . . . . . . . . . . . . . . . . . . . . . . . . . . . . . . . . . . . . . . . . . 1-4
Supplier Portal . . . . . . . . . . . . . . . . . . . . . . . . . . . . . . . . . . . . . . . . . . . . . . . . . . . . . . . . . . . . . . . . . . . . . . . . . . . . . . . . . 1-4
Finding Agile Data . . . . . . . . . . . . . . . . . . . . . . . . . . . . . . . . . . . . . . . . . . . . . . . . . . . . . . . . . . . . . . . . . . . . . . . . . . . . . . . . . . 1-4
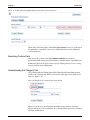
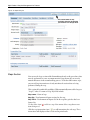
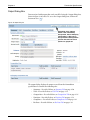
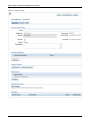
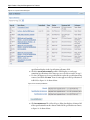
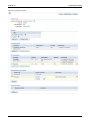
Understanding the Search Form . . . . . . . . . . . . . . . . . . . . . . . . . . . . . . . . . . . . . . . . . . . . . . . . . . . . . . . . . . . . . . . . . . . 1-4
Search Field Definitions . . . . . . . . . . . . . . . . . . . . . . . . . . . . . . . . . . . . . . . . . . . . . . . . . . . . . . . . . . . . . . . . . . . . . . 1-5
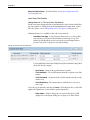
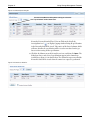
Key Field List . . . . . . . . . . . . . . . . . . . . . . . . . . . . . . . . . . . . . . . . . . . . . . . . . . . . . . . . . . . . . . . . . . . . . . . . . . . . . . . 1-5
Key Field Lists by Specification Type . . . . . . . . . . . . . . . . . . . . . . . . . . . . . . . . . . . . . . . . . . . . . . . . . . . . . . . . . 1-6
Operator List . . . . . . . . . . . . . . . . . . . . . . . . . . . . . . . . . . . . . . . . . . . . . . . . . . . . . . . . . . . . . . . . . . . . . . . . . . . . . . . 1-7
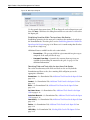
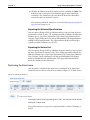
Search Term Field . . . . . . . . . . . . . . . . . . . . . . . . . . . . . . . . . . . . . . . . . . . . . . . . . . . . . . . . . . . . . . . . . . . . . . . . . . . 1-9
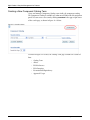
Entering Search Terms by Typing . . . . . . . . . . . . . . . . . . . . . . . . . . . . . . . . . . . . . . . . . . . . . . . . . . . . . . . . . . . . 1-9
Entering Search Terms by Prepopulated List . . . . . . . . . . . . . . . . . . . . . . . . . . . . . . . . . . . . . . . . . . . . . . . . . . 1-10
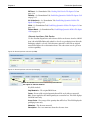
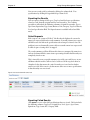
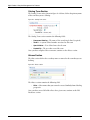
Using the Subsearch Tool . . . . . . . . . . . . . . . . . . . . . . . . . . . . . . . . . . . . . . . . . . . . . . . . . . . . . . . . . . . . . . . . . . 1-14
Searching for Field Types That Do Not Use the Search Terms Field . . . . . . . . . . . . . . . . . . . . . . . . . . . . . . . 1-16
Adding More Criteria . . . . . . . . . . . . . . . . . . . . . . . . . . . . . . . . . . . . . . . . . . . . . . . . . . . . . . . . . . . . . . . . . . . . . . . 1-16
Searching Custom Data . . . . . . . . . . . . . . . . . . . . . . . . . . . . . . . . . . . . . . . . . . . . . . . . . . . . . . . . . . . . . . . . . . . . . . . . . 1-17
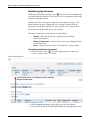
Understanding the Category Tab . . . . . . . . . . . . . . . . . . . . . . . . . . . . . . . . . . . . . . . . . . . . . . . . . . . . . . . . . . . . . . . . . 1-17
Chapter 2
Working with Specifications
Creating Specifications . . . . . . . . . . . . . . . . . . . . . . . . . . . . . . . . . . . . . . . . . . . . . . . . . . . . . . . . . . . . . . . . . . . . . . . . . . . . . .
Creating a New Specification. . . . . . . . . . . . . . . . . . . . . . . . . . . . . . . . . . . . . . . . . . . . . . . . . . . . . . . . . . . . . . . . . . . . . .
Creating a Copy of an Existing Specification . . . . . . . . . . . . . . . . . . . . . . . . . . . . . . . . . . . . . . . . . . . . . . . . . . . . . . . . .
Item History . . . . . . . . . . . . . . . . . . . . . . . . . . . . . . . . . . . . . . . . . . . . . . . . . . . . . . . . . . . . . . . . . . . . . . . . . . . . . . . . . . .
Managing Specifications . . . . . . . . . . . . . . . . . . . . . . . . . . . . . . . . . . . . . . . . . . . . . . . . . . . . . . . . . . . . . . . . . . . . . . . . . . . . .
Action Items . . . . . . . . . . . . . . . . . . . . . . . . . . . . . . . . . . . . . . . . . . . . . . . . . . . . . . . . . . . . . . . . . . . . . . . . . . . . . . . . . . .
Accessing Your Action Items . . . . . . . . . . . . . . . . . . . . . . . . . . . . . . . . . . . . . . . . . . . . . . . . . . . . . . . . . . . . . . . . . .
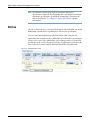
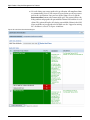
Understanding the Action Items Page. . . . . . . . . . . . . . . . . . . . . . . . . . . . . . . . . . . . . . . . . . . . . . . . . . . . . . . . . . .
2-1
2-1
2-1
2-3
2-4
2-4
2-4
2-4
v
Agile Product Lifecycle Management for Process
Resolving Workflows . . . . . . . . . . . . . . . . . . . . . . . . . . . . . . . . . . . . . . . . . . . . . . . . . . . . . . . . . . . . . . . . . . . . . . . . . . . . 2-6
Transitioning a Workflow . . . . . . . . . . . . . . . . . . . . . . . . . . . . . . . . . . . . . . . . . . . . . . . . . . . . . . . . . . . . . . . . . . . . . . . . 2-7
Selecting Workflow Participants . . . . . . . . . . . . . . . . . . . . . . . . . . . . . . . . . . . . . . . . . . . . . . . . . . . . . . . . . . . . . . . 2-8
Working with Signature Documents. . . . . . . . . . . . . . . . . . . . . . . . . . . . . . . . . . . . . . . . . . . . . . . . . . . . . . . . . . . . 2-8
Temporary Signature Authority . . . . . . . . . . . . . . . . . . . . . . . . . . . . . . . . . . . . . . . . . . . . . . . . . . . . . . . . . . . . . 2-9
Approval/Audit Trail Tab . . . . . . . . . . . . . . . . . . . . . . . . . . . . . . . . . . . . . . . . . . . . . . . . . . . . . . . . . . . . . . . . . . . . . . . . 2-11
Current Status Section . . . . . . . . . . . . . . . . . . . . . . . . . . . . . . . . . . . . . . . . . . . . . . . . . . . . . . . . . . . . . . . . . . . . . . 2-11
Event History Section . . . . . . . . . . . . . . . . . . . . . . . . . . . . . . . . . . . . . . . . . . . . . . . . . . . . . . . . . . . . . . . . . . . . . . . 2-11
Signature Document Section . . . . . . . . . . . . . . . . . . . . . . . . . . . . . . . . . . . . . . . . . . . . . . . . . . . . . . . . . . . . . . . . . 2-11
Lineage/History Section . . . . . . . . . . . . . . . . . . . . . . . . . . . . . . . . . . . . . . . . . . . . . . . . . . . . . . . . . . . . . . . . . . . . . 2-12
Comparing Ingredient Specifications. . . . . . . . . . . . . . . . . . . . . . . . . . . . . . . . . . . . . . . . . . . . . . . . . . . . . . . . . . . . . . . . . . 2-13
Printing Specifications. . . . . . . . . . . . . . . . . . . . . . . . . . . . . . . . . . . . . . . . . . . . . . . . . . . . . . . . . . . . . . . . . . . . . . . . . . . . . . 2-13
Printing Trade Specifications. . . . . . . . . . . . . . . . . . . . . . . . . . . . . . . . . . . . . . . . . . . . . . . . . . . . . . . . . . . . . . . . . . . . . 2-13
Documentation Format Section . . . . . . . . . . . . . . . . . . . . . . . . . . . . . . . . . . . . . . . . . . . . . . . . . . . . . . . . . . . . . . 2-14
Packaging Hierarchy . . . . . . . . . . . . . . . . . . . . . . . . . . . . . . . . . . . . . . . . . . . . . . . . . . . . . . . . . . . . . . . . . . . . . . . . 2-16
Title Specification . . . . . . . . . . . . . . . . . . . . . . . . . . . . . . . . . . . . . . . . . . . . . . . . . . . . . . . . . . . . . . . . . . . . . . . . 2-16
Related Trade Specifications . . . . . . . . . . . . . . . . . . . . . . . . . . . . . . . . . . . . . . . . . . . . . . . . . . . . . . . . . . . . . . . 2-16
Additional Related Items . . . . . . . . . . . . . . . . . . . . . . . . . . . . . . . . . . . . . . . . . . . . . . . . . . . . . . . . . . . . . . . . . . . . 2-17
Printing Other Specifications . . . . . . . . . . . . . . . . . . . . . . . . . . . . . . . . . . . . . . . . . . . . . . . . . . . . . . . . . . . . . . . . . . . . 2-19
Documentation Format . . . . . . . . . . . . . . . . . . . . . . . . . . . . . . . . . . . . . . . . . . . . . . . . . . . . . . . . . . . . . . . . . . . . . 2-19
Specification Listing . . . . . . . . . . . . . . . . . . . . . . . . . . . . . . . . . . . . . . . . . . . . . . . . . . . . . . . . . . . . . . . . . . . . . . . . 2-20
Specification Type. . . . . . . . . . . . . . . . . . . . . . . . . . . . . . . . . . . . . . . . . . . . . . . . . . . . . . . . . . . . . . . . . . . . . . . . 2-20
Sections . . . . . . . . . . . . . . . . . . . . . . . . . . . . . . . . . . . . . . . . . . . . . . . . . . . . . . . . . . . . . . . . . . . . . . . . . . . . . . . . 2-21
Attachments . . . . . . . . . . . . . . . . . . . . . . . . . . . . . . . . . . . . . . . . . . . . . . . . . . . . . . . . . . . . . . . . . . . . . . . . . . . . 2-21
Optional Objects to Print Through the Print Dialog Box. . . . . . . . . . . . . . . . . . . . . . . . . . . . . . . . . . . . . . . . 2-23
Chapter 3
Commonly Used Sections
Overview . . . . . . . . . . . . . . . . . . . . . . . . . . . . . . . . . . . . . . . . . . . . . . . . . . . . . . . . . . . . . . . . . . . . . . . . . . . . . . . . . . . . . . . . . . 3-1
Summary Tab . . . . . . . . . . . . . . . . . . . . . . . . . . . . . . . . . . . . . . . . . . . . . . . . . . . . . . . . . . . . . . . . . . . . . . . . . . . . . . . . . . . . . . 3-1
Summary Information Section . . . . . . . . . . . . . . . . . . . . . . . . . . . . . . . . . . . . . . . . . . . . . . . . . . . . . . . . . . . . . . . . . . . . 3-2
Cross References Section . . . . . . . . . . . . . . . . . . . . . . . . . . . . . . . . . . . . . . . . . . . . . . . . . . . . . . . . . . . . . . . . . . . . . . . . . 3-3
Available UOM . . . . . . . . . . . . . . . . . . . . . . . . . . . . . . . . . . . . . . . . . . . . . . . . . . . . . . . . . . . . . . . . . . . . . . . . . . . . . . . . . 3-4
UOM Conversions . . . . . . . . . . . . . . . . . . . . . . . . . . . . . . . . . . . . . . . . . . . . . . . . . . . . . . . . . . . . . . . . . . . . . . . . . . . . . . 3-4
Approved for Use In Section . . . . . . . . . . . . . . . . . . . . . . . . . . . . . . . . . . . . . . . . . . . . . . . . . . . . . . . . . . . . . . . . . . . . . . 3-5
Compliance Tab . . . . . . . . . . . . . . . . . . . . . . . . . . . . . . . . . . . . . . . . . . . . . . . . . . . . . . . . . . . . . . . . . . . . . . . . . . . . . . . . . . . . 3-6
Compliance Information Section . . . . . . . . . . . . . . . . . . . . . . . . . . . . . . . . . . . . . . . . . . . . . . . . . . . . . . . . . . . . . . . . . . 3-6
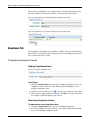
Adding Compliance Items . . . . . . . . . . . . . . . . . . . . . . . . . . . . . . . . . . . . . . . . . . . . . . . . . . . . . . . . . . . . . . . . . . . . 3-6
Removing Compliance Items. . . . . . . . . . . . . . . . . . . . . . . . . . . . . . . . . . . . . . . . . . . . . . . . . . . . . . . . . . . . . . . . . . 3-6
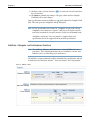
Additives, Allergens, and Intolerances Sections. . . . . . . . . . . . . . . . . . . . . . . . . . . . . . . . . . . . . . . . . . . . . . . . . . . . . . . 3-7
Adding Additives. . . . . . . . . . . . . . . . . . . . . . . . . . . . . . . . . . . . . . . . . . . . . . . . . . . . . . . . . . . . . . . . . . . . . . . . . . . . 3-8
Removing Additives . . . . . . . . . . . . . . . . . . . . . . . . . . . . . . . . . . . . . . . . . . . . . . . . . . . . . . . . . . . . . . . . . . . . . . . . . 3-8
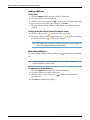
Related Specs Tab . . . . . . . . . . . . . . . . . . . . . . . . . . . . . . . . . . . . . . . . . . . . . . . . . . . . . . . . . . . . . . . . . . . . . . . . . . . . . . . . . . . 3-9
Associated Specifications Section . . . . . . . . . . . . . . . . . . . . . . . . . . . . . . . . . . . . . . . . . . . . . . . . . . . . . . . . . . . . . . . . . . 3-9
Master Specifications Section . . . . . . . . . . . . . . . . . . . . . . . . . . . . . . . . . . . . . . . . . . . . . . . . . . . . . . . . . . . . . . . . . . . . . 3-9
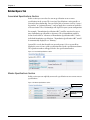
CSS Tab . . . . . . . . . . . . . . . . . . . . . . . . . . . . . . . . . . . . . . . . . . . . . . . . . . . . . . . . . . . . . . . . . . . . . . . . . . . . . . . . . . . . . . . . . . 3-10
Supporting Documents Tab . . . . . . . . . . . . . . . . . . . . . . . . . . . . . . . . . . . . . . . . . . . . . . . . . . . . . . . . . . . . . . . . . . . . . . . . . 3-12
Supporting Documents Section . . . . . . . . . . . . . . . . . . . . . . . . . . . . . . . . . . . . . . . . . . . . . . . . . . . . . . . . . . . . . . . . . . 3-12
Overview . . . . . . . . . . . . . . . . . . . . . . . . . . . . . . . . . . . . . . . . . . . . . . . . . . . . . . . . . . . . . . . . . . . . . . . . . . . . . . . . . 3-12
Creating a Supporting Document . . . . . . . . . . . . . . . . . . . . . . . . . . . . . . . . . . . . . . . . . . . . . . . . . . . . . . . . . . . . . 3-12
Managing Supporting Documents . . . . . . . . . . . . . . . . . . . . . . . . . . . . . . . . . . . . . . . . . . . . . . . . . . . . . . . . . . . . 3-13
Document Types . . . . . . . . . . . . . . . . . . . . . . . . . . . . . . . . . . . . . . . . . . . . . . . . . . . . . . . . . . . . . . . . . . . . . . . . . . . 3-14
Attachments/Procedures Document Type . . . . . . . . . . . . . . . . . . . . . . . . . . . . . . . . . . . . . . . . . . . . . . . . . . . . 3-14
URL . . . . . . . . . . . . . . . . . . . . . . . . . . . . . . . . . . . . . . . . . . . . . . . . . . . . . . . . . . . . . . . . . . . . . . . . . . . . . . . . . . . 3-15
Rich Text Document Type . . . . . . . . . . . . . . . . . . . . . . . . . . . . . . . . . . . . . . . . . . . . . . . . . . . . . . . . . . . . . . . . . 3-16
Product Fact Sheets. . . . . . . . . . . . . . . . . . . . . . . . . . . . . . . . . . . . . . . . . . . . . . . . . . . . . . . . . . . . . . . . . . . . . . . 3-16
vi
Global Specification Management User Guide
Contents
Nutrient Composition . . . . . . . . . . . . . . . . . . . . . . . . . . . . . . . . . . . . . . . . . . . . . . . . . . . . . . . . . . . . . . . . . . . .
View Thumbnails . . . . . . . . . . . . . . . . . . . . . . . . . . . . . . . . . . . . . . . . . . . . . . . . . . . . . . . . . . . . . . . . . . . . . . . .
DRL Documents Section . . . . . . . . . . . . . . . . . . . . . . . . . . . . . . . . . . . . . . . . . . . . . . . . . . . . . . . . . . . . . . . . . . . . . . . .
Viewing DRL Catalogs and Documents . . . . . . . . . . . . . . . . . . . . . . . . . . . . . . . . . . . . . . . . . . . . . . . . . . . . . . . .
Viewing a Catalog Reference . . . . . . . . . . . . . . . . . . . . . . . . . . . . . . . . . . . . . . . . . . . . . . . . . . . . . . . . . . . . . . . . .
Viewing a Document Reference. . . . . . . . . . . . . . . . . . . . . . . . . . . . . . . . . . . . . . . . . . . . . . . . . . . . . . . . . . . . . . .
Description Section . . . . . . . . . . . . . . . . . . . . . . . . . . . . . . . . . . . . . . . . . . . . . . . . . . . . . . . . . . . . . . . . . . . . . .
Version/Revision Section . . . . . . . . . . . . . . . . . . . . . . . . . . . . . . . . . . . . . . . . . . . . . . . . . . . . . . . . . . . . . . . . . .
Attachments Section. . . . . . . . . . . . . . . . . . . . . . . . . . . . . . . . . . . . . . . . . . . . . . . . . . . . . . . . . . . . . . . . . . . . . .
Adding DRL Catalog and Document References. . . . . . . . . . . . . . . . . . . . . . . . . . . . . . . . . . . . . . . . . . . . . . .
Testing Protocols Section . . . . . . . . . . . . . . . . . . . . . . . . . . . . . . . . . . . . . . . . . . . . . . . . . . . . . . . . . . . . . . . . . . . . . . . .
Attachments Section. . . . . . . . . . . . . . . . . . . . . . . . . . . . . . . . . . . . . . . . . . . . . . . . . . . . . . . . . . . . . . . . . . . . . . . . . . . .
% Breakdown (Formula) Section . . . . . . . . . . . . . . . . . . . . . . . . . . . . . . . . . . . . . . . . . . . . . . . . . . . . . . . . . . . . . . . . .
Formula Detail . . . . . . . . . . . . . . . . . . . . . . . . . . . . . . . . . . . . . . . . . . . . . . . . . . . . . . . . . . . . . . . . . . . . . . . . . . . .
Publish Settings Section . . . . . . . . . . . . . . . . . . . . . . . . . . . . . . . . . . . . . . . . . . . . . . . . . . . . . . . . . . . . . . . . . . .
Related Sourcing Approval Section . . . . . . . . . . . . . . . . . . . . . . . . . . . . . . . . . . . . . . . . . . . . . . . . . . . . . . . . . . . .
Formula Section . . . . . . . . . . . . . . . . . . . . . . . . . . . . . . . . . . . . . . . . . . . . . . . . . . . . . . . . . . . . . . . . . . . . . . . . . . .
References Tab . . . . . . . . . . . . . . . . . . . . . . . . . . . . . . . . . . . . . . . . . . . . . . . . . . . . . . . . . . . . . . . . . . . . . . . . . . . . . . . . . . . .
Activities Section . . . . . . . . . . . . . . . . . . . . . . . . . . . . . . . . . . . . . . . . . . . . . . . . . . . . . . . . . . . . . . . . . . . . . . . . . . . . . .
Suppliers Section . . . . . . . . . . . . . . . . . . . . . . . . . . . . . . . . . . . . . . . . . . . . . . . . . . . . . . . . . . . . . . . . . . . . . . . . . . . . . .
Specification Dependencies Section . . . . . . . . . . . . . . . . . . . . . . . . . . . . . . . . . . . . . . . . . . . . . . . . . . . . . . . . . . . . . . .
Related Documents Section. . . . . . . . . . . . . . . . . . . . . . . . . . . . . . . . . . . . . . . . . . . . . . . . . . . . . . . . . . . . . . . . . . . . . .
Custom Data. . . . . . . . . . . . . . . . . . . . . . . . . . . . . . . . . . . . . . . . . . . . . . . . . . . . . . . . . . . . . . . . . . . . . . . . . . . . . . . . . . . . . .
Extended Attributes Section. . . . . . . . . . . . . . . . . . . . . . . . . . . . . . . . . . . . . . . . . . . . . . . . . . . . . . . . . . . . . . . . . .
Custom Sections . . . . . . . . . . . . . . . . . . . . . . . . . . . . . . . . . . . . . . . . . . . . . . . . . . . . . . . . . . . . . . . . . . . . . . . . . . .
Calculated Attributes . . . . . . . . . . . . . . . . . . . . . . . . . . . . . . . . . . . . . . . . . . . . . . . . . . . . . . . . . . . . . . . . . . . . . . .
Adding a Custom Section. . . . . . . . . . . . . . . . . . . . . . . . . . . . . . . . . . . . . . . . . . . . . . . . . . . . . . . . . . . . . . . . . .
Editing a Custom Section. . . . . . . . . . . . . . . . . . . . . . . . . . . . . . . . . . . . . . . . . . . . . . . . . . . . . . . . . . . . . . . . . .
Deleting a Custom Section. . . . . . . . . . . . . . . . . . . . . . . . . . . . . . . . . . . . . . . . . . . . . . . . . . . . . . . . . . . . . . . . .
Chapter 4
3-16
3-18
3-18
3-18
3-18
3-19
3-19
3-20
3-20
3-20
3-21
3-22
3-22
3-22
3-23
3-24
3-24
3-25
3-25
3-25
3-27
3-27
3-28
3-29
3-29
3-29
3-30
3-31
3-33
Trade Specifications
Overview . . . . . . . . . . . . . . . . . . . . . . . . . . . . . . . . . . . . . . . . . . . . . . . . . . . . . . . . . . . . . . . . . . . . . . . . . . . . . . . . . . . . . . . . . . 4-1
Page-Level Functions . . . . . . . . . . . . . . . . . . . . . . . . . . . . . . . . . . . . . . . . . . . . . . . . . . . . . . . . . . . . . . . . . . . . . . . . . . . . . . . . 4-2
Summary Tab . . . . . . . . . . . . . . . . . . . . . . . . . . . . . . . . . . . . . . . . . . . . . . . . . . . . . . . . . . . . . . . . . . . . . . . . . . . . . . . . . . . . . . 4-3
Summary Information Section . . . . . . . . . . . . . . . . . . . . . . . . . . . . . . . . . . . . . . . . . . . . . . . . . . . . . . . . . . . . . . . . . . . . 4-3
Product Identification Section . . . . . . . . . . . . . . . . . . . . . . . . . . . . . . . . . . . . . . . . . . . . . . . . . . . . . . . . . . . . . . . . . . . . 4-3
Next Lower Level Items Section . . . . . . . . . . . . . . . . . . . . . . . . . . . . . . . . . . . . . . . . . . . . . . . . . . . . . . . . . . . . . . . . . . . 4-5
Parent Items (Calculated) Section. . . . . . . . . . . . . . . . . . . . . . . . . . . . . . . . . . . . . . . . . . . . . . . . . . . . . . . . . . . . . . . . . . 4-5
Brand Information Section . . . . . . . . . . . . . . . . . . . . . . . . . . . . . . . . . . . . . . . . . . . . . . . . . . . . . . . . . . . . . . . . . . . . . . . 4-6
Product Classification Section. . . . . . . . . . . . . . . . . . . . . . . . . . . . . . . . . . . . . . . . . . . . . . . . . . . . . . . . . . . . . . . . . . . . . 4-7
Packaging Tab . . . . . . . . . . . . . . . . . . . . . . . . . . . . . . . . . . . . . . . . . . . . . . . . . . . . . . . . . . . . . . . . . . . . . . . . . . . . . . . . . . . . . . 4-8
Packaging Attributes (Consumer Unit) Section . . . . . . . . . . . . . . . . . . . . . . . . . . . . . . . . . . . . . . . . . . . . . . . . . . . . . . 4-8
Packaging Attributes (Traded Unit) Section . . . . . . . . . . . . . . . . . . . . . . . . . . . . . . . . . . . . . . . . . . . . . . . . . . . . . . . . 4-10
Stacking Height Section . . . . . . . . . . . . . . . . . . . . . . . . . . . . . . . . . . . . . . . . . . . . . . . . . . . . . . . . . . . . . . . . . . . . . . . . . 4-11
Storage Requirements Section. . . . . . . . . . . . . . . . . . . . . . . . . . . . . . . . . . . . . . . . . . . . . . . . . . . . . . . . . . . . . . . . . . . . 4-11
Shelf Life Section . . . . . . . . . . . . . . . . . . . . . . . . . . . . . . . . . . . . . . . . . . . . . . . . . . . . . . . . . . . . . . . . . . . . . . . . . . . . . . 4-11
Packaging Materials Section . . . . . . . . . . . . . . . . . . . . . . . . . . . . . . . . . . . . . . . . . . . . . . . . . . . . . . . . . . . . . . . . . . . . . 4-12
Alternate Packaging Section . . . . . . . . . . . . . . . . . . . . . . . . . . . . . . . . . . . . . . . . . . . . . . . . . . . . . . . . . . . . . . . . . . . . . 4-12
Environmental Waste (per item sold) Section . . . . . . . . . . . . . . . . . . . . . . . . . . . . . . . . . . . . . . . . . . . . . . . . . . . . . . . 4-13
Compliance Tab . . . . . . . . . . . . . . . . . . . . . . . . . . . . . . . . . . . . . . . . . . . . . . . . . . . . . . . . . . . . . . . . . . . . . . . . . . . . . . . . . . . 4-13
Label Claims Section . . . . . . . . . . . . . . . . . . . . . . . . . . . . . . . . . . . . . . . . . . . . . . . . . . . . . . . . . . . . . . . . . . . . . . . . . . . 4-13
Label Claims Determination . . . . . . . . . . . . . . . . . . . . . . . . . . . . . . . . . . . . . . . . . . . . . . . . . . . . . . . . . . . . . . . . . 4-14
Related Specs Tab . . . . . . . . . . . . . . . . . . . . . . . . . . . . . . . . . . . . . . . . . . . . . . . . . . . . . . . . . . . . . . . . . . . . . . . . . . . . . . . . . . 4-17
Ingredient Specification Section . . . . . . . . . . . . . . . . . . . . . . . . . . . . . . . . . . . . . . . . . . . . . . . . . . . . . . . . . . . . . . . . . . 4-17
CSS Tab . . . . . . . . . . . . . . . . . . . . . . . . . . . . . . . . . . . . . . . . . . . . . . . . . . . . . . . . . . . . . . . . . . . . . . . . . . . . . . . . . . . . . . . . . . 4-17
vii
Agile Product Lifecycle Management for Process
Supporting Documents Tab . . . . . . . . . . . . . . . . . . . . . . . . . . . . . . . . . . . . . . . . . . . . . . . . . . . . . . . . . . . . . . . . . . . . . . . . .
Nutrient Profile Section . . . . . . . . . . . . . . . . . . . . . . . . . . . . . . . . . . . . . . . . . . . . . . . . . . . . . . . . . . . . . . . . . . . . . . . . .
Regulatory/Legislation Section . . . . . . . . . . . . . . . . . . . . . . . . . . . . . . . . . . . . . . . . . . . . . . . . . . . . . . . . . . . . . . . . . . .
Regulatory/Legislation Detail Page. . . . . . . . . . . . . . . . . . . . . . . . . . . . . . . . . . . . . . . . . . . . . . . . . . . . . . . . . . . . . . . . . . . .
Cover Page Tab . . . . . . . . . . . . . . . . . . . . . . . . . . . . . . . . . . . . . . . . . . . . . . . . . . . . . . . . . . . . . . . . . . . . . . . . . . . . . . . .
Application Summary Section. . . . . . . . . . . . . . . . . . . . . . . . . . . . . . . . . . . . . . . . . . . . . . . . . . . . . . . . . . . . . . . .
[Application Type] Cover Page Section . . . . . . . . . . . . . . . . . . . . . . . . . . . . . . . . . . . . . . . . . . . . . . . . . . . . . . . .
Product Formula Tab . . . . . . . . . . . . . . . . . . . . . . . . . . . . . . . . . . . . . . . . . . . . . . . . . . . . . . . . . . . . . . . . . . . . . . . . . . .
Product Formula Section . . . . . . . . . . . . . . . . . . . . . . . . . . . . . . . . . . . . . . . . . . . . . . . . . . . . . . . . . . . . . . . . . . . .
Processing Procedures Tab. . . . . . . . . . . . . . . . . . . . . . . . . . . . . . . . . . . . . . . . . . . . . . . . . . . . . . . . . . . . . . . . . . . . . . .
Comments Tab . . . . . . . . . . . . . . . . . . . . . . . . . . . . . . . . . . . . . . . . . . . . . . . . . . . . . . . . . . . . . . . . . . . . . . . . . . . . . . . .
Attachments Tab . . . . . . . . . . . . . . . . . . . . . . . . . . . . . . . . . . . . . . . . . . . . . . . . . . . . . . . . . . . . . . . . . . . . . . . . . . . . . . .
Related Specifications Section . . . . . . . . . . . . . . . . . . . . . . . . . . . . . . . . . . . . . . . . . . . . . . . . . . . . . . . . . . . . . . . .
Attachments Section . . . . . . . . . . . . . . . . . . . . . . . . . . . . . . . . . . . . . . . . . . . . . . . . . . . . . . . . . . . . . . . . . . . . . . . .
References Tab . . . . . . . . . . . . . . . . . . . . . . . . . . . . . . . . . . . . . . . . . . . . . . . . . . . . . . . . . . . . . . . . . . . . . . . . . . . . . . . . . . . .
Approval/Audit Trail Tab. . . . . . . . . . . . . . . . . . . . . . . . . . . . . . . . . . . . . . . . . . . . . . . . . . . . . . . . . . . . . . . . . . . . . . . . . . . .
Chapter 5
4-18
4-18
4-19
4-19
4-19
4-20
4-20
4-22
4-22
4-23
4-23
4-24
4-24
4-24
4-25
4-25
Process Specifications
Process Specification Integration into Formulation Specification Feature. . . . . . . . . . . . . . . . . . . . . . . . . . . . . . . . . . . . . 5-1
Chapter 6
Formulation Specifications
Overview . . . . . . . . . . . . . . . . . . . . . . . . . . . . . . . . . . . . . . . . . . . . . . . . . . . . . . . . . . . . . . . . . . . . . . . . . . . . . . . . . . . . . . . . . . 6-1
Concepts and Definitions . . . . . . . . . . . . . . . . . . . . . . . . . . . . . . . . . . . . . . . . . . . . . . . . . . . . . . . . . . . . . . . . . . . . . . . . . . . . 6-2
Outputs . . . . . . . . . . . . . . . . . . . . . . . . . . . . . . . . . . . . . . . . . . . . . . . . . . . . . . . . . . . . . . . . . . . . . . . . . . . . . . . . . . . . . . . 6-2
Output Types/Sub-Types . . . . . . . . . . . . . . . . . . . . . . . . . . . . . . . . . . . . . . . . . . . . . . . . . . . . . . . . . . . . . . . . . . . . . . . . . 6-3
Theoretical Ingredient Verses Output Ingredient . . . . . . . . . . . . . . . . . . . . . . . . . . . . . . . . . . . . . . . . . . . . . . . . . . . . . 6-4
“Designable” Workflow Status . . . . . . . . . . . . . . . . . . . . . . . . . . . . . . . . . . . . . . . . . . . . . . . . . . . . . . . . . . . . . . . . . . . . 6-4
Remaining Concepts and Definitions. . . . . . . . . . . . . . . . . . . . . . . . . . . . . . . . . . . . . . . . . . . . . . . . . . . . . . . . . . . . . . . 6-5
Page-Level Functions . . . . . . . . . . . . . . . . . . . . . . . . . . . . . . . . . . . . . . . . . . . . . . . . . . . . . . . . . . . . . . . . . . . . . . . . . . . . . . . . 6-6
Summary Tab . . . . . . . . . . . . . . . . . . . . . . . . . . . . . . . . . . . . . . . . . . . . . . . . . . . . . . . . . . . . . . . . . . . . . . . . . . . . . . . . . . . . . . 6-9
Formulation Attributes Section. . . . . . . . . . . . . . . . . . . . . . . . . . . . . . . . . . . . . . . . . . . . . . . . . . . . . . . . . . . . . . . . . . . . 6-9
Facility Information Section . . . . . . . . . . . . . . . . . . . . . . . . . . . . . . . . . . . . . . . . . . . . . . . . . . . . . . . . . . . . . . . . . . . . . 6-10
Formulation Tab. . . . . . . . . . . . . . . . . . . . . . . . . . . . . . . . . . . . . . . . . . . . . . . . . . . . . . . . . . . . . . . . . . . . . . . . . . . . . . . . . . . 6-10
Inputs Section . . . . . . . . . . . . . . . . . . . . . . . . . . . . . . . . . . . . . . . . . . . . . . . . . . . . . . . . . . . . . . . . . . . . . . . . . . . . . . . . . 6-11
Adding Materials To The Inputs Grid . . . . . . . . . . . . . . . . . . . . . . . . . . . . . . . . . . . . . . . . . . . . . . . . . . . . . . . . . . 6-11
Adding Materials. . . . . . . . . . . . . . . . . . . . . . . . . . . . . . . . . . . . . . . . . . . . . . . . . . . . . . . . . . . . . . . . . . . . . . . . . 6-11
Adding Rows and Then Materials . . . . . . . . . . . . . . . . . . . . . . . . . . . . . . . . . . . . . . . . . . . . . . . . . . . . . . . . . . . 6-13
Additional Notes Regarding Adding Materials To The Inputs Grid. . . . . . . . . . . . . . . . . . . . . . . . . . . . . . . . 6-14
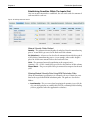
Establishing Quantities Within The Inputs Grid . . . . . . . . . . . . . . . . . . . . . . . . . . . . . . . . . . . . . . . . . . . . . . . . . 6-15
Material Quantity Fields Defined . . . . . . . . . . . . . . . . . . . . . . . . . . . . . . . . . . . . . . . . . . . . . . . . . . . . . . . . . . . 6-15
Entering Material Quantity Data Using BOM Calculation Paths . . . . . . . . . . . . . . . . . . . . . . . . . . . . . . . . . 6-15
Working With Cost In The Inputs Grid . . . . . . . . . . . . . . . . . . . . . . . . . . . . . . . . . . . . . . . . . . . . . . . . . . . . . . 6-18
Additional Tools Found in the Input Grid . . . . . . . . . . . . . . . . . . . . . . . . . . . . . . . . . . . . . . . . . . . . . . . . . . . . 6-19
Outputs Section . . . . . . . . . . . . . . . . . . . . . . . . . . . . . . . . . . . . . . . . . . . . . . . . . . . . . . . . . . . . . . . . . . . . . . . . . . . . . . . 6-20
Steps Section . . . . . . . . . . . . . . . . . . . . . . . . . . . . . . . . . . . . . . . . . . . . . . . . . . . . . . . . . . . . . . . . . . . . . . . . . . . . . . . . . . 6-22
Process Tab . . . . . . . . . . . . . . . . . . . . . . . . . . . . . . . . . . . . . . . . . . . . . . . . . . . . . . . . . . . . . . . . . . . . . . . . . . . . . . . . . . . . . . . 6-23
Steps Section . . . . . . . . . . . . . . . . . . . . . . . . . . . . . . . . . . . . . . . . . . . . . . . . . . . . . . . . . . . . . . . . . . . . . . . . . . . . . . . . . . 6-23
Interacting With Process Navigation. . . . . . . . . . . . . . . . . . . . . . . . . . . . . . . . . . . . . . . . . . . . . . . . . . . . . . . . . 6-23
Interacting With The Step Details Section . . . . . . . . . . . . . . . . . . . . . . . . . . . . . . . . . . . . . . . . . . . . . . . . . . . . 6-24
Bill Of Materials Sub-Tab . . . . . . . . . . . . . . . . . . . . . . . . . . . . . . . . . . . . . . . . . . . . . . . . . . . . . . . . . . . . . . . . . . . . 6-26
Input Items Sub-Section . . . . . . . . . . . . . . . . . . . . . . . . . . . . . . . . . . . . . . . . . . . . . . . . . . . . . . . . . . . . . . . . . . 6-27
Alternate Input Items Sub-Section . . . . . . . . . . . . . . . . . . . . . . . . . . . . . . . . . . . . . . . . . . . . . . . . . . . . . . . . . . 6-29
Output Items Sub-Section . . . . . . . . . . . . . . . . . . . . . . . . . . . . . . . . . . . . . . . . . . . . . . . . . . . . . . . . . . . . . . . . . 6-30
Alternate Output Items Sub-Section. . . . . . . . . . . . . . . . . . . . . . . . . . . . . . . . . . . . . . . . . . . . . . . . . . . . . . . . . 6-36
viii
Global Specification Management User Guide
Contents
Packaging Sub-Tab . . . . . . . . . . . . . . . . . . . . . . . . . . . . . . . . . . . . . . . . . . . . . . . . . . . . . . . . . . . . . . . . . . . . . . . . .
Input Items Sub-Section . . . . . . . . . . . . . . . . . . . . . . . . . . . . . . . . . . . . . . . . . . . . . . . . . . . . . . . . . . . . . . . . . .
Ext Data Tab . . . . . . . . . . . . . . . . . . . . . . . . . . . . . . . . . . . . . . . . . . . . . . . . . . . . . . . . . . . . . . . . . . . . . . . . . . . . . . . . . . . . . .
Related Specs Tab . . . . . . . . . . . . . . . . . . . . . . . . . . . . . . . . . . . . . . . . . . . . . . . . . . . . . . . . . . . . . . . . . . . . . . . . . . . . . . . . . .
Trade Specifications Section . . . . . . . . . . . . . . . . . . . . . . . . . . . . . . . . . . . . . . . . . . . . . . . . . . . . . . . . . . . . . . . . . . . . .
CSS Tab . . . . . . . . . . . . . . . . . . . . . . . . . . . . . . . . . . . . . . . . . . . . . . . . . . . . . . . . . . . . . . . . . . . . . . . . . . . . . . . . . . . . . . . . . .
Supporting Documents Tab . . . . . . . . . . . . . . . . . . . . . . . . . . . . . . . . . . . . . . . . . . . . . . . . . . . . . . . . . . . . . . . . . . . . . . . . .
References Tab . . . . . . . . . . . . . . . . . . . . . . . . . . . . . . . . . . . . . . . . . . . . . . . . . . . . . . . . . . . . . . . . . . . . . . . . . . . . . . . . . . . .
Approval/Audit Trail Tab. . . . . . . . . . . . . . . . . . . . . . . . . . . . . . . . . . . . . . . . . . . . . . . . . . . . . . . . . . . . . . . . . . . . . . . . . . . .
Additional Tools . . . . . . . . . . . . . . . . . . . . . . . . . . . . . . . . . . . . . . . . . . . . . . . . . . . . . . . . . . . . . . . . . . . . . . . . . . . . . . . . . . .
Overview of Basis . . . . . . . . . . . . . . . . . . . . . . . . . . . . . . . . . . . . . . . . . . . . . . . . . . . . . . . . . . . . . . . . . . . . . . . . . . . . . .
Basis dialog box . . . . . . . . . . . . . . . . . . . . . . . . . . . . . . . . . . . . . . . . . . . . . . . . . . . . . . . . . . . . . . . . . . . . . . . . . . . .
Specification Attributes Tab . . . . . . . . . . . . . . . . . . . . . . . . . . . . . . . . . . . . . . . . . . . . . . . . . . . . . . . . . . . . . . . . . .
Combined Ingredient Statement Section . . . . . . . . . . . . . . . . . . . . . . . . . . . . . . . . . . . . . . . . . . . . . . . . . . . . .
Ingredient Attributes Section. . . . . . . . . . . . . . . . . . . . . . . . . . . . . . . . . . . . . . . . . . . . . . . . . . . . . . . . . . . . . . .
Reconstitution/Equivalency Section . . . . . . . . . . . . . . . . . . . . . . . . . . . . . . . . . . . . . . . . . . . . . . . . . . . . . . . . .
% Breakdown Tab . . . . . . . . . . . . . . . . . . . . . . . . . . . . . . . . . . . . . . . . . . . . . . . . . . . . . . . . . . . . . . . . . . . . . . . . . .
Component % Breakdowns Section . . . . . . . . . . . . . . . . . . . . . . . . . . . . . . . . . . . . . . . . . . . . . . . . . . . . . . . . .
Nutrition Tab. . . . . . . . . . . . . . . . . . . . . . . . . . . . . . . . . . . . . . . . . . . . . . . . . . . . . . . . . . . . . . . . . . . . . . . . . . . . . .
Nutrient Composition Section . . . . . . . . . . . . . . . . . . . . . . . . . . . . . . . . . . . . . . . . . . . . . . . . . . . . . . . . . . . . .
Compliance Tab . . . . . . . . . . . . . . . . . . . . . . . . . . . . . . . . . . . . . . . . . . . . . . . . . . . . . . . . . . . . . . . . . . . . . . . . . . .
Adding Complies With Information. . . . . . . . . . . . . . . . . . . . . . . . . . . . . . . . . . . . . . . . . . . . . . . . . . . . . . . . .
Output Dialog Box . . . . . . . . . . . . . . . . . . . . . . . . . . . . . . . . . . . . . . . . . . . . . . . . . . . . . . . . . . . . . . . . . . . . . . . . . . . . .
Summary Tab . . . . . . . . . . . . . . . . . . . . . . . . . . . . . . . . . . . . . . . . . . . . . . . . . . . . . . . . . . . . . . . . . . . . . . . . . . . . .
Summary Information Section . . . . . . . . . . . . . . . . . . . . . . . . . . . . . . . . . . . . . . . . . . . . . . . . . . . . . . . . . . . . .
Composition Map Section . . . . . . . . . . . . . . . . . . . . . . . . . . . . . . . . . . . . . . . . . . . . . . . . . . . . . . . . . . . . . . . . .
Packaging Composition Map Section . . . . . . . . . . . . . . . . . . . . . . . . . . . . . . . . . . . . . . . . . . . . . . . . . . . . . . . .
Yield Tab . . . . . . . . . . . . . . . . . . . . . . . . . . . . . . . . . . . . . . . . . . . . . . . . . . . . . . . . . . . . . . . . . . . . . . . . . . . . . . . . .
Packaging Configuration Section . . . . . . . . . . . . . . . . . . . . . . . . . . . . . . . . . . . . . . . . . . . . . . . . . . . . . . . . . . .
Approximate Yield Section. . . . . . . . . . . . . . . . . . . . . . . . . . . . . . . . . . . . . . . . . . . . . . . . . . . . . . . . . . . . . . . . .
Design Attributes Section. . . . . . . . . . . . . . . . . . . . . . . . . . . . . . . . . . . . . . . . . . . . . . . . . . . . . . . . . . . . . . . . . .
Composition Tab . . . . . . . . . . . . . . . . . . . . . . . . . . . . . . . . . . . . . . . . . . . . . . . . . . . . . . . . . . . . . . . . . . . . . . . . . .
Regulatory BOM Section . . . . . . . . . . . . . . . . . . . . . . . . . . . . . . . . . . . . . . . . . . . . . . . . . . . . . . . . . . . . . . . . . .
Theoretical Breakdown Section. . . . . . . . . . . . . . . . . . . . . . . . . . . . . . . . . . . . . . . . . . . . . . . . . . . . . . . . . . . . .
Regulatory Breakdown Section . . . . . . . . . . . . . . . . . . . . . . . . . . . . . . . . . . . . . . . . . . . . . . . . . . . . . . . . . . . . .
Nutrition Tab. . . . . . . . . . . . . . . . . . . . . . . . . . . . . . . . . . . . . . . . . . . . . . . . . . . . . . . . . . . . . . . . . . . . . . . . . . . . . .
Nutrient Composition Section . . . . . . . . . . . . . . . . . . . . . . . . . . . . . . . . . . . . . . . . . . . . . . . . . . . . . . . . . . . . .
Compliance Tab . . . . . . . . . . . . . . . . . . . . . . . . . . . . . . . . . . . . . . . . . . . . . . . . . . . . . . . . . . . . . . . . . . . . . . . . . . .
Ext Data Tab . . . . . . . . . . . . . . . . . . . . . . . . . . . . . . . . . . . . . . . . . . . . . . . . . . . . . . . . . . . . . . . . . . . . . . . . . . . . . .
Custom Sections Section . . . . . . . . . . . . . . . . . . . . . . . . . . . . . . . . . . . . . . . . . . . . . . . . . . . . . . . . . . . . . . . . . .
Snapshots . . . . . . . . . . . . . . . . . . . . . . . . . . . . . . . . . . . . . . . . . . . . . . . . . . . . . . . . . . . . . . . . . . . . . . . . . . . . . . . . . . . .
Optimization. . . . . . . . . . . . . . . . . . . . . . . . . . . . . . . . . . . . . . . . . . . . . . . . . . . . . . . . . . . . . . . . . . . . . . . . . . . . . . . . . .
Target Specification Section . . . . . . . . . . . . . . . . . . . . . . . . . . . . . . . . . . . . . . . . . . . . . . . . . . . . . . . . . . . . . . . . . .
Constraints Section. . . . . . . . . . . . . . . . . . . . . . . . . . . . . . . . . . . . . . . . . . . . . . . . . . . . . . . . . . . . . . . . . . . . . . . . .
Ingredient Cost . . . . . . . . . . . . . . . . . . . . . . . . . . . . . . . . . . . . . . . . . . . . . . . . . . . . . . . . . . . . . . . . . . . . . . . . . .
Nutrient Content . . . . . . . . . . . . . . . . . . . . . . . . . . . . . . . . . . . . . . . . . . . . . . . . . . . . . . . . . . . . . . . . . . . . . . . .
Extended Attribute . . . . . . . . . . . . . . . . . . . . . . . . . . . . . . . . . . . . . . . . . . . . . . . . . . . . . . . . . . . . . . . . . . . . . . .
Ordering . . . . . . . . . . . . . . . . . . . . . . . . . . . . . . . . . . . . . . . . . . . . . . . . . . . . . . . . . . . . . . . . . . . . . . . . . . . . . . .
Guidelines Section . . . . . . . . . . . . . . . . . . . . . . . . . . . . . . . . . . . . . . . . . . . . . . . . . . . . . . . . . . . . . . . . . . . . . . . . .
Optimization Method Section . . . . . . . . . . . . . . . . . . . . . . . . . . . . . . . . . . . . . . . . . . . . . . . . . . . . . . . . . . . . . . . .
Formulation Column . . . . . . . . . . . . . . . . . . . . . . . . . . . . . . . . . . . . . . . . . . . . . . . . . . . . . . . . . . . . . . . . . . . . . . .
Constraints Column . . . . . . . . . . . . . . . . . . . . . . . . . . . . . . . . . . . . . . . . . . . . . . . . . . . . . . . . . . . . . . . . . . . . . . . .
Distribution Column . . . . . . . . . . . . . . . . . . . . . . . . . . . . . . . . . . . . . . . . . . . . . . . . . . . . . . . . . . . . . . . . . . . . . . .
Optimization Action Buttons . . . . . . . . . . . . . . . . . . . . . . . . . . . . . . . . . . . . . . . . . . . . . . . . . . . . . . . . . . . . . . . .
6-36
6-37
6-40
6-40
6-40
6-40
6-41
6-41
6-41
6-41
6-41
6-42
6-43
6-43
6-44
6-44
6-44
6-45
6-45
6-46
6-46
6-48
6-49
6-50
6-50
6-52
6-52
6-53
6-53
6-54
6-56
6-56
6-57
6-58
6-58
6-59
6-59
6-61
6-62
6-64
6-64
6-65
6-66
6-67
6-70
6-71
6-72
6-72
6-73
6-74
6-74
6-74
6-74
6-77
ix
Agile Product Lifecycle Management for Process
Chapter 7
Menu Item Specifications
Overview . . . . . . . . . . . . . . . . . . . . . . . . . . . . . . . . . . . . . . . . . . . . . . . . . . . . . . . . . . . . . . . . . . . . . . . . . . . . . . . . . . . . . . . . . . 7-1
Page-Level Functions . . . . . . . . . . . . . . . . . . . . . . . . . . . . . . . . . . . . . . . . . . . . . . . . . . . . . . . . . . . . . . . . . . . . . . . . . . . . . . . . 7-2
Summary Tab . . . . . . . . . . . . . . . . . . . . . . . . . . . . . . . . . . . . . . . . . . . . . . . . . . . . . . . . . . . . . . . . . . . . . . . . . . . . . . . . . . . . . . 7-3
Menu Item Description Section . . . . . . . . . . . . . . . . . . . . . . . . . . . . . . . . . . . . . . . . . . . . . . . . . . . . . . . . . . . . . . . . . . . 7-3
Build Tab . . . . . . . . . . . . . . . . . . . . . . . . . . . . . . . . . . . . . . . . . . . . . . . . . . . . . . . . . . . . . . . . . . . . . . . . . . . . . . . . . . . . . . . . . . 7-4
Menu Item Build Section . . . . . . . . . . . . . . . . . . . . . . . . . . . . . . . . . . . . . . . . . . . . . . . . . . . . . . . . . . . . . . . . . . . . . . . . . 7-4
Alternate Products/Menu Items Section . . . . . . . . . . . . . . . . . . . . . . . . . . . . . . . . . . . . . . . . . . . . . . . . . . . . . . . . . . . . 7-4
Packaging Tab . . . . . . . . . . . . . . . . . . . . . . . . . . . . . . . . . . . . . . . . . . . . . . . . . . . . . . . . . . . . . . . . . . . . . . . . . . . . . . . . . . . . . . 7-5
Packaging Materials Section . . . . . . . . . . . . . . . . . . . . . . . . . . . . . . . . . . . . . . . . . . . . . . . . . . . . . . . . . . . . . . . . . . . . . . 7-5
Alternate Packaging Section . . . . . . . . . . . . . . . . . . . . . . . . . . . . . . . . . . . . . . . . . . . . . . . . . . . . . . . . . . . . . . . . . . . . . . 7-5
Compliance Tab . . . . . . . . . . . . . . . . . . . . . . . . . . . . . . . . . . . . . . . . . . . . . . . . . . . . . . . . . . . . . . . . . . . . . . . . . . . . . . . . . . . . 7-6
Label Claims Section . . . . . . . . . . . . . . . . . . . . . . . . . . . . . . . . . . . . . . . . . . . . . . . . . . . . . . . . . . . . . . . . . . . . . . . . . . . . 7-6
Label Claims Determination . . . . . . . . . . . . . . . . . . . . . . . . . . . . . . . . . . . . . . . . . . . . . . . . . . . . . . . . . . . . . . . . . . 7-7
Related Specs Tab . . . . . . . . . . . . . . . . . . . . . . . . . . . . . . . . . . . . . . . . . . . . . . . . . . . . . . . . . . . . . . . . . . . . . . . . . . . . . . . . . . 7-10
Global/Regional Standard Section . . . . . . . . . . . . . . . . . . . . . . . . . . . . . . . . . . . . . . . . . . . . . . . . . . . . . . . . . . . . . . . . 7-10
Alternate Standards Section. . . . . . . . . . . . . . . . . . . . . . . . . . . . . . . . . . . . . . . . . . . . . . . . . . . . . . . . . . . . . . . . . . . . . . 7-10
Supporting Documents Tab . . . . . . . . . . . . . . . . . . . . . . . . . . . . . . . . . . . . . . . . . . . . . . . . . . . . . . . . . . . . . . . . . . . . . . . . . 7-11
Nutrient Profile Section . . . . . . . . . . . . . . . . . . . . . . . . . . . . . . . . . . . . . . . . . . . . . . . . . . . . . . . . . . . . . . . . . . . . . . . . . 7-11
References Tab . . . . . . . . . . . . . . . . . . . . . . . . . . . . . . . . . . . . . . . . . . . . . . . . . . . . . . . . . . . . . . . . . . . . . . . . . . . . . . . . . . . . 7-11
Approval/Audit Trail Tab. . . . . . . . . . . . . . . . . . . . . . . . . . . . . . . . . . . . . . . . . . . . . . . . . . . . . . . . . . . . . . . . . . . . . . . . . . . . 7-11
Chapter 8
Nutrient Profiles
Overview . . . . . . . . . . . . . . . . . . . . . . . . . . . . . . . . . . . . . . . . . . . . . . . . . . . . . . . . . . . . . . . . . . . . . . . . . . . . . . . . . . . . . . . . . . 8-1
Page-Level Functions . . . . . . . . . . . . . . . . . . . . . . . . . . . . . . . . . . . . . . . . . . . . . . . . . . . . . . . . . . . . . . . . . . . . . . . . . . . . . . . . 8-2
Summary Tab . . . . . . . . . . . . . . . . . . . . . . . . . . . . . . . . . . . . . . . . . . . . . . . . . . . . . . . . . . . . . . . . . . . . . . . . . . . . . . . . . . . . . . 8-2
Weight/Volume/Serving Information Section . . . . . . . . . . . . . . . . . . . . . . . . . . . . . . . . . . . . . . . . . . . . . . . . . . . . . . . . 8-3
Ingredient Statements Section. . . . . . . . . . . . . . . . . . . . . . . . . . . . . . . . . . . . . . . . . . . . . . . . . . . . . . . . . . . . . . . . . . . . . 8-4
Nutrition Panel Tab . . . . . . . . . . . . . . . . . . . . . . . . . . . . . . . . . . . . . . . . . . . . . . . . . . . . . . . . . . . . . . . . . . . . . . . . . . . . . . . . . 8-4
Nutrient Profile Section . . . . . . . . . . . . . . . . . . . . . . . . . . . . . . . . . . . . . . . . . . . . . . . . . . . . . . . . . . . . . . . . . . . . . . . . . . 8-4
Label Claims . . . . . . . . . . . . . . . . . . . . . . . . . . . . . . . . . . . . . . . . . . . . . . . . . . . . . . . . . . . . . . . . . . . . . . . . . . . . . . . . . . 8-10
Label Composition Tab . . . . . . . . . . . . . . . . . . . . . . . . . . . . . . . . . . . . . . . . . . . . . . . . . . . . . . . . . . . . . . . . . . . . . . . . . . . . . 8-13
Ext Data Tab . . . . . . . . . . . . . . . . . . . . . . . . . . . . . . . . . . . . . . . . . . . . . . . . . . . . . . . . . . . . . . . . . . . . . . . . . . . . . . . . . . . . . . 8-13
Related Specs Tab . . . . . . . . . . . . . . . . . . . . . . . . . . . . . . . . . . . . . . . . . . . . . . . . . . . . . . . . . . . . . . . . . . . . . . . . . . . . . . . . . . 8-13
Supporting Documents Tab . . . . . . . . . . . . . . . . . . . . . . . . . . . . . . . . . . . . . . . . . . . . . . . . . . . . . . . . . . . . . . . . . . . . . . . . . 8-14
References Tab . . . . . . . . . . . . . . . . . . . . . . . . . . . . . . . . . . . . . . . . . . . . . . . . . . . . . . . . . . . . . . . . . . . . . . . . . . . . . . . . . . . . 8-14
Approval/Audit Trail Tab. . . . . . . . . . . . . . . . . . . . . . . . . . . . . . . . . . . . . . . . . . . . . . . . . . . . . . . . . . . . . . . . . . . . . . . . . . . . 8-14
Chapter 9
Product Specifications
Overview . . . . . . . . . . . . . . . . . . . . . . . . . . . . . . . . . . . . . . . . . . . . . . . . . . . . . . . . . . . . . . . . . . . . . . . . . . . . . . . . . . . . . . . . . .
Page-Level Functions . . . . . . . . . . . . . . . . . . . . . . . . . . . . . . . . . . . . . . . . . . . . . . . . . . . . . . . . . . . . . . . . . . . . . . . . . . . . . . . .
Summary Tab . . . . . . . . . . . . . . . . . . . . . . . . . . . . . . . . . . . . . . . . . . . . . . . . . . . . . . . . . . . . . . . . . . . . . . . . . . . . . . . . . . . . . .
Product Attributes Section . . . . . . . . . . . . . . . . . . . . . . . . . . . . . . . . . . . . . . . . . . . . . . . . . . . . . . . . . . . . . . . . . . . . . . .
Design Attributes Section . . . . . . . . . . . . . . . . . . . . . . . . . . . . . . . . . . . . . . . . . . . . . . . . . . . . . . . . . . . . . . . . . . . . . . . .
Formulation Tab. . . . . . . . . . . . . . . . . . . . . . . . . . . . . . . . . . . . . . . . . . . . . . . . . . . . . . . . . . . . . . . . . . . . . . . . . . . . . . . . . . . .
Ingredient Statements Section. . . . . . . . . . . . . . . . . . . . . . . . . . . . . . . . . . . . . . . . . . . . . . . . . . . . . . . . . . . . . . . . . . . . .
Compliance Tab . . . . . . . . . . . . . . . . . . . . . . . . . . . . . . . . . . . . . . . . . . . . . . . . . . . . . . . . . . . . . . . . . . . . . . . . . . . . . . . . . . . .
Related Specs Tab . . . . . . . . . . . . . . . . . . . . . . . . . . . . . . . . . . . . . . . . . . . . . . . . . . . . . . . . . . . . . . . . . . . . . . . . . . . . . . . . . . .
Global/Regional Standard Section . . . . . . . . . . . . . . . . . . . . . . . . . . . . . . . . . . . . . . . . . . . . . . . . . . . . . . . . . . . . . . . . .
Alternate Standards Section. . . . . . . . . . . . . . . . . . . . . . . . . . . . . . . . . . . . . . . . . . . . . . . . . . . . . . . . . . . . . . . . . . . . . . .
Packing Configurations Specifications Section . . . . . . . . . . . . . . . . . . . . . . . . . . . . . . . . . . . . . . . . . . . . . . . . . . . . . . .
Supporting Documents Tab . . . . . . . . . . . . . . . . . . . . . . . . . . . . . . . . . . . . . . . . . . . . . . . . . . . . . . . . . . . . . . . . . . . . . . . . . .
x
9-1
9-2
9-3
9-3
9-3
9-4
9-4
9-4
9-5
9-5
9-5
9-5
9-6
Global Specification Management User Guide
Contents
References Tab . . . . . . . . . . . . . . . . . . . . . . . . . . . . . . . . . . . . . . . . . . . . . . . . . . . . . . . . . . . . . . . . . . . . . . . . . . . . . . . . . . . . . 9-6
Approval/Audit Trail Tab. . . . . . . . . . . . . . . . . . . . . . . . . . . . . . . . . . . . . . . . . . . . . . . . . . . . . . . . . . . . . . . . . . . . . . . . . . . . . 9-6
Chapter 10
Ingredient Specifications
Overview . . . . . . . . . . . . . . . . . . . . . . . . . . . . . . . . . . . . . . . . . . . . . . . . . . . . . . . . . . . . . . . . . . . . . . . . . . . . . . . . . . . . . . . . .
Page-Level Functions . . . . . . . . . . . . . . . . . . . . . . . . . . . . . . . . . . . . . . . . . . . . . . . . . . . . . . . . . . . . . . . . . . . . . . . . . . . . . . .
Summary Tab . . . . . . . . . . . . . . . . . . . . . . . . . . . . . . . . . . . . . . . . . . . . . . . . . . . . . . . . . . . . . . . . . . . . . . . . . . . . . . . . . . . . .
Ingredient Attributes Section . . . . . . . . . . . . . . . . . . . . . . . . . . . . . . . . . . . . . . . . . . . . . . . . . . . . . . . . . . . . . . . . . . . .
Shelf Life Section . . . . . . . . . . . . . . . . . . . . . . . . . . . . . . . . . . . . . . . . . . . . . . . . . . . . . . . . . . . . . . . . . . . . . . . . . . . . . .
Design Attributes Section . . . . . . . . . . . . . . . . . . . . . . . . . . . . . . . . . . . . . . . . . . . . . . . . . . . . . . . . . . . . . . . . . . . . . . .
Formulation Tab. . . . . . . . . . . . . . . . . . . . . . . . . . . . . . . . . . . . . . . . . . . . . . . . . . . . . . . . . . . . . . . . . . . . . . . . . . . . . . . . . . .
Ingredient Statements Section. . . . . . . . . . . . . . . . . . . . . . . . . . . . . . . . . . . . . . . . . . . . . . . . . . . . . . . . . . . . . . . . . . . .
Compliance Tab . . . . . . . . . . . . . . . . . . . . . . . . . . . . . . . . . . . . . . . . . . . . . . . . . . . . . . . . . . . . . . . . . . . . . . . . . . . . . . . . . . .
Related Specs Tab . . . . . . . . . . . . . . . . . . . . . . . . . . . . . . . . . . . . . . . . . . . . . . . . . . . . . . . . . . . . . . . . . . . . . . . . . . . . . . . . . .
Produced By Section . . . . . . . . . . . . . . . . . . . . . . . . . . . . . . . . . . . . . . . . . . . . . . . . . . . . . . . . . . . . . . . . . . . . . . . . . . .
Trade Specifications Section . . . . . . . . . . . . . . . . . . . . . . . . . . . . . . . . . . . . . . . . . . . . . . . . . . . . . . . . . . . . . . . . . . . . .
Packing Configurations Specifications Section . . . . . . . . . . . . . . . . . . . . . . . . . . . . . . . . . . . . . . . . . . . . . . . . . . . . . .
CSS Tab . . . . . . . . . . . . . . . . . . . . . . . . . . . . . . . . . . . . . . . . . . . . . . . . . . . . . . . . . . . . . . . . . . . . . . . . . . . . . . . . . . . . . . . . . .
Supporting Documents Tab . . . . . . . . . . . . . . . . . . . . . . . . . . . . . . . . . . . . . . . . . . . . . . . . . . . . . . . . . . . . . . . . . . . . . . . . .
References Tab . . . . . . . . . . . . . . . . . . . . . . . . . . . . . . . . . . . . . . . . . . . . . . . . . . . . . . . . . . . . . . . . . . . . . . . . . . . . . . . . . . . .
Substitute Materials Section . . . . . . . . . . . . . . . . . . . . . . . . . . . . . . . . . . . . . . . . . . . . . . . . . . . . . . . . . . . . . . . . . . . . .
Approval/Audit Trail Tab. . . . . . . . . . . . . . . . . . . . . . . . . . . . . . . . . . . . . . . . . . . . . . . . . . . . . . . . . . . . . . . . . . . . . . . . . . . .
Chapter 11
10-1
10-2
10-3
10-3
10-4
10-5
10-5
10-5
10-6
10-6
10-6
10-7
10-7
10-7
10-8
10-8
10-8
10-9
Packaging Material Specifications
Overview . . . . . . . . . . . . . . . . . . . . . . . . . . . . . . . . . . . . . . . . . . . . . . . . . . . . . . . . . . . . . . . . . . . . . . . . . . . . . . . . . . . . . . . . .
Page-Level Functions . . . . . . . . . . . . . . . . . . . . . . . . . . . . . . . . . . . . . . . . . . . . . . . . . . . . . . . . . . . . . . . . . . . . . . . . . . . . . . .
Summary Tab . . . . . . . . . . . . . . . . . . . . . . . . . . . . . . . . . . . . . . . . . . . . . . . . . . . . . . . . . . . . . . . . . . . . . . . . . . . . . . . . . . . . .
Packaging Attributes Section . . . . . . . . . . . . . . . . . . . . . . . . . . . . . . . . . . . . . . . . . . . . . . . . . . . . . . . . . . . . . . . . . . . . .
Tare Weight Section . . . . . . . . . . . . . . . . . . . . . . . . . . . . . . . . . . . . . . . . . . . . . . . . . . . . . . . . . . . . . . . . . . . . . . . . . . . .
Compliance Tab . . . . . . . . . . . . . . . . . . . . . . . . . . . . . . . . . . . . . . . . . . . . . . . . . . . . . . . . . . . . . . . . . . . . . . . . . . . . . . . . . . .
Environmental Waste Section . . . . . . . . . . . . . . . . . . . . . . . . . . . . . . . . . . . . . . . . . . . . . . . . . . . . . . . . . . . . . . . . . . . .
Printed Packaging Material Tab . . . . . . . . . . . . . . . . . . . . . . . . . . . . . . . . . . . . . . . . . . . . . . . . . . . . . . . . . . . . . . . . . . . . . .
Printed Packaging Material Section . . . . . . . . . . . . . . . . . . . . . . . . . . . . . . . . . . . . . . . . . . . . . . . . . . . . . . . . . . . . . . .
Related Specs Tab . . . . . . . . . . . . . . . . . . . . . . . . . . . . . . . . . . . . . . . . . . . . . . . . . . . . . . . . . . . . . . . . . . . . . . . . . . . . . . . . . .
Sub Components Section. . . . . . . . . . . . . . . . . . . . . . . . . . . . . . . . . . . . . . . . . . . . . . . . . . . . . . . . . . . . . . . . . . . . . . . .
Packing Configuration Specifications Section . . . . . . . . . . . . . . . . . . . . . . . . . . . . . . . . . . . . . . . . . . . . . . . . . . . . . . .
Equipment Specifications Section. . . . . . . . . . . . . . . . . . . . . . . . . . . . . . . . . . . . . . . . . . . . . . . . . . . . . . . . . . . . . . . . .
CSS Tab . . . . . . . . . . . . . . . . . . . . . . . . . . . . . . . . . . . . . . . . . . . . . . . . . . . . . . . . . . . . . . . . . . . . . . . . . . . . . . . . . . . . . . . . . .
Supporting Documents Tab . . . . . . . . . . . . . . . . . . . . . . . . . . . . . . . . . . . . . . . . . . . . . . . . . . . . . . . . . . . . . . . . . . . . . . . . .
References Tab . . . . . . . . . . . . . . . . . . . . . . . . . . . . . . . . . . . . . . . . . . . . . . . . . . . . . . . . . . . . . . . . . . . . . . . . . . . . . . . . . . . .
Substitute Materials Section . . . . . . . . . . . . . . . . . . . . . . . . . . . . . . . . . . . . . . . . . . . . . . . . . . . . . . . . . . . . . . . . . . . . .
Approval/Audit Trail Tab. . . . . . . . . . . . . . . . . . . . . . . . . . . . . . . . . . . . . . . . . . . . . . . . . . . . . . . . . . . . . . . . . . . . . . . . . . . .
11-1
11-2
11-3
11-3
11-3
11-4
11-5
11-5
11-5
11-5
11-5
11-6
11-6
11-7
11-7
11-7
11-7
11-8
xi
Agile Product Lifecycle Management for Process
Chapter 12
Equipment Specifications
Overview . . . . . . . . . . . . . . . . . . . . . . . . . . . . . . . . . . . . . . . . . . . . . . . . . . . . . . . . . . . . . . . . . . . . . . . . . . . . . . . . . . . . . . . . .
Page-Level Functions . . . . . . . . . . . . . . . . . . . . . . . . . . . . . . . . . . . . . . . . . . . . . . . . . . . . . . . . . . . . . . . . . . . . . . . . . . . . . . .
Summary Tab . . . . . . . . . . . . . . . . . . . . . . . . . . . . . . . . . . . . . . . . . . . . . . . . . . . . . . . . . . . . . . . . . . . . . . . . . . . . . . . . . . . . .
Equipment Identification Section . . . . . . . . . . . . . . . . . . . . . . . . . . . . . . . . . . . . . . . . . . . . . . . . . . . . . . . . . . . . . . . . .
Compliance Tab . . . . . . . . . . . . . . . . . . . . . . . . . . . . . . . . . . . . . . . . . . . . . . . . . . . . . . . . . . . . . . . . . . . . . . . . . . . . . . . . . . .
Environmental Waste (per item sold) Section . . . . . . . . . . . . . . . . . . . . . . . . . . . . . . . . . . . . . . . . . . . . . . . . . . . . . . .
Related Specs Tab . . . . . . . . . . . . . . . . . . . . . . . . . . . . . . . . . . . . . . . . . . . . . . . . . . . . . . . . . . . . . . . . . . . . . . . . . . . . . . . . . .
Packaging Specifications Section. . . . . . . . . . . . . . . . . . . . . . . . . . . . . . . . . . . . . . . . . . . . . . . . . . . . . . . . . . . . . . . . . .
Supporting Documents Tab . . . . . . . . . . . . . . . . . . . . . . . . . . . . . . . . . . . . . . . . . . . . . . . . . . . . . . . . . . . . . . . . . . . . . . . . .
References Tab . . . . . . . . . . . . . . . . . . . . . . . . . . . . . . . . . . . . . . . . . . . . . . . . . . . . . . . . . . . . . . . . . . . . . . . . . . . . . . . . . . . .
Approval/Audit Trail Tab. . . . . . . . . . . . . . . . . . . . . . . . . . . . . . . . . . . . . . . . . . . . . . . . . . . . . . . . . . . . . . . . . . . . . . . . . . . .
Chapter 13
Printed Packaging Specifications
Overview . . . . . . . . . . . . . . . . . . . . . . . . . . . . . . . . . . . . . . . . . . . . . . . . . . . . . . . . . . . . . . . . . . . . . . . . . . . . . . . . . . . . . . . . .
Page-Level Functions . . . . . . . . . . . . . . . . . . . . . . . . . . . . . . . . . . . . . . . . . . . . . . . . . . . . . . . . . . . . . . . . . . . . . . . . . . . . . . .
Summary Tab . . . . . . . . . . . . . . . . . . . . . . . . . . . . . . . . . . . . . . . . . . . . . . . . . . . . . . . . . . . . . . . . . . . . . . . . . . . . . . . . . . . . .
Label Information Section. . . . . . . . . . . . . . . . . . . . . . . . . . . . . . . . . . . . . . . . . . . . . . . . . . . . . . . . . . . . . . . . . . . . . . .
Tare Weight Section . . . . . . . . . . . . . . . . . . . . . . . . . . . . . . . . . . . . . . . . . . . . . . . . . . . . . . . . . . . . . . . . . . . . . . . . . . . .
Compliance Tab . . . . . . . . . . . . . . . . . . . . . . . . . . . . . . . . . . . . . . . . . . . . . . . . . . . . . . . . . . . . . . . . . . . . . . . . . . . . . . . . . . .
Related Specs Tab . . . . . . . . . . . . . . . . . . . . . . . . . . . . . . . . . . . . . . . . . . . . . . . . . . . . . . . . . . . . . . . . . . . . . . . . . . . . . . . . . .
Parent Packaging Material Section . . . . . . . . . . . . . . . . . . . . . . . . . . . . . . . . . . . . . . . . . . . . . . . . . . . . . . . . . . . . . . . .
CSS Tab . . . . . . . . . . . . . . . . . . . . . . . . . . . . . . . . . . . . . . . . . . . . . . . . . . . . . . . . . . . . . . . . . . . . . . . . . . . . . . . . . . . . . . . . . .
Supporting Documents Tab . . . . . . . . . . . . . . . . . . . . . . . . . . . . . . . . . . . . . . . . . . . . . . . . . . . . . . . . . . . . . . . . . . . . . . . . .
References Tab . . . . . . . . . . . . . . . . . . . . . . . . . . . . . . . . . . . . . . . . . . . . . . . . . . . . . . . . . . . . . . . . . . . . . . . . . . . . . . . . . . . .
Substitute Materials Section . . . . . . . . . . . . . . . . . . . . . . . . . . . . . . . . . . . . . . . . . . . . . . . . . . . . . . . . . . . . . . . . . . . . .
Approval/Audit Trail Tab. . . . . . . . . . . . . . . . . . . . . . . . . . . . . . . . . . . . . . . . . . . . . . . . . . . . . . . . . . . . . . . . . . . . . . . . . . . .
Chapter 14
13-1
13-2
13-3
13-3
13-3
13-4
13-4
13-5
13-5
13-5
13-6
13-6
13-6
Delivered Material Packing Specifications
Overview . . . . . . . . . . . . . . . . . . . . . . . . . . . . . . . . . . . . . . . . . . . . . . . . . . . . . . . . . . . . . . . . . . . . . . . . . . . . . . . . . . . . . . . . .
Page-Level Functions . . . . . . . . . . . . . . . . . . . . . . . . . . . . . . . . . . . . . . . . . . . . . . . . . . . . . . . . . . . . . . . . . . . . . . . . . . . . . . .
Summary Tab . . . . . . . . . . . . . . . . . . . . . . . . . . . . . . . . . . . . . . . . . . . . . . . . . . . . . . . . . . . . . . . . . . . . . . . . . . . . . . . . . . . . .
Packing Description Section . . . . . . . . . . . . . . . . . . . . . . . . . . . . . . . . . . . . . . . . . . . . . . . . . . . . . . . . . . . . . . . . . . . . .
Compliance Tab . . . . . . . . . . . . . . . . . . . . . . . . . . . . . . . . . . . . . . . . . . . . . . . . . . . . . . . . . . . . . . . . . . . . . . . . . . . . . . . . . . .
Environmental Waste Section . . . . . . . . . . . . . . . . . . . . . . . . . . . . . . . . . . . . . . . . . . . . . . . . . . . . . . . . . . . . . . . . . . . .
Related Specs Tab . . . . . . . . . . . . . . . . . . . . . . . . . . . . . . . . . . . . . . . . . . . . . . . . . . . . . . . . . . . . . . . . . . . . . . . . . . . . . . . . . .
Labeling Specifications Section . . . . . . . . . . . . . . . . . . . . . . . . . . . . . . . . . . . . . . . . . . . . . . . . . . . . . . . . . . . . . . . . . . .
Supporting Documents Tab . . . . . . . . . . . . . . . . . . . . . . . . . . . . . . . . . . . . . . . . . . . . . . . . . . . . . . . . . . . . . . . . . . . . . . . . .
References Tab . . . . . . . . . . . . . . . . . . . . . . . . . . . . . . . . . . . . . . . . . . . . . . . . . . . . . . . . . . . . . . . . . . . . . . . . . . . . . . . . . . . .
Approval/Audit Trail Tab. . . . . . . . . . . . . . . . . . . . . . . . . . . . . . . . . . . . . . . . . . . . . . . . . . . . . . . . . . . . . . . . . . . . . . . . . . . .
xii
12-1
12-2
12-2
12-3
12-3
12-3
12-3
12-4
12-4
12-4
12-4
14-1
14-2
14-2
14-2
14-3
14-3
14-3
14-3
14-3
14-4
14-4
Global Specification Management User Guide
Contents
Chapter 15
Packing Configuration Specifications
Overview . . . . . . . . . . . . . . . . . . . . . . . . . . . . . . . . . . . . . . . . . . . . . . . . . . . . . . . . . . . . . . . . . . . . . . . . . . . . . . . . . . . . . . . . .
Page-Level Functions . . . . . . . . . . . . . . . . . . . . . . . . . . . . . . . . . . . . . . . . . . . . . . . . . . . . . . . . . . . . . . . . . . . . . . . . . . . . . . .
Summary Tab . . . . . . . . . . . . . . . . . . . . . . . . . . . . . . . . . . . . . . . . . . . . . . . . . . . . . . . . . . . . . . . . . . . . . . . . . . . . . . . . . . . . .
Packing Description Section . . . . . . . . . . . . . . . . . . . . . . . . . . . . . . . . . . . . . . . . . . . . . . . . . . . . . . . . . . . . . . . . . . . . .
Packing Tab. . . . . . . . . . . . . . . . . . . . . . . . . . . . . . . . . . . . . . . . . . . . . . . . . . . . . . . . . . . . . . . . . . . . . . . . . . . . . . . . . . . . . . .
Packing Attribute (Inner Pack) Section . . . . . . . . . . . . . . . . . . . . . . . . . . . . . . . . . . . . . . . . . . . . . . . . . . . . . . . . . . . .
Packing Attribute (Master Case) Section . . . . . . . . . . . . . . . . . . . . . . . . . . . . . . . . . . . . . . . . . . . . . . . . . . . . . . . . . . .
Related Specs Tab . . . . . . . . . . . . . . . . . . . . . . . . . . . . . . . . . . . . . . . . . . . . . . . . . . . . . . . . . . . . . . . . . . . . . . . . . . . . . . . . . .
Inner-Delivered Packing Specifications Section . . . . . . . . . . . . . . . . . . . . . . . . . . . . . . . . . . . . . . . . . . . . . . . . . . . . .
Intermediate-Delivered Material Packing Specifications Section . . . . . . . . . . . . . . . . . . . . . . . . . . . . . . . . . . . . . . .
Outer-Delivered Material Packing Specification Section . . . . . . . . . . . . . . . . . . . . . . . . . . . . . . . . . . . . . . . . . . . . . .
Supporting Documents Tab . . . . . . . . . . . . . . . . . . . . . . . . . . . . . . . . . . . . . . . . . . . . . . . . . . . . . . . . . . . . . . . . . . . . . . . . .
References Tab . . . . . . . . . . . . . . . . . . . . . . . . . . . . . . . . . . . . . . . . . . . . . . . . . . . . . . . . . . . . . . . . . . . . . . . . . . . . . . . . . . . .
Approval/Audit Trail Tab. . . . . . . . . . . . . . . . . . . . . . . . . . . . . . . . . . . . . . . . . . . . . . . . . . . . . . . . . . . . . . . . . . . . . . . . . . . .
Chapter 16
Labeling Specifications
Overview . . . . . . . . . . . . . . . . . . . . . . . . . . . . . . . . . . . . . . . . . . . . . . . . . . . . . . . . . . . . . . . . . . . . . . . . . . . . . . . . . . . . . . . . .
Page-Level Functions . . . . . . . . . . . . . . . . . . . . . . . . . . . . . . . . . . . . . . . . . . . . . . . . . . . . . . . . . . . . . . . . . . . . . . . . . . . . . . .
Summary Tab . . . . . . . . . . . . . . . . . . . . . . . . . . . . . . . . . . . . . . . . . . . . . . . . . . . . . . . . . . . . . . . . . . . . . . . . . . . . . . . . . . . . .
Labeling Description Section . . . . . . . . . . . . . . . . . . . . . . . . . . . . . . . . . . . . . . . . . . . . . . . . . . . . . . . . . . . . . . . . . . . .
Compliance Tab . . . . . . . . . . . . . . . . . . . . . . . . . . . . . . . . . . . . . . . . . . . . . . . . . . . . . . . . . . . . . . . . . . . . . . . . . . . . . . . . . . .
Related Specs Tab . . . . . . . . . . . . . . . . . . . . . . . . . . . . . . . . . . . . . . . . . . . . . . . . . . . . . . . . . . . . . . . . . . . . . . . . . . . . . . . . . .
Delivered Material Packing Specifications That Rely on This Specification Section . . . . . . . . . . . . . . . . . . . . . . . .
Supporting Documents Tab . . . . . . . . . . . . . . . . . . . . . . . . . . . . . . . . . . . . . . . . . . . . . . . . . . . . . . . . . . . . . . . . . . . . . . . . .
References Tab . . . . . . . . . . . . . . . . . . . . . . . . . . . . . . . . . . . . . . . . . . . . . . . . . . . . . . . . . . . . . . . . . . . . . . . . . . . . . . . . . . . .
Approval/Audit Trail Tab. . . . . . . . . . . . . . . . . . . . . . . . . . . . . . . . . . . . . . . . . . . . . . . . . . . . . . . . . . . . . . . . . . . . . . . . . . . .
Chapter 17
15-1
15-2
15-2
15-2
15-3
15-3
15-3
15-4
15-4
15-5
15-5
15-5
15-6
15-6
16-1
16-2
16-3
16-3
16-4
16-4
16-4
16-4
16-4
16-4
Master Specifications
Overview . . . . . . . . . . . . . . . . . . . . . . . . . . . . . . . . . . . . . . . . . . . . . . . . . . . . . . . . . . . . . . . . . . . . . . . . . . . . . . . . . . . . . . . . .
Page-Level Functions . . . . . . . . . . . . . . . . . . . . . . . . . . . . . . . . . . . . . . . . . . . . . . . . . . . . . . . . . . . . . . . . . . . . . . . . . . . . . . .
Summary Tab . . . . . . . . . . . . . . . . . . . . . . . . . . . . . . . . . . . . . . . . . . . . . . . . . . . . . . . . . . . . . . . . . . . . . . . . . . . . . . . . . . . . .
Master Description Section . . . . . . . . . . . . . . . . . . . . . . . . . . . . . . . . . . . . . . . . . . . . . . . . . . . . . . . . . . . . . . . . . . . . . .
Applies To Tab . . . . . . . . . . . . . . . . . . . . . . . . . . . . . . . . . . . . . . . . . . . . . . . . . . . . . . . . . . . . . . . . . . . . . . . . . . . . . . . . . . . .
Specification Categories Section . . . . . . . . . . . . . . . . . . . . . . . . . . . . . . . . . . . . . . . . . . . . . . . . . . . . . . . . . . . . . . . . . .
Supporting Documents Tab . . . . . . . . . . . . . . . . . . . . . . . . . . . . . . . . . . . . . . . . . . . . . . . . . . . . . . . . . . . . . . . . . . . . . . . . .
Ext Data Tab . . . . . . . . . . . . . . . . . . . . . . . . . . . . . . . . . . . . . . . . . . . . . . . . . . . . . . . . . . . . . . . . . . . . . . . . . . . . . . . . . . . . . .
References Tab . . . . . . . . . . . . . . . . . . . . . . . . . . . . . . . . . . . . . . . . . . . . . . . . . . . . . . . . . . . . . . . . . . . . . . . . . . . . . . . . . . . .
Approval/Audit Trail Tab. . . . . . . . . . . . . . . . . . . . . . . . . . . . . . . . . . . . . . . . . . . . . . . . . . . . . . . . . . . . . . . . . . . . . . . . . . . .
17-1
17-2
17-2
17-2
17-3
17-3
17-5
17-5
17-5
17-5
xiii
Agile Product Lifecycle Management for Process
Chapter 18
LIO Profiles
Overview . . . . . . . . . . . . . . . . . . . . . . . . . . . . . . . . . . . . . . . . . . . . . . . . . . . . . . . . . . . . . . . . . . . . . . . . . . . . . . . . . . . . . . . . . 18-1
Page-Level Functions . . . . . . . . . . . . . . . . . . . . . . . . . . . . . . . . . . . . . . . . . . . . . . . . . . . . . . . . . . . . . . . . . . . . . . . . . . . . . . . 18-2
Summary Tab . . . . . . . . . . . . . . . . . . . . . . . . . . . . . . . . . . . . . . . . . . . . . . . . . . . . . . . . . . . . . . . . . . . . . . . . . . . . . . . . . . . . . 18-2
LIO Profile Section . . . . . . . . . . . . . . . . . . . . . . . . . . . . . . . . . . . . . . . . . . . . . . . . . . . . . . . . . . . . . . . . . . . . . . . . . . . . . 18-2
Output Material Selection Section . . . . . . . . . . . . . . . . . . . . . . . . . . . . . . . . . . . . . . . . . . . . . . . . . . . . . . . . . . . . . . . . 18-2
Nutrient Profile Section . . . . . . . . . . . . . . . . . . . . . . . . . . . . . . . . . . . . . . . . . . . . . . . . . . . . . . . . . . . . . . . . . . . . . . . . . 18-3
LIO Construction Tab . . . . . . . . . . . . . . . . . . . . . . . . . . . . . . . . . . . . . . . . . . . . . . . . . . . . . . . . . . . . . . . . . . . . . . . . . . . . . . 18-3
LIO Construction Section . . . . . . . . . . . . . . . . . . . . . . . . . . . . . . . . . . . . . . . . . . . . . . . . . . . . . . . . . . . . . . . . . . . . . . . 18-3
Restrictions . . . . . . . . . . . . . . . . . . . . . . . . . . . . . . . . . . . . . . . . . . . . . . . . . . . . . . . . . . . . . . . . . . . . . . . . . . . . . 18-4
Format . . . . . . . . . . . . . . . . . . . . . . . . . . . . . . . . . . . . . . . . . . . . . . . . . . . . . . . . . . . . . . . . . . . . . . . . . . . . . . . . . 18-4
Inactive Rows. . . . . . . . . . . . . . . . . . . . . . . . . . . . . . . . . . . . . . . . . . . . . . . . . . . . . . . . . . . . . . . . . . . . . . . . . . . . 18-5
Using the LIO Tree . . . . . . . . . . . . . . . . . . . . . . . . . . . . . . . . . . . . . . . . . . . . . . . . . . . . . . . . . . . . . . . . . . . . . . . . . 18-5
Declaration Options and Actions . . . . . . . . . . . . . . . . . . . . . . . . . . . . . . . . . . . . . . . . . . . . . . . . . . . . . . . . . . . . . . . . . 18-8
Right Menu Actions . . . . . . . . . . . . . . . . . . . . . . . . . . . . . . . . . . . . . . . . . . . . . . . . . . . . . . . . . . . . . . . . . . . . . . . . . . . 18-10
View . . . . . . . . . . . . . . . . . . . . . . . . . . . . . . . . . . . . . . . . . . . . . . . . . . . . . . . . . . . . . . . . . . . . . . . . . . . . . . . . . . . . 18-10
Add New Group . . . . . . . . . . . . . . . . . . . . . . . . . . . . . . . . . . . . . . . . . . . . . . . . . . . . . . . . . . . . . . . . . . . . . . . . . . 18-10
Refer to FIC . . . . . . . . . . . . . . . . . . . . . . . . . . . . . . . . . . . . . . . . . . . . . . . . . . . . . . . . . . . . . . . . . . . . . . . . . . . . . . 18-10
Recon/Equiv . . . . . . . . . . . . . . . . . . . . . . . . . . . . . . . . . . . . . . . . . . . . . . . . . . . . . . . . . . . . . . . . . . . . . . . . . . . . . 18-11
Delete Group . . . . . . . . . . . . . . . . . . . . . . . . . . . . . . . . . . . . . . . . . . . . . . . . . . . . . . . . . . . . . . . . . . . . . . . . . . . . . 18-12
Annotate . . . . . . . . . . . . . . . . . . . . . . . . . . . . . . . . . . . . . . . . . . . . . . . . . . . . . . . . . . . . . . . . . . . . . . . . . . . . . . . . 18-12
Audit History. . . . . . . . . . . . . . . . . . . . . . . . . . . . . . . . . . . . . . . . . . . . . . . . . . . . . . . . . . . . . . . . . . . . . . . . . . . . . 18-13
Divide. . . . . . . . . . . . . . . . . . . . . . . . . . . . . . . . . . . . . . . . . . . . . . . . . . . . . . . . . . . . . . . . . . . . . . . . . . . . . . . . . . . 18-14
Declaration Descriptions . . . . . . . . . . . . . . . . . . . . . . . . . . . . . . . . . . . . . . . . . . . . . . . . . . . . . . . . . . . . . . . . . . . . . . . 18-15
Ingredient Statement . . . . . . . . . . . . . . . . . . . . . . . . . . . . . . . . . . . . . . . . . . . . . . . . . . . . . . . . . . . . . . . . . . . . . . 18-15
List... x, y . . . . . . . . . . . . . . . . . . . . . . . . . . . . . . . . . . . . . . . . . . . . . . . . . . . . . . . . . . . . . . . . . . . . . . . . . . . . . . . . 18-15
List... i (x, y). . . . . . . . . . . . . . . . . . . . . . . . . . . . . . . . . . . . . . . . . . . . . . . . . . . . . . . . . . . . . . . . . . . . . . . . . . . . . . 18-15
List... i (x%, y%) . . . . . . . . . . . . . . . . . . . . . . . . . . . . . . . . . . . . . . . . . . . . . . . . . . . . . . . . . . . . . . . . . . . . . . . . . . 18-15
Do NOT Declare . . . . . . . . . . . . . . . . . . . . . . . . . . . . . . . . . . . . . . . . . . . . . . . . . . . . . . . . . . . . . . . . . . . . . . . . . . 18-15
LIO Operations. . . . . . . . . . . . . . . . . . . . . . . . . . . . . . . . . . . . . . . . . . . . . . . . . . . . . . . . . . . . . . . . . . . . . . . . . . . . . . . 18-16
Refresh Operation. . . . . . . . . . . . . . . . . . . . . . . . . . . . . . . . . . . . . . . . . . . . . . . . . . . . . . . . . . . . . . . . . . . . . . . 18-16
Preview Operation . . . . . . . . . . . . . . . . . . . . . . . . . . . . . . . . . . . . . . . . . . . . . . . . . . . . . . . . . . . . . . . . . . . . . . 18-16
Alias/FIC Operation . . . . . . . . . . . . . . . . . . . . . . . . . . . . . . . . . . . . . . . . . . . . . . . . . . . . . . . . . . . . . . . . . . . . . 18-17
Grouping Operation. . . . . . . . . . . . . . . . . . . . . . . . . . . . . . . . . . . . . . . . . . . . . . . . . . . . . . . . . . . . . . . . . . . . . 18-17
Audit Operation . . . . . . . . . . . . . . . . . . . . . . . . . . . . . . . . . . . . . . . . . . . . . . . . . . . . . . . . . . . . . . . . . . . . . . . . 18-18
Final Statement Tab . . . . . . . . . . . . . . . . . . . . . . . . . . . . . . . . . . . . . . . . . . . . . . . . . . . . . . . . . . . . . . . . . . . . . . . . . . . . . . . 18-19
Ingredient Statement Options Section . . . . . . . . . . . . . . . . . . . . . . . . . . . . . . . . . . . . . . . . . . . . . . . . . . . . . . . . . . . . 18-19
Format Field . . . . . . . . . . . . . . . . . . . . . . . . . . . . . . . . . . . . . . . . . . . . . . . . . . . . . . . . . . . . . . . . . . . . . . . . . . . 18-19
Style Field . . . . . . . . . . . . . . . . . . . . . . . . . . . . . . . . . . . . . . . . . . . . . . . . . . . . . . . . . . . . . . . . . . . . . . . . . . . . . 18-19
Final Ingredient Statement Section. . . . . . . . . . . . . . . . . . . . . . . . . . . . . . . . . . . . . . . . . . . . . . . . . . . . . . . . . . . . . . . 18-20
Label Composition Tab . . . . . . . . . . . . . . . . . . . . . . . . . . . . . . . . . . . . . . . . . . . . . . . . . . . . . . . . . . . . . . . . . . . . . . . . . . . . 18-20
Chapter 19
Testing Protocol Library
Overview . . . . . . . . . . . . . . . . . . . . . . . . . . . . . . . . . . . . . . . . . . . . . . . . . . . . . . . . . . . . . . . . . . . . . . . . . . . . . . . . . . . . . . . . .
Page-Level Functions . . . . . . . . . . . . . . . . . . . . . . . . . . . . . . . . . . . . . . . . . . . . . . . . . . . . . . . . . . . . . . . . . . . . . . . . . . . . . . .
Testing Protocol Detail. . . . . . . . . . . . . . . . . . . . . . . . . . . . . . . . . . . . . . . . . . . . . . . . . . . . . . . . . . . . . . . . . . . . . . . . . . . . . .
Testing Protocol (Header) Section . . . . . . . . . . . . . . . . . . . . . . . . . . . . . . . . . . . . . . . . . . . . . . . . . . . . . . . . . . . . . . . .
Facility Information Section . . . . . . . . . . . . . . . . . . . . . . . . . . . . . . . . . . . . . . . . . . . . . . . . . . . . . . . . . . . . . . . . . . . . .
Sections Section . . . . . . . . . . . . . . . . . . . . . . . . . . . . . . . . . . . . . . . . . . . . . . . . . . . . . . . . . . . . . . . . . . . . . . . . . . . . . . .
Extended Attributes Section . . . . . . . . . . . . . . . . . . . . . . . . . . . . . . . . . . . . . . . . . . . . . . . . . . . . . . . . . . . . . . . . . . . . .
Testing Protocol (Detail) Section . . . . . . . . . . . . . . . . . . . . . . . . . . . . . . . . . . . . . . . . . . . . . . . . . . . . . . . . . . . . . . . . .
xiv
19-1
19-2
19-2
19-2
19-3
19-3
19-4
19-4
Global Specification Management User Guide
Contents
Chapter 20
Activities
Overview . . . . . . . . . . . . . . . . . . . . . . . . . . . . . . . . . . . . . . . . . . . . . . . . . . . . . . . . . . . . . . . . . . . . . . . . . . . . . . . . . . . . . . . . .
Creating an Activity . . . . . . . . . . . . . . . . . . . . . . . . . . . . . . . . . . . . . . . . . . . . . . . . . . . . . . . . . . . . . . . . . . . . . . . . . . . . . . . .
Creating a Primary Relationship from a Specification . . . . . . . . . . . . . . . . . . . . . . . . . . . . . . . . . . . . . . . . . . . .
Creating an Activity That Is Independent of Specifications . . . . . . . . . . . . . . . . . . . . . . . . . . . . . . . . . . . . . . . .
Searching for an Activity . . . . . . . . . . . . . . . . . . . . . . . . . . . . . . . . . . . . . . . . . . . . . . . . . . . . . . . . . . . . . . . . . . . . . . . . . . . .
Summary Tab . . . . . . . . . . . . . . . . . . . . . . . . . . . . . . . . . . . . . . . . . . . . . . . . . . . . . . . . . . . . . . . . . . . . . . . . . . . . . . . . . . . . .
Activity Summary Section . . . . . . . . . . . . . . . . . . . . . . . . . . . . . . . . . . . . . . . . . . . . . . . . . . . . . . . . . . . . . . . . . . . . . . .
Primary Action Item Section. . . . . . . . . . . . . . . . . . . . . . . . . . . . . . . . . . . . . . . . . . . . . . . . . . . . . . . . . . . . . . . . . . . . .
Related Items Section . . . . . . . . . . . . . . . . . . . . . . . . . . . . . . . . . . . . . . . . . . . . . . . . . . . . . . . . . . . . . . . . . . . . . . . . . . .
Supporting Documents Tab . . . . . . . . . . . . . . . . . . . . . . . . . . . . . . . . . . . . . . . . . . . . . . . . . . . . . . . . . . . . . . . . . . . . . . . . .
Ext Data Tab . . . . . . . . . . . . . . . . . . . . . . . . . . . . . . . . . . . . . . . . . . . . . . . . . . . . . . . . . . . . . . . . . . . . . . . . . . . . . . . . . . . . . .
References Tab . . . . . . . . . . . . . . . . . . . . . . . . . . . . . . . . . . . . . . . . . . . . . . . . . . . . . . . . . . . . . . . . . . . . . . . . . . . . . . . . . . . .
Approval/Audit Trail Tab. . . . . . . . . . . . . . . . . . . . . . . . . . . . . . . . . . . . . . . . . . . . . . . . . . . . . . . . . . . . . . . . . . . . . . . . . . . .
Chapter 21
20-1
20-2
20-2
20-3
20-3
20-4
20-4
20-5
20-6
20-7
20-7
20-7
20-7
Using Change Management Features
Overview . . . . . . . . . . . . . . . . . . . . . . . . . . . . . . . . . . . . . . . . . . . . . . . . . . . . . . . . . . . . . . . . . . . . . . . . . . . . . . . . . . . . . . . . . 21-1
Global Succession Tool . . . . . . . . . . . . . . . . . . . . . . . . . . . . . . . . . . . . . . . . . . . . . . . . . . . . . . . . . . . . . . . . . . . . . . . . . . . . . 21-1
Accessing the Global Succession Tool . . . . . . . . . . . . . . . . . . . . . . . . . . . . . . . . . . . . . . . . . . . . . . . . . . . . . . . . . . . . . . 21-3
Finding the Specifications to Supersede . . . . . . . . . . . . . . . . . . . . . . . . . . . . . . . . . . . . . . . . . . . . . . . . . . . . . . . . . . . . 21-3
Performing the Global Succession . . . . . . . . . . . . . . . . . . . . . . . . . . . . . . . . . . . . . . . . . . . . . . . . . . . . . . . . . . . . . . . . 21-6
Verifying the Succession. . . . . . . . . . . . . . . . . . . . . . . . . . . . . . . . . . . . . . . . . . . . . . . . . . . . . . . . . . . . . . . . . . . . . . . . . 21-7
Smart Issue Tool . . . . . . . . . . . . . . . . . . . . . . . . . . . . . . . . . . . . . . . . . . . . . . . . . . . . . . . . . . . . . . . . . . . . . . . . . . . . . . . . . . . 21-8
Accessing the Smart Issue Tool . . . . . . . . . . . . . . . . . . . . . . . . . . . . . . . . . . . . . . . . . . . . . . . . . . . . . . . . . . . . . . . . . . . 21-9
Defining the Smart Issue Request . . . . . . . . . . . . . . . . . . . . . . . . . . . . . . . . . . . . . . . . . . . . . . . . . . . . . . . . . . . . . . . . 21-11
Finding the Specifications to Version . . . . . . . . . . . . . . . . . . . . . . . . . . . . . . . . . . . . . . . . . . . . . . . . . . . . . . . . . . . . . 21-13
Replace Specification . . . . . . . . . . . . . . . . . . . . . . . . . . . . . . . . . . . . . . . . . . . . . . . . . . . . . . . . . . . . . . . . . . . . . . 21-13
Replace Specification Given Parent . . . . . . . . . . . . . . . . . . . . . . . . . . . . . . . . . . . . . . . . . . . . . . . . . . . . . . . . . . . 21-13
Version Hierarchy Only . . . . . . . . . . . . . . . . . . . . . . . . . . . . . . . . . . . . . . . . . . . . . . . . . . . . . . . . . . . . . . . . . . . . 21-14
Exporting the Affected Specifications . . . . . . . . . . . . . . . . . . . . . . . . . . . . . . . . . . . . . . . . . . . . . . . . . . . . . . . . . 21-21
Exporting the Action List . . . . . . . . . . . . . . . . . . . . . . . . . . . . . . . . . . . . . . . . . . . . . . . . . . . . . . . . . . . . . . . . . . . 21-21
Performing the Smart Issue . . . . . . . . . . . . . . . . . . . . . . . . . . . . . . . . . . . . . . . . . . . . . . . . . . . . . . . . . . . . . . . . . . . . . 21-21
Verifying the Smart Issue . . . . . . . . . . . . . . . . . . . . . . . . . . . . . . . . . . . . . . . . . . . . . . . . . . . . . . . . . . . . . . . . . . . . . . . 21-22
Exporting the Results . . . . . . . . . . . . . . . . . . . . . . . . . . . . . . . . . . . . . . . . . . . . . . . . . . . . . . . . . . . . . . . . . . . . . . 21-23
Failed Requests . . . . . . . . . . . . . . . . . . . . . . . . . . . . . . . . . . . . . . . . . . . . . . . . . . . . . . . . . . . . . . . . . . . . . . . . . . . 21-23
Exporting Failed Results. . . . . . . . . . . . . . . . . . . . . . . . . . . . . . . . . . . . . . . . . . . . . . . . . . . . . . . . . . . . . . . . . . . . 21-23
Workflowing Specifications . . . . . . . . . . . . . . . . . . . . . . . . . . . . . . . . . . . . . . . . . . . . . . . . . . . . . . . . . . . . . . . . . 21-24
Checking the Status of the Smart Issue . . . . . . . . . . . . . . . . . . . . . . . . . . . . . . . . . . . . . . . . . . . . . . . . . . . . . . . . . . . 21-25
Chapter 22
Component Catalog
Component Catalog. . . . . . . . . . . . . . . . . . . . . . . . . . . . . . . . . . . . . . . . . . . . . . . . . . . . . . . . . . . . . . . . . . . . . . . . . . . . . . . .
Integration with Other Applications . . . . . . . . . . . . . . . . . . . . . . . . . . . . . . . . . . . . . . . . . . . . . . . . . . . . . . . . . . . . . .
Creating a New Component Catalog Term . . . . . . . . . . . . . . . . . . . . . . . . . . . . . . . . . . . . . . . . . . . . . . . . . . . . . . . . .
Catalog Term Section . . . . . . . . . . . . . . . . . . . . . . . . . . . . . . . . . . . . . . . . . . . . . . . . . . . . . . . . . . . . . . . . . . . . . . .
Aliases Section . . . . . . . . . . . . . . . . . . . . . . . . . . . . . . . . . . . . . . . . . . . . . . . . . . . . . . . . . . . . . . . . . . . . . . . . . . . . .
LIO Disclosure Section. . . . . . . . . . . . . . . . . . . . . . . . . . . . . . . . . . . . . . . . . . . . . . . . . . . . . . . . . . . . . . . . . . . . . .
LIO Groupings . . . . . . . . . . . . . . . . . . . . . . . . . . . . . . . . . . . . . . . . . . . . . . . . . . . . . . . . . . . . . . . . . . . . . . . . . . . .
Reconstitution/Equivalency Section . . . . . . . . . . . . . . . . . . . . . . . . . . . . . . . . . . . . . . . . . . . . . . . . . . . . . . . . . . .
Approved Usages Section . . . . . . . . . . . . . . . . . . . . . . . . . . . . . . . . . . . . . . . . . . . . . . . . . . . . . . . . . . . . . . . . . . . .
Using Component Catalog Terms . . . . . . . . . . . . . . . . . . . . . . . . . . . . . . . . . . . . . . . . . . . . . . . . . . . . . . . . . . . . . . . . . . . .
Appendix A
22-1
22-1
22-2
22-4
22-4
22-5
22-6
22-7
22-7
22-8
Key Search Fields
Searchable Fields . . . . . . . . . . . . . . . . . . . . . . . . . . . . . . . . . . . . . . . . . . . . . . . . . . . . . . . . . . . . . . . . . . . . . . . . . . . . . . . . . . . A-1
xv
Agile Product Lifecycle Management for Process
xvi
Global Specification Management User Guide
A BOUT T HIS M ANUAL
Agile Product Lifecycle Management for Process Documentation
The Agile Product Lifecycle Management (PLM) for Process documentation set
includes Adobe® Acrobat™ PDF files. The Oracle Technology Network (OTN)
Web site: http://www.oracle.com/technology/documentation/agile.html
contains the latest versions of the Agile PLM for Process PDF files. You can view
or download these manuals from the Web site, or you can ask your Agile
administrator if there is an Agile PLM for Process Documentation folder available
on your network from which you can access the Agile PLM for Process
documentation (PDF) files.
Note
To read the PDF files, you must use the free Adobe Reader™ version 7.0 or
later. This program can be downloaded from the Adobe Web site: http://
www.adobe.com/.
If you need additional assistance or information, please go to http://
metalink.oracle.com or phone 1.800.233.1711 for assistance.
Before calling Oracle Support about a problem with an Agile PLM for Process manual, please
have the full part number, which is located on the title page.
TTY Access to Oracle Support Services
Oracle provides dedicated Text Telephone (TTY) access to Oracle Support
Services within the United States of America 24 hours a day, 7 days a week. For
TTY support, call 800.446.2398. Outside the United States, call +1.407.458.2479.
Agile Training Aids
Go to the Oracle University Web page http://www.oracle.com/education/
chooser/selectcountry_new.html for more information on Agile Training
offerings.
Accessibility of Code Examples in Documentation
Screen readers may not always correctly read the code examples in this document.
The conventions for writing code require that closing braces should appear on an
otherwise empty line; however, some screen readers may not always read a line of
text that consists solely of a bracket or brace.
Accessibility of Links to External Web Sites in Documentation
This documentation may contain links to Web sites of other companies or
organizations that Oracle does not own or control. Oracle neither evaluates nor
makes any representations regarding the accessibility of these Web sites.
xvii
Agile Product Lifecycle Management for Process
Audience
This guide is intended for end users who are responsible for creating and
managing information in Agile Product Lifecycle Management for Process.
Information about administering the system resides in the Agile Product Lifecycle
Management for Process Administrator User Guide.
Variability of Installations
Descriptions and illustrations of the Agile PLM for Process user interface
included in this manual may not match your installation. The user interface of
Agile PLM for Process applications and the features included can vary greatly
depending on such variables as:
❑
Which applications your organization has purchased and installed
❑
Configuration settings that may turn features off or on
Customization specific to your organization
Security settings as they apply to the system and your user account
❑
❑
Where to Find Information
Consult the table below to find specific information from the relevant Agile PLM
for Process information source.
Table 1: Agile PLM for Process documentation topics, by source
Information type
GSM
User
Guide
Admin.
User
Guide
Administering Agile PLM
for Process
●
Cache management
●
Compliance
Extended attributes
●
●
●
Custom data management
Custom sections
●
●
●
●
●
●
●
●
●
Feature requests
Installing Agile PLM for
Process
●
●
New in this release
●
Technical support
xviii
●
●
●
●
●
●
Resolved issues
System-based roles
●
●
Known issues
Printing
●
●
Group management
Managing specifications
Agile
sales rep
●
Core data management
Creating specifications
Release Agile
Help
Notes
training Desk
●
●
Global Specification Management User Guide
About This Manual
Table 1: Agile PLM for Process documentation topics, by source (continued)
Information type
GSM
User
Guide
Admin.
User
Guide
Agile
sales rep
●
User management
Using the GSM
application
Release Agile
Help
Notes
training Desk
●
●
●
Workflow management
Document Conventions
The following formatting elements appear in Agile Product Lifecycle
Management for Process documentation.
Element
Meaning
Helvetica Condensed,
9 pt. bold type
A user interface (UI) element that a procedure is instructing
you to click, select, or type into. For example, buttons or text
entry fields.
9 pt. monospace font Code samples
10 pt. monospace
font
File names or directory names
Blue italic font
The linked portion of a cross-reference. Click it to go to the
referenced heading, table, or figure.
Minion Typeface,
Title Case
A named UI element that a procedure is describing but not
instructing you to click, select, or type into.
Alerts you to supplemental information.
Note
Minion 11.5 pt,
with faint blue
bar over & under
Caution!
Minion
11.5 pt, with
faint red bar
over & under
Important
Minion
11.5 pt, with
thick red bar
over & under
Alerts you to possible data loss, breaches of security, or other
more serious problems.
Alerts you to supplementary information that is essential to
the completion of a task.
xix
Agile Product Lifecycle Management for Process
xx
Global Specification Management User Guide
C HAPTER 1
Introduction
This chapter presents an overview of Global Specification Management and describes a few basic features.
Topics in this chapter include:
❑ The Global Specification Management Application
❑ Touch Points with Other Applications
❑ Finding Agile Data
The Global Specification Management Application
Global Specifications Management (GSM) provides your company with a
collaborative business process for managing data creation, localization,
taxonomy, and workflow for all levels included in the product genealogy—across
the enterprise and with value chain partners
Overview
GSM is the solution:
• In which your company’s products are created and modified
• From which the product data are syndicated to other enterprise systems
GSM enables your company to create “one version of the truth” of your entire
product record, from finished products and manufacturing processes to your
ingredients and packaging materials. The entire product genealogy is connected,
enabling your company to build an integrated view of the interrelationships
among all specifications.
GSM is a critical part of the larger Agile Product Lifecycle Management for
Process suite. For general information about the Agile PLM for Process suite and
available solution packages, please see the Agile Product Lifecycle Management for
Process Getting Started Guide.
Formulation and Compliance Tools
The following features included in this guide are available only through the
Formulation and Compliance solution package of Agile Product Lifecycle
Management for Process:
❑
Label Claims Determination
❑
Regulatory Filings
1-1
Agile Product Lifecycle Management for Process
❑
Listed Ingredient Order (LIO) tool
❑
Formula Optimization tool
❑
Computer-Aided Compliance Screening (CACS)
❑
Nutrition Surveillance Management (NSM)
❑
Product Quality Scorecard (PQS)
Key Global Specification Management Capabilities
❑
Trade specifications —Contain all the attributes required to describe the
finished products sold by your company.
❑
Process specifications — Replaced by formulation specifications.
❑
Formulation specifications — Describe the manufacturing and packaging
processes that your company uses to produce your products.
❑
Menu item specifications — Describe products or menu items that make up
a menu item.
❑
Nutrient profiles — Contain the nutrient data related to process and trade
specifications.
❑
Product specifications — Contain the data related to product specifications.
❑
Ingredient specifications — Enable your company to manage all attributes
related to ingredients that it purchases for use in the bill of materials
contained in the formulation specifications.
❑
Packaging material specifications — Contain the data related to the
packaging materials used to package trade specifications.
❑
Equipment specifications — Contain the data related to equipment
specifications.
❑
Printed packaging specifications —Describe the printed packaging to be
used in trade specifications.
❑
Delivered material packing specifications — Contain the data related to
the inbound packing materials specified for incoming goods (ingredients and
packaging materials). GSM then pulls these specifications together into
packing configuration specifications, which fully describe the conditioning of
incoming goods.
❑
Packing configuration specifications — Describe the inbound packing
configurations required by your company for incoming goods (ingredients
and packaging materials).
❑
Labeling specifications — Contain the labeling and coding requirements
that suppliers need to affix on delivered material packing specifications for
incoming goods (ingredients and packaging materials).
❑
Master specifications — Represent generic specifications, such as general
terms and conditions, company programs and directions, regulatory
guidelines, and so on. You can use such a specification to capture high-level
organizational standards for related traded products, formulations,
ingredients, or packaging. Using master specifications can increase flexibility
and improve document control.
1-2
Global Specification Management User Guide
Chapter 1
Introduction
Touch Points with Other Applications
Computer Aided Compliance Screening
Computer Aided Compliance Screening (CACS) enables you to screen products
through rules and regulations to ensure their compliance with customer, market,
nutritional, and regulatory constraints. For more information, refer to the Agile
Product Lifecycle Management for Process Computer Aided Compliance Screening
User Guide.
eQuestionnaire
eQuestionnaire (eQ) is a tool that you can use to obtain specification data from
suppliers and manage their disposition in GSM. For more information, refer to
the Agile Product Lifecycle Management for Process eQuestionnaire User Guide.
Document Reference Library
You can associate Document Reference Library (DRL) documents to many Agile
business objects within Agile PLM for Process applications, such as GSM
specifications, New Product Development projects, and eQuestionnaire
questionnaires. For more information, refer to the Agile Product Lifecycle
Management for Process Document Reference Library User Guide.
New Product Development
Use the activities feature in New Product Development (NPD) to tie
specifications created in GSM to projects. For more information, refer to the
Agile Product Lifecycle Management for Process New Product Development User
Guide.
Nutrition Surveillance Management
Import nutrient values from nutrient analyses or nutrient composites created in
the Nutrient Surveillance Management (NSM) application. For more
information, refer to the Agile Product Lifecycle Management for Process Nutrition
Surveillance Management User Guide.
Product Quality Scorecard
You can syndicate GSM core data to other Agile Product Lifecycle for Process
applications as well as to other systems in your company. Product Quality
Scorecard (PQS) uses testing protocols, which must be configured in GSM. For
more information, see the Agile Product Lifecycle Management for Process Product
Quality Scorecard User Guide.
Reporting
The Reporting application provides reporting capability for data in GSM. For
more information, see the Agile Product Lifecycle Management for Process
Reporting User Guide.
1-3
Agile Product Lifecycle Management for Process
Supply Chain Relationship Management
GSM specifications are syndicated to Supply Chain Relationship Management
(SCRM), where sourcing approvals are created. Refer to the Agile Product
Lifecycle Management for Process Supply Chain Relationship Management User
Guide for more information.
Supplier Portal
Suppliers can view specifications created in GSM using Supplier Portal. For more
information, see the Agile Product Lifecycle Management for Process Supplier
Portal User Guide.
Finding Agile Data
There are two basic ways of locating information in Agile Product Lifecycle
Management for Process:
❑
By searching
❑
By category
This section explores the first method. For guidance on using the category
method, see Understanding the Category Tab on page 1-17.
Understanding the Search Form
The initial screen in most applications and sections of Agile Product Lifecycle
Management for Process consists of a search form. The search form (or query
tool) has a basic structure but can vary greatly based on application or other
factors. See figure 1-1 for an illustration of the basic search form:
Figure 1-1: The basic GSM search form
Key field to
search in
Operator
Search
term
1-4
Global Specification Management User Guide
Chapter 1
Introduction
The search form resides on the Search tab, one of two tabs on the initial screen,
the other being Category (see Understanding the Category Tab on page 1-17). To
find a specification using the search form, set search criteria using a combination
of three basic fields in the Search Criteria section. As shown in figure 1-1, these
fields are:
• Key field
• Operator
• Search term
The main search form includes the following buttons, as shown in figure 1-1
above:
Search —Displays your search results
Reset —Clears all search criteria fields
Save Search —Saves search criteria in a reusable library. Use this option if you use
certain search criteria often (see Understanding the Category Tab on page 1-17).
Load Search —Loads a saved search
In Agile Product Lifecycle Management for Process the first two search criteria
fields contain a default value, in the case of a trade specification, Spec Name (as
shown in figure 1-1, on page 1-4). The top few choices in the drop-down list are
the most frequently used fields.
Search Field Definitions
See table 1-1 for a description of search fields that appear on the main search
form.
Table 1-1: Fields on the main search form
Field
Description
Key field list
Select from a list of search criteria based on the GSM menu
search option that you chose.
Operator
Select from a list of operators based on the criteria that you
chose in the key field list. A few examples include Equals, Not
Equals, Contains, and Starts With.
Search term
The actual word or words that you are looking for. If this field
is preceded by an add data icon ( ), click it to view a dialog box
with available choices. You can also enter a percent sign (%) to
perform a wildcard search.
Results per page
Sets the number of search results to display at one time.
Key Field List
The first drop-down list in the search form, the Key Field list, consists of field
names that specifications can include. See figure 1-2 below for a list of field
names in this drop-down list (for a trade specification).
1-5
Agile Product Lifecycle Management for Process
Figure 1-2: Choices in the key field drop-down list (for a trade specification search)
Most of these field names are self-explanatory. See table A-1, Key field names of
note in the search criteria key field list, described, on page A-1 for descriptions of
search fields of note.
Key Field Lists by Specification Type
Table 1-2 on page 1-7 is a partial list of possible fields. Note that the lists of key
fields varies by specification type to some degree.
1-6
Global Specification Management User Guide
Chapter 1
Introduction
Operator List
The delimiter in the Operator field changes depending on which Key Field you
have selected. These logical, or Boolean, operators dynamically adjust to a set of
choices that make sense for the possible values of fields in the Key Field dropdown list. See table 1-2 for a sample list of the possible logical operator sets.
Table 1-2: Sample list of search tool fields, by field type and operator sets
Field type
Field(s)
Operator set
Free text
•
•
•
•
•
•
•
•
•
•
•
•
•
•
•
•
•
•
•
•
•
•
•
•
•
•
•
•
•
•
•
•
•
•
Contains
Equals
Starts With
Spec Name
Brand
Equivalent
Activity Title
Activity Type
Analytical Properties - Spec Limits
Associated Spec Association
Associated Spec Equivalent
Associated Spec Name
Attachment Filename
BD Component
BD Component FCL (Food Composition Library)
BD Component Ing. Spec.
BD Component Term
BD Component Text
Combined Statement
Description
Ingredient Statement (nutp)
NPD Project
Parent Formulation Spec #
Parent Formulation Spec Equivalent
Parent Formulation Spec Name
Primary Item Equivalent
Primary Item Spec Name
Related Item Equivalent
Related Item Spec Name
Related Trade Spec #
Related Trade Spec Equivalent
Related Trade Spec Name
Short Name
Sourcing Number
Special Notes
Status
Supercedes
1-7
Agile Product Lifecycle Management for Process
Table 1-2: Sample list of search tool fields, by field type and operator sets (continued)
1-8
Field type
Field(s) (continued)
Operator set
Multiple-select
( )*
•
•
•
•
•
•
•
•
•
•
•
•
•
•
•
•
•
•
•
•
•
Contains All
Contains One
Actual Label Claims
Additives
Additives (does NOT contain)
Additives (may contain)
Allergens
Allergens (does NOT contain)
Allergens (may contain)
Breakdown Component COO (country of origin)
Breakdown Component Term or Alias
Classification
Complies With
Country of Origin
Input Item
Intolerances
Intolerances (does NOT contain)
Intolerances (may contain)
Material Type
Menu Item Build
Packaging Materials
Potential Label Claims
Standard
• Approved for Use In - Country
Contains One
Equals
Number
•
•
•
•
•
•
•
Activity #
Associated Spec Number
GTIN/UPC/EAN
Primary Item Spec #
Related Item Spec #
Spec #
System Equivalent
Equals
Starts With
Number
•
•
•
•
•
•
•
•
•
•
•
•
•
•
x/100g - Calories
x/100g - Carbohydrates
x/100g - Cholesterol
x/100g - Protein
x/100g - Sodium
x/100g - Total Fat
x/100g - Total Sugar
x/Serv - Calories
x/Serv - Carbohydrates
x/Serv - Cholesterol
x/Serv - Protein
x/Serv - Sodium
x/Serv - Total Fat
x/Serv - Total Sugar
Equals
Greater Than
Less Than
Global Specification Management User Guide
Chapter 1
Introduction
Table 1-2: Sample list of search tool fields, by field type and operator sets (continued)
Field type
Field(s) (continued)
Operator set
Single option
( )
•
•
•
•
•
•
•
•
•
•
Analytical Properties
Business Unit (+Children)
Business Unit (Exact Match)
Business Unit (Hierarchical)
Category
Concept (Exact Match)
Concept (Hierarchical)
Concept (+Children)
System Name
UDEX Classification
Equals
Date (
•
•
•
•
Effective
Inactive
Last Edit
Created
Equals
Greater Than
Less Than
Subsearch list
[search- withinsearch dialog
box] ( )
•
•
•
•
•
•
•
Facility
Menu Item Class
Output Item
Receiving Facilities
Source Facility
Standard
Workflow
Contains One
Subsearch list
[search- withinsearch dialog
box] ( )
• Originator
Equals
Exists
Sourcing Approval
Is NULL
True or False
Supplier signed spec
Is FALSE
Is TRUE
)
*Add data icon (
) opens a dialog box to further refine field entry
Search Term Field
The third main field is for entry of search terms. Depending on the type of field
selected in the first drop-down list, the Key Field list, the search term field:
• Accepts data entry that you type
• Accepts data entry that you select from prepopulated forms
• Does not accept data
Entering Search Terms by Typing
You can type your search term directly into the search term field when searching
for data in the following two field types:
• Free text fields
• Number fields
See table 1-2, Sample list of search tool fields, by field type and operator sets, on
page 1-7 for a list of fields of this type.
1-9
Agile Product Lifecycle Management for Process
Entering Search Terms by Prepopulated List
Several field types require that you choose your terms from prepopulated lists, as
indicated by the add data icon ( ). Field types that require entry from a
prepopulated list include:
• Multiple-select
• Date
• Single option
• Subsearch list (search within search field)
For a sample list of fields of these types, see table 1-2 on page 1-7.
The type of dialog box from which you select a search term can vary by field type
and by individual key field. There are a large number of fields for every
specification type. Because there are too many combinations to illustrate each
one, see the following section for a sampling of dialog boxes.
To select data from a filtered prepopulated field:
1 Click the add data icon ( ) to the left of the search term field, as shown in
figure 1-3, below.
Figure 1-3: Add data icon
A multiple-select dialog box appears.
1-10
Global Specification Management User Guide
Chapter 1
Introduction
Figure 1-4: One variety of data entry dialog box
2
If desired, narrow down your choices by filtering them using the Show
choices for drop-down list by selecting a grouping.
Figure 1-5: A Show choices for drop-down list, detail
The dialog box refreshes with a list of choices filtered based on your selected
criteria.
3
To filter choices alphabetically, click a letter in the leftmost box. The
contents of the second box reload with only those choices beginning with the
letter that you have selected
1-11
Agile Product Lifecycle Management for Process
4
To add an item listed in the second box, select the item and then click the
add selected data icon (
). The selected item moves over to the
rightmost box.
Note
5
6
This screen supports multiple select (Control + mouse in
Windows).
To remove one or more items from the rightmost box, select one or more
items in the rightmost box and click the remove selected data icon (
).
The selected item(s) move to the leftmost box.
At the top right of the dialog box, click Done. The dialog box closes, and your
revised set of fields appears listed in the search term field to the right of the
add data icon ( ) in the search form.
There is a lot of variety in the dialog boxes that display when you click the add
data icon ( ). The basic types of dialog boxes are:
• Alphabetically filtered prefilled list dialog box, as shown in figure 21-5,
Group Filter dialog box, on page 21-6
• Geographically and alphabetically filtered prefilled list dialog box, as
shown in figure 1-4, One variety of data entry dialog box, on page 1-11
• Single-select tree of hyperlinked choices, as shown in figure 1-6 below
Figure 1-6: Single-select tree of hyperlinked choices
1-12
Global Specification Management User Guide
Chapter 1
Introduction
• Single-select tree of choices with option buttons, as shown in figure 1-7
below
Figure 1-7: Single-select tree of choices with options buttons
Clicking a
hyperlinked
category
opens the
branch
beneath it
• Calendar dialog box, as shown in figure 1-8 below, used exclusively for
date fields
Figure 1-8: Calendar dialog box
• Subsearch (search-within-search) dialog box, for use in narrowing down
a large number of options, as described in Using the Subsearch Tool on
page 1-14
1-13
Agile Product Lifecycle Management for Process
Using the Subsearch Tool
Possibly the most complex method of entering data in the search terms field is
through use of the subsearch (search-within-search) dialog box. This dialog box
enables you to do a “mini-search” with selected criteria in order to populate a
large text field that you can then manually edit before sending its contents into
the search terms field of the main search form. The fields displayed in the
subsearch vary based on context, and there are a large number of possible
combinations.
There are three basic steps to using the subsearch (or search-within-search) tool:
1
2
3
Search for your criteria using the search form at the top
Select one or more hyperlinked search results (which then appear in the
Selected Items box)
Click Done to close the dialog box and send the contents of the Selected
Items box to the search terms field of the main search window.
See figure 1-9 for an illustration of how to use the subsearch tool.
Figure 1-9: Using the subsearch tool
1. Perform a
preliminary search
using the search
form at the top
2. Click the links of
the search results
that your preliminary
search produced
3. Click Done
1-14
Global Specification Management User Guide
Chapter 1
Introduction
Because of the nested design of the subsearch tool, there are too many
permutations to cover all of them in a user manual. Therefore you can consider
the samples below (figure 1-10 and figure 1-11) as representative of the whole.
Figure 1-10: Subsearch tool when searching for facilities, blank
1-15
Agile Product Lifecycle Management for Process
Figure 1-11: Facilities subsearch tool showing selected search results
Searching for Field Types That Do Not Use the Search Terms Field
The following two field types make use of logical, yes-or-no operators for which
the search terms field is unnecessary:
• Exists
• True or False
If the field in which you are searching is one of these types, for example, Sourcing
Approval or Supplier signed spec, you complete the search criteria when you
choose the operator (Is NULL, Is FALSE, Is TRUE).
Adding More Criteria
In addition to the basic entry fields on the search form—key field list, operator,
and search term— two action links appear, more criteria and additional attributes,
as shown in figure 1-12.
1-16
Global Specification Management User Guide
Chapter 1
Introduction
Figure 1-12: The More Criteria and Additional Attributes action links on the main search form
When clicked, the first of these action links, more criteria, creates a second row of
the main three search fields. You can use additional rows to enter additional
search parameters.
Searching Custom Data
You can use the second action link, additional attributes, to search for
specification with existing extended attributes, custom sections, %breakdown, or
BOM items. Refer to the Agile Product Lifecycle Management for Process Getting
Started Guide for more information.
Understanding the Category Tab
The second method of finding data within Global Specification Management
(GSM) is the Category tab, which resides on the same page as the main search
form (see figure 1-13).
Figure 1-13: Category tab, as seen from the main search form tab
If you need to locate a specification from within a large database, the most
efficient tool to use is the search form. We recommend that you use the Category
tab if you would like to:
1-17
Agile Product Lifecycle Management for Process
❑
Get a global view of what other specifications and categories exist
❑
Gain a better understanding of where your desired specification fits in within
the larger hierarchy
❑
Get a quick view of how many specifications comprise a grouping
❑
Get a quick view of the type of specifications in a grouping
To locate a specification using the Category tab:
1 Open GSM and click any specification type in the left navigation panel. The
main search form screen appears.
2 Click on the Category tab, as shown in figure 1-14, on page 1-18. The
Category tab page displays, showing the first-level list of categories relevant
to your selected specification type, as shown in figure 1-14 below.
Figure 1-14: Category tab, default, first-level view
3
1-18
Click the category of the specification that you are looking for. The category
opens, displaying one or more second-level categories, as shown in figure 115.
Global Specification Management User Guide
Chapter 1
Introduction
Figure 1-15: Category tab showing second- and third-level categories
4
Continue clicking categories in the tree that you have opened until you reach
your desired specification, which is at the level that shows no expand node
icon ( ) or collapse node icon ( ) next to the hyperlink, as shown in
figure 1-16. That level is the end level.
1-19
Agile Product Lifecycle Management for Process
Figure 1-16: Category tab showing fully expanded branch
5
1-20
Click your hyperlinked specification. The specification opens the Summary
tab of the full specification-specific information screen.
Global Specification Management User Guide
C HAPTER 2
Working with Specifications
This chapter presents guidance on using workflows and other common features of Global Specification
Management. Topics in this chapter include:
❑ Creating Specifications
❑ Managing Specifications
❑ Comparing Ingredient Specifications
❑ Printing Specifications
Creating Specifications
Creating a New Specification
All specification types have the same creation process in Global Specification
Management (GSM).
To create a specification:
1 On the left navigation panel, click the specification type. GSM displays the
specification search page for that specification type.
2 Click Create New at the upper right of the page. A specification page opens
with empty fields.
3 Follow the guidelines for your desired specification type as laid out in the
chapter in this manual that specifically addresses that type of specification.
Creating a Copy of an Existing Specification
To create a copy of a specification, you will use the Create Copy button, which is
visible only to those with the user role of [SPEC_COPIER] and the specification
creator role for the specification type you are trying to copy. To create an issue of
a specification, you must have the role [SPEC_ISSUER] and the specification
creator role for the specification type you are trying to issue. For more
information on user roles, please see the Agile Product Lifecycle for Process
Administrator User Guide.
2-1
Agile Product Lifecycle Management for Process
To create a copy of an existing specification:
1 Navigate to the specification to copy.
2 On the specification page, click Create Copy at the upper right of the page.
GSM displays a dialog box, as shown in figure 2-1, below.
Figure 2-1: Create New Specification links
3
Click the Create NEW ISSUE for this Specification link to create another issue
of the specification. This action duplicates most of the data on the
specification, increasing the latest Issue # by 1 for the current specification
number prefix.
Note
4
Note
2-2
The action in this step is the method of choice when you want to
issue the specification. GSM appends issue numbers to the end of the
specification number when specifications are referenced. For
example, in the specification # 5077456-001, the last 3 digits (001)
represent the issue number. GSM tracks specification issues by using
the item history feature. For more information, please see Item
History on page 2-3.
Click the Create NEW SPECIFICATION based on this one link to create a copy
of the specification. This action duplicates most data on the specification,
assigning a new specification number. This method saves time when
creating similar specifications.
When a copy or issue of a specification is created, the resolved workflow
and active workflow step will not follow the specification. The specification
will re-resolve to a workflow when saved within GSM. For more on
workflows, please see Resolving Workflows on page 2-6.
Global Specification Management User Guide
Chapter 2
Working with Specifications
Item History
Specification issues are tracked using the item history feature. To access the item
history of a specification, navigate to the specification and do one of the
following:
❑
Click Item History at the upper right of the page. GSM opens the Spec History
dialog box, as shown in figure 2-3, below.
❑
From formulation specifications, click the specification history icon ( ) in
the Inputs table, as shown in figure 2-2 below. GSM displays the input’s
history.
Figure 2-2: BOM table in editable mode, showing specification history icon
Figure 2-3: Spec History dialog box
The Spec History table displays all issues of the specification that exist. Along
with other identifying information, this table also displays the reason that the
specification was changed. The value in the Reason for Change column appears
in most specifications in a field in the Summary Information section of the
Summary tab. This section is ordered from newest to oldest, highlighting the
specification that you are on.
2-3
Agile Product Lifecycle Management for Process
Managing Specifications
All GSM specifications are workflow enabled. A workflow is a business process,
in whole or in part, during which documents, information, or tasks are passed
from one participant to another for action, according to a set of procedural rules.
In Agile Product Lifecycle Management for Process, workflows are managed
using the Workflow Administration (WFA) application. For more information
on WFA, please see the “Workflow Management for GSM” chapter in the Agile
Product Lifecycle Management for Process Administrator User Guide.
Action Items
As a document moves through the workflow process, the system generates a todo list, or “action items,” for designated team members. When a specification, or
business object, moves from one workflow status to another, GSM adds an entry
to the Action Items list for the current owner of that object.
There are three types of action items:
❑
Specification
❑
Signature document
❑
Activity
Accessing Your Action Items
You can access the Action Items page in three different ways:
❑
Click Applications > GSM > Action Items on the Application menu in the top
menu bar
❑
Click GSM > Action Items on the left navigation panel from the Portal
From within GSM, click Action Items on the left navigation panel
❑
Understanding the Action Items Page
As shown in figure 2-5, the Action Items page contains a table with the following
sortable columns:
Spec #—The number of the specification
Title—The number and name of the specification
Type— The type of action item, hyperlinked to the actual object
NPD Project—The name of the New Product Development (NPD) project tied
to the specification. Depending on your configuration, this column may not
appear.
2-4
Global Specification Management User Guide
Chapter 2
Working with Specifications
Status— The workflow step that the object is in (for example, draft,
developmental, draft (review), requested for certification, and others)
RAG/SLA— A visual representation of the status of your action item (RAG = red,
amber, and green dates) as shown below:
Figure 2-4: Red-amber-green (RAG) symbols
Note
If the RAG status is Late ( ), the amber (approaching deadline) and red
(deadline) dates appear immediately after the red “late” symbol.
Figure 2-5: The Action Items page
Click on any column
heading to sort action items
by that column
The RAG status is an indicator of compliance with the established service level
agreement (SLA) timelines for that document type. SLAs for a specification are
defined in that specification’s workflow.
2-5
Agile Product Lifecycle Management for Process
Resolving Workflows
When you first save a specification within GSM, the application associates a
workflow with the specification. In some cases, when the specification resolves to
multiple workflow templates, you will need to select the workflow template from
the available options.
In such a situation, select a template for this specification from the Select
Workflow Template dialog box, shown in figure 2-6, below, and then click Done
at the top right corner of the dialog box.
Figure 2-6: Select Workflow Template dialog box
Important
2-6
Once you have selected a workflow template, you will not be asked to
define the workflow again. If your specification needs to be reresolved, you will need to use the Resolve Workflow button, which is
visible only to those with the user role of [CAN_RERESOLVE_WORKFLOWS].
For more information on user roles, please see the Agile Product
Lifecycle Management for Process Administrator User Guide.
Global Specification Management User Guide
Chapter 2
Working with Specifications
Transitioning a Workflow
Within a specification or signature document, use the workflow feature to move
a document from one workflow step to another.
To move a document in a workflow:
1 Click Workflow at the top right of the page. The Document Workflow dialog
box opens, as shown in figure . Remember that the buttons and fields that
display vary based on the workflow and current workflow step.
Figure 2-7: Document Workflow dialog box
Select a step from this
drop-down list.
You must enter comments
in the Your Comments
field.
2
3
4
Enter comments in the Your Comments field (required).
Select a step from a drop-down list in the Next Action section.
Click the advance workflow icon (
) to forward the specification or
signature document to the next step in the approval process, or click the
move back icon (
) to return it to a prior step. The system updates the
workflow status based on your selection.
2-7
Agile Product Lifecycle Management for Process
Selecting Workflow Participants
If the workflow icon includes people (
), in the next dialog box you may
have to select workflow participants, such as one or more owners, persons being
asked for a signature, or persons being notified. As figure 2-9, on page 2-8 shows,
the dialog box may contain preselected data or may prompt you to select one or
more participants. Refer to figure 2-8 through figure 2-10, on page 2-8 for an
example of selecting workflow participants.
Figure 2-8: Single select example: Choose a single owner.
Figure 2-9: Pre-Selected Example: Notification recipient(s) have been preselected in the workflow template.
Figure 2-10: Multiple select example: Select one or more signatories from each tab .
Each tab represents a
functional area in which you
may need to make a selection
Working with Signature Documents
Use a signature document to solicit approval for a specification before the
specification can move to the next step in the workflow. All requested signature
documents must be moved to an approved state before the specification can
move to the next workflow step. When you select a signature document—
whether by action item or an email link—GSM displays the signature document
page, as shown in figure 2-11 below:
2-8
Global Specification Management User Guide
Chapter 2
Working with Specifications
Figure 2-11: Signature document page
The Summary tab shows the specification that you have been asked to review.
You can follow the link to view the specification.
As figure 2-12 shows below, the Approval/Audit Trail tab shows the current
status and owner of the signature document, the desired action, assigned dates,
and the history of the signature document.
Figure 2-12: Signature Approval tab
Click Workflow at the top right of the page to take action on the signature
document by changing its status to “approved” or “not approved.”
Temporary Signature Authority
Temporary signature authority enables a person who has been asked to provide
a signature to assign that task to another user. A user with temporary authority
can view and advance or move back all signature documents that are currently
owned by the original signature authority. Tasks assigned to a user with
temporary authority also appear in the Action Items list of that person.
2-9
Agile Product Lifecycle Management for Process
Accessing Temporary Signature Authority
Access temporary signature authority from the left navigation panel, as shown in
figure 2-13, below.
Figure 2-13: Temporary Signature Authority, from left navigation panel
You can search for existing signature authorities. For detailed guidance on
searching, please see the Agile Lifecycle Management for Process Getting Started
Guide.
Creating a Temporary Signature Authority
To create a new signature authority, click Create New at the upper right of the
page. Figure 2-14 below shows the fields on this page.
Figure 2-14: Temporary Signature Authority fields
Temporary Owner—You can designate temporary signature authority by
clicking the Temporary Owner link. GSM displays the user selection dialog box,
which you can use to search for the desired user. Selecting the user name closes
the dialog box and populates the Temporary Owner field.
Start Date and End Date—These fields represent when the temporary signature
authority begins and ends. To change the dates listed, click the date. GSM
displays a calendar popup window that you can use to select new dates.
Status—Using this field, you can enable and disable the signature authority.
Editing an Existing Temporary Signature Authority
You can edit existing signature authorities that you have created. Search and
select the signature authority to edit and click Edit at the upper right of the page.
When done editing, click Save & Close Document.
2-10
Global Specification Management User Guide
Chapter 2
Working with Specifications
Approval/Audit Trail Tab
All workflow-enabled specifications contain an Approval/Audit Trail tab. This
tab contains the data related to the workflow status and history of a specification.
This page consists of the following system-defined sections:
❑
Current Status
❑
Event History
Signature Document
Lineage/History (appears only for nutrient profiles, trade, formulation, and
ingredient specifications)
❑
❑
Current Status Section
The Current Status section contains the workflow data related to a specification.
Figure 2-15: Current Status section
Event History Section
The Event History section contains the list of preceding workflow actions
associated with the specification.
Figure 2-16: Event History section
Signature Document Section
The Signature Document section, shown in the figure below, contains the list of
signature documents associated with that step of the workflow. All signature
documents associated with a specification must be in the approved state before
the specification can be moved forward in the workflow.
2-11
Agile Product Lifecycle Management for Process
Figure 2-17: Signature Document section
Clicking View Historical Signature Documents opens a view of signature
documents completed prior to the current stage.
Lineage/History Section
The Lineage/History section, shown in the figure below, shows a history of where
a nutrient profile or ingredient, trade, or formulation specification was created
and updated from.
Figure 2-18: Lineage/History section
2-12
Global Specification Management User Guide
Chapter 2
Working with Specifications
Comparing Ingredient Specifications
You can compare up to 10 ingredient specifications by using the specification
comparison tool.
To access this tool:
1 Click Spec Comparison on the left navigation panel. GSM displays the Spec
Comparison Report dialog box, as shown in figure 2-19, below.
Figure 2-19: Spec Comparison Report dialog box
2
3
4
Click Add to select the specifications to compare. GSM opens the
specification search dialog box.
Find up to 10 specifications to compare and click Add Specs. The
specifications search dialog box closes, and your selected specifications
appear in the Specification(s) box.
Click Run to generate the report. GSM generates a Spec Comparison Report
in Adobe Acrobat .PDF format.
Printing Specifications
Where available, you can print specifications by clicking Print at the upper right
of the specification page, thereby opening the print dialog box. Options in the
printing dialog box vary according to specification type, as discussed below.
Printing Trade Specifications
Trade specifications follow a unique printing method. The printing dialog box
can contain many sections, depending on what items are related to that
specification.
The sections include Documentation Format and Packaging Hierarchy. The
print dialog box for trade specifications may contain sections for additional,
related items.
2-13
Agile Product Lifecycle Management for Process
Documentation Format Section
The Documentation Format section, shown in figure 2-20, contains fields that
directly affect the format of the printed output.
Figure 2-20: Documentation Format section
Key fields include:
Business Unit— Controls which master specifications are available for printing.
Changing this value changes the master specification listing.
Paper Size —Controls the page size.
Include Cross Reference —Includes the selected cross-reference inside the
header of each printed page.
Document Control —Dictates which watermark to display (“CONTROLLED COPY”
or “UNCONTROLLED COPY”).
Print Template —Lists all format options for the specification type.
Include Activity Summary —Attaches a summarized printout of each activity
that is attached to the specification, as shown in figure 2-21 below.
Style/Layout —Dictates the style and output of the specification.
Include Cover Sheet —Adds a cover sheet to the outgoing PDF, as shown in
figure 2-22 below.
2-14
Global Specification Management User Guide
Chapter 2
Working with Specifications
Figure 2-21: Trade specification activity summary sample
Figure 2-22: Trade specification cover sheet sample
2-15
Agile Product Lifecycle Management for Process
As shown in figure 2-22 above, the cover sheet includes the following
information:
• Specification name and number
• Status of the specification and all dependent specifications
• Effective date of the specification and all dependent specifications
• Name of the preparer
• Name of the specification, if any, that this specification supersedes
Packaging Hierarchy
The Packaging Hierarchy section contains a list of all related trade specifications
and their objects that are available for printing.
Title Specification
This drop-down list controls what specification will be displayed at the top of the
hierarchy. Changing this value adjusts the related trade specification listing.
Related Trade Specifications
The trade specifications available for printing are organized by item type
(TU=Traded Unit or CU=Consumer Unit). The active specification is shown in
the row that is highlighted.
The printed output includes everything that you have selected in the Related
Trade Items table. Those objects vary by specification but could include:
❑
Specification—Indicated by the specification name and item type.
❑
Supporting Documents—Indicated by the type or name of the document.
Types of supporting documents are:
• Attachments/Procedures are listed as: Attachment Title - Filename
• Rich Text Documents are listed as Rich Text Document - Rich Text
Name
• URLs are not included in the print dialog
See figure 2-23 below for examples.
To include any of these items in your printed output, check the box next to the
corresponding item in the Append Specification column.
You can print attachments individually outside of the printed output. These
attachments are listed underneath the associated trade specification and are
indicated by the attachment file name.
2-16
Global Specification Management User Guide
Chapter 2
Working with Specifications
Figure 2-23: Packaging Hierarchy section
To print attachments, click the linked attachment file name. In addition to
printing attachments separately, you can also include JPG and GIF images
formats in your PDF package. To include a JPG or GIF, check the box in the
Append Specification column next to the image(s) to include.
Additional Related Items
Additional related items are listed below the Packaging Hierarchy section. These
items are listed in their own sections. Each section is titled by the item type, as
shown in figure 2-24.
Possible related specifications include: printed packaging materials, packaging
materials, nutrient profiles, testing protocols, and master specifications. On copack trade specifications, ingredient breakdowns added to the supporting
documents tab will be listed as well, as shown in figure 2-25 below.
If the related specification includes attachments, the attachments will be listed
below the specification. To print attachments, click on the linked attachment file
name. By default, the custom data on the selected specifications is included in the
printout after the activity summary, unless your administrator has indicated to
suppress printing.
2-17
Agile Product Lifecycle Management for Process
Figure 2-24: Additional related items
2-18
Global Specification Management User Guide
Chapter 2
Working with Specifications
Figure 2-25: Additional related items, co-pack trade specification
Printing Other Specifications
Generally, all specifications other than trade specifications use the same print
function. The printing dialog box for these specifications contains two sections:
• Documentation Format
• Specification Listing
Documentation Format
The specification format section, shown in figure 2-26, contains fields that
directly affect the format of the printed output.
2-19
Agile Product Lifecycle Management for Process
Figure 2-26: Specifications Format dialog box
Key fields include:
Business Unit —Controls which master specifications are available for printing.
Changing this value changes the master specification listing in the Specification
Listing section.
Paper Size —Controls the page size.
Document Control —Dictates which watermark to display (“CONTROLLED COPY”
or “UNCONTROLLED COPY”).
Print Template —If enabled, this field lists all format options for the
specification type.
Include Activity Summary —Attach a summarized printout of each activity that
is attached to the specification. See page 2-14 for more information on this
option.
Specification Listing
The specification listing section contains a list of all specifications and their
objects available for printing. Specifications available for printing vary based on
specification type. The final printed output is an Adobe Acrobat (PDF) file. The
print output can include multiple specifications and objects.
The specification listing section includes the following information:
Specification Type
The specifications available for printing are organized by specification type. The
active specification is indicated by the text “Current Specification.”
2-20
Global Specification Management User Guide
Chapter 2
Working with Specifications
Sections
The printed output includes everything you have selected in the Sections column.
Those objects vary by specification type but could include:
Specification —Indicated by the specification number and name
Supporting Documents —Indicated by the type or name of the document (does
not include supporting documents/attachments that are marked as proprietary)
Custom Sections —Indicated by the name of the custom section (does not
include breakdowns that are marked with the suppress printing tag)
Testing Protocols —Indicated by the name of the testing protocol
% Breakdown —Indicated by the % breakdown name (does not include %
breakdowns that are marked with the suppress printing tag)
Sourcing Approval—Indicated by Sourcing Number - sourcing facility/receiving
facilities. Includes any sourcing approvals attached to the specification.
Nutrient Composition—Includes the nutrient composition supporting
document information
For formulation specifications:
Include the Expanded Bill of Materials—Includes a listing of all ingredients
used in lower level formulations
Include Formulation Steps—Includes a summary view of each formulation step
Include Ingredient Summary—Includes a printout containing a summary view
of every ingredient used in the formulation specification
Attachments
You can print attachments individually outside of the printed output. These
attachments are listed in the Attachments column and are indicated by the
attachment file name. The printed output can include images in JPG or GIF
format. To include JPG or GIF images in the output, check the Supporting
Documentation check box in the same row as the image files that you would like
to include.
2-21
Agile Product Lifecycle Management for Process
Figure 2-27: Ingredient specification print example
Sourcing approval
Specifications
Custom section
Supporting
documents
Figure 2-28: Formulation specification print example
2-22
Global Specification Management User Guide
Chapter 2
Working with Specifications
Optional Objects to Print Through the Print Dialog Box
For each specification type, there are objects that can be printed using the Print
dialog box.
“Attachments” listed below refer to files and rich text only.
Note
Trade
1 Current Specification
a Attachments [Respect OLS]
2 Entire Trade Hierarchy [Does not respect WFA or BU Security]
a This is available through title specification drop-down list. When a trade
specification is selected the related objects listing changes based on the
active trade specification. This is not secured, the user can print any trade
specification here regardless of read permissions
• Attachments per Trade Spec [Respects OLS]
3
Related Objects [All objects listed respect WFA and BU Security,
%Breakdown Classification and OLS]
a Packaging Material
• Attachments (Files and Rich Text)
b
Printed Packaging Material
• Attachments (Files and Rich Text)
c
Testing Protocols
Master
• Attachments (Files and Rich Text)
d
e
f
% Breakdown (co-pack trades only)
Nutrient Profiles
• Attachments (Files and Rich Text)
Formula
1 Current Specification
a Expanded Bill of Materials [Respect WFA and BU Security]
b Step Details
c Ingredient Summary [Respect WFA and BU Security]
d Attachments [Respect OLS]
e Custom Sections [Respect OLS]
f Testing Protocols
2 Related Objects [All objects listed respect WFA and BU Security]
a Output Materials
• Attachments [Respect OLS]
• Custom Sections [Respect OLS]
• Nutrient Composition
b
Master
• Attachments [Respect OLS]
• Custom Sections [Respect OLS]
2-23
Agile Product Lifecycle Management for Process
Menu Item
1 Current Specification
a Attachments [Respect OLS]
b Custom Sections [Respect OLS]
c Testing Protocols
2 Related Objects [All objects listed respect WFA and BU Security]
a Nutrient Profile
• Attachments [Respect OLS]
• Custom Sections [Respect OLS]
b
Master
• Attachments [Respect OLS]
• Custom Sections [Respect OLS]
Nutrient Profile
1 Current Specification
a Attachments [Respect OLS]
b Custom Sections [Respect OLS]
Product
1 Current Specification
a Attachments [Respect OLS]
b Custom Sections [Respect OLS]
c Testing Protocols
d %Breakdowns [Respect Formulation Security]
e Sourcing Approvals [Respect OLS and SCRM BU Security]
f Nutrient Composition
2 Related Objects [All objects listed respect WFA and BU Security]
a Packing Configuration
• Attachments [Respect OLS]
• Custom Sections [Respect OLS]
b
Master
• Attachments [Respect OLS]
• Custom Sections [Respect OLS]
Ingredient
1 Current Specification
a Attachments [Respect OLS]
b Custom Sections [Respect OLS]
c Testing Protocols
d %Breakdowns [Respect Formulation Security]
e Sourcing Approvals [Respect OLS and SCRM BU Security]
f Nutrient Composition
2 Related Objects [All objects listed respect WFA and BU Security]
a Packing Configuration
• Attachments [Respect OLS]
• Custom Sections [Respect OLS]
2-24
Global Specification Management User Guide
Chapter 2
Working with Specifications
b
Delivered Material Packing Specs linked to the Packing Configuration
• Attachments [Respect OLS]
c
Labeling Specs linked to the Delivered Material Packing Specifications
• Attachments [Respect OLS]
d
Master
• Attachments [Respect OLS]
• Custom Sections [Respect OLS]
Packaging Material
1 Current Specification
a Attachments [Respect OLS]
b Custom Sections [Respect OLS]
c Testing Protocols
d Sourcing Approvals [Respect OLS and SCRM BU Security]
2 Related Objects [All objects listed respect WFA and BU Security]
a Packing Configuration
• Attachments [Respect OLS]
• Custom Sections [Respect OLS]
b
Delivered Material Packing Specs linked to the Packing Configuration
• Attachments [Respect OLS]
c
Labeling Specs linked to the Delivered Material Packing Specifications
• Attachments [Respect OLS]
d
Master
• Attachments [Respect OLS]
• Custom Sections [Respect OLS]
Equipment
1 Current Specification
a Attachments [Respect OLS]
b Custom Sections [Respect OLS]
c Sourcing Approvals [Respect OLS and SCRM BU Security]
2 Related Objects [All objects listed respect WFA and BU Security]
a Packaging Material
• Attachments [Respect OLS]
• Custom Sections [Respect OLS]
b
Master
• Attachments [Respect OLS]
• Custom Sections [Respect OLS]
Printed Packaging
1 Current Specification
a Attachments [Respect OLS]
b Custom Sections [Respect OLS]
c Testing Protocols
2-25
Agile Product Lifecycle Management for Process
Sourcing Approvals [Respect OLS and SCRM BU Security]
Related Objects [All objects listed respect WFA and BU Security]
a Packaging Material
• Attachments [Respect OLS]
d
2
• Custom Sections [Respect OLS]
b
Packing Configuration linked to the Packaging Material
• Attachments [Respect OLS]
• Custom Sections [Respect OLS]
c
Delivered Material Packing Specifications linked to the Packing
Configuration
• Attachments [Respect OLS]
d
Labeling Specifications linked to the Delivered Material Packing
Specifications
• Attachments [Respect OLS]
e
Master
• Attachments [Respect OLS]
• Custom Sections [Respect OLS]
Delivered Material
1 Current Specification
a Attachments [Respect OLS]
2 Related Objects [All objects listed respect WFA and BU Security]
a Labeling Specs
• Attachments [Respect OLS]
Packing Configuration
1 Current Specification
a Attachments [Respect OLS]
b Custom Sections [Respect OLS]
2 Related Objects [All objects listed respect WFA and BU Security]
a Delivered Material Packing Specifications
• Attachments [Respect OLS]
b
Labeling Specifications linked to the Delivered Material Packing
Specifications
• Attachments [Respect OLS]
Labeling
1 Current Specification
a Attachments [Respect OLS]
Master
1 Current Specification
a Attachments [Respect OLS]
b Custom Sections [Respect OLS]
2-26
Global Specification Management User Guide
C HAPTER 3
Commonly Used Sections
This chapter describes sections that are used in many or most specification types.
Topics in this chapter include:
❑ Summary Tab
❑ Compliance Tab
❑ Related Specs Tab
❑ CSS Tab
❑ Supporting Documents Tab
❑ References Tab
❑ Custom Data
Overview
Information in Global Specification Management (GSM) is organized into tabs
that are in turn organized into sections. Several sections are common to all or
most types of specifications.
This chapter describes the most commonly used tabs and the sections within
them.
Summary Tab
The Summary tab in GSM contains three sections common to several
specification types:
• Summary Information
• Cross References
• Available UOM
• UOM Conversions
• Approved for Use In
3-1
Agile Product Lifecycle Management for Process
Summary Information Section
The section contains the primary identifying information for the specification.
Figure 3-1: Summary Information section
The table below shows the key fields for the Summary Information section:
Table 3-1: Summary Information key fields
Field Name
Importance
Details
Spec Name
Required
Use it to identify your
specification. This data is
used throughout the Agile
PLM for Process suite when
linking/referencing
specifications.
Short Name
Access Level
Short name is a shorter
reference to the specification
name. Depending on your
configuration, Short name
may or may not be required
or even displayed.
System Generated
Represents the access level for
secured objects on that
specification. Depending on
your configuration this field
may not be visible. For more
information about object
level security, see the Agile
Product Lifecycle
Management for Process
Administrator User Guide.
Category/Sub Category/Group
3-2
Required, Drives behavior Defaults to the first node in
the specification category.
Global Specification Management User Guide
Chapter 3
Commonly Used Sections
Table 3-1: Summary Information key fields (continued)
Field Name
Importance
Details
Originator
System Generated
Auto-populated field that
denotes the person who
created the specification.
• Originator Name
• Originator Country
Supercedes
Manual Entry or System
Generated
Identifies the superceded
specification.
Reason for Change
Manual Entry
Shows the reason given for
changing the specification.
Spec #
System Generated
Number used to identify
specifications.
Issue #
The issue number, generated
when an issue is created.
Status
Shows the current workflow
status.
Last Edit
Shows the date of the last
update.
Note
Date fields vary based on specification type.
Cross References Section
The Cross References section contains the list of cross-reference numbers for the
specification, as stored in external systems. You can use the equivalent value as a
search criteria and it can display in specification search results.
Figure 3-2: Cross References section
Key fields include:
System ID —A code that identifies an external database. Agile PLM for Process
obtains this code from the external system.
Equivalent —The equivalent number designed to identify the material as it is
referenced by other cross-reference systems.
3-3
Agile Product Lifecycle Management for Process
Externally Managed —An indication of whether this data is managed externally
or within Agile PLM for Process. If the data is managed externally, you cannot
modify the equivalent number from within Agile PLM for Process. (Notice that
there is no edit icon (
) for the externally managed system shown above.)
If the cross-referenced database is managed from within Agile PLM for Process,
you can modify the equivalent value in the Equivalent field in this table.
Note
Only an Agile administrator can turn the Externally Managed flag on or
off. For more information on this feature, please see the Agile Product
Lifecycle Management for Process Administrator User Guide.
Available UOM
The Available UOM section contains the valid UOM’s for the specification. The
user has the ability to define the base UOM, additional UOMs and define
conversions to the base UOM. UOMs are defined using the Data Administration
application. Only active UOMs can be used in this section.
Figure 3-3: Available UOM section
UOM Conversions
The UOM Conversions section is used to define conversions from other UOMs
back to the base.
Figure 3-4: UOM Conversions section
For example, if the base UOM is LB, the Additional UOMs section will allow the
user to define additional UOMs to be used for the specification.
3-4
Global Specification Management User Guide
Chapter 3
Commonly Used Sections
Once the UOMs from the base category have been defined, the user can enter
other UOMs and relate them back to the base. The UOMs in the left column are
filtered so the user does not see any UOM from the same category as the base
UOM, except for UOMs from the category of “OTHER”. UOMs from the
“OTHER” category should always be available in the left column. Additionally,
once a UOM from a category has been added, no other UOMs from that category
should be available. This will prevent users from specifying that 1IN = 1LB and
1FT=1LB.
The Available UOM control will not allow a user to define the density of a
material. The density data is already described on the specification so the list will
be filtered to prevent that from occurring.
The Available UOM control will also disallow conversions for UOMs in the
following categories:
• Concentration (ratio, %, Brix)
• Temperature (F, C)
• Time (ms, s, min, hr, days, wks, mos, yrs)
The available UOM selector respects the status assigned to each UOM described
in Data Administration (ADMN). Only Active UOMs are available for selection.
The user will also have the ability to select a cross reference system and
equivalence combination to a UOM conversion to assist with the tie back to the
ERP system. The Cross Reference column will be a concatenation of the available
cross reference systems and equivalence data that is present on the specification.
The user can add a status to the UOM conversions and can therefore inactivate
specific conversions. When a conversion is marked as inactive, the BOM
consumption should not show the UOM.
Once the available UOMs have been added to the specification and the
specification has been saved, the available UOM data cannot be edited by the
user. Up until the point the specification is saved, the user can edit or delete
available UOM data. Users can add new UOM conversions any time they have
edit access to the specification.
Approved for Use In Section
The Approved for Use In section contains a list of business units that the
specification is approved for use in. Business Units is a required field. Business
Unit is used in relation to search visibility. The Business Unit field can also be
used as the deciding factor in workflow resolution.
3-5
Agile Product Lifecycle Management for Process
This section is configurable. One configuration is Concepts and Business Unit;
the other is Business Units and Countries, as shown in the figures below.
Figure 3-5: Approved for Use In section with Concepts and Business Units fields
Figure 3-6: Approved for Use In section with Business Units and countries fields
Compliance Tab
The Compliance tab contains the compliance, additive, allergen, and intolerance
data related to a specification. Depending on your system configuration, some of
these sections may not be visible.
Compliance Information Section
Adding Compliance Items
Figure 3-7: Compliance Information section
To add items:
1 Click the Complies With link to open the Compliance dialog box. Select the
compliance items to add on the left, holding down the Ctrl key to select
multiple compliance items.
2 Click the add selected data icon (
) to move your selections to the right.
3 When you have made all of your selections, click Done. The page reloads and
the Complies With field displays your choices.
Removing Compliance Items
To remove one or more compliance items:
1 Click the Complies With link to open the Compliance dialog box.
2 Select the compliance items to remove on the right, holding down the Ctrl
key to select multiple compliance items.
3-6
Global Specification Management User Guide
Chapter 3
Commonly Used Sections
3
4
Click the remove selected data icon (
) to remove the selected items from
the selection box.
Click Done to commit your changes. The page reloads and the Complies
With field reflects your changes.
Some specifications contain an rollup icon ( ) to the right of the Complies With
field. This icon opens the compliance roll up dialog box.
Note
For the specification to be marked as “compliant” based on the roll up,
compliance items marked as “negative” only have to be declared on one
item; those not marked as negative must be declared on all formula items.
Compliance roll up for “does not contain” is supported for trade
specifications, but is not supported for menu item specifications.
Additives, Allergens, and Intolerances Sections
Note
The Additives, Allergens, and Intolerances sections all follow the same
procedures. This section demonstrates the use of additives, but the same
behavior can be used for allergens or intolerances.
The Additives section contains the additive data linked to a specification, and can
be broken out by “known to contain,” “does not contain,” and “may contain.”
Figure 3-8: Additives section
3-7
Agile Product Lifecycle Management for Process
Adding Additives
To add items:
1 Click the Additives link to open the Additives dialog box.
2 Select the additives to add on the left.
3 Click the add selected data icon (
) to move your selections to the right.
4 When you have made all of your selections, click Done.
5 The page reloads, and the Additives table displays the additives that you
selected.
To add/edit the Max/100g and Source/Comments values:
1 Click the edit row icon (
) to the left of the row to edit.
2 Once done editing, click the apply changes icon ( ) to apply your changes
or click the undo icon ( ) to cancel your changes.
Note
Max/100g values and Source/Comment values are only available for
Known to Contain and May Contain fields.
Removing Additives
To remove a single additive, click the delete icon ( ) when the row is open for
edit.
Note
As described above, removing values is only available for Known to
Contain and May Contain fields.
To remove one or more additives:
1 Click the Additives link to open the Additives dialog box.
2 Select the additives to remove on the right.
3 Click the remove selected data icon (
) to remove them from the
selection box.
4 Click Done to commit your changes.
3-8
Global Specification Management User Guide
Chapter 3
Commonly Used Sections
Related Specs Tab
Associated Specifications Section
In this section you can relate the current specification to one or more
specifications in the system. The Associated Specifications section provides a
context for that relationship. You can define pairs of contexts (such as “source/
by-product” or “primary/alternate”) and can apply these contexts to both sides
of an association. These relationships will depend on your system configuration.
For example, “Formulation Specification ABC” could be associated to one or
more formulation specifications as alternates. These formulations would be
declared and visible as “alternates of Formulation Specification ABC.” On the
individual formulation specifications, “Formulation Specification ABC” would
be automatically displayed as a “Primary.”
System ID is a code that identifies an external system. Select a system ID to
display the cross reference of the specification listed in the specification column.
The equivalent number will appear before the specification number.
Figure 3-9: Associated Specifications section
Master Specifications Section
In this section you can explicitly connect the specification to one or more master
specifications.
Figure 3-10: Master Specifications section
Explicitly set
Implicitly set (not
editable)
3-9
Agile Product Lifecycle Management for Process
Note
Specifications can have both explicit associations with master
specifications (defined by the relationship here) and implicit associations
with master specifications (by which the relationship is defined on the
master specification). See Chapter 17, Master Specifications for more
information.
CSS Tab
The sole section in the CSS (content synchronization and syndication) tab, Initial
Publication, contains the list of publications related to the specification.
You can create initial publications only from within GSM. Using the CSS
application, you can syndicate these publications to an internal or external target
system. Once created, these publications can be managed on the CSS tab of the
specification or they can be managed inside the CSS application. As shown in the
figure below, this section contains additional data about each publication.
Figure 3-11: Initial Publication section
3-10
Global Specification Management User Guide
Chapter 3
Commonly Used Sections
To add an initial publication:
1 Click Add New under the Initial Publication table. The publications
requirements dialog box displays, as shown below.
Figure 3-12: CSS Publications Requirements dialog box
2
Specify the following required data:
• Manufacturer —Defines the source of the data being syndicated. For
Global Data Synchronization Network (GDSN) compliant target
systems, this is the Global Locator Number or GLN of the information
provider.
• Publication Type —Used for GDSN compliant target systems. Typically
this is used to tell retailers if it is the first time they have received this
product information or if they already have it and should update their
information.
• Target Market—Defines the destination for the syndicated data.
Publications are organized by target market. Target market is a GDSN
term used to indicate the country where the trade item is available for
sale. For example, the US and Canada are two different target markets.
Note
3
This information resides on the Summary tab of the saved
publication.
Click Save. The publication appears in the Initial Publication table. The
default starting status for publications depends on the configuration of the
publication workflow.
3-11
Agile Product Lifecycle Management for Process
Note
You cannot view publications with a current status of “Draft.” Statuses are
controlled and updated automatically by the publication workflow.
For more information, please see the Agile Product Lifecycle Management for
Process Content Synchronization and Syndication User Guide.
Supporting Documents Tab
The Supporting Documents page includes sections which vary depending on
specification type. The following sections are found on most specification types:
❑
Supporting Documents
❑
DRL Documents
Testing Protocols
Attachments
% Breakdown
❑
❑
❑
Supporting Documents Section
Overview
The Supporting Documents section enables you to add unique documents to the
specification. You can add the following document types:
❑
Attachments/Procedures
❑
URL
Rich Text
Product Facts Sheet
Nutrient Composition
❑
❑
❑
Note
The Supporting Documents section is unique to each specification type.
Not all document types can be found on all specification types.
Creating a Supporting Document
The specification needs to be in edit mode before you can add a supporting
document to it.
To create a supporting document:
1 Click Edit at the upper right corner of the page. The page reloads with several
hyperlinks displayed below the table in the Supporting Documents section.
2 From the links below the supporting documents table, click the type of
document to create.
3-12
Global Specification Management User Guide
Chapter 3
Commonly Used Sections
Figure 3-13: Supporting Documents section (Ingredient Specification example)
Managing Supporting Documents
To view a supporting document, click the hyperlinked document name. You can
only edit supporting documents when the specification is in edit mode.
To edit a supporting document:
1 When the specification is in edit mode, click the edit icon (
) in the row
of the document to edit. The page reloads and displays the row in edit mode.
2 Open the document in edit mode by clicking the hyperlinked document
name, or click the delete icon ( ) to delete that document from the
specification.
3 After making your changes to your document, click the apply changes icon
( ) to apply the changes.
4 Click Save at the upper right of the page to save your changes.
3-13
Agile Product Lifecycle Management for Process
Document Types
Attachments/Procedures Document Type
Figure 3-14: Attachment/Procedures window
An attachments/procedures document is a collection of attachments. Each
document includes the noneditable summary section, which pulls its content
from the parent specification. Use the Security Classification field to assign a
security level to the document. This field appears when object level security
(OLS) is configured on.
To add an attachment to a document:
1 Click Add New below the attachments table. The Attachment Details dialog
box displays, as shown in figure 3-15, on page 3-15.
2 Complete the following fields, as shown in table 3-2 below:
Table 3-2: Attachment Detail fields
Field
Definition
Owner
Owner of the attachment
Title
Title of the attachment
Effective
Effective date of the attachment
Inactive
Inactive date of the attachment
Publish to Supplier Portal Check this box if you want to publish the attachment on
Supplier Portal
Proprietary
3-14
Check this box to prevent the attachment from being exposed
in Supplier Portal or from being printed
Global Specification Management User Guide
Chapter 3
Commonly Used Sections
3
4
5
Attach the file by clicking Browse to search for the file, and then click Upload.
Click Done on the Attachment Details dialog box and then click Done on the
Attachment/Procedures page.
Click Save.
Figure 3-15: Attachment Details dialog box
URL
Figure 3-16: URL Detail dialog box
You can store a URL link as a document. Clicking the link launches a URL popup.
These URLs will not be available through the print model, eQ, or Supplier Portal.
Key fields include:
Title—Name for the web page link
URL—Address for the URL
3-15
Agile Product Lifecycle Management for Process
Rich Text Document Type
Figure 3-17: Rich Text dialog box
The rich text document type is a way to create a formatted attachment to the
specification that can be printed in line with the printed specification. The rich
text document includes a title and an enriched textual entry.
To add rich text:
1 Click the Rich Text label link. The rich text dialog box opens.
Figure 3-18: Rich text label link dialog box
Using the rich text dialog box, you can apply simple formatting (boldface,
font color, font size, bullets, numbering, and so on.).
Product Fact Sheets
Note
Product Fact sheets are a configurable feature, and by default are
configured off. For more information, refer to the Agile Product Lifecycle
Management for Process Configuration Guide.
Nutrient Composition
Select Nutrient Composition as a supporting document to create a new a nutrient
composition document and enter the composition data for that specification, as
shown in figure 3-19, Nutrient Composition page, on page 3-17. A specification
can have only one nutrient composition.
3-16
Global Specification Management User Guide
Chapter 3
Commonly Used Sections
Figure 3-19: Nutrient Composition page
Key fields include:
Per 100g —Values per nutrient
Method —Select the method for determining this value; methods are configured
per nutrient item
Source —Administered list of sources that declare where this information came
from. This will be automatically populated if the value was set from some other
source in the Agile PLM for Process solution.
Click Import to select and import nutrient values from nutrient profiles,
ingredient specifications, or from Food Composition Library (FCL) items if your
environment has them available.
3-17
Agile Product Lifecycle Management for Process
Note
The Food Composition Library will need to be configured as a part of your
implementation.
Click NSM to select and import nutrient values from nutrient analyses or nutrient
composites in the Nutrient Surveillance Management (NSM) application.
View Thumbnails
In some specifications, you can view attached images in a thumbnail view (for
supported file formats). Click the View Thumbnails link to open a dialog box
showing all supported image types in thumbnail format.
DRL Documents Section
In the DRL Documents section you can link the specification to existing DRL
(Document Reference Library) catalog and document references. All referenced
catalogs and documents are read only. DRL catalogs and documents are created
and managed using the DRL application. For more information about the DRL
application, see the Agile Product Lifecycle Managment for Process Document
Reference Library User Guide.
A DRL catalog is a collection of DRL documents and child catalogs. The DRL
table consists of two columns: Name and Type. Name displays the DRL
document or catalog name. The type column identifies the linked DRL item as
either document or a catalog, as shown in figure 3-20 below.
Figure 3-20: DRL Documents section
Viewing DRL Catalogs and Documents
You can view a DRL document or catalog by clicking on the linked name.
Viewing a Catalog Reference
A catalog opens the DRL catalog viewer dialog box. In this view you can expand
the catalog to view its contents. Select a document name to open the DRL
document viewer.
3-18
Global Specification Management User Guide
Chapter 3
Commonly Used Sections
Figure 3-21: DRL catalog viewer
Viewing a Document Reference
Documents open the DRL document viewer dialog box. A DRL document
contains the following sections:
❑
Description
❑
Version/Revision
Attachments
❑
Figure 3-22: DRL document viewer
Description Section
This section contains the overall identifying information of the DRL document.
It includes the document title, description, and status. It also lists which catalogs,
business units, and classifications the document is assigned to.
3-19
Agile Product Lifecycle Management for Process
Version/Revision Section
Use this information to track versions and revisions for the document. This
section includes:
• Document ID
• Originator of the document
• Document dates
• Reason for any revision (if revised)
• Whether or not the document is
publishable to the Supplier Portal
Attachments Section
This table lists all of the attachments added to the document. It includes
attachment title, file name, and file size. You can view an attachment by clicking
its file name.
Adding DRL Catalog and Document References
In order to add a DRL catalog or document, you need to place the specification
in edit mode. You can add DRL catalogs and/or documents to the DRL section in
two ways:
Browsing —Click Add - Browse. The DRL browse dialog box displays. You can
link an entire catalog of documents or a specific individual document. Each
linked node is a catalog. Click the link to expand the catalog and view its contents.
A catalog can hold other catalogs and individual documents.
Figure 3-23: DRL browse dialog box
Searching —Click Add - Search. The DRL search dialog box opens. You can
search for documents using the provided criteria. Refer to the Agile Product
Lifecycle Management for Process Getting Started Guide for more information
about searching.
3-20
Global Specification Management User Guide
Chapter 3
Commonly Used Sections
Figure 3-24: DRL search form
Testing Protocols Section
In the Testing Protocols section you can link testing protocols to the
specification. For a more detailed discussion of testing protocols, please see
Chapter 19, Testing Protocol Library.
The specification needs to be in edit mode before you can add a testing protocol.
You can add testing protocols to the section in two ways:
Add a new protocol —Click Add New. The testing protocol dialog box displays,
allowing you to create a new testing protocol. This testing protocol will be specific
to this specification.
Add an existing protocol —Click Pull from Library. The testing protocol search
dialog box displays. You can search for testing protocols using the provided
criteria. Refer to the Agile Product Lifecycle Management for Process Getting
Started Guide for more information about searching.
Note
Protocols from the testing protocol library are managed centrally. Changes
made in the testing protocol library will be reflected on any specification
which consumes that testing protocol.
3-21
Agile Product Lifecycle Management for Process
Select protocols from your search results by clicking the protocol number of each
testing protocol you would like to reference, thereby adding the protocol to the
selection box below it. When you are finished adding protocols, click Add Spec to
add the testing protocols to the specification.
Attachments Section
The attachments section is where you add individual documents to a
specification. An attachment is an individual document. For instructions for
adding an attachment, see Attachments/Procedures Document Type and the
procedure under it on page 3-14.
% Breakdown (Formula) Section
The % Breakdown (Formula) section contains any percent breakdown formulas
for the specification. You can use these breakdowns to host different versions of
the formula breakdown based on supply or regulatory differentiation.
Figure 3-25: % Breakdown section
Key fields include:
Restrictions —This is used to help categorize different versions of the
breakdowns for usage in the Listed Ingredient Order (LIO) tool
Formula Classifications —Formula classifications can be used to enforce
security for individual specifications. Classifications can be managed in the
Admin Tool and are tied to user groups. Only users in the associated groups can
view formulas that have a formulation classification.
Note
On a trade specification, this section only appears when the item type is
“co-pack.” When it is available, this section appears on the Supporting
Documents tab.
Tags—Breakdowns can be tagged. Tags help identify breakdowns and most tags
help define how you want the system to react to the breakdown. Available tags are
listed on page 3-23.
Formula Detail
On the Formula detail page you can capture header information about the
breakdown, such as publication, sourcing, and formulation information. This
page is where the itemized % breakdown is captured and defined.
3-22
Global Specification Management User Guide
Chapter 3
Commonly Used Sections
Publish Settings Section
In this section you can capture information that helps determine how to use this
breakdown elsewhere in the system.
Figure 3-26: Publish Settings section
Key fields include:
Restrictions —A list of configurable tags that you can assign to the disclosure to
prevent use in the LIO process. LIO will only use disclosures with the same
restriction(s) or no restrictions applied.
Formula Classification —You can use formula classifications to enforce security
for individual specifications. Your Agile administrator can manage classifications
in the admin tool. Classifications are tied to user groups. Only users in the
associated groups can view formulas that have a formulation classification.
Tags:
• Master Formula—Denotes that this formula is considered the master
formulation. This tag is for informational purposes only; no system
behavior is tied to this tag.
• Regulatory—Designates which breakdown will be used during
formulation specification theoretical breakdown creation. Only one
breakdown can be marked as regulatory per specification. Breakdowns
created by a formulation specification will be automatically tagged as
regulatory.
Caution!
If the breakdown is on a formula output, this breakdown could be
possibly overwritten during formulation. See Chapter 6, Formulation
Specifications for more info.
• Do Not Publish to Supplier—Denotes that this breakdown will not
appear in Supplier Portal and eQ.
• Suppress Printing—Keeps the breakdown from being included in the
specification print out.
Note
The Suppress Printing and Do Not Publish to Supplier tags are
added by default when a breakdown is initially created.
3-23
Agile Product Lifecycle Management for Process
Related Sourcing Approval Section
In this section you can associate an existing supplier with this formulation. You
can select a supplier from any of the current sourcing relationships that are
related to the specification. These relationships help determine visibility to the %
breakdown in the Supplier Portal.
Figure 3-27: Related Sourcing Approvals section
Formula Section
In this section you can declare the breakdown along with associated information
such as country of origin. You can add items to the breakdown as free text, from
existing ingredient specifications in the system, Food Composition Library, or
from the Component Catalog.
Note
If your configuration is set to use strict % breakdowns, you can only add
Component Catalog terms to the breakdown.
Figure 3-28: Formula section
3-24
Global Specification Management User Guide
Chapter 3
Commonly Used Sections
References Tab
The Reference page contains the list of all reference data linked to a specification.
The following sections appear on most specification types:
• Activities
• Suppliers
• Specification Dependencies
• Related Documents
Activities Section
The Activities section displays all GSM activities that contain this specification as
the primary object. The description of an activity is the activity’s name and
number. To view an associated activity, click the description. For more
information on GSM activities, refer to Chapter 20, Activities.
Figure 3-29: Activities section
Suppliers Section
Supply Chain Relationship Management (SCRM) is the application dedicated to
managing supplier information. However, you can manage some supplierrelated tasks from within GSM. For detailed information on SCRM, see the Agile
Product Lifecycle Managment for Process Supply Chain Relationship Management
User Guide.
The Suppliers section of the References tab displays a summary of sourcing
approval documents that are associated with the specification. If you initiate the
creation of a sourcing approval from within GSM, you can add new suppliers.
Note
A specification must be assigned to a workflow before it can be associated
with a sourcing approval.
To add a new supplier to the specification:
1 With the specification in read mode, click Add New. The SCRM facility
search dialog box opens.
2 Search for the facility that will supply this specification. Refer to the Agile
Product Lifecycle Management for Process Getting Started Guide for help with
searching.
3 Select a facility. The SCRM application opens, displaying a new
specification-related sourcing approval, with prepopulated specification
and sourcing facility fields.
3-25
Agile Product Lifecycle Management for Process
Note
Sourcing approvals can also be created directly from Supply Chain
Relationship Management.
For more information on creating specification-related sourcing approvals, refer
to the Agile Product Lifecycle Managment for Process Supply Chain Relationship
Management User Guide.
You can also import sourcing approvals from an existing specification. This
action creates a copy of an existing sourcing approval, linking it to your active
specification.
To import a sourcing approval from an existing specification:
1 With the specification in read mode, click Import. GSM opens the Import
Sourcing Approvals dialog box. If the previous issue of the specification has
sourcing approvals, the dialog box will be populated with references to the
sourcing approvals from the prior issue.
2 Click Add Specs. GSM opens the Specification Search dialog box.
3 Find the specifications that reference the sourcing approvals that you would
like to import.
4 Once all of the specifications are selected, click Add Spec to apply your
selections and close the dialog box. The Import Sourcing Approvals dialog
box should now contain any sourcing approvals that existed on the selected
specifications.
5 Select the sourcing approvals to add and click Done. The system creates new
instances of sourcing approvals and populates them with data from the
selected sourcing approvals.
The Suppliers section displays important identifying information from the
specification. You can click the add data icon ( ) to go directly to the sourcing
approval. You can click the hyperlinked company or facility name to go directly
to the SCRM company or facility profile.
Figure 3-30: Suppliers section
3-26
Global Specification Management User Guide
Chapter 3
Commonly Used Sections
Specification Dependencies Section
The Specification Dependencies section contains a Where Used link. When
clicked, GSM displays a dialog box listing parent and child specifications that are
directly or indirectly related on this specification. This information is read only.
The dialog box displays a table that contains the parent or child specification type
and the number of specifications of that type that are related with the
specification that you are viewing. If you click the specification type hypertext
link, the table expands and displays the specification number and name of all the
dependent specifications.
Note
The specifications listed in the popup are configurable. For more
information, please see the Agile Product Lifecycle Management for Process
Configuration Guide.
You can go directly to a related specification by clicking on the linked
specification name.
Figure 3-31: Specification Dependencies dialog box, expanded
Related Documents Section
The Related Documents section contains links to a listing of NPD activities, NSM
documents, and LIO profiles that are related to a specification. This list contains
system-generated information that is read only.
3-27
Agile Product Lifecycle Management for Process
Figure 3-32: Related Documents section
Click the NPD Activities link to open the NPD Activities dialog box. The dialog
box displays all related NPD activities.
Refer to the Agile Product Lifecycle Management for Process New Product
Development User Guide for more information.
Click the Related NSM Documents link to open the Related NSM Documents
dialog box. The dialog box displays two sections: Nutrient Analysis and Nutrient
Composite. The Nutrient Analysis section displays a table that contains the
analysis number, date of analysis, source facility, and description. The analysis
number is a link to the actual analysis associated with the specification. The
Nutrient Composition section displays a table with composite number, date of
composite, title, and description. The composite number is linked to the actual
composite associated with the specification. Refer to the Agile Product Lifecycle
Management for Process Nutrient Surveillance Management User Guide for more
information.
Click the Related LIO Profiles link to open the Related LIO Profiles dialog box.
The dialog box displays the LIO number, date of creation, LIO name, status, and
description for each associated profile. Refer to Chapter 18, LIO Profiles for more
information.
Custom Data
Select specifications contain custom data. Use custom data to enter customized
information, in the form of extended attributes or custom sections.
The extended attributes and custom sections templates are created and
maintained by your administrator.
Custom data can consist of:
❑
❑
Extended Attributes
Custom Sections
For more information on creating custom data or extended attributes, see the
Agile Product Lifecycle Management for Process Administrator User Guide.
3-28
Global Specification Management User Guide
Chapter 3
Commonly Used Sections
Important
If you remove a custom section or extended attribute, the system
deletes the data that you entered. Delete data with caution, because
deleted data cannot be restored.
Extended Attributes Section
Extended attributes define important features and characteristics of the
specification.You can build these attributes to meet specific needs, as shown in
the figure below.
Figure 3-33: Extended Attributes section
Custom Sections
Custom sections are configurable sets of extended attributes. The custom data
that you enter is displayed in a table, as shown in the figure below.
Figure 3-34: Custom section
Calculated Attributes
Some extended attributes inside the Extended Attributes table and in custom
sections can be calculated. A calculated extended attribute is an attribute that
references other specification attributes and performs calculations. When you
add a calculated attribute to your specification, GSM calculates it when you click
any of the following buttons at the top right of the page:
3-29
Agile Product Lifecycle Management for Process
•
Calculate
•
Save
•
Save & Close Document
GSM can calculate attributes only when the specification is in edit mode. If GSM
encounters an error while calculating the attribute, it displays a calculation error
icon ( ). In some cases, you can click the error icon to see error details.
Note
You can add each distinct attribute to a specification once only. Only
distinct attributes inside the Extended Attributes table are pulled into
formulation specifications for use in prototyping. Additionally, extended
attributes tagged as design attributes will automatically be added to the
output.
Important
If you remove a custom section or extended attribute, the system
deletes the data that you entered. Delete data with caution, because it
cannot be retrieved.
Adding a Custom Section
To add a custom section:
1 With the page in edit mode, click Add Section. GSM displays a dialog box
listing available custom sections, as figure 3-35 shows below.
Figure 3-35: Custom section selection dialog box
2
3-30
Select a section name, and then click Done. The custom section is added to
the company profile.
Global Specification Management User Guide
Chapter 3
Commonly Used Sections
Editing a Custom Section
To edit a custom section table, row, or column:
1 To add values to the custom section, click Edit Section. A dialog box displays
the custom section in edit mode, as figure 3-36 shows below. The edit icon
(
) displays for every editable row and column. It also displays in the
upper left corner of the table, indicating you can edit the entire section.
Depending on the size of your custom section, editing the entire section may
not be available.
Figure 3-36: Custom section in edit mode
2
3
4
5
Click the edit icon (
) and make appropriate changes to the table, row, or
column.
Click the apply changes icon ( ).
Click Done.
Click Save.
To add a row:
1 With the custom section in edit mode, click Add Row. GSM displays a dialog
box listing rows that can be added, as figure 3-37 shows below:
Figure 3-37: Available rows dialog box
3-31
Agile Product Lifecycle Management for Process
2
3
4
5
Select a row, and then click the add selected data icon (
).
Repeat step 2 to add additional rows.
Click Done. GSM closes the dialog box. The added rows display in the table.
Click Save.
To delete a row:
1 With the custom section in edit mode, click the edit icon (
) on the row
you want to delete.
2 Click the delete row icon ( ). The row is deleted from the table.
3 Click Save.
To add a column:
1 With the custom section in edit mode, click Add Column. GSM displays a
dialog box listing columns that can be added, as figure 3-38 shows below:
Figure 3-38: Available columns dialog box
2
3
4
5
Select a column, and then click the add selected data icon (
).
Repeat step 2 to add additional columns.
Click Done. GSM closes the dialog box. The added columns display in the
table.
Click Save.
To delete a column:
1 With the custom section in edit mode, click Remove Column. GSM displays
a dialog box listing columns that can be deleted, as figure 3-38 shows above.
2 Select a column, and then click the add selected data icon (
).
3 Repeat step 2 to delete additional columns.
4 Click Done. GSM closes the dialog box. The selected columns no longer
appear in the table.
5 Click Save.
3-32
Global Specification Management User Guide
Chapter 3
Commonly Used Sections
Deleting a Custom Section
To remove a custom section:
1 With the page in edit mode, click Delete Section. GSM displays a dialog box
listing all custom sections, as figure 3-39 shows below.
Figure 3-39: Available sections dialog box
2
3
Select a custom section, and then click Done. The custom section is removed.
Click Save.
3-33
Agile Product Lifecycle Management for Process
3-34
Global Specification Management User Guide
C HAPTER 4
Trade Specifications
This chapter presents an overview of GSM capabilities regarding trade specifications. Topics in this chapter
include:
❑ Page-Level Functions
❑ Summary Tab
❑ Packaging Tab
❑ Compliance Tab
❑ Related Specs Tab
❑ CSS Tab
❑ Supporting Documents Tab
❑ Regulatory/Legislation Detail Page
❑ References Tab
❑ Approval/Audit Trail Tab
Overview
The Trade Specification page consists of the following tabs:
❑
Summary Tab on page 4-3
❑
Packaging Tab on page 4-8
Compliance Tab on page 4-13
Related Specs Tab on page 4-17
CSS Tab on page 4-17
Supporting Documents Tab on page 4-18
Regulatory/Legislation Detail Page on page 4-19
References Tab on page 4-25
Approval/Audit Trail Tab on page 4-25
❑
❑
❑
❑
❑
❑
❑
4-1
Agile Product Lifecycle Management for Process
Page-Level Functions
In the upper right corner of the page is a row of buttons that trigger actions that
can affect the entire page. All of these buttons (except Calculate) are displayed
when the specification is in read mode. These buttons and their functions are:
❑
Edit —Place the entire page in edit mode so that you can modify it.
❑
(Report) —Depending on the configuration of your Agile PLM for Process
❑
❑
❑
❑
❑
❑
❑
❑
❑
4-2
installation, this button may or may not appear (on certain specifications).
Click Report to launch the Reporting application.
Calculate—Performs all custom data calculations. This button is displayed
when the specification is in edit mode. Calculation also happens when you
save your specification.
Create Copy —Create a new copy of the current trade specification. For
discussion of this commonly used function, please see Creating a Copy of an
Existing Specification on page 2-1.
CACS — Screen the current specification using Computer Aided Compliance
Screening (CACS), an application that you can use to inspect materials for
fitness against any number of user-defined screens. (Appears only if your
installation includes CACS.) For more information on CACS, please refer to
the Agile Product Lifecycle Management for Process Computer Aided
Compliance Screening User Guide.
LIO—Create a new LIO profile, automatically referencing the active nutrient
profile attached to the trade specification. The LIO button only displays if the
Formulation and Compliance (F&C) bundle has been installed.
Print — Opens a dialog box through which you can print the current
specification in a variety of formats. For more information on printing a trade
specification, please see Printing Trade Specifications on page 2-13
Act —Create a primary activity, or mini-workflow, for this specification. For
more information about this function, please see Chapter 20, Activities.
Item History —Display all issues of the specification that exist in a Spec
History table, along with the reason for creating each issue and other
identifying information. For more information on this feature please see Item
History on page 2-3.
Workflow — Move the current specification, or document, from one
workflow step to another. For more information on workflows, please see
Transitioning a Workflow on page 2-7.
Resolve Workflow —Re-resolve the specification to a workflow (present only
when you are logged in with a user account that has the user role of
[CAN_RERESOLVE_WORKFLOWS].)
Global Specification Management User Guide
Chapter 4
Trade Specifications
Summary Tab
Key sections in the Summary tab include:
❑
Summary Information—Discussed below, at Summary Information Section
on page 4-3
❑
Product Identification—Discussed below, at Product Identification Section on
page 4-3
Next Lower Items—Discussed below, at Next Lower Level Items Section on
page 4-5
Parent Items—Discussed below, at Parent Items (Calculated) Section on
page 4-5
Brand Information—Discussed below, at Brand Information Section on
page 4-6
Product Classification—Discussed below, at Product Classification Section on
page 4-7
Cross References—For discussion of this commonly used section, please see
Cross References Section on page 3-3
Approved for Use In—For discussion of this commonly used section, please
see Approved for Use In Section on page 3-5
❑
❑
❑
❑
❑
❑
Summary Information Section
Fields in the Summary Information section are described in Summary
Information Section on page 3-2. For trade specifications, two additional fields are
included:
Available Date—Indicates when the product will be available for a retailer to
order.
End Available Date—Indicates when the product will no longer be available to
order.
Product Identification Section
In this section you can document product identifiers like GTIN (Global Trade
Item Number). Additionally, the Item Type chosen here determines which fields
and sections appear elsewhere in the specification. Figure 4-1 and figure 4-2
below demonstrate some of the field variations based on the Item Type field.
Figure 4-1: Product Identification section (Traded unit)
4-3
Agile Product Lifecycle Management for Process
Figure 4-2: Product Identification section, Consumer Unit (not for resale)
Key fields include:
Item Type —The item type selected determines which fields and sections are
visible on specification. For example, co-pack items have sections available to
create supply associations and formulation breakdowns. These sections are
unavailable for other trade item types. Available item types are as follows:
• Consumer Unit—Represents the lowest levels of the item hierarchy. This
type can be used to represent Eaches and Inner Packs depending on what
other specifications are linked to it.
• Consumer Unit (co-pack)—Represent the lowest level of the hierarchy
that is produced for you by someone else. This type has the ability to
record percent breakdown information and might be used for a can of
green beans produced on your company’s behalf.
• Consumer Unit (not for resale - co-pack)—Represents the lowest level
of the hierarchy that is produced for you by someone else but is not
intended for individual sale. This type might be used for a bottle of pickle
relish in a picnic pack that is produced on your company’s behalf.
• Consumer Unit (not for resale)—Represents the lowest level of the
hierarchy that is not intended for individual sale.
• Traded Unit—Represents the orderable units of the item hierarchy. This
type can be used to represent Cases, Pallets, Display Shippers, or Mixed
Modules depending on what other specifications are linked to it.
• Traded Unit (co-pack)—Represents the orderable units of the hierarchy
that are produced for you by someone else. This type has the ability to
record percent breakdown information and might be used for a case or
pallet of green beans produced on your company’s behalf.
• Traded Unit (no children - co-pack)—Represents a specification that is
both the orderable unit and the consumer unit all in one. It does not have
any children linked to it but can have a percent breakdown. This type
might be used for a barrel of vegetable oil that is produced on your
company’s behalf.
• Traded Unit (no children)—This type would represent a specification
that is both the orderable unit and the consumer unit all in one. It does
not have any children linked to it.
GTIN/UPC/EAN —This field is not visible for “Consumer Unit - Not for Resale”
trade items.
PLU Description —This field is not visible for “Consumer Unit - Not for Resale”
trade items.
POS Description —This field is not visible for “Consumer Unit - Not for Resale”
trade items.
4-4
Global Specification Management User Guide
Chapter 4
Trade Specifications
Most other specifications are static in nature, but the trade item is dynamic. The
trade item specification can display different attributes, fields, or sections based
on the item type selected.
Next Lower Level Items Section
In this section you can capture the next lower level in the trade item hierarchy
along with quantity information.
Figure 4-3: Next Lower Level Items section
Note
This section does not appear when the item type is a “Traded Unit (no
children)” or “Traded Unit (no children - co-pack).”
Parent Items (Calculated) Section
This section shows the derived relationships based on other specifications that
have referenced this specification as a lower level item.
Figure 4-4: Parent Items (Calculated) section
4-5
Agile Product Lifecycle Management for Process
Brand Information Section
In this section you can declare any relevant brand information.
Figure 4-5: Brand Information section
Key fields include:
Trading Company —Click the hyperlinked field label to display a dialog box
from which you can choose a company from a prepopulated list (configured by
your administrator).
Brand —Click the hyperlinked field label to display a dialog box from which you
can choose a brand name from a prepopulated list (configured by your
administrator).
SubBrand —Free text entry field that you can use for a more granular level of
information about brand, for example.
Label Owner —Click the hyperlinked field label to display a dialog box from
which you can choose a label owner from a prepopulated list (configured by your
administrator), as shown in figure figure 4-6 below.
Figure 4-6: Label Owner dialog box
4-6
Global Specification Management User Guide
Chapter 4
Trade Specifications
Product Classification Section
In this section you can declare any relevant product classification information.
The trade item type declared on the specification affects which of these fields are
visible (based on relevance).
Figure 4-7: Product Classification section, Traded Unit
Figure 4-8: Product Classification section, Traded Item (no children)
Figure 4-9: Product Classification section, Consumer Unit (not for resale)
Key fields include:
UNSPSC Code —This field is not visible on Traded Unit (no children - co-pack),
Traded Unit (no children), Consumer Unit (co-pack), or items not meant for
resale.
UDEX Classification —Search against categories used by UDEX Electronic
Exchange.
4-7
Agile Product Lifecycle Management for Process
GPC Code —Click the hyperlinked field label to display a dialog box from which
you can choose a GPC code taxonomy.
Tax Type/Rate —Click the hyperlinked field label to display a dialog box from
which you can choose a tax type or rate. This field is not visible on items not
meant for resale.
Packaging Tab
This tab hosts all of the attributes necessary to describe the traded or consumer
unit information, including dimensional and weight information, shelf life, and
packaging details.
Key sections in the Packaging tab include:
❑ Packaging Attributes (Consumer Unit) Section on page 4-8
❑ Packaging Attributes (Traded Unit) Section on page 4-10
❑ Stacking Height Section on page 4-11
❑ Storage Requirements Section on page 4-11
❑ Shelf Life Section on page 4-11
❑ Packaging Materials Section on page 4-12
❑ Alternate Packaging Section on page 4-12
❑ Environmental Waste (per item sold) Section on page 4-13
Packaging Attributes (Consumer Unit) Section
Depending on the item type of the specification, different packaging attributes
can appear in this section.The attributes below are designed to capture
information about a consumer unit.
4-8
Global Specification Management User Guide
Chapter 4
Trade Specifications
Figure 4-10: Packaging Attributes (Consumer Unit) section
Key fields include:
Packaging Type —Click the hyperlinked field label to display a dialog box from
which you can choose a packaging type from a list of available types
Variable Weight —Select this flag if the traded unit is best represented by a min/
max weight.
Variable Weight Type —“Pre-packed” and “Loose” represent how the product
content is packaged.
Min Net Weight —The least weight that is acceptable for the product.
Max Net Weight —The greatest weight that is acceptable for the product.
Tare Weight —This section appears when the item type is a “consumer unit” or
a “traded unit (no children).” For more information on tare weight and gross
weight, see Tare Weight Section on page 11-3.
Gross Weight —Net weight + tare weight. Click the hyperlinked field label to
choose.
Note
Net weight is defined as the weight of the food content or non-packaging
related material.
4-9
Agile Product Lifecycle Management for Process
Packaging Attributes (Traded Unit) Section
As with consumer units, depending on the item type of the specification,
different packaging attributes can appear in this section. This section appears
when the item type is a “traded unit.” The attributes below are designed to
capture information that help describe a traded unit, such as case and pallet
information.
The Net Weight calculations for case and pallet on a traded unit trade
specification use the net weight of the lower level item and the net weight of the
case as packaging is accounted for in the tare weight value.
The Tare Weight calculation takes into account packaging at all levels of the
hierarchy. If the user calculates the tare weight of the lowest level (no child trade
items) consumer unit trade specification, GSM adds the packaging associated
directly with the consumer unit and any packaging associated with the
formulation specification that is linked directly to the consumer unit trade
specification. The inclusion of the packaging associated with the formulation
specification is dependent on a configuration.
The Gross Weight calculation has been modified so that it adds the net weight
and the tare weight of the specification. Users can select the UOM prior to
calculating. This allows them to select the final UOM instead of returning in the
default UOM.
Figure 4-11: Packaging Attributes (Traded Unit) section
4-10
Global Specification Management User Guide
Chapter 4
Trade Specifications
Key fields include:
Packaging Type —Click the hyperlinked field label to choose a packaging type
from a list of available types.
Product Type —Choose a product type by selecting from a list of available types.
Stacking Height Section
In this section you can describe the stacking height information relevant to this
specification. This section appears when the item type is a “traded unit.”
Figure 4-12: Stacking Height section
Key fields include:
Mode Stacking Height —Enter the number of levels that the product can be
stacked.
Warehouse Stacking Height —Enter the number of units that can be stacked in
warehouse storage.
Storage Requirements Section
This section is for describing the storage requirements relevant to this
specification.
Figure 4-13: Storage Requirements section
Key fields include:
Storage Requirements —Click the hyperlinked field label to display a dialog
box from which you can choose the storage requirements from a list of options.
Shelf Life Section
This section is for describing the shelf life relevant to this specification.
Figure 4-14: Shelf Life section
4-11
Agile Product Lifecycle Management for Process
Packaging Materials Section
In this section you can describe the packaging associated with this specification
by associating and categorizing packaging and printed packaging specifications.
Figure 4-15: Packaging Materials section
Key fields include:
ERP System —This enables you to select the relevant cross-reference from the
system so that the system’s equivalent package identification number can be seen
along with the Agile PLM for Process number. Changing this selection toggles the
presentation of that equivalent number, but the preference is not stored as part
of the specification.
Pkg Type —Enables you to categorize how the packaging is applied to this item,
for example, whether it is considered inner, intermediate, or outer packaging.
Alternate Packaging Section
In this section you can describe the alternate packaging associated with this
specification. You can do so by associating packaging and printed packaging
specifications to the packaging that they are allowed to substitute for.
Figure 4-16: Alternate Packaging section
Key fields include:
Substitutes —Choose which piece of packaging (from the Packaging Materials
section) that this alternate is meant to substitute for.
4-12
Global Specification Management User Guide
Chapter 4
Trade Specifications
Environmental Waste (per item sold) Section
This section provides a place to log known waste materials for this specification
along with other relevant attributes required for environmental waste reporting.
Figure 4-17: Environmental Waste (per item sold) section
Key fields include:
Material Class —Click Add New to display a dialog box from which you can
choose a material class from a prepopulated list.
Compliance Tab
Key sections in the Compliance tab include:
❑
Extended Attributes—For discussion of this commonly used section, please
see Extended Attributes Section on page 3-29
❑
Custom Sections—For discussion of this commonly used section, please see
Custom Sections on page 3-29
Label Claims—Discussed below, at Label Claims Section on page 4-13
Compliance Information—For discussion of this commonly used section,
please see Compliance Information Section on page 3-6
Allergens, Intolerances, and Additives—For discussion of this commonly
used section, please see Additives, Allergens, and Intolerances Sections on
page 3-7
❑
❑
❑
Label Claims Section
The Label Claims section contains the label claims linked to a trade specification,
as figure 4-18 shows below. The label claims values and calculation rules are
maintained by an administrator
Figure 4-18: Label Claims section
4-13
Agile Product Lifecycle Management for Process
Key fields include:
Potential—Select all of the possible label claims for the finished good. This field
can be populated two ways. You can either click on the linked label Potential, or
calculate the label claims by using label claims determination. To calculate label
claims, select the label claims determination icon ( ). GSM opens the label
claims determination popup, shown in figure 4-20, on page 4-16. See Label
Claims Determination on page 4-14 for more information.
Actual—Select the actual label claims declared on the finished good. This field
can be populated two ways. You can either click on the linked label Actual or use
the copy field icon ( ). When you click the copy field icon, GSM displays a
multi select dialog box containing all values in the potential label claims field.
You can use the dialog box choices to populate the actual field only with potential
options.
Label Claims Determination
Using the label claims determination feature, you can interrogate a product for
claims applicability based on a centralized group of rules segregated by label
claims authority.
1
2
4-14
Click the label claims determination icon ( ). GSM opens the Label Claim
Determination dialog box.
Some claims require another product to compare to, such as Low Fat. The
system can evaluate comparative claims if you provide additional nutrient
information that describes the comparative product. Select the
Comparative/Reference Product tab and fill in the appropriate information
needed. You can also import data from another trade specification by
selecting the Reference Product label. Data will be imported from the trade
specification’s active nutrient profile. See figure 4-19 below.
Global Specification Management User Guide
Chapter 4
Trade Specifications
Figure 4-19: Label Claim Determination dialog box, Comparative/Reference Product tab
3
4
On the Claims Determination tab, from the Label Claim Authority dropdown list, select a specific rule group to use for considering claims
applicability.
Click Display Label Claims to display the Applicable Claims table.
The system evaluates label claims against rules that you previously defined.
All selected claims based on the label claims authority appear in the
Applicable Claims table with color coding to show whether the claim may be
made for the product.
When the system evaluates a claim as compliant, the Comments column
displays supporting information for the claim along with one or more userdefined values supporting the assessment in the Calculation(s) column, as
shown in figure 4-20. If the system finds that the claim is invalid, no such
information appears in the Comments column.
4-15
Agile Product Lifecycle Management for Process
5
Select the claims you want to push to the specification. All compliant claims
are automatically selected. You can unselect any claims you do not want to
push to the specification. Once you have all the claims selected, click the
Push Label Claims button at the bottom of the grid. This action will close the
dialog window and populate the potential label claims field with the selected
claims. This action will replace all existing potential label claims in the field;
if you would like to just append to the list make sure the “Append to existing
list” checkbox is selected. See figure 4-20 below.
Figure 4-20: Label Claims Determination dialog box
4-16
Global Specification Management User Guide
Chapter 4
Trade Specifications
Related Specs Tab
The Related Specs tab contains the following sections:
❑
Ingredient Specification— Discussed below, at Ingredient Specification
Section on page 4-17.
❑
Associated Specifications —For discussion of this commonly used field,
❑
Master Specifications —For discussion of this commonly used field, please
please see Associated Specifications Section on page 3-9.
see Master Specifications Section on page 3-9.
Ingredient Specification Section
This section represents the material that was produced as a result of a
formulation specification.
Figure 4-21: Ingredient Specification section
Key fields include:
Context—Used to specify which formulation specification actually produced the
material.
Qty—Indicates how much of the produced material is actually going into the
trade specification. The tare weight calculation uses this ratio when calculating
the amount of packaging.
CSS Tab
The CSS tab contains the data related to the list of publications of a specification
to any internal or external target system. For discussion of this tab, please see CSS
Tab on page 3-10.
4-17
Agile Product Lifecycle Management for Process
Supporting Documents Tab
Key sections in the Supporting Documents tab include:
❑
Supporting Documents —The document types available are URL,
Attachments/Procedures, and Rich Text. For discussion of this commonly
used section, please see Supporting Documents Section on page 3-12.
❑
❑
❑
❑
❑
DRL Documents —For discussion of this commonly used section, please see
DRL Documents Section on page 3-18.
Testing Protocols —For discussion of this commonly used section, please see
Testing Protocols Section on page 3-21.
Nutrient Profile —Discussed below, at Nutrient Profile Section on page 4-18.
% Breakdown section —This section only appears on trade items that are
identified as “co-pack.” For discussion of this commonly used section, please
see % Breakdown (Formula) Section on page 3-22.
Regulatory/Legislation —Discussed below, at Regulatory/Legislation Section
on page 4-19.
Nutrient Profile Section
In this section you can create new or associate existing nutrient profiles for this
specification.
Figure 4-22: Nutrient Profile section
Nutrient profiles are actually separate documents from the trade specification
with their own workflows.
More than one nutrient profile can exist on a trade specification, but one of the
nutrient profiles must be flagged as the “Active Profile” for usage in rollups
elsewhere in the system and label claim determination. Only one nutrient profile
can be marked as active.
4-18
Global Specification Management User Guide
Chapter 4
Trade Specifications
Regulatory/Legislation Section
The Regulatory/Legislation section displays summary details of the regulatory
documents that have been created for this trade specification.
Figure 4-23: Regulatory/Legislation section
Key fields include:
Filing # —A system-assigned number associated with the regulatory filing.
Approval # —An internal tracking number that you can enter in the Regulatory/
Legislative Detail page, Cover Page tab, Application Summary section. (See
Application Summary Section on page 4-20 below.)
Regulatory/Legislation Detail Page
On the Regulatory Legislation Detail page you can generate and document data
that supplements the trade specification in order to produce regulatory filing
documentation.
This page is unusual in that you access it from within another tab (Supporting
Documents). To access the Regulatory/Legislation Detail window, click the
hyperlinked specification name in the Regulatory/Legislation section of the
Supporting Documents tab. A new window opens with five tabs:
❑
Cover Page Tab on page 4-19
❑
Product Formula Tab on page 4-22
Processing Procedures Tab on page 4-23
Comments Tab on page 4-23
Attachments Tab on page 4-24
❑
❑
❑
Cover Page Tab
On the Cover Page tab you can define the application summary data including
the application type. The application type in turn drives some of the relevant
fields on the rest of the cover page.
Cover Page has the following sections:
❑
Application Summary Section on page 4-20
❑
[Application Type] Cover Page Section on page 4-20
4-19
Agile Product Lifecycle Management for Process
Application Summary Section
In this section you can identify information that will help classify and generate a
regulatory filing application such as the name of the product, the status, and the
formulation specification to use to generate the procedures.
Figure 4-24: Application Summary section
Key fields include:
Application Type—Controls which cover page attributes are visible and the
printed format of the filing
Status—You can alter the status when the specification is in edit mode
Ingredient Specification—Defines the produced material that the regulatory
filing is being created for
Formulation Specification—Choose from a list of formulation specifications
that are tied to this trade item. The formulation specification identified here is the
one that the system uses to generate data elsewhere in the filing document.
[Application Type] Cover Page Section
This section enables you to capture information necessary for generating
different regulatory forms.
Figure 4-25: [Application Type] Cover Page section, Generic sample
4-20
Global Specification Management User Guide
Chapter 4
Trade Specifications
Figure 4-26: [Application Type] Cover Page section, USDA sample
Key fields include for the USDA sample include:
Agent Name, Address, Telephone No. —Click Agent Name, the hyperlinked
part of the field label, to open a dialog box from which you can choose a company
from a prepopulated list. When you select the company, the dialog box closes and
the company name, address, and telephone number appear in the text box to the
right of the field label.
HACCP Process Category —From the drop-down list, select an HACCP
(Hazard Analysis and Critical Control Point) process category.
Click Generate Formula/Procedures to pull information from the selected
formulation specification and nutrient profile to build the filing.
4-21
Agile Product Lifecycle Management for Process
Product Formula Tab
The Product Formula tab contains only one section: Product Formula.
Product Formula Section
In the Product Formula section you can store an enriched text rendering of the
product formulation for use when generating the document. Using the Generate
Formula button, you can automatically generate an enriched text version of the
formulation information from the label composition of the attached nutrient
profile. This label composition will be generated when the LIO statement is
pushed from the LIO profile to the nutrient profile. If LIO has not been
performed, the label composition will not be present and the automatic
rendering will not be available.
Figure 4-27: Product Formula section
4-22
Global Specification Management User Guide
Chapter 4
Trade Specifications
Processing Procedures Tab
Processing Procedures, the sole section in this tab, is for storing an enriched text
rendering of the processing procedures that can be used when generating the
document. You can use the Generate Procedures button to automatically generate
an enriched text version of the processing procedures information from the
formulation specification selected on the Cover Page tab.
Figure 4-28: Processing Procedures section
Comments Tab
In Comments, the sole section in this tab, you can store enriched text comments
for use when generating the document.
Figure 4-29: Comments section
4-23
Agile Product Lifecycle Management for Process
Attachments Tab
The Attachments tab contains the following sections:
❑
Related Specifications
❑
Attachments
Related Specifications Section
The section allows you to reference attachments from ingredient and packaging
specifications related to the product.
Figure 4-30: Related Specifications section
Attachments Section
In this section you can attach binary documents such as Adobe™ Acrobat (PDF)
documents and Microsoft Office documents.
Figure 4-31: Attachments section
4-24
Global Specification Management User Guide
Chapter 4
Trade Specifications
References Tab
The trade specification References tab contains the list of all reference data linked
to a specification. Key sections in the References tab include:
❑
❑
Suppliers section —This section only appears on trade items that are
identified as “co-pack.” For discussion of this commonly used section, please
see Suppliers Section on page 3-25.
Activities section —For discussion of this commonly used section, please see
Activities Section on page 3-25.
❑
Specification Dependencies section —For discussion of this commonly
❑
used section, please see Specification Dependencies Section on page 3-27.
Related Documents section —For discussion of this commonly used
section, please see Related Documents Section on page 3-27.
Approval/Audit Trail Tab
For discussion of this tab, please see Approval/Audit Trail Tab on page 2-11.
4-25
Agile Product Lifecycle Management for Process
4-26
Global Specification Management User Guide
C HAPTER 5
Process Specifications
This chapter presents an overview of the capabilities of Global Specification Management regarding process
specifications. Topics in this chapter include:
❑ Process Specification Integration into Formulation Specification Feature
Process Specification Integration into Formulation Specification Feature
All features related to process specifications have been integrated into the
formulation specification process. For more information, refer to Chapter 6,
Formulation Specifications.
5-1
Agile Product Lifecycle Management for Process
5-2
Global Specification Management User Guide
C HAPTER 6
Formulation Specifications
This chapter presents an overview of the capabilities of Global Specification Management regarding
formulation specifications. Topics in this chapter include:
❑ Overview
❑ Concepts and Definitions
❑ Page-Level Functions
❑ Summary Tab
❑ Formulation Tab
❑ Process Tab
❑ Ext Data Tab
❑ Related Specs Tab
❑ CSS Tab
❑ Supporting Documents Tab
❑ References Tab
❑ Approval/Audit Trail Tab
❑ Additional Tools
Overview
The formulation specification is where we document the process or recipe for one
or more inventoried items. The formulation specification describes:
❑
The name of the formulation, which is often associated with the output
item(s).
❑
The required ingredients with their quantities needed to make the item(s).
The ordered preparation steps and instructions describing when and how to
mix materials.
Descriptive information about the formulation specification and the output
item(s). Examples include:
❑
❑
• Documents
• Custom Data
• Related Specifications
• And various core attributes used to describe specific elements of the
specification
6-1
Agile Product Lifecycle Management for Process
In addition the formulation specification is the foundation for a number of tools
that we use throughout the lifecycle of the specification. Examples of
organizational goals and the tools provided by the formulation specification to
help achieve these goals include:
❑
Capturing accurate data:
• Modeling operational and moisture gain/loss to better reflect
manufacturing conditions.
• Describing the various items created by a formula including Products,
Co-Products, and Waste.
• Identifying alternate inputs and outputs that are available at the time of
production.
❑
Making better decisions:
• Rolling up an output’s theoretical values for nutrition, compliance
information, yield, and custom data in order to understand and verify if
a recipe’s goals have been achieved.
• Performing ingredient substitutions using predefined and approved
substitute items.
• Modeling appropriate batch sizes to better understand the impact of
scaling.
• Optimizing a formula to achieve identified goals and constraints. See
Optimization on page 6-65 for more information.
❑
Efficiently managing information:
• Finding and reviewing historical recipes.
• Creating new issues of formulations to reflect specification changes over
time.
• Capturing “Snapshots” of a given formula while developing a new or
modified item, as described in Snapshots on page 6-64.
• Verifying and approving accuracy through a formal workflow process.
Concepts and Definitions
Outputs
When ingredient specifications are added to the formula and processing occurs,
an output is created. The output should be considered the result of a
manufacturing process or formulation specification.
Data associated with an output material includes:
❑
Ingredient specification attributes such as Nutrition, Compliance, Custom
Data, Supporting Documents, % breakdown, etc.
❑
Formulation and step specific information including:
• Gain/Loss Factors, Qty, Yield, etc.
• % Step
6-2
Global Specification Management User Guide
Chapter 6
Formulation Specifications
• Composition (inputs)
• Packaging
Output Types/Sub-Types
Outputs can be classified as one of the following types:
❑
Internal—Used to describe the material that moves from one step to another
within a single formulation specification. Internal outputs are not available
for use by other formulation specifications.
❑
External/Owned—Represents the result of the formulation. External/Owned
outputs can be used by other specifications for various purposes. To help
describe these purposes External/Owned outputs are further described by
Sub-Types. Sub-Types available include:
• Product—The primary material created from the formulation
specification. A product can be used in further processing by another
formulation specification or linked to a trade specification and thought
of as a finished good.
• By Product—A material that is created as a result of creating a product.
A by product output can be linked to a trade specification and sold as a
finished good. However it cannot be linked to other formulation
specifications for further processing.
• Waste—A material that is created as a result of making a product. A
waste output cannot be linked to a trade or formulation specification.
Therefore it is merely a tool to help accurately reflect inefficiencies or loss
during a manufacturing process.
❑
Referenced—Materials can exist outside the context of a single formulation.
Examples include:
• The item is both purchased and manufactured: An organization buys the
item and can choose to resell it. In this case, the ingredient can and would
exist whether a formulation specification was ever created.
• The item can be manufactured using different processes or procedures:
Multiple formulas can point to a single output ingredient. Each formula
can represent acceptable alternatives for manufacturing the output. In
this situation, the technical data for the output represents the goal for any
given formulation rather than the result. Therefore technical data does
not transfer from the formulation to the referenced output.
• Separate and distinct approval process or security: Some companies
manage formulation/processing instructions differently than materials.
These differences can include different approval processes and/or
different security rights. By referencing an ingredient as an output, the
output maintains all the functionality related to raw material ingredients
including its own workflow and security permissions. Therefore the
output ingredient can be approved using a different workflow and follow
different security rules than the formulation specification that produces
the output.
6-3
Agile Product Lifecycle Management for Process
Referenced outputs can be described by Sub-Types similar to External/
Owned outputs. Because the referenced output ingredient lives
independent of the formulation, the Sub-Types merely describe the role
the output plays in relation to the formulation specification.
Theoretical Ingredient Verses Output Ingredient
There are two parts to every output:
❑
Theoretical Ingredient—Describes how the inputs of a formulation come
together and create technical definition for composition, nutrition, custom
data, and other data elements. This technical definition represents a rollup of
data from the input ingredients. The theoretical ingredient is described by a
given formulation and is considered part of the formulation specification.
The theoretical ingredient is represented on an output’s BOM Item
Definition screen.
❑
Output Ingredient—The formal definition of the material. This portion is
represented using an ingredient specification. When an ingredient
specification is owned by a formulation specification, theoretical data is
pushed from the formulation specification to the ingredient specification.
When an ingredient specification is referenced the formulation specification
is not able to push data. Therefore users manage updates and changes.
Using both the Theoretical and Output Ingredient, it is possible to have multiple
formulation specifications that create the same output. Each of the formulation
specifications would have its own context specific data and references the same
material.
Please note, differences can exist between the Theoretical and Output Ingredient
due to timing issues related to the push from one to the other or the inability to
push when an item is referenced.
“Designable” Workflow Status
Formulation specifications provide a number of powerful tools. These tools are
often used during the early steps in a formulation specification’s workflow. As a
formulation specification moves past the initial workflow steps, it is expected that
the organization will focus their efforts on minor changes and approving the
specification for use by the greater organization.
Therefore in Workflow Administration, an administrator can designate or tag a
given step of a workflow as “Designable”. When a specification is in that
designable workflow step, the following design features will be available to that
specification:
• Costing
• Optimization
• Snapshots
• Moisture Loss Calculators
6-4
Global Specification Management User Guide
Chapter 6
Formulation Specifications
• Batch Tuning
• Theoretical Rollups
• Instance Level Ingredient Attribute Overrides or Basis
• Substitute Materials
Note
When using a formulation specification, if you are not able to access the
above features please verify that the specification is in a workflow step
marked as “Designable.”
Remaining Concepts and Definitions
The Formulation Specification page consists of the following tabs. Remaining
features and concepts will be described as we review the specific screen elements
of the formulation specification in the following sections.
❑
Summary Tab on page 6-9
❑
Formulation Tab on page 6-10
❑
Process Tab on page 6-23
❑
Ext Data Tab on page 6-40
❑
Related Specs Tab on page 6-40
❑
CSS Tab on page 6-40
❑
Supporting Documents Tab on page 6-41
❑
References Tab on page 6-41
❑
Approval/Audit Trail Tab on page 6-41
6-5
Agile Product Lifecycle Management for Process
Page-Level Functions
In the upper right corner of the page is a row of buttons that trigger actions that
can affect the entire page. All of these buttons (except Calculate) are displayed
when the specification is in read mode. These buttons and their functions are:
❑
Settings—The fields displayed in this drop-down list drive specific
functionality throughout the formulation specification. The default values
are derived from a user’s Profiles and Preferences. The values are then
associated to the formulation specification upon saving the specification. You
can change these settings at any time while working with your formulation.
Key fields include:
• UOM—The default unit of measure for steps in a formulation
specification.
• Path—The default BOM Calculation path to use when creating
formulation specifications. Examples include: Input Percent, Input
Quantity, and Input Yield.
• Combine Like Items—When checked, combines like input items when
viewing the formulation specification’s Formulation tab in read mode.
• Cross Reference—The cross references system equivalent used for
presenting alternate identities for attached specifications. This field will
be the equivalent number that is defined on the referenced specification.
• Currency—The default currency.
• Cost Type—Type associated with the cost set.
• Cost Set—The actual set of costs that will be used for viewing and
optimization for the bill of material (BOM) items added to the
formulation specification.
❑
Edit —Place the entire page in edit mode so that you can modify it.
❑
(Report) —Depending on the configuration of your Agile PLM for Process
❑
installation, this button may or may not appear (on certain specifications).
Click Report to launch the Reporting application.
Calculate—Performs calculations related to the formulation specification.
Specifically:
• BOM Calculation—This button is displayed when the specification is in
edit mode. Updates values associated with the formulation and step
BOMs. BOM Calculations also update:
• Yield
• Theoretical Nutrition
• Theoretical Compliance Data
• Theoretical Composition Data
• Custom Data—Executes custom calculations which are defined in
ADMN and associated with Calculated Extended Attributes which are
then placed on the specification as either simple extended attributes or as
part of a custom section.
6-6
Global Specification Management User Guide
Chapter 6
Formulation Specifications
Note
❑
❑
❑
❑
Calculation also happens when you save your specification.
Create Copy —Create a new copy of the current formulation specification.
For discussion of this commonly used function, please see Creating a Copy of
an Existing Specification on page 2-1.
Optimization —Optimize the formulation by defining goals and establishing
constraints related to ingredient costs, nutrients, and extended attributes. See
Optimization on page 6-65 for more information.
CACS — Screen the current specification using Computer Aided Compliance
Screening (CACS), an application that you can use to inspect materials for
fitness against any number of user-defined screens. CACS provides limited
functionality when run on a formulation specification due to the fact that
most material data is defined on the output ingredient. Therefore CACS can
perform screening for extended attributes defined on the formulation
specification (as opposed to an output ingredient) and approved for use in
business units.
Please note CACS appears only if your installation includes CACS. For more
information on CACS, please refer to the Agile Product Lifecycle Management
for Process Computer Aided Compliance Screening User Guide.
Target Revision—Allows users to create a new issue of a given specification
by:
• Starting with an established specification.
• Using “Target Revision” to point to another specification (the target) and
generating a new issue based on the target specification’s lineage
(Specification Number and Issue Number).
This feature is valuable when designers/developers create many different
variations of a potential product yet want to conform to a specific issue
number.
❑
Compare —Allows users to compare the input bill of materials between two
or more formulation specifications or snapshots. In addition, using the
Formula Basis, users can choose to compare based on the following options:
• Quantity - Recursive 100%—Provides items from the exploded bill of
materials and determines percentage based on the input quantity.
• Yield - Recursive 100%—Provides items from the exploded bill of
materials and determines percentage based on the yielded quantity.
• Quantity - Top Level Only—Provides items from the selected
specifications only and determines percentage based on the input
quantity.
• Yield - Top Level Only—Provides items from the selected specifications
only and determines percentage based on the yielded quantity.
❑
Print — Opens dialog box through which you can print the current
❑
Act —Create a primary activity, or an additional workflow object to manage
specification in a variety of formats.
parallel work streams associated with this specification. For more
information about this function, please see Chapter 20, Activities. (Appears
only if you have editorial control over the specification.)
6-7
Agile Product Lifecycle Management for Process
❑
❑
❑
❑
❑
Snapshot—A tool used to take a picture of a specification at a given point in
time. “Snapshots” can be retrieved at any point in time while a specification
is in edit mode. Snapshots are considered useful during early design when a
developer is refining a formula and wants to protect data.
Refresh—Replaces override values on the Basis with input ingredient
specification values. Upon clicking this button the system prompts you to
confirm the global update. When you select OK, the system pulls the
information from the input specifications for all items in your formulation
specification. This is only available in edit more. If you do not want to
perform a global refresh, then use the Basis screen to select specific sections
for a given input specification to refresh.
Item History —Display all issues of the specification that exist in a Spec
History table, along with the reason for creating each issue and other
identifying information. For more information on this feature please see Item
History on page 2-3.
Workflow — Move the current specification, or document, from one
workflow step to another. Please note that this workflow button may control
more than just the given formulation specification. If the output ingredients
are of the Type External/Owned then the output ingredient specifications will
also be impacted by this action. For more information on workflows, please
see Transitioning a Workflow on page 2-7.
Resolve Workflow —Re-resolve the specification to a workflow (present only
when you are logged in with a user account that has the user role of
[CAN_RERESOLVE_WORKFLOWS].)
Note
6-8
As of 6.0, Custom Nutrients are no longer supported.
Global Specification Management User Guide
Chapter 6
Formulation Specifications
Summary Tab
Key sections in the Summary tab include:
❑
Summary Information—For discussion of this commonly used section,
please see Summary Information Section on page 3-2
❑
Formulation Attributes—Discussed below, at Formulation Attributes Section
on page 6-9
❑
Facility Information—Discussed below, at Formulation Attributes Section on
page 6-9
Cross References—For discussion of this commonly used section, please see
Cross References Section on page 3-3
Approved for Use In—For discussion of this commonly used section, please
see Approved for Use In Section on page 3-5
❑
❑
Formulation Attributes Section
This section allows users to describe the formula being created, associate the
formula to a specific project, and filter data by defining substitute restrictions.
Figure 6-1: Formulation Attributes section
Key fields include:
Project Name—A reference to a project associated with the formulation
specification. This field is configurable to either:
• Allow users to link the formulation specification to a project defined in
NPD, or
• Enter free text to describe the project in an appropriate manner.
Substitute Restrictions—Links to a multi-select dialog box containing
substitute restrictions. Chosen restrictions filter the list of available substitutes
that will be presented while designing. This field is only available when the
specification is in a workflow status that is marked with a system action of
“Designable.”
If a formulation specification is not marked with any substitute restrictions, all
substitutes defined for raw materials in the BOM are available for design use. If a
formulation specification is marked with a USDA restriction, only substitutes
marked with a restriction of USDA will be available for design use.
Description—An appropriate definition or explanation of the formulation
specification. It is common for the description to describe what the formulation
is producing and occasionally methods used during production.
6-9
Agile Product Lifecycle Management for Process
Facility Information Section
The Facility Information section contains the list of facilities linked to a
formulation specification. This information is useful for identifying plants that
use or are approved to use a given formulation when performing production.
Figure 6-2: Facility Information section
Formulation Tab
The Formulation Tab is useful for:
❑
Building entire formulations from scratch
❑
Viewing:
• All input items associated with the formulation
• The total number of steps and descriptive data related to steps
• Processing step assigned to a given input material
• Input quantities, input yield, and relative percentages
• All output items (internal, external and referenced)
❑
Updating most aspects of the ingredient bill of materials, outputs, and
processing steps
The Formulation tab was designed to help users build formulations faster.
Therefore some functions such as defining multiple outputs and re-sequencing
steps must be performed using the Process Tab.
It is also important to note that many of the features available on the Formulation
tab are also available on the Process tab. Therefore it is recommended that users
interact with both tabs to determine which best fits their needs when creating
formulations.
6-10
Global Specification Management User Guide
Chapter 6
Formulation Specifications
Inputs Section
Adding Materials To The Inputs Grid
There are two primary methods for adding materials to the inputs grid. The two
approaches are:
1
2
Adding Materials—Allows the user to add multiple BOM items using a
search window.
Adding Rows And Then Using Auto Complete—Allows the user to add one
or many rows and then enter the information about the BOM item and have
GSM look up available entries leveraging the existing search model. You can
tailor auto complete to lookup based on specification name, specification
number, cross reference, and by how many characters the user must enter
before auto complete starts. These settings are configurable. See the Agile
Product Lifecycle Management for Process Configuration Guide for more
information.
Adding Materials
To add materials:
1 Click the Add New button leaving the field to the left of the button null, as
figure 6-3 shows below.
Figure 6-3: Add New button
GSM opens a search page, as figure 6-4 shows below.
6-11
Agile Product Lifecycle Management for Process
Figure 6-4: Search page
2
When you have found all the specifications you wish to add, click Done to
return to the populated Inputs grid.
Figure 6-5: Populated Inputs grid
6-12
Global Specification Management User Guide
Chapter 6
Formulation Specifications
Adding Rows and Then Materials
To add rows and then materials:
1 Enter the number of rows you wish to add to the left of the Add New button.
Figure 6-6: Inputs grid, number of rows to add
2
Click the Add New button. In the example below, the three rows are added
without a material assigned.
3
Next, click on the first row and start to type the name of the material. As you
type, a GSM search is performed and specifications are presented for your
selection. Use your mouse or up/down arrow to select the desired material.
We refer to this feature as “Auto-Complete.”
Figure 6-7: Three rows added
Note
Once materials are defined for a given row, the grid will re-sequence,
often placing the material at the bottom of the grid.
6-13
Agile Product Lifecycle Management for Process
Figure 6-8: Auto Complete feature
4
Repeat the previous step for each row to populate the entire grid, as figure 69 shows below.
Figure 6-9: Populated grid
Additional Notes Regarding Adding Materials To The Inputs Grid
❑ Changing a BOM Item: To change the specification for an item in the inputs
grid, click the add data icon ( ) in the Material column. GSM displays the
search page where you can search for and select an ingredient specification.
❑ Using either approach, the grid is placed in an “edit all” mode, so the user can
easily continue to enter data in the grid.
Note
6-14
Auto-Complete can be configured to search based on specification name,
specification number, cross reference, and by how many characters the
user must enter before auto complete starts. Refer to the Agile Product
Lifecycle Management for Process Configuration Guide for more
information.
Global Specification Management User Guide
Chapter 6
Formulation Specifications
Establishing Quantities Within The Inputs Grid
Once one or more materials are established, the user can describe the amount of
each material for each row.
Figure 6-10: Defining amounts of material
Material Quantity Fields Defined
Quantity—The amount of material gathered and placed into the manufacturing
process. A total field is presented as the final row of this column.
G/L (Gain/Loss)—A factor used to describe the amount of material either gained
or lost during a manufacturing process. As an example, when cookie dough is
placed in a bowl some amount sticks to the bowl and is lost.
Yield—The amount of material contributing to the output item(s).
Quantity * G/L = Yield. A total field is presented as the final row of this column.
Percent Batch—The percent yielded for a given material as compared to the total
yield.
Entering Material Quantity Data Using BOM Calculation Paths
When the formulation specification is in edit mode, the user is limited to enter
data based on predefined BOM calculation paths. The paths are described as
follows:
❑
Input Quantity—The user enters data by typing in the quantity. As needed, the
user can adjust gain/loss to establish the yield. The remaining fields including
yield are populated when the application recalculates.
6-15
Agile Product Lifecycle Management for Process
Figure 6-11: User types in Quantity
❑
Input Yield—The user enters data by typing in the yield. As needed, the user
can adjust gain/loss to establish the quantity. The remaining fields including
the quantity are populated when the application recalculates.
Figure 6-12: User types in Yield
❑
Input Percent—The user enters data by typing in the Total Yield and entering
in the proper allotment per row. When the application performs its
calculations, the yield for a given material or row will be established. As
needed, the user can adjust the gain/loss to establish the quantity. The
remaining fields will be updated as the application calculates.
6-16
Global Specification Management User Guide
Chapter 6
Formulation Specifications
Figure 6-13: User types Total Yield
Selecting a BOM Calculation Path—When a formulation specification is
created, the BOM calculation path is immediately assigned using the path found
in the user’s Profile and Preferences. Once the formulation specification is saved,
the BOM calculation path for the formulation specification is managed via the
formulation specifications Settings button. A user may change the formula’s
BOM calculation path at any time via the Settings button and the path will be
saved when the formulation specification is saved. Profile and Preferences is
described in detail in the Agile Product Lifecycle Management for Process Getting
Started Guide.
Calculation paths control the following:
• Which fields are editable
• Certain system actions
• Which type of user messages display based on the calculation
• Tags and rules
❑
Units Of Measure—When a formulation specification is created, the default
unit of measure (UOM) is derived from the user’s Profile and Preferences.
Therefore any rows added to the Inputs grid will initially be presented using
the UOM.
Similar to BOM calculation paths, the default UOM for a formula can be
changed via the Settings button. Upon making a change within Settings, any
new row added will correspond to the formula’s default UOM.
For a given material, a standard list of UOMs is presented by default. This list
can change if:
• Density is/is not defined on a given input ingredient specification. If it is
defined, additional UOMs associated with volume will appear in the
UOM drop down.
6-17
Agile Product Lifecycle Management for Process
• Explicit UOMs are defined on a given input ingredient specification. If
explicit UOMs are defined, they will also appear in the UOM drop down.
• If your site is configured to only use explicit UOMs, then the material will
only display UOMs described on the ingredient specification.
Working With Cost In The Inputs Grid
Two columns present cost data in the inputs grid. They are:
❑
USD/100g—The cost per 100 grams of material. This cost is derived and
presented in one of two ways.
• Cost Library—Cost can be loaded to the cost library via an API. If this is
performed then the data presented on the screen is controlled through
settings found on Profiles and Preferences, Formulation Preferences
under the Cost Preferences section.
• Override—Also, within GSM, you can change cost using the Setting
action button, Cost Preferences section. If a cost override has been
entered, the override icon (
) displays.
❑
EXT Cost—The calculated cost for the input material based on the quantity.
A total field is presented as the final row of this column representing the total
ingredient cost for the formula specification.
Figure 6-14: Cost data
6-18
Global Specification Management User Guide
Chapter 6
Formulation Specifications
Figure 6-15: Edit Adjusted Cost dialog box
Additional Tools Found in the Input Grid
❑ Steps—If steps have been defined, then the user can assign a given material
to the step in which it will be used. Please note the grid will refresh and
reorder materials based on the step assigned.
❑ Annotations—You can click the annotations icon (
) to add BOM
annotations. Added annotations display in read mode and are included in
printing.
❑ Context—When an ingredient is added to the Input grid as a material and the
ingredient itself is the output of another formulation specification, an
additional field will appear. This field allows the user to directly associate this
input to the formulation that created it.
Context is important because it provides the link between formulas. Context
impacts:
• Formulation Printing: If context is not defined, then the exploded BOM
will not present lower level formulations.
• Integration: When integrating formulation data through APIs or other
forms of integration, context provides the link to formulas.
❑
❑
Basis—A tool used to capture overrides to input ingredient data fields. The
overrides are specific to a given ingredient in a given formulation
specification. Therefore the override values are not associated with the input
ingredient and are not available when using the input ingredient as an input
to other formulation specifications. Refer to Basis dialog box on page 6-42 for
a detailed explanation of basis.
Get Latest Issue—When the user adds an ingredient specification to the
inputs grid, by default the relationship is specific to the ingredients issue
number, i.e. issue 001. Later if the ingredient is changed and a new issues is
created (002), then some form of change management must be performed to
update the formulation specification.
6-19
Agile Product Lifecycle Management for Process
However if Get Latest Issue is used when creating the relationship between
input ingredient and the formulation specification, the relationship is only
based on specification number and workflow status. Therefore the next time
the specification is viewed, the BOM will return the maximum issue number
that is in a workflow status marked with the “Is Approved” system action.
❑
Substitute Material—Displays the substitution icon (
) if substitutes have
been defined on the ingredient specification. When you click the icon, GSM
displays the Substitute Material dialog box. Use this dialog box to swap out
materials with available selections and to update quantities.
❑
Item history—Displays the item history icon (
❑
Delete—Click the delete icon (
). Click on the icon to view
a list of BOM items, their issues, and their statuses.
) to delete the BOM item.
Three columns containing the substitute material icon, item history icon, and the
delete icon display at the end of the inputs grid, as figure 6-16 shows below:
Figure 6-16: Inputs grid columns
Outputs Section
Use the Outputs section on the Formulation tab to manage the materials that are
created from a given step on a formulation specification. The Formulation tab
has simplified functionality in the area of managing outputs. Some examples of
features related to outputs available on the Process tab that are not available on
the Formulation tab include:
• Creating more than one output for a given step.
• Dispersing an internal output so that it can be used as an input into more
than one of the following steps.
• Defining alternate outputs.
If these scenarios are important for your organization, then you will want to
consider using the Process tab.
Note
6-20
Outputs are automatically created when a new step is defined. For this
reason you will not find an Add New button in this section.
Global Specification Management User Guide
Chapter 6
Formulation Specifications
Figure 6-17 below shows the Outputs section.
Figure 6-17: Outputs section
Key fields include:
Output—The corresponding step that this output created from.
Input—The step number where the output will be consumed. This field is only
available when output type is Internal.
Material—The name of the output. When the creation of a step automatically
creates an output a name is generated. The naming convention is:
Step+{Step Number}+Ouput+{Specification Number}+{Issue Number}
The name can be updated via the Output dialog box.
Output dialog box—The primary tool for managing data related to the output
such as nutrition, compliance, and other rolled up data. See Output Dialog Box
on page 6-49 for more information.
Drop-down arrow ( )—This arrow represents an extensibility point that has
been leveraged to help BOM calculations treat this output. It is primarily useful
when managing multiple outputs on the Process tab. By default, the outputs are
variable and should adjust linearly to the formula. For example, 2 outputs each
consume a half. Add two more, and all four outputs receive 25%. By choosing
“Fixed,” the specified quantity to the output will remain fixed regardless of
adjustments made to the input BOM.
Output Type—Available types are Internal, External/Owned, and Referenced as
defined in Outputs on page 6-2.
Qty—Total amount of inputs for that output. This field is not shown for Internal
types because the quantity associated with the material is accounted for in the
final output.
Process G/L—Factor applied to the initial quantity to account for output loss.
Please note that this factor impacts the entire output where as the input G/L was
specific to a single input.
Water G/L—Factor applied if during processing, water is lost or gained.
Yld—Final output quantity after all loss has been accounted for.
% Formula—Percentage of the formula that this output represents compared to
the total Formula Output.
Data associated with output that can be modified using the Output dialog box,
shown in figure 6-18 below. To access the Output dialog box, click the document
icon ( ). The output dialog box is described in more detail in Output Dialog
Box on page 6-49.
6-21
Agile Product Lifecycle Management for Process
Figure 6-18: Output dialog box
This action button is only
available when the formulation
specification is in design mode.
Steps Section
You can use the Steps section of the Formulation tab to describe procedures that
must be performed to create an output material. Steps themselves are merely
natural milestones in the manufacturing process. To further differentiate steps,
you can add step instructions to clearly articulate the actions that are being
performed during the step.
This section offers multi add capability. GSM automatically names added steps as
“Step X,” where X is name of step. Key fields include:
Step name—Name of step.
Step Qty—Total amount of inputs assigned to the step.
Step Yield—Total amount of inputs used in the step after gain loss has been
factored in.
Use the delete icon ( ) to delete a step. You cannot delete a step that creates
items being used.
Click the step instructions icon (
) to add instructions for each step. These
instructions will display on Process tab and in print details.
6-22
Global Specification Management User Guide
Chapter 6
Formulation Specifications
Process Tab
The Process tab has many of the same uses as the Formulation tab in that you can
add/remove, view and update inputs, outputs, steps and the various pieces of data
associated with these areas. However the Process tab does provide the user
additional capabilities that are not available on the Formulation tab. Examples of
these items include:
❑
Advanced modeling of outputs, including:
• Creating more than one output for a given step.
• Dispersing an internal output so that it can be used as an input into more
than one of the following steps.
❑
Identifying alternate materials for both inputs and outputs.
❑
Working with packaging that associated to the formulation.
❑
Generally developing a formulation by step. We have found that some types
of products are easier to organize and design by step. Therefore the detail
provided on the Process tab is considered useful for these types of products.
The tab is primarily structured in three parts:
❑
Steps Section—This section is identical to the Steps section described on the
Formulation tab. On the Process tab it acts as summary information for each
step.
❑
❑
Process Navigation—This is the gateway to the information found within
each step. This tool can also be used to create, delete, and reorder steps.
Step Details—Describes a given step at the most granular level. The elements
found in this section make up the majority of the content for our discussion
on the Process tab.
Steps Section
See Formulation tab, Steps Section on page 6-22.
Interacting With Process Navigation
Process Navigation displays in the left side of the page, as figure 6-19 shows
below. Steps are displayed under the Process Summary heading. Click on the step
to view details about the step.
6-23
Agile Product Lifecycle Management for Process
Figure 6-19: Process Summary panel
Subtabs
The following icons are used in process navigation:
• Add data icon ( )—Adds a step. New steps are reflected on the
Formulation tab.
• Edit icon (
)—Puts process navigation in edit mode, allowing you to
delete a step using the delete icon ( ) if the step meets the delete step
criteria, or reorder steps using the up and down arrow icons (
).
When process navigation is in edit mode, you cannot select a different
step to display in the Step Details section.
Interacting With The Step Details Section
This section represents the area where we will collect and present the most detail
regarding an individual manufacturing step.
Figure 6-20: Step Details section
Key Fields:
Step Name—The name of the step.
Consumer Prep—Indicates whether the step is a consumer preparation step. The
purpose for marking a step as consumer preparation is that it allows you to
perform additional modeling using the external or referenced outputs created by
the formulation.
The standard use case is cereal and milk. The external output for a given
formulation is cereal. However the industry usually describes the nutrition based
on how a consumer will prepare the item. In this case, the industry considers it
common that the consumer will add a cup of whole milk to the cereal.
Therefore after the user defines the steps needed to create the output, in this
6-24
Global Specification Management User Guide
Chapter 6
Formulation Specifications
example cereal, the user will add one more step. In this step the cereal and the
whole milk will be added as inputs. The output from the consumer prep step will
describe the theoretical data for the item as used by the consumer.
Specific functionality provided by the Consumer Prep flag:
• A consumer preparation step can consume external outputs from the
same specification.
• Any additional materials added to the consumer preparation step will not
affect the general formulation specification. I.e. inputs to a consumer
prep step will not appear on the Formulation tab’s BOM and will not
impact quantity, yield, or percentages.
• A consumer preparation step can consume a normal output. Once you
mark a step as consumer preparation, you can add external outputs from
the same specification. Anything you add will not affect the standard
formula.
Instructions—Information describing the actions being performed during the
step. Click the hyperlinked field to display the Edit Rich Text dialog box, as
figure 6-21 shows below. Enter instructions about the step, and then click Done
to close the dialog box.
Figure 6-21: Edit Rich Text dialog box
6-25
Agile Product Lifecycle Management for Process
In addition, GSM displays two subtabs in the Step Details section:
• Bill of Materials—Made up of input items for ingredient and alternate
input items for ingredients, as figure 6-22 shows below. Bill of Materials
will be further described in this document in the section titled Bill Of
Materials Sub-Tab on page 6-26.
• Packaging—Made up of input items for packaging and alternate input
items for packaging, as figure 6-23 shows below. Packaging will be
further described in this document in Packaging Sub-Tab on page 6-36.
Figure 6-22: Bill of Materials subtab
Figure 6-23: Packaging subtab
Bill Of Materials Sub-Tab
At initial glance the Bill Of Materials Grid appears very similar to the
Formulation tab’s Input Section. It is important to note that all aspect of this grid
relate only to one step in the overall formulation. In this portion of the document
we will describe how to use the Bill Of Materials grid to organize and present data
related to the step.
Key sub-sections:
Input Items—Described below, in Input Items Sub-Section on page 6-27
Alternate Input Items—Described below, in Alternate Input Items Sub-Section
on page 6-29
Output Items—Described below, in Output Items Sub-Section on page 6-30
6-26
Global Specification Management User Guide
Chapter 6
Formulation Specifications
Alternate Output Items—Described below, in Alternate Output Items Sub-
Section on page 6-36
Input Items Sub-Section
Adding Materials To The Input Items Sub-Section
For the most part, adding materials to the Input Items Sub-Section is handled in
the same manner as adding items to the Formulation tab’s Input Item section.
Therefore please review Adding Materials To The Inputs Grid on page 6-11.
Additional features are available in this sub-section include:
• Consume From Step—Using Consume From Step we are able to link
steps together to reflect how material moves from step to step. This
button specifically allows you to associate the internal output from a
previous step to the step you are currently defining.
Figure 6-24: Consume From Step dialog box
Use the following fields in this dialog box to provide amounts and pull in
the specified steps’ outputs.
• Spec Name—Name of the specification to consume
• Yield Available—The yielded amount from the step that created the
output
• Yield Consumed—A portion of the yielded amount already used by
another step
• Yield Remaining—The amount that is available for use in one or
more steps
Select the step to consume, and then click Done. The dialog box closes, and GSM
updates the Input Items section with the updated quantities.
• Order Items—Click to change the sort order of the inputs. GSM
displays the Order Inputs dialog box, as figure 6-25 shows below.
6-27
Agile Product Lifecycle Management for Process
Figure 6-25: Order Inputs dialog box
Use the up and down arrow icons (
) to change the order of input items, and
then click Done. GSM closes the dialog box and the new sort order is reflected in
the Inputs grid.
Establishing Quantities Within The Input Items Sub-Section
Establishing quantities for the most part is similar to the methods described on
the Formulation tab. Therefore please review Establishing Quantities Within The
Input Items Sub-Section on page 6-28. However it is worth noting that all values
are specific to a single step.
Additional features available in this sub-section include:
• Percent Step—The percent yielded for a given material in a given step as
compared to the total yield for the step.
• Consume From Step—Quantities for consume form step items are
established when adding the material to the grid. See page 6-27 for
additional information.
Remaining Fields and Tools within the Input Items Sub-Section
Due to the fact that many of the fields and tools are the used by both the
Formulation and Process tabs, the remaining fields will point you to the
appropriate definitions.
Annotations—See Formulation Tab, Additional Tools Found in the Input Grid on
page 6-19
Context—See Formulation Tab, Additional Tools Found in the Input Grid on
page 6-19
Basis—See Formulation Tab, Additional Tools Found in the Input Grid on
page 6-19
Get Latest Issue—See Formulation Tab, Additional Tools Found in the Input
Grid on page 6-19
Substitute Material—See Formulation Tab, Additional Tools Found in the Input
Grid on page 6-19
Item history—See Formulation Tab, Additional Tools Found in the Input Grid on
page 6-19
Delete—See Formulation Tab, Additional Tools Found in the Input Grid on
page 6-19
USD/100g—See Formulation Tab, Working With Cost In The Inputs Grid on
page 6-18
6-28
Global Specification Management User Guide
Chapter 6
Formulation Specifications
EXT Cost—See Formulation Tab, Working With Cost In The Inputs Grid on
page 6-18
Quantity—See Formulation Tab, Establishing Quantities Within The Inputs Grid
on page 6-15
G/L (Gain/Loss)—See Formulation Tab, Establishing Quantities Within The
Inputs Grid on page 6-15
Yield—See Formulation Tab, Establishing Quantities Within The Inputs Grid on
page 6-15
Percent Batch—See Formulation Tab, Establishing Quantities Within The Inputs
Grid on page 6-15
Alternate Input Items Sub-Section
Use the Alternate Input Items subsection to define an alternate item for a BOM
item (when the Bill of Materials subtab is selected) or a packaging item (when the
Packaging subtab is selected). Each alternate material is related to an original
material and allows for a substitution factor. This subsection uses the get latest
revision capability.
Figure 6-26: Alternate Input Items subsection (for BOM)
Figure 6-27: Alternate Input Items subsection (for Packaging)
Click the add data icon to select a different specification for
the original or alternate material
Key fields include:
Orig Materials—The original BOM item.
Factor—Factor of the original quantity that will be used with new material.
G/L—Factor applied to the initial quantity to account for loss. This field displays
for BOM items only.
Scrap Factor—Percentage of the quantity that will be lost. This field displays for
packaging items only.
Materials—The alternate material.
Description—Free text comments about the alternate item.
6-29
Agile Product Lifecycle Management for Process
To add an alternate item, click Add New. GSM displays the input items dialog box,
as figure 6-28 shows below.
Figure 6-28: Alternate input items dialog box (BOM example)
Select the input item(s) you are designating an alternate for, and then click Done.
The dialog box closes, and your selections are added to the Alternate Input Items
grid. Provide additional details for the alternate item using the fields defined
above.
You can now continue to the Output Items and Alternate Output Items
subsections. These sections apply to the entire step and are independent of the
Bill of Material and Packaging subtabs.
Output Items Sub-Section
The Output Items subsection displays all the outputs that come from the current
step.
This sub-section is especially important if you need to model disassembly, i.e.
You place an orange in a machine and the results are an orange peel, orange slices,
and orange juice. In this example the orange is an input and the remaining items
are outputs.
Figure 6-29: Output Items subsection
6-30
Global Specification Management User Guide
Chapter 6
Formulation Specifications
Key fields include:
Material—The name of the output.
• When the user clicks on the document icon ( ), GSM displays the
Output dialog box, shown in figure 6-48 below. The Output dialog box is
used to describe nutrition, compliance, and other rolled up data, as
described in Output dialog box on page 6-49 through page 6-62.
• Drop-down arrow ( )—This arrow represents an extensibility point
that has been leveraged to help BOM calculations treat this output. By
default, the outputs are variable and should adjust linearly to the
formula. For example, 2 outputs each consume a half. Add two more, and
all four outputs receive 25%. By choosing “Fixed,” the specified quantity
to the output will remain fixed regardless of adjustments made to the
input BOM.
Qty—Total amount of inputs for that output. This field is not shown for Internal
types because the quantity associated with the material is accounted for in the
final output.
Process G/L—Factor applied to the initial quantity to account for loss.
Water G/L—Factor applied if during processing, water is lost or gained.
Yld—Final output quantity after all loss has been accounted for.
% Step —Percentage of the step that this output makes.
EXT Cost—Calculated cost for the output quantity.
The following column displays at the end of the Output Items grid:
Delete—Click the delete icon (
) to delete the output item. GSM displays
confirmation dialog box. Click OK to delete the item. The item is removed from
the grid.
The following button is found at the bottom of the Output Items grid:
Add New—Click to add a new output. GSM displays the Output dialog box, as
figure 6-30 shows below. The edit all feature lets you make updates as you enter
quantities.
6-31
Agile Product Lifecycle Management for Process
Figure 6-30: Output dialog box
You can add multiple outputs from a single step.
Note
The Yield Consumed can be less than the Yield Available when an
additional output is modeled. Therefore, use the Composition Map to
describe the quantity or percentage of each input needed to make a given
output.
Packaging inputs can be mapped and follow the same concept as material inputs.
Refer to Summary Tab on page 6-50 for more details on this dialog box.
Adding Materials To The Outputs Grid
By default, when a step is created an output is also created for that step. Therefore
if you work with products that only produce one output per step you will rarely
need to work with this feature.
6-32
Global Specification Management User Guide
Chapter 6
Formulation Specifications
On the other hand, if you often find yourself describing how materials are
disassembled or describing how multiple items are created from a single process,
then this feature will help you model your products.
An important concept to understand when working with multiple outputs is
related to the initial output. It is assumed that input materials will initially be
assigned to the first output. Therefore all subsequent outputs reduce the amount
of material associated with the initial output. In GSM we describe the first output
as variable (or deselected Fixed) using the drop down feature described in the Key
Fields above.
These concepts will become clearer as we review an example:
1
Prior to clicking Add New it is expected that you will have input materials
defined and the automatically generated output. Note in this example all
1000lb of oranges is placed in the initial output.
2
Click Add New to create the second output and you will be presented with the
Output Dialog Box.
Figure 6-31: Oranges example
6-33
Agile Product Lifecycle Management for Process
Figure 6-32: Output dialog box
3
Populate the Yield Consumed. At this point you are assigning the portion of
the inputs to be taken from then initial input and assigned to the output you
are working with.
Note that once the Yield Consumed is entered and you click out of the field,
BOM Calculation is performed. Also the remaining tabs associated with the
Output Dialog Box appear.
In this example only one input exists. If more inputs were present then the
user would need to define by input the amount of material that contributes
to this output. This level of detail helps the application model theoretical
data.
6-34
Global Specification Management User Guide
Chapter 6
Formulation Specifications
Figure 6-33: Yield consumed
4
Upon clicking Done the output is now presented in the output subsection.
You may also notice that it is very useful to take the time to properly name
your outputs.
Figure 6-34: Output subsection
6-35
Agile Product Lifecycle Management for Process
Alternate Output Items Sub-Section
This section allows you to define an output that could be used instead of the one
you created in the step. This subsection uses the get latest revision capability.
Figure 6-35: Alternate Output Items subsection
Click the add data icon to select a different specification for
the original or alternate material
Key fields include:
Orig Materials—The original output item.
Factor—Factor of the original quantity that will be used with new material.
G/L—Factor applied to the initial quantity to account for loss. This field displays
for BOM items only.
Materials—The alternate material.
Description—Free text comments about the alternate item.
To add an alternate item, click Add New. GSM displays the output items dialog
box, as figure 6-36 shows below.
Figure 6-36: Alternate input items dialog box (BOM example)
Select the output item(s) you are designating an alternate for, and then click
Done. The dialog box closes, and your selections are added to the Alternate
Output Items grid. Provide additional details for the alternate item using the
fields defined above.
Packaging Sub-Tab
The Packaging Sub-Tab allows users to describe Packaging Material and Printed
Packaging Material specifications used in a manufacturing process. Some
important items to note regarding packaging:
6-36
Global Specification Management User Guide
Chapter 6
Formulation Specifications
❑
It is commonly recommended to model packaging used to ship products to
customers on the trade specification. This provides the user the ability to
define a material using output ingredients and reuse it across many different
trade specifications. It is on the various trade specifications that you
distinguish the product via packaging.
❑
Packaging on a formulation specification is used to describe how an output
ingredient is packaged. The output of a formulation specification cannot be a
packaging material or printed packaging material specification.
Input Items Sub-Section
Adding Materials To The Input Item Sub-Section
Unlike other areas of the formulation specification, there is only one path for
adding items to this sub-section and that is by clicking the Add New button. Upon
doing so you are presented with a standard search screen. The only major
difference is the ability to select packaging material or printed packaging material
specifications in the top left corner. See figure 6-37 below:
Figure 6-37: Packaging search page
6-37
Agile Product Lifecycle Management for Process
The fields in this section are carried over from the Inputs section on the
Formulation tab. As you add additional steps and details on this tab, the
Formulation tab reflects those changes.
This section behaves much like the Input Items section on the Formulation tab,
using the quick entry and edit all features.
Figure 6-38: Input Items section, Packaging subtab
Key fields include:
Packaging Material Specification—Packaging material specification that is
being added as an input item for the formulation specification. This field can
contain additional icons:
• By default, the BOM items are added with a locked icon ( , meaning the
specification is tied to an exact specification/issue combination. If you
want to use the get latest revision feature, unlock the specification ( ).
This action tells GSM to go and get the latest revision.
• You can click the annotations icon (
) to add annotations. Added
annotations display in read mode and are included in printing.
Pkg Type—Type of packaging. The four choices are: Inner, Outer, Intermediate
and Label. See Packaging Material Specifications on page 11-1 for more
information.
Qty—Amount of the packaging that goes into the formula.
Scrap Factor—Percentage of the quantity that will be lost. This field displays for
packaging items only.
Yld—Actual amount of the packaging used in the formula.
% Step—That packaging’s percentage as it relates to the step.
% Batch—Percentage that packaging makes up in the total.
USD/100g—This cost is loaded from the cost library which can be loaded via an
API. The preferences describing the default cost data to load are managed via
Profiles and Preferences, Formulation Preferences under the Cost Preferences
section. Also, within GSM, you can change cost using the Setting action button,
Cost Preferences section. If a cost override has been entered, the override icon
( ) displays.
EXT Cost—Calculated cost for the input quantity.
Three columns display at the end of the inputs grid, as figure 6-39 shows below:
6-38
Global Specification Management User Guide
Chapter 6
Formulation Specifications
Figure 6-39: Inputs grid columns
Substitute material—Displays the substitution icon (
) if substitutes have
been defined on the packaging specification. When you click the icon, GSM
displays the Substitute Material dialog box. Use this dialog box to swap out
materials with available selections and to update quantities.
Item history—Displays the item history icon ( ). Click on the icon to view a list
of input items, their issues and their statuses.
Delete—Click the delete icon ( ) to delete the input item. The step must meet
the delete step criteria for the icon to appear.
The following buttons are found at the bottom of the inputs grid:
Add New—Click to display the packaging specification search
dialog box, where
you can select a specification for the step.
Order Items—Click to change the sort order of the inputs. GSM displays the
Order Inputs dialog box, as figure 6-40 shows below.
Figure 6-40: Order Inputs dialog box, for packaging
Use the up and down arrow icons (
) to change the order of input items, and
then click Done. GSM closes the dialog box and the new sort order is reflected in
the Inputs grid.
Calculate—Click to perform a manual calculation.
6-39
Agile Product Lifecycle Management for Process
Ext Data Tab
The Ext Data tab includes the following sections:
❑
Extended Attributes—For discussion of this commonly used section, please
see Extended Attributes Section on page 3-29
❑
Custom Sections—For discussion of this commonly used section, please see
Custom Sections on page 3-29
Related Specs Tab
The Related Specs tab contains the following sections:
❑
Trade Specifications section— Discussed below, at Trade Specifications
Section on page 6-40
❑
Associated Specifications section—For discussion of this field, please see
Associated Specifications Section on page 3-9
Master Specifications section—For discussion of this field, please see Master
Specifications Section on page 3-9
❑
Trade Specifications Section
The Trade Specifications section contains the list of trade specifications linked to
a formulation specification.
Figure 6-41: Trade Specifications section
CSS Tab
For discussion of this tab, please see CSS Tab on page 3-10.
6-40
Global Specification Management User Guide
Chapter 6
Formulation Specifications
Supporting Documents Tab
The Supporting Documents tab contains the following sections:
❑
Supporting Documents section —The document types available are
Attachments/Procedures, URL and Rich Text. For discussion of this
commonly used section, please see Supporting Documents Section on page 312
❑
DRL Documents section —For discussion of this commonly used section,
❑
Testing Protocols section —For discussion of this commonly used section,
❑
please see Testing Protocols Section on page 3-21
Nutrient Profile section — Discussed below, at References Tab on page 6-41
please see DRL Documents Section on page 3-18
References Tab
The References tab contains the following sections:
❑
Activities section—For discussion of this commonly used section, please see
Activities Section on page 3-25
❑
Specification Dependencies section—For discussion of this commonly used
section, please see Specification Dependencies Section on page 3-27
Related Documents section—For discussion of this commonly used section,
please see Related Documents Section on page 3-27
❑
Approval/Audit Trail Tab
For discussion of this tab, please see Approval/Audit Trail Tab on page 2-11.
Additional Tools
Overview of Basis
You create a basis on an instance of a formulation specification. You can provide
information on the basis that supplements the specification, or you can provide
custom data on the basis for the current formulation specification.
The system creates a basis automatically when you add items to the Inputs section
of the formulation specification. You can access a basis from either the
Formulation or Process tab. To open a basis, click the document icon ( ) in the
Material column of the inputs grid. GSM displays the Basis dialog box, as
described below.
6-41
Agile Product Lifecycle Management for Process
Basis dialog box
The refresh feature allows the user to pull revised or more current specification
data into the basis for the formulation specification.Use the Basis dialog box,
shown in figure 6-43 below, to apply bases to your inputs. Two methods of
refresh are available:
1
2
Click Refresh at the top right of the dialog box to perform a basis refresh.
Using the refresh feature, you can update all of the information about a
specific formula item on your formulation specification. GSM prompts you
to confirm the update. When you select OK, the system pulls the information
from the specifications for all data elements.
Use a sections refresh icon ( ) to pull current specification data for that one
section, not the whole specification. GSM pulls the requested information
from the specification and displays it in the section, as figure 6-42 shows
below. After working with bases, click Done to close the Basis dialog box.
Figure 6-42: Refresh icon in section header
Once you close the Basis dialog box and return to the main tab, you can use the
Refresh action button to pull current specification data for the entire BOM. The
system prompts you to confirm the global update. When you select OK, the
system pulls the information from the specifications for all items in your
formulation specification. This is only available in edit mode.
6-42
Global Specification Management User Guide
Chapter 6
Formulation Specifications
Figure 6-43: Basis dialog box
The Basis dialog box consists of the following tabs:
Specification Attributes—Described below, in Specification Attributes Tab on
page 6-43
% Breakdown—Described below, in % Breakdown Tab on page 6-44
Nutrition—Described below, in Nutrition Tab on page 6-45
Compliance—Described below, in Compliance Tab on page 6-46
Ext Data—Described below, in Ext Data Tab on page 6-62
Specification Attributes Tab
This tab gives attributes of the ingredient specification and includes the following
sections:
• Combined Ingredient Statement—Described below, in Combined
Ingredient Statement Section on page 6-43
• Ingredient Attributes—Described below, in Ingredient Attributes Section
on page 6-44
• Reconstitution/Equivalency—Described below, in Reconstitution/
Equivalency Section on page 6-44
Combined Ingredient Statement Section
The data in the From Spec column is pulled directly from the specification from
which you created the formulation specification.
6-43
Agile Product Lifecycle Management for Process
Ingredient Attributes Section
This section provides ingredient attributes.
Key fields include:
Total Solids—Percentage of the specification that is not water.
Final Density—Conversion factor applied when converting the specification
from mass to volume.
Edible Portion—Percentage of the material that is edible.
Reconstitution/Equivalency Section
You can set up reconstitution/equivalency rules to assist in the management of
the reconstitution process in the listed ingredient order (LIO) feature. These
rules define how the water percentage of a given ingredient affects the label
naming of a product. For example, you could set up a rule by which, if the
percentage of water in an ingredient called “reconstituted orange juice” meets or
exceeds a preset level, the name of that ingredient changes to “orange juice.”
To add a new reconstitution/equivalency rule, click Add New under the
Reconstitution/Equivalency section. GSM adds to the grid a new row for you to
fill out. Key fields include:
Declare As—The name that GSM will assign to the product after you have
performed the defined reconstitution.
Target % / Factor—The adjustment amount required to perform the
reconstitution.
Target % / Factor UOM—The method for calculating the reconstitution.
% Breakdown Tab
The % Breakdown tab defines the contents of an ingredient specification. Percent
breakdowns are composed of breakdown components and their composition of
the total ingredient. In the Component % Breakdown(s) section, shown in
figure 6-44 below, you can modify breakdowns that exist on the specification or
add new breakdowns for use in listed ingredient order (LIO).
Figure 6-44: Basis dialog box, % Breakdown tab
6-44
Global Specification Management User Guide
Chapter 6
Formulation Specifications
Component % Breakdowns Section
The Component % Breakdowns section is the only section on the % Breakdown
tab. Use this section to define the contents of an ingredient specification using the
following fields:
From Spec—The value that exists for that field on the ingredient specification.
Restrictions—This is used to help categorize different versions of the
breakdowns for usage in the Listed Ingredient Order (LIO) tool.
Formulation Classifications—Formula classifications can be used to enforce
security for individual specifications. Classifications can be managed in the
Admin Tool and are tied to user groups. Only users in the associated groups can
view formulas that have a formulation classification.
Tags—Breakdowns can be tagged. Tags help identify breakdowns and most tags
help define how you want the system to react to the breakdown. Available tags are
listed on Tags: on page 3-23.
Nutrition Tab
In the Nutrition tab of the Basis dialog box you can modify the nutritional
information that is stored on the specification, as shown infigure 6-45 below.
You can edit the existing nutritional information by providing a custom value or
you can add new nutrients. You can add nutrients from the standard nutrient list,
NSM, or from the data that is stored in the Food Composition Library.
Note
The Food Composition Library will need to be configured as a part of your
implementation.
Figure 6-45: Basis dialog box, Nutrition tab
The Nutrition tab consists of the Nutrient Composition section.
6-45
Agile Product Lifecycle Management for Process
Nutrient Composition Section
This section shows the nutrient composition that is stored on the specification.
From Spec—The nutrients that exist on the specification.
Overrides—You can enter a new value for the nutrient and the Gain/Loss factor
column.
Gain/Loss Factor—You can specify a gain loss factor to be applied to the original
nutrient value.
Compliance Tab
In the Compliance tab you can enhance or modify specification information
related to compliance. You can add or modify the following compliance items:
• Complies With
• Allergens - Present
• Allergens - May Contain
• Allergens - Does Not Contain
• Intolerances (Sensitivities) - Present
• Intolerances (Sensitivities) - May Contain
• Intolerances (Sensitivities) - Does Not Contain
• Additives - Present
• Additives - May Contain
• Additives - Does Not Contain
6-46
Global Specification Management User Guide
Chapter 6
Formulation Specifications
Figure 6-46: Basis dialog box, Compliance tab
Key sections in the Compliance tab include:
• Complies With
• Allergens
• Additives
• Intolerances
6-47
Agile Product Lifecycle Management for Process
Adding Complies With Information
You can add new Complies With items by clicking the add data icon ( ). A
multiselect dialog box opens with available Complies With items listed on the left
side. If compliance items are currently in the specification, the dialog box lists
them in the box on the left side, as shown in figure 6-47, below.
Figure 6-47: Complies With dialog box
Note
“Complies With” items are positive by default and can only be made
negative via script. For the formulation specification to be marked as
“compliant” based on the rollup, compliance items marked as “negative”
in Data Admin only have to be declared on one item; those not marked as
negative must be declared on all formula items.
To add new items, select them and then click the add selected data icon (
).
The dialog box moves the selected items to the box on the right. To remove items,
select them and click the remove selected data icon (
). Once you have
completed your list of “complies with” items, click Done. The dialog box closes,
leaving you on the Compliance tab.
6-48
Global Specification Management User Guide
Chapter 6
Formulation Specifications
Output Dialog Box
Data associated with output that can be modified using the Output dialog box,
shown in figure 6-48 below. To access the Output dialog box, click on the
document icon ( ).
Figure 6-48: Output dialog box
Availability of the Settings
button is not controlled by
design mode, but it's underlying
functionality is. When not in
design mode the Settings button
presents the same list but all
options are greyed out.
The output dialog displays the output created from the formulation
specification. It contains the following tabs:
• Summary—Described below, at Summary Tab on page 6-50
• Yield—Described below, at Yield Tab on page 6-53
• Composition—Described below, at Composition Tab on page 6-56
• Nutrition—Described below, at Nutrition Tab on page 6-59
• Compliance—Described below, at Compliance Tab on page 6-61
• Ext Data—Described below, at Ext Data Tab on page 6-62
6-49
Agile Product Lifecycle Management for Process
Summary Tab
The Summary tab, shown in figure 6-48 above, shows the identity information
about the output, including name, specification number, and specification issue
number. If the output is owned, the tab shows the workflow status of the parent
formulation specification. If the output is referenced, the tab shows the status
from the ingredient specification.
The Summary tab contains the following sections:
• Summary Information—Described below, in Summary Information
Section on page 6-50
• Composition Map— Described below, in Composition Map Section on
page 6-52
• Packaging Composition Map—Described below, in Packaging
Composition Map Section on page 6-52
The Output dialog uses the following action buttons:
•
Settings—Displays options related to pushing data from the
theoretical
output to the output ingredient. If items are selected then data will be
pushed when the formulation specification is saved.
•
Batch Tuning—Allows users to increase or decrease the yielded
•
Calculate—Runs BOM calculation and performs the approximate yield
and extended attribute calculations.
•
Save and Close—Runs the BOM calculation and performs the
quantity
through various options. The tuning affects only the inputs tied to the
output being tuned.
approximate yield and extended attribute calculations and closes the
dialog box.
•
Close—Closes the dialog box without saving any data to the specification.
Summary Information Section
The Summary Information section contains the identity information about the
output, including:
Specification—The name of the output item. By default, the system
automatically names the output “Step X Output [Spec #]” where “X” is the
number of the step and [Spec #] represents the system assigned number given to
the output item. This can be edited by the user. When an output is marked as
External this will be the name given to the ingredient specification as well as the
specification number. Select the add data icon ( ) to reference an existing
ingredient specification. When a specification is referenced this field displays a
read only view of the specification name.
6-50
Global Specification Management User Guide
Chapter 6
Formulation Specifications
Short Name—Short name of the output item. By default, the system
automatically fills in this field with “Step X Output [Spec #” where “X” is the
number of the step and [Spec #] represents the system assigned number given to
the output item. This field can be edited by the user and when the output is
marked as external it will be the short name of the ingredient specification. When
a specification is referenced this field displays a read only view of the referenced
specification short name.
Output Type—Captures whether the output is Internal, External, or Referenced
and if it is classified as product, by-product, or waste.
Access Level—Used by object level contextual security to help determine if the
user has access to the data on the output item and ingredient specification. This
grid displays two values:
a Theoretical Access Level—This value is rolled up from the access level of
the ingredient specifications used to create it. Theoretical access level will
always roll up using the highest available access level. For example, if Spec
A [100], Spec B [400], and Spec C [300] were used to create output ABC
the theoretical access level would be 400. This access level is used when
deciding which custom data on the output item the user can see.
Theoretical access level is always calculated by the system regardless
whether the formulation specification is in design mode or not.
b Specification Access Level—This is the read only view of the External or
Referenced Ingredient specification’s access level. By default when an
output item is typed as external, the theoretical access level is pushed to
the specification. This value can be overridden on the ingredient
specification itself. For example, with output ABC, even though the
theoretical access level is 400, its corresponding material specification can
be set to 200.
Note
After the specification access level is set it can still be reset by the system.
This happens if the output composition is changed resulting in a different
theoretical access level than it previously had. At this time, the new access
level value will be pushed to the ingredient specification regardless whether
the formulation specification is in design mode or not. For example, if Spec
D [500], was added to Output ABC the specification access level of 400 will
be replaced with 500 when the formulation specification is saved.
If you are not familiar with access level and object level security in general, refer
to the Agile Product Lifecycle Management for Process Administrator User Guide
for more information.
Category—The category of the output item. This category selection uses the
ingredient specification category listing. When an output is marked as External
this will be the category given to the ingredient specification. When an output is
referenced this is a read only view of the referenced specification’s category.
6-51
Agile Product Lifecycle Management for Process
Subcategory—The subcategory of the output item. This category selection uses
the ingredient specification category listing. When an output is marked as
External this will be the category given to the ingredient specification. When an
output is referenced this is a read only view of the referenced specification’s
category.
Group—The group of the output item. This category selection uses the
ingredient specification category listing. When an output is marked as External
this will be the category given to the ingredient specification. When an output is
referenced this is a read only view of the referenced specification’s category.
Originator—Displays the first and last name of the user who created the output
item. When an output is marked as External this will be the originator given to
the ingredient specification.
Spec #—Displays the system defined number for the output item and/or
ingredient specification.
Issue #—Displays the system defined issue number for the output item and/or
ingredient specification. Internal and External outputs can only be issued when
the formulation specification is issued.
Status—Displays the workflow status of the output item. If the output is internal
or external it shares the same workflow and status as the formulation
specification. The output item’s workflow status will be updated when the
formulation specification’s status is updated.
Effective—Date the output item becomes effective. By default the system
automatically assigns the date the output was created.
Inactive—Date the output item could inactive.
Last Edit—Last edit date of the output item or specification.
Composition Map Section
This section shows what amount of each ingredient input goes into the output.
The Name column displays the same information that is displayed when a BOM
item is displayed on a formulation specification.
Packaging Composition Map Section
This section shows what amount of each packaging input goes into the output.
The Name column displays the same information that is displayed when a BOM
item is displayed on a formulation specification.
6-52
Global Specification Management User Guide
Chapter 6
Formulation Specifications
Yield Tab
The Yield tab, shown in figure 6-49 below, contains the packaging configuration
and approximate yield information as it relates to the output and formulation
specification.
The Yield tab contains the following sections:
• Packaging Configuration—Described below, in Packaging Configuration
Section on page 6-53
• Approximate Yield—Described below, in Approximate Yield Section on
page 6-54
• Design Attributes—Described below, in Design Attributes Section on
page 6-56
Figure 6-49: Output dialog, Yield tab
Packaging Configuration Section
In the Packaging Configuration section you can enter high-level packaging
information about this formulation. With this section, shown in figure 6-50
below, you can populate your output with reference amount and classification
data that would be used by Label Claims. You can also set the net weight and
serving size and see the calculated tare weight for your output material.
6-53
Agile Product Lifecycle Management for Process
Figure 6-50: Packaging Configuration section
Key fields in the Packaging Configuration section include:
Classification—Type of food product. The system uses this information when
you run Label Claims Determination against the specification.
Container Net Contents—The weight, volume, or share of total of the contents,
excluding the container.
Quantity/Traded Unit—The number of consumer units in each traded unit.
Reference Amount—The amount customarily consumed for this type of
product.
Approximate Yield Section
In the Approximate Yield section, shown in figure 6-51 below, you can enter
process-level loss and water gain loss information and calculate the approximate
yield for the formulation. This section also shows you the calculated % Total
Solids and Density values and gives you the ability to manually override them.
Note
If the relative density of any one of the formula items in the current
formulation is undefined, the system cannot calculate the final density
value.
If the total solids value of any one of the formula items in the current
formulation is undefined, the system cannot calculate the final and
beginning percent total solids values.
Figure 6-51: Approximate Yield section
Once you have adjusted the processing loss factor and the water gain/loss factor,
click Calculate to have the system calculate the new yield information.
6-54
Global Specification Management User Guide
Chapter 6
Formulation Specifications
Paths include:
• Moisture Loss —Path is used when the water/gain loss factor is known.
The user would input the water/gain loss factor and click the Calculate
button. This action will calculate the Approximate Yield amount and
Final % Moisture/Total Solids.
•
% Yield—Path is used when the approximate yield is known. The user
would input the approximate yield amount and click the Calculate
button. This action will calculate the Water Gain/Loss Factor and Final
% Moisture/Total solids fields will calculate.
• Target Moisture—Path is used when the Final % Moisture is known.
The user would input the final % moisture amount and click the
Calculate button. This action would calculate the Approximate Yield
amount and the Water/Gain Loss factor.
The Approximate Yield section contains the yield data for a formulation
specification. This section is configurable. One configuration captures %
moisture; the other captures % solids, as shown in the figures below.
Figure 6-52: Approximate Yield section
Key fields include:
Labeled Unit Contents — The amount per consumer unit
Beginning Batch Size — The batch size calculated from the specification
Processing Loss Factor — Estimated total loss for the process
Approximate Yield — The calculated yield based on the batch size, processing
loss, and water gain/loss factor
Labeled Units/Batch — The calculated number of consumer units per batch
Traded Units/Batch — The calculated number of traded units per batch
Quantity/Traded Unit —The quantity of labeled units per traded unit
Beginning % Total Solids — The percent of total solids, not accounting for
water gain or loss
Water Gain/Loss Factor — Estimated gain/loss factor for water
Final % Total Solids — Percent of total solids after adjusting for water gain/loss.
This value is used in other areas of Global Specification Management
6-55
Agile Product Lifecycle Management for Process
Final Density — The calculated density of the batch. This value is used in other
areas of Global Specification Management
Final Density Override — Enables you to override the final density. If declared,
this value is used instead of the value in the Final Density field in other areas of
Global Specification Management.
Design Attributes Section
The Design Attributes section displays Total Solids, Final Density, and Edible
Portion. The value used in the Total Solids field is pulled from the Final % Total
Solids value. This section includes three columns:
• Theoretical—Shows rolled up data from the formulation specification.
If any of the BOM items are missing data elements that are used for
rollups, the error icon ( ) is displayed. Click on the icon for more
information about offending specification.
• Override—Allows the user to enter a value different than the rolled up
value.
• Specification—Shows the data that already exists on the specification.
If the user provides an override for Total Solids, Final Density, or Edible Portion,
that value is stored to the ingredient specification.
Figure 6-53: Design Attributes section
Composition Tab
The Composition tab contains the regulatory BOM, composition listing, and
generated breakdown that will be written to the ingredient as the regulatory
breakdown.
The tab consists of the following sections:
• Regulatory BOM—Described below, in Regulatory BOM Section on
page 6-57
• Theoretical Breakdown—Described below, in Theoretical Breakdown
Section on page 6-58
• Regulatory Breakdown—Described below, in Regulatory Breakdown
Section on page 6-58
6-56
Global Specification Management User Guide
Chapter 6
Formulation Specifications
Note
To view the Composition tab, users must have the formula classifications
associated with all regulatory % breakdowns for the formula items. An
error message displays for users without access.
Only the specification name will display to a user who does not have
permissions (WFA and BU security) to read a formula item.
Figure 6-54 shows the Composition tab.
Figure 6-54: Output dialog, Composition tab
Regulatory BOM Section
This section displays a label composition-like version of the formulation as it
relates to the output. This view includes any % breakdown information for items
in the formulation. Only the % breakdown that is tagged with the “Regulatory”
tag will be included in this view.
6-57
Agile Product Lifecycle Management for Process
The declaration method for this view mimics the (X,Y) method from LIO. If a
regulatory breakdown does not exist or only uses range values, the specification
name is used. The data in this section is read-only and will not be included when
written to the ingredient specification. It will be printed with the formulation
specification/output material print.
Figure 6-55: Regulatory BOM section
Theoretical Breakdown Section
This section displays the combined view of the data in the Regulatory BOM
section. It includes % breakdown items from the regulatory BOM and combines
like items.
Figure 6-56: Theoretical Breakdown section
Regulatory Breakdown Section
This section displays the breakdown built by GSM based on the regulatory BOMs
of the input items for the formulation specification.
6-58
Global Specification Management User Guide
Chapter 6
Formulation Specifications
Figure 6-57: Regulatory Breakdown section
Nutrition Tab
This tab displays the rolled up nutrient information as it relates to the output and
formulation specification. The tab consists of one section: Nutrient
Composition.
Nutrient Composition Section
All of the nutrients that are present in BOM items are automatically included in
this section.
If you click on an individual nutrient, GSM displays the nutrient composition
dialog box, which contains the formula items where the nutrient is present.
When child specifications do not have specified nutrients, the rolled up value
may be incorrect. Warning icons ( ) display next to nutrients in error
conditions, as figure 6-58 shows below.
6-59
Agile Product Lifecycle Management for Process
Figure 6-58: Output dialog, Nutrition tab
The nutrient composition follows previously defined functionality around
overrides, namely:
Theoreticals—This column shows the rolled up data from the formulation
specification.
Overrides—This column allows you to enter a value different than the rolled up
value.
Specification—This column shows the data as it exists on the specification.
Per Serving—This column displays a value calculated from the value to be
stored on the specification and the serving size (from the Packaging
Configuration section). This is an un-rounded value.
Source—The original location of the nutrition. If the user provides an override
the rolled up value, the user must pick a source. Otherwise it defaults to
theoretical.
Comments—Free text comments around the nutrition.
The default source for all rolled up items is “Theoretical.” If you provide an
override, the source is blanked out. If you delete an override value, the source
defaults back to “Theoretical.” “Theoretical” cannot be selected from the list.
You cannot remove items from the grid if the items are rolled up from the child
items. However, if you added an item to the specification or to the Output dialog
box, you can remove the item using the delete icon ( ).
6-60
Global Specification Management User Guide
Chapter 6
Formulation Specifications
Click Add New to add new nutrient items. GSM displays the nutrient item list in
a dialog box. You can then enter a value in the Overrides field for the new item.
Click Import to add nutrient items that are tied to existing food composition
items, FCL items, ingredient specifications, or nutrient profiles.
Click NSM to import nutrient items from nutrient analyses or composites.
Compliance Tab
This tab displays the rolled up compliance information for the output and
formulation specification.
All of the compliance items (allergens, additives, intolerances, complies with)
that are present in child items are displayed by default.
If you click on a compliance item, a composition dialog box displays. The dialog
box contains formula items where the compliance items are and are not present.
The following columns are included:
Theoreticals—Shows the rolled up data from the formulation specification.
Overrides—Allows you to enter a value different than the rolled up value.
Specification—Shows the data as it exists on the specification.
Comments—Free text comments.
Click Add New to add compliance items to the grid. Refer to Adding Complies
With Information on page 6-48 for instructions.
You cannot remove items from the grid if the items are rolled up from the child
items. If you added an item to the specification or to the Output dialog box, you
can remove the item using the delete icon ( ).
The Complies With section displays whether the item is compliant or noncompliant. You can click the complies with item to view a dialog box showing the
formula items where the compliance items are present.
6-61
Agile Product Lifecycle Management for Process
Figure 6-59: Output dialog, Compliance tab
Ext Data Tab
This tab includes the rolled up custom data information for the output and
formulation specification. Distinct custom data (tagged with the “Is Design
Attribute” tag in ADMN) which are present on formula items are included. Two
sections are included: Extended Attributes and Custom Sections.
Figure 6-60: Output dialog, Ext Data tab
6-62
Global Specification Management User Guide
Chapter 6
Formulation Specifications
Note
When rolling up distinct extended attributes added to the Output dialog
box, only the security classification on the extended attribute will be used.
The security classification on the custom section where the extended
attribute may have existed on the raw material will be ignored.
Extended Attributes Section
In the Extended Attributes section, you can select from a list a number of
extended attributes related to the formulation. This list is the aggregate of the
extended attributes listed at the BOM item level on the basis.
Once you have selected the extended attribute values, GSM automatically rolls
them up from the BOM items to the formulation level, taking into account the
following:
• Formulation composition
• Gain/loss factor for each BOM item within each step
• Processing gain/loss factor at the batch level
• Water gain/loss factor at the batch level
Note
The only types of extended attributes that can be rolled up are numeric and
quantitative range.
You can choose a rollup method of “allowing null” to allow GSM to roll up data
even though data may be missing at the BOM item level. You can also choose
“not allowing null,” in which case GSM will not roll up the data if there is missing
data at the BOM item level.
The following columns are included:
Item—When clicked, displays the extended attribute composition dialog box.
The dialog box shows the formula item where the attribute is present.
Theoreticals—Shows the rolled up data from the formulation specification.
Overrides—Allows the user to enter a value different than the rolled up value.
Specification—Shows the data as it exists on the specification.
Method—This value defines how to treat the occurrence of nulls when the system
is trying to roll up the extended attribute value. “Allow Null” will provide the user
a value even if all specifications in the formula do not have the extended attribute
defined. “Do Not Allow Null” will not return a value if any of the formula items
do not have the extended attribute defined.
Comments—Comments about the extended attribute.
Click Add New to add extended attributes. If an attribute has already been rolled
up, it cannot be added again.
6-63
Agile Product Lifecycle Management for Process
You cannot remove items from the grid if the items are rolled up from the child
items. It you added an item to the specification or to the Output dialog box, you
can remove it using the delete icon ( ).
Custom Sections Section
This section displays custom sections for the formula item. Custom sections can
be added to the output popup just like anywhere else.
If a custom section is being added that has a distinct extended attribute that
already exists in the rollup section, it will not be added.
Custom sections do not get rolled up, only the distinct extended attributes from
the BOM items will be rolled up and displayed in the simple extended attribute
section of the output popup.
Custom sections that are added to the output popup will be pushed to the
ingredient specification just like the other output data.
Snapshots
When a formulation specification is in edit mode you have the ability to create
snapshots using the Snapshot action button.
This feature allows you to take and store a picture of your formulation
specification at any time during the development process. Using snapshots, you
can capture incremental changes that are made during the formulation process
and then revert to them later.
To create a snapshot:
1 Once you have an instance of a specification that you want to snapshot, click
Snapshot in the upper right corner of the application. The Snapshots dialog
box opens, as figure 6-61 shows below.
Figure 6-61: Snapshots dialog box
2
6-64
Click Add New. GSM displays the following confirmation message.
Global Specification Management User Guide
Chapter 6
Formulation Specifications
Figure 6-62: Snapshot confirmation
3
4
Click OK to save the specification and take the snapshot.
Type a new snapshot name in the Name field and any details about the
snapshot in the Comments field, as figure 6-63 shows below.
Figure 6-63: Snapshots detail
To restore a snapshot:
1 Click Snapshot in the upper right corner of the application. GSM opens the
Snapshots dialog box, which lists saved snapshots.
2 Click the linked creation date and time of the snapshot displayed in the
Created column. GSM restores the selected snapshot.
To preview a snapshot:
1 Click Snapshot in the upper right corner of the application. GSM opens the
Snapshots dialog box, which lists saved snapshots.
2 Click the view details icon ( ) of the snapshot. GSM displays a dialog box
showing snapshot details.
Optimization
Optimization can be used to adjust an output of a formulation specification
based on any number of constraints related to ingredient costs, nutrients, and
extended attributes. It uses a linear optimization algorithm to generate the most
optimal formulation based on the constraints, guidelines, and optimization
methods.
Optimization is started from the action menu of a formulation specification and
opens the optimization scenario in a popup. As shown in figure 6-64, the
Optimization tab is composed of the following sections:
❑
Target Specification
❑
Constraints
❑
Guidelines
Optimization Method
❑
6-65
Agile Product Lifecycle Management for Process
Figure 6-64: Optimization tab
Target Specification Section
The Target Specification section allows you to pick the output of the formulation
specification the optimization engine will try to optimize.
Figure 6-65: Target Specification section
6-66
Global Specification Management User Guide
Chapter 6
Formulation Specifications
Constraints Section
In the Constraints section you can build rules for the optimization engine to use
when searching for an optimal formulation. The Constraint table includes a
Type, Condition, and Design Conformance column. In the Type column you can
describe what kind of constraint you are adding and in the Condition column
you can describe the details about the constraint. The optimizer calculates the
value in the Design Conformance column based on data that is on the
specification and shows what level of conformance your specification is in
currently with regard to that constraint. Figure 6-66 shows the Constraints
section.
Figure 6-66: Constraints section
The first rule that you must define is the objective constraint. The system
automatically includes the objective constraint place holder. This objective is the
main goal for your optimization scenario. To edit the objective place holder
constraint, click the edit icon (
) on your objective constraint, as shown in
figure 6-67.
Figure 6-67: Edit mode
You can configure the objective constraint to any one of the following, which are
further explained below:
• Minimize Cost
• Minimize/Maximize a Nutrient
• Minimize/Maximize an Extended Attribute
Minimize Cost—Optimize based on the cost of your formulation.
GSM can display this information per 100g, per Serving, per Consumer Unit, or
per Traded Unit.
6-67
Agile Product Lifecycle Management for Process
Figure 6-68: Drop-down selection
Minimize/Maximize a Nutrient—Optimize based on minimizing or maximizing
a selected nutrient.
GSM pulls the nutrient list from the selected output. You can display this
information per 100g, per serving, per consumer unit, and per traded unit.
Figure 6-69: Nutrient list
Minimize/Maximize an Extended Attribute—Optimize based on minimizing or
maximizing a selected extended attribute.
GSM pulls the theoretical extended attribute list from the selected output. You
can display this information per 100g, per serving, per consumer unit, and per
traded unit.
6-68
Global Specification Management User Guide
Chapter 6
Formulation Specifications
Figure 6-70: Extended attribute list
Once you have selected your optimization objective, click the apply changes icon
( ) to save your objective. GSM displays the current value for the objective in
the Design Conformance column, as shown in figure 6-71 below.
Figure 6-71: Constraints section
After you have defined the objective of your optimization scenario, you can begin
to build constraints to help the optimization engine produce a solution that is in
line with your requirements. To add a new constraint, click Add New. A dialog box
opens, as shown in figure 6-72 below, from which you can select the type of
constraint you want to add.
6-69
Agile Product Lifecycle Management for Process
Figure 6-72: Selecting a constraint
GSM supports the following constraint types:
• Ingredient Cost
• Nutrient Content
• Extended Attribute
Ingredient Cost
Using the Ingredient Cost constraint type, you can set up a condition to monitor
the total ingredient cost associated with your formula, as shown in figure 6-73
below.
Figure 6-73: Ingredient Cost constraint
The Ingredient Cost constraint is composed of:
Operator—Logical operator used for comparison purposes. Options are:
• = (equal)
• <= (less than or equal)
• >= (greater than or equal)
Value—The value for cost that you want to optimize to.
UOM—The unit of measure for the cost.
6-70
Global Specification Management User Guide
Chapter 6
Formulation Specifications
Display as—GSM can display this information per100g, per Serving, per
Consumer Unit or per Traded Unit.
Design Conformance—The current value of the constraint and an icon
signifying if the constraint is met.
When you have finished creating the Ingredient Cost constraint, click the apply
changes icon ( ) to save your row. GSM redisplays the row showing the current
value in the Design Conformance column.
Nutrient Content
Using the Nutrient Content constraint type, you can set up a condition to
monitor the amount of a selected nutrient associated with your formula, as
shown in figure 6-74 below.
Figure 6-74: Nutrient Content
The Nutrient Content constraint is composed of:
Nutrient—The nutrient you want to constrain. GSM pulls the list of nutrients
from the theoretical nutrients on the selected output.
Operator—Logical operator used for comparison purposes. Options are:
• = (equal)
• <= (less than or equal)
• >= (greater than or equal)
Value—The value for nutrient that you want to optimize towards.
UOM—The unit of measure for the nutrient.
Display as—GSM can display this information per 100g, per Serving, per
Consumer Unit, or per Traded Unit.
Design Conformance—The current value of the constraint and an icon
signifying if the constraint is met.
When you have finished creating the Nutrient Content constraint, click the apply
changes icon ( ) to save your row. GSM redisplays the row showing the current
value in the Design Conformance column.
6-71
Agile Product Lifecycle Management for Process
Extended Attribute
Using the Extended Attribute constraint type, you can set up a condition to
monitor the amount of a selected extended attribute associated with your
formula, as shown in figure 6-75 below.
Figure 6-75: Extended Attribute constraint
The Extended Attribute constraint is composed of:
Extended Attribute—The extended attribute to constrain. GSM pulls the list of
extended attributes from the theoretical extended attributes on the output dialog.
Operator—Logical operator used for comparison purposes. Options are:
• = (equal)
• <= (less than or equal)
• >= (greater than or equal)
Value—The value for extended attribute that you want to optimize towards.
UOM—The unit of measure for the extended attribute.
Display as—GSM can display this information per 100g.
Design Conformance—The current value of the constraint and an icon
signifying if the constraint is met.
When you have finished creating the Extended Attribute constraint, click the
apply changes icon ( ) to save your row. GSM redisplays the row showing the
current value in the Design Conformance column.
Ordering
Once you have created all of the constraints to guide the optimization engine, you
can order them using the re-order row icons (
) at the right side of each
constraint row. Click the re-order row upwards icon ( ) to move the constraint
toward the top of the list and the re-order row downwards icon ( ) to move it
toward the bottom of the list. The order of constraints represents the rank
(priority) of the constraints during optimization (see figure 6-76, below).
6-72
Global Specification Management User Guide
Chapter 6
Formulation Specifications
Figure 6-76: Ordering constraints
Guidelines Section
In the Guidelines section you can give the optimization engine additional
information about how far it can go with certain items to reach a solution. You
can supply the necessary information using scalability factors and the Adjust
column. The Guidelines section (see figure 6-77) is always in edit mode so you
can quickly adjust guidelines on a formula item.
Figure 6-77: Guidelines section
Scalability factors set upper and lower controls and limits on the optimization
engine. The Scalability Control columns tell the optimization engine the range of
adjustment that you are comfortable with. The Scalability Limit columns tell the
optimization engine the biggest adjustment that you will enable it to make. In the
Adjust column you can give the optimization engine even more granular
information about how to handle each item during the optimization scenario.
The available options in the Adjust drop-down list are:
Fix—Do not change this item’s yield.
Raise—Do not change this item’s yield in a negative manner.
Lower—Do not change this item’s yield in a positive manner.
6-73
Agile Product Lifecycle Management for Process
The Last Optimization column shows the percent change due to the last
optimization performed.
Optimization Method Section
In the Optimization Method section, shown in figure 6-78, you can further tailor
the optimization scenario to meet your goals. You have control over the method
that is used from a formulation standpoint, a constraint standpoint, and a
distribution standpoint.
Figure 6-78: Optimization Method section
Formulation Column
The Formulation section is where you determine to what degree the optimization
engine will use the scalability factors set in the Guidelines section. You can set it
to either “Minimize Change” or “Emphasize Objective.”
Minimize Change—The optimization engine changes the formula as little as
possible and uses the scalability controls as the boundaries.
Emphasize Objective—The optimization engine uses the scalability limits in
addition to the scalability controls as the boundaries.
Constraints Column
The Constraints section is where you determine to what degree the optimization
engine will use the constraints set in the Optimization Method section. You can
set it to either “Incremental Constraints” or “All Constraints Required.”
Incremental Constraints—The optimization engine will meet as many of the
constraints as possible. It processes the constraints based on their rank. The
optimization scenario stops when a constraint fails to meet the defined criteria.
All Constraints Required—The optimization engine will meet every constraint
defined.
Distribution Column
The Distribution section is where you determine how the results will be applied
to the optimized formula. You can set it to either “Isolated Output Distribution”
or “Related Output Distribution.”
6-74
Global Specification Management User Guide
Chapter 6
Formulation Specifications
Isolated Output Distribution —The optimization engine will apply formula
changes to the selected output only.
Related Output Distribution—The optimization engine will apply formula
changes to all of the formulation outputs in the same manner.
Once you have defined all of the constraints, adjusted the necessary guidelines,
and defined the optimization method, you can start your optimization scenario
by clicking Optimize at the bottom of the page.
Figure 6-79: Constraints section with optimization error message
6-75
Agile Product Lifecycle Management for Process
The optimization engine will try to provide a solution to the optimization
problem with the rules that you have defined. If the constraints are too aggressive,
the optimization engine will be unable to find a feasible solution and will return
an error message, as shown in figure 6-79.
If the optimization engine cannot find a feasible solution, make your constraints
less restrictive and optimize again. When GSM has obtained an optimized
solution, the system displays the changes that it has made in order to achieve the
optimized solution, as shown in figure 6-80.
Figure 6-80: Optimized solution
6-76
Global Specification Management User Guide
Chapter 6
Formulation Specifications
To reset the optimization scenario to the original formulation, click Refresh.
The Refresh button will pull the original information from the formulation
specification as it relates to the selected output.
Optimization Action Buttons
Optimization action buttons are defined below and shown in figure 6-81:
Reset—Pulls the original information from the formulation specification as it
relates to the selected output and clears all constraints and guideline adjustments.
Snapshot—Stores the optimized formula as a snapshot on the original
formulation specification.
Save—Saves the optimization scenario without adjusting the original
formulation.
Done—Pushes the optimized formula (if one exists) to the formulation
specification based on the selected distribution method and returns the user to
the formulation specification. If no optimized formula exists, this will simply
close the optimization popup.
Cancel—Closes the optimization popup.
Figure 6-81: Optimization action buttons
6-77
Agile Product Lifecycle Management for Process
6-78
Global Specification Management User Guide
C HAPTER 7
Menu Item Specifications
This chapter presents an overview of the capabilities of Global Specification Management regarding menu
item specifications. Topics in this chapter include:
❑ Page-Level Functions
❑ Summary Tab
❑ Build Tab
❑ Packaging Tab
❑ Compliance Tab
❑ Related Specs Tab
❑ Supporting Documents Tab
❑ References Tab
❑ Approval/Audit Trail Tab
Overview
The Menu Item Specifications page consists of the following tabs:
❑
Summary Tab on page 7-3
❑
Build Tab on page 7-4
Packaging Tab on page 7-5
Compliance Tab on page 7-6
Related Specs Tab on page 7-10
Supporting Documents Tab on page 7-11
References Tab on page 7-11
Approval/Audit Trail Tab on page 7-11
❑
❑
❑
❑
❑
❑
7-1
Agile Product Lifecycle Management for Process
Page-Level Functions
In the upper right corner of the page is a row of buttons that trigger actions that
can affect the entire page. All of these buttons (except Calculate) are displayed
when the specification is in read mode. These buttons and their functions are:
❑
Edit —Place the entire page in edit mode so that you can modify it.
❑
(Report) —Depending on the configuration of your Agile PLM for Process
❑
❑
❑
❑
❑
❑
❑
❑
7-2
installation, this button may or may not appear (on certain specifications).
Click Report to launch the Reporting application.
Calculate—Performs all custom data calculations. This button is displayed
when the specification is in edit mode. Calculation also happens when you
save your specification.
Create Copy —Create a new copy of the current menu item specification. For
discussion of this commonly used function, please see Creating a Copy of an
Existing Specification on page 2-1.
CACS — Screen the current specification using Computer Aided Compliance
Screening (CACS), an application that you can use to inspect materials for
fitness against any number of user-defined screens. (Appears only if your
installation includes CACS.) For more information on CACS, please refer to
the Agile Product Lifecycle Management for Process Computer Aided
Compliance Screening User Guide.
Print — Opens a dialog box through which you can print the current
specification in a variety of formats.
Act —Create a primary activity, or mini-workflow, for this specification. For
more information about this function, please see Chapter 20, Activities.
(Appears only if you have editorial control over the specification.)
Item History —Display all issues of the specification that exist in a Spec
History table, along with the reason for creating each issue and other
identifying information. For more information on this feature please see Item
History on page 2-3.
Workflow — Move the current specification, or document, from one
workflow step to another. For more information on workflows, please see
Transitioning a Workflow on page 2-7.
Resolve Workflow —Re-resolve the specification to a workflow (present only
when you are logged in with a user account that has the user role of
[CAN_RERESOLVE_WORKFLOWS].)
Global Specification Management User Guide
Chapter 7
Menu Item Specifications
Summary Tab
Key sections in the Summary tab include:
❑
Summary Information—For discussion of this commonly used section,
please see Summary Information Section on page 3-2
❑
Menu Item Description—Discussed below, at Menu Item Description Section
on page 7-3
Cross References—For discussion of this commonly used section, please see
Cross References Section on page 3-3
Approved for Use In—For discussion of this commonly used section, please
see Approved for Use In Section on page 3-5
❑
❑
Menu Item Description Section
This section provides fields that you can use to categorize and classify menu
items. Additionally, it has enriched text fields that enable descriptions of menu
items, packaging, and appearance, as well as sensory descriptions.
Figure 7-1: Menu Item Description section
7-3
Agile Product Lifecycle Management for Process
Build Tab
The Build tab consists of two sections:
❑
Menu Item Build section
❑
Alternate Products/Menu Items section
Menu Item Build Section
The Menu Item Build section contains the products or menu items that make up
a menu item. You can adjust the quantity and comments around that item in the
build when the specification is in edit mode. GSM calculates the weight and build
percentage when you click the apply changes icon ( ) in that row.
Figure 7-2: Menu Item Build section detail showing one item, in edit mode
The units of measure (UOMs) for the build quantities may vary. By default,
mass-based units of measure are available for each product specification. If the
product specification has a relative density, then volume-based UOMs are also
available. If the product specification also has a unit conversion factor, then a
unit/count unit of measure will be available. You can use unit/count units of
measure when referring to menu items that are represented in the build.
Alternate Products/Menu Items Section
The Alternate Products/Menu Items section contains the product and menu item
specification data that you can use as a substitute for one of the items in a build.
You can replace each item in the primary build with one or more alternate items.
In this section you can define alternate products or menu items that may be used.
You can replace each item in this section with one or more alternate items. You
assign to each alternate a substitution factor to denote how users doing
formulation work should use the alternate item to replace the original.
7-4
Global Specification Management User Guide
Chapter 7
Menu Item Specifications
Figure 7-3: Alternate Products/Menu Items section
Packaging Tab
The Packaging tab contains information related to the packaging of a specific
menu item specification and consists of two sections:
• Packaging Materials
• Alternate Packaging
Packaging Materials Section
In this section you can describe the packaging associated with this specification
by associating and categorizing packaging and printed packaging specifications.
Figure 7-4: Packaging Materials section
Key fields include:
Pkg Type —Enables you to categorize how the packaging is applied to this item,
for example, whether the packaging is considered inner, intermediate, or outer
packaging.
Alternate Packaging Section
The Alternate Packaging section contains information related to any acceptable
alternative packaging options.
Figure 7-5: Alternate Packaging section
7-5
Agile Product Lifecycle Management for Process
Compliance Tab
The Compliance tab includes the following sections:
❑
Extended Attributes—For discussion of this commonly used section, please
see Extended Attributes Section on page 3-29
❑
Custom Sections—For discussion of this commonly used section, please see
Custom Sections on page 3-29
Label Claims—Discussed below, at Label Claims Section on page 7-6
Compliance Information—For discussion of this commonly used section,
please see Compliance Information Section on page 3-6
Allergens, Intolerances, and Additives—For discussion of this commonly
used section, please see Additives, Allergens, and Intolerances Sections on
page 3-7
❑
❑
❑
Label Claims Section
The Label Claims section contains the label claims linked to a menu item
specification, as figure 7-6 shows below. The label claims values and calculation
rules are maintained by an administrator
Figure 7-6: Label Claims section
Key fields include:
Potential—Select all of the possible label claims for the finished good. This field
can be populated two ways. You can either click on the linked label Potential, or
calculate the label claims by using label claims determination. To calculate label
claims, select the label claims determination icon ( ). GSM opens the label
claims determination popup, shown in figure 7-8, on page 7-9. See Label Claims
Determination on page 7-7 for more information.
Actual—Select the actual label claims declared on the finished good. This field
can be populated two ways. You can either click on the linked label Actual or use
the copy field icon ( ). When you click the copy field icon, GSM displays a
multi select dialog box containing all values in the potential label claims field.
You can use the dialog box choices to populate the actual field only with potential
options.
7-6
Global Specification Management User Guide
Chapter 7
Menu Item Specifications
Label Claims Determination
Using the label claims determination feature, you can interrogate a product for
claims applicability based on a centralized group of rules segregated by label
claims authority.
1
2
Click the label claims determination icon ( ). GSM opens the Label Claim
Determination dialog box.
Some claims require another product to compare to, such as Low Fat. The
system can evaluate comparative claims if you provide additional nutrient
information that describes the comparative product. Select the
Comparative/Reference Product tab and fill in the appropriate information.
See figure 7-7 below.
Figure 7-7: Label Claim Determination dialog box, Comparative/Reference Product tab
3
On the Claims Determination tab, from the Label Claim Authority dropdown list, select a specific rule group to use for considering claims
applicability.
7-7
Agile Product Lifecycle Management for Process
4
Click Display Label Claims to display the Applicable Claims table.
The system evaluates label claims against rules that you previously defined.
All selected claims based on the label claims authority appear in the
Applicable Claims table with color coding to show whether the claim may be
made for the product.
5
7-8
When the system evaluates a claim as compliant, the Comments column
displays supporting information for the claim along with one or more userdefined values supporting the assessment in the Calculation(s) column, as
shown in figure 7-8. If the system finds that the claim is invalid, no such
information appears in the Comments column.
Select the claims you want to push to the specification. All compliant claims
are automatically selected. You can unselect any claims you do not want to
push to the specification. Once you have all the claims selected click the Push
Label Claims button at the bottom of the grid. This action will close the
dialog window and populate the potential label claims field with the selected
claims. This action will replace all existing potential label claims in the field;
if you would like to just append to the list make sure the “Append to existing
list” checkbox is selected. See figure 7-8 below.
Global Specification Management User Guide
Chapter 7
Menu Item Specifications
Figure 7-8: Label Claims Determination dialog box
7-9
Agile Product Lifecycle Management for Process
Related Specs Tab
The Related Specs tab contains the following sections:
❑
Global/Regional Standard—Discussed below, at Global/Regional Standard
Section on page 7-10
❑
Alternate Standards—Discussed below, at Alternate Standards Section on
page 7-10
Master Specifications—For discussion of this commonly used field, please see
Master Specifications Section on page 3-9
❑
Global/Regional Standard Section
The Global/Regional Standard section contains any specifications that are global/
regional standards related to the menu item specification. You can associate only
one global/regional standard to each specification.
Figure 7-9: Global/Regional Standard section
Alternate Standards Section
The Alternate Standards section lists any alternate standard specifications for the
menu item specification. GSM locates and displays any alternates that are linked
to any other specification that references the current specification as a global/
regional standard.
Figure 7-10: Alternate Standards section
7-10
Global Specification Management User Guide
Chapter 7
Menu Item Specifications
Supporting Documents Tab
The Menu Item Specification Supporting Documents tab consists of four
sections:
❑
Supporting Documents —The document types available are Product Facts
Sheet, Attachments/Procedures, and Rich Text. For discussion of this
commonly used section, please see Supporting Documents Section on page 312.
❑
DRL Documents —For discussion of this commonly used section, please see
❑
Testing Protocols —For discussion of this commonly used section, please see
❑
Nutrient Profile— Discussed below, at Nutrient Profile Section on page 7-11.
DRL Documents Section on page 3-18.
Testing Protocols Section on page 3-21.
Nutrient Profile Section
In this section you can create new nutrient profiles or associate the menu item
specification to existing nutrient profiles.
Figure 7-11: Nutrient Profile section
Note
Nutrient profiles are considered separate documents from the menu item
specification and have independent workflows.
References Tab
The Menu Item Specifications References tab consists of three sections:
❑
Specification Dependencies—For discussion of this commonly used section,
please see Specification Dependencies Section on page 3-27
❑
Activities section—For discussion of this commonly used section, please see
Activities Section on page 3-25
Related Documents—For discussion of this commonly used section, please
see Related Documents Section on page 3-27
❑
Approval/Audit Trail Tab
For discussion of this tab, please see Approval/Audit Trail Tab on page 2-11.
7-11
Agile Product Lifecycle Management for Process
7-12
Global Specification Management User Guide
C HAPTER 8
Nutrient Profiles
This chapter presents an overview of the capabilities of Global Specification Management regarding nutrient
profiles. Topics in this chapter include:
❑ Page-Level Functions
❑ Summary Tab
❑ Nutrition Panel Tab
❑ Label Composition Tab
❑ Ext Data Tab
❑ Related Specs Tab
❑ Supporting Documents Tab
❑ References Tab
❑ Approval/Audit Trail Tab
Overview
The Nutrient Profile page consists of the following tabs:
❑
Summary Tab on page 8-2
❑
Nutrition Panel Tab on page 8-4
Label Composition Tab on page 8-13
Ext Data Tab on page 8-13
Related Specs Tab on page 8-13
Supporting Documents Tab on page 8-14
References Tab on page 8-14
Approval/Audit Trail Tab on page 8-14
❑
❑
❑
❑
❑
❑
8-1
Agile Product Lifecycle Management for Process
Page-Level Functions
In the upper right corner of the page is a row of buttons that trigger actions that
can affect the entire page. All of these buttons (except Calculate) are displayed
when the specification is in read mode. These buttons and their functions are:
❑
Edit —Place the entire page in edit mode so that you can modify it.
❑
(Report) —Depending on the configuration of your Agile PLM for Process
❑
❑
❑
❑
❑
❑
❑
❑
❑
installation, this button may or may not appear (on certain specifications).
Click Report to launch the Reporting application.
Calculate—Performs all custom data calculations. This button is displayed
when the specification is in edit mode. Calculation also happens when you
save your nutrient profile.
Create Copy —Create a new copy of the current nutrient profile. For
discussion of this commonly used function, please see Creating a Copy of an
Existing Specification on page 2-1.
CACS — Screen the current specification using Computer Aided Compliance
Screening (CACS), an application that you can use to inspect materials for
fitness against any number of user-defined screens. (Appears only if your
installation includes CACS.) For more information on CACS, please refer to
the Agile Product Lifecycle Management for Process Computer Aided
Compliance Screening User Guide.
LIO—Create a new LIO profile, automatically linking the nutrient profile. The
ingredient specification must be selected manually. The LIO button only
displays if the Formulation and Compliance (F&C) bundle has been installed.
Print — Opens a dialog box through which you can print the current
specification in a variety of formats. For more information on printing a
nutrient profile, please see Printing Other Specifications on page 2-19.
Act —Create a primary activity, or mini-workflow, for this specification. For
more information about this function, please see Chapter 20, Activities.
(Appears only if you have editorial control over the specification.)
Item History —Display all issues of the specification that exist in a Spec
History table, along with the reason for creating each issue and other
identifying information. For more information on this feature please see Item
History on page 2-3.
Workflow — Move the current specification, or document, from one
workflow step to another. For more information on workflows, please see
Transitioning a Workflow on page 2-7.
Resolve Workflow —Re-resolve the specification to a workflow (present only
when you are logged in with a user account that has the user role of
[CAN_RERESOLVE_WORKFLOWS].)
Summary Tab
The Nutrient Profile Summary tab consists of the following five sections:
8-2
Global Specification Management User Guide
Chapter 8
Nutrient Profiles
❑
Summary Information—For discussion of this commonly used section,
please see Summary Information Section on page 3-2.
❑
Weight/Volume/Serving Information—Discussed below, at Weight/Volume/
Serving Information Section on page 8-3.
Ingredient Statements—Discussed below, at Ingredient Statements Section on
page 8-4.
Approved for Use In—For discussion of this commonly used section, please
see Approved for Use In Section on page 3-5.
❑
❑
Weight/Volume/Serving Information Section
Figure 8-1: Nutrient Profile Weight/Volume/Serving Information section
Key fields in this section include:
• Density —Captures the density, which value is used in volumetric
nutrient declarations. You can define nutrients per 100 g or per 100 ml.
Density is used in the conversion between these two.
• Label Volume —The volume that is intended to show up on the label.
There are two entry fields, to accommodate two units of measure, for
example, 1 gal (US) 5 fl oz (US).
• Label Weight —The weight that is intended to show up on the label.
There are two entry fields, to accommodate two units of measure, for
example, 3 lb 8 oz (US).
• Reference Amount —Also known as Reference Amount Customarily
Consumed (RACC), the value in this field is the typical amount that
someone consumes in one sitting. Click the Reference Amount link to
search for a RACC set forth by an authority such as the U.S. Food and
Drug Administration. This data is used in determining label claims.
8-3
Agile Product Lifecycle Management for Process
• Classification —Used to determine label claim eligibility. This is also
used to filter label claim determination rule comments so the user can
view only the comments that pertain to the selected classification.
• Amount Per Serving —Used to determine the Per Serving values on the
nutrition panel.
• Serving Size (label) Serving/Pack (label) —Used for labeling.
• Special Attributes —Choose from a prepopulated list of special
attributes maintained by your administrator.
Ingredient Statements Section
The Ingredient Statements section contains the ingredient statement for general
use in labeling.
Nutrition Panel Tab
Nutrient Profile Section
Nutrient Profile, the sole section in the Nutrition Panel tab, stores the nutritional
information for the related specifications, as shown in figure 8-3, below. As
shown in figure 8-4, you can declare nutrient data by volume (if density has been
defined) or by mass, as shown in the dialog box in figure 8-2 below.
Figure 8-2: Per 100g/Per100mL dialog box
This data can appear within formulation specifications, and you can use this data
when determining label claims.
8-4
Global Specification Management User Guide
Chapter 8
Nutrient Profiles
Figure 8-3: Nutrient Profile section showing the Per 100g column
Figure 8-4: Nutrient Profile section showing the Per 100mL column in edit mode
Key fields include:
Nutrient—The name of the nutrient.
Per 100g / Per 100mL—The mass or volume-based declaration for the nutrient.
Volume (per 100mL) column can be displayed only if the density has been
defined in the Summary tab.
Source—The source system that nutrient data was retrieved from. When
nutrition is imported, the source will display the object it was imported from.
8-5
Agile Product Lifecycle Management for Process
Per Serving—Per Serving nutritional information. GSM calculates this field
from the Per 100g/100ml field and the Amount Per Serving data field.
Note
The Final Values field and rounding rules are by default, configured off.
For more information on this field, refer to the Agile Product Lifecycle
Management for Process Configuration Guide.
To calculate the value of the Per Serving field:
1 Click Edit at the upper right of the page to put the specification in edit mode.
2 Click Calculate. If you have a serving size specified, GSM will calculate the
per serving column.
To add a nutrient manually:
1 Click Edit at the upper right of the page to put the specification in edit mode.
2 Click Add New and select the nutrients from the dialog box that appears.
To import nutritional data from an ingredient specification:
1 Click Edit at the upper right of the page to put the specification in edit mode.
2 Click Import and select Ingredient in the drop-down list.
3 Search and select the item to import. A dialog box displays a list of nutrients
and their values from the ingredient specification’s nutrient composition.
4 Select the nutrients to import and click Done. The nutrient profile displays
the selected nutrients, along with their values.
To import nutritional data from the Food Composition Library:
1 Click Edit at the upper right of the page to put the specification in edit mode.
2 Click Import and select Food Composition Library in the drop-down list.
3 Search and select the item to import. A dialog box displays a list of nutrients
and their values.
4 Select the nutrients to import and click Done. The nutrient profile displays
the selected nutrients, along with their values.
To import nutritional data from another nutrient profile:
1 Click Edit at the upper right of the page to put the specification in edit mode.
2 Click Import and select Nutrient Profile in the drop-down list.
3 Search and select the item to import. A dialog box displays a list of nutrients
and their values.
4 Select the nutrients to import and click Done. The nutrient profile displays
the selected nutrients, along with their values.
To import nutrient analysis or nutrient composites from the Nutrition
Surveillance Management application (NSM):
1 At the upper right of the page, click Edit. The Nutrient Profile page reloads
in edit mode, in which the Label Claims button is gone and three new
buttons are present:
• Add New
• Import
• NSM
8-6
Global Specification Management User Guide
Chapter 8
Nutrient Profiles
Each row in the Nutrient Profile table is now editable.
2
3
4
Click NSM. The Import Nutrient Items search page appears.
Select Nutrient Analysis or Nutrient Composites in the drop-down list near the
top of the page, enter search criteria, and click Search. A Search Results
section appears, with a table of search results.
Click a hyperlinked analysis number or composite number in the first
column of the search results table. The Compare Nutrition dialog box
opens, displaying the nutrient information and the difference between what
you selected and the current nutrient profile, as shown in figure 8-5 below.
Figure 8-5: Compare Nutrition dialog box
5
Select the items to import and click Import Nutrient Items. GSM imports the
selected items and displays them in the Nutrient Profile section, as shown in
figure 8-6 below:
8-7
Agile Product Lifecycle Management for Process
Figure 8-6: Imported nutrient items
6
To roll up nutrient data for menu items only, click Rollup.
Note
This button is present only in nutrient profiles that have been
associated with a menu item specification.
A dialog box displays the following, as figure 8-7 shows below:
• Theoretical nutrient data rolled up from the inputs of the menu item’s
build
• The ingredient statement from the nutrient profile
• Compliance data broken out by specification.
8-8
Global Specification Management User Guide
Chapter 8
Nutrient Profiles
Figure 8-7: Nutrient profile Rollup screen
To change the source specifications of the nutrient rollup data:
1 Select only the desired menu items and products in the tables on the left. You
can also add menu items or products by selecting Add New.
2 Click the Total link at the top right of the page to recalculate the rollup data.
8-9
Agile Product Lifecycle Management for Process
Label Claims
Using the label claims determination feature, you can interrogate a product for
claims applicability based on a centralized rule base segregated by label claims
authority. Potential and Actual label claims are stored on the trade specification.
Label claim determination from the nutrient profile is for evaluation purposes
only. You can only view label claims when the specification is in read mode.
To view label claims:
1 Click the Nutrition Panel tab.
2 Click Label Claims.
3 Some claims require another product to compare to, such as Low Fat. The
system can evaluate comparative claims if you provide additional nutrient
information that describes the comparative product. Select the comparative
reference product tab and fill in the appropriate information needed. You
can also import data from another trade specification by selecting the
Reference Product label. Data will be imported from the trade specification’s
active nutrient profile. See figure 8-8, Label Claim Determination dialog box,
on page 8-11.
4 On the Claims Determination tab, from the Label Claims Authority dropdown list, select a specific rule group to use for considering claims
applicability.
5 Click Display Label Claims to display the Applicable Claims table. The system
evaluates label claims against rules that you previously defined. All selected
claims based on the label claims authority appear in the Applicable Claims
table with color coding to show whether the claim may be made for the
product.
When the system evaluates a claim as compliant, the Comments column
displays supporting information for the claim along with one or more userdefined values supporting the assessment in the Calculation(s) column, as
shown in figure 8-9, Label Claim Determination, Claims Determination tab,
on page 8-12. If the system finds that the claim is invalid, no such
information appears in the Comments column. When you click the
Comments column head within the Applicable Claims table, the Comments
column of those claims that are not applicable displays additional
information about claims that may not be made for the product. The
Comments column also includes error information.
8-10
Global Specification Management User Guide
Chapter 8
Nutrient Profiles
Figure 8-8: Label Claim Determination dialog box
8-11
Agile Product Lifecycle Management for Process
Figure 8-9: Label Claim Determination, Claims Determination tab
8-12
Global Specification Management User Guide
Chapter 8
Nutrient Profiles
Label Composition Tab
If you have created a label composition in the Listed Ingredient Order (LIO) tool
and have transferred it to the nutrient profile, then this tab displays the label
composition.
Note
Depending on your configuration, you may not see this tab.
Label Composition, the sole section in the Label Composition tab, displays the
composition of the specification for labeling purposes. This information can be
pushed to the nutrient profile from the LIO process. The data pushed to the
Nutrient Profile is read only.
Figure 8-10: Label Composition section
Ext Data Tab
This page includes the following sections:
❑
Extended Attributes—For discussion of this commonly used section, please
see Extended Attributes Section on page 3-29
❑
Custom Sections—For discussion of this commonly used section, please see
Custom Sections on page 3-29
Related Specs Tab
Related Specs, the sole section in the Related Specs tab, displays the menu item
and trade specifications that use the current nutrient profile. The system
automatically generates the list of specifications to which this nutrient profile is
tied and displays them in this section. Click the linked number in the Spec #
column to open the specification. A checkmark ( ) may be displayed next to the
specifications in the Active column. The checkmark signifies that the nutrient
profile is marked as the active on the trade specification.
8-13
Agile Product Lifecycle Management for Process
Figure 8-11: Related Specs section
Supporting Documents Tab
In Supporting Documents, the only section in this tab, you can attach any
background documents that may help to explain the nutrient profile. The
document types available are Attachments/Procedures, URL, and Rich Text. For
discussion of this commonly used section, please see Supporting Documents
Section on page 3-12.
References Tab
The References tab consists of the following sections:
❑
Activities section—For discussion of this commonly used section, please see
Activities Section on page 3-25
❑
Related Documents—For discussion of this commonly used section, please
see Related Documents Section on page 3-27
Approval/Audit Trail Tab
For discussion of this tab, please see Approval/Audit Trail Tab on page 2-11.
8-14
Global Specification Management User Guide
C HAPTER 9
Product Specifications
This chapter presents an overview of the capabilities of Global Specification Management regarding product
specifications. Topics in this chapter include:
❑ Page-Level Functions
❑ Summary Tab
❑ Formulation Tab
❑ Compliance Tab
❑ Related Specs Tab
❑ Supporting Documents Tab
❑ References Tab
❑ Approval/Audit Trail Tab
Overview
The Product Specification page consists of the following tabs:
❑
Summary Tab on page 9-3
❑
Formulation Tab on page 9-4
Compliance Tab on page 9-4
Related Specs Tab on page 9-5
Supporting Documents Tab on page 9-6
References Tab on page 9-6
Approval/Audit Trail Tab on page 9-6
❑
❑
❑
❑
❑
9-1
Agile Product Lifecycle Management for Process
Page-Level Functions
In the upper right corner of the page is a row of buttons that trigger actions that
can affect the entire page. All of these buttons (except Calculate) are displayed
when the specification is in read mode. These buttons and their functions are:
❑
Edit —Place the entire page in edit mode so that you can modify it.
❑
(Report) —Depending on the configuration of your Agile PLM for Process
❑
❑
❑
❑
❑
❑
❑
❑
9-2
installation, this button may or may not appear (on certain specifications).
Click Report to launch the Reporting application.
Calculate—Performs all custom data calculations. This button is displayed
when the specification is in edit mode. Calculation also happens when you
save your specification.
Create Copy —Create a new copy of the current product specification. For
discussion of this commonly used function, please see Creating a Copy of an
Existing Specification on page 2-1.
CACS — Screen the current specification using Computer Aided Compliance
Screening (CACS), an application that you can use to inspect materials for
fitness against any number of user-defined screens. (Appears only if your
installation includes CACS.) For more information on CACS, please refer to
the Agile Product Lifecycle Management for Process Computer Aided
Compliance Screening User Guide.
Print — Opens a dialog box through which you can print the current
specification in a variety of formats. For more information on printing a
product specification, please see Printing Other Specifications on page 2-19.
Act —Create a primary activity, or mini-workflow, for this specification. For
more information about this function, please see Chapter 20, Activities.
(Appears only if you have editorial control over the specification.)
Item History —Display all issues of the specification that exist in a Spec
History table, along with the reason for creating each issue and other
identifying information. For more information on this feature please see Item
History on page 2-3.
Workflow — Move the current specification, or document, from one
workflow step to another. For more information on workflows, please see
Transitioning a Workflow on page 2-7.
Resolve Workflow —Re-resolve the specification to a workflow (present only
when you are logged in with a user account that has the user role of
[CAN_RERESOLVE_WORKFLOWS].)
Global Specification Management User Guide
Chapter 9
Product Specifications
Summary Tab
The Product Specification Summary tab contains the following sections:
❑
Summary Information—For discussion of this commonly used section,
please see Summary Information Section on page 3-2.
❑
Product Attributes—Discussed below, at Product Attributes Section on page 93.
❑
Design Attributes—Discussed below, at Design Attributes Section on page 9-3.
Cross References—For discussion of this commonly used section, please see
Cross References Section on page 3-3.
Approved for Use In—For discussion of this commonly used section, please
see Approved for Use In Section on page 3-5.
❑
❑
Product Attributes Section
The Product Attributes section contains the specific core attributes of a product
specification.
Figure 9-1: Product Attributes section
Design Attributes Section
The Design Attributes section contains product information that is used for mass
conversions elsewhere in Agile Product Lifecycle Management for Process.
Figure 9-2: Design Attributes section
9-3
Agile Product Lifecycle Management for Process
Key fields include:
Density —Allows for the entry of mass-to-volumetric conversion factor.
Unit Conversion — Allows the declaration of an actual weight or measurement
for a particular unit. For example: 1 slice cheese = 3.2 oz.
Total Solids — Allows for the declaration of the material’s “% total solid”
composition.
Formulation Tab
The Formulation tab contains the data related to the ingredient statements and
formulations of a product specification and consists of two sections:
❑
Ingredient Statements—Discussed below, at Ingredient Statements Section on
page 9-4.
❑
Formula—For discussion of this commonly used section, please see %
Breakdown (Formula) Section on page 3-22.
Ingredient Statements Section
The Ingredient Statements section contains the ingredient statement for the
product specification. You can input the ingredient statement in two ways:
• GSM can derive it from a formulation that you select. To select a
formulation, click the hyperlinked Ingredient Statement field label and
select one of the formulas on your product specification. The page
refreshes and the ingredient statement will be populated based on the
components and their composition listed in the formula you selected.
• You can manually enter this information in the Ingredient Statement
field.
Figure 9-3: Ingredient Statements section
Compliance Tab
The Compliance tab includes the following sections:
❑
Extended Attributes—For discussion of this commonly used section, please
see Extended Attributes Section on page 3-29.
❑
Custom Sections—For discussion of this commonly used section, please see
Custom Sections on page 3-29.
Compliance Information section—For discussion of this commonly used
section, please see Compliance Information Section on page 3-6.
Allergens, Intolerances, and Additives—For discussion of this commonly
used section, please see Additives, Allergens, and Intolerances Sections on
page 3-7.
❑
❑
9-4
Global Specification Management User Guide
Chapter 9
Product Specifications
Related Specs Tab
The Related Specs tab contains the following sections:
❑
Global/Regional Standard—Discussed below, at Global/Regional Standard
Section on page 9-5.
❑
Alternate Standards—Discussed below, at Alternate Standards Section on
page 9-5.
Packing Configurations Specifications—Discussed below, at Packing
Configurations Specifications Section on page 9-5.
Master Specifications—For discussion of this field, please see Master
Specifications Section on page 3-9.
❑
❑
Global/Regional Standard Section
The Global/Regional Standard section contains any specifications that are global/
regional standards related to the product specification. You can associate only
one global/regional standard to each specification.
Figure 9-4: Global/Regional Standard section
Alternate Standards Section
The Alternate Standards section lists any alternate standard specifications for the
product specification. GSM locates and displays any alternates that are linked to
any other specification that references the current specification as a global/
regional standard.
Figure 9-5: Alternate Standards section
Packing Configurations Specifications Section
The Packing Configurations Specifications section contains the packing
configurations specifications associated with the product specification. In this
section you can describe the multiple ways in which your specified material can
be delivered (for instance, case/packaging variants).
9-5
Agile Product Lifecycle Management for Process
Figure 9-6: Packing Configuration Specifications section
Key fields include:
Equivalent—Use this field to associate a cross-reference equivalent per packing
configuration.
Supporting Documents Tab
The Product Specifications Supporting Documents tab consists of three sections:
❑
Supporting Documents section—The document types available are
Attachments/Procedures, URL, nutrient composition, and Rich Text. For
discussion of this commonly used section, please see Supporting Documents
Section on page 3-12.
❑
DRL Documents section—For discussion of this commonly used section,
please see DRL Documents Section on page 3-18.
Testing Protocols section—For discussion of this commonly used section,
please see Testing Protocols Section on page 3-21.
❑
References Tab
The Product Specifications References tab consists of the following sections:
❑
Suppliers section—For discussion of this commonly used section, please see
Suppliers Section on page 3-25.
❑
Specification Dependencies—For discussion of this commonly used section,
please see Specification Dependencies Section on page 3-27.
❑
Activities section—For discussion of this commonly used section, please see
Activities Section on page 3-25.
Related Documents—For discussion of this commonly used section, please
see Related Documents Section on page 3-27.
❑
Approval/Audit Trail Tab
For discussion of this tab, please see Approval/Audit Trail Tab on page 2-11.
9-6
Global Specification Management User Guide
C HAPTER 10
Ingredient Specifications
This chapter presents an overview of the capabilities of Global Specification Management regarding
ingredient specifications. Topics in this chapter include:
❑ Summary Tab
❑ Formulation Tab
❑ Compliance Tab
❑ Related Specs Tab
❑ CSS Tab
❑ Supporting Documents Tab
❑ References Tab
❑ Approval/Audit Trail Tab
Overview
The Ingredient Specification page consists of the following tabs:
❑
Summary Tab on page 10-3
❑
Formulation Tab on page 10-5
Compliance Tab on page 10-6
Related Specs Tab on page 10-6
CSS Tab on page 10-7
Supporting Documents Tab on page 10-8
References Tab on page 10-8
Approval/Audit Trail Tab on page 10-9
❑
❑
❑
❑
❑
❑
10-1
Agile Product Lifecycle Management for Process
Page-Level Functions
In the upper right corner of the page is a row of buttons that trigger actions that
can affect the entire page. All of these buttons (except Calculate) are displayed
when the specification is in read mode. These buttons and their functions are:
❑
Edit —Place the entire page in edit mode so that you can modify it.
❑
(Report) —Depending on the configuration of your Agile PLM for Process
❑
❑
❑
❑
❑
❑
❑
❑
❑
10-2
installation, this button may or may not appear (on certain specifications).
Click Report to launch the Reporting application.
Calculate—Performs all custom data calculations. This button is displayed
when the specification is in edit mode. Calculation also happens when you
save your specification.
Create Copy —Create a new copy of the current ingredient specification. For
discussion of this commonly used function, please see Creating a Copy of an
Existing Specification on page 2-1.
CACS — Screen the current specification using Computer Aided Compliance
Screening (CACS), an application that you can use to inspect materials for
fitness against any number of user-defined screens. (Appears only if your
installation includes CACS.) For more information on CACS, please refer to
the Agile Product Lifecycle Management for Process Computer Aided
Compliance Screening User Guide.
LIO—Create a new LIO profile, automatically referencing the ingredient
specification as the target specification. The nutrient profile must be selected
manually. The LIO button only displays if the Formulation and Compliance
(F&C) bundle has been installed.
Print — Opens a dialog box through which you can print the current
specification in a variety of formats. For more information on printing an
ingredient specification, please see Printing Other Specifications on page 2-19.
Act —Create a primary activity, or mini-workflow, for this specification. For
more information about this function, please see Chapter 20, Activities.
(Appears only if you have editorial control over the specification.)
Item History —Display all issues of the specification that exist in a Spec
History table, along with the reason for creating each issue and other
identifying information. For more information on this feature please see Item
History on page 2-3.
Workflow — Move the current specification, or document, from one
workflow step to another. For more information on workflows, please see
Transitioning a Workflow on page 2-7.
Resolve Workflow —Re-resolve the specification to a workflow (present only
when you are logged in with a user account that has the user role of
[CAN_RERESOLVE_WORKFLOWS].)
Global Specification Management User Guide
Chapter 10
Ingredient Specifications
Summary Tab
The Ingredient Specification Summary tab contains the following sections:
❑
Summary Information—For discussion of this commonly used section,
please see Summary Information Section on page 3-2.
❑
Ingredient Attributes—Discussed below, at Ingredient Attributes Section on
page 10-3.
❑
Shelf Life—Discussed below, at Shelf Life Section on page 10-4.
Design Attributes—Discussed below, at Design Attributes Section on page 105.
Cross References—For discussion of this commonly used section, please see
Cross References Section on page 3-3.
Available UOM—For discussion of this commonly used section, please see
Available UOM on page 3-4.
UOM Conversions—For discussion of this commonly used section, please see
Available UOM on page 3-4.
Approved for Use In—For discussion of this commonly used section, please
see Approved for Use In Section on page 3-5.
❑
❑
❑
❑
❑
Ingredient Attributes Section
The Ingredient Attributes section contains specific, core attributes of an
ingredient specification, as shown in figure 10-1, below. The Classification field
may be required, depending on the configuration of your installation.
Note
The graduate icon ( ) is available on ingredient specifications with a
output type of “External” for a user with the [SPEC_GRADUATOR] role.
Clicking on the icon changes the external output to a “Referenced”
ingredient and resolves the workflow to an ingredient specification
workflow. The Sourcing Approval section becomes available for an item
that has been graduated.
Figure 10-1: Ingredient Attributes section
10-3
Agile Product Lifecycle Management for Process
Key fields include:
Material Type—Defined by the system. There are two types of materials:
• Raw Material—General ingredient specification representing a sourced
material
• Formula Output—Ingredient specification created by a formulation
specification
If you purchase as well as produce a material, the ingredient will be
considered both a raw material and a formula output.
Output Type—See Output Types/Sub-Types on page 6-3 for a list of output types.
Classification —Depending on your configuration this could be a required field.
This field could potentially drive workflow resolution.
Shelf Life Section
Shelf lives can be declared in multiple contexts, usually based on storage
conditions. You can store one set of shelf life conditions for frozen material and
another for refrigerated material. For each separate context you can store values
such as storage requirements and instructions, relative humidity, and supplier
and internal shelf life.
Figure 10-2: Shelf Life section
Key fields include:
Type —Describes the context for the shelf life. Each specification can have only
one shelf life record for each type.
Tags —These tags describe how the shelf life will be used elsewhere in the system.
The following tags are available:
• Suppress Printing—Prevents the shelf life record from being printed.
• Do Not Publish to Supplier—Prevents the shelf life record from being
included in eQ and Supplier Portal.
10-4
Global Specification Management User Guide
Chapter 10
Ingredient Specifications
Design Attributes Section
The design attributes in this section can be used by formulation specifications.
Figure 10-3: Design Attributes section
Key fields include:
Density —Necessary for calculating density in formulation specifications.
Unit Conversion —Necessary for calculating mass in some areas of the
application in which units are used as a UOM. This is also used to convert
between mass and volume in formulation specifications.
Total Solids —Necessary for calculating total solids in areas of the application
such as for formulation specifications.
Edible Portion (ingredient specification only)—Percentage of the material that
is edible.
Formulation Tab
The Formulation tab contains the data related to the ingredient statements and
formulations of an ingredient specification. This tab has two sections:
❑
Ingredient Statements section—Discussed below, at Ingredient Statements
Section on page 10-5.
❑
% Breakdown section—For discussion of this section, please see %
Breakdown (Formula) Section on page 3-22.
Ingredient Statements Section
The Ingredient Statements section contains the ingredient statement for the
ingredient specification. The ingredient statement can be entered in a number of
ways:
• If you have the F&C bundle, you can generate and push the ingredient
statement using LIO. This would be pushed into the combined statement
field.
• If you do not have the F&C bundle, you can build the ingredient
statement from a selected % breakdown or manually enter the ingredient
statement.
10-5
Agile Product Lifecycle Management for Process
Figure 10-4: Ingredient Statements section
Compliance Tab
The Compliance tab includes the following sections:
❑
Extended Attributes—For discussion of this commonly used section, please
see Extended Attributes Section on page 3-29.
❑
Custom Sections—For discussion of this commonly used section, please see
Custom Sections on page 3-29.
Compliance Information section—For discussion of this commonly used
section, please see Compliance Information Section on page 3-6.
Additives, Allergens, and Intolerances—For discussion of this commonly
used section, please see Additives, Allergens, and Intolerances Sections on
page 3-7.
❑
❑
Related Specs Tab
The Related Specs tab contains the following sections:
❑
Produced By—Discussed below, at Produced By Section on page 10-6.
❑
Trade Specifications—Discussed below, at Trade Specifications Section on
page 10-7.
❑
Packing Configurations Specifications—Discussed below, at Packing
Configurations Specifications Section on page 10-7.
Associated Specifications —For discussion of this field, please see Associated
Specifications Section on page 3-9.
Master Specifications—For discussion of this field, please see Master
Specifications Section on page 3-9.
❑
❑
Produced By Section
The Produced By section shows formulation specifications that produced this
ingredient specification. This section is displayed only when producing
specifications exist and is view-only. If a producing specification exists, then the
material type on the ingredient specification will also include the type of Formula
Output.
Figure 10-5: Produced By section
10-6
Global Specification Management User Guide
Chapter 10
Ingredient Specifications
Trade Specifications Section
This section shows all trade specifications that this ingredient has been linked to.
It displays the trade specification and the formulation that was used as context on
the trade specification.
You can click on Add New to create a new trade specification with this ingredient
already linked. The trade will automatically inherit the name and business unit
from the ingredient specification.
Note
Make sure to save your ingredient specification before clicking on Add New.
When the trade specification is created, GSM takes you directly to the trade
specification. Any unsaved changes to your ingredient specification will be
lost.
Figure 10-6: Trade Specifications section
Packing Configurations Specifications Section
The Packing Configurations Specifications section contains the Packing
Configurations Specifications associated with the ingredient specification. In this
section you can describe the multiple ways in which this ingredient can be
delivered (for instance, case/packaging variants).
Figure 10-7: Packing Configurations Specifications section
Key fields include:
Equivalent —In this field you can associate a cross-reference equivalent per
packing configuration.
CSS Tab
For discussion of this commonly used tab, please see CSS Tab on page 3-10.
10-7
Agile Product Lifecycle Management for Process
Supporting Documents Tab
The Ingredient Specification Supporting Documents tab contains the list of all
supporting documents associated with an ingredient specification. The
Supporting Documents tab consists of three sections:
❑
Supporting Documents—The document types available are attachments/
procedures, nutrient composition, and rich text. For discussion of this
commonly used section, please see Supporting Documents Section on page 312.
❑
DRL Documents—For discussion of this commonly used section, please see
DRL Documents Section on page 3-18.
Testing Protocols—For discussion of this commonly used section, please see
Testing Protocols Section on page 3-21.
❑
References Tab
The Ingredient Specification References tab contains the list of all the reference
data linked to an ingredient specification. The References tab includes the
following sections:
❑
❑
❑
❑
❑
Suppliers—For discussion of this commonly used section, please see Suppliers
Section on page 3-25. This section only appears for ingredients with material
type as “Raw Material.”
Substitute Materials—Discussed below, at Substitute Materials Section on
page 10-8.
Activities—For discussion of this commonly used section, please see Activities
Section on page 3-25.
Specification Dependencies—For discussion of this commonly used section,
please see Specification Dependencies Section on page 3-27.
Related Documents—For discussion of this commonly used section, please
see Related Documents Section on page 3-27.
Substitute Materials Section
The Substitute Materials section allows users to capture substitute materials for
the raw materials. Substitutes can be added in read or edit modes. Users must
have the role [SUBSTITUTE_MATERIAL_DEFINER] to create new or modify
existing raw materials.
Figure 10-8: Substitute Materials section
10-8
Global Specification Management User Guide
Chapter 10
Ingredient Specifications
Key fields include:
Substitute Materials—Substitute materials associated with this raw material.
Factor—The factor to apply during the substitution process.
Substitute Restrictions—Lists substitute restrictions, which are maintained in
the Data Administration application. These restrictions will work to filter the
substitutions available to the formulator. For more information about substitute
restrictions, refer to the “Formulation Attributes Section” in Chapter 6,
Formulation Specifications.
Approval/Audit Trail Tab
For discussion of this tab, please see Approval/Audit Trail Tab on page 2-11.
10-9
Agile Product Lifecycle Management for Process
10-10
Global Specification Management User Guide
C HAPTER 11
Packaging Material Specifications
This chapter presents an overview of the capabilities of Global Specification Management regarding
packaging material specifications. Topics in this chapter include:
❑ Page-Level Functions
❑ Summary Tab
❑ Compliance Tab
❑ Printed Packaging Material Tab
❑ Related Specs Tab
❑ CSS Tab
❑ Supporting Documents Tab
❑ References Tab
❑ Approval/Audit Trail Tab
Overview
The Packaging Material Specification page consists of the following tabs:
❑
Summary Tab on page 11-3
❑
Compliance Tab on page 11-4
Printed Packaging Material Tab on page 11-5
Related Specs Tab on page 11-5
CSS Tab on page 11-7
Supporting Documents Tab on page 11-7
References Tab on page 11-7
Approval/Audit Trail Tab on page 11-8
❑
❑
❑
❑
❑
❑
11-1
Agile Product Lifecycle Management for Process
Page-Level Functions
In the upper right corner of the page is a row of buttons that trigger actions that
can affect the entire page. All of these buttons (except Calculate) are displayed
when the specification is in read mode. These buttons and their functions are:
❑
Edit —Place the entire page in edit mode so that you can modify it.
❑
(Report) —Depending on the configuration of your Agile PLM for Process
❑
❑
❑
❑
❑
❑
❑
❑
11-2
installation, this button may or may not appear (on certain specifications).
Click Report to launch the Reporting application.
Calculate—Performs all custom data calculations. This button is displayed
when the specification is in edit mode. Calculation also happens when you
save your specification.
Create Copy —Create a new copy of the current packaging material
specification. For discussion of this commonly used function, please see
Creating a Copy of an Existing Specification on page 2-1.
CACS —Screen the current specification using Computer Aided Compliance
Screening (CACS), an application that you can use to inspect materials for
fitness against any number of user-defined screens. (Appears only if your
installation includes CACS.) For more information on CACS, please refer to
the Agile Product Lifecycle Management for Process Computer Aided
Compliance Screening User Guide.
Print — Opens a dialog box through which you can print the current
specification in a variety of formats. For more information on printing a
packaging material specification, please see Printing Other Specifications on
page 2-19.
Act —Create a primary activity, or mini-workflow, for this specification. For
more information about this function, please see Chapter 20, Activities.
(Appears only if you have editorial control over the specification.)
Item History —Display all issues of the specification that exist in a Spec
History table, along with the reason for creating each issue and other
identifying information. For more information on this feature please see Item
History on page 2-3.
Workflow — Move the current specification, or document, from one
workflow step to another. For more information on workflows, please see
Transitioning a Workflow on page 2-7.
Resolve Workflow —Re-resolve the specification to a workflow (present only
when you are logged in with a user account that has the user role of
[CAN_RERESOLVE_WORKFLOWS].)
Global Specification Management User Guide
Chapter 11
Packaging Material Specifications
Summary Tab
The Packaging Material Specification Summary tab contains the following
sections:
❑
Summary Information—For discussion of this commonly used section,
please see Summary Information Section on page 3-2.
❑
Packaging Attributes—Discussed below, at Packaging Attributes Section on
page 11-3.
❑
Tare Weight—Discussed below, at Tare Weight Section on page 11-3
Cross References—For discussion of this commonly used section, please see
Cross References Section on page 3-3.
Available UOM—For discussion of this commonly used section, please see
Available UOM on page 3-4.
UOM Conversions—For discussion of this commonly used section, please see
Available UOM on page 3-4.
Approved for Use In—For discussion of this commonly used section, please
see Approved for Use In Section on page 3-5.
❑
❑
❑
❑
Packaging Attributes Section
A packaging material specification has a number of core attributes, such as
description, storage requirements, and relative humidity. List those attributes in
this section.
Figure 11-1: Packaging Attributes section
Tare Weight Section
The Tare Weight section for a packaging material or printed packaging
specification is shown in the figure below. Use this section to define the mass to
unit/count conversion.
In addition, UOM Conversions can define tare weight. Please note that the Tare
Weight fields must be populated in addition to the UOM Conversion fields for
this to calculate properly.
11-3
Agile Product Lifecycle Management for Process
Figure 11-2: Tare Weight section
From within a trade specification Packaging Attributes section, click the
hyperlinked Tare Weight field label to have GSM calculate the appropriate tare
weight, as shown in the figure below. If you have supplied the net weight, GSM
can also calculate the gross weight of the product (net weight + tare weight).
Figure 11-3: Portion of a trade specification Packing Attributes section showing the hyperlinked Tare
Weight field label
Compliance Tab
The Compliance tab contains the compliance data related to a packaging material
specification. It has the following sections:
❑
Extended Attributes—For discussion of this commonly used section, please
see Extended Attributes Section on page 3-29.
❑
Custom Sections—For discussion of this commonly used section, please see
Custom Sections on page 3-29.
Environmental Waste—Discussed below, at Environmental Waste Section on
page 11-5.
❑
11-4
Global Specification Management User Guide
Chapter 11
Packaging Material Specifications
Environmental Waste Section
This section provides a place to log known waste materials for this specification
material, along with other relevant attributes required for environmental waste
reporting.
Figure 11-4: Environmental Waste section
Printed Packaging Material Tab
Printed Packaging Material Section
The Printed Packaging Material section, the only section in the Printed Packaging
Material tab, contains the list of printed packaging specifications linked to a
packaging material specification.
Figure 11-5: Printed Packaging Material section
Related Specs Tab
The Related Specs tab contains the following sections:
❑
Sub Components—Discussed below, at Sub Components Section on page 115.
❑
Packing Configurations Specifications—Discussed below, at Packing
Configuration Specifications Section on page 11-6.
Equipment Specifications—Discussed below, at Equipment Specifications
Section on page 11-6.
Master Specifications—For discussion of this field, please see Master
Specifications Section on page 3-9.
❑
❑
Sub Components Section
The Sub Components section contains any packaging material specifications that
are subcomponents of this specification. You can categorize each subcomponent
based on packaging type, for example, “inner,” “outer,” and “intermediate.”
Additionally, you can declare the quantity of each subcomponent.
11-5
Agile Product Lifecycle Management for Process
Figure 11-6: Sub Components section
Packing Configuration Specifications Section
The Packing Configuration Specifications section contains the packing
configuration specifications associated with the packaging material specification.
In this section you can describe the multiple ways in which your material can be
delivered (for instance, case/packaging variants).
Figure 11-7: Packing Configuration Specifications section
Key fields include:
Equivalent—In this field you can associate a cross-reference equivalent per
packing configuration.
Equipment Specifications Section
The Equipment Specifications section contains the list of equipment
specifications linked to a packaging material specification.
Figure 11-8: Equipment Specifications section
11-6
Global Specification Management User Guide
Chapter 11
Packaging Material Specifications
CSS Tab
For discussion of this commonly used tab, please see CSS Tab on page 3-10.
Supporting Documents Tab
The Packaging Material Specification Supporting Documents tab contains the
list of all supporting documents associated with a packaging material
specification. The Supporting Documents tab consists of three sections:
❑
Supporting Documents—The document types available are Attachments/
Procedures, URL, and Rich Text. For discussion of this commonly used
section, please see Supporting Documents Section on page 3-12.
❑
DRL Documents—For discussion of this commonly used section, please see
DRL Documents Section on page 3-18.
Testing Protocols—For discussion of this commonly used section, please see
Testing Protocols Section on page 3-21.
❑
References Tab
The Packaging Material Specification References tab contains the list of all the
reference data linked to a packaging material specification. It includes the
following sections:
❑
❑
❑
❑
❑
Suppliers—For discussion of this commonly used section, please see Suppliers
Section on page 3-25.
Substitute Materials—Discussed below, at Substitute Materials Section on
page 11-7.
Activities—For discussion of this commonly used section, please see Activities
Section on page 3-25.
Specification Dependencies—For discussion of this commonly used section,
please see Specification Dependencies Section on page 3-27.
Related Documents—The available related documents include only NPD
activities. For discussion of this commonly used section, please see Related
Documents Section on page 3-27.
Substitute Materials Section
The Substitute Materials section allows users to capture substitute materials for
their raw materials. Users must have the role
[SUBSTITUTE_MATERIAL_DEFINER] to create new or modify existing raw
materials.
Figure 11-9: Substitute Materials section
11-7
Agile Product Lifecycle Management for Process
Key fields include:
Substitute Materials—Substitute materials associated with this raw material
Factor—The factor to apply during the substitution process
Substitute Restrictions—Lists substitute restrictions, which are maintained in
the Data Administration application.
Approval/Audit Trail Tab
For discussion of this tab, please see Approval/Audit Trail Tab on page 2-11.
11-8
Global Specification Management User Guide
C HAPTER 12
Equipment Specifications
This chapter presents an overview of the capabilities of Global Specification Management regarding
equipment specifications. Topics in this chapter include:
❑ Page-Level Functions
❑ Summary Tab
❑ Compliance Tab
❑ Related Specs Tab
❑ Supporting Documents Tab
❑ References Tab
❑ Approval/Audit Trail Tab
Overview
The Equipment Specification page consists of the following tabs:
❑
Summary Tab on page 12-2
❑
Compliance Tab on page 12-3
Related Specs Tab on page 12-3
Supporting Documents Tab on page 12-4
References Tab on page 12-4
Approval/Audit Trail Tab on page 12-4
❑
❑
❑
❑
12-1
Agile Product Lifecycle Management for Process
Page-Level Functions
In the upper right corner of the page is a row of buttons that trigger actions that
can affect the entire page. All of these buttons (except Calculate) are displayed
when the specification is in read mode. These buttons and their functions are:
❑
Edit —Place the entire page in edit mode so that you can modify it.
❑
(Report) —Depending on the configuration of your Agile PLM for Process
❑
❑
❑
❑
❑
❑
❑
installation, this button may or may not appear (on certain specifications).
Click Report to launch the Reporting application.
Calculate—Performs all custom data calculations. This button is displayed
when the specification is in edit mode. Calculation also happens when you
save your specification.
Create Copy —Create a new copy of the current equipment specification. For
discussion of this commonly used function, please see Creating a Copy of an
Existing Specification on page 2-1.
Print — Opens a dialog box through which you can print the current
specification in a variety of formats. For more information on printing an
equipment specification, please see Printing Other Specifications on page 2-19.
Act —Create a primary activity, or mini-workflow, for this specification. For
more information about this function, please see Chapter 20, Activities.
(Appears only if you have editorial control over the specification.)
Item History —Display all issues of the specification that exist in a Spec
History table, along with the reason for creating each issue and other
identifying information. For more information on this feature please see Item
History on page 2-3.
Workflow — Move the current specification, or document, from one
workflow step to another. For more information on workflows, please see
Transitioning a Workflow on page 2-7.
Resolve Workflow —Re-resolve the specification to a workflow (present only
when you are logged in with a user account that has the user role of
[CAN_RERESOLVE_WORKFLOWS].)
Summary Tab
Key sections in the Summary tab include:
❑
Summary Information —For discussion of this commonly used section,
please see Summary Information Section on page 3-2.
❑
Equipment Identification—Described below, at Equipment Identification
Section on page 12-3.
❑
Cross References—For discussion of this commonly used section, please see
Cross References Section on page 3-3.
Approved for Use In—For discussion on this commonly used section, please
see Approved for Use In Section on page 3-5.
❑
12-2
Global Specification Management User Guide
Chapter 12
Equipment Specifications
Equipment Identification Section
This section provides model information about the equipment.
Figure 12-1: Equipment Identification section
Compliance Tab
The Equipment Specification Compliance tab consists of the following sections:
❑
Equipment Attributes —This section contains a table called “Extended
Attributes.” For discussion of this commonly used section, please see
Extended Attributes Section on page 3-29.
❑
Custom Sections—For discussion of this commonly used section, please see
Custom Sections on page 3-29.
Environmental Waste (per item sold)—Discussed below, at Environmental
Waste (per item sold) Section on page 12-3.
❑
Environmental Waste (per item sold) Section
This section provides a place to log known waste materials for this specification
material along with other relevant attributes required for environmental waste
reporting.
Figure 12-2: Environmental Waste (per item sold) section
Related Specs Tab
The Related Specs tab contains the following sections:
❑
Packaging Specifications—Discussed below, at Packaging Specifications
Section on page 12-4.
❑
Master Specifications—For discussion of this field, please see Master
Specifications Section on page 3-9.
12-3
Agile Product Lifecycle Management for Process
Packaging Specifications Section
In this section you can associate this specification with one or more packaging
material specifications.
Figure 12-3: Packaging Specifications section
Supporting Documents Tab
The Equipment Specification Supporting Documents tab contains the list of all
supporting documents associated with an equipment specification. This tab
consists of three sections:
❑
Supporting Documents— The document types available are Attachments/
Procedures, URL, and Rich Text. For discussion of this commonly used
section, please see Supporting Documents Section on page 3-12.
❑
DRL Documents—For discussion of this commonly used section, please see
DRL Documents Section on page 3-18.
Testing Protocols—For discussion of this commonly used section, please see
Testing Protocols Section on page 3-21.
❑
References Tab
The Equipment Specification References tab contains the list of all the reference
data linked to an equipment specification and includes the following sections:
❑
❑
❑
Suppliers—For discussion of this commonly used section, please see Suppliers
Section on page 3-25.
Activities—For discussion of this commonly used section, please see Activities
Section on page 3-25.
Related Documents—The available related documents include only NPD
Activities. For discussions of this commonly used section, please see Related
Documents Section on page 3-27.
Approval/Audit Trail Tab
For discussion of this tab, please see Approval/Audit Trail Tab on page 2-11.
12-4
Global Specification Management User Guide
C HAPTER 13
Printed Packaging Specifications
This chapter presents an overview of the capabilities of Global Specification Management regarding printed
packaging specifications. Topics in this chapter include:
❑ Page-Level Functions
❑ Summary Tab
❑ Compliance Tab
❑ Related Specs Tab
❑ CSS Tab
❑ Supporting Documents Tab
❑ References Tab
❑ Approval/Audit Trail Tab
Overview
The Printed Packaging Specification page consists of the following tabs:
❑
Summary Tab on page 13-3
❑
Compliance Tab on page 13-4
Related Specs Tab on page 13-4
CSS Tab on page 13-5
Supporting Documents Tab on page 13-5
References Tab on page 13-6
Approval/Audit Trail Tab on page 13-6
❑
❑
❑
❑
❑
13-1
Agile Product Lifecycle Management for Process
Page-Level Functions
In the upper right corner of the page is a row of buttons that trigger actions that
can affect the entire page. All of these buttons (except Calculate) are displayed
when the specification is in read mode. These buttons and their functions are:
❑
Edit —Place the entire page in edit mode so that you can modify it.
❑
(Report) —Depending on the configuration of your Agile PLM for Process
❑
❑
❑
❑
❑
❑
❑
❑
13-2
installation, this button may or may not appear (on certain specifications).
Click Report to launch the Reporting application.
Calculate—Performs all custom data calculations. This button is displayed
when the specification is in edit mode. Calculation also happens when you
save your specification.
Create Copy —Create a new copy of the current printed packaging
specification. For discussion of this commonly used function, please see
Creating a Copy of an Existing Specification on page 2-1.
CACS—Screen the current specification using Computer Aided Compliance
Screening (CACS), an application that you can use to inspect materials for
fitness against any number of user-defined screens. (Appears only if your
installation includes CACS.) For more information on CACS, please refer to
the Agile Product Lifecycle Management for Process Computer Aided
Compliance Screening User Guide.
Print — Opens a dialog box through which you can print the current
specification in a variety of formats. For more information on printing a
printed packaging specification, please see Printing Other Specifications on
page 2-19
Act —Create a primary activity, or mini-workflow, for this specification. For
more information about this function, please see Chapter 20, Activities.
(Appears only if you have editorial control over the specification.)
Item History —Display all issues of the specification that exist in a Spec
History table, along with the reason for creating each issue and other
identifying information. For more information on this feature please see Item
History on page 2-3.
Workflow — Move the current specification, or document, from one
workflow step to another. For more information on workflows, please see
Transitioning a Workflow on page 2-7.
Resolve Workflow —Re-resolve the specification to a workflow (present only
when you are logged in with a user account that has the user role of
[CAN_RERESOLVE_WORKFLOWS].)
Global Specification Management User Guide
Chapter 13
Printed Packaging Specifications
Summary Tab
The Printed Packaging specification Summary tab contains the following
sections:
❑
Summary Information —For discussion of this commonly used section,
please see Summary Information Section on page 3-2.
❑
Label Information—Discussed below, at Label Information Section on
page 13-3.
Tare Weight—Discussed below, at Tare Weight Section on page 13-3
Cross References—For discussion of this commonly used section, please see
Cross References Section on page 3-3.
Available UOM—For discussion of this commonly used section, please see
Available UOM on page 3-4.
UOM Conversions—For discussion of this commonly used section, please see
Available UOM on page 3-4.
Approved for Use In—For discussion of this commonly used section, please
see Approved for Use In Section on page 3-5.
❑
❑
❑
❑
❑
Label Information Section
This section contains identifying information for the packaging label, as shown
in figure 13-1 below.
Figure 13-1: Label Information section
Note
The languages in the Language(s) field are different from the application
languages that you can specify in the user profile. These languages refer to
the languages that are represented on the physical label.
Tare Weight Section
The Tare Weight section for a packaging material or printed packaging
specification is shown in the figure below. Use this section to define the mass to
unit/count conversion.
In addition, UOM Conversions can define tare weight. Please note that the Tare
Weight fields must be populated in addition to the UOM Conversion fields for
this to calculate properly.
13-3
Agile Product Lifecycle Management for Process
Figure 13-2: Tare Weight section
From within a trade specification Packaging Attributes section, click the
hyperlinked Tare Weight field label to have GSM calculate the appropriate tare
weight, as shown in the figure below. If you have supplied the net weight, GSM
can also calculate the gross weight of the product (net weight + tare weight).
Figure 13-3: Portion of a trade specification Packing Attributes section showing the hyperlinked Tare
Weight field label
Compliance Tab
The Compliance tab consists of two sections:
❑
Extended Attributes—For discussion of this commonly used section, please
see Extended Attributes Section on page 3-29.
❑
Custom Sections—For discussion of this commonly used section, please see
Custom Sections on page 3-29.
Related Specs Tab
The Related Specs tab contains the following sections:
13-4
❑
Parent Packaging Material—Discussed below, at Parent Packaging Material
Section on page 13-5.
❑
Master Specification—For discussion of this field, please see Master
Specifications Section on page 3-9.
Global Specification Management User Guide
Chapter 13
Printed Packaging Specifications
Parent Packaging Material Section
In this section you can connect the printed packaging specification to a parent
packaging material specification.
Figure 13-4: Parent Packaging Material section
The printed packaging specification can have only one parent packaging material
specification.
CSS Tab
For discussion of this commonly used tab, please see CSS Tab on page 3-10.
Supporting Documents Tab
The Supporting Documents tab consists of four sections:
❑
Attachments—For discussion of this commonly used section, please see
Attachments Section on page 3-22.
❑
Supporting Documents—Document types available for use in the Printed
Packaging Specifications Supporting Documents tab are URL and Rich Text.
For more information, please see Supporting Documents Section on page 3-12.
DRL Documents—For discussion of this commonly used section, please see
DRL Documents Section on page 3-18.
Testing Protocols—For discussion of this commonly used section, please see
Testing Protocols Section on page 3-21.
❑
❑
13-5
Agile Product Lifecycle Management for Process
References Tab
The Printed Packaging Specification References tab includes the following
sections:
❑
❑
❑
❑
❑
Suppliers—For discussion of this commonly used section, please see Suppliers
Section on page 3-25.
Substitute Materials—Discussed below, at Substitute Materials Section on
page 13-6.
Activities—For discussion of this commonly used section, please see Activities
Section on page 3-25.
Specification Dependencies—For discussion of this commonly used section,
please see Specification Dependencies Section on page 3-27.
Related Documents—For discussion of this commonly used section, please
see Related Documents Section on page 3-27.
Substitute Materials Section
The Substitute Materials section allows users to capture substitute materials for
their raw materials. Users must have the role
[SUBSTITUTE_MATERIAL_DEFINER] to create new or modify existing raw
materials.
Figure 13-5: Substitute Materials section
Key fields include:
Substitute Materials—Substitute materials associated with this raw material
Factor—The factor to apply during the substitution process
Substitute Restrictions—Lists substitute restrictions, which are maintained in
the Data Administration application.
Approval/Audit Trail Tab
For discussion of this tab, please see Approval/Audit Trail Tab on page 2-11.
13-6
Global Specification Management User Guide
C HAPTER 14
Delivered Material Packing
Specifications
This chapter presents an overview of the capabilities of Global Specification Management regarding delivered
material packing specifications. Topics in this chapter include:
❑ Page-Level Functions
❑ Summary Tab
❑ Compliance Tab
❑ Related Specs Tab
❑ Supporting Documents Tab
❑ References Tab
❑ Approval/Audit Trail Tab
Overview
The Delivered Material Packing Specification page consists of the following tabs:
❑
Summary Tab on page 14-2
❑
Compliance Tab on page 14-3
Related Specs Tab on page 14-3
Supporting Documents Tab on page 14-3
References Tab on page 14-4
Approval/Audit Trail Tab on page 14-4
❑
❑
❑
❑
14-1
Agile Product Lifecycle Management for Process
Page-Level Functions
In the upper right corner of the page is a row of buttons that trigger actions that
can affect the entire page. All of these buttons are displayed when the
specification is in read mode. These buttons and their functions are:
❑
Edit —Place the entire page in edit mode so that you can modify it.
❑
(Report) —Depending on the configuration of your Agile PLM for Process
❑
❑
❑
❑
❑
❑
installation, this button may or may not appear (on certain specifications).
Click Report to launch the Reporting application.
Create Copy —Create a new copy of the current delivered material packing
specification. For discussion of this commonly used function, please see
Creating a Copy of an Existing Specification on page 2-1.
Print — Opens a dialog box through which you can print the current
specification in a variety of formats. For more information on printing a
delivered material packing specification, please see Printing Other
Specifications on page 2-19.
Act —Create a primary activity, or mini-workflow, for this specification. For
more information about this function, please see Chapter 20, Activities.
(Appears only if you have editorial control over the specification.)
Item History —Display all issues of the specification that exist in a Spec
History table, along with the reason for creating each issue and other
identifying information. For more information on this feature please see Item
History on page 2-3.
Workflow — Move the current specification, or document, from one
workflow step to another. For more information on workflows, please see
Transitioning a Workflow on page 2-7.
Resolve Workflow —Re-resolve the specification to a workflow (present only
when you are logged in with a user account that has the user role of
[CAN_RERESOLVE_WORKFLOWS].)
Summary Tab
This tab contains the following sections:
❑
Summary Information section —For discussion of this commonly used
section, please see Summary Information Section on page 3-2.
❑
Packing Description section—Described below, at Packing Description Section
on page 14-2.
❑
Approved for Use In section —For discussion of this commonly used section,
please see Approved for Use In Section on page 3-5.
Packing Description Section
Use this section to describe the packing material.
Figure 14-1: Packing Description section
14-2
Global Specification Management User Guide
Chapter 14
Delivered Material Packing Specifications
Compliance Tab
Environmental Waste Section
This section, the only section in the Compliance tab, provides a place to log
known waste materials for this specification material, along with other relevant
attributes required for environmental waste reporting.
Figure 14-2: Environmental Waste section
Related Specs Tab
This tab contains the following sections:
❑
Labeling Specifications —Described below, in Labeling Specifications Section
on page 14-3.
❑
Associated Specifications —For discussion on this commonly used section,
please see Associated Specifications Section on page 3-9.
Labeling Specifications Section
In Labeling Specifications, the only section in the Related Specs tab, you can
associate this specification with one or more labeling specifications that describe
the labeling requirements for delivered items.
Figure 14-3: Labeling Specifications section
Supporting Documents Tab
The Supporting Documents tab contains two sections:
❑
Supporting Documents —The document types available for use are
Attachments/Procedures, URL, and Rich Text. For more information, please
see Supporting Documents Section on page 3-12.
❑
DRL Documents—For discussion of this commonly used section, please see
DRL Documents Section on page 3-18.
14-3
Agile Product Lifecycle Management for Process
References Tab
The References tab includes the following sections:
❑
Activities—For discussion of this commonly used section, please see Activities
Section on page 3-25.
❑
Specification Dependencies—For discussion of this commonly used section,
please see Specification Dependencies Section on page 3-27.
Approval/Audit Trail Tab
For discussion of this tab, please see Approval/Audit Trail Tab on page 2-11.
14-4
Global Specification Management User Guide
C HAPTER 15
Packing Configuration Specifications
This chapter presents an overview of the capabilities of Global Specification Management regarding packing
configuration specifications. Topics in this chapter include:
❑ Page-Level Functions
❑ Summary Tab
❑ Packing Tab
❑ Related Specs Tab
❑ Supporting Documents Tab
❑ References Tab
❑ Approval/Audit Trail Tab
Overview
The Packing Configuration Specification page consists of the following tabs:
❑
Summary Tab on page 15-2
❑
Packing Tab on page 15-3
Related Specs Tab on page 15-4
Supporting Documents Tab on page 15-5
References Tab on page 15-6
Approval/Audit Trail Tab on page 15-6
❑
❑
❑
❑
15-1
Agile Product Lifecycle Management for Process
Page-Level Functions
In the upper right corner of the page is a row of buttons that trigger actions that
can affect the entire page. All of these buttons are displayed when the
specification is in read mode. These buttons and their functions are:
❑
Edit —Place the entire page in edit mode so that you can modify it.
❑
(Report) —Depending on the configuration of your Agile PLM for Process
❑
❑
❑
❑
❑
❑
installation, this button may or may not appear (on certain specifications).
Click Report to launch the Reporting application.
Create Copy —Create a new copy of the current packing configuration
specification. For discussion of this commonly used function, please see
Creating a Copy of an Existing Specification on page 2-1.
Print — Opens a dialog box through which you can print the current
specification in a variety of formats. For more information on printing a
packing configuration specification, please see Printing Other Specifications
on page 2-19.
Act —Create a primary activity, or mini-workflow, for this specification. For
more information about this function, please see Chapter 20, Activities.
(Appears only if you have editorial control over the specification.)
Item History —Display all issues of the specification that exist in a Spec
History table, along with the reason for creating each issue and other
identifying information. For more information on this feature, please see
Item History on page 2-3.
Workflow — Move the current specification, or document, from one
workflow step to another. For more information on workflows, please see
Transitioning a Workflow on page 2-7.
Resolve Workflow —Re-resolve the specification to a workflow (present only
when you are logged in with a user account that has the user role of
[CAN_RERESOLVE_WORKFLOWS].)
Summary Tab
This tab contains the following sections:
❑
Summary Information —For discussion of this commonly used section,
please see Summary Information Section on page 3-2.
❑
Packing Description—Discussed below, at Packing Description Section on
page 15-2.
❑
Cross References—For discussion of this commonly used section, please see
Cross References Section on page 3-3.
Approved for Use In—For discussion of this commonly used section, please
see Approved for Use In Section on page 3-5.
❑
Packing Description Section
Use this section to describe the packing material.
15-2
Global Specification Management User Guide
Chapter 15
Packing Configuration Specifications
Figure 15-1: Packing Description section
Packing Tab
This tab contains the following sections:
❑
Packing Attribute (inner pack)—Discussed below, at Packing Attribute (Inner
Pack) Section on page 15-3.
❑
Packing Attribute (master case)—Discussed below, at Packing Attribute
(Master Case) Section on page 15-3.
Extended Attributes—For discussion of this commonly used section, please
see Extended Attributes Section on page 3-29.
Custom Sections—For discussion of this commonly used section, please see
Custom Sections on page 3-29.
❑
❑
Packing Attribute (Inner Pack) Section
In this section you can capture attributes that describe the inner packing of the
delivered material. For example, if you have a case that contains six smaller bags
of material, this section would describe the bags.
Figure 15-2: Packing Attribute (inner pack) section
Packing Attribute (Master Case) Section
In this section you can capture attributes that describe the master case attributes
of the delivered material. For example, if you have a case that contains six smaller
bags of material, this section would describe the case.
15-3
Agile Product Lifecycle Management for Process
Figure 15-3: Packing Attribute (master case) section
Key fields include:
Packaging Type— Describe the packaging type by selecting from a list of
options.
Related Specs Tab
The Related Specs tab contains the following sections:
❑
Inner-Delivered Material Packing Specifications—Discussed below, at InnerDelivered Packing Specifications Section on page 15-4.
❑
Intermediate-Delivered Material Packing Specifications—Discussed below, at
Intermediate-Delivered Material Packing Specifications Section on page 15-5.
Outer-Delivered Material Packing Specification—Discussed below, at OuterDelivered Material Packing Specification Section on page 15-5.
❑
In the sections in this tab you can further describe the packing configuration by
distinguishing among inner, intermediate, and outer packing materials where
relevant.
Inner-Delivered Packing Specifications Section
In this section you can associate this packing configuration specification with one
or more delivered material packing specifications to describe the inner packing.
Figure 15-4: Inner-Delivered Packing Specifications section
The associated labeling specification numbers display automatically based on
their relationship with the delivered material packing specifications.
15-4
Global Specification Management User Guide
Chapter 15
Packing Configuration Specifications
Intermediate-Delivered Material Packing Specifications Section
In this section you can associate this packing configuration specification with one
or more delivered material packing specifications to describe the intermediate
packing.
Figure 15-5: Intermediate-Delivered Material Packing Specifications section
The associated labeling specification numbers display automatically based on
their relationship with the delivered material packing specifications.
Outer-Delivered Material Packing Specification Section
In this section you can associate this packing configuration specification with one
or more delivered material packing specifications to describe the outer packing.
Figure 15-6: Outer-Delivered Material Packing Specifications section
The associated labeling specification numbers display automatically based on
their relationship with the delivered material packing specifications.
Supporting Documents Tab
The Supporting Documents tab contains two sections:
❑
Supporting Documents —The document types available are Attachments/
Procedures, URL, and Rich Text. For more information, please see Supporting
Documents Tab on page 3-12.
❑
DRL Documents—For discussion of this commonly used section, please see
DRL Documents Section on page 3-18.
15-5
Agile Product Lifecycle Management for Process
References Tab
The References tab includes the following sections:
❑
Activities—For discussion of this commonly used section, please see Activities
Section on page 3-25.
❑
Specification Dependencies—For discussion of this commonly used section,
please see Specification Dependencies Section on page 3-27.
Approval/Audit Trail Tab
For discussion of this tab, please see Approval/Audit Trail Tab on page 2-11.
15-6
Global Specification Management User Guide
C HAPTER 16
Labeling Specifications
This chapter presents an overview of the capabilities of Global Specification Management regarding labeling
specifications. Topics in this chapter include:
❑ Page-Level Functions
❑ Summary Tab
❑ Compliance Tab
❑ Related Specs Tab
❑ Supporting Documents Tab
❑ References Tab
❑ Approval/Audit Trail Tab
Overview
The Labeling Specifications page consists of the following tabs:
❑
Summary Tab on page 16-3
❑
Compliance Tab on page 16-4
Related Specs Tab on page 16-4
Supporting Documents Tab on page 16-4
References Tab on page 16-4
Approval/Audit Trail Tab on page 16-4
❑
❑
❑
❑
16-1
Agile Product Lifecycle Management for Process
Page-Level Functions
In the upper right corner of the page is a row of buttons that trigger actions that
can affect the entire page. All of these buttons are displayed when the
specification is in read mode. These buttons and their functions are:
❑
Edit —Place the entire page in edit mode so that you can modify it.
❑
(Report) —Depending on the configuration of your Agile PLM for Process
❑
❑
❑
❑
❑
❑
16-2
installation, this button may or may not appear (on certain specifications).
Click Report to launch the Reporting application.
Create Copy —Create a new copy of the current labeling specification. For
discussion of this commonly used function, please see Creating a Copy of an
Existing Specification on page 2-1.
Print — Opens a dialog box through which you can print the current
specification in a variety of formats. For more information on printing a trade
specification, please see Printing Other Specifications on page 2-19
Act —Create a primary activity, or mini-workflow, for this specification. For
more information about this function, please see Chapter 20, Activities.
(Appears only if you have editorial control over the specification.)
Item History —Display all issues of the specification that exist in a Spec
History table, along with the reason for creating each issue and other
identifying information. For more information on this feature, please see
Item History on page 2-3.
Workflow — Move the current specification, or document, from one
workflow step to another. For more information on workflows, please see
Transitioning a Workflow on page 2-7.
Resolve Workflow —Re-resolve the specification to a workflow (present only
when you are logged in with a user account that has the user role of
[CAN_RERESOLVE_WORKFLOWS].)
Global Specification Management User Guide
Chapter 16
Labeling Specifications
Summary Tab
The Label Specifications Summary tab contains the following three sections:
❑
❑
❑
Summary Information —For discussion of this commonly used section,
please see Summary Information Section on page 3-2.
Labeling Description—Discussed below, at Labeling Description Section on
page 16-3.
Approved for Use In—For discussion of this commonly used section, please
see Approved for Use In Section on page 3-5.
Labeling Description Section
This section provides a place to describe the labeling requirements for this
specification.
Figure 16-1: Labeling Description section
16-3
Agile Product Lifecycle Management for Process
Compliance Tab
This tab is not currently used but is present for legacy purposes only.
Related Specs Tab
Delivered Material Packing Specifications That Rely on This Specification Section
This section is the only one in the Related Specs tab. Information in this section
is read only so you cannot associate specifications here. The section displays the
associations that have been made to this labeling specification from a delivered
material packing specification.
Figure 16-2: Delivered Material Packing Specifications that rely on this Specification section
Supporting Documents Tab
The Label Specifications Supporting Documents tab consists of three sections:
❑
Attachments —For discussion of this commonly used section, please see
Attachments Section on page 3-22.
❑
Supporting Documents—The only document type available for use in this
section is rich text. For more information, please see Supporting Documents
Section on page 3-12.
❑
DRL Documents—For discussion of this commonly used section, please see
DRL Documents Section on page 3-18.
References Tab
The Label Specifications References tab consists of two sections:
❑
Activities —For discussion of this commonly used section, please see
Activities Section on page 3-25.
❑
Specification Dependencies —For discussion of this commonly used section,
please see Specification Dependencies Section on page 3-27.
Approval/Audit Trail Tab
For discussion of this tab, please see Approval/Audit Trail Tab on page 2-11.
16-4
Global Specification Management User Guide
C HAPTER 17
Master Specifications
This chapter presents an overview of the capabilities of Global Specification Management regarding master
specifications. Topics in this chapter include:
❑ Page-Level Functions
❑ Summary Tab
❑ Applies To Tab
❑ Supporting Documents Tab
❑ Ext Data Tab
❑ References Tab
❑ Approval/Audit Trail Tab
Overview
The Master Specifications page consists of the following tabs:
❑
Summary Tab on page 17-2
❑
Applies To Tab on page 17-3
Supporting Documents Tab on page 17-5
Ext Data Tab on page 17-5
References Tab on page 17-5
Approval/Audit Trail Tab on page 17-5
❑
❑
❑
❑
17-1
Agile Product Lifecycle Management for Process
Page-Level Functions
In the upper right corner of the page is a row of buttons that trigger actions that
can affect the entire page. All of these buttons are displayed when the
specification is in read mode. These buttons and their functions are:
❑
Edit —Place the entire page in edit mode so that you can modify it.
❑
(Report) —Depending on the configuration of your Agile PLM for Process
❑
❑
❑
❑
❑
❑
installation, this button may or may not appear (on certain specifications).
Click Report to launch the Reporting application.
Create Copy —Create a new copy of the current master specification. For
discussion of this commonly used function, please see Creating a Copy of an
Existing Specification on page 2-1.
Print — Opens a dialog box through which you can print the current
specification in a variety of formats. For more information on printing a
master specification, please see Printing Other Specifications on page 2-19.
Act —Create a primary activity, or mini-workflow, for this specification. For
more information about this function, please see Chapter 20, Activities.
(Appears only if you have editorial control over the specification.)
Item History —Display all issues of the specification that exist in a Spec
History table, along with the reason for creating each issue and other
identifying information. For more information on this feature please see Item
History on page 2-3.
Workflow — Move the current specification, or document, from one
workflow step to another. For more information on workflows, please see
Transitioning a Workflow on page 2-7.
Resolve Workflow —Re-resolve the specification to a workflow (present only
when you are logged in with a user account that has the user role of
[CAN_RERESOLVE_WORKFLOWS]).
Summary Tab
The Master Specifications Summary tab consists of the following sections:
❑
❑
❑
Summary Information—For discussion of this commonly used section,
please see Summary Information Section on page 3-2.
Master Description—Discussed below, at Master Description Section on
page 17-2.
Approved for Use In—For discussion of this commonly used section, please
see Approved for Use In Section on page 3-5.
Master Description Section
In this section you can describe the purpose of the master specification, as shown
in figure 17-1 below.
Figure 17-1: Master Description section
17-2
Global Specification Management User Guide
Chapter 17
Master Specifications
Click the alternate wording icon ( ) to provide the description in multiple
languages, as shown in figure 17-2 below.
Figure 17-2: Master Description, alternative text input screen
Applies To Tab
Specification Categories Section
In Specification Categories, the only section in the Applies To tab, you can
associate this master specification to other specifications in the system by
choosing one or more categories that this master specification will automatically
apply to, as shown in figure 17-3, below.
Figure 17-3: Specification Categories section
You can apply specification categories from the highest to the lowest levels of the
specification categories. For example, you can create and apply a master
specification that will automatically apply to the following:
• All ingredient specifications
• Ingredient specifications exclusively for produce
• Ingredient specifications for apples
17-3
Agile Product Lifecycle Management for Process
Note
The business unit on the master specification must be the same on the
associated specification for this master specification to be associated. The
Business Unit field is set in the Approved for Use In section, as discussed
in Available UOM on page 3-4.
Applied master specifications appear on the associated specification in the
master specifications section of that specification. See Master Specifications
Section on page 3-9 for more information.
To apply a specification category:
1 On the Applies To tab, in the upper right of the page, click Edit. GSM reloads
the page in editable mode, showing the Edit Applies To button as shown in
figure 17-3 above.
2 Click Edit Applies To. GSM displays a dialog box with two large fields:
“Currently viewing items from” and “Selected Classifications,” as shown in
figure 17-4 below.
Figure 17-4: The “Edit Applies To” dialog box
3
In the “Currently viewing items from” field, select one specification type.
Note
4
5
17-4
This dialog box does not support multiple-select.
To choose from a preset list of subcategories associated with the selected
specification type, click Next>>. GSM displays the list of subcategories for
your selected specification type. (Continue this process until you arrive at
the subcategory that you need.)
Click Add. Your selected subcategory appears in the “Selected
Classifications” box.
Global Specification Management User Guide
Chapter 17
Master Specifications
6
7
Click Done. GSM closes the dialog box and adds your selections to the list in
the Specification Categories section of the Applies To tab.
Click Save or Save & Close Document.
Note
Master specifications can also be associated explicitly at the specification
level. See Master Specifications Section on page 3-9 for more information.
Supporting Documents Tab
This Supporting Documents tab consists of the following sections:
❑
Attachments —For discussion of this commonly used section, please see
Attachments Section on page 3-22.
❑
Supporting Documents—The only document type available for use in the
Master Specifications Supporting Documents tab is rich text. For more
information, please see Supporting Documents Section on page 3-12.
❑
DRL Documents—For discussion of this commonly used section, please see
DRL Documents Section on page 3-18.
Ext Data Tab
This tab consists of two sections:
❑
Extended Attributes—For discussion of this commonly used section, please
see Extended Attributes Section on page 3-29.
❑
Custom Sections—For discussion of this commonly used section, please see
Custom Sections on page 3-29.
References Tab
For discussion of the Activities section, the only section in the References tab,
please see Activities Section on page 3-25.
Approval/Audit Trail Tab
For discussion of this tab, please see Approval/Audit Trail Tab on page 2-11.
17-5
Agile Product Lifecycle Management for Process
17-6
Global Specification Management User Guide
C HAPTER 18
LIO Profiles
This chapter presents an overview of the capabilities of Global Specification Management regarding LIO
profiles. Topics in this chapter include:
❑ Page-Level Functions
❑ Summary Tab
❑ LIO Construction Tab
❑ Final Statement Tab
❑ Label Composition Tab
Overview
Listed Ingredient Order (LIO) is the tool for labeling administrators to:
❑
View a food or beverage item based on its aggregated labeling composition;
❑
Manage the labeling composition to meet regulatory requirements using
stored rules or manual overrides;
❑
Generate and push the final ingredient statement to a nutrient profile and/or
an ingredient specification so that the broader organization can further
augment and complete the labeling business process.
LIO uses ingredient specification’s percent breakdown and/or combined
ingredient statement to describe labeling composition. This information can be
presented using the top level output or the complete formulation and ingredient
specifications hierarchy to better understand and label a given item.
The LIO Profile page consists of the following tabs:
❑
Summary Tab on page 18-2
❑
LIO Construction Tab on page 18-3
Final Statement Tab on page 18-19
Label Composition Tab on page 18-20
❑
❑
18-1
Agile Product Lifecycle Management for Process
Page-Level Functions
In the upper right corner of the page is a row of buttons that trigger actions that
can affect the entire page. All of these buttons are displayed when the
specification is in read mode. These buttons and their functions include:
❑
Edit —Place the entire page in edit mode so that you can modify it.
Summary Tab
The LIO Profiles Summary tab consists of the following sections:
❑
❑
❑
LIO Profile —Discussed below, at LIO Profile Section on page 18-2.
Output Material Selection—Discussed below, at Output Material Selection
Section on page 18-2.
Nutrient Profile—Discussed below, at Nutrient Profile Section on page 18-3.
LIO Profile Section
Use the LIO Profile section to define the LIO profile.
Figure 18-1: LIO Profile section
Key fields include:
LIO #—Number assigned to the LIO profile by GSM.
LIO Name—Name of the LIO profile. The LIO name will often be very similar to
the trade specification or nutrient profile name as you are usually labeling a
finished good. This field is required.
Output Material Selection Section
Use this section to define which ingredient specification will be used as the basis
for the LIO. Click the Target Specification link to search for the targeted
specification. The “Select Context” drop-down list allows the user to select which
formulation specification to pull the child items from when generating the LIO
tree.
18-2
Global Specification Management User Guide
Chapter 18
LIO Profiles
Figure 18-2: Output Material Selection section
Nutrient Profile Section
This section allows the user to select which nutrient profile will be used if the user
decides to push the LIO data to the ingredient and nutrient profile using the Push
to Spec functionality from the Final Statement tab.
Figure 18-3: Nutrient Profile section
LIO Construction Tab
The LIO Construction tab consists of one section, LIO Construction, described
below. This tab and section is where a labeling administrator will perform a
majority of their work grouping, overriding, formatting and in the end creating
the ingredient statement.
LIO Construction Section
Use this section to build the ingredient statement. In the LIO Construction tab
you can manipulate formula items based on certain constraints imposed by each
item’s underlying specification, LIO profile, and currently selected labeling
restriction.
The first time you open the LIO tab of a profile, the LIO tree does not appear,
because the system will not have generated it yet, as shown in figure 18-4, below.
Figure 18-4: LIO Construction section
18-3
Agile Product Lifecycle Management for Process
To prepare to generate the LIO tree:
1 At the upper right corner of the page, click Edit. GSM reloads the page in
editable mode, as shown in figure 18-5 below.
Figure 18-5: LIO Construction section in edit mode
2
Define the following summary-level information:
• Restrictions
• Format
• Inactive Rows
Restrictions
Restrictions are a configurable list that you can use to differentiate disclosures
and groupings. Restrictions impact two major areas of functionality:
• Component Catalog—For example, in Canada you might be able to
rename “salty beef” to “beef,” but in the United States, because of tighter
regulations around sodium, you could not. By setting the restrictions on
the LIO tree to Canada, you could see disclosures and groupings set up in
the Component Catalog with a restriction of Canada. LIO would be able
to leverage this information to modify the ingredient statement in
Canada to refer to “salty beef” as “beef.” If you were creating an
ingredient statement for the United States, the “salty beef” would have to
be labeled as such. For more information on restrictions, disclosures and
groupings, see Component Catalog on page 22-1.
• Ingredient Breakdown—Similar to the Component Catalog, breakdowns
can contain regional or regulatory differences. Therefore restrictions can
be assigned to breakdowns and then filtered upon when using LIO.
Format
From the Format drop-down list you can choose the level of detail to which the
LIO tree will be created. After you change one of these options, GSM immediately
reformats the Generate LIO and Final Statement fields. There are two options:
• Combined Statement (Level 2)
• Multipart Statement (Level 1)
18-4
Global Specification Management User Guide
Chapter 18
LIO Profiles
Combined Statement (Level 2)—Omit top-level items in the LIO tree. For
example, if you have seasoning that has a percent breakdown of “salt,” “pepper,”
and “cinnamon” and you select this format, the resulting tree will contain salt,
pepper, and cinnamon.
Multi-part Statement (Level 1)—Shows you all the levels in the LIO tree, as
shown in figure figure 18-6, on page 18-6. In the example above, if you selected
the “Multi-part Statement (Level 1)” format, you would see “seasoning” with
“salt,” “pepper,” and “cinnamon” as child items.
Inactive Rows
Use the Inactive Rows field to choose whether the tree will display or hide rows
that are inactive. Hiding inactive rows is especially helpful if you are trying to
pinpoint exactly what data will be shown in the ingredient statement.
Using the LIO Tree
Once you have defined the restrictions, format, and inactive row handling, click
Generate LIO Tree to have the system create the requested tree, as shown in
figure 18-6 below.
18-5
Agile Product Lifecycle Management for Process
Figure 18-6: LIO Tree
GSM displays the tree directly under the inactive row handling information and
will display the entire formula tree.
Each item within the tree represents a material that may be considered for
inclusion in the final ingredient statement. Each LIO item is represented by an
icon indicating its type and current method of disclosure and includes its relative
percent composition (yield based) within the final formula.
In the LIO tree, you can right-click an individual LIO item to reveal a number of
declaration options/actions that you can use during LIO construction, as shown
in figure 18-7 below.
18-6
Global Specification Management User Guide
Chapter 18
LIO Profiles
Figure 18-7: LIO right-mouse menu
These options are contextual based on the type of item selected and the data
inherited from its underlying specification, LIO profile, and the currently
selected labeling restrictions. Using the described options/actions, you can build
your ingredient statement.
18-7
Agile Product Lifecycle Management for Process
Declaration Options and Actions
The table below describes the various presentations/methods for disclosing each
LIO item and the corresponding declaration options and actions available:
Table 18-1: Declaration options/actions
Icon Current Method for Disclosure
Declaration Options/Actions
Base level for LIO authoring
(does not appear in LIO)
Perform Action > Add new Group
Ingredient that is listed as a single item in
the LIO
Perform Action > View
Perform Action > Add new Group
Perform Action > Recon/Equiv
Perform Action > Rename Item
Perform Action > Annotate
Perform Action > Audit/History
Perform Action > Divide
Item Name
Ingredient Statement
Do NOT Declare
Ingredient that is broken out into separate Perform Action > View
subitems in the LIO
Perform Action > Add new Group
Perform Action > Recon/Equiv
Perform Action > Rename Item
Perform Action > Annotate
Perform Action > Audit/History
Perform Action > Divide
Item Name
Ingredient Statement
Breakdown List ... x, y
Breakdown List …i(x,y)
Breakdown List …i(x%,y%)
Context List …x,y
Context List …i(x,y)
Context List …i(x%,y%)
Ingredient that is flagged as “Do NOT
Declare” and will not appear in the LIO
18-8
Perform Action > View
Perform Action > Add new Group
Perform Action > Rename Item
Perform Action > Annotate
Perform Action > Audit/History
Perform Action > Divide
Item Name
Ingredient Statement
Do NOT Declare
Global Specification Management User Guide
Chapter 18
LIO Profiles
Table 18-1: Declaration options/actions (continued)
Icon Current Method for Disclosure
Declaration Options/Actions
Component that is listed as a single item in Perform Action > View
the LIO
Perform Action > Refer to Component
Catalog
Perform Action > Rename Item
Perform Action > Annotate
Perform Action > Audit/History
Perform Action > Divide
Item Name
Do NOT Declare
Component that is listed as a single item in Perform Action > View
the LIO and whose title has been manually Perform Action > Refer to Component
edited
Catalog
Perform Action > Rename Item
Perform Action > Annotate
Perform Action > Audit/History
Perform Action > Divide
Item Name
Do NOT Declare
Component that is flagged as “Do NOT
Declare” and will not appear in the LIO
Perform Action > View
Perform Action > Refer to Component
Catalog
Perform Action > Rename Item
Perform Action > Annotate
Perform Action > Audit/History
Perform Action > Divide
Item Name
Do NOT Declare
Group that has been added during the LIO Perform Action > Add new Group
process
Perform Action > Rename Item
Perform Action > Delete Group
Perform Action > Annotate
Perform Action > Audit/History
Perform Action > Divide
Item Name
List ... x, y
List ... i (x, y)
List ... i (x%, y%)
Do NOT Declare
18-9
Agile Product Lifecycle Management for Process
Right Menu Actions
View
In the case of ingredients, click View to refer to the corresponding specification in
GSM. In the case of Component Catalog components, click View to refer to the
corresponding Component Profile of the item.
Add New Group
Click this menu option to create a new group directly under the current item.
Once the group is created, you can delete it (if empty) or relocate it via drag-anddrop.
Refer to FIC
Click this menu option to consider other options for disclosure based on the
Component Catalog profile of the current item.
18-10
Global Specification Management User Guide
Chapter 18
LIO Profiles
Recon/Equiv
Click this menu option to work with reconstitution and equivalency factors that
will adjust the moisture content of the current item. Initially, GSM will display
the dialog box shown in figure 18-8 below:
Figure 18-8: Reconstitute Items, moisture
From this dialog box you can manually adjust the moisture content for the
selected item. To do so, first define a target “%Water” or “Factor,” and then
declare one or more items from which to source the moisture. If one or more
conversion factors have been previously defined for the current item, you can
access/select a predefined factor by clicking the import data icon ( ), which
GSM will display to the right of the field in the Reconstitute Item column. Click
the icon to open the dialog box shown in figure 18-9 below.
Figure 18-9: Reconstitution/Equivalency
The Reconstitution/Equivalency Options for a given item are managed within
the item’s corresponding LIO profile. GSM will use the selected factor/target %
to populate the matrix as shown in figure 18-10 below.
18-11
Agile Product Lifecycle Management for Process
Figure 18-10: Reconstitute Items with Source Item table
Enter the source from which to get the water necessary for performing the
reconstitution and click Done. The results of your reconstitution appear in the
LIO tree.
Delete Group
Click this menu option to delete the selected group. You can delete a group only
if it has no subitems.
Annotate
18-12
Global Specification Management User Guide
Chapter 18
LIO Profiles
Click this menu option to add a narrative comment to the item. Annotations are
typically used to provide additional explanation/rationale to help others
understand the decisions made during the LIO process. Any item containing an
annotation will be denoted with a special icon in the left margin of the LIO tree,
as shown in figure 18-11 below.
Figure 18-11: Annotation
Audit History
Click this menu option to get an accounting of the current disclosure method and
any relevant actions that have been performed against the selected item. GSM
displays a dialog box as shown in figure 18-12 below.
18-13
Agile Product Lifecycle Management for Process
Figure 18-12: Audit/History dialog box
Note
The Action Performed column of the Audit/History dialog box will be
recorded in the user’s currently selected language and will not be language
aware.
Divide
Click this menu option to create a new instance of the current item based on a
percent or quantity of the original item (that is, to split an item into two separate
instances). GSM prompts you to indicate a percentage or a quantity. Once you
have created the new item, it will appear at the same level as the original item in
the LIO hierarchy and you can move it via drag-and-drop to another area. Any
item affected by a “divide” action will be flagged with a special divide icon ( )
in the LIO tree view margin.
18-14
Global Specification Management User Guide
Chapter 18
LIO Profiles
Declaration Descriptions
Item Name
Click this option to list the item as a single entry in the LIO using the default
name of the current item.
Ingredient Statement
Click this option to list the item as a single entry in the LIO using the ingredient
statement of the current item (if available).
List... x, y
Click this option to suppress the current item in the LIO disclosure and create
individual entries for each lower level item, that is, “item one, item two, item
three.” For ingredients with multiple %Breakdown values and/or formulation
specification contexts, there may be multiple options (the term “List” is replaced
with the first 25 characters of each corresponding %Breakdown value or
formulation specification name, for example, “From Supplier... x, y,” “Canada
Only ... x, y,” and so on).
List... i (x, y)
Click this option to disclose as a combined statement using the current item and
its lower-level items, that is, “Item Name (item one, item two, item three)”. For
ingredients with multiple %Breakdown values and/or formulation specification
contexts, there may be multiple options (the term “List” is replaced with the first
25 characters of each corresponding %Breakdown value or formulation
specification name, for example, “From Supplier... i (x, y),”
“Canada Only... i (x y),” and so on).
List... i (x%, y%)
Click this option to disclose as a combined statement with percentage using the
current item and its lower-level items, for example, “Item Name (item one 50%,
item two 25%, item three 25%).” For ingredients with multiple %Breakdown
values and/or formulation specification contexts, there may be multiple options
(the term “List” is replaced with the first 25 characters of each corresponding
%Breakdown value or formulation specification name, for example, “From
Supplier ... i (x%, y%),” “Canada Only ... i (x%, y%),” and so on).
Do NOT Declare
Click this option to not disclose this item in the LIO. Items marked as “Do NOT
Declare” will not appear in the final ingredient statement.
18-15
Agile Product Lifecycle Management for Process
LIO Operations
During the LIO process, you can perform a number of operations using the row
of buttons beneath the LIO tree view, shown in figure 18-13 below.
Figure 18-13: LIO Operations buttons
Refresh Operation
For performance reasons, many of the declaration options and actions are not
executed immediately within the LIO tree view. Click Refresh to perform
multiple actions before posting the tree view back to the server for rendering.
Once a Declaration Option/Action has been selected, the affected LIO item will
be flagged to inform you that a change will occur upon the next refresh. When
you click Refresh, GSM posts the tree view back to the server for processing and
re-renders it to reflect the desired changes.
Preview Operation
When you click Preview, GSM opens a dialog box with a table in it, shown in
figure 18-14 below. This table indicates the order in which each LIO item will
appear in the final ingredient statement.
Figure 18-14: Preview
In addition, the Preview section shows the adjusted percent yield of each item
(based on suppressed items) and its relative weight/volume per serving.
18-16
Global Specification Management User Guide
Chapter 18
LIO Profiles
Note
The preview will automatically combine like items (including group
designations) based on LIO item name in the currently selected language.
Alias/FIC Operation
Click Alias/FIC to open the aliasing dialog box shown in figure 18-15 below.
Figure 18-15: Aliasing dialog box
The aliasing dialog box provides you with options for aliasing based on the
labeling rules of each item derived from its corresponding Component Catalog
Profile and its disclosures. GSM filters disclosure options based on matching
restrictions and displays them in order of priority (also defined within the FIC
Profile). See Chapter 22, Component Catalog, for more information.
Grouping Operation
Click Grouping to display the grouping dialog box shown in figure 18-16 below.
Figure 18-16: Grouping dialog box
18-17
Agile Product Lifecycle Management for Process
The grouping dialog box provides you with options for grouping based on each
the labeling rules of each item derived from its corresponding FIC Profile and its
groupings. GSM filters grouping options based on matching restrictions and
displays them in order of priority (also defined within the FIC Profile). See
Chapter 22, Component Catalog, for more information.
Note
You can manually group LIO items using the drag-and-drop feature.
Audit Operation
Similarly to the preview operation, the audit operation opens a dialog box with a
table that denotes the percent composition of each item with an accounting of the
current disclosure method and any relevant actions that have been performed
against that item (see figure 18-17 below).
Figure 18-17: Audit Operation
Note
The “High Level Action” column of the Audit/History table will be
recorded in English and will not be language aware.
Once you have performed all required actions on your tree, click the Final
Statement tab to finalize your ingredient statement.
18-18
Global Specification Management User Guide
Chapter 18
LIO Profiles
Final Statement Tab
This Final Statement tab consists of the following sections:
❑
Ingredient Statement Options —Discussed below, at Ingredient Statement
Options Section on page 18-19.
❑
Final Ingredient Statement—Discussed below, at Final Ingredient Statement
Section on page 18-20.
In the Final Statement tab you can further edit the generated statement for final
label production. Once you have completed the LIO construction process, you
can produce and edit the final ingredient statement using features found within
the tab, then push the changes to the specification.
Ingredient Statement Options Section
Figure 18-18: Ingredient Statement Options section
When editing the final statement, you can modify the statement using the
Format, Style, and Other fields.
Format Field
GSM supports the following formats:
Multi-part Statement (level 1)—Creates a multi-part statement using level one
items as primary headers
Combined Statement (level 2)—Creates a single, combined statement using all
items beginning at level 2 within the LIO hierarchy
Style Field
GSM supports the following styles:
Columnar—Arranges the final statement in a columnar list, separating each item
with a new line
Columnar - Uppercase—Arranges the final statement in a columnar list,
separating each item with a new line, and converts all text to upper case
Linear—Arranges the final statement as a linear paragraph
Linear - Uppercase—Arranges the final statement as a linear paragraph and
converts all text to upper case
Contains Less than 2% of...—Inserts “Contains Less than 2% of:” at the
appropriate point in the statement based on the percent composition of each
item
18-19
Agile Product Lifecycle Management for Process
Contains Less than 3% of...—Inserts “Contains Less than 3% of:” at the
appropriate point in the statement based on the percent composition of each
item
Once you have set the fields in the Ingredient Statement Options section and the
generated LIO is displayed, you can click Copy/Edit to move the generated
statement into the Final Statement page. At that time you can make any manual
adjustments that are necessary.
Final Ingredient Statement Section
Use this section to review the ingredient statement, perform final editing, and
push the changes to the specification.
Figure 18-19: Final Ingredient Statement section
Label Composition Tab
If you have created a label composition in the Listed Ingredient Order (LIO) tool
and have transferred it to the nutrient profile, then this tab displays the label
composition.
Note
This tab is enabled using the following configuration:
GSM.LabelComposition.Enabled
Label Composition, the sole section in the Label Composition tab, displays the
composition of the specification for labeling purposes. This information can be
pushed to the nutrient profile from the LIO process. The data pushed to the
Nutrient Profile is read only.
18-20
Global Specification Management User Guide
Chapter 18
LIO Profiles
Figure 18-20: Label Composition section
18-21
Agile Product Lifecycle Management for Process
18-22
Global Specification Management User Guide
C HAPTER 19
Testing Protocol Library
This chapter describes the purpose and use of the Testing Protocol Library of Global Specification
Management. Topics in this chapter include:
❑ Page-Level Functions
❑ Testing Protocol (Header) Section
❑ Facility Information Section
❑ Sections Section
❑ Extended Attributes Section
❑ Testing Protocol (Detail) Section
Overview
The Testing Protocol Library is a centralized location where you can document
and manage quality and sampling procedures. Procedures are documented in
GSM for specifications. Therefore you can capture protocols for raw materials
(ingredients, products, packaging, printed packaging), work in process
(ingredients and formulation), and finished goods (menu and trade).
Testing Protocols are then utilized in Product Quality Scorecard’s Scorecards to
assist in determining the quality of a specification.
A Testing Protocol can be created using one of two approaches:
❑
Global (via Library)—These testing protocols are global in scope and can be
applied to many specifications. The protocols are created and maintained via
the Testing Protocol Library and applied from a given specification by
“Pulling from Library”.
❑
Spec (via Specification)—Testing protocols created from an individual
specification are limited in scope to that specification. You can view them in
the library but cannot edit them from the library, as they are owned by the
specification and can only be edited from that specification.
19-1
Agile Product Lifecycle Management for Process
Page-Level Functions
In the upper right corner of the page is a row of buttons that trigger actions that
can affect the entire page. All of these buttons are displayed when the
specification is in read mode. These buttons and their functions are:
❑
Edit —Place the entire page in edit mode so that you can modify it.
❑
(Report) —Depending on the configuration of your Agile PLM for Process
❑
❑
installation, this button may or may not appear. Click Report to launch the
Reporting application.
Create New Copy —Create a new copy of the current testing protocol.
Validate —Validates the testing protocol to ensure key data has been entered
corrected. Validation uses customer rules that must be built as part of an
implementation.
Testing Protocol Detail
In the testing protocol you can define and categorize quality attributes to
measure and the scoring method to use in evaluating the results. You can access
the testing protocol library from the GSM left navigation panel.
Testing Protocol (Header) Section
This section captures information pertaining to the testing protocol such as
name, description, and status. The Status field controls whether or not you can
use the protocol on specifications. The only testing protocols that you can add to
a specification are those with a status of “active.”
Figure 19-1: Testing Protocol (Header) section
19-2
Global Specification Management User Guide
Chapter 19
Testing Protocol Library
Facility Information Section
Some protocols are closely associated to facilities due to equipment or geography.
In this section you can specify a set of facilities that you intend for this protocol
to test.
Figure 19-2: Facility Information section
Sections Section
In this section you can define a section for your protocol in which to group
testing attributes for scoring. You can apply a scoring method and weight to each
section to describe how GSM scores these attributes in the testing system.
Figure 19-3: Sections section
19-3
Agile Product Lifecycle Management for Process
Extended Attributes Section
Extended attributes define important features and characteristics of the testing
protocol. You can build these attributes to meet specific needs, as shown in the
figure below.
Figure 19-4: Extended Attributes section
Testing Protocol (Detail) Section
In this section you can define which properties of the specification to test in this
protocol and the details around the definition and scoring of the tests. You can
add a number of extended attributes and define the testing parameters for each.
To edit any data in this table, click Edit at the upper right of the page. GSM reloads
the page in editable form and displays an edit icon (
) to the left of each
editable row in the table. In the row to edit, click the edit icon. GSM reloads the
page, displaying the row in editable mode (with a yellow background), including
the apply changes icon ( ), the undo icon ( ), the delete icon ( ), and an add
data icon ( ) in the Property Description, Scoring, and Protocol ID columns, as
shown in figure 19-5, below.
19-4
Global Specification Management User Guide
Chapter 19
Testing Protocol Library
Figure 19-5: Testing Protocol (Detail) section
Key fields include:
Property Description/Section —Click the add data icon (
). If the item is an
analytical property, GSM opens a search form with which you can select a
different property description. From the Section drop-down list, choose a section
defined above to categorize which section this testing item belongs to. If the item
is an extended attribute, then it opens up a multi-select dialog box with active
extended attributes for testing protocols.
Specification Limits —Define target, upper, and lower bounds for this test as
well as a unit of measure.
Scoring —Set up the scoring for the item in this subsection. This field defines
how to score this item in the testing system. Click the add data icon ( ) in this
column to open the Scoring dialog box, from which you can make your
selections, as shown in figure 19-6 below.
19-5
Agile Product Lifecycle Management for Process
Figure 19-6: Scoring dialog box
If you intend to use the testing protocol in PQS, then select “Qualitative” from
the Record As drop-down list, as shown in figure 19-7, below.
Figure 19-7: Record As drop-down list
(For more information of PQS, please see the Agile Product Lifecycle Management
for Process Product Quality Scorecard User Guide.) If you have the applicable
administrative permissions, you can create observations that enable scorers to
comment based on an administered list of options, as shown in figure 19-8,
below.
19-6
Global Specification Management User Guide
Chapter 19
Testing Protocol Library
Figure 19-8: Scoring column with data
Protocol ID —Describes how frequently to perform this test. Click the add data
icon ( ) in this column to display a dialog box in which to input test frequencies,
as shown in figure 19-9, below. Use the apply changes icon ( ) to confirm new
additions, and click Done in the upper right of the dialog box to close it and
display your additions in the table.
Figure 19-9: Setting Protocol IDs and frequency
19-7
Agile Product Lifecycle Management for Process
19-8
Global Specification Management User Guide
C HAPTER 20
Activities
This chapter describes the purpose and use of the activities feature of Global Specification Management.
Topics in this chapter include:
❑ Creating an Activity
❑ Searching for an Activity
❑ Summary Tab
❑ Supporting Documents Tab
❑ Ext Data Tab
❑ References Tab
❑ Approval/Audit Trail Tab
Overview
An activity is a workflow enabled object that can be used with other specifications
or objects. Activities can be useful in the following scenarios:
❑
Managing Parallel Work—As an ingredient specification is moving through
its workflow a user may choose to launch a nutritional review. This review can
be modeled as a GSM activity working in parallel with the ingredient
specification’s workflow. In addition you can choose to create a linkage
between the activity and the specification to support business rules such as, “A
specification cannot move to an “Approved” status if a nutritional review has
been initiated and has not yet been completed.”
❑
Managing A Group Of Activities—A given activity can be linked to one or
many specifications or objects. This is useful if there is a single approval for all
objects. Examples include: Linking multiple smart issue requests to an activity
for approval or linking a number of specifications where a similar change
must be performed.
Providing A Notification To Specification Readers—Activities can be
configured to provide an informational notification when users open a
specification for reading. These notifications may be of value if a temporary
condition exists impacting a group of specifications or an impending change
is being considered.
Activities are based on workflow templates managed in the Workflow
Administration application (WFA). For more on WFA, please see the Agile
Product Lifecycle for Process Administrator User Guide.
❑
❑
20-1
Agile Product Lifecycle Management for Process
The Activity page consists of the following tabs:
❑
Summary Tab on page 20-4
❑
Supporting Documents Tab on page 20-7
❑
Ext Data Tab on page 20-7
References Tab on page 20-7
Approval/Audit Trail Tab on page 20-7
❑
❑
An activity is an additional workflow that may be tied to a specification. Activities
are based on workflow templates managed in the Workflow Administration
application (WFA). For more on WFA, please see the Agile Product Lifecycle for
Process Administrator User Guide.
Creating an Activity
You can create an activity from within Global Specification Management (GSM)
in two ways:
❑
Primary Relationship—A user can create an activity directly from another
specification. We refer to this relationship as a Primary Relationship where
the activity has a unique relationship to the originating specification.
❑
Related Relationship—A user can create a standalone activity and link it to
one or more specifications or objects. We refer to this relationship as a
Related Relationship and consider it to be generic in nature.
Creating a Primary Relationship from a Specification
You can create a primary relationship from an existing specification in GSM.
To create a primary relationship from an existing specification:
1 Access the specification to tie the activity to and click Act at the top right of
the page. GSM displays an activity, opened to the Summary tab. By creating
the activity in this manner, the activity has a primary relationship to the
specification from which it originated.
2 Type a title for the activity in the Activity Title field.
3 Click the hyperlinked Activity Type field label. A dialog box opens . Via this
dialog box users select an activity workflow that will be used to manage the
activity. The activity workflows are organized and presented by GSM
business unit (BU). Please note, activities do not resolve to workflows
similar to other specification types.
4 Select an application type from the list of types in that dialog box and click
Done at the top right. The box closes and your selection appears in the
Application Type field.
5 Continue filling out all required fields and any others that you wish to use as
listed in the Summary Tab, Supporting Documents Tab, Ext Data Tab, and
References Tab sections, later in this chapter.
6 Click Save or Save & Close Document at the top right of the activity page.
20-2
Global Specification Management User Guide
Chapter 20
Activities
Creating an Activity That Is Independent of Specifications
If you have the necessary user role, you can create an activity that is independent
of an individual specification. You must use the Create New button on the
Activities search page in order to create an activity of this type.
To create a specification-independent activity:
1 From within GSM, click Activities on the left navigation panel. The Activities
page displays.
2 Click Create New at the top right of the page. GSM displays an empty activity
page opened to its Summary tab, as shown in figure 20-1 below.
Figure 20-1: Empty activity creation page
3
Follow the same steps as in the procedure for specification-dependent
activities as described above (step 2 through step 6), keeping in mind that a
specification-independent activity contains no Primary Action Item section.
Searching for an Activity
From the Activities option on the left navigation panel, you can also search for an
existing activity.
To search for an existing activity:
1 Click Activities on the left navigation menu. The Activities search page loads.
2 From the leftmost drop-down list, select a key field to search on.
20-3
Agile Product Lifecycle Management for Process
3
4
5
6
From the middle drop-down list, select an operator, for example,
“Contains,” “Equals,” or “Starts With.”
In the rightmost drop-down list, select a search term, either by typing or by
using the subsearch dialog box that is available if an add data icon ( )
appears to the left of the field.
Under the search form, click Search. GSM runs the query and reloads the
page, showing your search results in a Search Results section.
Click the hyperlinked activity number of the activity to view. GSM opens the
activity page, defaulting to the Summary tab.
Note
For more detailed guidance on using the search form, please see
Understanding the Search Form on page 1-4.
Summary Tab
The Activity Summary tab contains the following sections:
❑
Activity Summary—Discussed below, at Activity Summary Section on
page 20-4
❑
Primary Action Item—Discussed below, at Primary Action Item Section on
page 20-5 (for specification-dependent activities only)
Related Items—Discussed below, at Related Items Section on page 20-6
❑
Activity Summary Section
The Activity Summary section contains the identifying information for the
activity and specifies which workflow template the activity is following.
Figure 20-2: Activity Summary section
Key fields include:
Activity Title —Identifies the activity by name (required field).
Activity # —Identifies the activity by number (system-defined field).
20-4
Global Specification Management User Guide
Chapter 20
Activities
Notify Specification Reader of this activity—When checked, a notification
panel will appear on the primary and/or related specification(s) informing the
user that the activity exists. This panel will appear when the user opens the
specification; the panel will disappear once the user places the specification in
edit mode or switches tabs.
Effective—The date the activity becomes active. This date controls when the
activity appears in the activity reference section on a related specification. This
date is not available on a primary activity (an activity created from and possibly
dependent on a specification).
Inactive—The date the activity expires. This date controls when the activity is
removed from the activity reference section on a related specification. If the
inactive date is not set, then the activity will never expire and always appear on
the specification(s). This date is not available on a primary activity (an activity
created from and possibly dependent on a specification).
Note
For either of the effective or inactive dates to control visibility of the
activity on the related specification(s), you must have the “Reference this
Activity on the above Specifications” checkbox selected. For more
information, see Related Items Section on page 20-6.
Activity Type —Link the activity to an activity workflow template (required
field). Your workflow administrator manages activity workflow templates using
the Workflow Administration application (WFA).
Note
For more information on managing workflow templates in WFA, please
see the “Using WFA to Manage GSM Workflows” chapter in the Agile
Product Lifecycle for Process Administrator User Guide.
Originator —Identify the person who created the activity (system-defined field).
Status —WFA template-defined field displaying the workflow step that the
activity is currently in.
Primary Action Item Section
The Primary Action Item section describes the specification participating in the
primary relationship with the activity and allows users to create a dependency
between the activity and the primary specification or item name.
Note
This section appears only in activities that are tied to a specific
specification. It does not appear when you are creating a new specificationindependent activity.
20-5
Agile Product Lifecycle Management for Process
Figure 20-3: Primary Action Item section
Key fields include:
Item Name —Displays the name and number of the specification that the activity
is tied to, hyperlinked to that specification.
Process Dependency —Users choose whether to create a relationship between
an activity workflow status and a specification workflow status. If a dependency
is in place, the specification cannot move forward into a designated specification
workflow status unless the activity first moves forward into the designated
activity workflow status.
Related Items Section
The related items section contains the specifications participating in a related
relationship to this activity. You can add one or more specifications and/or
objects to this section.
Note
Activities participating in a related relationship will not appear in a
specification’s Activities section unless you select “Reference this Activity
on the above Specifications”.
Figure 20-4: Related Items section
20-6
Global Specification Management User Guide
Chapter 20
Activities
Supporting Documents Tab
The Supporting Documents tab contains the following sections:
❑
Supporting Documents —The document types available are attachments/
procedures, URL, and rich text. For more information, please see
Attachments/Procedures Document Type on page 3-14 and Rich Text
Document Type on page 3-16.
❑
DRL Documents—For discussion of this commonly used section, please see
DRL Documents Section on page 3-18.
Ext Data Tab
The Ext Data tab can contain an Extended Attributes section, one or more
custom sections, or it can be empty.
❑
Extended Attributes—For discussion of this commonly used section, please
see Extended Attributes Section on page 3-29.
❑
Custom Sections—For discussion of this commonly used section, please see
Custom Sections on page 3-29.
References Tab
The Reference tab presents a list of primary and related activity relationships.
Similar to other specification types, activities can participate in these
relationships with other activities. Therefore a user can nest activities and view
the relationships via this tab.
Approval/Audit Trail Tab
For discussion of this tab, please see Approval/Audit Trail Tab on page 2-11.
20-7
Agile Product Lifecycle Management for Process
20-8
Global Specification Management User Guide
C HAPTER 21
Using Change Management Features
This chapter discusses the Change Management activities used to manage specifications. Topics in this
chapter include:
❑ Global Succession Tool
❑ Smart Issue Tool
Overview
The Change Management feature provides tools for efficiently managing GSM
specifications and for approving the modifications to specifications. The Change
Management submenu in GSM is shown in figure 21-1 below.
Figure 21-1: Change Management submenu
Two tools are available:
❑
Global Succession Tool on page 21-1—Globally replace specifications without
versioning the specifications
❑
Smart Issue Tool on page 21-8—Replace and version specifications
Global Succession Tool
As an Agile PLM for Process administrator, from time to time you may need to
globally replace specifications without versioning the host specifications. The
Global Succession tool is designed to assist you in making non-material changes
to relevant specifications in your Agile PLM for Process database. In this case,
“non-material” refers to changes that do not affect the composition or labelling
of the finished good.
Using this tool, you can request, tailor, approve, and execute (on a scheduled
basis) mass changes affecting any number of product hierarchies. You can tailor
the scope of target specifications (affected specifications) as required. Mass
changes using this tool are not an all-or-nothing proposition; they are a kind of
“find and replace” function.
21-1
Agile Product Lifecycle Management for Process
Caution!
Because this tool enables such sweeping changes, typically only an
administrator with the highest security level will have access to it. Two
roles are associated with the Global Succession tool:
[SUCCESSION_REQUEST_EDITOR]—Allows the user to edit and
run global succession requests.
[SUCCESSION_REQUEST_READER]—Allows the ability to search
and view global succession requests.
Table 21-1: Supported changes
21-2
Specification to Replace
Host Specification
Ingredient specification
Formulation Inputs and Alternate Inputs
Ingredient specification
Trade Specifications
Master specification
Equipment, Formulation, Ingredient, Menu
Item, Packaging Material, Printed Packaging,
Product, and Trade specifications
Menu Item specification
Menu Item specification
Packaging Material specification
Formulation Inputs and Alternate Inputs
Packaging Material specification
Trade Packaging Materials and Alternate
Packaging Materials
Printed Packaging specification
Formulation Inputs and Alternate Inputs
Printed Packaging specification
Trade Packaging Materials and Alternate
Packaging Materials
Product
Menu Item specification
Global Specification Management User Guide
Chapter 21
Using Change Management Features
Accessing the Global Succession Tool
Access the Global Succession tool as described in the procedure below.
To access the Global Succession tool:
1 Click GSM > Change Management > Global Succession. Agile PLM displays a
Global Successions search page with a Create New button in the top right, as
shown in figure 21-2 below.
Figure 21-2: Global Succession search page
Finding the Specifications to Supersede
The process of identifying the specifications to supersede and the specification to
replace them with includes these basic steps:
❑
❑
❑
❑
Narrowing down the list of specifications
Selecting the individual specifications to replace
Executing the global succession
Verifying the change
To narrow down the list of specifications:
1 Before entering search criteria, at the upper right of the Global Successions
page, click Create New. A Select Specification Type dialog box appears, as
shown in figure 21-3 below.
Figure 21-3: Global Successions Select Specification Type dialog box
21-3
Agile Product Lifecycle Management for Process
2
3
4
From the Select Specification Type drop-down list, select the type of
specification you are going to supersede.
Click the Spec To Supersede hyperlink to display a search form in a dialog
box.
Use that search form to locate the specification you are going to replace and
click that specification in the search results list (see figure 21-4, below).
Figure 21-4: Spec to Supersede search results
The search box closes, and your selection displays in the Select Specification
Type dialog box. The New Specification field label is now hyperlinked, as
shown in figure 21-5, on page 21-5.
5
21-4
Click the New Specification hyperlink to display a search form in a dialog
box.
Global Specification Management User Guide
Chapter 21
Using Change Management Features
6
As above, use that search form to locate the new specification and select it.
The search box closes and the new specification displays in the Select
Specification Type dialog box, as shown in figure 21-5.
Figure 21-5: Global Succession Select Specification Type dialog box after selecting a specification to supersede and a new specification to succeed the old one with
7
8
Select the parent specification type from the drop-down box with that name.
The parent specification type will help further filter out your search results.
For example, shown in the screen above, the system will find all trade
specifications that use Packaging A as an input and replace that input with
the Packaging B specification.
Enter a description of the global succession in the Reason for Change field,
and click Done. The Global Successions tool queries the database and returns
a list of target specifications on which you can perform a succession, as
shown in figure 21-6.
Figure 21-6: Global Successions page showing Target Specifications section
You have now narrowed down the list of specifications to choose from and are
ready to choose individual specifications to replace.
21-5
Agile Product Lifecycle Management for Process
Performing the Global Succession
You can now select specifications to replace.
To select and replace individual specifications:
1 On the Global Successions page with the narrowed-down list of
specifications in the Target Specifications section, click Edit. The page
reloads in editable mode, showing the Select All, Unselect All, and Run
Global Succession buttons, as shown in figure 21-7 below.
Figure 21-7: Available buttons at the bottom of the Global Successions Target Specifications section in editable mode
2
In the Target Specifications table, check the box next to each specification to
replace and then click Run Global Succession. The tool replaces all selected
specifications with the new specification and reloads the page showing the
checked specifications and a status of “Complete,” as shown in figure 21-8
below.
Figure 21-8: After a successful global succession request
The checked boxes represent specifications that have been replaced. The
boxes are now dimmed, indicating the succession request is complete. To
replace more specifications, run another global succession.
21-6
Global Specification Management User Guide
Chapter 21
Using Change Management Features
Verifying the Succession
To verify that the change has been made:
1 Find one of the targeted specifications in GSM, as explained in the
procedure beginning on page 21-3.
2 Click the Approval/Audit Trail tab.
3 Look in the Event History table for a notation stating that the global
succession was executed, as shown in figure 21-9 below.
Figure 21-9: Approval/Audit Trail tab, Event History section showing a record of a successful global succession
21-7
Agile Product Lifecycle Management for Process
Smart Issue Tool
The Smart Issue tool allows you to create issues of entire hierarchies of
specifications. You are able to just issue the hierarchy only, or replace
specifications when issuing.
For example, you have a finished good hierarchy where you want to replace
Packaging A with Packaging B. When smart issue is complete, you’ll see that the
entire trade specification hierarchy attached to Packaging A is issued and
Packaging B is attached to the new version of the hierarchy.
Figure 21-10: Smart Issue packaging trade specification example
Use the Smart Issue tool to:
• Version a hierarchy only
• Replace one specification with another, without specifying a parent
• Replace one specification with another, while specifying a parent
The following specification types are supported:
Table 21-2: Affected specifications
21-8
Specification Type to Add or Remove
Parent Specification Type
Trade
Trade
Ingredient
Trade
Ingredient
Formulation Inputs and Alternate Inputs
Packaging/Printed Packaging
Formulation Inputs and Alternate Inputs
Packaging/Printed Packaging
Trade Packaging Materials and Alternate
Packaging Materials
Packaging/Printed Packaging
Menu Packaging Materials and Alternate
Packaging Materials
Menu Item
Menu Item
Product
Menu Item
Global Specification Management User Guide
Chapter 21
Using Change Management Features
Caution!
Because this tool enables such sweeping changes, typically only an
administrator with the highest security level will have access to it. Three
roles are associated with the Smart Issue tool:
[SMART_ISSUE_CREATOR]— Allows the user to create smart issue
requests.
[SMART_ISSUE_EDITOR] — Allows the user to edit and run smart
issue requests.
[SMART_ISSUE_READER] — Allows the ability to search and view
smart issue requests.
Note
Additional security can be placed on the smart issue request itself by
leveraging the Private and additional readers fields. This ability is
explained further in this chapter.
Accessing the Smart Issue Tool
Access the Smart Issue tool as described in the procedure below.
To access the Smart Issue tool:
1 Click GSM > Change Management > Smart Issue. Agile PLM displays the
Smart Issue search page with a Create Request button in the top right, as
shown in figure 21-11 below.
Figure 21-11: Smart Issue search page
2
At the upper right of the Smart Issue page, click Create Request. The Smart
Issue page displays, as shown in figure 21-12 below.
21-9
Agile Product Lifecycle Management for Process
Figure 21-12: Smart Issue page
21-10
Global Specification Management User Guide
Chapter 21
Using Change Management Features
The tabs on the Smart Issue page include:
• Summary—Defines the smart issue request and the users and groups
able to view and edit it.
• Detail—Designates the specifications impacted by the smart issue
request.
• Results—This tab appears when the smart issue request is completed or
failed. This tab displays the new hierarchies created as a result of the
smart issue.
• Audit—Details and a status for the smart issue request.
Defining the Smart Issue Request
Use the Summary tab to define the smart issue request.
To define the smart issue request:
1 Enter a Title. This field is required. The system automatically assigns the
Originator, Status, Request #, Create Date, and Last Edit date.
2 Assign an owner of the smart issue request. The owner(s) of a request will be
the only users allowed to edit and issue the request. Click the Owners
hyperlink to display a search page, as figure 21-13 shows below. Owners is a
required field.
Figure 21-13: Owners search page
3
Use the search form to select users or groups that own the smart issue
request.
21-11
Agile Product Lifecycle Management for Process
4
5
6
7
Click Done. The search form closes and your selections display in the Owners
field.
a To designate the smart issue request as private, check the Private flag. By
default all users with the [SMART_ISSUE_READER] role will be able to
read the smart issue request. If a request is marked as Private, only the
users added to the Owner and Readers fields will be allowed to view the
request.
b If the Private flag is selected, the Readers field will appear. Click the
Readers hyperlink to open the user and group multi-select search. Only
users added to this field (and owners) will be able to view this smart issue
request.
Enter a Description of the request.
Optionally, in the remaining sections on the page, add extended attributes,
custom sections, and attachments.
Click Save to save the smart issue request.
You will be able to attach smart issue requests to NPD activities and/or GSM
activities. You can view all NPD activities associated to this request by clicking on
the NPD Activities hyperlink in the Related Documents section.
You will see all GSM activities associated to the smart issue request in the
Activities section.
21-12
Global Specification Management User Guide
Chapter 21
Using Change Management Features
Finding the Specifications to Version
Use the Details tab to specify which type of smart issue to perform. The options
are:
• Replace Specification
• Replace Specification Given Parent
• Version Hierarchy Only
Replace Specification
Use this option to replace a specification with another specification. This option
is used to find all hierarchies that are attached to a given specification.
In the example below you would be replacing the ingredient specification IngA
v1 with ingredient specification IngB v1. Notice after smart issue runs, all of the
hierarchies attached to IngA1 are issued and the new issues of the hierarchy are
now attached to IngB1.
Figure 21-14: Example of replacing a specification
Replace Specification Given Parent
Use this option to replace a specification with another specification filtered by a
parent specification. This option is used to find all hierarchies that are attached
to a given parent and child pair of specifications.
In the example below you would be replacing the ingredient specification IngA
v1 with ingredient specification IngB v1. However, you only want to replace IngA
when it is used inside formulation specification FC. All other formulations that
reference IngA you would like to keep untouched. This result could also be
accomplished with the replace specification type if you know the top level
specifications of the finished good hierarchies that reference formulation FC.
21-13
Agile Product Lifecycle Management for Process
Figure 21-15: Example of replacing a specification with another specification filtered by a parent specification
Version Hierarchy Only
Use this option to issue the hierarchy only without replacing a specification. This
option is used when you want to issue an entire hierarchy without replacing a
specification. Smart issue will issue every specification in the hierarchy starting
from the specification given as the “Starting From” specification.
In the example below, you would be versioning all hierarchies attached to
ingredient specification IngA v1. This action will also issue the ingredient
specification IngA v1 to Ing A v2. You could achieve this same result if you were
to manually create IngA v2 and use the replace specification type.
You may use only one option per smart issue request. The type selected will
display different fields below the Type drop-down list.
Figure 21-16: Example of issuing the hierarchy only without replacing a specification
21-14
Global Specification Management User Guide
Chapter 21
Using Change Management Features
To replace a specification:
1 From the Type drop-down list, select Replace Specification, as shown in
figure 21-17 below.
Figure 21-17: Replace Specification option
This icon clears search
criteria and the Action List
2
3
4
5
Click the Specification to Remove hyperlink to display a search form in a
dialog box.
Use the search form to select an ingredient, menu item, packaging material,
printed packaging, product, or trade specification. The search form closes.
Click the Specification to Add hyperlink to display a search form. This form
contains specifications of the same type you selected to remove in step 3.
Use the search form to select a specification to replace the specification being
removed, and then click Done. Your selection appears in the Specification to
Add field, as figure 21-18 shows below.
Figure 21-18: Specifications selected to remove and add
6
Click See All Affected. The Affected Specs dialog box displays a listing of all
of the specification hierarchies that are linked to the specification to remove,
as figure 21-19 shows below:
21-15
Agile Product Lifecycle Management for Process
Figure 21-19: Affected Specs dialog box
Use the Select/Deselect All options to help you select the
specifications for the smart issue.
All hierarchies are listed using the top level specification to represent the
hierarchy. For any hierarchy listed, you can click on the hierarchy
investigation icon ( ) to display a popup window listing all specifications
in the hierarchy that will be issued. Take notice of the Issued column, which
will state whether the specification will be issued or not based on the get
latest revision setting on the specification.
7
Click the checkbox next to the hierarchies to issue, and then click Done. The
dialog box closes, and selected specifications appear in the Smart Issue
Action List. The Action List represents all of the hierarchies that will be
issued when the smart issue request is performed.
You can now perform the smart issue, as described in Exporting the Affected
Specifications on page 21-21.
21-16
Global Specification Management User Guide
Chapter 21
Using Change Management Features
To replace a specification based on a parent specification:
1 From the Type drop-down list, select Replace Specification Given Parent, as
shown in figure 21-20 below.
Figure 21-20: Replace Specification Given Parent option
2
3
4
Click the Parent hyperlink to display a search form in a dialog box.
Use the search form to select a formulation, menu item, or trade
specification to designate as the parent specification. The search form closes.
Click the Specification to Remove hyperlink to display the Spec to Remove
dialog box, as shown in figure 21-21 below. This dialog box will display all
lower level specifications associated with the parent specification selected.
21-17
Agile Product Lifecycle Management for Process
Figure 21-21: Spec to Remove dialog box
5
6
7
Select a specification to remove. The dialog box closes and the selected
specification displays in the Specification to Remove field.
Click the Specification to Add hyperlink. GSM displays a search page
containing specifications of the same type you selected to remove in step 5.
Use the search page to select a specification to replace the specification being
removed, and then click Done. Your selection appears in the Specification to
Add field, as figure 21-22 shows below.
Figure 21-22: Selected specifications
8
21-18
Click See All Affected. The Affected Specs dialog box displays a listing of all
of the specification hierarchies that are linked to the specification to remove,
as figure 21-23 shows below:
Global Specification Management User Guide
Chapter 21
Using Change Management Features
Figure 21-23: Affected Specs dialog box
Use the Select/Deselect All options to help you select the
specifications for the smart issue.
All hierarchies are listed using the top level specification to represent the
hierarchy. For any hierarchy listed, you can click on the hierarchy
investigation icon ( ) to display a popup window listing all specifications
in the hierarchy that will be issued. Take notice of the Issued column, which
will state whether the specification will be issued or not based on the get
latest revision setting on the specification.
9
Click the checkbox next to the hierarchies to issue, and then click Done. The
dialog box closes, and selected specifications appear in the Smart Issue
Action List, as figure 21-24 shows below. The Action List represents all of the
hierarchies that will be issued when the smart issue request is performed.
Figure 21-24: Smart Issue Action list
21-19
Agile Product Lifecycle Management for Process
You can now perform the smart issue, as described in Exporting the Affected
Specifications on page 21-21.
To version a specification hierarchy:
1 From the Type drop-down list, select Version Hierarchy Only, as shown in
figure 21-25 below.
Figure 21-25: Version Hierarchy Only option
2
3
4
Click the Starting From hyperlink to display a search form in a dialog box.
Use the search form to select an ingredient, menu item, packaging material,
printed packaging, product, or trade specification. The search form closes.
This specification serves as a bottom-level specification and displays in the
Starting From field.
Click See All Affected. The Affected Specs dialog box displays a listing of
specifications available for smart issue, as figure 21-26 shows below.
Figure 21-26: Affected Specs dialog box
Use the Select/Deselect All options to help you select the
specifications for the smart issue.
All hierarchies are listed using the top level specification to represent the
hierarchy. For any hierarchy listed, you can click on the hierarchy
investigation icon ( ) to display a popup window listing all specifications
in the hierarchy that will be issued. Take notice of the Issued column, which
will state whether the specification will be issued or not based on the get
latest revision setting on the specification.
21-20
Global Specification Management User Guide
Chapter 21
Using Change Management Features
5
Click the checkbox next to the hierarchies to issue, and then click Done. The
dialog box closes, and selected specifications appear in the Smart Issue
Action List. The Action List represents all of the hierarchies that will be
issued when the Issue button is selected.
You can now perform the smart issue, as described in Exporting the Affected
Specifications on page 21-21.
Exporting the Affected Specifications
You can export a listing of ALL specifications affected (top-level and the lower
specifications related to each). The resulting spreadsheet includes the following
columns: Spec #, Spec Name, Equivalent, Type, Status, Issued, Business Unit,
Category, Top-Level Parent, Level and specification Pkid. The Export button is
available in Read and Edit mode. The export includes all affected hierarchies
regardless of what checkboxes are selected.
Exporting the Action List
You can export a listing of ALL specifications in your Action List (top-level and
the lower specifications related to each). The resulting spreadsheet includes the
following columns: Spec #, Spec Name, Equivalent, Type, Status, Issued, Business
Unit, Category, Top-Level Parent, Level and specification Pkid. The Export
button is available in Read and Edit mode. The export will only include the
hierarchies included in the Action List.
Performing the Smart Issue
Once hierarchies selected for the smart issue are displayed in the Smart Issue
Action List, you are able to select the Issue button, as figure 21-27 shows below.
Figure 21-27: Smart Issue Action List
Linked pages allow you to page through the results. You can also sort the data by
clicking the column head.
To issue the smart issue request, the request must have a status of ‘Pending’ or
‘Failed.’
21-21
Agile Product Lifecycle Management for Process
To perform the smart issue:
1 If desired, click the Version Nutrient Profiles checkbox. If selected, the
approved nutrient profiles associated to any specification that is reversioned will also be re-versioned. The new version of the nutrient profile
will be attached to the new revision of the specification and the old version
will be removed. Only Nutrient Profiles that are in a workflow step with a
system tag of ‘is Approved’ will be versioned. The new version of the
nutrient profile that was marked as Active will become the active profile on
the new specification.
2 Click Issue to perform the smart issue and the status is changed to executing.
At this point the fields become read-only.
When the smart issue request reaches either a “Failed” or “Complete” status,
an email is sent to the owner(s) and issuer of the request.
Once the smart issue request is in either a “Failed” or “Complete” state, the
Results tab will be available.
Verifying the Smart Issue
Agile PLM for Process displays the Results tab upon completion of the smart
issue request. This page shows two grids, one for the original hierarchies, and one
displaying the newly issued hierarchies, as figure 21-28 shows below.
Figure 21-28: Results tab
21-22
Global Specification Management User Guide
Chapter 21
Using Change Management Features
You can sort results grids by column by clicking the column head. View
specifications by clicking the hyperlinked Spec Name field.
Exporting the Results
You can export a listing of ALL specs (Top-level and the lower specifications
related to each) from the original and the new hierarchies. The resulting
spreadsheet will include the following columns: Original/New marker, Spec #,
Spec Name, Equivalent, Type, Status, Business Unit, Category, Top-Level Parent,
Level and specification Pkid. The Export button is available in Read and Edit
mode.
Failed Requests
If the request is in a status of “Failed,” this Results tab displays the reason the
smart issue request failed and a results summary. Generally a smart issue request
will fail because the link to the specification can no longer be found. Once the
problem is corrected manually, you are able to restart the smart issue request and
it will be begin re-issuing where it stopped.
The results summary grid lists all hierarchies that were attempted by smart issue.
An Issued column includes status icons representing whether that hierarchy was
completely issued or not.
This is intended to act as a quick summary view of the successful issues, so you
will know what hierarchies still need to be addressed. If the top level shows as
Completed, then that means the entire hierarchy was issued and no further
action is needed. If the icon is red, that means either one or more specifications
in that hierarchy were not issued.
Figure 21-29: Issued column with status icons
Exporting Failed Results
Click Export to receive a list of all specifications that were issued. The list includes
the following columns: Top Level, Original/New, Level, Spec #, Spec Name,
Equivalent, Type, Status, BU, Category, Pkid.
21-23
Agile Product Lifecycle Management for Process
Workflowing Specifications
The Results grids include a briefcase icon (
) that you can use to workflow the
new and original specifications. The briefcase serves as a navigation tool to help
navigate to each specification.
Clicking the briefcase icon opens a frame above the smart issue request. The
frame contains two grids, Original and New. Original is a listing of all the
specifications in the hierarchy before it was versioned. New is a listing of all
specifications in the hierarchy after it was versioned.
The frame contains three action buttons, as defined below:
• Refresh—Refreshes the briefcase, updating the specification
information displayed.
• Return to Smart Issue—Loads the smart issue request displayed below
the briefcase frame.
• Close—Closes the briefcase frame. The smart issue request remains.
To workflow specifications for approval:
1 Click the briefcase icon (
). A frame displays above the smart issue
request, as figure 21-30 shows below.
Figure 21-30: Briefcase frame
Clicking the briefcase icon displays the frame containing
Original and New grids.
2
3
21-24
Click the Spec # hyperlink in either grid to view the specification.
You can then edit the specification and workflow it to the appropriate status.
Global Specification Management User Guide
Chapter 21
Using Change Management Features
Checking the Status of the Smart Issue
Use the Audit tab to view the status of the smart issue request. The tab includes
the user that initiated the smart issue request, the data/time the request was
initiated, and the status.
21-25
Agile Product Lifecycle Management for Process
21-26
Global Specification Management User Guide
C HAPTER 22
Component Catalog
This chapter describes the capabilities and applied uses of the Component Catalog function. Topics in this
chapter include:
❑ Component Catalog
❑ Using Component Catalog Terms
Component Catalog
If you have the necessary administrative privileges, in Component Catalog you
can add terms to the database and manage certain properties about the terms.
Once these terms have been created, you can use the library of predefined terms
when creating percent breakdowns or when working on ingredient statements in
LIO in GSM.
Integration with Other Applications
Component Catalog is integrated with GSM. Use Component Catalog terms
when building percent breakdowns on ingredient specifications or when working
on ingredient statements in LIO.
22-1
Agile Product Lifecycle Management for Process
Creating a New Component Catalog Term
Create and manage Component Catalog terms inside the component catalog.
The Component Catalog is available as a submenu of GSM on the left navigation
panel. You can create a new term by clicking Create New in the upper right corner
of the search page, as shown in figure 22-1 below.
Figure 22-1: Create New button
As shown in figure 22-2 below, the Catalog Term page contains six sections of
data:
• Catalog Term
• Aliases
• LIO Disclosures
• LIO Groupings
• Reconstitution/Equivalency
• Approved Usages
22-2
Global Specification Management User Guide
Chapter 22
Component Catalog
Figure 22-2: Catalog Term sections
22-3
Agile Product Lifecycle Management for Process
Catalog Term Section
The Catalog Term section, shown in figure 22-3 below, defines the primary name
of the term that you are defining.
Figure 22-3: Catalog Term section
The Catalog Term section contains the following fields:
• Component Catalog—The name of the term being defined (required)
• Term #—A system defined number associated to this term
• Special Notes—User defined notes for the term
• Created By—The user who created the term
Once you have completed the term name, continue to the Aliases section.
Aliases Section
The Alias section defines the secondary name or names for the term that you are
defining.
Figure 22-4: Aliases section
The Aliases section contains the following field:
• Alias—Other names that you want to be treated similarly from a labeling
perspective
Once you have entered all of the aliases for a given term, continue to the LIO
Disclosure section.
22-4
Global Specification Management User Guide
Chapter 22
Component Catalog
LIO Disclosure Section
The LIO Disclosure section defines the terms that may be used (contextually) to
describe the component catalog term that is being created during the LIO
process. To add a new disclosure, click Add New under the Disclosures section. A
dialog box opens for you to enter the details of the disclosure, as shown in
figure 22-5 below.
Figure 22-5: LIO Disclosure dialog box
The LIO Disclosure section contains the following fields:
Disclosure—The name of this item as it might appear on the ingredient
statement if the restrictions and constraints are met.
Special Notes—Your notes.
Restrictions—A list of configurable tags that you can assign to the disclosure to
prevent use in the LIO process. LIO will only use disclosures with the same
restriction(s) or no restrictions applied.
Note
Specifying no restrictions means that the disclosure will be available for all
ingredient statements in LIO.
Priority—The order in which GSM presents the disclosures to you during the
LIO process. If a you select a priority of “Req,” that disclosure will be the only one
that you see.
Constraints—Additional criteria to limit when a particular disclosure can be
used.
Figure 22-6: LIO Disclosures section
22-5
Agile Product Lifecycle Management for Process
You can enter as many LIO disclosures as needed. Once you have entered all of
the disclosure information for a given term, continue to the LIO Grouping
section.
LIO Groupings
The LIO Groupings section defines the groups to which the component catalog
term can be added during the LIO process. To add a new grouping, click Add New
under the LIO Grouping section. A dialog box displays for you to enter details, as
figure 22-7 shows.
Figure 22-7: LIO Grouping dialog box
The LIO Grouping dialog box includes the following columns:
Grouping—The name of the group that the term can be added to during the LIO
process.
Special Notes—Your notes.
Method—The default declaration method for the group that is being added.
Restrictions—A list of configurable tags that you can assign to the group to
prevent use in the LIO process. LIO will only use groupings with the same
restriction(s) or no restrictions applied.
Note
Specifying no restrictions means that the group will be available for all
ingredient statements in LIO.
Priority—The order in which DWB presents the groupings to you during the LIO
process. If a you select a priority of “Req,” that group will be the only one that you
see.
Constraints—Additional criteria to limit when a particular grouping can be
used.
22-6
Global Specification Management User Guide
Chapter 22
Component Catalog
Figure 22-8: LIO Groupings section
You can enter as many LIO groupings as needed. Once you have entered all of the
group information for a given term, continue to the Reconstitution/Equivalency
section.
Reconstitution/Equivalency Section
The Reconstitution/Equivalency section defines the reconstitution or
equivalency rules that you can use during the LIO process. To add a new
reconstitution/equivalency rule, click Add New under the Reconstitution/
Equivalency section. A dialog box displays for you to enter details of the rule,
shown in figure 22-9 below.
Figure 22-9: Reconstitution/Equivalency section
The Reconstitution/Equivalency table includes the following columns:
Declare As —The name to use for the term after the reconstitution has been
performed
Target %/Factor —Factor or percent change to apply during the reconstitution
process
Comments—Your comments
Approved Usages Section
The Approved Usages section is for future use.
22-7
Agile Product Lifecycle Management for Process
Using Component Catalog Terms
You can use Component Catalog terms in GSM when you are creating a percent
breakdown on an ingredient specification or when you are performing LIO.
For more information on using LIO to create your ingredient statements, see LIO
Profiles on page 18-1.
22-8
Global Specification Management User Guide
A PPENDIX A
Key Search Fields
This appendix contains supplementary information about fields that are searchable within Global
Specification Management. Topics include:
❑ Searchable Fields
Searchable Fields
Table A-1 describes search fields whose meaning or use may not be selfexplanatory.
Table A-1: Key field names of note in the search criteria key field list, described
Key field
Description
Associated Specification
Search against specifications containing associated
specifications matching the search criteria entered. Search
criteria include: Association, Equivalent, Name, and
Number.
BD (Breakdown) Component
Search against the free text name of component, declared
within the percent breakdown
BD (Breakdown) Component
COO
Search against Country of Origin (COO) column declared
within the percent breakdown
BD (Breakdown) Component
FCL
Search against Food Composition Library (FCL) terms that
are declared within the percent breakdown
BD (Breakdown) Component
Ing. Spec.
Search against Ingredient Specifications that are declared
within the percent breakdown
BD (Breakdown) Component
Term
Search against Component Catalog terms that are declared
within the percent breakdown
BD (Breakdown) Component
Term or Alias
Search against Component Catalog term or alias that are
declared within the percent breakdown
BD (Breakdown) Component
Text
Search against the free text name of component, declared
within the percent breakdown
Combined Statement
Search against the free-text combined statement used to
declare materials in aggregation for labeling purposes.
Concept (+Children)
Search against the concept, including concepts that exist as
a child in the hierarchy
Concept (Exact Match)
Search against the exact match of the concept
Concept (Hierarchical)
Search against the hierarchy (both up and down) that the
concept exists in
Equivalent
Search against the equivalent number designed to identify
the material as it is referenced by other cross reference
systems
A-1
Agile Product Lifecycle Management for Process
Table A-1: Key field names of note in the search criteria key field list, described
A-2
Key field
Description
GTIN/UPC/EAN
Search against the Global Trade Item Number (GTIN) or
European Article Number (EAN) or Universal Product
Code (UPC) barcode number
Menu Item Build
Search against the Menu item specification or product
specification listed in a menu item build
Supplier signed spec
Search against the flag on a sourcing approval that indicates
the supplier has acknowledged a specification
System Equivalent
Search against the equivalent number designed to identify
the material as it is referenced by other cross reference
systems
Taxonomy
Search against the specification category of a specification.
You can also browse for specifications using specification
categories in the Category tab.
UDEX Classification
Search against taxonomies used by UDEX Electronic
Exchange
Global Specification Management User Guide