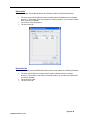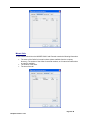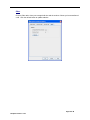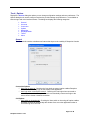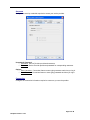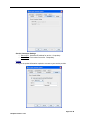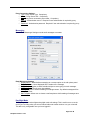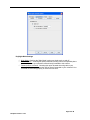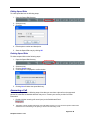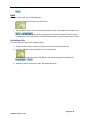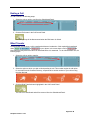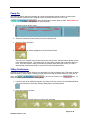
1
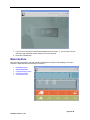
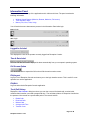
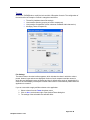
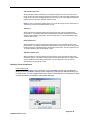
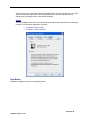
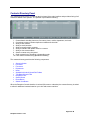
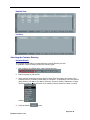
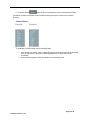
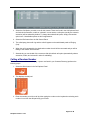
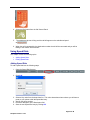
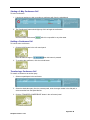
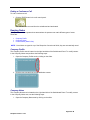
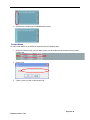
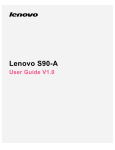
January 2007
Reception Console
User Guide
Page 1 of 40
Reception Console v. 13.1
Table of Contents
Table of Contents .......................................................................................................... 2
Welcome ........................................................................................................................ 4
Getting Started .............................................................................................................. 5
First Use ...................................................................................................................................5
Subsequent Use.......................................................................................................................5
Main Interface ................................................................................................................ 6
Information Panel ....................................................................................................................7
Logged In As Label ................................................................................................................................ 7
Time & Date Label ................................................................................................................................. 7
Full Screen Option ................................................................................................................................. 7
File|Logout ............................................................................................................................................. 7
File|Exit .................................................................................................................................................. 7
Tools|Call History................................................................................................................................... 7
Tools | Options..................................................................................................................................... 11
Help Button .......................................................................................................................................... 20
Switchboard Panel.................................................................................................................21
Link Call Column.................................................................................................................................. 21
Line Number Column ........................................................................................................................... 21
Call To (Called Party Information) Column .......................................................................................... 21
Extension Number ............................................................................................................................... 21
Call From (Calling Party Information) Column ..................................................................................... 22
Call Status Column .............................................................................................................................. 22
Time (Call Duration) Column ............................................................................................................... 22
Company Notes & Profile Area............................................................................................................ 22
Contacts Directory Panel ......................................................................................................23
Status Column ..................................................................................................................................... 24
Last name Column............................................................................................................................... 24
First name Column............................................................................................................................... 24
Mobile Column ..................................................................................................................................... 24
Department Column............................................................................................................................. 24
Notes Column ...................................................................................................................................... 24
Switch Views........................................................................................................................................ 24
Searching the Contacts Directory ........................................................................................................ 25
Call Options Panel .................................................................................................................27
Contact’s Extension ............................................................................................................................. 27
Contact’s Mobile .................................................................................................................................. 27
Contact’s Voicemail ............................................................................................................................. 27
Contact’s Messenger ........................................................................................................................... 27
Other (Transfer/Dial) ............................................................................................................................ 28
Call Control Panel..................................................................................................................29
Dial ....................................................................................................................................................... 29
Hold Calls............................................................................................................................................. 29
Transfer................................................................................................................................................ 29
3-Way Conference ............................................................................................................................... 29
End....................................................................................................................................................... 29
Managing Calls ............................................................................................................ 30
Calling a Contact ...................................................................................................................30
Calling a Random Number....................................................................................................31
Using Speed Dials .................................................................................................................32
Adding Speed Dials ............................................................................................................................. 32
Editing Speed Dials.............................................................................................................................. 33
Page 2 of 40
Reception Console v. 13.1
Deleting Speed Dials ........................................................................................................................... 33
Answering a Call....................................................................................................................33
Hold.........................................................................................................................................34
Un-Holding Calls .................................................................................................................................. 34
Ending a Call ..........................................................................................................................35
Blind Transfer ........................................................................................................................35
Consulted Transfer................................................................................................................36
Voicemail Transfer.................................................................................................................36
Camp On.................................................................................................................................37
3-Way Conference .................................................................................................................37
Starting a 3-Way Conference Call ....................................................................................................... 38
Holding a Conference Call................................................................................................................... 38
Transferring a Conference Call............................................................................................................ 38
Ending a Conference Call .................................................................................................................... 39
Keeping Notes........................................................................................................................39
Company Profile .................................................................................................................................. 39
Company Notes ................................................................................................................................... 39
Contact Notes ...................................................................................................................................... 40
Page 3 of 40
Reception Console v. 13.1
Welcome
The Reception Console is a carrier class IP Telephony Attendant Console for use by receptionists, or
telephone attendants, who manage and screen inbound calls for enterprises.
The Reception Console is a feature-rich desktop application that is fully integrated with the TelPack
platform. The application delivers the following benefits to users:
•
•
•
•
Easy to use design that follows the workflow of a call from the top to the bottom of the screen.
Intuitive business processes as only ‘valid’ options are presented to the attendant.
Professional call handling as critical information is available in ‘real time’.
Accurate delivery of messages via a one step process when people are unavailable.
Page 4 of 40
Reception Console v. 13.1
Getting Started
After you have installed Reception Console, you should read the following topics to start using its many
features quickly and easily:
•
•
First Use
Subsequent Use
First Use
When starting Reception Console for the first time, several items need to be correctly configured or
checked. These steps are outlined in this section. To start Reception Console on subsequent occasions
follow the procedure in the topic entitled Subsequent Uses.
Click on the Reception Console shortcut on your desktop, which should be displayed as:
From the Start Menu, navigate to Start | Reception Console | Reception Console. You will be presented
with the following login interface.
Click on the TOOLS button, and then OPTIONS located in the top right hand corner of the login screen.
1. Click on the CONNECTION tab and enter your service provider URL.
2. Click on the ACCOUNTS tab and enter your service provider username and password. If you are
unsure of your user name and password contact your service provider.
3. You can also select the SAVE USERNAME and SAVE PASSWORD option so that your username and
password will be remembered on your machine.
Subsequent Use
From the Start Menu, navigate to Start | Reception Console | Reception Console. You will be presented
with the following login interface.
Page 5 of 40
Reception Console v. 13.1
1. If you have not saved your username and password, enter it here. If you are unsure of your
username and password, please contact your service provider.
2. Press the LOGIN button.
Main Interface
After you login successfully, the main interface of Reception Console will be displayed. The main
interface is separated into the following five sections:
•
•
•
•
•
Information Panel
Switchboard Panel
Contact Directory Panel
Call Options Panel
Call Control Panel
Page 6 of 40
Reception Console v. 13.1
Information Panel
This panel is located at the top of the application and is visible at all times. The panel contains the
following information:
•
•
•
Window Control Buttons (Minimize, Restore, Maximize, Full screen)
Time and Date Labels
Menus (File, View, Tools, Help)
You will notice that more elements are present in the Information Panel after login.
Before Login
After Login
Logged In As Label
This displays the name of the operator currently logged into Reception Console.
Time & Date Label
The time and date information displayed is taken automatically from your computer's operating system.
Full Screen Option
This allows the user to expand the GUI so that it fills the entire monitor screen.
File|Logout
Logs you out of Reception Console and returns you to the login interface screen. This is useful if a new
operator is to use the application.
File|Exit
Logs out and exits the Reception Console application.
Tools|Call History
Displays the CALL HISTORY dialog box where you can view a record of missed calls, received calls,
numbers dialed, transfer count and average hold time. The call history feature of Reception Console lets
the operator view records for a specific date period. The records include:
•
•
•
•
•
Dialed Calls
Received Calls
Missed Calls
Average Hold Time
Transfer Count
Page 7 of 40
Reception Console v. 13.1
Dialed Calls
To see dialed calls click the DIALED CALLS tab. Records contain the following information:
•
•
•
The name of the call recipient for internal numbers (where available from the company
directory). The number of the call recipient for external numbers, or for internal numbers
when no name is available.
The number of the call recipient.
The time of the call
Received Calls
To see received calls click the RECEIVED CALLS tab. Records contain the following information:
•
•
•
The name of the Caller for internal numbers (where available from the company
directory). The number of the Caller for external numbers, or for internal numbers when
no name is available.
The number the caller.
The time of the call.
Page 8 of 40
Reception Console v. 13.1
Missed Calls
To see missed calls click on the MISSED CALLS tab. Records contain the following information:
•
•
•
The name of the Caller for internal numbers (where available from the company
directory). The number of the Caller for external numbers, or for internal numbers when
no name is available.
The number of the caller.
The time of the call.
Page 9 of 40
Reception Console v. 13.1
Other
Click the Other tab to view your average hold time and the number of times you have transferred
a call. Click the refresh button to update statistics.
Page 10 of 40
Reception Console v. 13.1
Tools | Options
Displays the OPTIONS dialog box where you can change configuration settings and user preferences. The
Options dialog box is used to configure user/service provider settings and preferences. It is available on
both the login and main interface screens. The dialog box displays the following categories:
•
•
•
•
•
•
•
•
General
Accounts
Connection
Update
Messaging
Day/Night Mode
Theme
About
General
The General tab contains miscellaneous features that improve the usability of Reception Console.
Connection Options
√ Auto login on start-up: Checking the 'Auto login on start-up' option enables Reception
Console to automatically login on the startup of the application.
√ Auto login when connected to network: Checking the 'Auto login when connected to
network' option enables Reception Console to automatically connect and login to the
server when it detects a network connection.
Call Options
√ Auto switch on incoming call: Checking the 'Auto switch on incoming call' option enables
Reception Console to automatically take window focus over other applications when a
new incoming call is received.
Page 11 of 40
Reception Console v. 13.1
Accounts
Configure the security credentials required to access your service provider.
Username & Password
√ Username: Service Provider provisioned username.
√ Password: Service Provider provisioned password for corresponding username.
Options
√ Save Username: Convenient feature to save typing username each time you log in.
√ Save Password: Convenient feature to save typing password each time you log in.
Connection
Configure the connection information required to connect to your service provider.
Page 12 of 40
Reception Console v. 13.1
Service Connection Settings
√ Server URL: Hostname/IP address for service. Compulsory.
√ Server Port: Port number for service. Compulsory.
Update
Configure the update information required to connect to your service provider.
Page 13 of 40
Reception Console v. 13.1
Proxy Connection Settings
√ Type: Proxy Server Type. Compulsory.
√ Server: Proxy Server URL. Compulsory.
√ Port: Proxy Server connection port number. Compulsory.
√ User ID: Authentication user id. Required if user authentication is required by proxy
server.
√ Password: Authentication password. Required if user authentication is required by proxy
server.
Messaging
Enable Email Messenger Settings to send email messages to contacts.
Email Messenger Settings
√ Display Name: Allow/disallow messaging as a contact option on the call options panel.
√ Reply-to Address: Name displayed as the sender of the message.
√ Default Subject: Option to define a default subject to save typing it in each message.
√ SMTP Host: SMTP mail server host address.
√ Mail Type: Option to select formatting of message content. By default messages will be
sent as plain text.
√ Mail Template: Allows user to choose a mail template to aid formatting of messages sent.
Day/Night Mode
The Day/Night Mode tab configures day/night mode call settings. This is useful to turn on at the
end of your work day when you want to forward calls onto another number or to your voicemail.
This tab is only configurable once you have logged in.
Page 14 of 40
Reception Console v. 13.1
Day/Night Mode Settings
√
√
√
Night Mode: Checking the 'Night Mode' option turns night mode on and off.
Forward calls to: Choosing this option forwards incoming calls to the specified phone
number. All calls to your extension will be directly forwarded to this number.
Forward calls to voicemail: Choosing this option forwards incoming calls to your
voicemail. All calls to your extension will be directly forwarded to your voicemail. Your
voicemail must be setup properly in order for this to work.
Page 15 of 40
Reception Console v. 13.1
Themes
Click on the THEMES tab to modify the look and feel of Reception Console. The configuration of
the look and feel of Reception Console is categorized as follows:
•
•
•
•
Theme file (load/save theme file settings)
User Interface Section (grouping of screen components)
User Interface Components (screen elements modifiable within that section)
Modifying Theme Components
File Settings
The theme refers to how the interface appears, which includes the colors in which the various
panels, buttons, logos and text are displayed, the size of each component and the manner in
which they are displayed in terms of spacing and size. A default theme such as "standard.thm" is
used for the visual display of Reception Console and this theme is automatically loaded when the
application is turned on.
If you as a user wish to apply a different theme to the application:
1. Select a theme from the THEME drop down menu.
2. Click on APPLY at the bottom right of the Options/Theme dialog box.
3. The settings of the selected theme will take affect.
Page 16 of 40
Reception Console v. 13.1
Saving Theme File Settings
1. You may create a new theme file by clicking on "Save As" at the bottom of the
Options/Theme dialog box. This will bring up a new dialog box prompting you to enter a
name for your new theme file.
2. After entering the name, click OK, and the theme file will be saved.
3. If you would like to apply this new theme file as your default, select it as explained above.
User Interface Section
Grouping of Screen Components
At present, there are two sections of components available, LOGIN and MAIN. Each section comes
with a group of components, each of which may be altered in appearance (such as color) to
correspond to a theme of display for the user. The sections may be selected from the drop down
menu section.
User Components Section
Login
This section has six components that may be altered.
o
o
o
o
o
o
Login Title Bar Logo
Login Title Bar Color
Login Title Bar Font Color
Login Title Bar Icon Color
Login Background Panel Image
Login Panel Logo
Title Bar Logo
The logo should ideally be 40 pixels in height. By default, the logo is set to align to the bottom
left-hand corner of the title bar panel. To change this alignment, simply add white space to the
bottom of your logo graphic file. This element can only be modified with a gif or jpeg file.
Using a transparent gif will enable you to make your logo independent of the title bar panel
color. Other graphic files such as jpegs will need you to amend the Login Title Bar Panel Color
to a color that matches your logo file background. Changes made to the logo are also
reflected in the main interface title bar.
Title Bar Color
This change is also reflected in the main interface title bar (not just the login title bar). The
color of the title bar is usually altered in conjunction with a re-branding of the interface with a
corporate logo.
Page 17 of 40
Reception Console v. 13.1
Title Bar Panel Font Color
The "logged in as...", time & date stamp text, logout, help, call history, and options title text are
all modified by modifying the color of this element. This text would ideally be changed to white
for darker title bar panel colors or black for lighter title bar panel colors. All you need to do is
ensure that the color combination you decide on does not render the text illegible.
Title Bar Panel Icon Color
By default, this is set to white. The color of the icons can be changed to black for lighter title
bar panel colors or white for darker title bar panel colors.
Background Panel Image
This component can only be modified with a gif or jpeg graphic file which is approximately 786
x 499 pixels wide. The interface will automatically scale graphics that are smaller or larger
than needed.
Panel Logo
This component can only be modified with a gif, jpeg or png graphic file which is approximately
186 x 30 pixels in size.
Main
This section has seven components that may be altered.
o
o
o
o
o
o
o
Switchboard Panel Color
Contact Directory Panel Color
Call Options Panel Color
Call Control Panel Color
Table Font
Panel Header Font
Slide Panel Header Font
Switchboard Panel Color
Altering this theme element enables you to modify the background color of the Switchboard
Panel. All other elements within this panel are set to black or white percentage transparencies
of this panel color. When modifying this element make sure it is of a color depth that allows for
legibility of the text and other elements within this panel.
Contact Directory Panel Color
Altering this theme element enables you to modify the background color of the Contacts
Directory Panel. All other elements within this panel are set to black or white percentage
transparencies of this panel color. When modifying this element make sure it is of a color depth
that allows for legibility of the text and other elements within this panel.
Call Options Panel Color
Altering this theme element enables you to modify the background color of the Call Options
Panel. All other elements within this panel are set to black or white percentage transparencies
of this panel color. When modifying this element make sure it is of a color depth that allows for
legibility of the text and other elements within this panel.
Page 18 of 40
Reception Console v. 13.1
Call Control Panel Color
Altering this theme element enables you to modify the background color of the Call Control
Panel. All other elements within this panel are set to black or white percentage transparencies
of this panel color. When modifying this element make sure it is of a color depth that allows for
legibility of the text and other elements within this panel.
NOTE: In order to change the Title Bar Panel Color, make the change in the LOGIN section is
automatically reflected in the MAIN interface as well.
Table Font
Altering this theme component changes the size and font style of the text inside all main
screen tables. The affected tables are the Switchboard Panel table, the Queue Panel table,
and the Contact Directory Panel table. The size ranges from 9 to 16, and the different types
are Plain, Bold, or Italic.
Panel Header Font
Altering this theme component changes the size and type of the text inside all main screen
panel headers. The affected panels are the Switchboard Panel, the Queue Panel, the Contact
Directory Panel, the Call Options Panel, and the Call Control Panel. The size ranges from 9 to
16, and the different types are Plain, Bold, or Italic.
Slide Panel Header Font
Altering this theme component changes the size and type of the text inside all main screen
slide panel headers. The affected components are the Company Notes, the Company Profile,
and the Alphabetical Index slide panel headers. The size ranges from 9 to 16, and the
different types are Plain, Bold, or Italic.
Modifying Theme Components
Color Components
In order to make a change to any component, click on CHANGE and make your new selection.
When you click on CHANGE to change a color component, a dialog box is displayed allowing you
to select a color. The only exception to this is the Log-in Title Bar Panel Icon component for which
only two alternatives are available, namely black and white.
Page 19 of 40
Reception Console v. 13.1
There are three color choice tabs available. Swatches allows you to pick a particular color, HSB
allows to change the depth of that color and RGB allows you to further alter that color by
changing the percentage of Red, Green and Blue shades.
About
Click on the ABOUT tab to find version information and read the general disclaimer for Reception
Console. The information displayed is as follows:
•
•
Reception Console Version
Reception Console Disclaimer
Help Button
Displays the programs help files in a separate window.
Page 20 of 40
Reception Console v. 13.1
Switchboard Panel
The switchboard panel is located on the second panel of the main interface and has the following
components (approximately from left to right in the diagram):
•
•
•
•
•
•
•
•
Link Column
Line Number
Call To (Called Party information)
Extension number dialed by the caller
Caller ID information (if available)
Call Status
Time (Duration of the Call)
Company Notes & Profile information
Link Call Column
The Link column lets you select the calls to be linked for a Consulted Transfer and 3-Way Conference.
You select the calls to link by clicking in the link column cell for the required call record (row).
The appearance of a chain link symbol indicates activation of this option. Clicking again in the cell will
toggle link option.
Line Number Column
The Line Number column indicates the virtual line number allocated to the call. The color of the number
indicates the Call Status.
Call To (Called Party Information) Column
The Call To column identifies the name of the party being called by the operator. A name will typically be
displayed when the operator dials an internal number that is in the Contacts Directory. A number is
displayed for calls made to persons not in the Contacts Directory and for most external calls.
Extension Number
The Extension Number column displays the actual number dialed by the operator for internal calls.
Page 21 of 40
Reception Console v. 13.1
Call From (Calling Party Information) Column
The Call From column identifies the person calling the operator. For internal calls this will be the contact
name assigned to the extension number in the Contacts Directory, or the extension number itself if no
name has been assigned. For external calls the caller’s number will be displayed unless the number is
blocked (private).
Call Status Column
The Call Status column shows the state of calls on the operator switchboard (phone) and is color coded
as following:
•
Ringing In (Red) indicates the line is ringing.
•
Active (Green) indicates the line is presently active and is the call you are dealing with.
•
Held (Blue) indicates the line is on hold.
•
Ringing Out (Orange) indicates the line is ringing on a remote phone.
Time (Call Duration) Column
The Time column displays the duration of the call including the Ring Time, Hold Time and Talk Time.
Company Notes & Profile Area
Located next to the Switchboard Panel, the Company Notes and Profile components let the operator
modify notes and profile content for a given organization. Operators can modify the content as required.
For more information see Company Notes and Company Profile.
Page 22 of 40
Reception Console v. 13.1
Contacts Directory Panel
The contacts directory panel is located as the third panel of the main interface and provides a listing of all
contacts available to the operator. The operator is provided the following:
1.
2.
3.
4.
5.
6.
7.
8.
9.
10.
Contact details including last name, first name, phone, mobile, department, and notes.
Convenient access to contact telephone numbers and voicemail.
Ability to dial contacts.
Ability to email contacts.
Ability to transfer calls to contacts.
Ability to maintain and update notes for a contact.
Ability to view contact status.
Search contacts using a keyword.
Order contacts in an ascending or descending order.
Filter ordered contacts using alphabetical indexing.
The contacts directory panel has the following components:
•
•
•
•
•
•
•
•
•
•
•
Status Indication
Last name
First name
Department
Notes
Alphabetical Index & Speed Dial Folders
Text Based Search Field
Dropdown Filter
Search Button
Reset Button
Switch View Button
When the Reception Console interface is resized (full-screen or otherwise) the contact directory is scaled
to allow for additional contacts based on your view and screen resolution.
Page 23 of 40
Reception Console v. 13.1
Status Column
The Status column shows the contact's phone on/off hook state. The following colors represent different
states:
Green - Contact phone is on-hook (available to receive a call).
Red - Contact phone is off-hook (on a call, busy).
Blue - Contact phone is ringing.
Orange - Contact phone has status set to DND - Do Not Disturb.
Grey/Black/No Icon - Contact phone state is currently unavailable or unknown.
Last name Column
The Last name column displays the contact’s Last name as provisioned by the service provider. Only the
Group/System Administrator may change this information.
First name Column
The First name column displays the contact’s First name as provisioned by the service provider. Only the
Group/System Administrator may change this information.
Mobile Column
The Mobile column shows the contact's provisioned mobile number as provisioned by the service
provider. Only the Group/System Administrator may change this information.
Department Column
The Department column displays the contact’s corporate department or section as provisioned by the
service provider. Only the Group/System Administrator may change this information.
Notes Column
The notes field allows the operator to modify Notes that are specific to a contact. The note is retained for
subsequent application sessions.
Switch Views
The Reception Console supports the display of contacts to be arranged in two views: a DETAILED and a
LIST view. Clicking this button toggles between the two views.
Page 24 of 40
Reception Console v. 13.1
Detailed View
List View
Searching the Contacts Directory
Keyword Search
The keyword search feature is located below the Contacts Directory list area.
To undertake a keyword search perform the following steps:
1. Click inside the Text Search area of the Contacts Directory.
2. Enter a keyword (or part thereof).
3. Select a search criteria filter from the Search Criteria Filter Drop Down area section of the
Contacts Directory. Available criteria filters are Full Name - a combination of the first and last
name (default), Last Name, First Name, Extension, Phone No, Mobile, Department or Notes.
The Phone number option will search for a matching contact's extension number or mobile
number.
4. Press the Search
button.
Page 25 of 40
Reception Console v. 13.1
5. Press the Reset
button to remove the effects of previous Searches and Filters.
Reception Console returns filters to the contacts matching the search criteria in the Contacts
Directory.
Column Search
To undertake a column search use the following steps:
1. Click the top of a column in the Contacts Directory to order the contacts in an ascending
order for that column. Words are ordered alphabetically, numbers are ordered
numerically.
2. Click the column again to order the contacts in a descending order.
Page 26 of 40
Reception Console v. 13.1
Call Options Panel
The Call Options panel is located as the fourth panel of the main interface. It has the following
components:
•
•
•
•
•
Contact's Extension
Contact's Mobile
Contact's Voice Mail
Contact's Email (Messenger)
Other Dialpad
When the Reception Console interface is resized (full-screen or otherwise) the Call Options panel size will
remain unchanged. This allows for the Contacts Directory panel to display a maximum number of
contacts.
Contact’s Extension
This button allows you to Transfer a Call or Make a Call to a selected contact’s extension. If this icon is
dull in appearance the contact does not have an extension number associated with their name on the
Contacts Directory. Only the Group/System Administrator can modify this number.
Contact’s Mobile
This button allows you to Transfer a Call or Make a Call to a selected contact’s mobile phone. If this icon
is dull in appearance the contact does not have a mobile number associated with their name on the
company database. Only the Group/System Administrator can modify this number.
Contact’s Voicemail
This button allows you to Transfer a Call to a selected contact's voicemail. If this icon is dull in
appearance, the contact does not have voicemail configured. Only the Group/System Administrator can
modify this number.
Contact’s Messenger
The Messenger button allows you to Send Messages via e-mail to a contact listed in your Contact
Directory. If this icon is dull in appearance, the contact does not have an email address configured on the
Page 27 of 40
Reception Console v. 13.1
company database or has not selected to enable Messaging. Only the Group/System Administrator can
modify this setting.
Other (Transfer/Dial)
The Other button displays a dial pad used to enter an ad-hoc number. This feature allows you to Transfer
a Call or Make a Call to another number. This icon is always enabled.
Page 28 of 40
Reception Console v. 13.1
Call Control Panel
The Call Control Buttons are used to execute call actions. The panel contains the following areas:
•
•
•
•
•
Dial
Hold the Call
Transfer
Conference
End (Disconnect) the Call
Dial
The Dial button is used to start the dialing process to the number you have selected. You Make a Call To
a Contact when a contact is highlighted, Make A Call To Another Number when the dial pad has been
used and Make A Call Via Speed Dials when speed dials have been used. This button is dulled when this
action is not an option.
Hold Calls
Clicking on the Hold button allows you to place an Active Call on Hold. For more information see Placing
a Call On Hold.
Transfer
The Transfer button also serves as the Camp-On button depending on the current context of a given call
scenario. Note the following dynamic changes to the button based on the call context:
3-Way Conference
Pressing the Conference button allows you to participate in 3-Way conference calls. This button is dulled
when this action is not an option. Starting a Conference Call is possible whilst two calls, both or either,
are active, held or Ringing (out); or at most one of them is in a Ringing (In) state.
End
Clicking this button disconnects the selected switchboard call.
Page 29 of 40
Reception Console v. 13.1
Managing Calls
Call Flow
You manage calls using a combination of the panels in a top to bottom workflow style. You should be able
to distribute calls typically using this workflow for most of the activities below:
•
•
•
•
•
•
•
•
•
•
•
Calling a Contact
Calling a Random Number
Using Speed Dials
Answering A Call
Hold
Ending A Call
Blind Transfer
Consulted Transfer
Voicemail Transfer
Camp On
3-Way Conference Calls
Calling a Contact
To make a call to a contact use the following steps:
1. FIND the CONTACT you wish to call by searching the Contacts Directory.
2. Select the contact by clicking on the Contact in the directory.
Page 30 of 40
Reception Console v. 13.1
3. Select the Call Option you wish to use for this contact. These are found in the Call Options Panel
and include the extension, mobile or voicemail. In most cases, a call option (usually the contact's
extension) will be selected by default. To change the selected call option, simply click another
option once. Unavailable options are dull in appearance.
4. Select the Dial button from the Call Control Panel.
5. The called party phone will ring and the call will appear on the switchboard panel as 'Ringing
(Out)'.
6. When the call is answered by the destination number the call will be connected and you will be
talking to the contact at that number.
7. Alternatively you can double click a contact to dial their default call option (automatically selects
extension, mobile, and voicemail in order of availability).
Calling a Random Number
To make a call to an ad-hoc number (e.g. a person not listed in your Contacts Directory) performs the
following steps:
1. Select the Other button in the Call Options Panel.
2. This displays the dial pad.
3. Enter the number you wish to call by either typing the number on the keyboard or selecting each
number in turn from the dial pad using your mouse.
Page 31 of 40
Reception Console v. 13.1
4. Select the Dial button from the Call Control Panel.
5.
The called party phone will ring and the call will appear on the switchboard panel
.
as
6. When the call is answered by the destination number the call will be connected and you will be
talking to the contact at that number.
Using Speed Dials
This chapter covers the following topics:
•
•
Adding Speed Dials.
Editing Speed Dials.
Adding Speed Dials
To add a speed dial use the following steps:
1. Open the Speed Dial directory.
2. Click Add.
3. Select a Key value from the drop-down list. This value determines what numbers you will have to
press on your phone to dial this speed dial entry.
4. Specify the phone number.
5. Provide a description in the Description field.
6. Save the new Speed Dial entry by clicking OK.
Page 32 of 40
Reception Console v. 13.1
Editing Speed Dials
To edit a speed dial use the following steps:
1. Open the Speed Dial directory.
2. Select an entry.
3. Click Edit.
4. Edit the phone number and description.
5. Save the Speed Dial entry by clicking OK.
Deleting Speed Dials
To delete a speed dial use the following steps:
1. Open the Speed Dial directory.
2. Select an entry.
3. Click the Delete button.
4. A message box is displayed to confirm delete.
5. Clicking YES will delete the speed dial entry.
Answering a Call
To answer a call, perform the following steps. Note that you must have a phone from the supported
phones list, otherwise undesirable behavior may occur. Contact your service provider for further
information:
1. Double click the incoming call record (row) on the Switchboard Panel.
2.
Reception Console will then indicate the new Call Status and then you may proceed to perform Call Control
activities such as transferring a call, placing a call on hold and ending a call.
Page 33 of 40
Reception Console v. 13.1
Hold
To place a call on hold, use the following steps:
1. Click the Hold button from the Call Control Panel.
2. This will place the active call in the Switchboard Panel on hold, and changes the Call Status from
to
.
This is useful when you need to perform other procedures such as Consulted Transfer or when
locating people. The Calling Party is muted during this operation, and will hear the Music on Hold.
Un-Holding Calls
To remove a call from hold, use the following steps:
1. Select the call you wish to remove from being on hold from the Switchboard Panel.
2. Press the 'UNHOLD' button available on the call control panel.
The call will become active and the Call Status in the Switchboard Panel will change from
to
.
3. Alternatively double click the held call in the switchboard panel.
Page 34 of 40
Reception Console v. 13.1
Ending a Call
To end a call use, the following steps:
1. Select the call you wish to end from the Switchboard Panel.
2. Click the End button in the Call Control Panel.
The Calling Party will be disconnected when the End button is clicked.
Blind Transfer
A blind transfer occurs when a call is transferred without an introduction. Calls maybe blind transferred
when
,
or
on your phone. In the case where a call is
the
blind transfer activity allows the call to be redirected before it is answered. To do a blind transfer use, the
following steps:
1. Select the call you wish to transfer.
2. Select the option to which you wish to blind transfer the call. This number maybe the call option
for a contact from the Contacts Directory, a Speed Dial or another number of your choice using
the other dial pad.
3. Click the Blind Transfer button highlighted in the Call Control Panel.
The call is now transferred and will be removed from the Switchboard Panel.
Page 35 of 40
Reception Console v. 13.1
Consulted Transfer
A consulted transfer allows the operator to announce or introduce the call to the Called Party. A call may
be transfer consulted whilst
,
or
. To do a consulted transfer, perform
the following steps:
1. Link the 2 calls to be transferred together by clicking in the link column in the Switchboard Panel.
You need to do this for both calls, thereby identifying the calls being linked.
2. Click the Consulted Transfer button highlighted in the Call Control Panel.
The calls are now transferred and will now be removed from the Switchboard Panel.
Voicemail Transfer
A blind transfer occurs when a call is transferred without an introduction. Calls maybe voicemail
transferred when
,
or
on your phone. In the case where a call is
the voicemail transfer activity allows the call to be redirected before it is answered. To do a
voicemail transfer use, the following steps:
1. Select the call you wish to transfer.
2. Select the voicemail option to transfer the call. This number maybe the call option for a contact
from the Contacts Directory, a Speed Dial or another number of your choice using the Other dial
pad.
3. Click the Voicemail Transfer button highlighted in the Call Control Panel.
The call is now transferred and will be removed from the Switchboard Panel.
Page 36 of 40
Reception Console v. 13.1
Camp On
The Camp On feature allows the operator to hold and automatically transfer a call to a contact when
he/she is available to take the call. Camping a call to a contact can only occur if the call
is
,
or
; and if the destination contact status is either 'On the Phone' or
'Call Incoming'. To camp a call, perform the following steps:
1. Select the call you wish to camp.
2. Select the contact at whose number you wish to camp the call.
3. Select the 'Extn' call option.
4. Click the 'Camp On' button highlighted in the Call Control Panel.
The call is now camped at the contact's extension and will show 'Camped' status against the call
in the Switchboard Panel. The Calling Party is muted while camped, and will hear the Music on
Hold. Once the contact is ready to take the call (contact status becomes 'Online'), the call is
automatically transferred and will be removed from the Switchboard Panel.
3-Way Conference
Pressing the Conference button allows you to participate in 3-Way conference calls. This button is dulled
when this action is not an option. Starting a 3-Way Conference Call is possible whilst two calls, both or
either, are
,
or
; or at most one of them is in a
state. To
create a 3-Way Conference, do the following Steps:
1. Link the 2 calls to be transferred together by clicking in the link column in the Switchboard Panel.
You need to do this for both calls, thereby identifying the calls being linked.
2. Press the Conference button.
The Call Control Panel will change to look like the one below
Page 37 of 40
Reception Console v. 13.1
Starting a 3-Way Conference Call
To start a conference:
1. Link the two parties you wish to conduct a conference with from the switchboard.
2. The "Conference" button should light up; click it to begin the conference.
Notice that both calls become
, which is not possible in any other state.
Holding a Conference Call
To hold an active conference:
1. Click the HOLD button in the call control panel.
Both call states change to
when this button is pressed.
2. To re-active the conference, click the un-hold button.
Transferring a Conference Call
To transfer a conference to another party:
1. Select one participant in the conference
2. Select the destination party from the contacts panel, enter the target number in the dial pad, or
select a number from the speed-dial list.
3. Click the "TRANSFER CONFERENCE" button in the call control panel.
Page 38 of 40
Reception Console v. 13.1
Ending a Conference Call
To end a conference call:
1. Click the "END" button in the call control panel.
The calls are then removed from the switchboard and terminated.
Keeping Notes
Reception Console incorporates three areas where the operator can retain different types of notes.
These are:
•
•
•
Company Profile
Company Notes
Contact Notes (Detail View)
NOTE: Once Notes are typed in any of the Reception Console note fields, they are automatically saved.
Company Profile
The Company Profile area is located on the right hand side of the Switchboard Panel. To modify content
in the Company Notes area performs the following steps:
1. Open the Company Profile area by clicking on the slider.
2. Click the text area and type to add/edit/delete content.
Company Notes
The Company Notes area is located on the right hand side of the Switchboard Panel. To modify content
in the Company Notes area, use the following steps:
1. Open the Company Notes area by clicking on the slider.
Page 39 of 40
Reception Console v. 13.1
2. Click the text area and type to add/edit/delete content.
Contact Notes
To retain notes specific to an individual contact perform the following steps:
1. Select the contact record (row) you want to leave a note beside from the Contact Directory whilst
in detail view.
2. Click on Edit
3. Type the notes you wish to store and hit OK.
Page 40 of 40
Reception Console v. 13.1