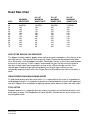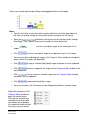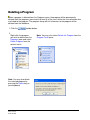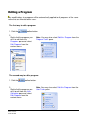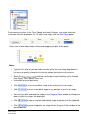
1
Owners Manual
© WOODWAY USA
PHONE # 262 548 6235
FAX# 262 548 6239
FORM: FORCE
REV: 10-23-07
APPR BY: EW
WOODWAY SERVICE PROVIDER INFORMATION SHEET
NAME OF COMPANY _________________________________________________
CONTACT PERSON _________________________________________________
ADDRESS __________________________________________________________
__________________________________________________________
PHONE NUMBER ____________________________________________________
FAX NUMBER _______________________________________________________
MAJOR CITIES AND AREAS YOUR COMPANY SERVICES ___________________
___________________________________________________________________
___________________________________________________________________
FORM: FORCE
REV: 10-23-07
APPR BY: EW
TABLE OF CONTENTS
CHAPTER 1: GETTING STARTED ................................................................................ 6
IMPORTANT SAFETY INSTRUCTIONS ...................................................................... 7
THINGS TO CONSIDER BEFORE STARTING EXERCISE PROGRAM ..................... 9
THEORY OF WOODWAY’S FITNESS PROGRAMS ................................................. 11
CHAPTER 2: USERS .................................................................................................... 12
CREATING A NEW USER ......................................................................................... 13
DELETING A USER ................................................................................................... 14
EDITING A USER....................................................................................................... 15
LOGGING IN A USER ................................................................................................ 16
LOGGING OUT A USER ............................................................................................ 17
CHAPTER 3: PROGRAMS ........................................................................................... 18
CREATING A NEW PROGRAM ................................................................................. 19
SAVING A PROGRAM ............................................................................................... 21
REMOVING A PROGRAM ......................................................................................... 22
LINKING A PROGRAM .............................................................................................. 23
DELETING A PROGRAM ........................................................................................... 24
EDITING A PROGRAM .............................................................................................. 25
RUNNING A PROGRAM ............................................................................................ 28
RENAMING A PROGRAM ......................................................................................... 32
CHAPTER 4: RESULTS ............................................................................................... 33
SAVING A RESULT ................................................................................................... 34
DELETING A RESULT ............................................................................................... 35
GENERATING A REPORT FROM A RESULT........................................................... 36
GENERATING A GRAPH FROM A RESULT ............................................................. 38
RUNNING A PACE WORKOUT ................................................................................. 39
RENAMING A RESULT .............................................................................................. 42
CHAPTER 5: TASK PANES ......................................................................................... 43
USER TASKS PANE .................................................................................................. 44
USER COLLECTION PANE ....................................................................................... 45
DETAILS PANE .......................................................................................................... 46
PROGRAMS PANE .................................................................................................... 47
DETAILS PANE .......................................................................................................... 48
WORKOUT TASKS PANE ......................................................................................... 48
WORKOUT CONTROL PANE.................................................................................... 49
COMMAND STATE PANE ......................................................................................... 51
EDITOR TASKS PANE .............................................................................................. 51
EDITOR CONTROL PANE ......................................................................................... 52
DETAILS PANE .......................................................................................................... 53
REPORT TASKS PANE ............................................................................................. 53
GRAPH TASKS PANE ............................................................................................... 54
GRAPH CONTROL PANE.......................................................................................... 55
FORM: FORCE
REV: 10-23-07
APPR BY: EW
CHAPTER 6: TABBED WINDOWS .............................................................................. 56
MANUAL..................................................................................................................... 57
HORIZONTAL FORCE CALIBRATION: ..................................................................... 59
VERTICAL FORCE CALIBRATION: ........................................................................... 60
UNITS CONFIGURATION: ......................................................................................... 60
REPORT CONFIGURATION:..................................................................................... 61
DATA COLLECTION CONFIGURATION: .................................................................. 61
CHAPTER 7: TOOLBAR BUTTONS ............................................................................ 62
USERS ....................................................................................................................... 63
PROGRAMS............................................................................................................... 63
WORKOUT ................................................................................................................. 63
LOG OUT ................................................................................................................... 63
NEW USER ................................................................................................................ 63
NEW PROGRAM........................................................................................................ 64
OPTIONS ................................................................................................................... 64
CHAPTER 8: MENU BAR ............................................................................................. 65
NEW USER ................................................................................................................ 66
NEW PROGRAM........................................................................................................ 66
WORKOUT ................................................................................................................. 66
LOG OUT ................................................................................................................... 66
CLEAN PROGRAMS COLLECTION .......................................................................... 66
USERS ....................................................................................................................... 67
PROGRAMS............................................................................................................... 67
OPTIONS ................................................................................................................... 67
INSERT STAGE ......................................................................................................... 67
COPY STAGE ............................................................................................................ 67
PASTE STAGE........................................................................................................... 67
CUT STAGE ............................................................................................................... 67
DELETE STAGE ........................................................................................................ 68
SEARCH..................................................................................................................... 68
CONTENTS ................................................................................................................ 68
CHAPTER 9: PREVENTATIVE MAINTENANCE ......................................................... 69
CLEANING AND INSPECTION .................................................................................. 70
LUBRICATION ........................................................................................................... 71
ADJUSTMENTS AND CALIBRATION........................................................................ 71
CHAPTER 10: WARRANTY INFORMATION ............................................................... 72
CHAPTER 11: WRAP UP ............................................................................................. 74
TROUBLESHOOTING ............................................................................................... 75
PREVENTATIVE MAINTENANCE LOG ..................................................................... 77
NUMBERS TO KNOW ............................................................................................... 78
FORM: FORCE
REV: 10-23-07
APPR BY: EW
MY WOODWAY ________________________ ARRIVED _______________________
Model Name
Date
WOODWAY History
WOODWAY’s history began in Germany in 1974. Willi Schoenberger, a technical director in
charge of planning a fitness center, noticed that the most important piece of equipment, the
treadmill, did not meet the most important requirements: a mechanically sound machine that
is designed to meet human needs.
He envisioned a comfortable surface that did not interfere with the natural biomechanics of
running or walking. Also, he wanted to design a transportation system which eliminated the
friction associated with the conventional (conveyor belt) treadmills. After intensive research,
and trial and error (and in cooperation with the Deutsche Sporthochschule in Koln, Germany),
Willi developed and patented a very unique and revolutionary treadmill design.
In 1975, WOODWAY GMBH was founded in Weil am Rhein, Germany. The name
“WOODWAY” is derived from the German “wald weg” or “way of the woods” – the feel of
running on a soft pine needle covered path in the forest.
In 1983, a manufacturing license was awarded to Sakai Medical, for the use of WOODWAY
technology in the Japanese marketplace.
In 1988, a U.S. license was granted to a small, but well-established manufacturing company
in Waukesha, Wisconsin. WOODWAY USA was formed when the U.S. incarnation of the
WOODWAY was developed and completed in 1990. WOODWAY USA is very proud to be
the primary manufacturer of WOODWAY Treadmills worldwide, exporting treadmills each
month to Germany and Japan for international distribution, in addition to serving our domestic
customers and clients.
Today, WOODWAY’s design and manufacturing facilities in the United States, Germany and
Japan make WOODWAY the largest specialized treadmill manufacturer in the world.
Constant enhancements in quality, design and function are shared and implemented by all
three WOODWAY manufacturers.
FORM: FORCE
REV: 10-23-07
APPR BY: EW
Chapter
1
GETTING STARTED
IMPORTANT SAFETY INSTRUCTIONS
TECHNICAL DATA
THINGS TO CONSIDER
THEORY OF WOODWAY FITNESS
FORM: FORCE
REV: 10-23-07
APPR BY: EW
Important Safety Instructions
All basic pertinent precautionary measures must always be taken into account when using a
treadmill. Please therefore read this manual carefully and familiarize yourself with the
operation of the unit and with all warning signs fitted to the machine.
DANGER: The treadmill must be disconnected before cleaning to protect from electric
shocks.
The surfaces of the treadmill should not be soaked with liquid; the best way to clean the
running mat is with a spray or a damp cloth.
CAUTION: Fuses may only be replaced by fuses of the same time and rated output to
provide permanent protection from fire.
WARNING: The following points must always be observed to protect from burns, electric
shocks and injuries:
1. Never leave the treadmill connected and running without supervision. Before leaving
the machine, stop it and disconnect it from the mains. To do so, switch all control
elements to STOP or OFF and then pull the plug out of the socket. This procedure is
always necessary when the treadmill is at a standstill and before dismantling any
parts.
2. The treadmill must be continuously monitored when used in the vicinity of children or
physically and mentally disabled persons.
3. The treadmill may only be used for the purposes described in this manual.
4. Never operate a treadmill with defective plug or cable or a running mat which is
damaged or not functioning correctly.
5. The cable should not come in contact with heating surfaces or sharp edges.
6. No objects of any kind may fall through the openings or onto moving machine
components. Also keep hands, hair, loose clothing, towels etc. away from the moving
treadmill.
7. Only qualified maintenance staff can carry out electrical and mechanical repair work.
Please contact your dealer, the Service Center, or the WOODWAY factory directly.
Only original spares may be used.
FORM: FORCE
REV: 10-23-07
APPR BY: EW
Important Directions
The following instructions are to be observed when operating the treadmill:
1. Loose clothing and towels may not be placed on the running mat of the treadmill.
2. The area behind the treadmill must be clear and at least 200 cm away from walls or
furniture.
3. Always keep hands well away from moving parts.
4. Never allow children near the treadmill without supervision. The Force treadmill is
designed for up to 500 pounds running, 800 pounds walking. If any objects should
become lodged in the belt or rollers, there is no guarantee that the treadmill will stop
immediately.
5. Never get on or off the treadmill while the running mat is moving. Always use handles
or a railing whenever possible.
6. Always wear suitable shoes, e.g. shoes with a rubber sole or other non-slip shoes.
High-heeled shoes or shoes with leather soles are not suitable. Also check that there
are no stones lodged in the soles.
7. Training sessions must be interrupted immediately in the case of abnormal stress
symptoms or pain. If there is any doubt, please consult your doctor.
8. Containers with liquids may never be placed on the treadmill.
9. To rule out the risk of electric shocks, avoid all contact between water and the electric
components (i.e. motor, mains cable and mains plug). Never service your treadmill
yourself. Please always contact your WOODWAY dealer or the authorized Service
Center.
10. For safety reasons, the treadmill must always be switched off when adjusting the
settings or when any other work is being carried out in the vicinity of the treadmill.
FORM: FORCE
REV: 10-23-07
APPR BY: EW
Things to Consider Before Starting Exercise Program
CONSULT A PROFESSIONAL FITNESS TRAINER
It is advisable for all exercise beginners to consult a professional fitness instructor or personal
trainer to develop an overall fitness evaluation/wellness program before starting an exercise
routine.
CONSULT A PHYSICIAN
If you are over 40, have a history of heart disease, are overweight, or have not been involved
in any kind of exercise program for several years, it is recommended that you see your
physician as a precaution before engaging in a vigorous exercise program.
UNDERSTAND THE IMPORTANCE OF WARMING UP AND COOLING DOWN
It is important to warm up and cool down prior to and at the end of each work out,
respectively. Always try to incorporate a series of basic leg stretches before and after each
workout. Stretching provides the necessary flexibility to prevent sore muscles and injury
during daily activities.
LEARN HOW TO TAKE YOUR PULSE PROPERLY
To select the Fitness Level that is most suitable to exercise, it is important to correctly
determine your heart rate or pulse. To do this, it is recommended that you use a good quality
heart rate monitor. If you do not have a heart rate monitor, you can find your pulse by placing
your fingers on the underside of your wrist or either side of your throat. While looking at the
second hand on your watch, count how many heartbeats you feel within fifteen (15) seconds.
Multiply this number by four to get your Beats Per Minute (BPM). Your heart rate will be
needed when you take the Self-Fitness Test.
KNOW YOUR MAXIMUM HEART RATE
To determine your maximum heart rate, subtract your age from 220 (general formula). The
difference is the approximation of your maximum heart rate, as used by the American Heart
Association and The American College of Sports Medicine. The only way to determine your
true maximum heart rate is to have a stress test administered by your physician. The
American Heart Association recommends that you have a stress test done if you have any
history of heart disease or if you are over the age of 40 and beginning an exercise program.
During exercise, it is recommended that you not exceed 85% of your maximum heart rate.
Our programs are designed to keep your heart rate within your Target Zone. Your Target
Zone is an area between 60 and 75% of your maximum heart rate. Should you find your heart
rate above the 75% level, you have probably selected a Fitness Level that is too high in that
particular Fitness Program. You should either drop to a lower intensity level in the same
Fitness Program, or use a less stressful Fitness Program.
FORM: FORCE
REV: 10-23-07
APPR BY: EW
Heart Rate Chart
AGE
MAXIMUM
HEARTRATE
60% OF
MAXIMUM
HEART RATE
20
25
30
35
40
45
50
55
60
65
70
75
200 BPM
195
190
185
180
175
170
165
160
155
150
145
120 BPM
120
110
110
100
100
100
90
90
90
90
80
75% OF
MAXIMUM
HEART RATE
85% OF
MAXIMUM
HEART RATE
150 BPM
150
140
130
130
130
120
120
120
110
110
100
170 BPM
160
160
150
150
140
140
130
130
130
120
120
HOW OFTEN SHOULD YOU EXERCISE?
The biggest mistake made by people when starting an exercise program is that they try to do
too much too fast. Give yourself time to get into shape. Becoming reconditioned also takes
time. Either way, it will not happen overnight. Remember: the key is consistency and duration
of exercise, not intensity. Fitness experts recommend that you start by exercising three to
four days a week within your target heart rate for at least 20 minutes per session. Your
ultimate goal should be to get yourself gradually to a level of fitness where you can
comfortably keep your heart rate in the Target Zone for 50 to 60 minutes four to five times a
week.
WEAR PROPER WALKING/JOGGING SHOES
To help avoid getting sore feet and muscles, it is suggested that you invest in a good pair of
walking/jogging shoes. It is important to purchase a comfortable pair of shoes with good heel
and arch support. Also, remember to regularly replace old or worn out shoes with new shoes.
STAY ACTIVE
Between workouts it is suggested that you simply stay active, eat well-balanced meals, and
drink plenty of water. The combination of these activities should enhance your chances for a
future of good health.
FORM: FORCE
REV: 10-23-07
APPR BY: EW
Theory of WOODWAY’s Fitness Programs
Today's research shows that we have underestimated the value of walking as an effective
method of achieving good cardiovascular and aerobic conditioning.
Jogging was thought to be the best way to achieve these goals. Research now tells us that
brisk walking actually can burn more calories than jogging and provide the fitness level
needed to live a healthy life. Even well known authorities in the field of aerobics are reversing
their ideas on the benefits of running over walking. In the January 1990 issue of Prevention
magazine, Charlotte A. Tate, a board of trustee member of the American College of Sports
Medicine stated, "The fact is, running a marathon does not make you any healthier than
walking three miles three times a week at a fairly fast pace".
The key to a successful exercise program is consistency. It is the small advances over a long
period of time that will give you the big benefits of fitness. Just as you can not wake up one
morning and be a professional baseball player, you can not achieve fitness overnight. Any
professional must learn his/her trade to become successful; so you must give yourself time to
achieve fitness.
WOODWAY has looked hard at today's research to form the philosophy behind our Fitness
Programs. Consistency is the key. It is the time you dedicate to your exercise program, not
the intensity level that is important.
Because walking is something that can easily be done by the unconditioned person as well
as by the highly conditioned person, WOODWAY has dedicated many of our programs to
walking and slow jogging. These programs are designed to gradually take you to a wellconditioned state and keep you there. Achieving fitness can be fun and not nearly as
strenuous as you thought.
Most of our programs are dedicated to the general public, although we do meet the need of
the fitness enthusiasts by including high intensity workouts for joggers and runners and elite
athletes alike.
Technically, our programs spread a workload over as many muscle groups as possible at a
low intensity (i.e. walking or jogging) for long periods of time. These programs gradually
increase the workloads by using speed and incline to keep the activity as aerobic (vs.
anaerobic) as possible. This will enable you to achieve the best kind of cardiovascular
conditioning exercise. Because our programs are designed to do all of this for you, you do not
need to worry about how to get into shape. Simply use your WOODWAY treadmill on a
regular basis and let us worry about the technicalities. Just have fun!
FORM: FORCE
REV: 10-23-07
APPR BY: EW
Chapter
2
USERS
FORM: FORCE
REV: 10-23-07
APPR BY: EW
Creating a new user
The topics contained within the Users heading provide help for all user related tasks. Learn
how to create a new user or delete an existing user. You can also make changes to a user’s
profile by editing a user. Finally, learn how to log a user in or log a user out.
The first way to create a new user:
1. Click the
toolbar button.
The second way to create a new user:
1. Press the
toolbar button.
2. Click Create New User in the User Tasks pane.
Note
• Items marked with an * are required.
Enter the information on
the Standard and Address
tabs and click OK.
The user(s) you create are
displayed in the
User Collection pane.
FORM: FORCE
REV: 10-23-07
APPR BY: EW
Deleting a User
Click the
button to make the User Tasks and User Collection panes visible.
The first way to delete a user:
1. Right-click the named user in the User Collection pane.
2. Select Delete from the context menu.
Note
• You may also delete the selected user by pressing the Delete key
on your keyboard.
The second way to delete a user:
1. Select Delete this User from the User Tasks pane.
Click the Yes button to delete the user.
• The user and all
associated records will
be permanently
deleted.
• Programs will not be deleted.
They remain intact in the
Programs pane.
FORM: FORCE
REV: 10-23-07
APPR BY: EW
Editing a User
Click the
button to make the User Tasks and User Collection panes visible.
The first way to edit a user:
1. Right-click the named user in the User Collection pane.
2. Select Edit from the context menu.
The second way to edit a user:
1. Select Edit this User from the User Tasks pane.
Make the appropriate changes and press OK.
FORM: FORCE
REV: 10-23-07
APPR BY: EW
Logging In a User
Click the
button to make the User Tasks and User Collection panes visible.
The first way to log in a user:
1. Right-click the named user in the User Collection pane.
2. Select Log In from the context menu.
Notes
• Items in the context menu that are in bold can be executed using
a double-click or by pressing the Enter key on your keyboard.
• Double-click the user name or press Enter to log in.
The second way to log in a user:
1. Select the named user in the User Collection pane.
2. Select Log this User In from the User Tasks pane.
The name of the logged-in user is displayed in the bottom-left corner of the status bar.
FORM: FORCE
REV: 10-23-07
APPR BY: EW
Logging Out a User
The first way to log out a user:
1. Click the
toolbar button.
The second way to log out a user:
Click the
button to make the User Tasks and User Collection panes visible.
1. Click the name of the user you wish to log out in the User Collection pane.
2. Select Log Out from the User Tasks pane.
The name of the user is now removed from the status bar.
FORM: FORCE
REV: 10-23-07
APPR BY: EW
Chapter
3
PROGRAMS
FORM: FORCE
REV: 10-23-07
APPR BY: EW
Creating a New Program
The topics contained within the Programs heading provide help for all program related
tasks. Learn how to create a personalized workout program, and how to save a program.
Remove an existing program from a particular user, but keep it in the list of programs for
future use. Learn how to link a program to any user. A user can have more than one
program, and the same program can be linked to different users. Delete a program to
permanently remove it. You may also edit a program using the Program Editor. Learn how
to run a program and increase or decrease the amount of resistance using the brake spin
button. Finally, learn how to rename a program.
The program editor allows you to create a personalized workout program. A program is
composed of one or more stages. Each stage includes a length of time, speed, load, and type
of instruction (Sprint, Run, Jog, Walk, None).
There are two ways to access the Program Editor:
The first way to access the Program Editor:
1. Click the
toolbar button.
The second way to access the Program Editor:
1. Click the
toolbar button.
2. Select Create New Program from the Program Tasks pane.
Enter numerical values in the Time, Speed, and Load list boxes, and select a desired
Instruction from the drop-down list. To add a new stage, click the New Stage button.
FORM: FORCE
REV: 10-23-07
APPR BY: EW
Values can also be adjusted by clicking and dragging the bars of the graph.
Notes
• Type the first letter of your desired instruction while the Instruction drop-down list
has focus to quickly change the instruction without having to use the mouse.
•
Select the
check box so that pressing the tab key cycles through
New Stage, Time, Speed, Load, and Instruction for faster data entry.
Click
•
to insert a new blank stage at the end of your list of
stages.
•
Click
to insert a new blank stage at any position in your list of stages.
•
You may also click-and-drag the stages in the Program Editor window to change the
order in which the stages are displayed.
•
Click
•
Click
to paste a copied or cut stage into the Program Editor window in the
desired position.
•
Click
to cut or remove a selected stage from the Program Editor window
and place it on the clipboard.
•
Click
•
You may also press the Delete key on your keyboard to delete a selected stage.
to copy a selected (highlighted) stage and place it on the clipboard.
to permanently delete a stage.
Right-click anywhere in the
Program Editor window to
open the context menu.
Pressing the shortcut keys
located next to each editor
task allows you to perform
the respective action without
having to use your mouse.
FORM: FORCE
REV: 10-23-07
APPR BY: EW
Saving a Program
When you're ready to save
a new program, click Save
As... in the Editor Control
pane. Enter a program
name and an optional
description.
The program name and
description are now
visible in the Details
pane.
You can now access your program
from the User Collection pane.
Expand the tree view by clicking
the to access your program.
Changes to a program that already has been named can be saved by
clicking Save in the Editor Control pane.
FORM: FORCE
REV: 10-23-07
APPR BY: EW
Removing a Program
Removing a program is different than deleting a program. Removing a program causes the
program to be removed from the User Collection pane but not from the Programs pane.
You would choose this option in situations where you wish to remove a particular program
from a user but retain it in the list of programs for future use.
1. Click the
toolbar button.
2.
Right-click the program in the
User Collection pane and select
Remove Program from the
context menu.
Note
• You may also select
Remove this Program from
the User Tasks pane.
A message is displayed reminding you that the program will only be removed from the
users contents but not from the Programs list.
Note: The program is not removed from the list of programs in the Programs pane.
FORM: FORCE
REV: 10-23-07
APPR BY: EW
Linking a Program
Linking a program allows you to associate any program with any user. A user can have
more than one program, and the same program
can be linked to different users.
1. Click the
toolbar button.
2. Log in the user who will be the recipient of the linked program. • see
3. Click the
Logging In a User
toolbar button.
4.
Right-click the program you
wish to link from the list in
the Programs pane and
select Link Program from
the context menu.
Note
• You may also select Link this Program to Logged
In User from the Program Tasks pane.
For this example, a program named Sample Program has been linked to a user named
Jane Smith.
FORM: FORCE
REV: 10-23-07
APPR BY: EW
Deleting a Program
When a program is deleted from the Programs pane, the program will be permanently
deleted from the programs pane and also from all of the users within the user collection who
are linked to the program. The program along with all references to the program will be
deleted from the database.
1. Click the
toolbar button.
2.
Right-click the program
you wish to delete from the
Programs pane and select
Delete Program from the
context menu.
Note: You may also delete
the selected program by
pressing the Delete key on
your keyboard.
FORM: FORCE
REV: 10-23-07
APPR BY: EW
Note: You may also select Delete this Program from the
Program Tasks pane.
Editing a Program
Any modifications to a program will be automatically applied to all programs of the same
name that are linked to other users.
The first way to edit a program:
1. Click the
toolbar button.
2.
Right-click the program you
wish to edit from the
Programs pane and select
Edit Program from the
context menu.
Note: You may also select Edit this Program from the
Program Tasks pane.
The second way to edit a program:
1. Click the
toolbar button.
2.
Right-click the program you
wish to edit from the User
Collection pane and select
Edit Program from the
context menu.
FORM: FORCE
REV: 10-23-07
APPR BY: EW
Note: You may also select Edit this Program from the
User Tasks pane.
Enter numerical values in the Time, Speed, and Load list boxes, and select a desired
Instruction from the drop-down list. To add a new stage, click the New Stage button.
Values can also be adjusted by clicking and dragging the bars of the graph.
Notes
•
Type the first letter of your desired instruction while the Instruction drop-down list
has focus to quickly change the instruction without having to use the mouse.
•
•
Select the
check box so that pressing the tab key cycles through
New Stage, Time, Speed, Load, and
Instruction for faster data entry.
•
Click
•
Click
•
You may also click-and-drag the stages in the Program Editor window to change the
order in which the stages are displayed.
•
Click
•
Click
to paste a copied or cut stage into the Program Editor window in the
desired position.
FORM: FORCE
REV: 10-23-07
APPR BY: EW
to insert a new blank stage at the end of your list of stages.
to insert a new blank stage at any position in your list of stages.
to copy a selected (highlighted) stage and place it on the clipboard.
•
Click
to cut or remove a selected stage from the Program Editor window
and place it on the clipboard.
•
Click
•
You may also press the Delete key on your keyboard to delete a selected stage.
•
Right-click anywhere in the Program Editor window to open the context menu.
Pressing the shortcut keys located next to each editor task allows you to perform the
respective action without having to use your mouse.
FORM: FORCE
REV: 10-23-07
APPR BY: EW
to permanently delete a stage.
Running a Program
The first way to run a program:
1. Click the
toolbar button.
2. Right-click the program you wish to run from the Programs pane and select Run
Program from the context menu.
Notes
• Items in the context menu that are in bold can be executed
using a double-click or by pressing the Enter key on your
keyboard.
• Double-click the program name or press Enter to
open the Workout pane to run the program.
You can also run a program by clicking Run this Program from the Program Tasks pane.
The second way to run a program:
1. Click the
toolbar button.
2. Expand the tree in the User
Collection pane by clicking the
until you reach the program you
wish to run, then right-click the
program and select Run
Program from the context menu.
FORM: FORCE
REV: 10-23-07
APPR BY: EW
Note: You may also run a program by clicking Run
this Program from the User Tasks pane.
Note: Items in the context menu that are in bold can be executed using a double-click or by
pressing the Enter key on your keyboard.
Note: Double-click the program name or press Enter to open the Workout pane to run the
program.
Click and drag the spin
button to set a value for the
brake. You may also enter a
value into the text box and
press Enter.
Press the Start button in the
Workout Control pane to
begin running the program. If
the Lag Alarm check box is
checked, when a runner falls
behind the entered stage
speed for the active stage,
the alarm will sound alerting
the runner to speed up.
FORM: FORCE
REV: 10-23-07
APPR BY: EW
The Stage View window
displays the details of each
stage of your program as it
runs. It displays the current
stage number, stage time,
speed, brake, and command
name. As one stage ends and
another begins, the details of
the new stage replace the
former.
The Relative Stage Speed gauge displays
the entered speed of the active stage
relative to the current speed of the treadmill
belt. If the Lag Alarm check box is checked,
when a runner falls behind the entered
stage speed for the active stage, the alarm
will sound alerting the runner to speed up.
Once the runner reaches or exceeds the
entered stage speed for the active stage,
the alarm will shut off.
FORM: FORCE
REV: 10-23-07
APPR BY: EW
Stage speed – Current belt speed = Relative Stage Speed
The progress bar displays the current status of
the program as it runs.
When the program finishes, the window below will be displayed. By default, the Result
Name will consist of the date and time of the
workout. However, you can enter any name you wish in the Result Name text box. You
may also enter any additional information in the Notes text box. Check the Generate
Graph Now check box and the Generate Report Now check box to generate a graph and a
report immediately after the workout is saved.
FORM: FORCE
REV: 10-23-07
APPR BY: EW
Renaming a Program
The first way to rename a program:
1. Click the
toolbar button.
2. Right-click the program you wish to rename from the Programs pane. Click Rename
from the context menu. Type the new name and press Enter.
The second way to rename a program:
1. Click the
toolbar button.
2. Right-click the program you wish to rename from the User Collection pane. Click Rename
from the context menu. Type the new name and press Enter.
Note: Another way to rename a program is to select it, then click it again. Type the new
name and press Enter.
Note: Any changes to the program name will be automatically applied to all programs of the
same name that are linked to other users.
FORM: FORCE
REV: 10-23-07
APPR BY: EW
Chapter
4
RESULTS
FORM: FORCE
REV: 10-23-07
APPR BY: EW
The topics contained within the Results heading provide help for tasks relating to program
results. Learn how to save a result or delete a result. You may also generate a report from a
result. A report contains detailed data collected from your saved result. Learn how to generate
a graph from the data as well. Each element (Distance, Speed, Power, Heart Rate, Target
Speed, Horizontal Force, and Vertical Force) are recorded and color coded, corresponding to
an individual line on the graph. Run a pace workout to compare the distance at the same point
in time as the result you ran the pace workout against. Finally, learn how to rename a result.
Saving a Result
When you save a workout program, the collected data is stored as a result. You can save as
many results as you wish. Once you save a result you can run a pace workout, generate a
report, or generate a graph from the collected data.
1. Begin by running a program.
2. When the program finishes, the window below will be displayed. By default, the Result Name
will consist of the date and time of the workout. However, you can enter any name you wish in
the Result Name text box. You may also enter any additional information in the Notes text box.
Check the Generate Graph Now check box and the Generate Report Now check box to
generate a graph and a report immediately after the workout is
saved.
Expand the Results folder
in the User Collection pane
tree to access the saved
result.
FORM: FORCE
REV: 10-23-07
APPR BY: EW
Deleting a Result
1. Locate the result you wish to delete by expanding the tree in the User Collection pane.
2. Right-click the result and
select Delete Result from the
context menu.
3. Click the Yes button to
confirm the deletion of the
named result.
FORM: FORCE
REV: 10-23-07
APPR BY: EW
Note: You may also delete the selected result by pressing the
Delete key on your keyboard
Generating a Report from a Result
A report contains detailed data collected from your saved result.
1. Expand the tree in the User Collection pane until you reach the desired result.
2. Right-click the result and select Generate Report from the context menu.
The report that is displayed in the Reports window contains all of the recorded data from the
program you executed. The data contained in the report includes the following:
•
The name of your result is displayed to the right of Performance Report.
•
The name of your user is displayed to the right of User Name.
•
The date and time you executed your workout program is displayed to the right of Time
Executed.
•
The default Units Configuration under the Totals heading is Time (Seconds), Distance
(Miles), Work (Joules).
•
The default Units Configuration under the Averages heading is Heart Rate (Beats/Min),
Speed (Miles/Hour), Power (Watts), Force (Pounds).
•
The default Units Configuration under the Peaks heading is Heart Rate (Seconds), Speed
(Seconds), Power (Seconds), Force (Seconds).
•
Each element (Distance, Speed, Power, Heart Rate, Target Speed, Horizontal Force,
and Vertical Force) are color coded and correspond to an individual line on the graph.
•
The Notes section displays information you optionally provided when you saved your
workout.
FORM: FORCE
REV: 10-23-07
APPR BY: EW
Notes:
•
The
toolbar button refreshes the report, resetting its property to default.
•
The
toolbar button prints the report.
•
The
toolbar button returns the report to Print Layout if the Zoom property was changed.
•
The
toolbar button allows you to change the Page Setup properties.
•
The
toolbar button gives you the option to export your report as a Microsoft® Excel
spreadsheet or an Acrobat® (PDF) file.
•
The
window.
FORM: FORCE
REV: 10-23-07
APPR BY: EW
drop-down list changes the size of the report as it's viewed in the Reports
Generating a Graph from a Result
1. Expand the tree in the User Collection pane until you reach the desired result.
2. Right-click the result and select Generate Graph from the context menu.
When you generate multiple graphs for comparison, the first graph that you generate
populates the graph1 (top) position. The next graph that you generate moves to the graph1
position, and the graph that was in the graph1 position is pushed down to graph2 (bottom). If a
third graph is generated, then the graph that was in the graph2 position is removed and
replaced by graph1, while the newly generated graph is placed in the graph1 (top) position. It's
important to note that newly generated graphs are always populated in the top position, while
other graphs are shifted downward until they are removed. This process is repeated as
successive graphs are generated.
Notes
• By default, only
and
will be checked in the Graph Control pane.
•
Check
to display two graphs at the same time in a split window. Graph one is
displayed on top and graph two is displayed on the bottom.
•
Each element (Distance, Speed, Power, Heart Rate, Target Speed, Horizontal Force,
and Vertical Force) are color coded and correspond to an individual line on the graph.
•
As you move the mouse over the graph, the values are dynamically updated to reflect the
changes in the line position.
•
Click-and-drag with the left mouse button to create a box around a specific area of the
graph, then release to zoom in.
•
The entire graph can be repositioned by clicking and holding the right mouse button and
dragging the graph to the desired location.
•
Refresh the graphs to their original state at any time by click the
Graph Tasks pane.
•
Click the
FORM: FORCE
REV: 10-23-07
APPR BY: EW
button in the Graph Tasks pane to print the graphs.
button in the
Running a Pace Workout
The pace workout compares distance at the same point in time as the result you ran the pace
workout against. Pace distance is the distance from the previous runner that created the recorded
result at the same point in time. Relative distance is the distance between the person currently
running and the position of the previous runner that created the recorded result at the same point
in time. A negative value indicates that the runner trails the previous runner that created the
recorded result. A positive value indicates that the runner is leading the previous runner that
created the recorded result.
Pace Distance represents the
distance from the previous runner
that created the recorded result at
the same point in time.
Relative Distance, as labeled on the gauge, is the distance between the person currently running
and position of the previous runner that created the recorded result at the same point in time. The
odometer displays your current relative position.
The Pace Brake label displays the level of resistance set by the brake.
Open the Results folder in the User Collection pane to access the result you
wish to run a pace workout from. Right-click the result and select Run Pace
Workout from the context menu.
Note: You may also select Run Pace
Workout from the User Tasks pane.
FORM: FORCE
REV: 10-23-07
APPR BY: EW
Note: Items in the context menu that are in bold can be executed using a double click or by
pressing the Enter key on your keyboard.
Note: Double-click the result name or press Enter to run a pace workout.
Press the Start button in the
Workout Control pane to begin
running the pace workout. If the
Lag Alarm check box is checked,
when the distance of the runner
falls below that of the previous
runner, the alarm will sound
alerting the runner to speed up.
Once the runner reaches or
exceeds the distance of the
previous runner, the alarm will
shut off.
The progress bar displays the current status of the result as it runs.
When the result finishes, the window below will be displayed. By default, the Result Name will
consist of the date and time of the workout. However, you can enter any name you wish in the
Result Name text box. You may also enter any additional information in the Notes text box.
Check the Generate Graph Now check box and the Generate Report Now check box to
generate a graph and a report immediately after the workout is saved.
FORM: FORCE
REV: 10-23-07
APPR BY: EW
If you run a program using the default units configuration, save the workout, then modify the
units configuration from the Options page and try to run a pace workout, you will receive a
warning message. Click the Yes button to change the units to the recorded units values and
continue.
FORM: FORCE
REV: 10-23-07
APPR BY: EW
Renaming a Result
1. Click the
toolbar button to make the Users pane visible.
2. Expand the Results folder in the User Collection pane tree to access the saved result(s).
3. Right-click the result you wish to rename. Click Rename from the context menu. Type the
new name and press Enter.
Note: Another way to rename a result is to select it, then click it again. Type the new name
and press Enter.
FORM: FORCE
REV: 10-23-07
APPR BY: EW
Chapter
5
TASK PANES
FORM: FORCE
REV: 10-23-07
APPR BY: EW
The topics contained within the Task Panes heading provide help for tasks relating to users,
programs, and results. The task panes are always displayed along the left side of the
application. The Users pane contains user-related tasks. Programs are stored in the
Programs pane. The Workout pane contains various workout tasks, and is opened when you
run a program. Learn how to create a new program using the Program Editor pane. View the
details of your workout in the form of a report. The Reports pane provides you with additional
user and program selections. Finally, the Graphs pane contains graph-related tasks,
including the ability to isolate a particular element (Distance, Speed, Power, Heart Rate,
Target Speed, Horizontal Force, or Vertical Force) and display it on the graph in its own color.
User Tasks Pane
The User Tasks pane is interrelated with the User Collection pane and contains selections
related to users, programs, and results. The selections will change depending upon what is
selected in the User Collection pane below it, with the exception of the first three choices.
They are listed below.
•
Click the
•
The
•
The
button to create a new user.
button collapses the tree in the User Collection pane.
button logs out the user currently logged in
When you select a named user from the User Collection pane:
•
Click the
•
Click the
•
Click the
button to log in the selected user.
button to edit the selected user.
button to delete the selected user.
When you select a named result from the Results folder of the User Collection pane:
•
Click the
button to view a report containing the details of the result.
•
Click the
graph.
button to view the details of the result in the form of a
•
Click the
button to run a pace workout.
FORM: FORCE
REV: 10-23-07
APPR BY: EW
User Collection Pane
The User Collection pane stores the collection of users and their related data.
Click the
toolbar button to access the User Collection pane.
Users, programs, and results are stored in an expandable tree. Click the + next to the
respective item to expand that section of the tree.
Note: You can also search for users with the keyboard. Click the Users toolbar button, then
click anywhere in the User Collection pane to set the focus. Begin by typing the last name of
a particular user and the User Collection pane will resolve and match the user you are
searching for with each key stroke in succession. This is also functional for Programs and
Results, but the search only responds to what is visible. Items collapsed in the tree are not
included in the search.
FORM: FORCE
REV: 10-23-07
APPR BY: EW
Details Pane
The Details pane is interrelated with the User Collection pane and displays details relating to
users, programs, and results. The selections will change depending upon what is selected in
the User Collection pane.
Select a user from the User Collection pane to display details associated with that particular
user.
Select a program name from the User
Collection pane to view its details.
Select a result from the User Collection pane to view its details.
FORM: FORCE
REV: 10-23-07
APPR BY: EW
Programs Pane
When a program is deleted from the Programs pane, the program will be permanently deleted
from the programs pane and also from all of the users within the user collection who are
linked to the program. The program along with all references to the program will be deleted
from the database.
The Programs pane is a master list where programs are stored. Select a program from the list
and choose an option from the Program Tasks pane.
You may also right-click a program from the list and choose an option from the context menu.
Note: You can also search for programs with the keyboard. Click the Programs toolbar
button, then click anywhere in the Programs pane to set the focus. Begin by typing the
name of a particular program and the Programs pane will resolve and match the program
you are searching for with each key stroke in succession. This is also functional for Users
and Results, but the search only responds to what is visible. Items collapsed in the tree are
not included in the search.
FORM: FORCE
REV: 10-23-07
APPR BY: EW
Details Pane
Select a program from the Programs pane to view its details.
The date and time you last modified or made any changes to
the program can be viewed below the Date Modified heading.
Workout Tasks Pane
•
Click the
•
Click the
•
Click the
•
Click the
•
Click the
button to open the Programs pane.
•
Click the
button to reset the values on all of the gauges to zero.
FORM: FORCE
REV: 10-23-07
APPR BY: EW
button to log out the currently logged in user.
button to begin running the opened program.
button to stop the currently running program.
button to open the Users pane.
Workout Control Pane
Click the Start button in the
Workout Control
pane to begin running a program
or a pace workout.
FORM: FORCE
REV: 10-23-07
APPR BY: EW
Note
• You may also click the Start
Workout button from the
Workout Tasks pan
Notes
check box is checked, when a runner falls behind
When running a program, if the
the entered stage speed for the active stage, the alarm will sound alerting the runner to
speed up. Once the runner reaches or exceeds the entered stage speed for the active stage,
the alarm will shut off.
When running a pace workout, if the
check box is checked, when the distance of
the runner falls below that of the previous runner, the alarm will sound alerting the runner to
speed up. Once the runner reaches or exceeds the distance of the previous runner, the
alarm will shut off.
FORM: FORCE
REV: 10-23-07
APPR BY: EW
Command State Pane
The Command State pane displays an image of a runner. The runner becomes animated
when you begin running a program, pace workout, or manual workout, but remains stationary
otherwise.
Editor Tasks Pane
• Click
to insert a new blank stage at the end of your list of stages.
• Click
to insert a new blank stage at any position in your list of stages.
• You may also click-and-drag the stages in the Program Editor window to change the order
in which the stages are displayed.
• Click
to copy a selected (highlighted) stage and place it on the clipboard.
• Click
desired position.
to paste a copied or cut stage into the Program Editor window in the
• Click
to cut or remove a selected stage from the Program Editor window and
place it on the clipboard.
• Click
to permanently delete a stage.
• You may also press the Delete key on your keyboard to delete a selected stage.
FORM: FORCE
REV: 10-23-07
APPR BY: EW
Editor Control Pane
When you're ready to save a new
program, click Save As... in the
Editor Control pane. Enter a
program name and an optional
description.
Changes to a program that already has been named can be saved by clicking Save in the
Editor Control pane.
Uncheck the
bar graph.
FORM: FORCE
REV: 10-23-07
APPR BY: EW
check box to remove the labels above the bars of the
Details Pane
The Details pane displays the
name and the description you
optionally assigned to the opened
program.
Report Tasks Pane
To access the Report Tasks pane,
select a result and click the button
from the User Tasks pane. You
may also right-click a result from
the User Collection pane and select
Generate Report from the context
menu.
• Click the
• Click the
• Click the
FORM: FORCE
REV: 10-23-07
APPR BY: EW
button to create a new user.
button to log out the currently logged in use a User
button to create a new program.
Graph Tasks Pane
To access the Graph Tasks pane, select a result and click the
button from
the User Tasks pane. You may also right-click a result from the User Collection pane and
select Generate Graph from the context menu.
Click the
The
FORM: FORCE
REV: 10-23-07
APPR BY: EW
button to create a new user.
button logs out the user currently logged in.
Graph Control Pane
When you generate multiple graphs for comparison, the first graph that you generate
populates the graph1 (top) position. The next graph that you generate moves to the graph1
position, and the graph that was in the graph1 position is pushed down to graph2 (bottom). If
a third graph is generated, then the graph that was in the graph2 position is removed and
replaced by graph1, while the newly generated graph is placed in the graph1 (top) position.
It's important to note that newly generated graphs are always populated in the top position,
while other graphs are shifted downward until they are removed. This process is repeated as
successive graphs are generated.
• By default, only
pane.
and
will be checked in the Graph Control
• Check
to display two graphs at the same time in a split window. Graph one is
displayed on top and graph two is displayed on the bottom.
• Each element (Distance, Speed, Power, Heart Rate, Target Speed, Horizontal Force, and
Vertical Force) are color coded and correspond to an individual line on the graph.
FORM: FORCE
REV: 10-23-07
APPR BY: EW
Chapter
6
TABBED WINDOWS
FORM: FORCE
REV: 10-23-07
APPR BY: EW
The topics contained within the Tabbed Windows heading provide help understanding the
information displayed on the opened tabs.The Workout tab displays data relating to
manual workouts, programmed workouts, and pace workouts. The Program Editor tab is
visible when you create a new program or edit an existing program. The Graphs tab is
displayed when you generate a graph from a result. The Reports tab becomes visible
when you generate a report from a result. Finally, click the Options button on the toolbar
to make the Options tab visible.
Manual
Click the
toolbar button to run a manual workout. Its details are displayed in the
Workout tab. The manual workout is a way to create a baseline for a runner for
designated period of time. It requires no setup other than logging in a user in order to
begin collecting the results. If you do not want to save the results of the session, you can
run the manual workout without logging a user in. However, a dialog box will appear
before the workout, informing the user that the data results will not be collected. When
prompted with this dialog, if the user clicks the Yes button, the manual workout will begin.
If the user clicks the No button, the workout will not start and the user will automatically be
taken to the User Collection pane to log in a user. If a user is logged in when the Start
button is clicked in the Workout Control pane, the manual workout will run indefinitely until
the user clicks the Stop button.
Use the Stop Workout
Markers window to enter
specific values for Time,
Distance, Speed, Work, or
Heart Rate. When
checked, the stop markers
will automatically stop the
running workout at the
entered value for the
selected stop marker. You
can have multiple stop
markers active at one time.
When multiple stop
markers are active, the
first value that matches the
running workout will stop
the running workout.
FORM: FORCE
REV: 10-23-07
APPR BY: EW
Click and drag the spin
button to set a value for the
brake. You may also enter a
value into the text box and
press Enter.
Press the Start button in the Workout Control pane.
To stop the running workout, click the Stop button. The window below will be displayed.
By default, the Result Name will consist of the date and time of the workout. However,
you can enter any name you wish in the Result Name text box. You may also enter any
additional information in the Notes text box. Check the Generate Graph Now check box
and the Generate Report Now check box to generate a graph and a report immediately
after the workout is saved. The results from a manual workout are stored in the Results
folder of the logged in user, in the User Collection pane.
FORM: FORCE
REV: 10-23-07
APPR BY: EW
Programmed
A programmed workout, or program is created in the Program Editor.
When you run a program, its details are displayed in the Workout tab.
Pace
When you run a pace workout, its details are displayed in the Workout tab.
Program Editor Tab
The Program Editor tab is displayed when you create a new program or edit an
existing program.
Graphs Tab
The Graphs tab is displayed when you generate a graph from a result.
Reports Tab
The Reports tab is displayed when you generate a report from a result.
Options Tab
Click the
button on the toolbar to open the Options tab.
Horizontal Force Calibration
This is where the user should setup the
calibration for the horizontal load cell. The
horizontal load cell is located at the rear of
the treadmill and is what the waist
harness is attached to. In the section,
Calibrate with no weight applied to
Horizontal load cell, the user should
have no weight attached to the load cell.
It should be free-floating. Press the
Calibrate button to capture the value. For
the Calibrate with weight applied to
Horizontal load cell section, hang a
weight plate from the horizontal load cell.
Enter the weight of the plate in pounds in
the Applied Weight text box. Press the
FORM: FORCE
REV: 10-23-07
APPR BY: EW
Calibrate button to capture the value.
Vertical Force Calibration
This is where the user should setup
the calibration for the vertical load cell.
The vertical load cell is located
beneath the belt of the treadmill. In
the section, Calibrate with no weight
applied to Vertical load cell, the user
should have no weight attached to the
treadmill belt. Press the Calibrate
button to capture the value.
For the Calibrate with weight
applied to Vertical load cell section,
place a weight plate in the center of
the treadmill belt and enter the weight
of the plate in pounds in the Applied
Weight text box. Press the Calibrate
button to capture the value.
Units Configuration
This is where the user can set
the desired units they prefer to
work with. The Units
Configuration can be modified
at any time, but pace workouts
can only run in the same units
they were recorded in. If you
run a program using the default
units configuration, save the
workout, then modify the units
configuration from the Options
page and try to run a pace
workout, you will receive a
warning message. Click the Yes
button to change the units to
the recorded units values and
continue.
FORM: FORCE
REV: 10-23-07
APPR BY: EW
Report Configuration
This is where a user can pre-configure the header and footer images for all generated
reports allowing users to create professional looking reports with their own company or
association logos.
Data Collection Configuration
This is where a user can configure
how many data points they would
like to collect per second. The
Data Collection Rate is set to 75
samples per second by default, but
has a range of 1 to 200 samples
per second. This setting will have
a direct effect on the resolution of
the data in the graphs. Most users
are satisfied with the default of 75
samples per second.
FORM: FORCE
REV: 10-23-07
APPR BY: EW
Chapter
7
TOOLBAR BUTTONS
FORM: FORCE
REV: 10-23-07
APPR BY: EW
62
The topics contained within the Toolbar Buttons heading provide help in detailing what
action is performed when each of the toolbar buttons is clicked. Click the Users toolbar
button to access user-related data. The Programs toolbar button opens the Programs pane
where programs are stored. Click the Workout toolbar button to open the Workout tab for a
manual workout. The Log Out toolbar button logs out the currently logged in user. Click the
New User toolbar button to create a new user. Clicking the New Program toolbar button
opens the Program Editor tab, allowing you to create a new program. Finally, click the
Options button on the toolbar to open the Options tab.
Users
Click the
toolbar button to access user-related data. The User Tasks pane
contains selections related to users, programs, and results. The User Collection pane
stores the collection of users and their related data. The Details pane is interrelated with
the User Collection pane and displays details relating to users, programs, and results.
The selections will change depending upon what is selected in the User Collection pane.
Programs
Click the
toolbar button to access program-related data. The Program Tasks
pane contains selections related to programs. The Programs pane stores the programs
you created. The Details pane contains the name, description, and the date and time you
last modified or made any changes to the selected program.
Workout
Click the
toolbar button to open the Workout tab for a manual workout.
Log Out
Click the
toolbar button to log out the currently logged in user.
New User
Click the
FORM: FORCE
REV: 10-23-07
APPR BY: EW
toolbar button to create a new user.
63
New Program
Click the
toolbar button to open the Program Editor tab, allowing you to
create a new program. The Editor Tasks pane contains selections related to program
editing. The Editor Control pane is used to save a new or existing program. The Details
pane displays the name and the description you optionally assigned to the opened
program.
Options
Click the
FORM: FORCE
REV: 10-23-07
APPR BY: EW
toolbar button to open the Options tab.
64
Chapter
8
MENU BAR
FORM: FORCE
REV: 10-23-07
APPR BY: EW
65
The menu bar provides the user with tasks that are routinely performed. The Actions menu
bar item contains selections to create a new user, create a new program, start a manual
workout, log out a user, or clean the programs collection. The View menu bar item contains
selections relating to users, programs, and options. Choose the Editor menu bar item for
selections the user would perform when creating a program in the program editor. Insert,
copy, paste, cut, and delete stages of a program. The Help menu bar item provides the user
with detailed documentation and step-by-step instructions for performing tasks. Included are
a search function, table of contents, and an index. Click on an item in the application to set
the focus and press F1 to open the context-sensitive help. Also available is a support section
containing contact information as well as software details.
New User
Click the Actions menu bar item. Select New User from the sub menu.
New Program
Click the Actions menu bar item. Select New Program from the sub menu.
Workout
Click the Actions menu bar item. Select Workout from the sub menu.
Log Out
Click the Actions menu bar item. Select Log Out from the sub menu.
Clean Programs Collection
Click the Actions menu bar item. Select Clean Programs Collection from the sub menu.
Choose this option to delete all programs that are not linked to or associated with any users.
All programs that are assigned to users will be retained in the list and will not be deleted.
FORM: FORCE
REV: 10-23-07
APPR BY: EW
66
Users
Click the View menu bar item. Select Users from the sub menu.
Programs
Click the View menu bar item. Select Programs from the sub menu.
Options
Click the View menu bar item. Select Options from the sub menu.
Insert Stage
Click the Editor menu bar item. Select Insert Stage from the sub menu to insert a new blank
stage at any position in your list of stages.
Note: You must have the Program Editor tab opened to insert a stage.
Copy Stage
Click the Editor menu bar item. Select Copy Stage from the sub menu to copy a selected
(highlighted) stage and place it on the clipboard.
Note: You must have the Program Editor tab opened to copy a stage.
Paste Stage
Click the Editor menu bar item. Select Paste Stage from the sub menu to paste a copied or
cut stage into the Program Editor window in the desired position.
Note: You must have the Program Editor tab opened to paste a stage.
Cut Stage
Click the Editor menu bar item. Select Cut Stage from the sub menu to cut or remove a
selected stage from the Program Editor window and place it on the clipboard.
Note: You must have the Program Editor tab opened to cut a stage.
FORM: FORCE
REV: 10-23-07
APPR BY: EW
67
Delete Stage
Click the Editor menu bar item. Select Delete Stage from the sub menu to permanently
delete a stage.
Note: You must have the Program Editor tab opened to delete a stage.
Search
Click the Help menu bar item. Select Search from the sub menu to open the search tab in the
help window. To search for topics, enter words or phrases in the text box, and click the
button. Matching topics are then displayed. Select a topic from the list and click
the
• Click the
button to view the help topic.
button to string words together using the joins AND, OR, NEAR, NOT.
• Check the
check box to search for words from the previous result.
• Check the
check box to display topics that include part of the word you're
searching for.
For example, if you're searching for the word "Programs", and you check the Match similar
words check box, the result will also include topics that contain the word "Program".
• Check the
check box to search for words that are only contained in a title.
Contents
Click the Help menu bar item. Select Contents from the sub menu to open the contents tab in
the help window. Expand the tree by clicking the + until you reach the desired topic. Click the
topic to display its contents.
Index
Click the Help menu bar item. Select Index from the sub menu to open the index tab in the
help window. Enter the title of a known topic and click the
button to view the topic.
Note: Only those topics that begin with the entered keywords will be displayed
FORM: FORCE
REV: 10-23-07
APPR BY: EW
68
Chapter
9
PREVENTATIVE MAINTENANCE
CLEANING AND INSPECTION
LUBRICATION
ADJUSTMENTS AND CALIBRATION
FORM: FORCE
REV: 10-23-07
APPR BY: EW
69
Cleaning and Inspection
Periodic cleaning and inspection of your WOODWAY treadmill will help to lengthen the life
while helping keep it looking like new. With this preventative maintenance it will be easier to
spot problems that might not otherwise be found.
Below is a guideline of our recommended cleaning and maintenance intervals. If your
treadmill is located in a dirty environment or under heavy-duty use, cleaning and inspection
should be implemented more often.
Do not use abrasive brushes or cleaners, as they may scratch the paint and plastic surfaces.
Do not soak any surface; the sensitive electronics may be harmed.
CAUTION: Turn off treadmill and disconnect power cord before cleaning.
Weekly:
• Clean handrail, front display panel & cosmetic covers.
• Inspect power cord.
• Check overall condition of the treadmill.
• Move, and vacuum underneath the treadmill.
Every Six (6) Months:
• Vacuum inside the treadmill (unplug and remove cosmetic covers.)
• Inspect all nuts and bolts. Tighten any that are loose.
• Clean running surface.
• Spray running surface with anti-static spray. ( grey belts only )
• Check drive belt – replace if shredding or teeth are missing.
Yearly:
• Grease front and rear roller bearings.
FORM: FORCE
REV: 10-23-07
APPR BY: EW
70
Lubrication
Bearings
Almost all of the bearings used in the treadmill are pre-lubricated and do not need to be
greased initially. On a yearly basis, the four (4) bearings located at the front and rear shaft
will need to be lubricated.
Running Belt
The teeth on the bottom of the running belt are pre-lubricated to aid in reducing noise. There
is no need to lubricate the teeth. If running belt is rubbing against the side of the drive pulleys,
then a small amount of grease (i.e. Molykote or equal) on the edges of the belt slats will help
reduce noise.
Drive Belt
As in the case of the running belt, the application of grease on the edge of the drive belt is
only needed to reduce belt squeak and should be used sparingly.
Note: Use a minimal amount of lubrication to prevent excess dirt and debris from sticking to
the machine after cleaning.
Adjustments and Calibration
Running Belt
The running belt should not require adjustment. However, if the running belt or associated
parts have been changed, then belt tension should be checked and set at 8 ½”.
Treadmill Mounting Feet – TOOLS NEEDED: 2 FT LEVEL, ¾ INCH WRENCH
If treadmill wobbles or seems unstable, mounting feet must be checked. Using the level,
check both ends of the treadmill. Loosen the tensioning nut and turn the foot until it is at the
correct level. Tighten the tensioning nut.
Note: When moving the treadmill the frame may flex. If treadmill seems wobbly, push handrail
to one side or the other, this may straighten frame without mounting feet adjustment needed.
FORM: FORCE
REV: 10-23-07
APPR BY: EW
71
Chapter
10
WARRANTY INFORMATION
FORM: FORCE
REV: 10-23-07
APPR BY: EW
72
Warranty Information
Performance Use
Frame
10 years
Track/Belt
5 years
Parts
3years
Labor
1 year
WOODWAY warrants that all products and accessories will be free from manufacturing
defects according to the applications/terms listed above. The warranty period commences on
the original date of purchase (with the exception of the running belt component, which is
warranted for a period of four years from the original date of purchase). This warranty is given
only to the original purchaser. This warranty does not cover damage or equipment failure
resulting from misuse, abuse, or failure to comply with electrical codes. Further, this warranty
shall not apply if there is any modification to the products or accessories or if there is a failure
to provide maintenance as outlined in the Owner's Manual.
WOODWAY GIVES NO OTHER WARRANTIES, EITHER EXPRESSED OR IMPLIED. THE
WARRANTY OF FITNESS FOR A PARTICULAR USE IS HEREBY DISCLAIMED.
The buyer's remedy for breach of the expressed warranties contained herein shall be limited
to the return of the product and accessories and repayment of the original purchase price.
Provided, however, at WOODWAY selection, it may repair and replace the non-conforming
goods or parts. WOODWAY shall not be liable for any incidental or consequential damages.
Our Guarantee
WOODWAY guarantees the repurchase of WOODWAY treadmill products for a period of up
to four (4) years after original installation. A direct payment or credit toward the purchase of a
new WOODWAY of 20% of the purchase price of the treadmill will be made to the owner of a
WOODWAY treadmill. This guarantee is limited to the original owner. Contact WOODWAY
for further details.
FORM: FORCE
REV: 10-23-07
APPR BY: EW
73
Chapter
11
WRAP UP
TROUBLESHOOTING
PREVENTATIVE MAINTENANCE LOG
NUMBERS TO KNOW
FORM: FORCE
REV: 10-23-07
APPR BY: EW
74
Troubleshooting
If you are having problems with your treadmill, please be prepared with answers to the
following questions before calling our service center.
QUESTIONS:
• What is the make, model and serial number of your treadmill?
• What happened prior to the problem?
• Did the problem happen unexpectedly or did it progressively worsen over time?
• Was someone using the treadmill at the time the problem occurred?
• Explain any other symptoms that you feel are relevant.
PROBLEMS:
1. No Display: If the treadmill’s display does not light up when powered up, check the
following items:
• Input power fuse – replace if blown
• Power coming out of wall outlet
• Check power with another piece of equipment (radio, fan, etc.). Check main fuse or
circuit breaker, move to another outlet.
• Is the treadmill plugged in?
• Is the safety magnet installed or positioned correctly? Try to reposition. Check all
connectors at circuit boards.
2. Belt Movement
• Is the display working properly?
• If the display works, and/or the incline works, unplug the treadmill and wait at least 60
seconds before plugging it back in.
BELT TIGHT/HARD TO PUSH
• First, determine if display board is illuminated and/or if the incline system is working.
This information will help our service technician in advising you where the source of
the problem may be.
BELT BINDING
• Check for obstructions and remove if possible.
3. Erratic or Blinking Display
• Probable causes: Low line voltage; too much load on the same line.
• Make sure treadmill is on a dedicated electrical circuit.
• Possible static problem / spray with staticide.
• Display power supply on Interface board is defective.
FORM: FORCE
REV: 10-23-07
APPR BY: EW
75
4. Squeaking Sounds: Possible causes:
• Noisy bearing(s). Try greasing or replacing the bearing.
• Drive belt rubbing against the drive pulley, try greasing the edge of the drive belt with a
little all purpose grease.
• Running belt rubbing against drive pulleys, try lightly greasing the teeth on the drive
shaft, and let the treadmill run at a slow speed for a couple of minutes to spread
grease evenly. (NOTE: Too much grease will make a mess and will accumulate dust.)
• Check for a defective guide roller or Z roller bearing on the bearing rail, replace if
defective
FORM: FORCE
REV: 10-23-07
APPR BY: EW
76
Preventative Maintenance Log
DATE
FORM: FORCE
REV: 10-23-07
APPR BY: EW
MAINTENANCE PERFORMED?
BY
RESULT
77
Numbers to Know
_________________________________________________
Your Treadmill Serial #(s): Model/#_
_________________________________________________
Model/#_
___________________________________________________
Model/#_
___________________________________________________
Model/#_
___________________________________________________
Model/#_
___________________________________________________
Model/#_
___________________________________________________
Model/#_
___________________________________________________
Model/#_
___________________________________________________
Model/#_
___________________________________________________
Model/#_
(The serial number can be found on the back of the treadmill’s display board housing & also
on the front/left section of treadmill frame – side cover must be removed to locate on the
frame).
FORM: FORCE
REV: 10-23-07
APPR BY: EW
78
Speed (MPH)
12.0
10.0
800-WOODWAY (966-3929)
FORM: FORCE
REV: 10-23-07
APPR BY: EW
79