1
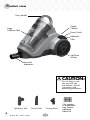
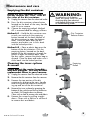
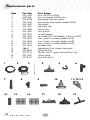
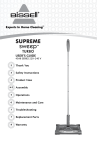
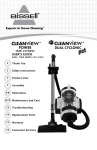
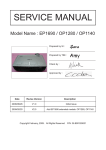
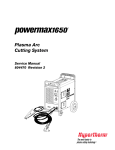
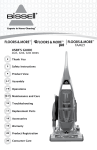
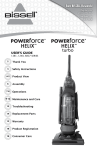
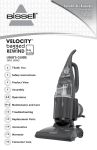
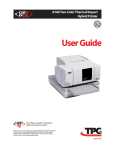
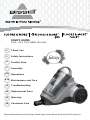
USER'S GUIDE
5330, 4124, 5307 SERIES 220-240V
2
Thank You
3
Safety Instructions
4
Product View
5
Assembly
6-8
8-12
Operations
Maintenance and Care
13
Troubleshooting
14
Replacement Parts
15
Warranty
16
Consumer Care
Febreze and related trademarks are owned by the Procter & Gamble Company, Cincinnati, Ohio and used under license by BISSELL Homecare, Inc.
Thanks for buying a BISSELL Vacuum
We’re glad you purchased a BISSELL Floors & More series vacuum.
Everything we know about floor care went into the design and
construction of this complete, high-tech home cleaning system.
Your BISSELL Floors & More series vacuum is well made, and we back
it with a limited two year warranty. We also stand behind it with a
knowledgeable, dedicated Consumer Care department, so, should you
ever have a problem, you’ll receive fast, considerate assistance.
My great-grandfather invented the floor sweeper in 1876. Today, BISSELL
is a global leader in the design, manufacture, and service of high quality
homecare products like your BISSELL Floors & More series vacuum.
Thanks again, from all of us at BISSELL.
Mark J. Bissell
Chairman & CEO
2
w w w. b i s s e l l . c o m IMPORTANT SAFETY INSTRUCTIONS
When using an electrical appliance,
basic precautions should be observed,
including the following:
Read all
instructions
before using your
CANISTER VACUUM.
WARNING:
To
reduce the risk of fire,
electric shock, or injury:
■Unplug from outlet when not in use
■Use indoors only.
■For dry pick up only.
■Do not leave machine when it is plugged in.
■Do not use with damaged cord or plug.
■If appliance is not working as it should, has
been dropped, damaged, left outdoors, or
dropped into water, return it to a service agent.
■Do not handle unit with wet hands.
■Do not pull or carry by cord, use cord as a
handle, close door on cord, pull cord around
sharp corners or edges, run appliance over
cord, or expose cord to heated surfaces.
■Do not unplug by pulling on cord. unplug
by grasping plug.
■Do not run appliance over cord.
■Do not handle plug or appliance with wet hands.
■Do not expose hair, loose clothing, fingers
or body parts to openings or moving parts.
■Do not pick up hot or burning objects such
as cigarettes, matches, or hot ashes.
■Do not pick up flammable or combustible
materials (lighter fluid, petrol, kerosene, etc.) or
use in the presence of explosive liquids or vapour.
■Do not use appliance in an enclosed space filled
with vapours given off by oil base paint, paint
thinner, some moth proofing substances,
flammable dust, or other explosive or toxic
vapours.
■Not intended for use by persons (including
children) with reduced physical, sensory or
mental capabilities, or lack of experience
and knowledge, unless they have been
given supervision or instruction concerning
use of the appliance by a person
responsible for their safety
w w w. b i s s e l l . c o m ■Children should be supervised to ensure that
they do not play with the appliance.
■Remove plug from electrical outlet before
cleaning or maintaining the appliance.
■If the supply cord is damaged, it must be
replaced by the manufacturer or its service
agent in order to avoid a hazard.
■Do not pick up toxic material (chlorine
bleach, ammonia, drain cleaner, petrol, etc.).
■Do not use for any purpose other than
described in this User’s Guide.
■Use only manufacturer’s recommended
attachments.
■Do not use with any opening blocked; keep
free of dust, lint, hair, and anything that
may reduce air flow.
■Keep appliance on a level surface.
■Turn off all controls before unplugging.
■Be extra careful when cleaning stairs.
■This appliance is provided with double
insulation. Use only identical replacement
parts.
■Do not use without the dirt cup and filters
in place.
■Pay close attention when working
around children.
SAVE THESE
INSTRUCTIONS
FOR FUTURE USE
This model is for household use only.
IMPORTANT
FOR OPERATION ON A 220-240 VOLT
A.C. 50 Hz POWER SUPPLY ONLY.
If your appliance is fitted with a
nonrewireable BS 1363 plug it must not be
used unless a 13 amp (ASTA approved to BS
1362) fuse is fitted in the carrier contained
in the plug. (Spares may be obtained from
your BISSELL supplier). If for any reason the
plug is cut off, it must be disposed of, as it is
an electric shock hazard should it be inserted
into a mains socket.
3
Product view
Carry Handle
Digital
Controls
Large
Collection Tank
Power Switch
Febreze®
Filter
Soft Touch
Wheels
Hose Inlet
Attachment
CAUTION:
Do not plug in your
vacuum until you
are familiar with all
instructions and
operating procedures.
Upholstery Tool
4
w w w. b i s s e l l . c o m Crevice Tool
Dusting Brush
Filter supplied
in sealed plastic
bag. Remove
packaging
before use
Assembly
1. Connect the hose to the vacuum by
WARNING:
Plastic film can be dangerous. To
inserting the hose connector into the
suction opening on the bottom front
of the vacuum. Push in until it clicks
into the locked position.
avoid danger of suffocation, keep
away from babies and children.
2. Connect the telescoping extension
wand to the handle end of the hose.
3. Connect the floor nozzle foot onto
the telescoping extension wand.
1.
2.
3.
4.
4. Attach the tool holder onto the top
portion of the extension wand.
Place the tools onto the tool holder
for storage.
5. To extend the telescoping extension
wand, push the black release button
and then pull the bottom of the wand
to the desired length.
6. Once assembled, you can store your
vacuum by inserting the storage clip
(located on the back of the floor
nozzle) into the storage slot on the
rear of the vacuum.
NOTE: Shorten the length
of the telescoping extension
wand for storage.
w w w. b i s s e l l . c o m 5
Operations
Power cord
The power cord is located at the rear of the
vacuum. Gently pull out the power cord,
watching for the yellow line. Stop pulling the
power cord once the yellow line is visible.
There is also a red line, which indicates the
end of the usable cord. Do not pull the power
cord out beyond the red line.
Automatic Cord
Rewind Button
Automatic cord rewind
Your vacuum is equipped with an automatic
cord rewind. When cleaning is finished, press
the power button OFF ( ) and grasp the plug
to disconnect from the electrical outlet. Hold
the plug and press the automatic cord rewind
button to rewind the cord automatically.
Power button
Turn the power ON or OFF by pressing
lightly downward on the power button (
Power
Button
).
Variable suction power control
The variable suction power control is located
on the back of the vacuum. Turn the control
toward the larger dots for maximum suction.
Turn the control toward the smaller dots to
minimize suction for lightly soiled areas or
delicate fabrics.
Variable Suction
Control
Air flow regulator
Open the air flow regulator by sliding the
regulator back towards the handle to an
open position. This will reduce the suction
power for vacuuming delicate fabrics.
For full suction power, close the air flow
regulator by sliding the regulator forward
to the closed position.
Air Flow
Regulator
Tip:
Use the variable
suction power
control and the
air flow regulator
to reduce air flow
as needed when
using the tools.
caution:
Before using your vacuum, make
sure that the dirt container and all
filters (pre-motor and post-motor)
are in place. Do not operate your
vacuum without the dirt container
and filters.
6
w w w. b i s s e l l . c o m Operations
Special tools
Your BISSELL Floors & More vacuum
is not only a powerful carpet and rug
vacuum cleaner, it’s also a versatile bare
floor and above floor vacuum cleaner
when you select one of the special tools.
1. Floor nozzle (Model 5330E):
Use to vacuum carpets, rugs and bare
floors. Swivel head turns to get into tight
spaces and fits under cabinets.
A. To vacuum carpets and rugs, push the
brush switch to the carpet position
. This will pull the brushes up
into the floor nozzle.
Brush Up
1A.
1B.
Brush
Down
B. To vacuum bare floors, push the brush
switch to the bare floor position
. This will extend the brushes down
from the floor nozzle.
2. Pet Hair Lifter™ Carpet and Hard Floor
Tool (Model 4124E):
Use to vacuum carpets, rugs and bare floors.
Swivel head turns to get into tightspaces and
fits under cabinets.
A. To vacuum carpets and rugs, push the
brush switch to the carpet position.
This will pull the brushes up into the
floor nozzle.
B. To vacuum bare floors, push the
2A.
brush switch to the bare floor position.
This will extend the brushes down
from the floor nozzle.
C. To help with pet hair pick-up on carpets
lower the Lint bar to help dislodge pet
hair while vacuuming.
3. Turbine Head (5307E Model)
Use to vacuum carpets and rugs. Swivel head
turns to get into tight spaces and fits under cabinets. Easy to remove nozzle window for cleaning
threads and debris from the brush roll. Squeeze
the 2 small tabs at the side of the foot to release
the window. To replace align the window tabs at
the top with the 2 openings of the foot and push
into place until you hear a snap and the window
is securely in place.
NOTICE:
These tools are designed
to remove pet hair from
upholstered or carpeted
surfaces. They should not
be used on pets.
Brush Up
Release Button
2B.
3.
Brush Down
4.
4. Hard Floor Brush (Model 5307E)
Specially designed to vacuum bare floors
w w w. b i s s e l l . c o m 7
Operations
Special tools continued
5. Upholstery tool: Use the upholstery
tool to clean curtains, draperies,
cushions and fabrics.
5.
6. Crevice tool: Use the crevice tool in
tight, narrow spaces.
7. Dusting brush: Use the dusting brush
to dust furniture, blinds, books, lamps,
shelves and baseboards.
8. Pet tool adapter:(select models only)
The pet tool adapter must be attached to
the handle end of the flex hose to use the
wide TurboBrush Pet. The narrow end of
the adapter attaches to the handle end
of the flex hose and the wide end of the
adapter attaches to the Wide TurboBrush
Pet. The adapter should fit snug to the hose
and pet tool without using excessive force
9. Pet TurboBrush™ Tool: (Models 4124E
& 5307E) Use rotating brush action for
small, flat areas such as cushions and
beds. NOTE: Press down gently
and pull toward you in a raking
motion. Too mush pressure will
cause the brush to stop rotating.
Maintenance and care
Collection Tank
& Filter Maintenance
To maintain optimum performance, the collection tank and the filters must be properly
maintained. The collection tank should be
emptied when the dust reaches the fill line
on the side of the tank.
Cleaning filters improves vacuum performance. The filters should be checked when
the collection tank is emptied and cleaned
or replaced if dust and debris has accumulated on the filters. See instructions on pages
10-11. Failure to follow these instructions may
impact the performance of your vacuum.
8
w w w. b i s s e l l . c o m 6.
7.
8.
9.
NOTICE:
These tools are designed
to remove pet hair from
upholstery or carpeted
surfaces. They should not
be used on pets.
Maintenance and care
Emptying the dirt container
Empty the dirt container as soon as
the dirt reaches the “FULL” lines on
the sides of the dirt container.
1. Unplug the vacuum from the electrical outlet.
2. Press the dirt container release button
located on the back of the carry handle
and lift up to remove.
3. Choose an emptying method. Method
#2 is recommended for allergy sufferers.
Method #1 – Hold the dirt container over
a trash can and push the emptying
button located on the back bottom of
the dirt container to open the bottom
door. Close the door after the dirt
empties and make sure it clicks back
into the locked position.
Method #2 – Place a plastic bag over the
bottom of the dirt container. Push the
emptying button, located on the back
bottom of the dirt container, through the
plastic to open the bottom door. After
the dust settles, remove the plastic bag to
discard. Close the door and make sure it
clicks back into the locked position.
WARNING:
To reduce the risk of electric
shock, turn power switch OFF and
disconnect plug from electrical
outlet before performing maintenance
or troubleshooting checks.
2.
Dirt Container
Release Button
3.
Cleaning the inner cyclone
& screen
Filters protect the motor from dirt
and dust particles. Use only BISSELL
replacement filters in your vacuum.
1. Unplug the vacuum from the electrical outlet.
Emptying
Button
3.
2. Remove the dirt container from the vacuum.
3. Remove the top portion of the dirt
container by grasping the carry handle
and turning counter clockwise and pulling up and out of the dirt container.
4. Remove the inner cyclone by grasping the
bottom of the cyclone and turning clockwise
to unlock. Pull straight down to remove.
Clean with a cloth to remove dust and debris
4.
5. Remove the screen by pulling straight
down. Clean with a cloth or a soft brush
to remove dust and debris.
w w w. b i s s e l l . c o m 9
Maintenance and care
Cleaning the inner cyclone & screen continued
6. The tank may also be wiped clean with
a damp cloth. Make sure the tank is
completely dry before reassembling.
7. To reassemble, hold the carry handle and
place the screen back onto the top portion
of the dirt container. Be sure to align the
notch on the top with the insert on the flat
edge of the screen. Then place the inner
cyclone back into the screen by aligning
the notches at the top of the inner cyclone
with the inserts inside the screen and turning
counter clockwise to lock into place.
NOTICE:
This product is intended for household
use only and not for commercial or
industrial use. Vacuuming of dust
from products like plaster, concrete
or ashes will damage the motor and
void the warranty.
3.
8. Place the top portion back onto the dirt
container by grasping the carry handle
and turning clockwise to lock into place.
Be sure that the dirt container release
button is aligned with the emptying button
when locked into place.
Cleaning the pre-motor filter
4.
Pre-Motor Filter
The pre-motor filter protects the motor
from dirt and dust particles. Use only
BISSELL replacement filters in your
vacuum cleaner.
1. Turn the power OFF. Unplug the vacuum
from the electrical outlet.
Filter Tray
2. Remove the dirt container from the vacuum.
3. The pre-motor filter is located behind the
door labeled “FILTER” on the main body
of the vacuum. Open the door by pushing
up on the tab at the bottom of the door
and pulling out to remove.
4. Remove the filter tray by pulling up on the
tab of the tray. Remove the pre-motor filter
and set aside. Tap the tray gently over a
trash can to remove any dirt or debris.
5. The pre-motor filter can be washed in cold water
with a mild detergent. Rinse well and air dry
thoroughly before placing back into the tray.
6. Place the tray back into the vacuum
and replace the filter door by inserting
the tabs at the top of the door and
pushing down until it clicks into the
locked position.
10
w w w. b i s s e l l . c o m Tip:
For optimum performance,
check the filters often and
clean or replace if dust and
debris has accumulated on
the filter.
WARNING:
Do not operate cleaner with
damp or wet filters or
without all filters in place.
Maintenance and care
Replacing the Febreze® post-motor filter
The post motor filter is a Febreze®
filter that is designed to eliminate
odors while you vacuum during the
regular life of the filter. It is a white
pleated filter that is NOT washable
and must be replaced when necessary. The filter should be checked
when the collection tank is emptied
and replaced if dust and debris has
accumulated on the filter. To maintain
full odor elimination, the filter should
be replaced when the fragrance is no
longer present.
1. Turn the power OFF. Unplug the vacuum
from the electrical outlet.
2.
3.
Post-Motor
Filter
2. The post-motor filter is located behind
the door labeled “FILTER” on the rear of
the vacuum. Open the door by pushing
down on the tab of the door and pulling
out to remove.
3. Remove the post-motor media filter by
grasping the handle on the filter and
pulling out to remove.
4. Replace the post-motor Febreze® filter
with a new filter.
5. Replace the filter door by inserting the two
tabs at the bottom of the filter door. Then
push down on the tab on the door and
push it back into the vacuum. Release the
tab on the door to lock into place.
w w w. b i s s e l l . c o m 11
Maintenance and care
Care and Maintenance of Turbine Head Floor tool (Model 5307E)
Use to vacuum carpets and rugs. Swivel head
turns to get into tight spaces and fits under
cabinets. Easy to remove nozzle window for
cleaning threads and debris from the brush roll.
Squeeze the 2 small tabs at the side of the foot
to release the window. To replace align the
window tabs at the top with the 2 openings of
the foot and push into place until you hear a
snap and the window is securely in place.
Maintaining the Pet TurboBrush™ Tool
Selected Models only 4124E & 5307E)
The Pet TurboBrush™ Tool should be
checked regularly for clogs or debris
wrapping around the brush.
1. Unplug the vacuum from electrical outlet.
2. If a clog is present or debris is visible,
turn the collar on the neck of the Pet
TurboBrush™ Tool counterclockwise to the
unlocked position to remove the faceplate
and clear any obstructions.
3. To clean debris from the brush, remove the
brush from the drive belt and clean debris.
4. Reposition the drive belt on the brush.
Place the ends of the brush in the slots
on the sides. Reposition the faceplate
and turn the collar clockwise to the
locked position.
Thermal protector
An internal thremal protector has
been designed into your vacuum to
protect it from overheating. When
the thermal protector activates, the
vacuum motor will stop operating.
If this happens:
1. Turn the vacuum OFF (O) and unplug
from electrical outlet.
2. Empty dirt container, check filters and air
passages for dirt accumulation.
3. The thermal protector automatically
resets after approximately 1 hour. If the
thermal protector does not reset, call
BISSELL Consumer Services.
12
w w w. b i s s e l l . c o m Troubleshooting
WARNING:
To reduce the risk of electric shock,
turn power OFF and disconnect plug
from electrical outlet before performing
maintenance or troubleshooting.
Vacuum cleaner won’t run
Possible causes
Remedies
1. Vacuum cleaner is not plugged in
1. Check electrical plug
2. Power button is not pressed down
2. Press power button down
3. Thermal protector activated
3. Allow vacuum to cool for 1 hour, see page 12
Vacuum cleaner won’t pick up or low suction
Possible causes
Remedies
1. Tools, hose and/or telescoping extension wands are blocked
1. Remove each part and check for blockages
2. Filters are dirty
2. Check and clean or replace pre-motor and post-motor filters
3. Dirt container is full
3. Empty dirt container
4. Hose not securely attached to suction opening
4. Make sure hose connector is locked into
suction opening
5. Crack or hole in flex hose
5. Check hose and replace if needed
6. Air flow regulator or variable suction power
6. Change to closed or maximum setting
control is set to open or minimum setting
Visible dust escaping from vacuum
Possible causes
Remedies
1. Dirt container is full
1. Empty dirt container
2. Filters missing or installed incorrectly
2. Check pre-motor and post-motor filter for correct installation
3. Filters are dirty
3. Check and clean or replace pre-motor and post-motor filters
4. Flex hose is blocked
4. Remove hose and check for blockages
5. Hose not securely attached to suction opening
5. Make sure hose connector is locked into suction opening
6. Crack or hole in flex hose
6. Check hose and replace if needed
Other maintenance or service not included in the manual should be
performed by an authorized service representative.
Thank you for selecting a BISSELL product.
Please do not return this product to the store.
w w w. b i s s e l l . c o m 13
Replacement parts
Item
Part No.
1
2
3
4
5
6
7
8
9
10
11 12 13 14
15
16 17
18
19 1
14
Hose (5330E & 4124E)
Hose and handle (5307E only)
Telescoping Extension Wand
Multi-Surface Floor Nozzle (Model 5330E)
Tool Holder
Upholstery Tool
Crevice Tool
Dusting Brush
Pet Tool Adaptor
Pet TurboBrush™ Tool (Models 4124E & 5307E)
Inner Cyclonic Assembly (Model 5330E)
Inner Cyclonic Assembly (Model 4124E)
Inner Cyclonic Assembly (Model 5307E)
Pre-Motor Filter
Replacement Filter Number Retail pack
Spare part Filter
Pet Hair Lifter™ Carpet and Hard Floor Tool
Turbine Head
Hard Floor Brush
4
9
8
15
Part Name
3
2
7
14
203-1578
2038346 203 8348 203-1536
203-1583
203-1581
203-1580
203-1582
203-7279
203-1290
203-1809
203-1808
203-1575
203-1569
5864C
203-8276
203-7275
203-1290
203-8175 16
w w w. b i s s e l l . c o m 5
11/12/13
10
17
6
18
19
Warranty – BISSELL Floors & More™ Vacuum
This warranty gives you specific legal rights, and you may also have other rights which may
vary from country to country. If you need additional instruction regarding this warranty or
have questions regarding what it may cover, please contact BISSELL Consumer Care by
telephone, or regular post as described below, or contact your local in country distributor.
Limited Two Year Warranty
Subject to the *EXCEPTIONS AND EXCLUSIONS identified below, BISSELL will replace (with
new or remanufactured components), at BISSELL’s option, free of charge from the date of
purchase by the original purchaser, for two years any defective or malfunctioning part.
This warranty applies to product used for personal, and not commercial or rental service.
This warranty does not apply to fans or routine maintenance components such as filters,
belts, or brushes. Damage or malfunction by negligence, abuse, neglect, unauthorized
repair, or any other use not in accordance with the User's Guide is not covered.
For UK inquiries:
Monday - Thursday 9 am — 5 pm
Friday
9 am — 4 pm
BISSELL Homecare (Overseas) Inc.
226 Berwick Avenue
Slough
Berkshire
SL14QT
United Kingdom
Telephone: 0844-888-6644
For all other inquiries:
Monday - Friday 8 am — 4 pm
BISSELL Homecare, Inc.
PO Box 1888
Grand Rapids, Michigan 49501 USA
Telephone: 01-616-453-4451
Fax: 01-616-453-1383
BISSELL IS NOT LIABLE FOR INCIDENTAL OR CONSEQUENTIAL DAMAGES OF ANY NATURE
ASSOCIATED WITH THE USE OF THIS PRODUCT. BISSELL’S LIABILITY WILL NOT EXCEED THE
PURCHASE PRICE OF THE PRODUCT.
*EXCEPTIONS AND EXCLUSIONS FROM THE TERMS OF THE LIMITED WARRANTY
THIS WARRANTY IS EXCLUSIVE AND IN LIEU OF ANY OTHER WARRANTIES EITHER ORAL OR
WRITTEN. ANY IMPLIED WARRANTIES WHICH MAY ARISE BY OPERATION OF LAW, INCLUDING
THE IMPLIED WARRANTIES OF MERCHANTABILITY AND FITNESS FOR A PARTICULAR PURPOSE, ARE
LIMITED TO THE TWO YEAR DURATION FROM THE DATE OF PURCHASE AS DESCRIBED ABOVE.
w w w. b i s s e l l . c o m 15
BISSELL consumer care
If your BISSELL product should require service:
Call BISSELL Consumer Care at the numbers below and we will give you the location of a
BISSELL Authorized Service Center in your area. For all other countries, contact your local in
country distributor for questions, service, or repair.
If you have questions about your warranty or need replacement parts please contact the
numbers below.
For UK inquiries:
Monday - Thursday 9 am — 5 pm
Friday
9 am — 4 pm
BISSELL Homecare (Overseas) Inc.
226 Berwick Avenue
Slough
Berkshire
SL14QT
United Kingdom
Telephone: 0844-888-6644
For all other inquiries:
Monday - Friday 8 am — 4 pm
BISSELL Homecare, Inc.
PO Box 1888
Grand Rapids, Michigan 49501 USA
Telephone: 01-616-453-4451
Fax: 01-616-453-1383
Or visit the BISSELL website - www.bissell.com
When contacting BISSELL, have model number of cleaner available.
Please record your Model Number: ___________________
Please record your Purchase Date: ___________________
NOTE: Please keep your original sales receipt. It
provides proof of purchase date in the event of a
warranty claim. See Warranty on page 15 for details.
Do not throw the appliance away with the normal
household waste at the end of its life, but hand it in
at an official collection point for recycling. By doing
this you will help to preserve the environment.
16
©2012 BISSELL Homecare, Inc
Grand Rapids, Michigan
All rights reserved. Printed in China
Part Number 110-4555
Rev 5/12
Visit our website at:
www.bissell.com
w w w. b i s s e l l . c o m