1
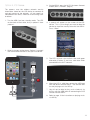
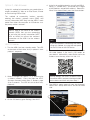
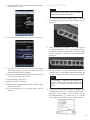
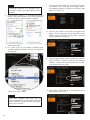
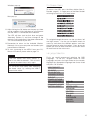
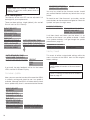
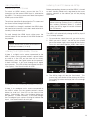
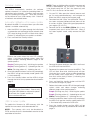
ASB-2
S
O
U
N
D
B
A
R
ASB-2
S
O
U
N
Owners
D
B
A
R
Manual
Contents
Contents 1
Using the ASB-2 19
Introduction 2
Watching a HDMI Source 19
ASB-2 Capabilities 2
Listening to a Digital Auxiliary Source 19
What’s in the box 2
Listening to an Analogue Auxiliary Source 19
AirPlay Compatibility 2
Listening to an iOS device via AirPlay 19
The ASB-2 3
Listening to Music on a PC/ Mac via AirPlay 20
ASB-2 Connections 3
Listening to an iOS device via AirPlay Direct 21
ASB-2 Buttons 4
AirPlay Direct to AirPlay 21
Remote 4
Listening to an iOS Device via the USB 22
Getting Started 5
Firmware Update. 23
Deciding on location 5
Automatic Notification of Firmware Update 23
Table Stand 5
USB Firmware Update 23
Connecting to a TV 5
Web Browser Firmware Update 24
Connecting Digital Devices Via HDMI 6
Changing the Remote Battery 25
Connecting Audio Devices Via Digital Input 7
LED Colour Matrix 26
Connecting Analogue Audio Devices Via Coaxial
Input 8
LED Flashing Patterns 26
Connecting the Power 9
Trouble Shooting 28
Setting Up 10
Unable to Connect to the Wireless Network 28
Turning On. 10
No Sound/ Noisy and Crackling Sound 28
Connecting to the Wi-Fi Network 10
The ASB-2 is Nonresponsive 28
What is required? 10
Option 1, WPS. 10
Occasional Breaking up of AirPlay Music
Playback 28
Option 2, iOS Device. 11
No AirPlay Icon on my iTunes Host Device 28
Option 3, Web Browser 12
AirPlay Connection Failed with Mac or PC 28
Via iOS-Device 12
LED Error Colour Matrix 29
Via Laptop/ PC/ Mac 13
Owner Information 29
Specifications 27
On Screen Menu 15
Language Selection 15
3D Audio 16
Equalisation 16
Channel Levels 17
Sub Out 17
Power Options 17
Firmware Update 18
Factory Reset 18
1
Introduction
What’s in the box
With the introduction of iOS 4.3 from Apple came
AirPlay. Monitor Audio have used 40 years of
knowledge to produce a TRUE hifi, AirPlay enabled
speaker system.
Whether using AirPlay Direct,
streaming via a wireless router or playing your music
collection from PC or MAC, the ASB-2 is the ideal
partner to AirPlay.
• ASB-2
ASB-2 Capabilities
• Fully active, high performance soundbar system
• 5 discrete power amplifier stages - fully digital amp
technology (class D)
• Wireless AirPlay music streaming
• Stream audio from an iOS-device using AirPlay
Direct without the need of a wireless router.
• Rubber table stand
• Mains lead (region specific).
• Quick Start Guide
• Safety Instructions
AirPlay Compatibility
To stream wirelessly to the ASB-2 using AirPlay (not
AirPlay Direct), you will need the following:
• A Wi-Fi certified router (Wireless 802.11 b/g class
only)
• Stream audio from an iOS-device via Wi-Fi to the
ASB-2 connected to the same network.
• A host for your music (iPhone/ iPad/ iPod Touch
running iOS 4.3 or later, or a PC/ Mac with iTunes
10 or later)
• Choose which AirPlay device you want to stream
to from your iOS-device when there are multiple
Airstream devices on your network.
Compatible AirPlay devices are listed below:
• Proprietary 3D spatial effects, consistent in quality
irrespective of environment
• iPad 4
• 4 x HDMI connections (3 in, 1 out) 1080P and 3D
pass through and Audio Return Channel (ARC)
• iPad 2
• Digital coaxial input (S/PDIF)
• Digital optical input (Toslink)
• Analogue stereo RCA inputs, 3.5mm Jack (autosensing between each input, via analogue switch)
• RCA LFE sub-woofer output (adjustable crossover
settings)
• iPad 3
• iPad
• iPhone 5
• iPhone 4S
• iPhone 4
• iPhone 3GS
• iPod Touch 5th Generation
• USB port for service, FW update and Airplay
network set up
• iPod Touch 4th Generation
• On-screen set up (OSD) – for all advanced audio
features access
• iPod Touch 2nd Generation
• Silicon rubber stand included for secure cabinet
top placement
• Designed to fit Sanus™ TV mounting systems
• Optional sturdy Monitor Audio wall bracket with
cable hole access and template installation
• Stream audio from your iOS-device to multiple
Airstream devices using our Airstream App.
Available in the App Store from 2013.
• Stream audio by Wi-Fi from any PC or Mac using
iTunes (version 10 or later) connected to the same
wireless network as the ASB-2.
2
• Remote Control
• iPod Touch 3rd Generation
The ASB-2
ASB-2 Connections
3
4
1
9
5
6
7
2
1. HDMI Inputs
Used to connect up to 3 High Definition sources to
the ASB-2 (refer to page 6).
2. HDMI output
Used to connect the ASB-2 to the TV, also used
as the Audio Return Channel (refer to page 5).
3. USB Input
Used to connect a USB device to the ASB-2 for
updating and connecting to the wireless network.
4. Digital Coaxial Input
Used to connect digital coaxial audio source to
the ASB-2 (Refer to page 7)
5. Digital Optical Input
Used to connect digital optical audio source to the
ASB-2 (Refer to page 7)
10
8
7. Auxiliary 2
Used to connect an analogue stereo audio source
to the ASB-2 using a 3.5mm stereo mini jack
connector (refer to page 8).
8. Sub Out
Used to connect the ASB-2 to an additional sub
woofer (refer to page 8).
9. Power Switch
Mains Power switch. Used to turn the ASB-2 on
and off (refer to page 9)
10.Mains Input
Used to connect the ASB-2 to the mains (refer to
page 9).
6. Auxiallary 1
Used to connect an analogue stereo audio source
to the ASB-2 using RCA phono connections.
(Refer to page 8).
3
ASB-2 Buttons
1
2
3
4
5
6
7
8
9
10
1. Standby
Used to put the ASB-2 in and out of stand by
mode. Holding it down for 5 seconds it searches
for an internet firmware update or a USB update.
A single press with iOS connected puts it into
Wi-Fi Sharing mode (refer to page 11); Holding
it down for 5 seconds enters Airstream Connect
mode (refer to page 12).
2. HDMI Toggle
Used to toggle through the HDMI inputs. The LED
on the front will flash to denote the HDMI input
number. eg, HDMI 2, will be 2 flashes. To enable
the ARC, it is HDMI 4.
6. AirPlay
Used to toggle between Airplay and Airplay Direct
mode (refer to page 19).
3. Digital Toggle
Used to toggle through the digital auxiliary inputs
(USB, Coaxial, Optical)
4. Analogue Toggle
Used to toggle through the analogue auxiliary
inputs (phono and mini jack).
5. Wi-Fi/ Airstream connect.
This button serves three purposes: A single press
puts the ASB-2 into WPS mode (refer to page 10);
Remote
7. 3D
Used to change the sound of the ASB-2 to create
a 3 dimensional effect (refer to page 16).
8. Mute
Used to mute the sound from the ASB-2. Pressing
it again returns the volume to the previous level.
The button will illuminate when mute is activated.
9. Volume Down
Used to reduce the volume of the ASB-2.
10.Volume Up
Used to increase the volume of the ASB-2
1. Standby
Used to put the ASB-2 in and out of stand by mode.
2. Volume Up
Used to increase the volume of the ASB-2.
1
2
3
6
3. Previous Track
Used to select the previous track of the audio
source.
7
4. Volume Down
Used to reduce the volume of the ASB-2.
8
4
5
9
5. Mute
Used to mute the sound from the ASB-2. Pressing
it again returns the volume to the previous level.
6. Menu
Used to display the on screen display of the ASB-2
(refer to page 15).
7. OK & Play/ Pause
Used to confirm a selection when in the menu and
also used to play/ pause the audio.
8. Next Track
Used to select the next track of the audio source.
4
9. Input Toggle
Used to toggle through the various analogue and
digital inputs.
Getting Started
Deciding on location
The ASB-2 is a very versatile product, it can be placed on a cabinet/ shelf siting it on the supplied rubber stand.
It can also be mounted to a wall using the optional Monitor Audio ASB-2 Wall Bracket. It can also be mounted
below a flat panel TV using the Sanus VMA202 Soundbar Speaker Mount. Refer to www.sanus.com for further
information.
Table Stand
The ASB-2 comes with a rubber table stand. This is used to prevent it from moving when placed on a shelf or
cabinet.
Making the Connections
Now the location has been decided, connect the sources to the ASB-2 ensuring that none of the cables are not
kinked or stretched.
NOTE: Do not connect the power to the ABS-2 until you have made all of your audio/ video connections.
Connecting to a TV
When connecting to a TV with an ARC (Audio Return Channel), it is possible to output the sound from the TV
through the ASB-2 without the need for additional cables. Simply connect a single HDMI lead from the TV to the
ASB-2 and select HDMI 4 by pressing the HDMI button on the product (item
2, ASB-2 Buttons, page 4) until the LED flashes white 4 times.
TV (With ARC)
If the TV does not have an ARC, then you can connect the ASB-2 and TV together by using the Digital Optical,
Digital Coaxial or Analogue Coaxial outputs from the TV. These connect to the corresponding input on the ASB-2.
5
Connecting Digital Devices Via HDMI
Digital devices such as a Blu Ray player, set top box, games console, DVD player, etc can all be connected via a
HDMI connection.
When using this method of connection, picture will go to the TV and sound will be played back through the ASB2. No other connections are need for sound.
NOTE: The ASB-2 does not decode Dolby or DTS signals, please set the source to PCM so that does the
decoding.
Examples of HDMI connection:
Blu Ray Player
HINT
Any HDMI device can be plugged to any of
the HDMI inputs.
Games Console
Set Top Box
Audio Return
Channel
TV
6
Connecting Audio Devices Via Digital Input
If the source does not have a HDMI output or it is in use elsewhere (already connected to TV), you can connect
the device to the ASB-2 using the Digital Optical or Digital Coaxial outputs from them.
It is also possible to connect an iOS device via USB to play stored music files.
CD Player
Games Console
7
Connecting Analogue Audio Devices Via Coaxial Input
You can connect to the ASB-2 using analogue audio source using either a stereo coaxial connection or a 3.5mm
mini jack lead.
MP3 Player
Set Top Box
Subwoofer Output
To get extra bass from the ASB-2 it has a subwoofer output facility
on it. The subwoofer must be purchased seperately. Simply use a
coaxial subwoofer lead to connect from the subwoofer output on the
ASB-2 to the LFE input of the subwoofer. Refer to page 17 for details
on the sub woofer settings.
Subwoofer
8
Connecting the Power
Now that all of the signal cables are connected, it is now time to connect the power.
IMPORTANT: Please follow the following instructions in sequence.
1. Connect the mains lead to the ASB-2 (leaving the switch in the off position).
2. Connect to wall socket and where applicable turn on.
3. Turn the mains power switch on the side of the amp panel to the on position. The ASB-2 will power on
straight away. The standby button will illuminate white and the LED on the front will flash blue as it goes
through the initial start up process and then slowly flash blue until it is connected to a wireless network or the
input changed.
9
Setting Up
Connecting to the Wi-Fi Network
Turning On.
There are a three different ways you can register the
ASB-2 onto the Wi-Fi network. The first uses WPS
(Wi-Fi Protected Setup), the second method connects
the iPhone, iPad or iPod Touch directly to the ASB2 using the Apple supplied USB lead, while the third
uses the ASB-2’s web portal via a PC, Mac or iOSdevice.
To wake the ASB-2 from standby, press the standby
button on the remote (item 1, remote, page 4) or press
the standby button (item 1, ASB-2 Buttons, page 4)
on the unit itself.
What is required?
To connect the ASB-2 to a Wi-Fi network you will need
to have the following:
• A Wireless router.
• For option 1, you need a WPS compatible router.
Difficulty - easy
• For Option 2, either an iPod Touch, iPhone or
iPad and the Apple supplied USB lead. Difficulty
- medium.
The standby button will then illuminate bright white
dimming to 50%
• For option 3, either a PC, Mac, iPod Touch, iPhone
or iPad connected wirelessly to the network. The
PC/ Mac must be connected wirelessly. Difficulty
- complicated
• ASB-2
Option 1, WPS.
This is by far the easiest and quickest option. You
will need to refer to your router instruction manual for
information on initialising WPS mode.
1. Enable WPS mode on your router. This normally
gives a timed window to connect the ASB-2.
The LED on the front will flash fast blue (Pattern 2 while
initialising) and then turn to pattern 1 when it cant find
a wireless network. This will happen the first time it
is turned on, when there has been a firmware update
and after a factory reset has been carried out. When
it has been set up and used, it will turn on in the same
mode it was turned off in.
2. With the ASB-2 out of standby mode, press the
Wi-Fi/ Airstream Connect button (Item 5, Buttons,
page 4)
3. The LED on the front of the ASB-2 will flash
alternately blue and green (pattern 2) and then
turn solid blue.
10
Option 2, iOS Device.
3. On the ASB-2, press the Wi-Fi/ Airstream Connect
Button (Item 5, Buttons, page 4)
This process uses the wireless network security
information stored on the iOS device to connect to
and gain access to the network. All you need is a
compatible iPod Touch, iPhone or iPad running iOS5
or above.
1. Turn the ASB-2 on from standby mode. The LED
on the front will flash blue, firstly in pattern 2 then
pattern 1.
4. A prompt will appear on the screen of the iOSdevice. This is just asking if you want to allow the
device to share the security data with the ASB-2.
Press “Allow”.
2. When it changes to the slower, Pattern 1, connect
the USB lead to the ASB-2 and your iOS-device.
5. The LED will then start to flash blue and green
alternately (Pattern 2) and turn solid blue when
connected to the Wi-Fi network.
6. When the LED is solid blue, remove the USB lead
from the device and the ASB-2. You are now able
to start playing music via AirPlay.
7. You will not be able to play music wirelessly via
AirPlay with the USB lead still connecting the iOS
Device and the ASB-2.
8. Refer to page 19 for instruction on playing music
via AirPlay.
11
Option 3, Web Browser
Using this method of connection you need either a
wireless enabled PC/ Mac or an iPod Touch, iPhone
or iPad running iOS5 or later.
4. In the list of available networks you will see ASB-2_
Setup_0... (Where the 0... will be the last six digits
of the products unique MAC address). Select this.
When it has been ticked, press the home button.
This method of connectivity involves manually
entering the wireless network name (SSID) and
security information (WEP Key) into the ASB-2’s web
portal from either the computer or iOS-device via a
temporary wireless network.
HINT
Make a note of the name of the wireless
network (SSID) that you are connecting
to and also the security information (WEP,
WPA or WPA2) to ensure the seamless
connection of the ASB-2 to the wireless
network.
Via iOS-Device
1. Turn the ASB-2 on from standby mode. The LED
on the front will flash blue, firstly in pattern 2 then
pattern 1 sequence.
HINT
If you face problems connecting the ASB-2
using this method, try using the web portal
via the PC/ Mac or the iOS device.
5. Here, you have two options, you can scan the
QR code (below) if you have a QR reader on
your device. Alternatively, select Safari and in the
address bar at the top, enter 192.168.1.12
HINT
2. When it changes to Pattern 1, it is searching for
a wireless network. Press and hold the Wi-Fi/
Airstream Connect button (Item 5, Buttons, page
4) for 5 seconds. The LED will start to flash blue,
pattern 3.
3. On the iOS device, go to Settings, then Wi-Fi.
12
If the IP address 192.168.1.12 doesn’t work,
turn off the ASB-2 and press the home button
on the device and then retry from Step 1.
6. The ASB-2’s portal page will now be displayed.
Select Wi-Fi Setup from the list on the left hand
side.
7. Enter the SSID and security details of your wireless
network, press save.
Via Laptop/ PC/ Mac
HINT
The Laptop, PC or Mac must be wireless
enabled with wireless turned on.
1. Turn the ASB-2 on from standby mode. The LED
on the front will flash blue, firstly in pattern 2 then
pattern 1.
8. There will be a warning pop up appear, select OK.
2. When it changes to Pattern 1, it is searching for
a wireless network. Press and hold the Wi-Fi/
Airstream Connect button (Item 5, Buttons, page
4) for 5 seconds. The LED will start to flash blue,
pattern 3.
9. The LED will then start to flash blue and green
alternately (Pattern 2) and turn solid blue when
connected to the Wi-Fi network.
10.Return your device to the original Wi-Fi network so
that you can stream your music.
11.Go to Settings, then Wi-Fi.
12.Select your Wi-Fi network.
13.When the tick appears next to your network, press
the Home button.
14.To start playing music via AirPlay please refer to
page 19.
3. On the Laptop/ PC, go to the Wireless network
selection tool. For Windows Operating System go
to step 4, for Mac Operating System go to step 6.
HINT
On a Windows 7 Machine, click on the Wi-Fi
strength indicator in the bottom right hand
corner. If it is hidden, click on the little up
arrow.
4. In the list will be your network (probably with
“Connected” next to it), and any other wireless
networks within range. One of them will be
AirstreamConnect****** (where the 6 *’s are the
last 6 digits of the ASB-2’s unique Mac Address).
13
HINT
If Airstream Connect isn’t displayed, click
the refresh arrows (top right corner of the
window).
7. On the computer, open your web browser and in
the address bar at the top of the page, type in
the following address to load the Airstream web
portal: 192.168.1.12
5. Click on ASB-2_Setup_*****, and then the Connect
button. After a few seconds, you will be connected
to the Airstream Connect wireless network.
8. Click on Wi-Fi Setup on the left hand side of the
page. On this page, you will see the details of the
ASB-2 and the “Profile” of the wireless network
you are about to connect to.
Continue to step 7.
6. On a Mac, click on the wireless network signal
strength indicator located in the bar at the top of
the desktop.
9. Click the drop down arrow to select the “Service
Set ID” (SSID). In the list should be your wireless
network. Select your network and enter the WEP
Key (or other security type).
Continue to Step 7 below.
HINT
With both Windows and Mac OS’s, if
AirstreamConnect isn’t displayed, come out
of the selection window and then try again
after a few seconds.
14
10.Click Apply. When you do, a warning pop up will
be displayed, click OK.
Windows pop up:
On Screen Menu
To access the OSD, press the Menu button (Item 6,
Remote, page 4). A single press of the Menu button
will bring up the menu, illustrated below:
Mac pop up:
11.After clicking the OK button on the pop up, there
will be no other visible indication on your browser
that the ASB-2 is connected to the network.
The LED will then start to flash blue and green
alternately (Pattern 2) and then change to the
previous input mode once it has been connected.
This will be indicated by the LED.
12.Remember to return to the Available Wireless
Networks list on your computer and reselect your
home Wireless Network.
13.To start streaming to the ASB-2 from your PC,
Mac or iOS device, please refer to page 19.
HINTS
If the LED flashes blue slowly (pattern 1),
then it has failed to connect. You will have
to repeat the above steps to try again.
If it still flashes blue slowly after repeating
the above steps, try moving the ASB-2
closer to the router.
To navigate through the menu use the up, down, left
and right arrows. Use the up and down arrows to
move up and down the different options and then
the right arrow to select that option. Press ok on the
option you wish to select and then use the left arrow
to move back to the main menu.
Language Selection
Firstly, we would recommend selecting the OSD
Language. To do this, navigate down to OSD
Language and press the right arrow on the remote.
Highlight the appropriate language from those listed
and press OK to select.
INPUT SELECT
3D AUDIO
EQUALISATION
CHANNEL LEVELS
SUB OUT
POWER OPTIONS
OSD LANGUAGE
FIRMWARE UPDATE
FACTORY RESET
ENGLISH
华语
NEDERLANDS
FRANÇAIS
DEUTSCH
ITALIANO
日本語
PORTUGUÊS
РУССКИЙ
ESPAÑOL
15
INPUT SELECT
3D AUDIO
ON
EQUALISATION
OFF
3D Audio changes the surround
effect for the all
inputs. Each input can have its own
3D effect
added
CHANNEL
LEVELS
SURROUND EFFECT HIGH
and saved.
SUB OUT
NORMAL
POWER OPTIONS
LOW
INPUT SELECT
Examples
3D AUDIO
ON OSD LANGUAGE
3D Audio Off, Surround Effect low.
FIRMWARE
UPDATE
EQUALISATION
OFF
FACTORY RESET
CHANNEL LEVELS
SURROUND EFFECT
3D Audio
SUB OUT
POWER OPTIONS
OSD LANGUAGE
FIRMWARE UPDATE
FACTORY RESET
2 Channel Audio
When turned on, the 3D Audio creates a wider sound
stage than would normally be heard.
HINT
3D Audio On, Surround Effect High
It will not create “extra” channels for the rear
and centre.
Off
On
Equalisation
This allows the bass, mid-range and treble levels to
be adjusted to your tastes/ environments. They each
have independent attenuation and gain from -10 to
+10dB.
HINT
5.1 or 7.1 Channel Audio
When fed with a multi-channel surround signal, the 3D
effect can be turned on or off.
With 3D off the left, right, centre and LFE channels will
be heard without any processing.
When turned on a wide stereo effect is applied to
the left and right channels as with a 2 channel signal.
In addition to this the surround channels will be
introduced with virtual surround processing applied to
create the impression of a 5.1 surround system. The
level of this virtual surround effect can be adjusted to
make it more or less pronounced.
16
Any adjustments made will effect all input
sources. It is not possible to have seperate
equalisation settings for each input.
INPUT SELECT
3D AUDIO
EQUALISATION
CHANNEL LEVELS
SUB OUT
POWER OPTIONS
OSD LANGUAGE
FIRMWARE UPDATE
FACTORY RESET
BASS LEVEL
MID LEVEL
TWEETER LEVEL
0
Channel Levels
This allows you to adjust the output levels of the virtual
centre, surround and sub woofer. They each have
independent attenuation and gain from -10 to +10dB
and will be the same for each input.
The virtual sub has the added ability to be turned off
as well. When the virtual sub is turned on, the LFE
channel will be output from the ASB-2 and the subwoofer (if there is one connected). When it is turned
off, the LFE will only be output through the external
INPUT SELECT
sub-woofer.
INPUT SELECT
3D AUDIO
EQUALISATION
CHANNEL LEVELS
SUB OUT
POWER OPTIONS
OSD LANGUAGE
FIRMWARE UPDATE
FACTORY RESET
the TV, should it have this function. You will need to
set the auto off timer to off if you are going to control
it in this way.
INPUT SELECT
3D AUDIO
EQUALISATION
CHANNEL LEVELS
SUB OUT
POWER OPTIONS
OSD LANGUAGE
FIRMWARE UPDATE
FACTORY RESET
AUTO STANDBY TIME
HDMI PASS THROUGH
FRONT LED BRIGHTNESS
3D AUDIO
EQUALISATION
CHANNEL LEVELS
SUB OUT
VIRTUAL CENTRE
LEVEL
0 AUTO STANDBY TIME
POWER OPTIONS
VIRTUAL SURROUND
LEVEL
HDMI PASS THROUGH
OSD LANGUAGE
VIRTUAL SUB-WOOFER
FIRMWARE UPDATE FRONT LED BRIGHTNESS
FACTORY RESET
Here you set the sub woofer output crossover
frequency. The frequency you set will depend on your
tastes and room, but we would recommend setting it
to 80Hz.
CROSSOVER FREQ.
Power Options
Here you have a few different options
to configure;
the
INPUT
SELECT
auto standby time, HDMI pass through and front LED
3D AUDIO
brightness.
15 MIN
30 MIN
60 MIN
NEVER
HDMI Pass Through
HDMI pass through will allow sound and picture to
pass through the ASB-2 when it is in standby mode.
This means that the source can be watched on the TV
without the need to turn the ASB-2 on.
Sub Out
INPUT SELECT
3D AUDIO
EQUALISATION
CHANNEL LEVELS
SUB OUT
POWER OPTIONS
OSD LANGUAGE
FIRMWARE UPDATE
FACTORY RESET
15
30
60
NE
The ASB-2 will only pass through the HDMI source
that was selected when it goes into standby mode.
For example, if it is put into standby mode when HDMI
1 (eg, set top box) is selected and you wish to watch
that, then the HDMI pass through will work and a
picture will be displayed. However, something that is
connected to HDMI 2 (eg, Blu Ray player), then it will
not be displayed on the TV.
0
INPUT SELECT
3D AUDIO
EQUALISATION
CHANNEL LEVELS
SUB OUT
POWER OPTIONS
OSD LANGUAGE
FIRMWARE UPDATE
FACTORY RESET
EQUALISATION
Auto Standby Time
CHANNEL LEVELS
The auto standby time option allows you to set
SUB OUT
a period of time that it will take before the ASB-2
POWER
automatically turns itself off. This can
be 15,OPTIONS
30, 45,
60 minutes, or Off. When set to Off,
it
will
only
turn off
OSD LANGUAGE
when the standby button on the remote
or product
is
FIRMWARE
UPDATE
pressed. The standby function can be controlled by
FACTORY RESET
AUTO STANDBY TIME
HDMI PASS THROUGH
FRONT LED BRIGHTNESS
AUTO STANDBY TIME
HDMI PASS THROUGH
FRONT LED BRIGHTNESS
ON
OFF
17
ON
OF
POWER OPTIONS
OSD LANGUAGE
HINT
FIRMWARE UPDATE
When HDMI Pass through is enabled,
the RESET
FACTORY
ASB-2 will consume more power when in
INPUT SELECT
standby mode.
3D AUDIO
Front LED Brightness
EQUALISATION
The intensity of the main LED can CHANNEL
be adjusted
if it is
LEVELS
too bright for your requirements. SUB OUT
POWER OPTIONS
There are three settings, bright (default), dim and off.
OSD LANGUAGE
Dim will set it to 50% intensity.
FIRMWARE UPDATE
INPUT SELECT
FACTORY RESET
INPUT SELECT
3D AUDIO 3D AUDIO
EQUALISATION
EQUALISATION
CHANNEL LEVELS
CHANNEL LEVELS
SUB OUT
SUB OUT POWER OPTIONS
OSD LANGUAGE
POWER OPTIONS
AUTO STANDBY TIME
FIRMWARE UPDATE CURRENT VERSION
HDMI PASS THROUGH
OSD LANGUAGE
FACTORY RESET
CHECK FOR UPDATE
FIRMWARE UPDATE
FACTORY RESET
FRONT LED BRIGHTNESS
CURRENT VERSION
CHECK FOR UPDATE
v#.##
You may be asked for the firmware version should
you contact Monitor Audio for any technical or set up
advice.
To check to see if the firmware is up to date, use the
arrow buttons on the remote to navigate to ‘Check for
Update’ and press the right arrow.
CURRENT VERSION
CHECK FOR UPDATE
FIRMWARE UP TO DATE
UPDATE AVAILABLE.
PRESS ‘OK’ TO PROCEED
It will then check and inform you that either it is up
to date, or that there is an update available. If there
is an update available, it will go through the update
procedure on page 22.
FIRMWARE UP TO DATE
BRIGHT
UPDATE AVAILABLE.
DIM ‘OK’ TO PROCEED
PRESS
UPDATE IN PROGRESS.
PLEASE WAIT
OFF
ELS
Factory Reset
NS
E
DATE
ET
AUTO STANDBY TIME
HDMI PASS THROUGH
FRONT LED BRIGHTNESS
BRIGHT
DIM
OFF
This resets all of the customisable settings within the
menu structure of the ASB-2 back to their original,
factory settings.
HINTS
The Firmware will remain as the most recent
version.
If set to off, the only feedback will be via the button
LED’s and the On Screen Display.
Firmware Update
The Wi-Fi settings will have to be re-entered.
Refer to page 10
Here, you can see what version of firmware the ASB-2
is currently running and check to see if an update is
available, although the ASB-2 will automatically check
for an update every time it is connected to the internet.
INPUT SELECT
3D AUDIO
EQUALISATION
CHANNEL LEVELS
SUB OUT
POWER OPTIONS
OSD LANGUAGE
FIRMWARE UPDATE
FACTORY RESET
18
CURRENT VERSION
CHECK FOR UPDATE
v#.##
Using the ASB-2
Watching a HDMI Source
To watch an HDMI source, ensure that the TV is
turned on and the correct HDMI input is selected for
the ASB-2. Turn on the source and select the required
HDMI input on the ASB-2.
The picture should be displayed on the TV screen and
the sound will be through the ASB-2.
If the Audio Pass through is enabled, the ASB-2 does
not need to be turned on, but it does need to be left in
standby in the desired input.
To scroll through the HDMI inputs, either press the
source button on the remote or the HDMI button on
the product.
HINT
The LED on the front will flash to indicate the
HDMI input number (1, 2 or 3).
Listening to an iOS device via AirPlay
Before proceeding, please ensure the ASB-2 is turned
on from standby mode and is registered to the same
wireless network as the device you will be playing
back from.
HINT
If the LED on the ASB-2 is flashing, it is
either initialising (Pattern 2) or it is searching
for a wireless network (Pattern 1). In either
state, the AirPlay logo will not be visible on
the iOS-device.
The ASB-2 will automatically change to AirPlay input if
it isn’t already selected.
1. On your device, select the music you wish to play.
2. When you are in “Music”, the AirPlay icon should
be on the bottom right hand corner of the display.
Press this and select Monitor_ASB-2 from the list.
Listening to a Digital Auxiliary Source
If there is a digital music source connected to the
ASB-2, either use the remote control’s source button
to scroll to it (the LED on the front will be white).
Alternatively, press the Digital button on the product.
In both instances, it will scroll through the 3 digital
input sources. The LED will flash to indicate the input:
1 for Optical, 2 for Coaxial and 3 for USB
3. The AirPlay logo will now be illuminated. This
means that your device will be playing via AirPlay.
Press the Play button and enjoy the music through
the ASB-2.
Listening to an Analogue Auxiliary Source
If there is an analogue music source connected to
the ASB-2, either use the remote control’s source
button to scroll to it (the LED on the front will be
green). Alternatively, press the Analogue button on
the product. In both instances, it will scroll through
the 2 analogue input sources flashing to indicate the
input: 1 for coaxial and 2 for mini jack.
19
Listening to Music on a PC/ Mac via AirPlay
Before proceeding, please ensure the ASB-2 is turned
on from standby mode and is registered to the same
wireless network as the device you will be playing
back from. The Mac or PC can be connected wired
or wirelessly to the same network as the ASB-2.
The ASB-2 will automatically change to airplay mode
if it isn’t already selected.
1. On the PC/ Mac, open iTunes. The AirPlay Icon will
appear next to the volume slider (iTunes version
11.0.1.12 illustrated below), but only if it has found
the ASB-2 on the network.
2. Click on the icon and select the ASB-2 from the
devices available. The AirPlay icon will then be
illuminated blue.
20
3. Select the song you wish to play and sit back and
enjoy.
HINT
The ASB-2 will get the volume level from
iTunes, not the PC/ Mac, so remember to
check the volume level of iTunes before
playing music.
In both examples of playback by AirPlay, the LED on
the front of the ASB-2 will be blue when in AirPlay
mode. If it doesn’t automatically change to AirPlay
mode when songs start playing, press the AirPlay
button on the ASB-2 or the remote.
Listening to an iOS device via AirPlay Direct
It is possible to use the ASB-2 to stream to from an iOS
device or wireless laptop without it being connected
to your network, or if you don’t have a wireless router
use the ASB-2 in AirPlay Direct mode to still be able to
enjoy your music.
AirPlay Direct means you can stream from your
compatible iOS Device, PC or Mac straight to the
ASB-2 without the need for a wireless network/ router.
To activate this mode creating a wireless network
solely between the ASB-2 and the iOS-device, follow
the steps below:
1. Turn the ASB-2 on from standby.
2. Press the AirPlay Direct button on the rear of the
ASB-2 (Button 5 on the illustration on page 4).
3. The LED on the front of the unit will momentarily
flash purple and then turn solid purple.
4. On the iOS-device, go to “Settings” and then
“Wireless”. Within the available wireless networks,
there should be “Airstream ASB-2...”. Select
HINT
If the Airstream ASB-2 isn’t one of the listed
networks, press the home button and try
again. It sometimes takes a few seconds
for the network to become visible.
6. To use AirPlay Direct from a PC or Mac, please
refer to page 9 for instruction on connecting to the
ASB-2.
HINTS
If a telephone call is received while in AirPlay
Direct mode, music will pause and restart
when the call is ended.
While in AirPlay Direct mode, cellular data will
not function. So, iMessage, emails and mobile
internet will not function simultaneously.
More than one device can be connected
in AirPlay Direct mode, but only one device
can play music in AirPlay Direct mode.
It is possible to toggle between AirPlay direct
and conventional AirPlay simply by pressing
the AirPlay button on the rear of the ASB-2.
“Airstream ASB-2...” from the list then press the
home button.
It is possible to connect a Wi-Fi enabled PC
or Mac to the ASB-2 via AirPlay Direct. You
do this in the same way as connecting an
iOS device except you use the PC/ Mac’s
Wi-Fi network selection tool.
AirPlay Direct to AirPlay
1. To exit from AirPlay Direct mode, press the AirPlay
Direct Button on the rear of the ASB-2 (Button 5
on the illustration on page 3).
2. The LED will then flash blue as it is trying to connect
5. To play music using AirPlay Direct, please refer to
page 11.
to a wireless network. When connected it will turn
solid blue. If this hasn’t been set up yet, it will
change from flash pattern #2 to flash pattern #1.
Refer to page 6 for instruction on connecting it to
the Wi-Fi network and to page 17 for information
on the flash patterns.
21
Listening to an iOS Device via the USB
The ASB-2 can play music via USB from an iOS device.
A list of compatible devices can be found below:
2. Press the digital input button on the ASB-2 (Button
3 on the illustration on page 4) until the USB input
is selected. The LED will flash white 3 times, then
stay white.
• iPhone 5
• iPhone 4S
• iPhone 4
• iPhone 3GS
• iPhone 3G
• iPod Touch 5th Generation
• iPod Touch 4th Generation
• iPod Touch 3rd Generation
• iPod Touch 2nd Generation
• iPod Touch
You will need to use the Apple supplied USB lead.
Before proceeding, please ensure the ASB-2 is turned
on from standby mode.
1. Connect the apple supplied USB lead to the ASB2 and your device. The ASB-2 will not charge any
iOS device during playback.
22
3. Navigate to the stored music and press play on
your device.
Firmware Update.
The ASB-2 automatically searches for software
updates whenever it is turned on (providing there is a
connection to the internet). However, there are other
ways of updating the firmware. These are manually
via the internet or via a USB memory stick. Details of
all methods are outlined below.
Automatic Notification of Firmware Update
By default the ASB-2 is set up to inform you a firmware
update is available automatically.
1. After the ASB-2 has gone through the initial boot
up procedure and connected to the network (blue
LED stops flashing), the LED will flash white slowly
(Pattern 1) indicating that an update is available.
NOTE: There are 3 different files within the compressed
file that is downloaded: US, JP and EU. The ‘US’ file
is for America only, the ‘JP’ file is for Japan only and
the ‘EU’ file is for the rest of the world.
1. On your PC/ Mac open the internet browser and
go to www.monitoraudio.com and navigate to
either the ASB-2 page or the Support page.
2. Download and the “unzip” the update file. When it
has been unzipped (decompressed) there will be
3 versions in there. Select the type appropriate for
your region (US, JP, EU).
3. Rename the file to be ASB-2_FW.fw (this is very
important) and save it to the USB stick. When it
has been copied/ saved, safely remove the USB
stick.
2. Press and hold the standby button.
Release the button when the main LED changes
colour. It will then go through various states and
colour changes indicating different stages of the
update process:
Purple (Flashing very fast) - Initialising the update
Purple (Flashing pattern 4) - Uploading to the unit
White (Flashing pattern 4) - Updating the unit.
3. Once the update has been successfully completed,
the ASB-2 will go into standby mode (power LED
is illuminated red).
4. Press the standby button and the ASB-2 will go
through the initial start up procedure described on
page 9.
HINT
If the update sequence differs from above,
the update may have failed. Please retry
using the USB update or web portal update.
Also check the support section of
www.monitoraudio.com
USB Firmware Update
To update the firmware by USB memory stick the
update firmware needs to be downloaded first.
NOTE: The memory stick must be formatted as
FAT32 and the file that is downloaded saved on to the
root folder of the drive.
4. Remove the power lead from the ASB-2 and insert
the USB stick into the ASB-2.
5. Reconnect the power and turn on the ASB-2. The
LED will flash blue while initialising and will then
illuminate blue, purple, white or green depending
on the mode it was turned off in. The LED will
then flash white slowly (Pattern 1) indicating that
an update is available.
6. Press and hold the standby button until the LED
on the front changes to purple.
7. Release the button and the LED will then go through
various states and colour changes indicating
different stages of the update process:
Purple (Flashing very fast) - Initialising the update
Purple (Flashing pattern 4) - Uploading to the unit
White (Flashing pattern 4) - Updating the unit.
8. Once the update has been successfully completed,
the ASB-2 will go into standby mode (power LED
is illuminated red), remove the USB stick.
9. Press the standby button and the ASB-2 will go
through the initial start up procedure described on
page 9.
23
Web Browser Firmware Update
It is possible to update the firmware in the ASB-2 via
its web page. There are a number of ways to do this
and these are listed below:
i. Via Safari. If you have safari web browser
installed, click on Bonjour and then the
bookmarks tab. The ASB-2 should appear as
one of the bookmarks in Bonjour. Continue to
step 1 below.
ii. Via Computer on a Windows 7 PC. Navigate
to the Computer (Start; Computer), and click on
Network. Scroll to Media Devices and double
click on Airstream ASB-2 xxxxxx (Where xxxxxx
is the last 6 digits of its unique MAC address).
Continue to Step 1 below.
iii.Via the Control Panel on a Windows 7 PC.
Navigate to the Control Panel and select
Hardware and Sound, and then Devices and
Printers. Airstream ASB-2 xxxxxx should be
displayed under the Devices title. Double click
to bring up the Properties window. Click on the
UPnP tab and then the link next to “Webpage”.
Continue to Step 1 below.
3. Connect to the ASB-2 using one of the 5 methods
outlined above and click on the Firmware Update
tab.
4. Click on the drop down menu next to ‘Update
Method’ and select the only option available which
is “Firmware Update From Network”.
5. Click on Ok. The page will change with a note to
say it should refresh in a couple of seconds, or
click a link. Click the link (if it doesn’t refresh).
iv.Via any internet browser. This method can only
be done if the IP address of the ASB-2 is known.
If you do not already know this, it can be found
out by going to your router’s control panel and
looking under attached devices (or similar). Refer
to the router’s manual for help on this. Continue
to step 1 below.
v.Via any web browser. This method can only be
done if the last 6 digits of the MAC address are
known. In the address bar of the browser, type
in the following:
http://airstream-ASB-2-xxxxxx.local./index.asp
Where xxxxxx is the last 6 digits of the MAC
address.
6. The LED on the ASB-2 will turn white.
7. Next, click on “Choose File” and navigate to the
location the updated firmware file was saved to.
Select it and click open.
WARNING: Do not, at any point during
the update procedure remove the power
from the ASB-2, or click back on the web
browser. Follow the on screen instructions and the
instructions in this manual.
1. Download the updated firmware from the www.
monitoraudio.com and save it to your computer.
2. Unzip the compressed file and save the three files
locally on your computer. The files are region
specific so make a not of the correct one for your
region.
24
8. Click on “Upload”.
9. Check the details of the file on the web page and
click “OK”.
Changing the Remote Battery
1. Holding the remote in your hands with the buttons
facing up, pull out the draw in the bottom of the
remote.
10.The web page will now change showing the
progress of the update. At the same time, the LED
will go through various states and colour changes
indicating different stages of the update process:
Purple (Flashing very fast) - Initialising the update
Purple (Flashing pattern 4) - Uploading to the unit
White (Flashing pattern 4) - Updating the unit.
2. Completely remove the drawer to reveal the
battery.
HINT
If the update sequence differs from above,
the update may have failed. Please retry
using the USB update or web portal update.
Also check the support section of
www.monitoraudio.com
The ASB-2 will now restart and will start back up
in the last mode it was left in.
11.The update is now complete. The web page might
not say that it is 100% complete, but when the
ASB-2 goes into standby mode (standby button
illuminated red), it has completed the update
process. Close the web browser.
3. Replace only with the same type, CR2025 3v.
4. Slide the drawer back into the remote.
12.Press the standby button and the ASB-2 will go
through the initial start up procedure described on
page 9.
25
LED Colour Matrix
The table below shows the various colours and flash patterns associated with the front LED and their meanings.
1
.
.
.
2
.
.
.
3
.
.
.
4
.
.
.
Description
Function
Alternate flash
green & blue
WPS Connect
Mode
Slow Flashing
Purple
Entering Airstream
Connect Mode
Fast Flashing
Blue
Initialising
Alternate flash
green & blue
Connecting to
Wi-Fi
Blinking Blue
No Wi-Fi
Connection
Blue
Airplay Mode
Green
Auxiliary Source
White
HDMI, Digital Aux,
iOS Source Via USB
Fast Flashing
Purple
Entering AirPlay
Direct Mode
Purple
AirPlay Direct
Mode
Purple
Airstream Connect
Mode
Very Slow
Blinking White
Update Available
Normal Operation
Firmware Update
Very Fast
Flashing Purple Initialising Update
Fast Flashing
Purple
Uploading to Unit
Fast Flashing Updating Firmware
White
LED Flashing Patterns
The table below shows the names of the flash patterns associated with the LED on the front of the ASB-2.
Pattern Number
#1
#2
#3
#4
26
250ms 250ms 250ms 250ms 250ms 250ms 250ms 250ms 250ms 250ms 250ms 250ms 250ms 250ms 250ms 250ms 250ms 250ms
Specifications
ASB-2
Frequency Response
40Hz - 20kHz
Power Output (RMS)
160Watts
Drive Unit Complement
2 x 5” (125mm) C-CAM® Cone Sub-Woofers
2 x 4” (100mm) C-CAM® Cone Mid-Range Driver
2 x 1” (25mm) C-CAM® Gold Dome Tweeter
System Configuration
3 Way, Rear Bass Reflex Port
Inputs
3 x HDMI
Digital Coaxial
Digital Optical
Analogue RCA Phono
Analogue 3.5mm Jack
Outputs
1 x HDMI (supports ARC)
RCA LFE Sub-woofer output
Auxiliary Input Impedance/
Sensitivity
10k Ohms/ 300mV
AC Input Voltage
100 - 240v (Auto Ranging)
Amplifier Category
Class D
Power Consumption
< 0.5W (Increased to 20W when HDMI Pass
through is enabled).
Supported File Formats (AirPlay)
AAC, ALAC, MPS
Supported
(Airstream)
AAC, ALAC, MP3, FLAC
File
Formats
Wireless Network Protocol
802.11b/g
Electrical Approvals
ETL/ CE/ Fcc/CB/ Erp/ Wi-Fi/ Wi-Fi WMM/ Apple
MFi Certified
Dimensions (each) (H x W x D)
(7 1/16 x 39 9/16 x 6 9/16”) 180 x 1005 x 167mm
Colour/ Finish
Charcoal Grey with Black Grille Cloth
Weight (each)
25lbs 6oz (11.25 Kg)
Monitor Audio reserves the right to alter specifications without notice.
iPhone, iPod, iPod classic, iPod nano, iPod shuffle, and iPod touch are trademarks of Apple
Inc., registered in the U.S. and other countries. iPad is a trademark of Apple Inc.
AirPlay works with iPhone, iPad, and iPod touch with iOS 4.3.3 or later, Mac with OS X
Mountain Lion, and Mac and PC with iTunes 10.2.2 or later.
“Made for iPod,” “Made for iPhone,” and “Made for iPad” mean
that an electronic accessory has been designed to connect
specifically to iPod, iPhone, or iPad, respectively, and has
been certified by the developer to meet Apple performance
standards. Apple is not responsible for the operation of this
device or its compliance with safety and regulatory standards.
27
Trouble Shooting
If experiencing problems with the ASB-2, there are
some quick and easy checks, which may help to solve
these problems. If the standby button is flashing red
and white, make a note of the front LED colour. This
may help to diagnose the issue. Refer to the table on
page 28
Unable to Connect to the Wireless Network
• Check if your Wi-Fi router is Wi-Fi 802.11b/g
certified. The ASB-2 is not compatible with
N Class routers. If your Wi-Fi router is Wi-Fi
802.11n, please ensure that it is in 802.11b/g
mode. The ASB-2 is not able to talk to routers
that are 802.11n only.
• Ensure you router is DHCP enabled.
• Keep away from potential sources of interference
which may affect Wi-Fi signal, such as microwave
ovens.
• If you fail to use your PC for Wi-Fi network setup,
check whether your PC is using a Wi-Fi network.
You cannot use Ethernet connection for AirPlay
network setup.
• Make sure that the SSID name of the router
consists of alphanumeric characters, with no
space or special characters like %/#/* inserted. It
must also not be hidden.
• Check that there are enough spare IP addresses
available on your router. Some limit the number of
devices that are allowed on the network
• The ASB-2 is set to work on Channel 1 - 11. It will
not work on channels 12, 13 or 14.
No Sound/ Noisy and Crackling Sound
• Check the volume, source and play/ pause
settings.
• Check that the mains power lead is connected
to the ASB-2 and the mains power socket and is
switched on at the wall.
• If the playback is very noisy/ crackling then it may
be that the source is set to bitsream, please set
it to PCM. This is because the ASB-2 does not
decode the sound track and so needs the source
to decode it and send the individual channels to
the ASB-2.
The ASB-2 is Nonresponsive
• Check that the mains power lead is connected
to the ASB-2 and the mains power socket and is
switched on at the wall.
28
• Remove the power from the ASB-2, wait for the
standby LED to go out and then reconnect the
power.
• Check that it is connected to the same wireless
network as your device.
• Check you are running the latest version of
firmware. Refer to page 15.
Occasional Breaking up of AirPlay Music
Playback
• Move the ASB-2 closer to your Wi-Fi router.
• Avoid using Wi-Fi channel which is overlapped by
the nearby Wi-Fi network.
• Check if your network speed is fast enough (in
cases where multiple devices share the same
router, the AirPlay performance may be affected).
Turn off the other devices connected to your router.
• Enable the Quality of Service (QoS) option (if
available on the Wi-Fi router).
• Turn off other Wi-Fi routers or range extenders to
try to diagnose a possible faulty one.
No AirPlay Icon on my iTunes Host Device
• Make sure the ASB-2 is connected to the same
Wi-Fi network as the host device
• It can sometimes take up to 30 seconds for the
ASB-2 to appear on the network. Try leaving
iTunes for a bit to see if it appears.
AirPlay Connection Failed with Mac or PC
• Temporarily disable the firewall and security
software to see whether it blocks the ports that
AirPlay uses to stream content. Refer to the help
documentation for your router/ firewall/ network
security to unblock the ports used by AirPlay.
• When you use iPod Touch/iPhone/iPad/Mac/PC
for AirPlay, if the music play breaks or stops, try
to restart your iPod Touch/iPhone/iPad, iTunes or
ASB-2.
• Video streaming or FTP downloads may overload
your router and therefore may cause interruptions
during AirPlay music play. Try to reduce the load
of your router.
If still experiencing difficulties after making the
suggested checks, please call the help desk for further
assistance. The help desk is open from 9.00am
to 5.00pm (GMT), Monday to Friday (excluding Bank
Holidays) and can be contacted on +44(0) 1268 740580.
Alternatively contact the store you purchased the ASB-2
from.
LED Error Colour Matrix
When the front LED is a solid colour and the standby button alternately flashes red and white, an error has
occurred. The table below explains these colour combinations.
Main LED
Colour
Errors (Standby Button Flashes White and Red Alternately)
1
.
.
.
2
.
.
.
Error
Blue
Error with network or on board network module
Purple
Update Error
Blue
Green
White
Current or thermal protection. During normal
operation (LED colour will depend on source
being used).
Purple
Owner Information
Product Details
Model ASB-2
Product Serial No …………………………………..
Date of Purchase ……………………………………
IP Address on Network ……………………………………
MAC Address of ASB-2 …………………………………..…
Dealer Details
Dealer Name ……………………………………………………………………………….
Address ……………………..………………………………………………………………
...........................................................................................................
Town ................................................................................................
Post code .........................................................................................
Country ………………………………………………………………………….............
E-mail address …………………………………………………………………..………
29
m o n i t o r a u d i o . c o . u k
Monitor Audio Ltd.
24 Brook Road
Rayleigh, Essex
SS6 7XJ
England
Tel: +44 (0)1268 740580
Fax: +44 (0)1268 740589
Email: [email protected]
Web: www.monitoraudio.com
Designed and Engineered in the
United Kingdom, made in China
Version 1. 2013