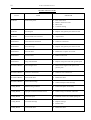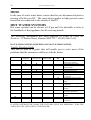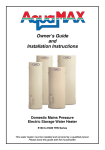
1
RECREATIONAL VEHICLE MANUFACTURERS
ASSOCIATION OF AUSTRALIA
RVMAA OWNERS HANDBOOK
The Association under its full name set out above is incorporated under the
Associations Incorporation Act 1981.
Among its principal purposes are:
a) to promote, develop and advance the scientific and technical aspects of
manufacturing, selling and dealing in or in any way disposing of,
recreational vehicles.
b) to disseminate among members, scientific technical and other beneficial
knowledge in respect to the recreational vehicle industry.
The Association in furtherance of its aims, maintains close contact with its
manufacturer members, and carries out its own inspection and assessment
of the standard of manufacture of its members products.
While every care is taken in carrying out the inspection and assessment,
the Association accepts no responsibility for failing to discover latent
defects or imperfections not discoverable by external examination.
It is important for all new Recreational Vehicle owners to adhere to this
owners manual and to the manual, specifications and warranties of items
such as wheels, axle, tyres, brakes, couplings, stove, refrigerator, gas
cylinders, rangehood, microwave, batteries, toilets, hot water systems,
battery chargers, airconditioners and awnings that are supplied to the RV
manufacturer by sub suppliers.
Each of these items carries a separate warranty from the warranty supplied
by the RV manufacturer. It is important that at all times owners should
operate within the recommended procedures in order to enjoy many
thousands of trouble free kilometres.
This manual should be kept in a safe place for future reference.
2
RVMAA OWNERS MANUAL
Because your new Recreational Vehicle represents a significant personal
investment it is important that you consult with the manufacturer of the
vehicle or the manufacturer of component parts as listed above before
attempting any repairs. Your RV manufacturer will happily supply details
on where your RV can be serviced or repaired anywhere in Australia.
Sometimes problems arise through misunderstandings between the
customer and the manufacturer. In order to avoid these circumstances it is
desirable to contact your dealer or manufacturer to receive advice on how
servicing or repairs should be carried out.
It is strongly recommended that all owners insure their Recreational
Vehicle for accidental damage, personal liability, theft, collision, property
damage, hail, lightning strike, storm & tempest and flood insurance, if
appropriate.
This manual has been prepared to enable RV owners to receive the
maximum enjoyment and utility from their vehicles. The guidelines and
recommended practice have been prepared by qualified engineers based on
experience over many years. If they are followed, many pitfalls will be
avoided.
There is nothing worse than having to postpone or cancel a planned
holiday because for one reason or another the RV is unserviceable.
The owner should acquaint himself or herself with the time limits of
warranties applying to the vehicle and its component parts as specified by
the manufacturer and sub suppliers.
If defects occur within the warranty period, reference to the manual will
help the owner to seek redress.
All information contained in this owners handbook is the property of the
Recreational Vehicle Manufacturers Association of Australia and may not be
copied in whole or in part without written permission of the R.V.M.A.A.
All information contained herein is correct at the time of printing. However, this
information is supplied as a guide only and does not substitute the warranty
conditions as laid down by individual RV or component manufacturers or
suppliers. You must adhere to warranty conditions and procedures as supplied
with your Recreational Vehicle.
RVMAA OWNERS MANUAL
3
INDEX
A
B
C
D
E
F
G
H
I
J
K
L
M
Air Conditioners
Aluminium
Antennas
Awnings
Batteries
Battery Chargers
Brakes
Bulbs
Bumper Bars
Canvas
Canvas Annexe
Chassis
Chemical Toilets
Corner Stabilisers
Coupling
Door Locks
Electrical
Electric Brake Controllers
Exterior Care
Electrical Safety
Fire Safety
Floor Coverings, Carpets & Vinyls
Gas Cylinders
Gas Leaks
Gas Safety
Handbrake
Handbrake Adjustment
Hand Pumps
Hatch
Hose
Hot Water Systems
Interior Lights
Interior Plywood
Jockey Wheel
....................................
....................................
....................................
....................................
....................................
....................................
....................................
....................................
....................................
....................................
....................................
....................................
....................................
....................................
....................................
....................................
....................................
....................................
....................................
....................................
....................................
....................................
....................................
....................................
....................................
....................................
....................................
....................................
....................................
....................................
....................................
....................................
....................................
....................................
5
8
9
9
10
10
10
25
25
26
26
26
26
26
27
27
28
28
28
28
31
32
32
32
33
36
36
36
36
37
37
38
38
39
Levelling Devices
Mattresses
Microwaves
....................................
....................................
....................................
39
40
40
RVMAA OWNERS MANUAL
4
Mirrors
N
O
P
Q
R
S
T
U
V
W
40
Payload
Plastic Pole Carriers
Poptops
12 Volt Pressure Pump
....................................
....................................
....................................
40
41
41
41
Rangehood
Refrigerators
Regulator
Rollout Awnings
Speed Limits
Stoves
Towing Equipment
Tyres
....................................
....................................
....................................
....................................
....................................
....................................
....................................
....................................
42
42
45
45
46
47
48
48
Warranty Procedures
Water Systems
Windows & Water Tanks
Wheel Nuts
....................................
....................................
....................................
....................................
49
49
50
52
Pre Trip Check List
Care and Maintenance
....................................
....................................
54
55
X
Y
Z
RV’s or Recreational Vehicles include camping
trailers : Poptops : Caravans : Camper Vans:
Camper Conversions : Motor Homes and Slide
on Campers
RVMAA OWNERS MANUAL
5
AIR CONDITIONERS
All manufacturers provide operating instructions with their product and it
is recommended that these be read carefully to ensure correct operation.
Also, complete and return your Warranty Card/Certificate as this will assist
you should a problem occur at a later date.
The following information has been supplied by Aircommand Australia Pty
Ltd who have service agents throughout Australia. (08) 8445 2877.
AIR CONDITIONERS (AIRCOMMAND)
Roof Top Models
These units are virtually maintenance free except for return air filters,
which should be kept clean for optimum performance. (Wash in warm
soapy water.)
Approximately six months after installation you should check the hold
down bolts as they may require tightening.
Do not be alarmed if, when the unit is in operation you see water running
from the roof as this will be the condensate from the air conditioner. In
humid conditions there will be more condensate than normal.
Split Systems
As with roof top models, ensure the return air filters are kept clean.
Some models of split systems require holes cut in the floor for the
condenser fan to draw air. Regular travel will not cause any problems to
the condenser with dust/dirt/water entering the unit. It is important that
these holes are not covered in any way, or the operation of the unit will be
seriously affected and could in fact seize the motor.
Should you be travelling for long periods “off road” where excessive dirt
(bull dust) or water (creek crossings) can enter, it is recommended you
contact the manufacturer for advice.
General Operation and Helpful Hints
• Air conditioners should not be run at full thermostat for long periods of
time, this setting is used mainly for testing purposes. Also note that if
the outside temperature is only 22° - 23° the unit may not switch on to
cooling as this is deemed to be a “comfortable temperature”. So if you
6
RVMAA OWNERS MANUAL
take delivery of your RV in winter and wish to test the operation of the
air conditioner, it will be necessary to firstly warm the RV interior to
above 23°C.
• With reverse cycle units, the air conditioner should be turned off for 3
minutes before switching to the opposite operation e.g. cooling to
heating.
• Always assist the “heat load” inside your RV by parking in the shade if
possible, using roll out awnings to shade windows and closing curtains.
Try also to eliminate other areas where heat can infiltrate i.e. hatches etc.
The following information has been supplied by Electrolux Finch who
have service agents throughout Australia Ph (03) 9545 5655.
AIR CONDITIONERS (ELECTROLUX)
Maintenance
Air Filters: Periodically remove the return air filters located above the
removable panels in the air box. Wash the filters with soap and warm
water, let dry and then reinstall.
NOTE: Never run the air conditioner without return air filters in place.
This may plug the unit evaporator coil with dirt and may substantially
affect the performance of the unit.
Service (Unit does not operate)
If your unit fails to operate or operates improperly, check the following
before calling your service centre.
a) If the van is connected to a motor generator, check to be sure the motor
generator is running and producing power.
b) If the RV is connected to a power supply by electrical lead, check to
be sure the lead if of 15 AMP capacity to run your air conditioner load
and that it is plugged into the power supply.
c) Check your fuse or circuit breaker.
d) In the airconditioner air box, check to be sure the air conditioner
conduit is plugged into the selector switch box.
RVMAA OWNERS MANUAL
7
e) After the above checks, call your local service centre for further help.
This unit must be serviced by qualified service personnel only.
When calling for service, always give the air conditioner Model Number,
Product Number, and Serial Number. This information can be found on
the unit rating plate located on the airconditioner base pan. To locate
these, remove the return air grill from the air box and look up through the
roof opening in the ceiling.
The following information has been supplied by Coast to Coast RV
Services - 32 Station Street, Dundas NSW 2117 Ph (02) 9684 1434
AIR CONDITIONERS (COLEMAN)
Maintenance - Owner
One of the biggest advantages to your new RV Products air conditioner is
that the maintenance needed to keep the unit in good care is minimal. In
fact, about the only thing that you, the owner, must take care of is the
cleaning and replacement of the filter. The filter is a vital part of every air
conditioning system. If the filters are not cleaned at regular intervals they
may become partially clogged with lint, dirt, grease etc. A clogged filter
will produce a loss of air volume and may eventually lead to the icing up
of the cooling (evaporator) coil.
Important
Do not operate the air conditioner for extended periods of time without the
filter installed.
When this happens the lint, dirt, grease etc. that is normally stopped by the
filter are now accumulating in the cooling coil. This not only leads to a
loss of cooling volume and a possible icing up of the cooling coil, but
could also result in serious damage to the operating components of the air
conditioner.
We recommend that filters be replaced or cleaned at least every two weeks
when the air conditioner is in operation.
Cleaning and/or changing the filters
1. Remove the selector switch and thermostat knobs from the ceiling
assembly.
8
RVMAA OWNERS MANUAL
2. Remove the screws that secure the ceiling shroud to the ceiling
assembly.
3. Lower the shroud and gently slide it off the two control shafts.
4. Take filters out and either clean or exchange with other filters.
Short Cycling
When an airconditioner is in operation, its compressor circulates
refrigerant under high pressure. Once off, it will take two to three minutes
for this high pressure to equalise.
The air conditioning compressor is unable to start against high pressure.
Therefore, once the air conditioner is turned off, it is important to leave it
off for two to three minutes before restarting.
Short cycling the compressor (or starting it before pressures have
equalised) will in some instances, kick the circuit breaker or overload.
Note
• Should icing-up occur, it is necessary to let the cooling (evaporator) coil
defrost before normal cooling operation is resumed. During this time,
operate the unit in the “HIGH FAN” position with the system at
maximum airflow. When increased or full airflow is observed the
cooling coil should be clear of ice.
• The air conditioner should be inspected periodically to be sure that the
bolts that secure the unit to the roof are tight and in good shape.
ALUMINIUM
The aluminium sheeting on the outside of your RV should only be cleaned
with warm soapy water. Never use abrasive materials or cutting
compounds as this could seriously deteriorate the baked paint finish on the
aluminium. Build up of road tar or bird droppings can be removed with a
diluted solution of mineral turps. This should be applied only to the
surface that needs cleaning and it should be immediately rinsed off with
warm soapy water.
RVMAA OWNERS MANUAL
9
ANTENNAS
Antennas should always be securely stowed away while travelling and
although there are many types of antenna on the market quite often the
simpler types are very effective for television reception and are much
easier to store when travelling. In the case of high winds, antennas should
be removed and stored away as the structures are not designed to withstand
strong wind conditions.
AWNINGS
The cleaning of vinyl material on rollout awnings should only be done
with warm soapy water. Never use any strong detergent or mineral based
cleaners to clean the vinyl on your awning as it could lead to discolouring.
The aluminium supporting arms to the awning should not need greasing or
oiling and when storing your awning away for any period of time the
awning should be completely and thoroughly dry to avoid mildew build up
on the vinyl surfaces.
Awning or rope tracks fitted will greatly benefit from the occasional
application of sprayable silicone to aid the sliding in and out of your
awning or annexe.
Wheel Nuts - for 1/2” dia. studs the torque
tension is 150 Nm. For 7/16” dia. studs 125
Nm.
Familiarise yourself with the location and the
instructions for use on your fire extinguisher.
10
RVMAA OWNERS MANUAL
BATTERIES
Batteries installed in Recreational Vehicles should be kept charged even
while stored away. General maintenance on the batteries should be carried
out in a similar way to car batteries. Water levels should be maintained
and any corrosion around the terminals should be removed.
BATTERY CHARGERS
Battery chargers that operate from 240 V are designed for low frequency
charging or trickle charging and it is necessary sometimes for flat batteries
to be recharged for at least 48 hours on the trickle charging method before
a considerable amount of current can be stored in the battery. In the case
of battery chargers you should refer to the supplier's manual for further
information.
BRAKES
Your RV is fitted with electric or mechanical brakes. These brakes may
from time to time need adjusting. It is suggested that all RV’s be returned
to the dealer after approximately 2000 km to check the brake adjustment.
If brake adjustment is required during or prior to this time you should
contact the nearest dealer or your original RV manufacturer to ensure that
this brake adjustment is carried out by an authorised person. THIS IS A
SERVICE FUNCTION NOT A WARRANTY ITEM.
If this RV is fitted with electric brakes you should consult the electric
brake handbook as supplied with the RV at the initial time of delivery.
The warranty card on the brakes should be filled out and returned to the
brake supplier in order that your warranty is registered.
BRAKES (AL-KO)
The following information is supplied with the consent of AL-KO
INTERNATIONAL PTY LIMITED suppliers of electric brakes to the
Australian RV industry. AL-KO have offices in
Victoria
59 Wedgewood Road
HALLAM VIC 3803
Telephone: (03) 9796 3700
Facsimile: (03) 9796 3711
RVMAA OWNERS MANUAL
11
New South Wales
14 Toohey Road
WETHERILL PARK
NSW 2164
Telephone: (02) 725 4655
Facsimile: (02) 725 4557
Queensland
62 Parramatta Road
UNDERWOOD QLD
4119
Telephone: (07) 3808 3030
Facsimile: (07) 3808 1719
OPERATORS SERVICE & WARRANTY (ELECTRIC BRAKES)
HOW YOUR ELECTRIC BRAKES OPERATE
The electric trailer brakes perform a similar function to the brakes on your
car. The major difference is that the car brakes use hydraulic pressure to
expand the brake shoes, whilst the trailer brakes use an electro magnet and
lever system. Activation of the electric brakes is via a controller mounted
inside your towing vehicle.
The controller provides both manual application of the trailer brakes or
automatic braking synchronised to that of your towing vehicle (when you
push the brake pedal in the car, the brakes on the trailer are also activated
via the brake controller). When the controller is activated high capacity
electro magnets are energised and attract to the inside surface of the brake
drum. Due to the rotation of the drum, the magnets move the lever arm in
the same direction. This movement causes the actuating block at the top of
the brake to push the front shoe against the drum. The force of the front
shoe in turn pushes the back shoe into contact with the drum.
Brake performance is proportional to the load of the towing vehicle and
the trailer. ENSURE AT ALL TIMES THAT THE TOWING CAPACITY
OF THE CAR AND THE MANUFACTURERS RECOMMENDED
LADEN WEIGHT IS NOT EXCEEDED.
HOW THE BRAKE CONTROLLER WORKS
Once properly installed and adjusted the brake controller can be operated
both automatically and manually. When the brakes are applied the
controllers electric circuit is operated automatically. As the tow vehicle
slows down a sensor inside the controller reacts to the deceleration and
increases the power to the trailer brakes, thus providing smooth and
proportional braking of the trailer. For manual operation, the controller is
provided with a sliding control. This activates the stop lights and the
12
RVMAA OWNERS MANUAL
brakes, and the indicator light on the front of the controller panel glows
from dim to bright the further the control is moved, indicating an increase
in braking power.
WARNING
There are several different types of brake controllers sold, some with
motion sensors and some without a motion sensoring device. If a brake
controller without motion sensor is used the trailer brakes will not be
applied in proportion to the vehicle and smooth synchronised braking will
not be achieved. If further information is required please contact AL-KO
International.
More detailed information on the operation of the controller is available in
the installation instructions contained with each unit.
FITTING TRAILER BRAKES
Electric trailer brakes when used and adjusted properly provide many
kilometres of smooth, dependable braking operation.
Electric trailer brakes must have a complete electrical circuit, any broken
or poor wire connections will prevent or interfere with the flow of
electrical power resulting in poor or no braking.
All electrical connections should be soldered or made via screw type
connectors.
On new trailers a break-in period may be required to achieve maximum
braking performance.
Proper Brake Balance Between Your Vehicle and Trailer
The brakes on your towing vehicle are designed to stop in a safe effective
manner, similarly the electric brakes fitted to your trailer are designed to
effectively stop the weight of the trailer to which they are fitted.
It is important that the performance of the brakes on both the towing
vehicle and the trailer are balanced so that neither are overloaded. If the
correct balance is not obtained between the braking systems, then
overheating of either system may occur with a deterioration in brake
performance. Correct brake balance is obtained when the trailer brakes
have a slight lead over the brakes on the towing vehicle. This can be
accomplished by the adjustment of the controller in the towing vehicle.
RVMAA OWNERS MANUAL
13
When correctly adjusted there will be no sensation of the trailer pushing
the vehicle, nor any excessive pull during braking.
GENERAL MAINTENANCE
In order to maintain the safe reliable stopping power of your AL-KO brake
system it is recommended that the brakes be serviced at regular intervals.
The following list of general maintenance items should be carried out as a
periodic maintenance check.
1.
Brake Adjustment Procedure
Located in the back of the brake backing plate is a small opening
covered by a protective plug. With the trailer wheels off the ground,
rotation of the star wheel, (as shown in the diagram below), will
result in correct brake adjustment. With a screw driver rotate the star
wheel until the brake drag makes it difficult to turn the wheel. The
star wheel can then be turned in the opposite direction to allow the
trailer wheel to turn ¾ to 1 revolution freely when spun.
14
2.
RVMAA OWNERS MANUAL
Brake Drum/Hub
The brake drum should be checked for excessive wear in accordance
with the periodic maintenance check list on page 17.
• If the drum has heavy scoring, or has a run out that exceeds 0.5mm
it should be machined by your local Service Centre.
• If the bore of the drum exceeds the maximum diameter cast on the
drum, it should be replaced.
• Brake drums that have been machined must be thoroughly cleaned
and checked before installation.
• If magnet wearing surface on the inside of the drum is unevenly
worn or badly scored, we suggest that the drum be referred to ALKO International for machining or replacement.
Note: Anytime the drum is replaced a new magnet should also be
installed.
3.
Wheel Bearings
Bearings must be inspected and lubricated periodically to ensure
reliable, safe operation of your trailer. We recommend that your
trailer be taken to your local Service Centre where correct wheel
bearing service can be undertaken.
If you need to remove a hub drum from your tailer, the diagram
below shows the correct sequence to follow.
• Seals should be checked and replaced if found to be nicked, torn or
worn.
RVMAA OWNERS MANUAL
15
• If the bearings are damaged or worn they should be referred to
your local Service Centre where replacement may be
recommended.
Note: It is recommended to replace the bearings and cups in sets.
• Always lubricate the bearings on your trailer with high quality
wheel-bearing grease.
• Every time the wheel hub is removed, the wheel bearings must be
adjusted.
To Adjust the Wheel Bearings
Turn the hub slowly to seat the bearings while tightening the slotted
nut until firm.
Loosen the slotted nut and then re-tighten by hand (not with a
wrench) to a “finger-tight” condition to align the first notch with the
hole in the shaft and insert the split pin. It is recommended that
bearing adjustment be carried out by your local Service Centre to
ensure that correct bearing adjustment is maintained.
4.
Brake Linings
Periodic inspection for lining wear or contamination from oil or
grease should be undertaken by your local Service Centre.
• If the lining is worn to within 0.8mm of the rivet or to a minimum
thickness of 1.5mm on bonded linings or shows irregular wear or
contamination from a foreign substance, shoes should be replaced
with the original parts from your local Service Centre.
16
5.
RVMAA OWNERS MANUAL
Magnet Assembly
The magnet assembly can be inspected for wear, without removing it
from the brake, by laying a straight edge over the length of the
magnet space as shown.
Magnets may be used with normal wear until the white plastic under
the friction element is barely visible. Replacement magnets are
available from your local Service Centre.
6.
Wheel Mounting
It is important to maintain proper torque specifications to provide
safe and secure attachment of the wheel to the hub drum.
• Start all nuts by hand to prevent cross threading.
• Tighten nuts in three stages using a cross star pattern.
• Whenever wheels are removed and refitted the wheel nut torque
should be checked. Wheel nuts should be tightened to a torque of
150 Nm (110 ft lb) for ½” diameter wheel stud threads or 125 Nm
(90 ft lb) for 7/16” diameter wheel stud threads.
It is recommended that the wheel nut tension be checked every 100
km for the first 400 km of your initial trailer use and then as per the
periodic maintenance check list on page 17.
• Tighten wheel nuts using a cross star pattern as shown below:
RVMAA OWNERS MANUAL
7.
17
Park Brake Cable Adjustment
In the laden condition it is imperative that the park brake lever
engages and secures the brakes in the 5th or 6th notch of the coupling
from the towball end - not closer.
Failure to adjust the cable tension in this manner will, through
suspension movement on both independent suspension and beam
axle with leaf springs, cause the brake shoes to be partially actuated
and excessive heating of the brake and drums to occur. Prolonged
use, if incorrectly adjusted, will cause initially the back (secondary
shoe) to overheat to the extent of disintegration of the brake lining
and will result in deterioration of brake performance until eventual
brake failure.
PERIODIC MAINTENANCE CHECK LIST
CHECK
FUNCTION REQUIRED
DAILY
EVERY
EVERY
5000 KM
OR 6
10,000 KM
OR 12
MONTHS
MONTHS
Trailer Brakes
Test that they are functioning properly.
Air Pressure
Inflate tyres to manufacturer’s specifications.
Wheel Nuts*
Tighten to proper torque specifications. As below*
Wheel Rims
Inspect for dents, damage, or out of round.
Brake Adjustment**
De-Dust. / Inspect for lining wear and adjust.
Brake Magnets
Inspect for uneven wear.
Wheel Bearings and Cups
Inspect for wear or damage and lubricate.
Hub/Drum
Inspect for heavy scoring or wear
Seals
Inspect for damage or wear.
Brake Linings
Inspect for lining wear and contamination
Park Brake
Inspect for excessive travel and adjust
*
**
Tighten wheel nuts every 100 km for the first 400 km and after every change in wheel mounting or every 1000 km
or six months for the life of the RV.
Adjust brakes and de-dust after first 300 km then at above intervals.
RVMAA OWNERS MANUAL
18
TROUBLE SHOOTING GUIDE
FAULT
CAUSE
CHECK FOR
No Brakes
No electrical power
•
•
•
•
No Brakes
Worn magnets
• Replace with genuine parts from AL-KO
No Brakes
Incorrect brake shoe clearance
• Adjust brakes
Weak Brakes
Loose electrical connection
• Check all connections
Weak Brakes
Worn out linings
• Replace with genuine parts from AL-KO
Weak Brakes
Worn out drum
• Remachine or replace if oversize
Weak Brakes
Excessive load
• Reduce trailer load
Weak Brakes
Lining contaminated
• Replace linings and seals with genuine parts
Intermittent Brakes
Broken magnet wire
• Bench check magnets and replace with
genuine parts
Intermittent Brakes
Loose wire connections
• Check all wire connections
Intermittent Brakes
Out of round drum
• Remachine drum
Intermittent Brakes
Loose wheel bearings
• Check and adjust wheel bearings
Locking Brakes
Malfunctioning controller
• Check and replace if necessary
Locking Brakes
Stop lights connected in brake circuit
• Check wiring of controller and trailer
Locking Brakes
Loose brake parts
• Check for loose rivets, broken springs etc.
Locking Brakes
Worn wheel bearings
• Replace bearings
• Examine hub
Locking Brakes
Out of round drum
• Remachine drum
Poor connections
Break in electrical circuit
Blown fuse
Controller setting
RVMAA OWNERS MANUAL
19
The following information has been supplied by Melbourne Trailer & RV
Supplies Pty Ltd, 333 Warrigal Road, Cheltenham 3192
Ph (03) 9585 0700 Fax (03) 9585 1426
BRAKES (MELBOURNE TRAILER & CARAVAN SUPPLIES PTY LTD)
Maintenance Hints : DEXTER BRAKES
a) Before any synchronisation adjustments are made, your trailer brakes
should be burnished-in by making 10-12 full stops from approximately
35 km/h.
b) Brakes should be adjusted after the first 300 km of operation when the
brake shoes and drums have “seated”.
c) Your trailer brakes must be inspected and serviced every 10,000 km.
d) Do not use grease or oil on the brake linings, drums or magnets.
e) The most common electrical problem is low or no voltage and
amperage at the brakes. (Refer magnet amperes chart).
f) Bearings must always be replaced in sets of a cone and cup.
g) Be sure to wear safety glasses when removing or installing force fitted
parts.
h) For maximum bearing life it is recommended that you revolve your
wheels periodically (every 2-3 weeks) during periods of prolonged
storage.
Magnet Amperes Chart
BRAKE SIZE
7 x 1¼
10 x 1¼
10 x 2¼
12 x 2
12¼ x 2¼
12¼ x 3 3/4
AMPS/MAGNET
TWO BRAKES
FOUR BRAKES
SIX BRAKES
2.5
3.0
3.0
3.0
3.0
3.0
5.0
6.0
6.0
6.0
6.0
6.0
10.0
12.0
12.0
12.0
12.0
12.0
15.0
18.0
18.0
18.0
18.0
18.0
RVMAA OWNERS MANUAL
20
Maintenance Schedule
ITEM
FUNCTION REQUIRED
WEEKLY
3 MONTHS OR
5000 KM
6 MONTHS OR
10000 KM
12 MONTHS OR
15000 KM
At every use
Brakes
Test they are operational
Brake Adjustment
Adjust to proper operating
clearance
Brake Magnets
Inspect for wear and current
draw
Brake Linings
Inspect for wear or
contamination
Brake Controller
Check for correct amperage &
modulation
Brake Cylinders
Check leaks, sticking
Brake Lines
Inspect for cracks, leaks, kinks
Trailer Brake
Wiring
Inspect wiring for bare spots,
fray, etc.
Breakaway System
Check battery charge and
switch operation
At Every Use
Hub/Drum
Inspect for abnormal wear or
scoring
Wheel Bearings &
Cups
Inspect for corrosion or wear.
Clean and repack
Seals
Inspect for leakage. Replace
if removed.
Springs
Inspect for wear, loss of arch
Suspension Parts
Inspect for loose fasteners,
wear.
Hangers
Inspect welds
Wheel and Bolts
Tighten to specified torque
values
Wheels
Inspect for cracks, dents or
distortion
Tyre Inflation
Pressure
Inflate tyres to manufacturer’s
specifications
Tyre Conditions
Inspect for cuts, wear, bulging
etc.
RVMAA OWNERS MANUAL
21
Trouble Shooting
SYMPTOM
CAUSES
REMEDIES
Open Circuits
Find & Correct
Severe Underadjustment
Adjust Brakes
Faulty Controller
Test and Correct
Short Circuits
Find and Correct
Grease or Oil on Magnets or
Linings
Clean or Replace
Corroded Connections
Clean & Correct Cause of
Corrosion
Worn Linings or Magnets
Replace
Scored or Grooved Brake Drums
Machine or Replace
Improper Synchronisation
Correct
Underadjustment
Adjust Brakes
Glazed Linings
Reburnish or Replace
Overloaded Trailer
Correct
No Brakes
Weak Brakes
RVMAA OWNERS MANUAL
22
Underadjustment
Adjust
Improper Synchronisation
Correct
Faulty Controller
Test and Correct
Loose, Bent or Broken Brake
Components
Replace components
Out-of-Round Brake Drums
Machine or Replace
Insufficient Wheel Load
Adjust System Resistor and
Synchronise
Faulty Controller
Test & Correct
Broken Wires
Repair or Replace
Loose Connections
Find and Repair
Faulty Ground
Find and Repair
Wrong Magnet Lead Wire Colour
Correct
Incorrect Adjustment
Adjust
Grease or Oil on Linings or
Magnets
Clear or Replace
Broken Wires
Find and Repair
Bad Connections
Find and Repair
Locking Brakes
Intermittent
Brakes
Brakes Pull
One Side
to
RVMAA OWNERS MANUAL
23
24
RVMAA OWNERS MANUAL
Underadjustment
Adjust
Improper Synchronisation
Correct
Improper Controller
Change
Faulty Controller
Test and Correct
Underadjustment
Adjust
Lack of Lubrication
Lubricate
Broken Brake Components
Replace Component
Incorrect Brake Components
Correct
Grease or Oil on Linings or
Magnet
Clean or Replace
Out-of-Round or Cracked Brake
Drums
Machine or Replace
Faulty Controller
Test and Correct
Harsh Brakes
Noisy Brake
Surging Brakes
RVMAA OWNERS MANUAL
25
Overadjustment
Readjust
Out-of-Round Brake Drums
Machine or Replace
Incorrect Brake Components
Replace
Loose, Bent or Broken Brake
Components
Replace
Faulty Breakaway Switch
Repair or Replace
Dragging Brakes
Loose
Wheel
Adjustments
Bent Spindle
Bearing
Adjust
Replace Axle
When towing your RV in high winds remember
to reduce your speed.
During windy conditions in open country,
crossing bridges and in road hill cuttings,
cross winds can be unpredictable and it is
important to be alert at all times.
RVMAA OWNERS MANUAL
26
BULBS
It is advisable to carry spare bulbs for interior and exterior lights. Bulbs
which are subject to vibration can give trouble and spare bulbs on hand are
a must for the experienced RV traveller.
BUMPER BARS
It is important that in the case of bumper bars you continually check for
cracks which can appear due to the transmission of vibrations from the RV
through to the back bumper bar. This position is sometimes accentuated
when a spare wheel or tyre is carried on the bumper bar as this weight can
tend to make rear bumper bars crack or fail. So it is important that if a
spare wheel and tyre is mounted on the bumper bar that it is only done
after consultation with the original manufacturer to ensure that the bumper
bar is designed to carry such a spare wheel and tyre. It is not advisable to
carry two spare wheels and tyres on the back of any bumper bars.
• DO NOT CARRY FULL FUEL CONTAINERS ON REAR BUMPER
BARS.
• DO NOT ADD ADDITIONAL WEIGHT TO REAR BUMPER BARS.
Warning - Always check that handbrake is
released before moving off.
RVMAA OWNERS MANUAL
27
CANVAS
It is advisable when taking delivery of a new canvas annexe or a camper
trailer equipped with canvas coverings that this canvas be soaked with water
and let to dry twice before using the camper trailer or annexe on an extended
trip. The reason for soaking the canvas twice is to allow the stitching to
expand into the holes caused by the needle stitching of the canvas and
therefore it will tend to make your annexe or canvas cover of your camper
trailer more waterproof.
CANVAS ANNEXE
Canvas annexes should be treated in a similar way to awnings and they
should always be stored away in a perfectly dry condition. They should be
carried in your car not in the front boot or inside on the floor of your RV.
This can upset the towing of your RV due to the additional load being placed
in the incorrect position.
CHASSIS
It is advisable to annually have a thorough check of the chassis on your
Recreational Vehicle. This includes the running gear, suspension, tyres,
wheels and brakes and coupling. The chassis is such an important part of
your RV you cannot afford to overlook the general maintenance and
serviceability of the chassis for the long term viability of your holidays. If in
any doubt you should take the RV to your nearest authorised dealer or
repairer to ask for a chassis inspection.
CHEMICAL TOILETS
It is only possible to dispose of the contents of the toilet in approved
dumping stations or through a normal household sewerage system. This can
often be done at caravan parks with the permission of the park owner.
However it is advisable to check with the park owner before discharging any
toilet material into sewerage lines as the chemical deodorant contained in the
toilet can sometimes have effects on the sewerage or septic system of the
caravan park. You should refer to the brochure supplied with all chemical
toilets for further information on their care and maintenance.
CORNER STABILISERS
Corner stabilisers are designed so that they stop the RV from tipping
towards one end as you walk inside the vehicle. They should be lowered
to the point where they touch the ground in a firm manner without taking
any weight of the vehicle. Remember THEY ARE NOT JACKS and
RVMAA OWNERS MANUAL
28
should never be used to take even partial weight of the vehicle. As you
move inside the vehicle from end to end you cause more weight to be
applied to the stabiliser. Therefore you should never use force on the
stabiliser handle to force the stabiliser to the ground thereby taking the
weight of the vehicle. Stabilisers that are bent due to excess weight being
applied to them are NOT COVERED UNDER WARRANTY.
COUPLING
Couplings should be regularly checked for any sign of loose bolts
connecting the coupling to the chassis as the two leading bolts on the
coupling are always under a lot of strain and it is important that these bolts
be regularly checked to ensure that they are tight. It is not advisable to
grease the ball of the coupling as this can lead to a build up of dust and
thereby create a lot of wear due to abrasion. A silicone spray from a
pressure can will be sufficient lubrication for the ball. Light machine oil
will also be effective without accumulating dust which could cause
excessive wear.
Wheel nuts should be tightened every 100 km
for the first 400 km and after every change
in wheel mounting or every 1,000 km or
6 months for the life of the RV.
DOOR LOCKS
Door locks are usually made from plastic and should not require any
lubrication. However, you should continually check to ensure that your
door lock is operating properly and after closing the door that the door is
not likely to spring open during travel. This can lead to the door being
torn off the vehicle or could cause an accident. So continually check to see
that the door lock functions properly.
RVMAA OWNERS MANUAL
29
ELECTRICAL
240 V electrical wiring can only be altered or changed in any way by a
certified licensed electrical contractor. Do not attempt any 240 V wiring
changes without consultation with an electrician. In the case of any 12 V
problem, this can be easily diagnosed by an auto electrician and again it
should only be carried out by an authorised auto electrician.
ELECTRIC BRAKE CONTROLLERS
This controller is fitted in your car and is usually of the pendulum type.
That is the type that recognises when you apply the brakes in your car and
applies an equal amount of braking to your RV automatically. Electric
brake controllers should only be serviced and maintained by an authorised
auto electrician and you should refer to the manufacturers warranty book
for further information on servicing this piece of equipment.
EXTERIOR CARE
The exterior of your RV should be regularly cleaned with soapy water and
a brush or broom. Extra care should be taken, when cleaning windows,
that a harsh brush is not used on these surfaces as the acrylic in the
windows may permanently scratch. In the case of rollout awnings, these
should also be occasionally washed with warm soapy water and rinsed
clean.
ELECTRICAL SAFETY
Do not make any changes to the circuitry or add on fixed appliances
without first consulting the manufacturer. All electrical additions must be
carried out by a licensed electrical contractor. Any gas additions or
alterations must again be carried out by a licensed gas contractor. Your
local dealer can help you with the names of suitable contractors to carry
out any of this work.
Any work carried out by persons other than those authorised above will
void the warranty on your Recreational Vehicle.
In the case of recreational vehicles you should not connect the 240 V
supply until the camper or poptop is fully erected. If power was connected
before these items are erected, any internal lights that are left switched on
may cause damage or a fire to the vinyl or canvas section of your poptop or
camper trailer.
30
RVMAA OWNERS MANUAL
RVMAA OWNERS MANUAL
31
RVMAA OWNERS MANUAL
32
FIRE SAFETY
SAFETY ADVICE TO USERS
VENTILATION
Do not obstruct the permanent ventilation openings which are fitted, your safety depends on them.
IN CASE OF FIRE
1.
2.
3.
4.
5.
Get everyone out.
Turn off outside gas valve at gas cylinder.
Disconnect the mains electricity supply.
Raise the alarm and call the fire brigade.
Attack fire if safe to do so.
FIRE PRECAUTIONS
CHILDREN:
DO NOT LEAVE CHILDREN ALONE
MEANS OF ESCAPE
1. Make sure you know the location and operation of exits.
2. Keep all escape routes clear.
COMBUSTIBLE MATERIALS
Keep them clear of all heating and cooking appliances.
FIRE FIGHTING
This unit has been fitted with a 1kg dry powder fire extinguisher. Familiarise yourself with the location and the
instructions for use on your fire extinguisher, and the local fire precaution arrangements.
APPROVED BY: RECREATIONAL VEHICLE MANUFACTURERS ASSOCIATION OF AUSTRALIA
When operating any appliances in this vehicle,
combustible materials such as curtains should
be restrained in their intended positions and
popup roofs should be elevated.
RVMAA OWNERS MANUAL
33
FLOOR COVERINGS, CARPETS AND VINYLS
Floor coverings, carpets and vinyls should be maintained in a similar way
to maintaining these items in a domestic household situation. They should
be regularly cleaned and vacuumed and in the case of vinyl it should only
be washed with lukewarm soapy water.
Never attempt to find a gas leak with a
match.
Never use cooking appliances for comfort
heating.
GAS CYLINDERS
Gas cylinders generally have a life of ten years after which time they have
to be restamped and certified by an authorised company to ensure that your
gas cylinders are in perfect condition. Where possible, in exposed salty
conditions, they should be covered to avoid the build up of rust and you
should always ensure that the valve on the gas cylinder is turned off when
storing your RV for any length of time.
GAS LEAKS
Never attempt to find a gas leak with a match. You should only detect gas
leaks with soapy water and observe any bubbles that are caused by the
liquid being applied to the gas joint. Gas leaks can occur due to vibration,
particularly underneath the vehicle or where pipes can be damaged by
stones or rocks. In the event of you smelling any gas you should
immediately
1. extinguish all open flames, pilot lights and smoking materials.
2. keep bystanders away.
3. do not touch electrical switches.
4. shut off the gas supply at the cylinder valve.
5. open doors and any other ventilating openings.
6. leave the area until the odour clears.
7. have the gas system checked and leakage source corrected by an
authorised gas installer before using the system again.
34
RVMAA OWNERS MANUAL
GAS SAFETY
GAS SYSTEM
For all vehicles fitted with gas cylinders or appliances the following
procedures must be followed:
1. Close appliance valves before opening cylinder valve.
2. Check connection at the appliances, regulators and cylinders
periodically for leaks with soapy water or its equivalent. This should
be done at least annually.
3. Never use a match or flame when checking leaks.
4. Close cylinder valve when appliances are not in use.
5. All appliances must be turned off and cylinder valve closed when not
in use or whilst refuelling is in progress.
6. In the event of an accidental gas leak, close cylinder valve and
ventilate the RV until air is clear.
7. Never use cooking appliances for comfort heating.
8. In the event of fire, immediately close cylinder valve.
9. Close valve and fit sealing plug to all spare cylinders not connected,
whether full or empty.
10. All additions or alterations to the LP Gas system shall be performed by
an authorised person. (Consult your LP Gas supplier.)
11. Appliances shall not be altered without authorisation of the
manufacturer.
12. Persons should familiarise themselves with the odour of unburnt LP
Gas to assist in the early detection of leaks.
13. All permanent ventilators, flues and vents should be checked regularly
to ensure that they are clear.
RVMAA OWNERS MANUAL
35
14. After disconnecting a gas cylinder ensure gas line or regulator is
covered with tape to stop dirt from entering the gas lines.
15. After connecting a gas cylinder always check connection with soapy
water for gas leaks.
Never operate any appliance in a poptop when
the roof is down.
WARNING
If you smell gas 1.
Extinguish all open flames, pilot lights and smoking materials.
2.
Keep bystanders away.
3.
Do not touch electrical switches.
4.
Shut off the gas supply at the cylinder valve.
5.
Open doors and other ventilating openings.
6.
Leave the area until the odour clears.
7.
Have the gas system checked and leakage source corrected by an
authorised gas installer before using the system again.
Switch off gas flame in your refrigerator and
hot water system before entering a service
station or refuelling your car.
RVMAA OWNERS MANUAL
36
GAS/ELEC APPLIANCES
IT IS NOT SAFE TO USE COOKING APPLIANCES FOR COMFORT
HEATING. Cooking appliances need fresh air for safe operation. Before
operating any cooking appliances open the hatch or in the case of a poptop
ensure the top is open or in the case of a camper trailer that the top is
folded out into its normal operating position. Open windows and doors
where possible.
LPG CYLINDERS
Always handle LPG cylinders with extreme care. When disconnecting the
regulator from the cylinder for refilling purposes be aware that the
connecting nut to the cylinder is a lefthand thread. ALWAYS COVER
GAS PIPES AND REGULATOR INLET WITH TAPE AFTER
DISCONNECTING GAS CYLINDERS.
GAS CONNECTIONS
All gas connections are subject to vibration and therefore all gas
connections should be checked with a soapy water solution at least
annually.
REFRIGERATOR
If an absorption refrigerator is fitted to this Recreational Vehicle it will
operate off 240 V, 12 V and LP Gas. It is important that if operating this
refrigerator from LP Gas, the refrigerator must be turned off prior to
entering any service station site or refuelling of your vehicle. The
refrigerator burner, if left alight, could cause a serious accident if
refuelling was attempted whilst the flame is burning.
IMPORTANT
Never refill a gas cylinder with Auto Gas. Auto gas
is a mixture of gases especially formulated for cars, if used in an RV
cylinder it could be a health hazard due to the incorrect burning qualities of
the gas. RV gas cylinders should only be refilled by authorised refillers
using liquid propane gas.
Never exceed the maximum allowable payload
as recommended by the RV manufacturer.
RVMAA OWNERS MANUAL
37
HANDBRAKE
The handbrake is located on the coupling on the front of your RV and it is
essential that you remember to release this handbrake prior to travelling on
every occasion. Should you fail to do so it could cause overheating of the
brakes and the hubs and this could deteriorate the grease in the bearings
and cause bearing failure as well as overheating of the brakes may cause a
fire. IT IS VERY ESSENTIAL THAT THE RELEASE OF THIS
HANDBRAKE BE CARRIED OUT PRIOR TO TRAVELLING.
HAND BRAKE ADJUSTMENT
In the laden condition it is imperative that the park brake lever engages
and secures the brakes in the 5th or 6th notch of the coupling from the
towball end - not closer.
Failure to adjust the cable tension in this manner will, through suspension
movement on both independent suspension and beam axle with leaf
springs, cause the brake shoes to be partially actuated and excessive
heating of the brake and drums could occur. Prolonged use, if incorrectly
adjusted, will cause initially the back (secondary shoe) to overheat to the
extent of disintegration of the brake lining and will result in deterioration
of brake performance until eventual brake failure.
HAND PUMPS
Hand pumps can sometimes be caused to malfunction due to kinking of the
water supply line from the tank to the pump. In this event you should
check underneath the van to ensure that the water supply line is clear of
kinks or any damage. Inside the hand pump there are buckets and seals as
well as valves. Each of these materials are of the plastic type and can be
replaced quite simply by disconnecting the top of the pump and inserting
new components. These components are usually purchased from an RV
supply company as a kit and it is advisable to replace each of those
components when servicing your hand pump.
HATCH
Ensure that your hatch is completely closed at all times prior to travelling
as this could not only let in excess dust and water but could also cause
damage to the hatch due to excessive vibration when the hatch is open.
RVMAA OWNERS MANUAL
38
HOSE
In the case of waste water hoses, ensure that they are disconnected prior to
moving off with your RV. The same advice applies to high pressure water
hoses that are connected to the outside of the RV.
HOT WATER SYSTEMS
Hot water systems can be electric or LP gas and it is advisable to refer to
the handbook of that appliance for all servicing details.
The following information has been supplied by Coast to Coast RV
Services - 32 Station Street, Dundas NSW 2117 Ph (02) 9684 1434
HOT WATER SYSTEMS (SUBURBAN LPG HOT WATER SYSTEM)
Trouble Shooting Guide
This can be used as a guide that will enable you to solve most of the
problems that the customer could have with the heater.
SOOTING
WILL NOT
COME ON
PILOT WILL
NOT STAY ON
NOT ENOUGH
HOT WATER
WATER TOO
HOT
POSSIBLE CAUSE
Possible malfunction of the
bottled gas regulator
Lint in pilot air opening
Loose or inoperative
thermocouple
Clogged pilot orifice
Improper pilot flame
Thermostat setting too low
Main burner orifice too small
or clogged
Thermostat setting too high
Pilot flame adjustment too
high
Thermostat not shutting off
completely
Yellow pilot due to improper
setting
Yellow flame due to improper
air shutter adjustment
Lint or dirt in pilot or pilot
orifice
Lint or dirt in burner tube
Leaves or other obstructions
in flue box
IF AFTER CHECKING THE CHART THE UNIT WILL STILL NOT PERFORM - TURN THE
APPLIANCE OFF AND CONTACT THE DEALER.
RVMAA OWNERS MANUAL
39
Safety
The water heater thermostat is constructed with a built-in safety shut-off
device. The gas supply to the main burner and pilot burner will be cut-off
in the event that the pilot flame is extinguished for any reason. The
thermostat is also equipped with a high temperature limit energy cut-off
switch (ECO). The energy cut-off switch will shut off all gas supplied to
the burner and pilot burner in the event of the water temperature exceeding
82 degrees Celsius. The energy cut-off switch is a single fuse switch and
is not field replaceable. Should the ECO function be used the thermostat
must be replaced before the water heater can be placed in operation again.
Contact your dealer for service. All service work must be done by a
qualified service agent.
Always switch off gas pilot flame of your hot
water system and refrigerator before
entering a service station or refuelling your
car.
INTERIOR LIGHTS
In the case of poptop or campervans, if the vehicle is connected to 240 V
the roof should be in the up position. If any lights were left switched “on”
they could cause the vinyl or canvas to burn. It is also essential to switch
off 12 V interior lights before lowering the roof. If the 12 V lights were
left switched on they also could burn the vinyl or canvas after the 12V lead
was connected to your car.
INTERIOR PLYWOOD
Care should be taken when cleaning internal plywood lining. Excessive
moisture and vigorous rubbing can easily rub through the plywood’s
decorative paper lining. A soft damp cloth gently wiped over surfaces
should be all that is required.
RVMAA OWNERS MANUAL
40
JOCKEY WHEEL
In the case of pneumatic tyres on jockey wheels, these should be pumped up
to a pressure which maintains the tyre in a condition that avoids a flat surface
on the bottom of the tyre. If left underinflated long term damage to the tyre
could result. The pressure depends upon the weight carried on the drawbar.
It is advisable to keep that tyre pumped to a pressure which avoids the
bulging of the tyre on the bottom. It is possible to grease the internal thread
of the jockey wheel. This can be done by removing the jockey wheel from its
clamp and unwinding the jockey wheel so that the top section of the jockey
wheel comes away from the bottom tubular section and you can then grease
the internal thread of the jockey wheel.
Always ensure that the hand brake is
released and jockey wheel is stored before
moving off.
Familiarise yourself with the location and the
instructions for use on your fire extinguisher.
LEVELLING DEVICES
Levelling devices or level rides can be fitted to most Recreational
Vehicle/Car combinations. It is advisable that you seek professional
advice from your RV dealer as to the type of levelling device you should
use depending upon the type of car and the type of vehicle being towed.
During heavy rain or when you leave your
Recreational Vehicle unattended you should
always lower your awning or annex to avoid
water ponding on the awning top.
Water ponding can cause damage to an awning
or annex due to the weight of the water
trapped on the roof.
RVMAA OWNERS MANUAL
41
MATTRESSES
Mattresses should only be cleaned with warm soapy water to remove any
stains and in the case of foam mattresses, a considerable amount of time
needs to be allowed for the drying of the foam in the sun prior to storing
away in the RV if they have been wet or after cleaning. The foam inside
the mattress can deteriorate if it is stored away wet and it can also cause a
damp smell to continually come from the mattress.
MICROWAVES
In the case of microwaves, they should be firmly strapped into position
before moving your RV and you should refer to the owners guarantee and
maintenance card as supplied with your microwave oven.
MIRRORS
It is compulsory in most states of Australia to fit rear vision mirrors whilst
towing a trailer or Recreational Vehicle. These mirrors should allow you
to see down the side of your trailer or Recreational Vehicle. When
purchasing mirrors it is important to select a type that allows minimum
vibration to the mirror whilst travelling. If fitting the type that attach to
your car’s external rear vision mirror ensure that you can adjust your car
mirror whilst the trailer mirror is fitted.
Always ensure the electrical lead is unplugged
prior to moving off.
PAYLOAD
UNDER NO CIRCUMSTANCES SHOULD YOU EXCEED THE
MAXIMUM ALLOWABLE PAYLOAD FOR YOUR RECREATIONAL
VEHICLE. Standard payload for single axle RV’s is 300 kg and for
tandem RV’s 400 kg.
These payload figures include the weight of water and gas i.e. a single
water tank 59 kg and gas either 4.5 or 9 kg per cylinder. The total amount
of weight carried in the water and gas must be deducted from the 300 or
400 kg payload capacity. The balance is the amount of allowable weight
42
RVMAA OWNERS MANUAL
that you can put into the RV without exceeding the manufacturers
recommended specification unless your RV has been especially built to
carry a larger payload (consult your dealer).
UNDER NO CIRCUMSTANCE SHOULD YOU CARRY MORE THAN
THE TOTAL ALLOWABLE PAYLOAD AS MENTIONED ABOVE,
OTHERWISE YOUR WARRANTY WILL BE VOID. Apart from the
warranty you could cause a serious accident by overloading tyres, springs,
axles or brakes. It is strongly recommended that if an owner cannot
determine the weight of his personal payload the vehicle should be
weighed with all personal items included together with the tank full of
water and the gas cylinders full of gas.
PLASTIC POLE CARRIERS
Tubular pole carriers are only intended to carry the weight of annex poles.
Do not overload pole carriers. They are usually attached to the front
drawbar or rear bumper bar. Every 500 klms you should check the fixing
bolts or screws as a great deal of vibration can be transmitted to these pole
carriers. Before travelling you should ensure that the screw-on cap is
tightened and where a locking pin is fitted, this pin must be in place.
POPTOPS
When raising the roof of a poptop or campervan it is advisable to leave the
main door open. If the main door is closed during this raising operation it
can cause a vacuum inside the RV and make the roof a little difficult to
raise. Leaving the door open will allow air to come into the campervan or
poptop whilst the roof is being raised and therefore make the raising
operation much easier.
12 VOLT PRESSURE PUMP
Your pressurised 12 V Water System should give years of trouble free
service. The modern pumps are both quiet and reliable. Pumps should be
isolated from power whilst travelling.
Your hand pump is also
maintenance free. Replacement parts are readily available for worn
washers and seals. Check these items prior to each trip to make sure they
are in good working order.
RVMAA OWNERS MANUAL
43
RANGEHOOD
Refer to the manufacturers warranty and maintenance details as supplied with
your RV.
REFRIGERATORS
Gas/electric refrigerators need at least 24 hours continuous running before
they will attain their maximum operating temperatures. It is essential that
you always have your refrigerator level when operating from either gas,
240 V or 12 V. Whilst the vehicle is travelling and is slightly out of level
this will affect the amount of refrigeration produced but the affect should
be minimal. When you are parked beside the road or in a camping spot it
is essential that your vehicle be level while it is operating. If you cannot
level your vehicle then you should switch the refrigerator off as continual
operation of the refrigerator in an out of level condition can damage some
parts of the refrigerator. You should refer to the warranty and instruction
manual as supplied with your vehicle for further information on
refrigerators.
When your RV is stored for any period of time your refrigerator should be
completely dry inside and the door should be left slightly open to allow air
circulation in the refrigerator otherwise mould could build up on the inside
surfaces of the refrigerator. It is important that the ventilation fitted to
your RV refrigerator must at all times be clear of any blockage and these
vents must not be taped over or blocked for any reason. In the case of
camper trailers and poptops, the refrigerator should not be operated whilst
the vehicle is stored with the top closed. It is allowable to operate the
refrigerator whilst travelling when the top is closed as air pressure will
allow circulation of air inside the vehicle. However, when the vehicle is
stored with the top down it may be possible for a build up of heat inside
the vehicle which is undesirable.
The refrigerator must be operated in a reasonably level position. The
cooling process of your refrigerator is dependant upon the refrigerator
being level in both directions. It is important that when stationary the
vehicle should be levelled as close as possible to level in both directions.
If the vehicle is not level in both directions the performance of the
refrigerator will be seriously impeded or it may not operate at all.
The refrigerator in your Recreational Vehicle is usually designed to
operate from LP Gas, 12 V or 240 V. In the case of these absorption
RVMAA OWNERS MANUAL
44
refrigerators it is extremely important to ensure that all ventilation to the
refrigerator is maintained in a clear and unblocked condition. Overheating
of the refrigerator components can lead to poor refrigeration in the cabinet.
When operating your refrigerator on 12 V ensure that a 6mm wire is
connected from the plug on the back of your car to the battery of your
towing vehicle. ANYTHING LESS THAN A 6MM may cause a build up
of heat in the wire and a loss of refrigeration in your RV.
The vehicle must be level in both directions (length & width) for your RV
refrigerator to operate efficiently. If parking your vehicle for more than 15
minutes ensure that the vehicle is level. If it is not level then switch off the
gas or 12 V supply as the refrigeration system will not operate. Never
allow the refrigerator to operate from 12 volt for more than 30 minutes
with the engine of your car switched off otherwise you could flatten the
battery of your car.
Heat Pump or Compressor Refrigerators
These refrigerators draw less 12 V current than absorption refrigerators
and therefore they can be left switched on for longer periods of time.
However with most 12 V refrigerators the running time on a fully charged
battery varies depending upon the temperature of the day and a 12 V
battery can last between 24 and 48 hours before it needs recharging.
Compressor refrigerators will operate up to 30 degrees out of level.
Switch off gas flame in your refrigerator and
hot water system before entering a service
station or refuelling your car.
The following information has been supplied by Electrolux Finch who
have service agents throughout Australia Ph (03) 9545 5655.
Refrigerator Fault Finding Electrolux
Owner’s Observation
Cause/Remedy
No sound from refrigerator
• As there are no moving parts in 3 way
absorption type refrigerators/freezers, no
sound will be detected during operation.
RVMAA OWNERS MANUAL
45
Refrigerator fails to operate • Controls set incorrectly.
Check that
on 240 volts
thermostat is set to maximum, power is
switched on and controls are set to obtain
240 volt operation.
• Break in electrical circuit. Check fuses,
switches and plugs.
• Drop in supply voltage. Check that the
supply voltage to the refrigerator/freezer
is maintained at full rate.
Refrigerator fails to operate • Controls set incorrectly. Check that the
on 12 volts
12 volt switch is on, and that the controls
are set correctly to obtain 12 volt
operation.
• Break in electrical circuit. Check fuses,
switches and plugs.
• Drop in supply voltage. Check that the
12 volt supply to the refrigerator/freezer
is maintained at the required full rate.
Refrigerator fails to operate • Controls set incorrectly. Check that the
LP Gas
thermostat is set to maximum, gas is
turned on and controls are set to obtain
gas operation.
• Gas supply restricted. Check that the gas
cylinder is full, all LP gas valves are
open, ensure gas jet is clean and burner is
alight.
• Incorrect lighting procedure. Check that
flame failure safety valve has not been
prematurely released.
Refrigerator not getting cold • Refrigerator/freezer not level.
The
enough.
refrigerator/freezer must be level in both
directions to operate correctly.
• Ventilation/installation inadequate. The
refrigerator /freezer must be ventilated,
installed and flued in accordance with
manufacturers instructions.
• Drop in supply voltage. Check that the
46
RVMAA OWNERS MANUAL
•
•
•
•
•
•
supply voltage to the refrigerator/freezer
is maintained at full rate.
Controls not set correctly or thermostat
incorrectly used. In hot weather the
thermostat setting should be closer to
maximum than usual.
More than one source of energy used at
the same time.
Door is not closed properly or magnetic
sealing strip is defective.
Gas system restricted or flame has gone
out. Depending on use, gas system
should be periodically cleaned and
adjusted.
Evaporator heavily coated with ice.
Refrigerator/freezer should be defrosted
at more frequent intervals.
The gas pressure is incorrect. Check the
pressure at both the gas cylinder and
burner.
For further information please refer to your operating instruction manual.
REGULATOR
A regulator is fitted to the gas cylinder when the Recreational Vehicle is
built. It will not be necessary to adjust the pressure of that regulator at any
future time. Should you feel the regulator needs adjusting it must be
carried out by an authorised gas installer who has the necessary equipment
to readjust the regulator. Never try to adjust the regulator at home.
ROLLOUT AWNINGS
It is advisable, that when rollout awnings are stored in the sun in a rolled
up position for a considerable period of time the vinyl on the awning
should be covered against deterioration from ultraviolet rays, as prolonged
exposure to weather will cause the exposed section of vinyl to lose its
colour or deteriorate. It is advisable that a cover be placed over the roller
of the rollout awning to avoid this deterioration taking place.
RVMAA OWNERS MANUAL
47
It is similarly advisable to cover the tyres on the vehicle and the gas
cylinders if they are mounted on the drawbar as they also can deteriorate if
left for long periods of time in strong sunlight.
Tyre pressure should be increased in your
tow vehicle to compensate for the extra
load of your RV. Consult vehicle
specifications in your car handbook.
SPEED LIMITS
State caravan towing speed limits as at April 1999 are as follows:
Northern Territory; Queensland; NSW; As sign posted
Victoria; South Australia
Western Australia
up to 750 kg - 100 km/h
over 750 kg - 90 km/h
Tasmania
90 km/h
These speed limits can change from time to time and it is advisable to
check with your local motoring authority before commencing your
journey.
The major concern is not how fast you can travel with your RV but how
safe can you travel. Irrespective of road speed signs, you should travel
only as fast as the road conditions, wind speed & direction, rain, type of
tow vehicle etc., permit. NEVER travel in excess of the towing speed
regulations for each state of Australia.
RVMAA OWNERS MANUAL
48
STOVES
Stoves should be operated in accordance with the stove manufacturers
printed instructions as supplied to you when the RV is originally delivered.
Please contact the dealer or manufacturer of the RV should those
instructions not be supplied at the time of delivery. Ensure that when RV’s
are stored that all appliances are turned off and cylinder valves closed.
Recreational Vehicle tyre pressure should be
kept at pressure stamped on VIN (Vehicle
Identification) plate.
Warranty Period.
During the warranty period remember it is
the owners duty of care to carry out regular
maintenance i.e. tyre pressure, wheel bearing
greasing and adjustment, greasing of corner
stabilisers, adjustment of brakes and hand
brake cable.
These items are NOT covered by warranty
and the cost of all general maintenance items
is the owners responsibility.
RVMAA OWNERS MANUAL
49
TOWING EQUIPMENT
It is advisable to take advice from your RV dealer as to the type of towing
equipment and towbar that should be fitted to your car. It is essential that
the towbar have a rating plate at least equal to the aggregate trailer mass of
the vehicle being towed. Weight distribution hitches in many cases are a
distinct advantage and these should be used in accordance with the
recommendations of your RV dealer.
TYRES
Checking tyre pressures - this should be done at least every 500 km and
they should be inflated to the manufacturer’s recommended tyre pressure
as stamped on the Vehicle Identification Plate which can be located on the
drawbar, in the front boot or inside of your RV.
Ensure that the correct pressure is maintained in the tyres at all times.
Underinflated tyres can lead to the tyre walls becoming overheated and
therefore tend to blow out. Overinflated tyres can cause severe vibration
and stresses to your RV and therefore this condition should also be
avoided. If in doubt about the pressure of the tyres on your RV you should
consult a recognised tyre refitting company that can recommend a tyre
pressure to you. Tyre pressure is essential for well maintained tyres. In
the case of the tyres on your towing vehicle, the tyre pressure should be
increased when towing the RV.
As a general guide the front tyres of your car should be increased by 10%
over the recommended pressure and the rear tyres of your car should be
increased by 20% over the recommended manufacturers specifications.
Check your car manufacturers recommendations in your car handbook.
RVMAA OWNERS MANUAL
50
WARRANTY PROCEDURES
It is essential that before undertaking any repairs or alterations to your RV
that you consult with the manufacturer or dealer prior to carrying out these
repairs. It is essential to return the warranty card as supplied with your RV
originally so that your warranty will be registered with the manufacturer.
Further procedures on warranty should be in accordance with the detailed
warranty card as supplied with your RV. It is essential to understand the
difference between warranty and service & maintenance. All RV’s need to
be maintained and serviced and this cost must be borne by the owner as it
is part of your cost of travel. Warranty procedures are those items which
are stated in the warranty card and you should carefully consider whether
an item is a service and maintenance item prior to contacting the
manufacturer to make a warranty claim.
WATER SYSTEMS
The water system on your RV is designed to be operated by a hand pump
or 12 V pump at the sink or a mains pressure connection to a tap at the
sink.
It is important that the tank of your RV be drained when the RV is stored
for any long period of time and the system is flushed out with clean fresh
water approximately once per year.
At times the hose connecting the tank to the pump can be become damaged
or kinked and under these circumstances it will be difficult to operate the
pump. In these instances check that no kinks have occurred and free the
line from the tank to the pump. Additionally, if the vent pipe to the tank
becomes blocked or damaged or kinked it can slow down the process of
withdrawing water from the tank via the pump. In these cases again check
to ensure that the vent pipe connected to the top of your tank is clear of all
obstructions.
Rv’s or Recreational Vehicles include camping
trailers : Poptops : Caravans : Camper Vans:
Camper Conversions : Motor Homes and Slide
on Campers
RVMAA OWNERS MANUAL
51
WINDOWS & WATER TANKS
You should refer to the main body of the owners manual for the servicing
of items such as windows and doors.
The following information has been supplied by CAMEC PTY LTD who
have offices in the following states
Victoria
Melbourne
Telephone: (03) 9562 9888
Facsimile: (03) 9562 9092
New South Wales
Sydney
Telephone: (02) 9949 5788
Facsimile: (02) 9949 4020
Queensland
Brisbane
Telephone: (07) 3273 7666
Facsimile: (07) 3273 0492
Australite Windout Window
Being a low maintenance product, very little service is required. A full
range of spare parts are readily available from most RV part retailers.
Cleaning: Warm soapy water and a soft cloth should be used for cleaning
your Australite Window.
Note: Never use solvents on any of the acrylic based glazing options
(Galaxy and Bubble range etc.).
Insect screens are removable from the outside and are best soaked in
warm soapy water for cleaning purposes.
Series 300 and series 44 Sliding Windows - should be treated the
same as Australite Windows but the slide tracks and drain slots should be
regularly cleaned. An occasional application of sprayable silicone will
ensure your windows continue to slide effortlessly in their tracks.
Australite Four Seasons Hatch
The Four Seasons Hatch is another low maintenance product. All
flaps should be closed to the “Lock” position when travelling. Screens are
easily removed for cleaning. Soak in warm soapy water. Your Australite
Four Seasons Hatch features 161 square centimetres of fixed ventilation,
52
RVMAA OWNERS MANUAL
even when closed. Every twelve months check for sealing where hatch is
fixed to roof.
Australite Protector Shade
Protector Shades feature a specially designed stay, with in-built limit
stops. The stay adjustment nuts should be kept lubricated to prevent
seizure, especially in coastal areas.
Australite Panorama, Trimatic and Camper Doors
Australite doors are virtually maintenance free if kept in good, clean
order. An eye should be kept on locks and striker plates to ensure that they
are kept in adjustment.
Note: The Sliding Tracks for Panorama Door sliding window should
be kept clean.. Acrylic window panels in Trimatic and Camper Doors
should be cleaned with warm soapy water. Never use solvents on
these parts.
Water Tanks
Your Camec Water Tank is manufactured from high quality nontoxic, non-tasting polyethylene featuring screw in barbs and breathers for
easy replacement and or drainage. When your van is not in use for
extended periods, it is recommended that your water tank and lines are
completely drained until ready for use again.
240 Volt Power
Please note that all RV’s are fitted with a 15 AMP 240 V power inlet.
A suitable 15 AMP extension lead is required as a normal 10 AMP
domestic lead will not fit this inlet. Do not attempt to modify the normal
domestic plugs or sockets, for this purpose.
12 Volt Travelling Lights
It is advisable to check all travelling lights several days prior to
departing on your trip. All lights should be checked for operation. Check
to ensure that all Festoon Bulb Contacts are tight and clean and all Bayonet
Contacts are clean. If this routine becomes habit prior to each journey,
much frustration and lost time can be prevented at departure time.
RVMAA OWNERS MANUAL
53
WHEEL NUTS
After approx 100 km of travelling the owner should check all wheel nuts
on the vehicle and these should be tightened to a tension of 125 Nm. or 90
ft lb (for 7/16” wheel studs). After each 100 km for the first 400 km, the
wheel nuts should be again checked to the same Nm. The wheel nuts
should then be checked every 1000 km or 6 months for the life of the RV.
Familiarise yourself with the location and the
instructions for use on your fire extinguisher.
54
RVMAA OWNERS MANUAL
RVMAA OWNERS MANUAL
55
PRE TRIP CHECK LIST
PRIOR TO DEPARTING ON YOUR RV TRIP
• Check that the wheel nuts on all wheels have been tightened to the
manufacturer’s specification for wheel nuts. These should be tightened
with a torque wrench to 90 ft lb or 125 Nm and they should be tightened
after each 100 km for the first 400 km and they should be checked every
1000 km or six months.
• Ensure that the water tank has been filled and that the locking cap is
secured.
• Check that all traffic lights on the vehicle are operating correctly from
the car.
• Ensure that the refrigerator door lock is secured in place.
• Ensure that the gas cylinders are secured.
• Ensure that the rear vision mirrors on your car are correctly adjusted.
• Check that electric brakes on your RV are working.
• The jockey wheel should be removed from its clamp and stored in the
boot of car or the boot of the RV or locked in the travelling position if of
a swivel mount type.
• Unless the gas refrigerator is being operated whilst travelling ensure the
gas cylinders are turned off.
• Ensure that front and rear corner stabilisers are in the up position.
• Ensure that the handbrake on the RV has been correctly released.
• Ensure that the 240 V electrical lead is disconnected from the RV.
56
RVMAA OWNERS MANUAL
• Ensure that the safety chains are correctly connected between the RV
and the car.
• The 12 V power lead for the RV lights should be correctly connected
and the towing aids or level rides should be correctly connected and
adjusted.
• Ensure that the roll out awning is stored away and locked in the travel
position.
• TV antenna should be securely stored.
CARE AND MAINTENANCE
All corner stabilisers should be oiled or greased regularly to ensure they
operate smoothly. Handbrake adjustment should be maintained via the
turnbuckle between the handbrake lever and the cable. This cable should
not be over tightened as it may cause brakes to overheat and in turn this
could cause bearing failure.
With your RV fully loaded the hand brake ratchet lever should engage the
5th or 6th notch from the tow ball end of the coupling. If the ratchet lever
engages any notch closer to the towball end of the coupling than 5 or 6
then the brake cable is “too tight”. If the cable tension is “too tight” it may
apply the RV brakes when the suspension compresses. This applies to
independent suspensions and beam axles with leaf springs. This “too
tight” or incorrect adjustment could cause overheating of brake shoes and
damage to your brakes and bearings. Brake cable adjustment should be
carried out via the turnbuckle and ensure that the lock nut is tightened after
adjusting the turnbuckle.
When the RV is not in use it should be stored preferably undercover but if
not undercover then a suitable amount of air should be allowed to circulate
inside the RV to avoid dampness and mildew from starting inside the
vehicle. The refrigerator door should be left ajar so that air can circulate in
the refrigerator. The gas cylinders should be turned off. The electrical
lead should be disconnected. In the case of the vinyl on poptops or the
canvas on campervans and tent trailers these should be occasionally aired
to maintain these items in perfect condition.
RVMAA OWNERS MANUAL
57
In the case of campervans and tent trailers where they are packed up in a
wet condition they should be thoroughly dried out at home before storing
them away permanently. Where an RV is left for a long period of time it
should be jacked up so that the weight is not permanently on the tyres.
Tyres can maintain a flat spot if they are left with the full weight of the RV
and particularly if the tyres lose some air this would tend to make the tyres
unbalanced and unsatisfactory for future use.
ENSURE ALL INTERIOR LIGHTS ARE SWITCHED “OFF”
WHEN THE ROOF IS CLOSED.
LOADING YOUR RECREATIONAL VEHICLE
It is advisable to load the RV as equally as possible front and back and side
to side. It is not advisable to carry exceptionally heavy loads such as
annexes in the front locker of your RV as this may upset the design
balance of your vehicle. These items should be carried in the boot of your
car. Heavier items should be carried towards the centre of the vehicle.
Never carry heavy items at the rear of the vehicle.
HITCHING AND UNHITCHING
It is essential that when carrying out the hitching and unhitching
operations you should do so without interruption as this can lead to some
essential items being missed, such as the handbrake being left on or safety
chains not being correctly attached. When carrying out this operation you
should run through a check list similar to the following.
1. Ensure that the coupling is correctly seated over the top of the ball and
the handle above the coupling is down in the correct position.
2. The 12 V electrical plug is connected between the RV and the car
securely and safely.
3. Ensure safety chains are attached to the vehicle in such a manner to
allow normal lateral movement between the RV and the car.
4. Load levelling devices or level rides should be correctly and
completely attached.
5. The jockey wheel must be removed from the clamp.
6. Release the handbrake.
58
RVMAA OWNERS MANUAL
After this hitching operation has taken place it is essential to walk around
the vehicle to ensure that the electrical lead has been disconnected, that the
water supply hose and drainage hose have been disconnected and that the
door is closed.
That all windows and hatches are in the lock position. That the step from
outside the door is either retracted or is stored in the front boot That all
lights are operating correctly, such as blinker lights, stop lights, tail lights
etc.
The awning on the side of your RV is completely retracted and locked.
The rear and front corner stabilisers are completely retracted and that any
chocks are removed from the wheels.
Double check the inside of the vehicle to ensure that the refrigerator door
is locked ready for travel. That all cupboard doors are closed securely.
That any loose items inside the vehicle and cupboards are properly stored
so that they cannot roll around or do damage whilst travelling. Items such
as television sets, microwaves, VCR’s should be securely fastened in place
and that exterior television antennas have been removed prior to travel.
Ensure to turn off all internal light switches 12 V and 240 V prior to
travelling as reconnecting of the 240 V or 12 V lead may bring lights on
and this could particularly damage the vinyl on a poptop.
When about to travel on the highway you should first test that the brakes,
particularly electric brakes, on your RV are operating. This can be done
by actuating the manual switch on the brake controller located inside your
car to ensure that the RV brakes will operate independently and that when
you travel the normal RV braking operation will be automatically supplied
from the brake controller of your car.
Before carrying out any alterations or repairs to your RV it is advisable to
firstly contact the dealer or the manufacturer to ensure that any work that
you carry out does not void the warranty on your RV.
It is recommended that an electrical lead with a safety switch fitted into the
lead be used at all times. - Some caravan parks do not have safety switches
fitted at the caravan park site pole. Circuit Breakers are not safety
switches. Safety switches have a test button fitted. If your RV does not
RVMAA OWNERS MANUAL
59
have a safety switch fitted on the inside of the van near the power inlet it is
strongly recommended that such a safety switch be fitted by a licensed
electrical contractor.
Rv’s or Recreational Vehicles include camping
trailers : Poptops : Caravans : Camper Vans:
Camper Conversions : Motor Homes and Slide
on Campers
The electrical safety information and cartoons used throughout this
handbook were developed by the Queensland Electrical Education Council
for the Electrical Safety Office, Dept. of Mines and Energy in cooperation
with the Caravan Trades & Industry Association of Queensland and the
Caravan Parks Association of Queensland.
The R.V.M.A.A. acknowledges the excellent contribution which the above
organisations have made to this Owner’s Handbook.
60
RVMAA OWNERS MANUAL
RVMAA OWNERS MANUAL
61
62
RVMAA OWNERS MANUAL
TRIP NOTES
RVMAA OWNERS MANUAL
TRIP NOTES
63
64
RVMAA OWNERS MANUAL
TRIP NOTES
RVMAA OWNERS MANUAL
TRIP NOTES
65