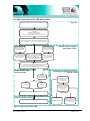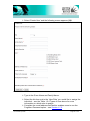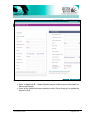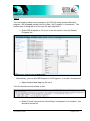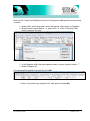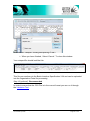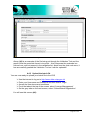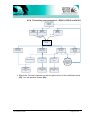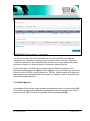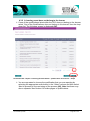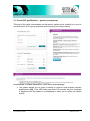
1
Version 3.7 January 2013 LRB User Guide LRB User Guide v 3.7 January 2013 Uncontrolled if printed LRmen LRUG01 Page 1 of 135 Contents Contents ................................................................................................................... 2 1. Purpose and structure of this guide ............................................................... 4 2. Operational guidelines for super users .......................................................... 5 2.1 High level view of the LRS and its uses ................................................. 6 2.2 Operational arrangements and user administration for super users....... 7 2.3 Arrangements for data governance ...................................................... 10 2.4 Training and awareness ....................................................................... 10 2.5 Naming conventions for multiple sites .................................................. 10 2.6 Update users ........................................................................................ 10 2.7 Access and password problems........................................................... 11 2.8 Change of super user........................................................................... 13 2.9 Contract staff or third party organisations using the LRS ..................... 13 2.10 Lost your only super user account? ..................................................... 13 2.11 Access to the developer’s team site ..................................................... 14 2.12 Preparation – privacy notice and verify learner’s identity ..................... 14 2.13 Support ................................................................................................ 16 2.14 Key points from this section ................................................................. 17 3. Use the LRS organisation portal ................................................................... 18 3.1 Log onto the LRS for the first time........................................................ 18 3.2 Welcome page ..................................................................................... 19 3.3 Online help ........................................................................................... 21 3.4 Set up additional users ......................................................................... 22 3.5 Update an existing user account .......................................................... 26 3.6 Delete a user account .......................................................................... 27 3.7 Verify identity........................................................................................ 28 3.8 Reset password ................................................................................... 29 3.9 Key points from this section ................................................................. 30 4. Unique Learner Number (ULN) management ............................................... 31 4.1 Work with individual ULNs ................................................................... 31 4.2 Tips for searching................................................................................. 33 4.3 Edit individual ULNs - view learner profile ............................................ 36 4.4 Find ULNs and register learners using the batch process.................... 44 4.5 Batch returns and exceptions ............................................................... 58 4.6 Report a ULN problem ......................................................................... 80 4.7 Report a ULN problem ......................................................................... 81 4.8 View data challenge history – report ULN or learning event problems . 83 4.9 Key points from this section ................................................................. 85 4. Personal Learning Record ............................................................................. 86 4.1 Access the personal learning record .................................................... 86 4.2 View a PLR .......................................................................................... 88 4.3 Report a learning event problem .......................................................... 93 4.4 Create a report ................................................................................... 106 4.5 Audit information on viewing a PLR ................................................... 107 LRB User Guide v 3.7 January 2013 Uncontrolled if printed LRUG01 Page 2 of 135 4.6 Key points from this section ............................................................... 108 5. Find a QCF qualification............................................................................... 109 5.1 Find a QCF qualification – generic (anonymous) ............................... 110 5.2 Find a QCF qualification – learner’s PLR details ................................ 117 5.3 Key points from this section ............................................................... 124 Appendix A – Create/update learner fields ........................................................ 125 Appendix B – Nationality codes (for learner detail fields)................................ 127 Appendix C – Glossary........................................................................................ 134 LRB User Guide v 3.7 January 2013 Uncontrolled if printed LRUG01 Page 3 of 135 1. Purpose and structure of this guide This Guide provides information and guidance for Learner Registration Bodies (LRBs) that sign up to use the Learning Records Service (LRS). Section 1 provides important operational guidelines on how to administer and manage users. Section 2 introduces you to the Organisation Portal. Section 3 provides guidance on managing Unique Learner Numbers (ULNs). There are several steps to managing ULNs, and the Guide describes these including how to set up and manage batch processes. Section 4 describes in detail how to access and manage the Personal Learning Record (PLR). Section 5 describes how to find a QCF qualification. This includes processing Rules of Combination (RoC) enquiries, which gives Learner Registration Bodies (LRBs) the opportunity - using selection criteria that help to produce options for learners - to find suitable courses. The Guide also offers advice and information on best practice, to help you make the most of the LRS, and provide details of how to get further help and guidance. If any of your users would receive the LRS newsletter - Service News - they can subscribe by sending their full name, organisation name and contact details by email to the LRS Customer Helpdesk. LRB User Guide v 3.7 January 2013 Uncontrolled if printed LRUG01 Page 4 of 135 2. Operational guidelines for super users Once your organisation has registered with the Learning Records Service (LRS) it will be referred to as a Learner Registration Body (LRB). You will need to establish managerial arrangements for running the LRS and ensure that appropriate arrangements for data governance are in place. Once we have checked and accepted your registration, LRS will set up your organisation account on the Organisation Portal and email your nominated Super User with a username and provide a password to enable access to the Organisation Portal. This section is for your organisation’s Super User and will help to: • Clearly define your managerial arrangements for running the LRS. • Establish your data governance arrangements. Assign additional Super User(s) and appropriate access for other users of the LRS. LRB User Guide v 3.7 January 2013 Uncontrolled if printed LRUG01 Page 5 of 135 2.1 High level view of the LRS and its uses Sign Up Learning Provider must register with the Learning Provider Register www .ukrlp.co.uk Once a UKPRN has been received your organisation must nominate a Super User for the service and sign up to the Learner Register and complete: an: Organisation Registration Form Learning Provider Agreement All users must agree to the terms of the User Agreement Details for learners who are 14 and over are gathered through the school census and sent through to the LRS using the S2S service. Learners present at a FE Learning Providerwith knowledge of their ULN Learning Provider gathers the ULN, Given Name and Family Name required to search for a learner. Capture learner details and obtain ULNs Learners present at a FE learning provider without knowledge of their ULN Learning Provider: Verify the Learner Identity to Tier 1, collect a an email address for the learner and show the Privacy Notice to the learner in readiness to update ,the to Organisation Portal. Access to the PLR. Learning Provider gathers 5 Personal details to Register the learner . Learning Providers work through the portal/web service or send batch files to the Learner Register to search/create ULNs If possible update the relevant fields to allow access to the PLR. Error Exception (RC006 – RC011) ULN obtained and communicated Successful (RC 001 – RC 005) ULN confirmed Check the Personal details/ULN / with the learner. Awarding Organisations verify learner ULNs Learners registered with an Awarding Body for examinations ULN created Awarding Organisation Verify learners’ ULN: using, ULN given name and Family name Successful Error ULN communicated to learners Learner details updated Learning Providers send through updates with the Learners’ ULN to the Learner Register, so that demographics can be updated, and relevant fields can be updated. ULN confirmed for Learner Awarding Organisation Request Provider check Personal details and ULN for the Learner Figure 1 High Level View of LRS LRB User Guide v 3.7 January 2013 Uncontrolled if printed LRUG01 Page 6 of 135 2.2 Operational arrangements and user administration for super users 2.2.1 Your role as a super user When your organisation registered as a Learner Registration Body (LRB), the LRS recognised a Super User as the person whose details were supplied on your LRS Organisation Registration form. An LRS Super User is the highest level organisation-specific role that you can be given. As a Super User, you are responsible for managing all users within your LRB, including setting up additional Super Users. This is to ensure that only the right people have access to LRS, that you maintain your user community and to make sure that the confidentiality of the records of learners is protected. As a Super User you will be the first contact point for your user community to: • Create Users • Update Users • Resolve access and password problems • Remove Users • Monitor User activity So now you must decide how to administer your user community and set up all other users. 2.2.2 Appoint other super users It is strongly recommended that your organisation has at least three super users to ensure that a Super User is available to unlock accounts, and so on, at any time. The Organisation Agreement sets out two complementary areas of responsibility which are assigned to the Super User(s) of the LRS: • • Oversight of Data Protection (DP) issues. Operational management of the LRS, including managing users, removing those who leave and oversight of procedure and practice. You may wish to consider the responsibilities of the Super Users for the following areas and the following responsibilities in mind: 1. Data protection responsibilities are separated from operational information processing management. 2. The potential number of learners or users is substantial. 3. The institution wishes to spread the risk / share the knowledge / provide staff cover. 4. Your organisation structure and locations. LRB User Guide v 3.7 January 2013 Uncontrolled if printed LRUG01 Page 7 of 135 2.2.3 Set up user administration procedures It is important to consider: • Internal processes; including how additional users can be set up. • How Super Users will deal with internal enquiries, as your Super User must be the first point of contact in your organisation. • Number of potential users in your organisation. 2.2.4 Things to consider when creating users As a Super User creating other users you must consider: • Who authorises the request? Any application for a new user account must follow your own internal process for checking people who are given access to confidential student records. Depending on the role, this may involve Criminal Records Bureau (CRB) checks. CRB checking is NOT mandated by the LRS. You must set up procedures for requesting a new user account which checks that the person being given access is properly authorised to access the LRS. • What level of permission is needed for the user? • What details are recorded for each user? • Are users aware of their responsibilities in using the LRS? • How will training and awareness about the LRS, including guidance on the use of the FileName field in respect of batches, be implemented. Please note: the LRS does not recommend the creation of ‘Guest’ user accounts. This will break the responsibility for maintaining access authorisation. The LRS may contact you if we identify any inappropriate behaviour when using our services. LRB User Guide v 3.7 January 2013 Uncontrolled if printed LRUG01 Page 8 of 135 2.2.5 Types of user in the LRS In order to protect the LRS and the information on learners, it is your responsibility to make sure users only have the level of access necessary to perform their job. To help identify this level, the LRS provides a number of roles which you can assign to a user; the roles can be ‘mixed and matched’ according to the level of accessed required. The User roles are: User Role Description LRB Super User This is the highest level organisation-specific role that you can be given. As a Super User you are responsible for managing all users within your registered organisation. LRB Batch User This is a basic role, allowing the user to submit and view the results and progress of batch jobs. LRB Online This is a basic role allowing the user to find, update learner User records and register learners. The functionality to ‘Find a QCF Qualification’ (anonymously) is provided as part of this role. LRB View Only This is the lowest level of access, allowing the user to find User learner records and ‘Find a QCF Qualification’ (anonymously), but not register learners or update learner records. Learner Record This role allows the user to view and print the Personal Learning Record (PLR) for any ULN. PLR Users can access a learner’s PLR once a ‘Find Learner search’ has been performed, and can use the ‘Find a QCF Qualification’ facility using units from the PLR. Learner Plan There are two additional roles which have been defined to give User/ Learner access to Learner Plan functionality: Learner Plan and Learner Plan View Only Plan View Only. These roles are only available to organisations delivering learning to offender learners who have been approved by OLASS. VLD Learning The (Verify Learner Details) role allows users to verify learners Provider using Learner Verification. This role is only available to providers funded by the Skills Funding Agency. If you would like more information, please contact the Data Service. Table 1 – User roles Please note: you can only select the user types that you have been granted access to when your organisation was set up as an LRB. For instructions on how to create users, please see Section 2.4. LRB User Guide v 3.7 January 2013 Uncontrolled if printed LRUG01 Page 9 of 135 2.2.6 User responsibilities The User Agreement sets out the individual’s responsibilities in using the LRS and must be accepted on screen every time a user logs into the LRS Portal. This text is also available in the Organisation Portal Help Pages and on the LRS website. You may also want to reinforce these messages in your guidance notes or through training and awareness. 2.3 Arrangements for data governance Whilst the obligations upon each individual user are set out in the User Agreement, the LRS requirements for data governance are articulated in the Organisation Agreement. These documents taken together frame and detail the responsibilities imposed upon the LRB. Ensuring proper practice in handling personal data is a requirement of learning providers, although there is no standard model of practice across the sector. 2.4 Training and awareness The LRS does not give training courses in using the LRS. The responsibility for user training and awareness lies with you as Super User. LRS does offer a range of support materials (including this Guide) which can be accessed on the LRS website as well as the Help Pages within the Organisation Portal. The LRS will not be able to tell your users about your specific practices in using the Portal. This training must be delivered by you. 2.5 Naming conventions for multiple sites The LRS registers an LRB as a single legal entity, even if the organisation has multiple sites and users. If you have a number of sites or offices, we suggest you give each its own name which can then be input into the FileName field when submitting a batch job. This will allow users to filter batch jobs by site using this field on the Organisation Portal. Once the filter is set, it will be applied every time that user logs in, until they remove it. You may want to consider issuing guidance to all your organisation’s users regarding the use of this function. 2.6 Update users It is important to maintain your user community. You and your fellow Super Users can update and manage all your user account details. Scenarios to consider are: LRB User Guide v 3.7 January 2013 Uncontrolled if printed LRUG01 Page 10 of 135 • Change in details, name, contact numbers, and so on, including email address so users can use the Forgotten Password – see Section 1.7.2. • Change in role or permission Basic account details, such as name and contact numbers, can be maintained by the individual user. As a Super User, you can tell your user community how to maintain their own user accounts. As a Super User, You need to set up your organisation’s procedures for authorising any changes in role, and make this known to users. This is important, especially if the change gives the user more responsibility and access. You must make sure that your internal procedures cover any more checks that may be needed before giving access. 2.7 Access and password problems As a Super User, you are your user community’s first point of call for: • LRS access problems • Password resets • Suspending and reinstating access to a user account For Organisation Portal access problems, please check whether there is a local access or internet connectivity issue before contacting the LRS Customer Helpdesk. 2.7.1 Reset a user account When a user has used the wrong password 3 times without entering the correct details to access the Organisation Portal, that user’s account will be locked. Once successfully logged in, the LRS is reset. To reset a user password please see Section 2.8. If you wish to deny a user (for any reason) access to the Organisation Portal, you can change the user account status to ‘suspended’. LRB User Guide v 3.7 January 2013 Uncontrolled if printed LRUG01 Page 11 of 135 2.7.2 Forgotten password When creating your users, by ensuring you provide an email address, they can use the Forgotten Password (1) option on the login screen so reset their own password. Screenshot 1 – Logon screen 2.7.3 Remove users Don’t leave user accounts open for people who no longer work for the organisation. This is important; if an account is left active, that person could still access the Portal online and potentially misuse the service. These activities will still be associated to your organisation and you will be held responsible. Remove a user account as soon as the user has: • Left your organisation • Moved to another organisation which is also an LRB • Taken on a role that no longer needs access to the Organisation Portal • Ceased being sub-contracted to your organisation LRB User Guide v 3.7 January 2013 Uncontrolled if printed LRUG01 Page 12 of 135 2.7.4 Monitor users activity The LRS recommends that you audit your user community annually, to check whether all your users are still using the LRS and whether they still hold the right level of access. You can find all your organisation’s users on the Portal. Just go to the ‘User Management ‘, leave the ‘find user’ criteria blank and select all of the roles and select ‘Find User’. The Portal will generate a full list of users where you can review your user’s roles. 2.8 Change of super user The initial Super User detailed on your Organisation Registration form is the LRS primary contact point. If you or another Super User changes roles or leaves the organisation, please complete the Change of Super User Form or contact the LRS Customer Helpdesk. 2.9 Contract staff or third party organisations using the LRS From time to time, you may hire contract or temporary staff to help within your organisation. As part of their role they may need access to the Organisation Portal. These staff must be subject to the same checks that protect confidentiality following your organisation’s policy. If another organisation is contracted to do work for your organisation and needs access to the Portal, it is your responsibility to give them access as users belonging to your organisation. This will ensure that all transactions that are conducted for your organisation are audited as belonging to your organisation. At present, contracted organisations are unlikely to pass the Learning Records Service registration checks to register directly as an LRB. If you are an agency working for a number of different LRBs, you will have to use separate user logons for each organisation you are working for. 2.10 Lost your only super user account? In the unfortunate event that your Super User account is suspended or your Super User account holder has left the organisation, and you have no other Super Users, the LRS will create a new Super User account for you. LRB User Guide v 3.7 January 2013 Uncontrolled if printed LRUG01 Page 13 of 135 To request a new Super User, please complete in the Change of Super User Form and send it to the LRS. The form must be signed by a Senior Manager from your organisation (preferably the same person who originally signed your Organisation Agreement). 2.11 Access to the developer’s team site If you would like your Management Information System (MIS) developer to develop the web services to the LRS Organisation Portal, they will need to sign up to the Developer’s Team site. Information on how they register is available on the LRS website. 2.12 Preparation – privacy notice and verify learner’s identity 1. Plan how your organisation will inform learners of their ULN. 2. You will need to make learners aware of the way their data can be used by ensuring they have read, or have access to a Privacy Notice (previously known as the Fair Processing Notice (FPN)). LRS has provided an example of a Privacy Notice that you may chose to incorporate into your enrolment processes. 3. It is recommended, but not mandated, that the identity of learners is verified as part of the LRS process and you may wish to put procedures in place to facilitate this. 2.12.1 Privacy notice The LRS has released standardised texts for Privacy Notices. These are for the benefit of learner providers to incorporate into their course registration and application forms plus administration systems for the next academic year. A short text version - suitable for inclusion in student and learner facing application forms. An extended text with simple explanations of how the LRS will use and process the information and data provided to us by Learner Registration Bodies (LRBs). This version is suitable for cascading to students and learners and to be used within your own application and information packs. Access and download the short and extended versions of the Privacy Notices and the Framework Code of Practice for all Providers. Please also see Section 4 to understand the implications for learners regarding the Privacy Notice and the Personal Learning Record. LRB User Guide v 3.7 January 2013 Uncontrolled if printed LRUG01 Page 14 of 135 The learner’s wishes should be recorded in the Ability to Share field – see Appendix B. 2.12.2 Identity verification guidelines The LRS includes the functionality to record the type of identification used to verify a learner’s identity. Where possible, a learner’s identity should be verified at enrolment, although a lack of proof of identity should not prevent enrolment. Where a learner’s identity cannot be verified at enrolment, it must be verified at a later date. The LRS also recommends verifying each learner’s identity before accepting them for credit or award based examinations. The facility for recording verification is provided by two fields: ‘Verification Type’ and ‘Other Verification Description’. The ‘Verification Type’ field is a controlled list whilst the ‘Other Verification Description’ is a free text entry field and is only used in value ‘Other’ is selected in Verification Type). 2.12.2.1 Verification type Select from the following verification type: • None provided • Relationship with school • Passport* • Driving licence* • ID Card or other form of national ID* • National Insurance Card* • Certificate of Entitlement to Funding* • Bank Credit\Debit\Card* • Other The verification type value ‘relationship with school’ should be used by pre-16 schools, where the identity checking processes typically involves verifying the identity of the learner with the parents or guardians. * Tier 1 ID verification type. Learners are required to be ID verified to Tier 1 before they can access their Personal Learning Record online through the Learner Portal or via the Lifelong Learning Account – for more information, please visit the National Career Service (NCS). This is to ensure the security and protection of personal data. Learning Records Service must be confident that the identity of an individual is checked before access can be given to their Personal Learning Record. LRB User Guide v 3.7 January 2013 Uncontrolled if printed LRUG01 Page 15 of 135 2.12.2.2 Other verification description Where the ‘Other’ value is assigned to the ‘Verification Type’ field, the verification document must be issued by a trusted third party. Any documentation that does not conform to the standard verification types or ‘other’ trusted documentation should result in the learner being registered with the verification type value ‘none’. Please see Section 1.12.2.1 for more information on how to update the learner’s details when the Verification Type value is set to ‘None’. Examples of trusted document types are: • • • • 2.13 Photographic security pass for current place of employment Armed Forces service ID Re-enrolment of known student (record as ‘returning student’) Exam Certificates Support For further information and support please contact the LRS Customer Helpdesk. Open Monday to Saturday, 8:00 am – 8:00 pm Telephone: 0845 602 2589 Email: [email protected] Website: www.learningrecordsservice.org.uk LRB User Guide v 3.7 January 2013 Uncontrolled if printed LRUG01 Page 16 of 135 2.14 Key points from this section • • • • • • • Appoint at least two more Super Users (one nominated and two deputies). Set up and publicise your procedures for requesting user access to the Portal Make sure your User community know your internal contact details, and contacts a Super User in the first instance with any issues. Ensure that all Users are trained in your internal processes and the use of the Organisation Portal. Amend user accounts and remove redundant accounts as soon as possible. Ensure learners are made aware of the way their data can be used by ensuring they have read, or have access to a Privacy Notice. Verify your learner’s identity and update the LRS. They will not be able to access their Learner Account unless their identity has been verified. Useful Links: • Fact sheets for learners and staff • Data Capture • Exceptions – Best practice LRB User Guide v 3.7 January 2013 Uncontrolled if printed LRUG01 Page 17 of 135 3. Use the LRS organisation portal You are now ready to log on to and use the LRS Organisation Portal 3.1 Log onto the LRS for the first time Open the internet and log on to http://www.uklrs.miap.gov.uk/ You will be presented with this Logon screen (2): Screenshot 2 – Logon screen On completion of registration, you as the nominated Super User will have received two communications, one by email and one by telephone, one containing the username and one the password. Enter your Username and Password and Select ‘Login’. The first time you log in you will need to read through the User Agreement (3): LRB User Guide v 3.7 January 2013 Uncontrolled if printed LRUG01 Page 18 of 135 Screenshot 3 – LRS authorisation Select ‘Accept’. Please note: Users are asked to accept a shortened version of the User Agreement each time they log into the LRS. The first time you log in you will need to create a ‘secret question’ (4). Select the question ampersand enter your answer. Screenshot 4 – Authentication details Confirm the answer and select ‘OK’. You have now logged in and should see the Welcome Page (5). 3.2 Welcome page Once successfully logged on, you sees a Welcome Page (5) which will be unique to their user type and role permissions. The image shown below is the Welcome Page of a Learner Registration Body Online User. LRB User Guide v 3.7 January 2013 Uncontrolled if printed LRUG01 Page 19 of 135 Screenshot 5 – Welcome page The Welcome Page displays various sections: • Up to two online ‘quick search forms’ may be displayed on the left hand side of the Welcome Page, depending on the user type and role permissions o ‘Find a Learner by ULN’ for all LRB roles apart from that of LRB Super User. o ‘Find a QCF Qualification’ for LRB Online Users and LRB View Only Users. Other User Roles will see an image displayed in this section of the Welcome Page. • On the right, ‘Latest Information’ gives news from the Learning Records Service LRB User Guide v 3.7 January 2013 Uncontrolled if printed LRUG01 Page 20 of 135 • ‘What’s New?’, at the foot of the page, gives latest information on the current release of software including details of new features and changes to functionality. 3.3 Online help The Portal provides online help and assistance, via the footer ‘Help’ button (circled below), giving guidance on the particular function or page. The LRS directs you to the Organisation Portal Help System (6), by opening a separate browser session. Once in the Help System, you can browse other Help topics, before returning to the page. Screenshot 6 - Online Help LRB User Guide v 3.7 January 2013 Uncontrolled if printed LRUG01 Page 21 of 135 The Organisation Portal also provides some context sensitive help; there are hyperlinks available at various points within the LRS, giving function specific help (7). Screenshot 7 – Contextual help 3.4 Set up additional users Once you as the nominated Super User have accessed the Portal for the first time, it is good practice to create additional Super Users. The Learning Records Service recommends at least three Super Users per establishment. Log on to https://www.uklrs.miap.gov.uk/secure/ . Enter your Username and Password and select ’Logon’. Select ‘Accept’ to accept the User terms and Conditions. You have now logged in and should see the welcome screen. Select ‘User Management ‘Tab and the following screen is displayed (8) on the bext page: LRB User Guide v 3.7 January 2013 Uncontrolled if printed LRUG01 Page 22 of 135 Screenshot 8 – Create new user – Find user Fill in the Given Name and Family Name and select the Learner Registration Body Super User role to tick the box. Select ‘Find User’ – This is to check that the user does not already exist before you create a new record. The results screen with a message ‘no user match the selected criteria’ is displayed (9). Screenshot 9 – Find user results LRB User Guide v 3.7 January 2013 Uncontrolled if printed LRUG01 Page 23 of 135 Select ‘Create User’ and the following screen appears (10): Screenshot 10 – Create User Type in the Given Name and Family Name. Select the tick box next to the ‘User Role’ you would like to assign the individual – see the Table 1.2.4 Types of User above for more information on which roles to assign. Complete the e-mail address field as this enables users to use the Forgotten Password option – see Section 1.7.2. LRB User Guide v 3.7 January 2013 Uncontrolled if printed LRUG01 Page 24 of 135 You will need to enter some information into the Verification Provided box – this could be staff ID or a school email address. If you have additional information such as a telephone number you could add it to the data, but only the fields marked * are mandatory. Select ‘Create User’. The Super User is now created. The next screen (11) shows the Super User’s Username and Password. Copy these carefully and send them to the new Super User/User. Screenshot 11 – User created Select ‘OK’. The next screen (12) shows a summary of the User you have created. Screenshot 12 – User created results LRB User Guide v 3.7 January 2013 Uncontrolled if printed LRUG01 Page 25 of 135 From this screen you can manage your users, for example, updating, resetting passwords and deleting. You will need to select the user before making amendments. When the additional users login for the first time they will be required to change their password. This allows the user to choose a more user friendly password. 3.5 Update an existing user account From the find user results screen (12 above) Select the radio button next to the user whose account details you wish to change Select ‘Update User’. Screenshot 13 – Update user account Update the details of the user account as required: LRB User Guide v 3.7 January 2013 Uncontrolled if printed LRUG01 Page 26 of 135 • Title, Given name and Family name – the LRS automatically produces a user account name out of the given name and family names. • Telephone landline and mobile numbers – optional but useful contact details for the person. • Email address – LRS recommends that you capture this as it is used email forgotten passwords • Preferred Language – the language the LRS screens will be displayed in; currently only English available. • Verification provided – confirmation of your internal authorisation procedure. • Staff ID or Your reference – optional field which can hold an internal staff reference to help with identification. The e-mail address will be validated to ensure it is in a correct form. You may use this screen to update the roles allowed for your own Super-User account if you want to have access to Learner Verification and Achievement Management functions. Select ‘Update’ to commit the changes made. You will this confirmation screen (14) Select ‘OK’ to continue. Screenshot 14 – Update user account confirmation 3.6 Delete a user account From the Find User Results screen: Check the radio button next to the user whose account you wish to delete Select ‘Delete User.’ You will now see this screen (15): LRB User Guide v 3.7 January 2013 Uncontrolled if printed LRUG01 Page 27 of 135 Screenshot 15 – Delete user account Select ‘Delete’ to go ahead with the deletion of the account or ‘Cancel’ to return without deleting the account. You should ensure you delete a user’s account as soon as it is no longer required. 3.7 Verify identity You may receive requests to amend user account details or reset passwords from your users who may be geographically dispersed. The LRS offers you a facility to check the identity of the remote user. On the Find User results screen (12 above): Check the radio button next to the user whose identity you wish to verify. Select ‘Verify Identity’. You will see this screen (16): Screenshot 16 – Verify Identity The secret question that the user has selected when activating their account will be presented. Ask the user for the answer to the question and key it in. Select 'Verify’. Note: the answer is not case sensitive, so ‘taylor’ will match against ’Taylor’ for example. You will then see this screen (17): LRB User Guide v 3.7 January 2013 Uncontrolled if printed LRUG01 Page 28 of 135 Screenshot 17 – Verify Identity successful In this case the answer supplied was correct and you can continue. If the answer had been incorrect, the message in the response box would be in red. Select ‘Ok’. 3.8 Reset password As a Super User, you can also reset the passwords of your users. Note: Users can reset their own password as long as they have an email recorded against their account. From the Find User results screen (12 above), in order to find the user, you will have to change the Status to ‘suspended’: Access the user account and change the status to ‘active’ to reinstate the account. The account is now active again and the password will work. You can tell the user how to receive an email prompt for their password from the LRS. This removes the need for you to know a user’s password. Check the radio button of the user whose password you wish to reset. Select ‘Reset Password’. You will see this confirmation screen (18): Screenshot 18 – Reset password confirmation ‘Confirm’ if you wish to proceed with resetting the password or ‘Cancel’ to exit. You will now see this screen (19): LRB User Guide v 3.7 January 2013 Uncontrolled if printed LRUG01 Page 29 of 135 Screenshot 19 – New password created The LRS displays the new one-time password for the selected user. You need to send this to the user. They will then be asked to change the password when they next log on. 3.9 Key points from this section • • • • This section is for Super Users. Login to the LRS Organisation Portal, read through and accept the User Agreement. Set up account and an additional two Super Users. Carry out regular administration of user accounts so details are up to date. LRB User Guide v 3.7 January 2013 Uncontrolled if printed LRUG01 Page 30 of 135 4. Unique Learner Number (ULN) management This Section of the Guide tells you how to obtain and manage Unique Learner Numbers (ULNs). Because many User Roles, not just that of the Super User, involve working with ULNs, this section is designed for all relevant users. The Organisation Portal is a very powerful tool. It is can be used to create a ULN for an individual or small group of learners, amend learner details and to rectify exceptions when batch processing. Before you can begin to register or update Unique Learner Numbers (ULNs), you will need to login to the LRS Organisation Portal. See Section 2 Subsections 2.1 – 2.3 for instructions on how to do this. 4.1 Work with individual ULNs 4.1.1 Find individual ULNs by personal details At the top of the Welcome Page, as is the case throughout the Organisation Portal, you will see row of tabs. From these tabs: Select ‘Learner Management’ Select ‘Find a learner’. You can see the ‘Find a Learner’ screen (20) which contains two forms. You need to work with the right hand form ‘Find by Personal Details’ Enter ‘Given name’ and ‘Family name’ of the learner whose ULN you are looking for – this would be the names used on their ID. Enter the ‘Date of birth’ from the drop down menu. Select the ‘Gender’ from the drop-down menu. Enter the last known ‘Postcode’. As a last resort use the ZZ99 9ZZ – if there is no possibility of obtaining a postcode from the learner. LRB User Guide v 3.7 January 2013 Uncontrolled if printed LRUG01 Page 31 of 135 Screenshot 20 – Find a learner This completes the mandatory fields, but if you know of a Previous Family Name, it would be useful to enter it as well to improve your search results. Select ‘Search.’ The results screen is displayed (21): Screenshot 21 – Find Learner Results In this case, Screen (21) shows that the LRS has found no learners matching the description you entered. LRB User Guide v 3.7 January 2013 Uncontrolled if printed LRUG01 Page 32 of 135 Check the details you entered as you can amend the details and ‘Search again’. Take a look at Section 3.1.2 for more tips on searching for learners. If you are unable to find a ULN, select ‘Register this learner’ to register the learner. See Section 3.1.3 for more information. 4.2 Tips for searching It is important to search thoroughly for a ULN for your learner before creating one. The LRS is large and continues to grow with the addition of over 1 million new learners a year, so your learner is very likely be one of these. Below is a one page summary of things to think about when searching for learners. More information can be found on the LRS website. Names 1. Swap previous name - try searching using the person’s previous family name. 2. Swap Given Name and Family Name - try swapping Given Name and Family Names around or use their middle name as their Given Name. 3. Prefix/Suffix - try searching for the person with and without a prefix/suffix on their Family Name or use alternative forms of prefix/suffix, for example, McDonald/MacDonald). 4. Preferred name - Try searching using their preferred or nickname as the Given Name. 5. Spelling - Check appropriate spelling of the person’s name and consider using phonetic spelling, for example, Czaja as Chiah. 6. Recording – when you are updating a Family Name copy the previous Family Name into the relevant field. 7. Try including and excluding a hyphen if a double barrelled name. Date of birth 8. Try swapping Month and Day around (if less than or equal to 12) or try using the first of the month. (01-MM-YYYY). 9. When the learner’s Date of Birth is not known, as a last resort a DOB is used that they will remember, for example, 1/1/ <choose a year closest to their age>. Contact information 10. Try searching using a previous postcode for the person (or their parent’s postcode). 11. Try searching using the default postcode ZZ99 9ZZ. LRB User Guide v 3.7 January 2013 Uncontrolled if printed LRUG01 Page 33 of 135 12. If you collect the previous postcode for learners you could try uploading a batch file with the previous postcode. Once you have obtained the ULN please update the ULN with the correct postcode. 13. If in doubt, use Address matching tools (such as http://postcode.royalmail.com) to produce a full address. 4.2.1 Find unsuccessful - register this learner You have searched using the tips for searching but there is no record of a ULN for your learner. So you need to register this learner for a ULN. Select ‘Register this learner’ (21). You will now see this screen (22): Screenshot 22 – Register this learner LRB User Guide v 3.7 January 2013 Uncontrolled if printed LRUG01 Page 34 of 135 You can see that this screen (22) has already been populated with the information input to the ‘Find by personal details form (20). Enter as many further details as you can onto this screen to help identity this learner in future searches. Complete all mandatory fields – Verification Type and Ability to Share see Table 2 below for values. Refer to Section 1.12 for more information on Verification Type and the Privacy Notice (Ability to Share). Hopefully you will be able to enter ‘FPN seen and able to share’ so that PLR data can be shared. Field Verification Type Ability to Share Format/drop down choice None provided Relationship with school – should be used by schools Bank/Credit/Debit Card* Certificate of Entitlement to Funding* Driving Licence* ID Card or other form of National ID* National Insurance Card* Other – if selected the Other Verification Description field needs to be completed Passport* * = Tier 1 Verification FPN not seen FPN Seen and able to share FPN Seen and unable to share Table 2 – Register learner – details dropdown options • Tier 1 ID verification type. Learners are required to be ID verified to Tier 1 before they can access their Personal Learning Record online through the Learner Portal. This is to ensure the security and protection of personal data. Learning Records Service must be confident that the identity of an individual is checked before access can be given to their Personal Learning Record. Select ‘Register learner.’ You will now see this confirmation screen (23), showing the ULN you have created. LRB User Guide v 3.7 January 2013 Uncontrolled if printed LRUG01 Page 35 of 135 Screenshot 23 – Learner registered successfully You now have a ULN for the learner – use the copy and paste hyperlink to copy the ULN into your MI Database, and tell the learner. Remember to use the ULN in future if you need to access this learner’s ULN record or Personal Learning Record in the Organisation Portal. Select ‘View learner profile’ to view the learner’s ULN record or select ‘Register another learner’ to create another ULN for another learner. 4.3 Edit individual ULNs - view learner profile On the ‘Welcome Page’ (screenshot 5 above) or on the ‘Find a Learner Page’ (screenshot 20 above) go to the left-hand form ‘Find a learner by ULN.’ Enter the learner’s ULN, Given Name and Family Name and select ‘Search’. On the Results screen (24), select ‘View profile’. Screenshot 24 – Find results screen displayed LRB User Guide v 3.7 January 2013 Uncontrolled if printed LRUG01 Page 36 of 135 You will now see the ‘View Learner Profile’ screen (25) S creenshot 25 – View learner profile This screen holds all the personal and contact details of the learner plus dates and times of when the record was created and last amended, as well as any linked ULNs (these are other ULN records that have been merged to make this ULN the Master ULN). Here you can check the learner’s details, and add further details or update information. 4.3.1 Add or update details Select ‘Edit details‘ at the bottom of the screen. You will now see this screen (26). LRB User Guide v 3.7 January 2013 Uncontrolled if printed LRUG01 Page 37 of 135 Screenshot 26 – View learner profile - edit Refer to Appendix B – Create/Update learner fields for more information on field requirements. Once all the fields have been updated, select ‘Save changes’ to update the learner’s ULN. LRB User Guide v 3.7 January 2013 Uncontrolled if printed LRUG01 Page 38 of 135 4.3.2 Register individual ULNs If you are confident that the learner does not already have a ULN, a new learner can be registered through the Organisation Portal using the Register Learner (fast track option). Select ‘Learner Management’ and then ‘Register Learner’ Screenshot 27 – Register learner (fast track) Fill in the Given Name, Family Name, Previous Family Name (optional) (27) but may enhance your search results. Enter the date of birth – (using the drop down menus). Select the Gender from the drop-down menu and enter the last known postcode – if there is none available then as a last resort use the default postcode ZZ99 9ZZ. Select the ‘Register’ button. The LRS will perform a search for any learners that match the details entered. If any matches are found, the system will display them. LRB User Guide v 3.7 January 2013 Uncontrolled if printed LRUG01 Page 39 of 135 Screenshot 28 – Register learner (fast track) – Possible match If a match is found but you still wish to register this learner, click the ‘Register this learner’ button on the results screen. See screenshot (28) for next steps. Alternatively, if no matches are found the system will display the Register Learner - details screen. Also see screenshot (29) for next steps. LRB User Guide v 3.7 January 2013 Uncontrolled if printed LRUG01 Page 40 of 135 Screenshot 29 – Register learner – details (fast track) Refer to Appendix B – Create/Update learner fields for more information on field requirements. Note that the mandatory information has been transferred from the search screen – add in as much more information as you can. Refer to Section 3.2.3 regarding personal details that should be updated. Select Verification Type from the drop-down. Pre-16 schools should use the Relationship with School entry. Select Ability to Share – hopefully this will be FPN seen and able to share data – See Section 1.12 for more information regarding the Privacy Notice. LRB User Guide v 3.7 January 2013 Uncontrolled if printed LRUG01 Page 41 of 135 Add in any other information you may have to help identify this learner in future searches and then click ‘Register learner’ Screenshot 30 – Learner registered successfully (fast track) You now have a ULN for the learner – use the copy and paste hyperlink to copy the ULN into your MI Database, and tell the learner. Remember to use the ULN in future if you need to access this learner’s ULN record or Personal Learning Record in the Organisation Portal. Select ‘View learner profile’ to view the learner’s ULN record or select ‘Register another learner’ to create another ULN for another learner. LRB User Guide v 3.7 January 2013 Uncontrolled if printed LRUG01 Page 42 of 135 4.3.3 Tips for updating a learner’s details Below is a one page summary when updating learners - More information can be found on the LRS website: 1. 2. 3. 4. 5. 6. 7. 8. 9. 10. 11. If you have ULNs for learners, the demographics can be updated using Batch Processing. One mandatory field can be updated per file. Prohibited text is not allowed, for example, prisoner. Should the learner’s name include prohibited text, please contact the LRS Customer Helpdesk. If prohibited a postcode, for example, a prison postcode, please use the learner’s last address or the default postcode ZZ99 9ZZ. View a list of published prohibited text. Ensure that the learner’s details are updated regularly by submitting batches of current learners prior to exam entry. Contact information Always complete the address lines with correct and valid postcode. If in doubt, use Address matching tools (such as http://postcode.royalmail.com) to produce a full address. Include the email address of the learner - but don’t use the word ‘none’. If you collect the previous postcode for learners you could try uploading a batch file with the previous postcode. Once you have obtained the ULN, please update the Organisation Portal with the correct postcode. Names Always use the learner’s legal name and not nicknames as these can be recorded in ‘Preferred Given Name’. Include the learner’s ‘Previous Family Name’ if known because this can improve search results. Add middle names to ‘Middle Other Name’ using a space between each. When updating a Family Name, copy the previous Family Name into ‘Previous Family Name’. 12. Date of birth When the learner’s Date of Birth is not known, as a last resort use a DoB that they will remember, for example, 1/1/ <choose a year closest to their age>. 13. School age If updating the School at Age 16, enter the proper school name but do not include the word ‘School’ or ‘College’. 14. Place of birth If you have this information, please include it in ‘Place of Birth’. This should be the city/town as recorded on their birth certificate. LRB User Guide v 3.7 January 2013 Uncontrolled if printed LRUG01 Page 43 of 135 4.4 Find ULNs and register learners using the batch process The Organisation Portal is useful for obtaining individual ULNs, but there are other ways: • For maintained schools, Schools to Schools (S2S) offered by the Department for Education (DfE) is the preferred way to retrieve ULNs. • For colleges and independent schools who cannot access S2S and may have several thousand learners to enter, a faster and more effective method is to use the batch process. • The most effective way of using the LRS is through web services which can be developed to link your Management Information System (MIS) to the LRS. Further details can be found at This section is about how to use the batch process. 4.4.1 Create a batch file A batch file can create or update ULNs. If updating ULNs, please note updates will only occur as follows: 1. 2. 3. 4. 5. 6. The five mandatory fields (Given Name, Family Name, Date of Birth, Gender or Last Known postcode), will only be updated if the Verification Type value is set to a value higher than 0 = none provided. If updating Given Name or Family Name, the above applies as well as the name needing to match the database value on a fuzzy or synonym. If updating the Address fields the five mandatory fields must match as explained in point 1. An update will be performed if at least 1 of the 4 address fields supplied in the batch file is completed. The batch file field contains a value and the same field in the ULN record is blank. The Verification fields will be updated as a group with the values in the batch file whether the same as the LRS or not. Ability to Share Ability to Share field has previously been set by the learner then this cannot be reset by any values in the batch file. Similarly, it cannot be updated to “0 = FPN Not Seen” if the field was previously set to one of the “FPN Seen” values. To create a batch file you need to have the LRS Batch File Toolkit. LRB User Guide v 3.7 January 2013 Uncontrolled if printed LRUG01 Page 44 of 135 The toolkit is a set of technical documents which describe exactly how to set up the data within the file and needs to be followed precisely to create the file. If updating the learner’s details, the minimum data content for each learner for the batch file is: ULN, Given Name and Family Name. If creating a new ULN, the minimum data content for each learner is: Given Name, Family Name, Postcode, Date of Birth, Gender, Ability to Share, Verification Type (ID) and if applicable, Verification Other Description. The batch file can either be a Comma Separated Value (CSV) or XML file. 4.4.2 Prepare a CSV file using MS Excel Read this section only if you are preparing a CSV file using MS Excel These notes use are for reference only and are intended as a quick guide. View the full Batch Interface Specification Guide. This is for reference only and is intended as quick guide. For full details of the batch processing specification please refer to the full Interface Specification. Step 1 Download the template file: LRB_template.xls and open it in MS Excel. The template will be blank. However as you go through the steps below, you will eventually see a similar layout to this (learner data will be different) (31). Screenshot 31 – Batch Excel template Later we will scroll across to see the rest of the columns. First, let’s look at this set. This is what they contain: Column Name LRB User Guide v 3.7 January 2013 Uncontrolled if printed Example Data Description Validation Rules LRUG01 Page 45 of 135 Column Name Example Data Description Validation Rules A FileVersion 2A Version of the file being submitted. Relates to the Organisation Portal software version, although the value is only changed when the file format changes. Mandatory. Must show ‘2A’. Must appear in first data row only. B FileName UCL_Fil e23 Your file reference for internal purposes Mandatory. Maximum 512 characters. Must appear in first data row only. C UKPRN 8 Your UK Provider Reference Number (UKPRN) as a Learning provider. Mandatory. Must be 8 characters. Must match the UKPRN held within the LRS. D LearnerRec ordCount 10 The number of learner records in the file. E ULN 1234567 899 Unique Learner Number Mandatory. Must be the number of data rows present in the file – number of lines in the file minus 1. Must appear in first data row only Optional. 10 digit number F MISIdentifier ABC123 An internal ID used by the LRB. Note that this is not stored within the Organisation Portal Secure Portal but is returned in the output file. Optional. Maximum length 128 characters G Title Ms Title Optional. 35 characters maximum H GivenName Anne GivenName I PreferredGiv enName Annie PreferredGivenName Mandatory. 35 characters maximum Optional. 35 characters maximum. If not provided, will be populated by value provided in GivenName. LRB User Guide v 3.7 January 2013 Uncontrolled if printed LRUG01 Page 46 of 135 Column Name Example Data Description Validation Rules J MiddleOther Name Jane MiddleOtherName Optional 35 characters maximum. K FamilyName Jones FamilyName Mandatory. 35 characters maximum. L PreviousFam ilyName Smith PreviousFamilyName Optional 35 characters maximum M FamilyName At16 Evans FamilyNameAt16 Optional 35 characters maximum N SchoolAtAge 16 Myton Free text. name of school the learner was attending when he / she turned 16. Optional. 254 characters maximum O LastKnownA ddressLine1 51 The Avenue First line of address Optional. 50 characters maximum P LastKnownA ddressLine2 First Floor Flat Second line of address Optional. 50 characters maximum Q LastKnownA ddressTown Bedford Town Optional. 50 characters maximum R LastKnownA ddressCount yorCity Bedfords hire County of City Optional. 50 characters maximum S LastKnown PostCode N17 6EE Last Known PostCode Optional if ULN present. Otherwise Mandatory. Please refer to Appendix D for Valid Postcode Rules T DateOfAddre ssCapture 2008-1220 Date Of Address Capture Optional. YYYY- MM-DD format. If not provided, will default to the system date Step 2 Now scroll across to the right of the page, and you will see the rest of the file: LRB User Guide v 3.7 January 2013 Uncontrolled if printed LRUG01 Page 47 of 135 Screenshot 32 – Batch Excel template – rest of file Starting at column ‘U’: Column Name Example Data Description U DateOfBirth 2008-12-20 Date Of Birth V PlaceOfBirth Guildford Place of birth W [email protected] Email Address X EmailAddres s Gender 1 Gender Y Nationality GBR or GB or 826 Nationality Z ScottishCand idateNumber AbilityToShar e 123456789 Scottish Candidate Number Ability to share information provided to the Learning Records Service AA LRB User Guide v 3.7 January 2013 Uncontrolled if printed 0 Validation Rules Optional if ULN present Otherwise Mandatory. YYYY-MM-DD format Age must be between 11 and 110 years. Optional. 35 characters maximum Optional. Must be valid email format. Optional if ULN present. Otherwise Mandatory. Options: 0 = Not Known. (Gender not recorded) 1 = Male 2 = Female 9 = Not Specified. (Unable to be classified) Optional. Two or three characters or 3 digits CDD compliant code Maximum 3 characters. See Appendix B. Optional. Maximum 9 characters Optional. (Mandatory if creating a new ULN). Must be 0, 1 or 2, where 0 = ‘FPN not seen’ 1 = ‘FPN Seen and able to share data’ 2 = ‘FPN Seen and unable to share data’ If this value is set to anything other than 0, it cannot be reset to 0. If it LRUG01 Page 48 of 135 Column Name Example Data Description AB VerificationT ype 1 Verification Type AC OtherVerificat ionDescriptio n Visa AD Notes Free text description of other verifications documentation Any extra information about the learner. NB: this field for LRS use only. Validation Rules has been set by the learner themselves it cannot be changed by LRBs. Optional. (Mandatory if creating a new ULN). Must be one of: 0=None provided 1=Relationship with school 2=Passport 3=Driving licence 4=ID Card or other form of national identification 5=National Insurance Card 6=Certificate of Entitlement to Funding 7=Bank/Credit/Debit Card 999=Other Should be empty unless Verification Type = 999 (Other). 55 characters maximum Optional. 4000 characters maximum. Table 3 – CSV batch file columns Step 3 Cut and paste your MI data into this template, making particularly sure that data is correctly entered into the mandatory fields columns H, K, S, U, X, AA, and AB. Step 4 Now copy the £ signs in columns A and AD all the way down to include the last learner. Step 5 Check the number in cell D2 (number of learners), matches the number of learners entered. Step 6 Move across to Column U. Right-click column U, then left-click Format Cells – see screenshot (33) below: LRB User Guide v 3.7 January 2013 Uncontrolled if printed LRUG01 Page 49 of 135 Screenshot 33 – Batch Excel formatting cells On the next screen, select the ‘Number’ tab. The screen will now look like this (34). Screenshot 34 – Batch Excel date format In the ‘Category’ column, highlight the word ‘Date’ , From the scroll down menu that now shows, select the date in the required format - ‘yyyy-mm-dd’ as shown. Select ‘OK’ at the bottom of the window. LRB User Guide v 3.7 January 2013 Uncontrolled if printed LRUG01 Page 50 of 135 You will notice that this has now changed the format of all the dates of birth in Column U, like this (35): Screenshot 35 – Batch Excel DoB date format applied Step 7 Recheck that all the data is correct, especially in the mandatory fields. Look out, for example, for letters instead of numbers and vice versa in the post codes: upper case I (I), lower case L (l) and the number one (1), can appear very similar! Step 8 Save your file as a CSV file, make sure you can see the file extension on saved files (36). Screenshot 36 – Saving Batch as CSV Save the file with the filename that matches the filename in cell B2, i.e. LRB_your 8 digit UKRLP number_ddmmyyyyhhmm.CSV. for example, LRB_44123456_180220091525.CSV It is important that you change the file type to CSV, and that you enter the CSV in upper case. LRB User Guide v 3.7 January 2013 Uncontrolled if printed LRUG01 Page 51 of 135 Step 9 You now need to make some changes to the CSV file using another Microsoft program - MS Notepad (usually found in Start > All Programs > Accessories. The easiest way of doing this is to find your file and right-click it. Select ‘MS Notepad’ or if it is not on the list, select it from the Default Programs list. Screenshot 37 – Opening file in MS Notepad Alternatively, you can find MS Notepad in ‘All Programs’, it is under ‘Accessories’ Open Notepad and drag the file into it . Your file should now look similar to this: Screenshot 38 – Batch file view in MS Notepad Select ‘Format’ and uncheck ‘Word Wrap’ in Notepad if it is checked – this should be turned off. LRB User Guide v 3.7 January 2013 Uncontrolled if printed LRUG01 Page 52 of 135 Now use the ‘Search and Replace’ function in Notepad to add speech marks around commas. Select ‘Edit’ and a drop down menu will appear. Move down to ‘Replace’ Select the left mouse button - or press Ctrl + H. In the ‘Find what’ field enter a comma, like this - , Screenshot 39 – Notepad using find and replace In the Replace with field enter speech marks, comma, speech marks - “,” Select ‘Replace All’ Your Notepad file should now look like this (40): Screenshot 40 – Notepad file view Now, in the same way replace the £ with speech marks (41). LRB User Guide v 3.7 January 2013 Uncontrolled if printed LRUG01 Page 53 of 135 Screenshot 41 – Notepad – Finding and replacing ‘£’ with “ When you have finished, Select ‘Cancel.’ To close this window. Your notepad file should look like this: Screenshot 42 – Notepad final layout This file now conforms to the Batch Interface Specification V2A and can be uploaded into the Organisation Portal for processing. Step 10 (optional)- Recommended In order to ensure that the CSV File is in the correct format you can run it through the Validation Tool. LRB User Guide v 3.7 January 2013 Uncontrolled if printed LRUG01 Page 54 of 135 Screenshot 43 – Validation Tool report Above (43) is an example of the file being put through the Validation Tool and the result is that the postcode format is incorrect – this is because the postcode is a fictional one, and not present in the validation list. Apart from the post code error, it has successfully passed the Validation Tool so it can be uploaded. 4.4.3 Upload the batch file You are now ready to upload your batch file to the LRS Use the internet to log on to http://www.uklrs.miap.gov.uk/ Enter your Username and Password and then Select ‘Login’ Accept the User terms and conditions. From the tabs at the top of the screen, select ‘Learner Management’ On the grey tabs on the next screen, select ‘Submit Batch Registration’. You will see this screen (44): LRB User Guide v 3.7 January 2013 Uncontrolled if printed LRUG01 Page 55 of 135 Screenshot 44 – Uploading a batch file Now choose your submission type from the dropdown menu. You are going to submit a file for ‘Full Submission’, so Select the ‘Full (FUL)’. (You would use the ‘Verification only (CHK)’ submission if you already had ULNs for your learners). Sc Screenshot 45 –Uploading a batch file – browsing for file Use the ‘Browse’ button to locate the batch file on your computer. Then Select the ‘Upload File’ button. If your file has been correctly prepared, you should see the success message (46): LRB User Guide v 3.7 January 2013 Uncontrolled if printed LRUG01 Page 56 of 135 Screenshot 46 – Batch file upload successful Make a note of the Job ID Number, to identify your file. Select ‘Submit another file’ to submit another batch file, if you need to or select ‘View job list’ to see that status of your file. The file is processed at regular intervals throughout the day LRB User Guide v 3.7 January 2013 Uncontrolled if printed LRUG01 Page 57 of 135 4.5 Batch returns and exceptions The LRS Batch process returns details on the success of the entered learners’ details. Learners that the LRS cannot register, because their details match existing learners or for any other reason, are called ‘Exceptions’; The Batch Exception process provides an online procedure to help Learner Registration Bodies provide additional and corrective information to improve the processing of Batch Exceptions. Once a batch file has been processed, an output file is available which contains a list of return codes. These codes describe whether a ULN has been found, a new one created or if an Exception has been found which needs to be investigated. The output file can be used to update your own MI database with new ULNs and the Exceptions should be ‘processed’, for example, investigated. There are two ways to enter the Exceptions process: • • Analyse the Exceptions for an individual batch, or View all outstanding exceptions for all batches for your organisation. 4.5.1.1 Batch job list Select ‘Learner Management‘ from the main tabs on any screen Select ‘View Batch Registration’ The following screen (47) is displayed, showing the Job Id, Organisational File Name, Type, Status, User, Date and Time. LRB User Guide v 3.7 January 2013 Uncontrolled if printed LRUG01 Page 58 of 135 Screenshot 47 – List of batch jobs submitted You can identify the file you are interested in from the ’Job ID’ column. If the ‘Status’ column shows ‘Waiting’, you have the option to remove the file from the list and cancel the batch process for that file. If the ‘Status’ column shows ‘Successful’ you have a choice of hyperlinked options in the right hand column. You can select ‘Download output file’ – allows the file to be downloaded in the same format it was uploaded (either CSV or XML). You can select ‘View exceptions’ to process the exceptions for just a particular batch file. You can select ‘View Job Details’ (48) for each processed file, which will display the following screen: LRB User Guide v 3.7 January 2013 Uncontrolled if printed LRUG01 Page 59 of 135 Screenshot 48 – Batch job details This ‘Job Details‘ screen (48) shows all the file details from the previous screen, and also provides details including: Total number of records overall Total number of records with each return code Return codes are covered in detail in the next Section. The processing details of the file are listed including date, time and duration of processing. 4.5.1.2 Batch output file – exceptions only The button ‘Download output file’, (which is the same option as on the Batch Job List screen), allows the file to be downloaded in the same format it was uploaded (either CSV or XML). LRB User Guide v 3.7 January 2013 Uncontrolled if printed LRUG01 Page 60 of 135 If are any Exceptions, then the button ‘View Exceptions’ (which is again the same as on the Batch Job List screen) lets you view and then process the exceptions for a single file. 4.5.1.3 Return codes RC001 – RC004: what they mean ‘Return Codes’ tell you what has happened to each learner record in your file. Some of these codes indicate a warning or error message to explain the reason for failure – these are call ‘exceptions’. There are 11 different return codes, but not all of them indicate exceptions RC001 to RC004 are not classed as exceptions’, although some action from you may be needed: Code ampersand Description RC001 Linked Master ULN Returned RC002 ULN Confirmed and Updated RC003 ULN Confirmed RC004 No Match – New ULN Created Explanation Action Required Successfully found an exact ULN match found but this is a merged ULN (Master ULN). Successfully updated - an exact ULN match found and fields updated. Successfully matched – ULN match has been made. Successfully created – LRS has created a new ULN. Update your records to reflect the right ULN to be used. No action required. No action required. Update your records with ULN. Table 4 – Return codes RC001 to RC004 4.5.2 Return codes RC005 – RC011: the exceptions These return codes all represent ‘exceptions’ which you will need to address. Viewing exceptions You can view all the exceptions in your organisation’s files together, or view the exceptions for a single batch file. The actions that you take within the LRS and the options available to you are the same in either case. To view all exceptions for your organisation Select ‘Learner Management‘ from the main tabs on any screen LRB User Guide v 3.7 January 2013 Uncontrolled if printed LRUG01 Page 61 of 135 Select ‘View Exceptions’. You will now see the ‘Exception List’ screen. To view the exceptions for a single batch file: Select ‘Learner Management’ from the main tabs on any screen Select ‘View Batch Registration’ – the View LRB batch jobs screen is displayed Find the batch you wish to resolve the Exceptions for Select ‘View exceptions’ hyperlink. Either route displays the following Exceptions list screen (49): Screenshot 49 – Exceptions list The screen shows all the exceptions that match the current filter, and gives totals for the number of exceptions that match the filter, followed by the number of unique exceptions shown in the table, and the number of duplicates of those that are hidden. The first number will always be the sum of the other two. LRB User Guide v 3.7 January 2013 Uncontrolled if printed LRUG01 Page 62 of 135 The filter button – ‘+’ – allows you to apply your own filtering criteria to files. To do this: Select ‘Open filter options’. You will see this screen (50). Screenshot 50 – View exceptions – filter options Select one or two options from the available drop downs. Select ‘Apply Filter’ to redisplay the Exception List screen with only those exceptions matching the selected criteria showing. Your filter criteria will be saved and will continue to be applied across user account sessions until they are either cleared using the ‘Clear Filter’ option, or amended. LRB User Guide v 3.7 January 2013 Uncontrolled if printed LRUG01 Page 63 of 135 4.5.3 Duplicate exceptions If an organisation submits the same learner details multiple times, and receives the same return code every time, these will be marked as duplicates, and only the most recent one matching the filter will be shown in the list. These are identified by the link “Process Duplicates” which will take you the Process Duplicates screen (51): Screenshot 51 - Process duplicate exceptions Selecting ‘Process all’ from this screen will resolve all the duplicates, whereas selecting ‘Process single’ will only resolve that exception. Note that this screen will show all duplicate exceptions across all files, no matter what filter settings were applied to the exceptions list. Therefore, the number here may be higher than the total number of duplicates displayed on the exceptions list page. LRB User Guide v 3.7 January 2013 Uncontrolled if printed LRUG01 Page 64 of 135 4.5.4 Return codes RC005 – RC011: what they mean Exceptions need to be resolved so that the learner’s ULN can be obtained or updated. This usually means checking that the learners’ details are correct. The different Return Codes relate issues with the data in your batch file and need further action to resolve. This is what the ‘Exceptions’ Return Codes mean and what action is required: Code ampersand Description RC005 No Match – No ULN Created Explanation and possible resolution Action Required Successfully verified The batch file was submitted in verification mode and has been verified. No action needs to be taken RC006 Insufficient Data to Create a ULN Failed to create a ULN one or more of the mandatory fields have not been supplied particularly Verification Type and/or Ability to Share not supplied. Check batch file. You may need to re-submit your batch file with the amended details. Failed to find/create a ULN – the LRS found up to 10 possible matches for the learner. RC007 Possible Match RC008 Too Many Matches RC009 No ULN Match RC010 Null values Failed to find/create a ULN - the LRS found more than 10 possible matches. Try refining your search – do you have any other details you can use. Refer to the tips in Section 5.1.3. The ULN supplied in your batch file has not been recognised. Check that the ULN you entered has 10 digits and that the Given Name, Family Name, Date of Birth, Gender and Postcode match this ULN. One or more of the mandatory fields is blank apart from Given Name or Family Name. Check the mandatory LRB User Guide v 3.7 January 2013 Uncontrolled if printed See Section 3.4.5 on how to process these exceptions. See Section 3.4.5 on how to process these exceptions. See Section 3.4.8 on how to process these exceptions. See Section 3.4.6 on how to process these exceptions. See Section 3.4.6 on how to process these exceptions. LRUG01 Page 65 of 135 RC011 Incorrect format fields. The learner record submitted in the batch file contains data which does not meet LRS formats. This could be: 1. Either the Family Name and/or Given Name are incomplete or contain an invalid name. 2. Prohibited text or postcode has been entered into any of the fields. 3. ULN already exists and file is attempting to update Verification Type being updated to 999 = Other and Verification Description field is blank. 4. Date of birth value means learner is less than 11 years old or more than 110 years old. 5. ULN already exists and Ability to Share is being set back to FPN Not Seen or when learner has previously set this field themselves (set their preference). 6. There is a double space in the Postcode field. See Section 3.4.6 on how to process these exceptions. Table 5 – Return codes RC005 to RC011 (exceptions) LRB User Guide v 3.7 January 2013 Uncontrolled if printed LRUG01 Page 66 of 135 4.5.5 Processing your exceptions – RC006, RC007 and RC008 LRB Batch submitted Find learner results screen Exact match Process RC008 Too many matches Process RC006 Insufficient data to create new ULN Process RC007 Possible match Find learner results screen No match Find learner results screen Possible match Select this learner Select and update learner Register new learner RC002 added to exceptions output file RC004 added to exceptions output file RC003 or RC001 added to exceptions output file LRB User Guide v 3.7 January 2013 Uncontrolled if printed Find learner results screen Too many matches Refine search and process exception again or update batch and resubmit LRUG01 Page 67 of 135 Select the ‘Process’ hyperlink on the far right column of the individual record (52). For duplicate exceptions, select the ‘Process all’ or ‘Process single’ hyperlink as appropriate. Screenshot 52 – View exceptions - Process an RC007 This is an exception because one or more possible match has been found. Refer back to Table 5 – Return codes RC005 to RC011 for guidance on what actions to take. Important - the details provided in your batch are used to populate both the ‘Provided details’ and the ‘Find by Personal Details’ areas of this screen. You will see this screen (53): LRB User Guide v 3.7 January 2013 Uncontrolled if printed LRUG01 Page 68 of 135 Check boxes Screenshot 53 – View exceptions - RC007 results The possible matches are listed and an option ‘+’ to expand one or more of the searched results to check that it is the record that matches with your entry. Note that (53) shows the search results for one possible match expanded to show the learner’s details. Once a check box is selected (53), the ‘Select this learner’ button is enabled, as shown in the screenshot below (54). If selected the exception will be deleted from the Exceptions List. At the same time, the ULN and learner’s associated details held in the LRS are added to the Exceptions batch output file. Please note this will appear in the new output file with a Return Code of RC001 or RC003. The same applies if the ‘Select and update learner’ button is selected. The only difference is that the LRS displays the ‘View learner profile’ screen which allows the learner’s details to be updated. Screenshot 54 – View exceptions – Select this learner and Select and update learner buttons LRB User Guide v 3.7 January 2013 Uncontrolled if printed LRUG01 Page 69 of 135 There are two other options within this display - ‘Return to exceptions list’ will return you to exception list. The option to ‘Register new learner’ will only be displayed, if no checkbox is selected. 4.5.6 Processing your exceptions – RC006 Select the ‘Process’ hyperlink on the far right column of the individual record (55). Screenshot 55 – View exceptions – Process RC006 Refer to Table 5 – Return codes RC005 to RC011 for guidance on what actions to take. Important - the details provided in your batch are used to populate both the ‘Provided details’ and the ‘Find by Personal Details’ areas of this screen. You have two possible options – ‘Cancel’ or ‘Register New Learner’ (56). Screenshot 56 – View exceptions – process RC006 results If the ‘Cancel’ option is selected, you return to View exceptions step 1. If the ‘Register this learner’ option is selected, the following screen is shown (57) to complete a new registration. LRB User Guide v 3.7 January 2013 Uncontrolled if printed LRUG01 Page 70 of 135 Screenshot 57 – View exceptions – Register a learner 4.5.7 Processing your exceptions – RC008 Select the ‘Process’ hyperlink on the far right column of the individual record (55). You will be presented with a screen with a message “Too many records match your search results”. You can either try searching again using the Find by personal details search or check to see if you have any further information you can add to your batch file and resubmit it. LRB User Guide v 3.7 January 2013 Uncontrolled if printed LRUG01 Page 71 of 135 4.5.8 Processing your exceptions – RC009, RC010 and RC011 LRB Batch submitted Process RC009 No ULN match Process RC011 Incorrect format ULN or no ULN submitted Process RC010 Null values No ULN submitted Find by personal details – amend details Find learner results screen Exact match No ULN Select this learner RC003 or RC001 added to exceptions output file Find learner results screen Too many matches Find learner results screen No match Find learner results screen Possible match Select and update learner Register new learner RC002 added to exceptions output file RC004 added to exceptions output file ULN Refine search and process exception again or update batch and resubmit Select the ‘Process’ hyperlink on the far right column of the individual record (52). You will see this screen (58) : LRB User Guide v 3.7 January 2013 Uncontrolled if printed LRUG01 Page 72 of 135 Screenshot 55 – View exceptions – Process an RC009, RC010 or RC011 These exceptions may have an issue because some of the details are wrong or missing. Refer to Table 5 – Return codes RC005 to RC011 for guidance on what actions to take. Important - the details provided in your batch are used to populate both the ‘Provided details’ and the ‘Find by Personal Details’ areas of this screen. If you are processing multiple duplicate exceptions, the MIS Identifier field will show a link to a pop-up window listing all of the MIS Identifiers for the duplicates that are being processed. This could be where the issue lies, though the personal details shown could all be fine. The problem could lie with fields it is not possible to update in this screen, in other words, Ability to Share so you may have to update your batch file and resubmit that record. Look at the ‘Find by Personal Details’ fields and enter any missing information or change anything that is incorrect. In the example in (57), there is no postcode, so the postcode should be entered. Select ‘Search’ (whether or not you have made any changes or added new information). The results screen that follows may show any of four possible results and what happens next will depend on which result is shown: 1. No matches 2. Too many possible matches 3. Exact match LRB User Guide v 3.7 January 2013 Uncontrolled if printed LRUG01 Page 73 of 135 4. Possible match 2. ‘No Matches’ . You have two possible options – ‘Cancel’ or ‘Register New Learner’. In this screenshot (59) updating the learner’s postcode has still not resulted in a match. The message is ‘The search has returned no results’. The only option is to ‘Continue’ and return to the exception list. Click the help – ‘What should I do now?’ for more information on possible next steps. This screen was processed after the amending the learner’s details in the Find a Learner screen (59), hence the ‘Amended’ line being displayed. Screenshot 56 – View exceptions – no match The ‘Register new learner’ button is not shown as a ULN has already been provided so the learner should already be registered. If there was no ULN, ‘Register new learner’ would be offered as an option next to the ‘Continue’ button. 3. ‘Too Many Possible Matches’ The LRS returns the message, ‘Your search returned more than the maximum number of learners permitted.’ (60) LRB User Guide v 3.7 January 2013 Uncontrolled if printed LRUG01 Page 74 of 135 Screenshot 60 – View exceptions – too many matches If available, use extra information you may have in your organisation’s database to distinguish the learner and try processing the exception again from screen (51) or update your batch and resubmit that record. 4. ‘Exact Match’ The LRS returns the message ‘Your search has returned an Exact Match. The LRS has selected this learner for you’ (61). LRB User Guide v 3.7 January 2013 Uncontrolled if printed LRUG01 Page 75 of 135 Screenshot 61 – View exceptions – exact match You will notice that when an Exact Match is returned, the LRS automatically ‘completes’ the check box, allowing you to proceed using ‘Continue’. Selecting ‘Continue’ returns the ‘View learner profile’ screen so you can update the record should you need to or view the learner’s Personal Learning Record. At the same time, the ULN and associate learner’s details are added to the Exceptions batch output file. Note, this will appear in the new output file as either a Return Code of ‘RC003: ULN Confirmed’ or ‘RC001: Linked master ULN returned’, depending on the match that has been made. For details on how to download the Exceptions batch output file. 5 ‘Possible Matches’ An example of the results, when possible matches are found, is shown below (62). This screen was processed after the amending the learner’s details in the Find a Learner screen (57), hence the ‘Amended’ line being displayed (62). LRB User Guide v 3.7 January 2013 Uncontrolled if printed LRUG01 Page 76 of 135 Check box Screenshot 62 – View exceptions – possible match The possible matches are listed and an option ‘+’ to expand one or more of the searched results to check that it is the record that matches with your entry. Note that (62) shows the search results for one possible match expanded to show the learner’s details. Once a check box is selected, the ‘Select this learner’ button is enabled, as shown in the screenshot below (63). If selected the exception will be deleted from the Exceptions List. At the same time, the ULN and learner’s associated details held in the LRS are added to the Exceptions batch output file. Please note this will appear in the new output file with a Return Code of RC001 or RC003. The same applies if the ‘Select and update learner’ button is selected. The only difference is that the LRS displays the ‘View learner profile’ screen which allows the learner’s details to be updated. Screenshot 57 – View exceptions – Select this learner and Select and update learner buttons There are two other options within this display - ‘Return to exceptions list’ will return LRB User Guide v 3.7 January 2013 Uncontrolled if printed LRUG01 Page 77 of 135 you to exception list. The option to ‘Register new learner’ will only be displayed, if no checkbox is selected and no ULN was provided in the Learner Registration Batch file. If a ULN was provided in the batch file for a learner, the ‘Register new learner’ button does not appear. If the ‘Register this learner’ option is selected, the following screen is shown to complete a new registration (64). Screenshot 58 – View exceptions – Register a learner Completing and/or updating the information, including the mandatory fields will allow the full registration of a new learner and will return a Unique Learner Number which is added to your exceptions output file LRB User Guide v 3.7 January 2013 Uncontrolled if printed LRUG01 Page 78 of 135 as an RC004 – No match new ULN created. 4.5.8.1 Completed processing exceptions – what next? Although exceptions are deleted automatically when any of the Select this learner, Select and update this learner or the Register new learner buttons are chosen, some management may still be required. From the Exception list or Process duplicate exceptions screen, simply select the check boxes of exceptions to be deleted and take the ‘Delete selected records’ button (65). Screenshot 59 – View exceptions – Delete selected records Once you have completed exception processing, the function to ‘Export my processed exceptions’ should be used to download a file to enable you to update your organisation’s database with your processed exceptions. For duplicate exceptions, this will contain one record for every duplicate. This can be found by returning to the View exceptions screen Select the ‘Export processed exceptions’ button which takes you to screenshot (66). Screenshot 60 – View exceptions – Export processed exceptions LRB User Guide v 3.7 January 2013 Uncontrolled if printed LRUG01 Page 79 of 135 Screenshot 61 – View exceptions – Downloading processed exceptions – output file Please select the same format you used to upload the file so the file can be loaded in your database. When you select a radio button the download button will be highlighted. 4.6 Report a ULN problem Part of the quality control processes and procedures for the LRS, allows you to Report a Problem (also known as a Data Challenge).It allows Learner Registration Bodies to identify a data issue with a learner’s ULN. A data issue could be one of the following: Enquiry Type ULN has been incorrectly created Identified Problem type • • Duplicate ULN, for example, a learner has been given a second ULN Fictitious or fraudulent ULN Information required to Report a Problem • Both ULNs that you suspect the learner has. • Which ULN is the master and which ULN is the duplicate • If data on the ULNs are significantly different then please give a reason for the merge request. E.G. if the ULNs have different post codes please confirm that the learner has lived at both addresses. ULN has been incorrectly merged • ULN has • ULN de-merge • Both ULNs that need to be de-merged. • The reason why they need de-merging. Two people sharing the LRB User Guide v 3.7 January 2013 Uncontrolled if printed • Please give as much LRUG01 Page 80 of 135 other unspecified • problem • • same ULN Deceased learner information as to what the issue is. ULN incorrect as details have changed (learner is therefore using another learner’s ULN) Other ULN problem Table 6 – Reporting ULN problems The data issue is then reported as a problem to the LRS Customer Helpdesk. Information sent should include what the data issue is and what the LRB believes the required corrective action is. Please ensure that you include as much information as you can when reporting a problem. If the LRS Customer Helpdesk does not have enough information they will need to get in contact with you for further information which will delay the issue being resolved. This is only for instances where the LRB cannot resolve the issue themselves and also includes issues raised by the learner. Instances where a data issue can be corrected directly by an LRB are: • Wrongly spelt/Incorrect Name • Wrong/Incorrect Address • Opting out settings • Date of Birth These can be changed using by updating the Learner’s details – see Section 3.2. 4.7 Report a ULN problem Select the Report a ULN Problem button (68). Note the help link – Why report a ULN problem? for more information. Screenshot 62 – Report a ULN problem Now select the type of enquiry, if it is a duplicate ULN for a learner then select “ULN has been incorrectly created” from the list of options (69). LRB User Guide v 3.7 January 2013 Uncontrolled if printed LRUG01 Page 81 of 135 Screenshot 63 – Report a ULN problem – problem type Use the text box to explain why you think it is a duplicate and you must also include the suspected duplicate ULN number (70). Screenshot 70 – Report a ULN problem – additional information Please ensure you complete your name and at least one of the other fields; email address and telephone number so that you can be contacted should any questions arise. The request will not submit unless at least two of these fields have been completed – an error message will appear. If you would like the enquiry to come back to another member of staff their details can be entered in here (71). Finally, select the ‘Finish’ button to submit your request (71). LRB User Guide v 3.7 January 2013 Uncontrolled if printed LRUG01 Page 82 of 135 Screenshot 71 – Report a ULN problem – contact information Make a note of enquiry reference number (72) should you wish to contact the LRS Customer Helpdesk. Screenshot 72 – Report a ULN problem – reference number 4.8 View data challenge history – report ULN or learning event problems A Learning Event is a qualification or achievement that appears on the learner’s PLR. A list of previously opened data challenges for a given learner can be viewed on the Organisation Portal. From the View learner profile screen, select the ‘View enquiries’ button. LRB User Guide v 3.7 January 2013 Uncontrolled if printed LRUG01 Page 83 of 135 Screenshot 73 – Report a problem history To view the details of any data challenge, click the ‘View Details’ (73) hyperlink. Screenshot 74 – Report a problem details If the data challenge has not been previously resolved or withdrawn, it can be withdrawn by clicking on the ‘Withdraw enquiry’ button (74). Select the ‘Return to enquiry list’ to go back to the first screen (74). LRB User Guide v 3.7 January 2013 Uncontrolled if printed LRUG01 Page 84 of 135 4.9 Key points from this section • • • • • • • • • This section is for all users with ability to create ULNs. The Unique Learner Number is unique number for each learner. Manage and keep ULN details up-to-date. Search thoroughly for a ULN before creating a new one. View learner profiles to check information is correct. Create and update ULNs using the batch file process. Check the validation rules for the batch file. Manage batch file exceptions and the action required to correct these. Report a ULN Data Challenge if a learner has a duplicate ULN; two people are sharing, and so on. LRB User Guide v 3.7 January 2013 Uncontrolled if printed LRUG01 Page 85 of 135 4. Personal Learning Record 4.1 Access the personal learning record The Personal Learning Record (PLR) is an electronic folder which details in one central place online all the awards, learning Achievements and qualifications of a learner. Only Learner Registration Body Online Users or View Only Users can access the PLR, if they are given the Learner Record role within the User Management facility and also the learner has agreed to share their PLR. This section has been created for Learner Registration Bodies to begin using the PLR within their organisations. It contains: 1. Information about the Privacy Notice and its relevance and implications to learners. 2. Instructions on how to view a learner’s PLR. 4.1.1 Information you can expect to find in the PLR Data for the PLR is obtained from three sources: • National Pupil Database (NPD) for Key Stage 4 and 5 qualifications. • Periodic Individualised Learner Record (ILR) returns to the Data Service, as long as a valid ULN and UKPRN are included within the ILR and they match the learner’s details. • Awarding Organisations are able to upload QCF qualifications and National Qualification Framework (NQF) qualifications regulated by Ofqual. Data from the NPD and ILR returns has been uploaded since summer 2008; therefore learners cannot expect to find data about learning achievements prior to this date included in their PLR. 4.1.2 Privacy notice – unable to share data The PLR allows learners to access their learning and training achievements online. In order to allow learners to access their PLR, providers must ensure that learners have read the Privacy Notice and if they have opted out of sharing that they are aware of the implications. A learner must be given the opportunity to opt out of sharing their data. This is usually provided on the registration form for a learning provider as part of the Privacy Notice. This provides a short summary of the way in which the learner’s data may be shared with different organisations. A learner can only opt out of sharing their qualification and participation data. They cannot opt out of sharing their Unique Learner Number. LRB User Guide v 3.7 January 2013 Uncontrolled if printed LRUG01 Page 86 of 135 When a learner registers with the Learning Records Service, as part of the process of opening their PLR, they then take control of the ‘ability to share’ flag and can switch this off. The effect of this would be to prevent a learning provider viewing any of the learner’s Learning Events* – and a message would subsequently be displayed: ‘No Learning Events to display’. Only the learner would be able to view their Learning Events. One of the consequences of not sharing learning data is that with the introduction of qualifications such as the 14-19 Diploma and the Qualifications Credit Framework (QCF) awards, learning data has to be shared with Awarding Organisations to accumulate and award the final qualification. It is important that a positive message is conveyed regarding sharing data and learners understand the consequences of opting out of sharing their information. Information regarding the benefits of the PLR is available on the LRS website. * A Learning Event is a qualification or achievement that appears on the learner’s PLR. LRB User Guide v 3.7 January 2013 Uncontrolled if printed LRUG01 Page 87 of 135 4.2 View a PLR This function is available following a ‘search’ for a learner. This includes the personal details search following the Learning Records Service batch process when resolving exceptions. To find a learner’s PLR you will need to carry out a search either by Unique Learner Number (ULN) or by personal details. This section shows the method for finding a Learner by ULN. Screenshot 64 – Find a learner by ULN • To find a learner’s PLR, first carry out a search for the learner. Select the ‘Learner Management’ tab and then ‘Find a learner’ (75). • Enter the learner's ULN, Given Name and Family Name (75). • Select the ‘Search’ button. If no exact match is found the Find Learner’s Results screen is displayed (76). LRB User Guide v 3.7 January 2013 Uncontrolled if printed LRUG01 Page 88 of 135 Screenshot 65 – Find learner results – no results If an exact match is found you are taken directly to the View learner profile screen (77). Screenshot 66 – View learner’s details LRB User Guide v 3.7 January 2013 Uncontrolled if printed LRUG01 Page 89 of 135 Select the View Personal Learning Record hyperlink to view the learner’s PLR (77). Screenshot 67 – View Personal Learning Record – All tab Each of the records display with up to eight fields of data (not all of the fields are populated) including (78): • Subject – displaying the title of each record (Hyperinks to View Qualification Detail) • Level – Level of the award from Entry Level – Level 8 (or could be blank). • Grade – Generally showing the grade of the award or ‘Pass’ or ‘blank’. • Credit – displaying the amount of Credit achieved for record. • Source – will be NPD, ILR or AO • Start Date – if applicable • End Date – if applicable • Award Date – Date of the Award or Achievement All of the above details are held in columns which can be sorted, using the down arrow, either in ascending (first select) or descending (second select) order. If several pages of records are available for the displayed learner, then all records are used within the sorting process and redisplayed. LRB User Guide v 3.7 January 2013 Uncontrolled if printed LRUG01 Page 90 of 135 The Credits and Units can be viewed by selecting the Credit and Units tab (79), showing the list of credits and units along with Level, Grade, Credit and Award Date. Once again all the columns can be sorted by selecting the down arrow on the header of each column name. Screenshot 68 – QCF credits and units All the subjects have a hyperlink (80) which can be selected to view more information on that particular subject or qualification: LRB User Guide v 3.7 January 2013 Uncontrolled if printed LRUG01 Page 91 of 135 Screenshot 69 – View Personal Learning Record – qualification details The source of the About this Qualification data is the Regulatory IT System (RITS). You can also see the Status of the qualification; Provisional or Final and whether or not the qualification is Under data challenge. Only NQF qualifications can have a Status of Provisional. All QCF qualifications are treated as Final. When Under data challenge. A View details hyperlink will become available which will redirect you to the View enquiries screen so you can see the current status. LRB User Guide v 3.7 January 2013 Uncontrolled if printed LRUG01 Page 92 of 135 4.3 Report a learning event problem You can report a problem (also known as Data Challenge) for any of the PLR Learning Events. Selecting the ‘Report a Problem’ button from the PLR display will present Step 1 within the process which will give a drop down box with a number of options: • Information on one of the qualifications is wrong (see 4.3.1) • One of the qualifications does not belong to this learner (see 4.3.2) • A qualification is missing (see 4.3.3) • One of the qualifications appear more than once (see 4.3.4) Screenshot 81 – Report a Learning Event problem – step 1 When you are reporting a problem, remember that the Learning Events available are those after summer 2008. Even data after this date may be missing as it may not have been possible to uniquely match the learner with their qualification data from the data sources used to populate the record. Once you have selected an option from the drop down box, select Next. Each of the options will now be detailed over the next few pages. LRB User Guide v 3.7 January 2013 Uncontrolled if printed LRUG01 Page 93 of 135 4.3.1 Information on one of the qualifications is wrong If one of the qualifications listed within the PLR does not have the correct details, then in Step 1, select ‘Information on one of the qualifications is wrong’ from the drop down list. This could be used if the learning event appears in the PLR but the details are incorrect. Select Next to display the following screen. Screenshot 82 – Report a Learning Event problem – qualification wrong - step 2 You are requested to choose the qualification that you are reporting by selecting the appropriate radio button in the ‘Select’ column and then select ‘Next’ to proceed to the next stage of the process (82). Note that there may also a separate ‘Next’ button for further pages of qualifications. LRB User Guide v 3.7 January 2013 Uncontrolled if printed LRUG01 Page 94 of 135 Screenshot 83 – Report a Learning Event problem – qualification wrong – step 3 The details of the chosen qualification appear in a form allowing you to edit the fields, so that correct information can be entered, for that learning event. Changes should only be made if they do not match Awarding Organisation certificates. Enter the changes and then select ‘Next’ (83). LRB User Guide v 3.7 January 2013 Uncontrolled if printed LRUG01 Page 95 of 135 More details should be entered to help provide more information to help resolve the issue with the qualification details. Screenshot 70 – Report a Learning Event problem – qualification wrong – step 4 You must provide a valid name (your name rather than the name of the learner that you are entering the problem for), valid email address and/or valid telephone number in order to progress. Name and at least one other field must be completed. Note if you would like the enquiry to come back to another member of staff, their details can be entered in here. Select ‘Finish’ (84). Once your enquiry has been successfully submitted, you will see an enquiry reference number (85); make a note of this number in case you need to contact the LRS Customer Helpdesk. LRB User Guide v 3.7 January 2013 Uncontrolled if printed LRUG01 Page 96 of 135 Screenshot 85 – Report a Learning Event problem – qualification wrong – successfully submitted Select ‘Continue’ to return to Report a Problem step 1 (85). LRB User Guide v 3.7 January 2013 Uncontrolled if printed LRUG01 Page 97 of 135 4.3.2 A learning event does not belong to the learner If one of the qualifications listed within the PLR does not belong to the learner, select ‘One of the Qualifications does not belong to this learner’ from the drop down list. The following screen is displayed (86): Screenshot 86 – Report a Learning Event Problem – qualification not learners – step 2 You are requested to choose the qualification that you are reporting by selecting the appropriate radio button in the ‘Select’ column and then select ‘Next to proceed to the next stage of the process (86). Note that there may also a separate ‘Next’ button for further pages of qualifications. LRB User Guide v 3.7 January 2013 Uncontrolled if printed LRUG01 Page 98 of 135 The record that is being challenged as not belonging to the learner is displayed. This gives the opportunity to check the details and cancel or go to the previous screen. Screenshot 87 – Report a Learning Event Problem – qualification not learners – step 3 Once the details have been verified, select the ‘Next’ button (88). Screenshot 71 – Report a Learning Event Problem – qualification not learners – step 4 You must provide a valid name (your name rather than the name of the learner that you are entering the problem for), valid email address and/or valid LRB User Guide v 3.7 January 2013 Uncontrolled if printed LRUG01 Page 99 of 135 telephone number in order to progress. At least two fields need to be completed. Note If you would like the enquiry to come back to another member of staff their details can be entered in here (88). Select the ‘Finish’ button to complete the process and receive your reference number - make a note of this number in case you need to contact the LRS Customer Helpdesk (88). Screenshot 88 – Report a Learning Event Problem – qualification not learners – successfully submitted 15. Select ‘Continue’ to return to Report a Problem, Step 1 (89). LRB User Guide v 3.7 January 2013 Uncontrolled if printed LRUG01 Page 100 of 135 4.3.3 A missing learning event If one of the qualifications is missing, select ‘A Qualification is missing’ from the drop down list. A similar screen to the one shown below will be displayed. Screenshot 90 – Report a Learning Event Problem – missing event – step 2 Two fields are mandatory – the Provider and the Aim Title (88). Other information that would be useful, if appropriate, are Name of the Awarding Body, Type, Qualification Reference, Start and End Dates, Achieved Grade, Achieved Date and Credit Value. Note Remember events will only be shown since summer 2008. After entering as much additional information as possible, select ‘Next’ (90). LRB User Guide v 3.7 January 2013 Uncontrolled if printed LRUG01 Page 101 of 135 Screenshot 91 – Report a Learning Event Problem – missing event – step 3 You must provide a valid name (your name rather than the name of the learner that you are entering the problem for), valid email address and/or valid telephone number in order to progress (91). At least two fields need to be completed. Note If you would like the enquiry to come back to another member of staff their details can be entered in here. Select ‘Finish’. Once your enquiry has been successfully submitted you will see an enquiry reference number (91), make a note of this number in case you need to contact the helpdesk or you are raising a number of problems. Screenshot 92 – Report a Learning Event Problem – missing event – successfully submitted Select ‘Continue’ to return to Report a Problem step 1 (92). LRB User Guide v 3.7 January 2013 Uncontrolled if printed LRUG01 Page 102 of 135 4.3.4 A Duplicate learning event If one of the qualifications is duplicated, select ‘One of the qualifications appears more than once’. A similar screen to the one shown below will be displayed. Screenshot 92 – Report a Learning Event Problem – duplicate event – step 2 Select the two qualifications which you wish to report (two events need to be selected, in order to proceed to the next stage of the procedure) (92). There are some circumstances where the same qualification has been provided by two different sources and it may not be possible to delete one of these events at this time. Select ‘Next’ (92). LRB User Guide v 3.7 January 2013 Uncontrolled if printed LRUG01 Page 103 of 135 Screenshot 93 – Report a Learning Event Problem – duplicate event – step 3 The rest of the process is similar to the incorrect Learning Event. Any additional information is useful: especially the establishment where the learner was studying for the qualification and the data feed the event had been loaded from (94). You must provide a valid name (your name rather than the name of the learner that you are entering the problem for), valid email address and/or valid telephone number in order to progress (93). At least two fields need to be completed. Note If you would like the enquiry to come back to another member of staff their details can be entered in here. Select the ‘Finish’ button to complete the process and receive your reference number - make a note of this number in case you need to contact the LRS Customer Helpdesk (93). LRB User Guide v 3.7 January 2013 Uncontrolled if printed LRUG01 Page 104 of 135 Screenshot 94 – Report a Learning Event Problem – duplicate event – successfully submitted Select Continue to return to Report a Problem step 1 (94). To view the enquiries raised, please refer to Section 3.7 View Data Challenge history – Report ULN or Learning Event problems. LRB User Guide v 3.7 January 2013 Uncontrolled if printed LRUG01 Page 105 of 135 4.4 Create a report A report can be created for one or more records from the Personal Learning Record. This is accessed via the Create a Report tab on the PLR screen (95). Screenshot 72 – Create a report (PLR) Selecting this option will give a display with all the qualifications and events listed in date order. There are check boxes on the left hand side of each record - initially all are ticked ready for reporting. If there are any of the records that you do not wish to see in the report, simply untick the relevant check boxes (95). The report will be displayed in PDF format – if you need to download a viewer for a PDF, select the hyperlink to ‘Download Adobe Acrobat Reader to view your report’ and follow the instructions on the screen (95). When this is completed, simply select ‘View my Report’ (95). The following screen is displayed: LRB User Guide v 3.7 January 2013 Uncontrolled if printed LRUG01 Page 106 of 135 Screenshot 96 – Create a report (PLR) – select qualifications The report can be saved for future use or opened immediately by selecting open from the file download window. Selecting ‘Open’ will present the report in PDF form, giving a read only version of the report. From here you can save and / or print the report as required (96). Below is an example report (97). Screenshot 97 – View report (PLR) - PDF 4.5 Audit information on viewing a PLR An audit record of who has viewed a learner’s PLR is held within the LRS and can be accessed by contacting LRS Customer Helpdesk. This information will only be made available to the learner themselves, in line with guidance from the Information Commissioners Office (ICO). For a learner to request this information they must be able to: LRB User Guide v 3.7 January 2013 Uncontrolled if printed LRUG01 Page 107 of 135 • Provide their ULN, Family Name and Given Name (exactly as entered in the LRS), or • If the learner has logged onto the Learner Portal provide their ULN and be able to provide the answer to their secret question. (This will have been created when they first logged onto the Learner Portal) If the learner cannot provide this information the LRS Customer Helpdesk will not be authorised to disclose the information. 4.6 Key points from this section • • • • • • This section is for Learner Registration Bodies only. The Personal Learning Record holds learners’ awards, learning achievements and qualifications. Data for the PLR is obtained from the National Pupil Database (NPD), Periodic Individualised Learner Record (ILR), QCF qualifications and National Qualification Framework (NQF) qualifications. Learners must read the Privacy Notice and can choose to opt-out of sharing their data. A Learning Event Problem is where information on one of the qualifications is wrong, qualification does not belong to a learner, a qualification is missing or a qualification appears more than once. Create a report of a learner’s qualifications and events. LRB User Guide v 3.7 January 2013 Uncontrolled if printed LRUG01 Page 108 of 135 5. Find a QCF qualification The Welcome screen, presents a form for the Find a QCF Qualification function, available to a Learner Registration Body (LRB) Online User and LRB View Only User. This feature allows you to browse QCF Qualifications and to select Units which will make up a qualification. The Qualifications and Credit Framework is a new way of recognising achievement through the award of credit for the achievement of units and qualifications. This function is designed to give quick and easy access to Qualifications within the QCF and to give LRS Users the opportunity to search and produce suitable combinations. There are two versions of the Find a QCF Qualification – a search that links to a learner’s achieved units and a generic search that does not use any information within a learner’s PLR. The Find a QCF Qualification can be developed into Rules of Combination enquiries. The Rules of Combination refer to regulatory rules around how QCF qualifications must be designed. These rules, in combination with the design of the qualification, determine what credits a learner must achieve to be considered to award for a qualification. LRB User Guide v 3.7 January 2013 Uncontrolled if printed LRUG01 Page 109 of 135 5.1 Find a QCF qualification – generic (anonymous) This part of the guide concentrates on the generic option and is suitable for a one on one discussion or for group sessions when carrying out careers advice. Screenshot 98 – Find QCF qualification – quick search (welcome page) The search allows you to enter a number of fields to help pinpoint relevant qualifications (98). If the LRS finds more than 100 records, an error message is displayed and the search is re-displayed to allow you to refine the search criteria. LRB User Guide v 3.7 January 2013 Uncontrolled if printed LRUG01 Page 110 of 135 Screenshot 99 – Find a QCF qualification search Initially there are five search fields plus a number of country ‘check boxes’, unless you selects ‘More Search Options’ or the query returns the screen with the warning shown above. ‘More Search options’ would be used if you knew the Reference code of the qualification (99). The search fields include: Keyword Search – performs an exact match on the data entered with information within the title of the qualification. If more than one word is entered, then these words must appear exactly in the order as entered on the screen. Reference Code – the reference code is in the form ‘999/9999/9’, must be entered with the slashes and needs to match exactly with a code held within the LRS. Level – All qualifications have a level between Entry Level and level 8. The level is chosen from options within a drop down box. Size – volume of learning. There are three types of qualification size: o Awards (1 to 12 credits) o Certificates (13 to 36 credits) o Diplomas (37 credits or more) Sector Subject Area – again the valid options come from a drop down selection list and are used to find qualifications within sectors which correspond to relevant subjects. Offered In – the country codes regulated by Ofqual are listed and they are England, Wales and Northern Ireland. More than one can be selected using the appropriate check boxes. To proceed you must select and enter, one of ‘Keyword’, ‘Reference Code’ or ‘Subject Sector Area’; entering more than one field narrows down the search. Select Search. LRB User Guide v 3.7 January 2013 Uncontrolled if printed LRUG01 Page 111 of 135 The search results screen shows all of the matching qualifications. Each of the qualifications displays with a Reference Number, the Qualification Title, the Level of the Qualification and the Total Credits required to achieve the qualification. You can sort the results by selecting on the column title, once for ascending order, with a second select giving descending order. There may be a number of pages of information and you can select ‘View All’ from the ‘Show’ dropdown box to display all selections found or choose a page number or ‘Next’ to move to the following page of information. Selecting Export to PDF will generate a PDF report detailing the search results and search criteria. This may be viewed, downloaded or printed. The PDF report will be compatible with the PDF file format (Adobe Acrobat Reader v5.0 and above). You will notice that the Viewing learner details, ULN and Date of birth are all blank throughout this function as this is a generic search – it makes no reference to any learner record information. Screenshot 100 – Find a QCF qualification – successful search LRB User Guide v 3.7 January 2013 Uncontrolled if printed LRUG01 Page 112 of 135 Each of the qualification titles appear as a hyperlink (100). Choosing this link will open a further screen with more details on the qualification section showing the qualification’s structure. Select one of the hyperlinks in the Qualification Title column to open the Find a QCF Qualification results screen to view available qualification options. In this example, take the qualification at the foot of the page. The next screen is displayed with two separate sections (101). The first part of the screen displays more information ‘About this Qualification’. This first section displays information from the selection process and further associated details including the name of the owning organisation, the Level of the qualification, Sector Subject Area, Grading Structure, Total Credits, Minimum Credits at Level and Minimum Guided Learning Hours. This information can be hidden by selecting the toggle, ‘-‘, and expanded by selecting ‘+’. Screenshot 101 – Find a QCF qualification - credits The lower part of the screen displays the structure of the qualification (102). It shows the grouping of the units and also group, which can also LRB User Guide v 3.7 January 2013 Uncontrolled if printed LRUG01 Page 113 of 135 be compound groups. The qualification information has a header and a footer called the Qualification Credits line, which is initially dark grey and changes to green when the Rules of Combination are calculated and equal to or greater than the Minimum Credits and Minimum Credits at Level. Each Group can have minimum credit, maximum credit, minimum components and maximum components. The minimum credits and minimum components for each group are displayed on the screen. The maximum constraints (limits to overachievement) are also used when calculating the levels of credit. You have the choice to either open up a single group or all the displayed groups. Selecting ‘+’, shown alongside a group will open display all the details of that group, whereas selecting ‘Expand all’ will expand all groups within the qualification. The Total Credit and Credit at Level that must be met are shown in the header line and are the aggregate of the various credits that are selected using the check boxes, displayed between the level and the amount of credit for that unit. The ‘Minimum Credit at Level’ must also be achieved – credits for units may be awarded at different levels. This value is the amount of the total credit that must be at this level of the qualification or above. (At a minimum this will be 51% of the total credit but may be more). Screenshot 102 – Find a QCF qualification - calculate Selecting ‘Default to View’ will return the display to the default view and has the opposite effect of ‘Expand All’. Some qualifications can have many group and units. For qualifications that may be displayed over several screens, the ‘back to top’ option can be selected to return to the first screen. Selecting LRB User Guide v 3.7 January 2013 Uncontrolled if printed LRUG01 Page 114 of 135 Export to PDF will export the results to a PDF file that will reflect the state of the screen as it was when it was last calculated. Screen changes after the last calculation are not reflected in the report. More information can be retrieved from the Ofqual portal on the Units displayed, including the Learning Outcome and Assessment Criteria of the units. Select a hyperlinked ‘Unit Code’ (highlighted by a red circle) (101) will open up a link to the Ofqual record. Screenshot 103 – Find a QCF qualification – Ofqual link to reference number Returning to the expanded qualification credit screen, select the relevant unit check boxes. Some of the units may be required (highlighted by a red circle) (102) to achieve qualification for that unit while others are optional. Once you have selected your options, select ‘Calculate’ (highlighted by a red circle) (102). The calculate button will recompute the credits at the various points in the structure of the qualification. You can go back into the group structure to select more options. LRB User Guide v 3.7 January 2013 Uncontrolled if printed LRUG01 Page 115 of 135 Screenshot 104 – Find a QCF qualification – successful outcome The Rules of Combination can cause a huge calculation process to ensure that all combinations are evaluated, especially where the learner has over achieved by having more credits than are required. When this happens the calculation has to choose which of the learners credits best meets the constraints of the group / qualification. Occasionally it may indicate that the qualifications criteria have not been met when in fact there is a successful outcome. The calculation can never indicate that the constraints have been met when they have not. There is a hyperlink to access more help by choosing ‘The calculation is not working as expected’. The option ‘Back to List’ will return you to the list of selected qualifications. LRB User Guide v 3.7 January 2013 Uncontrolled if printed LRUG01 Page 116 of 135 5.2 Find a QCF qualification – learner’s PLR details This is the Find a QCF Qualification for users with access to the PLR and displaying details of learners who have agreed to share their PLR. Entry to this option is available from within the PLR by selecting the ‘Find a QCF Qualification’ hyperlink. You will notice from the screen below (105), that the learner’s name, ULN and Date of Birth are displayed at the top of the page and any Qualifications and Units are displayed on the right hand side of the page. Screenshot 105 – Find a QCF qualification – search using learner units The process is very similar to the generic version, but this time any of the qualifications can be selected and used within the search, for a suitable qualification(s). The search will only select qualifications that include ‘checked’ unit or qualification and the entered values in Keyword, Reference Code, Level, Size, Sector Subject Area and Country (Offered in). As per the generic version you may Export to PDF, which will generate a PDF report detailing the search results and search criteria. This may be viewed, LRB User Guide v 3.7 January 2013 Uncontrolled if printed LRUG01 Page 117 of 135 downloaded or printed. The PDF report will be compatible with the PDF file format (Adobe Acrobat Reader v5.0 and above) In this example, we have entered the word search ‘Teach’ as a keyword and selected the unit ‘Preparing to Teach in the Lifelong Learning Sector’. Several qualifications are found, as shown in the screen below. Screenshot 106 – Find a QCF qualification – results of learner unit search All of the above have the selected unit, from the learner’s PLR in the qualification and the word ‘Teach’ within the title. From this screen, we select the hyperlink for the qualification with reference number 500/3982/9 and the screen below is displayed. LRB User Guide v 3.7 January 2013 Uncontrolled if printed LRUG01 Page 118 of 135 Screenshot 107 – Find a QCF qualification – learner credits Note that in Group 1 (Mandatory Units) the Minimum Credits achieved are initially totalling 6 out of 18. (This is a reflection of the credits for the unit that the learner has already achieved). The Qualification Credits line does not include credits until a whole group is achieved. We have the option to expand each group, one at a time, or to ‘Expand all’. Expand all reveals units as in the screen shown below. LRB User Guide v 3.7 January 2013 Uncontrolled if printed LRUG01 Page 119 of 135 LRB User Guide v 3.7 January 2013 Screenshot 73 – Find a QCF Uncontrolled if printed qualification – Learner’s achievements LRUG01 Page 120 of 135 Note again, how the Unit that was selected from the record is shown as achieved and the check box is already ‘greyed out’ and selected. Screenshot 108 – Find a QCF qualification – Learner achieved unit All the other units are available for selection, whether optional or required. LRB User Guide v 3.7 January 2013 Uncontrolled if printed LRUG01 Page 121 of 135 Screenshot 109 – Find a QCF qualification – learner – expanded groups LRB User Guide v 3.7 January 2013 Uncontrolled if printed LRUG01 Page 122 of 135 From the expanded screen, we check appropriate units to select, carefully analysing the totals required, for credits and level (if needed) for each group. After choosing the options, the ‘Calculate’ button is selected. Screenshot 110 – Find a QCF qualification – learner – successful outcome The above shows a successful outcome for the Rules of Combination, displaying in green and ‘ticks’ (110) at the Total Credits and Minimum Credits at Level on the Qualification Credits line plus showing similar successes for each Group included in the calculation. This completes a Find a QCF Qualification and Rules of Combination for a learner. LRB User Guide v 3.7 January 2013 Uncontrolled if printed LRUG01 Page 123 of 135 5.3 Key points from this section • • • • Users can search for and browse the Qualifications and Credit Framework (QCF) units awarded to learners. The generic ‘Find a QCF qualification’ option does not use learners’ PLR data The ‘Find a QCF qualification – learner’s PLR details’ will display users with PLR access and those who have agreed to share their PLR information. The Rules of Combination (RoC) query refers to regulatory rules for how QCF qualifications are designed. These rules determine the credits a learner must achieve to attain for a qualification. LRB User Guide v 3.7 January 2013 Uncontrolled if printed LRUG01 Page 124 of 135 Appendix A – Create/update learner fields Field Title Given Name Preferred Given Name Middle Other Name Family Name Previous Family Name Family Name at 16 Gender Entry type Free Text Free Text Free Text Date of Birth Place of Birth Nationality Last Known Address 1 Last Known Address 2 Last Known Town Last Known County/City Last Known Postcode Date of Address Capture Email Address Date field: Free Text Drop down Free Text Verification Type * Tier 1 verification Drop down Other Verification Description School at Age 16 Free Text LRB User Guide v 3.7 January 2013 Uncontrolled if printed Format/drop down choice Free Text Free Text Free Text Free Text Drop down Female Male Not Known Not Specified Drop down Please see Appendix B Free Text Free Text Free Text Free Text Date field Drop down Free Text Bank/Credit/Debit Card* Certificate of Entitlement to Funding* Driving Licence* ID Card or other form of National ID* National Insurance Card* None provided Other Passport* Relationship with School Free Text LRUG01 Page 125 of 135 Scottish Candidate Number Ability to Share LRB User Guide v 3.7 January 2013 Uncontrolled if printed Free Text Drop down FPN not seen FPN Seen and able to share data FPN Seen and unable to share data LRUG01 Page 126 of 135 Appendix B – Nationality codes (for learner detail fields) Codes 00 000 000 AF AFG 004 AX ALA 248 AL ALB 008 DZ DZA 012 AS ASM 016 AD AND 020 AO AGO 024 AI AIA 660 AQ ATA 010 AG ATG 028 AR ARG 032 AM ARM 051 AW ABW 533 AU AUS 036 AT AUT 040 AZ AZE 031 BS BHS 044 BH BHR 048 BD BGD 050 BB BRB 052 BY BLR 112 BE BEL 056 BZ BLZ 084 BJ BEN 204 BM BMU 060 BT BTN 064 BO BOL 068 BA BIH 070 BW BWA 072 BV BVT 074 BR BRA 076 BQ ATB ??? IO IOT 092 BN BRN 096 BG BGR 100 BF BFA 854 BU BUR 104 BI BDI 108 BY BYS 112 KH KHM 116 CM CMR 120 CA CAN 124 LRB User Guide v 3.7 January 2013 Uncontrolled if printed Country Not known Afghanistan Aland Islands Albania Algeria American Samoa Andorra Angola Anguilla Antarctica Antigua and Barbuda Argentina Armenia Aruba Australia Austria Azerbaijan Bahamas Bahrain Bangladesh Barbados Belarus Belgium Belize Benin Bermuda Bhutan Bolivia Bosnia and Herzegovina Botswana Bouvet Island Brazil British Antarctic Territory British Indian Ocean Territory Brunei Bulgaria Burkina Faso Burma Burundi Byelorussian SSR Cambodia Cameroon Canada LRUG01 Page 127 of 135 Codes CT CTE 128 CV CPV 132 KY CYM 136 CF CAF 140 TD TCD 148 CL CHL 152 CN CHN 156 CX CXR 162 CC CCK 166 CO COL 170 KM COM 174 CG COG 178 CD COD 180 CK COK 184 CR CRI 188 HR HRV 191 CU CUB 192 CY CYP 196 CZ CZE 203 CS CSK 200 DY DHY 204 YD YMD 720 DK DNK 208 DJ DJI 262 DM DMA 212 DO DOM 214 NQ ATN 216 TP TMP 626 EC ECU 218 EG EGY 818 SV SLV 222 GQ GNQ 226 ER ERI 232 EE EST 233 ET ETH 231 ET ETH 230 FK FLK 238 FO FRO 234 DE DEU 280 FJ FJI 242 FI FIN 246 FI FIN 246 FR FRA 250 GF GUF 254 PF PYF 258 TF ATF 260 LRB User Guide v 3.7 January 2013 Uncontrolled if printed Country Canton and Enderbury Islands Cape Verde Cayman Islands Central African Republic Chad Chile China Christmas Island Cocos (Keeling) Islands Colombia Comoros Congo Congo, Democratic Republic Cook Islands Costa Rica Croatia Cuba Cyprus Czech Republic Czechoslovakia Dahomey Democratic Yemen Denmark Djibouti Dominica Dominican Republic Dronning Maud Land East Timor Ecuador Egypt El Salvador Equatorial Guinea Eritrea Estonia Ethiopia Ethiopia Falkland Islands Faroe Islands Federal Republic of Germany Fiji Finland Finland France French Guiana French Polynesia French Southern Territories LRUG01 Page 128 of 135 Codes AI AFI 262 GA GAB 266 GM GMB 270 GE GEO 268 DD DDR 278 DE DEU 276 GH GHA 288 GI GIB 292 GE GEL ??? GE GEL 296 GR GRC 300 GL GRL 304 GD GRD 308 GP GLP 312 GU GUM 316 GT GTM 320 GG GGY 831 GN GIN 324 GW GNB 624 GY GUY 328 HT HTI 332 HM HMD 334 VA VAT 336 HN HND 340 HK HKG 344 HU HUN 348 IS ISL 352 IN IND 356 ID IDN 360 IR IRN 364 IQ IRQ 368 IE IRL 372 IM IMN 833 IL ISR 376 IT ITA 380 CI CIV 384 JM JAM 388 JP JPN 392 JE JEY 832 JT JTN 396 JO JOR 400 KH KHM 116 KZ KAZ 398 KE KEN 404 KI KIR 296 KP PRK 408 LRB User Guide v 3.7 January 2013 Uncontrolled if printed Country French Territory of Afars and Issas Gabon Gambia, The Georgia German Democratic Republic Germany Ghana Gibraltar Gilbert and Ellice Islands Gilbert Islands Greece Greenland Grenada Guadeloupe Guam Guatemala Guernsey Guinea Guinea-Bissau Guyana Haiti Heard Island and McDonald Islands Holy See Honduras Hong Kong Hungary Iceland India Indonesia Iran Iraq Ireland Isle of Man Israel Italy Ivory Coast Jamaica Japan Jersey Johnston Atoll Jordan Kampuchea Kazakhstan Kenya Kiribati Korea, North LRUG01 Page 129 of 135 Codes KR KOR 410 KW KWT 414 KG KGZ 417 LA LAO 418 LV LVA 428 LB LBN 422 LS LSO 426 LR LBR 430 LY LBY 434 LI LIE 438 LT LTU 440 LU LUX 442 MO MAC 446 MK MKD 807 MG MDG 450 MW MWI 454 MY MYS 458 MV MDV 462 ML MLI 466 MT MLT 470 MH MHL 584 MQ MTQ 474 MR MRT 478 MU MUS 480 YT MYT 175 MX MEX 484 FM FSM 583 MI MID 488 MD MDA 498 MC MCO 492 MN MNG 496 ME MNE 499 MS MSR 500 MA MAR 504 MZ MOZ 508 MM MMR 104 NA NAM 516 NR NRU 520 NP NPL 524 NL NLD 528 AN ANT 530 AN ANT 532 NC NCL 540 NH NHB 548 NZ NZL 554 NI NIC 558 LRB User Guide v 3.7 January 2013 Uncontrolled if printed Country Korea, South Kuwait Kyrgyzstan Laos Latvia Lebanon Lesotho Liberia Libya Liechtenstein Lithuania Luxembourg Macao Macedonia Madagascar Malawi Malaysia Maldives Mali Malta Marshall Islands Martinique Mauritania Mauritius Mayotte Mexico Micronesia Midway Islands Moldova Monaco Mongolia Montenegro Montserrat Morocco Mozambique Myanmar Namibia Nauru Nepal Netherlands Netherlands Antilles Netherlands Antilles New Caledonia New Hebrides New Zealand Nicaragua LRUG01 Page 130 of 135 Codes NE NER 562 NG NGA 566 NU NIU 570 NF NFK 574 MP MNP 580 NO NOR 578 OM OMN 512 PK PAK 586 PW PLW 585 PS PSE 275 PA PAN 591 PZ PCZ ??? PG PNG 598 PY PRY 600 PE PER 604 PH PHL 608 PN PCN 612 PL POL 616 PT PRT 620 PR PRI 630 QA QAT 634 RE REU 638 RO ROU 642 RU RUS 643 RW RWA 646 SH SHN 654 KN KNA 659 KN KNA 658 LC LCA 662 PM SPM 666 VC VCT 670 WS WSM 882 SM SMR 674 ST STP 678 SA SAU 682 SN SEN 686 RS SRB 688 CS SCG 891 SC SYC 690 SL SLE 694 SK SKM ??? SG SGP 702 SK SVK 703 SI SVN 705 SB SLB 090 SO SOM 706 LRB User Guide v 3.7 January 2013 Uncontrolled if printed Country Niger Nigeria Niue Norfolk Island Northern Mariana Islands Norway Oman Pakistan Palau Palestine Panama Panama Canal Zone Papua New Guinea Paraguay Peru Philippines Pitcairn Poland Portugal Puerto Rico Qatar Reunion Romania Russia Rwanda Saint Helena Saint Kitts and Nevis Saint Kitts-Nevis-Anguilla Saint Lucia Saint Pierre and Miquelon Saint Vincent and the Grenadines Samoa San Marino Sao Tome and Principe Saudi Arabia Senegal Serbia Serbia and Montenegro Seychelles Sierra Leone Sikkim Singapore Slovakia Slovenia Solomon Islands Somalia LRUG01 Page 131 of 135 Codes ZA ZAF 710 GS SGS 239 VD VDR ??? RH RHO '716 ES ESP 724 EH ESH 732 LK LKA 144 SD SDN 736 SR SUR 740 SJ SJM 744 SZ SWZ 748 SE SWE 752 CH CHE 756 SY SYR 760 TW TWN 158 TJ TJK 762 TZ TZA 834 TH THA 764 TL TLS 626 TG TGO 768 TK TKL 772 TO TON 776 TT TTO 780 PC PCI 582 TN TUN 788 TR TUR 792 TM TKM 795 TC TCA 796 TV TUV 798 UG UGA 800 UA UKR 804 UA UKR 804 SU SUN 810 AE ARE 784 GB GBR 826 US USA 840 UM UMI 581 PU PUS 849 HV HVO 854 UY URY 858 UZ UZB 860 VU VUT 548 VA VAT 336 VE VEN 862 VN VNM 704 VG VGB 092 LRB User Guide v 3.7 January 2013 Uncontrolled if printed Country South Africa South Georgia South Vietnam Southern Rhodesia Spain Spanish Sahara Sri Lanka Sudan Suriname Svalbard and Jan Mayen Swaziland Sweden Switzerland Syria Taiwan Tajikistan Tanzania Thailand Timor-Leste Togo Tokelau Tonga Trinidad and Tobago Trust Territory of the Pacific Islands Tunisia Turkey Turkmenistan Turks and Caicos Islands Tuvalu Uganda Ukraine Ukrainian SSR Union of Soviet Socialist Republics United Arab Emirates United Kingdom United States United States Minor Outlying Islands United States Miscellaneous Pacific Islands Upper Volta Uruguay Uzbekistan Vanuatu Vatican City State Venezuela Vietnam Virgin Islands, British LRUG01 Page 132 of 135 Codes VI VIR 850 WK WAK 872 WF WLF 876 EH ESH 732 YE YEM 887 YE YEM 886 YU YUG 891 ZR ZAR 180 ZM ZMB 894 ZW ZWE 716 LRB User Guide v 3.7 January 2013 Uncontrolled if printed Country Virgin Islands, U.S. Wake Island Wallis and Futuna Western Sahara Yemen Yemen Yugoslavia Zaire Zambia Zimbabwe LRUG01 Page 133 of 135 Appendix C – Glossary Abbreviation Term / Explanation AO Awarding Organisation CRB Check Criminal Records Bureau Check CSV / XML File formats – Comma Separated Values or Extensible Markup Language Family Name The surname or family name of the learner FPN Fair Processing Notice – summary of way data may be shared Given Name The forename or the name that the learner is usually known by ICO Information Commissioners Office ILR Individualised Learner Record LAD Learning Aims Database LR Learner Register LRB/s Learner Registration Body/bodies LRS Learning Records Service (previously MIAP) MIAP Managing Information Across Partners MIS Management Information System NPD National Pupil Database NQF National Qualifications Framework Ofqual Office of Qualifications and Examinations Regulation PLR Personal Learning Record QCF Qualification and Credit Framework RoC Rules of Combination RtA Routes to Achievement Super User Responsible for Managing Users in an Organisation UKPRN UK Provider Reference Number UKRLP UK Register of Learning Providers ULN Unique Learner Number LRB User Guide v 3.7 January 2013 Uncontrolled if printed LRUG01 Page 134 of 135 LRB User Guide v 3.7 January 2013 Uncontrolled if printed LRUG01 Page 135 of 135