1
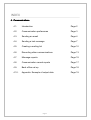
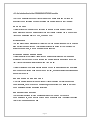
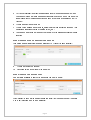
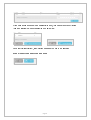
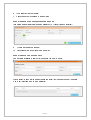
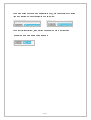
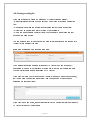
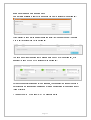
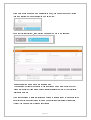
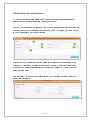
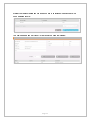
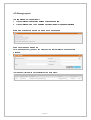
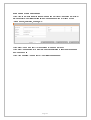
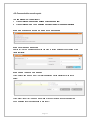
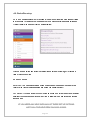
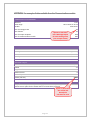
USER GUIDE (4)
COMMUNICATIONS
LAST REVISION 13.3.15
INDEX
4. Communications
4.1.
Introduction
Page 2
4.2.
Communication preferences
Page 3
4.3.
Sending an email
Page 4
4.4.
Sending a text message
Page 7
4.5.
Creating a mailing list
Page 10
4.6.
Recording other communications
Page 13
4.7.
Message reports
Page 15
4.8.
Communication record reports
Page 17
4.9.
Back office set up
Page 18
4.10.
Appendix: Example of output data
Page 19
Page 1
4.1. An introduction to the COMMUNICATIONS module
The ‘Communication’ section of Tracker gives you multiple tools and methods for
effectively communicating with and recording communications with your tenants:
EMAIL OR TEXT
Tracker allows you to easily communicate with tenants through email or text and
automatically puts a communication record in their profile. Allowing you to monitor and
track communications sent by whom, when and what.
MAILING LISTS
You can also create mailing lists in Tracker so that communications sent out by post can
also be recorded and tracked. This function includes the ability for you to upload the
actual document sent, to add to effective record keeping.
MANAGING TENANT PREFERENCES
Tracker easily lets you respect tenant’s communication preferences: if a tenant has
expressed that they do not wish to receive communications via a specific method (e.g.
text) Tracker will automatically exclude them from the list.
Tracker will also automatically exclude tenants with no email addresses from email lists
and those without valid mobile numbers from text list, so only deliverable addresses and
numbers are kept in.
RECORD OTHER COMMUNICATIONS
Other communications performed outside of Tracker can also be recorded such as
Questionnaires, Face to Face communications, phone calls etc. by filling in the ‘other
communications’ section and listing recipients.
REPORTING AND ANALYSIS
The reporting functions in this module easily allow you to see who you have
communicated with, when and via which method. It can also show the delivery success
rate for text messages and emails.
Page 2
4.2. Communication preferences
Within the 'Profiles' tab, you have the facilities to record a tenant's communication
preferences which Tracker will then use to manage any survey or communication with
that tenant:
The two panels of tick boxes cover:
•
Preferences linked to emails, text messages and mailings managed through the
Communications module.
•
Preferences linked to surveys managed through the Feedback module.
In each case there are standard options programmed in so that if, for instance, 'no phone
surveys' is ticked then this resident is automatically blocked by TP Tracker from being
included in any telephone survey call lists.
The landlord can add other options but these will only appear for information only in
searches and reports, they will not be 'programmed' into any specific TP Tracker
functions.
Page 3
4.3. Sending an email
Sending an email message from TP Tracker means you can easily create your mailing
list and TP Tracker will automatically:
•
Block inclusion of anyone who has said they do not wish to receive a email from you;
•
Create a communication record for each recipient;
•
Create a summary report of who it went to and the message outcomes (delivered,
wrong address, etc.) ;
•
Hold a copy of the actual message sent.
TP Tracker will take you through the four-step process:
Step1: Write the actual message;
Step 2: Prepare the Communication Record to be created for each recipient;
Step 3: Create the list of people to be sent the message;
Step 4: Send the message.
STEP 1. WRITE THE MESSAGE
1.
TP Tracker automatically creates a unique reference for each message;
2.
You can add a text description to the end of the 'Message ref.' if you wish by typing in
a brief description;
3.
Select one of the greeting options or leave as 'None';
4.
Select a second part to the greeting or leave as 'None' - be careful to avoid ending up
with a greeting like 'Dear J.';
Page 4
5.
TP Tracker will insert a default email address in here (if one has been set up) and
you can edit this so that each message will appear to have come from you and if the
tenant clicks 'reply' the response will come back to your normal email inbox (not TP
Tracker);
6.
Type in a subject as per normal;
7.
Type in your message as per normal, using the formatting toolbar as required - this
can include inserting pictures or pasting in text, etc.;
8.
You can add an attachment (one only per email) by browsing and uploading the file
required.
STEP 2: PREPARE THE COMMUNICATION RECORD
This will be automatically created automatically by TP Tracker for each recipient:
9.
Type in any notes you require;
10.
Click blue button to continue to the next step.
STEP 3: CREATE THE MAILING LIST
Use the filters available to search for the people you want to email:
Click 'Display' to show all the search results in a table; tick the ones you want then click
'Add to list to include them in the mailing list.
Page 5
If you have added someone to the mailing list in error, they can be removed by ticking
them and clicking the 'Remove selected from list' button:
Once your list is all correct, click 'Preview message' to move to the final step.
STEP 4: CHECK AND SEND
SEND THE MESSAGE
Page 6
4.4. Sending a text message
Sending a text message from TP Tracker means you can easily create your mailing list
and TP Tracker will automatically:
•
Block inclusion of anyone who has said they do not wish to receive a text message;
•
Create a communication record for each recipient;
•
Create a summary report of who it went to and the message outcomes (delivered,
wrong number, etc.);
•
Hold a copy of the actual message sent.
TP Tracker will take you through the four-step process:
Step1:
Write the actual message;
Step 2: Prepare the Communication Record to be created for each recipient;
Step 3: Create the list of people to be sent the message;
Step 4: Send the message.
STEP 1. WRITE THE MESSAGE
1.
TP Tracker automatically creates a unique reference for each message;
2.
You can add a text description to the end of the 'Message ref.' if you wish by typing in
a brief description;
3.
Enter a telephone number to which you want replies directed;
4.
Select one of the greeting options or leave as 'None';
5.
Select a second part to the greeting or leave as 'None' - be careful to avoid ending up
with a greeting like 'Dear J.';
Page 7
6.
Type in any notes you require;
7.
Click blue button to continue to the next step.
STEP 2: PREPARE THE COMMUNICATION
COMMUNICATION RECORD
This will be automatically created automatically by TP Tracker for each recipient:
9.
Type in any notes you require;
10.
Click blue button to continue to the next step.
STEP 3: CREATE THE MAILING LIST
Use the filters available to search for the people you want to email:
Text
Click 'Display' to show all the search results in a table; tick the ones you want then click
'Add to list to include them in the mailing list.
Page 8
If you have added someone to the mailing list in error, they can be deleted by ticking
them and clicking the 'Remove selected from list' button:
Once your list is all correct, click 'Preview message' to move to the final step.
STEP 4: CHECK AND SEND THE MESSAGE
Page 9
4.5. Creating
Creating a mailing list
If you use this facility to create a mailing list TP Tracker will automatically:
(a) Block inclusion of anyone who has said they do not wish to receive a mailing from
you;
(b) Substitute the details of a nominated 'Alternative contact' where appropriate;
(c) Create a Communication Record for each of the recipients;
(d) Give you an Excel file in whatever format you require for mail-merging into your
document template off-line.
You can upload a copy of the document template for storage linked to the records in TP
Tracker for this mailing if you wish.
STEP ONE: PREPARE THE MAILING RECORD
The mailing will be given a unique reference by TP Tracker; you can add a short
description to the end of the reference by typing some text into the 'Description' field.
All the other fields are automatically filled by TP Tracker.
If you wish to store a copy of the document template (not each mail-merged document,
just the template you use for mail-merging) then you can do so by browsing and
uploading the file in any format.
If you wish to add any notes, these will appear in the Communication records created in
TP Tracker for each of the recipients.
Page 10
STEP TWO: CREATE THE MAILING LIST
Use the filters available to search for the people you want to include in the mailing list;
Click 'Display' to show all the search results in a table; tick the ones you want then click
'Add to list’ to include them in the mailing list.
You have the option of sending your mailing to each PERSON in the mailing list, or of
sending it to each HOUSEHOLD included in the mailing list:
For each household represented in the mailing list, you can select the range of people to
be included in the consolidated 'mailing name': all the people living at the address or only
those of certain:
1. Tenancy type(s)
2.Age band(s) or 3. Household status.
Page 11
If you have added someone to the mailing list in error, they can be removed by ticking
them and clicking the 'Remove selected from list' button:
Once your list is all correct, click 'Preview message' to move to the final step:
STEP THREE: DOWNLOAD YOUR MAILING LIST
You can select whichever Excel format you require and mail-merge the list with your
document template off-line using the functionality available in 'Word' or your preferred
alternative software.
The Excel download (mailing list) includes a column to indicate is any of the people listed
have ‘Large Print Required’ ticked in their ‘Communication preferences’ profile within
Tracker; you can use this to respond accordingly.
Page 12
4.6. Recording other communications
TP Tracker will automatically create Communication Records' of all messages sent
through the Communications Module by email, text or post.
However, if you have sent a message by some other means, such as via your own email
account, and you wish to manually create a record of it in TP Tracker, you would do this
in Communications>Other communications.
Prepare your Communication Record by filling in the fields above: a description of the
message (1); the type of message (2); an outcome code (3) where the options will be
depend on the 'type' previously selected; who sent the message (4); when (5) and any
notes you wish to add.
You then select the people to be included in the Communication Record by using the
search filters available:
Page 13
Display your search results and tick those who are to be included then click 'Save the
communication record':
You will then see a summary report of the record you have just created:
Page 14
4.7. Message reports
You can access two types of report:
1.
A report relating to a specific message which has been sent
2.
A report relating to the Communication Records created for message recipients
STEP ONE: SELECT THE TYPE OF REPORT YOU REQUIRE
STEP TWO: SELECT MESSAGE
For a 'Message Report', use any combination of the filters available to find a specific
message:
The results of your search will be displayed in a table below:
Page 15
STEP THREE: OPEN THE REPORT
Click 'View' in the table of search results to see a summary report and below that a list of
all the people in the original mailing list and the message outcome for each of them
(wrong number, delivered, opened, etc.).
Click 'Export Summary Report' for a download of the summary report.
Click 'Export message log' for a list of all the activities relating to sending this message
and their outcomes.
Click 'View message' to see a copy of the original message sent.
Page 16
4.8. Communication
Communication record reports
You can access two types of report:
1.
A report relating to a specific message which has been sent
2.
A report relating to the Communication Records created for message recipients
STEP ONE: SELECT THE TYPE OF REPORT YOU REQUIRE
STEP TWO: SELECT RECORDS
Search for the Communication Records you wish to review using any combination of the
filters available:
STEP THREE: CREATE
CREATE THE REPORT
Click 'Search' and a summary of the records selected will be displayed in the table
below:
Click 'Export report' for the summary details or 'Export records' to download all of the
communication records contributing to this report.
Page 17
4.9. Back office set up
Go to ‘Communications>Set up’ or access to the set up options for a wide range of fields
in this module. This allows you to manage your own dropdown lists and field options so
Tracker reflects the needs of your own organisation:
Click on a menu option and follow the instruction on screen to create, edit or delete a
field or dropdown option.
GENERAL RULES
DELETING: You can only delete an option while it has not been used; once there is a
record in the Tracker database using this option you cannot delete it.
ARCHIVING: Tick an ‘Archive’ tick-box to hide an option from further use without actually
deleting it; options can be unticked at any time to reinstate them and reveal the records
linked to them.
IF YOU NEED ANY HELP WITH ANY OF THESE SET UP OPTIONS
OPTIONS
JUST CALL THE HELP DESK ON 01603 813932.
Page 18
APPENDIX: An example
example of data available from the Communications module
COMMUNICATION SUMMARY
Method
Text
Date range
01.10.14 to 31.12.14
Sender
John Smith
No. of messages sent
28
No. of dates
Option to drill down
into a Message Report
for each message sent
(see example below)
No. of unique recipients
No. of communication records
26
358
435
MESSAGE REPORT
Method
Text
Description
Invite to Tenants Open Day
Date
17.10.14
Sent by
John Smith
Outcome analysis
Delivered
3,254
Failed
17
Illegal number
12
Network error
0
Blocked by user
0
TOTAL (Call list)
3,283
Message details
I hope we’ll see you on Friday at the Happy Homes tenants open day; 11.00 at the Jubilee
Hall to see our plans for the estate and let us know what you think.
Option to download
the call list and
identify the
outcome for each
Page 19
Page 20
Page 21
Page 22
Arena Partnership Ltd
Rowan House
Queens Road
Hethersett
NR9 3DB
T: 01603 813932
W: www.arenapartnership.co.uk
E: [email protected]
Page 23