1
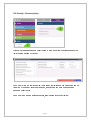
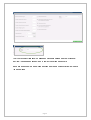
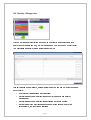
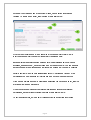
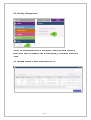
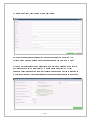
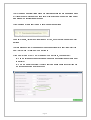
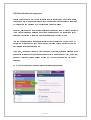
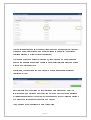
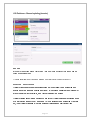
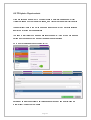
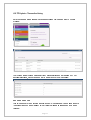
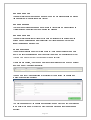
USER GUIDE (7)
SITE ADMINISTRATION
LAST REVISION 16.3.15
INDEX
6. Site administration
6.1.
Introduction
Page 2
6.2.
Security – Password policy
Page 3
6.3.
Security – Manage roles
Page5
6.4.
Security – Manage users
Page7
6.5.
Database – Personal reference sequences
Page 10
6.6.
Database – Manual updating (tenants)
Page12
6.7.
Database – Manual updating (households)
Page15
6.8.
TP Update – Report contacts
Page16
6.9.
TP Update – Transaction history
Page17
Page 1
6.1. An introduction to the Admin functions
There are a number of over-riding controls which landlords can manage to determine
how their Tracker site is configured and used.
In each module is a ‘Set up’ section for managing dropdown lists and other field options.
In the ‘Admin’ section are controls for managing:
SECURITY
•
Manage the format of passwords which can be created for user-access controls;
•
Create the password renewal/reset policy for all users;
•
Determine where users can go, what they can see and what they can do in Tracker;
•
Set up individual users linked to the access packages above;
DATABASE
•
Control the automatic generation of ‘Personal references’ for non-residents who are
added manually into Tracker;
•
Respond to ‘Query reports’ generated by the automatic ‘TP Update’ process which
keeps designated fields in your Tracker database synchronised to your main housing
management database;
•
Manually update other people or households fields in your Tracker database, via ad
hoc file uploads as required;
•
Access automated files of data exported back out of Tracker using the ‘Reverse
upload’ process for you to update your own database(s).
Page 2
6.2. Security – Password policy
Click on the ‘Manage password policy’ option to view the current controls on passwords
that are being applied by Tracker:
If you want to turn the controls so that there are no restrictions on how passwords can be
formatted or when they should be renewed, then click the red ‘Turn off security and
password policy’ button.
If you want to amend the existing controls, click the blue ‘Edit policy’ button:
Page 3
The ‘Admin contact’ field links to messages which users will see if they get blocked at
any time: the message will direct them to contact the person named here.
Make any amendments to the settings and click the green ‘Update policy’ button to save
the new settings.
Page 4
6.3. Security – Manage roles
Click on the ‘Manage roles’ option to access the controls for creating ‘Roles’ which
determine where users can go, what they can see and what they can do within Tracker.
You will initially see a list of all the ‘Roles’ already set up:
This list includes some standard, default ‘Roles’ which you can use but which you cannot
edit or delete:
•
‘Administrator’ gives access to all functions;
•
‘Level 3’ gives access to all functions except for password and security
management;
•
‘Level 2’ gives access to all functions excluding any admin options;
•
‘Level 1’ gives ‘view only’ access and does not allow access to any of the
personal data, just reports and analyses.
Page 5
Roles that you create and name in addition to these, can be edited or deleted as
required. To create a new ‘Role’, click the blue ‘Create role’ button:
Give your new ‘Role’ a name (4) and leave the ‘Who can use this? Field (5) set to
‘Everyone can use this’ (the other options are for Arena’s use only).
Because there are several hundred options within the ‘permissions list’ (what can be
accessed, seen and done), we have broken them up into sections (6) : you can then skip
any sections that are not required and just look at the options that you want to consider.
Select a section (6) and the permissions listed below (7) will change. Tick any of the
permissions you want to enable for this role and then move on to another section.
If you make a mistake and want to clear all the selections you have made so far, click the
grey ‘Reset’ button and start again.
When you have been through all the relevant sections and ticked all the relevant
permissions, save this role by clicking the green ‘Create role’ button (8).
To edit an existing role, go to the list of roles and click the appropriate ‘Edit’ option.
Page 6
6.4. Security – Manage users
Click on the ‘Manage users’ option (9) to access the controls for creating new users,
amending the security or access settings for existing users, or removing an ex-user from
the list.
You will initially see a list of all the ‘Users’ already set up:
Page 7
To create a new user, click the blue ‘Create user’ button:
Enter the required personal details of the new user and select the ‘Role’ from the
dropdown list which best defines the access arrangements you want them to have.
Give them an initial password and passphrase: note that these will need to comply with
any rules you have set up (see ‘Security – Manage password policy’ p.3). If your
password policy forces users to reset their passwords as soon as they log in following an
‘Admin reset’ (as here) then this initial password and passphrase will only be used once:
Page 8
The ‘Group’ and ‘Landlord’ fields will be pre-populated unless you are managing a group
of Tracker sites. In this case you will be able to restrict access to one of the sites only or
give access to multiple sites as required.
Click the green ‘Create user’ button to save the user and settings.
In the list of users, there are options for each to View, Edit or Delete the user and their
settings.
There is also an option to ‘Reset password and passphrase’ for a user: click this if you
want to force them to reset next time they log in.
If you want to force EVERYONE to reset next time they log in, you can either:
(a) Use the screen above and click ‘Reset password and passphrase’ for each user
in the list; or
(b) Go to the master controls at ‘Admin>Security>Manage password policy’ and tick
the ‘Expire passwords today’ check box.
Page 9
6.5. Personal reference sequences
People who are in both the Tracker database and the landlord’s own master database,
will have the same ‘Personal reference’ in both databases: these are always generated
by the landlord and originate from the landlord’s master database.
However, users can add other people (usually service customers or other non-residents)
to the Tracker database. Because they are not originating from the landlord’s master
database Tracker has to generate a ‘Personal reference’ for each of them.
You can manually enter ‘Personal references’ but there is always a risk that you may
duplicate a reference if you have not carried out thorough checks to discover what the
next sequential reference should be.
If you wish, you can set Tracker to create these automatically, keeping a standard format
and adding references in correct sequential order for a given ‘Tenancy type’, only if that
‘Tenancy type’ is not being managed through the TP Update process from the master
database.
Go to ‘Admin>Database>Tenants>Personal reference sequences’:
Page 10
The first screen will show a list of ‘Tenancy types’ and in the ‘Sequence format’ column it
will identify those that are linked to the master database by saying that the Personal
reference allocated to a record will be “As uploaded”.
If a Tenancy type shows a blank in this column, it is not linked to the master database
and you can manually add anything you like in the personal reference field when adding
a record with this Tenancy type.
Alternatively, you can click ‘Edit’ to get Tracker to automatically generate personal
references for you:
Each reference must comprise a two-letter prefix and a six-digit number. Enter two
letters you want as a prefix and the six-digit number from which you wish the sequence
of references generated by Tracker to start (numbering from ‘000001’ will avoid problems
with Excel when sorting numbers exported from Tracker).
Click the green ‘Update sequence’ to save your settings.
Page 11
6.6. Database – Manual updating (tenants)
BROWSE
Browse for the upload file on your system: this must be in Excel.csv format and use the
column headers agreed.
[The file template is not yet live on screen – contact the Help Desk for a copy].
FILE TYPE - FULL UPLOAD
Tracker will expect all the agreed upload columns to be present in the upload file and
exactly as per the standard wording and format. If the column headers are not present or
are worded/formatted incorrectly, then Tracker will reject the upload.
Tracker will also expect all the people who are in your Tracker database (excluding those
with a ‘protected tenancy type’ – see page 14) to be included in the upload file. If any are
not, then Tracker will assume they are no longer residents and will ‘Archive’ them.
Page 12
FILE TYPE - PARTIAL
PARTIAL UPLOAD
Use this facility to update part of your database: e.g. to amend the phone numbers for
say 20 people without changing anything else for those people or anything at all for
anyone else in the database.
Tracker will only update the fields and records (people) in the Tracker database that are
included in your partial upload file:
•
Tracker will NOT amend any fields that are not included in the upload file;
•
Tracker will ONLY amend the fields that are included in the file for the people
who are included in the upload file, not for anyone else;
•
Tracker will NOT archive any people who are not included in the upload file,
unless you expressly instruct it do so by ticking the ‘Archive missing records’
check box (see below).
LANDLORD COLUMN HEADER
If you are uploading data for a ‘Group’ of Tracker sites (several landlord sites linked
together with a common database) then you will need to identify the column header in
the upload file which will tell Tracker to which site each row of data needs to be linked.
APPLY
APPLY DATA REMOVAL
Unless you tick this check-box, Tracker will not overwrite data in Tracker if a ‘Blank’
exists in the relevant field in the upload file.
If you do tick this check-box, Tracker will replace data in Tracker with a ‘Blank’ from the
upload file, but only for those records (people) included in the upload file, not for anyone
else.
You can use this feature to delete incorrect data in Tracker.
ARCHIVE MISSING RECORDS
Unless you tick this check-box, Tracker will not archive any records that are missing from
the upload file.
If you do tick this check-box, Tracker will archive any record that it does not find in the
upload file (as defined by their personal reference), unless the ‘Tenancy type’ of the
record in Tracker is defined as ‘Protected’.
Page 13
PROTECTED TENANCY TYPES
A ‘Protected’ tenancy type (e.g. ‘Non-resident’) means that it is not covered by the
TP Update process and is manually created and managed within Tracker.
UPLOAD
Click the green ‘Upload tenant data file’ button to process the upload.
Page 14
6.7. Database
Database – Manual updating (households)
(households)
[Not yet live – contact the Help Desk if you need this function]
Page 15
6.8. TP Update – Report contacts
If you are using the automated TP Update process to maintain the alignment of your
Tracker database with your master database, then Tracker may generate ‘Alert’ emails.
These will report back to you on the outcomes of each update. They may also include a
link for you to review any queries raised.
You need to tell Tracker who these emails should be sent to: that may be more than one
person and you can add or amend their emails through this screen.
Go to ‘Admin>Database>Report contacts’ (15):
Delete any emails you no longer want included and/or add any new emails: click the
‘Create report contact’ button to save.
Page 16
6.9. TP Update – Transaction history
Here you can see all the files that have been uploaded via the automated TP Update
process:
The ‘Upload status’ column will identify if any uploads failed and the reasons why. For
successful uploads, click ‘View summary’ to see a report of what happened:
RECORDS CREATED
This is the number of new records (people) added to the database: i.e. someone found in
the upload file who was not already in the Tracker database so is assumed to be a new
resident.
Page 17
RECORDS UPDATED
These are records where a change was made to one or more fields because the upload
file was different to the existing data in Tracker.
RECORDS SKIPPED
There were no differences between the data held in Tracker and the data uploaded so
Tracker skipped these records without making any changes.
RECORDS ARCHIVED
These are records existing in Tracker which were not included in the upload (and the
upload was not designated as a ‘partial upload’) so Tracker assumed they were no
longer residents and archived them.
QUERIED AND HELD
These records included one or more field where (a) there was a difference in the data
and (b) the field is designated as ‘Query and hold’ rather than ‘Automatically over-write’.
[Call the Help Desk if you want to change any of these settings].
If there are any queries, the ‘View summary’ link will be replaced with a ‘Check & upload’
link to the right of the upload file details:
The summary report will then include a further link for you to review the queries and
‘Select which queries to upload’:
You will then see each of the queries and can select those which you wish to be included
in the update (tick these) or which you wish the update process to ignore (leave these
unticked).
Page 18
Use this box to
Tick/Untick all
the boxes in the
list below.
When you have ticked those queries you want to be included in the upload process, click
the purple ‘Include selected in upload’ button.
If you wish the update process to ignore all the queries, click the grey ‘Ignore all and go
back to upload screen’ button.
You will then be returned to the summary report screen:
Click the green ‘Complete data upload’ button to complete the update process.
Page 19
Page 20
Page 21
Page 22
Arena Partnership Ltd
Rowan House
Queens Road
Hethersett
NR9 3DB
T: 01603 813932
W: www.arenapartnership.co.uk
E: [email protected]
Page 23