1
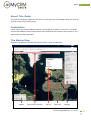
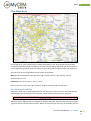
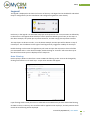
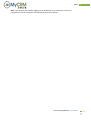
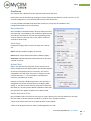
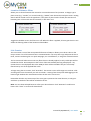
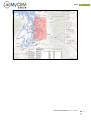
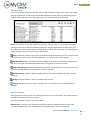
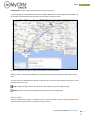
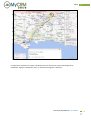
USER GUIDE
GET TRIAL
eMap
BUY NOW
Created by MyCRM Ltd
eMap
User Guide
Jason Cook
1/17/2014
VIEW
ONLINE
eMap
About This Guide
This guide is intended for CRM users who wish to understand how to use eMap and get the most out
of its advanced location filtering tools.
Installation
Please refer to the separate eMap Installation and Configuration guide for instructions. This guide
assumes that eMap has been installed with at least the default data, and that some entities in your
CRM system have been geocoded.
The Master Map
By default, the eMap master map will appear in Sales -> Maps in CRM 2013:
Created by MyCRM Ltd | User Guide
2
eMap
The Map Area
On the map area, each record (entity) in CRM is displayed as a pin. Only entities that have been
successfully geocoded and are included in the map’s dataset will be displayed. See the Installation
and Configuration guide for more information on geocoding and configuring maps and map layers.
The map area can be navigated with either mouse or keyboard:
Mouse: Click and drag with either the left or right mouse buttons to pan around. Use the
mousewheel to zoom.
Keyboard: Cursor keys to pan, + and – to zoom.
Hover the mouse cursor over a pin to display a pop-up with details about that entity.
Pin limits and visibility
eMap has a fixed limit of 1000 displayed pins in the map area. If there are more than 1000 entities
located within the boundaries of the map area, a Data Visibility warning will be displayed:
When more than 1000 entities are available for display, eMap will attempt to distribute pins to give
a general overview of the location of data. When you zoom and pan the map, the available pins will
Created by MyCRM Ltd | User Guide
3
eMap
be recalculated. Zooming in or using the filtering tools will reduce the number of entities that need
to be displayed, and when that number is 1000 or less, the Data Visibility warning will disappear.
If the Data Visibility warning is not visible, then all of the available entities are being displayed.
If the Data Visibility warning is displayed, but you need to get an at-a-glance view of all of the
available entities, you may click the “Temporarily show all data” link to reveal all pins. This may take
some time to draw all pins if there are many thousands of entities available for display. The next
time the map area is panned or zoomed, the limiter will be re-activated.
The Pop-Up
The pop-up appears when the mouse is hovered over any of the displayed entity pins:
The pop-up shows the entity’s icon and title, any fields that have been configured for display (see
the Installation and Configuration guide), and a number of buttons to perform extra functions.
Clicking on the pop-up title will open up the entity record in CRM.
The following options may be available, depending on map configuration and the type of entity:
Add to Route: Adds the entity’s location to the route planner as a waypoint. See Route Planner
for details.
New Activity: Create a new activity against this entity (an activity type selection window will
appear).
Add to Marketing List: Add this entity to a Marketing List. Only available for Account, Contact
and Lead entities.
Assign: Assign this entity to another user or team.
The pop-up can be closed by either clicking the “X” close button, or by left-clicking on the entity’s
pin.
Created by MyCRM Ltd | User Guide
4
eMap
Legend
The legend is displayed in the lower-left corner of the map. The legend can be disabled for individual
maps in configuration (see the Installation and Configuration guide for more details).
Each entry in the legend is an individual map layer and represents one or more entities as defined by
its data source. The legend shows which pin colour represents which type of entity on the map. In
the above example, the yellow pins represent Accounts, and the orange pins represent Contacts.
The map layers are drawn in order, so in the above example, Account pins will be drawn on top of
Contact pins. The checkboxes on the right of each legend entry toggle the visibility for that layer.
Double-clicking on the name of a legend entry will zoom and pan the map area to show all of the
pins associated with it. In the above example, double-clicking on “Account” will zoom the map so
that all of the Account pins are displayed in the map area.
Data Filtering
Each map layer obtains its data from a view in CRM. The filtering on this view can be changed by
clicking on the filter icon for each layer. A Layer Filter window will appear:
Layer filtering works exactly the same as Advanced Find in CRM. Once you have altered the filtering,
click OK to return to the map. The new filter will be applied to the map layer, and only entities which
match the new filtering will be displayed.
Created by MyCRM Ltd | User Guide
5
eMap
Note: Layer filtering and visibility toggling can be disabled on a per-map basis via the map
configuration. See the Installation and Configuration guide for details.
Created by MyCRM Ltd | User Guide
6
eMap
Features
The Features bar is displayed on the right-hand side of the map area:
Each feature can be minimised by clicking on its title. Note that map features can be turned on or off
via map configuration, so not all maps will have the same feature set.
It is also possible to disable the features bar entirely for a map. See the Installation and
Configuration guide for more information.
Map Selection
Only available on the Master Map, this drop-down lists all of
the maps that are available to view. Selecting a different map
from the list will switch to the new map. Depending on the
amount of data on the new map, it may take a number of
seconds to switch maps.
View Type
Change the imagery that is used in the map area. Choices
are:
Aerial: Overlays satellite imagery on the map.
Road: Shows a clean Road view without satellite imagery.
Automatic: Switches between Road and Aerial as the map is
zoomed in and out.
Quick Filter
Type in the text box to quickly filter by the contents of an
entity’s display field. The display field is the field that appears
at the top of the pop-up box for each entity. This can be
configured in the map layer setup, but is usually set to the
name of the entity – i.e. Account Name, Full Name (for
Contacts), and Name (for Leads).
Example: if the map is displaying Accounts, and the layer is
configured to show the Account Name as its display field,
typing “a” into the text box will only show pins for Accounts
that have an A in their Account Name somewhere. Note that
the typed text can appear anywhere in the display field.
Entity Distance Filter
Only available if there is more than one layer on a map. Allows you to show all entities on one layer
that are within a certain distance of entities on another layer. Example scenarios:
“Show me all Petrol Stations that are with 10 miles of Fuel Depots”
“Show me all Engineers that are within travelling distance of a Job”
Created by MyCRM Ltd | User Guide
7
eMap
Click “Apply” to apply the filtering rule, and “Clear” to stop filtering. Once applied, all entities on the
first layer that are not within the filtering radius of an entity on the second layer will be hidden.
Created by MyCRM Ltd | User Guide
8
eMap
Location Distance Filter
Allows you to show all entities that are within a certain distance of any location. To begin, type a
place name (e.g. “London”) or a Postal code (e.g. “90210”) into the text box and press return. A Bing
Search will be carried out on the typed text. If the place or postal code is found, the text box will
become green. If the search was unsuccessful, it will return red:
Successful search
Unsuccessful search
Toggle the checkbox to turn the filter on or off. When the filter is applied, all entity pins that are not
within the filtering radius of the location will be hidden.
List Creator
The List Creator is one of the most powerful features of eMap. It allows you to draw a box on the
map to return a list of all entities that are contained within. You may then copy and paste the list to
Excel, create a marketing list or a quick campaign, run a workflow on, or assign the selected entities.
The list creator will take into account any filters that are already applied, so only visible pins will be
included in the list. One exception to that rule is if the Data Visibility warning is displayed – any
entities that are not displayed due to the 1000 pin limit will be included if they are not already
filtered out by one of the applied filter tools.
To begin using the List Creator, click “Draw box”. The mouse cursor will change to a crosshair. Click
and drag a box over the entities you wish to include – starting from the top left and dragging to the
bottom right. Release the mouse button when the box is the correct size.
Remember that the very bottom tip of the entity pins represents the actual location, so only pins
with their tip inside the box will be included in the list.
Note: You can draw multiple boxes to refine your data selection. Click “Draw Box” to add more
boxes. Click “Clear” to remove all drawn boxes.
Created by MyCRM Ltd | User Guide
9
eMap
Created by MyCRM Ltd | User Guide
10
eMap
The List Grid
Once a box has been drawn around data, the List Grid will appear at the bottom of the map. eMap
will then request each of the entities from CRM, and display results in the grid. Depending on the
number of pins selected, it may take a few minutes for all of the data to be returned.
Note that each layer on the map is given its own tab in the grid view, so you can draw boxes that
contain a mixture of entities from different map layers and get separate lists for each entity type.
The number of entities returned/total is displayed in the tab for each map layer. The following grid
toolbar functions operate on the currently selected tab:
Copy: Copies the content of the grid to the clipboard (Internet Explorer only). The results can be
pasted directly into Excel for further manipulation, or to create a CSV for data imports.
Run Workflow: Opens a workflow selection dialog that contains any On Demand workflows for
the tab’s entity type. The selected workflow will be run against all entities in the list.
Add to Marketing List: Opens a Marketing List selection dialog and adds all of the entities in the
list to the selected Marketing List. (Account, Contact, Lead only)
Quick Campaign: Creates a Quick Campaign for all of the entities in the list. (Account, Contact,
Lead only)
Assign: Assign all entities in the list to another user or team.
Refresh: Refreshes all of the data for all map layers. Use refresh if the map data filters have
changed.
Route Planner
The route planner allows you to plan a driving route with up to ten waypoints. A waypoint can be a
manually-entered location or an entity pin.
You can start to plan a route in one of two ways:
Manual entry: Type the name of a place or a postal code into the Route Planner text box. See
“Location Distance Filter” for information on searching for a place name or postal code.
Created by MyCRM Ltd | User Guide
11
eMap
Add to Route: Click the Add to Route icon on an entity’s pop-up.
Further waypoints can be added by the same method. When two or more waypoints are added, the
route will be calculated and the map will pan and zoom to show the route.
To clear a waypoint, click the “x” next to the location name to remove it.
When a route is successful calculated, the route itinerary window will appear at the bottom of the
map.
You can click on an individual instruction on the itinerary to zoom to that location on the map. There
are also two tools to use:
Copy: Copies the plain-text of the itinerary to the clipboard. (Internet Explorer only)
Email: Creates a new email in CRM with the itinerary in the message body.
Route Filter
Click the “Show entities within:” checkbox to turn on the route filter. This will show any entities that
are within the selected radius of any point along the route:
Created by MyCRM Ltd | User Guide
12
eMap
In conjunction with the List Creator, the Route Filter can be used to create marketing lists for
roadshows, organise salesperson visits, or maximise an engineer’s efficiency.
Created by MyCRM Ltd | User Guide
13